

Koenic KBO 23311 User Manual

KBO 23311
EN
User Manual
DE
Benutzerinformation
Oven

CONTENTS
Safety information 2
Safety instructions 3
Product description 6
Before first use 6
Daily use 7
Using the accessories 8
Additional functions 9
Hints and tips 9
Care and cleaning 16
Troubleshooting 18
Installation 19
Energy efficiency 20
Subject to change without notice.
SAFETY INFORMATION
Before the installation and use of the appliance, carefully
read the supplied instructions. The manufacturer is not
responsible for any injuries or damages that are the result of
incorrect installation or usage. Always keep the instructions
in a safe and accessible location for future reference.
Children and vulnerable people safety
• This appliance can be used by children aged from 8 years
and above and persons with reduced physical, sensory or
mental capabilities or lack of experience and knowledge if
they have been given supervision or instruction concerning
the use of the appliance in a safe way and understand the
hazards involved.
• Do not let children play with the appliance.
• Keep all packaging away from children and dispose of it
appropriately.
• Keep children and pets away from the appliance when it
operates or when it cools down. Accessible parts are hot.
• If the appliance has a child safety device, this should be
activated.
• Children shall not carry out cleaning and user maintenance
of the appliance without supervision.
• Children aged 3 years and under must be kept away from
this appliance when it is in operation at all times.
2

General Safety
• Only a qualified person must install this appliance and
replace the cable.
• The control panel must be connected to specified heating
unit with matching colours of connectors, to avoid possible
hazard.
• WARNING: The appliance and its accessible parts
become hot during use. Care should be taken to avoid
touching heating elements. Children less than 8 years of
age shall be kept away unless continuously supervised.
• Always use oven gloves to remove or put in accessories or
ovenware.
• Before carrying out any maintenance, disconnect the
appliance from the power supply.
• Ensure that the appliance is switched off before replacing
the lamp to avoid the possibility of electric shock.
• Do not use a steam cleaner to clean the appliance.
• Do not use harsh abrasive cleaners or sharp metal
scrapers to clean the glass door since they can scratch the
surface, which may result in shattering of the glass.
• If the mains power supply cable is damaged, it must be
replaced by the manufacturer, its Authorised Service
Centre or similarly qualified persons to avoid an electrical
hazard.
• To remove the shelf supports first pull the front of the shelf
support and then the rear end away from the side walls.
Install the shelf supports in the opposite sequence.
• The means for disconnection must be incorporated in the
fixed wiring in accordance with the wiring rules.
SAFETY INSTRUCTIONS
Installation
WARNING! Only a qualified
person must install this
appliance.
• Remove all the packaging.
• Do not install or use a damaged
appliance.
• Follow the installation instructions
supplied with the appliance.
• Always take care when moving the
appliance as it is heavy. Always use
safety gloves and enclosed footwear.
3

• Do not pull the appliance by the handle.
• The kitchen cabinet and the recess
must have suitable dimensions.
• Keep the minimum distance from other
appliances and units.
• Make sure that the appliance is
installed below and adjacent safe
structures.
• Parts of the appliance carry current.
Close the appliance with furniture to
prevent touching the dangerous parts.
• The sides of the appliance must stay
adjacent to appliances or units with the
same height.
• The appliance is equipped with an
electric cooling system. It must be
operated with the electric power supply.
Electrical connection
WARNING! Risk of fire and
electric shock.
• All electrical connections should be
made by a qualified electrician.
• The appliance must be earthed.
• Make sure that the parameters on the
rating plate are compatible with the
electrical ratings of the mains power
supply.
• Always use a correctly installed
shockproof socket.
• Do not use multi-plug adapters and
extension cables.
• Make sure not to cause damage to the
mains plug and to the mains cable.
Should the mains cable need to be
replaced, this must be carried out by
our Authorised Service Centre.
• Do not let mains cables touch or come
near the appliance door, especially
when the door is hot.
• The shock protection of live and
insulated parts must be fastened in
such a way that it cannot be removed
without tools.
• Connect the mains plug to the mains
socket only at the end of the
installation. Make sure that there is
access to the mains plug after the
installation.
• If the mains socket is loose, do not
connect the mains plug.
• Do not pull the mains cable to
disconnect the appliance. Always pull
the mains plug.
• Use only correct isolation devices: line
protecting cut-outs, fuses (screw type
fuses removed from the holder), earth
leakage trips and contactors.
• The electrical installation must have an
isolation device which lets you
disconnect the appliance from the
mains at all poles. The isolation device
must have a contact opening width of
minimum 3 mm.
• This appliance complies with the E.E.C.
Directives.
Use
WARNING! Risk of injury,
burns and electric shock or
explosion.
• This appliance is for household use
only.
• Do not change the specification of this
appliance.
• Make sure that the ventilation openings
are not blocked.
• Do not let the appliance stay
unattended during operation.
• Deactivate the appliance after each
use.
• Be careful when you open the
appliance door while the appliance is in
operation. Hot air can release.
• Do not operate the appliance with wet
hands or when it has contact with
water.
• Do not apply pressure on the open
door.
• Do not use the appliance as a work
surface or as a storage surface.
• Open the appliance door carefully. The
use of ingredients with alcohol can
cause a mixture of alcohol and air.
• Do not let sparks or open flames to
come in contact with the appliance
when you open the door.
4

• Do not put flammable products or items
that are wet with flammable products
in, near or on the appliance.
WARNING! Risk of damage to
the appliance.
• To prevent damage or discoloration to
the enamel:
– do not put ovenware or other
objects in the appliance directly on
the bottom.
– do not put aluminium foil directly on
the bottom of cavity of the
appliance.
– do not put water directly into the hot
appliance.
– do not keep moist dishes and food
in the appliance after you finish the
cooking.
– be careful when you remove or
install the accessories.
• Discoloration of the enamel or stainless
steel has no effect on the performance
of the appliance.
• Use a deep pan for moist cakes. Fruit
juices cause stains that can be
permanent.
• This appliance is for cooking purposes
only. It must not be used for other
purposes, for example room heating.
• Always cook with the oven door closed.
Care and cleaning
WARNING! Risk of injury, fire,
or damage to the appliance.
• Before maintenance, deactivate the
appliance and disconnect the mains
plug from the mains socket.
• Make sure the appliance is cold. There
is the risk that the glass panels can
break.
• Replace immediately the door glass
panels when they are damaged.
Contact the Authorised Service Centre.
• Be careful when you remove the door
from the appliance. The door is heavy!
• Clean regularly the appliance to
prevent the deterioration of the surface
material.
• Clean the appliance with a moist soft
cloth. Only use neutral detergents. Do
not use any abrasive products,
abrasive cleaning pads, solvents or
metal objects.
• If you use an oven spray, follow the
safety instruction on it's packaging.
• Do not clean the catalytic enamel (if
applicable) with any kind of detergent.
Internal light
WARNING! Risk of electric
shock.
• The type of light bulb or halogen lamp
used for this appliance is only for
household appliances. Do not use it for
house lighting.
• Before replacing the lamp, disconnect
the appliance from the power supply.
• Only use lamps with the same
specifications.
Disposal
WARNING! Risk of injury or
suffocation.
• Disconnect the appliance from the
mains supply.
• Cut off the mains electrical cable close
to the appliance and dispose of it.
• Remove the door catch to prevent
children or pets from becoming trapped
in the appliance.
Service
• To repair the appliance contact an
Authorised Service Centre.
• Use original spare parts only.
5
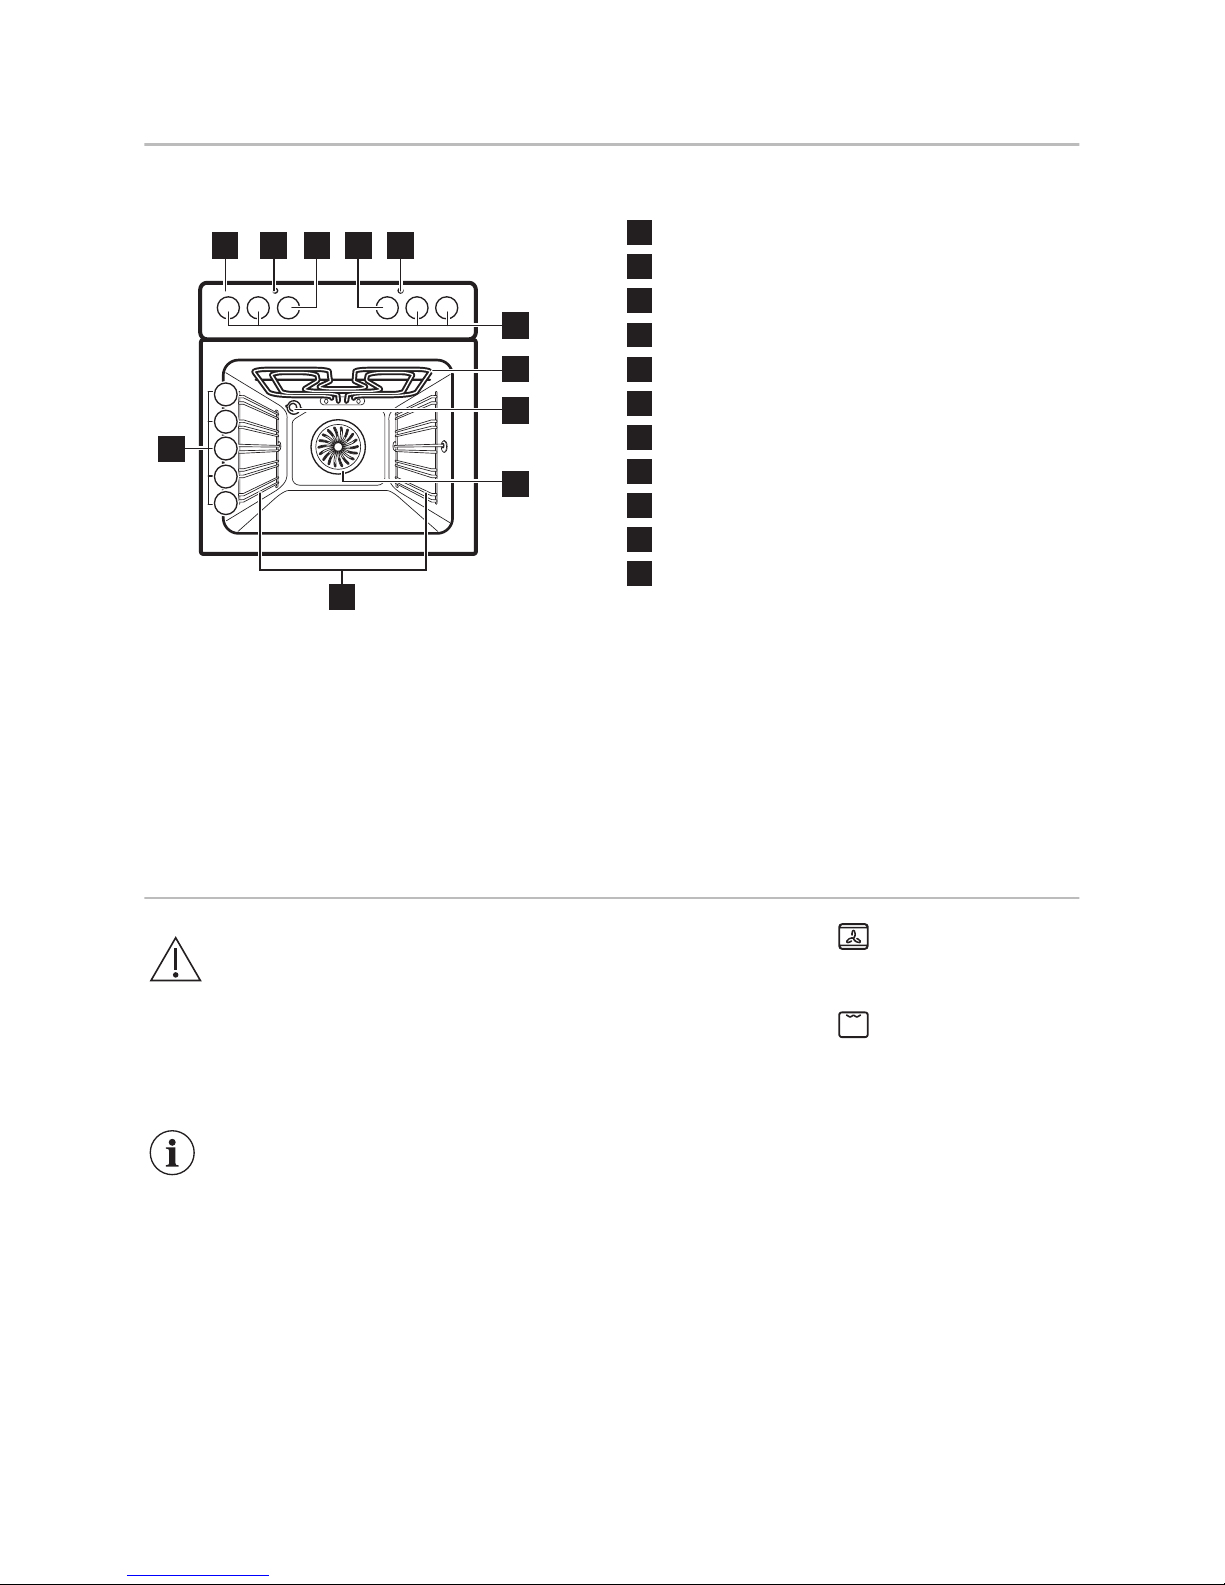
PRODUCT DESCRIPTION
General overview
10
521 3 4
9
8
7
6
5
4
3
2
1
11
1
Control panel
2
Power lamp / symbol
3
Knob for the oven functions
4
Knob for the temperature
5
Temperature indicator / symbol
6
Knobs for the hob
7
Heating element
8
Lamp
9
Fan
10
Shelf support, removable
11
Shelf positions
Accessories
• Wire shelf
For cookware, cake tins, roasts.
• Combi pan
For cakes and biscuits. To bake and
roast or as a pan to collect fat.
• Telescopic runners
For shelves and trays.
BEFORE FIRST USE
WARNING! Refer to Safety
chapters.
Initial Cleaning
Remove all accessories and removable
shelf supports from the oven.
Refer to "Care and cleaning"
chapter.
Clean the oven and the accessories
before first use.
Put the accessories and the removable
shelf supports back to their initial position.
Preheating
Preheat the empty oven before first use.
1. Set the function and the maximum
temperature.
2. Let the oven operate for 1 hour.
3. Set the function and set the
maximum temperature.
4. Let the oven operate for 15 minutes.
5. Turn off the oven and let it cool down.
Accessories can become hotter than
usual. The oven can emit an odour and
smoke. Make sure that the airflow in the
room is sufficient.
6
DAILY USE
WARNING! Refer to Safety
chapters.
Turning the oven on and off
1. Turn the knob for the oven functions to
select an oven function.
2. Turn the knob for the temperature to
select a temperature.
3. To turn off the oven, turn the knobs for
the oven functions and temperature to
the off position.
The lamp turns on when the oven
operates.
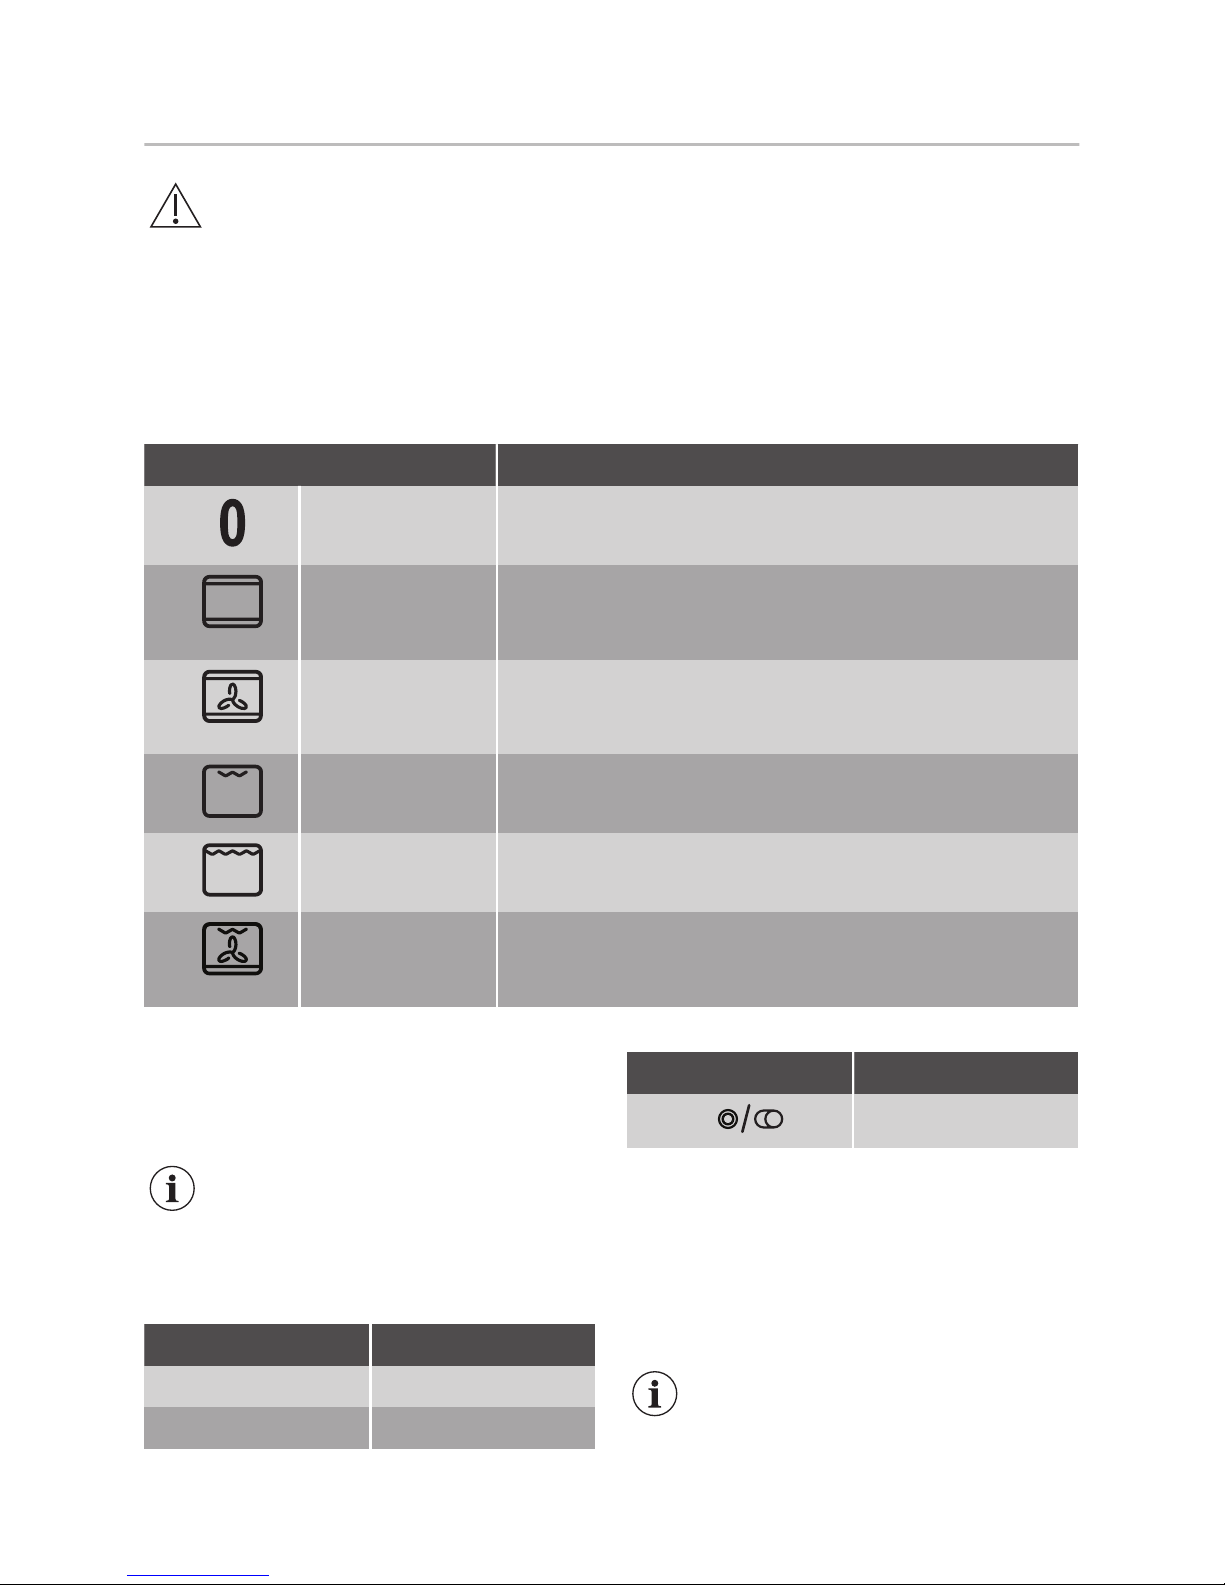
Oven Functions
Oven function Application
Off position The appliance is off.
Conventional
Cooking (Top /
Bottom Heat)
To bake and roast food on one shelf position.
Fan Cooking To roast or roast and bake food with the same cooking
temperature on more than one shelf position, without fla‐
vour transference.
Grilling To grill flat food and to toast bread.
Fast Grilling To grill flat food in large quantities and to toast bread.
Pizza Setting To bake food on one shelf position for a more intensive
browning and a crispy bottom. Set the temperature 20 40 °C lower than for Top / Bottom Heat.
Knobs for the cooking zones
You can operate the hob with the knobs
for the cooking zones.
You must read the Safety
chapters in the hob user
manual.
Heat settings
Knob indication Function
0 Off position
1 - 9 Heat settings
Knob indication Function
Double zone switch
1. Turn the knob to a necessary heat
setting.
2. To complete the cooking process, turn
the knob to the off position.
Using the double zone (if
applicable)
To activate the double zone,
turn the knob clockwise. Do not
turn it through the stop position.
7

1. Turn the knob clockwise to position 9.
2. Turn the knob slowly to the symbol
until you can hear a click. The
two cooking zones are on.
3. To set the necessary heat setting refer
to "Heat settings".
USING THE ACCESSORIES
WARNING! Refer to Safety
chapters.
Inserting the accessories
Wire shelf:
Push the shelf between the guide bars of
the shelf support and make sure that the
feet point down.
Deep pan:
Push the deep pan between the guide
bars of the shelf support.
Wire shelf and deep pan together:
Push the deep pan between the guide
bars of the shelf support and the wire shelf
on the guide bars above.
Small indentation at the top
increase safety. The
indentations are also anti-tip
devices. The high rim around
the shelf prevents cookware
from slipping of the shelf.
Telescopic Runners
Keep the installation
instructions for the telescopic
runners for future use.
With telescopic runners you can put in and
remove the shelves more easily.
CAUTION! Do not clean the
telescopic runners in the
dishwasher. Do not lubricate
the telescopic runners.
1. Pull out the right and left hand
telescopic runners.
8
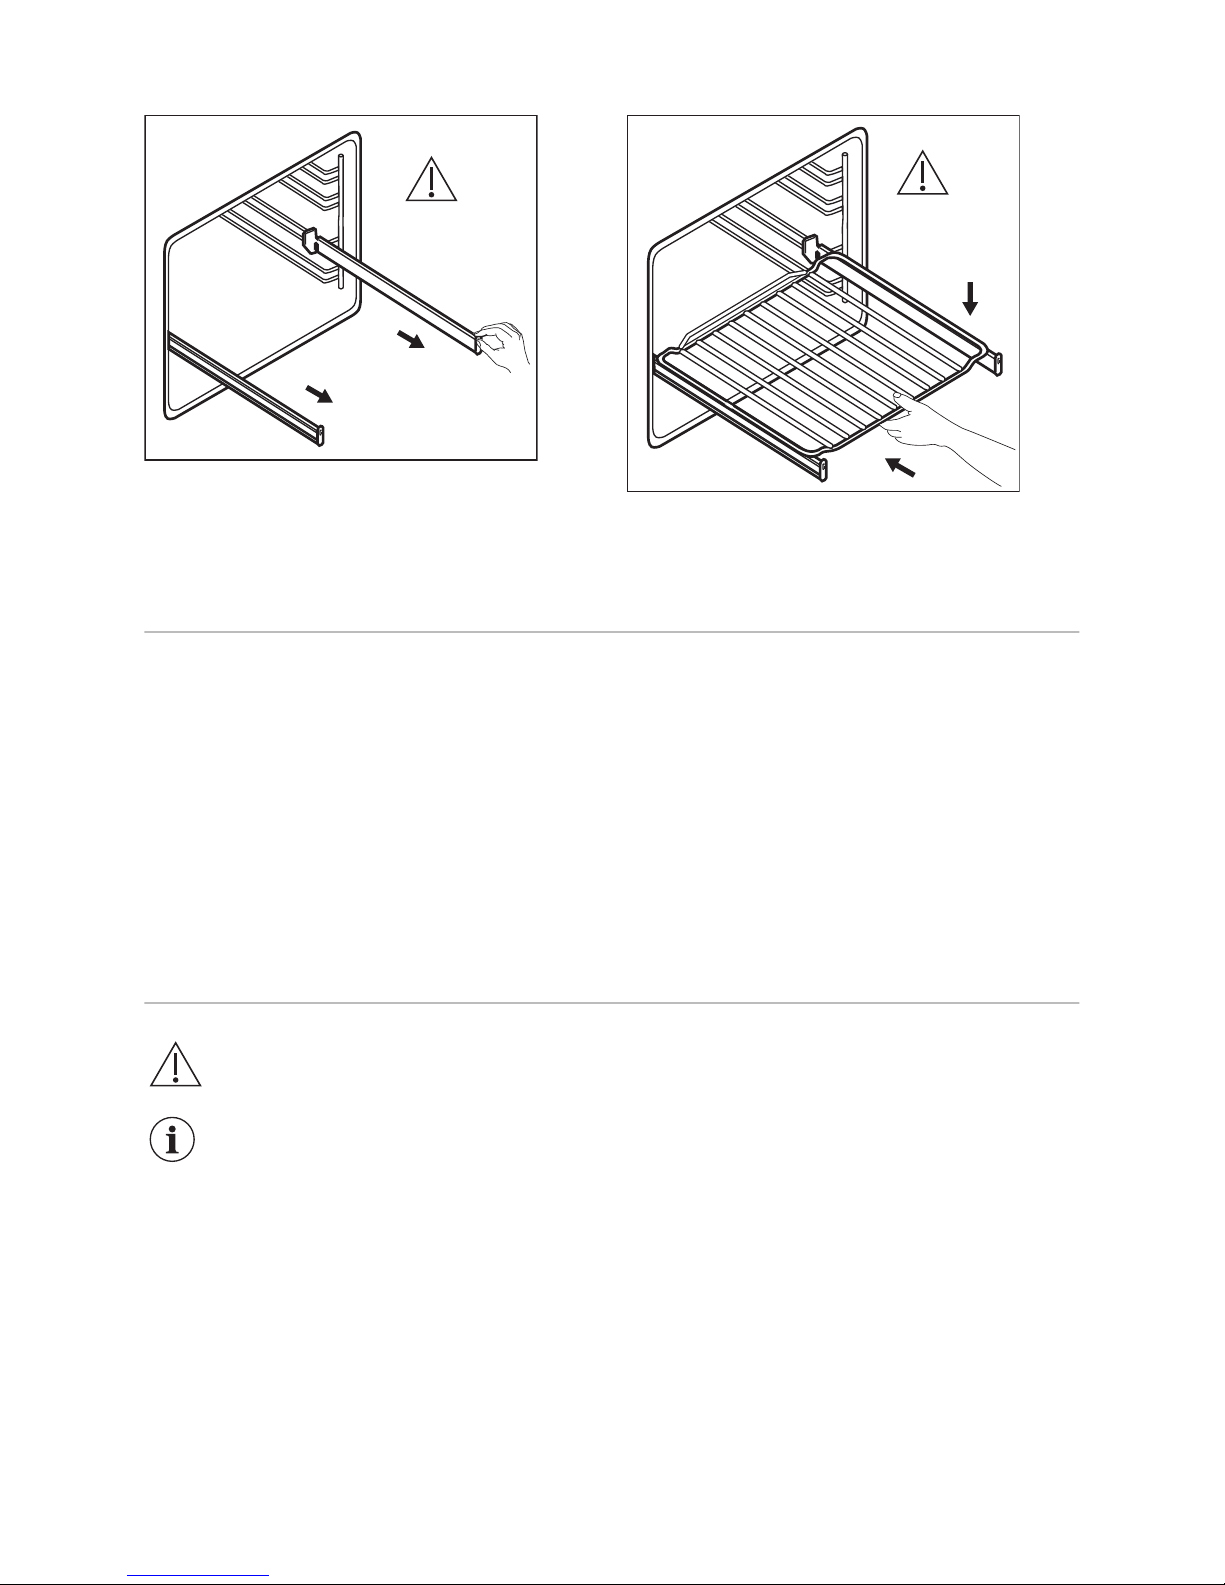
°C
2. Put the wire shelf on the telescopic
runners and carefully push them into
the oven.
°C
Make sure you push back the telescopic
runners fully in the oven before you close
the oven door.
ADDITIONAL FUNCTIONS
Cooling fan
When the oven operates, the cooling fan
turns on automatically to keep the
surfaces of the oven cool. If you turn off
the oven, the cooling fan can continue to
operate until the oven cools down.
Safety thermostat
Incorrect operation of the appliance or
defective components can cause
dangerous overheating. To prevent this,
the oven has a safety thermostat which
interrupts the power supply. The oven
activates again automatically when the
temperature drops.
HINTS AND TIPS
WARNING! Refer to Safety
chapters.
The temperature and baking
times in the tables are
guidelines only. They depend
on the recipes and the quality
and quantity of the ingredients
used.
General information
• The appliance has five shelf positions.
Count the shelf positions from the
bottom of the appliance floor.
• The appliance has a special system
which circulates the air and constantly
recycles the steam. With this system
you can cook in a steamy environment
and keep the food soft inside and
crusty outside. It decreases the cooking
time and energy consumption to a
minimum.
• Moisture can condense in the
appliance or on the door glass panels.
This is normal. Always stand back from
the appliance when you open the
appliance door while cooking. To
decrease the condensation, operate
the appliance for 10 minutes before
cooking.
• Clean the moisture after each use of
the appliance.
9

• Do not put the objects directly on the
appliance floor and do not put
aluminium foil on the components when
you cook. This can change the baking
results and cause damage to the
enamel.
Baking cakes
• Do not open the oven door before 3/4
of the set cooking time is up.
• If you use two baking trays at the same
time, keep one empty level between
them.
Cooking meat and fish
• Use a deep pan for very fatty food to
prevent the oven from stains that can
be permanent.
• Leave the meat for approximately 15
minutes before carving so that the juice
does not seep out.
• To prevent too much smoke in the oven
during roasting, add some water into
the deep pan. To prevent the smoke
condensation, add water each time
after it dries up.
Cooking times
Cooking times depend on the type of food,
its consistency, and volume.
Initially, monitor the performance when
you cook. Find the best settings (heat
setting, cooking time, etc.) for your
cookware, recipes and quantities when
you use this appliance.
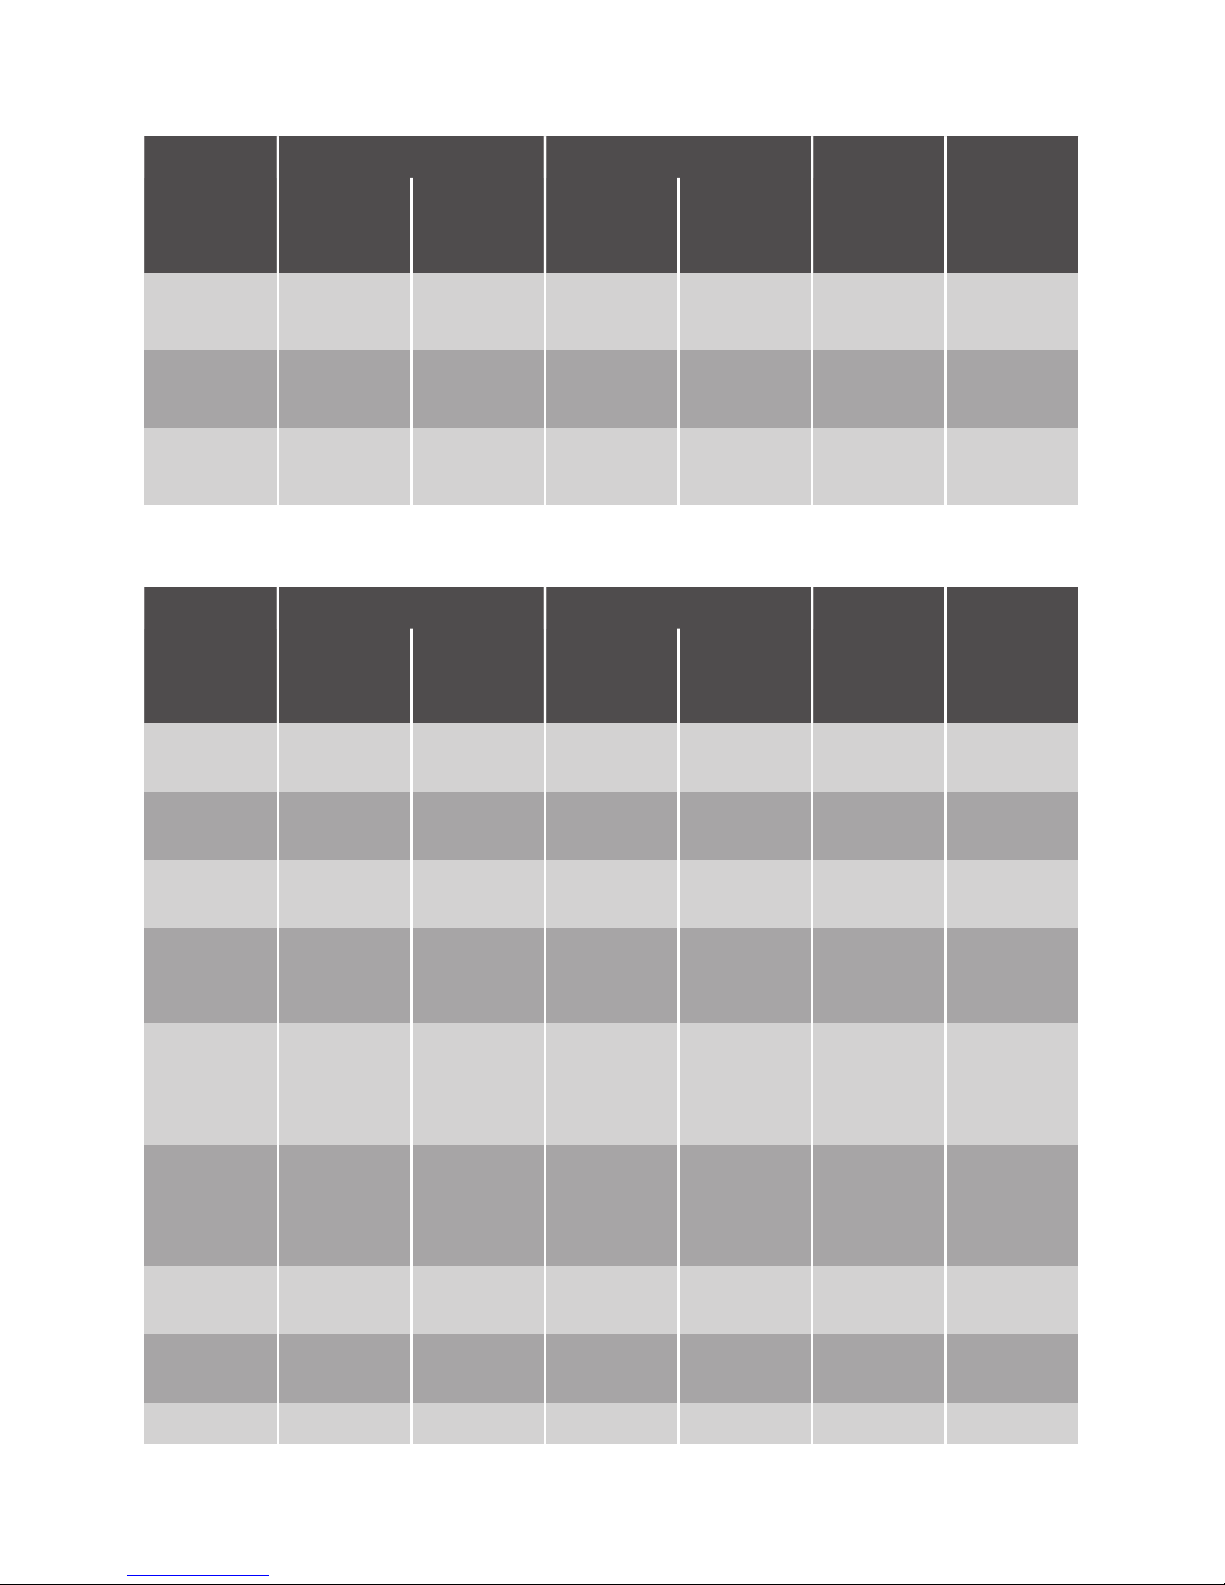
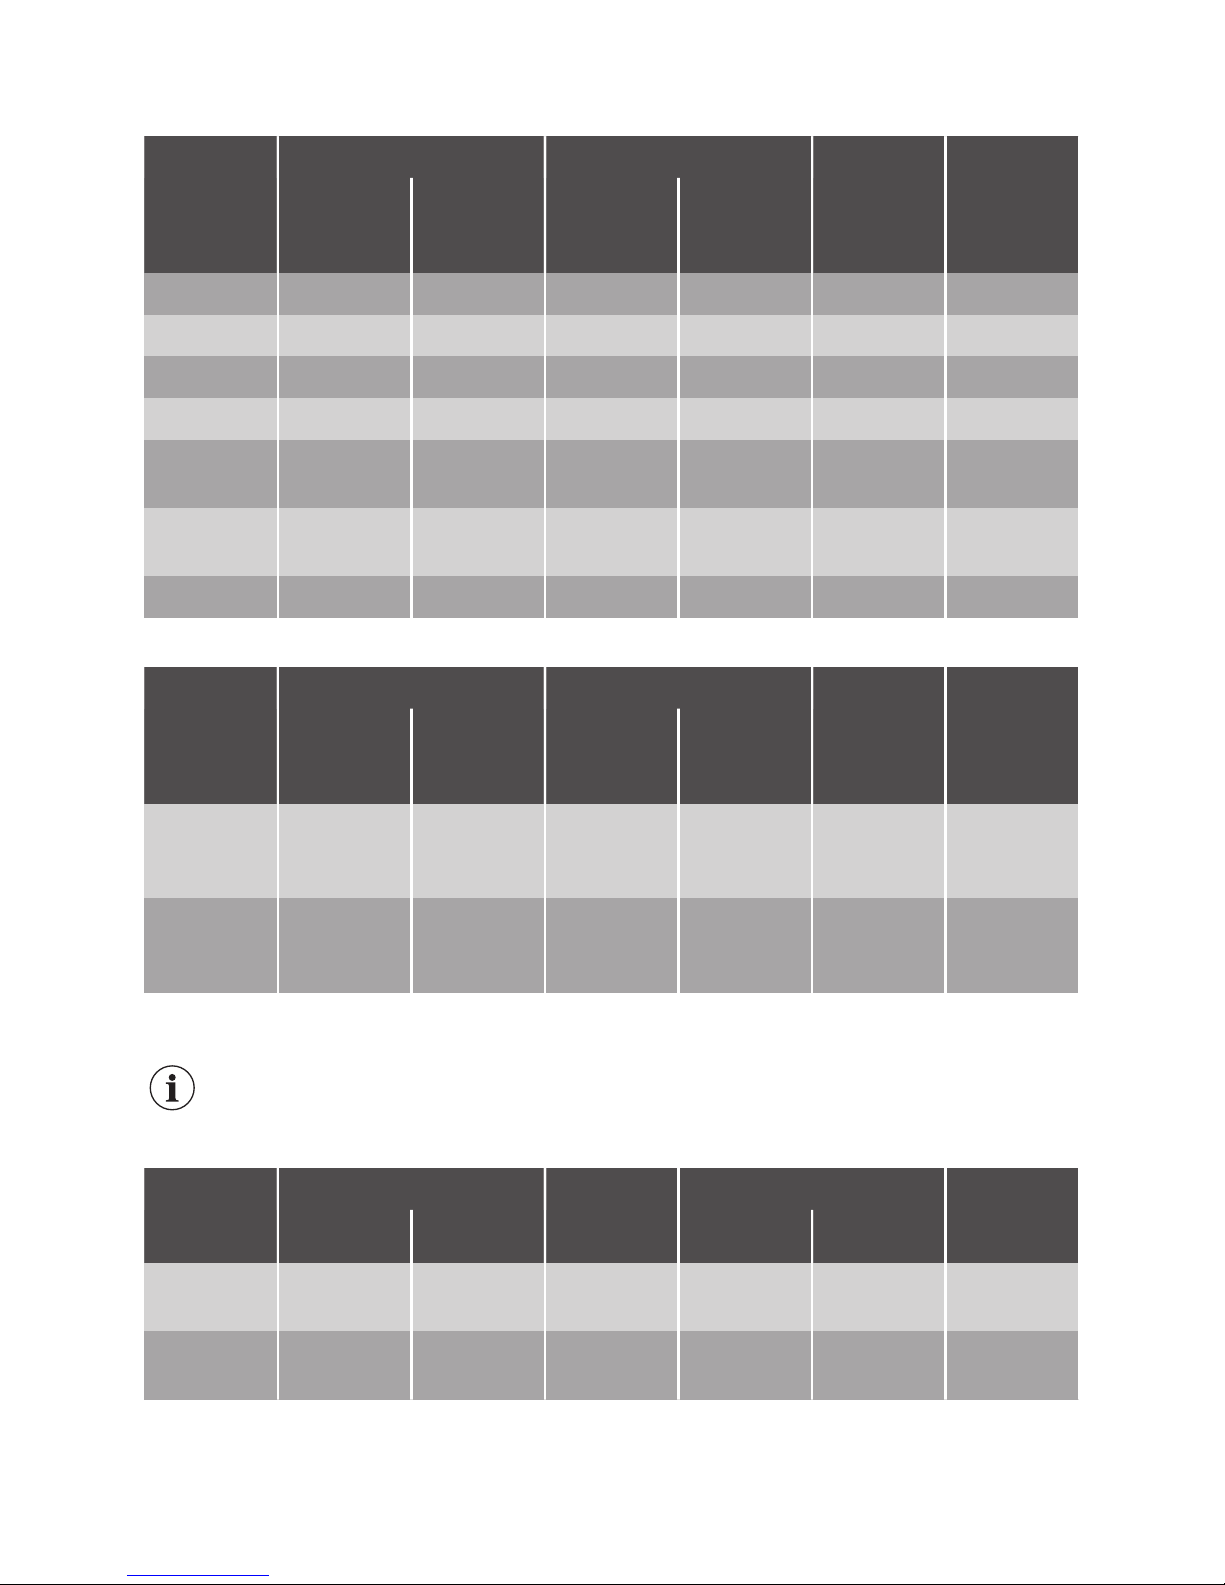
Baking and roasting table
Cakes
Food Top / Bottom Heat Fan Cooking Time
(min)
Com‐
ments
Temper‐
ature
(°C)
Shelf po‐
sition
Temper‐
ature
(°C)
Shelf po‐
sition
Whisked
recipes
170 2 160 3 45 - 60 In a cake
mould
Short‐
bread
dough
170 2 160 3 20 - 30 In a cake
mould
Butter‐
milk
cheese‐
cake
170 1 160 1 70 - 80 In a 26
cm cake
mould on
a wire
shelf
Apple
cake (Ap‐
ple pie)
1)
170 2 160 2 (left
and right)
80 - 100 In two 20
cm cake
moulds
on a wire
shelf
Strudel 175 3 150 2 60 - 80 In a bak‐
ing tray
10

Food Top / Bottom Heat Fan Cooking Time
(min)
Com‐
ments
Temper‐
ature
(°C)
Shelf po‐
sition
Temper‐
ature
(°C)
Shelf po‐
sition
Jam-tart 170 2 165 2 (left
and right)
30 - 40 In a 26
cm cake
mould
Sponge
cake
170 2 160 2 50 - 60 In a 26
cm cake
mould
Christ‐
mas
cake /
Rich fruit
cake
1)
160 2 150 2 90 - 120 In a 20
cm cake
mould
Plum
cake
1)
175 1 160 2 50 - 60 In a
bread tin
Small
cakes one level
170 3 140 - 150 3 20 - 30 In a bak‐
ing tray
Small
cakes two levels
- - 140 - 150 2 and 4 25 - 35 In a bak‐
ing tray
Biscuits /
pastry
strips one level
140 3 140 - 150 3 30 - 35 In a bak‐
ing tray
Biscuits /
pastry
strips two levels
- - 140 - 150 2 and 4 35 - 40 In a bak‐
ing tray
Merin‐
gues
120 3 120 3 80 - 100 In a bak‐
ing tray
Buns
1)
190 3 180 3 15 - 20 In a bak‐
ing tray
Eclairs 190 3 170 3 25 - 35 In a bak‐
ing tray
Plate
tarts
180 2 170 2 45 - 70 In a 20
cm cake
mould
11

Food Top / Bottom Heat Fan Cooking Time
(min)
Com‐
ments
Temper‐
ature
(°C)
Shelf po‐
sition
Temper‐
ature
(°C)
Shelf po‐
sition
Rich fruit
cake
160 1 150 2 110 - 120 In a 24
cm cake
mould
Victoria
sand‐
wich
1)
170 1 160 1 50 - 60 In a 20
cm cake
mould
1)
Preheat the oven for 10 minutes.
Bread and pizza
Food Top / Bottom Heat Fan Cooking Time
(min)
Com‐
ments
Temper‐
ature
(°C)
Shelf po‐
sition
Temper‐
ature
(°C)
Shelf po‐
sition
White
bread
1)
190 1 190 1 60 - 70 1 - 2
pieces,
500 gr
per piece
Rye
bread
190 1 180 1 30 - 45 In a
bread tin
Pizza
1)
230 - 250 1 230 - 250 1 10 - 20 In a bak‐
ing tray
or a deep
pan
Scones
1)
200 3 190 3 10 - 20 In a bak‐
ing tray
1)
Preheat the oven for 10 minutes.
Flans
Food Top / Bottom Heat Fan Cooking Time
(min)
Com‐
ments
Temper‐
ature
(°C)
Shelf po‐
sition
Temper‐
ature
(°C)
Shelf po‐
sition
Pasta
flan
200 2 180 2 40 - 50 In a
mould
Vegeta‐
ble flan
200 2 175 2 45 - 60 In a
mould
12
Food Top / Bottom Heat Fan Cooking Time
(min)
Com‐
ments
Temper‐
ature
(°C)
Shelf po‐
sition
Temper‐
ature
(°C)
Shelf po‐
sition
Quich‐
es
1)
180 1 180 1 50 - 60 In a
mould
La‐
sagne
1)
180 - 190 2 180 - 190 2 25 - 40 In a
mould
Cannello‐
ni
1)
180 - 190 2 180 - 190 2 25 - 40 In a
mould
1)
Preheat the oven for 10 minutes.
Meat
Food Top / Bottom Heat Fan Cooking Time
(min)
Com‐
ments
Temper‐
ature
(°C)
Shelf po‐
sition
Temper‐
ature
(°C)
Shelf po‐
sition
Beef 200 2 190 2 50 - 70 On a wire
shelf
Pork 180 2 180 2 90 - 120 On a wire
shelf
Veal 190 2 175 2 90 - 120 On a wire
shelf
English
roast
beef, rare
210 2 200 2 50 - 60 On a wire
shelf
English
roast
beef, me‐
dium
210 2 200 2 60 - 70 On a wire
shelf
English
roast
beef, well
done
210 2 200 2 70 - 75 On a wire
shelf
Shoulder
of pork
180 2 170 2 120 - 150 With rind
Shin of
pork
180 2 160 2 100 - 120 Two
pieces
Lamb 190 2 175 2 110 - 130 Leg
13
Food Top / Bottom Heat Fan Cooking Time
(min)
Com‐
ments
Temper‐
ature
(°C)
Shelf po‐
sition
Temper‐
ature
(°C)
Shelf po‐
sition
Chicken 220 2 200 2 70 - 85 Whole
Turkey 180 2 160 2 210 - 240 Whole
Duck 175 2 220 2 120 - 150 Whole
Goose 175 2 160 1 150 - 200 Whole
Rabbit 190 2 175 2 60 - 80 Cut in
pieces
Hare 190 2 175 2 150 - 200 Cut in
pieces
Pheasant 190 2 175 2 90 - 120 Whole
Fish
Food Top / Bottom Heat Fan Cooking Time
(min)
Com‐
ments
Temper‐
ature
(°C)
Shelf po‐
sition
Temper‐
ature
(°C)
Shelf po‐
sition
Trout /
Sea
bream
190 2 175 2 40 - 55 3 - 4 fish
Tuna
fish / Sal‐
mon
190 2 175 2 35 - 60 4 - 6 fil‐
lets
Grilling
Preheat the empty oven for 3
minutes before cooking.
Food Quantity Temper‐
ature
(°C)
Time (min) Shelf po‐
sition
Pieces (g) 1st side 2nd side
Fillet
steaks
4 800 max. 12 - 15 12 - 14 4
Beef
steaks
4 600 max. 10 - 12 6 - 8 4
14
 Loading...