

Page 1
KODAK PROFESSIONAL
RFS 3600 Film Scanner
User’s Manual Addendum
Version 2.10 Host Software Update
Page 2

2
Introduction .......................................................................................................5
System Requirements......................................................................................5
MICROSOFT WINDOWS ...........................................................................5
MACINTOSH................................................................................................6
Software Installation .........................................................................................7
From a CD ....................................................................................................7
MICROSOFT WINDOWS ...........................................................................7
MACINTOSH................................................................................................8
From a Web Download................................................................................8
MICROSOFT WINDOWS ...........................................................................8
MACINTOSH................................................................................................9
Post-Installation ............................................................................................9
Firmware .........................................................................................................10
Software Operation.........................................................................................10
Adobe Systems Software ..........................................................................10
Troubleshooting Connectivity......................................................................... 10
MACINTOSH..............................................................................................11
Mac OS 8.5.1, 8.6, 9.1 – SCSI Interface...................................................11
Mac OS 9.1 – USB Interface .....................................................................11
MICROSOFT WINDOWS .........................................................................12
MICROSOFT WINDOWS 98SE, ME, 2000, XP Pro and XP Home – USB Interface 12
MICROSOFT WINDOWS 98SE – SCSI Interface...................................12
MICROSOFT WINDOWS 2000 – SCSI Interface ...................................12
Troubleshooting Memory Problems............................................................... 12
Additional Resources .................................................................................13
Main Screen.................................................................................................... 14
Page 3

3
Settings Tab....................................................................................................15
Status Bar .......................................................................................................15
File Size ......................................................................................................15
Scan All, DMin Cal, Light Cal, Resize Window ........................................15
Scan All.......................................................................................................15
DMin Cal .....................................................................................................16
Light Cal......................................................................................................17
Window Resize...........................................................................................17
Configuration Icon...........................................................................................17
Prescan Resolution ....................................................................................18
Color Processing ........................................................................................18
Final Scan, Multi-Sampling ........................................................................18
Frame Numbering ......................................................................................18
Output Depth ..............................................................................................18
Embed Output Profile.................................................................................19
Defaults.......................................................................................................19
Scan Profile.....................................................................................................19
Scan Icons ......................................................................................................20
Autofocus....................................................................................................20
Initial Setup .................................................................................................20
Slide Autofocus...........................................................................................20
Filmstrip Autofocus.....................................................................................20
Manual focus ..............................................................................................20
Focus Details..............................................................................................21
Image Viewing and Editing.............................................................................21
Thumbnails .................................................................................................22
White/Gray/Black Balance Eyedroppers...................................................22
Page 4

4
Image Window............................................................................................22
Tabs ................................................................................................................24
Settings Tab................................................................................................24
Frame Number ...........................................................................................24
Auto Balance Button ..................................................................................24
Scan and Output Settings..........................................................................24
Crop Box.....................................................................................................24
Color Balance and Levels & Curves Tab..................................................25
Frame Number ...........................................................................................25
Custom Settings .........................................................................................25
Color Tools .................................................................................................25
Scan and Output Settings ..............................................................................25
Scan and Output Settings..........................................................................26
The Relationship Between Scan, Output and Magnification ...................26
Automatic Software Adjustments ..............................................................27
Locking Scan and Output Settings............................................................27
Intended Use and Output Resolution........................................................28
Common Sizes and Output Size...............................................................28
Miscellaneous Items .......................................................................................30
Information Icon..........................................................................................30
Page 5

5
Introduction
This document contains information describing the KODAK PROFESSIONAL RFS 3600
Film Scanner (RFS 3600) version 2.10 software. This software package includes a
MICROSOFT WINDOWS TWAIN Data Source and a MACINTOSH Acquire Module;
these two items will be referred to as the Host Software. Your RFS 3600 must have
firmware version 1.34 installed for this Host Software to work properly. This document
discusses the new features and layout of the version 2.10 Host Software, as well as all
enhancements created since the original version 1.00 Host Software. For complete RFS
3600 information, refer to the User’s Manual on your original Host Software CD. Or, you
may obtain a copy of the User’s Manual from www.kodak.com.
With respect to version 1.20 Host Software, this version of software has several user
interface changes and enhancements. Also, the host computer system requirements
have been updated.
If you are a new RFS 3600 owner or this is the first time you are operating the RFS 3600
on a specific PC or MACINTOSH, you must install the software first! Do not connect
the film scanner to your computer and turn it on until you have installed the Host Software
and turned off your computer. If your computer “finds” or “sees” the film scanner and there
is no installed software to interface to it, you will not be able to use the scanner.
The screen shots seen in this document were captured from the MICROSOFT
WINDOWS TWAIN Data Source display. The screens seen in the MACINTOSH Acquire
Module are very similar.
System Requirements
MICROSOFT WINDOWS
The KODAK PROFESSIONAL RFS 3600 TWAIN Data Source is supported on
MICROSOFT’S 32-bit WINDOWS/Intel x86 or compatible PCs that meet or exceed the
following minimum system requirements:
1) 300 MHz Pentium
2) 128 MB of RAM
3) 200 MB of free disk space
4) ADOBE PHOTOSHOP 5.0, 5.5, 6.0, ADOBE PHOTOSHOP 5.0 LE or Adobe
Elements 1.0. This Host Software Version has not been tested on ADOBE
PHOTOSHOP 7.
5) 800x600Screen area, 16-bit color display (higher color setting recommended)
Page 6

6
The KODAK PROFESSIONAL RFS 3600 TWAIN Data Source is TWAIN 1.8 compliant.
The RFS 3600 TWAIN Data Source has been tested on systems using the following
Microsoft Operating Systems:
1) MICROSOFT WINDOWS 98 Second Edition (SCSI and USB)
2) MICROSOFT WINDOWS NT 4.0 Service Pack 5 (SCSI only)
3) MICROSOFT WINDOWS 2000 (USB only, Must have System Administrator
privileges to install and run the software. Or, your system administrator must install
the software and you must have a Power User account with Modify privileges to the
folder <winroot>\twain_32\KFILM).
4) MICROSOFT WINDOWS XP Professional (USB only, System Administrator must
install the software and connect the scanner. After the New Hardware Wizard has
completed its procedure, a common User may log on and run the RFS 3600
software).
5) MICROSOFT WINDOWS XP Home (USB only, New or Full installation only, not
Upgrade installation)
6) The RFS 3600 has not been tested on the MICROSOFT WINDOWS 95 OSR2
platform. The Eastman Kodak Company assumes no liability for issues found or
experienced with this operating system.
MACINTOSH
The KODAK PROFESSIONAL RFS 3600 Acquire Module is supported on MACINTOSH
systems that meet or exceed the following that meet or exceed the following minimum
requirements system requirements:
1) 300MHz PowerPC processor
2) A maximum of 100 MB of memory allocated to the ADOBE application on systems
3) 900 MB of memory allocated to the ADOBE application on systems with more than
4) 200 MB of free disk space
6) ADOBE PHOTOSHOP 5.0, 5.5, 6.0, ADOBE PHOTOSHOP 5.0 LE or Adobe
5) 800x600Screen area, 16-bit color display (higher color setting recommended)
The KODAK PROFESSIONAL RFS 3600 Acquire Module has been tested on systems
using the following MACINTOSH Operating Systems:
with less than 1GB of installed DRAM.
1GB of installed DRAM.
Elements 1.0. This Host Software Version has not been tested on ADOBE
PHOTOSHOP 7.
1) Mac OS 8.5.1 or 8.6 (SCSI only)
2) Mac OS 9.x (SCSI and USB)
Page 7

7
The Acquire Module is not qualified for use on machines running Mac OS X.
Software Installation
From a CD
If you have a Version 2.10 Host Software CD, install the software as follows:
MICROSOFT WINDOWS
Please note: When installing the Host Software on some MICROSOFT WINDOWS
systems, you may be presented with various dialog boxes stating the RFS 3600 Host
Software has not passed MICROSOFT WINDOWS Logo Testing, or the software does
not have a Microsoft Digital Signature. You may ignore these messages; click through
these dialog boxes to install the RFS 3600 Host Software.
1) Insert the CD into your CD-ROM drive. The CD browser should launch; click on the
“Install RFS 3600 TWAIN Data Source” button. If you have a previous version of RFS
3600 TWAIN Data Source, the installer will display an “Uninstall” routine. Follow the
Uninstall prompts to remove the previous TWAIN Data Source version; when the
uninstall is completed, click on the CD browser’s “Install RFS 3600 TWAIN Data
Source” button again.
2) If the browser does not start when the CD is mounted, open My Computer on your
MICROSOFT WINDOWS Desktop, open the RFS 3600 Host Software CD and
double click the “Launch.exe” icon.
3) Follow all prompts to reboot your machine.
4) The video settings for your monitor will affect the appearance of your scans and the
performance of the RFS 3600 TWAIN Data Source. For the best results, make sure
your Display Properties are set to show High Color or True Color (i.e., more than 256
colors). General instructions are provided here. Refer to the documentation that came
with your computer for further details about changing display settings for your
computer. To change color depth or screen size (resolution):
a) Click Start
b) Select Settings/Control Panel
c) Double click on the Display control panel
d) Click on the Settings tab.
e) Select either High Color or True Color. (Note: Your monitor type and video
adapter determine the maximum number of colors available for your display.)
f) Adjust the slider for a minimum screen area to 800x600.
g) Click OK.
Page 8

8
MACINTOSH
1) Insert the CD into your CD-ROM drive. The CD icon will appear on the desktop.
Double-click the icon and then double-click on the “Install RFS 3600 TWAIN Data
Source” icon to start the software installation procedure. If you have more than one
version of Adobe Systems software (Photoshop, Photoshop LE or Photoshop
Elements) on your MACINTOSH, the installer will located all instances of
Import/Export folders and prompt you for the location to place the RFS 3600 module.
Select the Import/Export folder of the Adobe software you expect to use most
frequently and a new plug-in "Kodak RFS 3600" will be put inside the that folder. If
you want to use the RFS 3600 software with more than one Adobe software package,
make a copy of the RFS 3600 plug-in and place it in the additional Import/Export
folders.
2) Some non-English versions of Adobe software do not name these plug-in folders
Import/Export. We suggest you temporarily rename the folders to Import/Export for
the software installation. After the installation is complete, change their names back to
their non-English names.
3) Follow all prompts to reboot your machine.
4) The video settings for your monitor will affect the appearance of your scans and the
performance of the RFS 3600 Acquire Module. For the best results, make sure your
monitor is set to show Thousands of Colors or Millions of Colors. General instructions
are provided here. Refer to the documentation that came with your computer for
further details about changing display settings for your computer. To change color
depth or screen size (resolution):
a) Open the Monitor Control Panel.
b) Your monitor type and video adapter determine the maximum number of colors
available for your display. Select either thousands or millions of colors.
c) Your screen size (resolution) might change as a result of changing color settings,
so you may have to trade off between the number of colors your display can
show and the size of the desktop area you can work with. The minimum
resolution is 800 x 600. This will help you see your pictures at the largest possible
size. The Acquire Module can still be run using other resolution settings.
From a Web Download
If you downloaded the Version 2.10 Host Software from www.kodak.com, install as
follows:
MICROSOFT WINDOWS
1) Navigate on your computer's hard drive to the location where you downloaded the file
from the Kodak Web site. Double click the file and then you will be prompted for a
location to save the expanded files. For example, save to location C:\Kodak. The
default location will be C:\Temp.
2) Next, in folder you saved the expanded files, you will find the structure: ..\RFS 3600
SW INSTALLER\DISK_1. Inside the DISK_1 folder, double click the Setup.exe Icon.
Page 9

9
3) If you have a previous version of the RFS 3600 Film Scanner TWAIN Data Source, a
message will appear telling you the older TWAIN must be removed before the new
TWAIN can be installed. Click OK and the removal process will execute.
4) Once the old TWAIN is removed, the installation of the new TWAIN will start
automatically. If it does not, double click the Setup.exe icon again. When the
installation screens for the new TWAIN appears, follow the directions on the screens.
5) Follow the monitor setup steps in 4) above.
6) If the installation files are copied to a network drive, the installation may fail with the
message "The parameter is incorrect." if the network path to the installation directory
is too long. This problem can be resolved by moving the installation directory to a
location with a shorter network path
MACINTOSH
1) Double click the installer file from the download and installation will begin. During
installation, the installer will check your computer for the ADOBE PHOTOSHOP;
ADOBE PHOTOSHOP LE and PHOTOSHOP ELEMENTS applications. You must
have at least one of these applications on your MACINTOSH for the RFS 3600
Acquire Module installer to complete its installation.
2) If you have more than one version of Adobe Systems software (ADOBE
PHOTOSHOP, ADOBE PHOTOSHOP LE or PHOTOSHOP ELEMENTS) on your
MACINTOSH, the installer will located all instances of Import/Export folders and
prompt you for the location to place the RFS 3600 module. Select the Import/Export
folder of the Adobe software you expect to use most frequently and a new plug-in
"Kodak RFS 3600" will be put inside the that folder. If you want to use the RFS 3600
software with more than one Adobe software package, make a copy of the RFS 3600
plug-in and place it in the additional Import/Export folders.
3) Some non-English versions of ADOBE PHOTOSHOP software do not name these
plug-in folders Import/Export. We suggest you rename the folders for the software
installation, and afterwards change their names back.
4) After the software installation is completed, you MUST "Restart" your MACINTOSH
as directed by the installer.
5) Follow the monitor setup steps in 4) above.
Post-Installation
To ensure that the prescan image in the RFS 3600 software matches the final scan which
is transferred into ADOBE PHOTOSHOP, please take the following steps: ADOBE
PHOTOSHOP 5.0 or 5.5 – navigate to the File>Color Settings>RGB Setup menu. Make
sure that the "Display Using Monitor Compensation" box is not checked and click the OK
button. ADOBE PHOTOSHOP 6.0 – navigate to the Edit>Color Settings menu. In the
Settings dropdown listing, select Color Management Off. Performing these setups
ensures that ADOBE PHOTOSHOP does not apply an additional profile to the image after
it has been scanned.
Page 10

0
Launch the RFS 3600 Film Scanner Host Software and make sure the monitor and output
profiles selected in the Settings tab are the same. (Selecting the Kodak sRGB Display
profile should produce satisfactory results in most cases). The monitor profile controls
how the prescan image is rendered and the output profile controls how the final scan is
rendered. If these profiles are the same, the prescan shown in the RFS 3600 Host
Software should match the final scan which appears in ADOBE PHOTOSHOP.
If you are using the Scan to File feature, review the new Embed Output Profile function
which has been implemented in this software release.
Firmware
Your RFS 3600 Film Scanner must have firmware version 1.34 installed before version
2.10 or later Host Software can operate the film scanner. This version 2.10 Host Software
may be used to upgrade your film scanner’s firmware. Your film scanner may already
have this firmware version installed. If it does not, use the firmware file 3600_133.bin
located the Firmware folder on the Host Software CD. If you do not have the Host
Software CD, you may obtain the firmware file from www.kodak.com. See Page 60 of the
User’s Manual and the Information Icon section of this document for the film scanner
firmware upgrade procedure.
Software Operation
Adobe Systems Software
In this document, it is assumed the image editing program in use is ADOBE
PHOTOSHOP (Photoshop). For information regarding hardware system requirements,
software features, online or printed manual instructions and help or other software issues
dealing with ADOBE PHOTOSHOP, ADOBE PHOTOSHOP LE or PHOTOSHOP
ELEMENTS, you may contact Adobe Systems Incorporated via their web site at:
www.adobe.com . Do not contact the Eastman Kodak Company for information regarding
Adobe System software installation, features or operation.
Troubleshooting Connectivity
The following information is provide to help you troubleshoot any RFS 3600 to computer
connectivity problems. Before checking your system, ensure the following have been
completed:
1) Did you install the Kodak software? If you cannot find the Kodak software on the
ADOBE PHOTOSHOP “File – Import” submenu, the software has not been correctly
installed. Turn off your computer, disconnect any cables between the film scanner
and your computer, restart your computer and install the software per the section
Software Installation.
2) Is the film scanner connected? Ensure your cables are connected to both to your
computer and the film scanner. If you are using the SCSI interface, turn off your film
scanner and computer before connecting or disconnecting a SCSI cable. Ensure you
dialed a valid SCSI id number on the bottom of the film scanner and the SCSI
termination has been set. When using the SCSI system, you must turn on the
1
Page 11

connected film scanner before you boot your computer. For SCSI or USB, ensure the
sliding panel on the back of the film scanner has been slid completely to the side not
in use.
3) The internal SCSI terminator used in the RFS 3600 is an active terminator which
requires power from the scanner. Some computers may experience startup
problems if the scanner is turned off when the computer performs its power up
routines. If you experience this problem with your computer (e.g. it will not boot
completely, hangs at the SCSI identification routine),you may:
1) Change your SCSI cabling so the scanner is not the last item in the SCSI
chain.
2) Disconnect the scanner from the SCSI chain when it is not in use.
3) Do not use the internal SCSI terminator. Install an external terminator on the
unused SCSI port.
4) The USB interface is a hot connect interface; you should be able to connect and
disconnect a USB device without having to power off either the device or your
computer. Some computers may not perform the device recognition process
flawlessly. If your computer does not find the RFS 3600 when hot connecting via the
USB interface, try rebooting your machine with the film scanner turned on and the
USB cable connected between the two.
MACINTOSH
Mac OS 8.5.1, 8.6, 9.1 – SCSI Interface
You may experience improved RFS 3600 Film Scanner performance if the film scanner is
the only device on the SCSI chain.
When connected via SCSI, the Devices and Volumes tab of the Apple System Profiler will
list the RFS 3600 information including SCSI bus number the film scanner is mounted on,
the SCSI ID the film scanner is using, Vendor = Kodak, Revision number = x.xx (firmware
revision level), product id = RFS 3600. To obtain this information, select the Apple System
Profiler item which is located on the Apple Menu. If the Apple System Profiler does not
find the film scanner, the ADOBE PHOTOSHOP Acquire Module will not be able to
operate the scanner. Turn off your MACINTOSH and film scanner and check your
connections and SCSI bus termination. Turn on the film scanner and then turn on your
MACINTOSH.
Mac OS 9.1 – USB Interface
When connected via USB, the Devices and Volumes tab of the Apple System Profiler will
list the RFS 3600 information under a USB Scanner or a Class 0 heading, including
Product ID = 289, Vendor = Genesys Logic, Inc. To obtain this information, select the
Apple System Profiler item which is located on the Apple Menu. If the Apple System
Profiler does not find the film scanner, the ADOBE PHOTOSHOP Acquire Module will not
be able to operate the scanner. Turn off your MACINTOSH and film scanner and check
your connections. USB is a hot connect interface, but some computer systems accept
USB devices easier if the device is connected and On when the computer is started. The
11
Page 12

2
Host Software installer places the RFS 3600 USB driver, RFS3600Extension, in the
System Folder’s Extensions folder.
MICROSOFT WINDOWS
MICROSOFT WINDOWS 2000 and MICROSOFT WINDOWS XP may not support your
installed SCSI interface board. Check www.microsoft.com, Hardware Compatibility List
Database, for complete information regarding the OS and supported SCSI Host Adapters.
MICROSOFT WINDOWS 98SE, ME, 2000, XP Pro and XP Home – USB
Interface
The procedure to check the drivers for these MICROSOFT WINDOWS operating systems
is very similar. On the MICROSOFT WINDOWS Desktop, right-click on the My Computer
icon and select Properties from the popup menu that appears. On the Properties window
that appears, open the Device Manager. You may have to first navigate to a Hardware
tab. View the devices by Type and a RFS 3600 (USB) entry will be seen under the
Imaging devices heading. Double-click the RFS 3600 (USB) listing and examine the
driver details. The driver seen should have an entry similar to this:
<winroot>\system32\usbscan.sys
If there is a yellow exclamation point on the RFS 3600 scanner icon when you review the
Device Manager entries, there is a problem with the driver. Reinstalled the RFS 3600
Version 2.10 software.
MICROSOFT WINDOWS 98SE – SCSI Interface
When connected via SCSI, the Win 98SE Device Manager tab of the System Properties
analyzer will have an listing “Kodak RFS 3600” as an Imaging Device. Click Properties,
Driver File Details and the driver <winroot>\system\VMM32.VXD is listed. This is a
Microsoft Windows driver and it should be the driver you use.
MICROSOFT WINDOWS 2000 – SCSI Interface
Click Imaging Devices and the film scanner will be listed as “Kodak RFS 3600”. Doubleclick the film scanner listing and bring up the Kodak RFS 3600 Properties box; click the
Driver tab and then the Driver Details… button. The correct MICROSOFT WINDOWS
2000 driver should have a listing <winroot>\system32\drivers\scsiscan.sys.
Troubleshooting Memory Problems
Computer memory error messages may appear while you are operating the RFS 3600
Film Scanner. The causes of these error messages are varied, but they may be
completely suppressed if you setup your system correctly and form some easy to adopt
scanning habits. If you are not completely comfortable with checking and/or modifying
computer system settings, have a knowledgeable friend or co-worker help you.
First, it is not necessary or even desirable to scan multiple high dpi images directly into
ADOBE PHOTOSHOP. Every large image file you send to ADOBE PHOTOSHOP is
data that ADOBE PHOTOSHOP and your computer’s OS must manage and maintain in
both system memory and in virtual memory. Your system will create hard drive temporary
1
Page 13

3
file(s) which get larger and larger as you send more and more data to ADOBE
PHOTOSHOP. Even if you have a system with hundreds of megabytes, or even more
than 1 gigabyte of DRAM, switching between multiple ADOBE PHOTOSHOP image
MICROSOFT WINDOWS, each holding a 50MB image, can be time consuming and
awkward. If you are performing high resolution scans of several frames, it is a more
efficient workflow for you to send the image files directly to your hard drive. Consider
using the “Scan to File” feature of the RFS 3600 software. After scanning to your hard
drive the frames you want, exit the RFS 3600 software and open the image files one or
two at a time in ADOBE PHOTOSHOP.
Next, you must have sufficient Virtual Memory allocated for your OS. Specifically, in
MICROSOFT WINDOWS, this is your “Paging File Size”. Use the MICROSOFT
WINDOWS Help system for information regarding the Paging File. If your Paging File fills
up, the film scanner’s software will not be able to continue to perform scans. If your
MACINTOSH has less than 1 gigabyte of system memory (actual DRAM), turn on Mac’s
Virtual Memory. Select the Memory Control Panel under the Apple Menu. Click the “On”
radio button for the Virtual Memory and enter size box a value equal to the Mac’s built-in
memory.
Your assignment of Memory to ADOBE PHOTOSHOP will affect its performance. On a
MACINTOSH, perform a Command + I keystroke on the ADOBE PHOTOSHOP icon. On
the resulting pop-up, select Memory from the “Show:” dropdown. If your MACINTOSH has
less than 1 gigabyte of system memory, enter 80MB to 100MB (80000K to 100000K) in
both the Preferred and Minimum Size data boxes. Do not exceed 100MB. If your
MACINTOSH has more than 1GB of DRAM, assign 900MB to ADOBE PHOTOSHOP.
For MICROSOFT WINDOWS, start ADOBE PHOTOSHOP and open the Memory and
Image Cache preference dialog box. Assign a fixed percentage of memory to ADOBE
PHOTOSHOP. However, ADOBE PHOTOSHOP will only use the amount of RAM equal
to or less than its scratch disk space, no matter how much RAM is installed or allocated to
it. “ (from www.adobe.com)
Additional Resources
Review the “ADOBE PHOTOSHOP support knowledgebase” on Adobe’s web site,
www.adobe.com. In particular, review the documents “RAM Use and Available Hard
Disk Space in Photoshop”, “Optimizing Performance in Photoshop for Mac OS” and
"How to Troubleshoot System Errors or Freezes in Photoshop for Mac OS."
1
Page 14

4
Main Screen
When you select the RFS 3600 Film Scanner Host Software from the ADOBE
PHOTOSHOP Import sub-menu, the Main Screen and Settings tab will appear. Figure 1
is similar to how the main screen will look when the software is started and a filmstrip is in
the scanner. All new software features that have been created since the Version 1.00
Host Software will be discussed in this addendum. To obtain further information regarding
all other software features, see the User’s Manual on the Host Software CD or download a
PDF file copy from www.kodak.com.
• Figure 1, Main Screen
Changes to the Host Software Main Screen include moving the Scan Profile function to a
new location, a re-grouping of the film scan function icons (see Scan Icons) and the
addition of new icons and buttons in the lower right corner of the screen (see Scan All,
DMin Cal, Light Cal, Resize Window).
1
Page 15

5
Settings Tab
Most of the Settings Tab features have not been changed. As with Version 1.20 software,
select your film type (Negative, Reversal or Black & White) and then select the correct film
term in the drop down box. Make a selection for your Monitor and Output Profile. You
may select a Sharpening Level before or after you perform a Prescan. The Auto Balance
icon has been moved to the right of the Sharpening radio buttons.
Status Bar
File Size
Below the Scan to File icon, the estimated file size value is shown. This size is related to
the scan size and resolution settings and is valid when scanning an image into ADOBE
PHOTOSHOP or when scanning and creating an image file on your computer’s hard
drive. This file size estimate is valid only for TIFF images.
• Figure 2, File Size
Scan All, DMin Cal, Light Cal, Resize Window
The new Scan All, DMin Cal and Light Cal buttons are located in the lower right corner of
the main window. When these buttons’ features are enabled, the text on the buttons will
be black, as seen in Figure 3. When the features are disabled, the text will be grayed out.
Double-click a button to change its state.
• Figure 3, Buttons Enabled
Scan All
Scan All is a new filmstrip feature. Please note – before using this function, make sure
your filmstrip frames are correctly aligned, left and right, in the film scanning area. Also,
you should ensure your desired Scan Area and Resolution values are set before using
Scan All.
If Scan All is enabled and Scan or Scan to File is selected without performing a prescan
on any frames in the filmstrip, a final scan is performed for each frame in the filmstrip
starting with the current frame in the scan position and proceeding to the left-most frame
on the filmstrip.
When a Prescan of one or more frames has been performed on a filmstrip, and Scan All is
then enabled, all prescanned frames will be selected for final scanning. If you disable
1
Page 16

6
Scan All or select one thumbnail (which deselects all others), all prescanned frames are
deselected except for the frame displayed in the tabs.
If Scan All is enabled and then Scan or Scan to File is selected after one or more frames
have been prescanned, a final scan is performed on each prescanned frame and on all
remaining frames on the filmstrip located to the left of the prescanned frames. For
example, if the first 4 frames of a 36 frame filmstrip are prescanned and then Scan All is
enabled, when Scan or Scan to File is selected, a final scan of all filmstrip frames is
performed.
If the Auto Balance button is enabled, the scanner will perform 2 scans of every frame that
has not been prescanned.
• The first scan will perform a Prescan which does not generate a visible image, i.e. the
prescan image will not be displayed on the user interface. This Prescan necessary
because the Auto Balance software requires data from the Prescan.
• The second scan will perform the final scan.
If the Scan All feature is disabled, the operation the film scanner’s prescan and scan
functions remain the same as in the previous version 1.20 Host Software. The Scan All
feature is by default disabled and it will be disabled each time the RFS 3600 Host
Software is started.
DMin Cal
DMin Cal is a new software feature which is applicable when using Color Negative or
Black and White Negative filmstrips. When a filmstrip is inserted into the film scanner, the
scanner normally performs an automatic DMin (Density – minimum) measurement. The
procedure makes a measurement of the lowest film density present on the filmstrip
(usually the interframe gap). If you have six 6-frame strips from the same 36-frame roll,
the DMin value probably will be the same on each 6-frame strip. If you want, you may
allow the DMin measurement to be performed on the first strip and disable the DMin
measurement for the remaining five strips to save time.
If DMin Cal is enabled and a Color Negative or B&W Negative film type is selected, the
DMin measurement will be performed on every filmstrip inserted into the film scanner. If
Reversal Film Type is selected, the DMin Cal is automatically disabled and may not be
enabled.
If a Color Negative or B&W Negative type is selected and DMin Cal is disabled, the DMin
measurement will not be performed when a filmstrip inserted into the film scanner.
However, if a DMin measurement has not been made since the Host Software has been
started, one will be performed for the first Color Negative or B&W filmstrip inserted, even if
the DMin Cal feature is disabled.
If Reversal Film Type is selected and then Color Negative or B&W Film Type is selected,
DMin Cal will automatically be enabled.
The setting of the DMin Cal button, enabled or disabled, is saved from scan session to
scan session. The default setting is “Enabled”.
1
Page 17

7
When scanning Color Negative or B&W negative filmstrips, be sure the strip has less than
one half of the frame completely exposed (i.e. film is totally black). The DMin
measurement will fail if the scanner "sees" a full frame of black film. Trim the film strip so
that when it is inserted into the scanner, the first frame has some transparent leader.
Similarly, a problem might exist if you exit the Host Software when the last frame of your
filmstrip is near the exit port of the scanner. If you start the Host Software, the scanner will
sense a filmstrip in the scanner and perform the DMin measurement. In this case, there
will not be a full frame of film below the scanning head and the film scanner will incorrectly
measure the light source. If this happens, eject the filmstrip and reload it. A new minimum
density measurement will be performed.
Light Cal
This feature existed on previous RFS 3600 Host Software, but its button has been moved
to this new location. If this button is enabled, the film scanner will perform a light source
calibration before each final scan. If this button is disabled, the film scanner will skip
making this calibration. The exception is if the film scanner had been in its low power
mode where its lamp was turned off to save energy. In this situation, a light source
calibration will be performed automatically once the lamp has warmed up and the
“Preparing film scanner” message window is displayed.
The setting of the Light Cal button, enabled or disabled, is saved from scan session to
scan session. The default setting is “Enabled”.
Window Resize
You may now “grab” the lower right corner of the main screen, drag it and make the
software screen larger or smaller. The minimum screen size limit is 800 x 600 pixels.
Configuration Icon
Clicking the new Configuration icon brings up the screen seen in Figure 4. The
setting of all options on the Configuration screen are saved from scan session to scan
session.
1
Page 18

8
• Figure 4, Configuration Screen
Prescan Resolution
You may now select between three different prescan resolutions – 300, 600 or 900 dpi. A
high dpi Prescan will maintain higher image quality longer if you magnify the Prescan
using the Zoom In tool. However, higher dpi Prescans will take longer to perform and
process and place larger temporary files on your hard drive. The files will be deleted when
the Host Software is closed.
Color Processing
This item replaces the Color Depth selection, 8-bit or 12-bit, in the older RFS 3600
software. As with the earlier RFS 3600 Host Software, all Prescans and Scans performed
by the RFS 3600 generate 12 bits of data per pixel. If the 8-bit Color Processing option is
selected, the scanner’s 12-bit Prescan/Scan data are converted to 8-bit space before
being transferred to your computer, one byte/pixel. Once in the computer, the data is
transformed back up to 12-bit space. If the 12-bit Color Processing option is selected, the
scanner’s 12-bit Prescan/Scan data are transferred directly to your computer using 2
bytes/pixel. The Kodak image processing performed in your computer is done in 12-bit
space, no matter which of these two options is selected. The tradeoff is a shorter total data
transfer time with the 8-bit Color Processing option versus more accurate image details
with the 12-bit Color Processing.
Final Scan, Multi-Sampling
This new option allows you to average multiple data samples which may help produce a
lower overall digital noise level in your final scan. The higher your Multi-Sampling
selection, the longer your final scans will take to be completed.
Frame Numbering
This new feature allows you input the frame numbering sequence of your filmstrip. For
example, say you have a 6-frame filmstrip, frame numbers 13-18. If you insert the filmstrip
with frame 18 being the first frame, you may now have the thumbnails at the top of the
Main Screen numbered 18 through 13. Enter 18 into the “Start numbering at:” box and
click the Descending radio button. As the Prescans are performed, the thumbnails will be
assigned the same number as the frames on the filmstrip. See the strip of thumbnails in
Figure 6 for an example of reverse numbering. In addition, this “Start numbering at:” value
and the Ascending/Descending selection are transferred to the Scan to File dialog box.
The “Start numbering at:” feature may only be applied to future prescans; you cannot
renumber existing thumbnails. Valid thumbnail numbers are from 0 to 999.
Output Depth
Note: your imaging editing application must be able to use 16-bit data for this new feature
to be of use. If you plan on working in the 16-bit space, you should review the features
within ADOBE PHOTOSHOP 6. This version of ADOBE PHOTOSHOP has the most
extensive 16-bit features, but still many of its Filters are not available in 16 Bits/Channel
Mode.
1
Page 19

9
Selecting 8 bits Output Depth commands the Host Software to transform the image data
from the Kodak 12-bit processing space to 8-bit space before it is transferred into ADOBE
PHOTOSHOP or the image file is written to your hard drive (Scan to File feature).
Selecting 16 bits causes the data to be moved from 12-bit space to 16-bit space before
the data is sent to ADOBE PHOTOSHOP or to your hard drive. Note: if you select the
16 bits option and scan into ADOBE PHOTOSHOP, the memory allocation in
ADOBE PHOTOSHOP to hold the image data will be twice the allocation required
for an image produced using the 8 bits option. Similarly, the file created on your
hard drive using the Scan to File feature will be twice as large as a file created
using the 8 bits option.
Embed Output Profile
Checking this box will cause your Output Profile selection to be embedded into the image
file when performing the Scan to File option. It is not possible to embed the Output Profile
if you are scanning directly into ADOBE PHOTOSHOP.
Defaults
Clicking this button will reset the Configuration Screen to the default settings seen in
Figure 4. You may not change the default settings.
Scan Profile
The location of the Scan Profile function has been moved to the lower left corner of the
Main Window. The Scan Profile operation has not been modified since the version 1.20
Host Software release. Custom Scan Profiles created with version 1.00 Host Software will
not operate correctly with version 2.10 Host Software. You should recreate those Scan
Profiles using this new software release.
1
Page 20

0
Scan Icons
Autofocus
All of the icons dealing with film scanning have been grouped together in the middle of the
bottom edge of the main screen. These icons, seen in Figure 5, are, left to right:
Autofocus (AF), Prescan Frame, Prescan Strip, Scan and Scan to File. These functions of
these buttons have not been changed or enhanced.
• Figure 5, Scan Icons
Initial Setup
The first Prescan or Scan on a slide and on a filmstrip after the installation of this Host
Software will first start with an Autofocus operation.
Slide Autofocus
The AF button is enabled whenever the film scanner detects the presence of a slide. No
longer does a Prescan of the slide have to be performed before the AF button is enabled.
Filmstrip Autofocus
The AF button is enabled whenever the film scanner detects the presence of a filmstrip
(after the filmstrip Dmin function has been completed). If a filmstrip Prescan or Scan is
attempted without an Autofocus first being performed, you will be presented with a
message asking for confirmation of the Prescan/Scan.
After loading a filmstrip, we suggest you align a valid image frame in the film scanner's
view window before exercising the autofocus function. Align the frame by tapping the
scanner’s Reverse or Forward buttons, or by Control-clicking (Option-clicking on
MACINTOSH) on the Host Software’s Move Filmstrip left/right icon. Then click on the
Autofocus button.
Manual focus
After the Autofocus operation is completed, a Prescan of the slide or filmstrip frame will be
performed. Subsequent "clicks" of the AF button when the same slide or filmstrip is
installed will produce an Autofocus / Manual focus option. Selecting one of these options
will cause an focus operation to be performed on the frame currently in the scan position.
The Manual focus operation allows you to command a specific focus point. This set focus
point value will be used for all slide and filmstrip prescans and final scans until a different
focus point is set either by a new AF or Manual focus operation.
2
Page 21

Focus Details
The focus point value, either from an AF or Manual focus operation, is saved and used
from scan session to scan session. It is up to you, the film scanner's user, to decide how
often you want to use the focus feature. A mounted slide and a filmstrip have different
focus points. Also, slide mounts with different thickness’ will have different focus points.
Your computer will store the separate values used for the last slide and filmstrip focus
point. If you connect your film scanner to a different computer, or connect a different RFS
3600 to your computer, you should perform new autofocus operations on slides and
filmstrips.
Please note: This filmstrip and slide focusing feature cannot compensate for soft frames
captured by a poorly focused camera. In order to produce sharp images on your
negatives, you must have your camera correctly focused when exposing the film.
Image Viewing and Editing
• Figure 6, Preview and Thumbnails
21
Page 22

2
Thumbnails
Page 49 of the original User's Manual states that image thumbnails will not be affected by
color adjustments made by the user. This is incorrect; the thumbnails will reflect the
changes seen in the Preview Image.
The thumbnail strip across the top of the Main Screen has some new features. Click on a
thumbnail to select it and the frame’s Preview Image appears in the Preview Screen. The
thumbnail which is currently being displayed in the Preview Screen has a dashed red
border. See thumbnail number 15 in Figure 6. Shift-click to select consecutive
thumbnails; Control-click to select individual, non-consecutive thumbnails. A crop box on
a Preview Image will also be seen on its thumbnail when the thumbnail is selected.
As seen in Figure 7, the thumbnail listing now shows both the total number of thumbnails
that were generated and how many have been selected. Notice that the maximum
number of frames allowed on a filmstrip has been increased to 40.
• Figure 7, Frame Selection
White/Gray/Black Balance Eyedroppers
The black, gray and white eyedroppers adjust the brightness and contrast of an image
such that the new brightness of the point chosen by the user is either black, mid-scale
gray or white.
The operation of these color balance eyedroppers has been changed to more closely
reflect the operation you have seen in ADOBE PHOTOSHOP. Note: As with ADOBE
PHOTOSHOP eyedroppers, the RFS 3600 Host Software eyedroppers’ values will
be saved from scan session to scan session. To reset the RFS 3600 eyedroppers’
values to their default values, perform a Prescan and then click the Default Balance
button.
Eyedropper usage example: After performing a Prescan, double-click the black
eyedropper tool, enter a value of 20 for Red, Green and Blue and then click “OK”.
The pointer then changes to a black eyedropper. Using the Preview Image or the
image in the Image Window, you then select (click on) a pixel having RGB code
values of 50, 55 and 60 (example only). The code values of this pixel will be shifted to
20, 20, 20 and the pixel values throughout the image are adjusted proportionately.
The operation of the black balance eyedroppers is similar. In the case of the gray
eyedropper, the point chosen by the user will now have a brightness level similar to
that of a mid-scale gray although the point itself may not become gray (have equal
code values).
Image Window
No new features have been added to the Image Window. However, using the Image
Window with the new high dpi Prescan function will help you perform accurate cropping
and color adjustment operations. See Prescan Resolution.
2
Page 23

3
2
Page 24

4
Tabs
Settings Tab
Frame Number
The thumbnail number of the frame which is currently being displayed in the Preview
Window is shown in the upper right corner of the Settings Tab. See Frame Numbering to
learn how to match the thumbnails’ numbers with the filmstrip’s frame numbers.
Auto Balance Button
The Auto Balance button has been moved onto the Setting Tab and placed next to the
Sharpening radio buttons. The Auto Balance function remains the same; its default is
“On” (depressed) for Negative and B&W film types and “Off” (raised) for the Reversal film
type.
• Figure 8, Frame Number
Scan and Output Settings
These two functions have a complete new look and operation. See the Scan and Output
Settings section of this addendum for a complete explanation.
Crop Box
The Crop Box’s Height and Width minimum values have been change to be 0.01”.
2
Page 25

5
Color Balance and Levels & Curves Tab
Page 73 and 75 of the original User's Manual state that the Before and After images on
the Color Balance and Levels & Curves tabs will be identical when you enter the
respective tab. This is only true if you have made no adjustments to the image with the
black/gray/white balance eyedroppers, the color tools, or the tone curve tools. If you make
image adjustments, the After image will show the cumulative effect of the adjustments,
while the Before image will maintain the look of your original scan.
Frame Number
As seen in Figure 9 below, the thumbnail number of the frame which is currently being
displayed in the Before and After Image windows is shown between those two images.
See Frame Numbering to learn how to match your thumbnails’ numbers with the filmstrip’s
frame numbers.
• Figure 9, Color Balance, Levels & Curves
Custom Settings
Also seen in Figure 9 are asterisks to the left and right of the tab titles. These asterisks
appear on the top of the tab if you have made changes to tab’s image using the tools on
the Color Balance or the Levels & Curves tab. On the Color Balance tab, this would be
adjustments to any of the 6 sliders. On the Levels & Curves tab, any modification to the
Channels Curve or to the Histogram Sliders will cause the asterisks to appear. These
asterisks serve as a visual reminder because any adjustments made on these two tabs
are saved from scan session to scan session. After starting a new scan session, you may
delete these saved adjustments by navigating to the affected tab and clicking on the tab’s
Reset Button.
Color Tools
The color tools on the Color Balance and on the Levels & Curves tabs have been modified
so their effects on the Preview Image are not so aggressive. If you use Version 1.00 Scan
Profiles which include adjustments using these color tools, you will need to update these
Scan Profiles.
Scan and Output Settings
2
Page 26
6
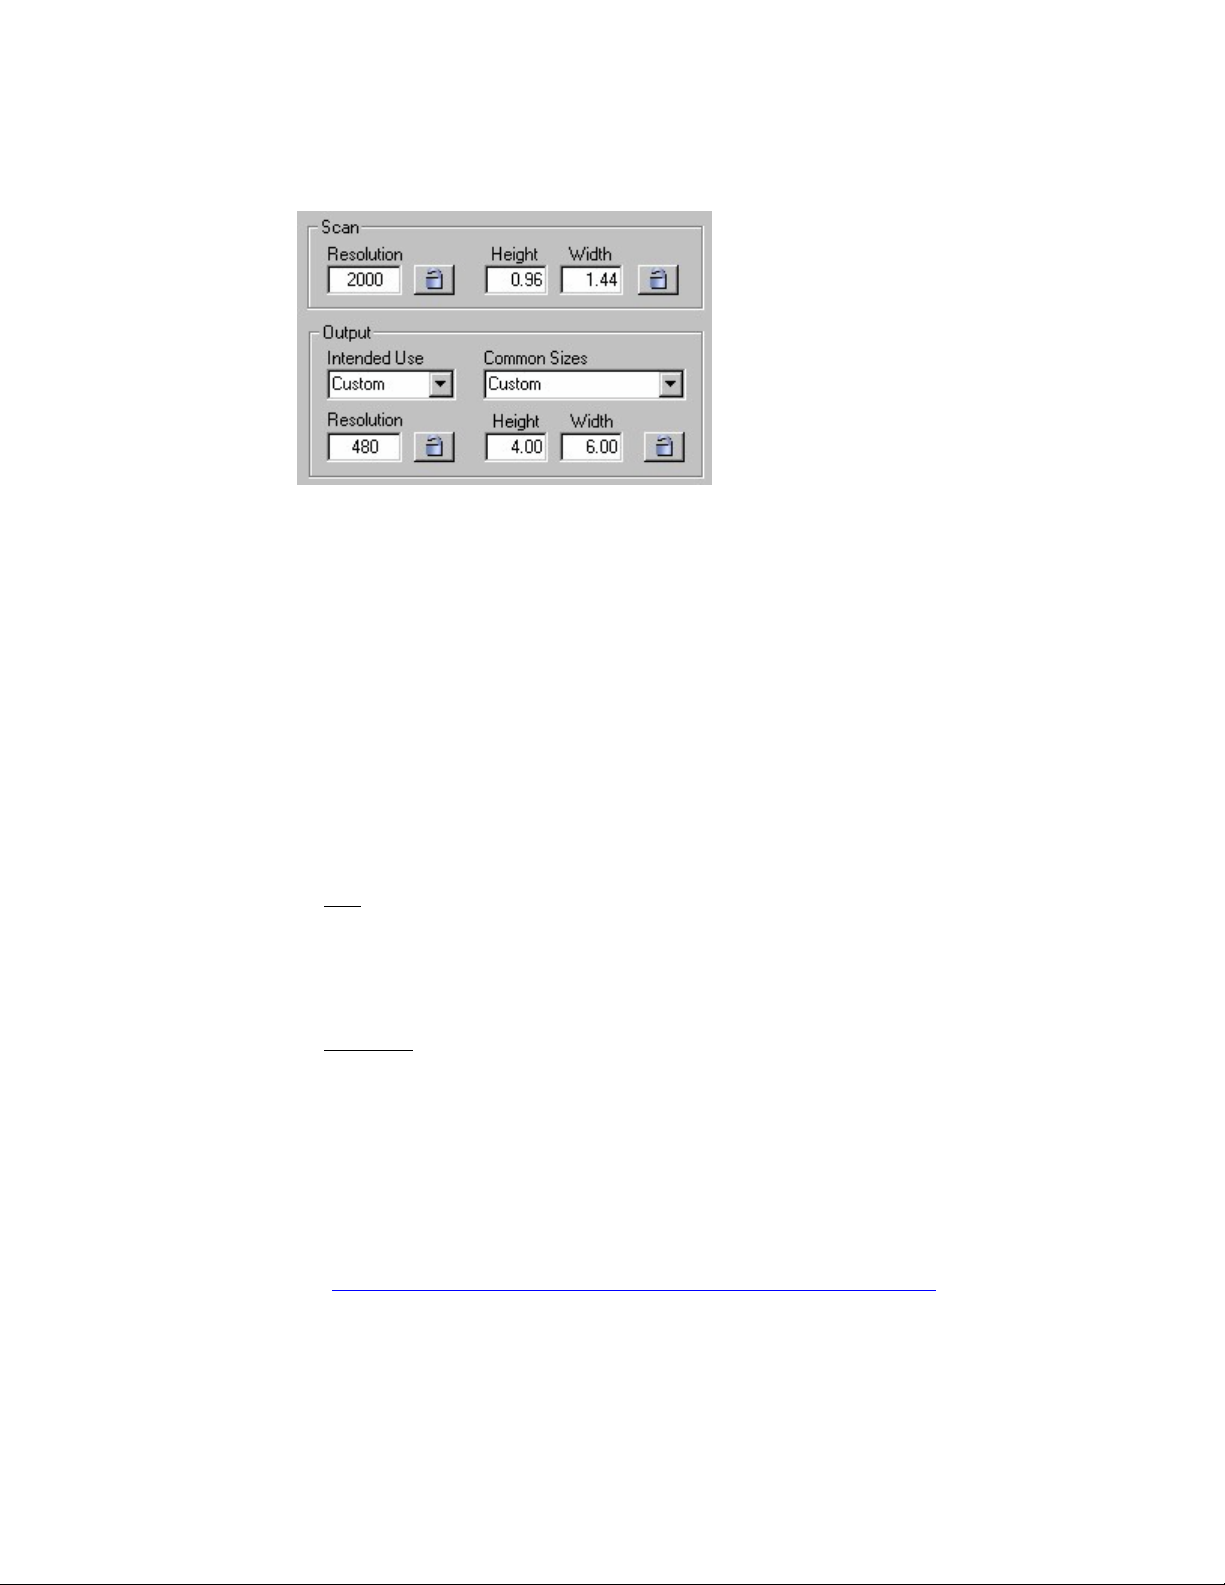
Scan and Output Settings
• Figure 10, Scan and Output Settings
The Scan and Output settings (Resolution, Height and Width) are laid out to allow their
values to be easily compared, and to make the relationships between these fields more
apparent. The Magnification value from Scan to Output is no longer displayed, but is still
maintained by the software.
The operation of the six data entry boxes, Resolution, Height and Width, have been
updated so the Host Software accepts a value when you press your keyboard’s Enter or
Return key.
The Relationship Between Scan, Output and Magnification
The relationship between the Scan and Output settings and the underlying Magnification
remains the same:
Size
Output Width = Scan Width * Magnification
Output Height = Scan Height * Magnification
Resolution
Scan Resolution = Output Resolution * Magnification
The Size and Resolution are inversely proportional (i.e. as one gets larger the other gets
proportionally smaller). Simply stated, as an image is enlarged by a certain percentage
from the 35mm slide or negative to a specific output size, the overall size of the image
(stated in dots or pixels) remains the same. But, the resolution (measured in dots or pixels
per inch) is reduced by the same factor that the scan size was enlarged to the output size.
See Figure 11, Relationship Between Scan Settings and Output Settings. This figure
illustrates the affects of scanning the full area on a 35mm frame (0.96 x 1.44 inches) and
making a 4x6 inch print using the scanned image. This is a 417% enlargement from the
35mm frame to the 4x6 print. The 35mm frame was scanned at a resolution of 2000 dots
per inch (dpi), resulting in a 1920 x 2880 dot (or pixel) digital image. When the 1920 x
2880 digital image is printed on 4x6 inch paper, the resulting output resolution is 480 dpi,
2
Page 27

7
which is a 24% reduction from the scan resolution of 2000 dpi. Note that this is also a
417% increase in resolution from Output back to the Scan.
Automatic Software Adjustments
As in Version 1.x Host Software, whenever you change a Scan or Output setting, the
software has to change one or more of the other settings to balance the formulas listed
above. In Version 2.10, the rules the software follows to determine which settings to
change are different:
• Magnification is the first setting the software will change.
• If needed, the Output Resolution and/or Output Width and Height are the next settings
the software will change.
• The software will only adjust the Scan Resolution and Scan Width and Height as a
last resort.
For example, if you start with the Factory Default settings (no cropping, 3600 dpi) and
change the Output Width to 6 inches, the software will change the Magnification to 417%
(6” / 1.44”). It will then change the Output Height to 4 inches and the Output Resolution to
863 dpi using the new Magnification. The Scan Width, Height and Resolution are not
changed.
Locking Scan and Output Settings
Since the rules the software follows for changing settings will not meet every situation,
Version 2.10 also includes the ability to lock a setting. When a setting is locked, you may
change its value, but the software may not. The following settings may be locked:
• Output Width and Height
• Output Resolution
• Scan Width and Height
• Scan Resolution
The lock buttons operate as a toggle. To lock a setting, place the cursor on its lock button
) and press the selection button on your computer’s pointing device. The button will
(
change appearance to indicate that the associated setting is locked (
). Simply
perform this operation again to unlock the setting.
You can lock only one of the resolutions at a time and only lock one set of the Width and
Height fields at a time.
When the Output Size is locked, a crop box (and therefore the Scan Size) will
automatically adhere to the aspect ratio defined by the Output Width and Height. In
addition, when you have locked the Output Size, clicking the Preview Image outside the
crop box will not eliminate a crop box. To dismiss a crop box, unlock the Output Size and
click outside the crop box.
2
Page 28

8
Intended Use and Output Resolution
The Intended Use field allows you to set the Output Resolution by selecting the intended
use of the image. The choices are seen below, the resolution listed to the right of each
choice indicates its corresponding Output Resolution.
• Print 300 dpi
• E-Mail 72 dpi
• Internet 72 dpi
• Archive 3600 dpi
• Custom Does not change existing dpi
When one of the first 4 choices is selected, its corresponding resolution value is
automatically entered into the Output Resolution field.
When any choice other than Custom is selected, the Output Resolution field is disabled
from being directly edited. When Custom is selected, the Output Resolution field is
enabled for editing, and its most-recent value remains.
Common Sizes and Output Size
The Common Sizes field provides a list of common output sizes for you to choose from.
Common Sizes include sizes such as the following:
• 4x6 inches
• 5x7 inches
• 8x12 inches
When one of these choices is selected, its corresponding width and height values are
automatically entered into the Output Width and Height fields.
When any of these choices is selected other than Custom, the Output Width and Height
fields are disabled from being directly edited. When common size Custom is selected, the
Output Width and Height fields are enabled for editing, and their most-recent values
remain.
2
Page 29
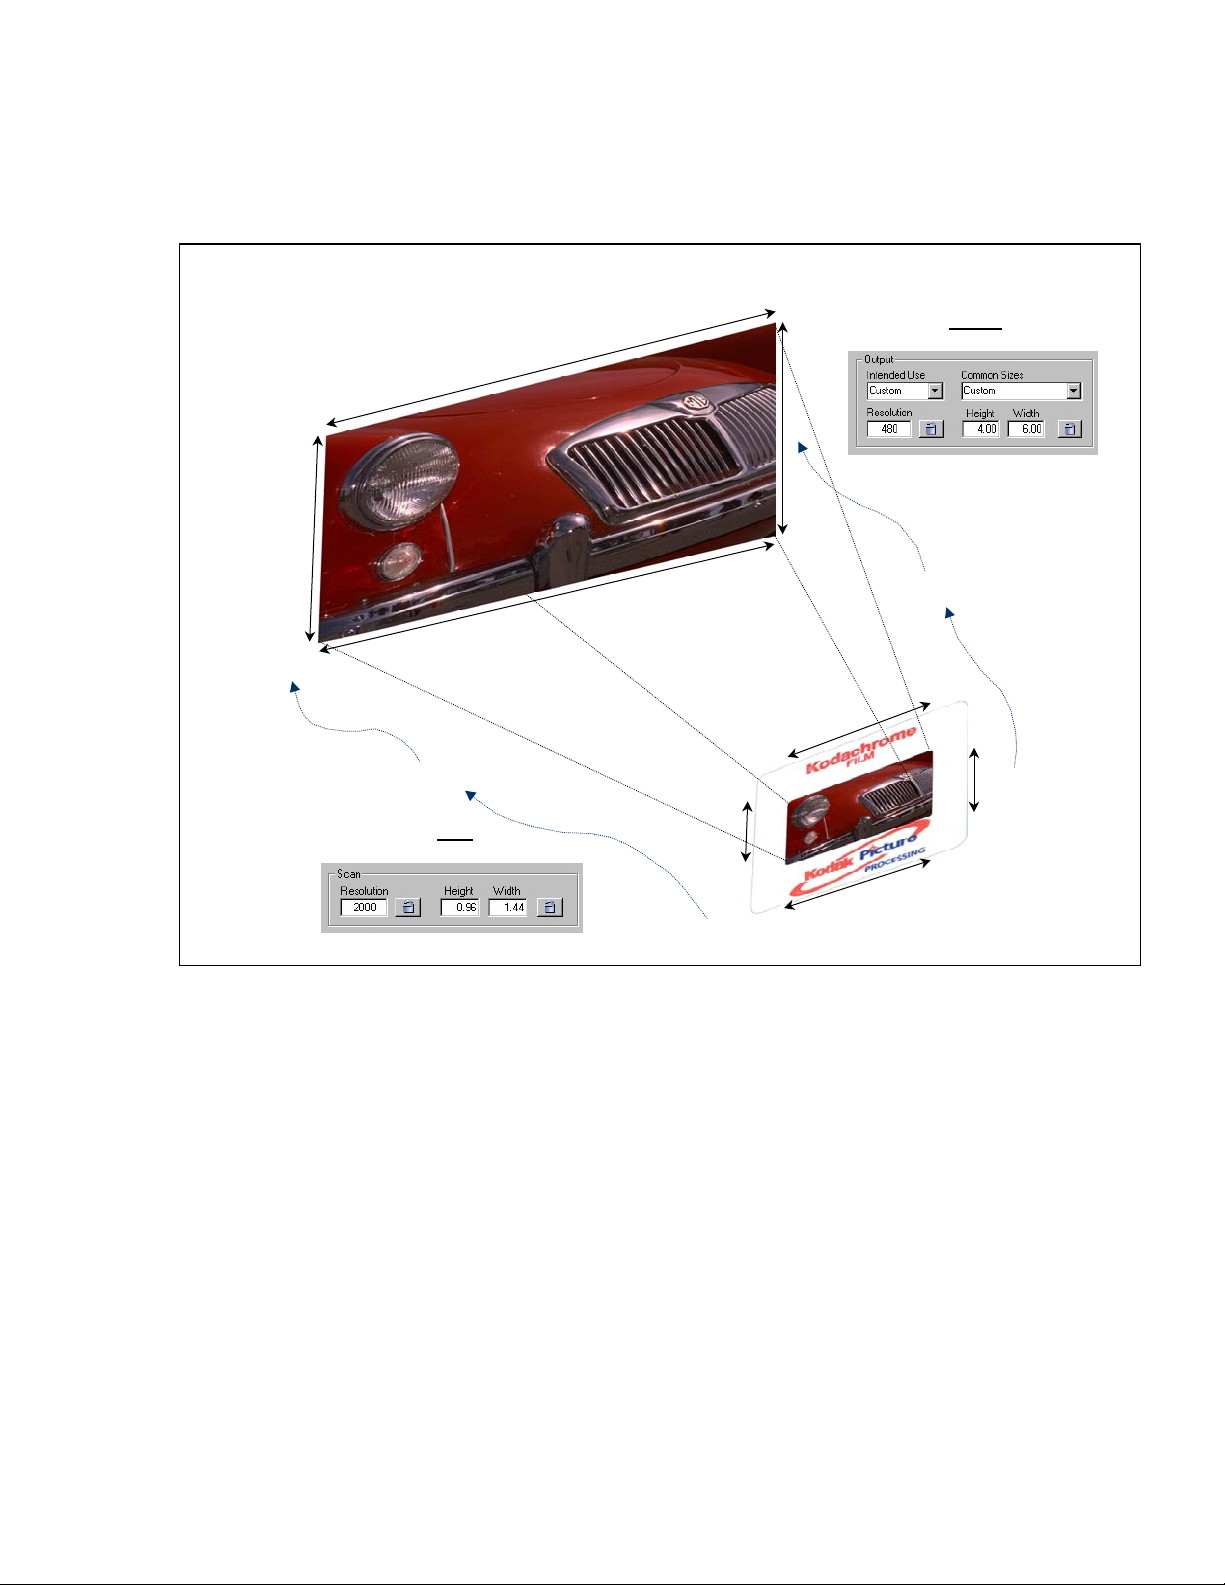
Relationship between Scan settings & Output settings
KODAK PROFESSIONAL RFS 3600
6”
1920 dots
2880 dots
480 dots per inch
Output
4x6 inch Print
4”
417%
increase in size
1.44”
decrease in resolution (dpi)
24%
Scan
35mm Slide
1920 dots
2000 dots per inch
Figure 11, Relationship Between Scan Settings and Output Settings
0.96”
2880 dots
Page 30
0
Miscellaneous Items
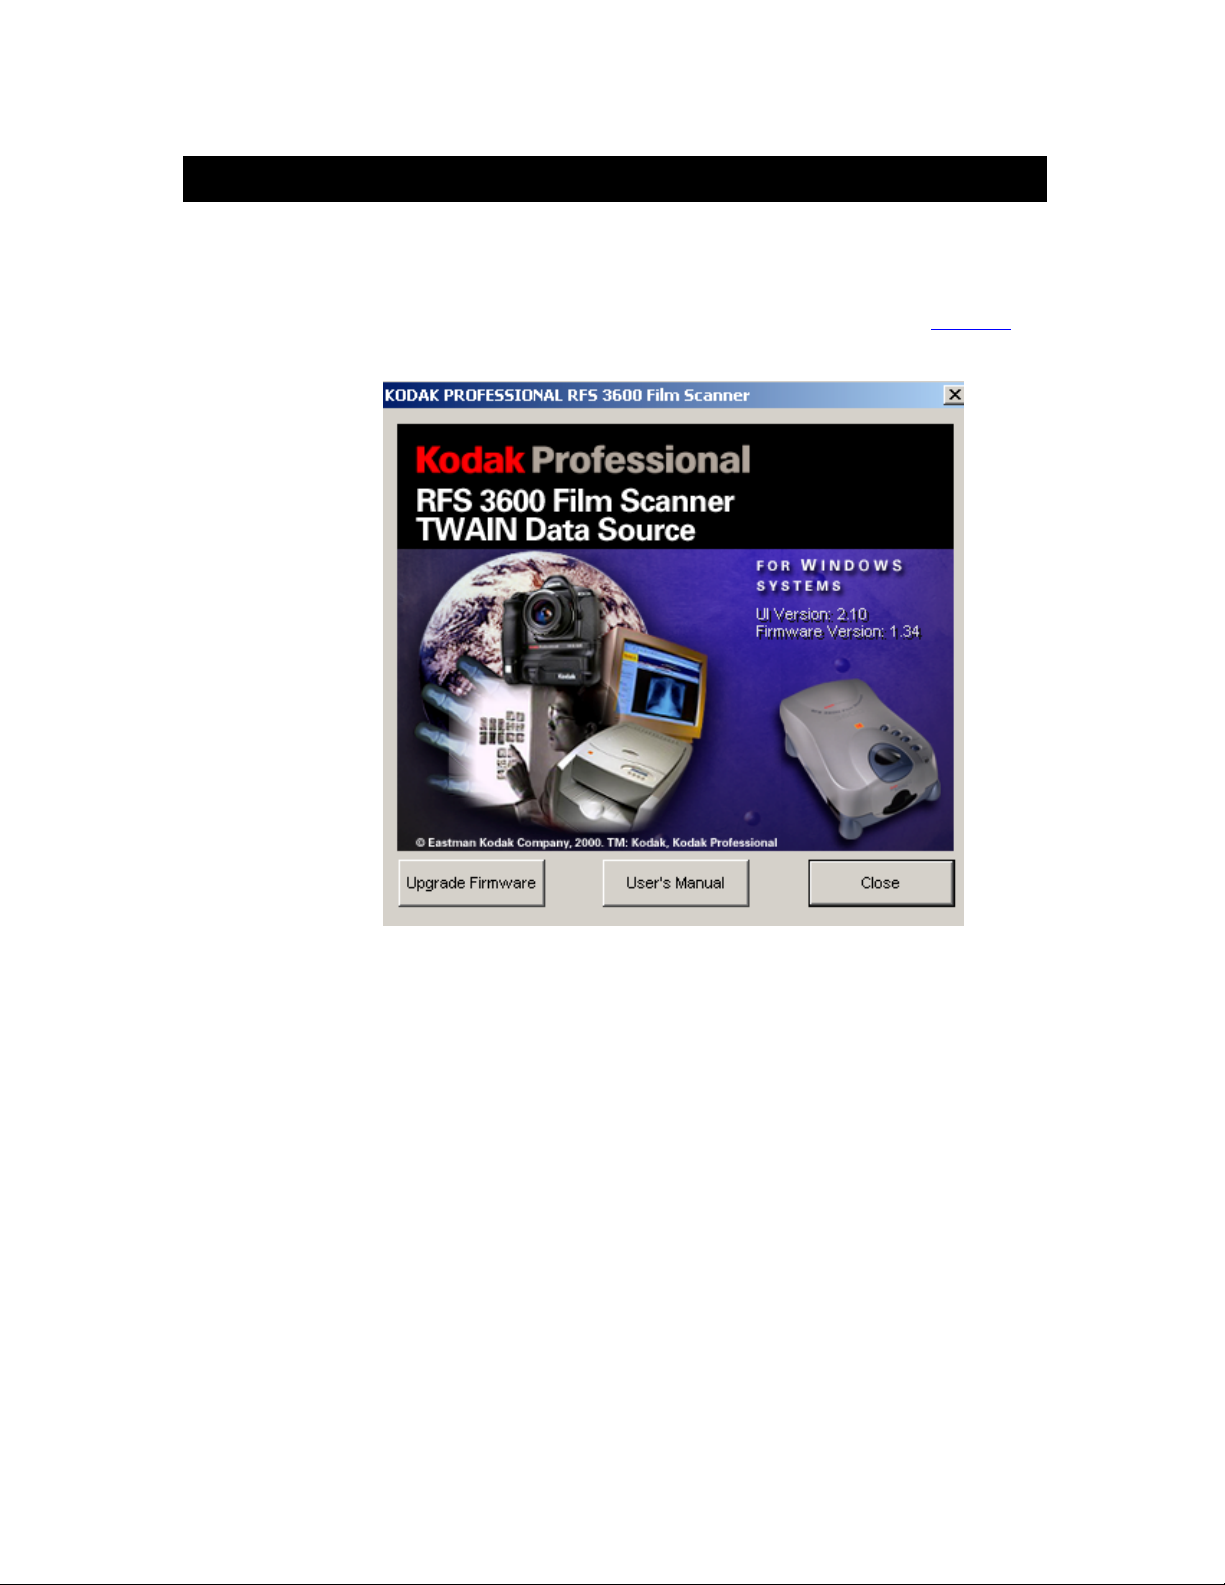
Information Icon
The functions contained within the Version 1.x About icon and Help icons have been
combined in a screen which is produce by clicking the Information icon. See Figure 12.
• Figure 12, Information Screen
Clicking the Upgrade Firmware button starts the firmware update procedure. See the
User’s Manual for details.
3
Page 31

Eastman Kodak Company • Rochester, NY 14650
KODAK PROFESSIONAL RFS 3600 Film Scanner
Kodak is a trademark of the Eastman Kodak Company. New 03-2002
31
 Loading...