

Page 1
OK
#
abc
2
ghi
4
pqrs
7
8
tuv
0
wxyz
9
jkl
5
mno
6
1
def
3
4.2
2.2/4.2 all-in-one printer
User Guide
Page 2
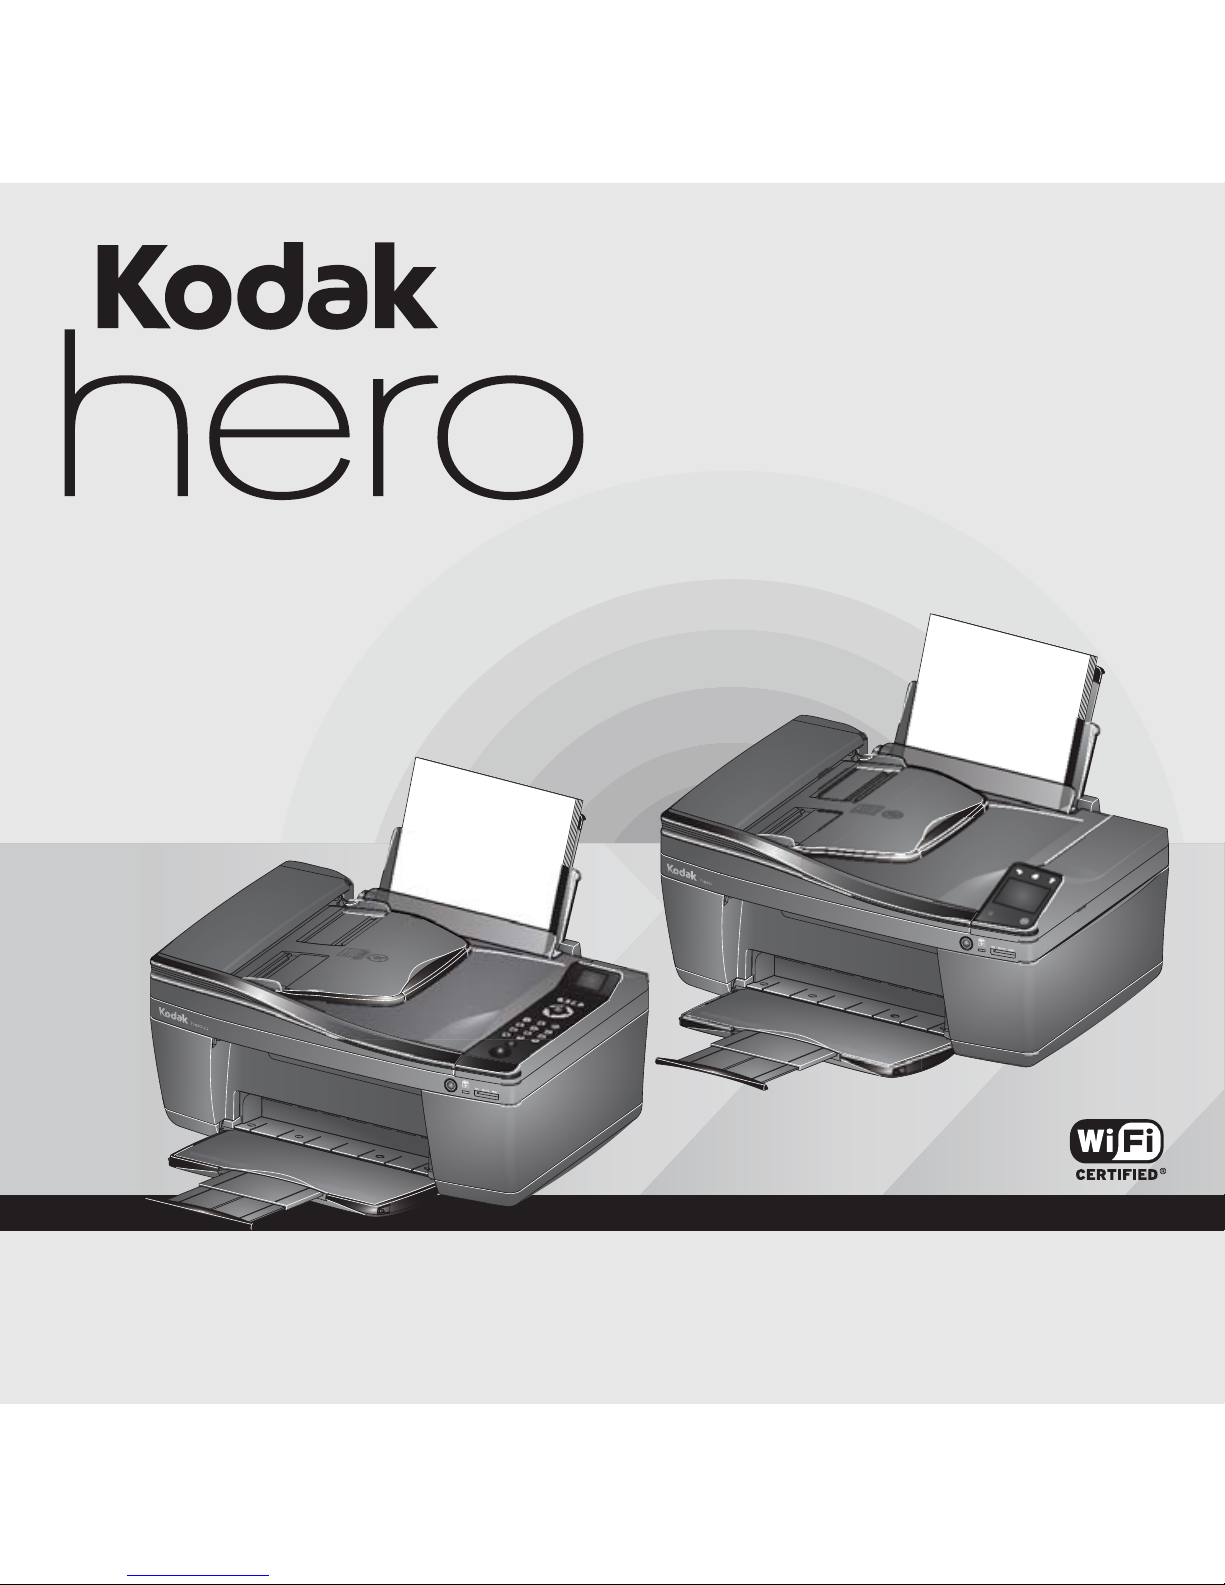
1 Printer Overview
2
6
7
9
4
5
8
3
1
Your KODAK All-in-One Printer combines ease-of-use and affordable inks to provide
high-quality pictures and documents.
Components
1 Paper guard 5 Control panel (HERO 2.2 Printer shown)
2 Paper input tray 6 Output tray
ADF tray extender 7 Output tray extender
3
4 Right paper-edge guide* 8 ADF paper-edge guides
*Left paper-edge guide not shown. When you
move one guide, both guides move.
2
Automatic document feeder (ADF)
9
Page 3
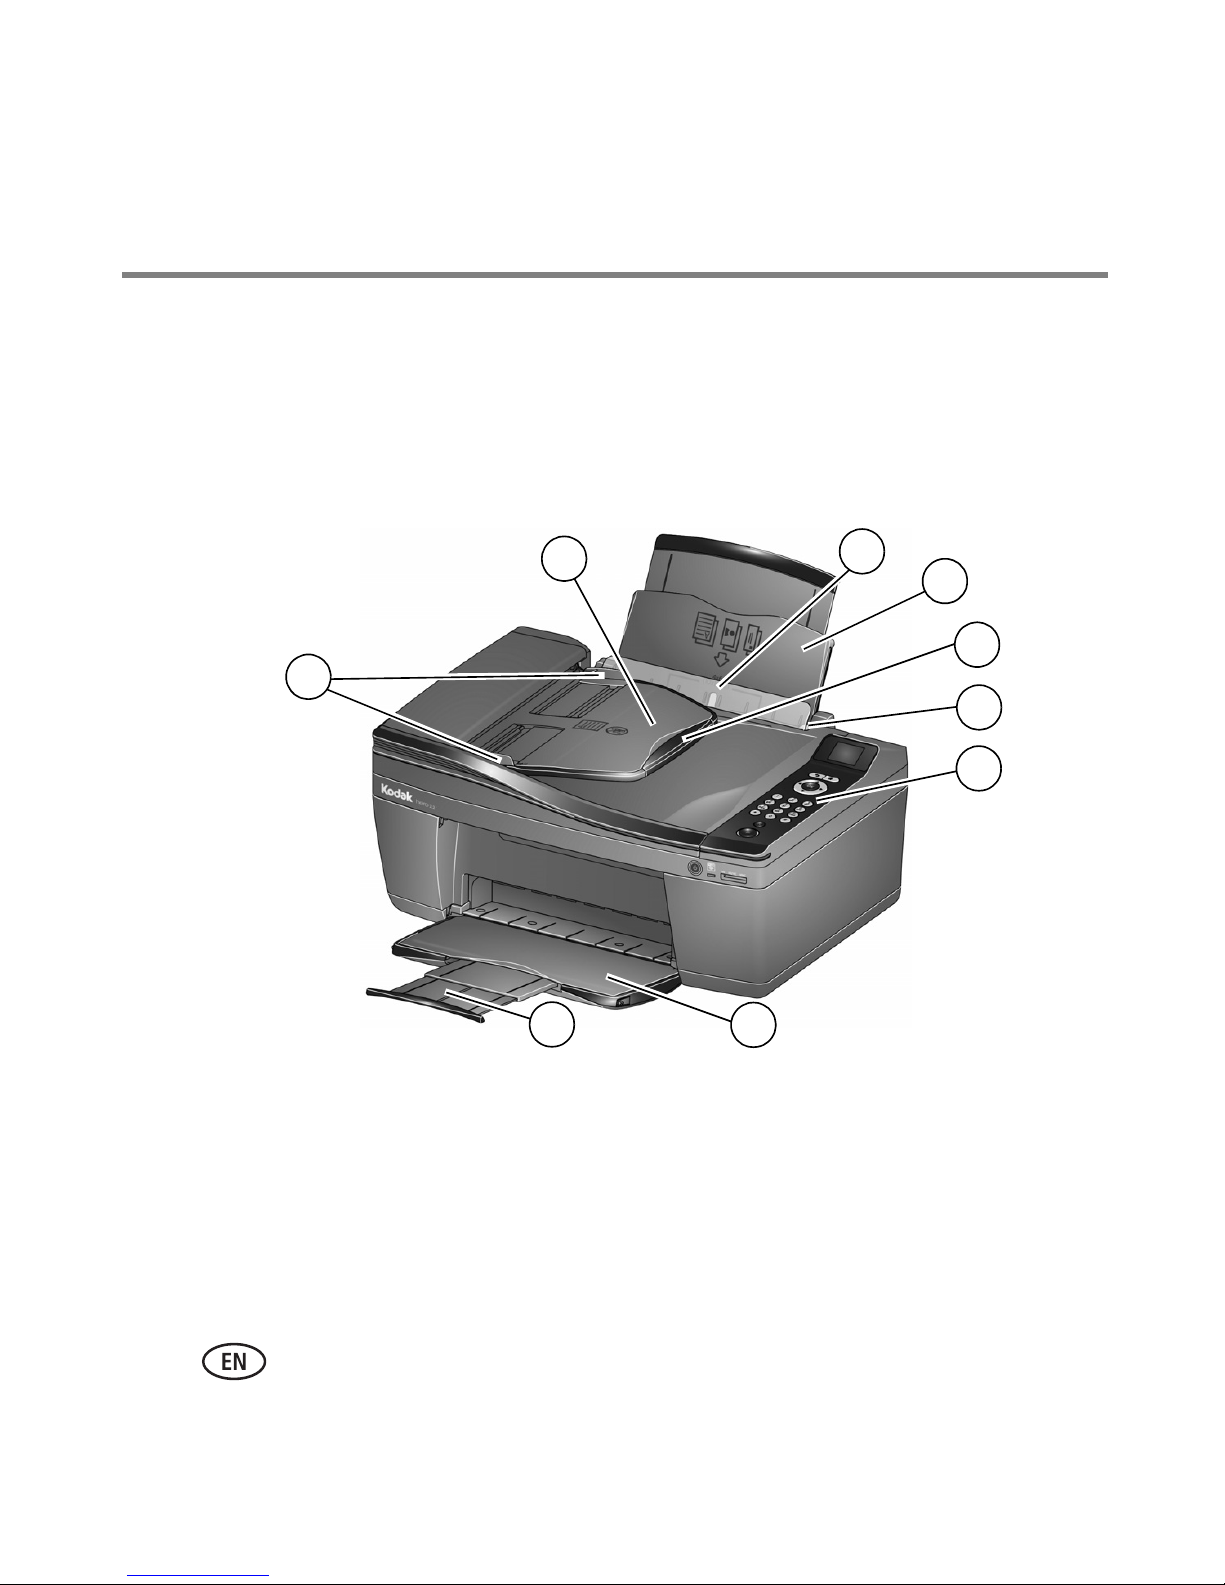
Printer Overview
10
1112
13
14
15
16
19
20
21
22
18
17
10 Scanner lid 17 Kodak Service Number
11 Scanner glass 18 Duplexer
Memory card slot 19 Power cord connection port
12
13 Wi-Fi connectivity LED 20 USB port
Power button 21 Line in phone port
14
15 Access door 22 Ext out phone port
16 Printhead with ink cartridges installed
3
Page 4
Printer Overview
4
3
6
5
7
1 2
8
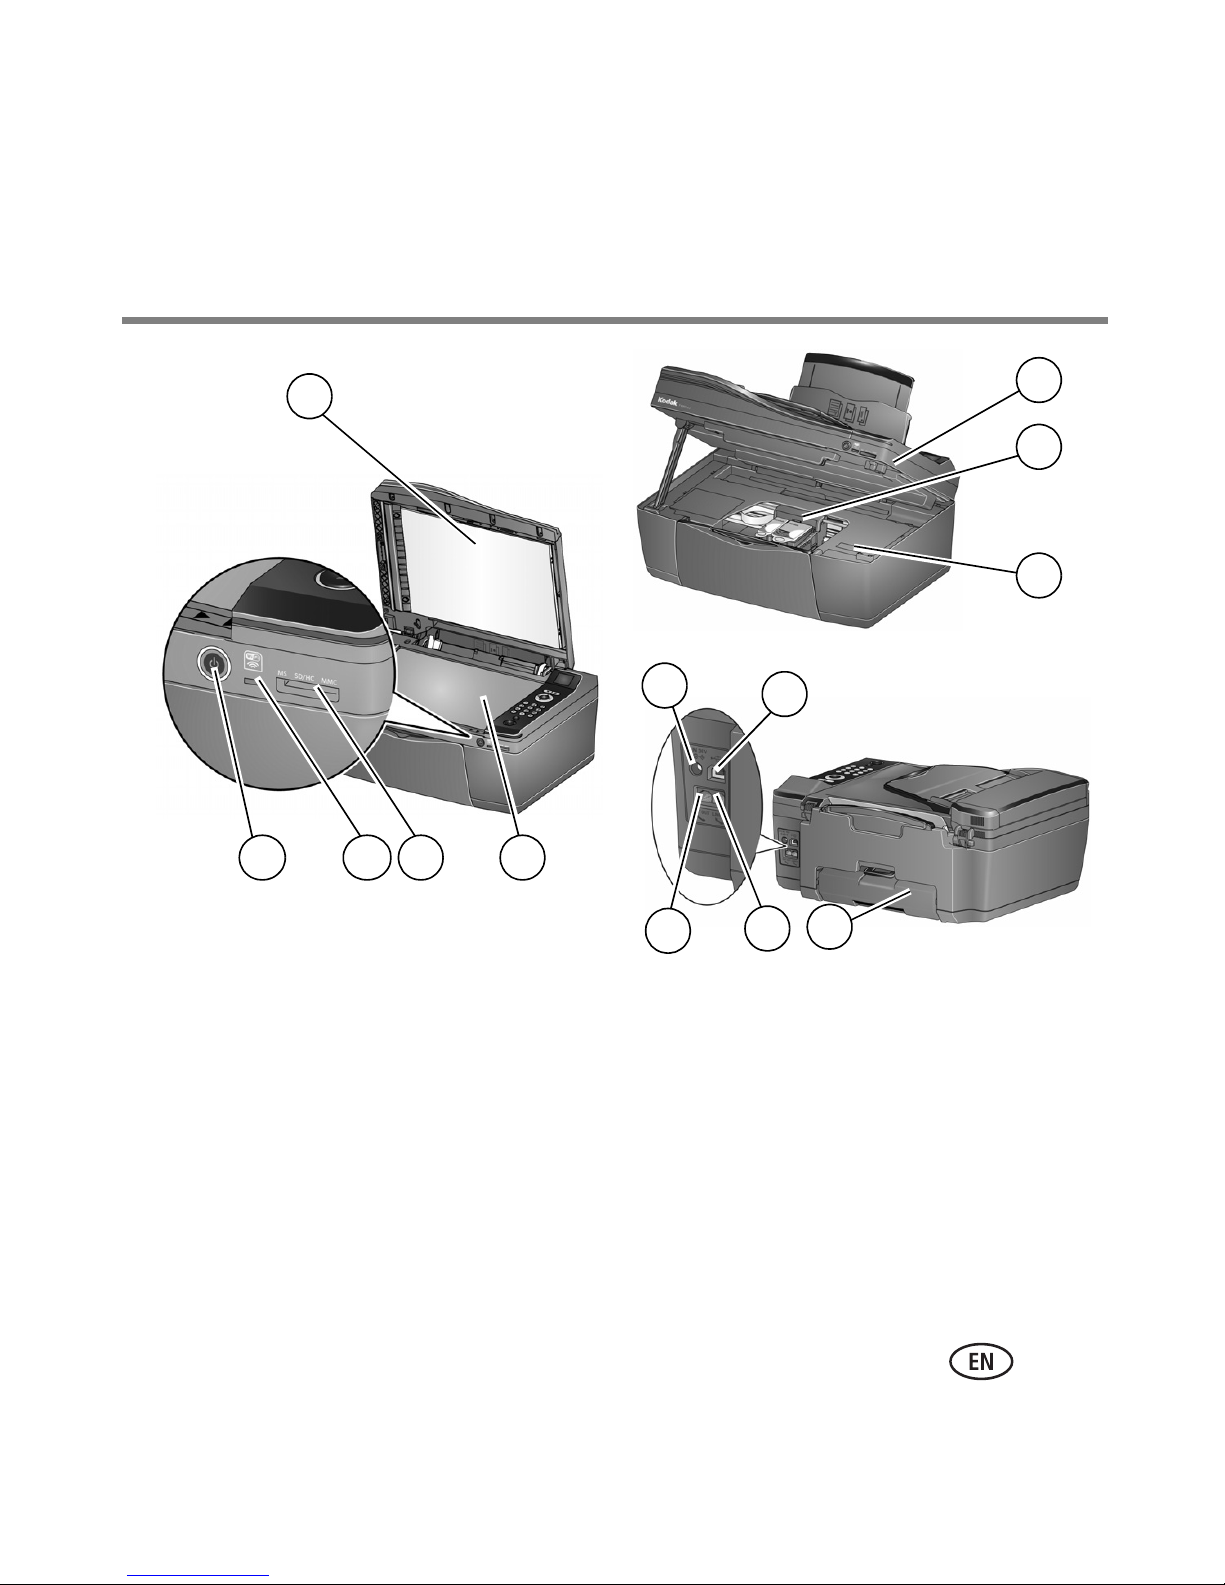
Control panel — HERO 2.2 Printer
Feature Description
1 LCD Displays pictures, messages, and
menus
2 Home button Displays the main menu
3 Navigation buttons Used to navigate menus and scroll
through pictures
4 OK button Selects a menu item, accepts a
setting, and continues with the
current operation
5 Numeric keypad Used to dial a phone number or a
Quick Dial number for faxing; to
enter information and Quick Dial
settings into the fax phonebook; to
specify a quantity for making
copies; and to enter information
for authenticating access to a
network
6 Cancel button Stops the current operation and
returns to the menu
7 Start button Begins copying, scanning,
printing, faxing, maintenance
tasks, and file transfer
8 Back button Displays the previous screen
4
Page 5

Control panel — HERO 4.2 Printer
43
6
5
1 2
Feature Description
1 LCD touch screen Displays icons, pictures,
messages, help, and menus
2 Back button Displays the previous
screen
Printer Overview
3 Home button Displays the main menu
4 Help button Displays context-sensitive
help
5 Start button Begins copying, scanning,
printing, faxing,
maintenance tasks, and file
transfer
6 Cancel button Stops the current operation
and returns to the previous
menu, and closes the Help
screen
5
Page 6
Printer Overview
Home Center Software
KODAK Home Center Software is installed with your KODAK All-in-One Printer Software,
unless you chose otherwise. The Home Center icon will appear on your desktop/dock.
Paper
For the best photo printing results, use KODAK Photo Papers. For the best document
printing results, use KODAK Document Papers or paper with the COLORLOK Technology
logo on the package.
For more information about paper, see the Extended User Guide at
www.kodak.com/go/hero2_2manuals or www.kodak.com/go/hero4_2manuals.
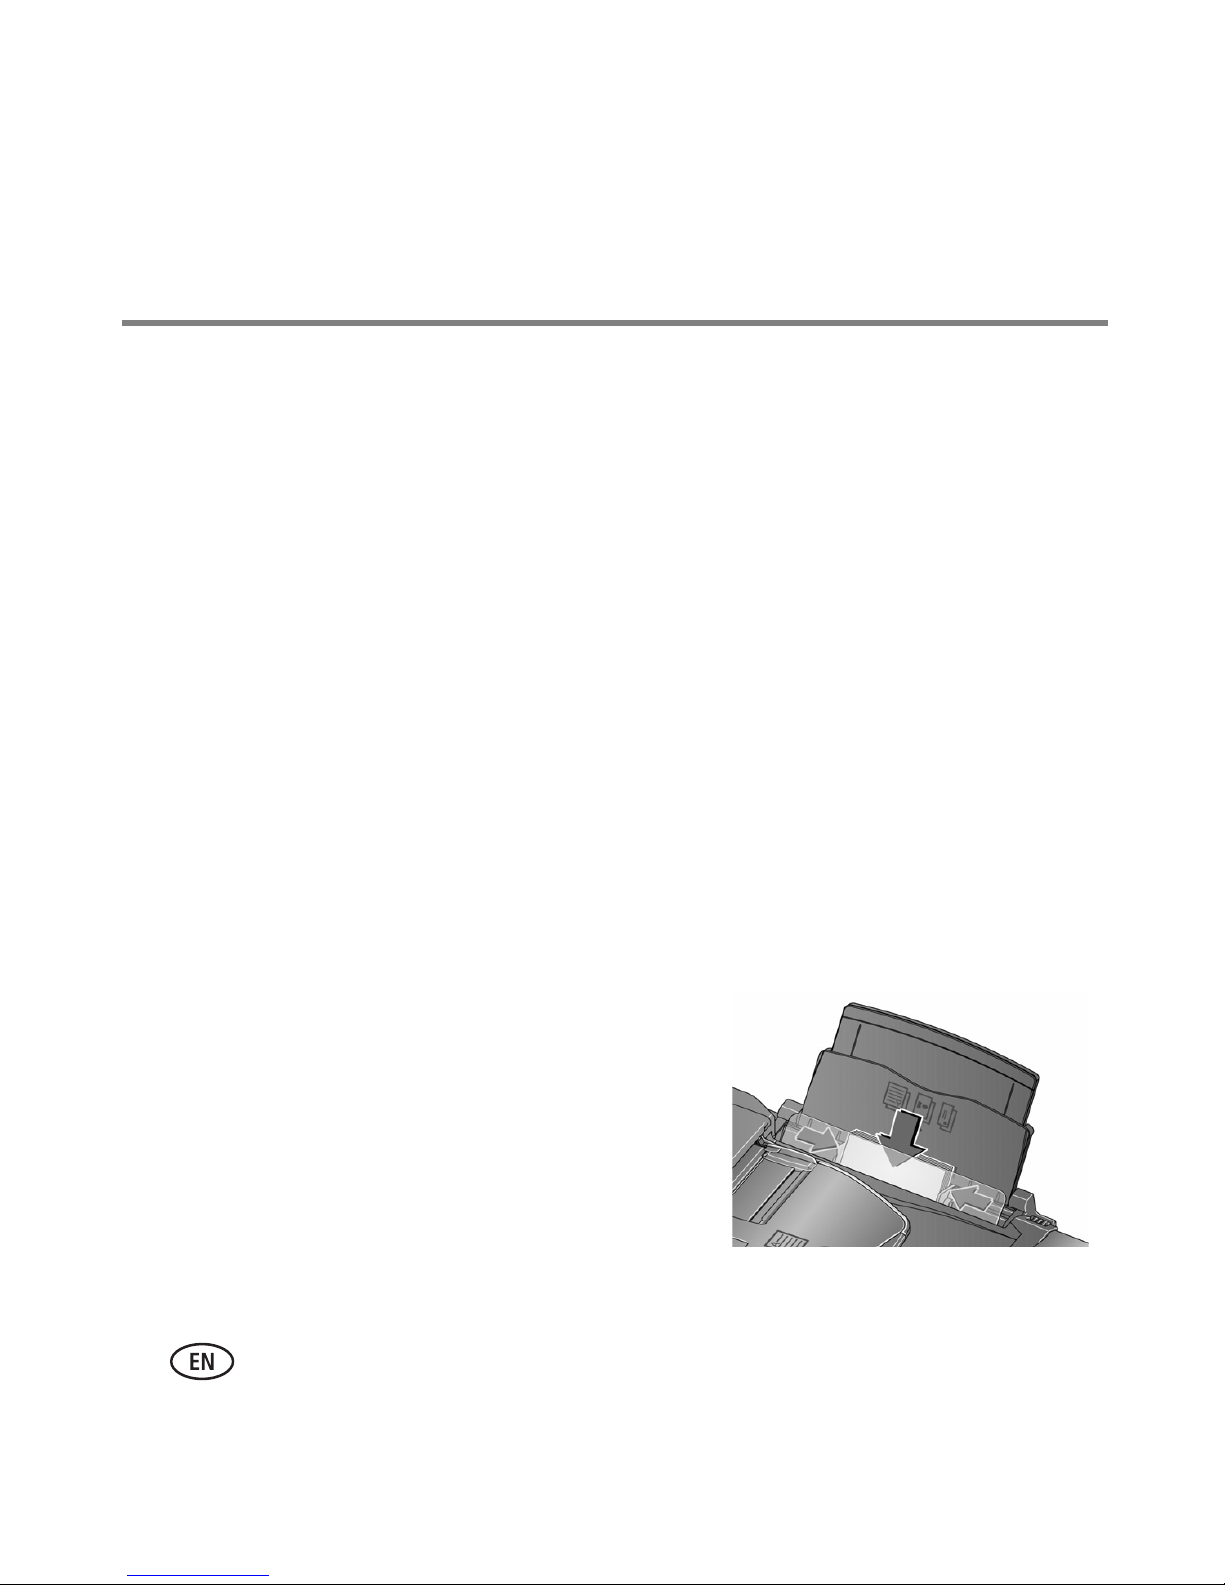
Loading photo paper
For information about loading plain paper, see the Extended User Guide at
www.kodak.com/go/hero2_2manuals or www.kodak.com/go/hero4_2manuals.
The paper input tray capacity is 20 sheets of photo paper.
1 Remove any plain paper from the tray.
2 Insert the paper (short side first) into the paper
input tray with the logo side facing toward
the tray and the glossy side toward you.
IMPORTANT:
If the photo paper is loaded the
wrong way, the image quality will
be affected.
3 Move the paper-edge guides until they touch the
paper.
6
Page 7

2 Basic Functions
Loading originals
You can place originals for copying, scanning, or faxing on the scanner glass or in the
automatic document feeder (ADF).
Using the scanner glass
1
If needed, remove originals from the ADF.
2 Lift the scanner lid, and place the document or picture face down in the right-front
corner.
3 Close the scanner lid.
7
Page 8

Basic Functions
ADF paper-edge guides
Using the Automatic Document Feeder (ADF)
You can load up to 25 originals (16 to 24 lb / 60 to 90 gsm plain paper) from B5,
Executive, LTR, and A4 sizes in the ADF.
IMPORTANT:
Do not load photographs, cards, or paper stock heavier than
24 lb / 90 gsm in the ADF
.
1 If needed, remove originals from the scanner glass.
2 Move the ADF paper-edge guides outward.
3 Fan and stack the originals, then insert them face up in the ADF.
4 Move the ADF paper-edge guides until they touch the paper.
8
Page 9

Basic Functions
Printing
Print from anywhere using your smartphone, tablet, or computer using Google Cloud
Print™ enabled apps*, or send documents to your printer using any email service with
KODAK Email Print*. For more information, see the Extended User Guide at
www.kodak.com/go/hero2_2manuals or www.kodak.com/go/hero4_2manuals.
Printing documents
To print a document from your computer:
1 Open the document.
2 Select File > Print.
3 In the Print window, select your KODAK Printer.
4 Choose the pages to print, number of copies, etc, then click OK (on a computer with
WINDOWS OS) or Print (on a computer with MAC OS).
Printing pictures
You can print pictures with your all-in-one printer from a memory card, iPhone / iPod
Touch / iPad (may not be available with all models), BLACKBERRY, or ANDROID Device;
for information on mobile printing, go to www.kodak.com/go/mobile.
You can also print pictures using Home Center Software from your computer with
WINDOWS OS. Home Center Software lets you edit and enhance your pictures quickly.
On a computer with either MAC OS or WINDOWS OS, you can print pictures from any
picture-editing or photo-management software.
*A GOOGLE Account is required. The device and printer must be connected to the Internet. Subject
to service availability.
9
Page 10

Basic Functions
memory card slot
Printing pictures from a memory card
HERO 2.2 Printer HERO 4.2 Printer
1 Insert the memory card into the
memory card slot.
2 Press or to browse to the
picture you want to print.
3 Press OK to select each same-size
picture you want to print.
4 Press .
1 Insert the memory card into the
memory card slot.
2 Touch or to browse to the
picture you want to print.
3 Touch OK to select each picture you
want to print.
4 Select a print size:
a Press , touch , then touch
Print Size. (Only one size can be
used per print job.)
b Touch the picture size to print.
5 Press .
For more information about printing, see the Extended User Guide at
www.kodak.com/go/hero2_2manuals or www.kodak.com/go/hero4_2manuals.
10
Page 11

Basic Functions
Copying
1 Use the automatic document feeder (documents only) or lift the scanner lid, and place
the document or picture face down.
2 Press .
3 HERO 2.2 Printer: Press or to select Copy Document or Copy Photo,
then press OK.
HERO 4.2 Printer: Touch Copy Document or Copy Photo.
4 Press .
Scanning
1 Use the automatic document feeder (documents only) or lift the scanner lid, and place
the document or picture face down.
2 Press .
3 HERO 2.2 Printer: Press or to select Scan, press OK, then select Scan to
Computer or Scan to Memory Card, and press OK.
HERO 4.2 Printer: Touch Scan, then touch Computer, Memory Card, Email, or
Network Folder.
4 Select the scan options you want to change, as needed.
5 Press . The scanned file appears at the destination you specified.
For more information about copying and scanning, see the Extended User Guide at
www.kodak.com/go/hero2_2manuals or www.kodak.com/go/hero4_2manuals
.
11
Page 12

Basic Functions
Faxing
Sending faxes
1 Press .
2 Use the automatic document feeder (documents only) or lift the scanner lid, and place
a document or picture face down.
3 HERO 2.2 Printer: Press or to select Send Fax, then press OK.
HERO 4.2 Printer: Touch Fax.
4 Enter a fax number using the numeric keypad (HERO 2.2 Printer) or touching the
numbers on the LCD touch screen (HERO 4.2 Printer).
5 Press .
Receiving faxes
1 Load LTR or A4 paper into the printer.
2 Under Fax Settings, make sure Auto Answer is on. The printer will receive all
incoming faxes automatically.
For more information about faxing, see the Extended User Guide at
www.kodak.com/go/hero2_2manuals or www.kodak.com/go/hero4_2manuals.
12
Page 13

3 Troubleshooting
Some problems can be resolved quickly by power cycling the printer: Turn off your printer,
wait five seconds, then turn on the printer.
Quick links for troubleshooting
Go to... For...
www.kodak.com/go/aiosupport
www.kodak.com/go/aiotroubleshooting help with hardware issues.
www.kodak.com/go/aiodownloads the latest software and firmware.
www.kodak.com/go/inkjetnetworking answers about wireless networking.
www.kodak.com/go/aiomanuals instructions and recommended system
www.kodak.com/go/contact issues that you cannot resolve, provide the
– answers and resources, use Search or
select a support category.
– error codes/messages, use the error code
or message in the Search field.
requirements; see the Extended User Guide
for your printer.
following:
– printer model (located on the front of the
printer)
– Kodak Service Number (located inside
printer when you open the access door)
– Computer model, operating system, and
version of Home Center Software
13
Page 14

4 Appendix
Safety Information
– Always follow all warnings and instructions marked on the product.
– Use only the power source provided with the product.
– Use only the power cord that comes with the product (or an approved power cord greater than
2
or equal to H05W-F, 2G, 0.75 mm
not use the included power cord with any other equipment.
– If you do not use this product for a long period of time, unplug it from the electrical outlet.
– Always turn this product off by using the power button. Wait until the power button stops
flashing before removing the power plug from the outlet.
– Do not allow the power cord to become damaged or frayed.
– If you need to use an extension cord with this product, make sure that the ampere rating of the
product does not exceed the ampere rating of the extension cord.
– Place the product on a flat, stable surface that extends beyond the product’s base in all
directions. This product will not operate properly if tilted or at an angle.
– When storing or transporting this product, do not tilt or stand it on its side. Never turn this
product upside down (ink can leak out of the product).
). Using another power cord may cause fire and/or shock. Do
– Avoid placing this product in an environment that is subject to rapid changes in temperature or
humidity, mechanical shocks, vibration, or dust. Do not place near radiators, heating vents, or in
direct sunlight.
– Leave enough room around this product for sufficient ventilation.
– Do not block this product’s covers or openings, or insert any objects through slots.
– Do not use aerosol products inside or around this product.
– Do not spill any liquid on this product.
– Do not attempt to repair or service this product.
– If the power cord or plug is damaged, if any liquid has been spilled onto the product, if the
product has been dropped or the case damaged, or if the product does not operate normally or
exhibits a major change in performance level, unplug this product and contact Kodak at
www.kodak.com/go/contact.
14
Page 15

Appendix
LCD Screen Safety
– Use only a dry, soft cloth to clean the LCD screen. Do not use any liquid or chemical cleaners.
– If the LCD screen is damaged, contact Kodak immediately. If any of the solution from the display
gets on your hands, wash them thoroughly with soap and water.
Ink Cartridge Safety
– Keep all ink cartridges out of the reach of children.
– If ink gets on your skin, wash with soap and water. If ink gets into your eyes, flush your eyes
immediately with water. If any discomfort or change in vision persists after washing, seek
medical attention immediately.
– For Material Safety Data Sheets for inks, go to www.kodak.com/go/MSDS.
Limited Warranty
Kodak warrants Kodak consumer electronic products and accessories (“Products”), excluding
batteries, to be free from malfunctions and defects in both materials and workmanship for one year
from the date of purchase. Retain the original dated sales receipt. Proof of the date of purchase will
be required with any request for warranty repair.
Limited Warranty Coverage
Warranty service is only available from within the country where the Products were originally
purchased. You may be required to send Products, at your expense, to the authorized service facility
for the country where the Products were purchased. Kodak will repair or replace Products if they fail
to function properly during the warranty period, subject to any conditions and/or limitations stated
herein. Warranty service will include all labor as well as any necessary adjustments and/or
replacement parts. If Kodak is unable to repair or replace a Product, Kodak will, at its option, refund
the purchase price paid for the Product provided the Product has been returned to Kodak together
with proof of the purchase price paid. Repair, replacement, or refund of the purchase price are the
sole remedies under this warranty. If replacement parts are used in making repairs, those parts may
be remanufactured or may contain remanufactured materials. If it is necessary to replace the entire
Product, it may be replaced with a remanufactured Product. Remanufactured Products, parts and
materials are warranted for the remaining warranty term of the original Product, or 90 days after the
date of repair or replacement, whichever is longer.
15
Page 16

Appendix
Limitations
This warranty does not cover circumstances beyond Kodak’s control. This warranty does not apply
when failure is due to shipping damage, accident, alteration, modification, unauthorized service,
misuse, abuse, use with incompatible accessories or attachments (such as third party ink or ink
tanks), failure to follow Kodak’s operation, maintenance or repacking instructions, failure to use
items supplied by Kodak (such as adapters and cables), or claims made after the duration of this
warranty. KODAK MAKES NO OTHER EXPRESS OR IMPLIED WARRANTY FOR THIS PRODUCT, AND
DISCLAIMS THE IMPLIED WARRANTIES AND CONDITIONS OF MERCHANTABILITY AND FITNESS
FOR A PARTICULAR PURPOSE. In the event that the exclusion of any implied warranty is ineffective
under the law, the duration of the implied warranty will be one year from the purchase date or such
longer period as required by law. The option of repair, replacement, or refund is Kodak’s only
obligation. Kodak will not be responsible for any special, consequential or incidental damages
resulting from the sale, purchase, or use of this product regardless of the cause. Liability for any
special consequential or incidental damages (including but not limited to loss of revenue or profit,
downtime costs, loss of the use of the equipment, cost of substitute equipment, facilities or services
or claims of your customers for such damages resulting from the purchase, use or failure of the
Product), regardless of cause, or for breach of any written or implied warranty is expressly
disclaimed.
Your Rights
Some states or jurisdictions do not allow exclusion or limitation of incidental or consequential
damages, so the above limitation or exclusion may not apply to you. Some states or jurisdictions do
not allow limitations on how long an implied warranty lasts, so the above limitation may not apply to
you. This warranty gives you specific rights, and you may have other rights which vary from state to
state or by jurisdiction. Your statutory rights are not affected.
Outside the United States and Canada
In countries other than the United States and Canada, the terms and conditions of this warranty may
be different. Unless a specific Kodak warranty is communicated to the purchaser in writing by a
Kodak company, no warranty or liability exists beyond any minimum requirements imposed by law,
even though defect, damage, or loss may be by negligence or other act.
Declaration of Conformity
See www.kodak.com/go/declarationofconformity.
16
Page 17

4K3051
Eastman Kodak Company
Rochester, NY 14650 U.S.A.
© Eastman Kodak Company, 2012.
MC/MR/TM: Kodak, Hero.
Printed in China.
 Loading...