

Page 1
Kodak EasyShare-One
zoom digital camera
User’s guide
www.kodak.com
For interactive tutorials, www.kodak.com/go/howto
For help with your camera, www.kodak.com/go/easyshare-onesupport
Page 2

Eastman Kodak Company
Rochester, New York 14650
© Eastman Kodak Company, 2005
All screen images are simulated.
®
Contains Macromedia
Flash™ technology by Macromedia, Inc.
Copyright © 1995-2003 Macromedia, Inc. All rights reserved.
®
Wi-Fi
is a registered trademark of the Wi-Fi Alliance.
All other trademarks are the trademarks of their respective owners.
Eastman Kodak Company is an authorized licensee of the SD trademark.
Kodak, EasyShare, and EasyShare-One are trademarks of
Eastman Kodak Company.
P/N 4J1926_en
Page 3
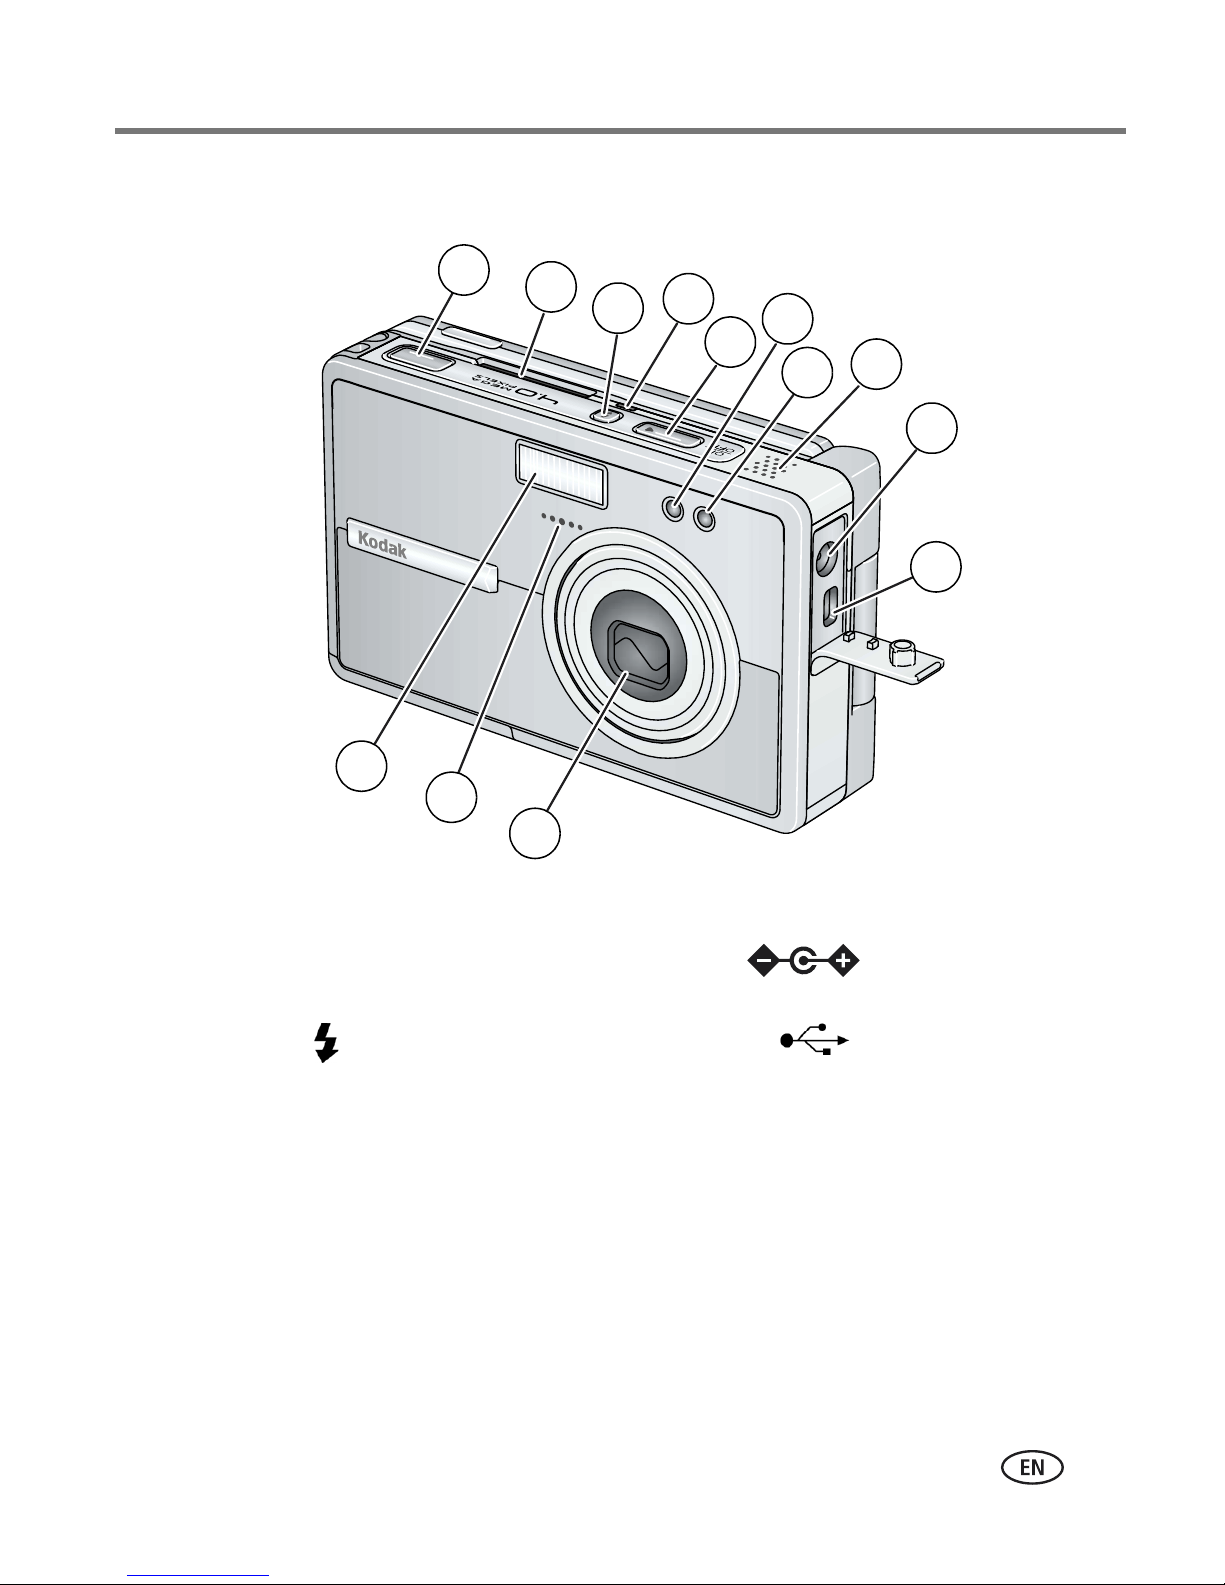
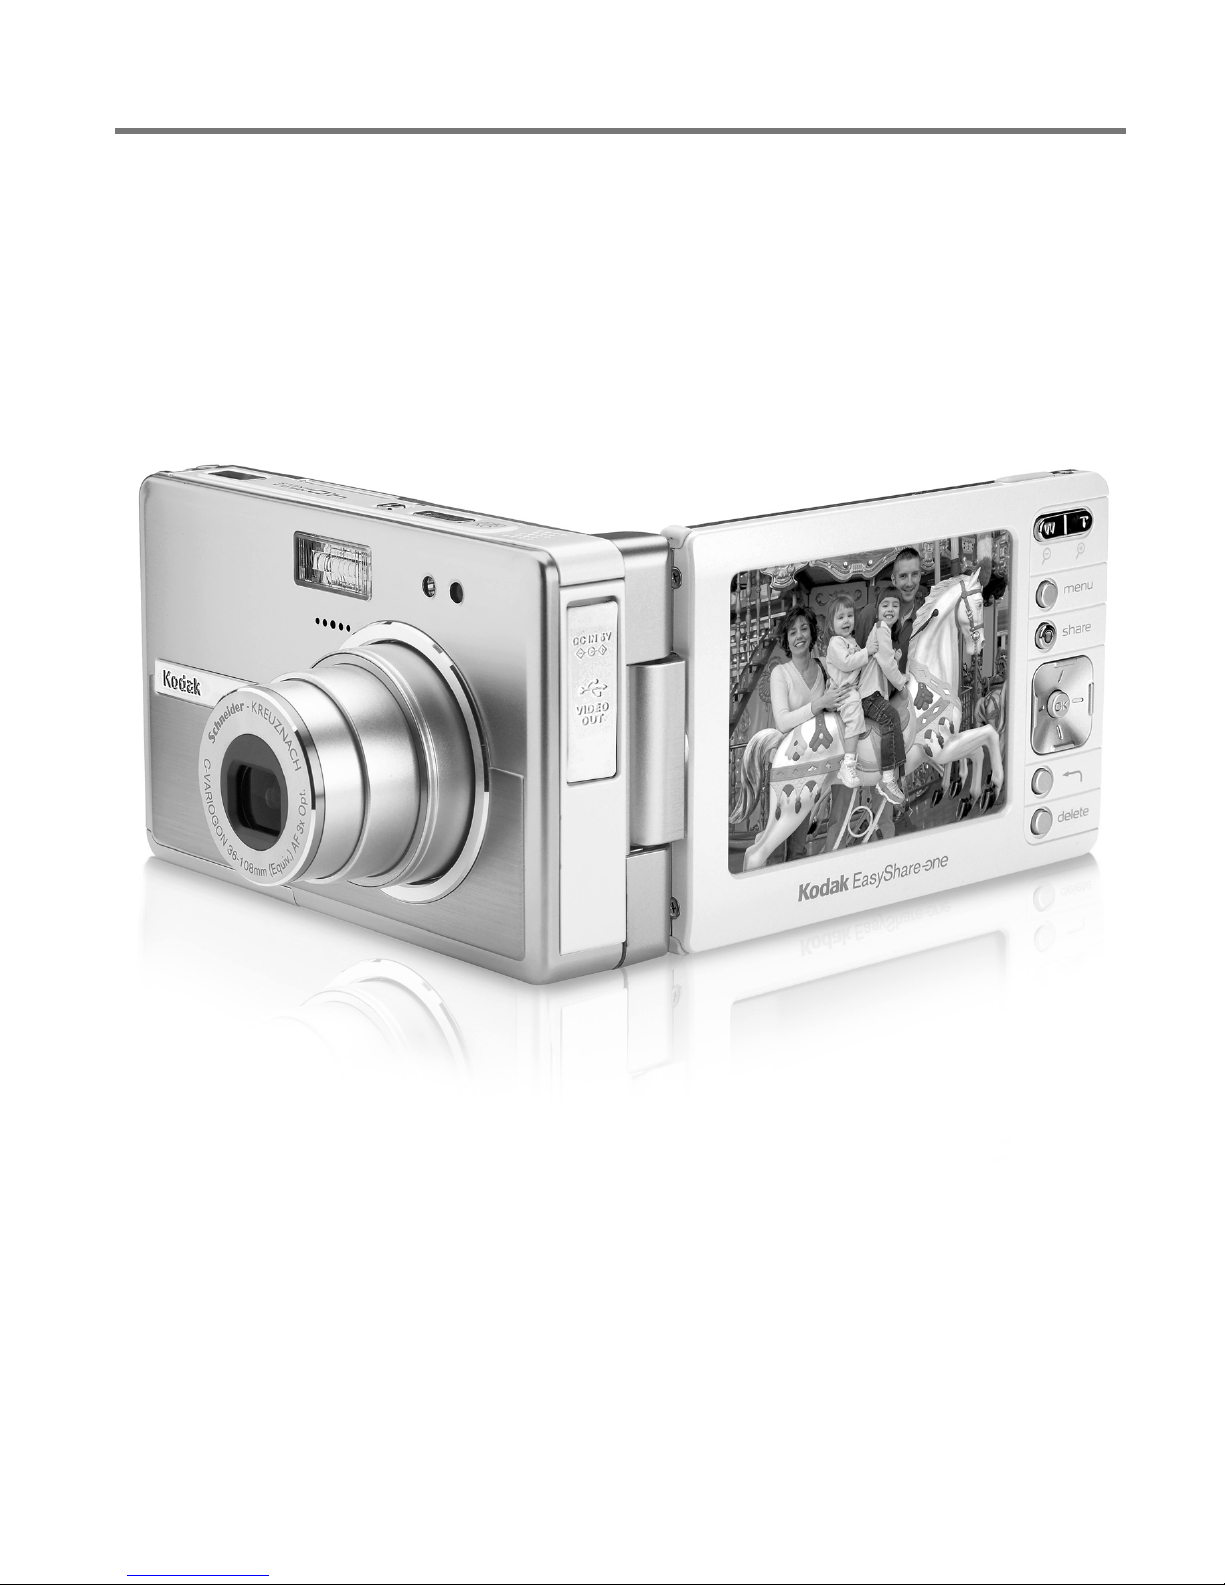
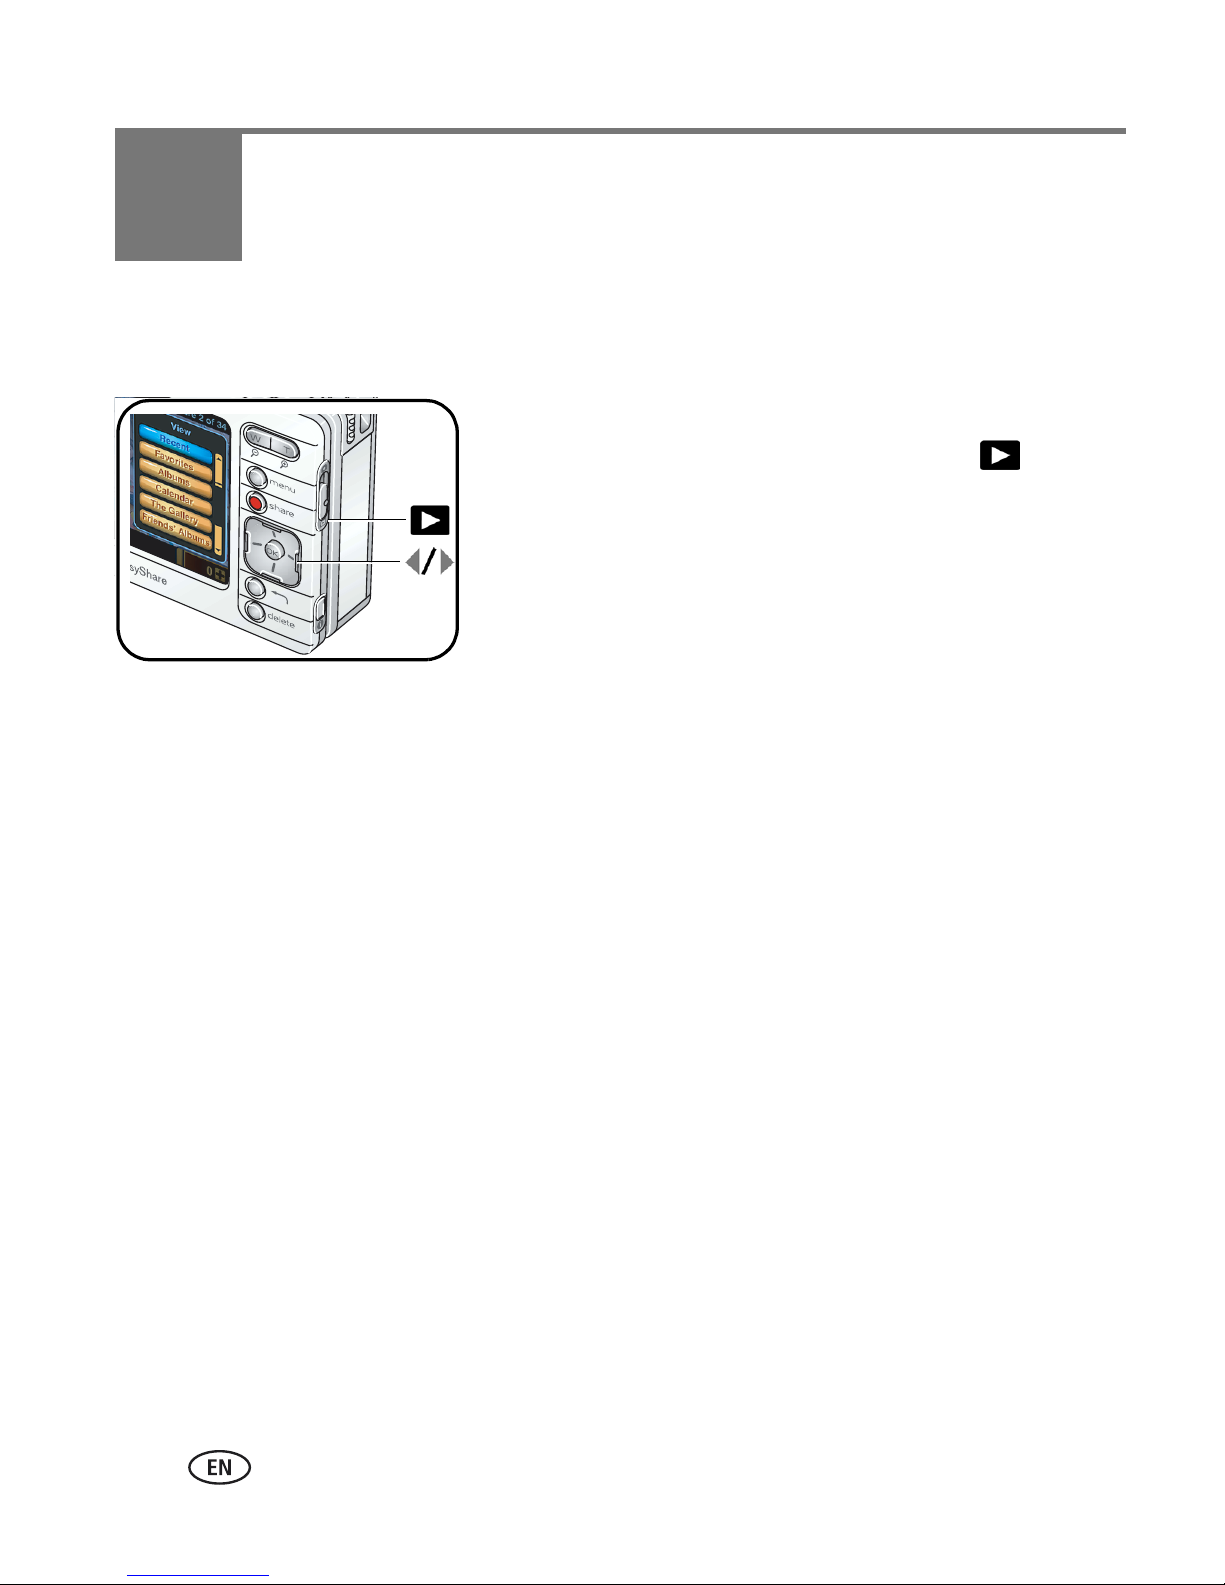
Front/top/side view
Product features
13
12
1
11
2
3
4
5
6
7
8
9
10
1 Shutter button 8 Speaker
2 Slot for Kodak Wi-Fi
(may be sold separately)
3 Flash button 10 USB, A/V Out
4 Wireless network status light 11 Lens/Lens cover
5 On/Off button 12 Microphone
6 Self-Timer/Video light 13 Flash unit
7 Light sensor
www.kodak.com/go/support
®
card
9 DC-In (5V) , for optional AC
adapter
i
Page 4
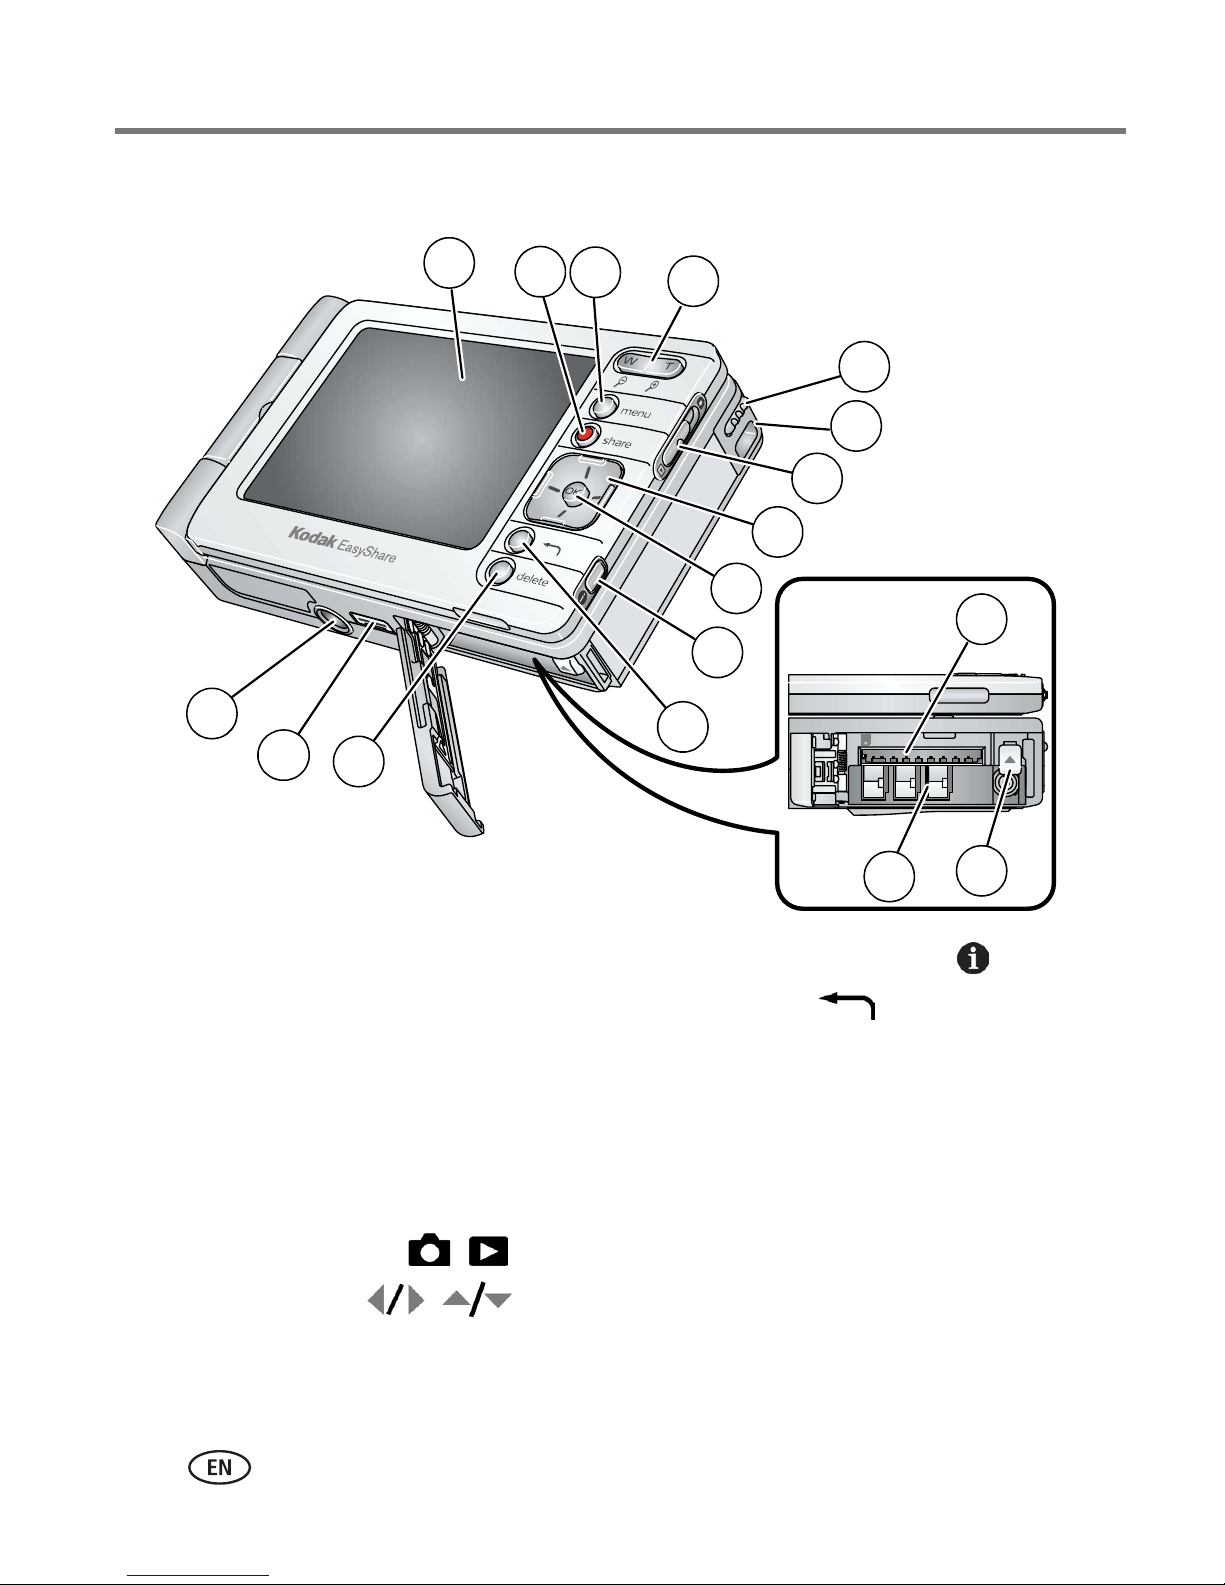
Product features
Back/bottom/side view (open)
14
13
12
1
2
3
4
5
6
7
8
9
15
10
11
16
1 Touchscreen display (LCD) 10 Info (information) button
2 Share button 11 Back button
3 Menu button 12 Delete button
4 Zoom (Wide Angle/Telephoto)/Magnifier 13 Dock connector
5Stylus 14Tripod socket
6 Wrist strap mount 15 Slot for optional SD/MMC card
7 Capture/View switch / 16 Battery slot
8 4-way controller 17 Battery release switch
9 OK button (press)
17
ii www.kodak.com/go/support
Page 5

Table of contents 1
1 Getting started ......................................................................................1
What is the EasyShare-One camera?.............................................................. 1
Attaching the wrist strap............................................................................... 2
Charging the battery .....................................................................................2
Loading the battery.......................................................................................3
Turning the camera on and off ...................................................................... 4
Navigating in your camera.............................................................................5
Setting up your camera .................................................................................6
Storing pictures and videos on an optional SD/MMC card ............................11
2 Taking pictures and videos ..................................................................12
Taking a picture ..........................................................................................12
Taking a video ............................................................................................ 13
Viewing the picture or video just taken........................................................13
Overview of capture icons ...........................................................................14
Using optical zoom .....................................................................................14
Using digital zoom ......................................................................................15
Using the flash............................................................................................15
3 Viewing pictures and videos ................................................................17
Locating pictures and videos on your camera............................................... 17
Playing videos.............................................................................................18
Viewing picture and video information.........................................................19
Magnifying a picture ...................................................................................19
4 Organizing and editing on your camera ..............................................20
Working with albums ..................................................................................20
Tagging pictures and videos as favorites...................................................... 22
Using the drawer to select multiple pictures and videos ...............................23
Adding or modifying a caption.....................................................................25
www.kodak.com/go/support iii
Page 6

Table of contents
Cropping pictures........................................................................................25
Copying pictures and videos........................................................................26
Deleting pictures, videos, and albums..........................................................26
5 Taking pictures and videos: more tips and tricks .................................27
Choosing a scene mode ..............................................................................27
Using burst .................................................................................................29
Changing exposure compensation ...............................................................30
Using the self-timer.....................................................................................31
Taking overhead pictures and videos ........................................................... 32
Pre-assigning pictures to an album .............................................................. 33
Changing capture settings........................................................................... 33
Changing device settings.............................................................................36
Changing preferences ................................................................................. 38
6 Using your camera with a Wi-Fi wireless network ...............................39
Why go wireless?........................................................................................39
What are some of the wireless features of my camera?................................40
Types of Wi-Fi wireless networks .................................................................41
Wireless networking and the Internet ..........................................................43
®
Inserting and deploying a Kodak Wi-Fi
card .............................................. 43
Connecting to a Wi-Fi wireless network .......................................................44
Glossary of common wireless terms .............................................................48
7 Synchronizing and transferring to a computer ....................................51
Installing the software.................................................................................52
Setting up your camera for sync and transfer ...............................................53
8 Sharing pictures and videos ................................................................57
Do it from your camera—just press Share! ..................................................57
More ways to share your pictures and videos...............................................66
The outbox .................................................................................................69
iv www.kodak.com/go/support
Page 7

Table of contents
9 Troubleshooting ..................................................................................73
Camera.......................................................................................................73
Picture quality.............................................................................................75
USB connection to computer .......................................................................76
Wireless network connection.......................................................................77
Synchronization and transfer .......................................................................79
Printing.......................................................................................................80
Helpful links................................................................................................81
Telephone customer support .......................................................................82
10 Appendix ...........................................................................................84
Camera specifications ................................................................................. 84
Storage capacities.......................................................................................88
Dock compatibility.......................................................................................89
Power-saving features.................................................................................90
Wireless channels........................................................................................90
Important safety instructions .......................................................................91
Battery life ..................................................................................................93
Upgrading your software and firmware........................................................94
Additional care and maintenance ................................................................94
Warranty..................................................................................................... 95
Regulatory compliance ................................................................................97
www.kodak.com/go/support
v
Page 8
1 Getting started
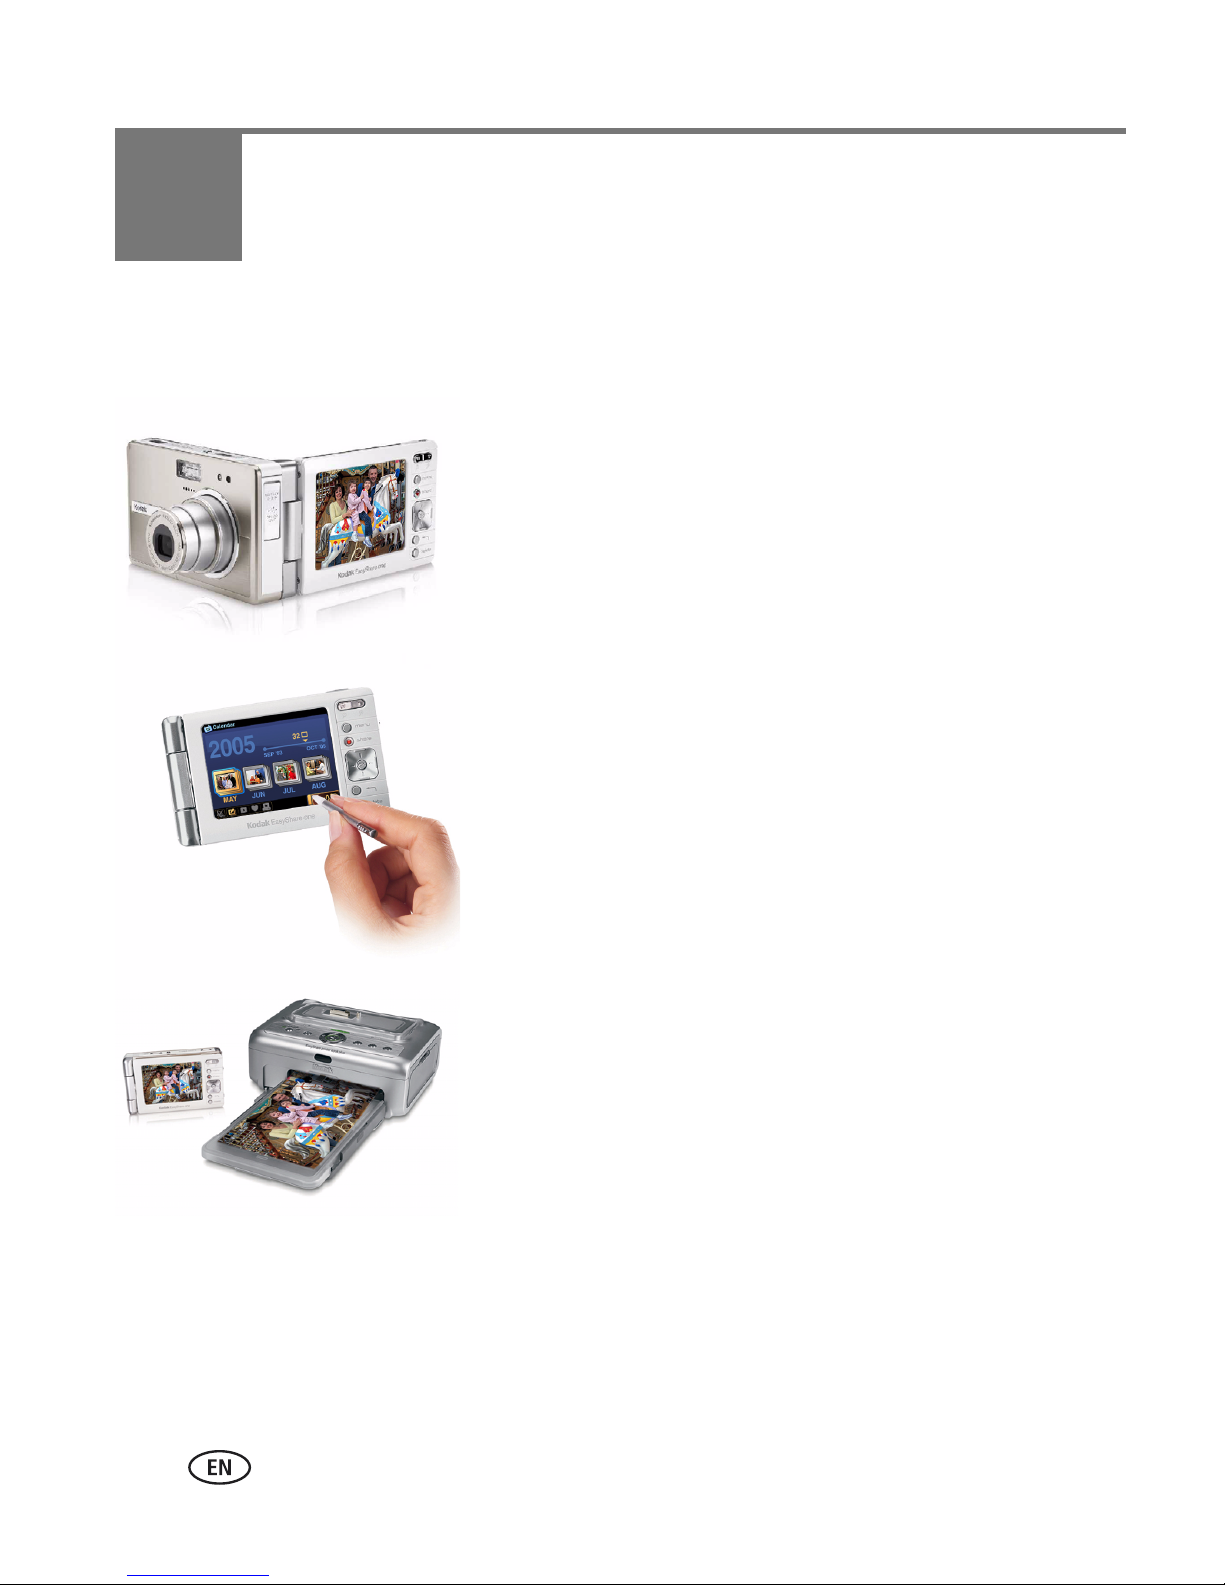
What is the EasyShare-One camera?
More than just a digital camera, the Kodak
EasyShare-One zoom digital camera combines
Kodak's signature ease-of-use with new technology
into a single, innovative device: a device ideal for
taking, viewing, organizing, sharing, and printing
pictures. In addition, the wireless capabilities of the
EasyShare-One camera let you share the world right
from the palm of your hand.
Like all EasyShare digital cameras, the Kodak
EasyShare-One zoom digital camera is compatible
with the Kodak EasyShare system and software, so
you know it’s simple to use.
About using your EasyShare-One camera
There may be several ways to accomplish the same
task. You’ll find that part of the fun of owning and
using the EasyShare-One camera is in discovering
different methods to operate it. As you use the
EasyShare-One camera, you’re sure to find intuitive
shortcuts and techniques that work for you.
1 www.kodak.com/go/support
Page 9
Getting started
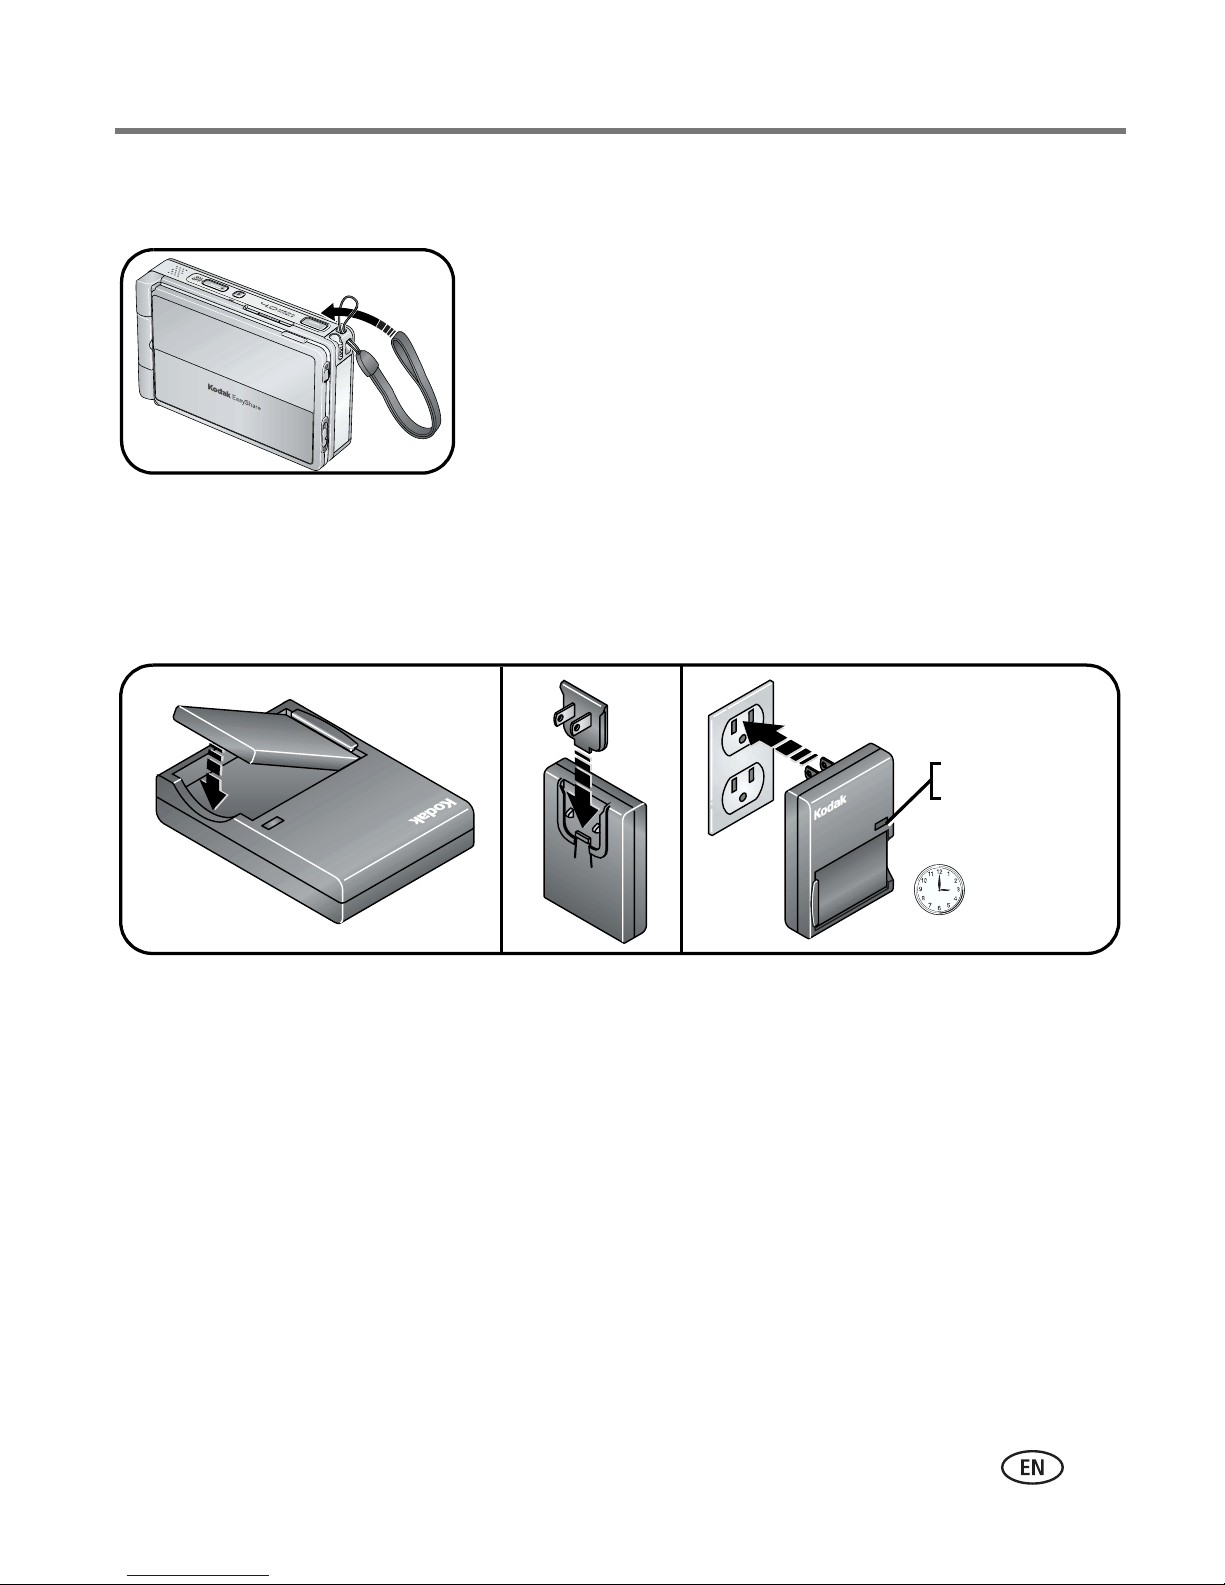
Attaching the wrist strap
Charging the battery
Charge the Li-Ion rechargeable battery before first use. Use the correct plug adapter
for your country.
Red—charging
Green—complete
Approximately
3 hours for full
charge
You can also charge the battery using a Kodak EasyShare printer dock or camera
dock. See a dealer of Kodak products or visit
www.kodak.com/go/easyshare-oneaccessories.
www.kodak.com/go/support
2
Page 10
Getting started
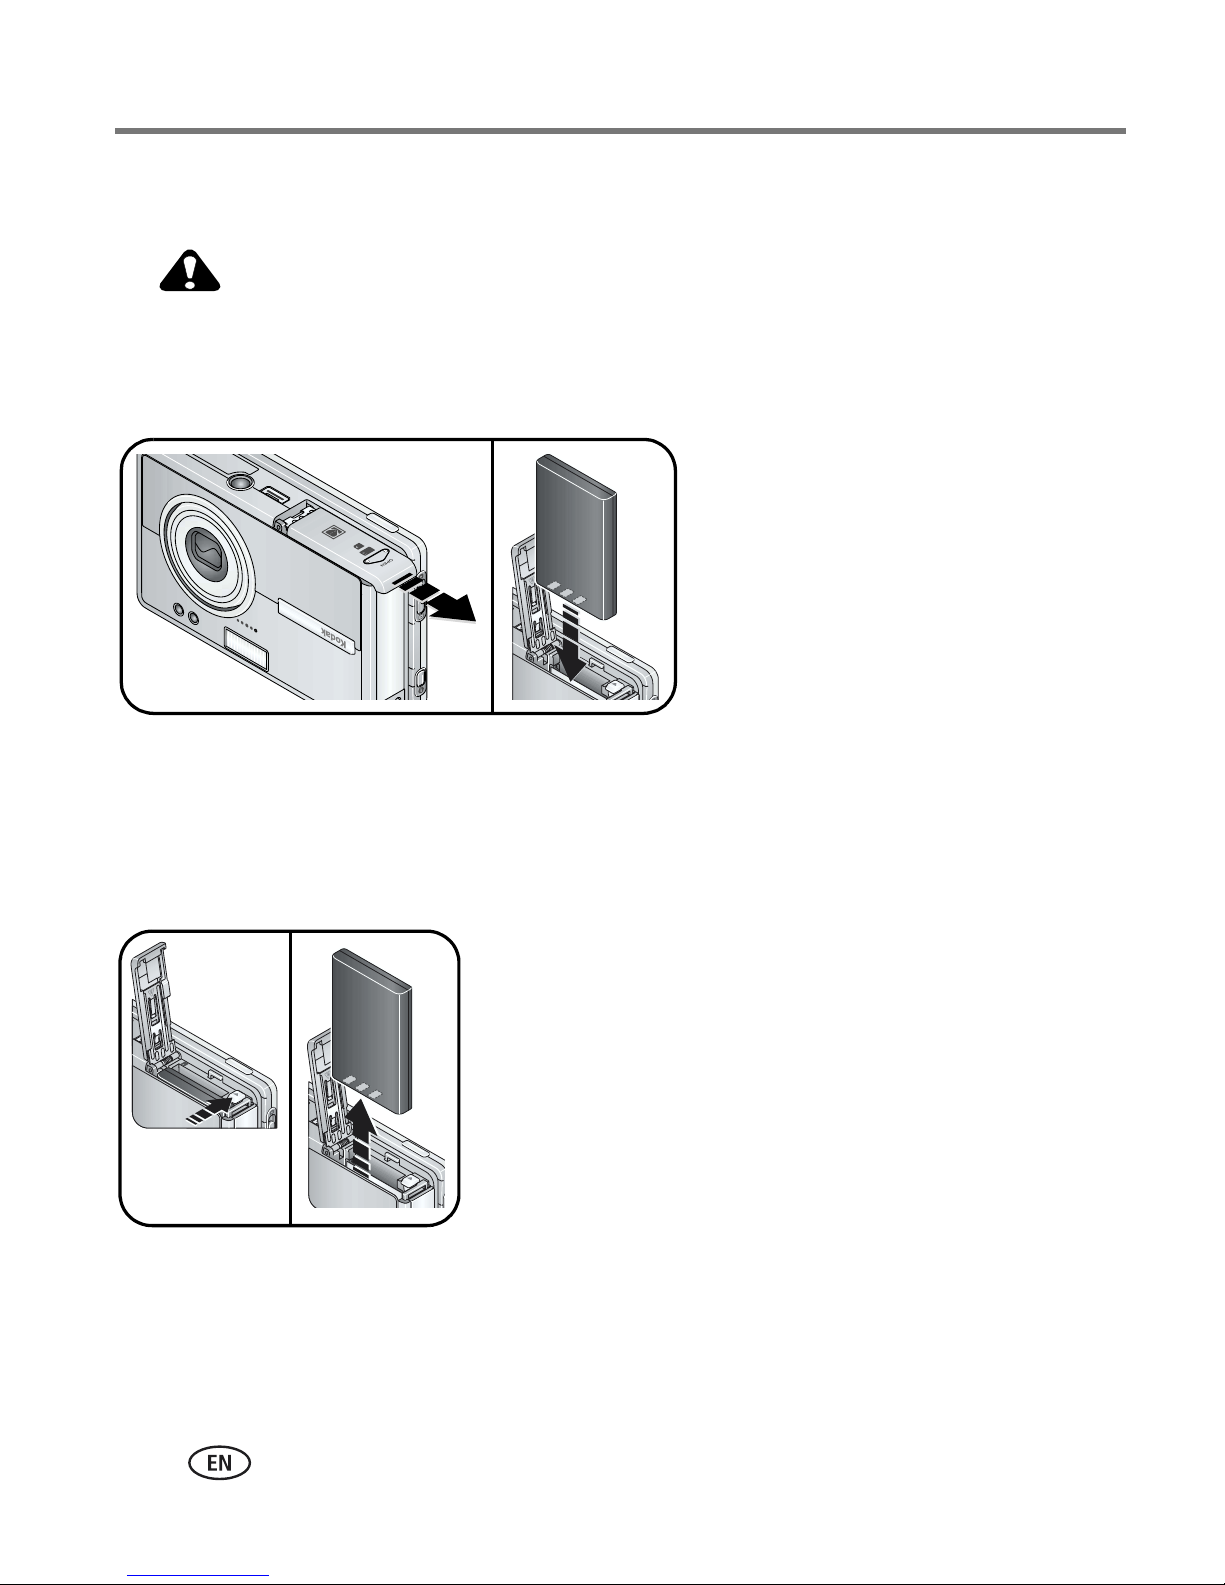
Loading the battery
CAUTION:
Use only a Kodak Li-Ion rechargeable digital camera battery
KLIC-5000, and orient it so that the battery contacts line-up with the
contacts inside the battery slot.
Removing the battery
1 Turn off the camera, then open the battery/card
door.
2 Press the release tab and pull the battery out.
Release tab
For information on battery life see page 93.
3 www.kodak.com/go/support
Page 11
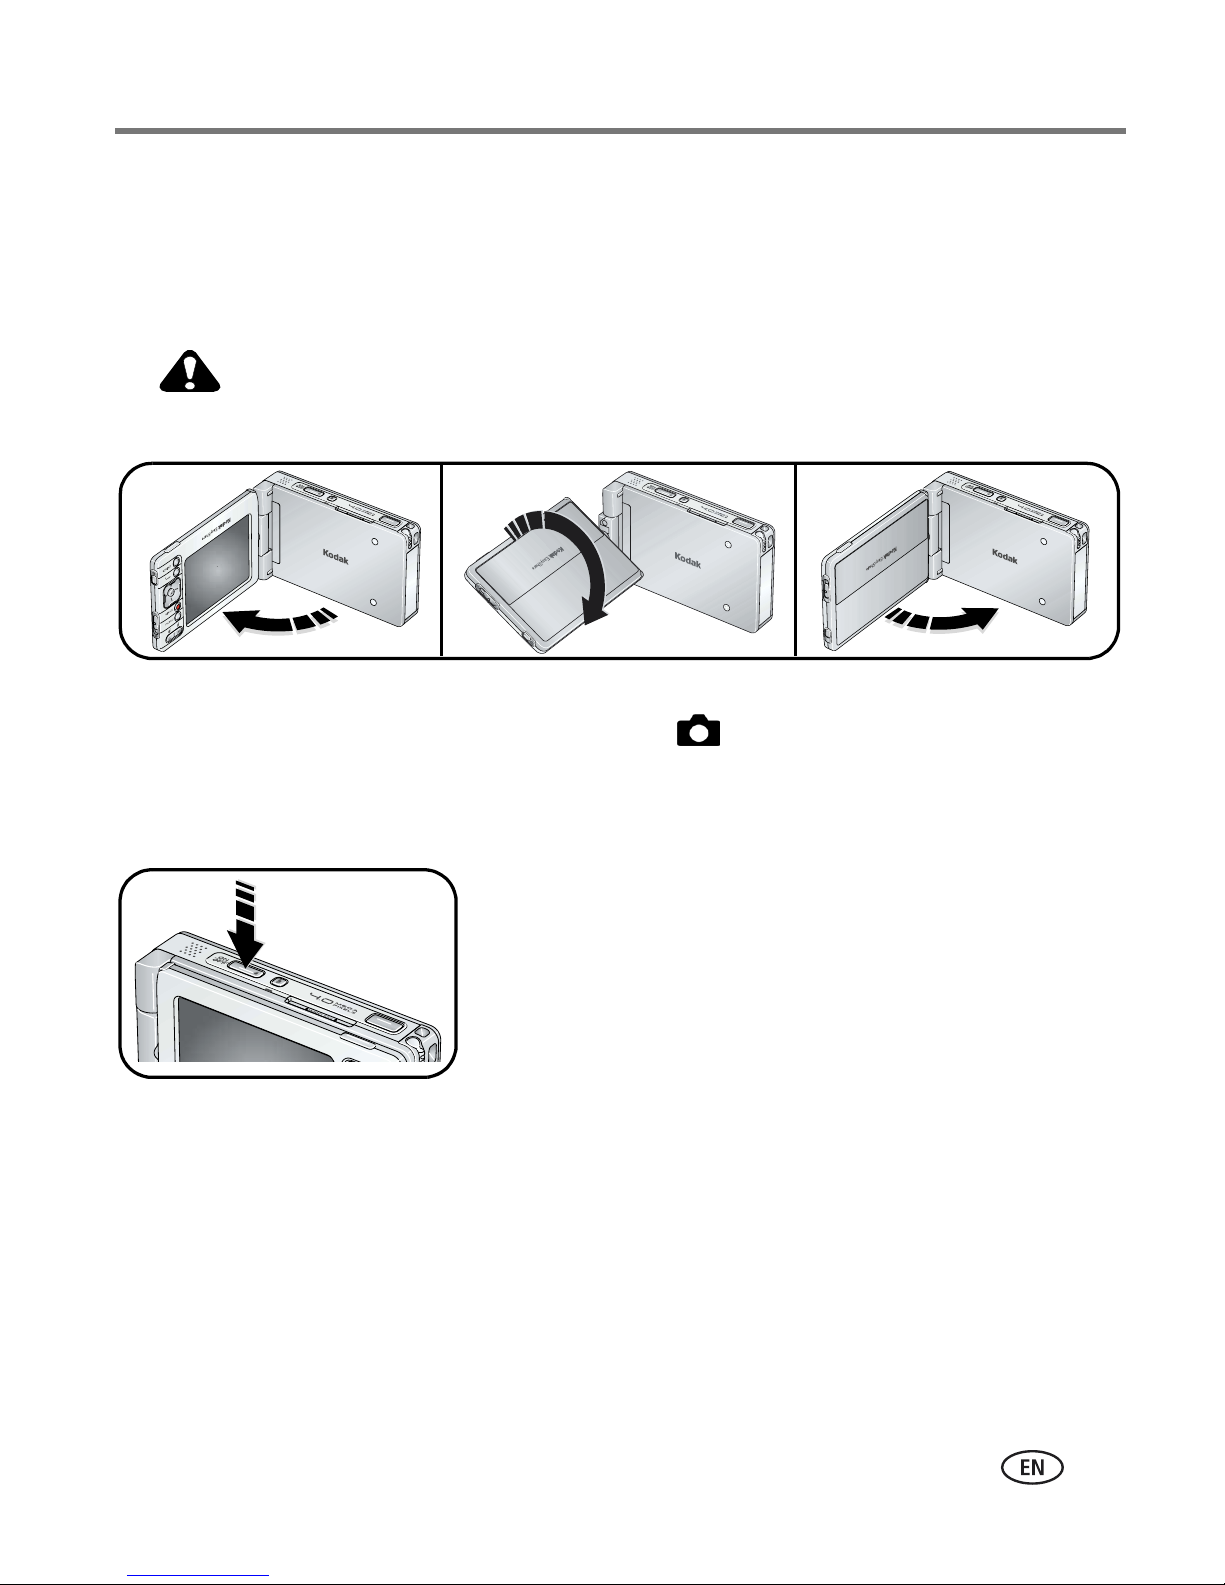
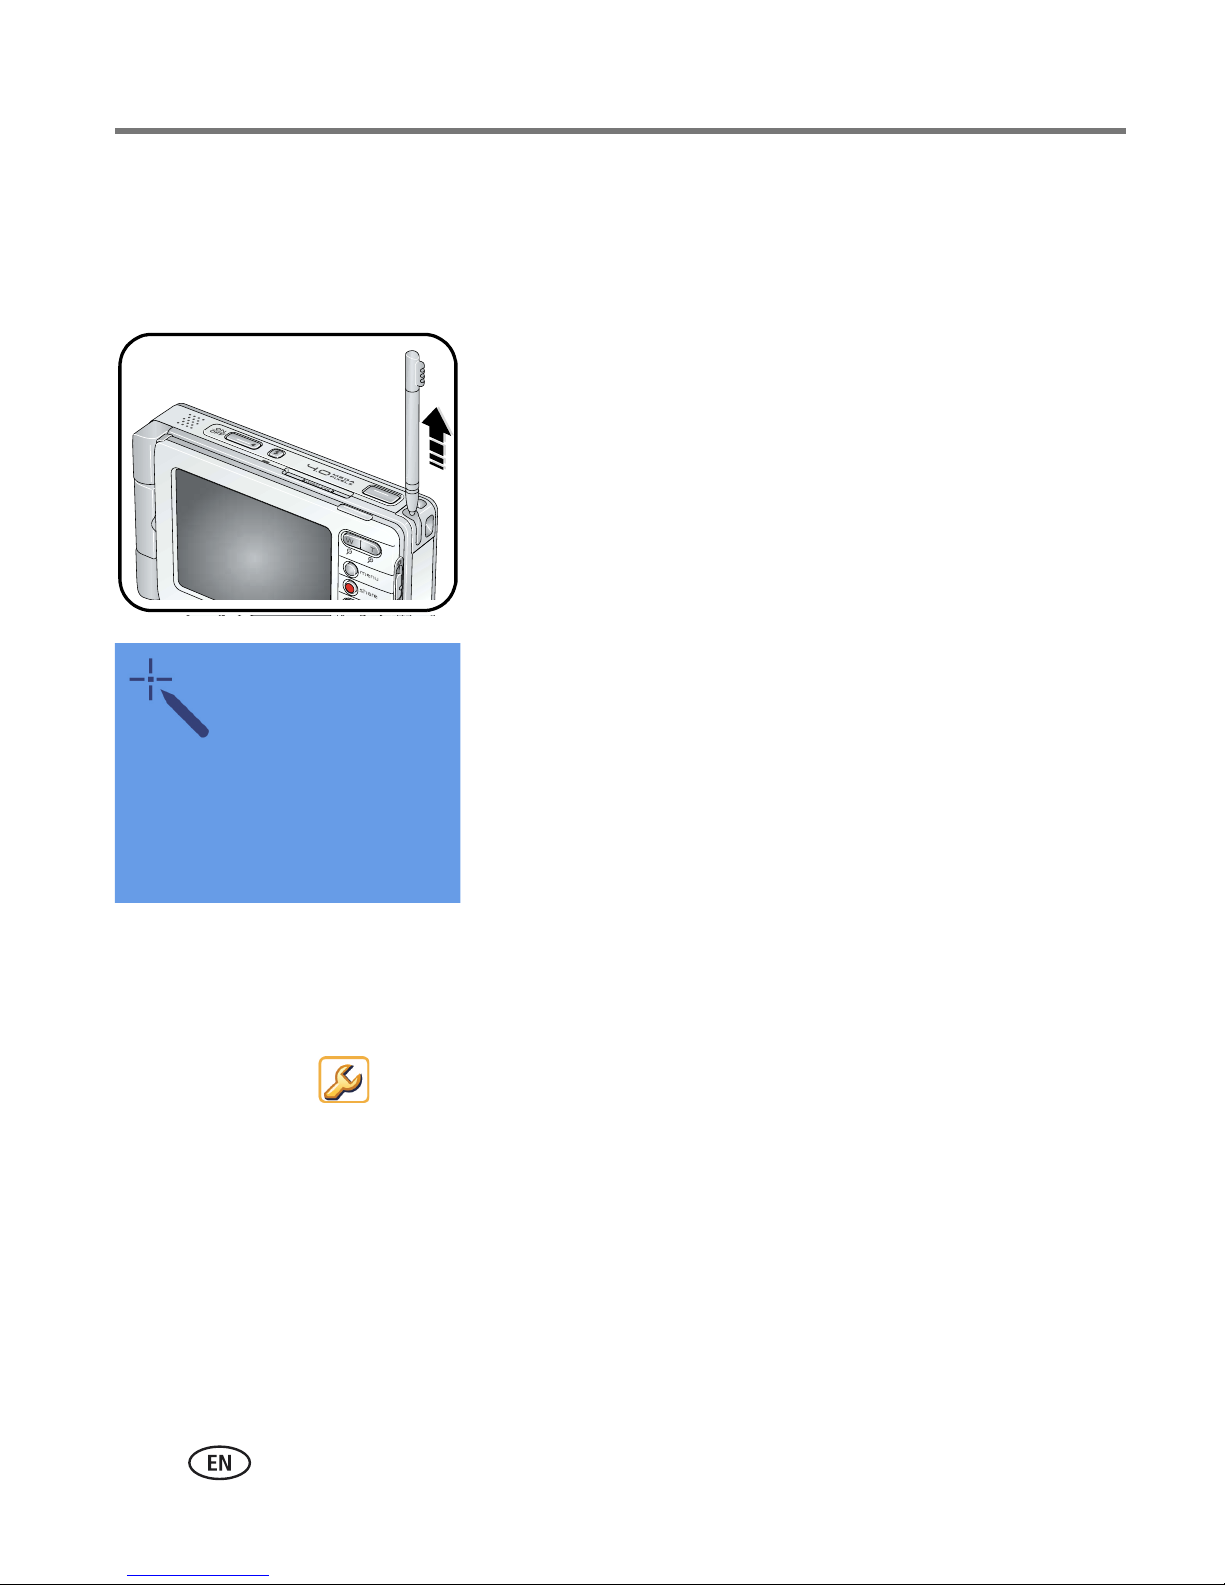
Turning the camera on and off
To turn on the camera:
Open, then rotate the touchscreen display.
CAUTION:
Rotate the display in the direction shown. Do not force.
Getting started
Your camera is ready for use when the On/Off button glows steady blue. If the
Capture/View switch is in the Capture position , the lens extends.
■ After 10 seconds of not using the camera, the screen dims to conserve power.
Press the OK button to refresh the screen.
■ If you do not use the camera for 8 minutes, it
On/Off
automatically turns off. Press the On/Off button to
restore power to the camera.
To turn off the camera:
Open, rotate, then close the touchscreen display.
www.kodak.com/go/support
4
Page 12
Getting started
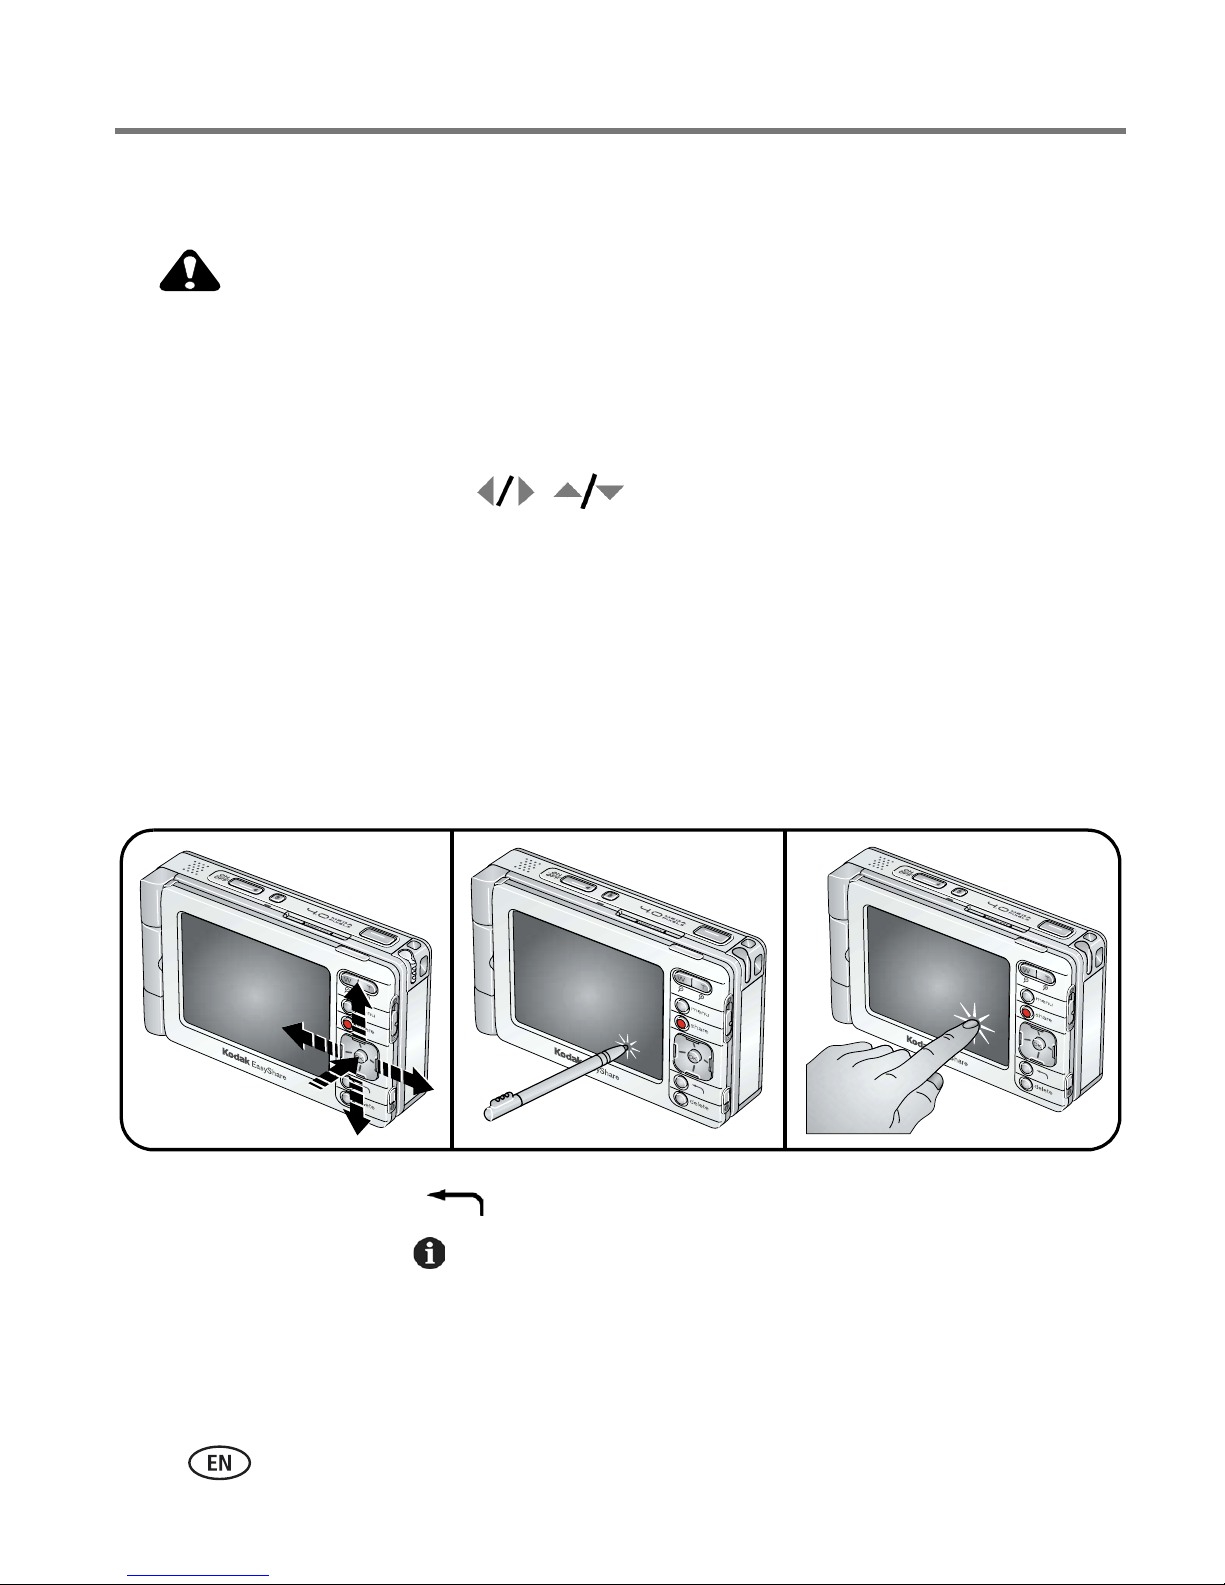
Navigating in your camera
CAUTION:
Do not use a pen, pencil, or other sharp instrument with the
touchscreen. Do not exert excessive pressure upon the touchscreen.
Doing so may damage the touchscreen display.
You can move from screen to screen and make selections three ways:
■ Press the 4-way controller to move between options, pictures, and
videos. Press the OK button to select options, pictures, and videos, and to actuate
buttons and icons.
■ Touch the touchscreen with the stylus to select options, pictures, and videos, and
to actuate buttons and icons.
■ Touch the touchscreen with your finger to select options, pictures, and videos, and
to actuate buttons and icons.
IMPORTANT:
■ Press the Back button, , to return to a higher menu or to the previous view.
■ Press the Info button, , located on the edge of the touchscreen display, for more
Calibrate the touchscreen before using (see page 7).
information about selected icons or pictures and videos.
5 www.kodak.com/go/support
Page 13
Getting started
Using the touch keyboard
Some features of your camera may require you to enter words or phrases that help
you identify images or set up account information on your camera. When presented
with the touch keyboard screen, touch keys with the stylus to enter information.
■ Touch abc to enter alphanumeric characters
(default).
■ Touch int for international characters.
■ Touch sym for symbols.
When finished, touch Done.
Setting up your camera
Selecting a language
The Language screen appears the first time you turn on the camera.
■ Press the 4-way controller to highlight a
language, then press the OK button to select it.
To select a language anytime:
1 Press the Menu button, then select Setup.
2 Select Device , then select Language.
3 Press the 4-way controller to highlight a language, then press the OK
button to select it.
www.kodak.com/go/support
6
Page 14
Getting started
Calibrating the touchscreen
The Touchscreen Calibration screen appears after the Language screen the first time
you turn on the camera.
1 Remove the stylus then touch Next to begin.
2 Touch each point with the stylus.
3 When finished, touch Next.
To calibrate the touchscreen anytime:
1 Press the Menu button, then select Setup.
2 Select Device , then select Touchscreen Calibration.
3 Touch Start to begin.
4 Touch each point with the stylus.
5 When finished, touch Done.
7 www.kodak.com/go/support
Page 15

Getting started
Setting the date and time
The Date & Time screen appears after the Touchscreen Calibration screen the first time
you turn on the camera.
1 For each field, touch the up and down arrows to
select a value.
2 When finished, touch Next.
To set the date and time anytime:
1 Press the Menu button, then select Setup.
2 Select Device , then select Date & Time.
3 For each field, touch the up and down arrows to select a value.
4 When finished, touch Done.
NOTE: Depending on your settings, Kodak EasyShare software may update the camera clock during
synchronization (see page 51). Click the Help button in the Kodak EasyShare software for details.
www.kodak.com/go/support
8
Page 16
Getting started
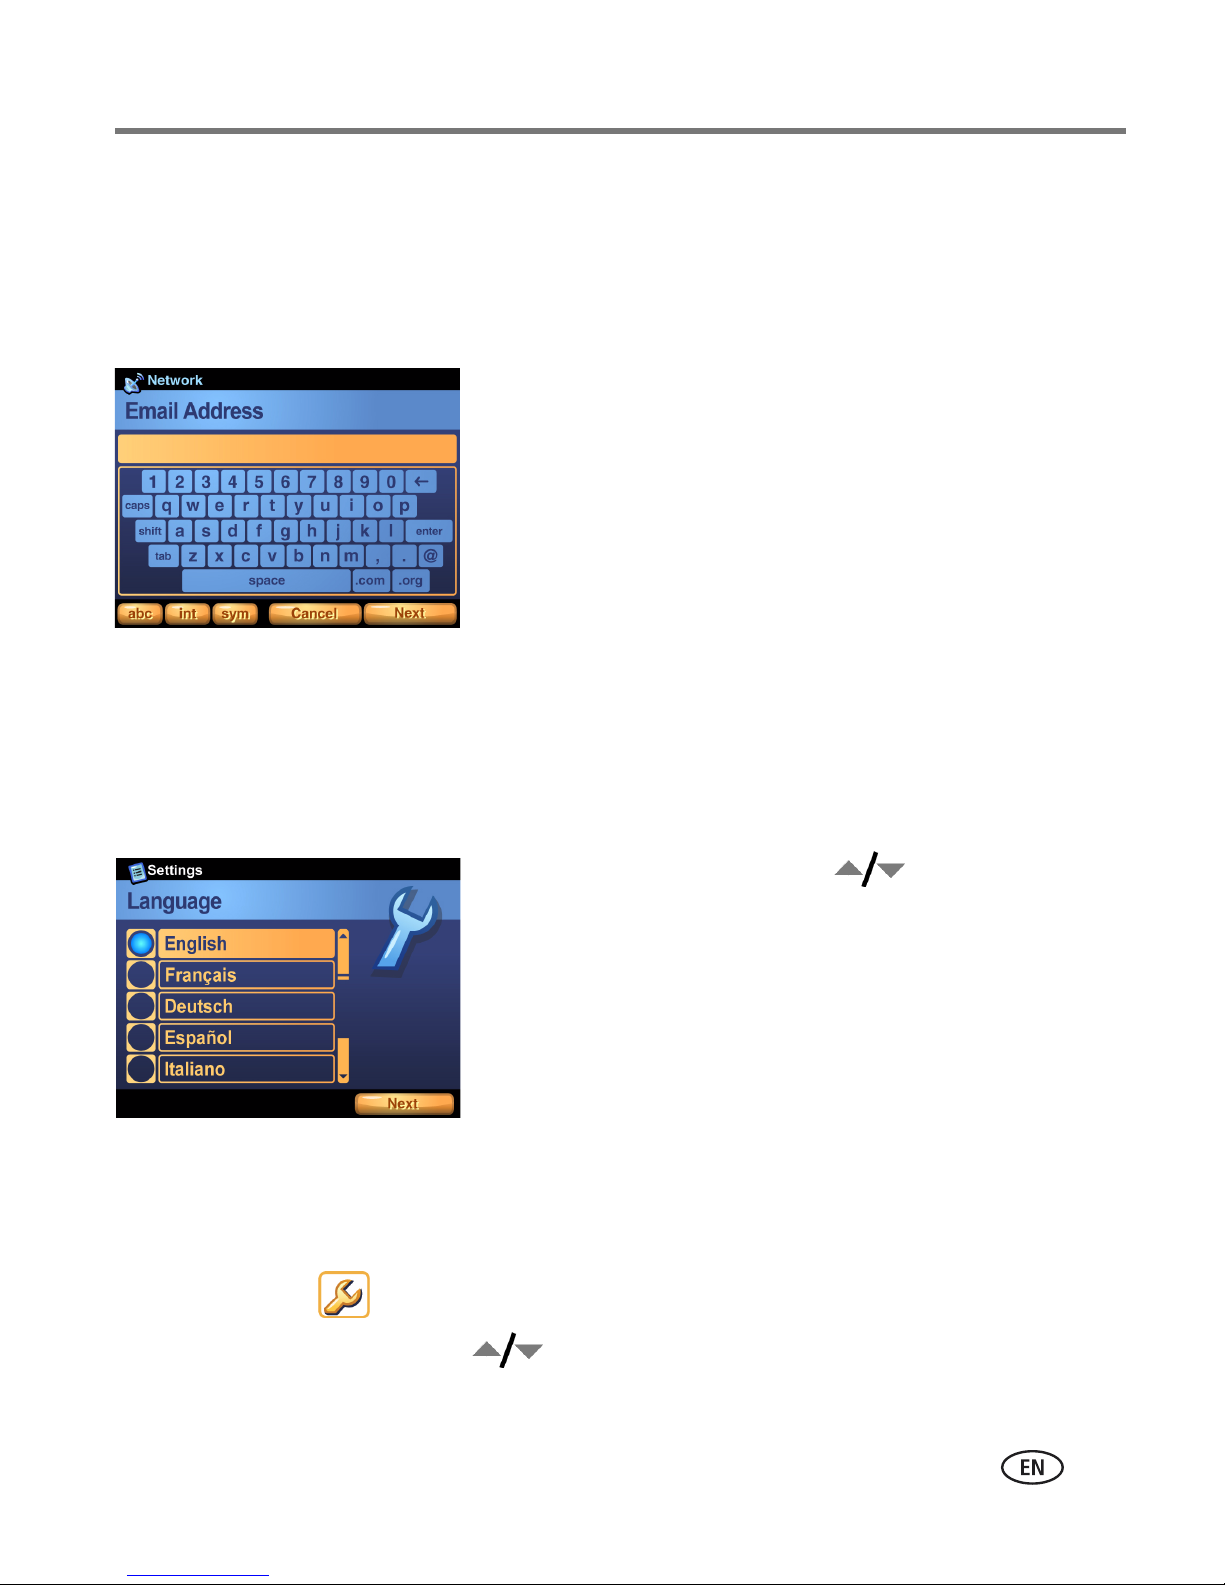
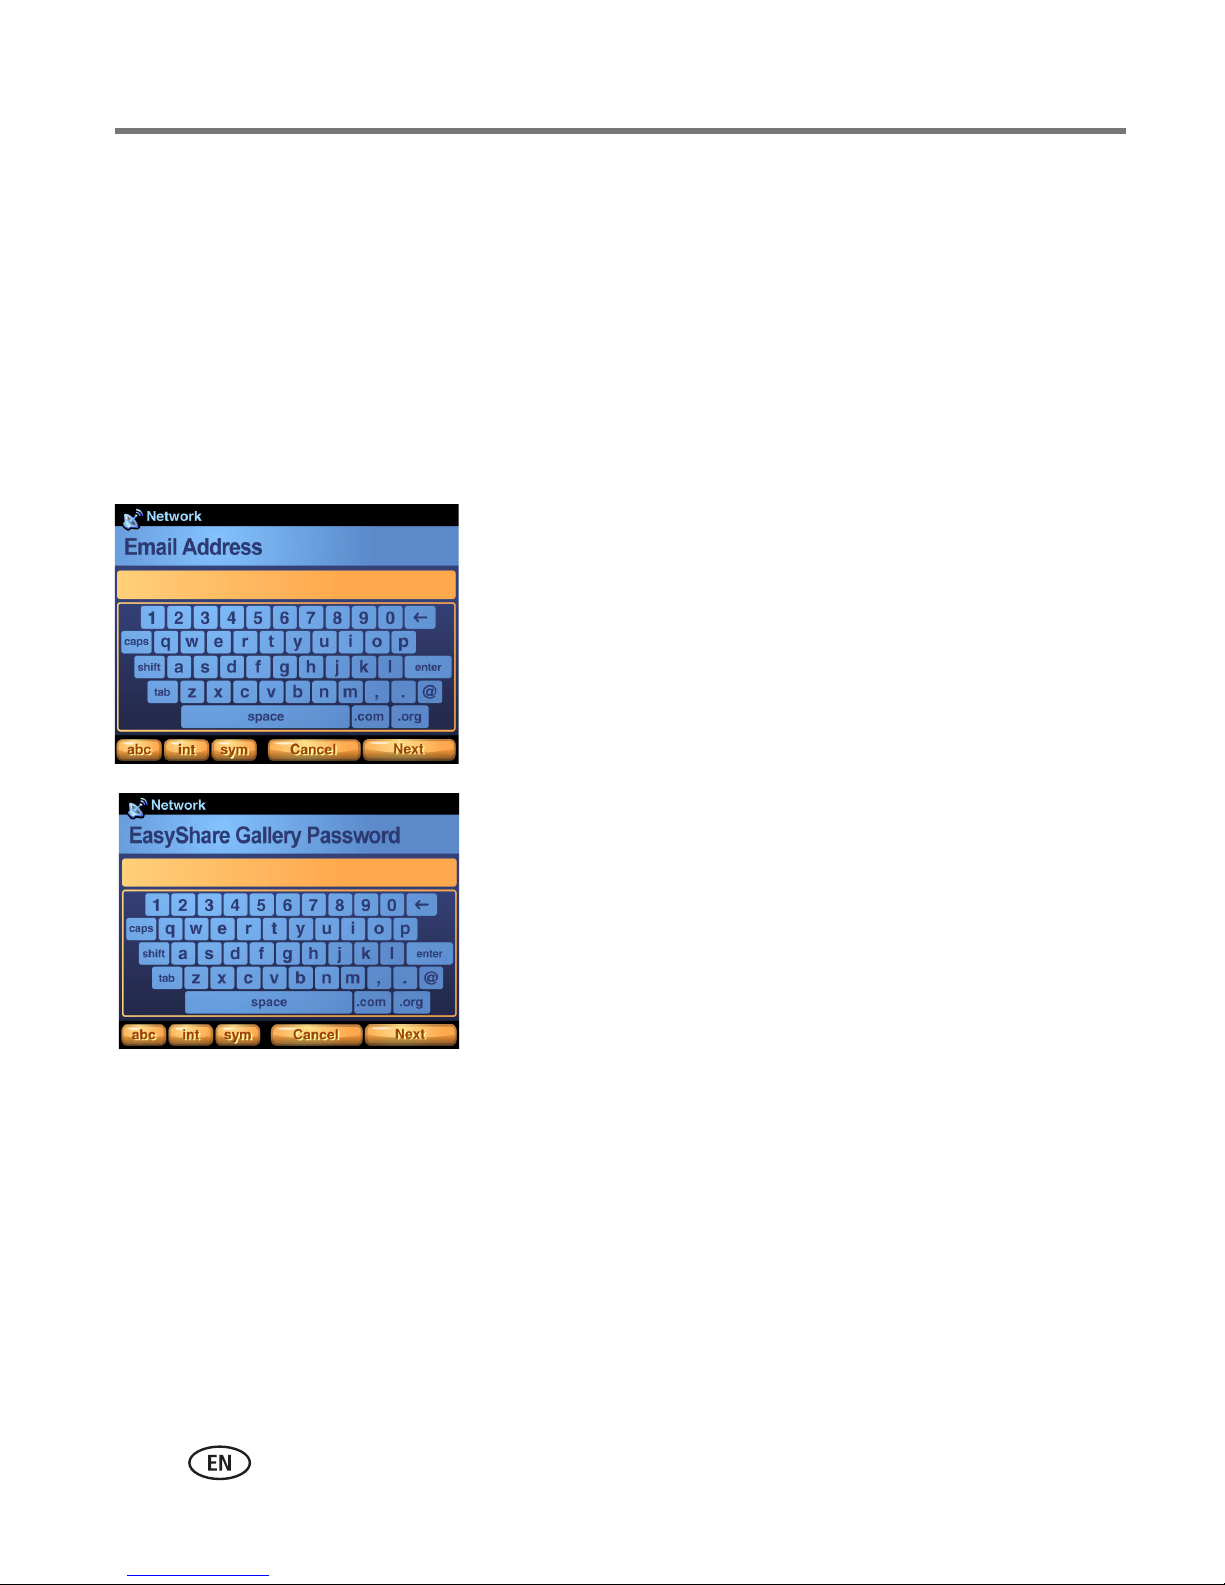
Setting KODAK EASYSHARE Gallery account information
The Email Address and Gallery Password screens appear after the Date & Time screen
the first time you turn on the camera.
Visit www.kodakgallery.com to create your free KODAK EASYSHARE Gallery account,
then enter the email address and password for your account.
NOTE: EASYSHARE Gallery may not be available in your area; however, you can use your camera with your
regional online Kodak picture service.
1 Use the touch keyboard (see page 6) to type the
email address used for your Gallery account.
2 When finished, touch Next.
3 Type your Gallery account password.
4 When finished, touch Next.
9 www.kodak.com/go/support
Page 17

Getting started
To set Gallery account information anytime:
1 Press the Menu button, then select Setup.
2 Select Preferences .
3 Touch Email Address.
4 Use the touch keyboard (see page 6) to type the email address used for your
Gallery account. When finished, touch Done.
5 Touch The Gallery Password.
6 Type your Gallery account password. When finished, touch Done.
www.kodak.com/go/support
10
Page 18
Getting started
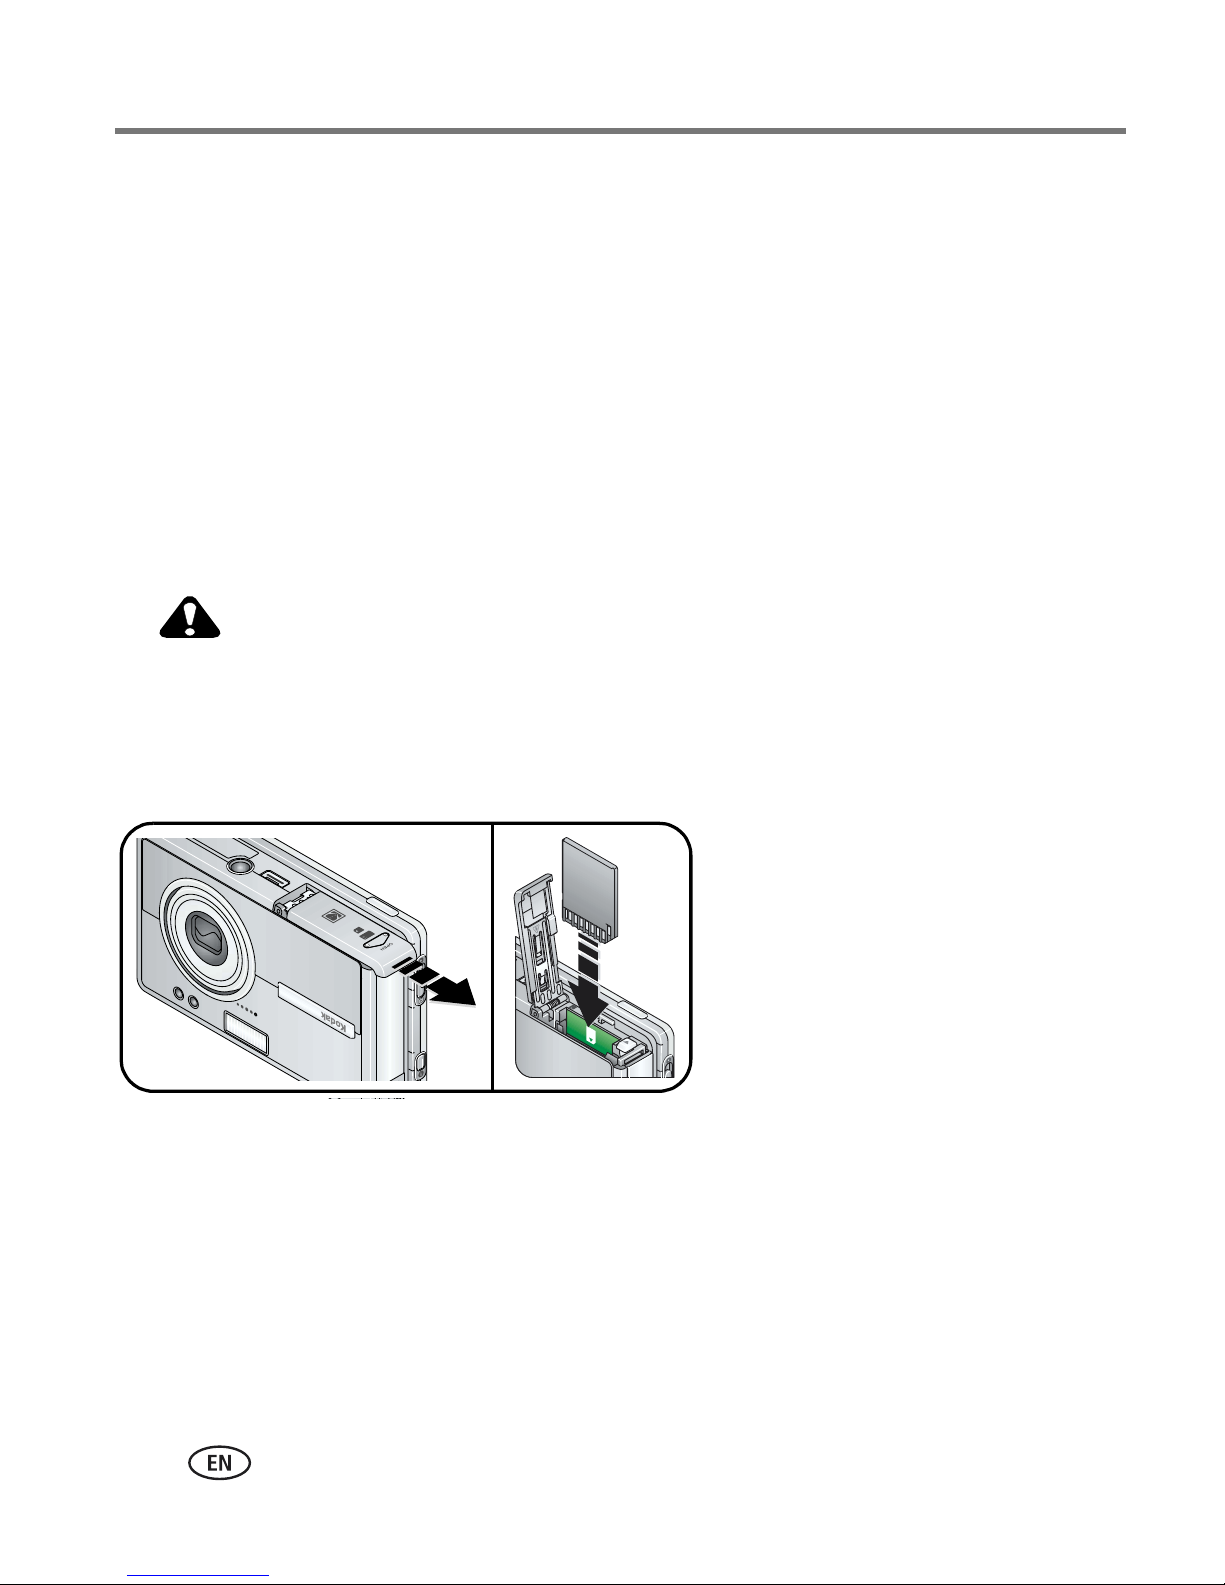
Storing pictures and videos on an optional
SD/MMC card
Your camera has 256 MB of internal memory (approximately 185 MB available for
image storage)*. You can purchase optional SD/MMC cards for removable, reusable
storage for your pictures and videos (compatible up to 1 GB). The camera
automatically stores pictures and videos on the card if one is inserted.
*1 MB equals 1 million bytes, 1 GB equals 1 billion bytes.
NOTE: We recommend Kodak SD or MMC cards. When using the card for the first time, format it in this
camera before taking pictures or videos (see Changing device settings, page 36).
CAUTION:
Insert card as shown. Do not force. Do not insert a Kodak Wi-Fi® card
in the slot shown. Doing so may damage the camera or card. After
taking a picture, allow time for processing before removing a card to
avoid damaging your pictures, card, or camera.
To remove the card:
1 Turn off the camera.
2 Push the card in, then release it.
3 When the card is ejected, pull it out.
See page 88 for storage capacities. Purchase SD/MMC cards at a dealer of Kodak
products or www.kodak.com/go/easyshare-oneaccessories.
11 www.kodak.com/go/support
Page 19
2 Taking pictures and videos
Taking a picture
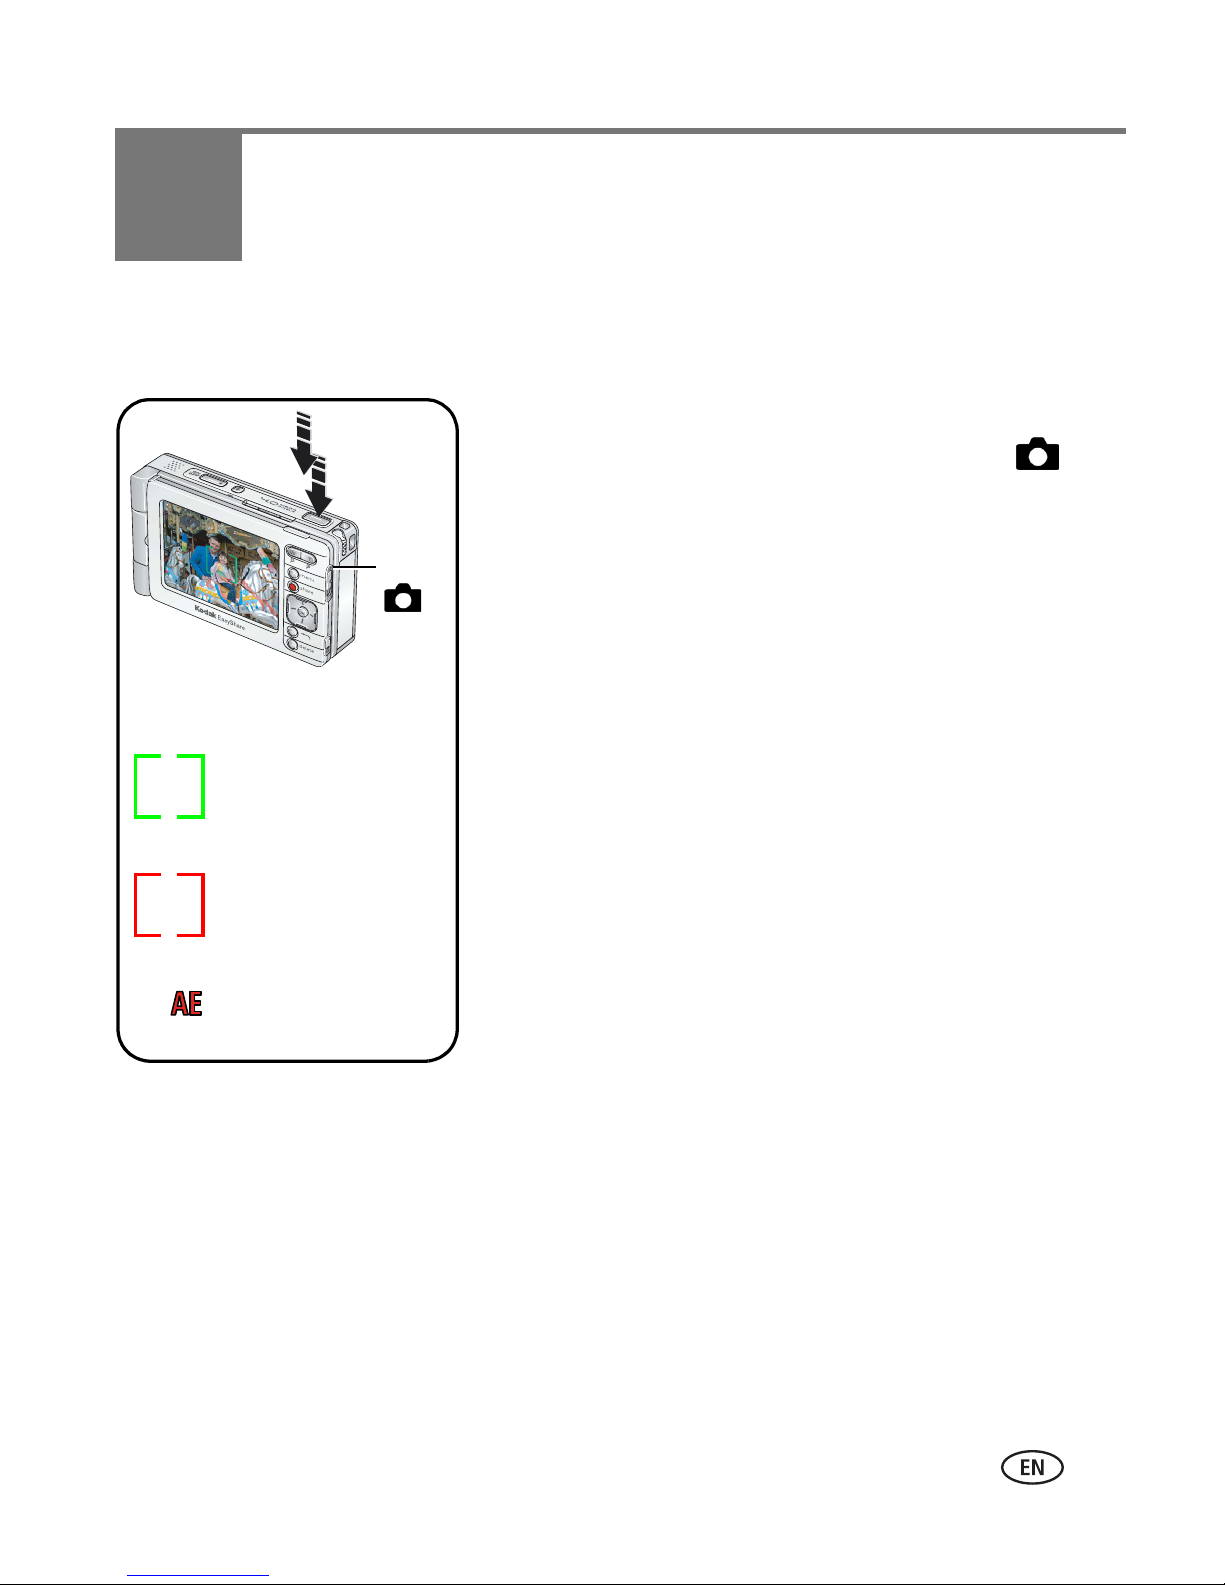
1 Turn on the camera (see page 4).
AF Framing Brackets:
GREEN
Focus and exposure are
successful.
RED
Focus or exposure have
failed.
RED AE icon
Exposure has failed.
Capture
2 Slide the Capture/View switch to Capture
.
3 Press the Menu button, then select Auto (default).
4 Frame your subject in the screen.
5 Press and hold the Shutter button halfway to set
the Auto Focus (AF).
When the AF framing brackets turn green, focus is
successful in the region indicated.
If the AF framing brackets turn red, focus failed.
Release the Shutter button then try again.
If a red AE (Auto Exposure) icon appears, exposure
failed. Release the Shutter button then try again.
6 Press the Shutter button the rest of the way
down to take the picture.
NOTE: The camera attempts to focus on foreground subjects, even if
the subjects are not centered in the scene.
■ Press the OK button to turn the capture and toolbar icons off. Press again to turn
them on.
www.kodak.com/go/support 12
The AF framing brackets are disabled for videos and some
scene modes (see page 27).
Page 20
Taking pictures and videos
Taking a video
1 Turn on the camera (see page 4).
2 Slide the Capture/View switch to Capture .
3 Press the Menu button, then select Video.
Capture
■ Alternatively, you can press the Shutter button completely down and hold it for
more than 2 seconds to begin recording. To stop recording, release the Shutter
button.
4 Frame your subject in the screen.
5 Press the Shutter button completely down and
release. To stop recording, press and release the
Shutter button again.
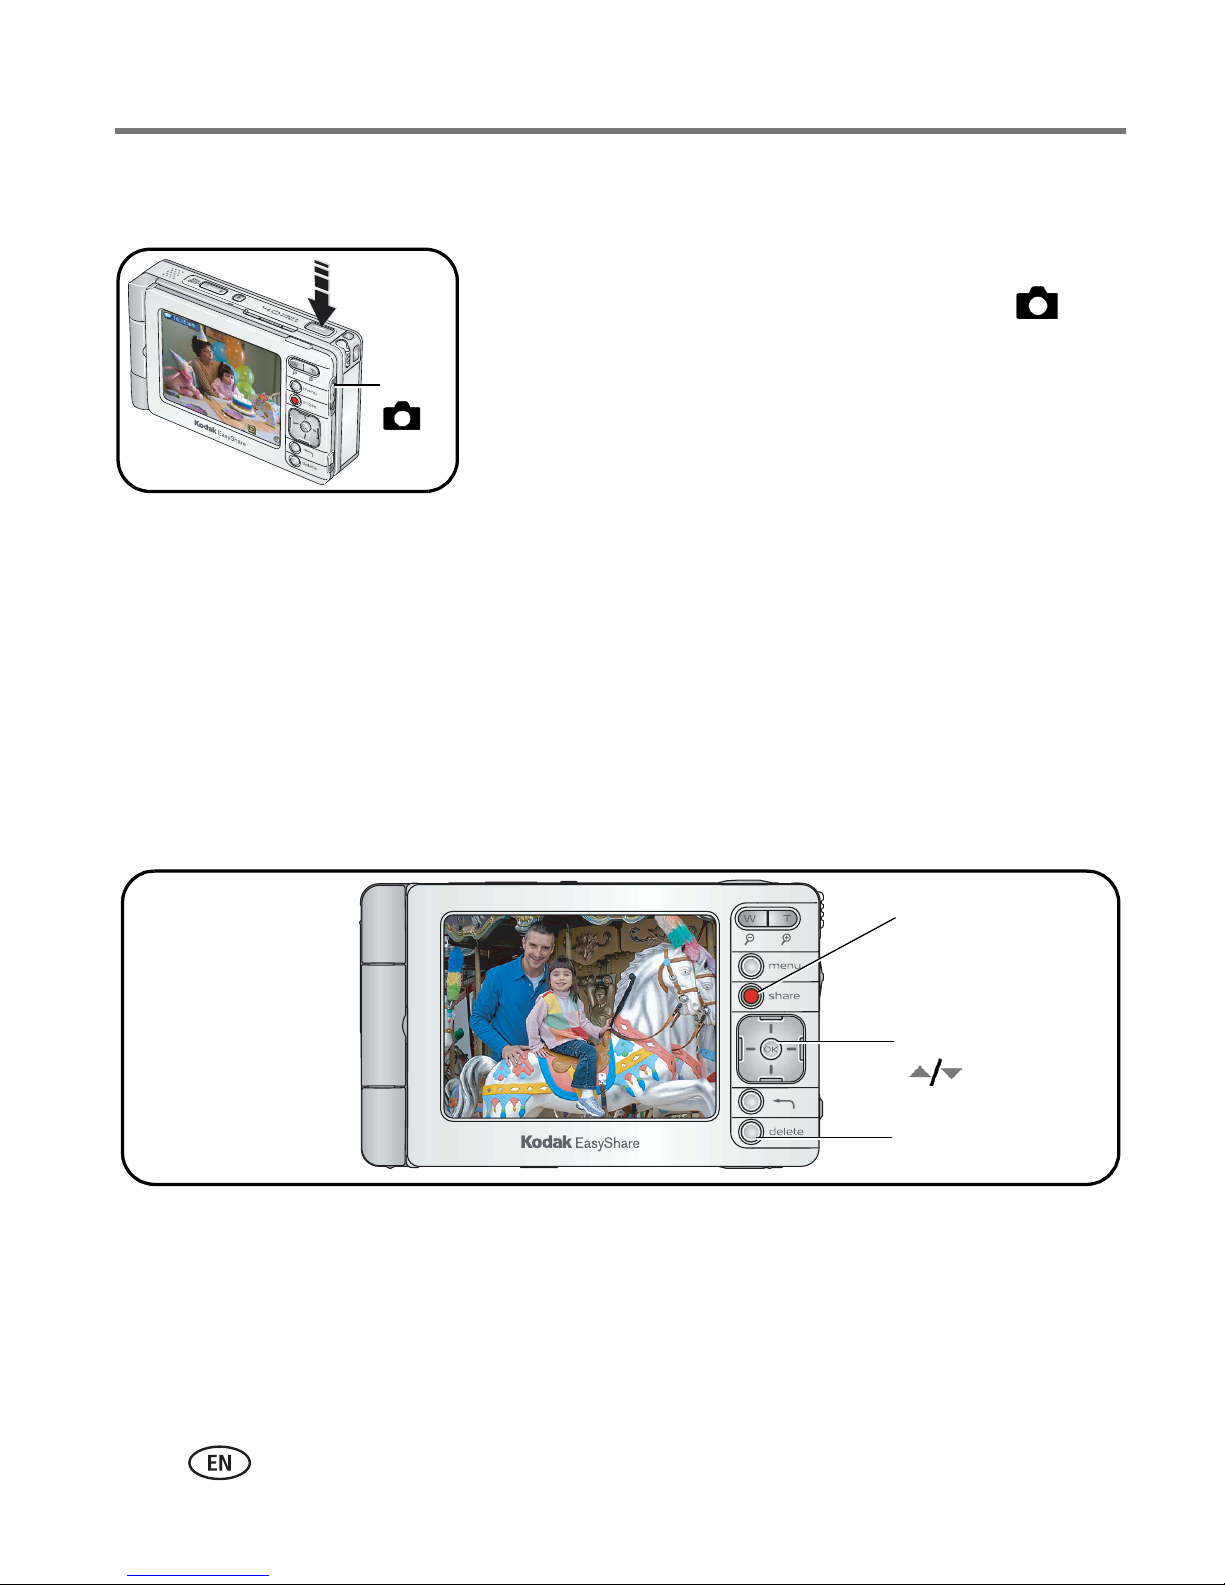
Viewing the picture or video just taken
After you take a picture or video, a brief view, or Quickview, of the picture is displayed
on the screen for several seconds. During Quickview:
Press Share* to tag a
picture or video for
or for printing.
email
The picture or video is
saved automatically
unless you press the
Delete button.
* See Sharing pictures and videos, page 57.
Press OK to play a video
(
Press to delete the
picture or video.
to adjust volume).
13 www.kodak.com/go/support
Page 21
Taking pictures and videos
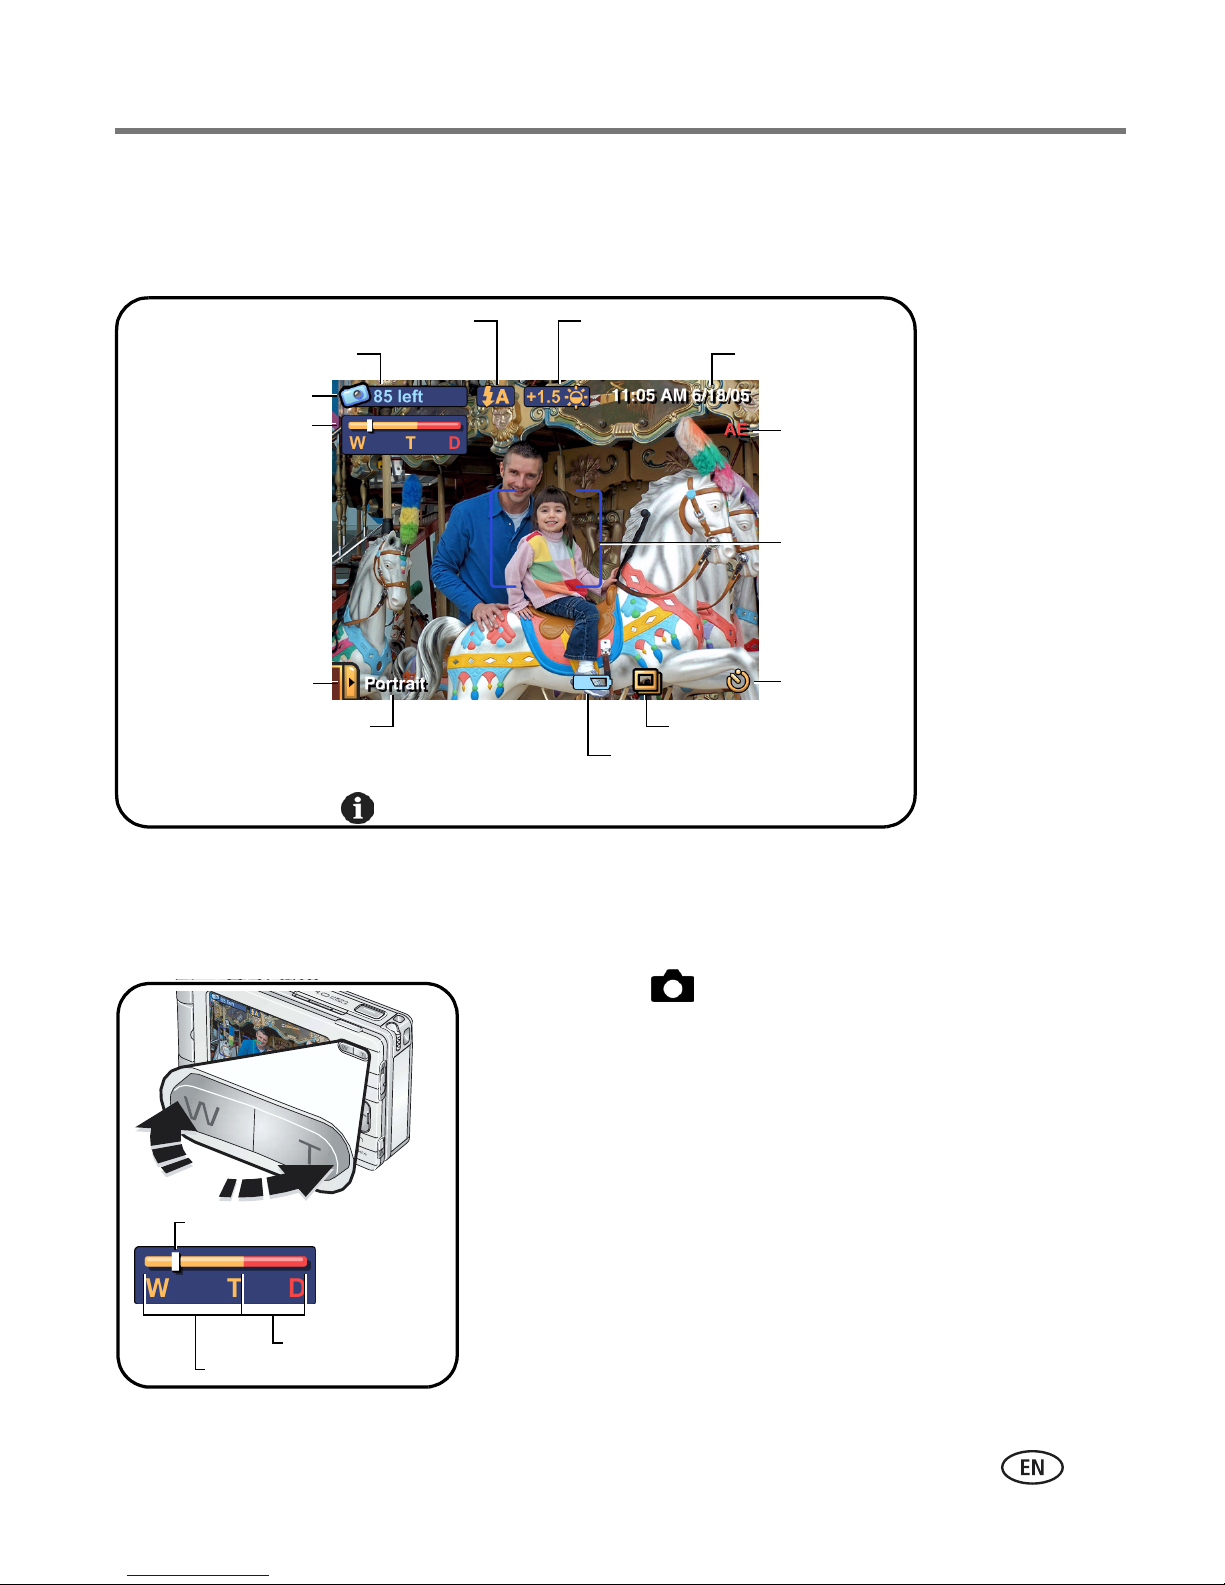
Overview of capture icons
Icons that appear on the screen indicate active camera and picture settings.
Flash
Pictures/time remaining
Current capture mode
Zoom:
W - wide
T - telephoto
D - digital
Scene mode menu
Current scene mode
repeatedly to toggle capture icons on and off.Press
Using optical zoom
Exposure compensation
Date/video length
Auto Exposure
fail indicator
AF framing
brackets
Self-timer
Capture album
Low battery (flashing = exhausted)
Use optical zoom to get up to 3X closer to your subject.
1 In Capture , frame your subject in the screen.
2 Press the Zoom Telephoto (T) button to zoom in.
Press Wide Angle (W) to zoom out.
The zoom indicator shows zoom status.
3 Take the picture or video.
Current zoom position
Digital range
Optical range
www.kodak.com/go/support
14
Page 22

Taking pictures and videos
Using digital zoom
Use digital zoom to get additional 3.3X magnification beyond optical zoom.
Combined zoom settings are from 3.3X to 10.0X in 0.3X increments.
NOTE: Digital zoom is disabled for videos.
You may notice decreased image quality when using digital zoom. The blue slider on the zoom
indicator pauses, then turns red when the picture quality reaches the limit for an acceptable 4 x 6 in.
(10 x 15 cm) print.
1 In Capture , frame your subject in the screen.
2 Press the Zoom Telephoto (T) button to the optical zoom limit. Release the button,
then press it again.
The zoom indicator shows zoom status.
3 Take the picture.
Using the flash
Use the flash when you take pictures at night, indoors, or outdoors in heavy shadows.
Press the
The active flash icon appears in the top toolbar (see the
following table).
Effective flash range:
Wide Angle—2–10.5 ft (0.6–3.2 m)
Telephoto—2–7.5 ft (0.6–2.3 m)
button to scroll through the flash options.
15 www.kodak.com/go/support
Page 23
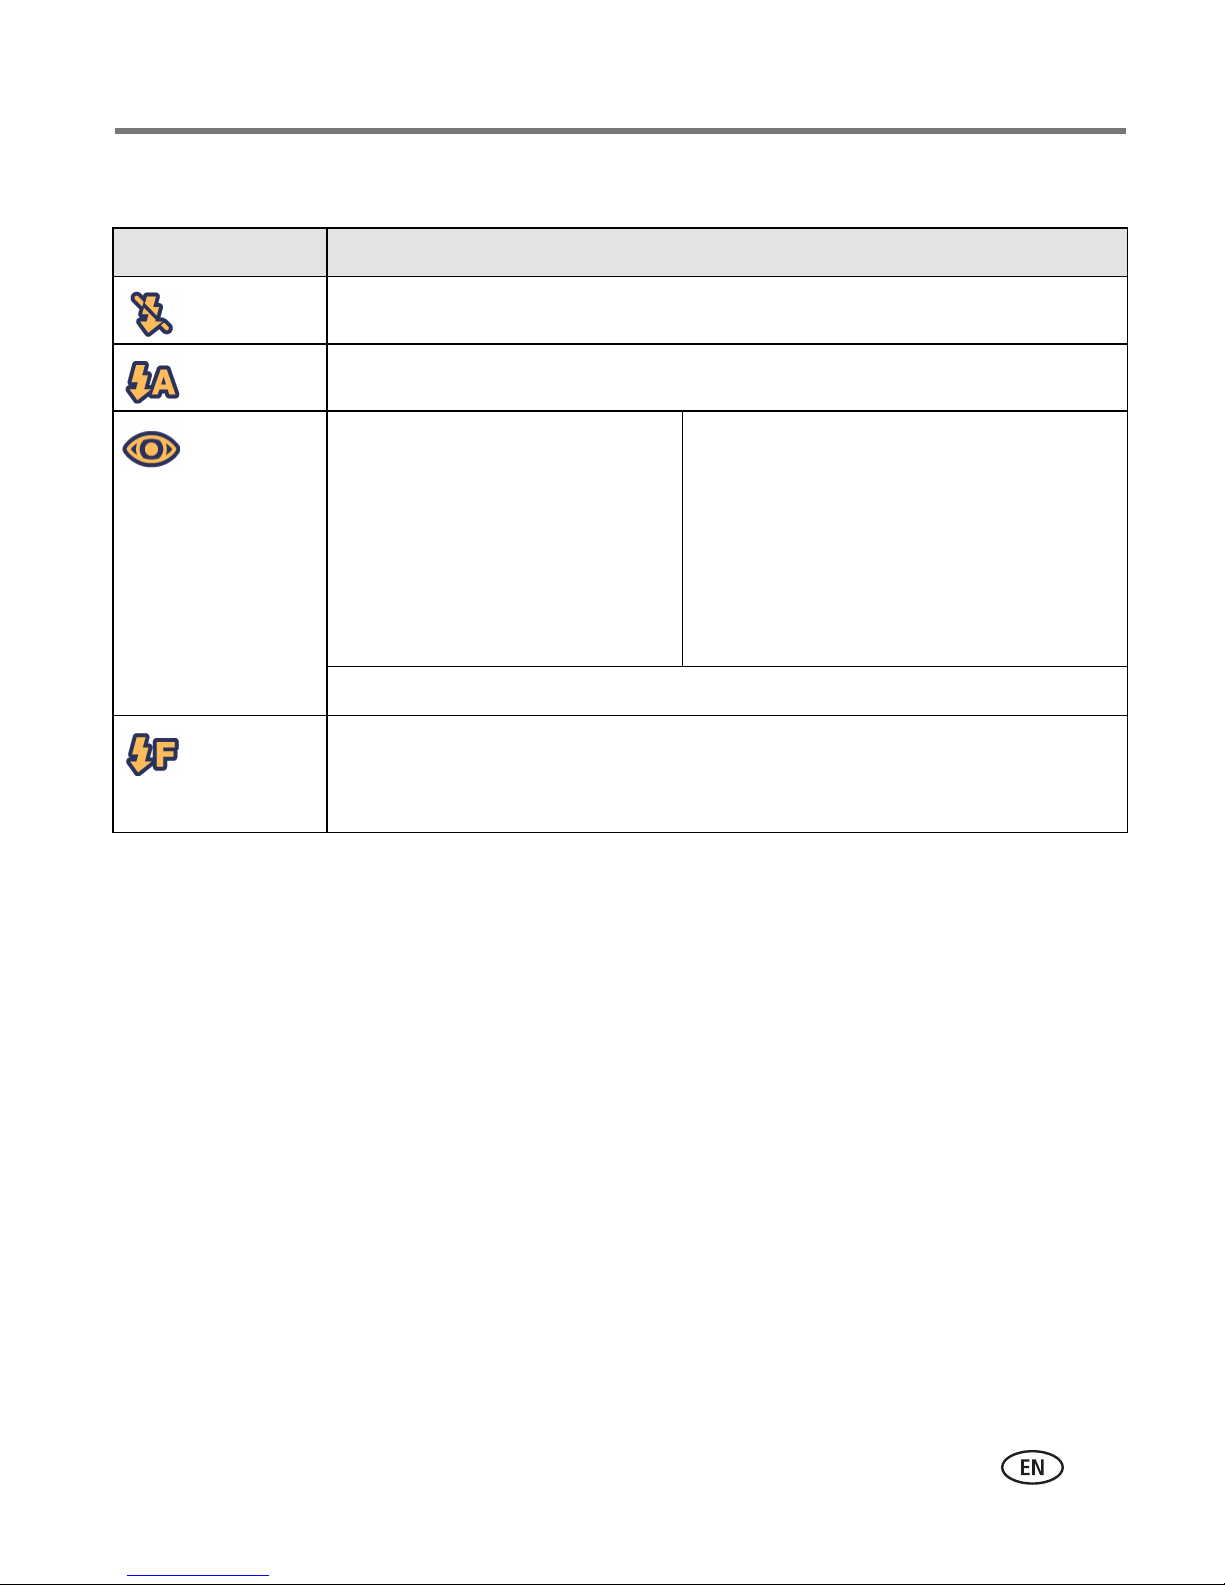
Taking pictures and videos
NOTE: Flash settings are preset for each scene mode (see page 27). Flash is disabled for videos and burst.
Flash setting Flash fires
No flash Never.
Auto When the lighting conditions require it.
Red-eye If Red-eye Pre-flash is turned off:
■ The flash fires once.
■ The camera automatically
corrects red-eye in the
picture.
If Red-eye Pre-flash is turned on:
■ The flash fires once so the subject’s
eyes become accustomed to the
flash, then fires again when the
picture is taken.
■ The camera automatically corrects
red-eye in the picture.
To turn Red-eye flash on or off, see Changing capture settings, page 33.
Fill Every time you take a picture, regardless of the lighting conditions. Use
when the subject is in shadow or is "backlit" (when light is behind the
subject). In low light, hold the camera steady or use a tripod.
www.kodak.com/go/support
16
Page 24
3 Viewing pictures and videos
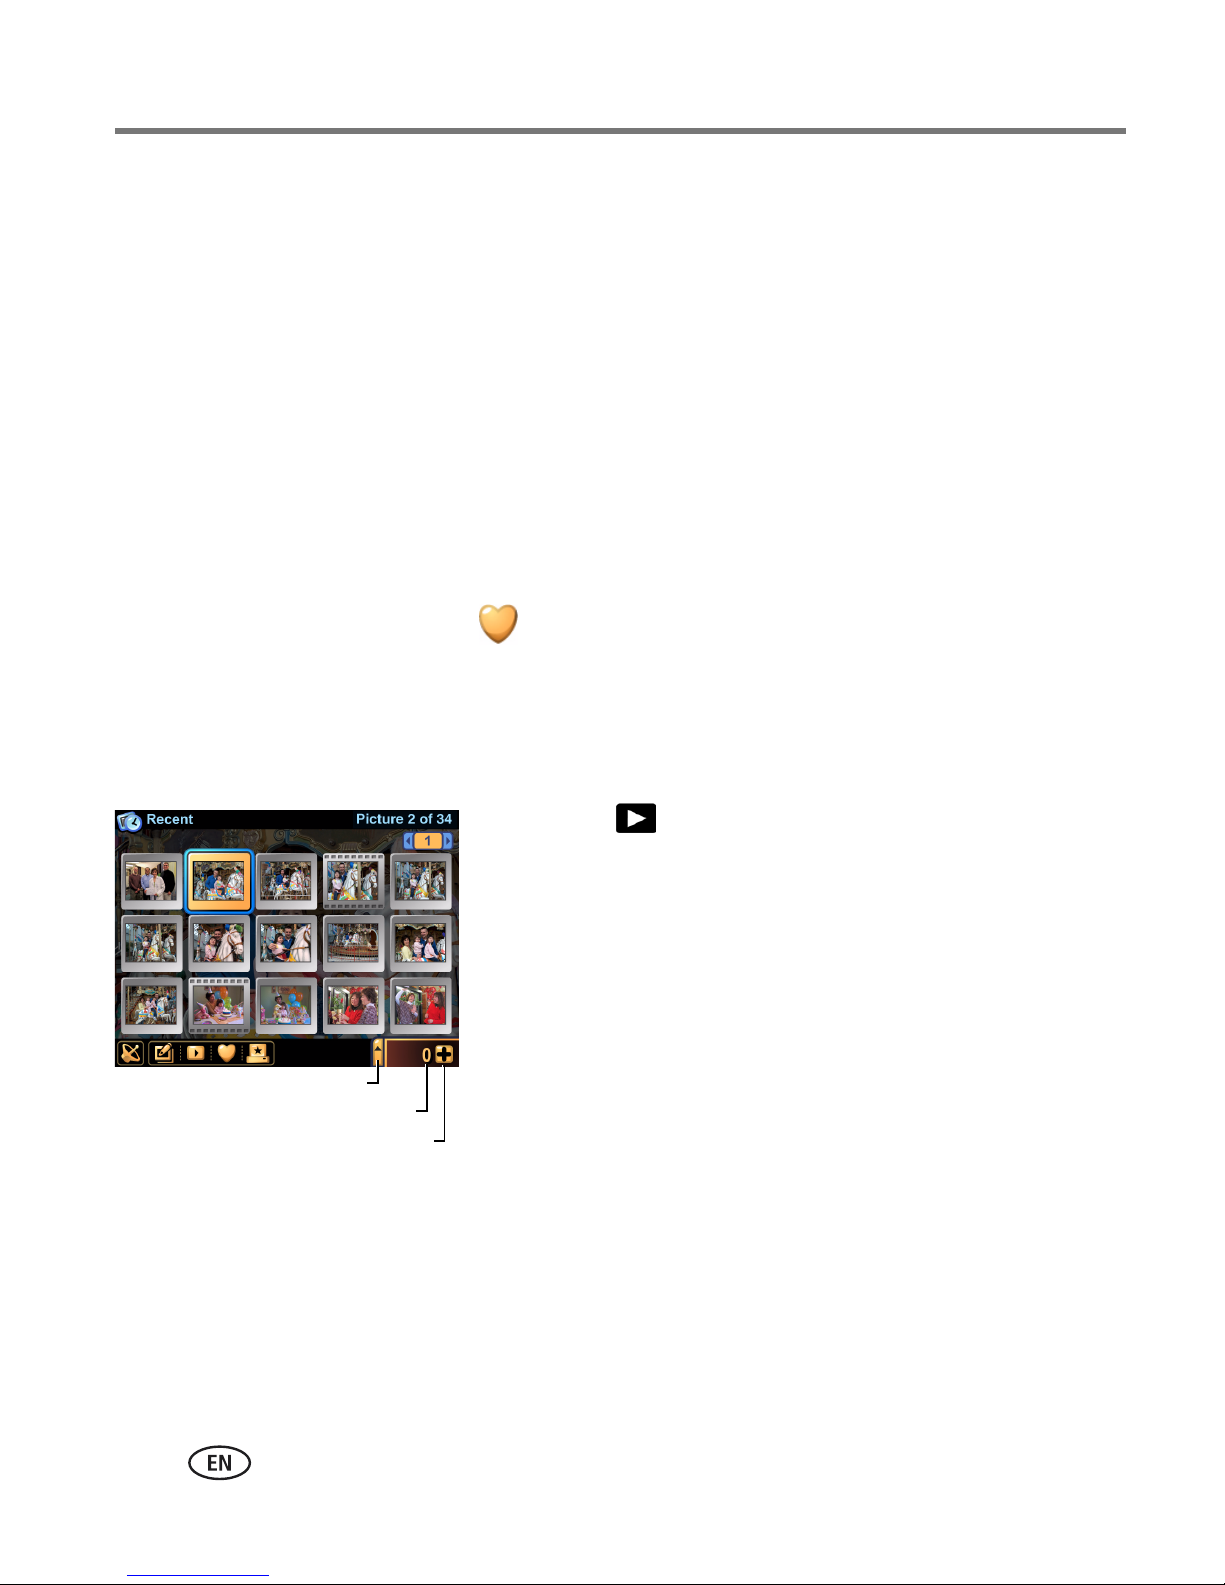
Locating pictures and videos on your camera
1 Turn on the camera (see page 4).
2 Slide the Capture/View switch to View .
3 Press the Menu button, then select a view option:
Recent—all pictures and videos, from newest to oldest.
Favorites—pictures and videos tagged as favorites (see page 22).
Albums—pictures and videos arranged by albums (see page 20).
Calendar—pictures and videos arranged by the month they were taken.
The Gallery—pictures from your albums on KODAK EASYSHARE Gallery or your
regional online Kodak picture service (see page 63).
Friends’ Albums—pictures from your friends’ albums on
KODAK EASYSHARE Gallery (see page 63).
Outbox—pictures tagged for print or for email (see page 69).
Storage (not shown)—pictures and videos stored in internal memory or on an
installed memory card.
Setup (not shown)—change camera settings.
IMPORTANT:
Pictures and videos viewed by Calendar are arranged according to your
camera’s date and time (see page 8). Check the date and time for accuracy
after changing the battery.
17 www.kodak.com/go/support
Page 25
Viewing pictures and videos
4 Press to locate and select a thumbnail
of the picture, video, or album you want to view
(the current selection is highlighted with a yellow
border).
■ To view the selection full-screen, press the OK
button or touch the selection.
■ Press the Back button, , to return to the
previous view.
5 Press , or touch the left- or right-hand portion of the image, to scroll
backward or forward through pictures and videos, and albums. (For fast scrolling,
press and hold .)
Playing videos
1 Slide the Capture/View switch to View .
2 Select a video (the current selection is highlighted with a yellow border, and
resembles a film clip, ).
■ To view the selection full-screen, press the OK button or touch the selection.
Press the Back button, , to return to the previous view.
3 Press the OK button to play the video.
■ To adjust the volume, press .
■ To pause the video, press the OK button during playback.
www.kodak.com/go/support
18
Page 26
Viewing pictures and videos
Viewing picture and video information
1 In View , select a picture or video.
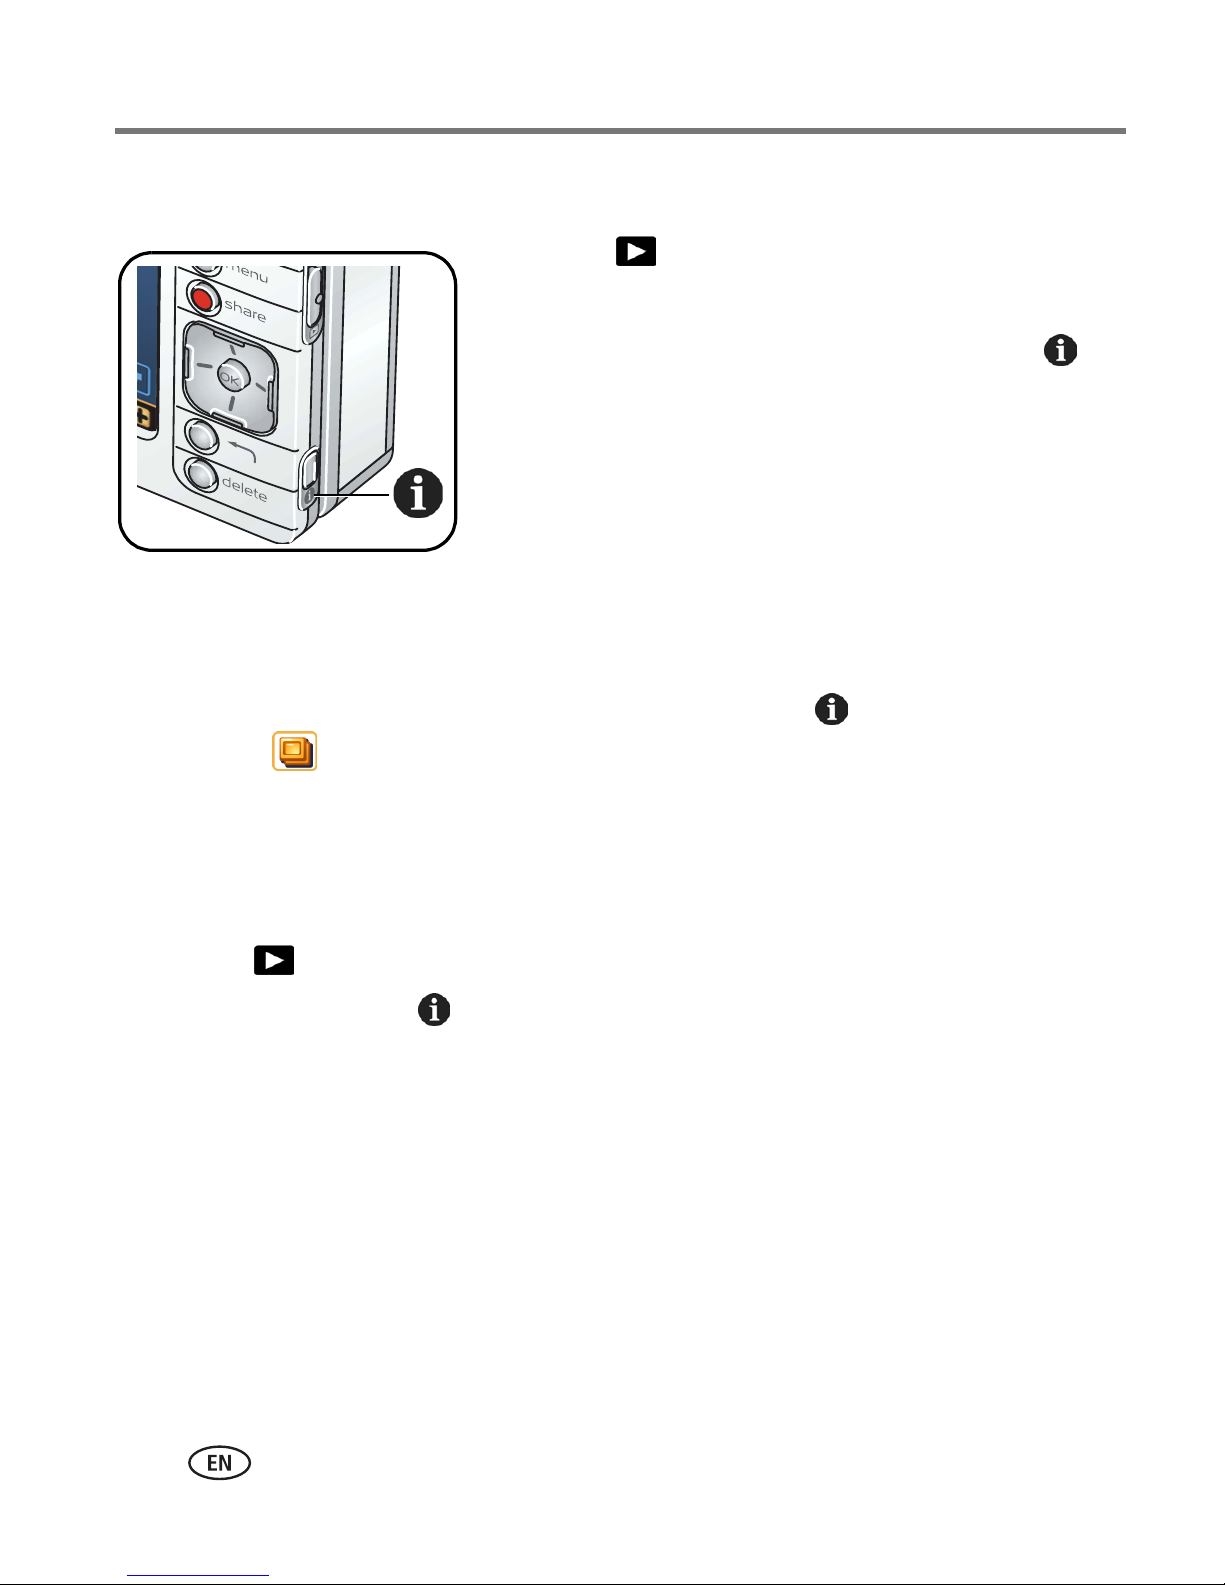
2 Press the Info button, , located on the lower outside edge of the touchscreen
display, to view and manage information about the current selection.
■ Touch to view the picture or video caption. To add or change a caption,
see page 25.
■ Touch to view albums the picture or video is assigned to. See also
Working with albums, page 20.
■ Touch to view the settings used to take the picture or video.
Magnifying a picture
1 In View , select a picture.
2 Press the Zoom Telephoto (T) button repeatedly to increase the magnification up
to 8X or press Wide (W) to decrease it.
■ To see different parts of the picture, press .
■ To redisplay the picture at the 1X (original) size, press the Back button, .
19 www.kodak.com/go/support
Page 27

4 Organizing and editing on
your camera
Working with albums
NOTE: Album settings are automatically updated when you synchronize with EasyShare software (see
page 51).
Adding pictures and videos to albums
1 In View , select a picture or video. To select
multiple pictures and videos, use the drawer (see
page 23).
2 Touch the Edit/Album icon, .
3 Select Album.
Edit/Album icon
4 To place the selected picture or video into a new album:
Touch New Album, then enter an album name using the touch keyboard.
To add the picture or video into an existing album:
Select the album names in which to add the picture or video.
5 When finished, touch Done.
www.kodak.com/go/support 20
Page 28
Organizing and editing on your camera
Removing pictures and videos from albums
1 In View , press the Menu button.
2 Select Albums.
3 Select an album, then press the Info button, .
The album name, contents, and other information
appears.
4 Select pictures and videos to remove. Touching a
picture or video repeatedly adds or removes
it.
5 When finished, touch OK.
■ Alternatively:
1 Select a picture or video, then press the Info button, .
2 Touch .
3 Touch albums from which to remove the picture or video. Touching an album
repeatedly adds or removes the picture from the album.
Renaming albums
1 In View , select an album to rename.
2 Press the Info button, .
The album name, contents, and other information appears.
3 Touch the album name, then change the name using the touch keyboard. When
finished, touch Done.
21 www.kodak.com/go/support
Page 29

Organizing and editing on your camera
Tagging pictures and videos as favorites
In addition to arranging your pictures and videos using albums, you can tag pictures
and videos as favorites for easy showcasing of your prized images.
NOTE: Pictures tagged as favorites are automatically transferred to and from your computer and are
updated when synchronizing with EasyShare software (see page 51).
1 In View , select a picture or video. To select
multiple pictures and videos, use the drawer (see
page 23).
2 Touch the Favorite icon, .
A blue fill appears in the Favorite icon, indicating the
picture or video has been tagged as a favorite.
Favorite icon
■ To remove the Favorite tag, touch the Favorite
icon again.
3 Press and to scroll through and tag
other favorites.
To view Favorites, see page 17.
www.kodak.com/go/support
22
Page 30
Organizing and editing on your camera
Using the drawer to select multiple pictures and
videos
The drawer is the tool that lets you select multiple pictures and videos at once. It is a
temporary location in your camera to place pictures and videos for viewing,
organizing, sharing, editing, or changing settings.
The drawer is useful in sorting your pictures and videos, and lets you apply changes or
tags to all the pictures in the drawer at once. That is, any action or setting changes
you make with the drawer open are applied to all the pictures and videos in the
drawer.
For example, you can place pictures and videos in the drawer, then with the drawer
open, touch the Favorite icon, . As a result, all the pictures and videos in the
drawer are tagged as favorites (see page 22).
To place pictures and videos into the drawer:
1 In View , select a picture, video, or album.
2 Touch the plus sign + .
The selected picture or video is placed in the drawer. (If
an album is selected, all the pictures and videos in the
album are placed in the drawer.)
Drawer tab
Number of pictures in drawer
Add picture or video to drawer
To view the drawer contents:
■ Touch the drawer tab to open it.
23 www.kodak.com/go/support
Page 31

Organizing and editing on your camera
l
To remove a picture or video from the drawer:
Remove se
or video from drawer
Number of pictures and
Close drawer
Remove all pictures and
To remov e
ected picture
1 With the drawer open, select a picture or video.
2 Touch the minus sign - .
videos in drawer
The selected picture or video is removed from the
drawer.
NOTE: Pictures and videos removed from the drawer are not
deleted, and still reside in their original location on the
camera. To permanently delete a picture or video, see
page 26.
The drawer contents are emptied when the camera
powers-off.
videos from drawer
all
pictures and videos from the drawer:
■ With the drawer open, touch Empty.
To close the drawer:
■ Touch the drawer tab.
www.kodak.com/go/support
24
Page 32

Organizing and editing on your camera
Adding or modifying a caption
1 In View , select a picture or video. To select
multiple pictures and videos, use the drawer (see
page 23).
2 Press the Info button, , located on the lower
outside edge of the touchscreen display.
The Picture Info screen appears.
3 Touch .
4 Touch the text box, then use the touch keyboard to
enter a caption.
5 When finished, press the Info button, , or the
Cropping pictures
Back button, .
1 In View , select a picture.
2 Touch the Edit/Album icon, .
3 Select Crop.
4 Press the Telephoto (T) to make the crop box
smaller.
Press Wide Angle (W) to make the crop box larger.
Press to move the crop box.
5 Press the OK button to crop the picture.
A new cropped image is saved to your camera. (The
original image is also retained.)
25 www.kodak.com/go/support
■ Alternatively, you can touch and drag the crop box
and touch the on-screen W - T icons to zoom in or
out, as described above.
Page 33

Organizing and editing on your camera
Copying pictures and videos
You can copy pictures and videos from a memory card to internal memory or from
internal memory to an installed memory card.
Before you copy, make sure that a memory card is inserted in the camera (page 11).
1 In View , press the Menu button.
2 Select Storage, then select a storage location to view.
3 Select a picture or video, then touch the Edit/Album icon, . To select multiple
pictures and videos, use the drawer (see page 23).
4 Select Copy, then select Yes to copy the picture or video to either internal memory
or the memory card.
NOTE: Pictures and videos are copied, not moved. After copying, to remove a picture or video from its
original location, find the picture or video in Storage view (see page 17), then delete it.
Tags applied for print, email, and favorites are not copied.
Deleting pictures, videos, and albums
1 In View , select a picture or video. To select multiple pictures and videos, use
the drawer (see page 23) or select an album.
2 Press the Delete button.
3 Choose whether to continue by selecting Yes or No.
www.kodak.com/go/support
26
Page 34

5 Taking pictures and videos:
more tips and tricks
Choosing a scene mode
NOTE: Scene modes are unavailable for videos.
The default scene mode is Auto. However, you can choose from a variety of scene
modes to accommodate almost any picture-taking condition. The capture settings for
each mode are preset to best suit the scene. To change them, see page 33.
1 In Capture , touch the scene mode tab.
2 Press to find the scene mode that best suits
your picture-taking situation. (See the following
table for descriptions.)
Scene mode tab
3 Press the OK button to select the highlighted scene mode.
The scene mode remains until you leave still capture or turn off the camera.
■ Alternatively, you can press the Menu button then select Scenes to access the
scene mode menu.
Use this mode For
Auto General picture-taking—offers an excellent balance of image quality
and ease of use. Automatically sets exposure, focus, and flash.
Portrait Full-frame portraits of people. Allows the subject to be sharp and the
background to be indistinct. For best results, position your subject at
least 6 ft (2 m) away and fill the frame with a head-and-shoulder
pose. Use zoom to exaggerate background blur.
Sports Subjects in motion. Uses fast shutter speed and Auto flash setting.
27 www.kodak.com/go/support
Page 35

Taking pictures and videos: more tips and tricks
Use this mode For
Landscape Distant scenery. Flash does not fire.
Close-Up Subjects closer than 24 in. (61 cm).
Night Portrait People in night scenes or low-light conditions. Minimizes red-eye.
Place the camera on a flat, steady surface or use a tripod.
Night Landscape Distant scenery at night. Flash does not fire. Place the camera on a
flat, steady surface or use a tripod.
Snow Bright snow scenes.
Beach Bright beach scenes and sunlit water surfaces.
Text Copying documents. Focus is close-up.
Fireworks Fireworks. Flash does not fire. Place the camera on a flat, steady
surface or use a tripod.
Flower Close-ups of flowers or other small subjects in bright light.
Museum / Polite Quiet occasions, like a wedding or lecture.
Flash and sound are disabled.
Self-Portrait Close-ups of yourself. Assures proper focus and minimizes red-eye.
Party People indoors. Minimizes red-eye.
Children Action pictures of children in bright light.
Backlight Subjects that are in shadow or "backlit" (when light is behind the
subject).
www.kodak.com/go/support
28
Page 36

Taking pictures and videos: more tips and tricks
Using burst
Use burst to take pictures in rapid succession. To choose a burst setting:
Capture mode
Burst setting Description
First
Burst
Capture an
expected event.
Example:
While the Shutter button is pressed, the camera takes up to five pictures
in rapid succession.
1 Touch the Capture mode icon.
2 Select First Burst or Last Burst (see table, below).
To return to still capture mode, select Still.
To change camera settings, select Setup.
NOTE: Burst settings are disabled for videos and for some scene
modes.
Pictures from start of
burst series are saved
A person swinging
a golf club.
Last
Burst
Capture an event
when the precise
timing is uncertain.
Example:
A child blowing out
birthday candles.
While the Shutter button is pressed, the camera takes pictures in rapid
succession for as long as you hold the Shutter button. When the Shutter
button is released, pictures at the end of the series (up to five) are saved.
Pictures from end of
burst series are saved
NOTE: If you press Delete after taking a burst series of pictures, all pictures in the burst series are deleted.
To delete a single picture in a burst series, do so in View (see page 26).
29 www.kodak.com/go/support
Page 37

Taking pictures and videos: more tips and tricks
Changing exposure compensation
You can manually adjust the exposure for further control in different lighting
conditions, such as bright backlight and other non-standard scenes. If the picture is
too light, decrease the setting ; if it is too dark, increase the setting .
NOTE: Exposure compensation is disabled for videos.
Exposure
compensation
■ In Capture , press to adjust the
exposure compensation between -2.0 to +2.0.
This setting remains until you change modes or turn off
the camera.
■ Alternatively, you can touch the Exposure
compensation icon repeatedly to change it.
www.kodak.com/go/support
30
Page 38

Taking pictures and videos: more tips and tricks
Using the self-timer
Use the Self-Timer to create a timed delay between the time you press the Shutter
button and the time the picture or video is taken.
1 In Capture , touch the Self-Timer icon, .
2 Select an increment for the self-timer duration (up to 60 seconds).
For videos, set the video duration:
Choose 5, 15, or 30 seconds; or choose Max— video records as long as there is
room on the card or internal memory, or until you press the Shutter button.
3 Open the touchscreen display and position it so that the screen faces the same
direction as the lens.
4 Place the camera on a flat surface or tripod and compose the scene.
5 Press the Shutter button halfway and hold to set the exposure and focus, then
press completely down. Move into the scene.
A countdown appears on the screen before the picture or video is taken.
The Self-Timer setting turns off after you take the picture or video or if you change
capture modes. Video recording stops when the duration is reached or there is no
storage space remaining.
■ To cancel the Self-Timer during countdown or during video recording, press the
Shutter button.
31 www.kodak.com/go/support
Page 39

Taking pictures and videos: more tips and tricks
Taking overhead pictures and videos
Adjust the touchscreen display to take pictures and videos over crowds and obstacles.
CAUTION:
Rotate the display in the direction shown. Do not force.
www.kodak.com/go/support
32
Page 40

Taking pictures and videos: more tips and tricks
Pre-assigning pictures to an album
You can create or assign an album in which to place your pictures and videos as you
take them.
1 In Capture , touch the Capture album icon, .
2 Touch New Album to start a new album, or touch an existing album to select it.
3 When finished, touch Done.
A check mark appears in the Capture album icon.
The setting remains until you change it.
■ To stop pre-assigning pictures to the album, touch the Capture album icon again.
The check mark in the Capture album icon disappears.
Changing capture settings
1 Press the Menu button, then select Setup.
2 Touch Capture .
3 Select a setting and option to change.
NOTE: Some capture settings are unavailable in some scene modes and videos.
Setting Options
Picture Size
Choose a picture
resolution.
This setting remains until
you change it.
4.0 MP (default)—for printing up to 20 x 30 in. (51 x 76 cm);
pictures are highest resolution and largest file size.
3.5 MP (3:2)—ideal for printing 4 x 6 in. (10 x 15 cm) prints without
cropping. Also for printing up to 11 x 14 in. (28 x 36 cm); some
cropping may result due to the 3:2 aspect ratio.
2.1 MP—for printing up to 8 x 10 in. (20 x 25 cm); pictures are
medium resolution with smaller file size.
1.1 MP—for printing up to 5 x 7 in. (13 x 18 cm); for emailing,
Internet, or screen display; pictures are lowest resolution and
smallest file size.
33 www.kodak.com/go/support
Page 41

Setting Options
Taking pictures and videos: more tips and tricks
White Balance
Choose your lighting
condition.
This setting remains until
you change modes or turn
off the camera.
ISO
Control the camera’s
sensitivity to light.
This setting remains until
you change modes or turn
off the camera.
Date Stamp
Imprint the date on
Auto (default)—automatically corrects white balance. Ideal for
general picture-taking.
Daylight—for pictures in natural lighting.
Tungsten—corrects the orange cast of household light bulbs. Ideal
for indoor pictures under tungsten or halogen lighting without flash.
Fluorescent—corrects the green cast of fluorescent lighting. Ideal
for indoor pictures under fluorescent lighting without flash.
Auto (default), manual: 80, 100, 200, 400
Choose a lower ISO setting in brightly lit scenes; use a higher ISO
setting in low-light scenes.
Choose a date format, or turn on Date Stamp. (Default is Off.)
pictures.
This setting remains until
you change it.
Red-eye Pre-flash
Choose if Red-eye
Pre-flash fires before a
picture is taken.
This setting remains until
you turn off the camera.
Color Mode
Choose color tones.
This setting remains until
you change modes or turn
off the camera.
On—flash fires once before the picture is taken.
Off (default)—flash doesn’t fire before the picture is taken, but
camera still applies internal red-eye correction to the picture.
Color (default)—for color pictures.
Black & White—for black-and-white pictures.
Sepia—for pictures with a reddish-brown, antique look.
NOTE: EasyShare software also lets you change a color picture to
black-and-white or sepia.
www.kodak.com/go/support
34
Page 42

Taking pictures and videos: more tips and tricks
Setting Options
Focus Zone
Select a large or
concentrated area of
focus.
This setting remains until
you change it.
Exposure Metering
Evaluate light levels at
specific areas of a scene.
This setting remains until
you change modes or turn
off the camera.
Sharpness
Multi-zone (default)—evaluates 3 zones to give an even picture
focus. Ideal for general picture taking.
Center-zone—evaluates the small area centered in the viewfinder.
Ideal when precise focus of a specific area in the picture is needed.
NOTE: For the best pictures, the camera is set to Multi-zone when in
Landscape mode.
Multi-pattern (default)—evaluates lighting conditions throughout
the image to give an optimum picture exposure. Ideal for general
picture-taking.
Center-weight—evaluates the lighting conditions of the subject
centered in the viewfinder. Ideal for backlit subjects.
Center-spot—similar to Center-weight, except the metering is
concentrated on a smaller area of the subject centered in the
viewfinder. Ideal when you need an exact exposure of a specific area
in the picture.
High
Control picture
sharpness.
This setting remains until
you change modes or turn
off the camera.
Continuous AF
Choose an auto-focus
setting.
This setting remains until
you change it.
Normal (default)
Low
On (default)—the camera continuously adjusts focus. When the
Shutter button is pressed halfway, focus is locked.
Off—the camera adjusts (and locks) focus only when the Shutter
button is pressed halfway.
35 www.kodak.com/go/support
Page 43

Setting Options
Taking pictures and videos: more tips and tricks
Video AF
Turn auto-focus on or off
for videos.
This setting remains until
you change it.
Video Zoom
Turn optical zoom on or
off during videos.
This setting remains until
you change it.
On (default) or Off.
NOTE: The auto-focus mechanism inside the camera may be audible during
playback of videos. Turning off this reduces noise, but your subject
may be out of focus, especially if it is moving.
On (default) or Off.
NOTE: Like many video cameras, the zoom mechanism inside the camera
may be audible during playback of videos. Turning off this setting
reduces noise but disables zoom.
Changing device settings
1 Press the Menu button, then select Setup.
2 Select Device .
3 Select and change settings as needed:
Setting Options
Language See page 6.
Date & Time See page 8.
Touchscreen Calibration See page 7.
Slide Show Interval
Set the duration of the interval between slides
during slide show.
LCD Backlight
Set the duration of camera inactivity, before the
screen dims to conserve battery power.
3 (default), 5, 10, or 30 seconds
5, 10 (default), 20, 30 seconds, or
Always On
www.kodak.com/go/support
36
Page 44

Taking pictures and videos: more tips and tricks
Setting Options
Orientation Sensor
Orient pictures so that they are displayed with the
correct side up.
Sound Theme Shutter Only, Dew (default), Skies,
Sound Volume Off, Low, Medium (default), High, or
Video Out
Choose the regional setting that lets you connect
the camera to a television or other external device.
About
View camera information.
Format
CAUTION:
On (default) or Off
Dunes, Days
Max
NTSC (default)—used in North America
and Japan; most common format.
PAL—used in Europe and China.
Memory Card—deletes everything on
the card; formats the card.
Internal Memory—deletes everything in
Formatting deletes all pictures and
videos, including those that are
protected. Removing a card during
formatting may damage the card.
internal memory including email addresses,
album names, and favorites; formats the
internal memory.
37 www.kodak.com/go/support
Page 45

Taking pictures and videos: more tips and tricks
Changing preferences
1 Press the Menu button, then select Setup.
2 Select Preferences .
3 Select and change settings as needed:
Setting Options
Email Address See page 9.
The Gallery Password See page 9.
The Gallery URL
Choose the domain name of your regional online
Kodak picture service.
See page 61.
www.kodak.com/go/support
38
Page 46

6 Using your camera with a
Wi-Fi wireless network
Why go wireless?
Perhaps the most obvious benefit of a Wi-Fi wireless network is the absence of cables
or wires to connect devices on a network. Wireless devices on a Wi-Fi wireless
network use radio signals to communicate and transfer data. This flexibility makes for
quick and relatively easy setup of networks. Additionally, a Wi-Fi wireless network
offers great portability and accessibility to networks from locations where wired
connections may not be practical or are otherwise impossible.
For more information, visit www.kodak.com/go/wifisupport or www.wi-fi.org.
39 www.kodak.com/go/support
Page 47

Using your camera with a Wi-Fi wireless network
What are some of the wireless features of my
camera?
The Kodak Wi-Fi® card (may be sold separately) unlocks a whole new experience in
wireless network technology, allowing you to connect to a Wi-Fi wireless network*
and remotely:
■ Transfer pictures to your computer and synchronize with EasyShare software (see
page 51).
■ Email pictures directly to your friends and family (see page 58).
■ Print to a Wi-Fi enabled Kodak EasyShare printer dock, photo printer, or other
printer connected to a Wi-Fi wireless network (see page 60).
■ Upload to, and view your pictures on KODAK EASYSHARE Gallery or your regional
online Kodak picture service (see page 61).
* Uses Wi-Fi 802.11b protocol—compatible with Wi-Fi wireless 802.11b and
802.11g networks.
NOTE: Wireless functions are only available in View .
www.kodak.com/go/support
40
Page 48

Using your camera with a Wi-Fi wireless network
Types of Wi-Fi wireless networks
There are generally two types of Wi-Fi wireless networks: Infrastructure networks, and
device-to-device, or Ad Hoc networks.
Infrastructure network
An Infrastructure network is a wireless network where data transferred between
wireless devices on the network pass through a central access point (AP), such as a
wireless network router.
For more information, visit www.kodak.com/go/wifisupport or www.wi-fi.org.
41 www.kodak.com/go/support
Page 49

Using your camera with a Wi-Fi wireless network
Ad Hoc network
An Ad Hoc, or device-to-device network is a wireless network where data is
transmitted directly between wireless devices on the network, without passing
through an access point.
For more information, visit www.kodak.com/go/wifisupport or www.wi-fi.org.
www.kodak.com/go/support
42
Page 50

Using your camera with a Wi-Fi wireless network
Wireless networking and the Internet
Some wireless functions on your camera, including emailing pictures (page 58), and
uploading & viewing pictures on KODAK EASYSHARE Gallery (page 61) require access
to the Internet. Most public networks are connected to the Internet, as are most home
networks, typically through an Internet Service Provider (ISP).
Inserting and deploying a Kodak Wi-Fi® card
CAUTION:
Insert card as shown. Do not insert an SD or MMC card in the slot
shown.
1
Push the card all the way in
to the retracted position.
2 3
Push the card again so it is
in the deployed position.
When possible, keep the Wi-Fi card in the retracted (2) position for safe-keeping and
to conserve battery life. To connect to an available Wi-Fi wireless network, push the
card in so that it springs back up to the deployed (3) position (see page 44).
■ To remove the Wi-Fi card: from the deployed position, pull it out.
For more information, visit www.kodak.com/go/wifisupport or www.wi-fi.org.
43 www.kodak.com/go/support
Page 51

Using your camera with a Wi-Fi wireless network
Connecting to a Wi-Fi wireless network
Once connected to a Wi-Fi wireless network, you can use the wireless capabilities of
your camera.
NOTE: The range of a typical Wi-Fi wireless network can vary between 100 to 300 ft (30 to 90 m),
depending on signal obstructions or other interference. Make sure you are in the vicinity of the Wi-Fi
wireless network you want to connect to.
1 Slide the Capture/View switch to View .
®
2 Insert a Kodak Wi-Fi
page 43).
3 Deploy the Wi-Fi card (see page 43).
If the card is already in the deployed position, you can re-scan for available
card (may be sold separately) into the camera (see
networks by:
– Touching the Wireless icon, , located on the bottom toolbar.
– Pressing the Menu button, selecting Setup, then selecting Available Networks
under the Wireless menu.
– Redeploying the Wi-Fi card by retracting, then deploying the card (see
page 43).
The wireless network status light (next to the Wi-Fi card slot) blinks amber as the
camera scans for available networks.
www.kodak.com/go/support
44
Page 52

Using your camera with a Wi-Fi wireless network
■ If one or more wireless networks are available, the camera checks for network
profiles stored in the camera (see page 46):
– If the settings of a profile match the settings for an available network, a
connection is made according to the profile order.
– If a matching profile is not on the camera, the camera screen lists the
available networks. Select the network you want to connect to.
For each network on the list:
Connection type is designated with either (Infrastructure)
or (Ad Hoc).
The presence of a padlock, , indicates the network requires a
security key.
Relative signal strength is indicated by the number of escalating bars,
. Green bars indicate a connection to the network.
If prompted, enter a security key code for the network. (Ask the network
administrator for this information if it is unavailable.)
When a connection is made, the wireless network status light glows steady
green.
■ If a wireless network is not available or you are unable to connect:
– You may be out of the signal range. Move within range.
– The network may not be broadcasting it’s SSID or network name, so it does
not appear as an available network on your camera. Set up a profile on
your camera to match the network settings (see page 46) and try again.
– Network settings may not match the settings in any of the profiles in your
camera. Set up a profile on your camera to match the network settings (see
page 46) and try again.
For more information, visit www.kodak.com/go/wifisupport or www.wi-fi.org.
45 www.kodak.com/go/support
Page 53

Using your camera with a Wi-Fi wireless network
Setting up a network profile
When you connect to a secure network, designated by a padlock, , or if you
connect to an any network more than once, a profile containing the network settings
is stored on your camera. Depending on the network settings, you may need to create
a network profile to connect to it.
For example, if the network is not broadcasting it’s SSID, or network name, the
network does not appear as an available network on your camera. However, if you
know the SSID and other information about the network, you can manually create a
profile which will allow your camera to connect:
1 In View , press the Menu button, then select Setup.
2 Select Wireless .
3 Select Profiled Networks.
4 Select Add Network Profile.
5 Select and change settings to match the network you want to connect to. When
finished, touch Done.
For more information, visit www.kodak.com/go/wifisupport or www.wi-fi.org.
Choosing or changing a network connection
If you are connected to a Wi-Fi wireless network and you want to switch the
connection to a different network, select another available network on your camera:
1 In View , press the Menu button, then select Setup.
2 Select Wireless .
3 To see a list of networks that are broadcasting in your vicinity, select Available
Networks.
To see a list of networks stored on your camera, select Profiled Networks.
4 Select a network from the list. If prompted, enter a security key code for the
network. (Ask the network administrator for this information if it is unavailable.)
For more information, visit www.kodak.com/go/wifisupport or www.wi-fi.org.
www.kodak.com/go/support
46
Page 54

Using your camera with a Wi-Fi wireless network
Key to the wireless network status light
Wireless network
status light
See page 43 for card positions.
Color - behavior Indicates...
Off Camera power is off; card is not inserted or is retracted
Red - Blinking Card error; remove and reinsert
Amber - Solid Card is deployed; no network connection
Amber - Blinking Card is deployed; searching for a network to connect to
Green - Solid Card is deployed; connected to a network
47 www.kodak.com/go/support
Page 55

Using your camera with a Wi-Fi wireless network
Glossary of common wireless terms
Access point—(Also called AP.) A wireless network transceiver or “base station”
that can connect a wired local area network to one or many wireless devices. Access
points can also bridge to each other.
Ad Hoc—A client setting that provides independent device-to-device connectivity in
a wireless local area network. An alternative set-up is one where PCs communicate
with each other through an access point.
Bridge—A product that connects a local area network to another local area network
that uses the same protocol (for example, wireless, Ethernet or token ring). Wireless
bridges are commonly used to link buildings in campuses.
Client—An application on a computer or device connected to a network that
requests services (files, print capability) from another member of the network.
DHCP—Dynamic Host Configuration Protocol: a utility that enables a server to
dynamically assign IP addresses from a predefined list and limit their time of use so
they can be reassigned. Without DHCP, an IT Manager would have to manually enter
in all the IP addresses of all the clients on the network. With DHCP, whenever a client
logs onto the network, it automatically gets an IP address assigned to it.
DNS—Domain Name System (or Service, or Server): a program that translates URLs
to IP addresses by accessing a database maintained on a collection of Internet servers.
The program works behind the scenes to facilitate surfing the Web with alpha versus
numeric addresses. A DNS server converts a name like mywebsite.com to a series of
numbers like 107.22.55.26. Every Web site has its own specific IP address on the
Internet.
DSL—Digital Subscriber Lines: various technology protocols for high-speed data,
voice and video transmission over ordinary twisted-pair copper POTS (Plain Old
Telephone Service) telephone wires.
www.kodak.com/go/support
48
Page 56

Using your camera with a Wi-Fi wireless network
Encryption key—An alphanumeric (letters and/or numbers) series that enables
data to be encrypted then decrypted so it can be safely shared among members of a
network. WEP uses an encryption key that automatically encrypts outgoing wireless
data. On the receiving side, the same encryption key enables the computer to
automatically decrypt the information so it can be read.
Infrastructure—A client setting providing connectivity to an access point. As
compared to Ad Hoc mode, whereby PCs communicate directly with each other,
clients set in Infrastructure Mode all pass data through a central access point. The
access point not only mediates wireless network traffic in the immediate
neighborhood, but also provides communication with the wired network.
IP—Internet Protocol: technology that supports voice, data and video transmission
via IP-based local area networks, wide area networks, and the Internet. This includes
VoIP (Voice over IP).
IP address—A number that identifies each sender or receiver of information that is
sent across the Internet.
Network name—Identifies the wireless network for all the shared components.
During the installation process for most wireless networks, you need to enter the
network name or SSID. Different network names are used when setting up your
individual computer, wired network or workgroup.
Router—A access point (AP) or device that sends data from one local area network
(LAN) or wide area network (WAN) to another. A router monitors and controls data
flow and sends information using the most efficient route based on traffic load, line
costs, speed, bad connections, etc.
SSID—Service Set Identifier: also referred to as a network name, since it is essentially
a name that identifies a wireless network. The identifier is attached to the a wireless
local area network (WLAN) and acts as a password when a mobile device tries to
connect to the system. A device will not be permitted to join the network unless it can
provide the unique SSID. An SSID can be broadcast by the network router, allowing
devices to detect it as an available network. An SSID does not supply security to the
network.
49 www.kodak.com/go/support
Page 57

Using your camera with a Wi-Fi wireless network
SSL—Secure Sockets Layer: a commonly used encryption scheme used by many
online retail and banking sites to protect the financial integrity of transactions.
TCP/IP—The underlying technology behind the Internet and communications
between computers in a network.
WEP—Wired Equivalent Privacy: basic wireless security provided by Wi-Fi. In some
instances, WEP may be all a home or small-business user needs to protect wireless
data. WEP is available in 40-bit (also called 64-bit), or in 108-bit (also called 128-bit)
encryption modes. As 108-bit encryption provides a longer algorithm that takes
longer to decode, it can provide better security than basic 40-bit (64-bit) encryption.
WPA—Wi-Fi Protected Access: a Wi-Fi security standard that works with existing
Wi-Fi products enabled with Wired Equivalent Privacy (WEP). It uses data encryption
through the Temporal Key Integrity Protocol (TKIP). TKIP scrambles the keys and
ensures that the keys haven’t been tampered with. User authentication is performed
through the Extensible Authentication Protocol (EAP), to ensure that only authorized
network users can access the network.
Wi-Fi—Wireless Fidelity: a term developed by the Wi-Fi Alliance that is commonly
used to describe any type of 802.11 standard wireless network. Products tested and
approved as "Wi-Fi Certified" (a registered trademark) by the Wi-Fi Alliance are
certified as interoperable with each other, even if they are from different
manufacturers.
For more information, visit www.kodak.com/go/wifisupport or www.wi-fi.org.
www.kodak.com/go/support
50
Page 58

7 Synchronizing and
transferring to a computer
Connect your camera to a computer to synchronize (or "sync") with or transfer
pictures and videos to your computer.
Synchronizing with Kodak EasyShare software is an easy way to organize and match
the pictures on your camera with the pictures on your computer (and vice versa). More
than just transferring pictures from your camera to your computer, synchronizing lets
you:
■ Copy Favorites from EasyShare software on your computer to your camera*
■ Synchronize picture and album information between the camera and EasyShare
software
■ Update the date and time on your camera with the date and time on your
computer
■ Synchronize address book information between your camera and EasyShare
software
* If this option is selected, recently taken pictures and videos on your camera are also
transferred to EasyShare software. To save storage space, EasyShare software
replaces the original pictures on your camera with lower-resolution versions. These
pictures are suitable for printing 4 x 6 in. (10 x 15 cm) prints.
Each time your camera connects to EasyShare software, updates are made, according
to the options selected in the EasyShare software sync & transfer preferences. Click
the Help button in the Kodak EasyShare software for details.
Of course, you can always transfer pictures and videos without synchronizing.
Transferring allows you to copy to your computer only the pictures and videos you
choose.
51 www.kodak.com/go/support
Page 59

Synchronizing and transferring to a computer
Installing the software
1 Close all software applications that are open on
your computer (including anti-virus software).
2 Place the Kodak EasyShare software CD into the
CD-ROM drive.
IMPORTANT:
Use the EasyShare software CD included
with your camera, or visit
www.kodak.com/go/easysharesw
to download a free copy.
3 Load the software:
Windows OS—if the install window does not appear, choose Run from the Start
menu and type d:\setup.exe where d is the drive letter that contains the CD.
Mac OS X—double-click the CD icon on the desktop, then click the Install icon.
4 Follow the on-screen instructions to install the software.
Windows OS—select Complete to automatically install the most commonly used
applications. Select Custom to choose the applications you wish to install.
Mac OS X—follow the on-screen instructions.
When prompted, register your camera and software. Registering lets you sign up
for information that keeps your system up-to-date. To register later, visit
www.kodak.com/go/register.
5 Restart the computer if prompted. If you turned off anti-virus software, turn it back
on. See the anti-virus software manual for details.
6 Continue to follow the on-screen instructions. When prompted, enter your KODAK
EASYSHARE Gallery account information or create a new account. Providing this
information lets you take advantage of many wireless features of your camera.
NOTE: KODAK EASYSHARE Gallery may not be available in your area; however, you can use the
EasyShare-One camera with your regional online Kodak picture service.
www.kodak.com/go/support
52
Page 60

Synchronizing and transferring to a computer
Setting up your camera for sync and transfer
Your camera can transfer pictures and videos to any computer running EasyShare
software. However, to ensure consistent organization of images and information, your
camera stores an internal identifier that allows it to synchronize with only one
computer. This identifier is established and sent to your camera through the sync &
transfer settings in EasyShare software.
The first time you connect to a computer, either with a USB cable or by wireless
transfer, you are prompted to choose a sync & transfer option. Pick an option that best
suits your situation (you may change these options in EasyShare software later):
Yes, synchronize with my software—recommended if installing on a single or
"primary" computer. Each time you connect your camera with a USB cable, recently
taken pictures and videos are automatically transferred to your computer. In addition,
images, albums, date & time, and address book information are updated on your
computer and on the camera according to the synchronization options you set in
EasyShare software.
No, only transfer my pictures—recommended if installing on an additional, or
"secondary" computer. Each time you connect your camera with a USB cable, pictures
and videos are transferred to your computer. Synchronization is disabled.
NOTE: After connecting your camera to your computer for the first time, synchronization or transfer is
automatic when connecting with a USB cable (see page 54). When connecting wirelessly,
synchronization or transfer occurs only by selecting these options on your camera (see page 55).
IMPORTANT:
To avoid unintentional deletion of pictures and videos, make sure
synchronization is disabled for additional computers on which you install
EasyShare software. Follow the prompts closely during software installation
and when connecting to your computer. Click the Help button in the Kodak
EasyShare software for details.
53 www.kodak.com/go/support
Page 61

Synchronizing and transferring to a computer
Sync and transfer with a USB connection
When you connect your camera to a computer using the USB cable, synchronization or
transfer starts automatically, depending on which option you choose the first time you
connect your camera. You can change this setting in EasyShare software any time.
Click the Help button in the Kodak EasyShare software for details.
CAUTION:
Install Kodak EasyShare software
before
connecting the camera or to
the computer. Failure to do so may cause the software to load
incorrectly.
1 Install Kodak EasyShare software (see page 52).
2 Turn off the camera.
3 Plug the labeled end of the USB cable into the
labeled USB port on your computer. See your
computer user’s guide for details.
4 Plug the other end of the USB cable into the labeled
USB port on the camera.
5 Turn on the camera and follow the instructions on
the computer screen.
If this is the first time connecting to your computer,
the setup assistant will guide you through the
www.kodak.com/go/support
connection setup process. Be sure to choose a sync
& transfer option when prompted (see page 53).
Pictures and videos on your camera are synchronized
with or transferred to your computer according to the
sync & transfer settings in EasyShare software.
54
Page 62

Synchronizing and transferring to a computer
Sync and transfer over a Wi-Fi wireless network
Synchronize and transfer with EasyShare software on your computer over your Wi-Fi
®
wireless network using a Kodak Wi-Fi
Transferring pictures and videos over a Wi-Fi wireless network
card (may be sold separately).
IMPORTANT:
Make sure your computer is on and you are logged-in. In EasyShare
software, make sure the Enable Wireless Connection option is checked
(under Preferences > Wireless). Click the Help button in the Kodak
EasyShare software for details.
1 Connect to the same wireless network as the computer you want to transfer
pictures and videos to (see page 44).
2 In View , select a picture or video. To select multiple pictures and videos, use
the drawer (see page 23), or select an album.
3 Press the Share button on the camera, then select Transfer.
The camera checks for available computers running EasyShare software on the Wi-Fi
wireless network.
4 If one or more computers running EasyShare software are available, on your
camera select the computer you want to transfer your pictures and videos to.
■ If prompted, select an authentication option on your computer to authorize
your camera to transfer. Click the Help button in the Kodak EasyShare
software for details.
■ If this is the first time connecting to your computer, on your computer select a
sync & transfer option when prompted (see page 53).
Transfer starts, and a message appears on the camera screen indicating the transfer
status.
NOTE: If the camera is also connected via the USB cable when attempting to transfer wirelessly, pictures
are transferred to the computer through the USB connection.
See Using your camera with a Wi-Fi wireless network, page 39 for more information.
55 www.kodak.com/go/support
Page 63

Synchronizing and transferring to a computer
Synchronizing with EasyShare software over a Wi-Fi wireless network
IMPORTANT:
Make sure your computer is on and you are logged-in. In EasyShare
software, make sure the Enable Wireless Connection option is checked
(under Preferences > Wireless). Click the Help button in the Kodak
EasyShare software for details.
NOTE: If this is the first time connecting to your computer, the synchronize feature on the camera is not
functional. You must first designate your computer for synchronizing with your camera, either by
connecting the camera to the computer with a USB cable, or through wireless transfer (see
page 53). Once connected, change sync & transfer settings in EasyShare software. Click the Help
button in the Kodak EasyShare software for details.
1 Connect to the same wireless network as the
computer you have established for synchronizing
(see page 44).
2 Touch the Wireless icon, , located on the
bottom toolbar.
3 On the camera, select Synchronize.
■ If prompted, select an authentication option on
your computer to authorize your camera to
connect wirelessly. Click the Help button in the
Kodak EasyShare software for details.
Synchronization starts, and a message appears on the
camera screen and computer screen indicating the
transfer status.
4 When finished, touch Done.
NOTE: If the camera is also connected via the USB cable when attempting to synchronize wirelessly,
pictures are transferred to the computer through the USB connection.
See Using your camera with a Wi-Fi wireless network, page 39, or visit
www.kodak.com/go/wifisupport for more information.
www.kodak.com/go/support
56
Page 64

8 Sharing pictures and videos
With the Kodak EasyShare-One zoom digital camera, sharing pictures with your family
and friends has never been more convenient. In addition to giving you several ways to
print and email your pictures, the brilliant 3 in. (7.6 cm) hybrid LCD touchscreen lets
you show-off your pictures and videos from the palm of your hand.
For even greater versatility, connect to the Internet on a Wi-Fi wireless network to
view your pictures on KODAK EASYSHARE Gallery. Coupled with the ability to store
up to1500 (optimized for viewing on the camera), your Kodak EasyShare-One camera
is the ultimate personal sharing device.
Do it from your camera—just press Share!
Press the Share button to print and email pictures,
to upload pictures online to KODAK EASYSHARE
Gallery, and to transfer pictures and videos to your
computer.
1 Press the Share button:
■ In Capture , to share the most recent picture or video taken.
■ In View , to share the pictures and videos you select.
2 Select a Share option:
Email—send pictures to friends and family over the Internet (see page 58).
Prints—print pictures right away over a Wi-Fi wireless network, or tag them for
printing at a later time (see page 60).
Upload—add pictures to your KODAK EASYSHARE Gallery albums (see page 61).
Transfer—transfer pictures to your computer (see page 64).
Slide Show—watch a slide show of your albums (see page 65).
Setup—change camera settings.
57 www.kodak.com/go/support
Page 65

Sharing pictures and videos
Sending email over a Wi-Fi wireless network
Use the email feature to invite your family and friends to view your albums on KODAK
EASYSHARE Gallery.
NOTE: Your camera uses an Internet connection and KODAK EASYSHARE Gallery to email pictures
remotely. KODAK EASYSHARE Gallery may not be available in your area; however, you can use the
EasyShare-One camera with your regional online Kodak picture service.
1 In View , select a picture. (In Capture, the most recent picture taken is
automatically selected). To select multiple pictures, use the drawer (see page 23)
or select an album.
2 Press the Share button, then select Email. Touch Start to begin.
3 Touch a name from the list, or touch Add Person to create a new entry.
4 Use the touch keyboard to enter a subject and a message.
5 When finished, touch Done.
If connected to an available Wi-Fi wireless network with an Internet connection, the
email is sent to the selected person. Otherwise, the email is placed in the outbox (see
page 69).
NOTE: An email message inviting the recipients to view your pictures is sent from your KODAK EASYSHARE
Gallery account. If this is the first time emailing the selected pictures, a new album is created in your
KODAK EASYSHARE Gallery account.
■ With an available Wi-Fi wireless network with an Internet connection, you can
even email albums stored in your KODAK EASYSHARE Gallery collection. See
page 64.
See Using your camera with a Wi-Fi wireless network, page 39, or visit
www.kodak.com/go/wifisupport for more information.
www.kodak.com/go/support
58
Page 66

Sharing pictures and videos
Creating and managing an address book
1 Press the Menu button, then select Setup.
2 Select Contacts .
3 Touch a name from the list, or touch Add Person to enter a new name. Use the
touch keyboard to enter contact information, including email address.
NOTE: You can also create and manage an address book using EasyShare software on your computer, then
synchronize to update your camera (see page 51). Click the Help button in the Kodak EasyShare
software for details.
Creating and managing group lists
1 Press the Menu button, then select Setup.
2 Select Groups .
3 Touch a group from the list, or touch Add Group to enter a new group.
4 Use the touch keyboard to enter a group name, then select contacts from your
address book to add to the group.
NOTE: You can also create and manage an address book using EasyShare software on your computer, then
synchronize to update your camera (see page 51). Click the Help button in the Kodak EasyShare
software for details.
59 www.kodak.com/go/support
Page 67

Sharing pictures and videos
Printing pictures over a Wi-Fi wireless network
1 In View , select a picture. (In Capture, the most recent picture taken is
automatically selected). To select multiple pictures, use the drawer (see page 23)
or select an album (videos are excluded).
2 Press the Share button, then select Prints.
3 Press to select the number of copies to print.
4 When finished, press the OK button or touch Done.
If connected to an available Wi-Fi wireless network with one or more connected
printers, the print is sent to the printer you select. Otherwise, the picture is placed in the
outbox (see page 69).
NOTE: For the best 4 x 6 in. (10 x 15 cm) prints, set the camera to the (3:2) Picture Size setting (see
page 33).
See Using your camera with a Wi-Fi wireless network, page 39, or visit
www.kodak.com/go/wifisupport for more information.
www.kodak.com/go/support
60
Page 68

Sharing pictures and videos
Accessing KODAK EASYSHARE Gallery from your camera
With a Kodak Wi-Fi® card (may be sold separately) and available Wi-Fi wireless
network with an Internet connection, you can logon to your EASYSHARE Gallery
account, then upload, view, and email pictures right from your camera.
Visit www.kodakgallery.com to create a free account. Then, enter your account
information on your camera (see page 9).
NOTE: KODAK EASYSHARE Gallery may not be available in your area; however, you can use the
EasyShare-One camera with your regional online Kodak picture service.
Setting the Gallery domain name
In addition being connected to a Wi-Fi wireless network with Internet connection (see
page 39), to use the EASYSHARE Gallery features of your camera, you must choose
the proper domain name, or URL, for the region you live in. You are prompted to
choose one the first time you connect to EASYSHARE Gallery.
To change it:
1 Press the Menu button, then select Setup.
2 Select Preferences .
3 Touch The Gallery URL.
4 Select the URL for the region you live in.
61 www.kodak.com/go/support
Page 69

Sharing pictures and videos
Uploading pictures to the Gallery
1 Make sure the account settings on your camera match your EASYSHARE Gallery
account settings (see page 9).
2 Connect to a Wi-Fi wireless network with Internet connection (see page 39). If this
is the first time connecting to EASYSHARE Gallery, select your regional online
picture service domain when prompted. To change your regional domain after
setting it, see page 61.
3 In View , select a picture. To select multiple pictures, use the drawer (see
page 23) or select an album.
4 Press the Share button, then select Upload.
The camera checks for an Internet connection and regional EASYSHARE Gallery
service.
■ If services are available, the camera connects to EASYSHARE Gallery. Follow
the instructions on the screen.
A message appears on the screen indicating the upload status.
■ If a service is not available, try again when and where services are available.
www.kodak.com/go/support
62
Page 70

Sharing pictures and videos
Viewing pictures on the Gallery
1 Make sure the account settings on your camera match your EASYSHARE Gallery
account settings (see page 9).
2 Connect to a Wi-Fi wireless network with Internet connection (see page 39). If this
is the first time connecting to EASYSHARE Gallery, select your regional online
picture service domain when prompted. To change your regional domain after
setting it, see page 61.
3 In View , press the Menu button.
4 Select The Gallery to view your albums, or select Friends’ Albums to view the
albums of others that have been saved to your account.
The camera checks for an Internet connection and regional EASYSHARE Gallery
service.
■ If services are available, the camera connects to EASYSHARE Gallery, and lets
you view your albums and pictures.
■ If a service is not available, try again when and where services are available.
Viewing a slide show of your pictures on the Gallery
■ While viewing pictures in your EASYSHARE Gallery collection, touch the Slide show
icon, .
Pictures from the current album are displayed every 3 seconds. The slide show repeats
after it cycles through all images in the album.
■ To move forward or backward through the slide show order, press .
■ To pause the slide show, press . To resume, press .
■ To end the slide show any time, touch the screen or press the OK button.
■ To view the slide show on your TV, connect the camera to the TV, then run the
slide show (see page 66).
63 www.kodak.com/go/support
Page 71

Sharing pictures and videos
Emailing from the Gallery
1 While viewing albums in your EASYSHARE Gallery collection (see page 63), select
an album, then press the Share button.
2 Select Email.
3 Touch a name from the list, or touch Add Person to enter a new name.
4 Use the touch keyboard to enter a subject and a message.
5 When finished, touch Done.
The email is sent to the selected person.
Transferring pictures and videos to a computer
You can transfer pictures and videos from your camera to any computer that has
EasyShare software installed. Use the USB cable to transfer automatically, or select
pictures on your camera then select Transfer from the Share menu to transfer over
your Wi-Fi wireless network.
See Synchronizing and transferring to a computer, page 51.
www.kodak.com/go/support
64
Page 72

Sharing pictures and videos
Viewing a slide show
1 In View , press the Menu button then select a
View option (see page 17).
2 Press the Share button, then select Slide Show.
Or, touch the Slide show icon, .
Pictures and videos from the album are displayed every
3 seconds. The slide show repeats after it cycles
through all images in the album.
■ To move forward or backward through the slide
Slide show icon
show order, press .
■ To pause the slide show, press . To resume,
press .
■ To end the slide show any time, press the OK
button.
■ To view the slide show on your TV, connect the
camera to the TV (see page 66), then run the
slide show.
NOTE: The display switches from the camera screen to the TV screen
when a connection is made. Use the 4-way controller
to control the camera functions when connected to
a TV.
65 www.kodak.com/go/support
Page 73

Sharing pictures and videos
More ways to share your pictures and videos
Displaying pictures and videos on a television
You can display pictures and videos on a television, computer monitor, or any device
equipped with a video input. (Image quality on a television screen may not be as good
as on a computer monitor or when printed.)
NOTE: Ensure that the Video Out setting (NTSC or PAL) is correct (see page 36). If you are viewing a slide
show (see page 65), the slide show stops if you connect or disconnect the cable during the slide
show.
1 Connect the audio/video cable (included) from the camera A/V Out/USB port to the
television video-in port (yellow) and audio-in port (white). See your television
user's guide for details.
NOTE: The display switches from the camera screen to the TV screen when a connection is made. Use
the 4-way controller to control the camera functions when connected to a TV.
2 View pictures and videos on the television.
Emailing pictures from your computer
Use EasyShare software on your computer to send pictures over the Internet to your
friends and family.
Or, try using EasyShare software to quickly set up an address book or a group list.
Next time you synchronize your camera with EasyShare software (see page 51), the
address book and group lists you created are added to your camera. For details, click
the Help button in the Kodak EasyShare software.
www.kodak.com/go/support
66
Page 74

Sharing pictures and videos
Using the quick print option
Touch the Quick print icon, , to print a single
copy of the selected picture over your Wi-Fi wireless
network to a printer on the same network (see
Using your camera with a Wi-Fi wireless network,
page 39).
If you are not connected to a Wi-Fi wireless
network, or if a printer is not available, pictures
Quick print icon
tagged for printing are placed in the outbox (see
page 69).
Docking and printing on a Kodak EasyShare printer dock
Dock your camera to a compatible EasyShare printer dock and print directly—with or
without a computer (see Dock compatibility, page 89).
In addition, you can print to a Wi-Fi enabled Kodak EasyShare printer dock or photo
printer directly over a Wi-Fi wireless Ad Hoc network connection. For more
information about the Wi-Fi wireless capabilities of your camera, see page 39.
Printing from your computer
For details on printing pictures from your computer, click the Help button in the Kodak
EasyShare software or view the documentation for the software application you want
to print from.
Printing from an optional SD/MMC card
■ Automatically print tagged pictures when you insert your card into a printer with
an SD/MMC card slot. See page 71 and your printer user’s guide for details.
■ Make prints at an SD/MMC card-capable Kodak picture maker. (Contact a location
prior to visiting. See www.kodak.com/go/picturemaker.)
■ Take the card to your local photo retailer for professional printing.
67 www.kodak.com/go/support
Page 75

Sharing pictures and videos
Visit EASYSHARE Gallery from your computer
Discover a world of sharing options when you access EASYSHARE Gallery on the
Internet using your computer. KODAK EASYSHARE Gallery is one of several online
print services offered in the Kodak EasyShare software. You can easily:
■ Upload your pictures to albums on KODAK EASYSHARE Gallery.
■ Edit, enhance, and add borders to your pictures.
■ Store pictures, and share them with family and friends.
■ Order high-quality prints, photo greeting cards, frames, and albums—and have
them delivered to your home, or to the homes of your friends and family.
EASYSHARE Gallery will even address the envelopes and mail them for you.
Visit www.kodakgallery.com to create your free account.
NOTE: KODAK EASYSHARE Gallery may not be available in your area; however, you can use the
EasyShare-One camera with your regional online Kodak picture service.
www.kodak.com/go/support
68
Page 76

Sharing pictures and videos
The outbox
When sending email over a Wi-Fi wireless network (see page 58), if a Wi-Fi wireless
network with Internet service or regional online picture service is not available,
pictures tagged for email are placed in the outbox for future delivery.
Similarly, when printing over a Wi-Fi wireless network (see page 60), if a Wi-Fi
wireless network with a connected printer is not available, pictures tagged for printing
are placed in the outbox for future delivery.
Viewing pictures in the outbox
1 In View , press the Menu button, then select Outbox.
2 Select Email or Prints.
Sending email
1 Connect to a Wi-Fi wireless network with an Internet connection (see page 39).
2 Touch the Wireless icon, , located on the bottom toolbar.
3 Select Send Email Order.
A message appears on the screen indicating current
activity and status.
4 Touch Done.
Emails are sent and are removed from the outbox.
■ Alternatively, you can send tagged pictures for email by synchronizing with
EasyShare software (see page 51).
69 www.kodak.com/go/support
Page 77

Sharing pictures and videos
Sending pictures for print
1 Connect to a Wi-Fi wireless network (see page 39).
2 Touch the Wireless icon, , located on the bottom toolbar.
3 Select Send Print Order.
A message appears on the screen indicating current
activity and status.
4 Touch Done.
Pictures are sent to the printer and are removed from
the outbox.
■ Alternatively, you can send pictures for printing through EasyShare software on
your computer. Connect to EasyShare software through synchronization or transfer
(see page 51).
www.kodak.com/go/support
70
Page 78

Sharing pictures and videos
Creating a print order on a memory card
You can make a digital print order file (DPOF) from pictures on an inserted memory
card with the pictures in the outbox. Once a print order has been created, simply
remove the card from your camera, then insert it into a Kodak picture maker or a
compatible EasyShare printer dock or photo printer (with card reader) for fast,
convenient printing.
NOTE: To ensure pictures you select for print are placed in the outbox rather than printed immediately,
avoid connecting the camera to your computer or to a Wi-Fi wireless network. For best results, keep
the Wi-Fi card in the retracted position while selecting pictures (see page 43).
1 Make sure an SD or MMC memory card is inserted in the camera (see page 11).
2 In View , select a picture
located on the memory card
.
NOTE: A print order can only be created with pictures on the memory card. To include pictures from
internal memory in the print order, first copy them to the card (see page 26).
3 Press the Share button, then select Prints.
4 Press to select the number of copies to print, then press the OK button.
Repeat steps 2-4 for each picture you want to add to the print order.
5 Press the Menu button, then select Outbox.
6 Select Card Print Order.
7 Follow the instructions on the screen. When finished touch Done.
The print order is created on the memory card.
71 www.kodak.com/go/support
Page 79

Sharing pictures and videos
Removing email from the outbox
1 In View , press the Menu button, then select Outbox.
2 Select Email.
3 Select an email then press the Delete button.
The picture is removed from the outbox. (The picture is not deleted from the original
location on the camera.)
NOTE: The accompanying email text message is also deleted.
Removing pictures for print from the outbox
1 In View , press the Menu button, then select Outbox.
2 Select Prints.
3 Select a picture then press to set the print quantity to zero.
4 Press the Back button, , to exit.
NOTE: The picture is not deleted from the original location on the camera.
www.kodak.com/go/support
72
Page 80

9 Troubleshooting
Camera
For step-by-step product support, visit www.kodak.com/go/easyshare-onesupport
and select Interactive Troubleshooting & Repairs.
Problem Cause and/or solution
Camera does not
turn on
Camera does not
turn off and the lens
does not retract
Camera buttons and
controls do not
function
Lens does not extend
when camera turns
on
Pictures remaining
number does not
decrease after you
take a picture
■ Remove the battery and verify that it is the correct type. Before
reinserting, be sure the battery is oriented so that the battery
contacts line-up with the contacts inside the battery slot on the
camera (page 3).
■ Place the camera on a compatible Kodak EasyShare camera dock or
printer dock (sold separately), then try again.
■ Connect the camera to a Kodak 5-volt AC adapter (sold separately),
then try again.
See page 93 for more battery information.
■ Camera may be in View . Slide the Capture/View switch to the
Capture position to extend lens and take pictures.
■ Remove the battery and wipe the contacts with a clean, dry cloth.
■ Insert a charged battery (page 3).
■ Turn the camera off then on again (page 4).
■ Continue taking pictures. The camera is operating normally.
(The camera estimates the number of pictures remaining after each
picture is taken, based on picture size and content.)
Picture orientation is
not accurate
Flash does not fire
■ Set the Orientation Sensor to ON (page 36).
■ The camera lens is pointing straight up or straight down. Tilt
camera slightly to allow the camera to better detect orientation.
■ Check the flash setting and change as needed (page 15).
73 www.kodak.com/go/support
Page 81

Problem Cause and/or solution
Troubleshooting
Storage location is
almost or entirely full
You cannot take a
picture
Cannot locate a
picture
■ Transfer pictures and videos to the computer (page 51).
■ Delete unwanted pictures and videos, or insert a new memory card
(page 11).
■ Change the image storage location to internal memory by removing
the memory card.
■ Slide the Capture/View switch to the Capture position.
■ Turn the camera off, then on again (page 4).
■ Depress the shutter button completely down (page 12).
■ Insert a new or charged battery (page 3).
■ Wait until the AF framing brackets turn green before attempting to
take another picture (page 12).
■ Slide the Capture/View switch to the View position and press
the Menu button to choose an appropriate view option.
■ The picture may have been transferred to EasyShare software
during synchronization, and removed from your camera. Check the
sync & transfer settings in your EasyShare software. Click the Help
button in the Kodak EasyShare software for details.
Slide show does not
run on an external
video device
Error message
appears on the
■ Adjust the camera Video Out setting (NTSC or PAL, page 36).
■ Make sure that the external device settings are correct (see the
device’s user’s guide).
■ Turn the camera off (page 4).
■ Remove the memory card from the camera (page 11).
screen
■ Remove the battery and wipe the contacts with a clean, dry cloth.
■ Insert a charged battery (page 3).
■ Turn the camera off then on again (page 4).
Memory card not
recognized or camera
■ Card may be corrupted. Format card in camera (page 36).
■ Use another memory card.
freezes with card
www.kodak.com/go/support
74
Page 82

Troubleshooting
Problem Cause and/or solution
A memory card is
inserted in the Wi-Fi
card slot
■ Using a separate memory card to remove it: with contacts facing
out, insert the card into the Wi-Fi card slot. Gently push the card
against the inserted card to unseat it from the connector. Remove
the card by inverting the camera.
Picture quality
Problem Cause and/or solution
Picture is too dark
■ Reposition the camera for more available light.
■ Use Fill flash (page 15) or change your position so light is not behind
the subject.
■ Move so that the distance between you and the subject is within the
effective flash range (page 15).
■ To automatically set exposure and focus, press the Shutter button
halfway. When the AF framing brackets turn green, press the
Shutter button completely down to take the picture.
■ Increase the exposure compensation (page 30).
Picture is too light
■ Reposition the camera to reduce the amount of available light.
■ Turn flash off (page 15).
■ Move so that the distance between you and the subject is within the
effective flash range (page 15).
■ To automatically set exposure and focus, press the Shutter button
halfway. When the AF framing brackets turn green, press the
Shutter button completely down to take the picture.
■ Decrease the exposure compensation (page 30).
75 www.kodak.com/go/support
Page 83

Troubleshooting
Problem Cause and/or solution
Picture is not clear ■ Select a scene mode that matches the scene you are trying to capture
(page 27).
■ To automatically set exposure and focus, press the Shutter button
halfway. When the AF framing brackets turn green, press the
Shutter button completely down to take the picture.
■ Clean the lens (page 94).
■ Make sure the camera is not in Close-up mode if you are more than
21 in. (0.7 m) from your subject.
■ Place the camera on a flat, steady surface or use a tripod, especially
in high-zoom settings or in low light.
USB connection to computer
Problem Cause and/or solution
Computer does not
communicate with
■ Turn on the camera (page 4).
■ Turn on, or "wake-up" the computer.
the camera
■ Insert a charged battery (page 3).
■ Make sure the USB cable is securely connected on the camera
and the computer port (page 53).
■ Make sure that EasyShare software is installed (page 52).
Pictures and videos do not
■ Click the Help button in the EasyShare software.
transfer to computer
www.kodak.com/go/support
76
Page 84

Troubleshooting
Wireless network connection
Problem Cause and/or solution
Camera cannot
connect to the network
Camera cannot
connect to KODAK
EASYSHARE Gallery (or
regional online Kodak
picture service), or
service is interrupted
■ Make sure a Kodak Wi-Fi
®
card is correctly inserted in the
camera.
■ Make sure the camera is turned on and has adequate battery
power.
■ Make sure the wireless router and network are running before
the camera begins scanning for a network.
■ Make sure you are within the recommended operating range.
■ The network profile on your camera is incorrect. Change the SSID,
security, and mode settings on the camera to match those of the
network.
■ There is interference in the wireless signal (such as a microwave
oven or a cordless telephone).
■ The wireless router is not connected to Internet or an Internet
connection is unavailable.
■ The online picture service is unavailable.
■ There is no online Kodak picture service in the region.
■ A firewall is blocking the camera from accessing Internet.
■ The proxy setting on the camera is incorrect (if required).
■ The IP address setting on the camera is incorrect. Change the IP
■ The email address and/or password on camera are incorrect.
■ There is a problem with the network (see above).
77 www.kodak.com/go/support
address on the camera or set to Dynamic IP.
Page 85

Problem Cause and/or solution
Troubleshooting
Camera cannot
connect to the
expected EasyShare
software
■ Authentication in EasyShare software is needed the first time
connecting. Click the Help button in the Kodak EasyShare
software for details.
■ The Enable Wireless Connection option in EasyShare software is
not checked. Click the Help button in the Kodak EasyShare
software for details.
■ EasyShare software is not running. Open EasyShare software.
Once open, you may close the active session, however make sure
the Kodak logo appears in your system tray.
■ EasyShare software is not installed. Load the EasyShare software
CD that came with the camera or download from the Web
(www.kodak.com/go/easysharesw).
■ The camera is connected to the wrong wireless router using the
same setting.
■ The EasyShare software is an older version that doesn’t support
wireless service. Load the software CD that came with the
camera, or download the latest software from the Web
(www.kodak.com/go/easysharesw).
■ The computer is on a different network. Configure your computer
and camera network settings so they match.
■ There is a problem with the network (see above).
www.kodak.com/go/support
78
Page 86

Troubleshooting
Synchronization and transfer
Problem Cause and/or solution
Synchronization/
transfer stops or does
not start
Synchronization/
transfer is slow
■ The computer has entered standby or hibernation.
■ The camera is disconnected (during authentication and setup),
possibly due to:
– Camera turning off
– Distance (weak signal)
– Interference (such as a microwave oven or a cordless
telephone)
– The wireless router shutting down
– Wi-Fi card not properly inserted
■ Synchronization/transfer is not set in EasyShare software (see
EasyShare software Help for details).
■ Set up and authenticate the camera on EasyShare software (see
EasyShare software Help for details).
■ The network is slow possibly due to:
– Distance (weak signal)
– Interference (such as a microwave oven or a cordless
telephone)
■ The computer is slow, possibly due to:
– Processing other tasks
– Disk space is full
– Low processor speed
■ The wireless router is set to slow transfer rate.
Incomplete transfer or
missing images
■ There is not enough disk space left on the computer.
■ The transfer was interrupted (see above).
79 www.kodak.com/go/support
Page 87

Printing
Problem Cause and/or solution
Troubleshooting
Printing does not start
Camera prints to the
wrong printer
Print is not complete
■ The printer power is off.
■ Printer is busy printing or is engaged in another session.
■ Printer has a full buffer.
■ Printer is in an error state. Correct the error.
■ The printer, camera, or computer (if using one) are not connected
to the network or are on different networks.
■ The IP address setting on the camera or printer is incorrect.
Change the IP address or set to Dynamic IP.
■ There is a problem with the network (see page 77).
■ The selected printer has the same name as the intended one, and
is on the same network.
■ The printer was disconnected from the network in mid-print.
www.kodak.com/go/support
80
Page 88

Troubleshooting
Helpful links
Camera Get support for your product
(FAQs, troubleshooting
information, etc.)
Purchase camera accessories
(camera docks, printer docks,
lenses, cards, etc.)
Download the latest camera
firmware and software
See online demonstrations of
your camera
Software Get information on EasyShare
software
Get help with the Windows
operating system and working
with digital pictures
www.kodak.com/go/easyshare-onesupport
www.kodak.com/go/wifisupport
www.kodak.com/go/easyshare-oneaccessories
www.kodak.com/go/easyshare-onedownloads
www.kodak.com/go/howto
www.kodak.com/go/easysharesw
(or click the Help button in the EasyShare software)
www.kodak.com/go/pcbasics
Other Get support for other cameras,
software, accessories, more
Get information on Kodak
EasyShare printer docks
Get information on Kodak
inkjet products
Optimize your printer for truer,
more vibrant colors
Register your camera www.kodak.com/go/register
www.kodak.com/go/support
www.kodak.com/go/printerdocks
www.kodak.com/go/inkjet
www.kodak.com/go/onetouch
81 www.kodak.com/go/support
Page 89

Troubleshooting
Telephone customer support
If you have questions concerning the operation of the software or camera, you may
speak with a customer support representative. Before you call, have the camera or
dock connected to your computer. Be at your computer, and have the following
information available:
■ Computer model, Operating system
■ Processor type and speed (MHz)
■ Amount of memory (MB) and free hard
■ Camera serial number
■ Version of Kodak EasyShare software
■ Exact error message you received
disk space
Australia 1800 147 701 Greece 00800 441 40775 Singapore 800 6363 036
Austria 0179 567 357 Hong Kong 800 901 514 Spain 91 749 76 53
Belgium 02 713 14 45 India 91 22 617 5823 Sweden 08 587 704 21
Brazil 0800 150000 Italy 02 696 33452 Switzerland 01 838 53 51
Canada 1 800 465 6325 Japan 03 5540 9002 Taiwan 0800 096 868
China 800 820 6027 Korea 00798 631 0024 Thailand 001 800 631
0017
Denmark 3 848 71 30 Netherlands 020 346 9372 Turkey 00800 448
827073
Indonesia001 803 631
0010
Ireland 01 407 3054 Norway 23 16 21 33 US (toll-free)
Finland 0800 1 17056 Philippines /
France 01 55 1740 77 Poland 00800 441 1625 International
Germany 069 5007 0035 Portugal 021 415 4125
Visit www.go/dfiswwcontacts.
www.kodak.com/go/support
New Zealand 0800 440 786 UK 0870 243 0270
1 800 235 6325
Metro Manila
1 800 1 888 9600
/ 632 6369600
/ (toll)
International
Toll Line
Toll Fax
/ 585 781 6231
+44 131 458
6714
+44 131 458
6962
82
Page 90

Troubleshooting
Notice of Limitations to Wireless Support
Kodak Service and Support
■ Installing and setting up Kodak EasyShare software, version 5.0 or higher
■ Using and setting up the Kodak EasyShare-One zoom digital camera, or a Wi-Fi
will
assist you with:
enabled Kodak EasyShare printer dock or photo printer on an Infrastructure or Ad
Hoc Wi-Fi wireless network
Before calling for wireless problems with the Kodak EasyShare-One zoom digital
camera, please make sure you have a working Wi-Fi wireless network.
Kodak Service and Support cannot assist you with:
■ Installing or setting up a wireless Infrastructure network
■ Installing or setting up wireless cards or equipment not manufactured by Kodak
■ Installation or setting up drivers or software not manufactured by Kodak
■ Problems with your Internet connection, or cable, DSL, or dial-up equipment
■ Problems with your Internet Service Provider
For problems setting up your wireless network, please contact the manufacturer of
your wireless network equipment, or contact your network administrator for
assistance.
83 www.kodak.com/go/support
Page 91

10 Appendix
Camera specifications
For more specifications, visit www.kodak.com/go/easyshare-onesupport.
EasyShare-One zoom digital camera specifications
CCD
CCD 1/2.5 in. Interline Transfer CCD, 4:3 aspect ratio
Output image size (image
quality mode)
Display
Color display 3.0 in. (7.6 cm) hybrid LCD, 960 x 240 (230K - RGB) pixels,
Preview Frame rate: 30 fps
Lens
Taking lens 3X optical zoom, f/2.8–4.8,
Focus system Auto focusing, TTL-AF, Multi-Zone
4.0 MP: 2304 x 1728 pixels
3.5 MP (3:2): 2304 x 1536 pixels
2.1 MP: 1656 x 1242 pixels
1.1 MP: 1200 x 900 pixels
Touchscreen
Field-of-view: 100%. Continuous AF, AE, AWB
36–108 mm (35 mm film camera equivalent)
TTL-AF locked at halfway shutter press in Capture
www.kodak.com/go/support 84
Working range:
24 in. (60 cm)–infinity @ wide and telephoto normal
4–28 in. (10–70 cm) @ wide macro
17–28 in. (43–70 cm) @ telephoto macro
33 ft (10 m)–infinity in Landscape mode
Page 92

Appendix
EasyShare-One zoom digital camera specifications
Digital zoom 1.0–3.3X with 0.3X step
Not supported for video
Accessory lens thread Not supported
Lens cover Yes, in camera
Exposure
Exposure metering TTL-AE
Multi-pattern AE, Center-weight, Center-spot AE
AE (@ still) locked at halfway shutter press, Continuous AE (@
video and preview)
Exposure range AE Range (@ wide): EV 4.4–15.3 (1/2 sec. @ f/2.9 to 1/1400 sec.
@ f/4.7)
Full Range (@ wide): EV 1.4–15.3 (4 sec. @ f/2.9 to 1/1400 sec.
@ f/4.7)
Exposure compensation ±2.0 EV with 0.3 EV step
Shutter Mechanical shutter with CCD electrical shutter
1/1448–1/2 sec.
ISO speed Auto, manual: 80, 100, 200, 400
Flash
Electronic flash Guide no. 8.0 @ ISO 100
Auto flash
2–10.5 ft (0.6–3.2 m) @ Wide
2–7.5 ft (0.6–2.3 m) @ Tele
Flash modes Auto, Fill, Red-eye, Off
Capture
Scene modes Auto, Portrait, Sports, Landscape, Close-Up, Night Portrait, Night
85 www.kodak.com/go/support
Landscape, Snow, Beach, Text, Fireworks, Flower, Museum/Polite,
Self-Portrait, Party, Children, Backlight
Page 93

Appendix
EasyShare-One zoom digital camera specifications
Burst mode Maximum 5 pictures
AE, AF, AWB executed for first shot only
Video capture Image size: VGA (640 x 480)
Frame rate: 24 fps
Image file format Still: EXIF 2.21 (JPEG compression), file organization DCF
Video: QuickTime (CODEC MPEG4)
Image storage Optional MMC or SD Card , 1 GB maximum capacity
(The SD logo is a trademark of the SD Card Association.)
Internal storage capacity 256 MB internal memory/185 MB available for image storage
(1 MB equals one million bytes)
View
Quickview Yes
Video output NTSC or PAL, via model AV-8 AV cable
Power
Kodak Li-Ion rechargeable digital camera battery KLIC-5000
5V AC adapter, optional
Communication with computer
USB 2.0 full speed (PIMA 15740 protocol), via model U-8 USB cable, EasyShare camera dock,
or EasyShare printer dock
IEEE802.11b (Wi-Fi), via SD Wi-Fi card
Other features
Wireless capability of
camera
Compliance: IEEE 802.11b (Wi-Fi), RCR STD-33, ARIB STD-T66
Transmission rate: 1/2/5.5/11Mbps (auto-detect)
Frequency range: 2412-2462 MHz (1 - 11 channel ISM band)
Access modes: Infrastructure, Ad Hoc
www.kodak.com/go/support
Security: 64/128 bit WEP
86
Page 94

Appendix
EasyShare-One zoom digital camera specifications
Wireless capability of
optional Kodak Wi-Fi
card
®
Card type: SD Input/Output Card (SDIO; specification Ver 1.00
compliant)
Compliance: IEEE 802.11b (Wi-Fi), RCR STD-33, ARIB STD-T66
Transmission rate: 1/2/5.5/11Mbps (auto-detect)
Frequency range: 2412-2462 MHz (1 - 11 channel ISM band)
Modulation Technique: Direct Sequence Spread Spectrum
(CCK,DQPSK,DBPSK)
Operation: 3.3 V via device
Dimensions: 24 x 40 x 2.1 mm
Device compatibility: Wi-Fi technology enabled Kodak EasyShare
devices
Software compatibility: Kodak EasyShare software version 5 or
higher
PictBridge support No
Self-timer Selectable: up to 60 seconds (still); 5, 15, 30, or Max (video)
Sound feedback Power up, shutter release, self-timer, error; on or off selectable.
White balance Auto, Daylight, Tungsten, Fluorescent
Power save Selectable LCD auto-dimmer, auto power off after 8 minutes
Color modes Color, black & white, sepia
Sharpness modes Sharp, standard, soft
Date stamp None, YYYY/MM/DD, MM/DD/YYYY, DD/MM/YYYY
Tripod mount 1/4 in.
Operating temperature 32 to 104
°F (0 to 40 °C)
Size 4.1 in. (10.3 cm) x 1.0 in. (2.6 cm) x 2.5 in. (6.3 cm) @ power off
Weight 8 oz (225 g) without battery or card
87 www.kodak.com/go/support
Page 95

Appendix
Storage capacities
The numbers listed are approximate and can vary due to file size. Cards can contain
other files. You may be able to store more or fewer pictures and videos.
Picture storage capacity
Number of pictures
4.0 MP 3.5 MP (3:2) 2.1 MP 1.1 MP
256 MB Internal memory* 150 167 270 451
16 MB SD/MMC card 12 13 21 36
32 MB SD/MMC card 24 27 43 73
64 MB SD/MMC card 45 54 87 146
128 MB SD/MMC card 97 109 175 293
256 MB SD/MMC card 196 218 351 588
*Internal memory can store up to 1500 images, tagged as Favorites, optimized for
viewing on the camera.
Video storage capacity
Minutes/seconds of video
256 MB Internal memory 6 min.
16 MB SD/MMC card 30 sec.
32 MB SD/MMC card 1 min.
64 MB SD/MMC card 2 min.
128 MB SD/MMC card 4 min.
256 MB SD/MMC card 8 min., 10 sec.
www.kodak.com/go/support
88
Page 96

Appendix
Dock compatibility
Kodak EasyShare dock Docking configuration
■ printer dock plus series 3*
■ series 3 printer docks and
camera docks
Custom
dock insert
Dock
■ printer dock
■ printer dock plus
■ printer dock 6000
■ camera dock 6000
■ printer dock 4000
■ camera dock II
■ LS420, LS443, LS755 camera
Not compatible
dock
NOTE: Your camera is also compatible with the Kodak EasyShare photo printer 500*, a non-docking, Wi-Fi
enabled printer.
*Where available. Visit www.kodak.com/go/easyshare-oneaccessories.
89 www.kodak.com/go/support
Page 97

Power-saving features
No action for The camera To turn the camera back on
Appendix
5, 15, 20, 30
seconds (selectable)
8 minutes Enters auto power off. Press the On/Off button.
Screen dims. Press any button or touch the screen.
Wireless channels
This product operates on the legal channel for your region. You are not able to
manually select the channel. Wi-Fi networks operate in the ISM (Industrial, Scientific,
and Medical) radio frequency band. The ISM band is divided into channels, each
occupying 5MHz of frequency band. To join a wireless network, a node must set its
channel to that of the wireless router (or - in a device-to-device network - to that of
the first node).
Nearby networks that operate on the same channel will interfere with one another,
resulting in lower network speed or connection loss.
CAUTION:
The Wi-Fi card for this device transmits at 15 dBm. In France, the
power level is limited to 10 dBm in outdoor environments, per
regulations. When in France, use the wireless functions of this product
indoors only.
www.kodak.com/go/support
90
Page 98

Appendix
Important safety instructions
Using this product
■ Read and follow these instructions before using Kodak products. Always follow
basic safety procedures.
■ Use only a USB-certified computer. Contact your computer manufacturer if you
have questions.
■ The use of an accessory attachment that is not recommended by Kodak, such as an
AC adapter, may cause fire, electric shock, or injury.
■ If using this product in an airplane, observe all instructions of the airline.
CAUTION:
Do not disassemble this product; there are no user-serviceable parts
inside. Refer servicing to qualified service personnel. Do not expose
this product to liquid, moisture, or extreme temperatures. Kodak AC
adapters and battery chargers are intended for indoor use only. The
use of controls, adjustments, or procedures other than those specified
herein may result in exposure to shock and/or electrical or mechanical
hazards. If the LCD breaks, do not touch the glass or liquid. Contact
Kodak Support.
Battery safety and handling
CAUTION:
When removing batteries, allow them to cool first; batteries may be
hot.
■ Read and follow all warnings and instructions supplied by the battery
manufacturer.
■ Use only batteries approved for this product to avoid risk of explosion.
■ Keep batteries out of the reach of children.
91 www.kodak.com/go/support
Page 99

Appendix
■ Do not allow batteries to touch metal objects, including coins. Otherwise, a battery
may short circuit, discharge energy, become hot, or leak.
■ Do not disassemble, install backward, or expose batteries to liquid, moisture, fire,
or extreme temperature.
■ Replace all batteries of a set at the same time. Do not mix new batteries with used
ones. Do not mix rechargeable and non-rechargeable batteries. Do not mix lithium,
Ni-MH, and Ni-Cd batteries together. Do not mix batteries of different chemistry
types, grades, or brands. Failure to observe this precaution may cause leakage.
■ Remove batteries when the product is stored for an extended period of time. In the
unlikely event that battery fluid leaks inside the product, contact your local Kodak
Customer Service representative.
■ In the unlikely event that battery fluid leaks onto your skin, wash immediately with
water and contact your local health provider. For additional health-related
information, contact your local Kodak Customer Service representative.
■ Dispose of batteries according to local and national regulations.
■ If the battery contacts touch metal objects, the battery may short-circuit, discharge
energy, become hot, or leak.
■ Do not charge non-rechargeable batteries.
For more information on batteries, see
www.kodak.com/global/en/service/batteries/batteryUsage.jhtml
www.kodak.com/go/support
92
Page 100

Appendix
Battery life
Li-Ion rechargeable battery
(per charge)
0 200
Battery life per CIPA testing method. (Approx. number of pictures in Auto mode, using 128 MB
SD card.) Actual life may vary based on usage.
120 - 180
Use only a Kodak Li-Ion rechargeable digital camera battery KLIC-5000. Not all
manufacturers’ 3.7V Li-Ion rechargeable batteries are compatible with the camera.
Damage caused by unauthorized accessories is not covered under warranty.
Extending battery life
■ Reduce LCD dimmer setting.
■ Limit excessive use of the flash.
■ Limit excessive use of Wi-Fi functions
■ Dirt on the battery contacts can affect battery life. Wipe the contacts with a clean,
dry cloth before loading batteries in the camera.
■ Battery performance is reduced at temperatures below 41°F (5°C). When using
your camera in cold weather, carry spare batteries and keep them warm. Do not
discard cold batteries that do not work; when they return to room temperature,
they may be usable.
93 www.kodak.com/go/support
 Loading...