

Page 1
Kodak EasyShare C533/C503
zoom digital camera
User's guide
www.kodak.com
Forinteractivetutorials,www.kodak.com/go/howto
Forhelpwith yourcamera,www.kodak.com/go/cB33supportor
www.kodak.com/go/c503support
Page 2
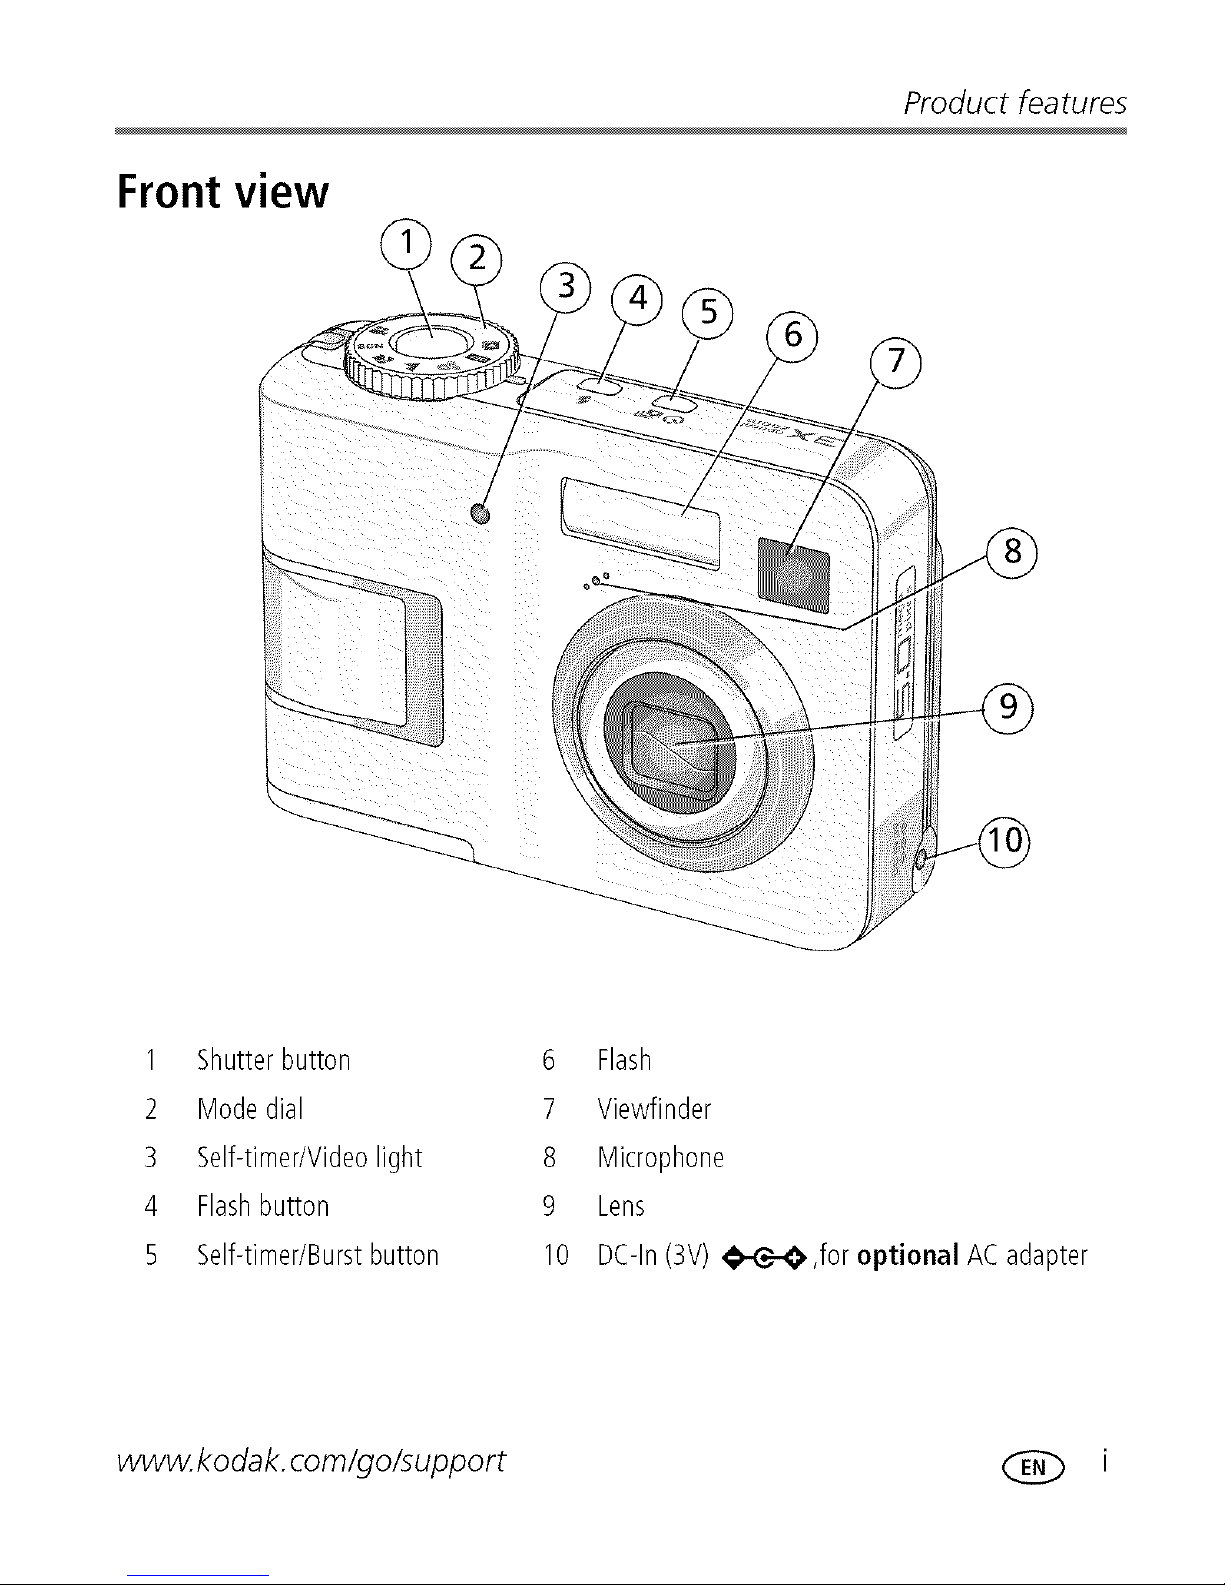
Front view
Product features
1 Shutterbutton
2 Modedial
3 Self-timer/Videolight
4 Flashbutton
5 Self-timer/Burstbutton
6 Flash
7 Viewfinder
8 Microphone
9 Lens
10 DC-In (3V) _l_C_-@,for optional AC adapter
www.kodak, corn/go/support (_ i
Page 3
Product features
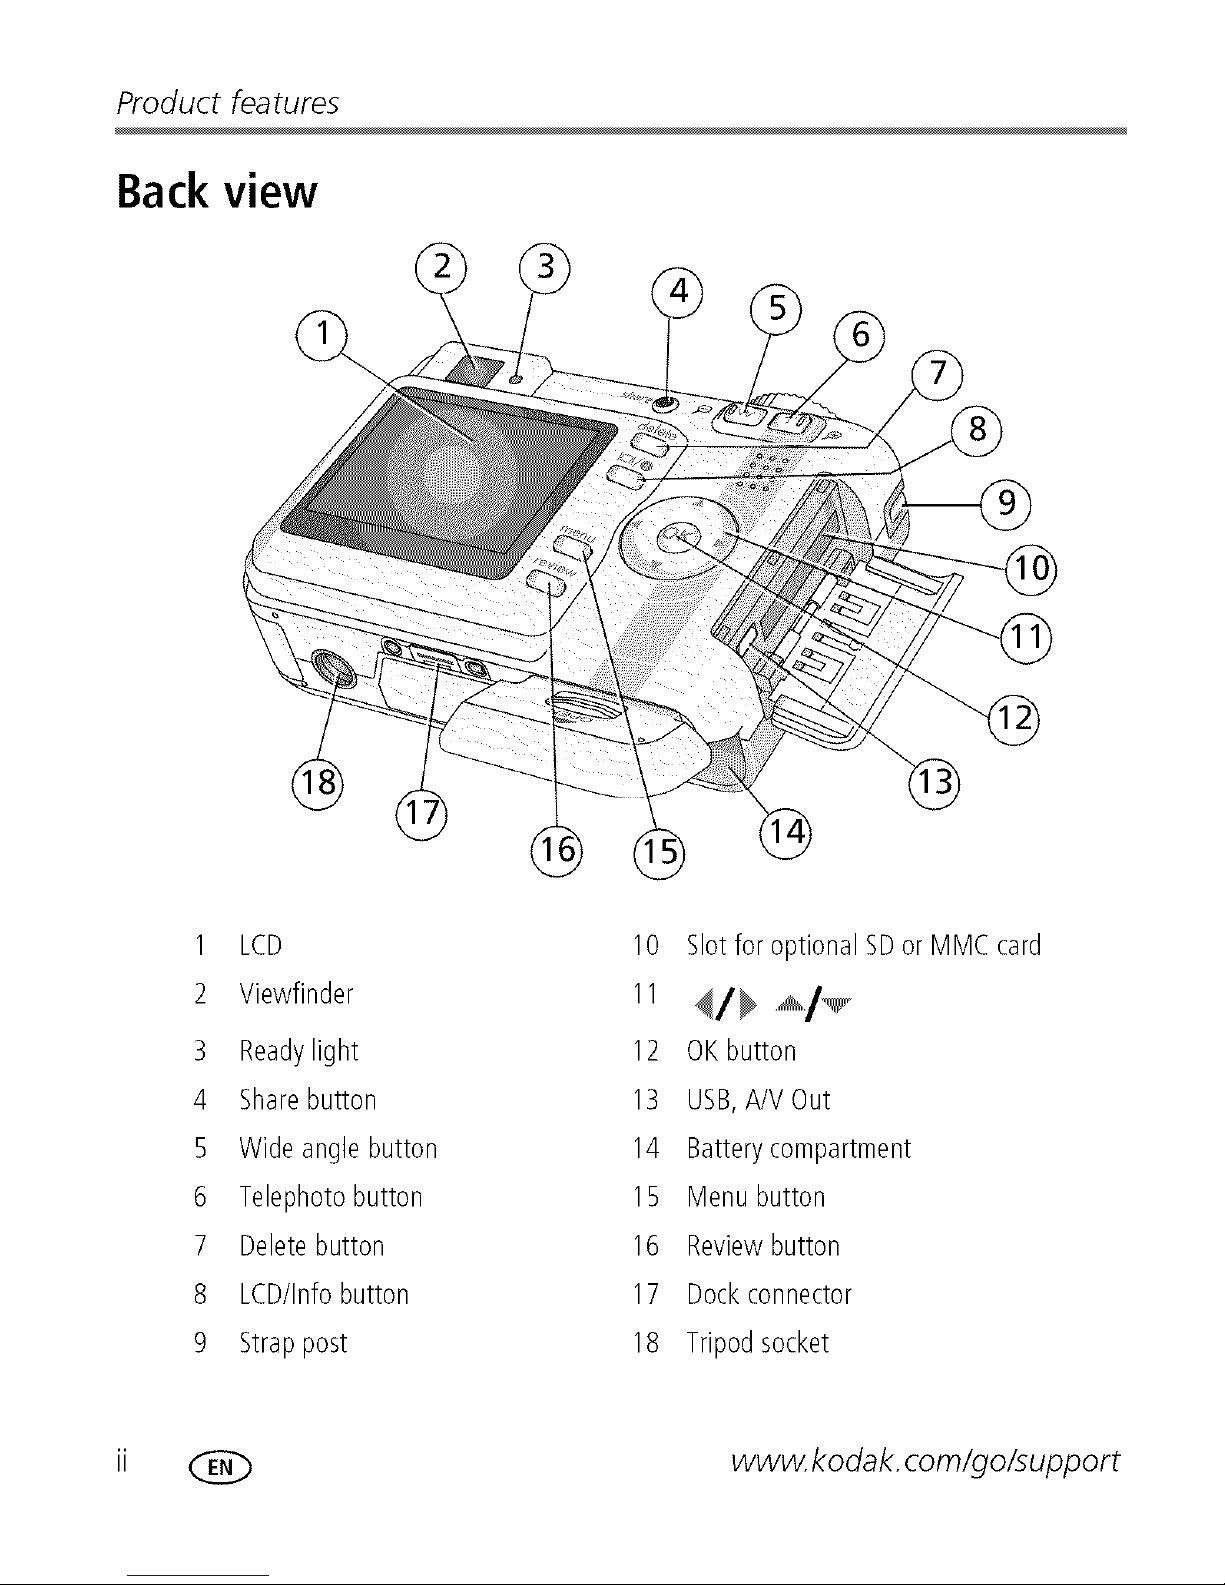
Back view
1 LCD
2 Viewfinder
3 Readylight
4 Sharebutton
5 Wide anglebutton
6 Telephotobutton
7 Deletebutton
8 LCD/Infobutton
9 Strappost
10 Slotfor optional SDor MMCcard
12 OKbutton
3 USB,A/VOut
4 Batterycompartment
5 Menubutton
6 Reviewbutton
7 Dockconnector
8 Tripodsocket
ii @ www.kodak, corn/go/support
Page 4
Table of contents
Setting up your camera ......................................................................... 1
Attachingthe strap.......................................................................................1
Loadingthebattery.......................................................................................1
Turningon the camera..................................................................................2
Settingthe language,date/time.....................................................................2
Storingpictureson an SDorMMCcard.........................................................3
Taking pictures and videos .................................................................... 4
Takinga picture............................................................................................4
Usingtheflash..............................................................................................7
Reviewingpicturesandvideoson yourcamera..............................................8
3 Transferring and printing pictures ....................................................... 11
Installingthesoftware.................................................................................11
Transferringpictureswith the USBcable......................................................12
Printingpictures..........................................................................................12
Dockcompatibilityfor yourcamera..............................................................15
4 Doing more with your camera ............................................................. 16
Usingopticalzoom .....................................................................................16
Picture-takingmodes..................................................................................17
Usingexposurecompensationto adjustbrightness......................................19
Usingthe self-timer.....................................................................................19
Usingburst.................................................................................................20
Changingpicture-takingsettings.................................................................20
Customizingyourcamera............................................................................24
Runninga slideshow..................................................................................26
Croppingpictures........................................................................................27
Viewingpicture/videoinformation...............................................................28
Copyingpicturesandvideos........................................................................28
Pre-taggingfor albumnames......................................................................29
Sharingyourpictures...................................................................................30
www.kodak.com/go/support (_ iii
Page 5

Tableof contents
5 Troubleshooting .................................................................................. 35
Cameraproblems........................................................................................35
Camerareadylightstatus............................................................................37
Camera/computercommunications..............................................................38
LCDscreenmessages..................................................................................39
6 Getting help ........................................................................................ 42
Helpfullinks................................................................................................42
Telephonecustomersupport.......................................................................43
7 Appendix ............................................................................................. 44
Cameraspecifications.................................................................................44
Storagecapacities.......................................................................................47
Importantsafetyinstructions.......................................................................48
Batterylife..................................................................................................50
Upgradingyoursoftwareandfirmware........................................................51
Additionalcareand maintenance................................................................51
Warranty.....................................................................................................51
Regulatorycompliance................................................................................54
iv (_ www.kodak, com/go/support
Page 6
Setting up your camera
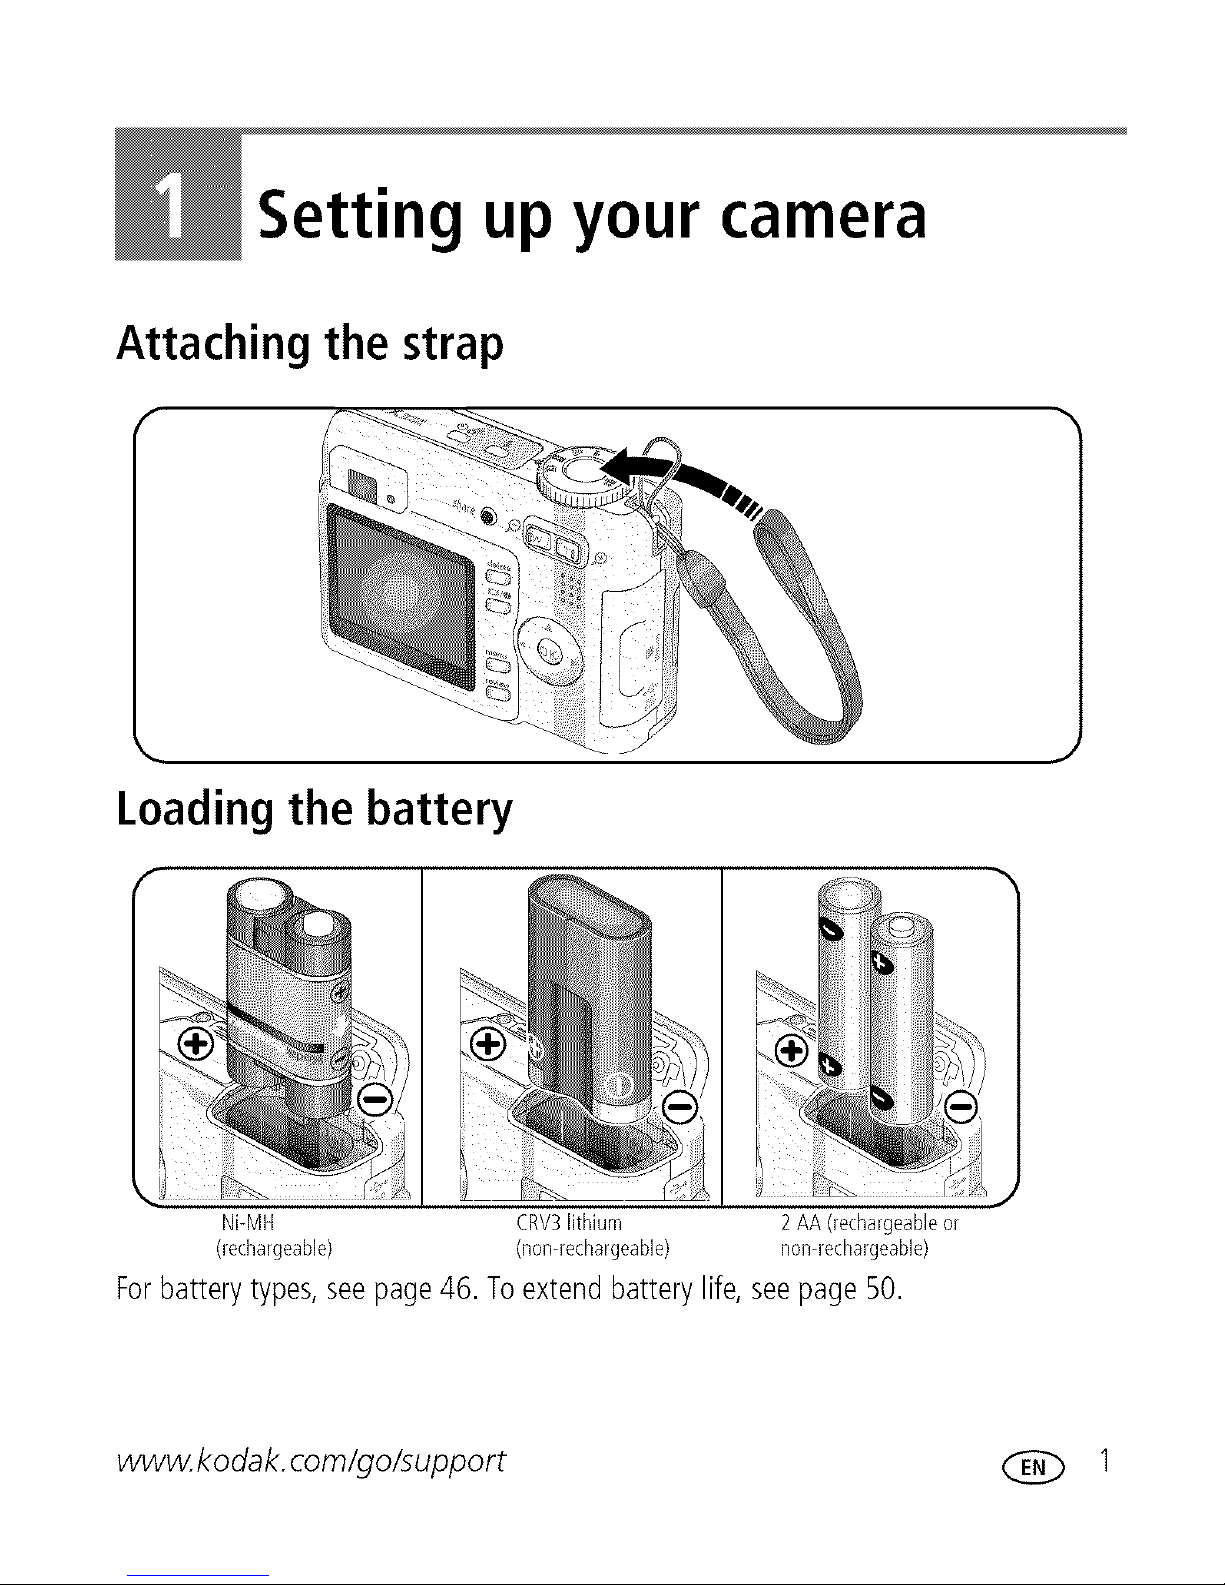
Attaching the strap
Loading the battery
__li_!ii!,iliiliii'¸_ili_i,!,'ili_i_!i
ii
J
Ni-MH 2AA (rechargeableor
(rechargeable) nomrechargeable)
Forbatterytypes,seepage46. Toextendbatterylife,seepage50.
CRV3lithium
(nomrechargeable)
www.kodak, com/go/support (_ 1
Page 7
Setting up your camera
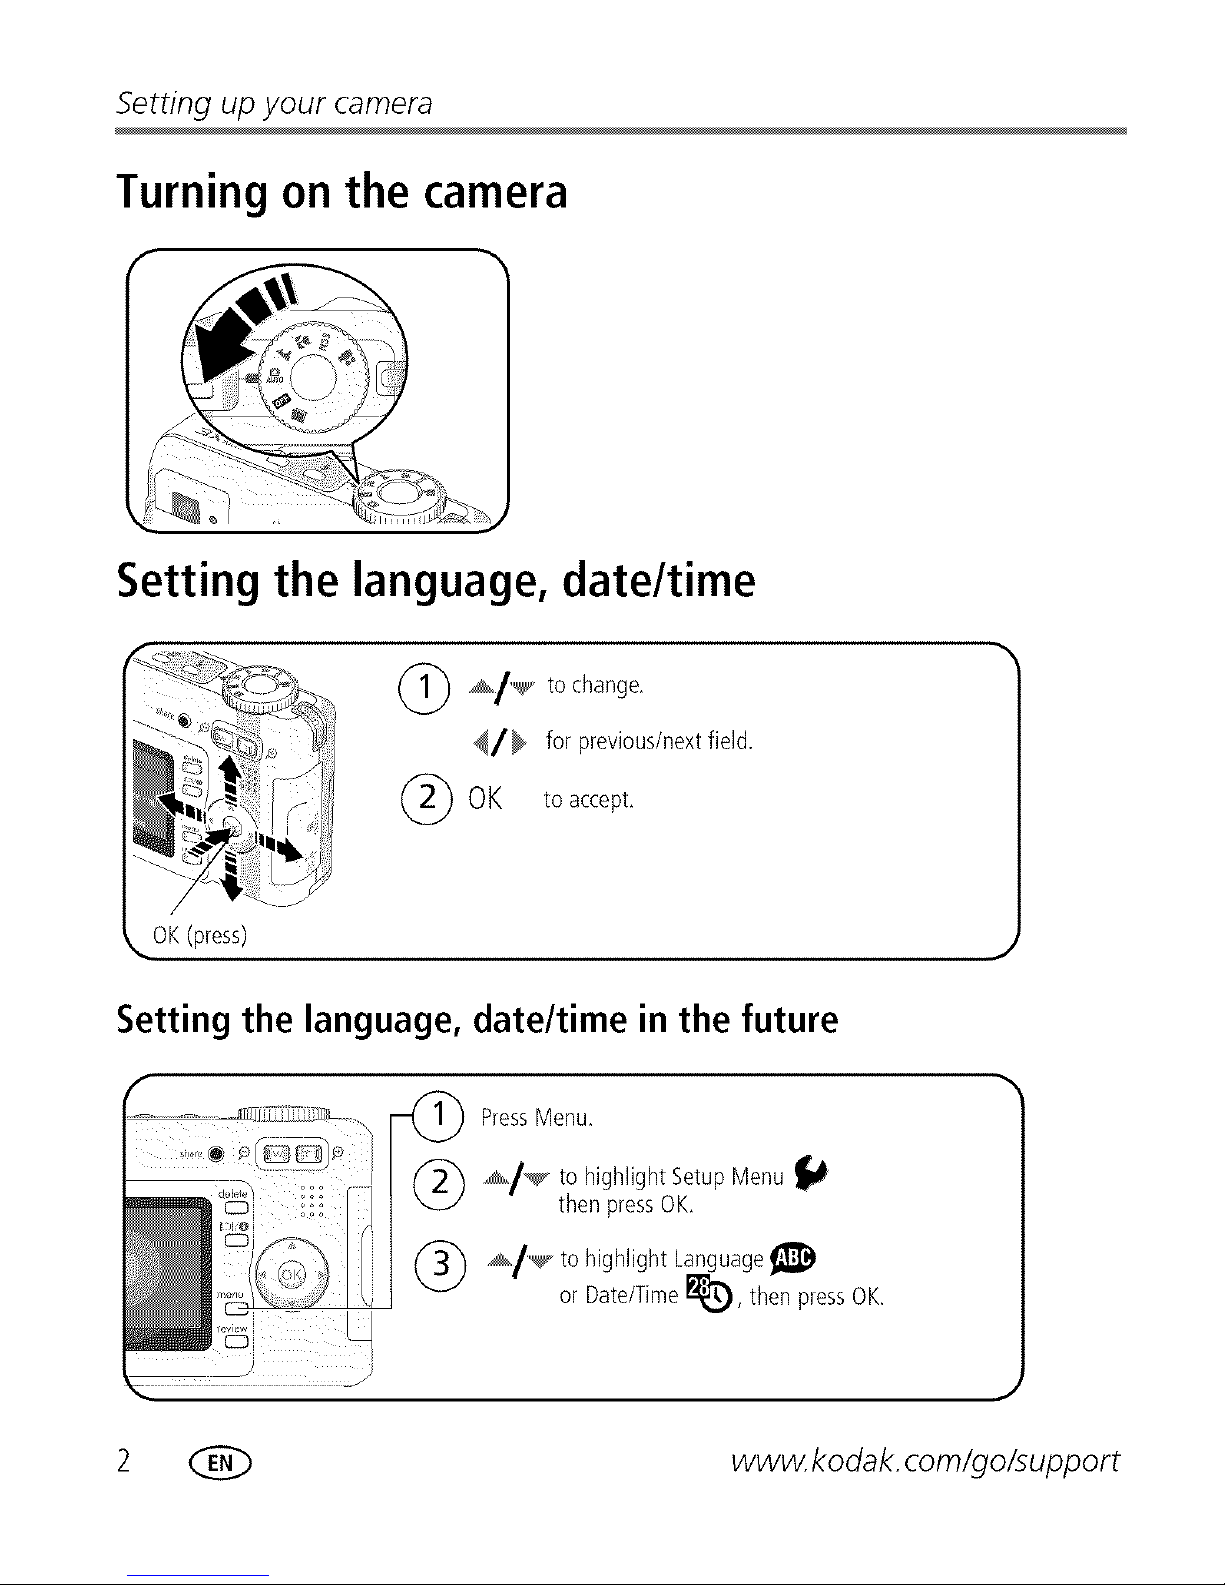
Turning on the camera
Setting the language, date/time
(_ _/,_,_ to change,
_/_ for previous/next field.
(_OK to accept,
OK(press)
Setting the language, date/time in the future
.. Press Menu,
(_) _/_ to highlight Setup Menu
c::D ::: then press OK,
(_) ,_/'_ to highlight Language
or Date/Time !_, then press OK,
2 (_ www.kodak, com/go/support
Page 8
Settingupyourcamera
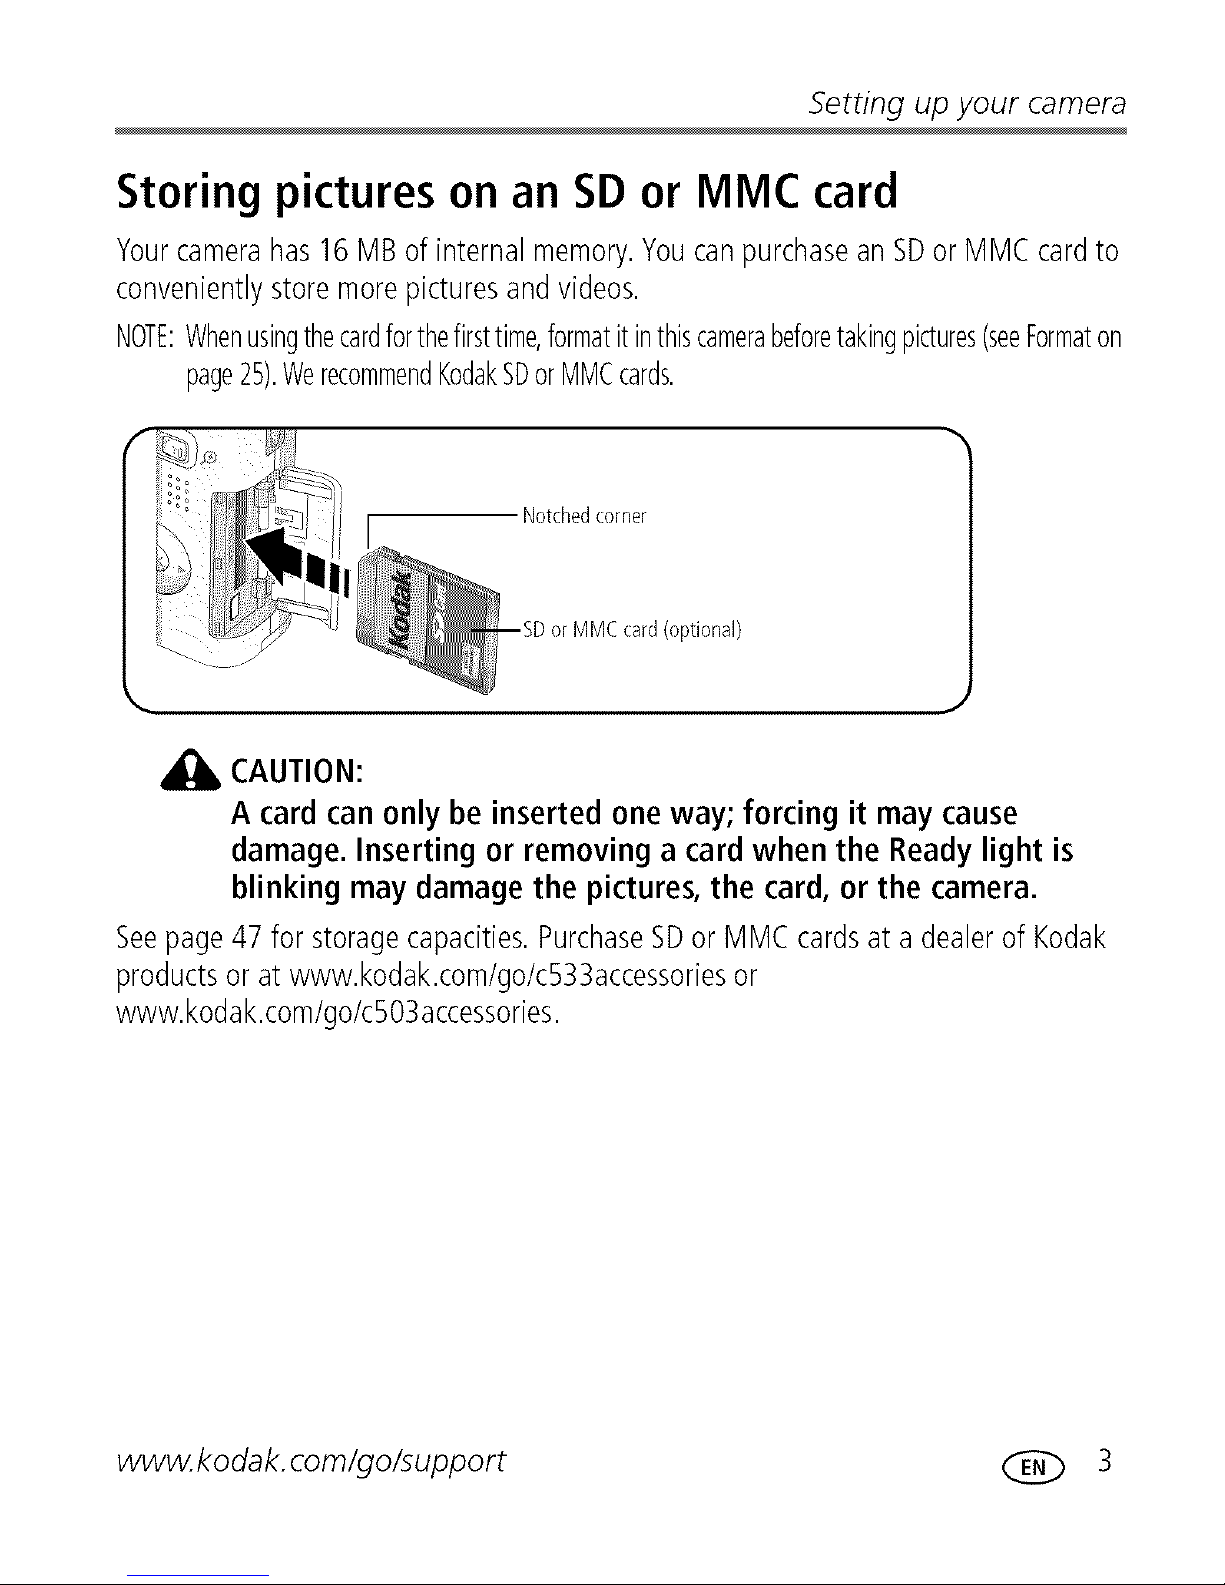
Storing pictures on an SD or MMC card
Yourcamerahas16MBof internalmemory,YoucanpurchaseanSDorMMCcardto
convenientlystoremorepicturesandvideos.
NOTE:Whenusingthecardforthefirsttime,formatitinthiscamerabeforetakingpictures(seeFormaton
page25).WerecommendKodakSDorMMCcards.
Notchedcorner
(optional)
CAUTION:
A card can only be inserted one way; forcing it may cause
damage. Inserting or removing a cardwhen the Readylight is
blinking may damage the pictures,the card,or the camera.
Seepage47 for storagecapacities.PurchaseSDor MMC cardsat a dealerof Kodak
productsor at www.kodak.com/go/c533accessoriesor
www.kodak.com/go/c503accessories.
www.kodak, com/go/support ( E(_ 3
Page 9
Taking pictures and videos
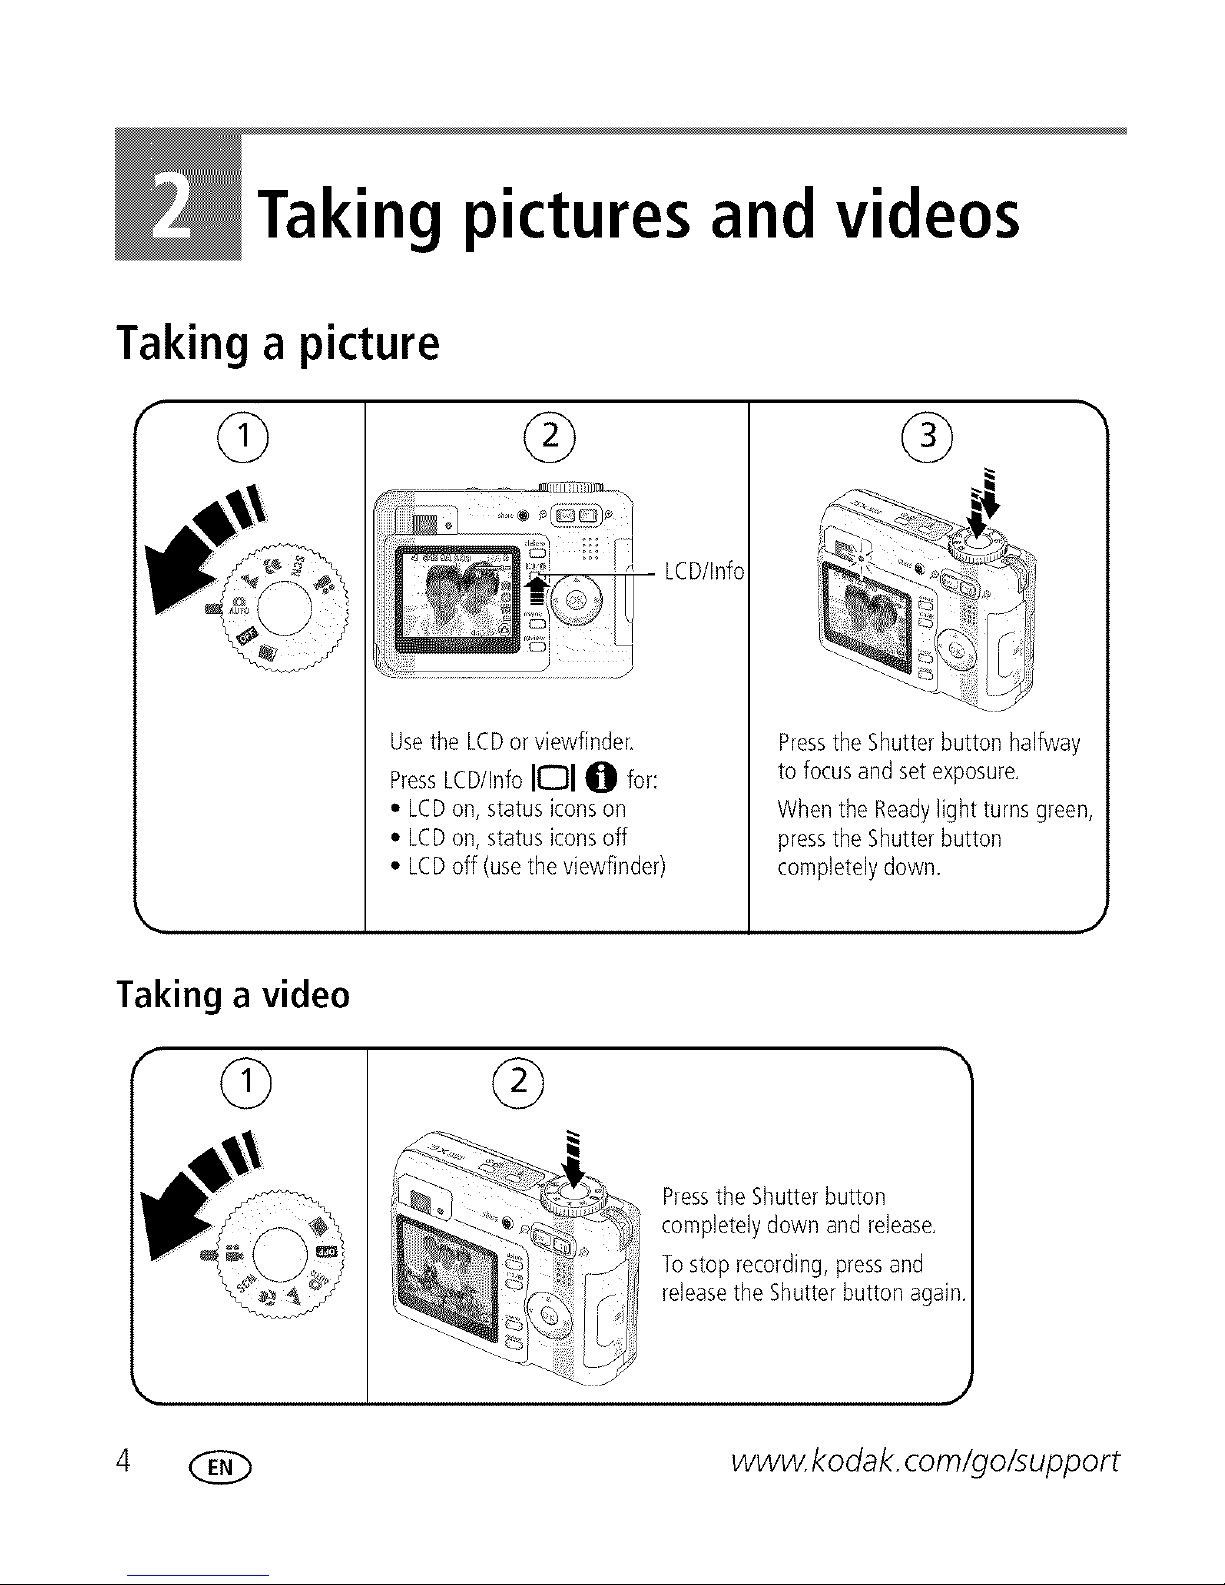
Taking a picture
®
LCD/Info
Usethe LCDor viewfinder,
PressLCD/InfoI010 for:
• LCDon,status iconson
• LCDon,status iconsoff
• LCDoff (usetheviewfinder)
@
Press the Shutter button halfway
to focus and set exposure,
When the Ready light turns green,
press the Shutter button
completely down,
J
Taking a video
@
Pressthe Shutterbutton
completelydown andrelease,
Tostop recording,pressand
releasetheShutterbutton again
J
www.kodak, com/go/support
4 ebb
Page 10
Taking pictures and videos
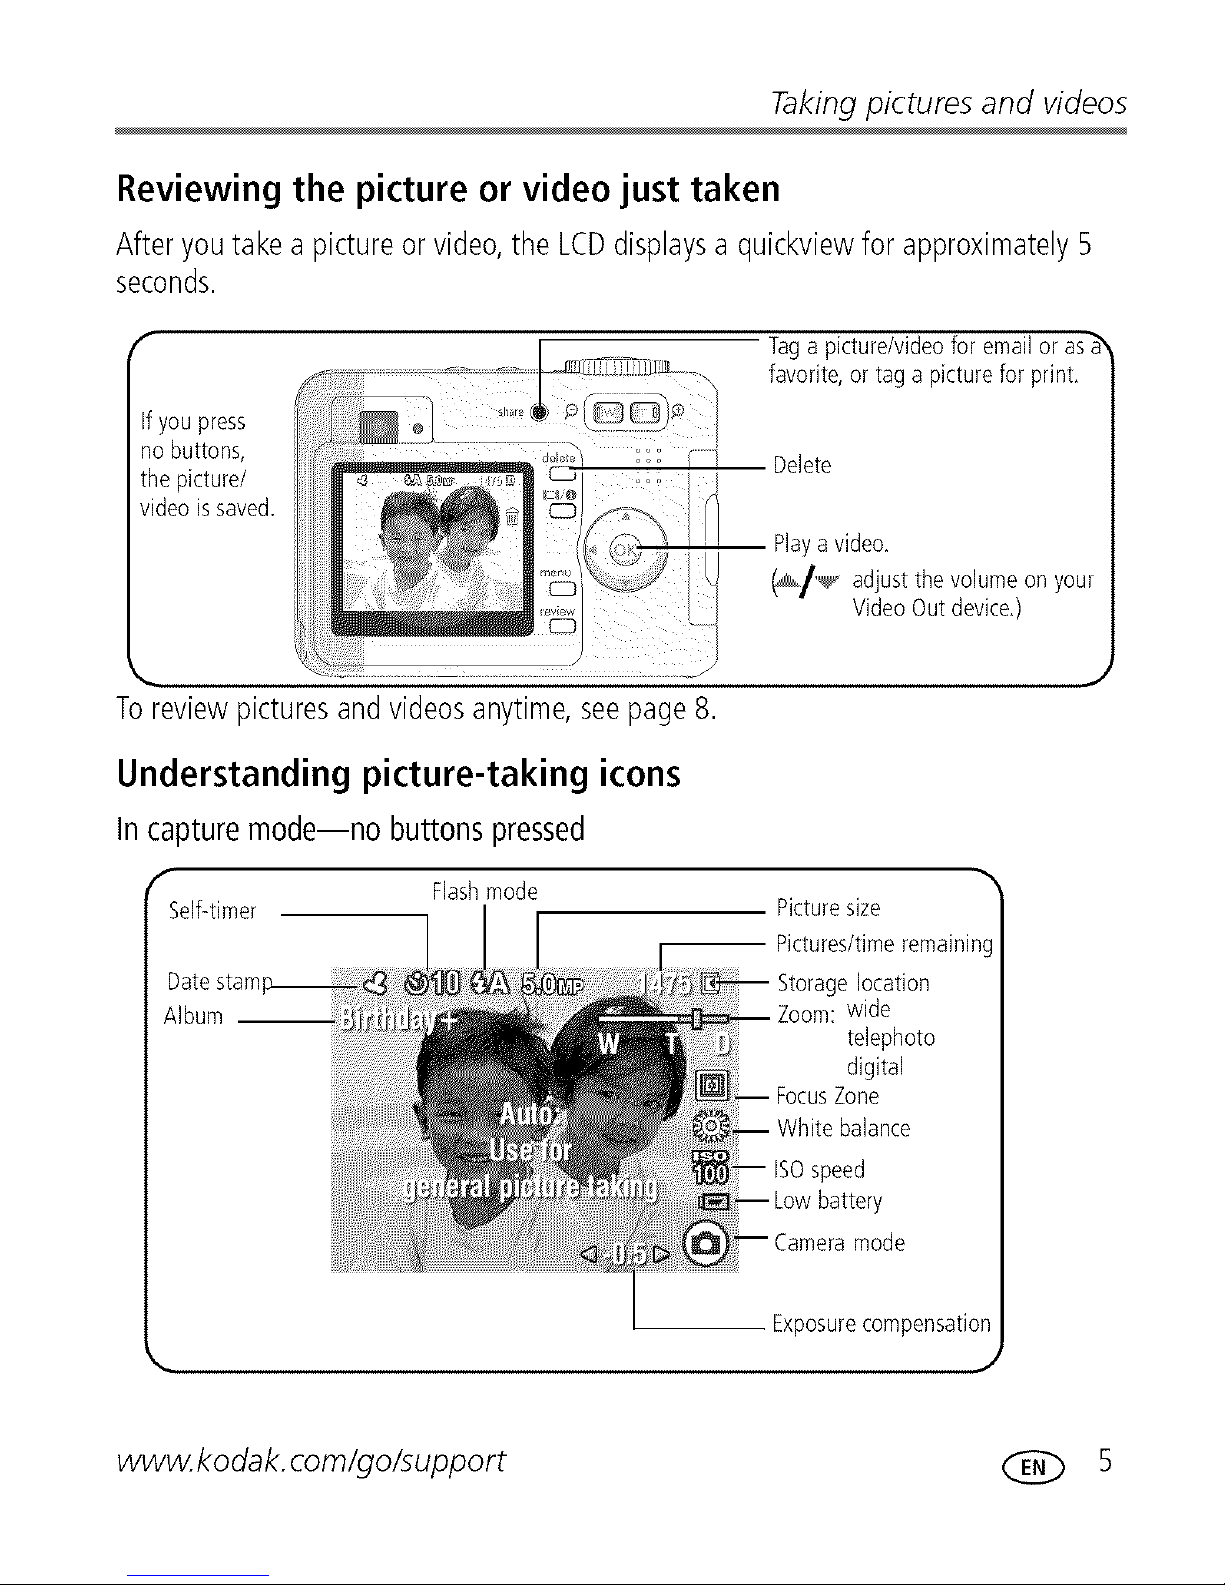
Reviewing the picture or video just taken
Afteryoutakea pictureor video,the LCDdisplaysa quickviewfor approximately5
seconds.
Tag a pkture/video for email or
-- Delete
-- Playavideo,
Toreviewpicturesandvideosanytime,seepage8.
Understanding picture-taking icons
In capturemode--no buttonspressed
Flashmode
Self-timer
1 I
Date
Album
Video Out device,)
Picture size
-- Pictures/time remaininc
location
wide
telephoto
digital
ISOspeed
battery
Camera mode
k.
Exposure compensatiot
J
www.kodak, com/go/support ( E(_ 5
Page 11
Taking pictures and videos
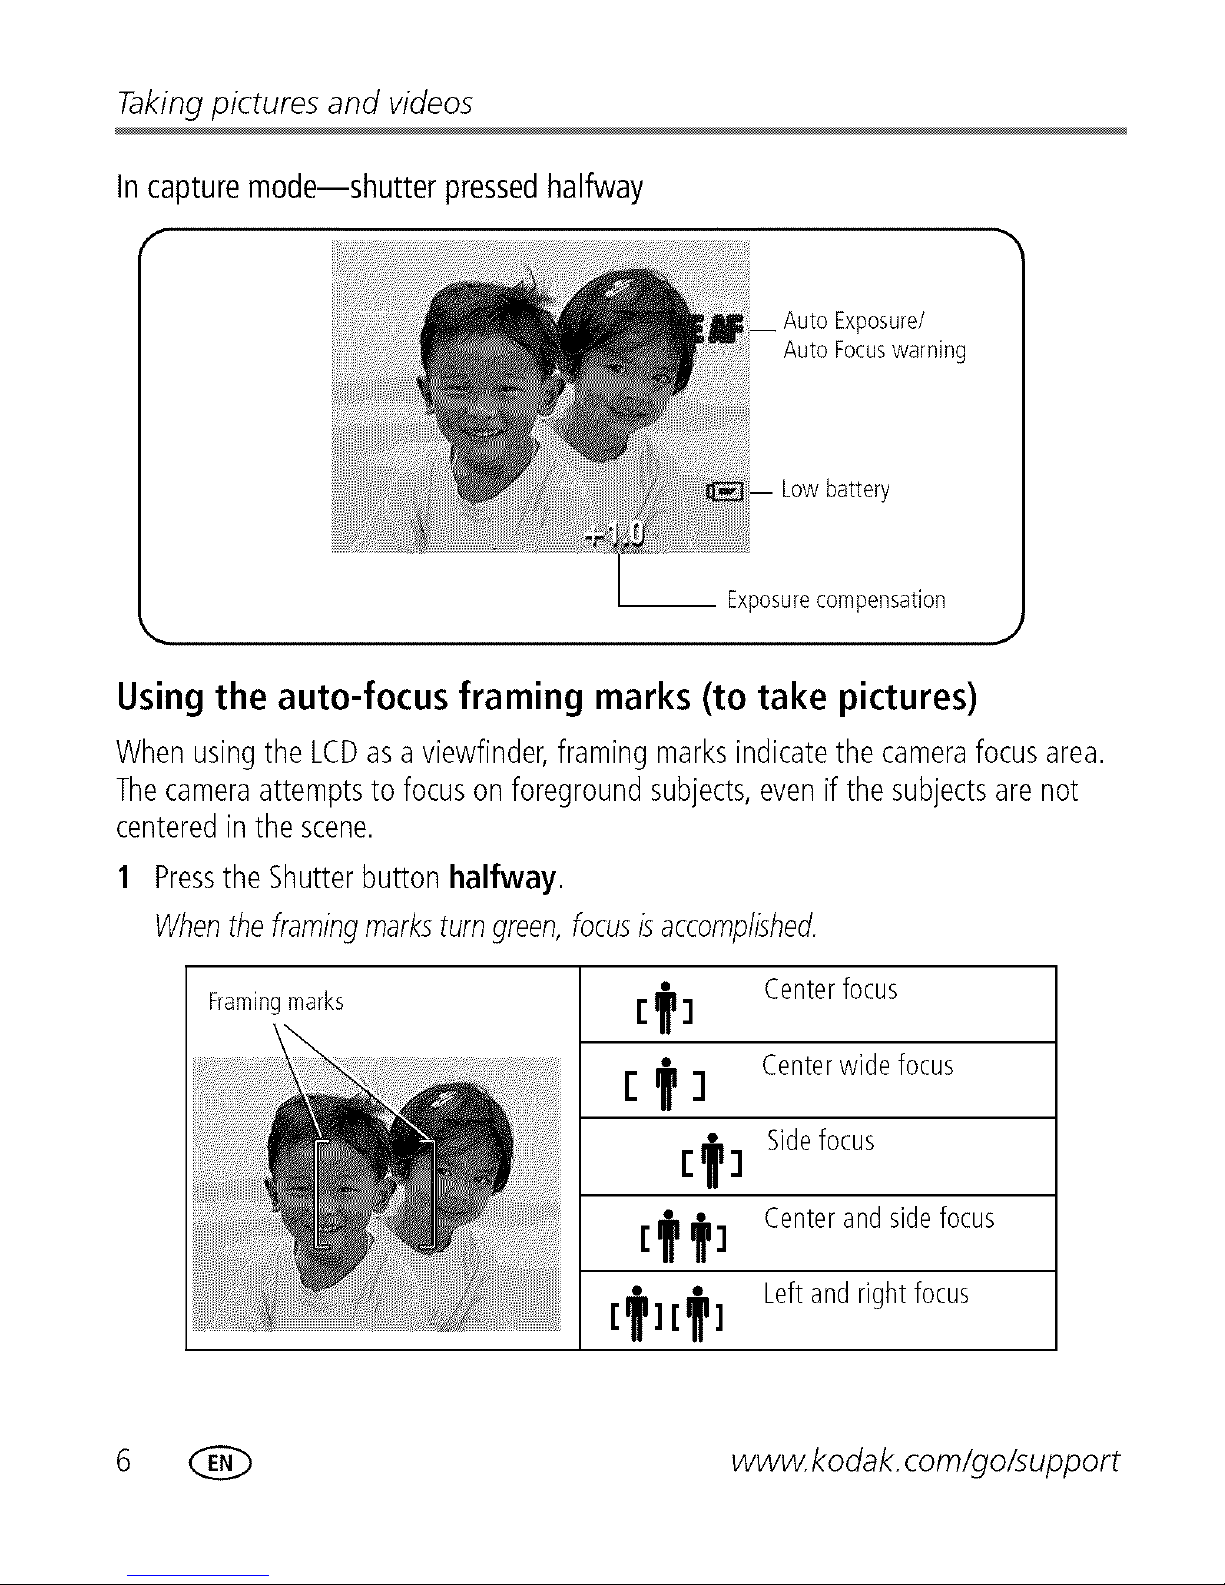
In capturemode--shutter pressedhalfway
f
Exposure/
Auto Focuswarning
Low battery
__ Exposure compensation
J
Using the auto-focus framing marks (to take pictures)
Whenusingthe LCDasa viewfinder,framingmarksindicatethecamerafocusarea.
Thecameraattemptsto focusonforegroundsubjects,evenif thesubjectsarenot
centeredinthe scene.
1 Pressthe Shutterbutton halfway.
Whentheframingmarksturngreen,focusisaccomplished.
Framingmarks
i. i_1.I Centerfocus
r iil 1 Centerwidefocus
[111-1 Sidefocus
I't t "1 Centerandsidefocus
i.tl [t ] Leftand right focus
6 (_ www.kodak, com/go/support
Page 12

Taking pictures and videos
2 Ifthe cameraisnotfocusingon thedesiredsubject(or if the framingmarks
disappear),releasetheShutterbutton, recomposethe scene,and repeatstep1.
3 Pressthe Shutterbutton completely down to takethepicture.
NOTE:FramingmarksdonotappearinLandscapeorVideomode.WhenyouuseFocus
Zone(seepage22)andsetCenterZone,theframingmarksarefixedatCenterWide.
Using the flash
Use the flash when you take pictures at night, indoors, or outdoors in heavy shadows.
i
Auto Whenthe lightingconditionsrequireit.
Flash
Fill Everytime youtake a picture, regardlessof the lighting conditions.Usewhen the subjectis in shadowor is"backlit" (whenthe lightis behindthe
subject).
Red- Once,sothesubject'seyesbecomeaccustomedto the flash,then fires
eye againwhenthe pictureistaken. (Ifthe lighting conditionsrequireflashbut
do not requireRed-eyereduction,theflash mayfire onlyonce.)
_,._ Off Never
www.kodak, com/go/support ( E(_ 7
Page 13
Taking pictures and videos
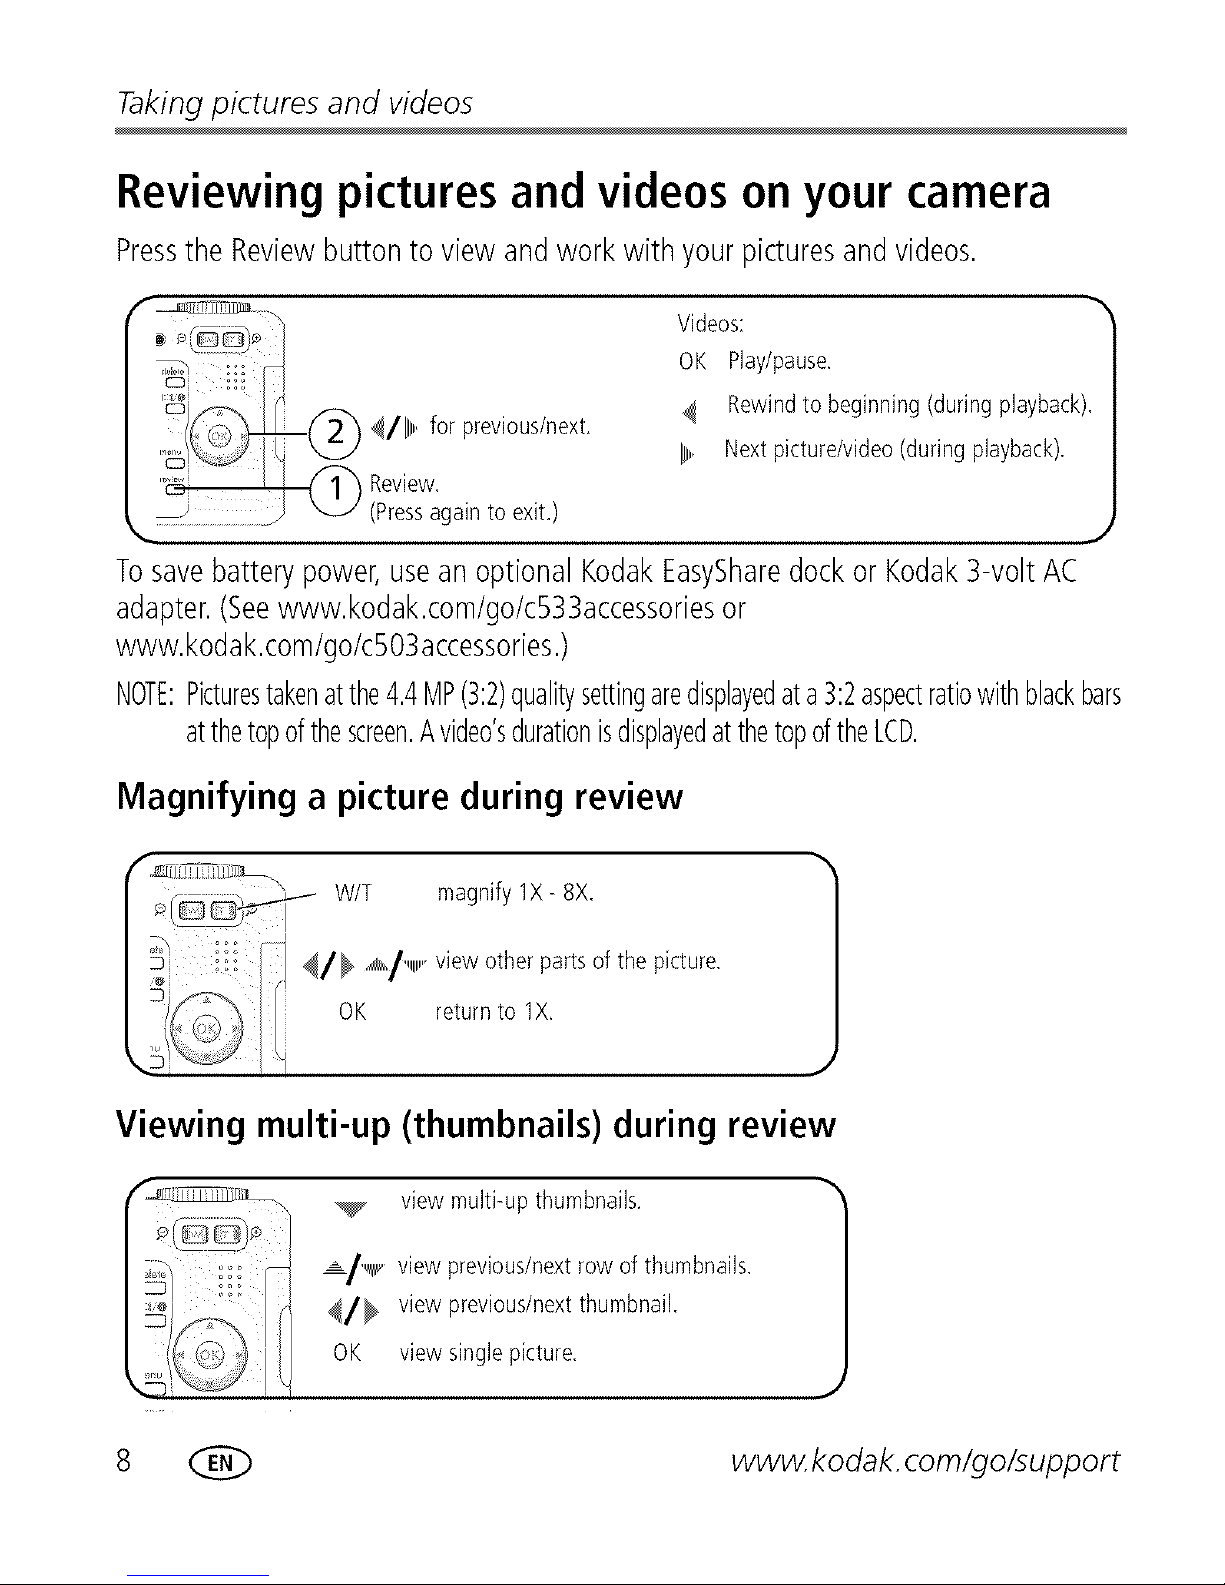
Reviewing pictures and videos on your camera
Pressthe Reviewbuttonto viewand workwith yourpicturesandvideos.
Videos:
OK Play/pause,
4 Rewindto beginning(duringplayback).
_,,. Nextpicture/video(duringplayback).
CDi
i:_e
c_) 4/111" for previous/next,
i_! (_ Review.
/Pressagaintoexit.)
%,, ,,,
Tosavebatterypower,useanoptionalKodakEasySharedockor Kodak3-voltAC
adapter.(Seewww.kodak.com/go/c533accessoriesor
www.kodak.com/go/c503accessories.)
NOTE:Picturestakenatthe4.4MP(3:2)qualitysettingaredisplayedata3:2aspectratiowithblackbars
atthetopofthescreen.Avideo'sdurationisdisplayedatthetopoftheLCD.
Magnifying a picture during review
p(-_ W/T magnify 1X- 8X.
4/_ '_/"""" view other parts of the picture.
OK return to lX,
1
Viewing multi-up (thumbnails) during review
view multi-up thumbnails,
J
_/.._ view previous/nextrow of thumbnails.
4/_ view previous/next thumbnail.
OK view single picture.
8 _ www.kodak, com/go/support
Page 14
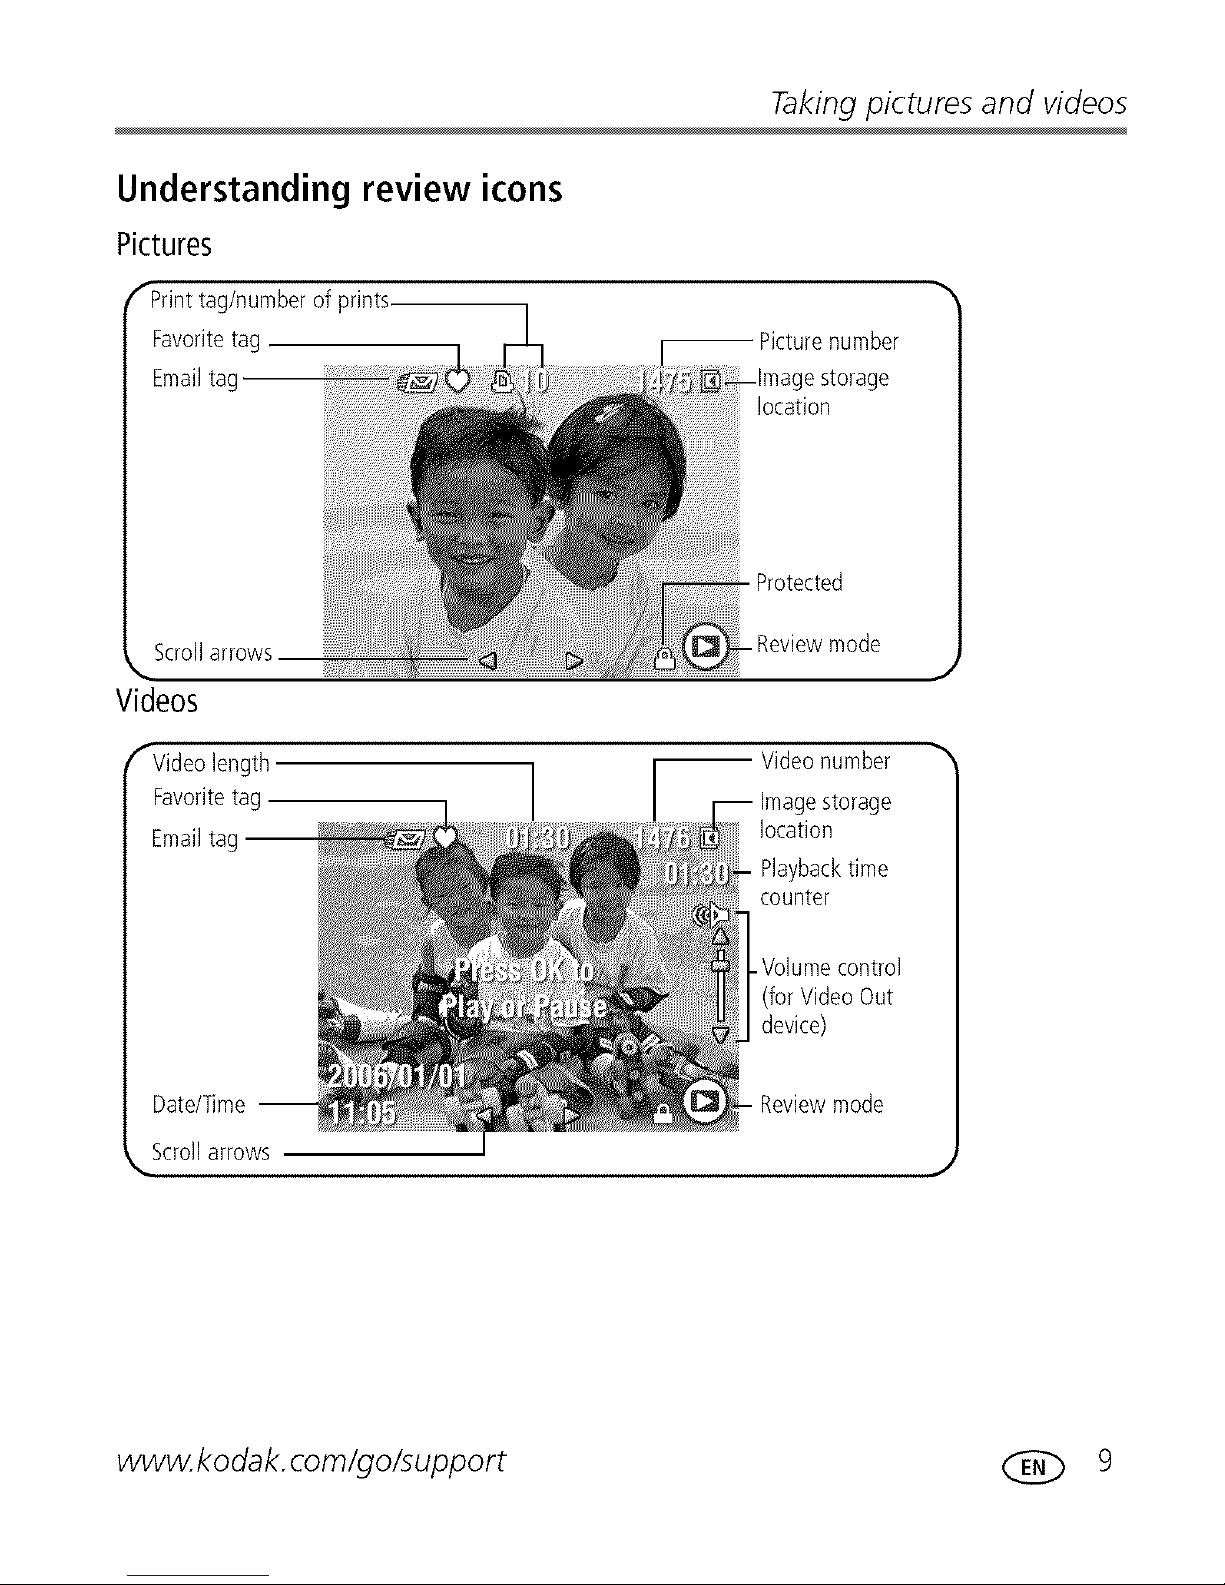
Understanding review icons
Pictures
of
Taking pictures and videos
number
Videos
fVideo length
Favorite tag
Email
Date/Time--
k..Scrollarrows
location
Playback time
counter
- Volumecontrol
(for VideoOut
device)
.Reviewmode
J
www.kodak, com/go/support ( E(_ 9
Page 15
Taking pictures and videos
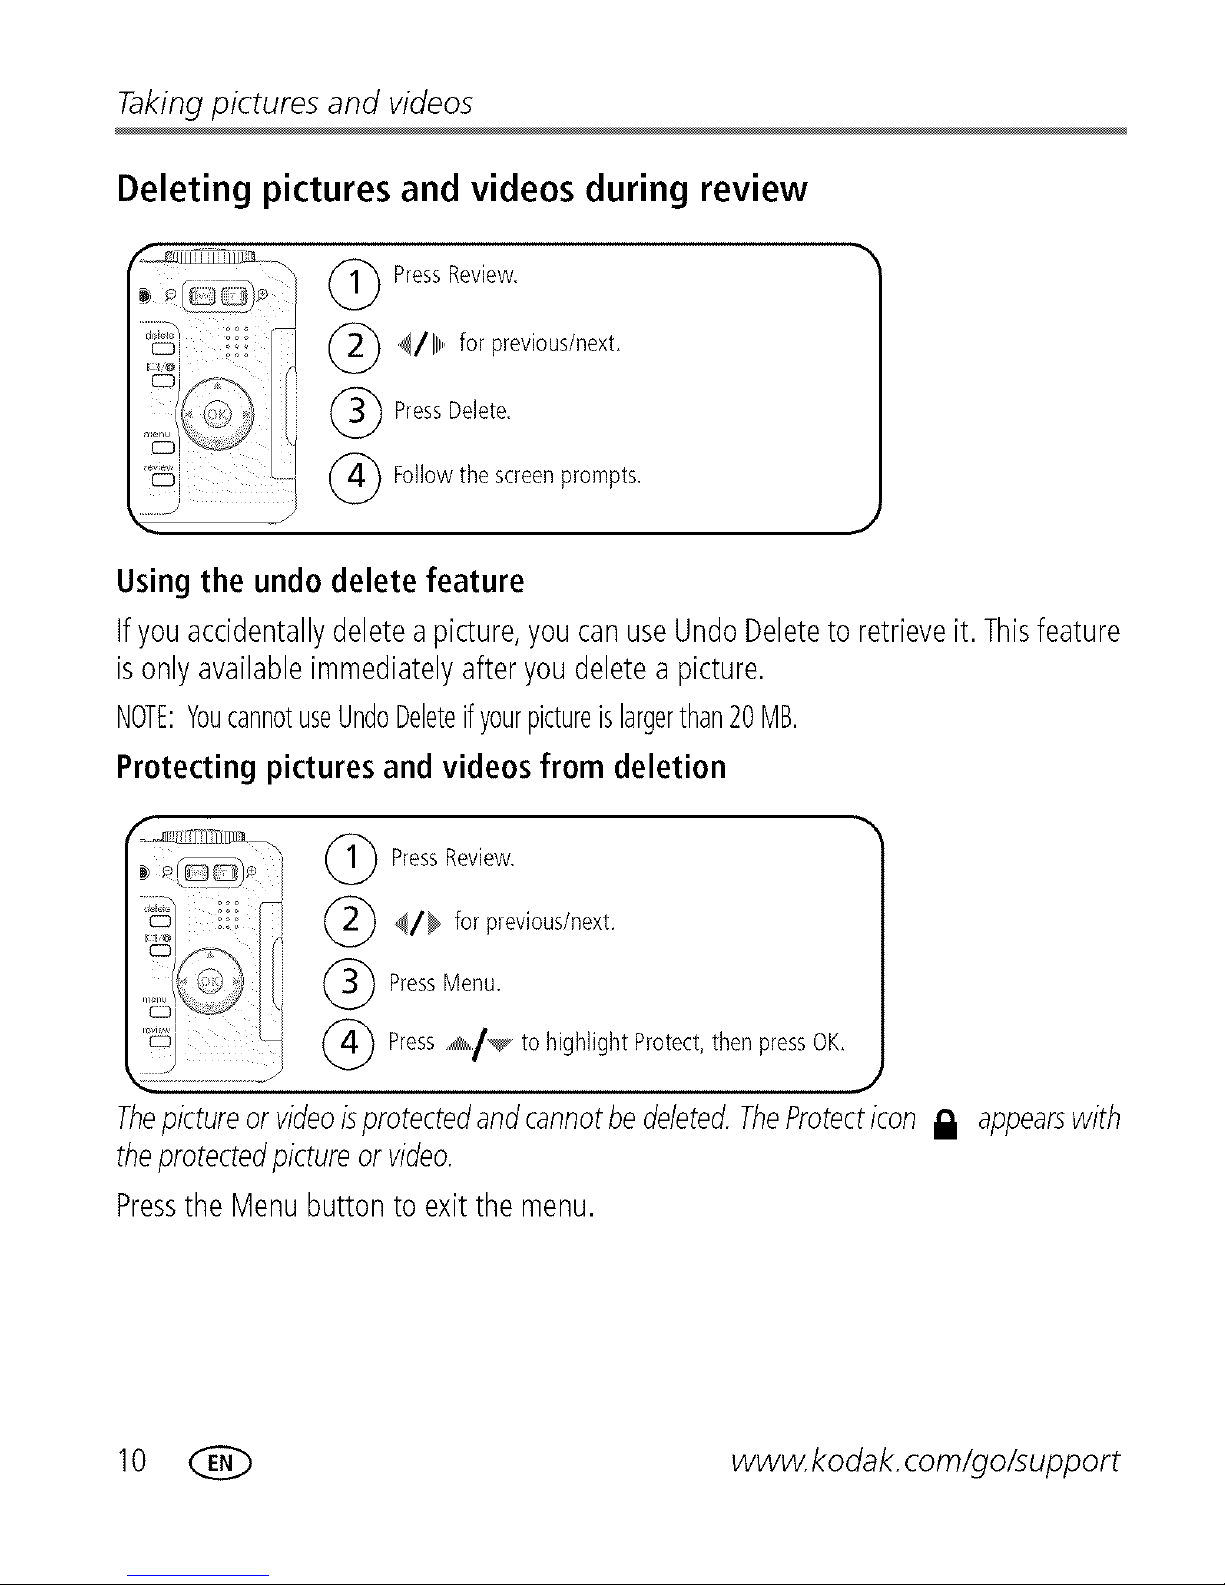
Deleting pictures and videos during review
(_ PressReview,
(_) 4/11,,,'for previous/next,
(_ PressDelete,
_ Followthescreenprompts,
Usingthe undo delete feature
Ifyouaccidentallydeleteapicture,youcanuseUndoDeleteto retrieveit. Thisfeature
isonlyavailableimmediatelyafteryoudeletea picture.
NOTE:YoucannotuseUndoDeleteifyourpictureislargerthan20MB.
Protecting pictures and videos from deletion
(_ Press Review.
(_/_ for previous/next,
(_ Press Menu.
_) Press ,_/_ to highlight Protect, then press OK,
Thepictureorvideoisprotectedandcannotbedeleted.TheProtecticon il appearswith
theprotectedpictureorvideo.
Pressthe Menubuttonto exit the menu.
10 (_ www.kodak.com/go/support
Page 16
Transferring and printing
pictures
Installing the software
1
2
3
CAUTION:
Install EasySharesoftware before connecting the camera to the
computer.Failureto do so may causethe software to load
incorrectly.
Closeall softwareapplicationsthat areopen onyourcomputer(including
anti-virussoftware).
PlacetheEasySharesoftwareCDintothe CD-ROMdrive.
Loadthe software:
Windows OS--if the installwindow doesnotappear,chooseRunfrom theStart
menuandtype d:\setup.exe whered isthe driveletter thatcontainsthe CD.
Mac OSX--double-click the CDiconon thedesktop,thenclickthe Installicon.
Followthe on-screeninstructionsto installthe software.
Windows OS--select Completeto automaticallyinstallthemostcommonlyused
applications,or Customto choosetheonesyouwishto install.
Mac OSX--follow theon-screeninstructions.
If prompted,restartthe computer.Ifyouturnedoff anti-virussoftware,turnit back
on.Seetheanti-virussoftwaremanualfor details.
Forinformationon thesoftwareapplicationsincludedon theEasySharesoftwareCD,
clickthe Helpbutton in EasySharesoftware.
www.kodak.com/go/support (E(_ 11
Page 17
Transferring and printing pictures
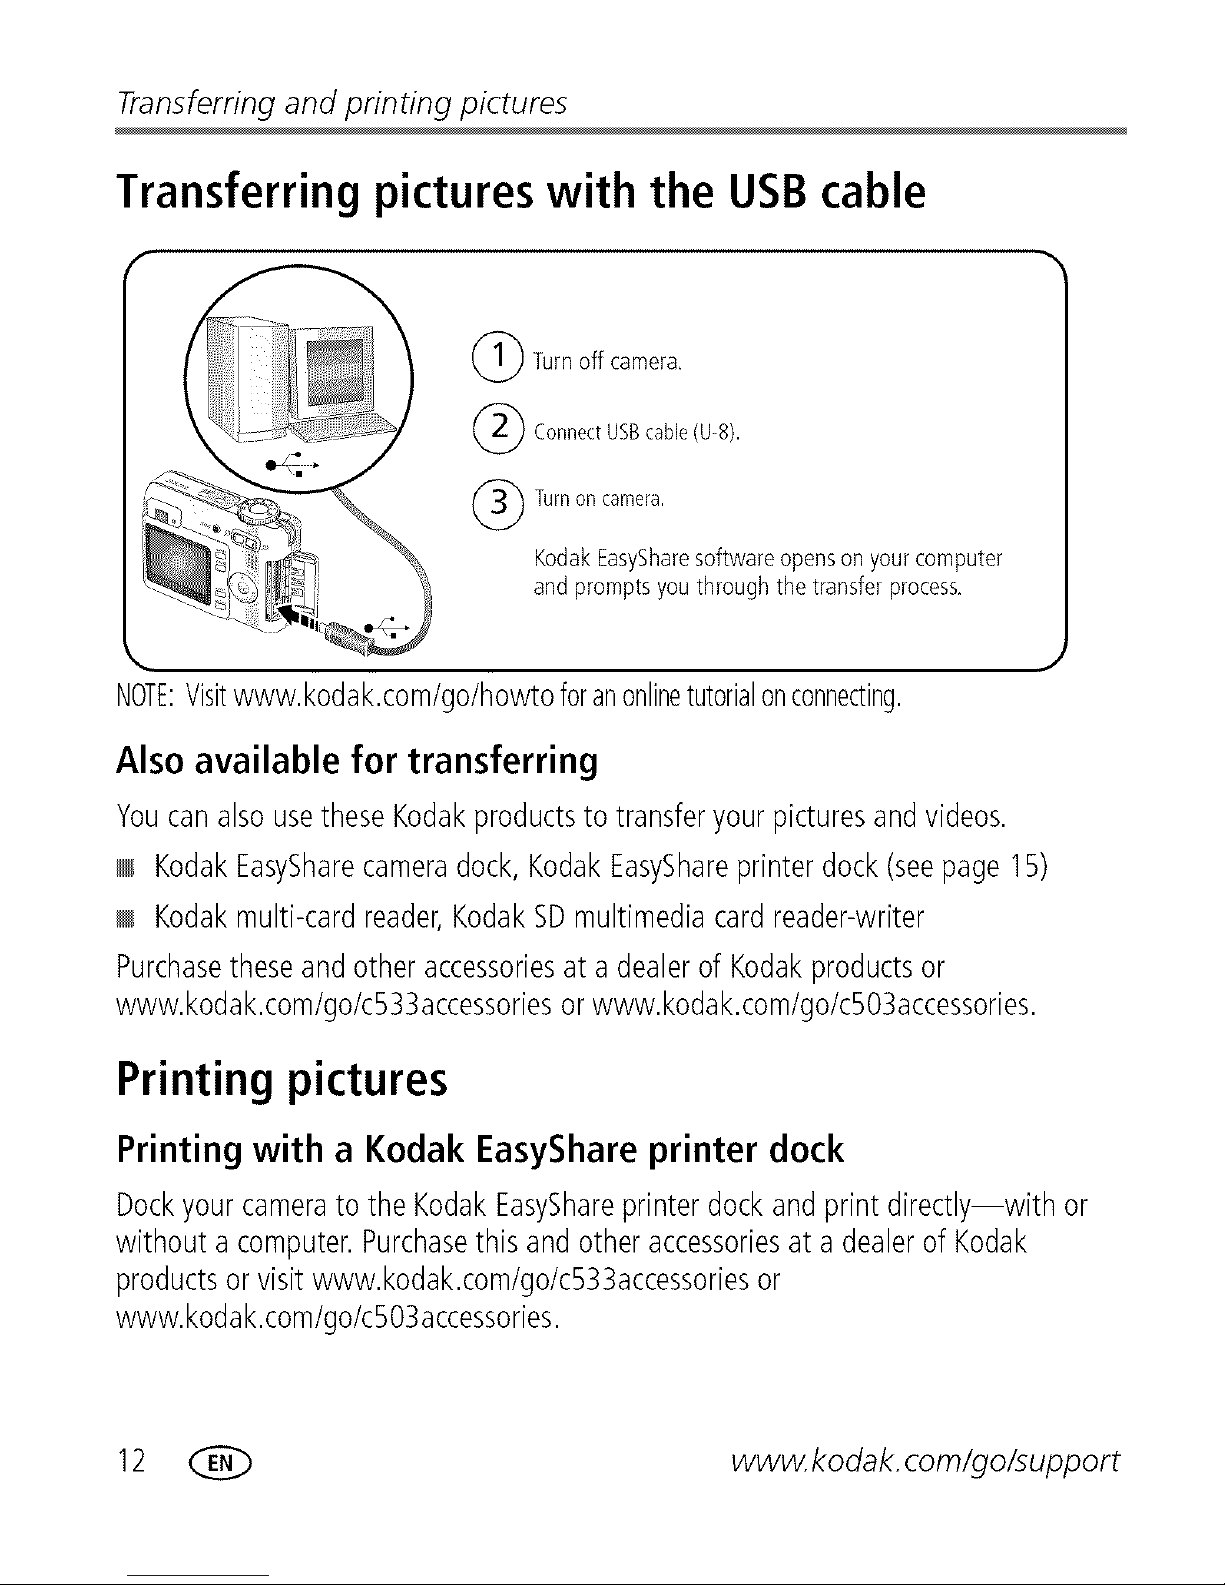
Transferring pictures with the USB cable
r
(_) Turn off camera_
(_ ConnectUSBcable(U-8).
(_ Turnon camera.
Kodak EasyShare software opens on your computer
and prompts you through the transfer process.
NOTE:Visitwww.kodak.com/go/howtoforanonlinetutorialonconnecting.
Also available for transferring
YoucanalsousetheseKodakproductsto transferyourpicturesandvideos.
KodakEasySharecameradock,KodakEasyShareprinterdock(seepage15)
Kodakmulti-cardreader,KodakSDmultimediacardreader-writer
Purchasetheseandotheraccessoriesat adealerof Kodakproductsor
www.kodak.com/go/c533accessoriesorwww.kodak.com/go/c503accessories.
Printing pictures
Printing with a Kodak EasyShare printer dock
Dockyourcamerato the KodakEasyShareprinterdockandprint directly--with or
without a computer.Purchasethis andotheraccessoriesat a dealerof Kodak
productsor visitwww.kodak.com/go/c533accessoriesor
www.kodak.com/go/c503accessories.
12 (_ www.kodak, com/go/support
Page 18
Transferring and printing pictures
Direct printing with a PictBridge enabled printer
Your camera is compatible with PictBridge technology, so you can print directly to
PictBridge enabled printers. You need:
Camerawith fully chargedbatteries _ PictBridgeenabledprinter
USBcable(maybesoldseparately)
Connecting the camera to a PictBridge enabled printer
1 Turnoff the camera and printer.
2 Connect the appropriate USBcable from the camera to the printer. (Seeyour
printer user guide or visit www.kodak.com/go/c533accessories or
www.kodak.com/go/c503accessories.
Printing from a PictBridge enabled printer
1 Turnon the printer. Turn on the camera.
ThePictBridgelogo is displayed,followed by the currentpicture and menu. (If no
pictures arefound,amessageis displayed.)If the menu interface turns off, pressany
button to redisplayit.
2 Press_/_ to choose a printing option, then press the OK button.
Current Picture Press_/1_,,.to chooseapicture.Choosethenumberof copies.
Tagged Pictures If yourprinteriscapable,print picturesthatyoutaggedfor printing and
choosea print size.
Index Print Printthumbnailsof all pictures.Thisoptionrequiresoneor moresheets
of paper.If the printeris capable,choosea printsize.
All Pictures Printall picturesin internalmemory,on acard,or in Favorites.Choose
the numberof copies.
Image storage Accessinternal memory,acard,or Favorites.
NOTE:Duringdirectprinting,picturesarenotpermanentlytransferredorsavedtothecomputerorprinter.
www.kodak.com/go/support _ 13
Page 19
Transferring and printing pictures
Disconnecting the camera from a PictBridgeenabled printer
1 Turnoff the cameraand printer.
2 Disconnectthe USBcablefrom the cameraandthe printer.
Using a printer that is not PictBridge enabled
Fordetailsonprintingpicturesfromyourcomputer,clicktheHelpbutton in EasyShare
software.
Ordering prints online
KodakEasyShareGallery(www.kodakgallery.com)isone ofthe manyonlineprint
servicesofferedin the KodakEasySharesoftware.Youcaneasily:
Uploadyourpictures.
Edit,enhance,andaddbordersto yourpictures.
Storepictures,andsharethem with familyandfriends.
Orderhigh-qualityprints,photogreetingcards,frames,and albums--and have
themdeliveredto yourdoor.
Printing from an optional SD/MMC card
Automaticallyprinttaggedpictureswhenyouinsertyourcardintoa printerwith
an SD/MMCcardslot.Seeyourprinteruser'sguidefor details.
Makeprintsat anSD/MMCcard-capableKodakpicturemaker/picturekiosk.
(Contacta locationpriorto visiting.Seewww.kodak.com/go/picturemaker.)
Takethe cardto yourlocalphotoretailerfor professionalprinting.
14 (_ www, kodak, com/go/support
Page 20
Transferring and printing pictures
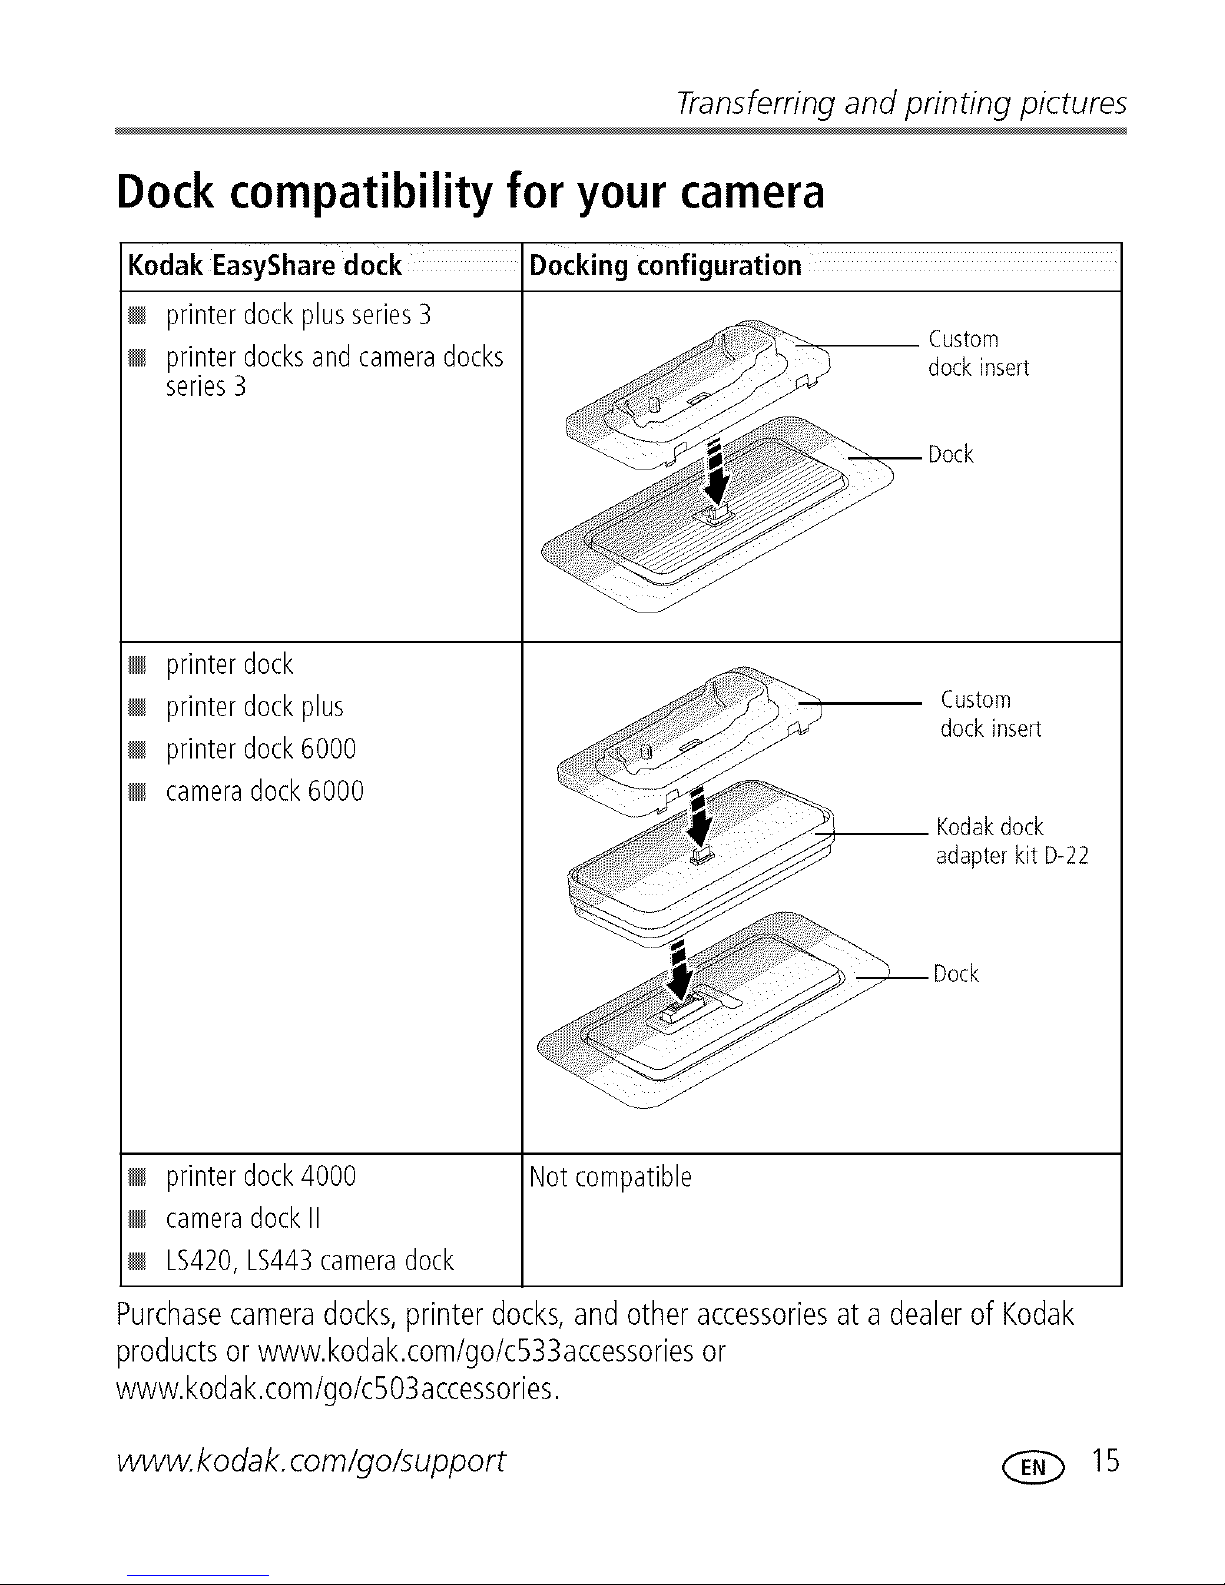
Dock compatibility for your camera
KodakEasySharedock
printerdockplusseries3
printerdocksandcameradocks
series3
printerdock
printerdockplus
printerdock6000
cameradock6000
printerdock4000
cameradockII
LS420,LS443cameradock
Not compatible
__ Custom
dock insert
Dock
Custom
dockinsert
__ Kodakdock
adapterkit D-22
Dock
Purchasecameradocks,printerdocks,and otheraccessoriesat a dealerof Kodak
productsor www.kodak.com/go/c533accessoriesor
www.kodak.com/go/c503accessories.
www.kodak, com/go/support ( E(_ 15
Page 21

Doing more with your camera
Using optical zoom
Useopticalzoomto getup to 3X closerto yoursubject.Opticalzoomiseffective
whenthelensis nocloserthan24 in.(60 cm)to thesubjector 5 in. (12.7cm)in
Close-upmode.Youcanchangeoptical zoombefore(but notduring)videorecording.
1 Usetheviewfinderor LCDtoframeyoursubject.
2 PressTelephoto(T)to zoomin. PressWideAngle (W)to zoomout.
Thezoomindicatorshowszoomstatus.
Zoom indicator
Optical Digital
zoom zoom
range range
Takethe pictureor video.
Using digital zoom
Usedigitalzoom inanyStillmodeto get upto 15Xmagnification.
1 Pressthe Telephoto(T)button tothe opticalzoomlimit (3X).Releasethe button,
thenpressit again.
2 Takethe pictureor video.
NOTE:Youcannotusedigitalzoomforvideorecording.Youmaynoticedecreasedimagequalitywhen
usingdigitalzoom.Theblueslideronthezoomindicatorpausesandturnsredwhenthepicture
qualityreachesthelimitforanacceptable4x6-in.(10x15cm)print.
16 (_ www.kodak.com/go/support
Page 22

Picture-taking modes
Doing more with your camera
Choosethe modethat bestsuits
yoursubjectsandsurroundings.
i ii iiiii!!!ii
a Auto Generalpicture-taking--offers anexcellentbalanceofimagequalityand
AUTO easeof use.
all.Landscape Far-awayscenes.Thecamerausesinfinityauto-focus.Auto-focusframing
marksarenot availablein Landscape.
Close-up Closerange.Useavailablelight insteadof flashif possible.Thecamera
automaticallysetsthe focusdistancedependingonthe zoomposition.
SCN Scene Point-and-shootsimplicitywhentakingpicturesunderspecialconditions.
(Seepage18.)
go Video Capturingvideowith sound.(Seepage4.)
Ha
www.kodak, com/go/support _ 17
Page 23

Doing more with your camera
Scene modes
1 Turnthe Mode dial to Scene SCN.
2 Press 4/_ to display Scenemode descriptions.
NOTE:IftheHelptextturnsoff,presstheOKbutton.
3 Pressthe OK button to choose a Scene mode.
Portrait Full-frameportraitsof people.
Sport Subjectsthat arein motion.
Children Action picturesof childrenin bright light.
(_ Party Peopleindoors.Minimizesredeye.
Beach Bright beachscenes.
Snow Brightsnowscenes.
Fireworks Fireworksdisplays.Flashdoes notfire. Placethe cameraon a flat,
steadysurfaceorusea tripod.
Self- Close-upsof yourself.Assuresproperfocusand minimizesredeye.
Portrait
Backlight Subjectsthat arein shadowor "backlit" (whenlight isbehindthe
subject).
_) ight Night scenesor low-light conditions.Minimizesredeye.Placethe
Portrait cameraona flat, steadysurfaceor usea tripod.
18 (_ www.kodak.com/go/support
Page 24

Doingmorewithyourcamera
Using exposure compensation to adjust brightness
in Auto, Landscape,or Close-upmode,youcanadjustexposurecompensationto
makeyourpicturesdarkeror lighter.Press_ to decreaseexposurecompensation
and _ to increaseexposurecompensation.
TheexposurecompensationlevelisshownontheLCD andtheLCDgets
dimmerorbrighter
Using the self-timer
Place camera on a tripod or flat surface.
Inany Still mode, press %!_
• Oncefor a lO-seconddelay(soyou havetime to get intothe scene)
• Againfor a2-seconddelay (fora steady,auto-shutterreleaseon a tripod)
• Again for 2-shot (one picture taken after 10 seconds and another picture taken
8 secondslater)
(_ Composethe scene.
(_) PresstheShutterbutton halfway,
thencompletelydown.
Tocancelthe Self-timerbeforethepictureistaken,presstheSelf-timerbutton.
Usethe same procedureto take a video, but:
Turnthe Modedial to Videoe_.
Pressthe Shutterbutton completelydown.
NOTE:Thevideostopswhennostoragespaceremains.Onlythe2-andlO-secondoptionsareavailablein
videomode.
www.kodak.com/go/support (E(_ 19
Page 25

Doing more with your camera
Using burst
_ Cameratakesupto3 pictures(3persecond)whilethe
Shutterbuttonispressed.
Burst _ First 3 pictures are
LH
saved.
Captureanexpected
event.
Example:
Apersonswinginga
golf club.
1 in mostStillmodes,pressthe Burstbutton repeatedlyto choosean option.
2 Pressthe Shutterbutton halfway to focusand setexposure.
3 Pressthe Shutterbutton completely down and hold it to takepictures.
ThecamerastopstakingpictureswhenyoureleasetheShutterbutton,whenthe
picturesaretaken,or whenthereisnomorestoragespace.
NOTE:Duringquickview,youcandeleteallpicturesintheburstseries.Todeleteselectively,dosoin
Review(seepage10).
Changing picture-taking settings
Youcanchangesettingsto getthe bestresultsfromyourcamera:
1 Pressthe Menubutton.
2 Press-/',,,_ to highlighta setting,thenpressthe OKbutton.
3 Chooseanoption,thenpresstheOKbutton.
4 Pressthe Menubuttonto exit.
20 (_ www.kodak, com/go/support
Page 26

Doingmorewithyourcamera
NOTE:Somesettingsareunavailableinsomemodes.
-2.0to+2.0 (in0.5increments)
Exposure Compensation
Controlhow muchlight enters
the camera.
Thissettingremainsuntilyouturn
theModedial.
Picture Size
Chooseapictureresolution.
Thissettingremainsuntilyou
changeit.
White Balance
Chooseyourlighting condition.
Thissettingremainsuntilyouturn
off thecamera.
5.0 MP (default)--for printing upto 20x 30 in.(51x 76
cm);picturesarehighestresolutionand largestfile size.
4.4 MP (3:2)--ideal for printing 4x 6 in.
(10x 15cm)printswithout cropping.Alsoforprinting upto
20 x 30 in.(51 x 76 cm).
3.1 MP-- for printing up to 20x 30 in.(51 x 76 cm);
picturesaremediumresolutionwith smallerfile size.
2.1 MP--for printing up to 11 x 14 in. (28x 36 cm);
picturesaremediumresolutionwith smallerfile size.
1.1 MP--for printing 4 x 6 in. (10x 15cm),emailing,
Internet,screendisplay,or for conservingspace.
Auto (default)--automatically correctswhite balance.
Idealfor generalpicturetaking.
Daylight--for picturesin naturallighting.
Tungsten--corrects the orangecastof householdlight
bulbs.Idealfor indoor picturesundertungstenor halogen
lightingwithout flash.
Fluorescent--corrects the greencastof fluorescent
lighting.Idealfor indoorpicturesunderfluorescentlighting
without flash.
www.kodak, com/go/support ( E(C) 21
Page 27

Doing more with your camera
i i !!ilil
ISO Speed
Controlthe camera'ssensitivity
to light.
Thissettingremainsuntilyouturn
off thecamera.
FocusZone
Selecta largeor concentrated
areaoffocus.
Thissettingremainsuntilyouturn
off thecamera.
Color Mode
Choosecolortones.
Thissettingremainsuntilyouturn
theModedial.
Long Time Exposure
Choosehow longthe shutter
staysopen.
Thissettingremainsuntilyouturn
off thecamera.
Auto (default)
ISO80, 100, 200, 400, 800 (800availableonlyfor
smallestpicturesizesetting).
Choosea lowerISOsettingin brightlylit scenes;usea
higherISOforlow-light scenes.
NOTE:ISOreturnsto AutoduringLongTimeExposure.
Unavailablein Videomode.
Multi-zone (default)--evaluates 2zonestogiveaneven
picturefocus.Idealfor generalpicturetaking.
Center-zone--evaluatesthe smallareacenteredin the
viewfinder. Idealwhen precisefocusof aspecificareain the
pictureis needed.
NOTE:Forthebestpictures,thecameraissetto Multi-zonewhen
inLandscapemode.
Color (default)
Black & White
Sepia--for pictureswith areddish-brown,antiquelook.
NOTE:EasySharesoftwarealsoletsyouchangeacolorpictureto
black-and-whiteor sepia.
Unavailablein Videomode.
None (default)
0.5, 0.7, 1.0, 1.5, 2.0, 3.0, 4.0 sec.
22 _ www.kodak.com/go/support
Page 28

Doingmorewithyourcamera
i i !!ilil
Set Album On (whenAlbumnameisselected)
ChooseAlbum names.
Thissettingremainsuntilyou
changeit. Youcanapplydifferent
SetAIbumchoicestovideosandto
pictures.
Image Storage
Chooseastoragelocation for
pictures/videos.
Thissettingremainsuntilyou
changeit.
Setup Menu
Chooseadditionalsettings.
Video Size
Video Length
Off
Pre-selectalbumnamesbeforeyoutake picturesorvideos.
Then,allthe picturesorvideosyoutake are taggedwith
thosealbum names.Seepage29.
Auto (default)--the camerausesthe cardif one isin the
camera.Ifnot, the camerausesinternalmemory.
Internal Memory--the camerausesinternalmemory,
evenif a cardisinstalled.
NOTE:Ifyoufillupyourcardwhiletakingpktures,yourcamera's
memoryplusfeaturepromptsyoutoswitchtointernal
memory,ifspaceisavailable.Memoryplusisunavailablein
Videomode.
SeeCustomizingyour cameraon page24.
640 x 480
320 x 240
Availableonlyin Video mode.
Continuous (default)
5 seconds
15 seconds
30 seconds
Availableonlyin Video mode.
www.kodak.com/go/support (_ 23
Page 29

Doing more with your camera
Customizing your camera
UseSetupto customizeyourcamerasettings.
1 Inanymode,pressthe Menubutton.
2 Press_/_ to highlightSetuptr!il, thenpressthe OKbutton.
3 Press_/_ to highlightthe settingyouwish to change,thenpresstheOKbutton.
4 Chooseanoption,thenpresstheOKbutton.
5 Pressthe Menubuttonto exit.
NOTE:Thesesettingsremainuntilyouchangethem.
Return to previousmenu.
Liveview
Changeliveviewdefaultto on or off.
NOTE:Insomemodes,theLCDturnsonevenif
theliveviewoptionissettoOff.(Toturn
theLCDon/offanytime,pressthe
LCD/Infobutton.)
Camera Sounds
Chooseto enableor disablesoundeffects.
Auto Power Off
Chooseinactivitytime until cameraturnsoff.
Date & Time
On (default)
Off
All On (default)--applies a soundeffectto
camerafunctions.
Shutter Only--applies a soundeffectonly
when youpressthe Shutterbutton.
All Off--disables soundeffects.
10 minutes
5minutes
3 minutes (default)
1minute
Seepage2.
24 (_ www, kodak, com/go/support
Page 30

Doing more with your camera
N,
Video Out NTSC (default)--used in North America and
Choose the regional setting that lets you Japan: most common format.
connect the camera to a television or other PAL--used in Europe and China.
external device (see page 27).
Orientation Sensor On (default)
Orient pictures so that they are displayed Off
with the correct side up.
Date Stamp Off (default)
Imprintthe dateon pictures. YYYYMM DD, MM DD YYYY,
DDMM YYYY
Video Date Display
DisplayDate/Timeat the start of video
playback.
Language
Format
_lb CAUTION:
Formatting deletes all
pictures/videos, including
those that are protected.
Removinga card during
formatting may damage
the card.
About
Viewcamerainformation.
YYYY MM DD (default)
MM DD YYYY, DD MM YYYY,
YYYY MM DD H:M, MM DD YYYY H:M,
DDMM YYYY H:M,
None
Seepage2.
Memory Card--deletes everythingonthe
card;formatsthe card.
Cancel--exits without makinga change.
Internal Memory--deletes everythingin
internal memoryincludingemailaddresses,
album names,and favorites;formatsthe
internal memory.
www.kodak, corn/go/support ( E(_ 25
Page 31

Doing more with your camera
Running a slide show
UsetheSlideShowto displayyourpictures/videosonthe LCD.Torun aslideshowon
a televisionoron anyexternaldevice,seepage27.Tosavebatterypower,usean
optionalKodak3V ACadapter.(Visitwww.kodak.com/go/c533accessoriesor
www.kodak.com/go/c503accessories.)
Starting the slide show
1 Pressthe Reviewbutton,thenpressthe Menubutton.
2 Press_/_ to highlightSlideShowI_, thenpresstheOKbutton.
3 Press_/_ to highlightBeginShow,thenpressthe OKbutton.
Eachpictureandvideoisdisplayedonce.
Tointerruptthe SlideShow,presstheOKbutton.
Changing the slide show display interval
Thedefaultintervalsettingdisplayseachpicturefor 5 seconds.Youcansetthedisplay
intervalfrom 3 to 60 seconds.
1 OntheSlideShowmenu,press_/._ to highlightInterval,then presstheOK
button.
2 Selectadisplayinterval.
Toscrollthroughthe secondsquickly,pressand hold _/_.
3 Pressthe OKbutton.
Theintervalsettingremainsuntilyouchangeit.
Running a continuous slide show loop
Whenyouturnon Loop,theslideshowiscontinuouslyrepeated.
1 OntheSlideShowmenu,press_/_ to highlightLoop,thenpressthe OKbutton.
26 (_ www.kodak.com/go/support
Page 32

Doingmorewithyourcamera
2 Press._i_ to highlightOn,thenpresstheOKbutton.
TheslideshowrepeatsuntilyoupresstheOKbuttonor untilbatterypoweris
exhausted.TheLoopfeatureremainsuntilyouchangeit.
Displaying pictures and videos on a television
Youcandisplaypictures/videoson a television,computermonitor,or anydevice
equippedwith avideoinput.(Imagequalityon atelevisionscreenmaynot beasgood
asona computermonitoror whenprinted.)
NOTE:EnsurethattheVideoOutsetting(NTSCorPAL)iscorrect(seeVideoOutonpage25).Theslide
showstopsifyouconnectacablewhiletheslideshowisrunning.
1 Connectanaudio/videocablefromthecameraUSB,A/VOutporttothe television
video-inport(yellow)andaudio-inport (white).Seeyourtelevisionuser'sguidefor
details.
2 Reviewpictures/videosonthetelevision.
Cropping pictures
Press Review,
(_ _/111_,,,for previous/next,
(_ Press Menu, choose Crop _"_, then press OK,
(_ PressTelephoto (T)to zoom in, or _//_ ,_/,,,,,,,,,,,to move the crop box,
(_ Followthe screenprompts,
J
Thepictureiscopied,thencropped.Theoriginalpictureissaved.A croppedpicturecannot
becroppedagainonthecamera.
Pressthe Menubuttonto exit the menu.
www.kodak.com/go/support (_ 27
Page 33

Doing more with your camera
Viewing picture/video information
(_ PressReview,
(_) Press LCD/Info,
Toexit Review,pressthe Reviewbutton.
Copying pictures and videos
Youcancopypictures/videosfroma cardto internalmemoryor from internalmemory
to a card.
Beforeyou copy,make sure that:
A cardisinsertedin the camera.
Thecamera'spicturestoragelocationissetto the locationfrom whichyouare
copying.(SeeImageStorageon page23.)
Copy pictures or videos:
1 Pressthe Reviewbutton,thenpressthe Menubutton.
2 Press_/_ to highlightCopyI_, thenpressthe OKbutton.
3 Press_/_ to highlightan option.
4 Pressthe OKbutton.
NOTE:Pictures/videosarecopied,notmoved.Toremovepictures/videosfromtheoriginallocationafter
copying,deletethem(seepage10).Tagsthatyouappliedforprint,email,andfavoritesarenot
copied.Protectionsettingsarenotcopied.Toapplyprotectiontoapictureorvideo,seepage10.
28 (_ www.kodak, com/go/support
Page 34

Doingmorewithyourcamera
Pre-tagging for album names
UsetheSetAlbum(StillorVideo)featureto pre-selectalbumnamesbeforeyoutake
picturesor videos.Then,all thepicturesorvideosyoutakearetaggedwith those
albumnames.
First--on your computer
Usethe EasySharesoftwarethat waspackagedwith yourcamerato createalbum
namesonyourcomputer.Thenexttimeyouconnectthecamerato thecomputer,copy
up to 32 albumsto thealbumnamelist.SeeEasySharesoftwareHelpfor details.
Second--on your camera
1 Inanymode,pressthe Menubutton.
2 Press_/_ to highlightSetAlbum_, then pressthe OKbutton.
3 Press_/_ to highlightan albumname,thenpresstheOKbutton.Repeatto
markpicturesor videosfor albums.
Selectedalbumsarenotedwith acheckmark.
4 Toremovea selection,highlightan albumnameandpressthe OKbutton. To
removeall albumselections,selectClearAll.
5 HighlightExit,thenpresstheOKbutton.
Yourselectionsaresaved.IfyouturnontheLCD,youralbumselectionisdisplayedon
thescreen.Aplus(+)afterthea/burnnamemeansmorethanonea/burnisselected.
6 Pressthe Menubuttonto exit the menu.
Third--transfer to your computer
Whenyoutransferthetaggedpicturesorvideosto yourcomputer,EasyShare
softwareopensandcategorizesyourpicturesintheappropriatealbum.SeeEasyShare
softwareHelpfor details.
www.kodak.com/go/support (_ 29
Page 35

Doing more with your camera
Tagging pictures/videos for albums
UsetheAlbumfeaturein Reviewmodeto tagthe pictures/videosinyourcamerawith
albumnames.
First--on your computer
UseEasySharesoftwareto createalbumsonyourcomputer,thencopyupto 32 album
namesto the camera'sinternalmemory.SeeEasySharesoftwareHelpfor details.
Second--on your camera
1 Pressthe Reviewbutton,thenlocatethepictureor video.
2 Pressthe Menubutton.
3 Press_/_ to highlightAlbum_, thenpresstheOKbutton.
4 Press_/._ to highlightan albumfolder,then pressthe OKbutton.
Toaddotherpicturesto thesamealbum,press</_,,.to scrollthroughthepictures.
Whenthepictureyouwant isdisplayed,presstheOKbutton.
Toaddthe picturesto morethan onealbum,repeatstep4 for eachalbum.
Thea/burnnameappearswiththepicture.A plus(+)afterthea/burnnamemeansthe
picturewasaddedtomorethanonea/burn.
Toremovea selection,highlightan albumnameand presstheOKbutton.Toremove
all albumselections,selectClearAll.
Third--transfer to your computer
Whenyoutransferthetaggedpictures/videosto yourcomputer,EasySharesoftware
opensand categorizesyourpictures/videosintheappropriatealbumfolder.See
EasySharesoftwareHelpfor details.
Sharing your pictures
Pressthe Sharebutton to "tag" yourpicturesandvideos.Whenthey aretransferred
to yourcomputer,youcansharethem.UsetheSharebutton:
Anytime.(Themostrecentpicture/videotakenisthen displayed.)
30 (_ www.kodak, com/go/support
Page 36

Doing more with your camera
Justafteryoutakea picture/video,during quickview.
After pressingtheReviewbutton.
Tagging pictures for printing
1 Pressthe Sharebutton. Press_/1_,,,.to locatea picture.
2 Press_/_. to highlightPrint _, thenpresstheOKbutton.*
3 Press._/_. to selectthe numberofcopies(0-99).Zeroremovesthetag forthat
picture.
Optional: Youcanapplyaprint quantityto otherpictures.Press,</1_,,,.to locatea
picture.Press_/_ to changetheprint quantity.Repeatuntil thedesiredprint
quantityisappliedto pictures.
4 Pressthe OKbutton.
ThePrinticon_ appearsin thestatusarea.
5 Pressthe Sharebutton to exitthe menu.
* Totag all picturesinthe storagelocation,highlightPrintAll, pressthe OKbutton,
thenindicatethe numberofcopies.PrintAll is notavailableinquickview.Toremove
printtaggingfor allpicturesinthestoragelocation,highlightCancelPrints,thenpress
theOKbutton.CancelPrintsisnot availableinquickview.
Printing tagged pictures
Whenyoutransferthetaggedpicturesto yourcomputer,KodakEasySharesoftware
printscreenopens.Fordetails,clickthe Helpbutton in EasySharesoftware.
Formoreinformationon printingfrom yourcomputer,printerdock,PictBridge
enabledprinter,or card,seepage12.
NOTE:Forthebest4x6in.(10x 15cm)prints,setthecameratothe4.4MP(3:2)printqualitysetting.
(SeePictureSizeonpage20.)
www, kodak, com/go/support (E(_ 31
Page 37

Doing more with your camera
Tagging pictures and videos for emailing
First--on your computer
UseKodakEasySharesoftwareto createanemailaddressbookonyourcomputer.
Thencopyupto 32 emailaddressesto thecamera'sinternalmemory.Fordetails,click
theHelpbutton in EasySharesoftware.
Second--tag pictures/videos on your camera
1 Pressthe Sharebutton. Press</I,,,,.to locatea picture/video.
2 Press_/._ to highlightEmail_, then pressthe OKbutton.
TheEmailicon_ appearsin thestatusarea.
3 Press_/._ to highlightan emailaddress,thenpressthe OKbutton.
Totag otherpictures/videoswith the sameaddress,press</_ to scrollthrough
them.Whenthepictureyouwant isdisplayed,pressOK.
Tosendthepictures/videosto morethanoneaddress,repeatstep3 for each
address.
Selectedaddressesarechecked.
4 Toremovea selection,highlighta checkedaddressandpresstheOKbutton.To
removeall emailselections,highlightClearAll.
5 Press_/._ to highlightExit,thenpresstheOKbutton.
6 Pressthe Sharebutton to exitthe menu.
Third--transfer and email
Whenyoutransferthetaggedpictures/videosto yourcomputer,theEmailscreen
opensand letsyousendthemto theaddressesyouspecified.Fordetails,clickthe
Helpbutton in KodakEasySharesoftware.
Tagging pictures as favorites
Youcanpreserveyourfavoritepicturesinthe FavoritesI_1 sectionofyourcamera's
internalmemory,then sharethemwith friendsandfamily.
32 (_ www, kodak, com/go/support
Page 38

Doingmorewithyourcamera
NOTE:Whenyoutransferpicturesfromyourcameratoyourcomputer,allpictures(includingfavorites)are
storedonyourcomputeratfullsize.Favoritepictures-smallercopiesofyouroriginals-areloaded
backtoyourcamera,soyoucanshareandenjoymore.
1.Tag pictures as
favorites
2. Transfer
pictures to your
computer
1 Pressthe Sharebutton. Press4/1_,,.to locatea picture.
2 Press_/_' to highlightFavorite_, then pressthe OKbutton.
TheFavoriteicon_ appearsin thestatusarea.Toremovethetag,press
theOK,buttonagain.
Pressthe Sharebuttonto exit the menu.
1
2
3. View favorites 1
onyour camera 2
Toenjoyfull functionality, loadand usethe EasySharesoftwarethat
waspackagedwith thiscamera.(Seepage11.)
Connectthe camerato the computerusingthe USBcable(see
page12)or an EasySharedock.
Thefirsttimeyoutransferpictures,thesoftwarehelpsyoumakechoices
aboutyourfavoritepictures.Then,yourpicturesaretransferredto the
computer.Favoritepictures(smallerversionsof theoriginals)areloaded
totheFavoritessectionofyourcamera'sinternalmemory.
Turnthe Mode dialto FavoritesI_1'
Press</_ to scrollthrough favorites.
NOTE:Thecameraholdsalimitednumberoffavorites.UseCameraFavoritesintheEasySharesoftwareto
customizethesizeofyourcameraFavoritesI_1 section.Videostaggedasfavoritesremaininthe
FavoritesfolderinEasySharesoftware.Fordetails,clicktheHelpbuttoninEasySharesoftware.
Optional settings
In Favorites mode, press the Menu button to accessoptional settings.
SlideShow(page 26)
Multi-up (page8)
j emoveall favorites(page34)
SetupMenu(page24)
www.kodak.com/go/support (_ 33
Page 39

Doing more with your camera
NOTE:Picturestakenatthe4.4MP(3:2)qualitysettingaredisplayedata3:2aspectratiowithblackbars
atthetopofthescreen.
Removing all favorites from your camera
1 Turnthe Modedial to Favorites_1.
2 Pressthe Menubutton.
3 HighlightRemoveFavoritesI_1,thenpresstheOKbutton.
Atlpicturesstoredin theFavoritessectionofinternalmemoryareremoved.Favoritesare
restoredthenexttimeyoutransferpicturesto thecomputer
4 Pressthe Menubuttonto exit the menu.
Preventingfavorites from transferring to the camera
1 OpenKodakEasySharesoftware.ClicktheMy Collectiontab.
2 Goto theAlbumsview.
3 Clickthe CameraFavoritesAlbumfor yourcamera.
4 ClickRemoveAlbum.
Thenexttimeyoutransferpicturesfromyourcamerato thecomputer,usetheCamera
FavoritesWizard/AssistanttoeitherrecreateyourCameraFavoritesAlbumorto turnoff
theCameraFavoritesfeature.
Printing and emailing favorites
1 Turnthe Modedial to Favorites_1. Press</1_,,,.to locatea picture.
2 Pressthe Sharebutton.
3 HighlightPrint _, or Email_, then pressthe OKbutton.
NOTE:Favoritesthatweretakenonthiscamera(notimportedfromanothersource)aregoodforprintsup
to4x6in.(lOx 15cm).
34 (_ www.kodak.com/go/support
Page 40

Troubleshooting
Forstep-by-stepproductsupport,visitwww.kodak.com/go/c533supportor
www.kodak.com/go/c503supportandselectInteractiveTroubleshooting&Repairs.
Camera problems
Cameradoes not
turn on.
Cameradoes not
turn off.
Picturesremaining
numberdoesnot
decreaseafter
takinga picture.
Shortbattery life
with KodakNi-MH
rechargeable
digital camera
batteries.
Storedpicturesare
corrupted.
InReviewmode,
youdo not seea
picture(orthe
expectedpicture)
on the LCDscreen.
Try one or more the following
Installnewbatteries(page 1).
Chargerechargeablebatteries.
Removethe battery,thenreinsertor replaceit.
Thecameraisoperatingnormally.Continuetaking pictures.
@
@
Wipe the contactswith a clean,drycloth (page51) beforeloading
batteriesin the camera.
UsetheRefreshfeatureon yourcameradockseries3or printerdock
series3.
Retakepicture.Do not removecardwhile the readylight isblinking.
Keeprechargeablebatteriescharged.
Checkthe imagestoragelocationsetting (page23).
www.kodak, corn/go/support ( E(_ 35
Page 41

Troubleshooting
If...
InReviewmode,a
blueor black
screenis displayed
insteadofa
picture.
Shutterbutton
doesnot work.
Slideshowdoes
notrunonexternal
videodevice.
Pictureistoo light.
Pictureis not clear.
Pictureistoo dark.
@
Transferthepicturetothe computer(page12),thenformatthe cardin
the camera(page25).
Caution: Formatting a card deletes all pictures and videos,
including protected files.
Turnon the camera(page2).
Wait until the readylight stopsblinkingredbeforeattemptingto take
anotherpicture.
Transferpicturesto the computer(page 12),deletepicturesfrom the
camera(page 10),switchimagestoragelocations(page23),or insert
acardwith availablememory(page3).
Forbestpictures,seepage4.
Adjust the cameraVideoOutsetting (NTSCor PAL,page25).
Seethe externaldevice'suser'sguide.
Movesothere isat least24in. (61cm) betweencameraandsubject.
DecreaseExposureCompensation(page21).
Cleanthe lens(page 51).
Movesothere isat least24in. (61cm) betweenthe cameraandthe
subject.
Placethe cameraonaflat, steadysurfaceor useatripod.
Turnon theflash (page7).
Movesothere isno morethan7.9 ft (2.4 m)betweenthe cameraand
the subject.
UseFillflash(page7) or changeyourpositionsolightis not behind
the subject.
IncreaseExposureCompensation(page21).
36 _ www, kodak, com/go/support
Page 42

Troubleshooting
If...
Cameradoes not
recognize
SD/MMCcard.
Camerafreezesup
when acardis
insertedor
removed.
Memorycardfull.
Memorycardand
internal memory
full.
PurchaseacertifiedSD/MMCcard.
Reformatthe card(page25).
Caution: Formatting a card deletes all pictures and videos,
including protected files.
Inserta cardinto the slot,then pushto seat(page3).
Turnthe cameraoff, then backon. Makesurethe cameraisturnedoff
beforeinsertingor removinga card.
Inserta newcard(page3), transferpicturesto the computer
(page12),or deletepictures(page10).
Transferpicturesto the computer(page 12),thenformatthe cardor
internalmemory(page25).
Caution: Formatting a card deletes all pictures and videos,
including protected files.
Camera ready light status
If..' Tryone or more of the following
Readylight does _ Turnon the camera(page2).
notturnonandthe _ Installnewbatteries(page1)or chargerechargeablebatteries.
cameradoesnot
Turncameraoff, then backon.
work.
Readylight blinks _ Camerais operatingnormally.
green.
Readylight blinks _ Wait. Resumepicturetakingwhen the lightstopsblinking andturns
amber, green.
Readylight blinks _ Installnewbatteries(page1)or chargerechargeablebatteries.
redandcamera
turnsoff.
www.kodak.com/go/support _ 37
Page 43

Troubleshooting
If...
Readylight glows
steadyred.
Transferpicturesto the computer(page 12),deletepicturesfrom the
camera(page 10),switchimagestoragelocations(page23),or insert
acardwith availablememory(page3).
Wait. Resumepicturetakingwhen the lightturnsgreen.
Changethe imagestoragelocationto internalmemory(page 23),or
usea differentcard.
Readylight glows _ Camerais operatingnormally.
steadygreen.
Camera/computer communications
Thecomputerdoes
not communicate
with the camera.
Cannottransfer
pictures.
(TheAdd New
HardwareWizard
cannot locate
drivers.)
Tryone or more of the following
Visit www.kodak.com/go/c533supportor
www.kodak.com/go/c503support.
Turnon the camera(page2).
Installnewbatteries(page 1)or chargerechargeablebatteries.
Seethe PowerManagementsectionofthe laptopuser'sguideto
disablethisfeature.
Connectcableto cameraandcomputerport (page12).
Installthe software(page11).
Disconnectthe USBcable.Closeall openapplications.Re-installthe
software(page11).
Disconnectcamerafromthe computer.Closeall softwareapplications,
reconnectcamera.
DisconnectUSBcable.(If usingcameradockor printerdock,
disconnectcableand removecamerafromdock).Closeallopen
applications.Re-installthesoftware(page11).
Disconnectthe USBcable.Closeall openapplications.Re-installthe
software(page11).
38 _ www, kodak, com/go/support
Page 44

Troubleshooting
LCD screen messages
Changeimagestoragelocationsetting(page23).Nopicturesor
videosto display
Memorycard
requires
formatting
Memorycard
cannot beread
(Pleaseformat
memorycardor
insertanother
card)
Onlyone USB
connection
allowed.
Internalmemory
requires
formatting
Internalmemory
cannot beread
(Pleaseformat
internal memory)
Nomemorycard
(Filesnot copied)
Notenoughspace
to copyfiles(Files
not copied)
Inserta newcard(page3) orformat the card(page 25).
Caution: Formatting a card deletes all pictures and videos,
includingprotected files.
Turncameraoff, then backon.
Formattheinternal memory(page25).
Caution:Formatting deletes all pictures and videos, including
protected files. (Formatting internal memory also deletes email
addresses, album names,and Favorites. To restore them, seethe
Kodak EasyShare software Help.)
Inserta card(page3).
Deletepicturesfrom the imagestoragelocationyouarecopyingto
(page10),or insert a new card (page3).
www.kodak.corn/go/support (_ 39
Page 45

Troubleshooting
If...
Memorycardis
locked(Insertnew
memorycard)
Readonlymemory
card.
Removewrite
protectionto
captureor writeto
card.
Inserta newcard(page3), movetheswitch onthe cardto unlockthe
card,or changethe imagestoragelocation to internal memory
(page23).
Memorycardis _ Inserta newcard(page3) orformat the card(page25).
unusable(Insert Caution: Formatting a card deletes all pictures and videos,
newmemorycard) including protected files.
Dateand time _ Resetthe clock(page2).
havebeenreset
Createandcopyaddressbookfrom computer.Seethe Kodak
EasySharesoftware Help.
Noaddressbookin
camera(Connect
with computerto
import address
book)
Noalbumnames
in camera
(Connectwith
computerto
import album
names)
Highcamera
temperature.
(Camerawill be
turnedoff.)
Createandcopyalbumnamesfrom computer.Seethe Kodak
EasySharesoftware Help.
Leavethe cameraoff untilit's coolto the touch,thenturn it backon.
40 (_ www.kodak.com/go/support
Page 46

Troubleshooting
If...
Canonlymark
pictureor video
with 32 album
names.Onlythe
first 32 album
nameswill be
saved
Unrecognizedfile
format
Cameraerror
#XXXX.Seeuser's
guide.
Deleteoneor morealbumnamesassociatedwith the image
(page29).
Transferthe pictureto the computer(page12),or deleteit (page 10).
Turncameraoff, then backon.
www.kodak.com/go/support (_ 41
Page 47

Getting help
Helpful links
Camera
Email,write, or phonecustomersupport www.kodak.com/go/contact
Getsupportfor yourproduct(FAQs, www.kodak.com/go/c533supportor
troubleshootinginformation,arrangeforrepairs, www.kodak.com/go/cS03support
etc.)
Purchasecameraaccessories(cameradocks, www.kodak.com/go/c533accessoriesor
brinterdocks,lenses,cards,etc.) www.kodak.com/go/cS03accessories
Downloadthe latestcamerafirmwareand www.kodak.com/go/c533downloadsor
software www.kodak.com/go/c503downloads
Seeonlinedemonstrationsof yourcamera www.kodak.com/go/howto
Software
Getinformationon EasySharesoftware www.kodak.com/go/easysharesw(or click
the Helpbutton in EasySharesoftware)
Gethelpwith theWindowsoperatingsystemand www.kodak.com/go/pcbasics
workingwith digital pictures
Other
Getsupportforother cameras,software,accessorieswww.kodak.com/go/support
Getinformationon KodakEasyShareprinterdocks www.kodak.com/go/printerdocks
Getinformationon Kodakinkjet products www.kodak.com/go/inkjet
Optimizeyourprinter for truer,morevibrant colors www.kodak.com/go/onetouch
Registeryourcamera www.kodak.com/go/register
42 (_ www.kodak.com/go/support
Page 48

Gettinghelp
Telephone customer support
If you have questions concerning this product, contact your customer support
representative and have this information available:
Operatingsystem
Processorspeed(MHz)
Computermodel
Amountof memory(MB)
Australia 1800 147701
Austria 0179 567357
Belgium 027131445
Brazil 0800 150000
canada 18004656325
China 800 820 6027
Denmark 38487130
Ireland 01407 3054
Finland 0800 117056
France 01 55 1740 77
Germany 06950070035
Greece 00800 44140775
HongKong 800901514
India 91 22617 5823
Italy .......02 69633452 ........
Japan 03 5540 9002
Korea 007986310024
Exacterrormessageyou received
Versionof KodakEasySharesoftwareCD
Cameraserialnumber
Netherlands 020 346 9372
NewZealand 0800 440 786
Norway 23162133
Philippines 1800 1 888 9600
Poland 00800 4411625
Portugal 021 415 4125
singapore 8006363036
spain 91 749 76 53
Sweden 0858770421
Switzerland 01 838 53 51
Taiwan 0800096868
Thailand 001 800631 0017
Turkey 00800448827073
United Kingdom 0870 2430270
UnitedStates ............. 1800 235 6325
585781 6231 (toll)
InternationalTollLine +44 131458 6714
InternationalToll Fax +44 i3i458 6962
www.kodak.com/go/support (_ 43
Page 49

Appendix
Camera specifications
For more specifications, visit www.kodak.com/go/c533support or
www.kodak.com/go/c503support.
i i_i_i_i_i_i_i_i_i_i_i_i_i_i_i_i_i_i_i_i_i_i_i_i_i_i_i_i_i_i_i_i_i_i_i_i_i_i_i_i_i_i_i_i_i_/:....
CCD(charge-coupleddevice)...............................
CCD 1/2.5 in. CCD,4:3 aspectratio
Output imagesize 5.0 MP: 2576x 1932pixels
4.4 MP(3:2): 2576x 1716pixels
3.1 MP: 2048x 1536pixels
2.1 MP: 1656x 1242pixels
1.1 MP: 1200x 900 pixels
Displays
Colordisplay 4_ cm(1.8in)color hybridLCD,115 K pixels
Preview IFramerate:30 fps; Field-of-view:100%.
Lens
Takinglens 3Xopticalzoomlensf/2.73 -f/4.85
Aperture:f/2.73 and f/4.82 @Wide; f/4.85 and f/8.54 @ Tele
37 ram- 111 mm(35 mm equivalent)
Lensbarrier Automaticbuilt-in
Focussystem TTL-AF;Multi-zoneAF,andCenter-zoneAF.Working range:
0.6 m(24 in.)-infinity @ normal
0.10- 0.7 m (3.9-27.6 in)@ Wide
0.20- 0.7 m (7.8-27.6 in)@ Telephoto
10 m(32.8 ft)-infinity @ Landscape
44 (]_) www.kodak.com/go/support
Page 50

Appendix
ii !!!!!!!!!!!!!!!!!!!!!!!!!!!!!!!!!!!!!!!!!!!!!!!!!!!!!!!....
Digitalzoom 5.0Xcontinuouswith 0.6X increments
[Not supportedfor move capture
Exposure
Exposuremetering TTL-AE;Center-weighted
Exposurecompensation +/-2.0 EVwith 0.5 EVstep
Shutterspeed Mechanicalshutterwith CCDelectrical
Auto: 4 - 1/1400sec.
ISOspeed Auto, Portrait,Close-up,Landscape:80 - 160
Movie:80 - 200
Sport:80 - 160
NightPortrait,LongTimeExposure:80
Selectable:80, 100,200,400, 800 (800 availableonlyfor smallest
3icturesizesetting)
Flash
Electronicflash Guideno. 8.3 (@ISO100)
Auto flashwith pre-flash
IWorkingrangeat ISO140:0.6-3.5 m(2-11.5ft) @ Wide
I_0.L_.0m(2-6.6 ft)@ Tele
Flashmodes IAuto,Fill,Red-eye,Off
Capture
Capturemodes Auto, Landscape,Close-up,SCN(scenes),Video
Videocapture VGA(640 x 480) @ 11fps
QVGA(320x 240) @ 20fps
Imagefileformat Still:EXIF2.21 (JPEGcompression);file organization:DCF
MovieCODEC:Motion JPEG;Format:MOV
Imagestorage OptionalSD/MMCCard _. (TheSDlogois a trademarkof the
SDCardAssociation.)
www.kodak.com/go/support (_D 45
Page 51

Appendix
ii ....
Internalstorage 16 MBinternal memory/10MB availablefor imagestorage
capacity [(1 MBequasone mi ion bytes)
Review
Quickview Y_
Videooutput INTSCor PALselectable
Power
2Kodakoxy-alkalinedigital camerabatteriesAAZR6(non-rechargeable);2-AAlithium digital
camerabatteries;2-AAalkalinebatteries;2KodakNi-MHrechargeabledigitalcamerabatteries
AA; 1Kodaklithium digital camerabatteryCRV3(non-rechargeable);1KodakNi-MH
rechargeabledigital camerabattery KAA2HR,3VAC adapter
Communicationwith computer
USB2.0 (PIMA15740 protocol),via USBcablemodelU-8, EasySharecameradockor printer
dock
Other features
PictBridgesupport Yes
SelfTimer 2 seconds,10seconds,or 2-shot
White balance Auto, Daylight,Tungsten,Fluorescent
Auto poweroff Selectable1,3, 5, 10minutes
Color modes Color,Black& White, Sepia
Datestamp None,YYYY/MM/DD,MM/DD/YYYY,DD/MM/YYYY
Tripodmount 1/4 inch
Viewfinder Optical,real-image;85% fieldof view
Operatingtemperature 32-104% (0-40°C)
Size 35 mm(1.4 in.) x 66 mm(2.6in.) x 91 mm (3.6in.) @ poweroff
Weight 143g (5.0oz.)without batteryor card
46 _ www.kodak.com/go/support
Page 52

Appendix
Storage capacities
Actual storage capacity varies depending on subject composition, card brand, and
other factors. You may be able to store more or fewer pictures and videos. Favorites
take up additional space in internal memory.
Picture storage capacity
5.0MP ,,t,,tMp (_:7_ 3.1MP 211MP
1.1MP
Internal memory
16 MB SD/MMC
32 MB SD/MMC
64 MB SD/MMC
128 MB SD/MMC
256 MB SD/MMC
512 MB SD/MMC
1GB SD/MMC
7 8 11 16 30
12 13 19 26 47
24 27 38 52 95
48 54 77 104 191
97 108 154 209 491
194 216 308 418 766
377 422 597 810 1482
755 845 1194 1622 2966
www.kodak.com/go/support (_ 47
Page 53

Appendix
Video storage capacity
Minutes/secondsofvideo
VGA(640x 480)QVGA (320x 240)
Internal memory 14sec. 34sec.
16 MBSD/MMC 20sec. 50sec.
32 MBSD/MMC 39sec. 1min.39sec.
64 MBSD/MMC 1min.18sec. 3 min.18sec.
128MBSD/MMC 2rain.36sec. 6 rain.24sec.
256MBSD/MMC 5min.55sec. 14min.29sec.
512MBSD/MMC 11rnin.49sec. 28rnin.57sec.
1 GBSD/MMC 23min.39sec. 57min.57sec.
NOTE:If youare usinga 1 GBor largermemorycard,videorecordingmaystop
automaticallyafter 80 mins.Pressthe Shutterbutton to starta newvideofile.
Important safety instructions
CAUTION:
Do not disassemble this product; there are no user-serviceable
parts inside.Refer servicingto qualified service personnel. Do not
expose this productto liquid, moisture,or extreme temperatures.
KodakACadapters and battery chargersare intendedfor indoor
useonly. The useof controls, adjustments,or proceduresother
than those specified herein may result in exposure to shock
and/or electrical or mechanicalhazards.If the LCDbreaks,do not
touchthe glassor liquid. ContactKodak customersupport.
48 (_ www.kodak.com/go/support
Page 54

Appendix
Using this product
Theuseofan accessoryattachmentthatisnotrecommendedbyKodak,suchasan
ACadapter,maycausefire,electricshock,or injury.
Useonlya USB-certifiedcomputer.Contactyourcomputermanufacturerifyou
havequestions.
If usingthis productin an airplane,observeall instructionsof theairline.
Battery safety and handling
CAUTION:
When removingthe battery, allow it to cool; it may be hot.
Useonlybatteriesapprovedfor this productto avoidriskof explosion,
Keepbatteriesout ofthe reachofchildren.
Donotallowbatteriesto touchmetalobjects,includingcoins.Otherwise,a battery
mayshortcircuit,dischargeenergy,becomehot, or leak.
Donot disassemble,installbackward,or exposebatteriesto liquid,moisture,fire,
or extremetemperature.
Donot chargenon-rechargeablebatteries.
Removethebatterywhenthe productisstoredfor anextendedperiodoftime. in
theunlikelyeventthat batteryfluid leaksinsidetheproduct,contactKodak
customersupport.
in the unlikelyeventthat batteryfluid leaksontoyourskin,washimmediatelywith
waterand contactyourlocalhealthprovider.Foradditionalhealth-related
information,contactyourlocalKodakcustomersupport.
Disposeof batteriesaccordingto localand nationalregulations.
Formoreinformationon batteries,see
www.kodak.com/global/en/service/batteries/batteryUsage.jhtml
www.kodak.com/go/support (_ 49
Page 55

Appendix
Battery life
UsetheseKodakbatteries.(Batter
CRV3lithium battery
AA (2)lithium batteries
Ni-MH rechargeable digital
camera battery (per charge)
AA (2) Ni-MH rechargeable
batteries (per charge)
AA (2) oxy-alkaline
non-rechargeablebatteries
typesarealsomoldedinto thebatterydoor.)
AA (2) alkaline
non-rechargeable batteries
400 700
Battery life per ClPA testing method (Approx, number of pictures in Auto
mode, using 128 MB SD card.). Actual life may vary based on usage.
We do not recommendor support AA manganese batteries. Foracceptable
batterylife,andto makesureyourcameraoperatesdependably,usethe batteries
listed.
Extending battery life
SeeAuto PowerOff on page24.
Limitthefollowing activitiesthat quicklydepletebatterypower:
- Reviewingyourpicturesonthe LCD(seepage8)
- Usingthe LCDasa viewfinder(seepage6)
- Excessiveuseofthe flash
Dirt onthe batterycontactscanaffectbatterylife.Wipethecontactswith a clean,
drycloth beforeloadingbatteriesin the camera.
50 (_ www.kodak.com/go/support
Page 56

Appendix
@
Batteryperformanceisreducedattemperaturesbelow41° F(5° C).Whenusing
yourcamerain coldweather,carrysparebatteriesand keepthemwarm. Donot
discardcoldbatteriesthat do not work;whentheyreturn to roomtemperature,
theymaybe usable.
Upgrading your software and firmware
Downloadthe latestversionsof thesoftwareincludedonthe KodakEasyShare
softwareCDandthe camerafirmware(thesoftwarethat runson thecamera).See
www.kodak.com/go/c533downloadsor www.kodak.com/go/c503downloads.
Additional care and maintenance
if the camerahasbeensubjectedto inclementweatheror yoususpectwater has
gotten insidethe camera,turn off the cameraand removethebatteryandcard.
Allow all componentsto air-dryfor at least24 hoursbeforeusingthecamera
again.
Blowgentlyonthe lensor LCDto removedust anddirt. Wipegentlywith a soft,
lint-freecloth or an untreatedlens-cleaningtissue.Donotusecleaningsolutions
unlessdesignedspecificallyfor cameralenses.Donot allowchemicals,suchas
suntanlotion,to contactpaintedsurfaces.
Serviceagreementsmaybe availablein yourcountry.Contacta dealerof Kodak
productsfor moreinformation.
Fordigitalcameradisposalor recyclinginformation,contactyourlocalauthorities.
in the US,visitthe ElectronicsIndustryAllianceWebsite atwww.eiae.orgor the
KodakWebsiteat www.kodak.com/go/c533downloadsor
www.kodak.com/go/c503downloads.
Warranty
Limited warranty
KodakwarrantsKodakEasySharedigitalcamerasand accessories(excluding
www, kodak, corn/go/support (E(_ 51
Page 57

Appendix
batteries)to befreefrom malfunctionsanddefectsin both materialsand
workmanshipfor oneyearfromthe dateof purchase.
Retaintheoriginal datedsalesreceipt.Proofofthe dateofpurchasewill be required
with anyrequestforwarrantyrepair.
Limited warranty coverage
Thislimitedwarrantywill be honoredonlywithin the geographicallocationthat
Kodakdigital camerasandaccessorieswerepurchased.
Kodakwill REPAIRor REPLACEKodakEasySharedigital camerasandaccessoriesif
theyfailto functionproperlyduringthewarrantyperiod,subjectto anyconditions
and/orlimitationsstatedherein.Suchrepairservicewill includeall labor aswellas
anynecessaryadjustmentsand/orreplacementparts.Suchrepairor replacementis
thesoleremedyunderthis warranty.
If replacementpartsareusedin makingrepairs,thesepartsmayberemanufactured,
or maycontainremanufacturedmaterials.If it isnecessaryto replacethe entire
product,it maybe replacedwith a remanufacturedproduct.
Limitations
RequestforWarrantyservicewill not be acceptedwithout proofof dateofpurchase,
suchasa copyof theoriginal datedKodakEasySharedigital cameraoraccessory
salesreceipt.(Alwayskeepthe originalforyourrecords.)
Thiswarrantydoesnotapplyto the battery(s)usedin digitalcamerasoraccessories.
ThiswarrantydoesnotcovercircumstancesbeyondKodak'scontrol,nor problems
causedbyfailureto follow theoperatinginstructionsinthe KodakEasySharedigital
camerasandaccessoriesUser'sGuides.
Thiswarrantydoesnotapplywhenfailureisdueto shippingdamage,accident,
alteration,modification,unauthorizedservice,misuse,abuse,usewith incompatible
accessoriesor attachments,failureto follow Kodak'soperation,maintenanceor
repackinginstructions,failureto useitemssuppliedbyKodak(suchasadaptersand
cables),or claimsmadeafterthe durationof this warranty.
52 (_ www, kodak, com/go/support
Page 58

Appendix
Kodakmakesnootherexpressor impliedwarrantyforthis product.Intheeventthat
theexclusionofanyimpliedwarrantyisineffectiveunderthe law,thedurationofthe
impliedwarrantywill be oneyearfromthe purchasedate.
Theoption of replacementisKodak'sonlyobligation.Kodakwill not be responsible
foranyspecial,consequentialorincidentaldamagesresultingfromthesale,purchase,
or useof thisproduct,regardlessofthe cause.Liabilityforanyspecial,consequential
or incidentaldamages(includingbut notlimited to lossof revenueor profit,
downtimecosts,lossofthe useof theequipment,costof substituteequipment,
facilitiesor services,orclaimsofyourcustomersfor suchdamagesresultingfromthe
purchase,useor failureof the product),regardlessof causeorfor breachof any
written or impliedwarrantyisexpresslydisclaimedandexcludedherefrom.
Your rights
Somestatesorjurisdictionsdo not allowexclusionorlimitationof incidentalor
consequentialdamages,sothe abovelimitationor exclusionmaynot applyto you.
Somestatesorjurisdictionsdo not allowlimitationson howlongan impliedwarranty
lasts,sotheabovelimitationmaynot applyto you.
Thiswarrantygivesyouspecificrights,andyoumayhaveother rightswhichvaryfrom
stateto stateor byjurisdiction.
Outside the United States and Canada
Incountriesotherthanthe UnitedStatesandCanada,the termsandconditionsof
thiswarrantymaybedifferent.UnlessspecificKodakwarrantyiscommunicatedto the
purchaserin writing bya Kodakcompany,no warrantyor liabilityexistsbeyondany
minimumrequirementsimposedbylaw, eventhoughdefect,damage,or lossmaybe
bynegligenceor otheract.
www.kodak.com/go/support (_ 53
Page 59

Appendix
Regulatory compliance
FCC compliance and advisory
[_ KodakEasyShareC533/C503zoomdigitalcamera
Thisequipmenthasbeentestedandfoundto complywith the limitsfor a ClassB
digitaldevice,pursuantto Part15 ofthe FCCRules.Theselimitsaredesignedto
providereasonableprotectionagainstharmful interferenceina residential
installation.
Thisequipmentgenerates,uses,andcanradiateradiofrequencyenergyand,if not
installedor usedin accordancewith the instructions,maycauseharmfulinterference
to radiocommunications.However,thereisno guaranteethat interferencewill not
occurin a particularinstallation.
if this equipmentdoescauseharmfulinterferenceto radioor televisionreception,
whichcanbedeterminedbyturningthe equipmentoff andon,the userisencouraged
totry to correcttheinterferencebyoneor moreofthefollowing measures:1)reorient
or relocatethereceivingantenna;2) increasethe separationbetweenthe equipment
andthereceiver;3) connectthe equipmentto anoutlet on acircuitdifferentfrom that
to whichthe receiverisconnected;4)consultthe dealeror anexperiencedradio/TV
technicianfor additionalsuggestions.
Anychangesor modificationsnotexpresslyapprovedbythepartyresponsiblefor
compliancecouldvoidthe user'sauthorityto operatetheequipment.Whereshielded
interfacecableshavebeenprovidedwith theproductor specifiedadditional
componentsor accessorieselsewheredefinedto beusedwith the installationof the
product,they mustbe usedinorderto ensurecompliancewith FCCregulation.
Australian C-Tick
ON137
54 (_ www.kodak.com/go/support
Page 60

Appendix
Canadian DOC statement
DOC Class B Compliance--This Class Bdigital apparatus complies with Canadian
ICES-003.
Observation des normes-Class B--Cet appareil num_rique de la classeB est
conforme a la norme NMB-003 du Canada.
Waste Electrical and Electronic Equipment labeling
' nthe EuropeanUnion,donot discardthisproductasunsortedmunicipalwaste.
Contactyourlocalauthoritiesor go towww.kodak.com/go/recyclefor recycling
i programinformation.
Korean Class B ITE
English translation: Asthis equipment hasobtained EMC registration for household
use, it can be used inany area including residential areas.
VCCl Class B ITE
Englishtranslation:Thisisa ClassB productbasedon the standardof the VoluntaryControl
Councilfor Interferencefrom InformationTechnologyEquipment(VCCI).If this isusedneara
radioor televisionreceiverin a domesticenvironment,it maycauseradiointerference.Install
andusethe equipmentaccordingto the instructionmanual.
www.kodak.com/go/support (_ 55
Page 61

Index
A
A/Vout, 27
AA battery,loading,1
aboutpicture,video,28
aboutthis camera,25
accessories,12
battery,50
buying,42
printerdock,12
SD/MMCcard,3
album
set,23
taggingpictures,29
appendix,44
AustralianC-Tickregulation,54
auto, 17
flash,7
focusframingmarks,6
B
backlight,18
batteries
expectedlife, 50
extendinglife, 50
loading,1
types,46, 50
battery
safety,49
batterycompartment,ii
batterylife, 50
beach,18
burstbutton, i
burst,using,20
button
burst,i, 20
delete,ii, 5
flash,flash button,i
flash/status,7
info, ii
LCD/Info,ii
menu,ii
OK,ii
review,ii, 8
self-timer,self-timerbutton, i
Share,ii
shutter,i
telephoto,ii
wideangle,ii
zoom,16
C
cable
audio/video,27
USB,12
camerascreen
errormessages,39
reviewingvideos,8
camerasounds,24
caringforyourcamera,51
caution
formatting,10
children,18
ClassBITE,55
clock,setting,2
56 (_ www.kodak.com/go/support
Page 62

colormode,22
compatibility,dock,15
copypictures
cardto memory,28
memoryto card,28
to computer,11
croppingpictures,27
CRV3battery
loading,1
customizingcamerasettings,24
D
datesetting,2
datestamp,25
DC-in,i
deletebutton, ii
deleting
duringquickview,5
pictures,videos,10
protectingpictures,videos,10
digitalzoom,using,16
displayingslideshow,26
disposal,recycling,51, 55
dock
connector,ii
printer, 12
dockcompatibility,15
doing morewith yourcamera,16
downloadpictures,11
E
EasySharesoftware
installing,11
emailingpictures,videos,32
errormessages,39
expectedbatterylife, 50
exposure
compensation,19
long time,22
exposurecompensation,21
externalvideodevice
viewingpictures,videos,27
F
favorites
removing,34
settings,33
tagging,32
fireworks,18
firmware,upgrading,51
flash
settings,7
focus
framingmarks,6
zone,22
format, 25
formatting
caution,10
6
guidelines,battery,50
H
help,35
camera,35
weblinks,42
I
icons
Index
www.kodak.com/go/support (_ 57
Page 63

Index
picture-taking,5
reviewingpictures,9
icons,modedial, 17
imagestorage,23
info button,ii
information
aboutpictures,videos,28
installing
batteries,1
SD/MMCcard,3
software,11
internalmemory
storagecapacity,47
interval,slideshow,26
loop,slideshow,26
M
MacintoshOS-basedcomputers
installingsoftware,11
magnifypicture,8
maintenance,camera,51
memory
full, 23
insertingcard,3
storagecapacities,47
memoryplus,23
menubutton, ii
modedial, i, 17
modes
K
KodakEasySharesoftware
upgrading,51
Kodakweb sites,42
KoreanClassBITE,55
/
LCD,ii
LCD/Infobutton,ii
lens
cleaninglens,51
auto, 17
backlight,18
beach,18
children,18
fireworks,18
night portrait,18
party,18
SCN,17
self-portrait,18
snow,18
text, 18
light
ready,37
liveview,24
loading
batteries,1
SD/MMCcard,3
software,11
longtime exposure,22
58
multi-up,8
N
night portrait, 18
0
OKbutton,ii
onlineprints,ordering,14
opticalzoom,16
www. kodak, corn/go/support
Page 64

orientationsensor,25
P
party,18
PictBridgeenabledprinter, 13
picture
magnify,8
picturesize,21
pictures
copying,28
cropping,27
deleting, 10
emailingtagged,32
printing, 14
protecting,10
reviewing,8
storagecapacity,47
tagging,29
taking,modes,17
transfer,11
picture-takingsettings,20
power
camera,2
powerlight, i
printerdock,12
printing
from a card,14
fromcomputer,14
optimizingprinter,42
orderonline,14
PictBridgetechnology,13
taggedpictures,14
with EasyShareprinterdock,12
problem-solving,35
protectingpictures,videos,10
Q
quickview
using,5
R
readylight, 37
recycling,disposal,51, 55
red-eye,flash,7
regulatoryinformation,54
ClassBITE,55
removingfavorites,34
repair,42
return,24
reviewbutton,ii, 8
reviewingpictures
asyoutakethem, 5
camerascreen,8
reviewingpictures,videos
slideshow,26
reviewingvideos
camerascreen,8
runningslideshow,26
S
safety,battery,49
scenemodes,18
SCN,17
SD/MMCcard
inserting,3
printingfrom, 14
slot,ii
storagecapacities,47
self-portrait,18
Index
www.kodak.com/go/support (_ 59
Page 65

Index
self-timer
with pictures,19
setting
about, 25
album,23
camerasounds,24
colormode,22
dateandtime, 2
datestamp,25
exposurecompensation,21
flash,7
focuszone,22
imagestorage,23
liveview,24
longtime exposure,22
orientationsensor,25
picturesize,21
picturetaking mode,17
return,24
self-timer,19
setupmenu,23
videodatedisplay,25
videoout, 25
videosize,23
white balance,21
settings
picturetaking, 20
setupmenu,23
setupmode,using,24
Sharebutton, ii
sharingpictures,videos,30
shutter
problems,36
self-timerdelay,19
shutterbutton, i
slideshow
continuousloop,26
interval,26
problems,36
running,26
snow,18
software
installing,11
upgrading,51
sounds,24
specifications,camera,44
status
camerareadylight, 37
storagecapacity,47
storagelocation
switching,23
switchingstoragelocation,23
T
tagging
favorites,32
for albums,29
for email,32
for print, 31
taking a picture,4
taking avideo,4
telephotobutton,ii
television,slideshow,27
text, 18
thumbnails,8
time,setting,2
timer,shutterdelay,19
transferringpictures,videos,11
60 (_ www.kodak.com/go/support
Page 66

trashcan,deleting,5
tripodsocket,ii
troubleshooting,35
camera,35
camera/computer
communications,38
errormessages,39
readylight status,37
turningcameraon and off, 2
U
undelete,10
undo,10
upgradingsoftware,firmware,51
URLs,Kodakwebsites,42
USBcable,12
USB,A/Vout, ii
V
VCCIcompliance,55
video
copying,28
datedisplay,25
out, 25
protecting,10
reviewing,8
storagecapacities,47
viewing,8
videosize,23
videos
deleting, 10
emailingtagged,32
transfer,11
viewfinder,i
viewingpicture
aftertaking, 5,8
W
warranty,51
WEEE,55
white balance,21
wideanglebutton, ii
WindowsOS-basedcomputers
installingsoftware,11
wriststrap,1
wriststrappost,ii
Z
zoom
digital, 16
optical,16
Index
www.kodak.corn/go/support (_ 61
Page 67

EastmanKodakCompany
Rochester,New York14650
© EastmanKodakCompany,2005
All screenimagesaresimulated.
Kodakand EasySharearetrademarksof EastmanKodakCompany.
P/N4J4609_en
 Loading...