

Page 1
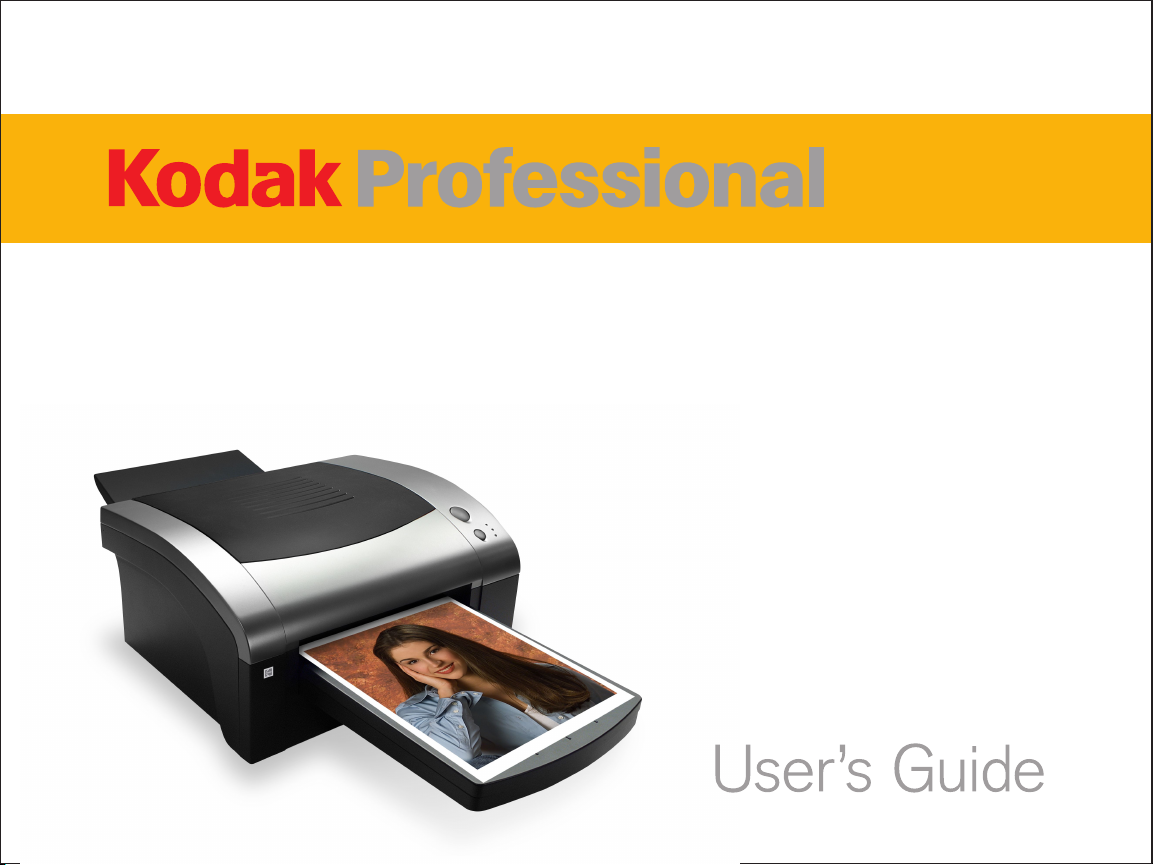
1400 Digital Photo Printer
Page 2

KODAK PROFESSIONAL 1400
Digital Photo Printer
User’s Guide
P/N 4J2113_EN
Page 3

Eastman Kodak Company
343 State Street
Rochester, New York, 14650
© Eastman Kodak Company, 2005
Kodak, Kodak Professional, and XtraLife are trademarks of Eastman Kodak Company.
Page 4

Contents
Introduction
User’s Guide
Introduction
Printer Features
About This Manual
Safety Precautions
Paper and Image Sizes
Printer Driver
Interfaces
Setting up the Printer
Finding a Location for the 1400 Printer
Unpacking the 1400 Printer
Loading the Ribbon Carrier
Connecting the USB Cable
Handling Paper
Storing Paper
Loading the Paper Tray
Installing the Dust Cover
About Printer Initialization
Making a Test Print
Calibrating the Printer (Optional)
Setting up the 1400
Printer
Operating the 1400
Printer
Troubleshooting
Site Specifications
Accessories and
Supplies
Operating the 1400 Printer
CONTENTS
PRINTER DRIVER GUIDE
SEARCH
HELP
Page 5

Buttons and Lights
Working with Paper
Handling and Storing Prints
Keeping the 1400 Printer in Good Working Condition
Cleaning the 1400 Printer
Troubleshooting
Light Indications and How to Resolve Them
If the Printer Does Not Operate Correctly
Clearing a Paper Jam
Clearing a Paper Jam from the Back Area
Repairing a Torn Ribbon
Cleaning the Thermal Head
Repacking the Printer
Getting Additional Help
ERROR Light Off, MEDIA Light Red
ERROR Light Red, MEDIA Light Off
ERROR Light Red, MEDIA Light Red
1400 Printer does Not Turn On
Printing Takes Much Longer than Usual
Nothing Happens when a Job is Sent
White or Colored Lines and Scratches
White or Multicolored Spots
Smudges, Smears, and Fingerprints
Paper does not Feed
Introduction
Setting up the 1400
Printer
Operating the 1400
Printer
Troubleshooting
Site Specifications
Accessories and
Supplies
CONTENTS
PRINTER DRIVER GUIDE
SEARCH
HELP
Page 6

Printer does not Respond when you Press Buttons
Invalid Ribbon Type
Site Specifications
Printer Specifications
Space Requirements
Operating Environment
Power Requirements
Accessories and Supplies
Introduction
Setting up the 1400
Printer
Operating the 1400
Printer
Search
Help
Navigating
Printing
Magnifying
CONTENTS
PRINTER DRIVER GUIDE
SEARCH
Troubleshooting
Site Specifications
Accessories and
Supplies
HELP
Page 7

Introduction
Thank you for purchasing the KODAK PROFESSIONAL 1400 Digital Photo
Printer (1400 printer). The 1400 printer is a dye-sublimination device with
superior printing speed. Printed images are high-contrast and long lasting.
KODAK EKTATHERM XTRALIFE Ribbon applies a coating that protects
images from fingerprints.
The 1400 printer is the latest model of the KODAK PROFESSIONAL page size
dye-sublimination printers. These printers produce superb photographic prints
and proofs. The 1400 printer is easy to install and set up, and its interface is
compatible with virtually all computer environments.
Printer Features
The 1400 printer includes the following features:
Paper Sizes: The 1400 printer prints on a variety of paper sizes. 3-color
YMC ribbons can be used in the 1400 printer.
Resolution: The 1400 printer has a resolution of 301 pixels per inch (ppi),
and prints a page in about 90 seconds.
Introduction
Setting up the 1400
Printer
Operating the 1400
Printer
Troubleshooting
Site Specifications
Accessories and
Supplies
Printer Driver: The printer driver supports MAC OS X, WINDOWS 2000,
and WINDOWS XP Operating Systems.
CONTENTS
PRINTER DRIVER GUIDE
SEARCH
HELP
Page 8

About This Manual
Introduction
This manual consists of the following sections:
• Introduction—describes the 1400 printer, available papers, printer drivers
and interfaces.
• Setting up the 1400 printer—describes how to set up the 1400 printer.
• Operating the 1400 printer—contains information on maintaining the
1400 printer and working with the paper and ribbon.
• Troubleshooting—describes possible problems and how to resolve them.
• Site specifications—describes the 1400 printer specifications, space
requirements and operating conditions.
• Accessories and supplies—lists the accessories and supplies for the
1400 printer.
Setting up the 1400
Printer
Operating the 1400
Printer
Troubleshooting
Site Specifications
Accessories and
Supplies
CONTENTS
PRINTER DRIVER GUIDE
SEARCH
HELP
Page 9
Safety Precautions
Introduction
The lightning flash symbol within an equilateral triangle is intended to
alert you to the presence of uninsulated "dangerous voltage" within the
product’s enclosure that may be of sufficient magnitude to constitute the risk of
electric shock.
The explanation point within an equilateral triangle is intended to alert
you to the presence of important operating and maintenance instructions in the
literature accompanying the appliance.
The hot surfaces symbol within an equilateral triangle is intended to
alert you to the presence of a hot surface. Do not touch. This symbol appears
next to the print head.
WARNING:
RISK OF ELECTRIC SHOCK. DO NOT OPEN
To reduce the risk of electric shock, do not remove cover or back.
There are no user-serviceable parts inside. Refer servicing to
qualified service personnel.
CAUTION:
There are no user or field serviceable components. Do not open
covers under any circumstances.
Setting up the 1400
Printer
Operating the 1400
Printer
Troubleshooting
Site Specifications
Accessories and
Supplies
CONTENTS
PRINTER DRIVER GUIDE
SEARCH
HELP
Page 10

WARNING:
HOT SURFACE
AVOID CONTACT WITH THE THERMAL HEAD. It becomes hot during
printing and may remain hot, causing injury. Touching the thermal
head or sensor may cause malfunctions due to static electricity. Oils,
salts, and moisture from your hands will contaminate the head and
may spoil the prints.
WARNING:
To prevent fire or shock hazard, do not expose this appliance to rain
or moisture.
CAUTION:
Before connecting, read instructions.
IMPORTANT: This thermal printer contains lead. Disposal of lead may be
regulated due to environmental considerations. For disposal or
recycling information, please contact your local authorities or the
Electronics Industry Alliance: www.eiae.org.
Introduction
Setting up the 1400
Printer
Operating the 1400
Printer
Troubleshooting
Site Specifications
Accessories and
Supplies
CONTENTS
PRINTER DRIVER GUIDE
SEARCH
HELP
Page 11

WARNING:
Use the included AC power cord so as not to interfere with radio and
television reception.
NOTE: This equipment has been tested and found to comply with the limits for
a Class B digital device, pursuant to Part 15 of the FCC Rules. These
limits are designed to provide reasonable protection against harmful
interference in a residential installation. This equipment generates,
uses, and can radiate radio frequency energy and, if not installed and
used in accordance with the instructions, may cause harmful
interference to radio communications. However, there is no guarantee
that interference will not occur in a particular installation. To determine
if this equipment causes harmful interference to radio or television
reception, turn the equipment off and on. To correct the interference, try
one or more of these measures:
This Class B digital apparatus complies with Canadian ICES-003.
Introduction
Setting up the 1400
Printer
Operating the 1400
Printer
Troubleshooting
Site Specifications
Cet appareil numérique de la classe B est conforme à la norme
NMB-003 du Canada.
• Reorient or relocate the receiving antenna
• Increase the separation between the equipment and receiver
• Connect the equipment into an outlet on a different circuit than the
receiver
• Consult the dealer or an experienced radio/TV technician for help
Changes or modifications not expressly approved by the party responsible for
compliance could void the user’s authority to operate the equipment.
CONTENTS
PRINTER DRIVER GUIDE
SEARCH
HELP
Accessories and
Supplies
Page 12

Introduction
This digital photo printer complies with the requirements of the EC Directive
89/336/EEC, 73/23/EEC, and 93/68/EEC.
The electromagnetic susceptibility has been chosen at a level that gains proper
operation in residential areas, on business and light industrial premises, and on
small-scale enterprises, inside as well as outside of the buildings. All places of
operation are characterized by their connection to the public low voltage power
supply system.
In the interest of safety, please observe the following precautions:
Power Requirement
This product is designed for operation on 100V - 240V AC, 50 / 60Hz. Never
connect to any outlet or power supply having a different voltage or frequency.
WARNING:
This apparatus must be grounded.
Avertissement: Cet appereil doit etre mis a la terre.
Setting up the 1400
Printer
Operating the 1400
Printer
Troubleshooting
Site Specifications
Accessories and
Supplies
CONTENTS
PRINTER DRIVER GUIDE
SEARCH
HELP
Page 13

Protective Measures
Introduction
If abnormalities arise:
If the printer emits smoke or abnormal sounds, immediately unplug the
power cord from the printer or power outlet. Continued use is hazardous.
Contact your dealer about having the printer checked and serviced.
Never insert any object into the unit.
Nothing other than supplies for this printer should ever be inserted into the
printer. Other items can cause a safety hazard and extensive damage to the
mechanism and electronics.
Do not set heavy objects on top of the unit.
Heavy objects can damage the unit and/or cause misoperation.
Avoid damaging the power cord.
Do not set anything heavy on the power cord or allow it to become pinched,
or cut. If the power cord becomes damaged, replace it immediately to avoid
shock hazard or electrical fire.
When the power cord is replaced, use the same type as originally supplied;
it is designed to reduce interference to radio & TV reception.
When unplugging the power cord, hold the plug, and remove it carefully.
Setting up the 1400
Printer
Operating the 1400
Printer
Troubleshooting
Site Specifications
Accessories and
Supplies
CONTENTS
PRINTER DRIVER GUIDE
SEARCH
HELP
Page 14

Keep the unit dry. Do not place water or other liquid containers, flower
vases/pots on top of the unit.
Introduction
Liquids that get into the unit can cause serious damage to the unit and
potential shock or fire danger. If liquid is spilled into or seeps into the unit,
unplug the Power Cord immediately and seek service as soon as possible
to avoid additional or possible damage due to corrosion.
Avoid handling liquids near the unit.
Do not remove the cabinet. There are no user-serviceable parts inside
and you will expose yourself to hazardous voltages and/or you may
cause damage to the unit.
Touching internal parts is dangerous and may expose you to an electrical
shock or cause a printer malfunction. Contact your dealer to carry out
internal checks and adjustments. Disconnect the power cord before
opening the cover to clear a paper jam, etc.
Unplug the power cord during a long absence or during an electrical
storm.
Turn off the Main Power switch and unplug the power cord during a long
absence or during an electrical storm.
Do not insert your fingers or any object into the paper exit when the
printer is on.
Setting up the 1400
Printer
Operating the 1400
Printer
Troubleshooting
Site Specifications
Accessories and
Supplies
There is a roller inside the paper exit. If you insert your fingers when the
printer is on, you may get injured.
CONTENTS
PRINTER DRIVER GUIDE
SEARCH
HELP
Page 15

Be careful with the printing mechanism.
Do not move the printer while the top cover is open. This may cause injury.
Be careful not to catch your fingers in the printing mechanism.
Connecting Cables
Introduction
Setting up the 1400
Printer
Use the power cord supplied with the printer.
WEEE Statement
In the European Union, this symbol indicates
that when the last user wishes to discard this
product, it must be sent to appropriate facilities
for recovery and recycling. Contact your local
Kodak representative or refer to
www.kodak.com/go/recycle for additional
information on the collection and recovery
programs available for this product.
Operating the 1400
Printer
Troubleshooting
Site Specifications
Accessories and
Supplies
CONTENTS
PRINTER DRIVER GUIDE
SEARCH
HELP
Page 16

Installation Locations
Maintain good ventilation.
Introduction
Ventilation slots and holes are provided on the top and rear of this unit.
Place the unit on a hard, level surface. Allow the following minimum space
around the printer to ensure proper ventilation:
Top: 2 in. (5.08 cm)
Sides: 0.5 in. (1.27 cm)
Rear: 2 in. (5.08 cm) - If the rear dust cover is in place (recommended)
then no additional space is required at the rear.
When installing the unit in a system rack, leave space between the unit and
the back of the rack.
Unsuitable locations:
Locations with high humidity and dust:
Do not place the unit in locations with high humidity and dust. They can
cause extensive damage. Avoid locations where the unit is likely to be
exposed to oily fumes and vapors.
Locations likely to be extremely hot:
Locations exposed to direct sunlight or near heating appliances can
attain extremely high temperatures which may deform the cabinet or
cause other damage.
Setting up the 1400
Printer
Operating the 1400
Printer
Troubleshooting
Site Specifications
Accessories and
Supplies
CONTENTS
PRINTER DRIVER GUIDE
SEARCH
HELP
Page 17

Place the unit on a horizontal surface.
The unit is likely to be affected if it is operated when tilted, inclined or in
unstable places.
Protect against dew formation.
Introduction
Setting up the 1400
Printer
When the unit is moved from a cold area into a warm area, moisture can
condense inside the unit and prevent operation. Allow the temperature to
stabilize before use.
Operating ambient temperature range:
The operating temperature range is 59 - 86°F (15 to 30°C) and humidity of
10% - 85%. When using the unit in a system rack, make sure that the
temperature inside the rack does not exceed this range.
Operating the 1400
Printer
Troubleshooting
Site Specifications
Accessories and
Supplies
CONTENTS
PRINTER DRIVER GUIDE
SEARCH
HELP
Page 18

For Long Operating Life
Unsuitable materials for cleaning the printer
Introduction
Paint coat flaking and plastic deformation are likely to occur if the unit is
wiped with chemical dusters, benzine, thinner or any other solvent, if rubber
or PVC items are left in contact with the unit for a extended period, or if the
unit is sprayed with insecticide.
Care of the cabinet
Unplug and clean with a soft cloth slightly moistened with a mild soap and
water solution. Allow to dry completely before operating. Never use
petroleum-base solutions or abrasive cleaners.
Head abrasion
The thermal print head, like a video head, wears out. When it is worn, fine
details of the picture are not printed, requiring replacement of the thermal
head. Consult your dealer about having the head replaced.
Connecting devices
Read thoroughly the Safety Notices, Cautions, and Operating Precautions
of the instruction booklets for the other devices connected with the unit.
Caution on relocating
When transporting this unit, make sure to avoid impacts. Before moving the
unit, make sure to disconnect the power cord from the power outlet and the
cables from the connected devices. Remove the paper tray and ribbon
carrier.
Setting up the 1400
Printer
Operating the 1400
Printer
Troubleshooting
Site Specifications
Accessories and
Supplies
CONTENTS
PRINTER DRIVER GUIDE
SEARCH
HELP
Page 19
Other Cautions
Dust or other foreign matter adhering to the print paper or the sheet cartridge,
or deformation resulting from exposure to extremely low or high temperatures
could cause loss of color, uneven color or lines, or wrinkles in the print images.
Paper and Image Sizes
The 1400 printer can print on the following sizes and types of KODAK
PROFESSIONAL EKTATHERM XLS Print Paper. See “KODAK Thermal Paper
Types, Sizes, and Image Sizes” for illustrations of the maximum image size for
each.
Introduction
Setting up the 1400
Printer
Operating the 1400
Printer
Troubleshooting
Site Specifications
210 x 297 mm (8.27 x 11.69 in.)
Standard A4 paper
216 x 305 mm (8.5 x 12 in.)
A (long) paper
216 x 356 mm (8.5 x 14 in.)
Legal paper
CONTENTS
Paper Size Maximum Image Size
203 x 254 mm (8.0 x 10.0 in.)
203 x 254 mm (8.0 x 10.0 in.)
210 x 305 mm (8.27 x 12.0 in.)
PRINTER DRIVER GUIDE
SEARCH
Accessories and
Supplies
HELP
Page 20

Printer Driver
Introduction
The printer driver developed for the 1400 printer is based on high-quality
Kodak photographic printing methods. The printer driver allows you to access
printing options based on Kodak color science.
The printer driver is provided for use with the following operating systems:
• WINDOWS XP
• WINDOWS 2000
• MAC OS X
Interfaces
The 1400 printer has a standard USB 2.0 interface.
Setting up the 1400
Printer
Operating the 1400
Printer
Troubleshooting
Site Specifications
Accessories and
Supplies
CONTENTS
PRINTER DRIVER GUIDE
SEARCH
HELP
Page 21

Setting up the Printer
This section explains how to set up the 1400 printer. The steps are:
Introduction
1. Finding a Location for the 1400 Printer
2. Unpacking the 1400 Printer
3. Loading the Ribbon Carrier
4. Installing the printer driver.
For information on the printer driver, refer to the KODAK PROFESSIONAL
1400 Digital Photo Printer / Printer Driver Guide.
IMPORTANT: Turn the 1400 printer off before installing the printer driver.
5. Connecting the USB Cable, connecting the power cord, and turning on the
1400 printer
6. Loading the Paper Tray
7. Installing the Dust Cover
8. Making a Test Print
The software shipped with the 1400 printer enables you to take full advantage
of the 1400 printer’s capabilities. After you set up the 1400 printer, install the
appropriate printer driver.
Setting up the 1400
Printer
Operating the 1400
Printer
Troubleshooting
Site Specifications
Accessories and
Supplies
CONTENTS
PRINTER DRIVER GUIDE
SEARCH
HELP
Page 22
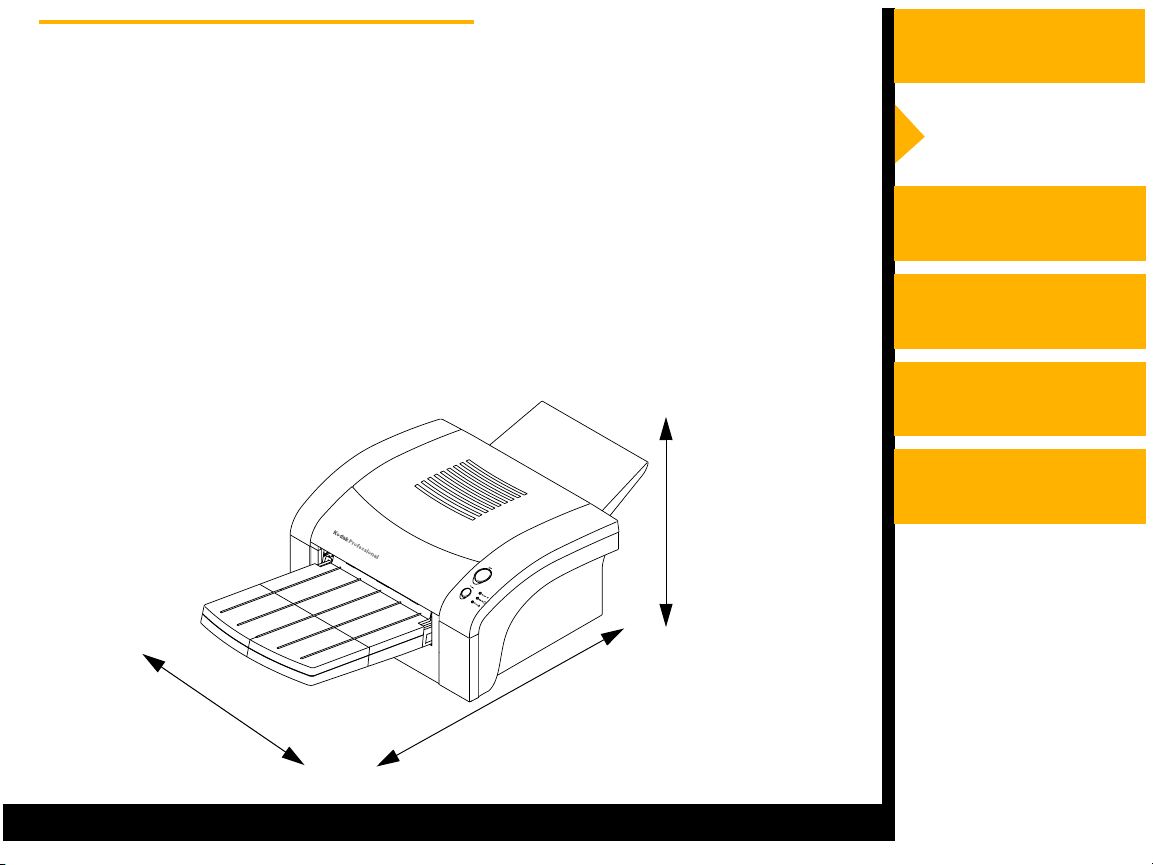
Finding a Location for the 1400 Printer
Introduction
As you look for an appropriate location for the 1400 printer, keep the following
guidelines in mind. See “Site Specifications” for specific requirements.
• Avoid placing the 1400 printer in areas where ventilation ducts, open
doors, or frequent passers-by might expose it to debris. Airborne dirt
particles can cause image-quality problems.
• The space requirements for the 1400 printer are shown below.
Allow 45.1 cm
(17.75 in.) to open
the top door
1400 Digital Photo Printer
43.1 cm
(17 in.)
Allow 88.9 cm (35 in.)
to remove the paper tray
Setting up the 1400
Printer
Operating the 1400
Printer
Troubleshooting
Site Specifications
Accessories and
Supplies
CONTENTS
PRINTER DRIVER GUIDE
SEARCH
HELP
Page 23

Unpacking the 1400 Printer
Introduction
The following accessories are included with the 1400 printer. If any are
missing, contact your dealer.
•Power cord
• CD containing the printer drivers, calibration utility, and user
documentation in PDF format. The CD also contains ADOBE ACROBAT
Reader for accessing, viewing, and printing the documentation.
• Rear dust cover
• Ribbon carrier
• Paper tray
To unpack the 1400 printer:
1. Open the shipping carton.
2. Carefully remove the top foam with the accessories.
3. Lift the printer out of the carton.
4. Remove the 1400 printer from the plastic sheet, and place the printer in the
desired location.
Setting up the 1400
Printer
Operating the 1400
Printer
Troubleshooting
Site Specifications
Accessories and
Supplies
NOTE: Save the packaging in case you need to ship the 1400 printer.
CONTENTS
PRINTER DRIVER GUIDE
SEARCH
HELP
Page 24

Loading the Ribbon Carrier
Introduction
The ribbon provides dyes for printing images. The three-color XTRALIFE
Ribbon contains enough dye to make 25 or 50 prints. The ribbon also contains
clear patches that protect images from fingerprints and fading.
Handling Ribbon Spools
• Do not expose the ribbon to direct sunlight, extreme heat, dust, or liquids.
• Leave the top cover closed except when you need to access the inside of
the 1400 printer.
• Avoid touching the ribbon.
Storing Ribbons
For the highest image quality, store ribbons as follows:
• Store unopened ribbons at temperatures below 77°F (25°C). Avoid
exposure to temperatures higher than 100°F (38°C).
• Keep partially used ribbons in their original wrappers to protect them from
dust and dirt when they are not loaded in the 1400 printer. Dust and dirt
specks on the ribbon show up as much larger spots on prints.
Setting up the 1400
Printer
Operating the 1400
Printer
Troubleshooting
Site Specifications
Accessories and
Supplies
CONTENTS
PRINTER DRIVER GUIDE
SEARCH
HELP
Page 25
Loading the Ribbon Carrier in the 1400 Printer
The ribbon carrier fits easily in the 1400 printer. There is only one way to
correctly load the ribbon carrier.
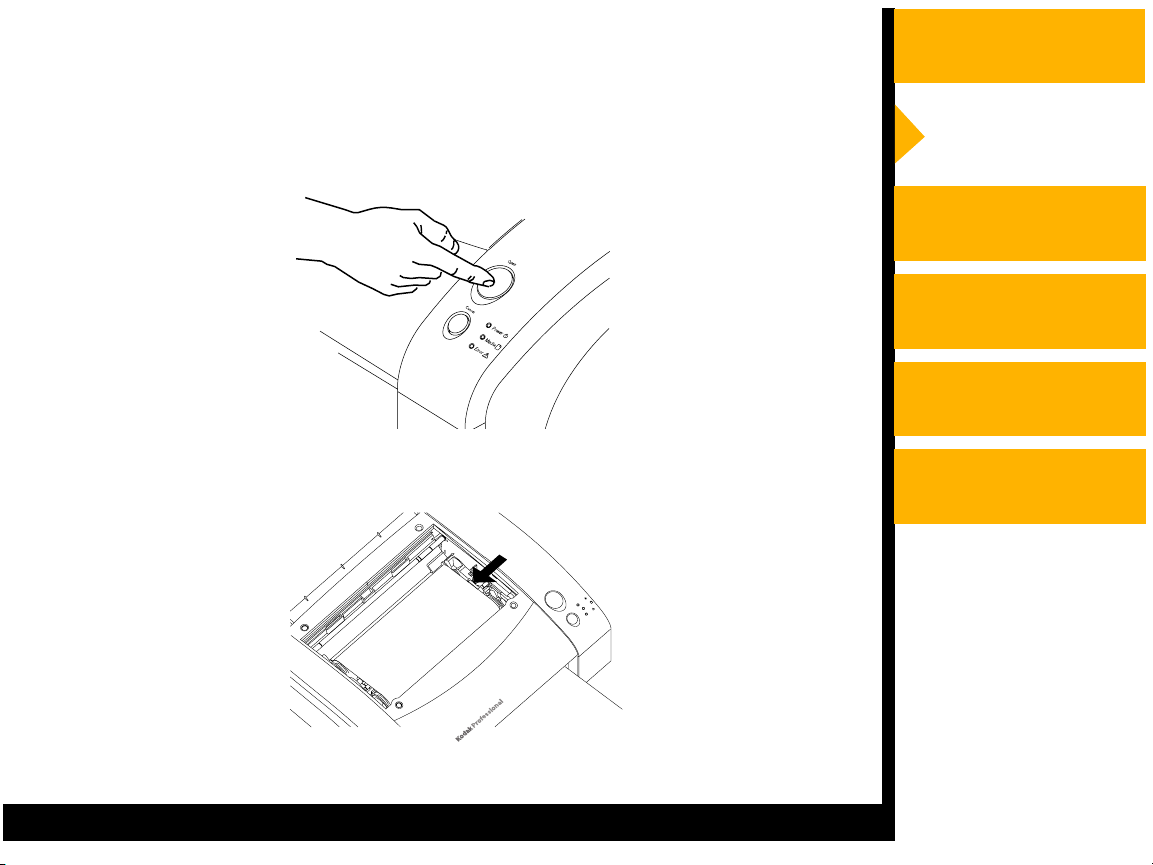
1. Press the OPEN button to open the top cover.
Introduction
Setting up the 1400
Printer
Operating the 1400
Printer
Troubleshooting
Site Specifications
2. If necessary, push the ribbon carrier to the left and lift it to remove it.
Open
Power
Media
Error
Cancel
1400 Digital Photo Printer
CONTENTS
PRINTER DRIVER GUIDE
SEARCH
Accessories and
Supplies
HELP
Page 26
NOTE: Images remain on the ribbon after printing. If you are working with
confidential documents, consider alternate ways of disposing of the
ribbon to maintain security.
Introduction
3. Remove the used ribbon from the ribbon carrier.
IMPORTANT: Do not discard the ribbon carrier.
4. Remove the new ribbon from its packaging.
IMPORTANT: Touching the dye patches could contaminate the ribbon,
resulting in scratches on your prints.
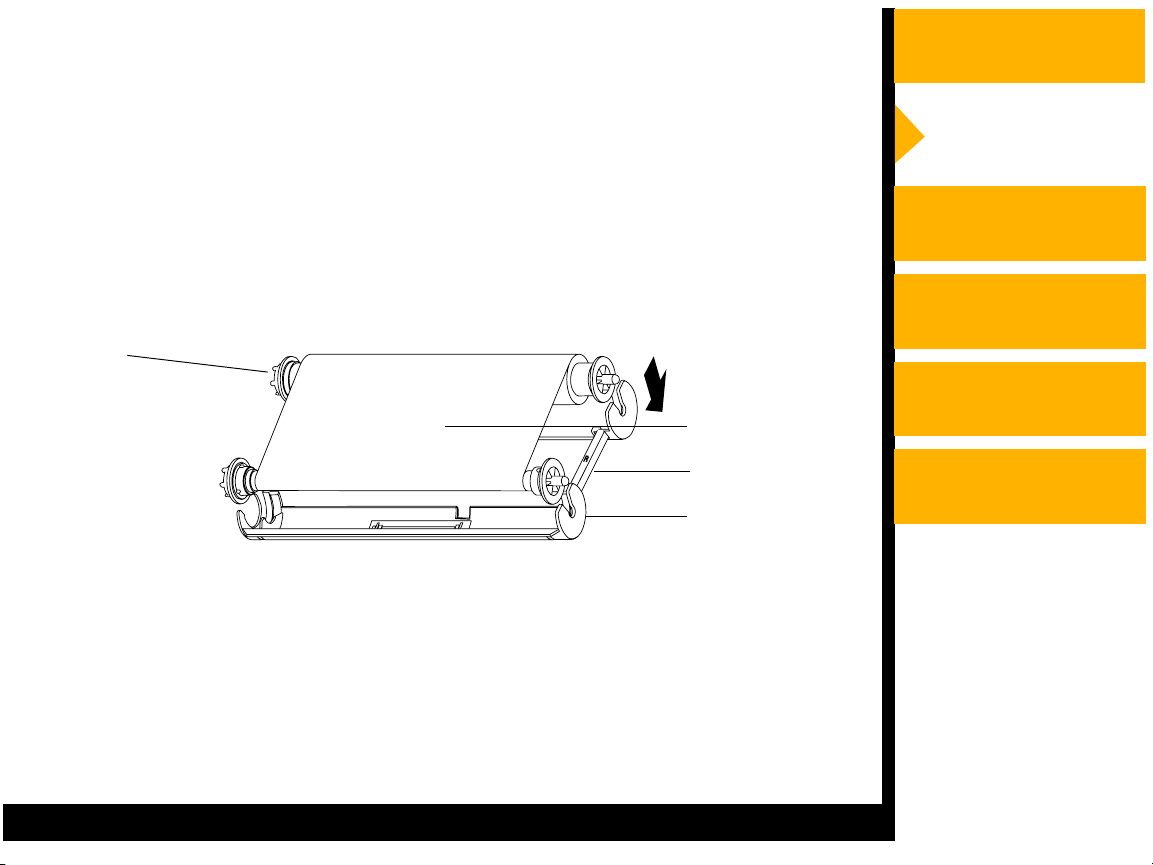
5. Set the new ribbon on the ribbon carrier as shown below.
spool
ribbon
handle
ribbon carrier
6. Firmly snap the ends of the ribbon spools into the ribbon carrier.
Setting up the 1400
Printer
Operating the 1400
Printer
Troubleshooting
Site Specifications
Accessories and
Supplies
CONTENTS
PRINTER DRIVER GUIDE
SEARCH
HELP
Page 27
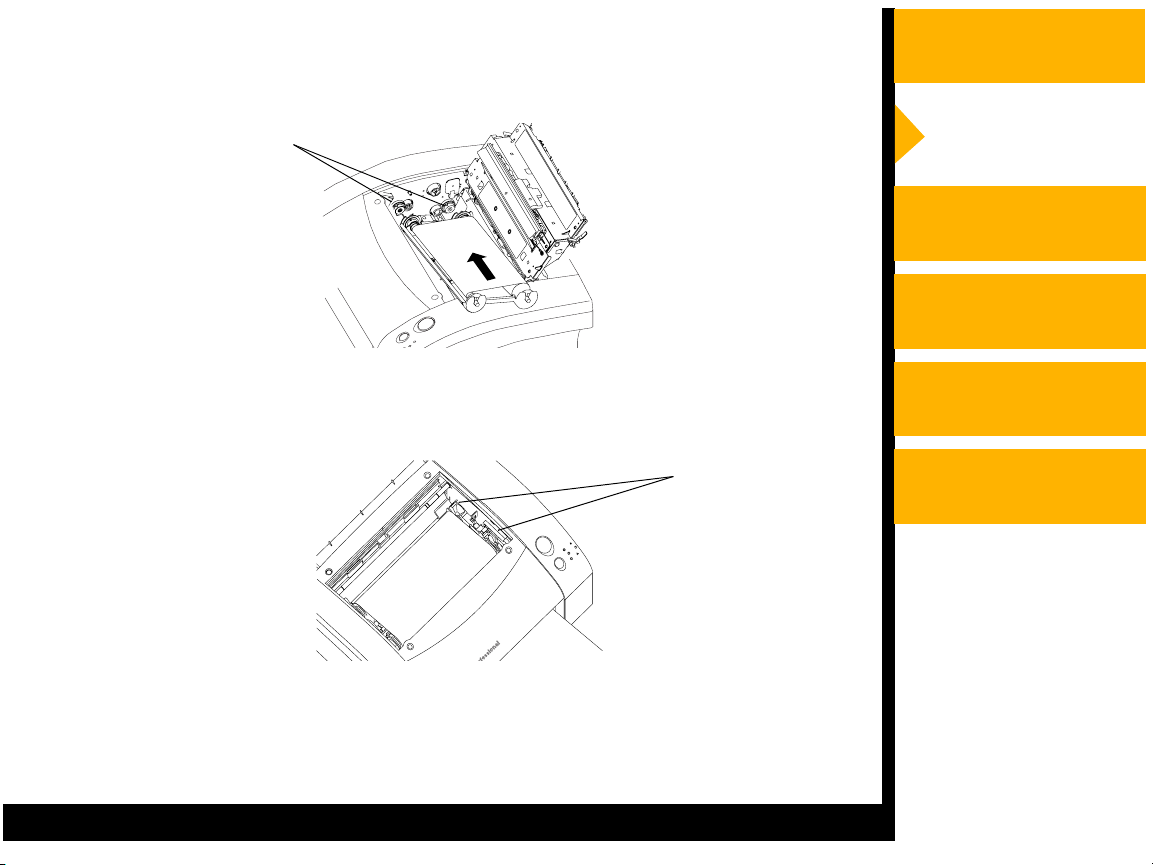
7. Grasp the ribbon carrier by the handle, and slide the spool onto the two
hubs on the left side.
Introduction
Hubs
8. Push the ribbon carrier against the hubs on the left until it can engage the
two holders on the right.
Holder
Open
Power
Media
Error
Cancel
1400 Digital Photo Printer
9. Turn the supply spool until the ribbon is taut.
Setting up the 1400
Printer
Operating the 1400
Printer
Troubleshooting
Site Specifications
Accessories and
Supplies
10. Close the top cover.
CONTENTS
PRINTER DRIVER GUIDE
SEARCH
HELP
Page 28

Connecting the USB Cable
Introduction
You must provide the necessary USB interface cable. The 1400 printer has a
standard USB 2.0 port. While you can use any "A-B" USB cable, a USB
2.0-compatible cable achieves maximum speed.
1. Be sure the printer driver is installed.
For information on the printer driver, refer to the KODAK PROFESSIONAL
1400 Digital Photo Printer / Printer Driver Guide.
2. Connect and secure the USB cable to the USB port.
USB port
Power switch
Power cord inlet
3. Connect the power cord.
4. Turn the power on. The POWER light turns green.
Setting up the 1400
Printer
Operating the 1400
Printer
Troubleshooting
Site Specifications
Accessories and
Supplies
CONTENTS
PRINTER DRIVER GUIDE
SEARCH
HELP
Page 29

Handling Paper
Introduction
Follow these guidelines when you handle the paper:
• Hold the paper by the edges to avoid fingerprints.
• Do not load more than 50 sheets of paper in the paper tray.
• Do not use wet or damaged paper.
Storing Paper
Follow these storage instructions to ensure the highest image quality:
• Store opened paper at temperatures below 77°F (25°C). Avoid exposure
to temperatures higher than 100°F (38°C).
• Store a loose stack of paper in its wrapper.
Setting up the 1400
Printer
Operating the 1400
Printer
Troubleshooting
Site Specifications
Accessories and
Supplies
CONTENTS
PRINTER DRIVER GUIDE
SEARCH
HELP
Page 30

Loading the Paper Tray
Introduction
See “Working with Paper”' for complete information about the various types.
You can adjust the paper tray to the size of the paper you are loading. Do not
force paper that is too long or too wide into the tray.
IMPORTANT: Use only the tray designed for the 1400 printer.
1. Push the plastic paper support on the paper tray until you hear a click.
Setting up the 1400
Printer
Operating the 1400
Printer
Troubleshooting
Site Specifications
Accessories and
Supplies
CONTENTS
PRINTER DRIVER GUIDE
SEARCH
HELP
Page 31

2. If necessary, adjust the paper tray to fit the paper you are loading.
• Move the paper width adjuster to the correct position for either 12 in.,
14 in., or A4 size paper.
• Slide the paper length adjuster to the correct position for the length of
the paper you are loading. Make sure that the paper length adjuster is
locked into position.
Paper width
adjuster
Paper length adjuster
Loosen the paper
before unpacking
3. Remove the paper from the package.
Introduction
Setting up the 1400
Printer
Operating the 1400
Printer
Troubleshooting
Site Specifications
Accessories and
Supplies
IMPORTANT: The paper may stick together. Loosen the pages well before
unpacking. Handle the paper by the edges to avoid fingerprints
on the top sheet.
CONTENTS
PRINTER DRIVER GUIDE
SEARCH
HELP
Page 32

4. Place the paper in the tray with the logo
side down (as shown in the label on the
tray) making sure that the front corners
of the stack are under the metal tabs.
NOTE: One package includes 25 or 50
sheets of paper.You can load up to
50 sheets of paper in the paper
tray.
5. Set the clear cover on the paper tray.
6. Install the paper tray in the 1400
printer.
Introduction
Setting up the 1400
Printer
Operating the 1400
Printer
Troubleshooting
Site Specifications
Accessories and
Supplies
CONTENTS
PRINTER DRIVER GUIDE
1400 Digital Photo Printer
SEARCH
HELP
Page 33

Installing the Dust Cover
Introduction
Install the dust cover on the back of the 1400 printer.
• Insert the bottom of the dust cover in the back slit of the 1400 printer.
Setting up the 1400
Printer
Operating the 1400
Printer
Troubleshooting
Site Specifications
Accessories and
Supplies
CONTENTS
PRINTER DRIVER GUIDE
SEARCH
HELP
Page 34

About Printer Initialization
Introduction
When you turn the 1400 printer on, it initializes (starts up and performs a
self-check) in a few seconds. During this time, the POWER and MEDIA lights
blink.
If the 1400 Printer Does Not Initialize
If the 1400 printer fails to initialize, no light illuminates on the display panel.
Turn the 1400 printer off and then back on.
If a light still does not illuminate, turn off both the 1400 printer and the
computer. Disconnect the USB cable from the 1400 printer and turn on the
printer. If no light illuminates, call for service.
Setting up the 1400
Printer
Operating the 1400
Printer
Troubleshooting
Site Specifications
Accessories and
Supplies
CONTENTS
PRINTER DRIVER GUIDE
SEARCH
HELP
Page 35

Making a Test Print
Introduction
Making a test print verifies proper 1400 printer setup and operation, and
confirms print quality.
1. Turn on the power while holding the CANCEL button for five seconds.
NOTE: You may need to press the CANCEL button a second time to start the
test print.
Example of the test print:
Setting up the 1400
Printer
Operating the 1400
Printer
Troubleshooting
Site Specifications
Accessories and
Supplies
2. Turn the power off, then on to exit Test Print mode.
CONTENTS
PRINTER DRIVER GUIDE
SEARCH
HELP
Page 36

Calibrating the Printer (Optional)
Introduction
The Calibration Utility is included on the CD for the KODAK PROFESSIONAL
1400 Digital Photo Printer. After installing the software from the CD, follow the
procedure below to calibrate the printer.
NOTE: The MACINTOSH Calibration Utility is supported on MACINTOSH
OS 9 systems and, under the Classic environment, on MACINTOSH
OS X systems.
There are three ways to calibrate the KODAK PROFESSIONAL 1400 Digital
Photo Printer. The simplest method, Easy-Cal, is shown here.
NOTE: The dialog boxes shown in this procedure are from a WINDOWS
Operating System. The dialog boxes on MACINTOSH OS vary slightly.
1. WINDOWS Operating Systems:
From the Start menu choose Programs / Kodak / KODAK Calibration
Utility.
MACINTOSH OS:
Double-click the Hard Drive. Open the KODAK Calibration Utility folder and
double-click the KODAK Calibration Utility icon. You will be prompted to
start Classic mode if it is not already running. Click Start Classic to run the
Calibration Utility.
Setting up the 1400
Printer
Operating the 1400
Printer
Troubleshooting
Site Specifications
Accessories and
Supplies
CONTENTS
PRINTER DRIVER GUIDE
SEARCH
HELP
Page 37

2. Click Begin from the Easy-Cal menu.
3. Select the Printer Model. Click Next.
4. Click Select Printer.
Introduction
Setting up the 1400
Printer
Operating the 1400
Printer
Troubleshooting
Site Specifications
Accessories and
Supplies
CONTENTS
PRINTER DRIVER GUIDE
SEARCH
HELP
Page 38

5. If the printer is found, a screen like this appears. Click OK.
OR
If the printer is not found, a screen like this appears.
Check the following:
• Is the printer turned on?
• Is the USB cable connected?
• Was the printer software installed?
Introduction
Setting up the 1400
Printer
Operating the 1400
Printer
Troubleshooting
Site Specifications
Accessories and
Supplies
If you resolved the problem, the OK button becomes enabled. Click OK.
If you did not resolve the problem, click Cancel, re-install the Calibration
Utility, and begin the calibration again.
CONTENTS
PRINTER DRIVER GUIDE
SEARCH
HELP
Page 39

6. Click Change Setup.
7. Select the Ribbon type currently loaded in your printer (Matte or Glossy).
Click OK.
Introduction
Setting up the 1400
Printer
Operating the 1400
Printer
Troubleshooting
Site Specifications
Accessories and
Supplies
CONTENTS
PRINTER DRIVER GUIDE
SEARCH
HELP
Page 40

8. Click Next.
9. Click Next.
Introduction
Setting up the 1400
Printer
Operating the 1400
Printer
Troubleshooting
Site Specifications
Accessories and
Supplies
CONTENTS
PRINTER DRIVER GUIDE
SEARCH
HELP
Page 41

10. Click Print. Retrieve the test print from the printer.
Introduction
Setting up the 1400
Printer
Operating the 1400
Printer
Troubleshooting
Site Specifications
Accessories and
Supplies
CONTENTS
PRINTER DRIVER GUIDE
SEARCH
HELP
Page 42

11. Evaluate the clusters in the printed test print.
Introduction
Setting up the 1400
Printer
Operating the 1400
Printer
Troubleshooting
Site Specifications
Accessories and
Supplies
CONTENTS
PRINTER DRIVER GUIDE
SEARCH
HELP
Page 43

12. Enter the number of the most neutral (gray) cluster. Click Done.
Introduction
Setting up the 1400
Printer
Operating the 1400
Printer
Troubleshooting
13. Click Quit.
CONTENTS
PRINTER DRIVER GUIDE
SEARCH
Site Specifications
Accessories and
Supplies
HELP
Page 44

Operating the 1400 Printer
This chapter provides the information you need to operate the 1400 printer. It
includes:
“Buttons and Lights”
Introduction
Setting up the 1400
Printer
“Working with Paper”
“Handling and Storing Prints”
“Keeping the 1400 Printer in Good Working Condition”
“Cleaning the 1400 Printer”
NOTE: Before operating the 1400 printer you must install the appropriate
printer driver. Refer to the Printer Driver Guide for the details.
Operating the 1400
Printer
Troubleshooting
Site Specifications
Accessories and
Supplies
CONTENTS
PRINTER DRIVER GUIDE
SEARCH
HELP
Page 45

Buttons and Lights
Introduction
Setting up the 1400
Printer
Operating the 1400
Printer
OPEN button
1400 Digital Photo Printer
CANCEL button
POWER light
MEDIA light
ERROR light
Buttons:
• OPEN button—Press to open the top cover. Open the top cover when
loading the ink ribbon or clearing a paper jam.
• CANCEL button—Press to cancel the print in progress.
IMPORTANT: Do not open the top cover during printing. Doing so may cause a
print error and malfunction of the printer.
CONTENTS
PRINTER DRIVER GUIDE
SEARCH
HELP
Troubleshooting
Site Specifications
Accessories and
Supplies
Page 46

Power switch:
Introduction
Setting up the 1400
Printer
Operating the 1400
Printer
Power switch
Indicator lights:
• POWER light—illuminates in green when the 1400 printer is turned on.
• MEDIA light—illuminates in red when an error concerning print paper
occurs.
• ERROR light—illuminates in red when an error occurs. The light remains
on until all the errors are resolved.
CONTENTS
PRINTER DRIVER GUIDE
SEARCH
HELP
Troubleshooting
Site Specifications
Accessories and
Supplies
Page 47

Working with Paper
Introduction
This section describes the paper used with the 1400 printer. It also lists
handling and storage guidelines.
Thermal paper looks and feels like photographic paper, but it is not light
sensitive. The back is imprinted with the Kodak logo. The paper is shipped as
50-sheet or 25-sheet packages. Only 50 sheets can be loaded in the printer at
one time.
IMPORTANT: Use only paper designed for the 1400 printer. Using other
materials may cause problems.
KODAK PROFESSIONAL EKTATHERM Paper is available. The following
table identifies each paper type and size and the maximum image size for each
paper type.
Setting up the 1400
Printer
Operating the 1400
Printer
Troubleshooting
Site Specifications
Accessories and
Supplies
CONTENTS
PRINTER DRIVER GUIDE
SEARCH
HELP
Page 48

KODAK Thermal Paper Types, Sizes, and Image Sizes
Introduction
Type of Paper Paper Size Type of Ribbon Maximum Image
Size
KODAK
PROFESSIONAL
EKTATHERM
1400 Print Kit /
Glossy / 8.5 x 12 /
216 x 305 mm
(8.5 x 12 in.)
KODAK
PROFESSIONAL
EKTATHERM
XTRALIFE 1400
Glossy Ribbon
203 x 254 mm
(8.0 x 10.0 in.)
50 Pack
KODAK
PROFESSIONAL
EKTATHERM
1400 Print Kit /
Glossy / 8.5 x 12 /
25 Pack
Setting up the 1400
Printer
Operating the 1400
Printer
Troubleshooting
Site Specifications
Accessories and
Supplies
CONTENTS
PRINTER DRIVER GUIDE
SEARCH
HELP
Page 49

Type of Paper Paper Size Type of Ribbon Maximum Image
Size
Introduction
KODAK
PROFESSIONAL
EKTATHERM
1400 Print Kit /
Glossy / 8.5 x 14 /
50 Pack
KODAK
PROFESSIONAL
EKTATHERM
1400 Print Kit /
Glossy / 8.5 x 14 /
25 Pack
KODAK
PROFESSIONAL
EKTATHERM
1400 Print Kit /
Glossy / A4 / 50
Pack
216 x 356 mm
(8.5 x 14 in.)
210 x 297 mm
(8.27 x 11.69
in.)
KODAK
PROFESSIONAL
EKTATHERM
XTRALIFE 1400
Glossy Ribbon
KODAK
PROFESSIONAL
EKTATHERM
XTRALIFE 1400
Glossy Ribbon
210 x 305 mm
(8.27 x 12 in.)
203 x 254 mm
(8.0 x 10.0 in.)
Setting up the 1400
Printer
Operating the 1400
Printer
Troubleshooting
Site Specifications
Accessories and
Supplies
CONTENTS
PRINTER DRIVER GUIDE
SEARCH
HELP
Page 50

Type of Paper Paper Size Type of Ribbon Maximum Image
Size
Introduction
KODAK
PROFESSIONAL
EKTATHERM
1400 Print Kit /
Matte / 8.5 x 12 /
50 Pack
KODAK
PROFESSIONAL
EKTATHERM
1400 Print Kit /
Matte / A4 / 50
Pack
216 x 305 mm
(8.5 x 12 in.)
210 x 297 mm
(8.27 x 11.69
in.)
KODAK
PROFESSIONAL
EKTATHERM
XTRALIFE 1400
Matte Ribbon
KODAK
PROFESSIONAL
EKTATHERM
XTRALIFE 1400
Matte Ribbon
203 x 254 mm
(8.0 x 10.0 in.)
203 x 254 mm
(8.0 x 10.0 in.)
Setting up the 1400
Printer
Operating the 1400
Printer
Troubleshooting
Site Specifications
Accessories and
Supplies
CONTENTS
PRINTER DRIVER GUIDE
SEARCH
HELP
Page 51

Handling and Storing Prints
Introduction
The image stability of thermal prints depends upon factors such as
temperature, relative humidity, and exposure to light or to biological or chemical
contaminates. Using XTRALIFE Ribbon increases the stability and durability of
your prints.
Your thermal images will last a long time if you use these guidelines for
handling and storing them:
• Remove prints from the exit area ONLY AFTER the printer ejects them.
• Do NOT put a print back into the paper tray. Doing so can cause jams
and loss of completed prints.
• Handle prints as little as possible. When handling prints, make sure your
hands are clean and free of food, oil, and grease. Hold prints by the
edges.
• Store thermal prints in a cool, dry environment free of chemical
contamination.
• Avoid storing prints at high temperatures for extended periods.
• A relative humidity between 30% and 50% is ideal.
• Avoid exposure to high intensity light sources, particularly fluorescent
light and sunlight, which are rich in ultraviolet radiation.
Setting up the 1400
Printer
Operating the 1400
Printer
Troubleshooting
Site Specifications
Accessories and
Supplies
CONTENTS
PRINTER DRIVER GUIDE
SEARCH
HELP
Page 52

• Avoid exposure to vinyl items (those made of polyvinyl chloride) or any
plastic which contains plasticizer. These items usually have a distinct
plastic odor.
• Do not place objects on top of the 1400 printer.
Keeping the 1400 Printer in Good Working Condition
• Keep the printer clean. Keep the surrounding area vacuumed and clean.
• Protect the 1400 printer from tobacco smoke, dust, sand, and liquid spills.
Introduction
Setting up the 1400
Printer
Operating the 1400
Printer
Troubleshooting
Site Specifications
Accessories and
Supplies
CONTENTS
PRINTER DRIVER GUIDE
SEARCH
HELP
Page 53

Cleaning the 1400 Printer
Introduction
To help ensure good performance and high-quality output, make sure the
operating environment is clean and dust free.
Clean the 1400 printer regularly as described below. Before you begin, turn off
the 1400 printer and unplug it.
CAUTION:
Never use abrasives or harsh chemicals to clean any part of the 1400
printer. Do not use alcohol cleaning pads to clean the cabinet.
• Wipe the covers, the paper tray area, and the paper tray with a lint-free
cloth moistened with water. This eliminates dust build-up and prevents
dirt from getting into the 1400 printer.
• Clean the area around and under the printer to prevent dirt from getting
into the 1400 printer.
Setting up the 1400
Printer
Operating the 1400
Printer
Troubleshooting
Site Specifications
Accessories and
Supplies
CONTENTS
PRINTER DRIVER GUIDE
SEARCH
HELP
Page 54

Troubleshooting
This chapter describes the problems that you may occasionally have with the
1400 printer. It also tells how to resolve these problems.
This chapter contains the following sections:
Introduction
Setting up the 1400
Printer
• “Light Indications and How to Resolve Them”
• “If the Printer Does Not Operate Correctly”
• “Clearing a Paper Jam”
• “Repairing a Torn Ribbon”
• “Cleaning the Thermal Head”
• “Repacking the Printer”
• “Getting Additional Help”
Operating the 1400
Printer
Troubleshooting
Site Specifications
Accessories and
Supplies
CONTENTS
PRINTER DRIVER GUIDE
SEARCH
HELP
Page 55

Light Indications and How to Resolve Them
Introduction
The indicator lights become red when a problem has occurred. You must
resolve any problems before you can print.
Click the following light indication links to learn more.
“ERROR Light Off, MEDIA Light Red”
“ERROR Light Red, MEDIA Light Off”
“ERROR Light Red, MEDIA Light Red”
Setting up the 1400
Printer
Operating the 1400
Printer
Troubleshooting
Site Specifications
Accessories and
Supplies
CONTENTS
PRINTER DRIVER GUIDE
SEARCH
HELP
Page 56

: LED on : LED blinking : LED off
Introduction
Status Light Indications
POWER MEDIA ERROR
Power Off
Initializing Green Green Green
Online Green Green
Offline Green
Normal status
Transferring data Green Green
Printing Green Green
Pre-heating Green Green Green
Setting up the 1400
Printer
Operating the 1400
Printer
Troubleshooting
Site Specifications
Accessories and
Supplies
CONTENTS
PRINTER DRIVER GUIDE
SEARCH
HELP
Page 57

Status Light Indications
POWER MEDIA ERROR
Introduction
Over heat
Green Green
(cooling)
Top cover open Green Red Red
Out of media
Green Red
(ribbon)
Paper picking
Error status
error or Out of
Green Red
paper
Paper size illegal Green Red Red
Paper jam Green Red
Media size too
Green Red Red
small for image
Media size too
Green Red Green
large for image
Setting up the 1400
Printer
Operating the 1400
Printer
Troubleshooting
Site Specifications
Accessories and
Supplies
CONTENTS
PRINTER DRIVER GUIDE
SEARCH
HELP
Page 58

If the Printer Does Not Operate Correctly
Introduction
You may be able to identify or correct problems yourself. Follow the instructions
for the problem you have, and make a test print to see if the problem is
resolved. Use the following list to correct the problem. If the problem persists,
service is required. See “Getting Additional Help”.
The following is a list of common problems. Click the appropriate link for the
possible cause and solution for the problem.
“1400 Printer does Not Turn On”
“Printing Takes Much Longer than Usual”
“Nothing Happens when a Job is Sent”
“White or Colored Lines and Scratches”
“White or Multicolored Spots”
“Smudges, Smears, and Fingerprints”
“Paper does not Feed”
“Printer does not Respond when you Press Buttons”
“Invalid Ribbon Type”
Setting up the 1400
Printer
Operating the 1400
Printer
Troubleshooting
Site Specifications
Accessories and
Supplies
CONTENTS
PRINTER DRIVER GUIDE
SEARCH
HELP
Page 59

Clearing a Paper Jam
Introduction
Paper and ribbon may occasionally jam in the 1400 printer. Jams are typically
identified when the Error light becomes red. Jams may occur in the following
locations:
Ribbon carrier area
Back area
Front area
1400 Digital Photo Printer
Open
Cancel
Power
Media
E
rror
Setting up the 1400
Printer
Operating the 1400
Printer
Troubleshooting
Site Specifications
Accessories and
Supplies
CONTENTS
PRINTER DRIVER GUIDE
SEARCH
HELP
Page 60

Clearing a Paper Jam from the Front Area
1. Turn off the 1400 printer.
Introduction
2. Completely remove the paper tray.
1400 Digital Photo Printer
3. Turn on the printer.
The printer will eject the paper.
IMPORTANT: If the paper does not eject, turn off the printer, pull out the
partially-fed paper. Discard the paper.
4. Install the tray in the printer.
Setting up the 1400
Printer
Operating the 1400
Printer
Troubleshooting
Site Specifications
Accessories and
Supplies
CONTENTS
PRINTER DRIVER GUIDE
SEARCH
HELP
Page 61

Clearing a Paper Jam from the Ribbon Carrier Area
1. Turn off the 1400 printer.
Introduction
2. Open the top cover.
3. Push the ribbon carrier to the left and lift it up to remove it.
Open
Power
Media
Error
Cancel
Setting up the 1400
Printer
Operating the 1400
Printer
Troubleshooting
Site Specifications
Accessories and
Supplies
CONTENTS
PRINTER DRIVER GUIDE
1400 Digital Photo Printer
SEARCH
HELP
Page 62

4. Pull out the jammed paper and discard.
CAUTION:
Be careful not to damage the thermal head.
5. Install the ribbon carrier and close the top cover.
IMPORTANT: Do not put partially-fed paper back into the paper tray.
Introduction
Setting up the 1400
Printer
Operating the 1400
Printer
Troubleshooting
Site Specifications
Accessories and
Supplies
CONTENTS
PRINTER DRIVER GUIDE
SEARCH
HELP
Page 63

Clearing a Paper Jam from the Back Area
Introduction
1. Turn off the 1400 printer.
2. Completely remove the paper tray.
3. Turn on the 1400 printer.
The printer will eject the paper.
IMPORTANT: If the paper does not eject, turn off the printer.
Next, remove the back dust cover and pull out the partially fed
paper. Install the back dust cover. Discard the paper.
Setting up the 1400
Printer
Operating the 1400
Printer
Troubleshooting
Site Specifications
Accessories and
Supplies
CONTENTS
PRINTER DRIVER GUIDE
SEARCH
HELP
Page 64

Repairing a Torn Ribbon
Introduction
1. Position the ribbon carrier with the torn ribbon on a clean place as shown
below.
Transparent tape
2. Place a piece of transparent tape on the center of the ribbon.
3. Wind the takeup spool counterclockwise so that the tape is not seen and
the ribbon is straight.
4. Install the ribbon carrier in the 1400 printer.
Supply spool
Takeup spool
Setting up the 1400
Printer
Operating the 1400
Printer
Troubleshooting
Site Specifications
Accessories and
Supplies
CONTENTS
PRINTER DRIVER GUIDE
SEARCH
HELP
Page 65

Cleaning the Thermal Head
Introduction
Cleaning the thermal head helps to eliminate lines and streaks on your prints.
CAUTION:
Never rub or wipe anything across the thermal head except when
cleaning it.
1. Turn off the 1400 printer and open the top cover.
Power switch
Setting up the 1400
Printer
Operating the 1400
Printer
Troubleshooting
Site Specifications
Accessories and
Supplies
CONTENTS
PRINTER DRIVER GUIDE
SEARCH
HELP
Page 66

2. Use a lint-free cloth moistened with isopropyl alcohol or distilled water to
clean the print head, and wipe along the heater line four times:
• Wipe the full length of the area (always in one direction).
• Use a clean part of the cloth for each wipe.
• Apply firm, even pressure.
• Wipe only the following areas.
Guide bar
Heater line
Introduction
Setting up the 1400
Printer
Operating the 1400
Printer
Troubleshooting
Site Specifications
Accessories and
Supplies
3. Allow the wiped area to dry for about two minutes.
4. Close the top cover and turn on the printer.
5. Make a test print.
NOTE: It may be necessary to repeat Steps 1- 5 several times to remove any
artifacts. If you cannot remove the artifacts, call for service.
CONTENTS
PRINTER DRIVER GUIDE
SEARCH
HELP
Page 67

Repacking the Printer
Introduction
If you need to ship the printer, pack it as follows:
1. Remove the paper from the paper tray.
2. Open the top cover then remove the ribbon carrier. Store the ribbon in its
original box. Put the ribbon carrier in its original packing.
3. Close the top cover.
4. Put the 1400 printer in its original plastic wrapping to keep it clean during
shipping.
5. Pack the printer in its original box with its original packing materials.
Setting up the 1400
Printer
Operating the 1400
Printer
Troubleshooting
Site Specifications
Accessories and
Supplies
CONTENTS
PRINTER DRIVER GUIDE
SEARCH
HELP
Page 68

Getting Additional Help
Introduction
Your dealer of Kodak products is the best source for information about your
printer and about purchasing supplies and accessories.
In addition, technical support is also available on the Kodak Web site at
www.kodak.com. Call 1-800-23kodak (1-800-235-6325) from 9:00 a.m. to
8:00 p.m., Eastern Standard Time, on regular business days.
Help numbers for the Asia/Pacific regions are listed below:
Country Country
code
Australia 61 3 9350-1222
Hong Kong 85 2 2564-9333
Indonesia 81 3 5488-2001
Korea 82 2 708-5400
Malaysia 60 3 757-2722
Philippines 63 2 815-8851
Singapore 65 473-6611
Thailand 66 2 271-3040
Number
Setting up the 1400
Printer
Operating the 1400
Printer
Troubleshooting
Site Specifications
Accessories and
Supplies
CONTENTS
Taiwan 88 6 2 895-1580
PRINTER DRIVER GUIDE
SEARCH
HELP
Page 69

In the European regions a call center will assist you. Help numbers for the call
center’s customer support teams appear below:
Introduction
Country Number
Belgium 2 263-2211
Denmark 8088 2082
Finland 0800 112773
France 0800 903716
Germany 49-(0) 711 406-3434
Hungary 06800 17030
Italy 0800 782764
Netherlands 0800 0228756
Norway 80014898
Poland 0800 4412399
Portugal 0800 880449
Russia 0810 800 21162044
South Africa 0800 990514
Spain 0900 997 116
Setting up the 1400
Printer
Operating the 1400
Printer
Troubleshooting
Site Specifications
Accessories and
Supplies
CONTENTS
Sweden 0200 285772
United Kingdom 0800 0158528
PRINTER DRIVER GUIDE
SEARCH
HELP
Page 70

ERROR Light Off, MEDIA Light Red
Power
Media
Error
Introduction
Setting up the 1400
Printer
Operating the 1400
Printer
Troubleshooting
Possible Cause Possible Solution
Out of media (ribbon) or
unrecognized ribbon type.
CONTENTS
PRINTER DRIVER GUIDE
Install a new ribbon in the ribbon
carrier. See “Loading the Ribbon
Carrier”.
SEARCH
HELP
Site Specifications
Accessories and
Supplies
Page 71

ERROR Light Red, MEDIA Light Off
Power
Media
Error
Introduction
Setting up the 1400
Printer
Operating the 1400
Printer
Troubleshooting
Possible Cause Possible Solution
A paper jam occurred. Clear the paper path. See “Clearing a
Paper Jam”.
A mechanical error occurred. Remove the paper tray and ribbon
carrier. Turn off the 1400 printer
power and turn it on again.
The paper tray is empty or the paper
tray is not set.
CONTENTS
PRINTER DRIVER GUIDE
Load paper. See “Loading the Paper
Tr ay ” .
SEARCH
HELP
Site Specifications
Accessories and
Supplies
Page 72

ERROR Light Red, MEDIA Light Red
Power
Media
Error
Possible Cause Possible Solution
Introduction
Setting up the 1400
Printer
Operating the 1400
Printer
Troubleshooting
Site Specifications
The paper is not loaded properly. Load the proper paper into the tray.
The top cover is open. Close the top cover.
Illegal paper size. Make sure the paper is a valid size.
Paper size does not match image
size.
CONTENTS
PRINTER DRIVER GUIDE
Use a different paper size or resize
the image.
SEARCH
HELP
Accessories and
Supplies
Page 73

1400 Printer does Not Turn On
Introduction
Possible Cause Possible Solution
The power is not on. Check that the power switch is in the
On position.
The power cord is not connected
securely.
Defective USB cable Disconnect the USB cable
Check that the power cord is
connected securely.
Setting up the 1400
Printer
Operating the 1400
Printer
Troubleshooting
Site Specifications
Accessories and
Supplies
CONTENTS
PRINTER DRIVER GUIDE
SEARCH
HELP
Page 74

Printing Takes Much Longer than Usual
Introduction
Possible Cause Possible Solution
The image file size may be larger than
usual and, therefore, takes longer to
process.
The 1400 printer is too warm.
The ERROR light blinks green.
The 1400 printer is too cold.
All three lights are green.
Wait a few minutes.
1. Wait until the temperature inside
the 1400 printer falls.
2. If the temperature does not fall,
turn the 1400 printer off. Consider
moving the 1400 printer to a
cooler location.
1. Wait a few minutes.
2. The operating environment may
be below the site specification for
the printer. Consider moving the
printer to a warmer location.
Setting up the 1400
Printer
Operating the 1400
Printer
Troubleshooting
Site Specifications
Accessories and
Supplies
CONTENTS
PRINTER DRIVER GUIDE
SEARCH
HELP
Page 75

Nothing Happens when a Job is Sent
Introduction
Possible Cause Possible Solution
Job is processing. Wait to see if the job is still
processing.
Printer settings
Printer connections
1. Print a file that you printed
previously.
2. Check the communication settings
for compatibility between the 1400
printer and the host computer.
1. Disconnect the cable and make a
test print.
2. If the problem persists, service is
required.
Setting up the 1400
Printer
Operating the 1400
Printer
Troubleshooting
Site Specifications
Accessories and
Supplies
CONTENTS
PRINTER DRIVER GUIDE
SEARCH
HELP
Page 76

White or Colored Lines and Scratches
Introduction
Possible Cause Possible Solution
Dust or dirt has caused
contamination.
1. Check that the paper in the paper
tray is clean and streak free.
2. Check that the ribbon is clean.
3. Be sure the ribbon is snapped
firmly in the ribbon carrier.
4. Clean the print head. See
“Cleaning the Thermal Head”.
If the problem persists, service is
required.
White or Multicolored Spots
Possible Cause Possible Solution
Dirt or dust has caused
contamination.
1. Clean the 1400 printer and the
surrounding area.
Setting up the 1400
Printer
Operating the 1400
Printer
Troubleshooting
Site Specifications
Accessories and
Supplies
CONTENTS
2. Move the 1400 printer away from
room ventilation ducts or open
doors.
PRINTER DRIVER GUIDE
SEARCH
HELP
Page 77

Smudges, Smears, and Fingerprints
Introduction
Possible Cause Possible Solution
Fingerprints or other oils have
contaminated the paper or ribbon.
Paper does not Feed
Possible Cause Possible Solution
Improper loading or installation of
paper tray.
Replace the contaminated paper or
ribbon with new ones. Handle paper
and ribbon carefully. See “Handling
Ribbon Spools” and “Working with
Paper”.
Use only KODAK PROFESSIONAL
EKTATHERM XTRALIFE Ribbon.
1. Remove sheets with irregularities.
2. Check that the tray is correctly
adjusted for the size paper
installed.
3. Reduce the size of the stack of
paper in the paper tray.
Setting up the 1400
Printer
Operating the 1400
Printer
Troubleshooting
Site Specifications
Accessories and
Supplies
CONTENTS
PRINTER DRIVER GUIDE
SEARCH
HELP
Page 78

Printer does not Respond when you Press Buttons
Possible Cause Possible Solution
Introduction
Setting up the 1400
Printer
Printer conditions.
1. Make sure the top cover is closed.
2. Remove and reinstall the paper
tray.
3. Restart the 1400 printer.
4. Check that the POWER light
illuminates.
Operating the 1400
Printer
Troubleshooting
Site Specifications
Accessories and
Supplies
CONTENTS
PRINTER DRIVER GUIDE
SEARCH
HELP
Page 79

Invalid Ribbon Type
Introduction
An error message appears when this occurs.
Possible Cause Possible Solution
Ribbon is not seated correctly in
• Re-seat the ribbon in the ribbon
ribbon carrier
Barcode on ribbon is scratched,
• Check the barcode for damage.
defective, or dirty.
• Gently wipe the barcode with a
carrier. Make sure the bobbins
engage in the ribbon carrier.
(See illustration below.)
See your dealer if it is scratched.
lint-free cloth.
barcode
bobbins
Setting up the 1400
Printer
Operating the 1400
Printer
Troubleshooting
Site Specifications
Accessories and
Supplies
CONTENTS
PRINTER DRIVER GUIDE
SEARCH
HELP
Page 80

Site Specifications
Introduction
Printer Specifications
Printer dimensions:
Width: 16.96 in. (43.08 cm)
Depth: 19 in. (48.3 cm) excluding paper tray
Height: 17.75 in. (45.1 cm) with ribbon door open
Printer weight:
Approx. 28.7 lbs (Approx. 13 kg)
Setting up the 1400
Printer
Operating the 1400
Printer
Troubleshooting
Site Specifications
Accessories and
Supplies
CONTENTS
PRINTER DRIVER GUIDE
SEARCH
HELP
Page 81

Space Requirements
Introduction
Minimum space required with the paper tray inserted:
Width: 17 in. (43.2 cm)
Depth: 30.75 in. (78.1 cm)
Height: 8.5 in. (21.6 cm)
Minimum space for removing the paper tray and opening the top cover:
Width: 17 in. (43.2 cm)
Depth: 35 in. (88.9 cm)
Height: 17.75 in. (45.1 cm)
Setting up the 1400
Printer
Operating the 1400
Printer
Troubleshooting
Site Specifications
Accessories and
Supplies
CONTENTS
PRINTER DRIVER GUIDE
SEARCH
HELP
Page 82

Operating Environment
Introduction
Ambient operating temperature: 59 to 86°F (15 to 30°C)
Relative humidity: 10% to 85%
Power Requirements
Voltage/frequency:
AC100V-240V / 50/60Hz
Power consumption
115VAC / 23VAC, 2.4A / 1.2 A
Setting up the 1400
Printer
Operating the 1400
Printer
Troubleshooting
Site Specifications
Accessories and
Supplies
CONTENTS
PRINTER DRIVER GUIDE
SEARCH
HELP
Page 83

Accessories and Supplies
The following kits are available for the 1400 printer. The kits contain ribbon and
paper. Purchase the kits from your printer dealer or distributor.
Kit Catalog Number
Introduction
Setting up the 1400
Printer
KODAK PROFESSIONAL EKTATHERM 1400 Print Kit /
Glossy / 8.5 x 12 / 50 Pack
KODAK PROFESSIONAL EKTATHERM 1400 Print Kit /
Glossy / 8.5 x 14 / 50 Pack
KODAK PROFESSIONAL EKTATHERM 1400 Print Kit /
Glossy / A4 / 50 Pack
KODAK PROFESSIONAL EKTATHERM 1400 Print Kit /
Matte / 8.5 x 12 / 50 Pack
KODAK PROFESSIONAL EKTATHERM 1400 Print Kit /
Matte / A4 / 50 Pack
KODAK PROFESSIONAL EKTATHERM 1400 Print Kit /
Glossy / 8.5 x 12 / 25 Pack
KODAK PROFESSIONAL EKTATHERM 1400 Print Kit /
Glossy / 8.5 x 14 / 25 Pack
1666031
8847527
8602898
8957185
8335788
8172041
8856841
Operating the 1400
Printer
Troubleshooting
Site Specifications
Accessories and
Supplies
CONTENTS
PRINTER DRIVER GUIDE
SEARCH
HELP
Page 84

Search
You can search the active manual for desired information. This function is
executed through the search utilities of ADOBE ACROBAT.
To search within the active manual:
Introduction
Setting up the 1400
Printer
1. Click the find tool in the toolbar to open the Find dialog box.
2. Enter the word or phrase you want to find.
3. Click Find to begin the search.
The first occurrence of the word or phrase is highlighted.
Operating the 1400
Printer
Troubleshooting
Site Specifications
Accessories and
Supplies
CONTENTS
PRINTER DRIVER GUIDE
SEARCH
HELP
Page 85

Help
This online manual links you to topics within this manual. You can also print the
manual. Refer to the following procedures for help navigating and printing the
document.
Navigating
Introduction
Setting up the 1400
Printer
Operating the 1400
Printer
Use the links within the windows as well as standard Adobe Acrobat tools to
navigate the manual. For more information about the tools, see the Adobe
Acrobat documentation.
Identifying the Active Section
The tabs on the right side of your window identify the sections. The active
section is shown as a white tab with a yellow arrow.
Opening Sections
To open a different section, click the desired tab.
Following a Link
Cross-referenced information is identified with blue text. To view the referenced
information, click the blue text.
CONTENTS
PRINTER DRIVER GUIDE
SEARCH
HELP
Troubleshooting
Site Specifications
Accessories and
Supplies
Page 86

Browsing
You can also browse through the manual using the browse buttons in the
toolbar at the top of the window.
Displays the next page
Introduction
Setting up the 1400
Printer
Displays the previous page
Displays the first page of the manual
Displays the last page of the manual
Printing
To print, select Print from the File menu. Complete the dialog box and send the
print request.
Operating the 1400
Printer
Troubleshooting
Site Specifications
Accessories and
Supplies
CONTENTS
PRINTER DRIVER GUIDE
SEARCH
HELP
Page 87

Magnifying
Introduction
Some of the images are better viewed at a larger magnification. To change the
view magnification, use the controls in the toolbar, or click and drag in the page
with the zoom tool.
Use of the Toolbar View Buttons
Click one of the three page view buttons on the toolbar to change the
magnification of the page.
Actual size
Fits in window
Fits width of window
Using the Zoom Buttons
You can use the zoom buttons to zoom in or zoom out of an area on the page.
To magnify an area, click the zoom tool and draw a rectangle around an
area on the page.
Setting up the 1400
Printer
Operating the 1400
Printer
Troubleshooting
Site Specifications
Accessories and
Supplies
To reduce the magnification of an area, click the zoom out tool and click
the area of the page to zoom out.
CONTENTS
PRINTER DRIVER GUIDE
SEARCH
HELP
Page 88

EASTMAN KODAK COMPANY
Rochester, NY 14650
www.kodak.com/go/professional
TM/MC/ MF/MR: Kodak, Kodak Professional
© Eastman Kodak Company, 2005.
4J2113_EN
 Loading...