

Page 1

Catalogue
General notices for use ........................................................................................................................................... II
Disclaimer............................................................................................................................................................... II
Box Contents .......................................................................................................................................................... II
1. Product Basics .................................................................................................................................................... 1
1.1 Buttons and connections ............................................................................................................................ 1
1.2 Start up and shut down .............................................................................................................................. 1
2. Introduction ........................................................................................................................................................ 2
2.1 How to Use TF card .................................................................................................................................. 2
2.2 Removing TF card ..................................................................................................................................... 2
2.3 Software Keyboard .................................................................................................................................... 2
2.4 USB Keyboard........................................................................................................................................... 2
2.5 Touch Screen ............................................................................................................................................. 2
2.6 How to connect with computer.................................................................................................................. 3
3. General Operation .............................................................................................................................................. 3
3.1 Ethernet...................................................................................................................................................... 3
3.2 Task Bar ..................................................................................................................................................... 5
3.3 Install and Uninstall ................................................................................................................................... 5
3.3 Camera ....................................................................................................................................................... 5
3.4 TV-OUT ..................................................................................................................................................... 6
3.5 Trouble Shooting ....................................................................................................................................... 7
AppendixⅠ Frequently Asked Questions ............................................................................................................. 8
AppendixⅡ 3G Support List............................................................................................................................... 10
I
Page 2

General notices for use
—This product is a highly advanced electronics device, disassembly, customization or repairs without the
appropriate knowledge and pre-cautions can lead to dangerous situations with chance on damaging the product
and serious injuries.
—Avoid use in extreme conditions such as high and low temperatures, high humidity or moist environments
and around magnetic fields. Also avoid long-time exposure to sunlight.
—Only use by the manufacturer permitted accessories to avoid damages to the product with possibly
warranty loss.
—Please follow the relevant local environmental regulations to deal with obsolete machines and
accessories.
—Use a protective folder to avoid extreme physical shocks to the device (i.e. of dropping).
Disclaimer
—The screenshots are for Android reference only. They may be made on a device with a different resolution
or hardware configuration than yours and therefore can be slightly different that the final product.
—The manufacturer takes no responsibility for loss of information or data caused by hardware or software
failure. The user is responsible for performing timely backups of important data.
—All information and images used in this user manual are provided ‘as is’ and are subject to change
without notice.
—The manufacturer accepts no liability for the information offered in this document.
Specifications
Display: 10.1 inch 1024X600 Resolution Capacitive screen
CPU: Rockchip 3066 Dual-Core
RAM: 1GB DDR
Internal Storage: 8GB
Expansion Memory: USB & TF card, 32GB Max.
AC Adapter: DC 5V-2A
Operating System: Android 4.1
Battery: 6000mAh
Box Contents
Tablet – 1pc
Power Adapter -1pc
USB Cable-1pc
OTG Cable -1pc
Earphone -1pc
Stylus pen -1pc
User Manual -1pc
II
Page 3
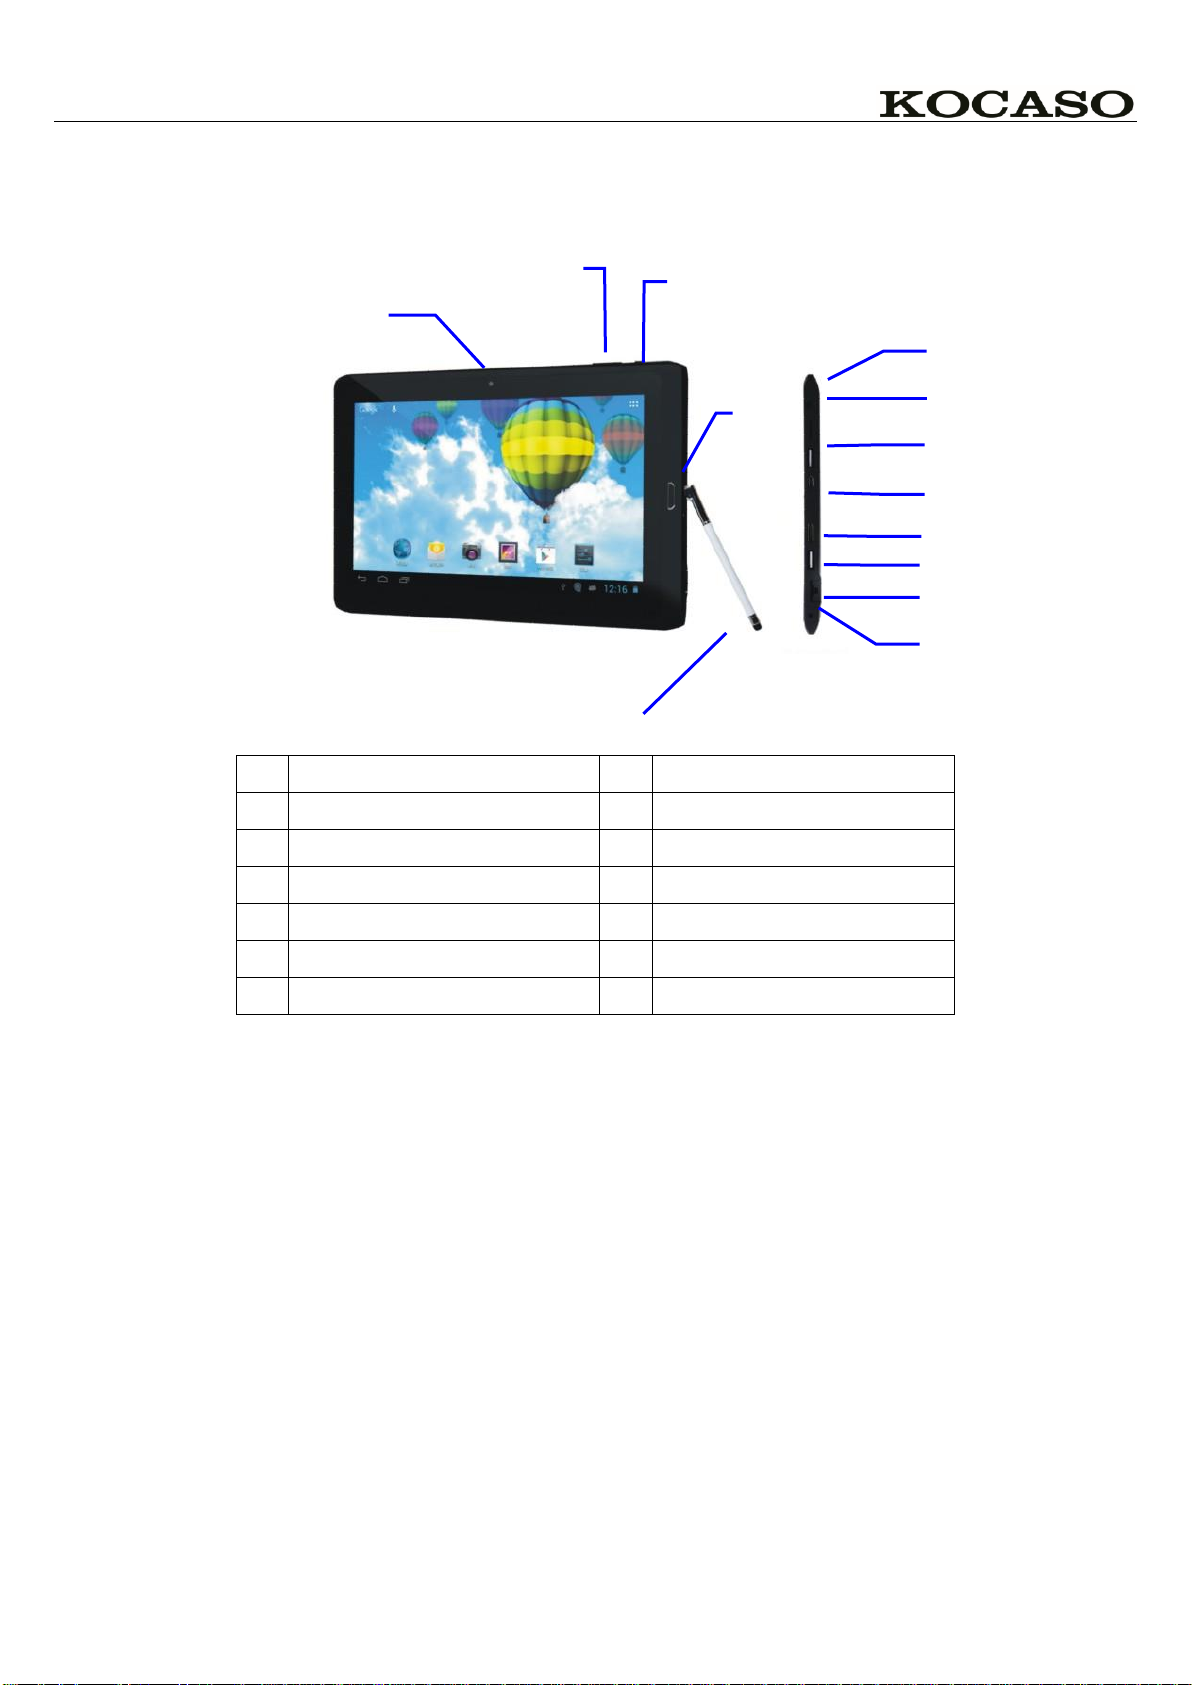
1. Product Basics
1
Headset Port
2
TF card slot
3
USB Port
4
Micro USB Port
5
TV-OUT Port
6
USB Port
7
RJ45
8
DC Jack
9
Camera
10
Home button r
11
Volume
12
Power ON/OFF button
13
Stylus Pen
1
2
3
4
6
13
51012
11
9
7
8
1.1 Buttons and connections
1.2 Start up and shut down
Battery Charging
The tablet has a built-in rechargeable Li-polymer battery.
1. To charge connect the AC power adapter to the DC jack on the right side of the tablet.
2. A battery icon on Screen will illuminate to show the battery is charging. Battery icon full means it’s fully
charged.
3. The tablet can be used even if the battery is being charged.
Power ON/OFF
ON:
1. Press and hold the power button until the tablet turns “ON”.
OFF:
1. Press and hold the power button until device optional
2. Select power off
1
Page 4

3. Select OK to power off the tablet
Screen Lock/Unlock:
This feature locks the screen, at the same time turn OFF the screen’s backlight after a few seconds.
Screen locks when:
1. System is idle.
2. Manually activated by pressing the Power button once.
2. Introduction
2.1 How to Use TF card
1. Insert the TF card into the TF card slot. Gently push TF card into slot until it clicks into place.
2. A prompt will be seen on the screen saying “ Preparing SD card “
2.2 Removing TF card
1. Close all applications and documents which have been opened from the TF card.
2. Select “Setting” and find “Storage” then click “Unmounts SD card”.
3. A prompt will be seen on the screen saying “ SD card safe to remove”
4. Gently press the TF card to remove and pull out the TF card.
Note: Insert the TF card in correct position; otherwise it will damage the card and the slot.
2.3 Software Keyboard
The tablet has a software keyboard which automatically shows up when you tap the place on screen where
text or number are to be entered.
2.4 USB Keyboard
The unit support external USB keyboard to input text and number. Some buttons on the unit and some
function keys on keyboard may not work if an external USB keyboard was connected.
2.5 Touch Screen
The touch screen responds to finger touch
Note: don’t place any object on the touch screen for it may damage or crush the screen.
Single Click: single click one icon to choose the icon or option you want.
Long Press: press and hold one icon to choose the icon and you can drag it to the bottom shortcut bar.
Drag: drag on the screen and you can move between magic cube sides or drag the application icons into the
shortcut bar.
2
Page 5

2.6 How to connect with computer
Note: first should put the switch to Device status,
Before transporting documents, firstly you must set store mode for your MID.
1. Use USB cable to connect MID with computer. Notice bar will appear notice cue.
2. Press Menu button to pop up Menu option, and click on Notice.
3. In the notification panel, click on the USB connection, then click Loading USB Storage Device.
4. Then the USB connection has been successfully.
3. General Operation
3.1 Ethernet
1. Connect the Ethernet cable to the Ethernet port of the tablet.
2. Select “Settings” and Select “ More…” then Select “Ethernet”
Wireless:
1. Select “ Settings”
3
Page 6

2. Select “Wi-Fi” and slide OFF to ON status.
3. All detected wireless networks in the area will e listed, Click to select desired wireless connection.
4. Enter WEP key or network key if necessary.
5. Once connected to a wireless network, settings will be saved
6. Wireless icon will appear on the taskbar when connected successfully.
Note: when the tablet detects the same wireless network in the future, a pop-up notification with the name of
the wireless network will appear. Click “connect” to re-establish the connection or “Forget” to remove the
network from the list.
Connect to 3G Network:
First, you need to buy a 3G wireless card from your 3G service provider.
Since our company is continuously committed to improving product quality and the software edition is
always updating which will support more models in the future, please refer to the finished products.
You have to buy above mentioned model to get access to 3G network. Insert your SIM card into the 3G card
and then insert the 3G card into the USB port. The signal light of the 3G card will be light which means you’re
ready for 3G network surfing.
Click Settings -> Wireless & Networks -> Mobile networks to enter:
Select the checkbox on the back of 3G network and you’ll see which means 3G connection is completed.
Web Browsing
Connect to the internet via Ethernet or wireless and launch the browser.
4
Page 7

3.2 Task Bar
The Task Bar will show the following: SD card, Battery, Time, Return/Back, Desktop, Menu and Wireless
SD card
Battery
Time
Return/Back
Desktop
Menu
Wi-Fi network
3.3 Install and Uninstall
Install from memory card or USB drive
Please go to APK Manager,Select “Install” and then select the file with the extension name .apk in the
memory card. Select “Install” to install the software.
Install application from internet
You can use App Market to search any application you want, after download finish it will automatic install
** Go to http://Android.com/market or use MARKET application on desktop to find more application for
you Tablet**
After installation, you can run the software right away or run the software on the subcategory interface.
Uninstall
If you want to uninstall the software from a third party, please go to APK Manager, Select the software that
you want to uninstall. You will see the following options: run, extract, uninstall and search. Click “uninstall” to
uninstall the software.
3.3 Camera
Touch the icon to enter camera mode and the interface is shown as follows:
5
Page 8

1. Touch the icon at the bottom right and you can save your photos in DCIM/Camera directory in TF
card.
2. Move the icon on the right and you can switch camera mode to film mode.
3. Touch the icon on the top right to see the previous picture and you can also delete, share, set it as the
wallpaper or contact profile. Click finish button to exit camera interface.
Note: this tablet supports video talking function
3.4 TV-OUT
You can switch the video to play it on the TV-OUT display equipment (such as TV with a TV-OUT interface)
by TV-OUT. The maximum output resolution is 720p and its method is shown as follows:
1. Open the Tablet;
2. Connect the Tablet to TV by a TV-OUT cable. Open the TV;
3. Play video on the Tablet;
4. The video will be switched on the TV. Wait for more than 5 seconds;
5. You can switch by 3 methods:
a) When the video play is finished, the video will be switched automatically back on the Tablet.
b) You can also press Home button or Return button in the process of video, the video will be switched back
on the Tablet.
c) If you don't want to switch to TV, please disconnect the Tablet from TV. You can go on watch movie on
Tablet.
6
Page 9

3.5 Trouble Shooting
Close Application
All running applications take up system memory and will slow down system response. Please shut down all
idle applications to release memory and get the system speed back to normal.
To close the application, click the icon on the shortcut bar to enter the system configuration interface.
Select the Application → Running services and the interface is shown as follows:
Tap the application you want to close. A pop-up window will be displayed.
Tap “Stop” to close that application.
Mandatory Power off
1. Press and hold the power button for 7 seconds and the device will be powered off.
2. Press the reset button on the right and the device will be forced to be powered off.
Restore Default Setting
If you want to reset the factory setting and erase all materials, please press Settings → Privacy → Factory
data reset.
** Warning: Factory data reset setting will delete your Google account, data and configuration of system
and applications and applications from downloading.
**Please use this function carefully.
7
Page 10

AppendixⅠ Frequently Asked Questions
Q: Why won't my device turn on?
Make sure your tablet has been charged for at least four hours prior to use. When plugging in the cable,
make sure you are not accidentally plugging it into the headphone jack. Also, the power button is on the side
(for tablets) and not the one on the front of the touchscreen. The button on the front is for navigation.
Q: Why won't this unit connect to Ethernet?
Assuming your unit does have the RJ45 port, you want to make sure that Wireless is turned off. If Wi-Fi is
on, it will negate the Ethernet connection.
Q: Why does my unit have scratches/bubbles on the screen?
These units ship with a very fine plastic film to protect the item in transit. This film is intended to be
removed prior to use. Sometimes this takes a strong fingernail or some similar item to peel it off.
Q: Should I perform a Firmware Update?
Not necessarily. This is actually intended if obscure issues with the tablet occur. Unless you are having
issues with the tablet which a Factory Data Reset has not resolved, it is not advised that you perform this step.
However, if you are sure you wish to attempt this procedure, please visit the following link for available
firmware downloads and the instructions on how to perform the update:
http://mymidpad.com/firmware/
Q: Why don't I see a firmware version for my model?
We are always working on providing the latest and best firmware for all of our devices. If you don't see
your specific model listed, please check back soon.
Q: I don't remember my password, what can I do?
If you have previously added a Google account, you may be prompted for a password reminder if you fail
the security 4 or 5 times. Otherwise, please refer to Should I perform a Firmware Update?
Q: How long should my battery last after charging?
As for battery life, this depends on which model tablet you use. Our Android 2.2 tablets usually average
around 1-4 hours. The Android 4.0 tablets approximately twice that. However, that is totally relative to factors
such as how bright the screen is during use, how often it is using the wireless connection, what background
8
Page 11

processes are running, if you are using a Live Wallpaper, and more. It is very difficult to estimate the duration
of a full charge in consideration of these issues. If this seems like abnormally poor performance, just let us
know.
Q: Why does my screen not respond properly when I use the touchscreen?
This may be a couple of different things. If this only occurs when charging from a power supply, this may
be due to noise from the power source not being adequately filtered out. You may wish to give the unit a full
charge and then disconnect from power for use, or, if possible, charge with a USB cable instead. Otherwise,
your screen calibration may be off. To correct this, check for Settings->Touchpad Calibration to see if you can
recalibrate this to resolve the issue.
Q: Why is my tablet stuck at boot up, and the Android screen will not go away?
Please see above: Should I perform a Firmware Update?
9
Page 12

AppendixⅡ 3G Support List
NO.
3G Model
Cellphone Model
1
Huawei E172
WCDMA
2
Huawei E153
WCDMA
3
Huawei E220
WCDMA
4
Huawei E1552
WCDMA
5
Huawei E1756
WCDMA
6
Huawei E1750,
WCDMA
7
Huawei E353
WCDMA
8
Huawei E160E
WCDMA
9
Huawei E261
WCDMA
10
Huawei E1552
WCDMA
11
Huawei E173
WCDMA
12
Huawei E170
WCDMA
13
ZTE MF626
WCDMA
14
ZTE MF628
WCDMA
15
ZTE MF180
WCDMA
16
ZTE MF190
WCDMA
17
Huawei EC150
CDMA2000
18
Huawei EC156
CDMA2000
19
Huawei EC167
CDMA2000
20
Huawei EC1261
CDMA2000
21
Huawei EC122
CDMA2000
22
Huawei-EC189,
CDMA2000
23
Huawei-EC1270
CDMA2000
24
Huawei EC1270
CDMA2000
25
ZTE AC580
CDMA2000
26
ZTE AC2736
CDMA2000
27
ZTE AC2746
CDMA2000
28
ZTE-AC590
CDMA2000
29
ZTE-AC2736,
CDMA2000
30
ZTE-AC2746
CDMA2000
31
ZTE-AC2736
CDMA2000
10
 Loading...