

Page 1
Operating Instruction
for
Electronic Pressure Switch
Model: PDD
Page 2

PDD
1. Contents
1. Contents ........................................................................................................ 2
2. Note .............................................................................................................. 3
3. Instrument Inspection .................................................................................... 3
4. Regulation Use .............................................................................................. 3
5. Operating Principle ........................................................................................ 4
6. Mechanical Connection ................................................................................. 4
7. Electrical Connection .................................................................................... 5
8. Commissioning .............................................................................................. 6
8.1. Function Keys ...................................................................................... 7
9. Set-Up ........................................................................................................... 7
9.1. Parameter setting ................................................................................ 8
9.2. Set-up for PDD-1x and PDD-2x ........................................................... 9
9.3. Set-up for PDD-5x and PDD-7x ......................................................... 11
10. Main Menu Options ..................................................................................... 13
10.1. Switch point ....................................................................................... 13
10.2. Hysteresis .......................................................................................... 13
10.3. Window point (Duo point) (only PDD-1 and PDD-2) .......................... 13
10.4. Switching behaviour ........................................................................... 14
10.5. Filter ................................................................................................... 15
10.6. Time response ................................................................................... 15
10.7. Contact type ....................................................................................... 15
10.8. Set-up start point ............................................................................... 16
10.9. Code .................................................................................................. 16
11. Maintenance ............................................................................................... 16
12. Technical Information .................................................................................. 17
13. Order Codes ............................................................................................... 18
14. Dimensions ................................................................................................. 19
15. Declaration of Conformance ....................................................................... 20
Manufactured and sold by:
Kobold Messring GmbH
Nordring 22-24
D-65719 Hofheim
Tel.: +49(0)6192-2990
Fax: +49(0)6192-23398
E-Mail: info.de@kobold.com
Internet: www.kobold.com
Page 2 PDD K03/0507
Page 3

PDD
2. Note
Please read these operating instructions before unpacking and putting the unit
into operation. Follow the instructions precisely as described herein.
The devices are only to be used, maintained and serviced by persons familiar
with these operating instructions and in accordance with local regulations
applying to Health & Safety and prevention of accidents.
When used in machines, the measuring unit should be used only when the
machines fulfil the EWG-machine guidelines.
3. Instrument Inspection
Instruments are inspected before shipping and sent out in perfect condition.
Should damage to a device be visible, we recommend a thorough inspection of
the delivery packaging. In case of damage, please inform your parcel service /
forwarding agent immediately, since they are responsible for damages during
transit.
Scope of delivery:
The standard delivery includes:
• Electronic Pressure Switch model: PDD
• Operating Instructions
4. Regulation Use
Pressure switches serve for the regulation and monitoring of pressure in
containers, hydraulic and pneumatic systems, and refrigeration technology etc.
This instrument may only be used with liquids that are compatible with the wetted
parts.
PDD K03/0507 Page 3
Page 4
PDD
S
16288)
∅
5. Operating Principle
KOBOLD pressure sensors / switches series PDD are cost effective electronic
pressure switches with digital indication of actual pressure. Two switch points, on
/ off-switch delay and hysteresis that are within the measuring range are
programmable.
A piezo resistive ceramic sensor is used. The units can be used where high
switching accuracy is needed. Long-term stability, repeatability and the compact
and robust design makes it an ideal unit for use in OEM applications.
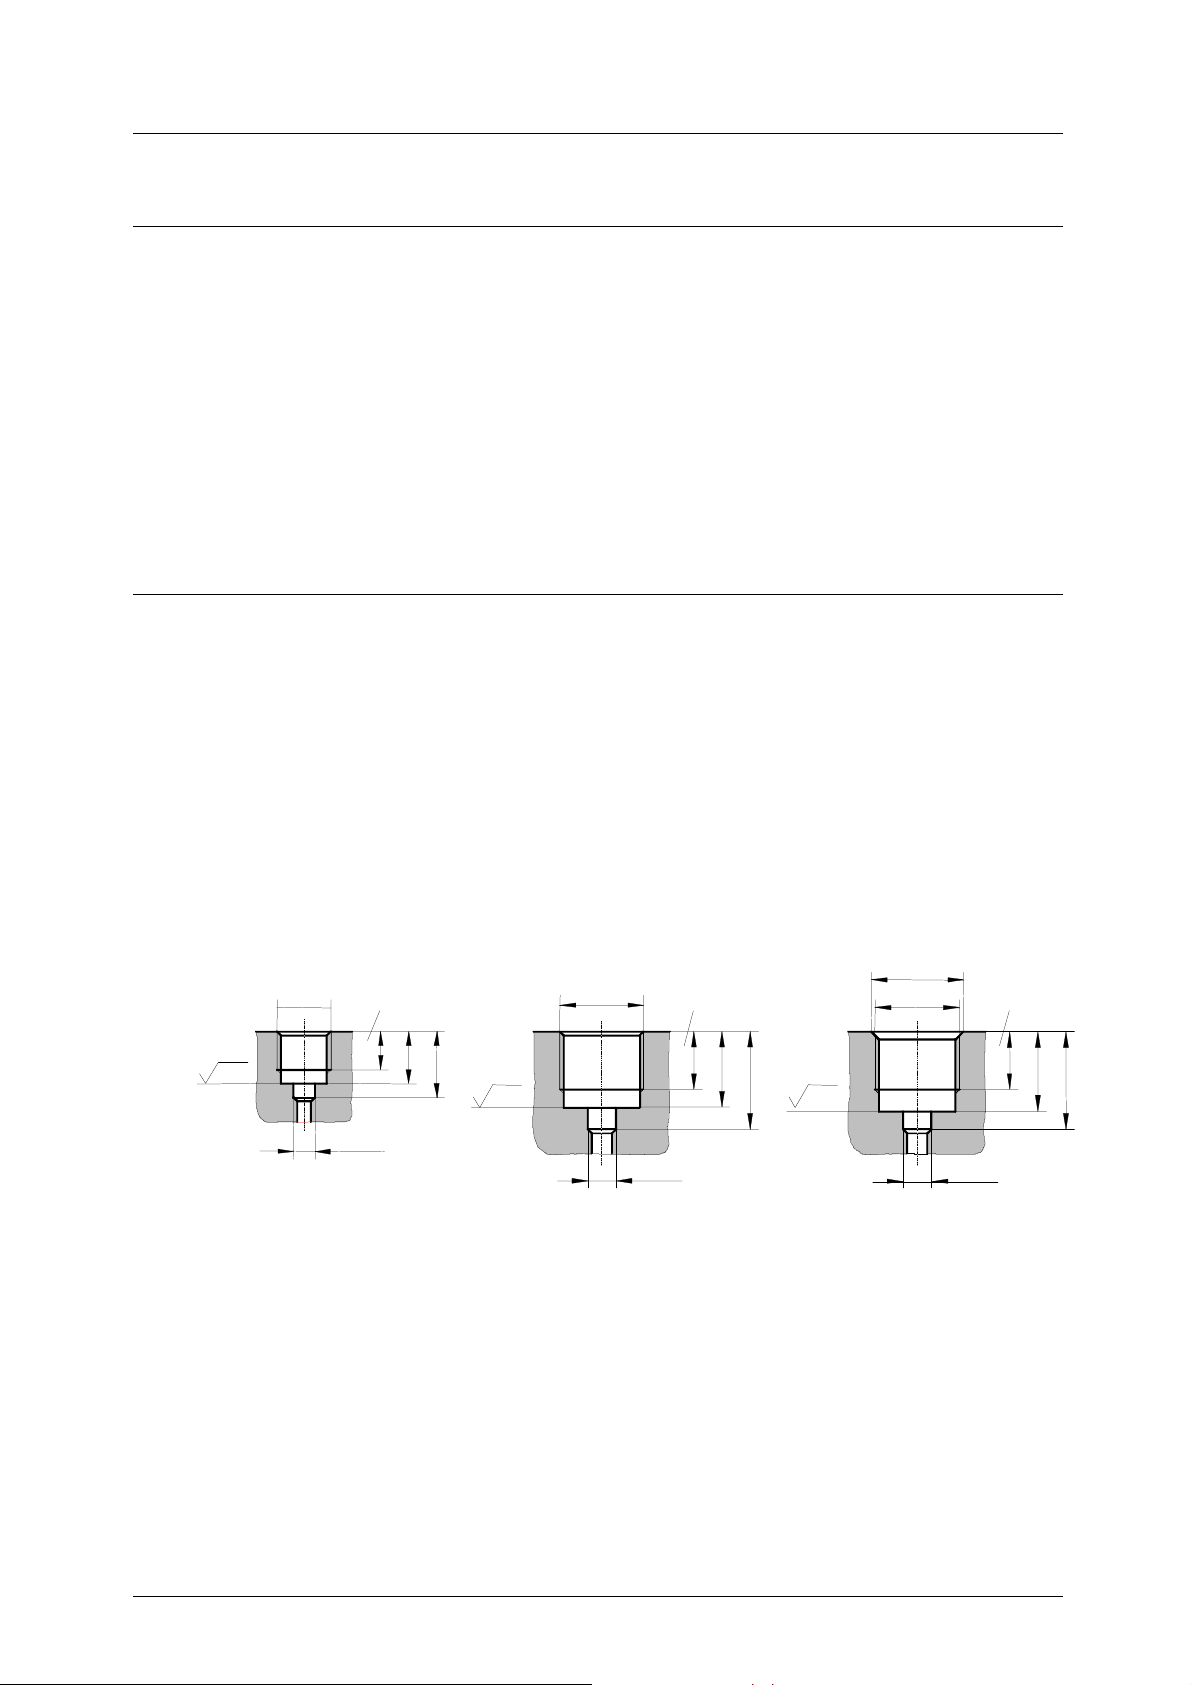
6. Mechanical Connection
The pressure tappings should be prepared according to the following
specification for the screw-in holes.
For the purpose of sealing, disc-sealing (DIN 16 258) or profile sealing may be an
adequate choice. The correct torque depends on the material, and the form of the
seal and the pressure connection of the pressure sensor.
The mounting place should be free from strong vibrations and radiant heat.
The admissible site conditions of pressure sensors are to be maintained.
After making pressure connection and electrical connection, the sensors are
ready for use.
G 1/4 A
R 16
z
ealing (DIN
* min.
+1
0,5
9
16
Flat sealing
R 16
z
G 1/2 A
* min.
0,5
+1 +1
14
24
R 16
z
∅
21,3
G 1/2 A
-0,2
14
* min.
0,5
20
,5
24
+0,2
∅
7
+0,2
7
+0,2
∅
7
Page 4 PDD K03/0507
Page 5

PDD
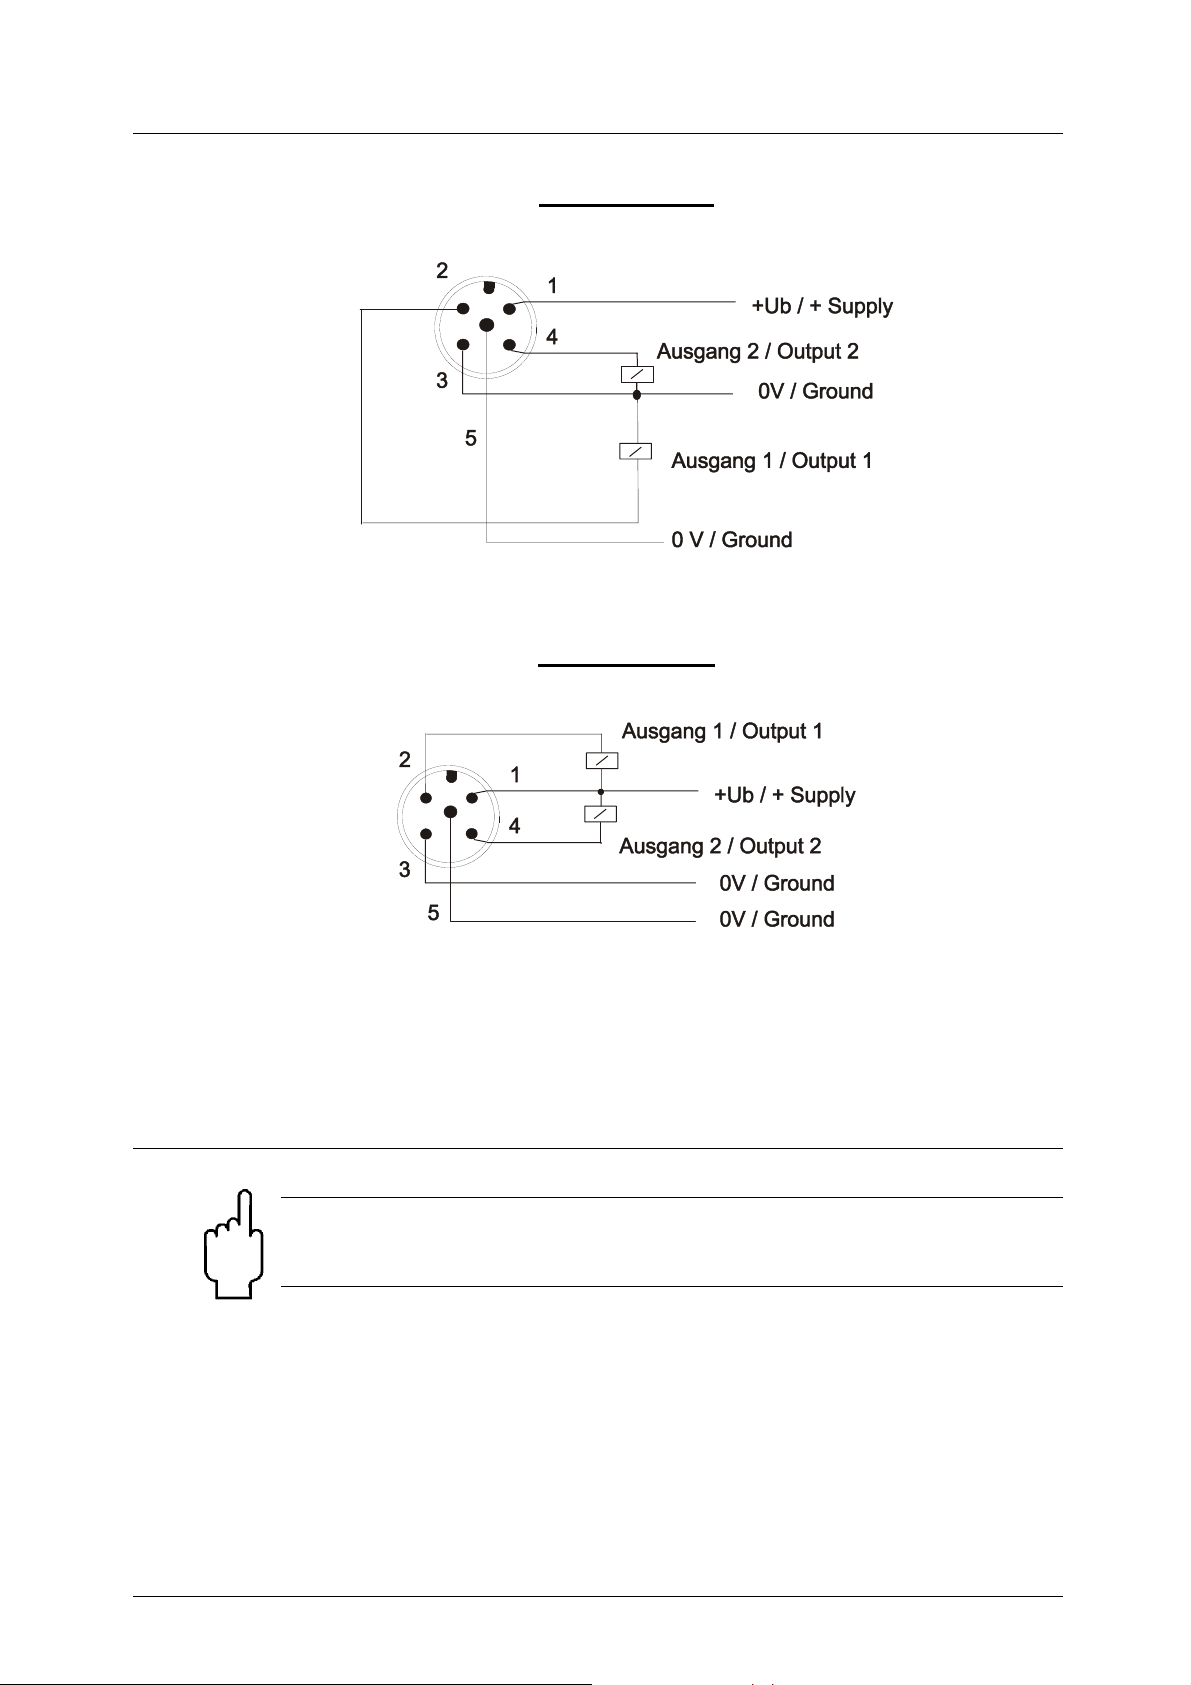
7. Electrical Connection
Attention! Ensure that the voltage levels of your supply system are
in agreement with the voltage levels given on this manual.
• Make sure that the supply wires are de-energised.
• The connection is via an M 12x1 plug, as shown below.
• Matching couplings with different cable lengths are available optionally.
Attention! Incorrect wiring will lead to damage of the unit’s
electronics.
Plug connections
PDD-1 PDD-2
not connected not connected
Plug
Accessories Plug
Plug with cable ZUB-KAB-12K002
+24 VDC +24 VDC
PNP-Output NPN-Output
0 V / GND 0 V / GND
0 V / GND 0 V / GND
PDD-5 PDD-7
PNP-Output 1 NPN-Output 1
+24 VDC +24 VDC
PNP-Output 2 NPN-Output 2
0 V / GND 0 V / GND
0 V / GND 0 V / GND
PDD K03/0507 Page 5
Page 6
PDD
Plug
PNP Wiring
NPN Wiring
Plug
8. Commissioning
Attention! Please take note that during operation at high
temperatures, the surface and the elements within the unit may
become very hot!
Connect the pressure switch according to the figure shown on the previous page,
and supply the device with the specified voltage.
After switching the unit on, the measuring range (full scale) is displayed for
3 seconds.
Page 6 PDD K03/0507
Page 7

PDD
W
8.1. Function Keys
In Normal mode (Measuring mode)
: Press 3 sec set-up mode
: Switch point/display window point
: Switch point/display hysteresis
In set up mode
PDD-1x and PDD-2x
PDD-5x and PDD-7x
: Next level
: Change value
9. Set-Up
The following parameters may be changed:
Display range
Switch point (Spo, SP1, SP2)
Hysteresis (HYS, HY1, HY2)
Window point (duo, only PDD-1/-2)
Any time:
3 sec.
or 20 sec.
ithout pressing any
key
Normal Mode
Standard
factory pre-set
-199...999 50 % f.s.
-199...0 000
Switch point ...999 --- (inactive)
Filter (Filt)
Time response (dS1, dS2, dr1, dr2)
->PDD –5/7 (dSE,drE) -> PDD –1/2
Contact type (Con, Co1, Co2) (N.O.) or (N.C.) contact N.O. contact
Zero-point (S-A, Start adjust)
Code (CCo, change code)
1/2/4/8/16/32/64 1
0,0...99,5 sec. 0,0
000 is adjusted
000...999 000
PDD K03/0507 Page 7
Page 8

PDD
9.1. Parameter setting
From main menu option (e.g. Switching point, "SPo"), press "" key in order to
go to Parameter set up. The following flow diagram shows the sequence of steps
required to change a single parameter.
[from main menu option]
1. Set position
2. Set position
3. Set position
Adjust decimal point
Save selected value or
set new value
Save
[To next main menu option]
Page 8 PDD K03/0507
Page 9

PDD
e
9.2. Set-up for PDD-1x and PDD-2x
3 sec
Code input
Setting parameter
Code=
Switch pt. 1
Setting parameter
Hysteresis
Duo-Point
On-Delay
Off-Delay
Contact type
N/O contact
N/C contact
Setting parameter
Setting parameter
Setting parameter
Setting parameter
Sav
PDD K03/0507 Page 9
Page 10

PDD
Filter
Set-up
Startpoint
Change code
7 levels
Setting parameter 1..2..4...64
7sec
Setting parameter
Setting parameter
Page 10 PDD K03/0507
Seite 2 von 2
Page 11

PDD
9.3. Set-up for PDD-5x and PDD-7x
3 sec
Code input
Setting parameter
Code=
Switch pt. 1
Switch pt. 2
Hysteresis 1
Hysteresis 2
On-Delay 1
On-Delay 2
Setting parameter
Setting parameter
Setting parameter
Setting parameter
PDD K03/0507 Page 11
Page 12

PDD
Off-Delay 1
Off-Delay 2
Contact type 1
N.O. contact
N.C. contact
Setting parameter
Setting parameter
Save
Filter
Set-up
Startpoint
Change code
N.O. contact
N.C. contact
Save
7 levels
7sec
Setting parameter
Setting parameter
Page 12 PDD K03/0507
Page 13

PDD
10. Main Menu Options
10.1. Switch point
In menu option "SPo", “SP1”, “SP2” the switch point can be set. A value
between -199 and 999 can be selected. Additionally, a decimal place can be
assigned to this value. The decimal point can be set after the first or the second
place (e.g. 10.0 or 1.00). If the displayed value exceeds or equals the adjusted
switch point and the window point is not set, then the switch will be active. An
active switch is signalled by the LED being lit.
In case the hysteresis is set to zero, then the switch will be inactive if the value is
lower than the switch point.
10.2. Hysteresis
After setting the switch point, a hysteresis “HYS“, “HYS1”, “HYS2”, can be
entered as a negative value in the menu. The hysteresis default value is zero.
However, this can lead to an unwished switching behaviour during the operation,
if the measuring signal keeps varying around the switch point or the window
point. An increase in hysteresis will suppress the effect. The hysteresis refers to
both the switch point and the window point (switch point minus hysteresis,
window point plus hysteresis).
Example: Switch point:: 100 bar; Hysteresis: -2.5 bar
The switch will become active at and above 100 bar when the
indicated value goes up, and will become inactive at 97.5 bar when the
value goes down.
10.3. Window point (Duo point) (only PDD-1 and PDD-2)
Apart from the switch point, a window point (“duo“) can be defined. It must be
larger than the switch point. With both the "window point" and the "switch point"
set, the measured value can be monitored within a certain range. If a window
point is set, the state of the switch underneath the switch point is similar to the
one above the window point.
If the window point (duo) is smaller or equal to the switch point, an
error message (Er4) is momentarily displayed, afterwards its value
is deleted and thus its function becomes ineffective (this is valid for
the window point as well as for the switch point setting).
This parameter setting is similar to the switch point setting. The window point is
needed for processes, during which the pressure must be monitored within or
outside a certain range.
Example: Switch point: 100 bar; Window point: 150 bar; Hysteresis: -1 bar
The switch changes state when pressure exceeds 100 bar. At this moment, if the
pressure remains between 99 (100-1) bar and 151 (150+1) bar, the switch
remains in the active state (LED on). If the pressure increases crossing 151 bar
limit or (decreases to go below 99 bar limit), the switch will revert to an inactive
state.
PDD K03/0507 Page 13
Page 14

PDD
10.4. Switching behaviour
The following diagram clarifies the switching behaviour of the pressure switch.
The contact closes (type of contact: N.O.) when exceeding the switch point or
falling short of the window point. It opens only again after exceeding the window
point plus the hysteresis or falling below the switch point minus the hysteresis. An
LED signals the switching status of the pressure switch.
Display
bar (°C)
Switching pt.
Hysteresis
LED ON
Display
bar (°C)
Hysteresis
Window point
Switching pt.
Hysteresis
time/ t
only PDD-1 and PDD-2
LED ON
LED ON
time / t
Page 14 PDD K03/0507
Page 15

PDD
10.5. Filter
The filter function "Filt" forms a running average from the measured values. The
following values can be set (see section 8; set up):
1 / 2 / 4 / 8 / 16 / 32 / 64
They correspond to the number of samples used in the running average. The
filter value determines the dynamic behaviour of the display value. The larger the
adjusted value, the slower the display response. With a filter value of "1" the filter
is switched off, i.e. the display value is equal to the unfiltered measured value.
The integrated step function detector reacts to a change of value corresponding
to approx. 6.25% of the full scale value. As soon as a step function signal is
detected, the instantaneous measured value is directly indicated in the display.
10.6. Time response
Using the menu items “dS1”, “dS2”, “dr1” and “dr2” (PDD –5/7 and
respectively “dSE” and “drE” (PDD- 1/2) it is possible to set the switch-on-
delay (delay set) and the switch-off-delay (delay reset.
The delay set causes delayed switching of the output if the switching point is
exceeded.
The delay reset causes a delayed resetting of the output when falling short of the
switching point – hysteresis.
The setting range for both parameters is 0.0 ... 99.5 seconds. The step rate is 0.5
seconds.
With these two functions it is also possible to suppress temporary disturbances.
10.7. Contact type
In menu option "Con", “Co1”, “Co2” the transistor switching output function is
set. The switching function changes from
N.O. contact
to
N.C. contact, and back.
N.O. contact means: Contact closes on exceeding the switch point.
N.C. contact means: Contact opens on exceeding the switch point.
PDD K03/0507 Page 15
Page 16

PDD
10.8. Set-up start point
In a state of no pressure, a new Zero-point is calibrated in menu option “S-A“.
For security reasons, the user must press and hold the "" key for 7 seconds, in
order to set the parameter.
10.9. Code
The function "CCO" (change code) is used to protect the device against
unauthorised changes to the other parameters. If the code is different from 000,
the user must input the previously set code first in order to make any changes in
the set up mode.
Please note that if the customer code has been lost, the unit has to be returned to
the manufacturer for reprogramming.
11. Maintenance
The device is maintenance-free, when used as described under "Intended
Application". Deposits, which develop by contaminated media, could lead to
incorrect measured values.
Page 16 PDD K03/0507
Page 17

PDD
12. Technical Information
Housing: stainless steel 1.4305
Connections: G 1/4 or G 1/2 male
stainless steel 1.4404
option: 1/4 NPT or 1/2 NPT
others on request
Gasket: FPM (option EPDM)
Sensor element: piezzo resistive ceramic cell
Indication: 3-digit LED, 7mm
Resolution: max. 0.01 bar
(depending on measuring range
and measuring value)
Max. temperature: media: -20...+80 °C
ambient -20...+80 °C
Max. over pressure: 3 times (measuring range ≤ 60 bar)
2 times (measuring range ≤ 250 bar)
1.5 times (measuring range = 400 bar)
Supply voltage: 24VDC ± 20%
Power
consumption: approx. 100 mA (without switching output)
Electr. connection: plug M12x1
Switching output: semiconductor PNP or NPN,
short-circuit proof max. 300 mA
Contact: N/O or /N/C, window, programmable
Switching point adjustment: programmable via 2 buttons
Output indicator: 1 (2) LED
Hysteresis: adjustable via 2 buttons
ON/OFFswitching delay: 0.5...99.5 s (separately adjustable)
Response time: 0.5 s
Accuracy: ±0.5 % of f.s. (±1% of full scale for
measuring range < 1,6 bar)
Protection: IP 65
PDD K03/0507 Page 17
Page 18

PDD
13. Order Codes
Example: PDD-15 3 R2 C315
Model/Output
PDD-15=1x PNP-switching output
PDD-25=1x NPN- switching output
PDD-55=2x PNP- switching output
PDD-75=2x NPN- switching output
Electrical
connection
3=St. M12x1
Connection Measuring range*
C315=-1...0 bar
B025= 0...1 bar
B035= 0...1,6 bar
B045= 0...2,5 bar
B055= 0...4 bar
R2=G 1/4
R4=G 1/2
N2=1/4 NPT
N4=1/2 NPT
B065= 0...6 bar
B075= 0...10 bar
B085= 0...16 bar
A095= 0...25 bar
A105= 0...40 bar
A115= 0...60 bar
A125= 0...100 bar
A135= 0...160 bar
A145= 0...250 bar
A155= 0...400 bar
Additional: Electrical connection
Description Model
M12x1 socket with terminal
M12x1 socket with 2 m cable
M12x1 socket with 5 m cable
M12x1 socket with Quickon-plug
ZUB-KAB-12D500
ZUB-KAB-12K002
ZUB-KAB-12K005
ZUB-KAB-12Q000
Page 18 PDD K03/0507
Page 19

PDD
14. Dimensions
Info! The suitable M12x1 socket with 2m cable for the M12x1 plug
can be obtained with the order code: ZUB-KAB-12K002.
(Illustration with socket)
PDD K03/0507 Page 19
Page 20

PDD
15. Declaration of Conformance
We, KOBOLD Messring GmbH, Hofheim-Ts, Germany, declare under our sole
responsibility that the product:
Electronic Pressure Switch model: PDD-1, PDD-2, PDD-5 and PDD-7
to which this declaration relates is in conformity with the standards noted below:
EN 61326: 1997 +A1: 1998 +A2:2001
Electrical equipment for measurement, control and laboratory use
- noise immunity: according EN 61326/A1 Amendment A table A.1
Criteria: according table 2, continuos not monitored operation
- Generic emission standard: according EN 61326/A1
Limit values: according table 4, equipment of class B
EN 61010-1 1993
Safety requirements for electrical equipment for measurement, control and
laboratory use
Also the following EC guidelines are fulfilled:
2004/108/EC EMC Directive
Hofheim, 16. Jan. 2007
H. Peters M. Wenzel
General Manager Proxy Holder
Page 20 PDD K03/0507
 Loading...