

Page 1
Operating Instructions
for
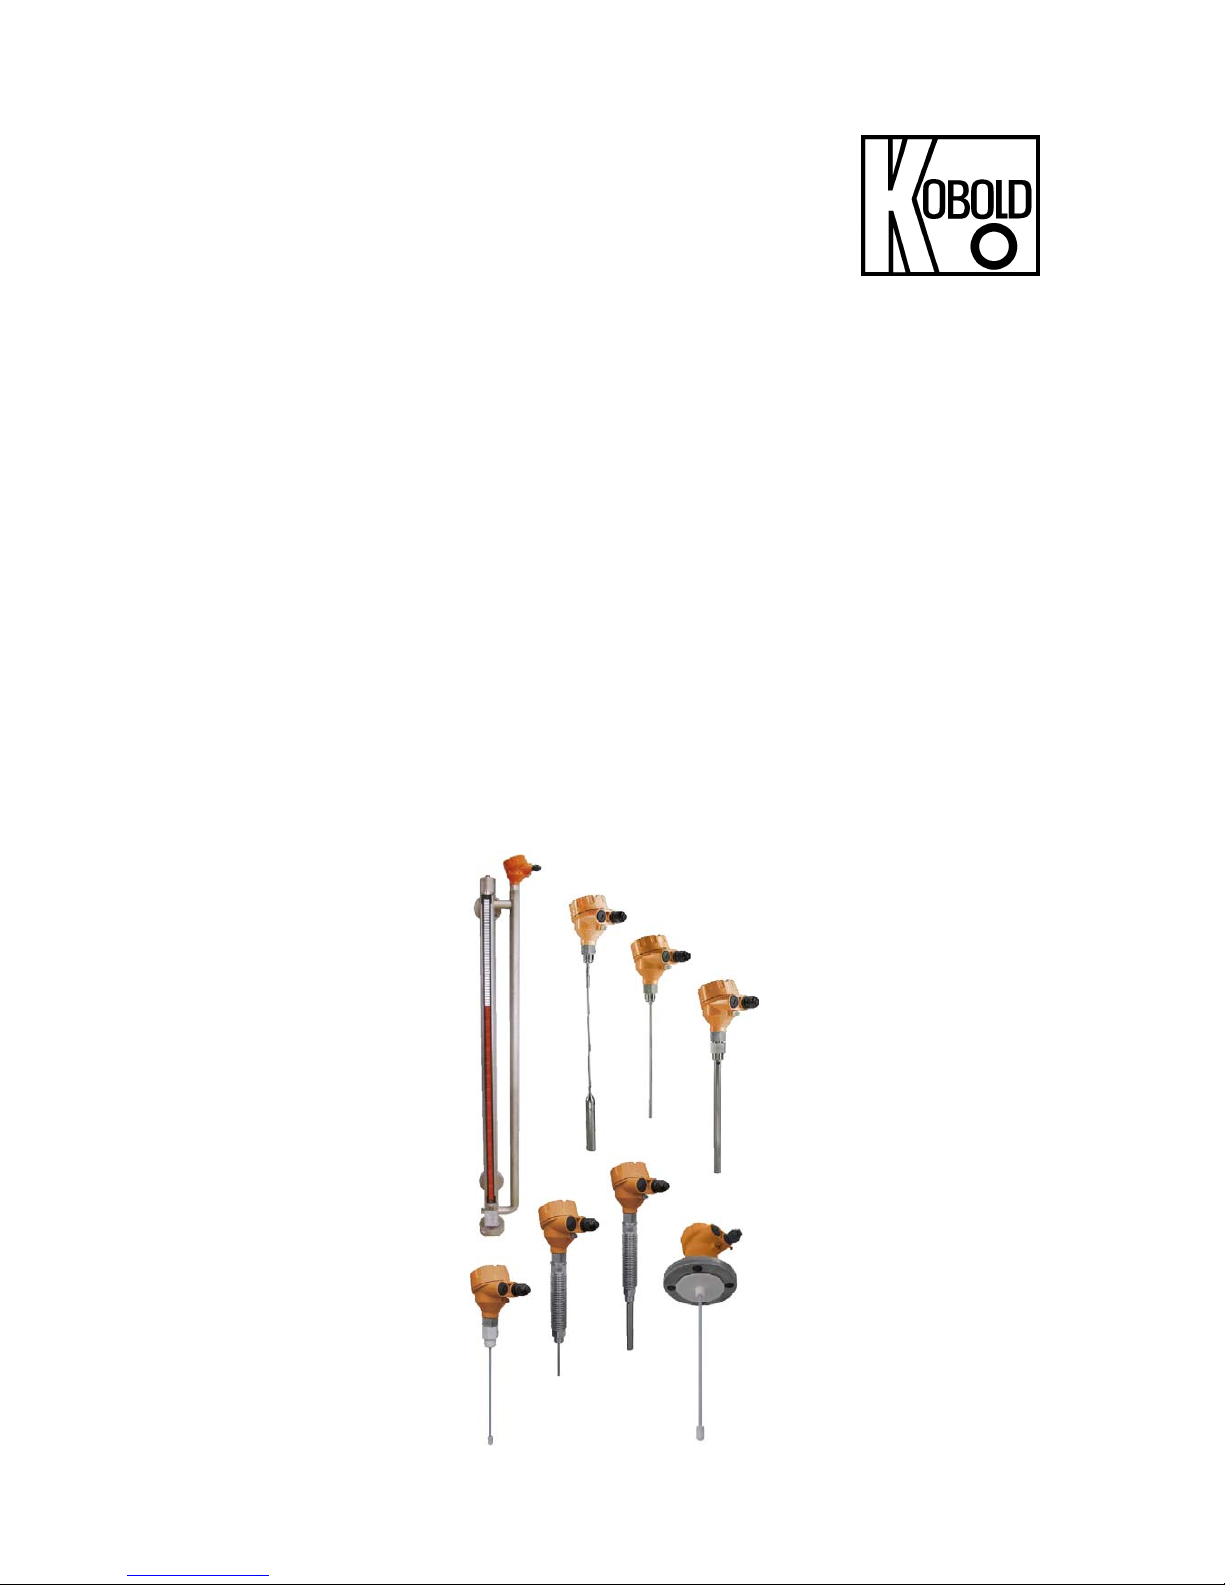
Guided Wave Radar Level Transmitter
(TDR)
Model: NGM
Page 2

NGM
page 2 NGM K09/0717
We don’t accept warranty and liability claims neither upon this publication nor in
case of improper treatment of the described products.
The document may contain technical inaccuracies and typographical errors. The
content will be revised on a regular basis. These changes will be implemented in
later versions. The described products can be improved and changed at any time
without prior notice.
Page 3

NGM
NGM K09/0717 page 3
1. Contents
1. Contents ....................................................................................................... 3
2. Note .............................................................................................................. 4
3. Instrument Inspection .................................................................................... 4
4. Regulation Use ............................................................................................. 4
5. Operating Principle ....................................................................................... 5
6. Mechanical Connection ................................................................................. 5
6.1 Mounting .............................................................................................. 5
6.2 Extended temperature range ............................................................... 6
6.3 PTFE coated single rod probe ............................................................. 7
6.4 Mounting considerations ...................................................................... 7
6.5 Cable entries and cable glands ........................................................... 9
7. Electrical Connection .................................................................................. 10
7.1 Wiring ................................................................................................ 10
8. Operation / Configuration / Adjustments ..................................................... 12
8.1 Control Elements ............................................................................... 12
8.2 Configuration single rod probe or wire rope probe ............................. 14
8.3 Configuration Coaxial probe .............................................................. 17
8.4 probe length and measuring range .................................................... 18
8.5 disturbance signal scan ..................................................................... 19
8.6 Guide to communicating from a PC to a NGM probe ........................ 20
(Configuration of device specific parameters) ............................................. 20
9. Technical Information .................................................................................. 46
10.Order Codes ............................................................................................... 48
11.Dimensions ................................................................................................. 49
12.Safety Instructions for Ex-Versions Model NGM ......................................... 53
13.EU Declaration of Conformance ................................................................. 59
14.ATEX Certificate ......................................................................................... 60
Manufactured and sold by:
Kobold Messring GmbH
Nordring 22-24
D-65719 Hofheim
Tel.: +49(0)6192-2990
Fax: +49(0)6192-23398
E-Mail: info.de@kobold.com
Internet: www.kobold.com
Page 4

NGM
page 4 NGM K09/0717
2. Note
Please read these operating instructions before unpacking and putting the unit
into operation. Follow the instructions precisely as described herein.
The devices are only to be used, maintained and serviced by persons familiar
with these operating instructions and in accordance with local regulations
applying to Health & Safety and prevention of accidents.
When used in machines, the measuring unit should be used only when the
machines fulfil the EC-machine guidelines.
This quick installation guide gives instructions for mounting, wiring, and basic
configuration of NGM. This will be sufficient to achieve a fully functional sensor in
most applications. For further details and advanced configuration of NGM, please
contact your local distributor or KOBOLD directly.
3. Instrument Inspection
Instruments are inspected before shipping and sent out in perfect condition.
Should damage to a device be visible, we recommend a thorough inspection of
the delivery packaging. In case of damage, please inform your parcel service /
forwarding agent immediately, since they are responsible for damages during
transit.
Scope of delivery:
The standard delivery includes:
Guided Wave Radar Level Transmitter model: NGM
Operating Instructions
4. Regulation Use
Any use of the Guided Wave Radar Level Transmitter, model: NGM, which
exceeds the manufacturer’s specification may invalidate its warranty. Therefore,
any resulting damage is not the responsibility of the manufacturer. The user
assumes all risk for such usage.
Page 5
NGM
NGM K09/0717 page 5
5. Operating Principle
NGM uses TDR (Time Domain Reflectometry) technology, which is also known
as Guide Microwave or Guided Wave Radar. This means that low-energy and
high-frequency electromagnetic impulses, generated by the sensor’s circuitry, are
propagated along the probe which is immersed in the liquid or solid to be
measured.
When these impulses hit the surface of the media, part of the impulse energy is
reflected back up the probe to the circuitry which then calculates the level from
the time difference between the impulses reflected.
The sensor can output the analysed level as 4...20 m analogue output, or it can
convert the values into freely programmable switching output signal.
6. Mechanical Connection
6.1 Mounting
In case NGM is delivered with a detached probe, attach the probe onto the small
threaded stud below the hexagon. Ensure that you mount the counter nut first to
secure the probe connection: it has to be interlocked against the probe, NOT
against the plastic of the feedthrough (this would result in sheering off the small
threaded stud; permanently damaging the sensor).
Figure1: mounting
Page 6
NGM
page 6 NGM K09/0717
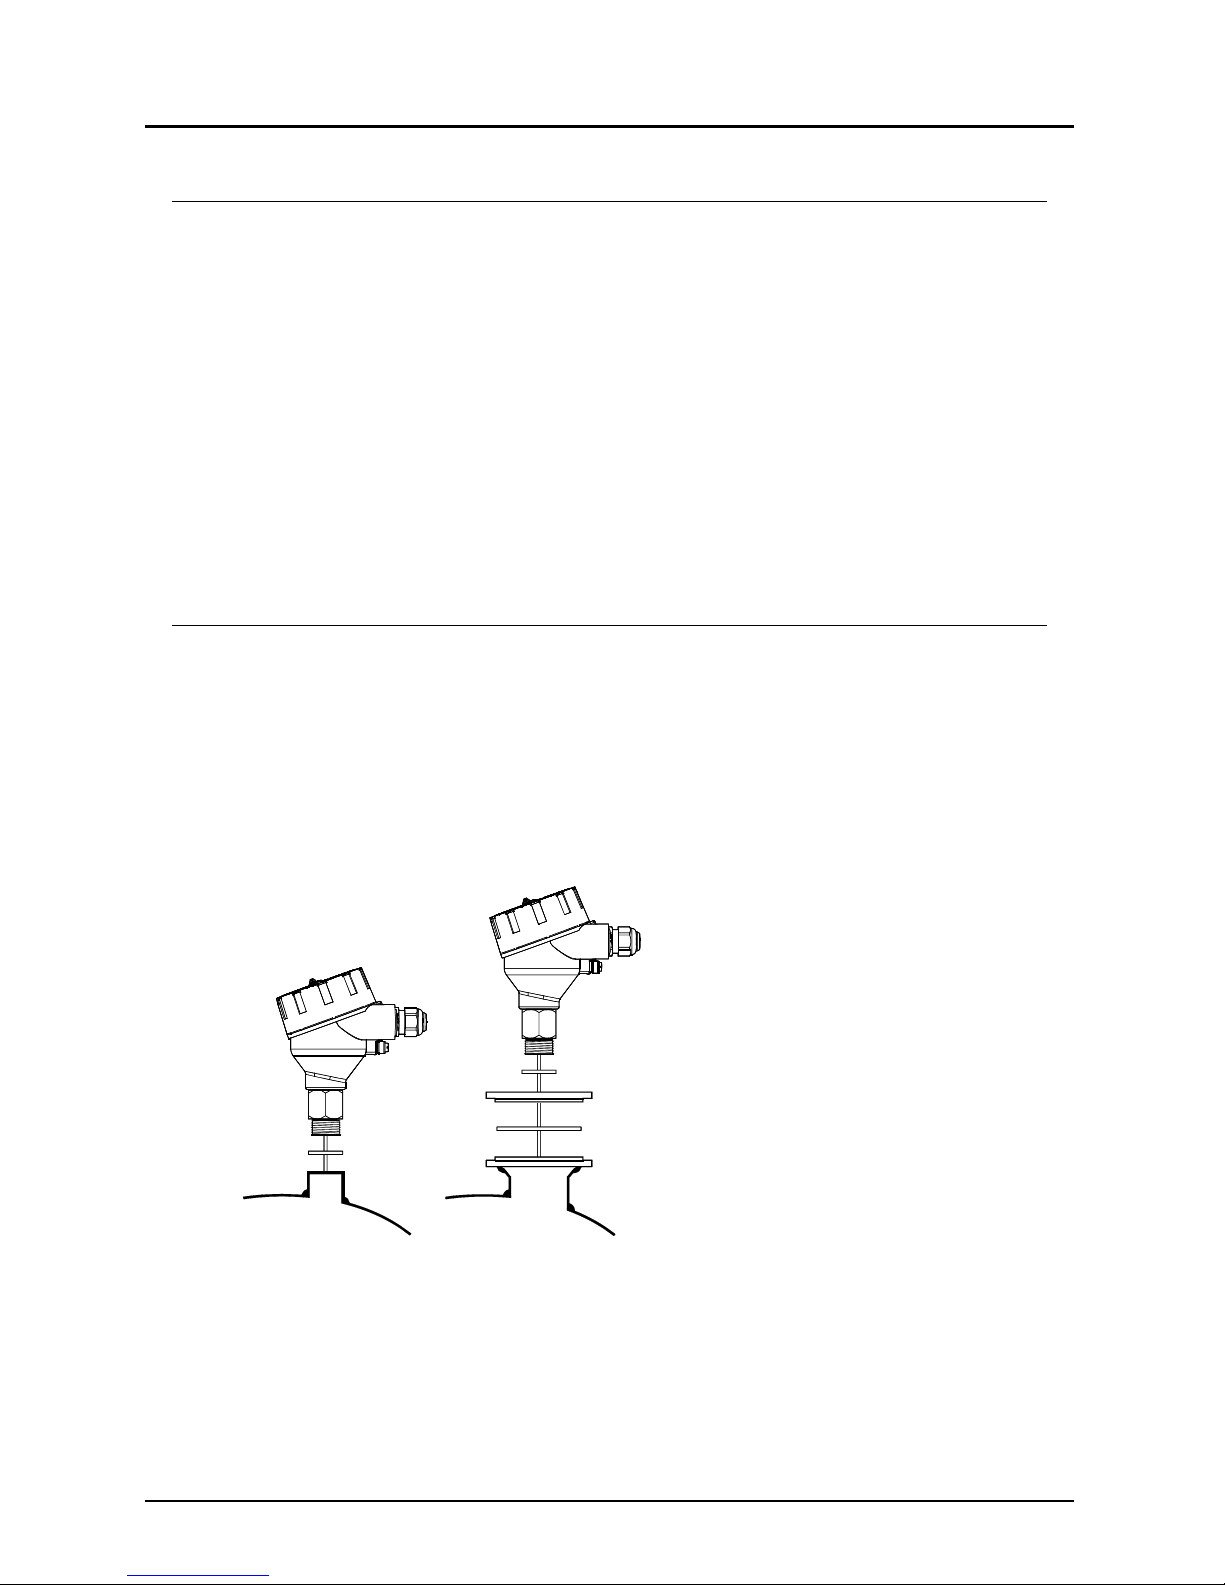
NGM is mounted vertically to the tank via its connection thread, which is screwed
directly into a standard threaded tank connection, i.e. weld-in socket, or it can be
screwed into a flange, which is then connected to a tank nozzle.
NGM should not be welded directly into the tank. Neither should flanges be
welded onto NGM. Welding on the metal parts of NGM will cause serious
damage to the sensor.
Do not lift or handle NGM by its probe; this can cause excessive stress on the
probe connection. NGM should be handled by the hexagon or the lower section
of the housing. Do not screw in NGM by its housing; it should be tightened only
via its hexagon (wrench size 32mm).
Tighten the coaxial probe only at its lower hexagon; the upper hexagon of the
coaxial probe is not needed for mounting.
The customer has to ensure proper sealing of the sensor connection; based on
his process conditions like temperature, pressure and resistance against his
process liquids and atmosphere.
G thread connections require a suitable gasket for pressure-tight joints.
The G3/4A connection thread of NGM is supplied with a gasket made of Klingersil
C-4400, thickness 2mm. The suggested tightening torque for this thread size, this
type of gasket, and a process pressure of max. 40bar is 25Nm (maximum
permissible torque: 45 Nm).
For NPT thread connections, pressure-tight joints require a sealant directly on the
threads.
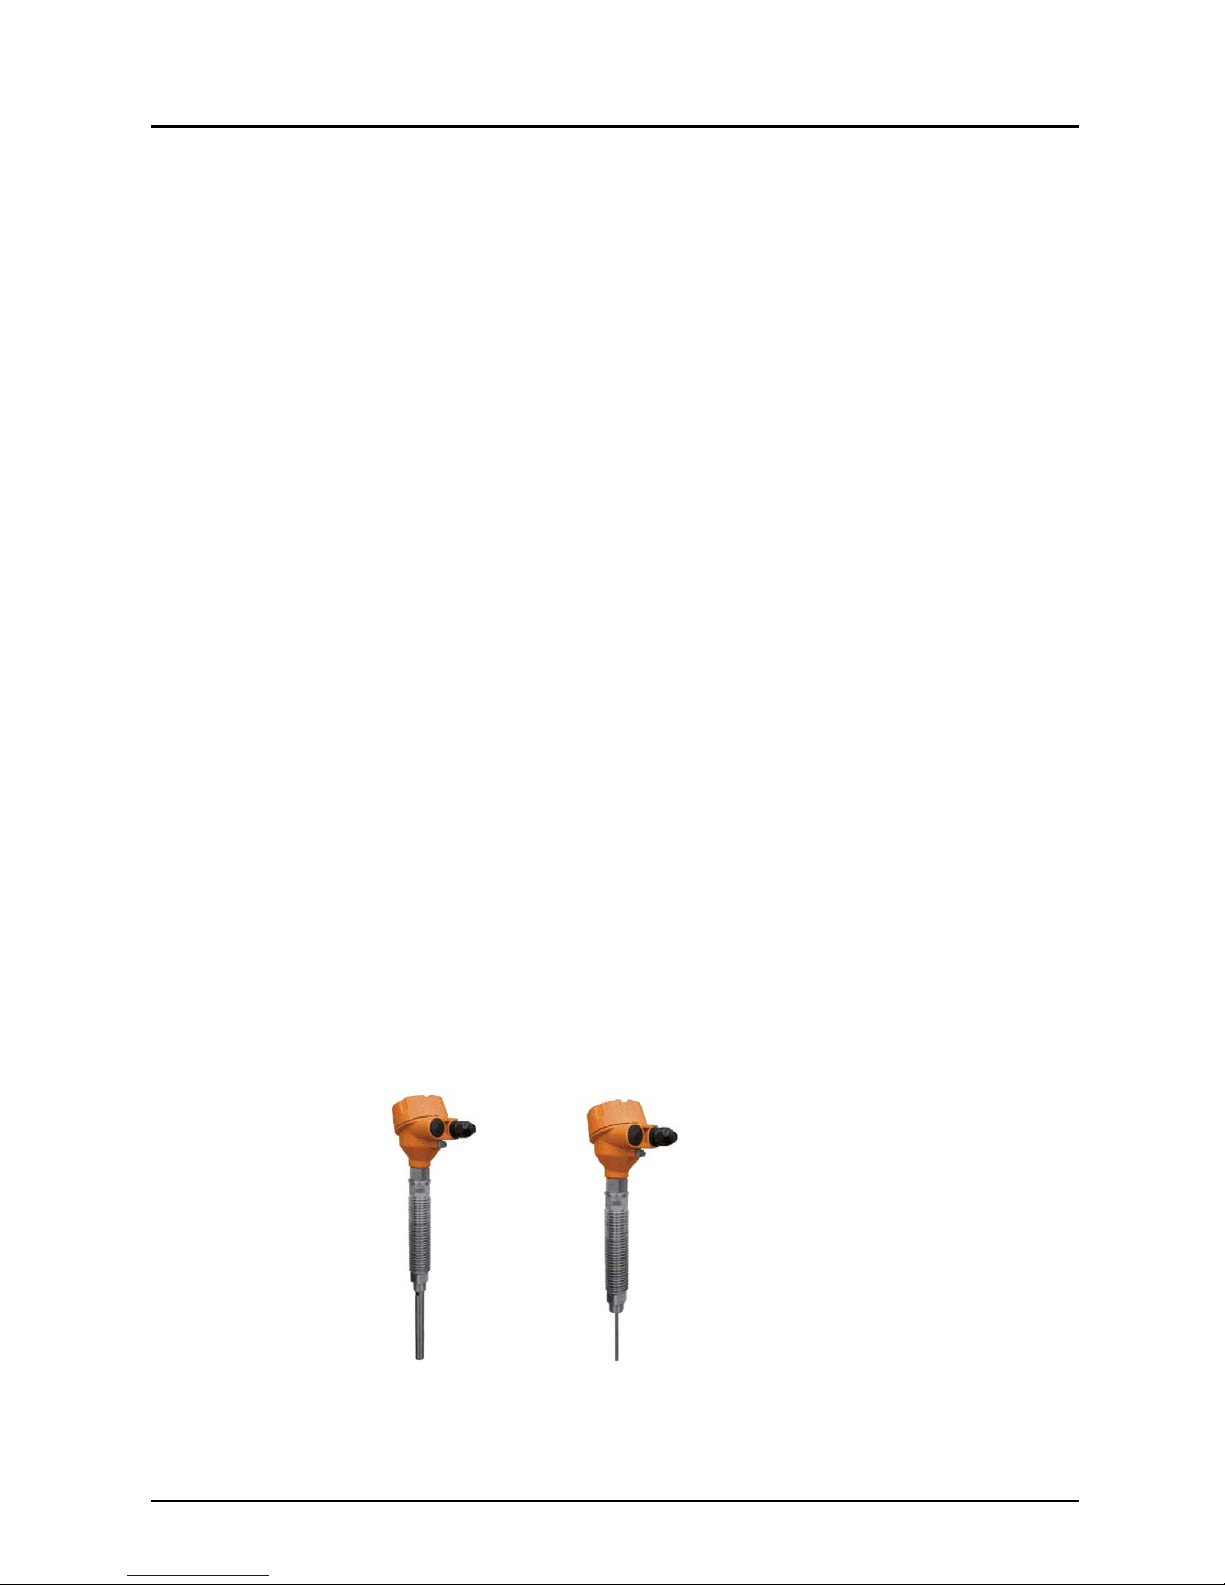
6.2 Extended temperature range
NGM with the extended temperature option must be properly included into the
tank insulation to prevent excessive temperatures at the sensor housing due to
thermal radiation or convection, as well as prevention of condensate formation .
However, the insulation layer should not reach higher than the hexagon nut; the
cooling fins of the radiator-style temperature extension have to be outside the
insulation in order to function properly. If necessary, adjust the height of the
mounting socket or nozzle accordingly.
Figure 2: extended temperature option
Page 7
NGM
NGM K09/0717 page 7
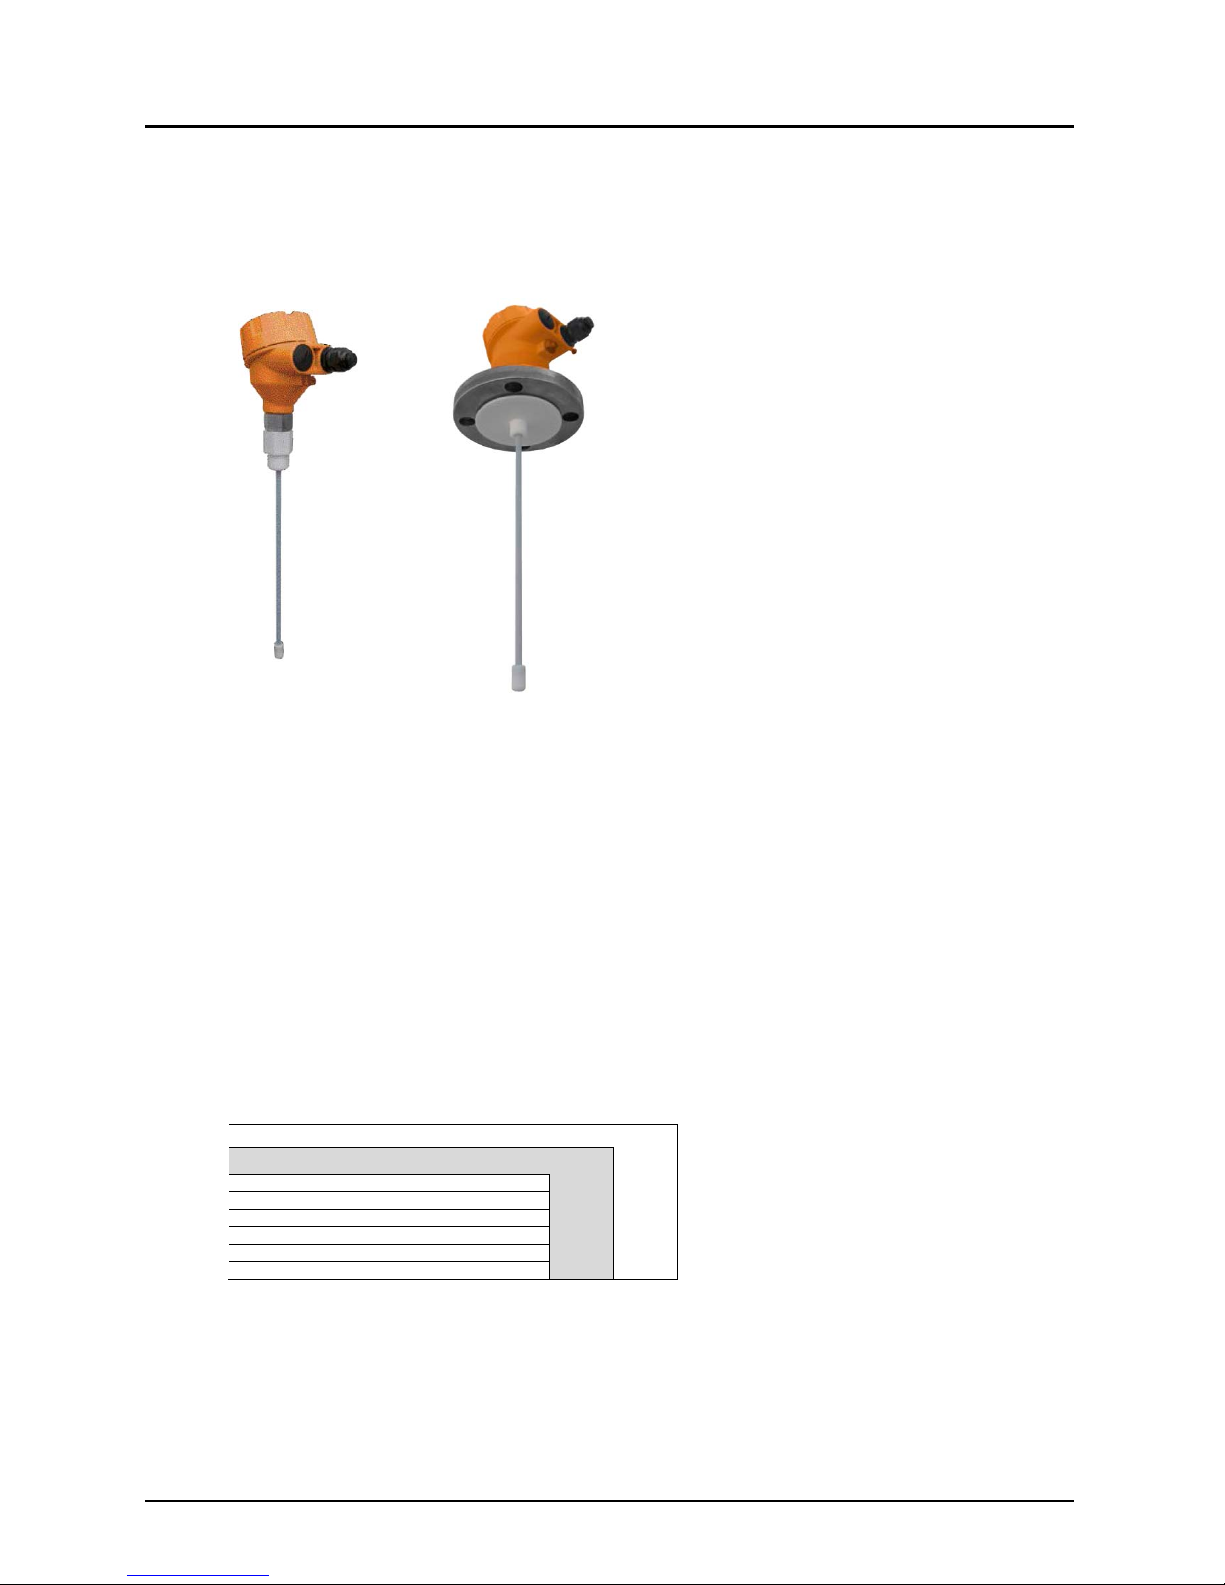
6.3 PTFE coated single rod probe
PTFE coated probes must be handled carefully to prevent damage to the coating.
For detailed instruction show to mount a PTFE coated NGM, please contact your
local distributor or KOBOLD directly.
Figure 3: single rod probe, PTFE coated
6.4 Mounting considerations
The probes should be installed so that they are not directly impacted by liquids
flowing out of the filling inlet.
They should neither touch nor sway towards other objects inside the tank or the
tank/nozzle walls; e.g. by agitator swirls. In applications with very strong fluid
movements, which can also cause excessive lateral force on the probe, it is
recommended to anchor the probe. The anchoring fixtures are customer
supplied.
For further details about mounting NGM or if you would like to anchor the probes,
please contact your local distributor or KOBOLD directly.
single rod / wire rope probe
coaxial probe
nozzle diameter
-
1
>50mm
nozzle height
-
<300mm
clearance to tank wall or other internal objects
-
>100mm
clearance between probe end and tank bottom
-
>2mm
diameter of bypass chamber / stilling well
-
2
>25mm
- = no restrictions
1
enough diameter to fit in the coaxial tube (Ø17,2mm)
2
enough diameter to fit in the coaxial tube (Ø17,2mm) and enough room around
the probe for the liquid to flow in and out of the bypass chamber / stilling well
Figure 4: mounting considerations
Page 8
NGM
page 8 NGM K09/0717
The single rod probe is suitable for a very wide range of applications in liquids,
but the signal has a wider detection radius around the rod. Thus, it is more
responsive for measurement signal disturbances which can be easily overcome
by observing a few mounting considerations (see Fig.4) and making simple
configuration adjustments to the sensor.
Caution! While using single rod or wire rope probes, activating the
powerful disturbance signal suppression feature is strongly
recommended.
However, those work most efficiently on stationary interference targets like tall
and narrow nozzles or close-by objects. In case that non-stationary interference
targets close to the single rod probe, like slowly rotating agitator blades, cause
problems with the measurement, it is recommended to use the coaxial probe.
The single rod probe is also the recommended probe type for mounting NGM into
bypass chambers or stilling wells. In this case, plastic centering disks are needed
to prevent the probe from contacting the wall. Please contact your local distributor
or KOBOLD directly for further details.
covered Probe length
6m 12m 20m
Tank Ø
materia
l
3m 6m 9m 3m 6m 9m 3m 6m 9m
Wheat 0,7 0,8 0,9 2 2,7 3 4,1
- -
Corn 0,6 0,7 0,8 1,8 2,4 2,7 3,7
- -
Rice 0,5 0,7 0,7 1,5 2,1 2,4 2,8 4,5
Flour 0,3 0,4 0,4 1,1 1,3 1,5 2,4 3,3 3,7
Sugar 0,7 1 1 1,9 2,8 3,4 3,4
- -
Silica sand 1,1 1,4 1,5 3,2 4,5
-
- - -
Cement 1,2 1,5 1,7 3,2 4,7
-
- - -
Alumina 0,9 1,1 1,3 2,3 3,5 4,2 4,3
- -
Phosphate
fertilizer
1,8 2,3 2,6 5
- -
- - -
Fly ash 1 1,3 1,4 2,5 3,9 4,7 4,7
- -
Coal dust 0,7 0,9 1 1,8 2,7 3,3 3,3
- -
Plastic pellets 0,4 0,5 0,5 1 1,5 1,7 1,9 3,2 4
- = exceeds the max. tensile load of NGM: 5kN.
Figure 5: approx. pulling forces [kN]
Above figures are guidelines to estimate the approx. pulling forces from freeflowing solids acting on a suspended 4mm wire rope probe without any anchoring
in a metal tank with smooth walls
The wire rope probe is recommended for installations in solids, tall tanks and
where limited headroom is available. Its performance characteristics and
mounting considerations are similar to the single rod probe.
Page 9
NGM
NGM K09/0717 page 9
In addition, please consider the following advice when using NGM in solid
applications:
The bulk solid inside the tank or silo can exert a considerable tensile load on the
wire rope probe, depending on properties of the bulk solid, tank dimension sand
covered probe length (see Fig. 5). This can lead to considerable downwards
pulling forces on the tank roof, which has to be able to withstand the max. tensile
load of NGM: 5kN
It is recommended that the tank be empty during installation. This ensures that
the probe hangs down straight and does not get entangled. After installation also
regularly check if the wire rope probe got entangled or unbraided
Some bulk solids easily form build-up on the tank wall or on internal structures.
This will interfere with the measurements. Choose a mounting position where the
wire rope probe is not in contact with, or close to, such product build-up
For anchoring the wire rope probe in solid applications, please contact your local
distributor or KOBOLD directly
The coaxial probe does not have restrictions regarding mounting position, tank
connection, and proximity to the tank wall or other objects inside the tank.
The coaxial probe is recommended for installing NGM into a non-metallic tank or
open pit. If that is not possible, single rod or wire rope probes can be used when
NGM is mounted into at least a DN50 metal flange or screwed into a metal sheet
with at least Ø150mm.
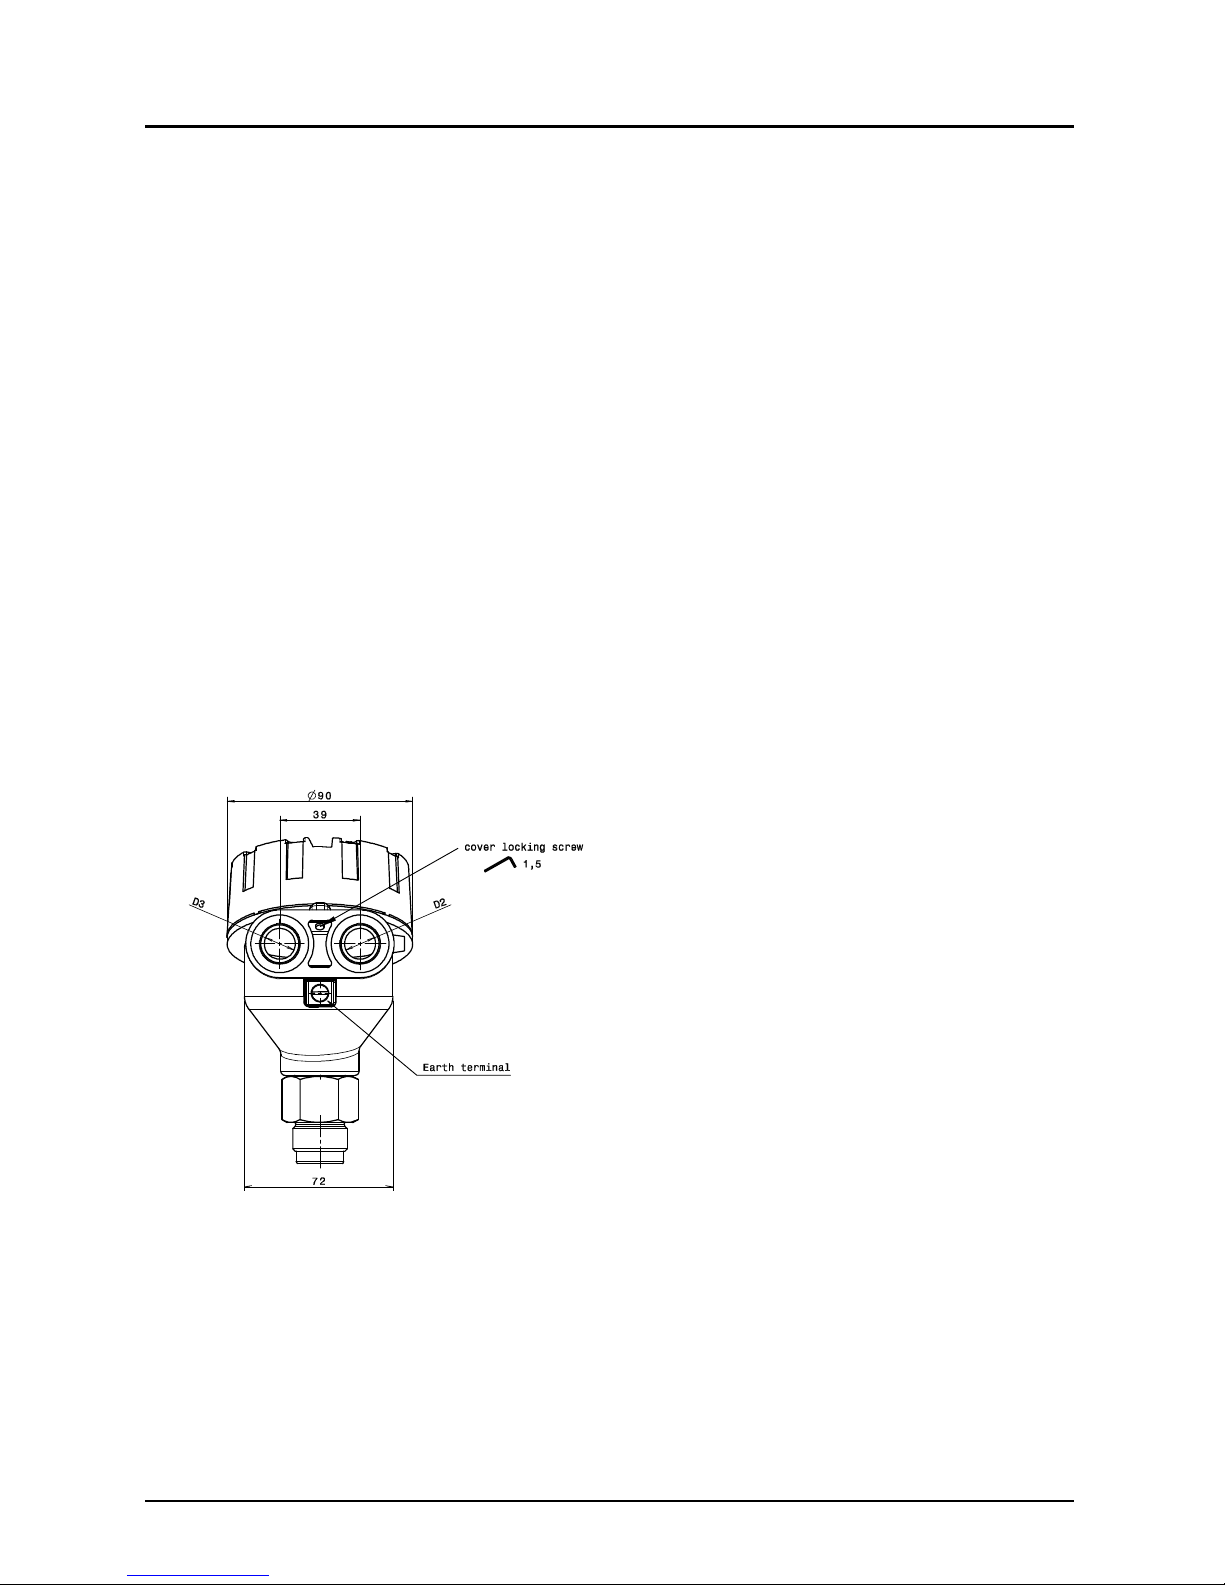
Figure 6: cable entries
6.5 Cable entries and cable glands
The housing has two cable entries and can be ordered with assembled standard
screw plugs and cable glands. Nevertheless, the customer has to confirm the
suitability of those cable glands for his specific application requirements and
cabling; and replace them when necessary.
Page 10
NGM
page 10 NGM K09/0717
Both cable entries can be fitted with cable glands or suitable conduit systems. If
only one cable gland is fitted, it is recommended to use cable entry D2 (see Fig.
6). Then cable entry D3 has to be closed with a suitable screw plug.
IP68-rated screw plugs and cable glands have to be properly sealed and have to
be properly tightened around cable of suitable type and diameter to ensure the
IP68 rating of the housing.
Cable entries with metric threads can be sealed by mounting the suitable screw
plug or cable gland with matching rubber washers underneath.
Cable entries with NPT threads require a sealant directly on the thread of the
screw plug or cable gland.
For M20x1,5 cable entries, NGM comes assembled with:
1 x cable gland M20x1,5, IP68, nylon PA66, for non-armoured cable Ø5…9mm,
with EPDM washer, max. tightening torque 6Nm on all hexagons, wrench size
24mm. For protection during shipment it is closed with an EPDM sealing plug
which has to be removed for cabling
1 x screw plug, IP68, M20x1,5, nylon PA66, with EPDM washer
For ½” NPT cable entries, NGM comes assembled with:
2 x screw plug, 1/2" NPT, PE-LD. They are not IP68 and are only for housing
protection during shipment. They have to be replaced by the customer
When wiring with shielded or armoured cable, suitable cable glands have to be
used. The contact between the metal housing and the shielding of the cable is
made by using a suitable EMC-type cable gland. Ground the shielding of the
cable only on the sensor side; not on the supply side.
7. Electrical Connection
7.1 Wiring
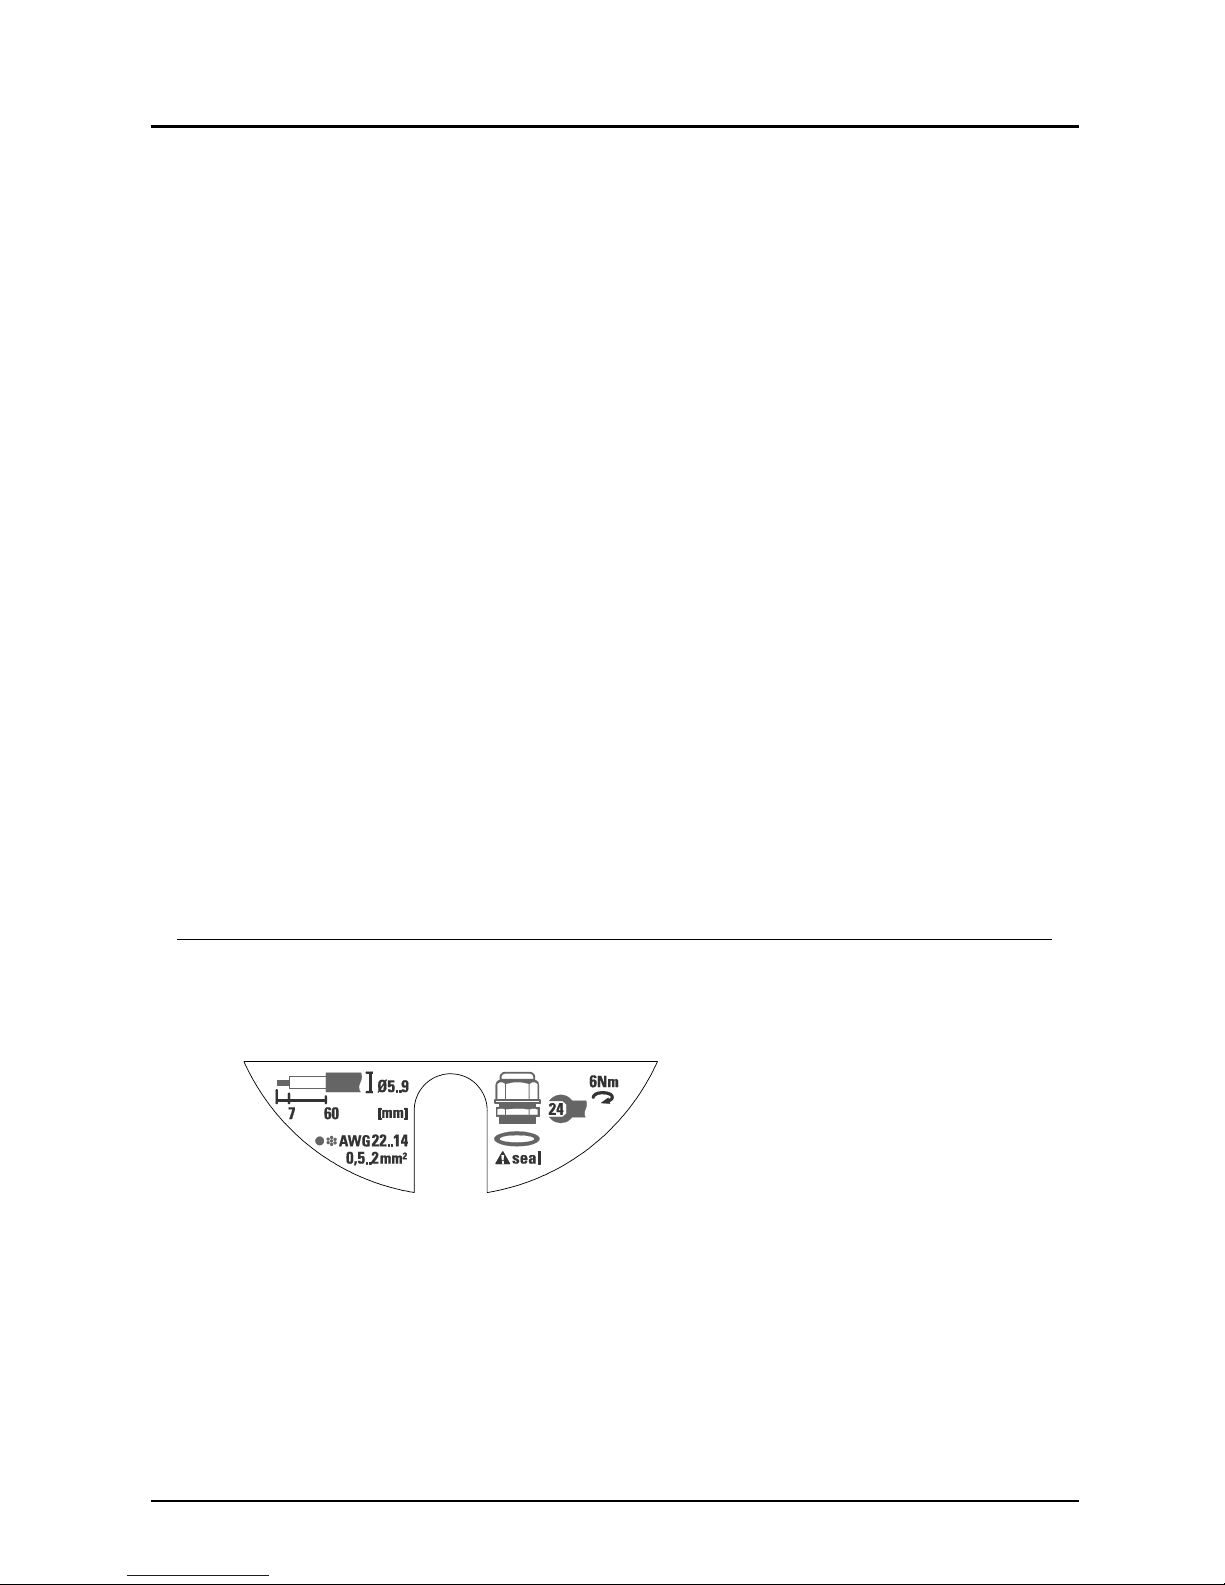
Figure 7: lower sticker on the black plastic cartridge
Verify that the power supply for the sensor is switched off.
Establish an equipotential connection (potential equalization) between the
external earth terminal of NGM and the closest ground potential terminal of the
tank.
Page 11

NGM
NGM K09/0717 page 11
Open the housing cover by turning it counter clockwise. It may be necessary to
loosen the cover locking screw with an allen key size 1,5mm. The cover has a
safety chain to prevent it from falling to the ground after being unscrewed.
The lower sticker on the black plastic cartridge inside the housing gives
instructions for the standard M20x1,5 cable gland (Fig. 7). When other cable
glands are being used, their details have to be observed instead.
Loosen the cable gland and pull the cable through the cable gland into the
housing. Pull it far enough to have a convenient length for stripping and handling
the cable.
Install cable with a drip loop outside the housing where the bottom of the loop
must be lower than the cable entry of the housing.
Dismantle the cable carefully and strip the wires as indicated on the sticker.
The stripped wire ends are connected to the sensor electronic via the green
screw less, cage clamp terminal block. It can accommodate stranded and solid
wires 0,5…2mm² / AWG 22...14. The usage of cable end sleeves with insulation
collar is not recommended.
Simply press an orange lever straight down with a small flat tip screwdriver, insert
a stripped wire end into the terminal hole, and release the orange lever; the wire
is now connected.
The upper sticker inside the housing illustrates the inputs and outputs if the
sensor. Connect all wires accordingly, as indicated in Fig. 8.
Pull the cable back, but make sure its mantle does not retract into the cable
gland.
Tighten the cable gland to ensure proper sealing function.
Switch on the power supply for the sensor.
The sensor LED should start blinking green within 6 seconds after connecting the
power (during this start-up time the LED is solid green). The blinking green LED
indicates that the sensor is in measuring mode and working correctly.
Do not tighten the housing cover yet. Some basic configuration is still to be
done…
Page 12

NGM
page 12 NGM K09/0717
Figure 8: wiring
8. Operation / Configuration / Adjustments
8.1 Control Elements
Figure 9: Control Elements
power supply
control system,
e.g. DCS or PLC
HART modem
computer
DIP switch
push button LED
off/0
on/1
Page 13

NGM
NGM K09/0717 page 13
Basic configuration of NGM can be done directly on the device via three control
elements: a DIP switch, a single push button and a LED for visual feedback. All
settings required to get NGM fully operational can be performed directly on the
device; or NGM can be ordered completely pre-configured.
All three control elements are enclosed in the black plastic cartridge inside the
housing.
The DIP switch has 8 small white levers. Small numbers from 1 to 8 are printed
underneath the levers: they indicate the DIP switch positions and correspond to
the ones in Fig.9.
The upper position of a lever is off/0 and the lower position is on/1. On the left
side of the DIP switch is also a small indication of the on/1 state.
The off/0 and on/1 states of the DIP switch correspond to the 0/1 indications in
Fig.9.
The upper sticker on the black plastic cartridge shows three colour segments
close to the DIP switch: red, grey, and blue; they correspond to the coloured rows
in Fig.10.
red: indicates DIP switch position 8 which switches between measuring and
configuration mode. Only when DIP switch position 8 is on/1, NGM can be
configured; configuration mode is indicated by the LED blinking alternately green
and red.
When DIP switch position 8 is off/0, NGM is in measuring mode; indicated by the
LED blinking green.
It is only possible to enter the configuration mode when DIP switch positions 1 to
7 are off/0 before setting DIP switch position 8 to on/1; otherwise the LED is
blinking red to indicate an error
blue: indicates the DIP positions through which groups of functions are selected,
e.g. all functions related to the analog current output or the switching output
grey: indicates the DIP positions through which individual functions/configuration
settings are selected
When entering into configuration mode, always start from DIP switch position 8
and move towards position 1.
When exiting configuration mode, always set back all the DIP switch positions to
0, starting from position 1 and move towards position 8.
After setting all DIP switch positions to represent the 0/1 sequence of the desired
function (as described in Fig.10), the push button has to be pressed to execute
the desired function. Execution of the function is indicated by the LED remaining
green until the function has been properly executed, in which case the LED
returns to blinking alternately green and red.
Page 14
NGM
page 14 NGM K09/0717
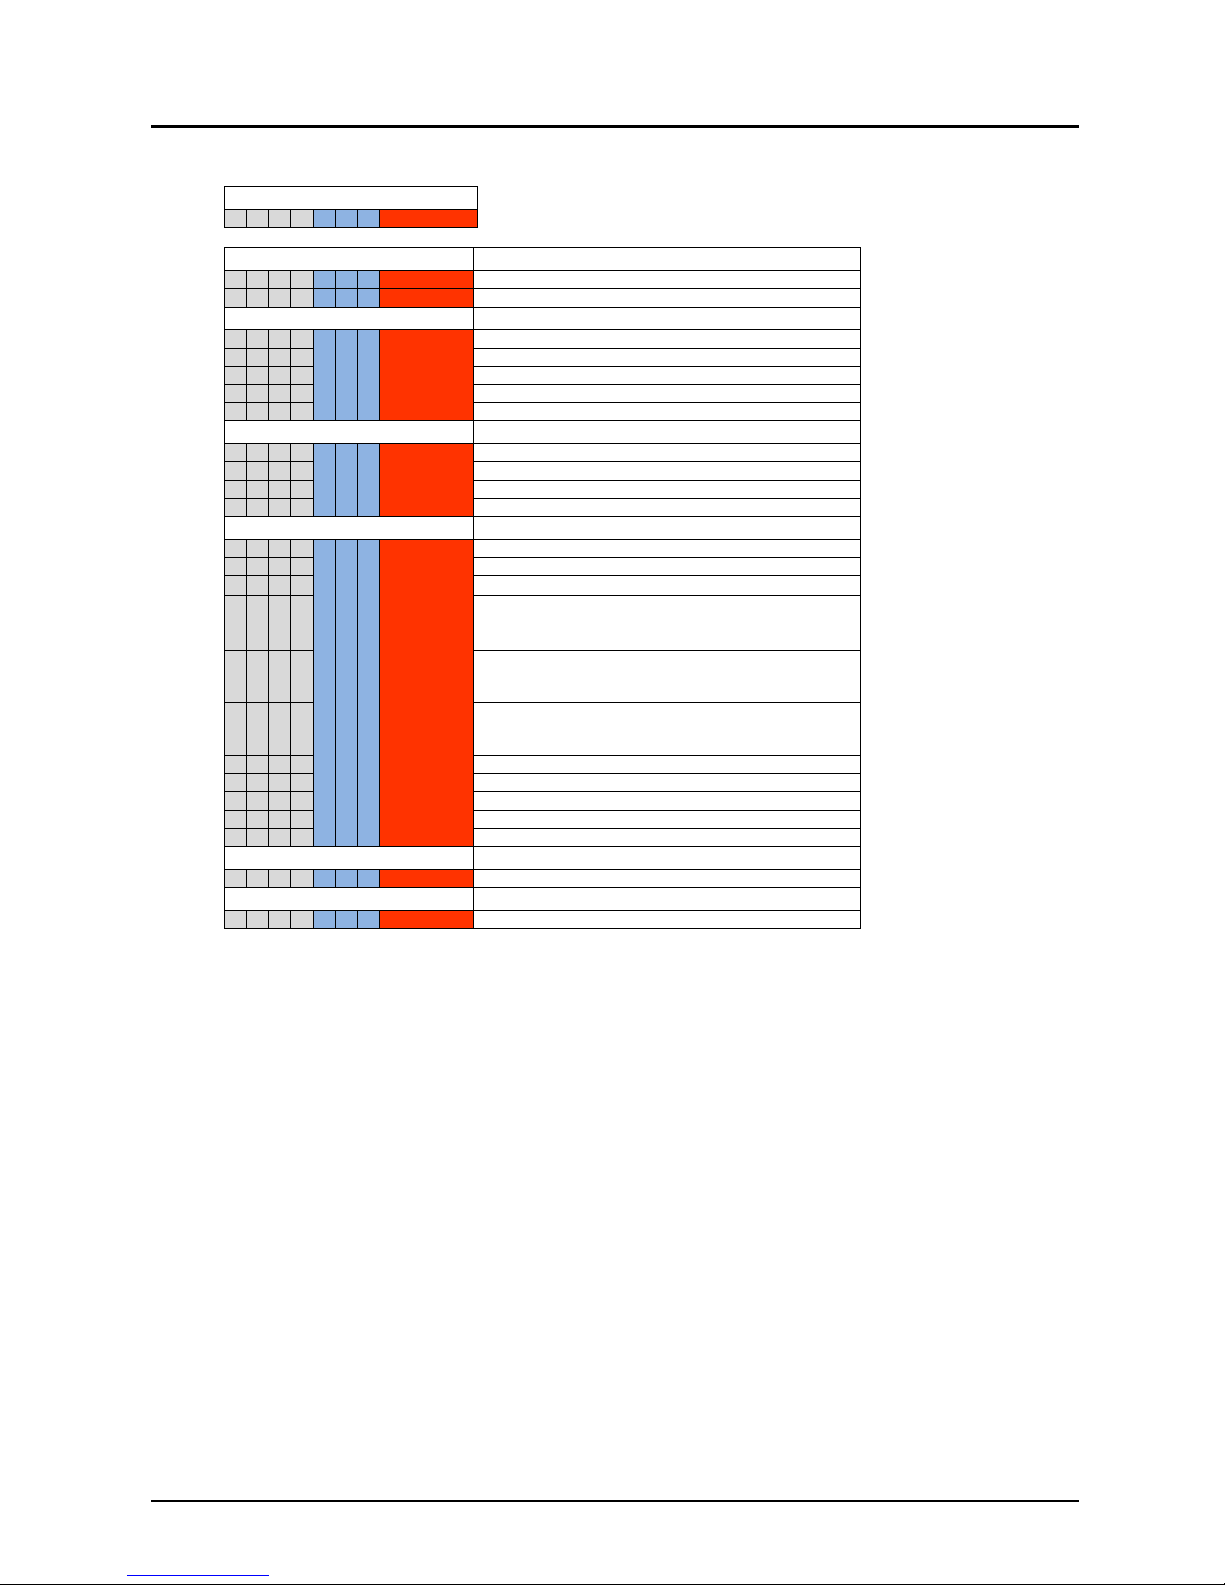
DIP switch Position
1 2 3 4 5 6 7 8
DIP switch settings description
0 0 0 0 0 0 0 0 measuring mode
0 0 0 0 0 0 0 1 configuration mode
function group 1 analog current output
0 0 0 1
0 0 1 1
lower range value [4mA]; span 0%
0 0 1 0 upper range value [20mA]; span 100%
0 1 0 0 response time 0,5s[default]
0 1 0 1 response time 2s
0 1 1 0 response time 5s
function group 2 switching output
0 0 1 0
0 1 0 1
lower threshold
0 0 1 1 upper threshold
0 1 0 0 NC [default]
0 1 0 1 NO
function group 3 disturbance signal suppression
0 0 0 1
0 1 1 1
perform disturbance signal scan
0 0 1 0 disturbance signal scan: do not utilize
0 0 1 1
disturbance signal scan: utilize[default]
1
0 1 0 0
upper dead band: short [default]
2
rod probe: 30 mm3
coaxial probe: 0 mm
3
0 1 0 1
upper dead band: medium
rod probe: 190 mm
3
coaxial probe: 160 mm3
0 1 1 0
upper dead band: long
rod probe: 390 mm
3
coaxial probe: 360 mm3
1 0 0 0 amplitude threshold: low[default]
1 0 0 1 amplitude threshold: medium
1 0 1 0 amplitude threshold: high
1 1 0 0 coaxial probe
1 1 0 1 single rod / wire rope probe
function group 4 reset
0 0 0 1 1 0 0 1 reset to delivery configuration
function group 5 measure probe length
0 0 0 1 1 0 1 1 measure probe length
1
for single rod and wire rope probes with a probe length [L] >5.500mm only the top 5.500mm of the probe get scanned for
disturbance signals
2
for single rod and wire rope probes with a probe length [L] >3.000mm the default setting is upper dead band: long
3
determined at reference point (sealing surface of connection thread, see dimensional drawing)
Function groups 4 and 5 require the push button to be pressed and held for at
least 10 seconds for the functions to be executed.
Figure 10: DIP switch settings
8.2 Configuration single rod probe or wire rope probe
For most standard applications, executing the three basic configuration steps
below issufficient to achieve a fully functional sensor; providing a continuous level
measurement through its analog current output.
For further details and advanced configuration of NGM, please contact your local
distributor or KOBOLD directly.
Page 15
NGM
NGM K09/0717 page 15
8.2.1 perform disturbance signal scan
NGM has to be mounted in its final position and the tank has to be
completely empty in order to perform a disturbance signal scan
set the DIP switch positions to the 0/1 sequence in Fig. 11on the left; start
from position 8 and move towards position 1!
LED will blink alternately green and red
press the push button
LED will remain green for a few seconds while the disturbance signal scan
is being performed
once the scan is completed successfully, the LED will return to blinking
alternately green and red
DIP switch Position
1 2 3 4 5 6 7
8
DIP switch settings description
0 0 0 1 0 1 1
1 perform disturbance signal scan
Figure 11: perform disturbance signal scan
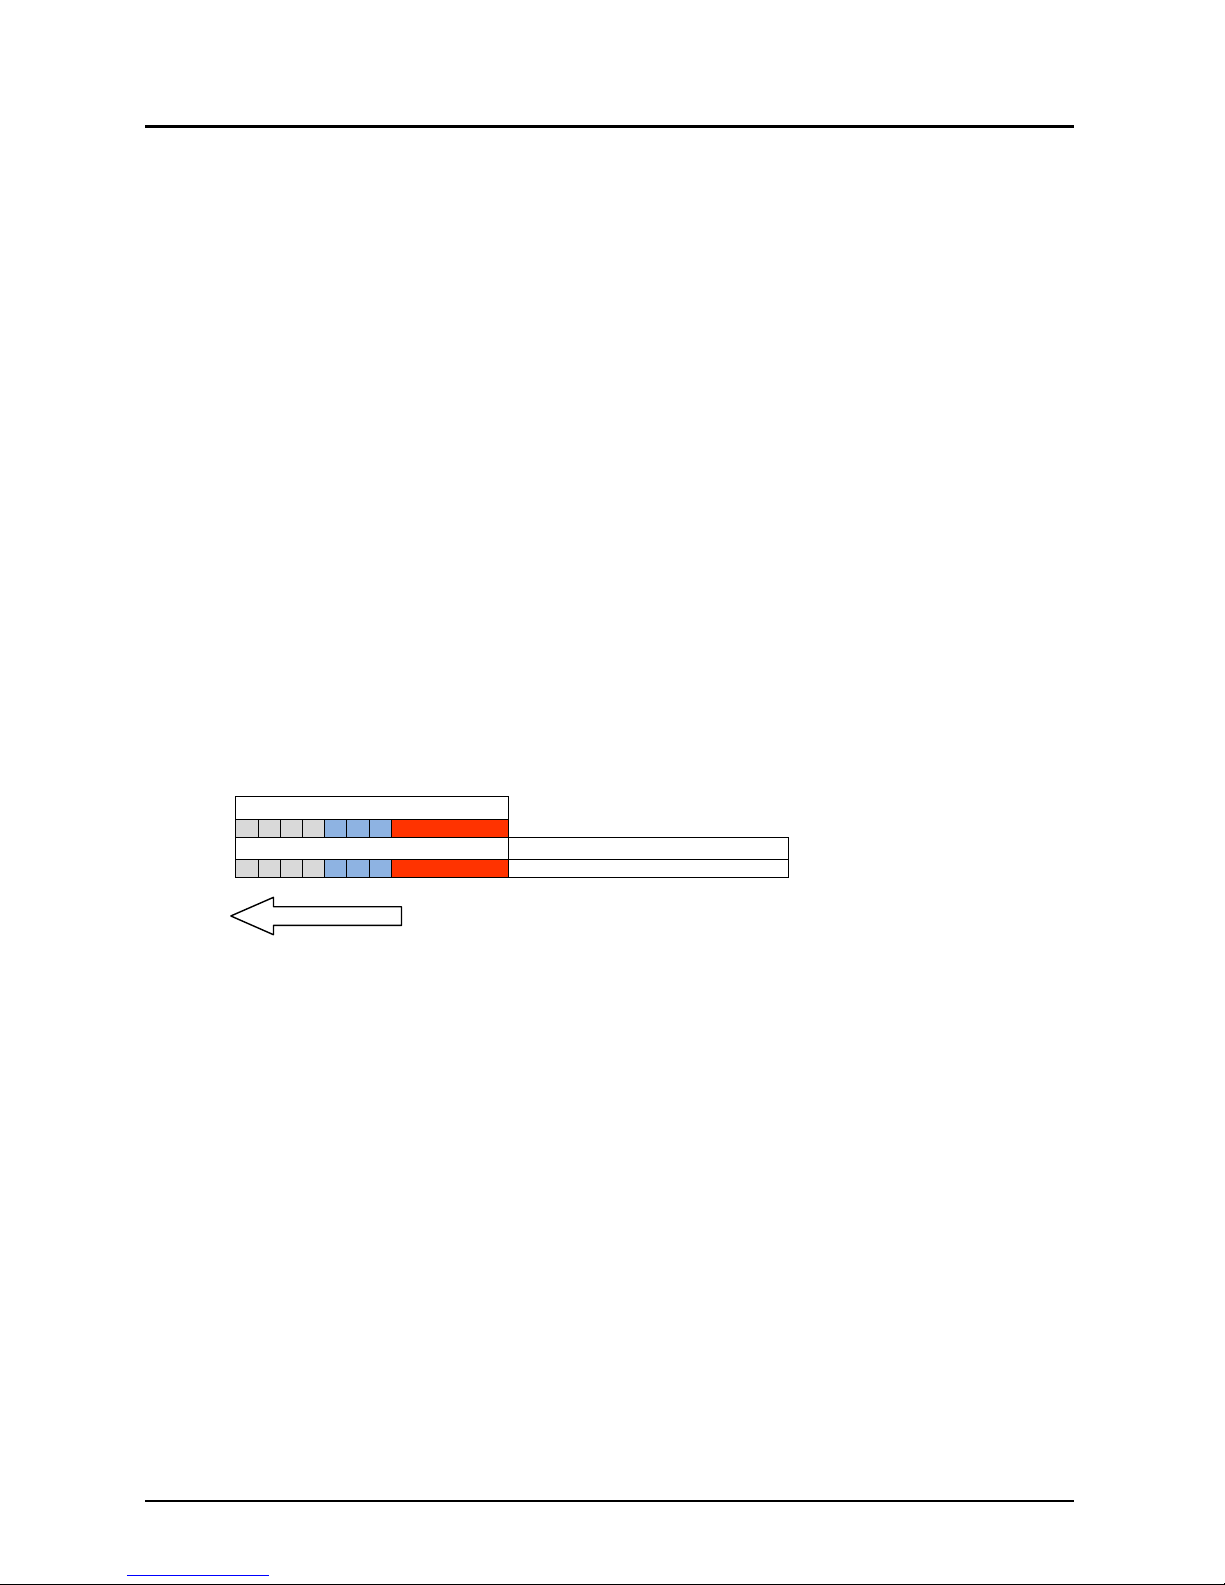
8.2.2 lower range value [4MA]; span 0%
fill the liquid into the tank up to the level where you want to position the
lower range value [4mA]; span 0%.
It is recommended that the lower range value stays within the measuring
range [M]
change DIP switch position 6 to off/0
press the push button
LED will remain green briefly while the lower range value setting is being
executed
once it has been executed successfully, the LED will return to blinking
alternately green and red
DIP switch
Position
1 2 3 4 5 6 7 8
DIP switch
settings
description
0 0 0 1 0 0 1 1
lower range value [4mA]; span
0%
Figure 12: lower range value [4mA]; span 0%
Page 16

NGM
page 16 NGM K09/0717
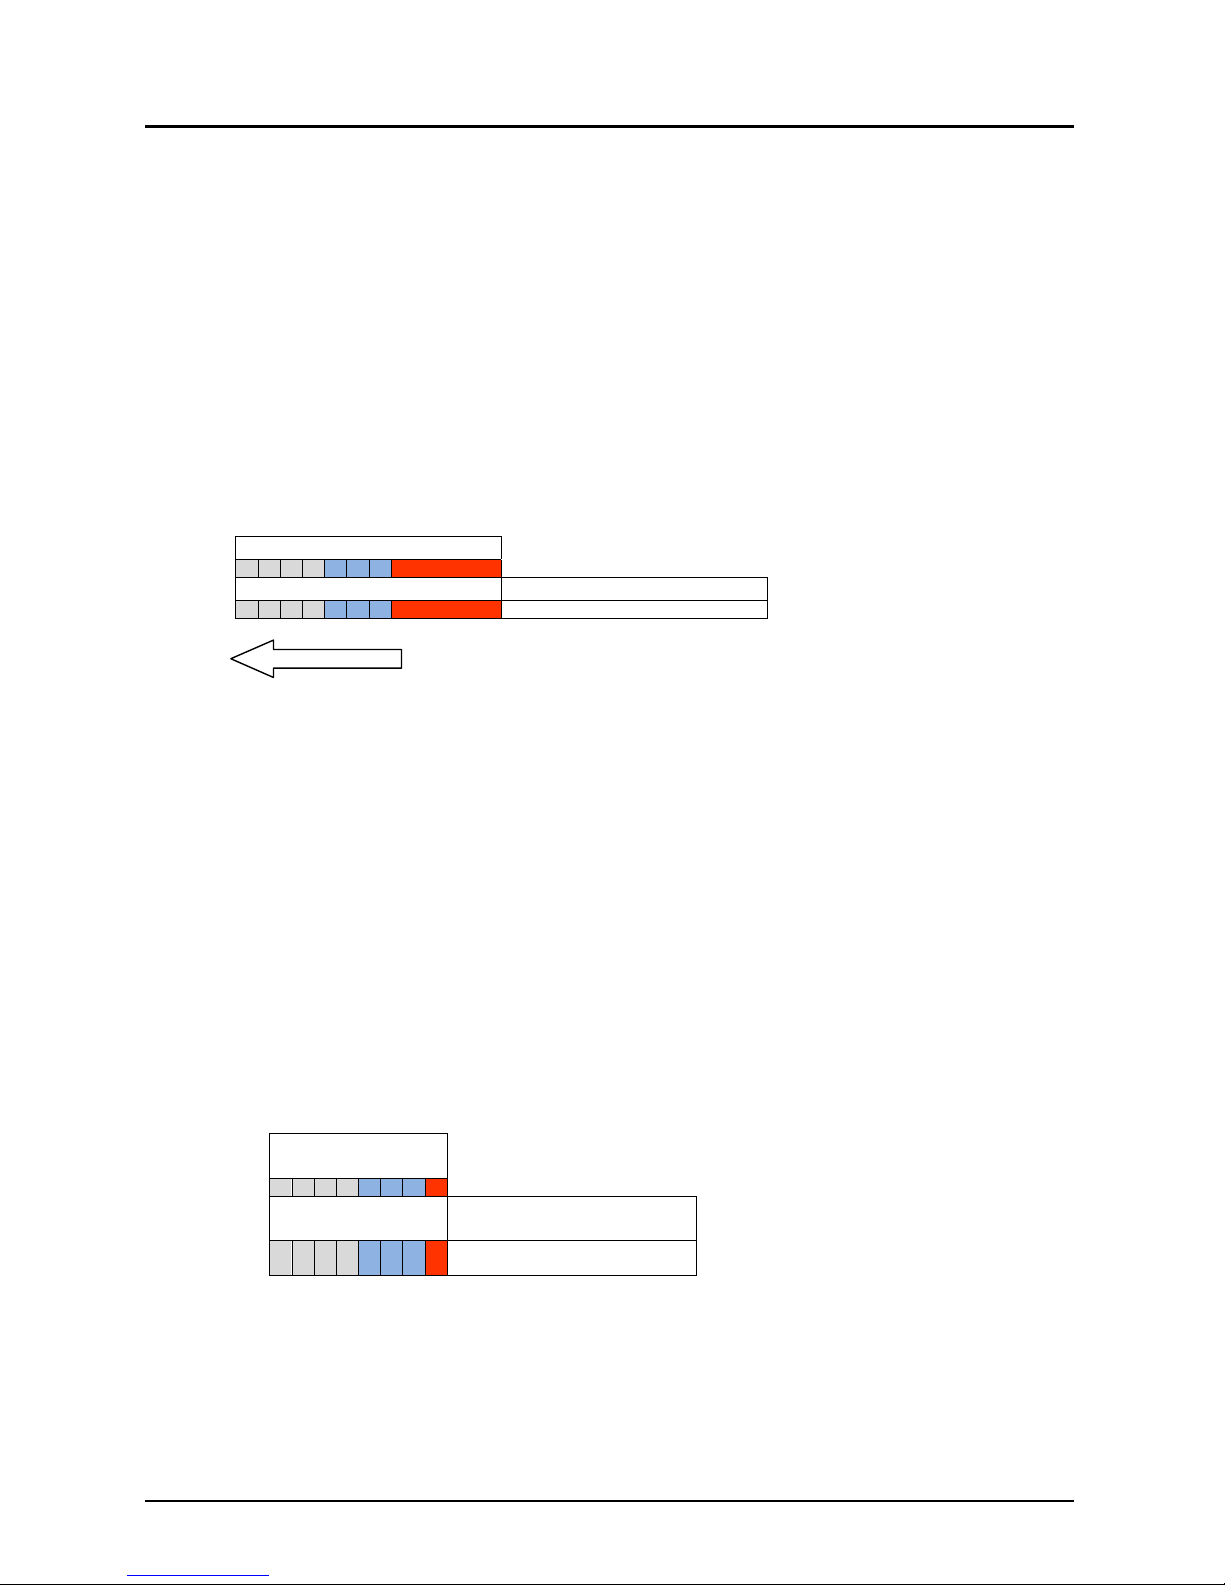
8.2.3 upper range value [20MA]; span 100%
raise the liquid inside the tank up to the level where you want to position
the upper range value [20mA]; span 100%.
It is recommended that the upper range value stays within the measuring
range [M]
change DIP switch position 3 to on/1
change DIP switch position 4 to off/0
press the push button
LED will remain green briefly while the upper range value setting is being
executed
once it has been executed successfully, the LED will return to blinking
alternately green and red
set all the DIP switch positions to 0 as indicated in Fig.14on the left; start
from position 1 and move towards position 8!
the LED will change to blinking green
DIP switch Position
1 2 3 4 5 6 7 8
DIP switch settings description
0 0 1 0 0 0 1 1 upper range value [20mA]; span 100%
Figure 13: upper range value [20mA]; span 100%
Tighten the housing cover properly by turning it clockwise; make sure the cover
safety chain does not tangle up. If desired, tighten the cover locking screw with
an allen key size 1,5mm.
DIP switch Position
1 2 3 4 5 6 7
8
DIP switch settings description
0 0 0 0 0 0 0
0 measuring mode
Figure 14: measuring mode
Page 17
NGM
NGM K09/0717 page 17
8.3 Configuration Coaxial probe
The coaxial probe has a very robust and reliable measurement performance in
almost any application without further configuration. For basic configuration only
the range values for the analogue current output have to be set.
For further details and advanced configuration of NGM, please contact your local
distributor or KOBOLD directly.
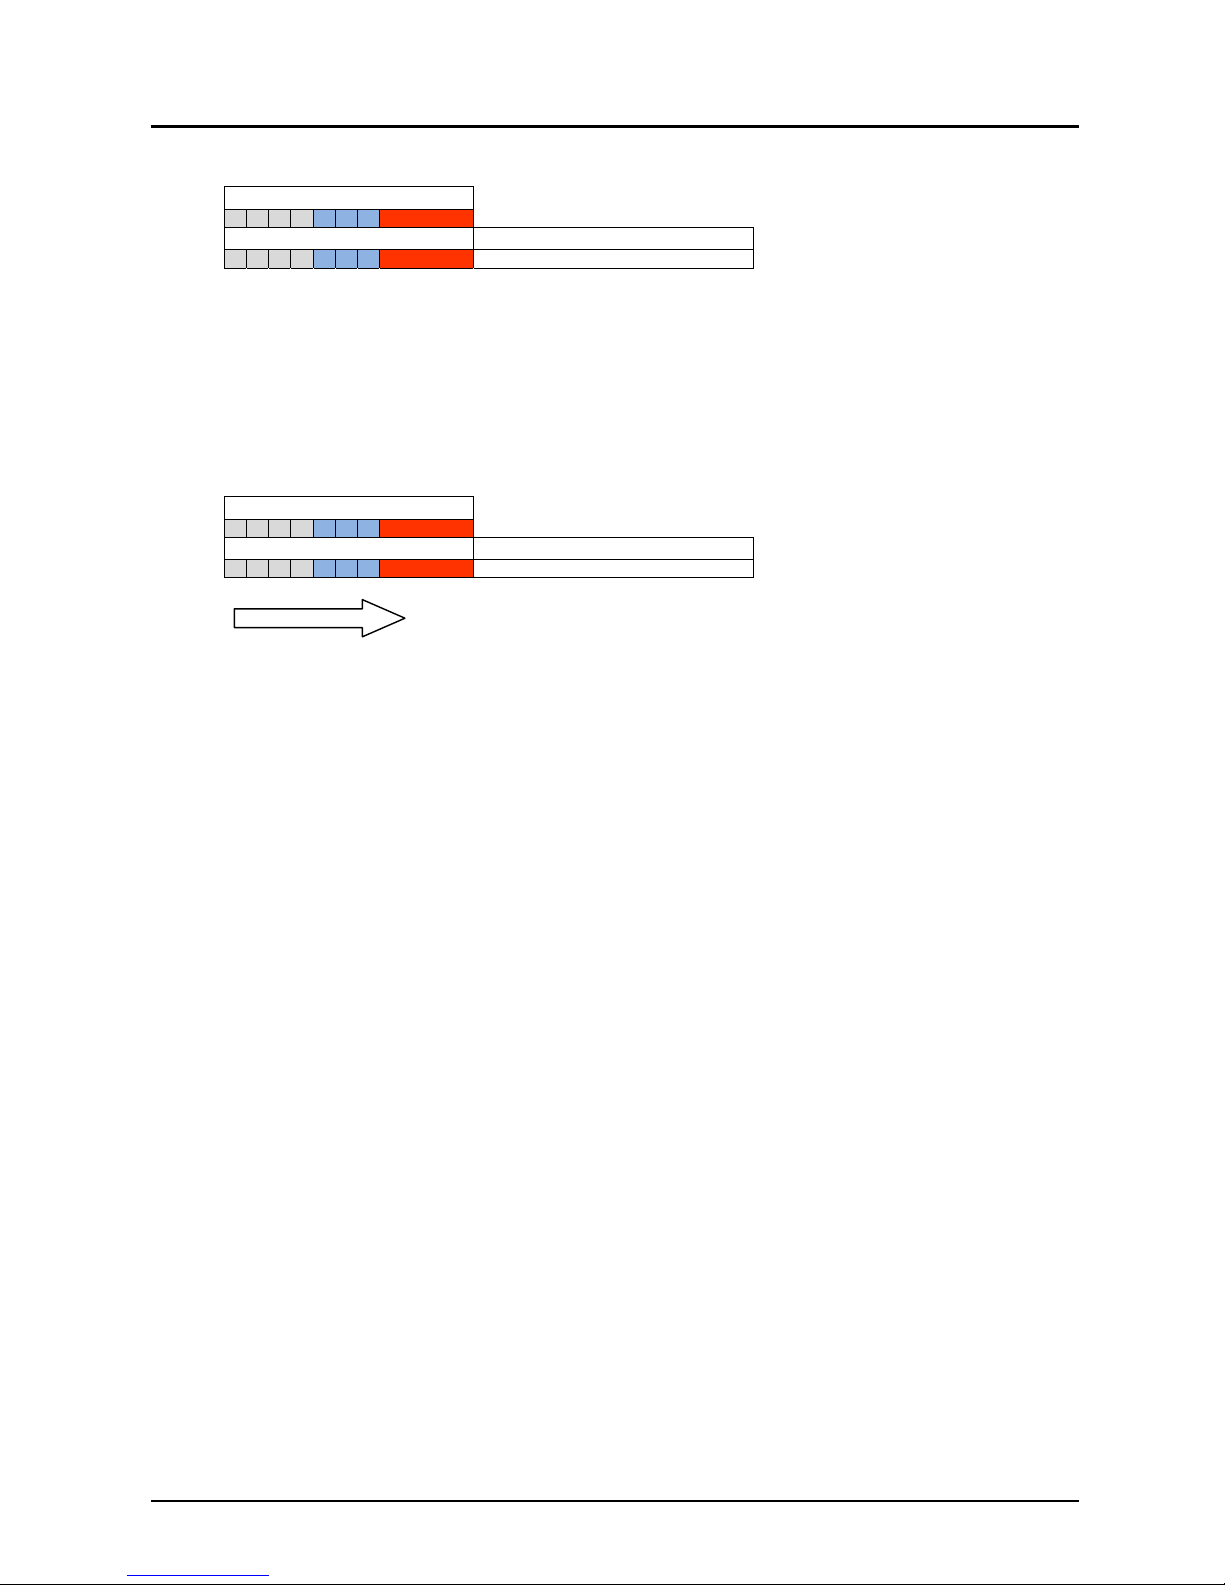
8.3.1 lower range value [4MA]; span 0%
set the DIP switch positions to the 0/1 sequence in Fig.15on the left; start
from position 8 and move towards position 1!
lower the liquid inside the tank down to the level where you want to
position the lower range value [4mA]; span 0%.
It is recommended that the lower range value stays within the measuring
range [M]
press the push button
LED will remain green briefly while the lower range value setting is being
executed
once it has been executed successfully, the LED will return to blinking
alternately green and red
DIP switch Position
1 2 3 4 5 6 7
8
DIP switch settings description
0 0 0 1 0 0 1
1 lower range value [4mA]; span 0%
Figure 15: lower range value [4mA]; span 0%
8.3.2 upper range value [20MA]; span 100%
raise the liquid inside the tank up to the level where you want to position
the upper range value [20mA]; span 100%.
It is recommended that the upper range value stays within the measuring
range [M]
change DIP switch position 3 to on/1
change DIP switch position 4 to off/0.
press the push button
LED will remain green briefly while the upper range value setting is being
executed
once it has been executed successfully, the LED will return to blinking
alternately green and red
set all the DIP switch positions to 0 as indicated in Fig.17on the left; start
from position 1 and move towards position 8!
the LED will change to blinking green
Page 18
NGM
page 18 NGM K09/0717
DIP switch Position
1 2 3 4 5 6 7 8
DIP switch settings description
0 0 1 0 0 0 1 1 upper range value [20mA]; span 100%
Figure 16: upper range value [20mA]; span 100%
Tighten the housing cover properly by turning it clockwise; make sure the cover
safety chain does not tangle up. If desired, tighten the cover locking screw with
an allen key size 1,5mm.
DIP switch Position
1
2 3 4 5 6 7 8
DIP switch settings description
0 0 0 0 0 0 0 0 measuring mode
Figure 17: measuring mode
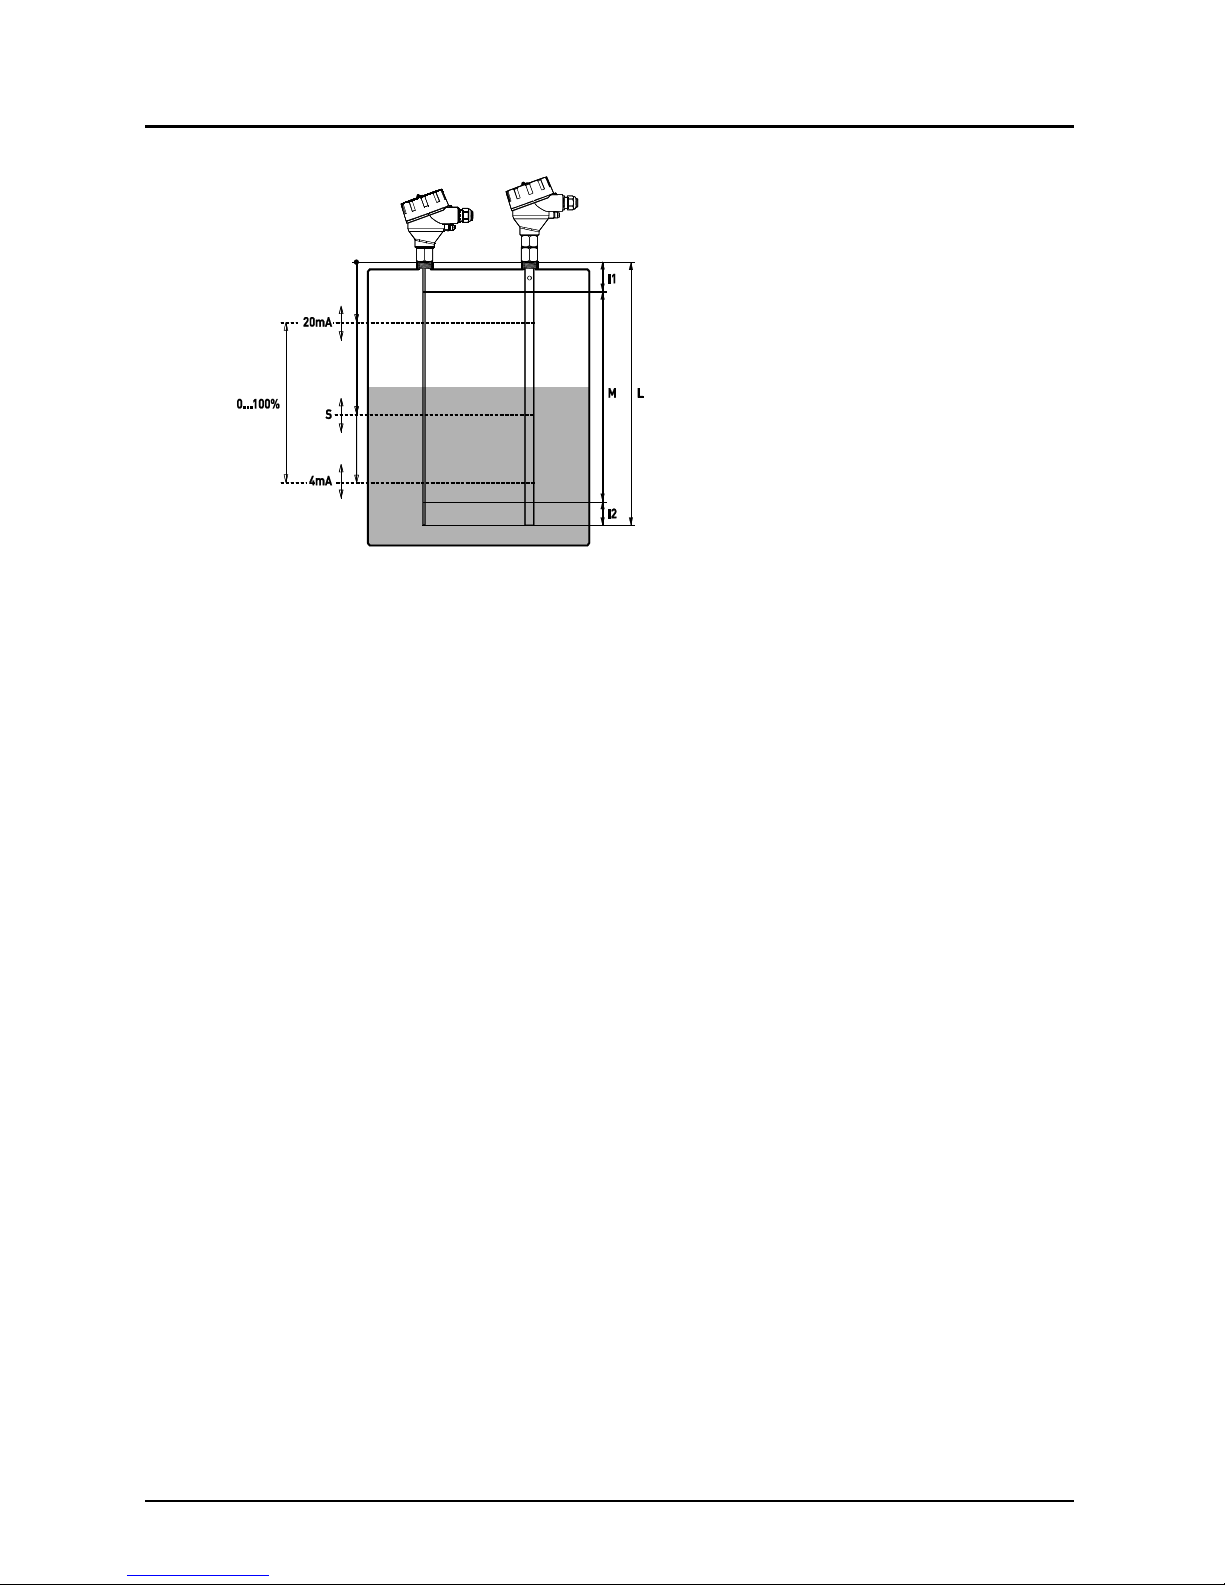
8.4 probe length and measuring range
The reference point for definition of the probe length [L] is always the shoulder of
the connection thread. The probe length [L] is an important mechanical dimension
which is needed to make sure the probe physically fits into the tank at the
anticipated mounting location; it is not equal to the actual measuring range [M] of
the sensor!
TDR level sensors have small inactive areas at top [I1] and bottom [I2] of the
probe. Those are due to the presence of unavoidable signal disturbances at both
ends of the probe. In these inactive areas the measurements are non-linear or
have reduced accuracy. Therefore, it is not recommended to actually measure
level within those inactive areas. Their length depends on the probe type and the
reflectivity (i.e. dielectric constant) of the liquid to be measured.
The measuring range [M] of NGM extends between the top and bottom inactive
areas of the probe; this is the area in which NGM will have the specified
measurement performance. It is recommended that the maximum and minimum
liquid levels to be measured in the tank are actually within the measuring range
[M] of the sensor. The span between the lower range value [4mA] and the upper
range value [20mA] of the analog current output is equal to 0...100% of your
continuous level measurement reading. It is recommended that the span between
those two range values stays within the measuring range [M].
Page 19
NGM
NGM K09/0717 page 19
Figure 18: probe length and measuring range
8.5 disturbance signal scan
The disturbance signal scan is a powerful disturbance signal suppression feature
of NGM. The sensorscans its entire probe length for any disturbance signals in
the application that could potentially be misinterpreted as level readings,
memorizes and suppresses them during operation; that way NGM only
recognizes the actual level signals caused by the liquid to be measured.
The disturbance signal scan is intended for the single rod probe, since its signal
has a wider detection radius around the rod, making it more responsive for
measurement signal disturbances.
The disturbance signal scan works most efficiently on stationary interference
targets like tall and narrow nozzles or close-by objects. Thus, NGM has to be
mounted in its final position and the tank has to be completely empty in order to
perform a disturbance signal scan; that will ensure a reliable identification of the
actual disturbance signals only. In case that non-stationary interference targets
close to the single rod probe, like slowly rotating agitator blades or streams of
liquid being filled into the tank, cause problems with the measurement, it is
recommended to use the coaxial probe.
Performing a disturbance signal scan is the prerequisite for utilizing this feature of
NGM.
Page 20

NGM
page 20 NGM K09/0717
8.6 Guide to communicating from a PC to a NGM probe
(Configuration of device specific parameters)
8.6.1 Communication with NGM
Requirements:
- PC with Microsoft Office
- Excel file NGM Configuration Tool LA (HART) V172.xls (for serial no. below
335490 (non-Ex) and serial no. below E5048 (Ex))
- Excel file NGM Configuration Tool LA (HART) V175.xls (from serial no. 335490
(non-Ex) and serial no. E5048 (Ex))
This file enables the customer to configure measuring parameters, analogue
output, measuring length and probe/rope shortening/extending.
- HART Modem with USB connector
- Communication resistor approx. 250 Ohm
- NGM level probe
- Power supply 24VDC
Connection:
- Connect the NGM probe to the power supply
- The LED at the NGM must start to flash green
- Connect the resistor between + and – of the active 4…20mA output.
- Connect in parallel the HART modem to the resistor and plug in the USB
connector to the PC
Page 21

NGM
NGM K09/0717 page 21
8.6.2 Connection of a NGM Probe to a PC
• Check the COM port assignment of the PC to the USB HART modem with the
Device Manager
http://www.computerhope.com/issues/ch000833.htm
* In this case COM port 4 has been assigned to the HART modem
Page 22

NGM
page 22 NGM K09/0717
8.6.3 First Steps with the Excel Tool
1. Open the Excel file
2. Prerequisite: worksheet is active and the macros are running
(Hint: A restart of the Excel file might help to activate the Macros.)
3. HOME
4. Enter the assigned COM port indicated at the device manager.
For the usage of the Excel tool, a click on the necessary cell activates the
communication and/or parameters can be changed. For re-sending the
command, click on a free cell elsewhere and move back to the required cell. The
OK status has to return for a successful communication.
Page 23

NGM
NGM K09/0717 page 23
BASIC CONFIGURATION
Establishing a HART communication:
• Serial number obtainable by clicking on the light blue SEND button J2 in step 1
“get serial number”
• Macros are running
• OK status (H2) disappears and reappears after serial number read out and
shown in G2
If OK status does not reappear, check the connection or the COM port settings
Now the HART communication is established and the modification of devicespecific parameter as well as the read-out of the echo curve can be performed.
Page 24

NGM
page 24 NGM K09/0717
8.6.4 Upper / Lower Range Value
BASIC CONFIGURATION
• Read out actual 4…20mA settings by clicking on I6 and I7
With the command “get lower / upper range value”, the actual 4…20mA values in mm are shown
after the OK status disappeared and is visible again.
• Change actual 4…20mA settings by changing the values in G4 and G5 and
clicking on I4 and I5 “set lower / upper range value”
• Verify changes by clicking again on I6 and I7 “get lower / upper range value”
Reference point = 0mm
Page 25

NGM
NGM K09/0717 page 25
8.6.5 Response Time
BASIC CONFIGURATION
• Read out actual response time, by clicking on I9.
Field G9 is showing the actual response time multiplied with 0,1ms.
• Change actual response time within a range of 2 … 100 (0,2 … 10sec) in field
G8 and clicking on I8 “set response time”.
Use high response times for storage tanks with slow level movements. Use low response times
for buffer and process tanks.
Verify changes by clicking again on I9 “get response time”
Page 26

NGM
page 26 NGM K09/0717
8.6.6 Switching Output Mode
BASIC CONFIGURATION
• Read out actual switching output mode by clicking on I11
Field G11 is showing the actual switching output mode.
0 = nc = normally closed
1 = no = normally open
Once the probe is powered, the switch output can be open or closed. The standard switch output
mode is set to “normally closed”, as it would open at a power failure for highest safety.
• Change actual switching output mode 0 or 1 in field G10 and clicking on I10 “set
switching output mode”
Verify changes by clicking again on I11 “get switching output mode”
Page 27

NGM
NGM K09/0717 page 27
8.6.7 Threshold switching output
BASIC CONFIGURATION
• Read out actual lower / upper threshold switching output, by clicking on I13 and
I15.
Field G13/15 indicates the actual lower / upper switching threshold.
With the help of the thresholds, a hysteresis can be programmed to avoid output switching at
turbulent levels. First, the upper threshold must be passed to activate the output then the lower
threshold for deactivation of the output.
• Change actual lower / upper threshold in field G12 / G14 and click on I12 / I14
“set lower / upper threshold switching output mode”.
Verify changes by clicking again on I13 / I15 “get lower /
upper threshold switching output”
Page 28

NGM
page 28 NGM K09/0717
8.6.8 Upper Dead Band
BASIC CONFIGURATION
• Read out actual upper dead band, by clicking on I17.
Field G17 indicates the actual upper dead band.
With the upper dead band, noisy signals or ringing caused by the installation can be blocked.
Increase the value for cutting signals left to the dead band, whose position is indicated by a green
line. Any signal left to the green line will not be analyzed by the software. Entered values are in
mm and are visible at the echo curve.
• Change actual upper dead band in field G16 and click on I16 “set upper dead
band”.
Verify changes by clicking again on I17 “get upper dead band”
Page 29

NGM
NGM K09/0717 page 29
8.6.9 Amplitude threshold
BASIC CONFIGURATION
• Read out actual amplitude threshold, by clicking on I19
Field G19 indicates the actual amplitude threshold. Dynamic noise or ringing can be blocked if it
is within the amplitude threshold band. The level reflection should be always 1/3 bigger than the
width of the amplitude threshold band.
• Change actual amplitude threshold in field G18 and click on I18 “set amplitude
threshold”.
Verify changes by clicking again on I19 “get amplitude threshold”
Page 30

NGM
page 30 NGM K09/0717
8.6.10 Disturbance Signal Scan Status
BASIC CONFIGURATION
• Read out actual disturbance signal scan status by clicking on I21
Field G21 indicates the actual disturbance scan signal status.
00=off, raw echo curve
01=disturbance signal active on top
10=disturbance signal active on top and bottom
• Change actual disturbance signal scan status in field G20 and click on I20 “set
disturbance signal scan status”
• Once changing it to “10” or “01” a disturbance signal scan must be performed
with I22.
Verify changes by clicking again on I21 “get disturbance signal scan status”
Page 31

NGM
NGM K09/0717 page 31
8.6.11 Probe Type
BASIC CONFIGURATION
• Read out actual probe type status, by clicking on I24.
Field G24 indicates the actual probe type status.
0= coaxial probe
1= single probe rod or rope
Thresholds are adapted automatically by changing this parameter.
• Change actual probe type in field G23 and click on I23 “set probe type”.
Verify changes by clicking again on I24 “get probe type”
Page 32

NGM
page 32 NGM K09/0717
8.6.12 Probe Length
BASIC CONFIGURATION
• Read out actual probe length, by clicking on I26.
Field G26 indicates the actual probe length in mm.
• Change actual probe length in field G25 and click on I25 “set probe length”.
Verify changes by clicking again on I26 “get probe length”
Page 33

NGM
NGM K09/0717 page 33
8.6.13 Set Delivery Configuration
BASIC CONFIGURATION
• Set actual parameters as delivery configuration by clicking on I27
Former delivery configuration parameters will be overwritten!
No reset to factory conditions is possible anymore.
UNDO NOT POSSIBLE!
Page 34

NGM
page 34 NGM K09/0717
8.6.14 Reset to Delivery Configuration
BASIC CONFIGURATION
Reset unit back to delivery configuration, by clicking on I28.
4…20mA, response time, switching mode and thresholds, upper dead band, amplitude threshold,
disturbance scan, probe type, and probe length will be set back to delivery configuration.
UNDO NOT POSSIBLE!
Page 35

NGM
NGM K09/0717 page 35
8.6.15 Level Reading
BASIC CONFIGURATION
• Get actual level reading, by clicking on I29.
If you do not measure the current output in series with a Multimeter, it is recommended to read
out the level 3 – 5 times to recognize potential current fluctuations.
If a fluctuating current can be observed, the amplitude threshold or dead band needs to be
adjusted.
Page 36

NGM
page 36 NGM K09/0717
8.6.16 Software Revision
BASIC CONFIGURATION
• Get actual software revision, by clicking on I30.
As of April 30, 2013, the actual software revision is V150.
For an upgrade please contact KOBOLD.
Page 37

NGM
NGM K09/0717 page 37
8.6.17 Device Status
BASIC CONFIGURATION
• Get actual devise status, by clicking on I31.
Important probe status information can be communicated.
Click on the small red upper right corner for more details.
Page 38

NGM
page 38 NGM K09/0717
8.6.18 Signal Data – Echo Curve
BASIC CONFIGURATION
• Acquire actual signal data or also called echo curve by clicking on I32
Once the OK status in field H32 does not disappear anymore, the echo curve can be visualized
by clicking on worksheet SIGNAL.
Reading out the echo curve from the electronics can take several seconds, as all data must be
communicated via the serial HART protocol to the PC.
Page 39

NGM
NGM K09/0717 page 39
8.6.19 Signal Range
BASIC CONFIGURATION
• Set signal range, by entering values in field G33/34 and clicking on I33/34
Depending on the probe length, the range within the echo curve in worksheet SIGNAL can be
adapted.
A negative X1 range of -1000 is always recommended and standard. With this the microwave
generation and coupling can be verified.
Page 40

NGM
page 40 NGM K09/0717
8.6.20 Signal
SIGNAL
• Visualization of the actual echo curve, where the level calculation is based on.
• The NGM gets 70 echo curves every second for calculating the level.
The most important parameters (4…20mA; dead band and amplitude threshold) are visualized.
With the arrows up/down, the amplitude threshold can be positioned properly on the average zero
line of the echo curve as a means to evaluate the correct value.
x-axis: length in mm
y-axis : voltage according to factory-specific scales
Page 41

NGM
NGM K09/0717 page 41
8.6.21 More Parameters…
ADVANCED CONFIGURATION
• Parameters within the worksheet ADVANCED CONFIGURATION are only
recommended to change by experts.
Page 42

NGM
page 42 NGM K09/0717
8.6.22 Signal Discussion 1
Empty Coaxial Probe
• Nice reference reflection at the beginning
• Perfect coupling into the coaxial probe
• Positive end of probe reflection which corresponds to the physical end of probe
Dead band parameter at 30mm.
20mA parameter at 50mm.
4mA parameter at 230mm.
Amplitude threshold at 1000.
Page 43

NGM
NGM K09/0717 page 43
8.6.23 Signal Discussion 2
Level Coaxial Probe
• Stable reference reflection at the beginning
• Negative level reflection at 168mm
• No end of probe reflection as energy is completely reflected at water surface
Dead band parameter at 30mm.
20mA parameter at 50mm.
4mA parameter at 230mm.
Amplitude threshold at 1000.
Page 44

NGM
page 44 NGM K09/0717
8.6.24 Signal Discussion 3
Empty Rod Probe
• Nice reference reflection at the beginning
• Strong positive impulse at the transition of coupling to the single rod
• Reflection can change with mounting conditions.
• Positive end of probe reflection which corresponds to the physical end of probe
Dead band parameter at 30mm.
20mA parameter at 50mm.
4mA parameter at 230mm.
Amplitude threshold at 1000.
Page 45

NGM
NGM K09/0717 page 45
8.6.25 Signal Discussion 4
Level Rod Probe
• Stable reference reflection at the beginning
• Negative level reflection at 168mm
• No end of probe reflection as energy is completely reflected at water surface
• Positive coupling reflection in saturation as amplification factor increased
Dead band parameter at 30mm.
20mA parameter at 50mm.
4mA parameter at 230mm.
Amplitude threshold at 1000.
Page 46

NGM
page 46 NGM K09/0717
9. Technical Information
Single rod Wire rope Coaxial
Probe diameter
6 mm 4 mm 17.2 mm
Max. Load
Lateral: 6 Nm = 0,2 kg at 3 m Tensile: 5 kN Lateral: 100 Nm = 4.67 kg at
6 m
Probe length L
100...3000 mm 1000...20,000 mm 100...6000 mm (standard)
100...1000 mm (high
temperature)
Dielectric Constant
(Ɛ
r
)
> 1.8 > 1.8 > 1.4
Viscosity (cP)
< 5000 < 5000 < 500
Medium temperature,
standard version
-40...+150°C (without
PTFE)
-15...+100°C (PTFE lining)
-40...+150°C -40...+130°C (EPDM O-ring)
-15...+150°C (FKM O-ring)
High temperature
version
-200...+250°C (NBR O-ring)
-150...+250°C (FKM O-ring)
Not available -200...+250°C (NBR O-ring)
-150...+250°C (FKM O-ring)
Materials exposed to
tank atmosphere
1.4571/316 Ti, PEEK
Standard version
PTFE, O-ring
(see order code),
(PTFE lining)
1.4571/316 Ti, PEEK,
PTFE
O-ring (see order code),
(high temperature version)
In all cases, in addition, a
Klinger SIL
®
C-4400 gasket
at connection thread, 2 mm
thick
1.4401/316, PEEK
In addition, a Klinger
SIL
®
C-4400 gasket
at connection thread,
2 mm thick
1.4404/316 L, PEEK, O-ring
(see order code),
(standard version)
1.4404/316 L, PEEK, PTFE,
O-ring (see order code),
(high temperature version)
In all cases, in addition, a
Klinger SIL
®
C-4400 gasket
at connection thread, 2 mm
thick
Measuring principle: Guided Wave Radar (GWR)
Installation position: Vertical
Ambient temperature: -25...+80°C
Storage temperature: -40...+85°C
Max. Pressure: -1...+40 bar (except NGM-19:0...4 bar)
Accuracy*: ±3 mm or 0.03 % of measured distance,
whichever is greater
Repeatability*: < 2 mm
Resolution*: < 1 mm
*Reference condition: Ɛr = 80, water, tank ø 1 m, DN200 metl flange
Velocity of level change: < 1000 mm/s
Medium conductivity: No restrictions
Medium density: No restrictions
Process connection: Thread or flange, see ordering code
Interface
(e.g. oil on top of water): An oil layer of < 70 mm thickness on top of water
is not detected by the sensor; in this case the sensor will detect only the water
level at a slightly lower position than actual.
From an oil layer thickness > 70 mm onwards, the sensor detects the total level,
including the oil layer, according to specifications.
Page 47

NGM
NGM K09/0717 page 47
Materials
Housing: Aluminium alloy, epoxy coated, with safety chain
and tin plated 1.4301/SS304 external earth
screw
Option: Stainless steel 1.4401/SS316
O-ring: NGM Rod/Rope: None
NGM Coaxial: FKM or EPDM
NGM high temperature: NBR or FKM
Weights
Housing incl. electronics: 720 g
Stainless steel housing
incl. electronics: 1340 g
Connection ¾ (Coaxial): 350 g
1 m Rod probe: 230 g
1 m Rope probe: 66 g + 380 g ballast weight
1 m Coaxial probe: 540 g + 130 g (attachment kit)
Cooling extension for high
temperature: 900 g
Electrical data
Supply voltage: 12...30 VDC (reverse-polarity protected < 50 mA)
4 wire-system
Output: 4...20 mA (programmable by HART®modem)
Total load: < 500 Ω + load resistance approx. 250 Ω
Response time: 0.5 s [default], 2 s, 5 s (selectable)
Temperature drift: < 0.2 mm/K change in ambient temperature
Switching output
DC PNP (active): NC [default] or NO (short-circuit protected)
Load current: < 200 mA
Signal voltage HIGH: Supply voltage – 2 V
Signal voltage LOW: 0 V...1 V
Response time: < 100 ms
Current consumption: < 50 MA at 24 V
DC
(no burden)
Start-up time: < 6 s
Cable terminals: Clamp terminal block for cable 0.5...2 mm
2
Cable entry: 2 x M20 x 1.5
Protection: IP68
Page 48

NGM
page 48 NGM K09/0717
10. Order Codes
Ordering Data (Example: NGM-1200 G5 A40)
Model Material
(Probe/O-ring)
Connection Output Option
NGM-1 Rod probe 200 = stainless steel,
PEEK/without O-ring
9005) = stainless
steel, PEEK/FKM
PTFE coating
G5 = G ¾ male
N5 = ¾ NPT male
F8 = DN40 / PN 40 B1,
1.4404/316L flange EN1092-1
F9 = DN 50 / PN 40 B1, 316L
flange EN1092-1
FB = DN 80 / PN 40 B1,
1.4404/316L flange EN1092-1
FC = DN 100 / PN16 B1,
1.4404/316L flange EN1092-1
A8 = 1 ½ʺ ASME B 16.5
CL 150, 1.4404/316L
A9 = 2ʺ ASME B 16.5
CL 150, 1.4404/316L
AA = 2½ ʺ ASME B 16.5
CL 150, 1.4404/316L
AB = 3ʺ ASME B 16.5
CL 150, 1.4404/316L
AC = 4ʺ ASME B 16.5 CL 150,
1.4404/316L
XX = special (please specify in
clear text)
A4 = 4…20 mA,
PNP
E4
4)
= 4…20 mA,
PNP, ATEXversion
00 = without
B3
1)
= mounted in Bypass
with DIN-flange DN10
B41) = mounted in Bypass
with DIN-flange DN15
B51) = mounted in Bypass
with DIN-flange DN20
B61) = mounted in Bypass
with DIN-flange DN25
BB1) = mounted in Bypass
with ANSI-flange ½“
BC1) = mounted in Bypass
with ANSI-flange ¾“
BD1) = mounted in Bypass
with ANSI-flange 1“
S12) = mount. in stilling well
DIN-flange DN40/PN40
S22) = mount. in stilling well
DIN-flange DN50/PN40
S32) = mount. in stilling well
DIN-flange DN80/PN40
S42) = mount. in stilling well
DIN-flange DN100/PN16
SA2) = mount. in stilling
well ANSI-flange 1½“
150 lbs
SB
2)
= mount. in stilling
well ANSI-flange 2“ 150 lbs
SC2) = mount. in stilling
well ANSI-flange 2½“
150 lbs
SD
2)
= mount. in stilling
well ANSI-flange 3“ 150 lbs
SE2) = mount. in stilling
well ANSI-flange 4“ 150 lbs
K0
3)
= mounted in bypass
with roller/ball display
YY = special
NGM-8 Rod probe,
high
temperature
210 = stainless steel,
PEEK/NBR
220 = stainless steel,
PEEK/FKM
NGM-2 Coaxial
probe
230 = stainless steel,
PEEK/EPDM
220 = stainless steel,
PEEK/FKM
NGM-9 Coaxial
probe, high
temperature
210 = stainless steel,
PEEK/NBR
220 = stainless steel,
PEEK/FKM
NGM-4 Wire rope
ø 4 mm
(liquids and
light solids
only)
200 = stainless steel,
PEEK/without O-ring
1)
Bypass specification, see NBK-M data sheet
2)
Please specify probe length L and stilling well length (when different from standard, see drawing
dimensions) in clear text while ordering
3)
Bypass specification, see NBK data sheet. Max. possible measuring length ML = 5500 mm. Not possible
with NGM-2/-9/-4. Max. medium viscosity 500 cP.
4)
Not possible with NGM-19..., NGM-8..., and NGM-9
5)
Not possible for flange sizes <DN50/PN40 and <2½” ASME CL 150
Note: Please specify probe length L in clear text while ordering
Page 49

NGM
NGM K09/0717 page 49
11. Dimensions
Dimensions in mm
NGM-12.../NGM-42...with flange connection
Single rod version Wire rope version
NGM-12.../NGM-42...with thread connection
Single rod/wire rope probe
Standard application temperature
Page 50

NGM
page 50 NGM K09/0717
NGM-22 with thread connection NGM-22…with flange connection
Coaxial probe
Standard application temperature
NGM-19…with flange connection
Single rod probe, PTFE coated
Flange disk
NGM-19…with thread connection
Single rod probe, PTFE coated
Connection thread
Page 51

NGM
NGM K09/0717 page 51
NGM-8…/NGM-9…with thread connection
(high temperature version)
Single rod/coaxial probe
Extended application temperature
NGM assembled in a bypass tube option B
NBK-M
Bottom cover with G¼ (DIN flanges) or ¼“ NPT (ASME flanges)
drain plug or optional needle valve
measurin
g
len
g
th ML
Page 52

NGM
page 52 NGM K09/0717
Connectio
n
Flange „X“ ø
F8
DN40/PN40 18 15
0
F9
DN50/PN40 20 16
5
FB
DN80/PN40 24 20
0
FC
DN100/PN16 20 22
0
A8
1½“/CL 150 17.9 12
5
A9
2“/CL 150 19.5 15
0
AA
2½“/CL 150 22.7 18
0
AB
3“/CL 150 24.3 19
0
AC
4“/CL 150 24.3 21
5
NGM with „Top Mounting in Stilling Well“ option S
NGM assembled in a bypass tube with roller/ball display
(redundant measurement) option K
measuring length ML
Page 53

NGM
NGM K09/0717 page 53
12. Safety Instructions for Ex-Versions Model NGM
NGM
4-wire TDR-Sensor with single rod or coaxial probe for continuous level
measurement and point level detection in liquids, with analog and switching
output.
DOCUMENT DESCRIPTION
These safety instructions are part of the NGM Quick Installation Guide and give
instructions regarding to proper installation and operation of NGM in hazardous
areas.
GENERAL DESCRIPTION
NGM is suitable for applications with hazardous gas or dust atmospheres, for
applications requiring instruments of category 1/2G, 1/2D or 2G, 2D. If NGM is
installed and operated in hazardous areas, the general hazardous area
installation regulations IEC 60079-14, all relevant national, regional and local
regulations and standards, as well as these safety instructions must be observed.
The installation of electrical equipment in hazardous areas must always be
carried out by qualified personnel.
APPROVAL DETAILS
0158 SEV 13 ATEX 0108 X
II 1/2G Ex ia/db IIC T6 Ga/Gb
II 1/2D Ex ia/tb IIIC T86°C IP68 Da/Db
II 2G Ex ia db IIC T6 Gb
II 2D Ex ia tb IIIC T86°C IP68 Db
SENSOR COMPONENTS
NGM consists of three major components: housing, feedthrough, and probe. The
only components that are exposed to the atmosphere inside the tank are probe
and the part of the feedthrough below the hexagon. NGM has a flameproof metal
housing that contains the sensor s electronics and input/output terminals and has
no contact to the atmosphere inside the tank. For hazardous applications that
require category 1/2G, 1/2D devices, the housing is installed in hazardous areas
requiring devices of category 2G, 2D (zone 1, zone 21). The feedthrough of the
sensor (acting as separation barrier between zones 0/1, zone 20/21) is installed
in the wall which separates areas requiring devices of category 2G, 2D from 1G,
1D. The probe is installed in hazardous areas requiring devices of category 1G,
1D (zone 0, zone 20). For hazardous applications that require category 2G, 2D
devices, all components of NGM are installed in hazardous areas requiring
devices of category 2G, 2D (zone 1, zone 21).
Page 54

NGM
page 54 NGM K09/0717
MOUNTING
NGM is mounted vertically to the tank via its connection thread, which is screwed
directly into a standard threaded tank connection, i.e. weld-in socket, or it can be
screwed into a flange, which is then connected to a tank nozzle. NGM should not
be welded directly into the tank. Neither should flanges be welded onto NGM.
Welding on the metal parts of NGM will cause serious damage to the sensor. Do
not lift or handle NGM by its probe; this can cause excessive stress on the probe
connection. NGM should be handled by the hexagon or the lower section of the
housing. Do not screw in NGM by its housing; it should be tightened only via its
hexagon (wrench size 32mm for connection thread G3/4A). Tighten the coaxial
probe only at its lower hexagon; the upper hexagon of the coaxial probe is not
needed for mounting. The customer has to ensure suitability of all materials
exposed to the tank atmosphere as well as proper sealing of the sensor
connection; based on his process conditions like temperature, pressure and
resistance against his process liquids and atmosphere. G thread connections
require a suitable gasket for pressure-tight joints. The G3/4A connection thread of
NGM is supplied with a gasket made of Klingersil C-4400, thickness 2mm. The
suggested tightening torque for this thread size, this type of gasket, and a
process pressure of max. 40bar is 25Nm (maximum permissible torque: 45 Nm).
For NPT thread connections, pressure-tight joints require a sealant directly on the
threads.
Page 55

NGM
NGM K09/0717 page 55
MOUNTING CONSIDERATIONS
The probes should be installed so that they are not directly impacted by liquids
flowing out of the filling inlet. They should neither touch nor sway towards other
objects inside the tank or the tank/nozzle walls; e.g. by agitator swirls. In
applications with very strong fluid movements, which can also cause excessive
lateral force on the probe, it is recommended to fix the probe. The anchoring
fixtures are customer supplied.
The customer is not permitted to disassemble the feedthrough from the housing
or perform any mechanical repairs/alterations on either the feedthrough or the
enclosure. If the NGM requires service or repair, please contact Kobold.
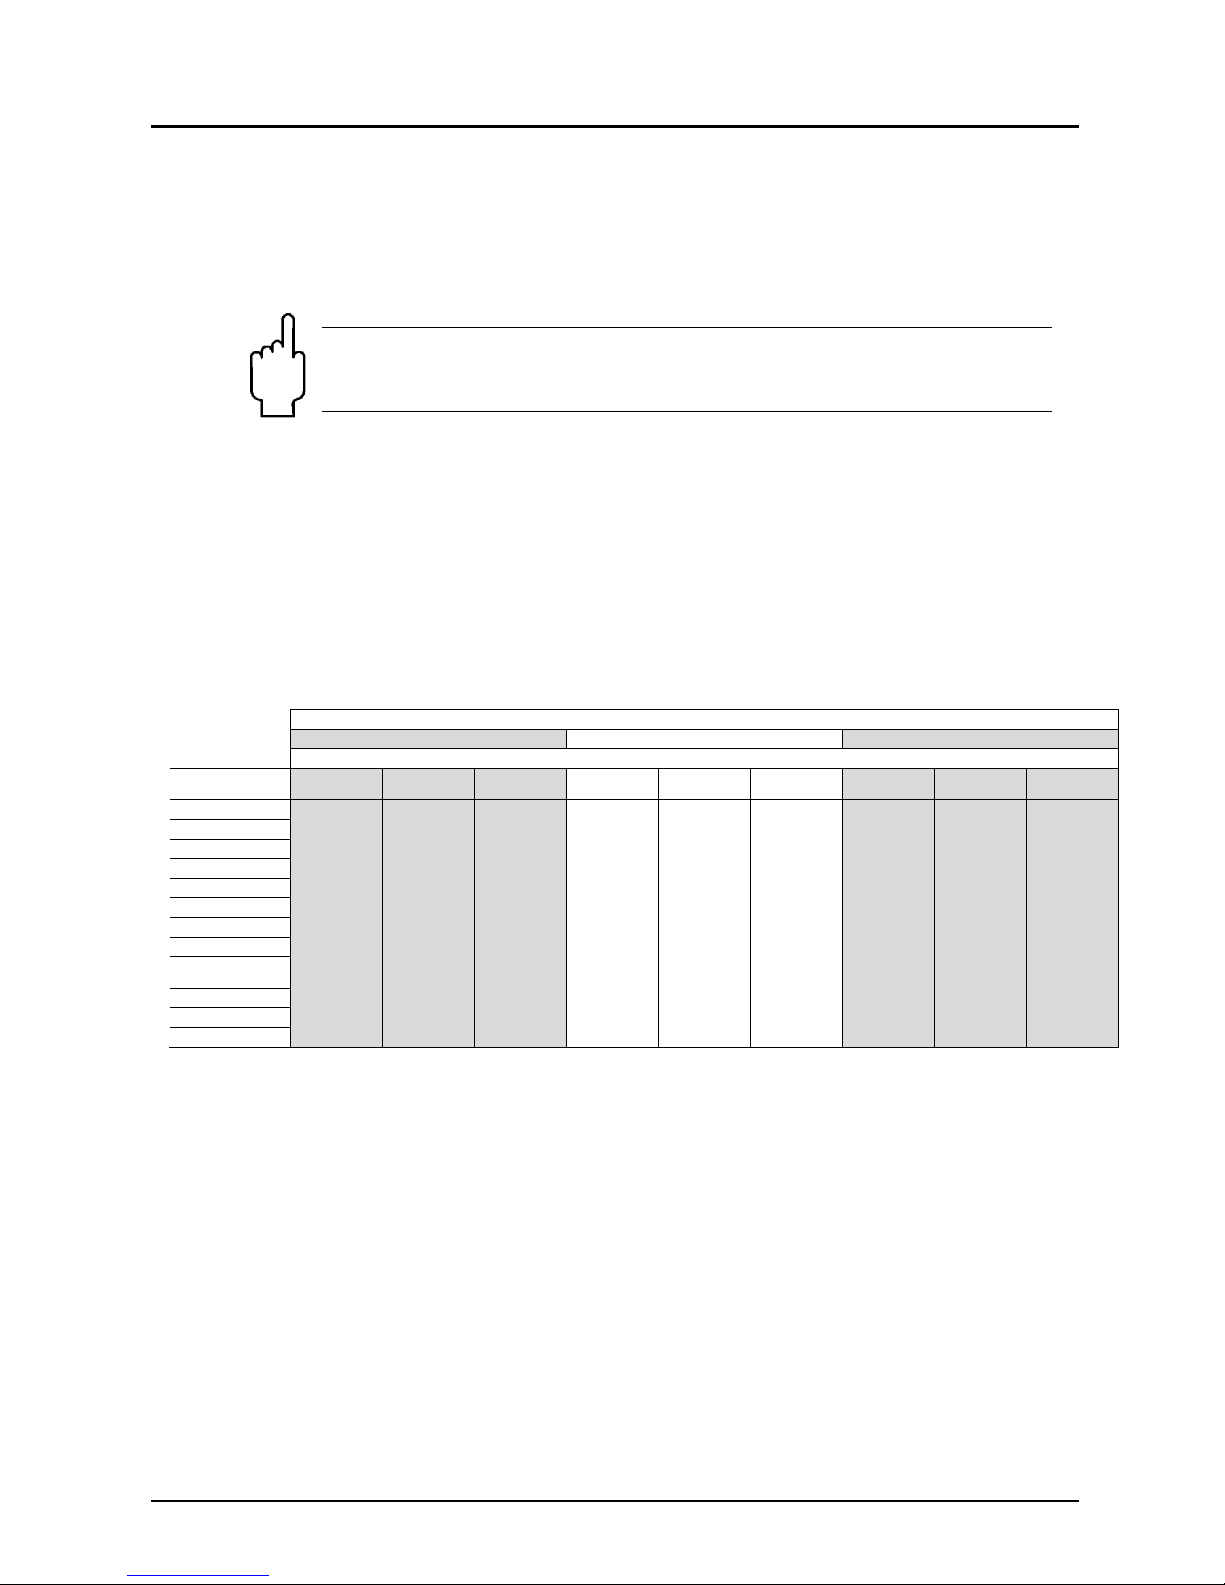
TEMPERATURE CLASSES
For applications in hazardous gas atmospheres, the maximum permissible
application and ambient temperatures, depending on the temperature classes,
are specified in figure 3. For applications in hazardous dust atmospheres, the
maximum permissible surface temperature is +86°C and the ambient temperature
range is -40 +70°C. For hazardous areas that require category 1/2G devices, the
application pressure must be between 0,8 1,1 bar. If NGM is operated at
temperatures higher than those specified in figure 3, please make sure through
appropriate measures that there is no danger of ignition from the hot surfaces.
The maximum permissible ambient temperature should not exceed the values
specified in figure 3. For application conditions in non-hazardous area, please
refer to the data sheet.
Page 56

NGM
page 56 NGM K09/0717
ELECTRICAL DATA
Supply voltage (terminals 1+2): U = 12 30V DC
Um = 250V AC
Analog output (terminals 3+4): I = 4 20mA
Um = 250V AC
Switching output (terminals 5+6): Us = 0 U
Um = 250V AC
CABLE ENTRIES AND CABLE GLANDS
The housing has two cable entries. For installation in hazardous areas, only
cable glands certified according to IEC 60079-1 or certified conduit systems
are permitted. The tightening torque specified by the manufacturer of the
certified cable glands or conduit systems has to be observed. The torque
mentioned on the sensor electronic only applies to standard cable
glands/conduits, which are not permitted for installation in hazardous areas. Both
cable entries can be fitted with cable glands/conduits. If only one cable
gland/conduit is fitted, it is recommended to use cable entry D2 (see Fig. 5).
Page 57

NGM
NGM K09/0717 page 57
Then cable entry D3 has to be sealed with a certified screw plug. The cable
entries have to be properly sealed and cable glands have to be properly tightened
around cable of suitable type and diameter to ensure the IP68 rating of the
housing. The seals for mounting the cable glands/conduits, the cable
glands/conduits themselves and the cable used for wiring have to be rated
for a temperature of +86 °C. When wiring with shielded or armoured cable,
suitable cable glands have to be used. The contact between the metal housing
and the shielding of the cable is made by using a suitable EMC-type cable gland.
Ground the shielding of the cable only on the sensor side; not on the supply side.
WIRING
Before opening the housing cover for any reason, verify that the power
supply for the sensor has been switched off for at least 6 minutes or no
explosive atmosphere is present. After wiring NGM, tighten the housing cover
properly by turning it clockwise (make sure the cover safety chain does not tangle
up) and properly tighten the cover locking screw with an allen key size 1,5mm
(see Fig. 5). Only when the cover is tightened and secured it is permitted to
power up NGM. The housing cover of NGM features a thread acting as a
flameproof gap and a caution message; it must not be exchanged for any other
cover. Establish an equipotential connection (potential equalization) between the
external earth terminal of NGM and the closest ground potential terminal of the
tank.
Page 58

NGM
page 58 NGM K09/0717
Page 59

NGM
NGM K09/0717 page 59
13. EU Declaration of Conformance
We, KOBOLD Messring GmbH, Hofheim-Ts, Germany, declare under our sole
responsibility that the product:
Guided Wave Radar Level Model: NGM
to which this declaration relates is in conformity with the standards noted below:
EN 61326-1:2013 Electrical equipment for measurement, control and
laboratory use - EMC requirements - Part 1: General requirements
Also the following EC guidelines are fulfilled:
2014/30/EU EMC Directive
2011/65/EU RoHS
2014/34/EU
Equipment and Protective systems intended for
use in potentially Explosive Atmospheres
Quality Management Production
Certificate number: DMT 03 ATEX ZQS / E 110
Notified body: Deutsche Montan Technologie
Identification number: 0158
Hofheim, 21. March 2017
H. Peters M. Wenzel
General Manager Proxy Holder
Page 60

NGM
page 60 NGM K09/0717
14. ATEX Certificate
Page 61

NGM
NGM K09/0717 page 61
Page 62

NGM
page 62 NGM K09/0717
 Loading...