

Page 1
Page 2
Welcome
Dear user, thanks for purchasing this product.
Much investment in time and effort has gone into its development,
and it is our hope that it will give you many years of trouble-free service.
Safety Notice
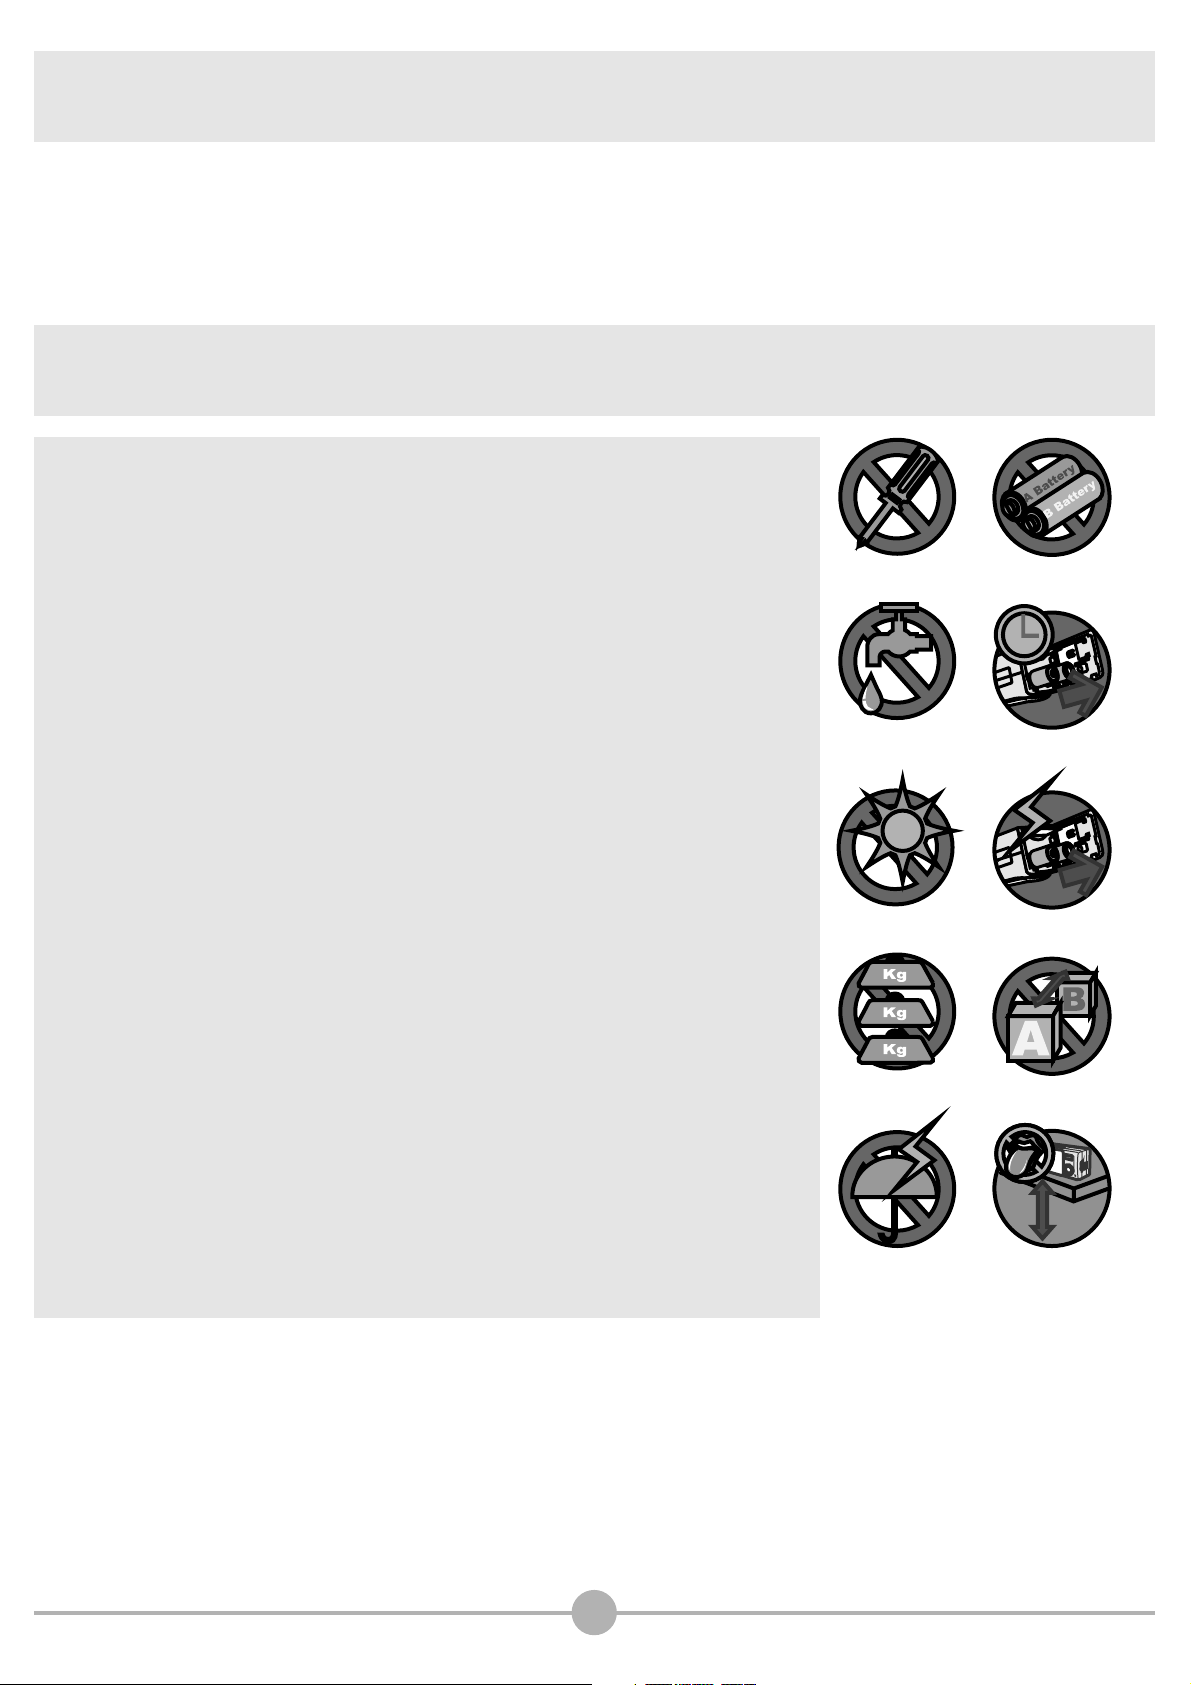
1. Do not drop, puncture or disassemble the camera; otherwise
the warranty will be voided.
2. Avoid all contact with water, and dry hands before using.
3. Do not expose the camera to high temperature or leave it in
direct sunlight. Doing so may damage the camera.
4. Use the camera with care. Avoid pressing hard on the camera
body.
5. For your own safety, avoid using the camera when there is a
storm or lightning.
6. Avoid using batteries of different brands or types at the same
time. This may lead to the potential for serious damage.
7. Remove batteries during long periods between usage, as
deteriorated batteries may affect the functionality of the
camera.
8. Remove batteries if they show signs of leaking or distortion.
9. Use only the accessories supplied by the manufacturer.
10. Keep the camera out of the reach of children.
01
Page 3

Table of Contents
Welcome
Safety Notice
Table of Contents
Camera Parts
Getting Started
Loading the batteries
Inserting the SD/MMC card (optional)
Attaching the wrist strap (optional)
How to hold your camera
How to open the connector cover
Using the tripod (optional)
Basic Operations
1
1
2
5
6
6
7
8
9
9
10
12
Turning on your camera
Turning off your camera
Setting the language
Recording a video clip
- How to record a video clip
- Setting the focus
- Zooming
- Selecting metering modes
Taking a still picture
- How to take a still picture
- Using flash strobe
- Zooming
- Selecting metering mode
Recording a voice clip
Playing back your recordings
12
12
13
14
14
15
15
16
17
17
18
18
18
19
20
- Full-screen view
- Thumbnail view
- Reviewing a still picture
- Playing back a video or audio clip
Switching on/off the OSD display
Connecting the camera to your TV
20
21
22
23
24
25
02
Page 4

Table of Contents
Advanced Operations
Menu access and operations
Digital Video Camcorder menu
- Changing the video resolution
- Adjusting exposure compensation
- Applying special effects to video clips
Digital Still Camera menu
- Changing picture resolution
- Using the self-timer
- Adjusting the white balance
- Adjusting exposure compensation
- Applying special effects to still pictures
- Using the date stamp
Playback menu
- Deleting files
- Viewing file information
- Locking files
- Sorting files
26
26
27
27
28
29
30
30
31
32
33
34
35
36
36
37
38
39
Playing MP3 music
- Copying MP3 files to the camera
- Playing MP3 files
MP3 menu
- Repeat playing
- Setting 3D enhancement
- Setting bass effect
- Viewing MP3 info
- Deleting MP3 files
- Holding button settings
Camera Settings
Switching to Settings mode
Setting the date and time
Setting the beep sound
40
40
41
42
42
43
44
45
46
47
48
48
48
49
Setting the flicker
Setting the TV system
Setting the language
49
50
50
03
Page 5

Table of Contents
Setting auto-off
Formatting media
Restoring default settings
Copying Files to Your PC
Installing MoviePix M-330 Manager on your PC
Connecting the camera to your PC
Copying files to the PC
Viewing/Playing files on your PC
File location
Using MoviePix M-330 Manager
Installing MoviePix M-330 Manager
Before starting the application
Starting the application
51
51
52
54
54
56
57
59
60
62
62
62
64
MoviePix M-330 Manager - File Management
- Picture Enhancement
- Downloading files to your PC
- Slide show
MoviePix M-330 Manager - PC Camera
- Recording an AVI movie
- Taking a snapshot
- Configuring Format options
- Configuring Properties options
- Configuring Flicker options
Addenda
Flicker Settings Table
LED Event Table
Storage Capacity Table
TV System Settings Table
65
66
66
66
67
68
68
68
69
69
70
70
70
71
71
Battery Life Table
System Message Table
Specificatoins
Troubleshooting
Troubleshooting on USB
72
73
74
75
78
04
Page 6
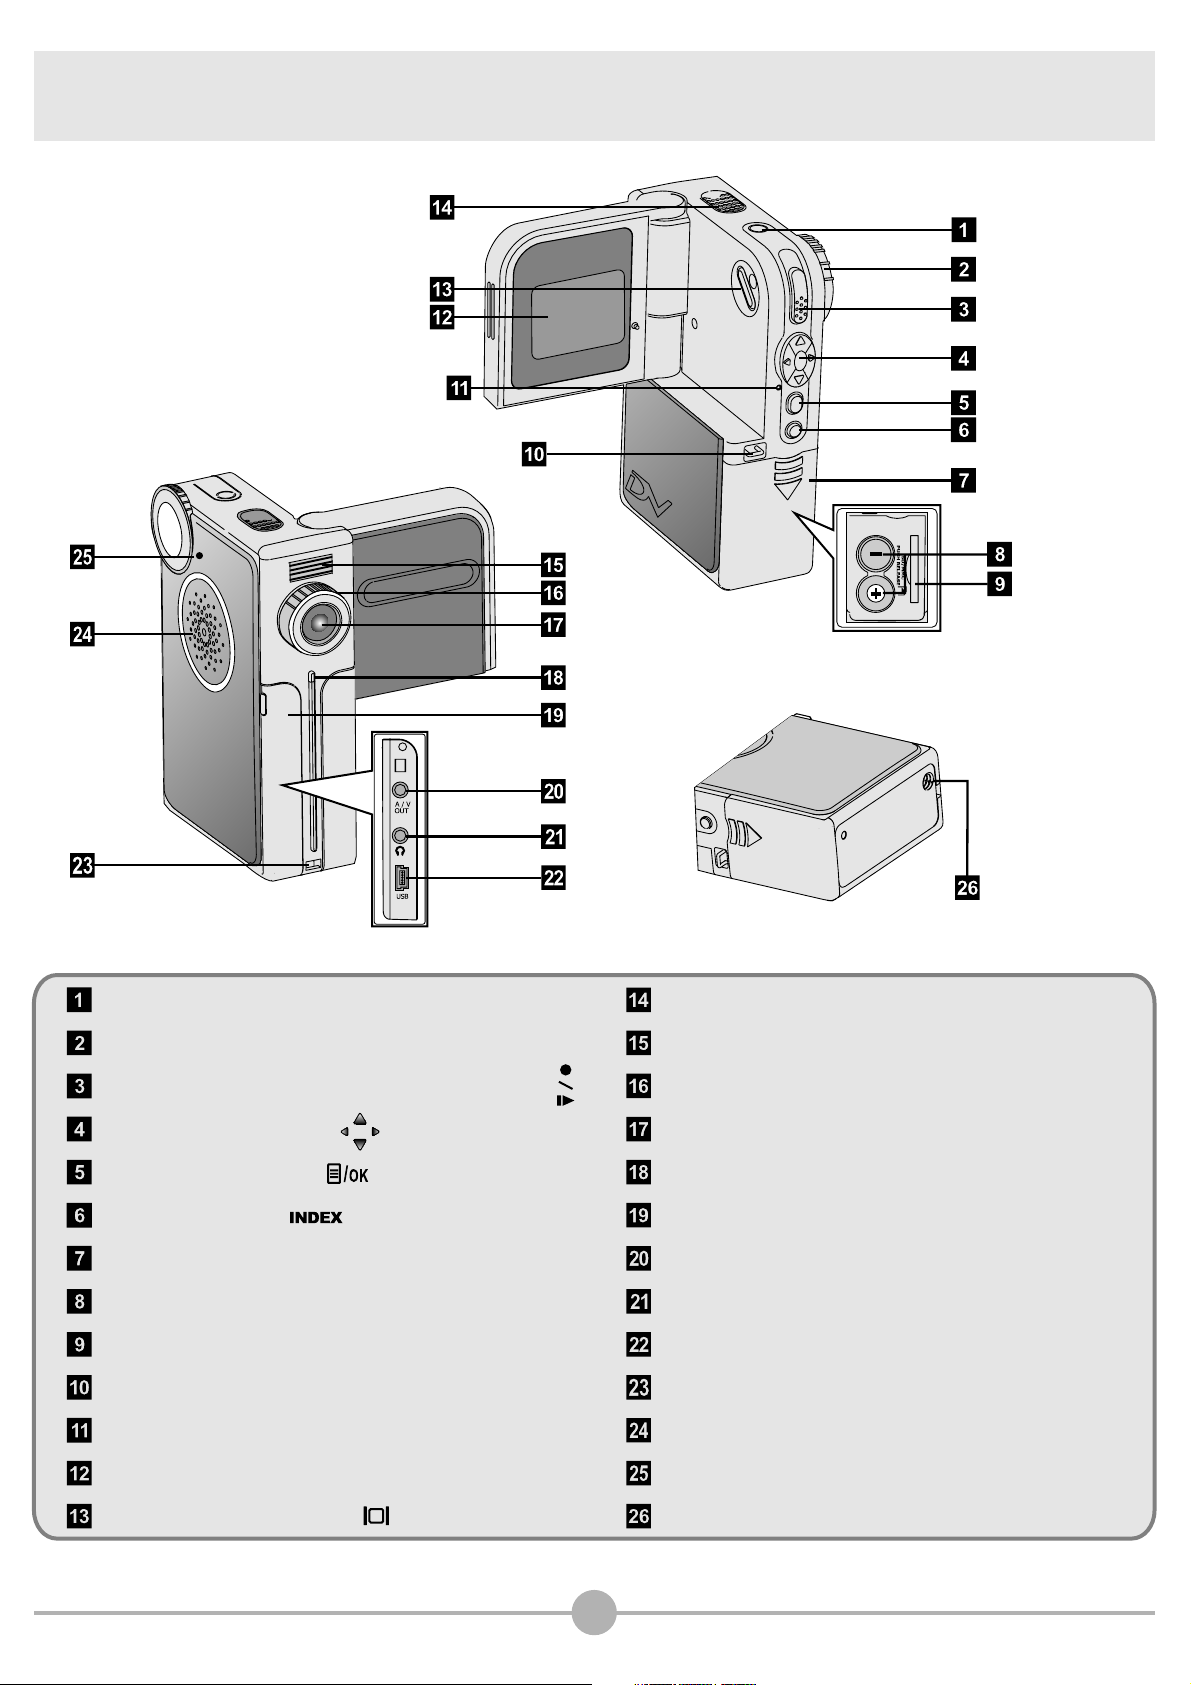
Camera Parts
Power button
Mode Dial
Record/Shutter/Play/Pause button ( )
Direction buttons ( )
Menu/OK button ( )
INDEX button ( )
Battery compartment cover
Battery compartment
Memory card slot
Strap hook (1)
Status LED
LCD panel
LCD display switch ( )
Microphone
Flash strobe
Focus switch
Lens
Self-timer LED
Connector cover
A/V out connector
Earphone connector
USB connector
Strap hook (2)
Speaker
Mode Dial pointer
Tripod socket
05
Page 7

Getting Started - Loading the batteries
Getting Started
Loading the batteries
1. Slide the battery compartment cover
open in the direction as indicated.
2. Place the batteries into the
compartment. Note that the positive(+)
㖀
㖅
㖃
㖃
㕸㕵㕼
㕴
㖂
㕟
㕽㕽㕳
㕵㕱
㖃
㕵
and negative(-) ends cannot be
reversed.
3. After the batteries are properly
installed, replace the battery
compartment cover.
-
+
㖀
㖅
㖃
㕸
㕴
㖂
㕟
㕵
㕽㕽㕳
㕼
㕵㖃
㕱
㖃
㕵
Do not use different types or brands of batteries at the same time.
Alkaline batteries or rechargeable NiMH batteries are recommended for high
performance.
06
Page 8
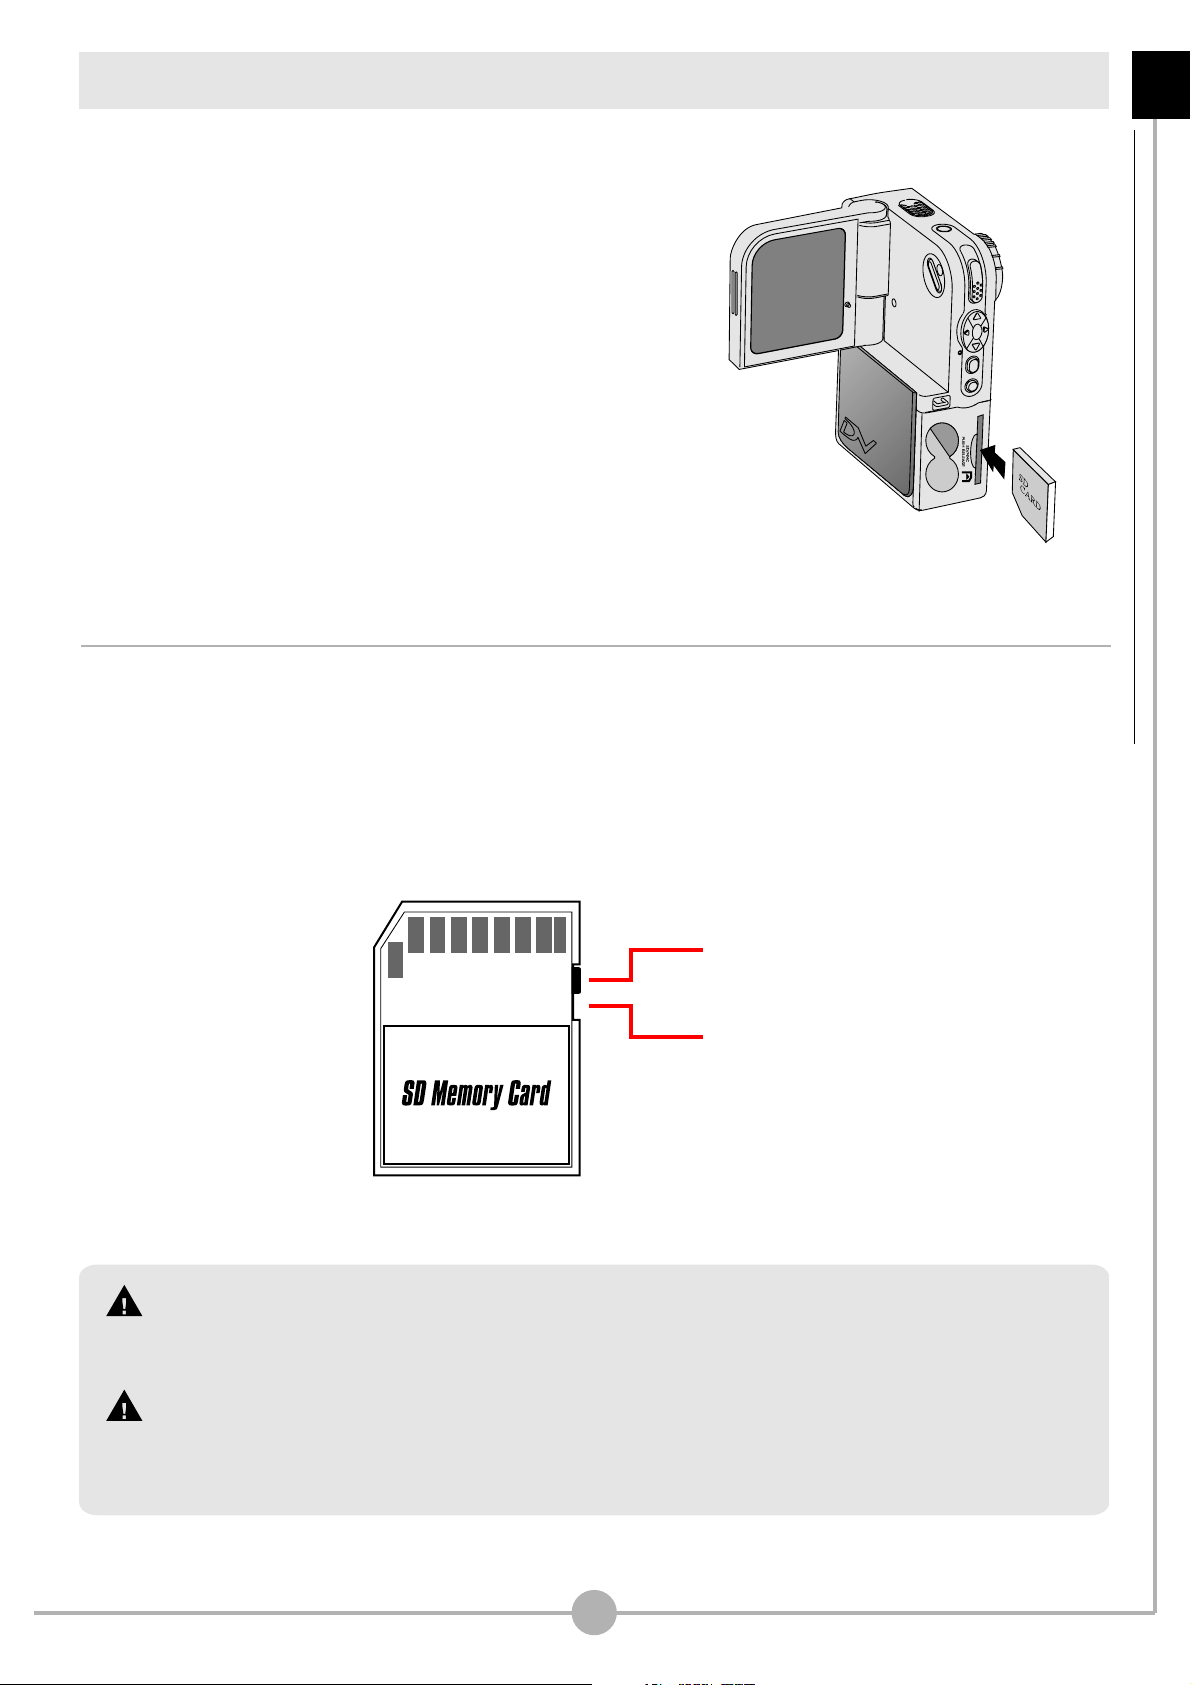
Inserting the SD/MMC card (optional)
In addition to 16MB (128Mbits) of built-in flash
memory, your camera can store data on a
Secure Digital (SD) card or a MultiMedia card
(MMC). The supported memory size ranges
from 8MB to 512MB.
To insert a SD/MMC card, gently push the card
as indicated until the card reaches the end of
the slot. To remove the card, first gently push
the card. After the card pops up, pull the card
out of the slot.
Getting Started - Inserting the SD/MMC card (optional)
The SD card comes with a write-protect switch. When the write-protect switch is
set to the Lock position, the card will become non-writable. To ensure that the
camera can operate normally, you should set the write-protect switch to the
Unlock position before inserting the SD card.
Unlock
Lock
Do not remove the SD/MMC card while the camera is processing data (when the LED
indicates red light).
When a SD/MMC card is inserted, the camera will use the card as the main storage
media. Files stored in the camera's built-in memory will become inaccessible until the
SD/MMC card is removed.
07
Page 9
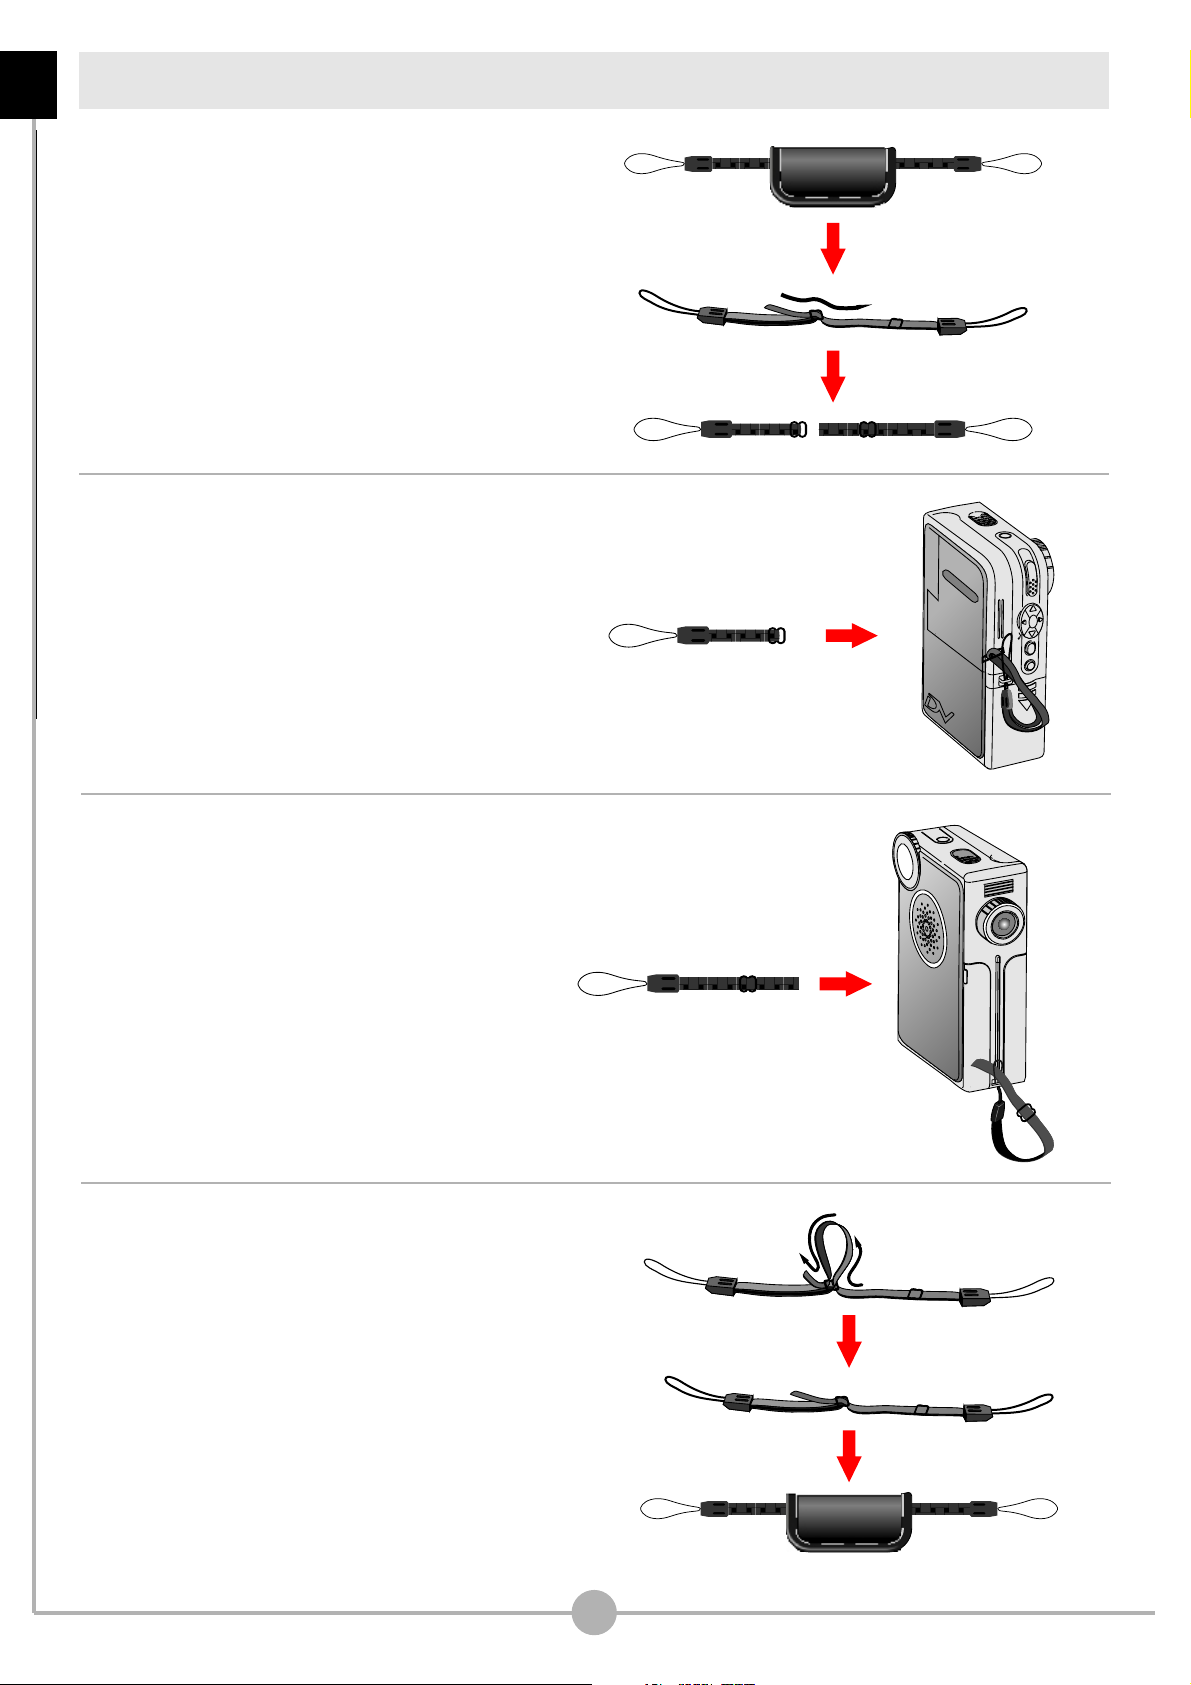
Attaching the wrist strap (optional)
Getting Started - Attaching the wrist strap (optional)
1. Unfasten and separate the strap into
two parts.
2. Thread one part of the strap into the
hook (1) on the back side of the
camera.
3. Thread the other part of the strap into
the hook (2) on the front side of the
camera.
4. Fasten the wrist strap as indicated.
Moving the ring on the strap to the
right will tighten the strap, and vice
versa. Then use the leather wrap to
hold the strap.
08
Page 10
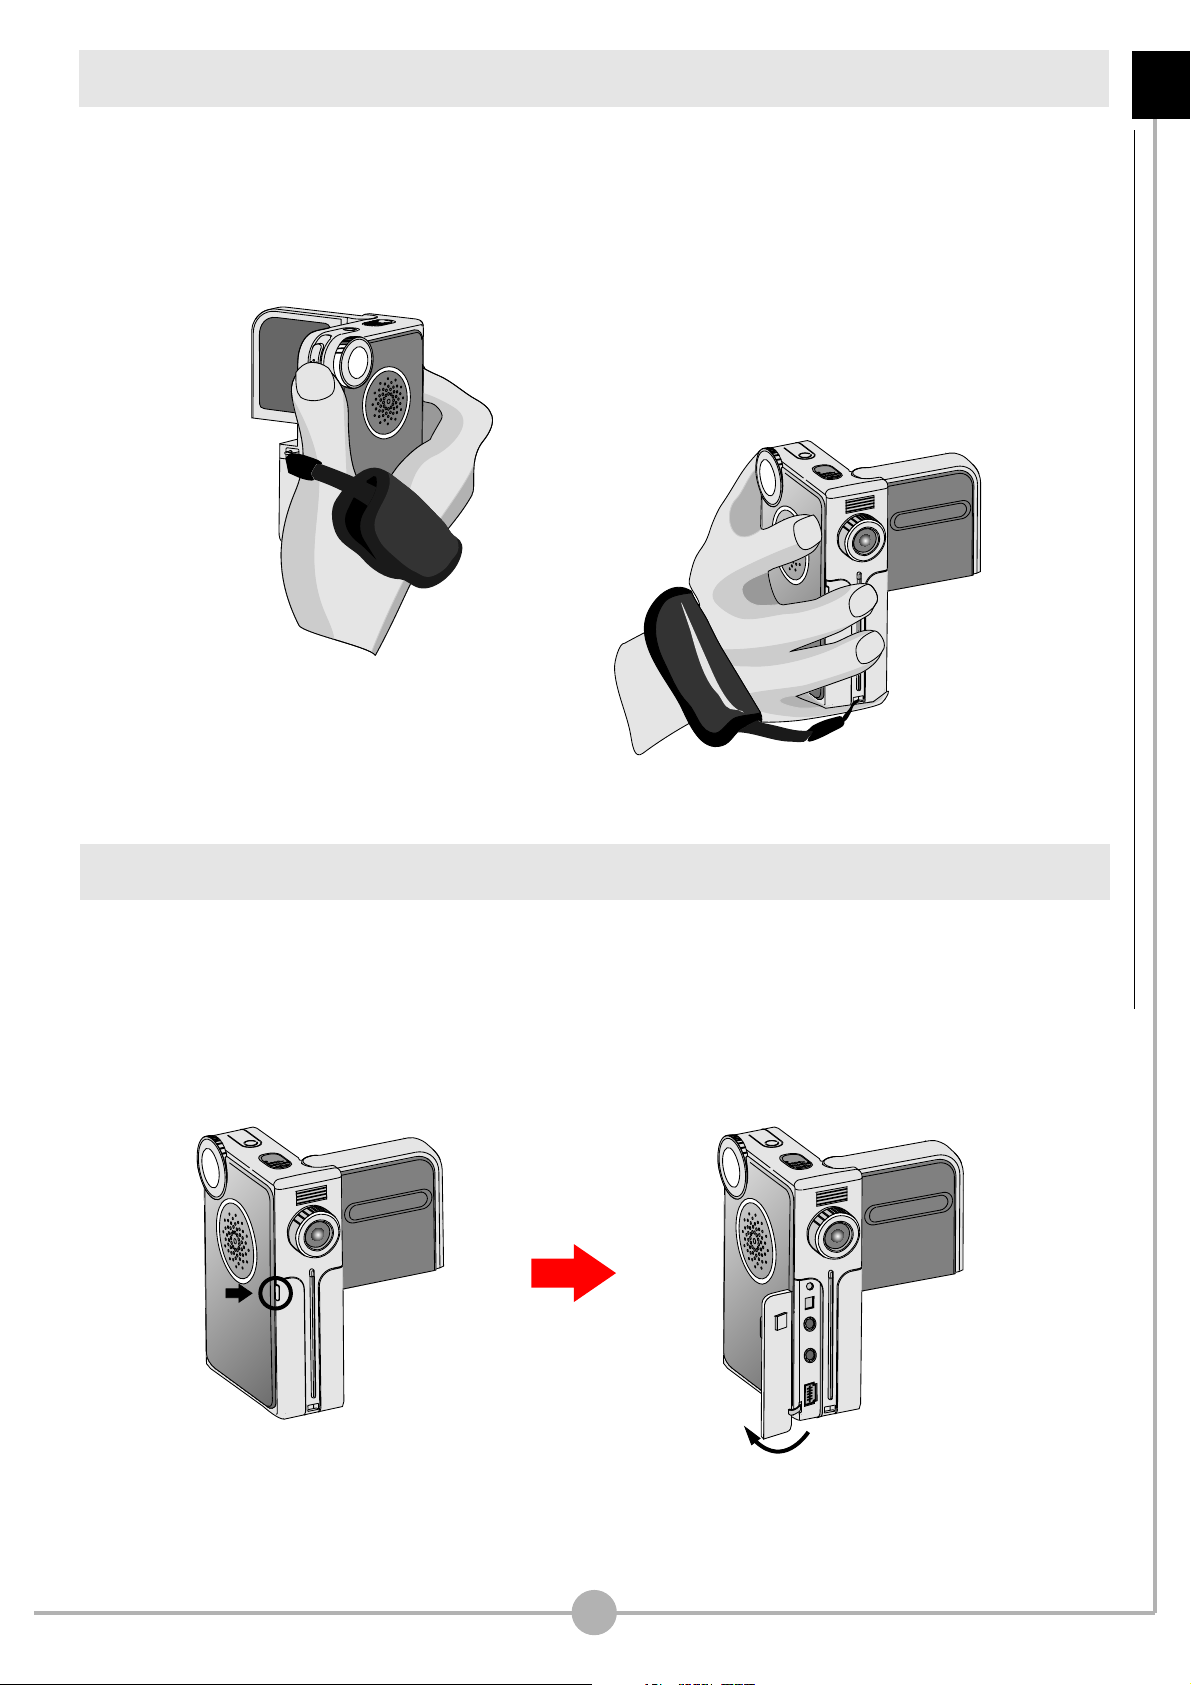
How to hold your camera
Please put your hand through the wrist strap and firmly hold the camera as
illustrated. While taking still pictures or recording video clips, avoid blocking the
lens to retain the best result.
Getting Started - How to hold your camera / How to open the connector cover
Avoid blocking the lens.
How to open the connector cover
When you want to connect the camera to your PC, TV or earphone, you need to
open the connector cover. Please open the cover gently in the direction as
illustrated below.
09
Open the connector cover.Gently pull up the cover.
Page 11
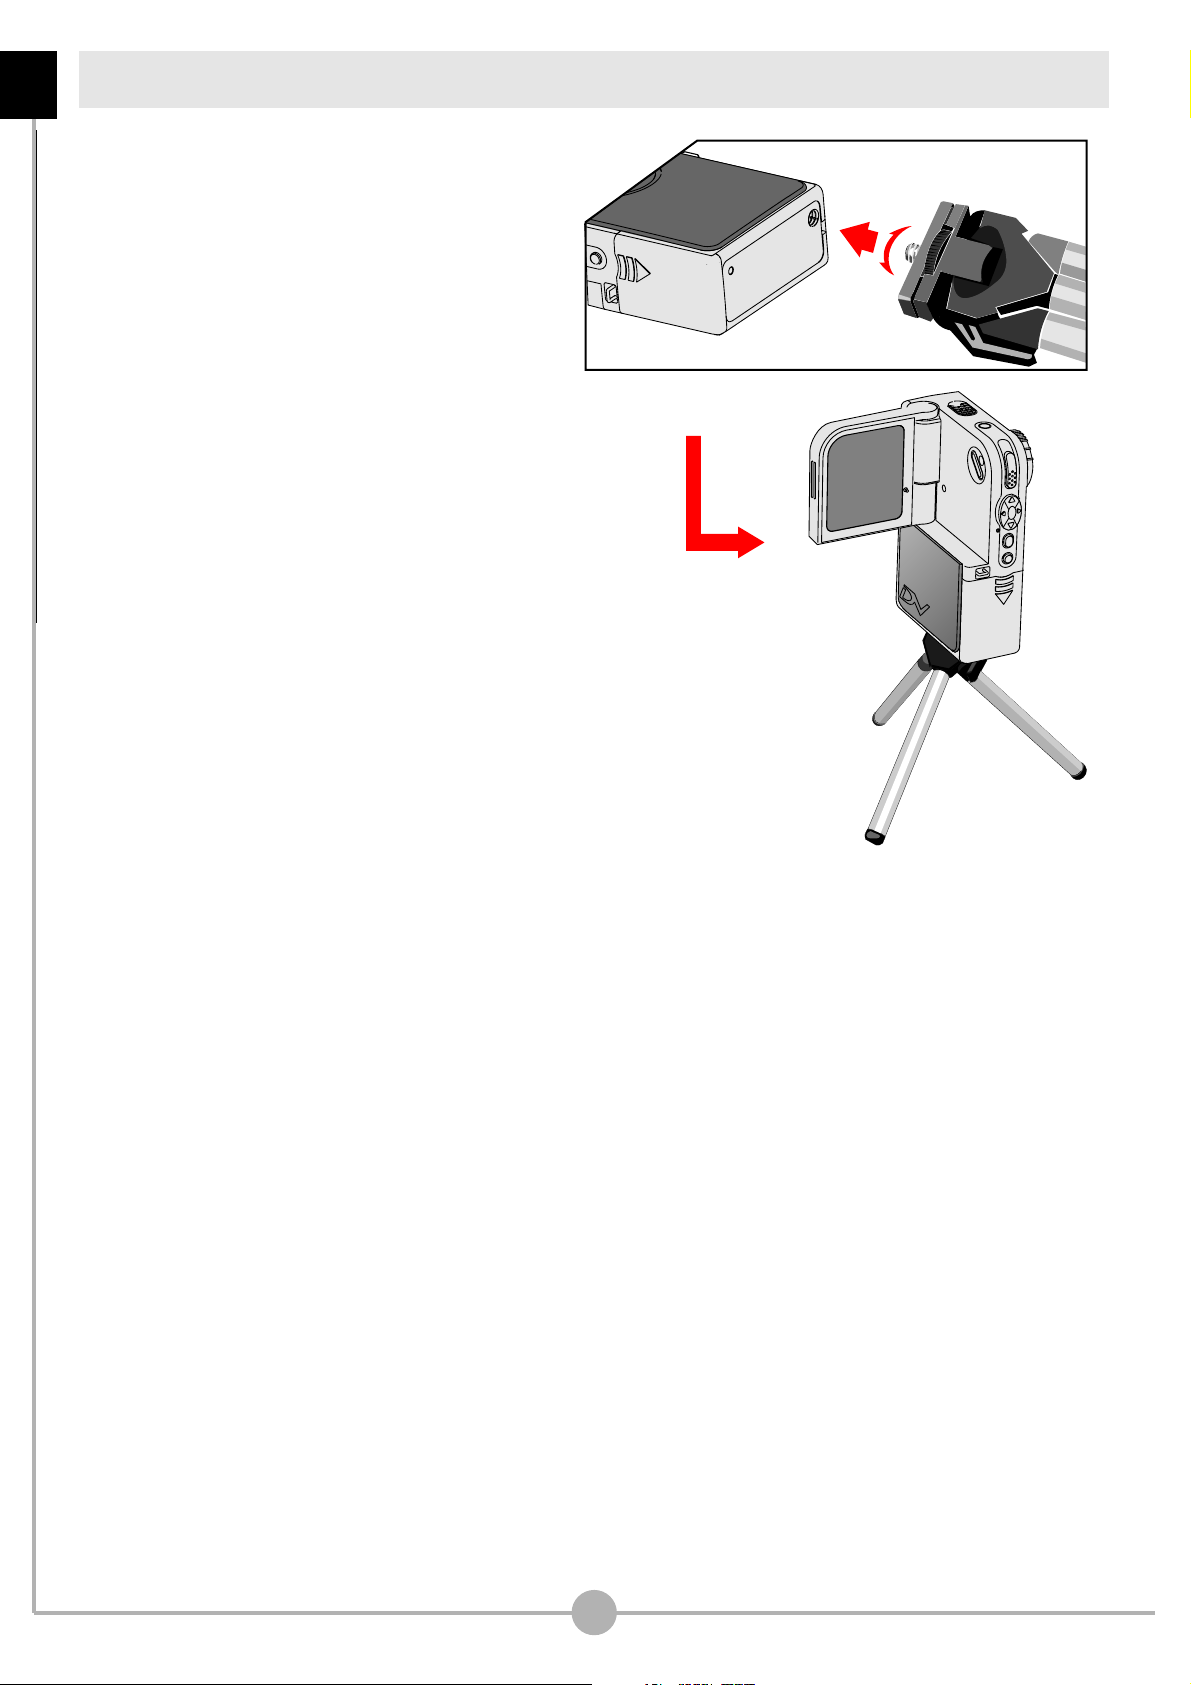
Using the tripod (optional)
Getting Started - Using the tripod (optional)
Use a tripod to minimize camera
movement and ensure optimal image
quality, especially while shooting self-
portraits or video conferencing.
Tight
Loose
10
Page 12

Basic Operations
Page 13
Basic Operations
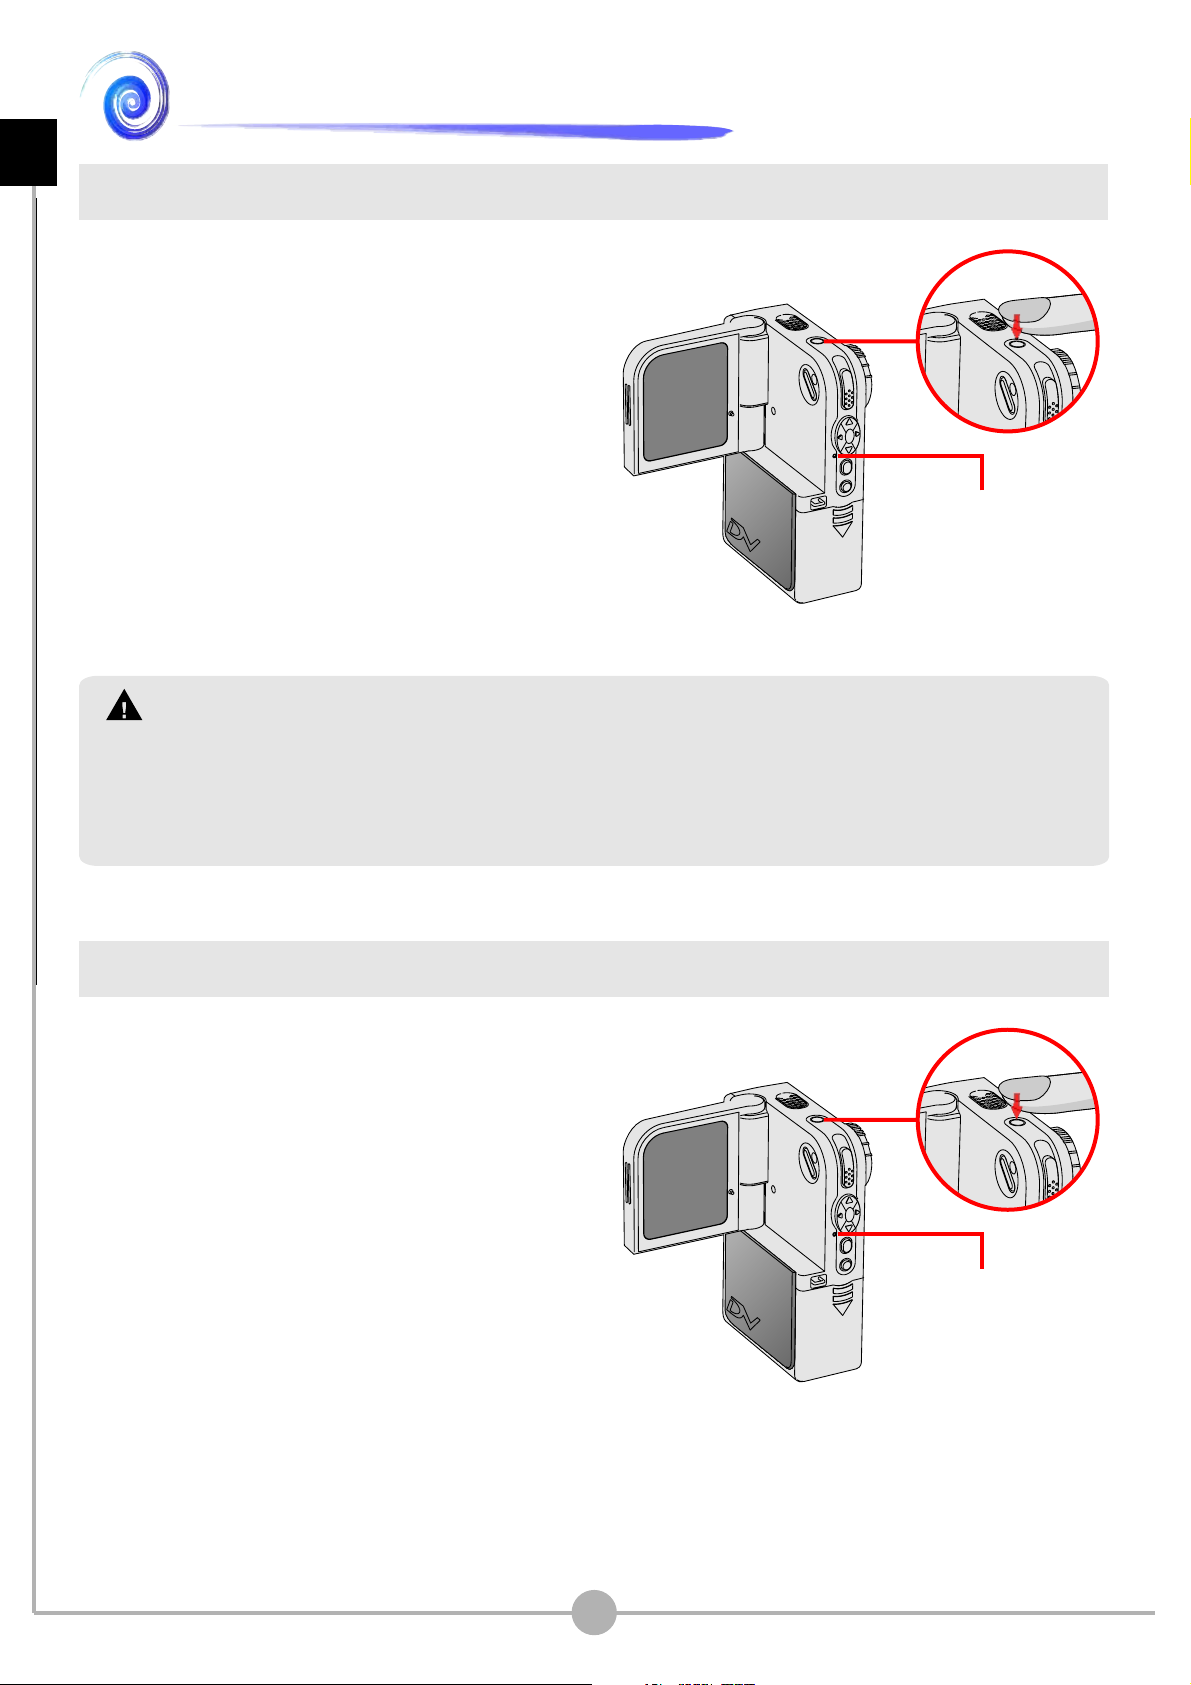
Basic Operations - Turning on your camera / Turning off your camera
Turning on your camera
Press and hold down the power button
for 1 second to turn on the camera.
If the camera is not turned on after pressing the power button, please check:
1. There are two AA batteries installed in the camera.
The LED will light up.
2. The batteries have enough power left.
3. The polar(+ -) directions of the installed batteries are correct.
Turning off your camera
Press and hold down the power button
for 1 second to turn off the camera.
The LED will go out.
12
Page 14
Setting the language
When you power on the camera for the first time, the
LCD display may not be shown in your local language.
You can set the LCD display language using the
method below:
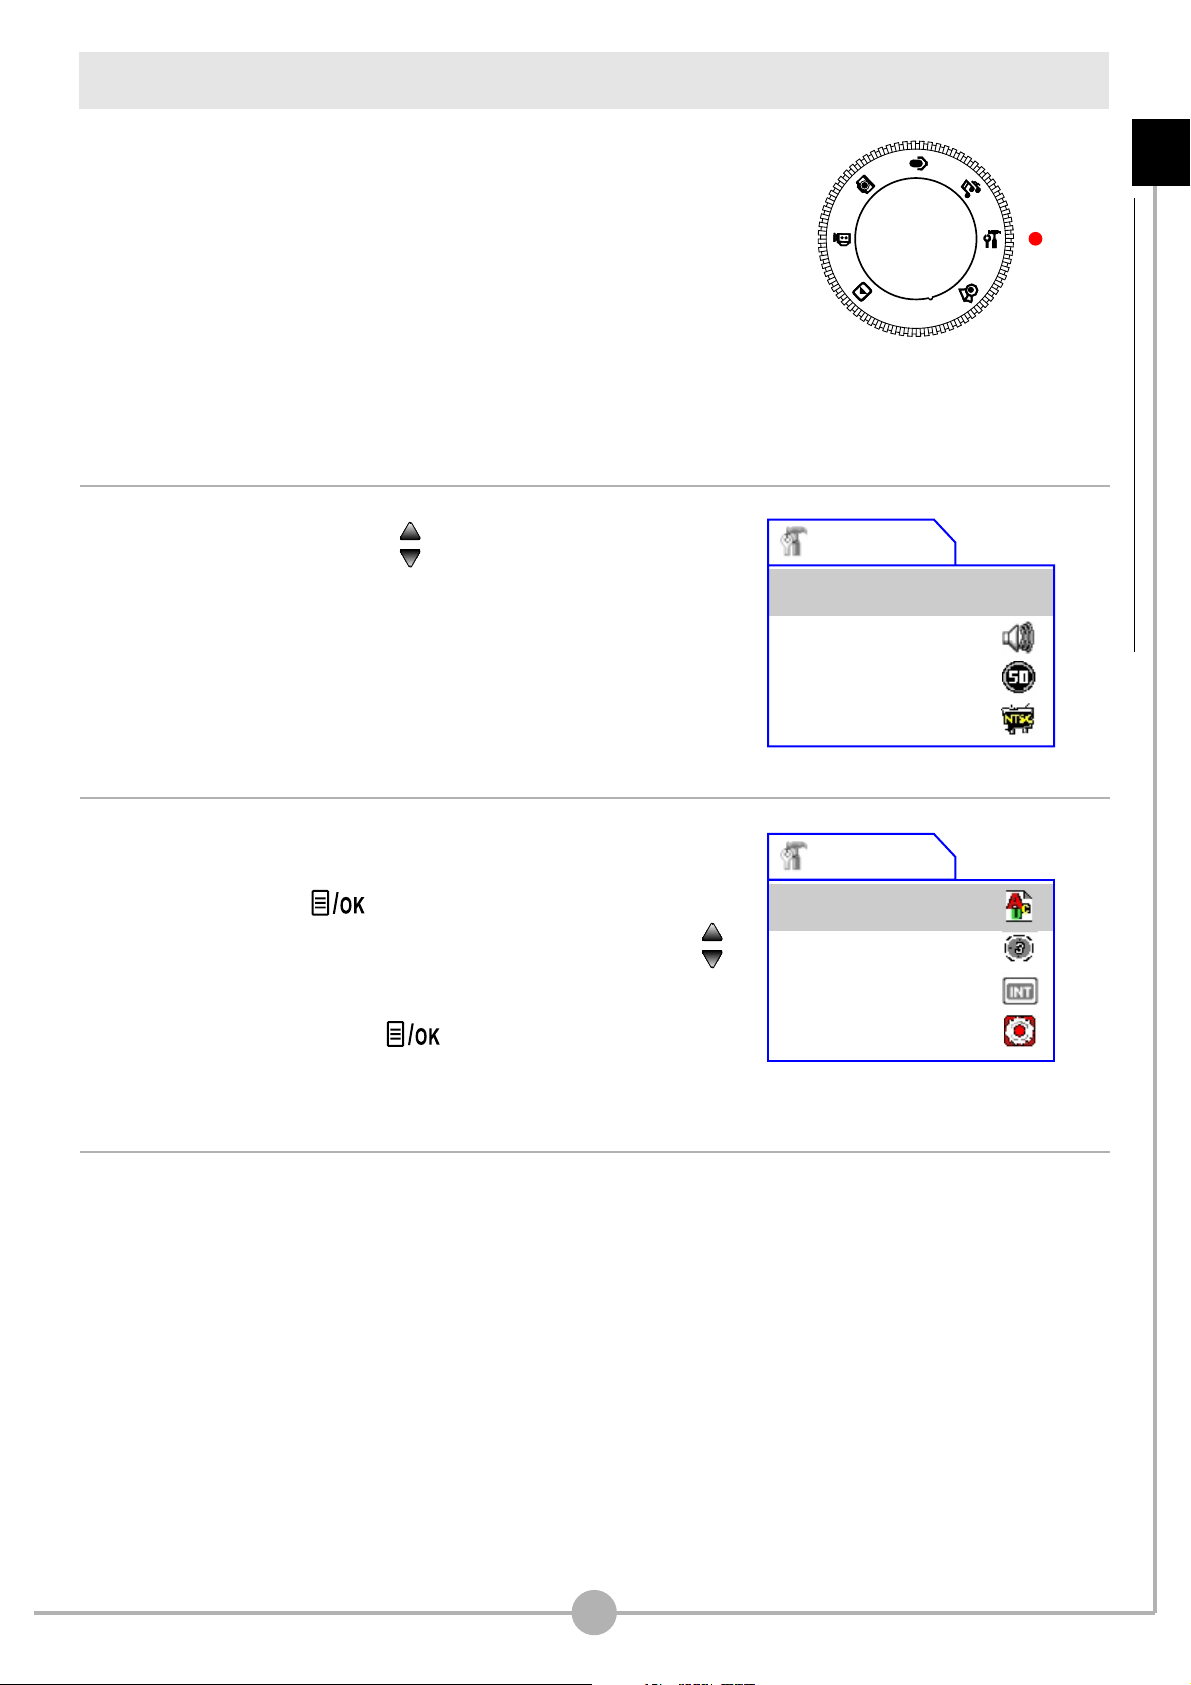
1. Set the Mode Dial to the Settings mode, and the
Settings menu will display as illustrated.
Basic Operations - Setting the language
2. Use the Up or Down ( ) button to highlight the
Language item.
3. When the Language item is highlighted, press
the Menu/OK ( ) button to enter the sub-
menu. In the sub-menu, use the Up or Down ( )
button to select a suitable language, and then
press the Menu/OK ( ) button to adopt.
Settings
Time ----/--/-Beep
Flicker
TV System
Settings
Language
Auto Off
Format
Default
4. After all settings are done, you are ready to use
the camera. Set the Mode Dial to other modes
according to your purpose.
13
Page 15
Recording a video clip
1.0X 10
00:00:10
How to record a video clip
Basic Operations - Recording a video clip
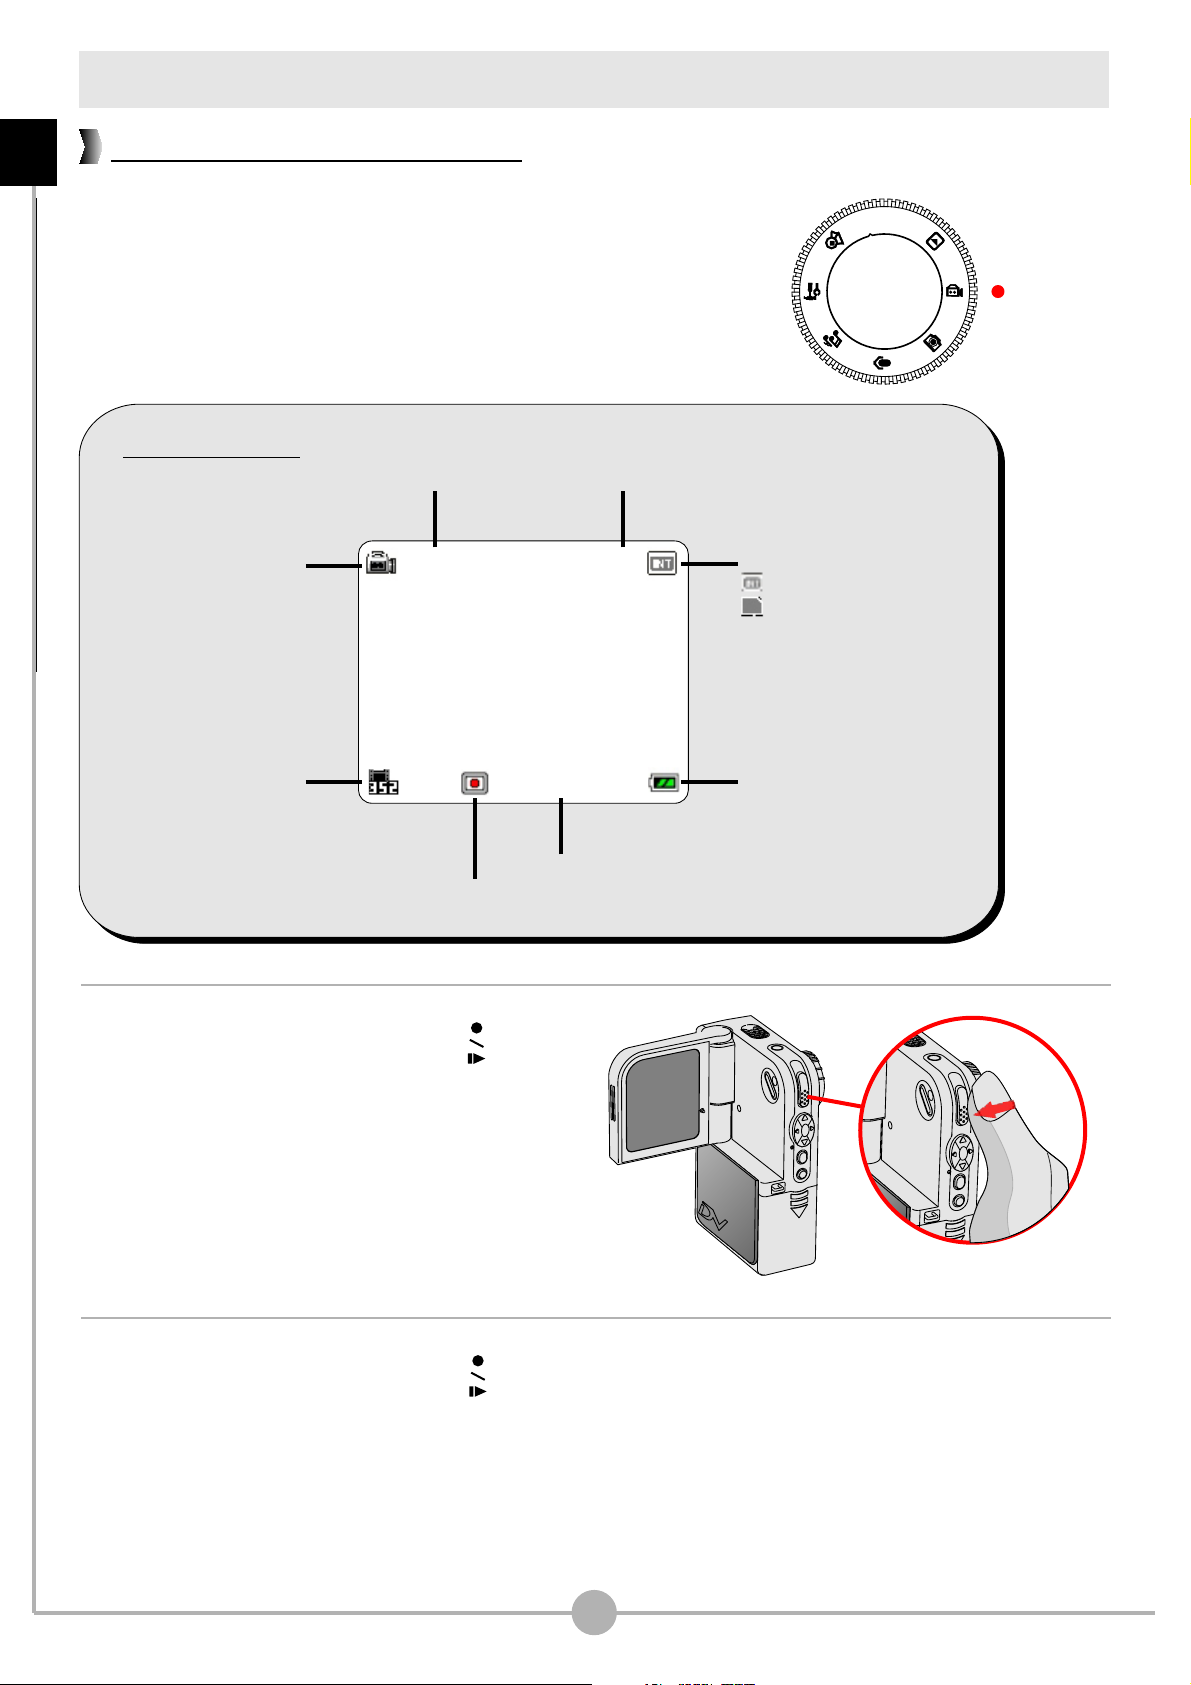
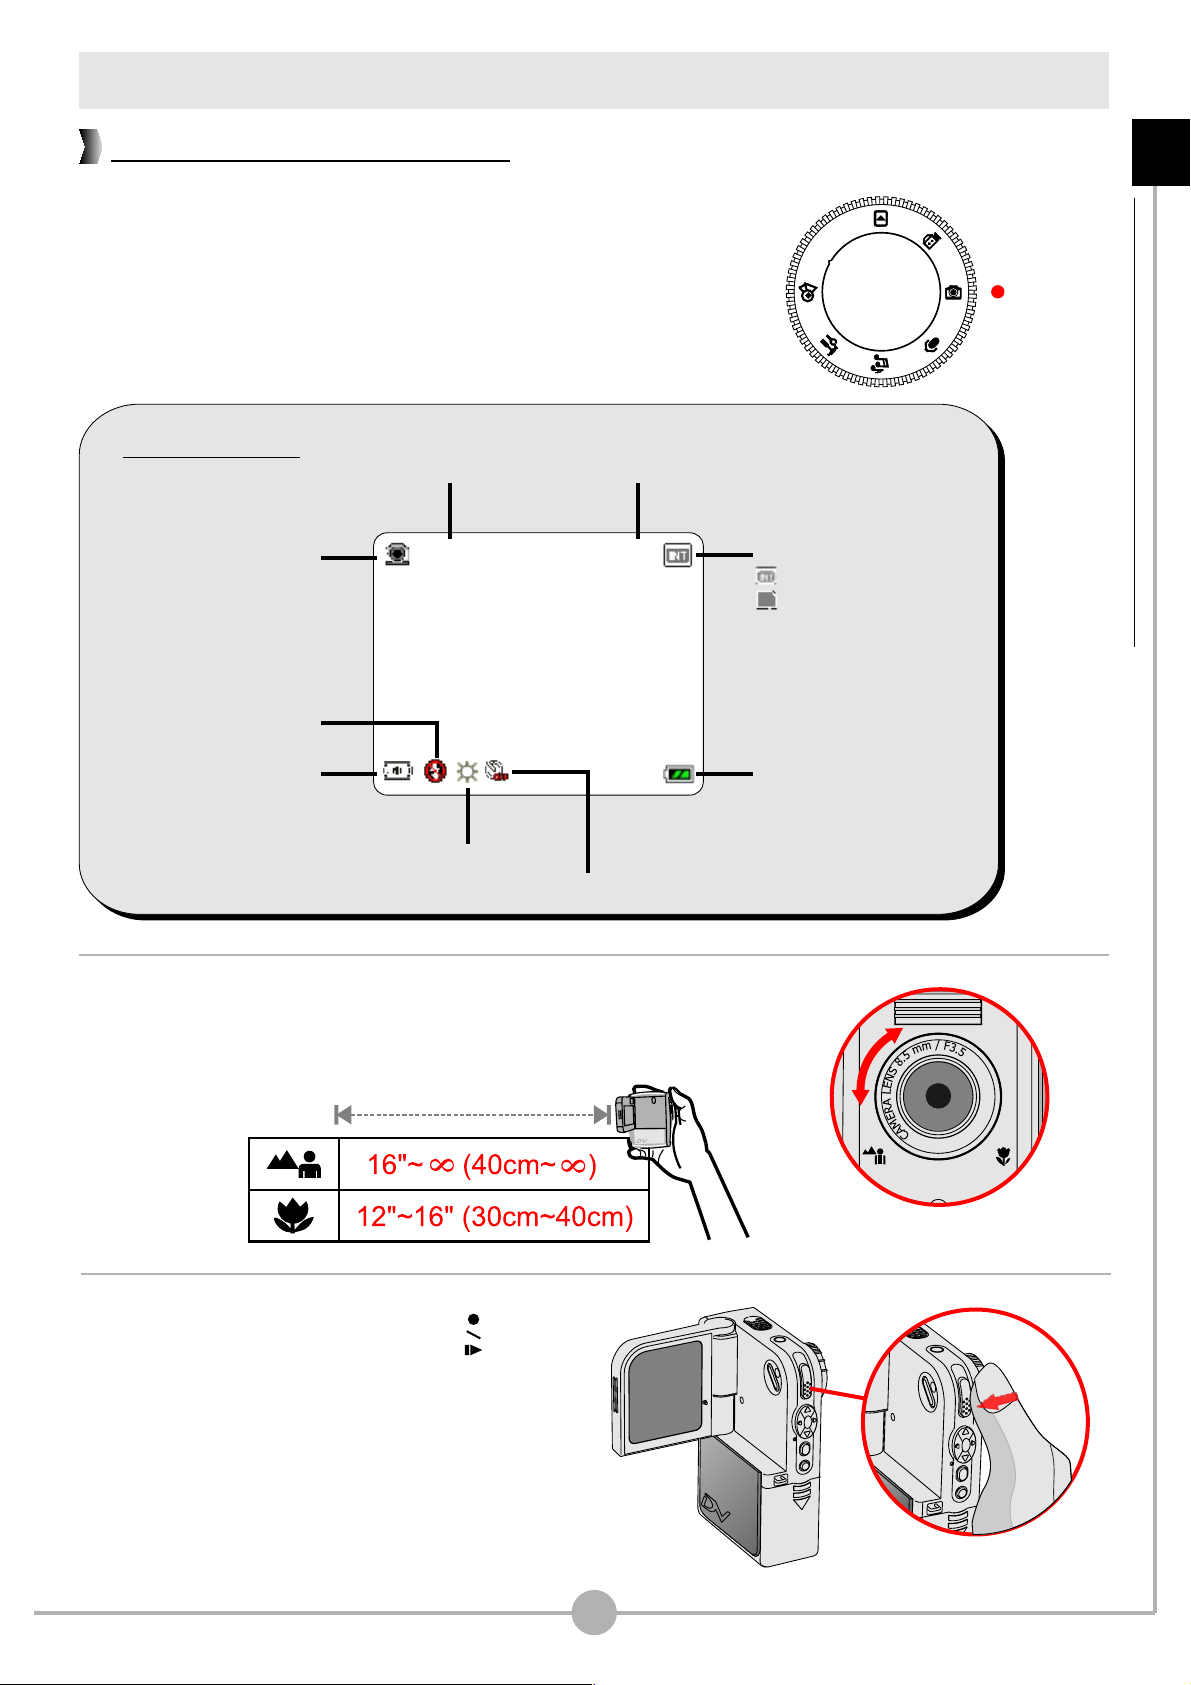
1. Set the Mode Dial to Digital Video Camcorder
mode. The LCD display will show the screen below:
LCD Display
Number of recordingsZoom ratio
Mode Icon
Resolution
Record / Stop
2. Press the Record/Shutter ( )
button to start recording.
Storage media:
: internal memory
: SD/MMC card
Battery life
Recording time
3. Press the Record/Shutter ( )
button again to stop recording.
14
Page 16
Recording a video clip (continued)
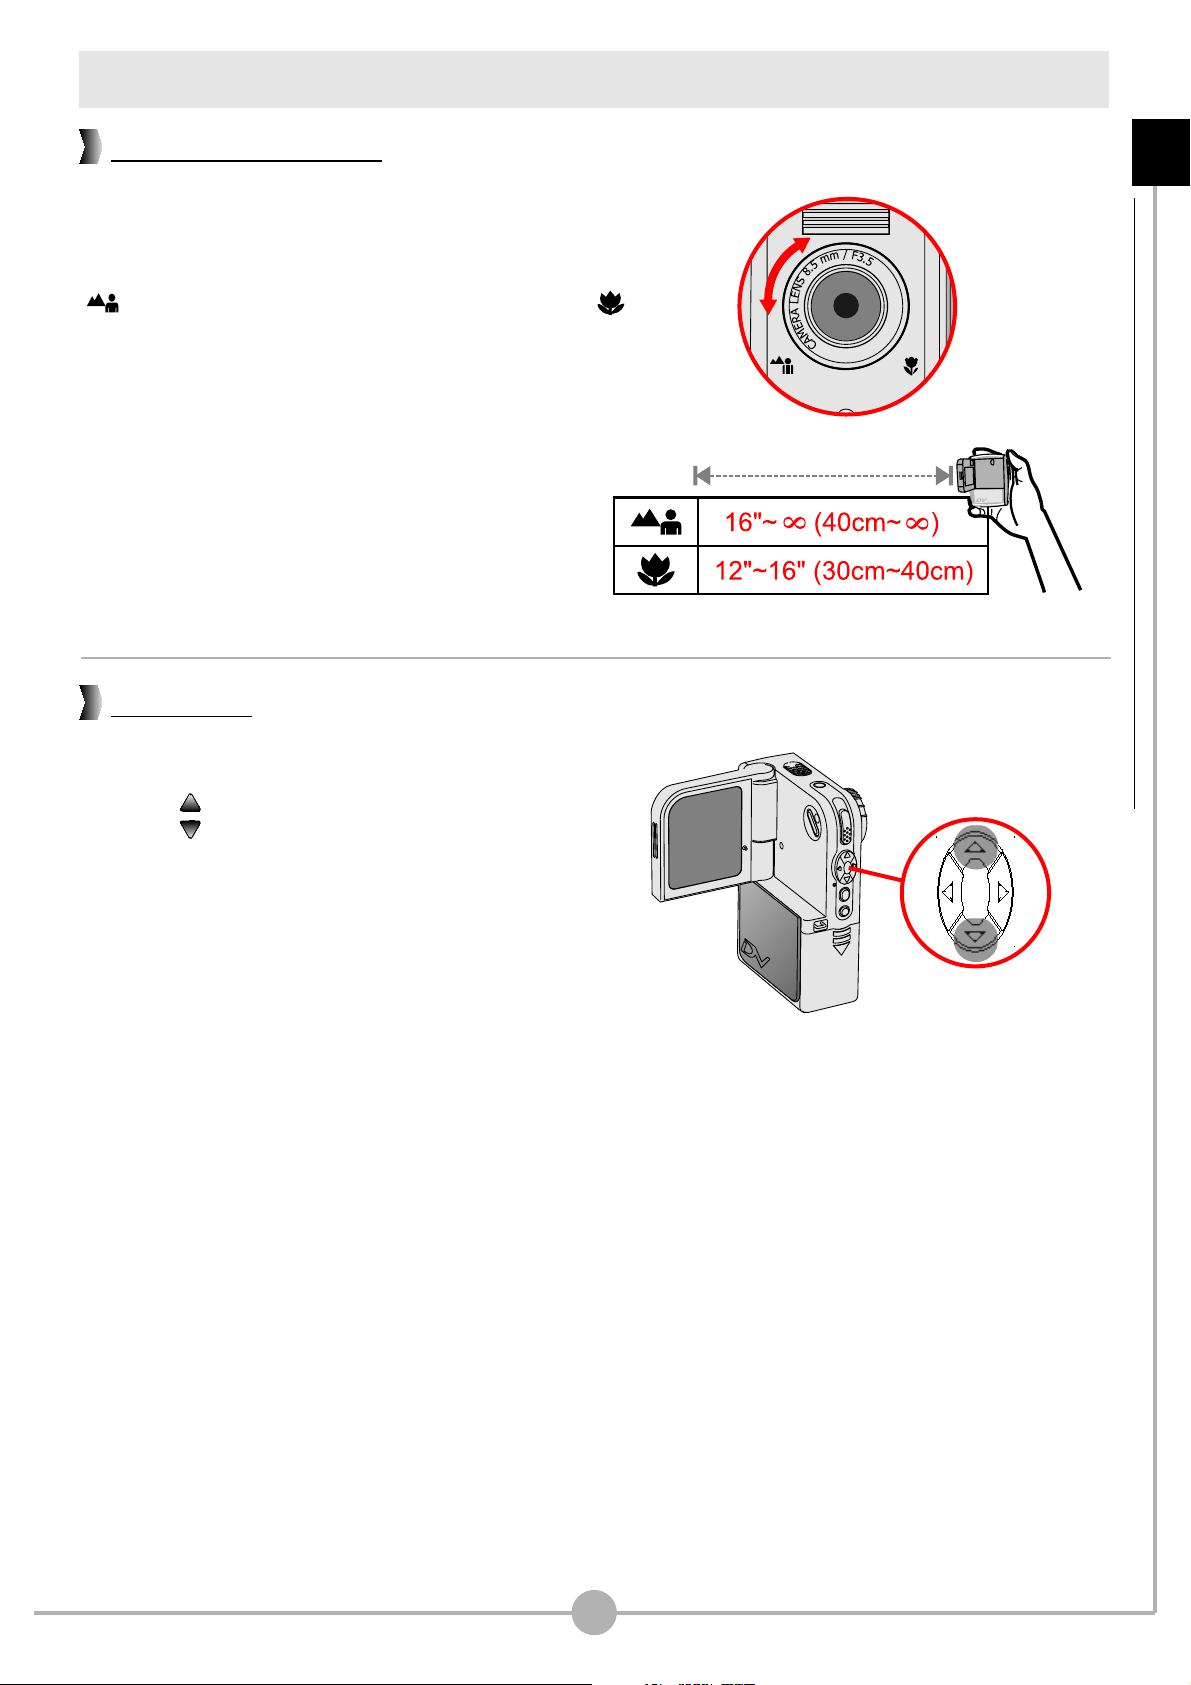
Setting the focus
You can adjust the focus by setting the Focus
Switch. Normally, you should set the focus to
( ) for most shooting conditions. Select ( )
only for close-ups. The focus is adjustable
during recording.
Basic Operations - Recording a video clip (continued)
Zooming
While recording, you can press the Up or
Down ( ) button to zoom in or zoom
out the picture.
15
Page 17
Recording a video clip (continued)
1.0X 10
1.0X 10
1.0X 10
1.0X 10
Selecting metering modes
Basic Operations - Recording a video clip (continued)
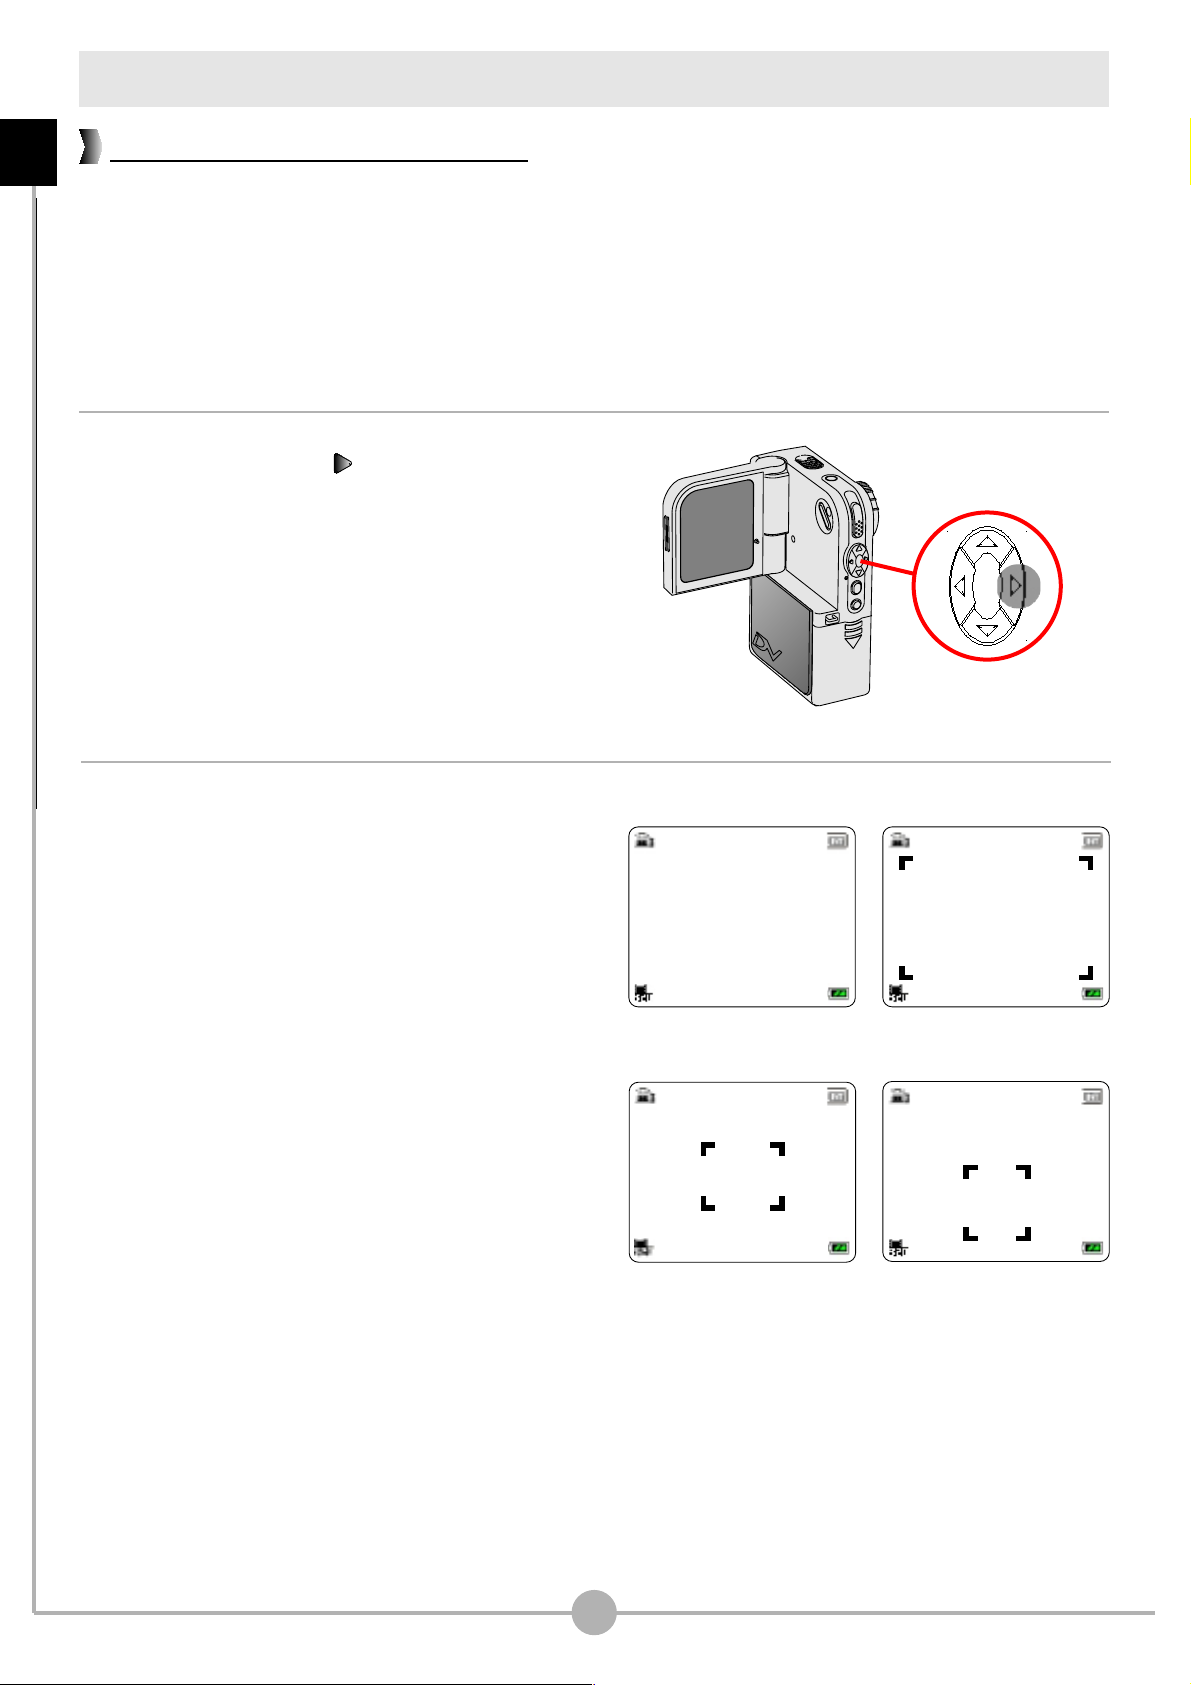
Under normal condition, the light is automatically measured based on overall
lighting. If the subject of shooting appears too dark and the background too bright,
you can manually select a proper metering mode according to the subject's
position.
Pressing the Right ( ) button repeatedly
will switch the metering mode in the
following order:
Auto Average Center Center-low
g
ggg
Auto.
Auto mode (no indicator): When the
camera is in Auto mode, the camera will
automatically select the best metering
method for the overall conditions.
Average mode: When in Average mode,
the camera will measure the lighting
condition within the bracketed area.
Center mode: When under Center mode,
the camera will measure the lighting
Auto Mode
Average Mode
condition within the central area.
Center-low mode: The camera will focus
the metering on the center-low area.
16
Center Mode
Center-low Mode
Page 18
Taking a still picture
1.0X 10
How to take a still picture
1. Set the Mode Dial to Digital Still Camera mode.
The LCD display will show the screen below:
LCD Display
Number of recordingsZoom ratio
Basic Operations - Taking a still picture
Mode Icon
Flash status
Resolution
White Balance
Self-timer status
2. Use the Focus Switch to set focus as appropriate.
Storage media:
: internal memory
: SD/MMC card
Battery life
3. Press the Record/Shutter ( )
button to take a still picture.
17
Page 19

Taking a still picture (continued)
Using the flash strobe
Basic Operations - Taking a still picture (continued)
Before taking a still picture, you can set to use the flash strobe if the lighting is not
sufficient for your shooting environment.
Pressing the Left ( ) button repeatedly will
switch the flash mode in the following order:
Off Auto Off.
gg
Off ( ): The flash is disabled.
Auto ( ): The flash automatically fires
when the lighting is insufficient.
1. If the battery life icon indicates , the flash strobe may be disabled due to
insufficient voltage. Please change batteries immediately.
2. You cannot take pictures when the flash strobe is recharging.
Zooming
Before taking a still picture, you can
press the Up or Down ( ) button to
zoom in or zoom out the picture.
Selecting metering modes
Before taking a still, you can press the Right ( )
button to select a metering mode. The metering
mode changes in the following order:
Auto g Average g Center g Center-low g Auto.
For a detailed description of each metering mode,
please see page 16.
18
Page 20
Recording a voice clip
10
00:00:10
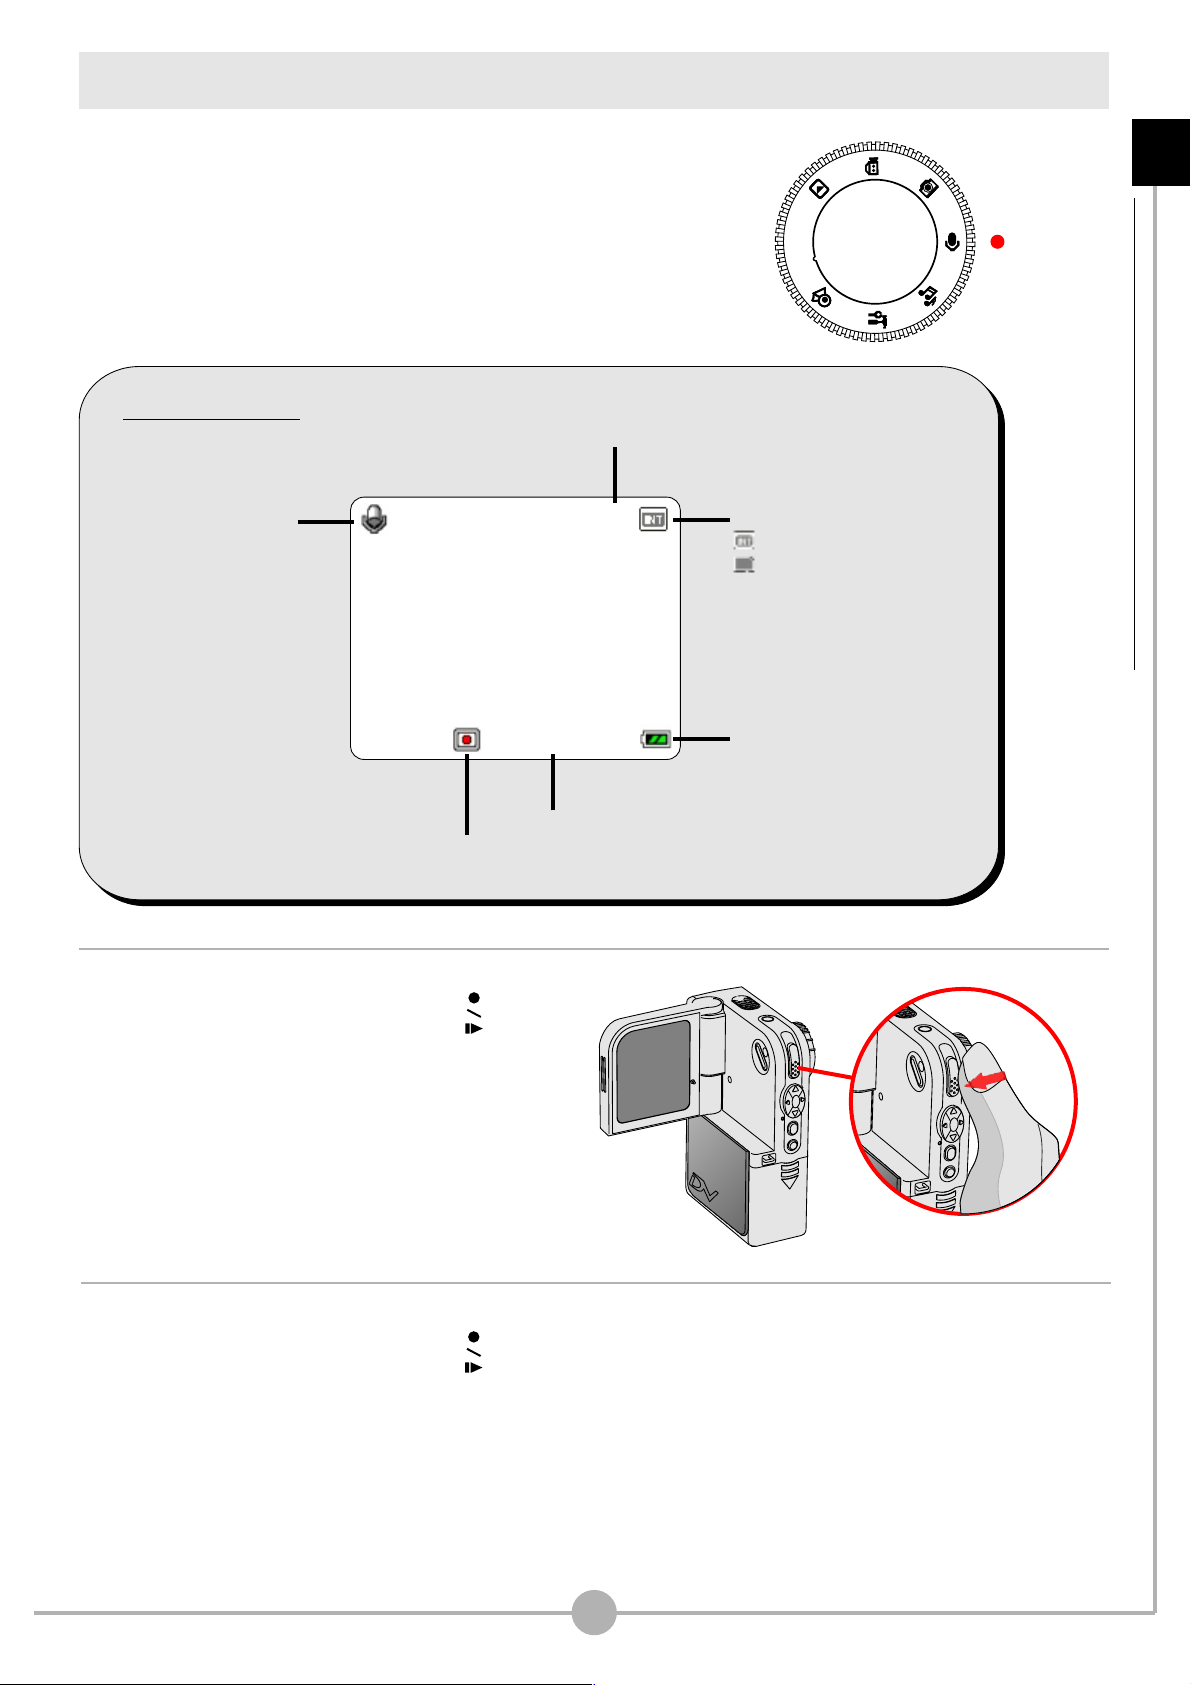
1. Set the Mode Dial to Voice Recording mode.
The LCD display will show the screen below:
LCD Display
Number of recordings
Basic Operations - Recording a voice clip
Mode Icon
Record / Stop
2. Press the Record/Shutter ( )
button to start recording.
Storage media:
: internal memory
: SD/MMC card
Battery life
Recording time
3. Press the Record/Shutter ( )
button again to stop recording.
19
Page 21
Playing back your recordings
1.0X 7/10
00:00:10
Full-screen view
Basic Operations - Playing back your recordings
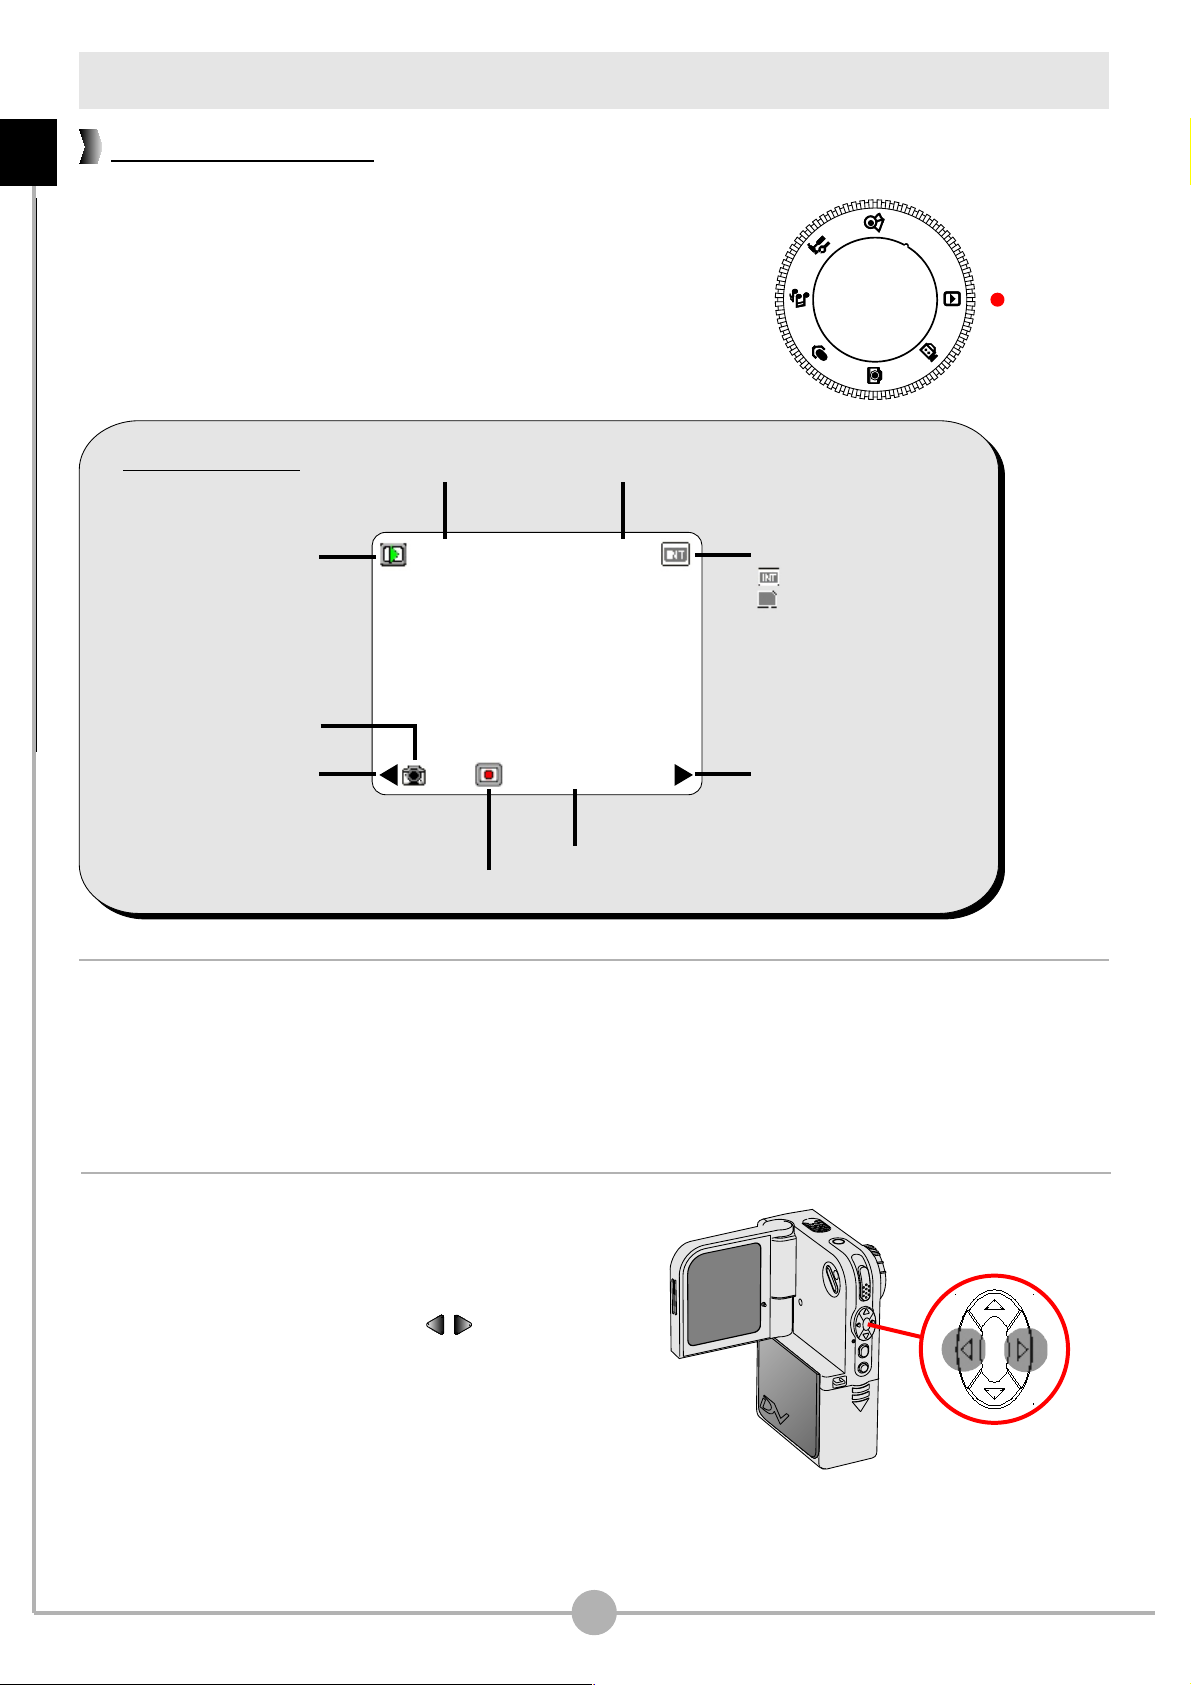
The Playback mode allows you to review the files
stored in the SD/MMC card or internal memory.
1. Set the Mode Dial to Playback mode.
LCD Display
Mode Icon
File type
Left arrow
Play / Pause / Stop
2. When you set the Mode Dial to
Current / Total recordingsZoom ratio
Storage media:
: internal memory
: SD/MMC card
Right arrow
Playing time
Playback mode, the last recorded
file will be automatically played.
3. If you want to view other files stored
in the camera, you can use the
Right and Left buttons ( ) to
shift between files.
20
Page 22
Playing back your recordings (continued)
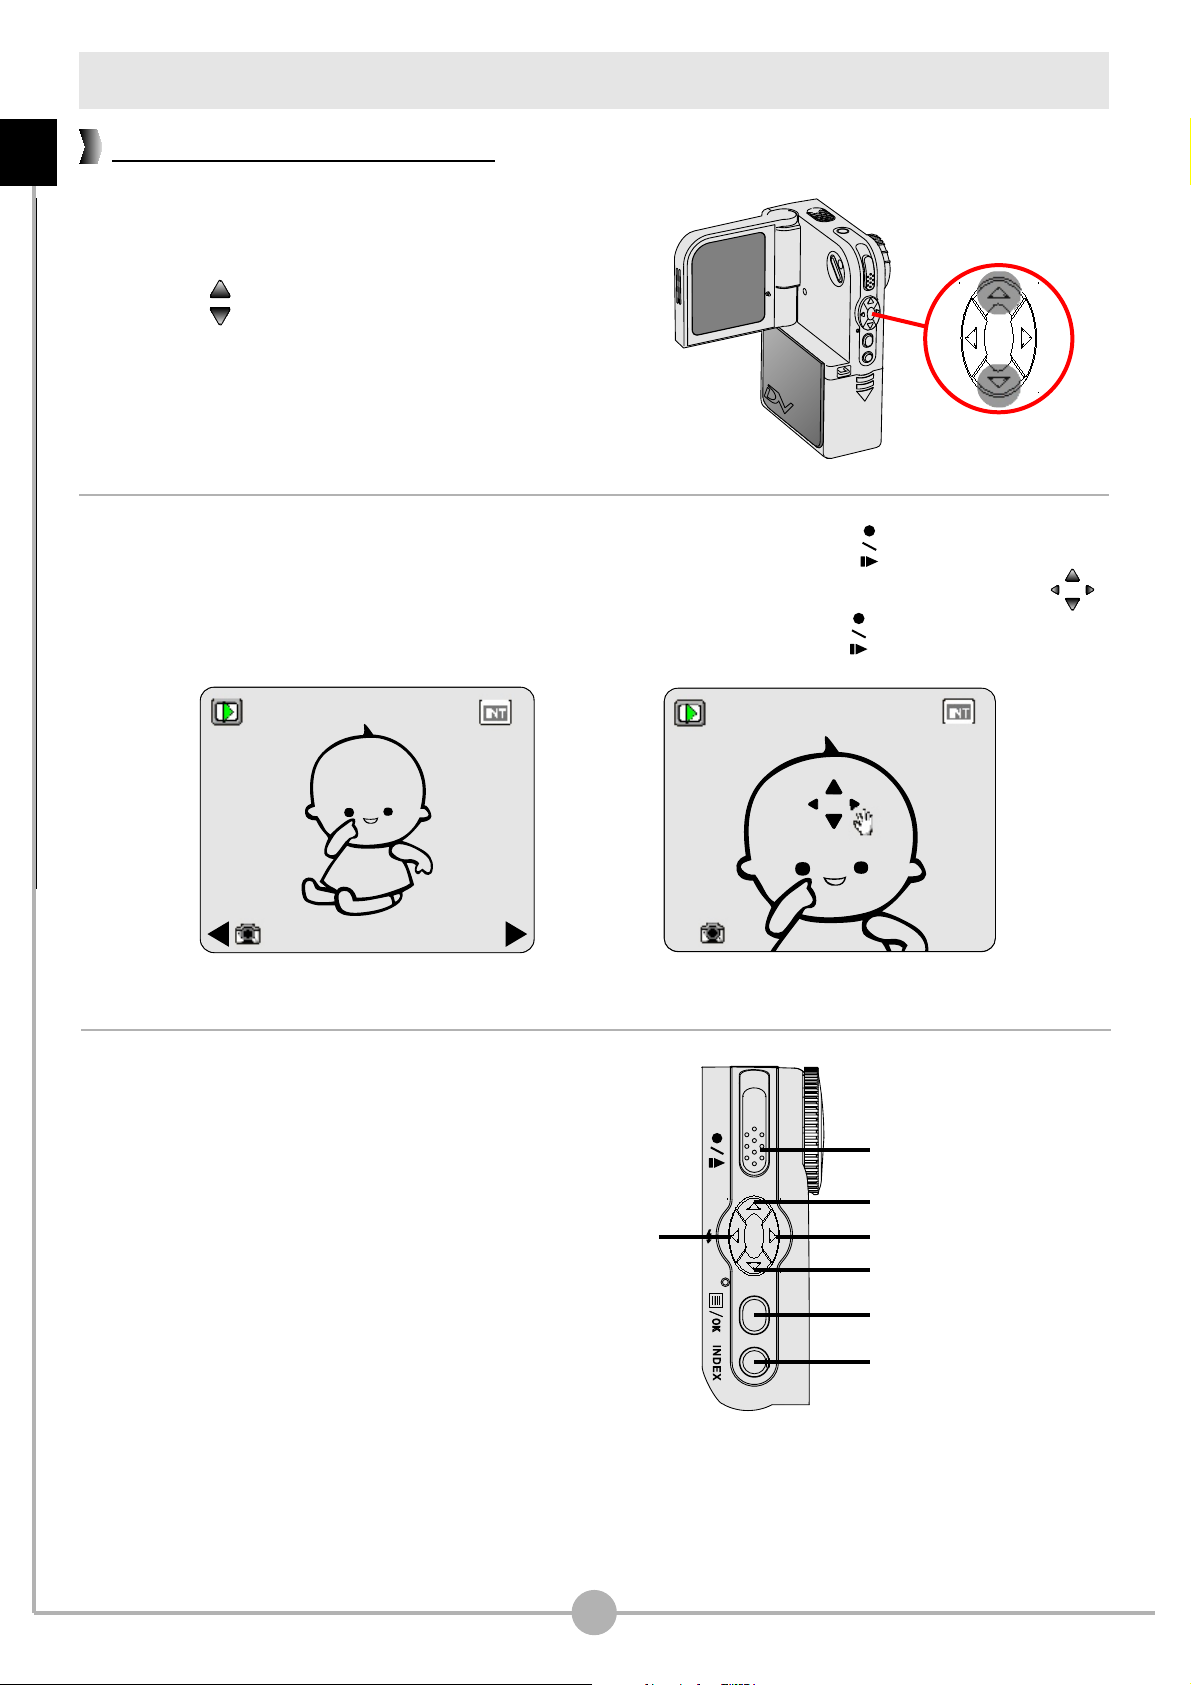
Thumbnail view
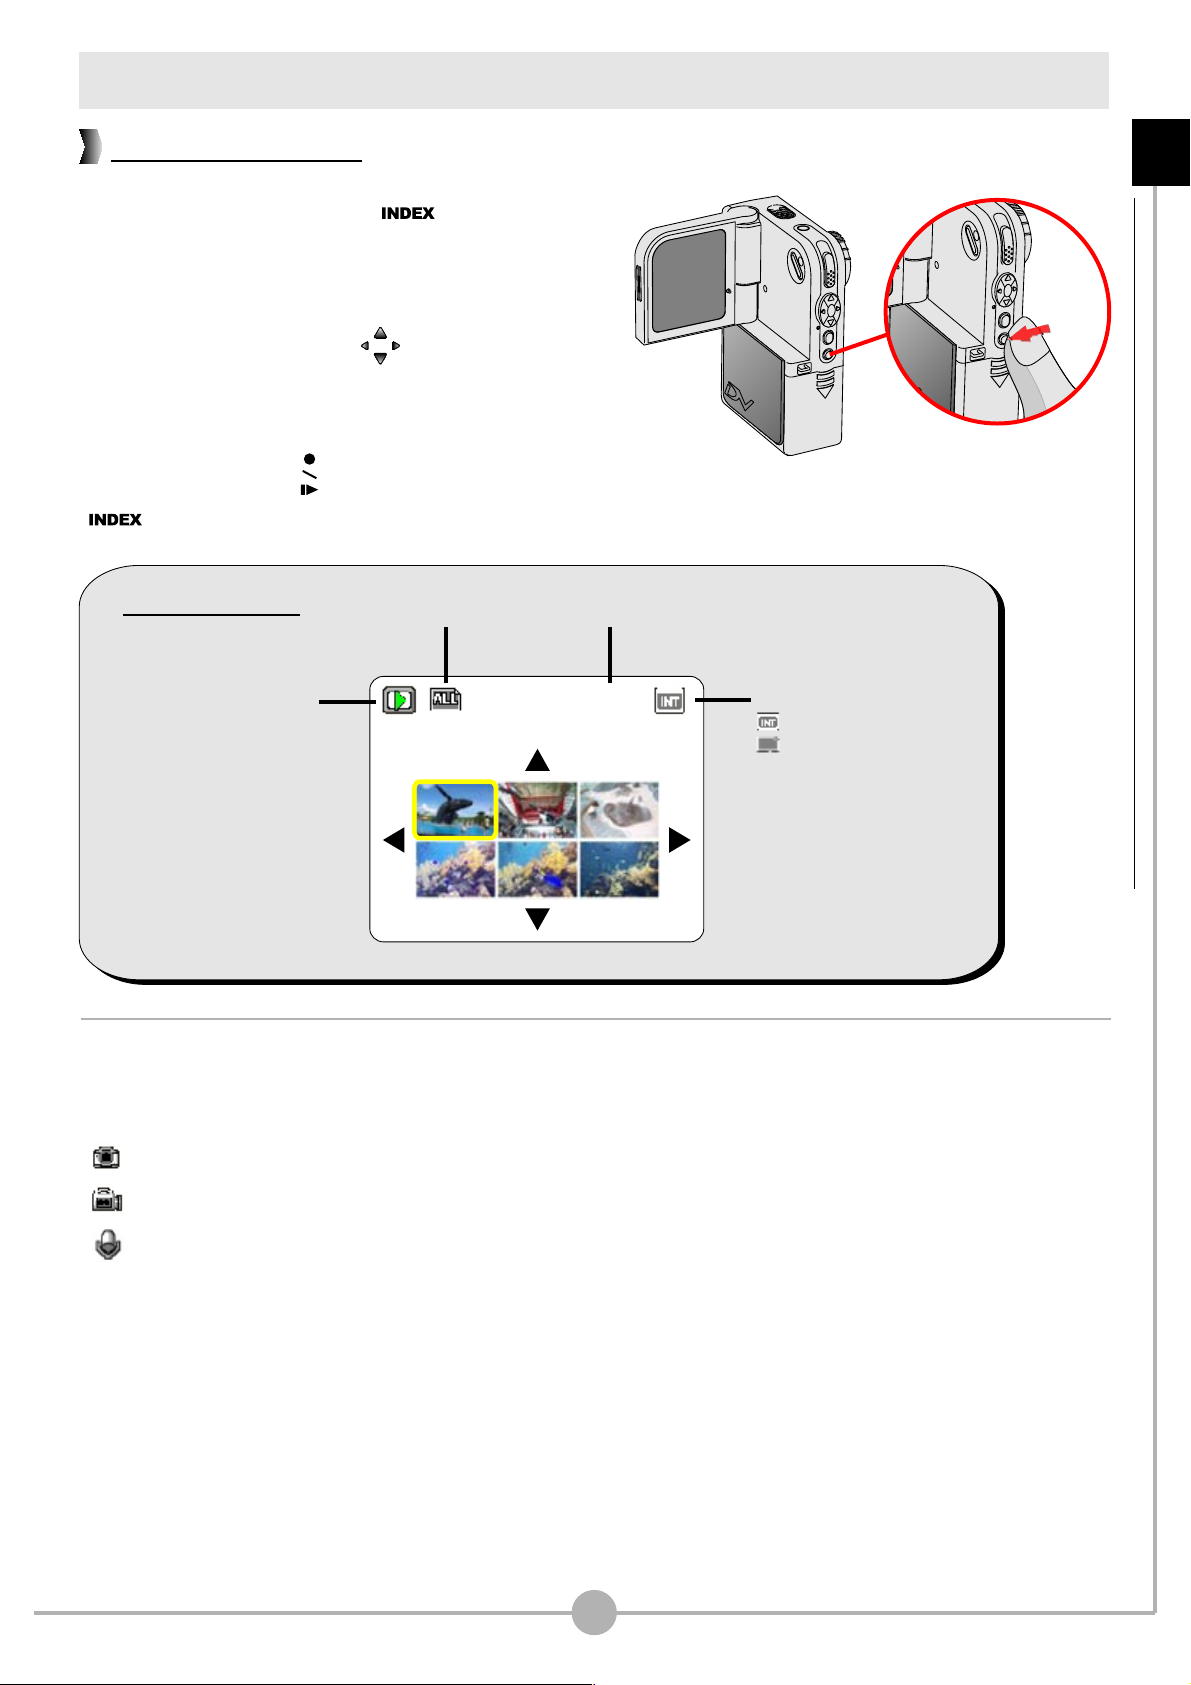
If
you press the INDEX ( ) button under
playback mode, the camera will be
Basic Operations - Playing back your recordings (continued)
switched to thumbnail view. Then
you can
use the four direction ( ) buttons to
select the file you want to view. Once you
select the target file, press either the
Record/Shutter ( ) button or the INDEX
( ) button to view the file.
LCD Display
Mode Icon
File icon
Current / Total recordings
1/20
Storage media:
: internal memory
: SD/MMC card
There are three file types that you can identify by
the icons on the thumbnails:
: JPG format pictures
: ASF format video clips
: WAV format audio clips
For detailed operations on viewing a still picture,
please see page 22. For detailed operations on
playing a video or audio clip, please see page 23.
21
Page 23
Playing back your recordings (continued)
1/201.0X
1/202.0X
Reviewing a still picture
Basic Operations - Playing back your recordings (continued)
While viewing the picture in full-
screen mode, you can use the Up
or Down ( ) button to zoom in or
zoom out the picture.
If you zoom in the picture and then press the Record/Shutter ( ) button, the
zoom ratio will be locked. You can then browse the picture using the direction ( )
buttons. To unlock the zoom ratio, press the Record/Shutter ( ) button again.
Full Screen Zoom-lock Screen
While viewing a still picture, the
available function buttons are as
follows:
Previous file
(Left)
Lock (Unlock)
Zoom in (Up)
Next file (Right)
Zoom out (Down)
Menu/OK
Thumbnail view
( ) zoom-lock mode
22
Page 24
Playing back your recordings (continued)
1/20
00:00:56
1/20
00:00:56
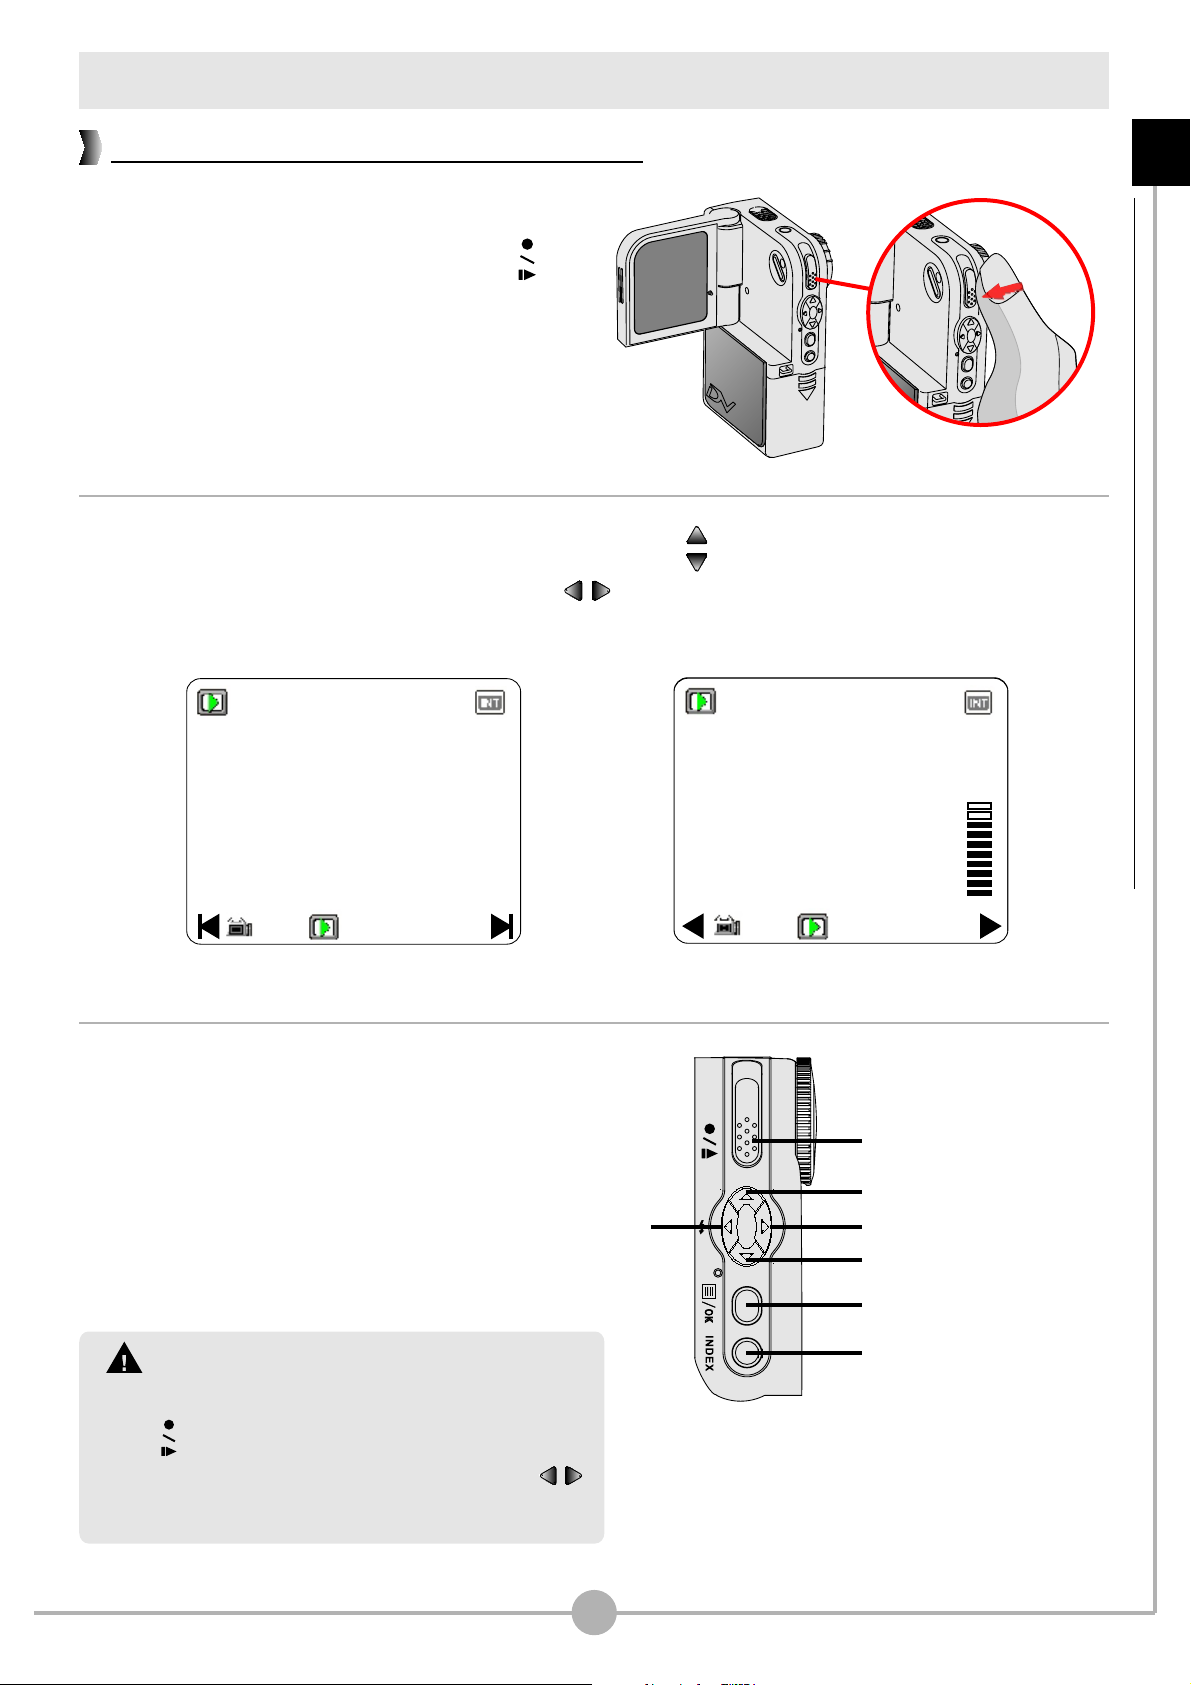
Playing back a video or audio clip
When playing back the video or audio
clip, pressing the Record/Shutter ( )
button can pause the playing. To resume
playing, press the same button again.
While playing the file, pressing the Up or Down ( ) button can adjust the sound
volume. If you press the Right or Left ( ) button during playing, you can fast
wind or rewind the video or audio clip.
Basic Operations - Playing back your recordings (continued)
Playing a video clip
While playing a video or audio
clip, the available function
buttons are as follows:
While playing back an video or audio
clip, you must press the Record/Shutter
( ) button to pause or stop the playing.
Then can you use the Right or Left ( )
button to shift between files.
Previous file
(Rewind)
Adjusting volume
Play / Pause
Volume up
Next file (Fast wind)
Volume down
Menu / OK
Thumbnail view
( ) during playing
23
Page 25

Switching on/off the OSD display
When playing back a video clip or
Basic Operations - Switching on/off the OSD display
reviewing a still picture, you can press
the LCD display switch ( ) to disable
the OSD display, thus gaining a clearer
view for your display. Press the same
button again will switch on the display.
LCD display switch ( )
24
Page 26
Connecting the camera to your TV
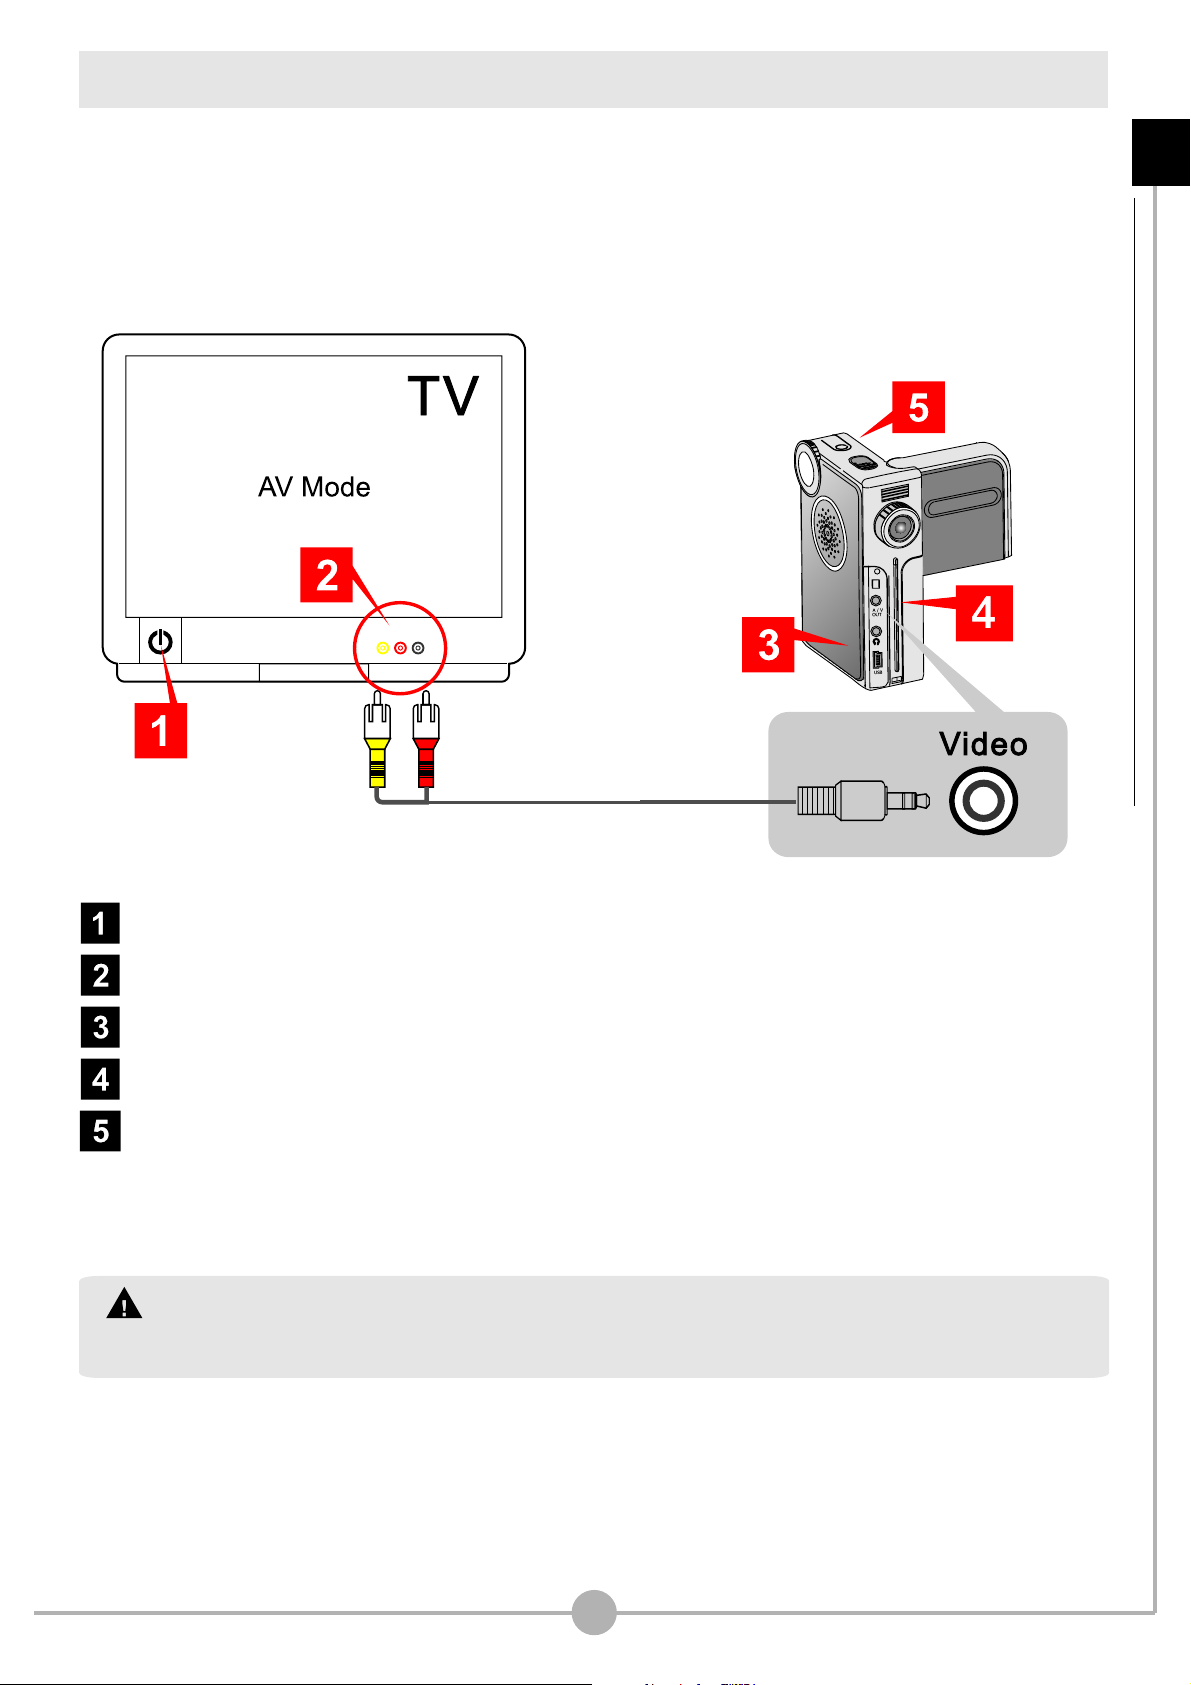
Connect your camera and TV via an AV cable for real-time display. You can display
your video clips, still pictures, audio recordings, as well as the MP3 files you
uploaded, directly on your TV screen to share them with friends and family
members.
Basic Operations - Connecting the camera to your TV
AudioVideo
Turn on your TV and switch to AV mode.
Connect the audio and video ends of the AV cable to your TV.
Open the connector cover of your camera. (page 9)
Connect the other end of the video cable to your camera.
Turn on the camera.
If the TV screen displays only noises after the camera is connected, please check if the
TV system (PAL / NTSC) setting is correct. See page 50 for more information.
25
Page 27
Advanced Operations
Menu access and operations
Advanced Operations - Menu access and operations
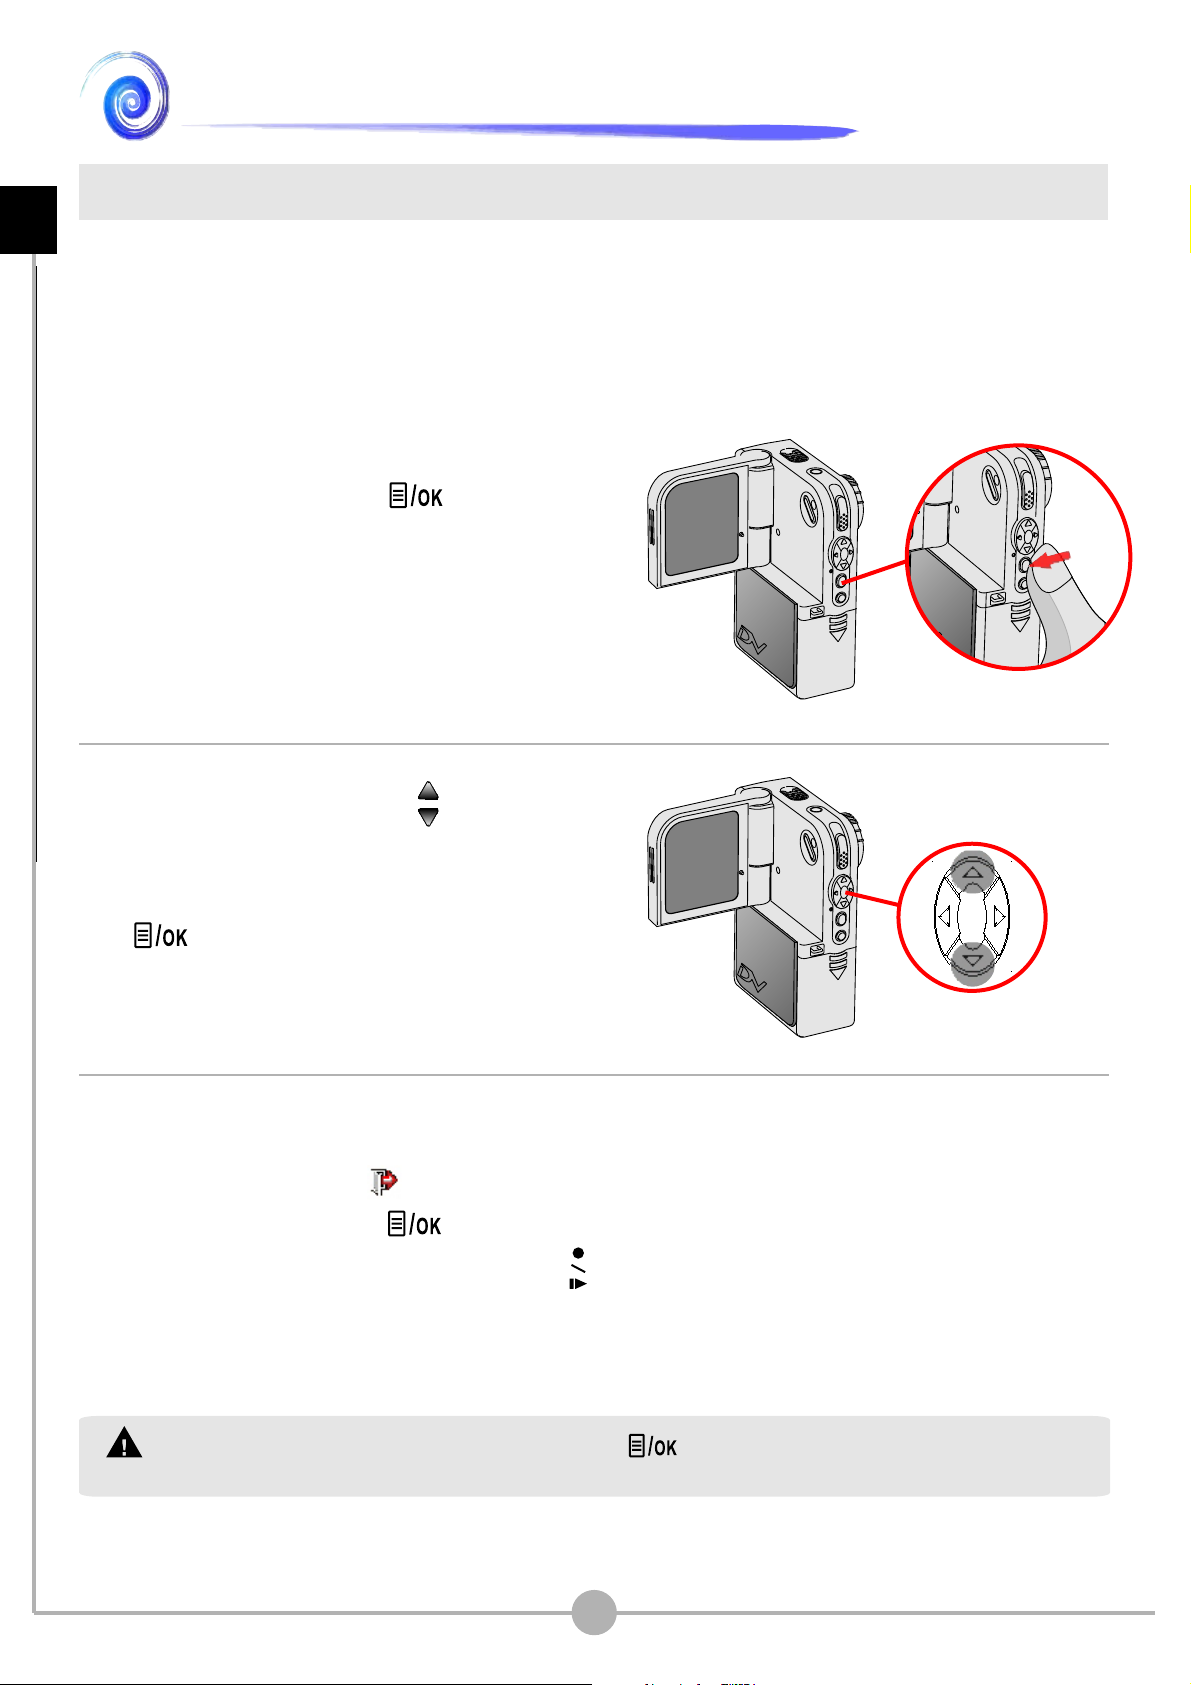
In several modes, you can bring up the menu to fine tune the camera settings by
changing the menu items. The following describes how you can bring up the menu
and perform normal operations to complete an action:
1. Set the Mode Dial to your target mode.
Press the Menu/OK ( ) button to
bring up the menu.
2. Press the Up or Down ( ) button to
select the target item. Once the target
item is selected, press the Menu/OK
( ) button to confirm the selection.
3. If you want to exit a menu screen, you
can select the Exit ( ) item and
press the Menu/OK ( ) button, or
you can press the Record/Shutter ( )
button to quick-exit the menu.
In the Voice Recording mode, the Menu/OK ( ) button has no function.
26
Page 28
Digital Video Camcorder menu
Changing the video resolution
Before recording a video clip, you can change the resolution to suit your viewing
preferences.
To change the video resolution:
1. While in Digital Video Camcorder mode, press the Menu/OK ( ) button.
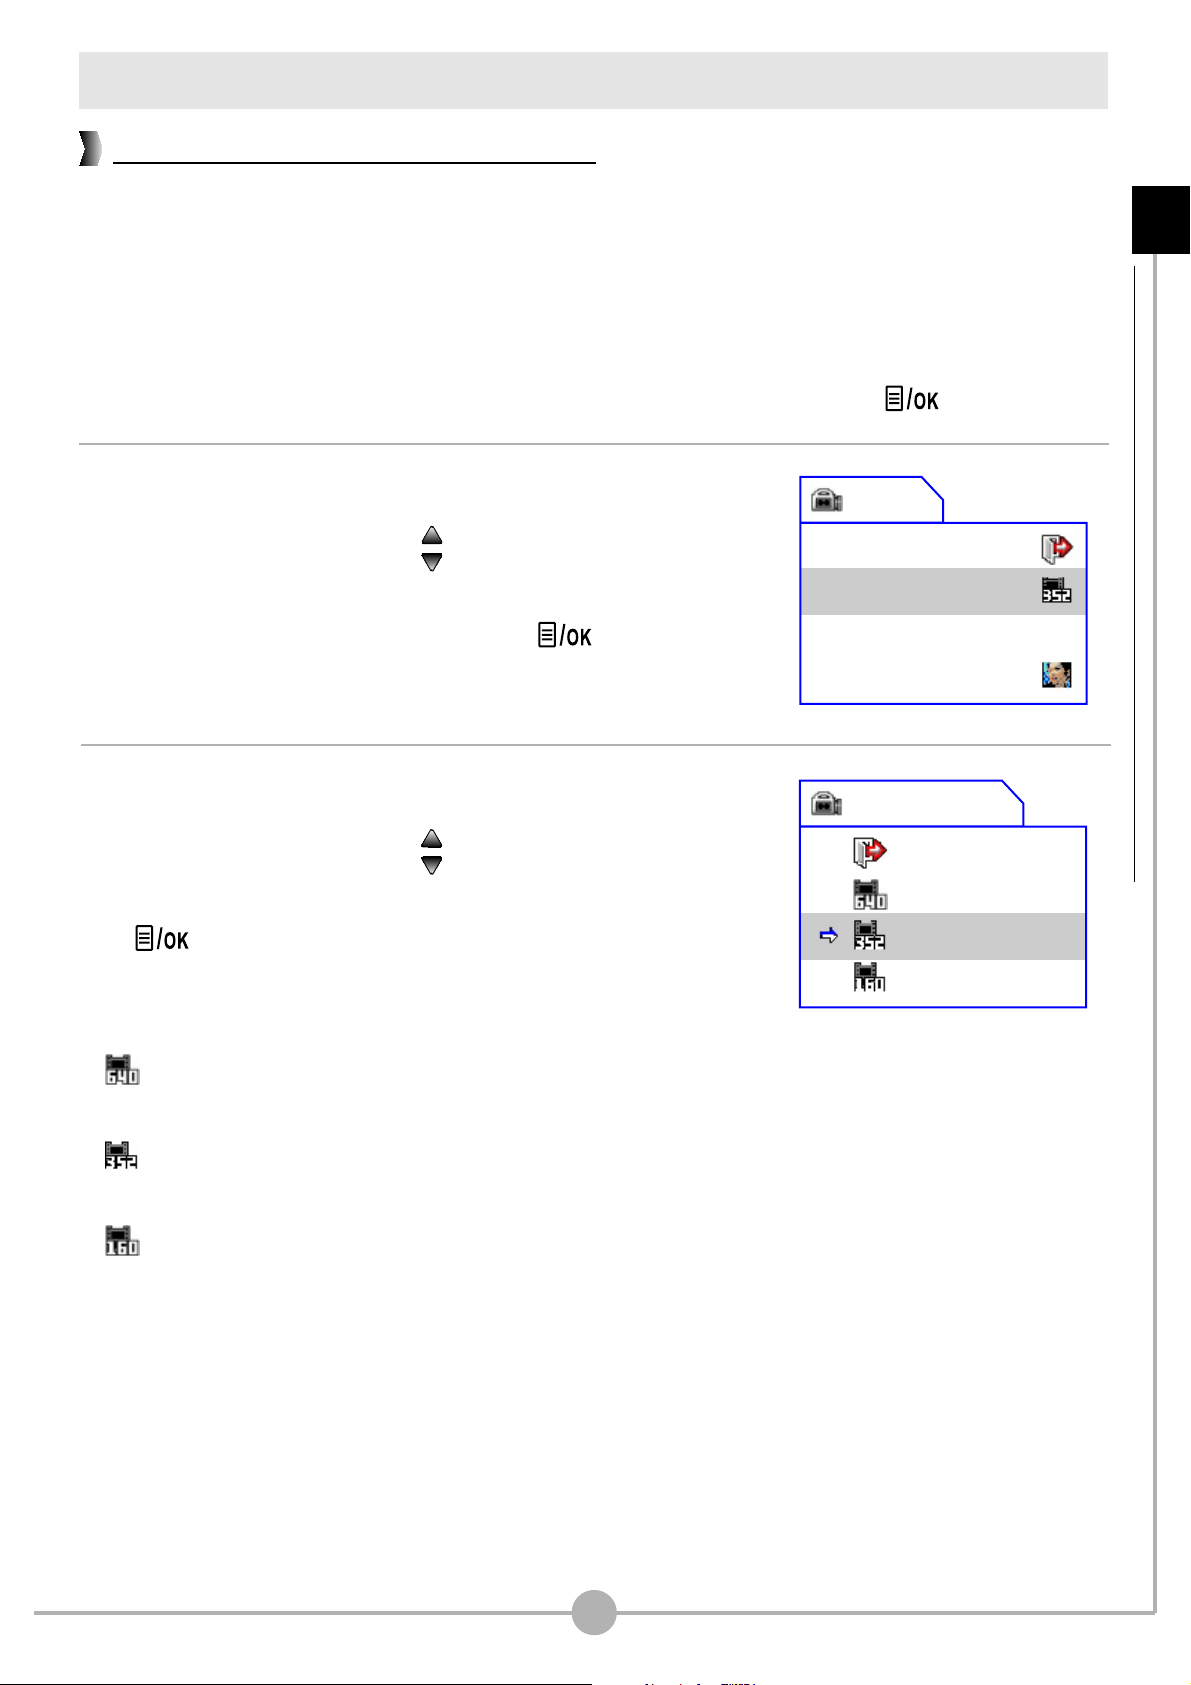
2. A menu as illustrated on the right will appear.
Press the Up or Down ( ) button to highlight
the Resolution item. Once the Resolution item is
highlighted, press the Menu/OK ( ) button.
Menu
Exit
Resolution
Exposure
Effect
3. A sub-menu as illustrated on the right will appear.
Resolution
Advanced Operations - Digital Video Camcorder menu
0.0
Press the Up or Down ( ) button to select a
resolution setting, and then press the Menu/OK
( ) button to apply.
The three items you can choose from are:
640x480: best resolution, suitable for shooting
stable subjects.
352x288: suitable for viewing on TV. The display
quality is similar to VCD.
160x128: low resolution with the smoothest flow.
Exit
640x480
352x288
160x128
27
Page 29
Digital Video Camcorder menu (continued)
Adjusting exposure compensation
You can manually adjust the exposure to gain better effect when the previewed
image appears too bright or too dark.
Advanced Operations - Digital Video Camcorder menu (continued)
To adjust exposure compensation:
1. While in Digital Video Camcorder mode, press the Menu/OK ( ) button.
2. A menu as illustrated on the right will appear.
Press the Up or Down ( ) button to highlight
the Exposure item. Once the Exposure item is
highlighted, press the Menu/OK ( ) button.
3. A sub-menu as illustrated on the right will appear.
Press the Up or Down ( ) button to select an item
and then press the Menu/OK ( ) button to apply.
The applicable value ranges from -1.5 to +1.5. A
positive value indicates the display will be brighter than
usual; while a negative value makes the display
Menu
Exit
Resolution
Exposure
Effect
Exposure
+0.3
0.0
-0.3
-0.6
0.0
dimmer. The default setting is 0.0.
28
Page 30
Digital Video Camcorder menu (continued)
Applying special effects to movie clips
When recording a video clip, you can apply a special effect to the clip to add a
personal touch.
To select a special effect:
1. While in Digital Video Camcorder mode, press the Menu/OK ( ) button.
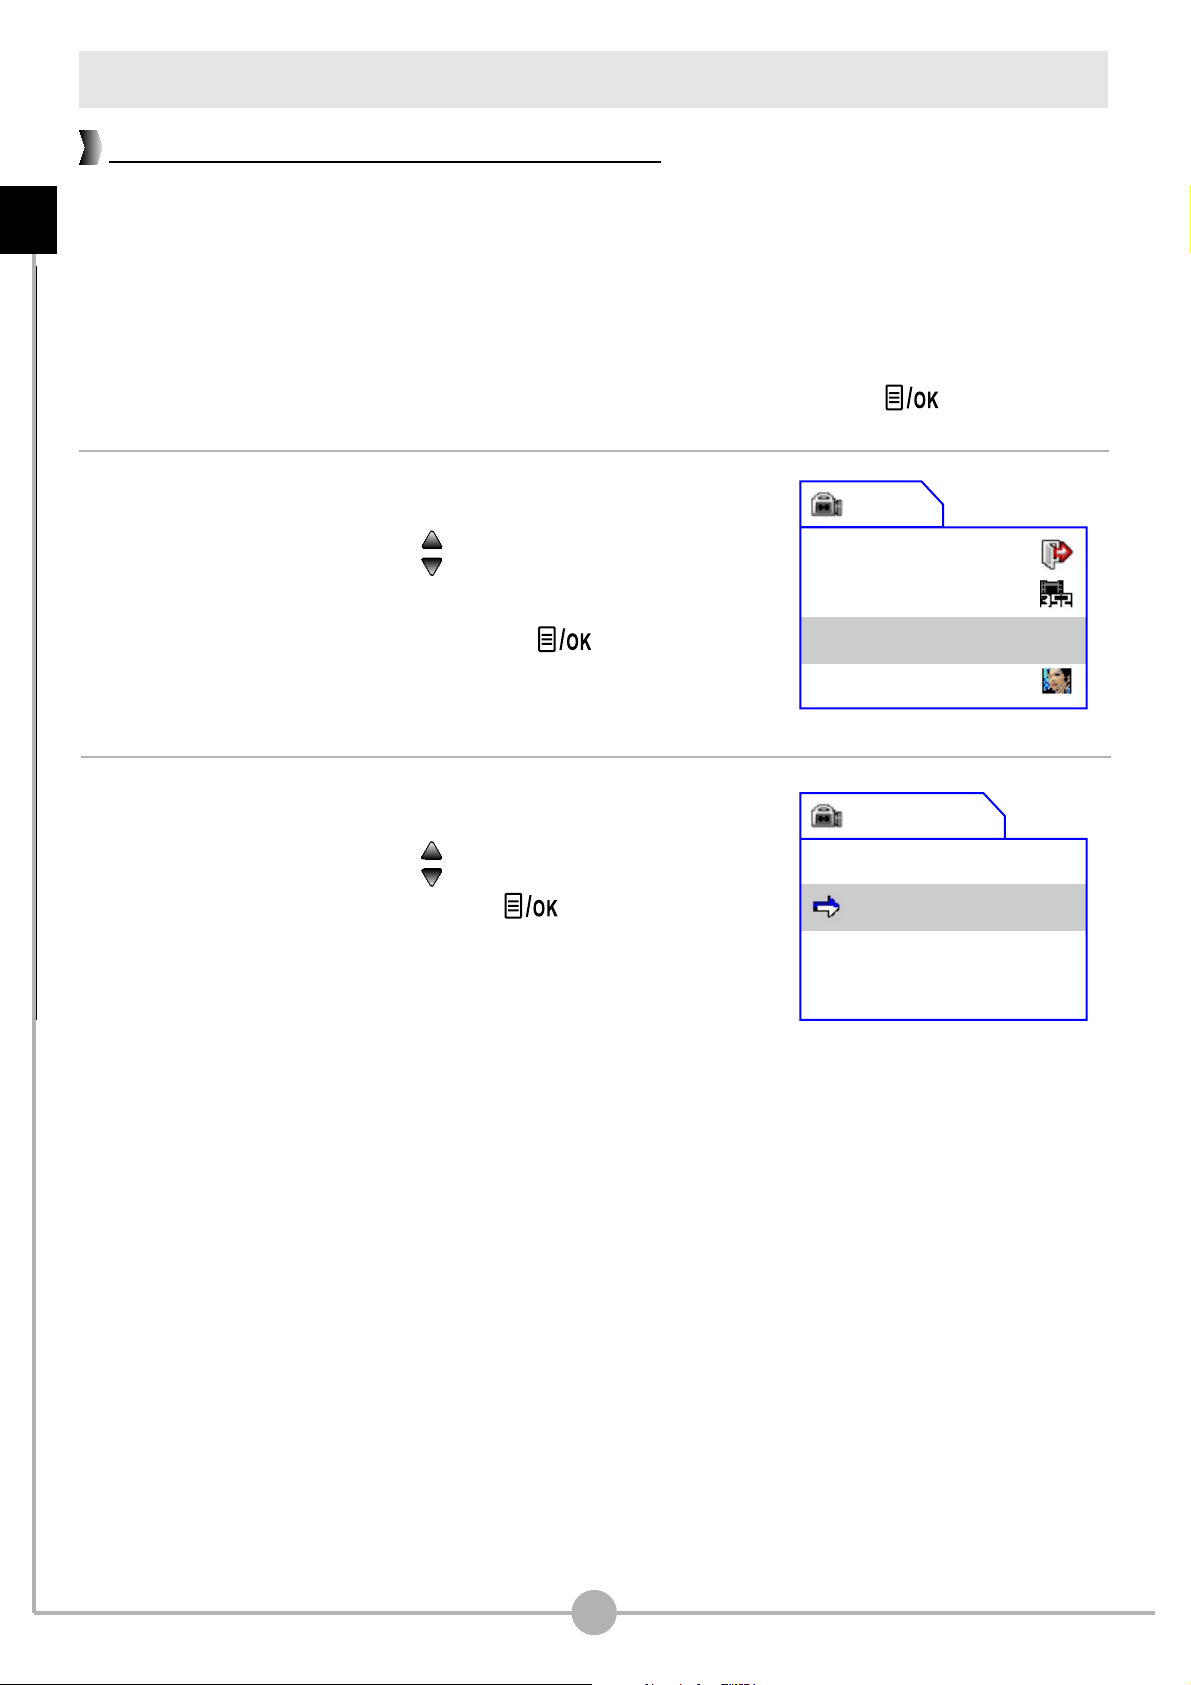
2. A menu as illustrated on the right will appear.
Press the Up or Down ( ) button to highlight the
Effect item. Once the Effect item is highlighted,
press the Menu/OK ( ) button.
Menu
Exit
Resolution
Exposure
Effect
3. A sub-menu as illustrated on the right will appear.
Effect
Advanced Operations - Digital Video Camcorder menu (continued)
0.0
Press the Up or Down ( ) button to highlight an
item, and then press the Menu/OK ( ) button to
apply.
The three effects you can choose from are:
Normal: This option allows you to record the
movie in natural color. It is also the default setting.
B / W: This option allows you to record the movie
in black and white.
Classic: With this option selected, the movie will
be sepia-toned, making the movie look like an
old classic film.
Exit
Normal
B/W
Classic
29
Page 31

Digital Still Camera menu
Changing picture resolution
Changing the resolution will affect the number of pictures that can be taken. The
Advanced Operations - Digital Still Camera menu
higher the resolution, the more memory-demanding the images will be.
To change the video resolution:
1. While in Digital Still Camera mode, press the Menu/OK ( ) button.
2. A menu as illustrated on the right will appear.
Press the Up or Down ( ) button to highlight the
Resolution item. Once the Resolution item is
highlighted, press the Menu/OK ( ) button.
3. A sub-menu as illustrated on the right will appear.
Press the Up or Down ( ) button to select an item
and then press the Menu/OK ( ) button to apply.
The three items you can choose from are:
2048X1536: the most memory-demanding option.
This resolution is ideal for developing 3x5 or 4x6
Menu
Exit
Resolution
Self Timer
White Balance
Resolution
Exit
2048X1536
1600X1200
640X480
pictures.
1600X1200: the mediocre option. This resolution
is also suitable for developing 3x5 or 4x6 pictures.
640X480: the most memory-saving option. This
resolution is suitable for viewing on the computer.
30
Page 32

Digital Still Camera menu (continued)
Using the self-timer
This function comes in handy when you want to take a self-portrait picture.
To enable the self timer:
1. While in Digital Still Camera mode, press the Menu/OK ( ) button.
2. A menu as illustrated on the right will appear.
Press the Up or Down ( ) button to highlight the
Self Timer item. Once the Self Timer item is
highlighted, press the Menu/OK ( ) button.
Menu
Exit
Resolution
Self Timer
White Balance
3. A sub-menu as illustrated on the right will appear.
Press the Up or Down ( ) button to select On and
Self Timer
Exit
Advanced Operations - Digital Still Camera menu (continued)
press the Menu/OK ( ) button to apply.
After the self timer is turned on, the camera will have
ten seconds delay before taking a picture when the
Record/Shutter ( ) button is pressed. After the shutter
fires, the self timer will be automatically disabled.
Off
On
31
Page 33

Digital Still Camera menu (continued)
Adjusting the white balance
You can manually select the white balance setting to suit the shooting
Advanced Operations - Digital Still Camera menu (continued)
environment.
To select a white balance setting:
1. While in Digital Still Camera mode, press the Menu/OK ( ) button.
2. A menu will appear. Press the Up or Down ( )
button to highlight the White Balance item. Once
the White Balance item is highlighted, press the
Menu/OK ( ) button.
3. Press the Up or Down ( ) button to scroll page and
select an item. Then press the Menu/OK ( )
button to apply.
There are five effects you can choose from:
Auto: The camera will determine the best white
balance setting for your shooting environment.
Menu
Exit
Resolution
Self Timer
White Balance
White Balance
Exit
Auto
Sunny
Cloudy
White Balance
Sunny: suitable for normal outdoor shooting in
sunny weather.
Cloudy: suitable for shooting under cloudy
weather or shady environments.
Tungsten: suitable for indoor shooting with
incandescent lamp lighting, or environments with
low color temperature.
Fluorescent: suitable for indoor shooting with
fluorescent lamp lighting, or environments with
high color temperature.
32
Tungsten
Fluorescent
Page 34

Digital Still Camera menu (continued)
Adjusting exposure compensation
You can manually adjust the exposure to gain better effects when the previewed
image appears too bright or too dark.
To adjust exposure compensation:
1. While in Digital Still Camera mode, press the Menu/OK ( ) button.
2. A menu will appear. Press the Up or Down ( )
button to scroll page and highlight the Exposure
item. Once the Exposure item is highlighted, press
the Menu/OK ( ) button.
3. A sub-menu as illustrated on the right will appear.
Menu
Exposure
Effect
Date Stamp
Exposure
Advanced Operations - Digital Still Camera menu (continued)
0.0
Press the Up or Down ( ) button to select an item
and then press the Menu/OK ( ) button to apply.
The applicable value ranges from -1.5 to +1.5. A
positive value indicates the display will be brighter than
usual; while a negative value makes the display
dimmer. The default setting is 0.0.
+0.3
0.0
-0.3
-0.6
33
Page 35

Digital Still Camera menu (continued)
Applying special effects to still pictures
You can apply special effects to your pictures to add a personal touch.
Advanced Operations - Digital Still Camera menu (continued)
To select a special effect:
1. While in Digital Still Camera mode, press the Menu/OK ( ) button.
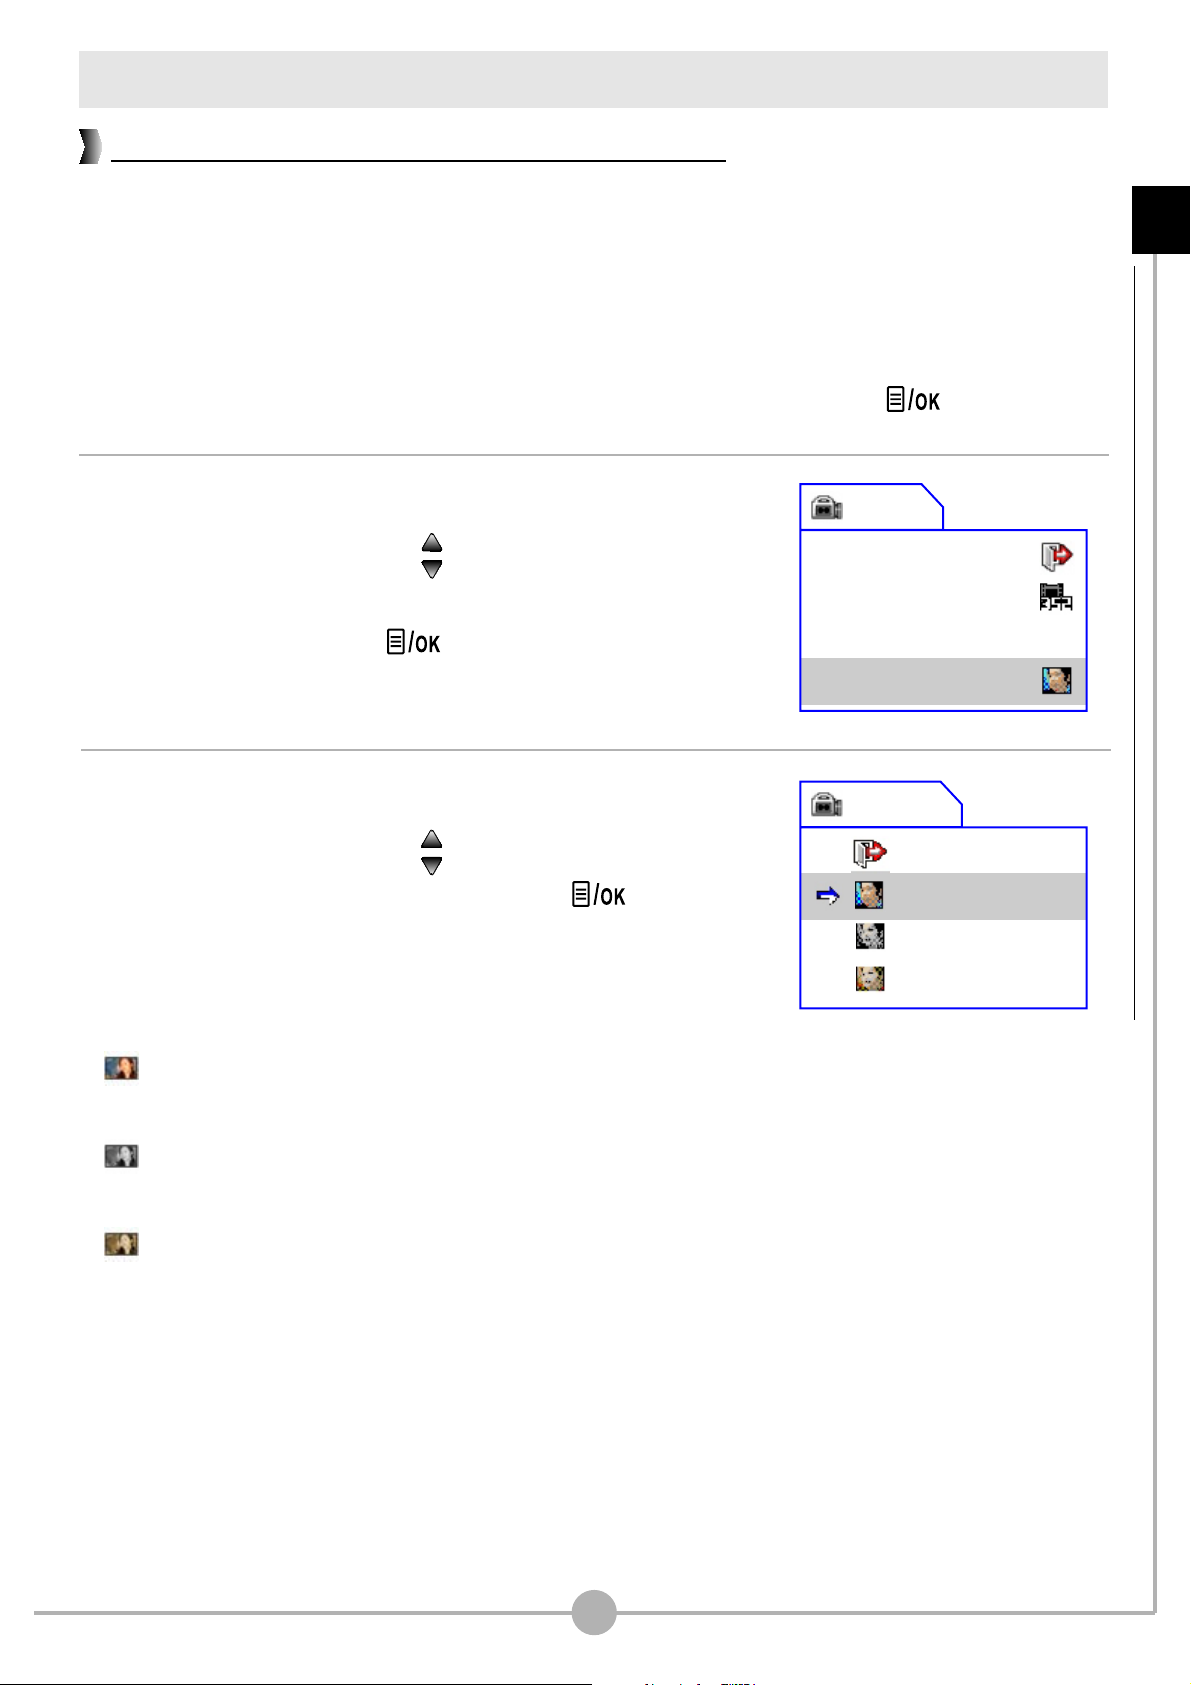
2. A menu will appear. Press the Up or Down ( )
button to scroll page and highlight the Effect item.
Once the Effect item is highlighted, press the
Menu/OK ( ) button.
3. A sub-menu as illustrated on the right will appear.
Press the Up or Down ( ) button to select an item
and then press the Menu/OK ( ) button to apply.
The three effects you can choose from are:
Normal: This option allows you to take the picture
in natural color. It is also the default setting.
Menu
Exposure
Effect
Date Stamp
Effect
Exit
Normal
B/W
Classic
0.0
B / W: This option allows you to take the picture
in black and white.
Classic: With this option selected, the picture will
be sepia-toned, making the image look like an old
photo.
34
Page 36

Digital Still Camera menu (continued)
Using the date stamp
Enabling the date stamp will print the date of shooting on the picture.
To enable the date stamp:
1. While in Digital Still Camera mode, press the Menu/OK ( ) button.
2. A menu as illustrated on the right will appear.
Press the Up or Down ( ) button to highlight the
Date Stamp item. Once the Date Stamp item is
highlighted, press the Menu/OK ( ) button.
3. A sub-menu as illustrated on the right will appear.
Press the Up or Down ( ) button to select On and
Menu
Exposure
Effect
Date Stamp
Date Stamp
Exit
Advanced Operations - Digital Still Camera menu (continued)
0.0
press the Menu/OK ( ) button to apply.
After the date stamp is turned on, a date mark will be
printed on the pictures taken.
Before enabling this function, please make sure that the date and time are correctly set
up. See page 48 for more information.
Off
On
35
Page 37

Playback menu
Deleting files
While reviewing your recordings, you can delete the files that you do not want to
Advanced Operations - Playback menu
preserve.
To delete a file or all files:
1. While in Playback mode, press the Menu/OK ( ) button.
2. A menu will appear. Press the Up or Down ( )
button to highlight the Delete or Del All item
depending on your purpose. Once the desired item
is selected, press the Menu/OK ( ) button.
3. Depending on the item you select, the corresponding
sub-menu will appear. If you select Delete to delete
one file, you can use the Left or Right ( ) button
to shift between files in the sub-menu. Press the Up
or Down ( ) button to select the check mark and
then press the Menu/OK ( ) button to confirm
the deletion.
Menu
Exit
Delete
Delete All
Info
Delete
Exit
Delete
8/11
Sure?
Delete current file?
Delete All
You can not delete a file that has been locked. Please
see page 38 for more information.
36
Exit
Delete All
Sure?
Delete all files?
Page 38

Playback menu (continued)
Viewing file information
The file information provides you data such as date of recording, file size, and
lock status.
To view the file information:
1. While in Playback mode, press the Menu/OK ( ) button.
2. A menu will appear. Press the Up or Down ( )
button to highlight the Info item. Once the Info item
is highlighted, press the Menu/OK ( ) button.
Exit
Delete
Delete All
Info
Advanced Operations - Playback menu (continued)
Menu
3. An info page of the file will then
appear. Note that the actual
display shown depends on the
file type. You can also press the
Right or Left ( ) button to shift
between files. When you want to
exit, press the Menu/OK ( )
button.
If there is a lock icon ( ) on the screen, it indicates the file has been locked.
File type
Lock icon
File size
Info
IMG-0003.jpg
640X480
2003/08/01
158 KB
00:00:30
File name
Resolution
Date
Recording
time
37
Page 39

Playback menu (continued)
Locking files
The locking file function can prevent files from being accidently erased.
Advanced Operations - Playback menu (continued)
To lock a file or all files:
1. While in Playback mode, press the Menu/OK ( ) button.
2. A menu will appear. Press the Up or Down ( )
button to scroll page and highlight the Lock or Lock
All item. Once the desired item is selected, press
the Menu/OK ( ) button.
3. Depending on the item you select, the
corresponding sub-menu will appear. If you select
Lock to lock one file, you can use the Left or Right
( ) button to shift between files in the sub-menu.
Press the Up or Down ( ) button to select the
check mark and then press the Menu/OK ( )
button to confirm the lock action.
Menu
Lock
Lock All
Index
Lock This?
Exit
Yes
No
Lock current file?
Lock All?
38
Exit
Yes
No
Lock all files?
Page 40

Playback menu (continued)
Sorting files
The sorting file function allows you to select the file type you want the camera to
display in the thumbnail mode.
To enable the sorting file function:
1. While in Playback mode, press the Menu/OK ( ) button.
2. A menu will appear. Press the Up or Down ( )
button to scroll page and highlight the Index item.
Once the Index item is selected, press the
Menu/OK ( ) button.
Lock
Lock All
Index
3. A sub-menu as illustrated on the right will appear.
Advanced Operations - Playback menu (continued)
Menu
Index
Press the Up or Down ( ) button to select a file
type and then press the Menu/OK ( ) button to
confirm the selection. After the file type is
determined, only files of the selected type will be
displayed in the thumbnail mode.
ALL
Picture
Video
Audio
39
Page 41

Playing MP3 music
Copying MP3 files to the camera
Before you can play MP3 music, you need to
Advanced Operations - Playing MP3 music
copy MP3 files to the camera.
1. To upload MP3 files to the camera, you need
to connect the camera to a PC using the USB
cable. For details on connecting the camera to
your PC, please see page 56.
2. After the camera is connected to the PC, double-click
on My Computer and you will find a removable disk.
Inside the removable disk you can locate a MP3
folder. Then you can copy the desired MP3 files into
the folder for playing.
For MP3 files
To take advantage of the removable disk function, Windows 98SE users may need to
install the USB Mass Storage Driver. For details on the installation, please refer to page
54-55.
40
Page 42

Playing MP3 music (continued)
1/3
00:00:56
0001
track01.MP3
00:04:30
Playing MP3 files
1. Set the Mode Dial to MP3 mode, and you are
ready to play MP3 music. The LCD display will
show the screen as below:
LCD Display
: hold
none: unhold
Mode icon
Status icon:
: repeat
none: no repeat
Track index
Current / Total tracks
Advanced Operations - Playing MP3 music (continued)
Storage media:
: internal memory
: SD/MMC card
File name
Length
Playing time
Play / Pause / Stop
2. The available function buttons in MP3
mode are as illustrated on the right.
Previous file
(Rewind)
Play / Pause
Volu me u p
Next file (Fast wind)
Volume down
Menu / OK
( ) during playing
41
Page 43

MP3 menu
You can use several functions provided by the MP3 menu. Note that there are no
MP3 files in the camera, the menu cannot be activated.
Advanced Operations - MP3 menu
Repeat playing
You can repeat playing to save the trouble of pressing the play button.
To repeat playing MP3 music:
1. While in MP3 mode, press the Menu/OK ( ) button.
2. A menu as illustrated on the right will appear.
Press the UP or Down ( ) button to select
Repeat item. Once the Repeat item is selected,
press the Menu/Ok ( ) button.
3. A sub-menu as illustrated on the right will appear.
Press the Up or Down ( ) button to select Yes,
and then press the Menu/OK ( ) button to
confirm the selection.
Menu
Exit
Repeat
3D Enhance
Bass
Repeat
Exit
Yes
No
42
Page 44

MP3 menu (continued)
Setting 3D enhancement
You can enable the 3D enhancement effect to enrich the sound quality.
To enable the 3D enhancement effect:
1. While in MP3 mode, press the Menu/OK ( ) button.
2. A menu as illustrated on the right will appear.
Press the UP or Down ( ) button to select 3D
Enhance item. Once the 3D Enhance item is
selected, press the Menu/Ok ( ) button.
3. A sub-menu as illustrated on the right will appear.
Advanced Operations - MP3 menu (continued)
Menu
Exit
Repeat
3D Enhance
Bass
3D Enhance
Press the Up or Down ( ) button to select a
desired item, and then press the Menu/OK ( )
button to confirm the selection:
Strong: The 3D effect is the strongest.
Low: The 3D effect is moderate.
Off: The 3D effect is disabled.
Exit
Strong
Low
Off
43
Page 45

MP3 menu (continued)
Setting bass effect
You can enhance the sound quality by enabling the bass effect.
Advanced Operations - MP3 menu (continued)
To enable the bass effect:
1. While in MP3 mode, press the Menu/OK ( ) button.
2. A menu will appear. Press the Up or Down ( )
button to highlight the Bass item. Once the Bass
item is selected, press the Menu/OK ( ) button.
3. A sub-menu as illustrated on the right will appear.
Press the Up or Down ( ) button to select a
desired item, and then press the Menu/OK ( )
button to confirm the selection:
Strong: The Bass effect is the strongest.
Low: The Bass effect is moderate.
Off: The Bass effect is disabled.
Menu
Exit
Repeat
3D Enhance
Bass
Bass
Exit
Strong
Low
Off
44
Page 46

MP3 menu (continued)
Viewing MP3 info
This item enables you to view the MP3 file information.
To enable the bass effect:
1. While in MP3 mode, press the Menu/OK ( ) button.
2. A menu will appear. Press the Up or Down ( )
button to scroll page and highlight the Info item.
Once the Info item is selected, press the Menu/OK
( ) button.
3. A sub-menu as illustrated on
Info
Advanced Operations - MP3 menu (continued)
Menu
Info
Delete
Hold
the right will appear. The
information of the selected
file will be displayed on the
screen. You can also press
the Right or Left ( ) button
to shift between files. When
you want to exit, press the
Menu/OK ( ) button.
Status icon:
: repeat
none: no repeat
0001
Filename.MP3
00:03:50
3858 KB
Track index
File name
Length
File size
45
Page 47

MP3 menu (continued)
Deleting MP3 files
Deleting MP3 files can free some memory space for other purposes.
Advanced Operations - MP3 menu (continued)
To delete MP3 files:
1. While in MP3 mode, press the Menu/OK ( ) button.
2. A menu will appear. Press the Up or Down ( )
button to scroll page and highlight the Delete item.
Once the Delete item is selected, press the
Menu/OK ( ) button.
3. A sub-menu as illustrated on the right will appear.
Press the Up or Down ( ) button to select Delete,
and then press the Menu/OK ( ) button to
confirm the deletion.
Menu
Info
Delete
Hold
Delete
Exit
Delete
1/3
Sure?
46
Page 48

MP3 menu (continued)
Holding button settings
Holding the button settings can prevent current status from being changed, so
that you can carry the camera without worrying about the settings being changed.
To hold button settings:
1. While in MP3 mode, press the Menu/OK ( ) button.
2. A menu will appear. Press the Up or Down ( )
button to scroll page and highlight the Hold item.
Once the Hold item is selected, press the Menu/OK
( ) button.
3. A sub-menu as illustrated on the right will appear.
Menu
Info
Delete
Hold
Hold
Advanced Operations - MP3 menu (continued)
Press the Up or Down ( ) button to select Yes,
and then press the Menu/OK ( ) button to
confirm the selection.
4. To unlock the status, press any button except the
power button, and a menu will pop up as indicated.
Press the Up or Down ( ) button to select Yes,
and then press the Menu/OK ( ) button to
confirm.
Make sure the settings are correctly configured before activating this function.
Exit
Yes
Unhold?
Exit
Yes
47
Page 49

Camera Settings
Switching to Settings mode
Set the Mode Dial to Settings mode, and you can fine
tune several functions of the camera.
Camera Settings - Switching to Settings mode / Setting the date and time
When you set the Mode Dial to the Settings mode, the
menu as illustrated will display. For details on each
setting, please refer to the corresponding page.
Settings
page 48
page 49
page 49
page 50
Time 2003/01/01
Beep
Flicker
TV System
menu page 1
page 50
page 51
page 51
page 52
Setting the date and time
1. While in Settings mode, use the Up and Down
( ) buttons to highlight the Time item, and
then press the Menu/Ok ( ) button to
enter the sub-menu.
Settings
Language
Auto Off
Format
Default
menu page 2
2. Use the Right and Left ( ) buttons to shift
between items. Use the Up and Down ( )
buttons to adjust the value. When the settings
are done, press the Menu/OK ( ) button to
confirm.
48
Time
2003/01/01
00:00:00
Page 50

Setting the beep sound
1. While in Settings mode, use the Up and Down
( ) buttons to highlight the Beep item, and
then press the Menu/Ok ( ) button to
enter the sub-menu.
Camera Settings - Setting the beep sound / Setting the flicker
2. Use the Up and Down ( ) buttons to select On
or Off. When the desired item is selected, press
the Menu/OK ( ) button to confirm.
Setting the flicker
1. While in Settings mode, use the Up and Down
( ) buttons to highlight the Flicker item, and
then press the Menu/Ok ( ) button to
enter the sub-menu.
Beep
Exit
On
Off
2. Use the Up and Down ( ) buttons to select
the desired flicker setting. When the desired
item is selected, press the Menu/OK ( )
button to confirm.
If you travel to another country, the flicker setting may not suit the country you are
staying in. For more details on flicker settings, please refer to page 68.
49
Flicker
Exit
50Hz
60Hz
Page 51

Setting the TV system
1. While in Settings mode, use the Up and Down
( ) buttons to highlight the TV System item,
and then press the Menu/Ok ( ) button to
enter the sub-menu.
Camera Settings - Setting the TV system / Setting the language
2. Use the Up and Down ( ) buttons to select a
suitable item. When the settings are done, press
the Menu/OK ( ) button to confirm.
If you travel to another country, the TV system setting may not suit the country you are
staying in. For more details on TV system settings, please refer to page 69.
Setting the language
1. While in Settings mode, use the Up and Down
TV System
Exit
PAL
NTSC
( ) buttons to highlight the Language item,
and then press the Menu/Ok ( ) button to
enter the sub-menu.
2. Use the Up and Down ( ) buttons to select a
suitable language. When the desired item is
selected, press the Menu/OK ( ) button to
confirm.
50
Language
Exit
English
German
Page 52

Setting auto-off
1. While in Settings mode, use the Up and Down
( ) buttons to highlight the Auto Off item, and
then press the Menu/Ok ( ) button to enter
the sub-menu.
Camera Settings - Setting auto-off / Formatting media
2. Use the Up and Down ( ) buttons to select a
desired item. When the desired item is selected,
press the Menu/OK ( ) button to confirm.
Formatting media
1. While in Settings mode, use the Up and Down
( ) buttons to highlight the Format item, and
then press the Menu/Ok ( ) button to enter
the sub-menu.
Auto Off
Exit
1Min
3Min
5Min
2. Use the Up and Down ( ) buttons to select
Yes, and then press the Menu/OK ( ) button
to confirm.
Formatting the media will erase all files stored in the SD/MMC card or internal memory.
Note that locked files will also be erased.
51
Format
Exit
Yes
Sure?
Page 53

Restoring default settings
1. While in Settings mode, use the Up and Down
( ) buttons to highlight the Default item, and
then press the Menu/Ok ( ) button to enter
the sub-menu.
Camera Settings - Restoring default settings
2. Use the Up and Down ( ) buttons to select
Yes, and then press the Menu/OK ( ) button
to confirm.
Restoring default settings will override your current settings.
Default
Exit
Yes
Return to
init. setting?
52
Page 54

Copying Files to Your PC
Page 55

Copying Files to Your PC
Installing MoviePix M-330 Manager on your PC
You need to install MoviePix M-330 Manager to ensure that video clips can be
played back on your PC. To install the software:
Copying Files to Your PC - Installing MoviePix M-330 Manager on your PC
1. Turn on your computer. Then place the accessory CD into the CD-ROM drive.
Do not connect the USB cable to your computer now.
Shut down all other applications running on your computer.
If the title screen does not appear automatically, please double-click on My Computer
and then the CD-ROM drive. Then browse to the folder "\MoviePix M-330 Driver" and
start the Setup.exe program manually.
2. Click on the icon to launch the
installation of MoviePix M-330
Manager.
Notice for Windows 2000 users:
During the installation process, the warning message regarding digital signature may
appear twice or more. Please click Yes to continue the process. The software is fully
compatible with Windows 2000 operation system.
54
Page 56

Installing MoviePix M-330 Manager on your PC (continued)
3. The Install Shield Wizard will then appear and
automatically install the program. Please click on
Next and follow the on-screen instructions to
complete the installation.
4. The program will prompt you to install Windows
Media Player Codecs. If you are not sure if the
codec has been installed in your computer,
please click Yes.
Copying Files to Your PC - Installing MoviePix M-330 Manager on your PC (continued)
5. The program will prompt you to install Windows
Media Format 9 Series Runtime. If you are not
sure if this program has been installed in your
computer, please click Yes.
6. The program will prompt you to install Direct X
8.0 or above. If you are not sure if this program
has been installed in your computer, please click
Yes to continue.
Windows Media Player Codecs, Windows Media Format 9 Series Runtime and
Direct X 8.0 or above are necessary for viewing the video clips recorded by the camera.
7. After the installation is completed, you may need to
restart your computer for the driver to take effect.
55
Page 57

Connecting the camera to your PC
1. Turn on your computer, and then
connect the USB cable to the USB
port of your computer. Make sure
the cable and the port are correctly
aligned.
Copying Files to Your PC - Connecting the camera to your PC
2. Set the camera to any mode except Live
( ) mode, and then connect the other
end of the USB cable to your camera.
Notice for Windows 2000/XP/ME users:
If you select DISK mode and then want to disconnect the camera from your computer,
please follow these steps:
1. Double-click on the system tray.
2. Click (USB Disk), and then click Stop.
3. Select the camera when the confirmation screen appears and click OK.
4. Follow the on-screen instructions to safely disconnect the camera from your computer.
56
Page 58

Copying files to the PC
1. This step varies depending on your operation
system:
For Windows XP users:
After the camera is connected to your
computer, a dialogue window will appear
automatically. Please select the item Open
folder to view files using Windows
Explorer and click OK.
For Windows 2000/ME/98SE users:
Double-click on My Computer. Then double-click on the icon of the
removable disk that has just appeared.
Copying Files to Your PC - Copying files to the PC
Some users may find two removable disks appear under My Computer, that is because
the OS detects two storage media in the camera (the internal memory and the SD/MMC
card). If you can not find your files in one of the disks, please try to find them in the other
disk.
57
Page 59

Copying files to the PC (continued)
2. Double-click on the DCIM file folder.
Copying Files to Your PC - Copying files to the PC (continued)
3. Double-click on the 100MEDIA file folder.
4. Drag the target file into My Documents or the destination folder.
58
Page 60

Viewing/Playing files on your PC
1. Double-click on My Documents or any other folder that stores your files.
Copying Files to Your PC - Viewing/Playing files on your PC
2. Double-click on the desired file, and the file will be opened by the program
matching the file's type.
59
Page 61

File location
After connecting the camera to your
computer, a removable disk will appear
in your computer. Under the disk you
can find all files stored in your camera.
See the figure in the right to see where
different types of files are located. Note
Copying Files to Your PC - File location
that MP3 format files must be copied
into the MP3 folder, or the camera will
not be able to locate the MP3 files.
60
Page 62

Using MoviePix M-330 Manager
Page 63

Using MoviePix M-330 Manager
Installing MoviePix M-330 Manager
You need to install MoviePix M-330 Manager to take advantage of the provided
functions. If you have not yet installed the software, please refer to page 54 for
details on installing the package.
Using MoviePix M-330 Manager - Installing MoviePix M-330 Manager / Before starting the application
Before starting the application
After the installation is completed, please follow
these steps to prepare for starting the program.
1. Set the Mode Dial to Live ( ) mode.
2. Connect the camera to your computer with the
USB cable. Your computer will automatically
detect the camera and finish all necessary
settings.
Notice for Windows ME users:
When the following screen appears, please select
Automatic search for a better driver and click Next
to continue.
62
Page 64

Before starting the application (continued)
Notice for Windows 98SE users:
1. Click Next when the following screen appears.
2. When the following screen appears, please select Search for the best driver for your
device and click Next to continue.
Using MoviePix M-330 Manager - Before starting the application (continued)
3. During the installation process, some users might be asked to insert a licensed 98SE
CD into the CD-ROM drive to copy the needed files.
4. Follow the on-screen instructions to finish the installation.
Notice for Windows 2000 users:
During the installation process, the following warning message may appear twice or more.
Please click Yes to continue the process. The camera is fully compatible with Windows
2000 operation system.
63
Page 65

Starting the application
1. Select the operation mode:
Disk mode: Please set the Mode Dial to , , , , , or . In this
mode, you can manage your files using MoviePix M-330 Manager.
Live mode: Please set the Mode Dial to . In this mode, you can activate
the PC Camera function using MoviePix M-330 Manager. You can also take
advantage of Video Conference function using other software.
Using MoviePix M-330 Manager - Starting the application
2. Connect the USB cable to your camera and the computer.
3. Double-click the MoviePix M-330 icon on the Desktop to start the program.
After the program is started, you can begin to use MoviePix M-330 Manager.
If you cannot find the program shortcut on the desktop, you can start the program from
the Programs menu.
64
Page 66

MoviePix M-330 Manager - File Management
After starting MoviePix M-330 Manager, the following File Management interface
will appear if the camera is not set to Live ( ) mode. In this mode, you can
directly preview the files stored in the camera. Moreover, you can also choose to
copy, delete, email, or play your recordings.
Double-click to play the file.
Delete
Select all
DV Disk:
DCIM -> 100MEDIA:
folder for storing ASF,
JPG, WAV files.
MP3: folder for storing
MP3 files.
(1) (2) (3) (4) (5)
Using MoviePix M-330 Manager - MoviePix M-330 Manager - File Management
Copy to
Mail to
Picture Enhancement
Slide show
65
(1)
Previous
(2)
Play
(3)
Stop slide show
(4)
Pause
(5)
Next
Page 67

MoviePix M-330 Manager - File Management (continued)
Picture enhancement
Press the button to use
this function. After "Picture
Enhancement" is set, the
picture will be automatically
enhanced when you press
the button to copy the
Using MoviePix M-330 Manager - MoviePix M-330 Manager - File Management (continued)
picture to your PC.
Downloading files to your PC
While in Disk mode, your camera
functions as a removable disk, and
you can directly download files to your
computer:
Normal Enhanced
640x480 1280x1024
1600x1200
2048x1536
2048x1536
2272x1704
1) Select one file or press the
button to select all files.
2) Press the button to copy the
selected files to a target folder.
Use Windows Explorer to copy files
from the removable disk to a target
folder on your computer.
Removable Disk
Slide show
Select files you want to play, and then press
the button to start the slide show. Use
the panel to control the playing.
66
Page 68

MoviePix M-330 Manager - PC Camera
After starting MoviePix M-330 Manager, the following screen will show up if the
camera is set to Live ( ) mode. In this mode, you can use the PC Camera
function.
Preview
Window
Using MoviePix M-330 Manager - MoviePix M-330 Manager - PC Camera
Start recording a video clip
Stop recording
Snapshot
Format
If you want to use the Video Conferencing function, please install programs such as
Netmeeting to serve the purpose.
*
Properties
Start/Stop preview window
Setting
Sub-menu is available.
*
67
*
*
Page 69

MoviePix M-330 Manager - PC Camera (continued)
Recording an AVI movie
1. Click on the icon.
2. Press to specify the path and name of
the AVI file.
3. Set the frame rate and recording time
according to your needs.
4. Press the Start Record button to begin
Using MoviePix M-330 Manager - MoviePix M-330Manager - PC Camera (continued)
recording.
5. To stop recording, click on the icon.
Taking a snapshot
Click on the icon to take a snapshot.
Configuring Format options
! Color Space:
Select one of the following functions according to your needs.
- RGB 24: This item is for retaining better quality.
- I420: This item indicates the AVI movie will be more
compressed to gain the advantage of faster
processing speed.
! Output Size:
Set output size to change the size of the
preview window. The default size is
320x240. Select larger pixels when you
need a larger preview window.
68
Page 70

MoviePix M-330 Manager - PC Camera (continued)
Configuring Properties options
! Video setting:
- Banding Filter: If the screen of your
computer flickers when using PC
Camera function, change this setting to
avoid noise.
- Bandwidth: If the network bandwidth
is congested when using PC Camera,
select a smaller value in the
"Bandwidth" item to avoid this problem.
! Custom setting:
You can use the default settings, or
Using MoviePix M-330 Manager - MoviePix M-330 Manager - PC Camera (continued)
change the settings (such as
brightness, contrast, saturation, and
sharpness) on your own.
Configuring Flicker options
If you take your camera abroad, and find
the screen of your computer flickers
when using PC Camera function, please
check the Cancel Flicker box to prevent
noises from appearing on the screen. Or,
you can refer to the Flicker Settings
Table (p. 70) for proper flicker value that
suits the country you are staying.
69
Page 71

Flicker Settings Table
Addenda
Country
Setting
Country
Setting
The flicker setting is based on the frequency standard of your
*
England
50Hz
Portugal
50Hz
Germany
50Hz
America
France
Tai wa n
Italy
50Hz 50Hz60Hz
China
50Hz60Hz60Hz
local power supply.
LED Event Table
Condition LED color
Meanings
Spain
50Hz
Japan
50/60Hz
Netherlands
Korea
60Hz
Status
(Status LED)
Flash
(Status LED)
Data
transformation
(Status LED)
Self-Timer
(Self-Timer LED)
Red
Green
Red
Green
Red
Green
Red (regularly)
Busy (storage, or capture)
Ready (waiting for command)
Charging flash
Ready (waiting for command)
Data transformation
Ready (waiting for command)
Counting
Capturing the pictureRed (rapidly)
70
Page 72

Storage Capacity Table
Addenda
Still picture Video Clip
Memory
Flash memory (16MB)
SD/MMC card (32MB)
SD/MMC card (64MB)
SD/MMC card (128MB)
SD/MMC card (256MB)
SD/MMC card (512MB)
1. The actual number of pictures stored may vary (up to + 30%) depending on the resolution
*
and color saturation.
2. The video test result applies to all resolutions.
*
2048x1536 1600x1200
20
40
80
160
320
640 960 1536 96-224 min
30
60
120
240
480
640x480
48
96
192
384
768
All
resolutions
3-7 min
6-14 min
12-28 min
24-56 min
48-112 min
Audio Clip
Maximum
1 hr
2 hr
4 hr
8 hr
16 hr
32 hr
TV System Settings Table
NTSC
PAL
America, Taiwan, Japan
and Korea...etc.
Germany, England, Italy
Netherlands, China, Japan
and Hongkong...etc.
71
Page 73

Battery Life Table
>> Battery indicator status
Addenda
Icon
Note: The following tests are conducted based on the following conditions:
1. Alkaline batteries are used.
2. Temperature: 25 C.
3. LCD display is always on.
>> Shooting still pictures (pics)
Still picture
2048x1536 1600x1200
Description
Full battery life
Moderate battery life
Low battery life
Empty battery life
640x480
120110
130
1. Shooting interval: 30 seconds.
*
2. The flash strobe is used for every other image.
>> Continuous shooting (pics)
Still picture
2048x1536 1600x1200
1. Shooting interval: 4 seconds.
*
2. Flash strobe is disabled.
>> Recording video clips (continuous recording, mins)
Video clips
640x480 352x288
6060
640x480
700600500
160x128
60
72
Page 74

System Message Table
Addenda
Message
Recording
Please Unlock SD Card
No Files To Play
Please Change Batteries
Memory Full
Card Error
Memory Error
Description
The camera is recording a file.
If you insert a SD card and the card is set to "Protected",
this message will show up when the camera tries to write
data into the card.
When the camera is set to Playback or MP3 mode without
any existing file to play, this message will show up.
The camera is under the status of low power. You should
change the batteries immediately.
The storage memory is full and can not store any more files.
Please change the SD/MMC card or delete some files to
free some memory space.
The inserted card is not compatible with the camera. Please
change the card or try formatting the card.
The camera can not access data in the internal memory.
Please format the media to solve this problem.
Strobe Is Charging
File Format Error
Deleting
Formatting
File Is Locked
Locking
Unlocking
Setting
The flash strobe is charging.
The file being played is not compatible with the camera.
The camera is performing file deletion.
The camera is formatting the storage media.
The current file is locked and can not be deleted.
The current file is being locked to protect it from deletion.
The current file is being unlocked.
The camera is performing a setting action.
73
Page 75

Specifications
Addenda
Sensor effective resolution
Interpolated resolution
Internal memory
External memory
Digital video camcorder
Digital still camera
Digital voice recorder
MP3 player
PC Camera
2Mega (1600x1200) pixels
3.1Mega (2048x1536) pixels
16 MB flash memory (storage)
Built-in SD/MMC slot (maximum: 512 MB)
MPEG4 (.ASF) Format
VGA (640x480 pixels) / up to 11 fps
CIF (352x288 pixels) / up to 30 fps
160x128 pixels / up to 30 fps
JPEG (.JPG) Format
3.1Mega (2048x1536) pixels
2Mega (1600x1200) pixels
VGA (640x480 pixels)
WAVE (.WAV) Format with 16MB memory
Recording time: approximately 1 hour
Support all kinds of sample rate
VGA (640x480 pixels) / up to 10 fps
QVGA (320x240 pixels) / up to 20 fps
LCD display
Digital zoom
TV-out
Built-in microphone
Built-in speakers
Built-in flash strobe
Built-in headset connector
Lens
Self Timer
Interface
Power saving
Battery
Dimension
1.5" Color TFT LCD
4X (real-time)
Yes (NTSC/PAL TV system)
Yes
Yes
Yes
Yes
F=3.5 / 8.5mm
10 seconds
USB 2.0 (USB 1.1 compatible)
1min/3min/5min (auto power-off if idle for over selected time)
AAx2 (alkaline recommended)
3.86"x2.57"x1.28" (98x67x33 mm)
1. Specification is subject to change without notification.
*
74
Page 76

Troubleshooting
When using the camera:
Q1 The camera can not be switched on normally.
A: 1) The batteries may be out of power. Please change the batteries.
2) Make sure the batteries are correctly installed.
Q2 The camera is still powered on, but the LCD screen does not display.
A: If the camera stays idle for over one minute, the LCD screen will automatically
shut down to save power. You can press any button except the power button to
reactivate the display.
Q3 Can not take pictures or video clips when pressing the Record/Shutter
button.
A: 1) The storage media may be full. Please free some space from the SD/MMC
card or the internal memory.
2) Check if the camera is recharging the flash strobe.
3) If you are using a SD card, check if the card is set to "protected".
4) If the LCD screen displays "MEMORY ERROR" or "CARD ERROR" message,
please set the camera to Settings mode and format the storage media.
Q4 I did not delete the pictures and video clips, but can not find them in the
memory.
A: 1) Check if you take pictures and video clips and then insert a SD/MMC card.
The camera will use the card as the main storage media and files previously
stored in the internal memory will be inaccessible until the card is removed.
2) Check if the "Index" option (see page 39) is set to displaying a particular file
type. If yes, you can set the option to "All" or restart the camera to access other
files.
75
Page 77

Troubleshooting
Q5 I cannot use the flash strobe.
A: If the battery life icon indicates , the flash strobe may be disabled due to
insufficient voltage. Please change batteries immediately.
Q6 The pictures taken appear too blurred.
A: Please adjust the focus as appropriate.
Q7 The pictures or video clips taken appear too dark.
A: Make sure the environment of shooting or recording has adequate light. Or you
may consider using flash strobe when taking pictures.
Q8 Noises occur when viewing images on the LCD screen or on the computer.
A: Check if the flicker setting matches the place you are staying. For more
information, please refer to the "Flicker Settings Table" on page 70.
Q9 I cannot play MP3 and the title displays strange characters.
A: This problem is probably caused by double-byte characters (such as Chinese,
Korean...etc.). Please rename these files before copying them to the camera.
76
Page 78

Troubleshooting
When connecting the camera to the computer or TV:
Q1 I can not view the video clips on my computer.
A: Please install Direct X 8.0 or above and Windows Media 9.0 Codecs to solve
this problem. See page 54 for details on installing the driver, or go to
http://www.microsoft.com to download the required files.
Q2 The driver installation failed.
A: 1) Please remove the driver and other related programs. Follow the installation
steps in the manual to reinstall the driver.
2) Make sure you install the driver before plugging in the USB cable.
Q3 The TV screen does not display after connecting the camera to the TV.
A: 1) Check if the camera is correctly connected to the TV.
2) Make sure the TV system is correctly set in the camera settings. Please see
page 50 for more details.
Q4 A conflict with other installed camera or capture device occurred.
A: If you have any other camera or capture device installed in your computer,
please completely remove the camera and its driver from the computer to avoid
the conflict.
Q5 Noises occur on my computer screen when using Video Conferencing.
A: Please set the flicker filter to match the place you are staying. See "Configuring
Flicker options" on page 69 for more details.
77
Page 79

Troubleshooting on USB
1. If you connect your camera to the USB 2.0 port on your computer and find that
your computer cannot correctly detect camera, please read the following text for
solution:
1. Windows 98SE/ME users:
Windows 98SE/ME does not fully support USB 2.0 port connection. Please
consider using another port for connection. Or you may upgrade your system to
Windows 2000 or XP, and then proceed with the following steps to download and
install the service pack and driver.
2. Windows XP/2000 users:
After connecting your camera to the USB 2.0 port on your computer, if the
computer does not work, or you cannot use your camera and the computer
displays a "Hardware not found" message, it is probably because your current
operation system does not fully support USB 2.0 port. Please consider using
another port for connection, or follow step 1 to install the necessary software:
STEP 1. Download the OS Update software from the Internet
Please go to http://v4.windowsupdate.microsoft.com/en/default.asp to download
the latest OS Update software:
- Windows XP users: please download Service Pack 1.
- Windows 2000 users: please download Service Pack 4.
After you download and install the software, proceed with step 2.
STEP 2. Update the Driver provided by the OS
Please note that the installation display may differ according to your computer
mainboard, language, and operation system. The screen shots in the following
case are for reference only.
Windows 2000 users:
1) Launch "Device Manager" and unfold the "Universal Serial Bus controllers"
container.
78
Page 80

Troubleshooting on USB
2) Highlight the USB 2.0 controller ("Billionton USB 2.0 Host Controller" in this case)
and right-click the mouse, a menu should pop up:
a) Click on "Properties", and a sub-menu as the following should show up.
b) Click on the "Driver" tab. Then click on the "Update Driver..." button.
(a)
(b)
79
Page 81

Troubleshooting on USB
3) When the following dialogue window appears, click on "Next >" to continue.
4) When the following dialogue window appears:
a) Check the item "Search for a suitable driver for my device".
b) Click on "Next >" to continue.
(a)
(b)
80
Page 82

Troubleshooting on USB
5) When the following dialogue window appears, select none of the items and click
on "Next >" to continue.
6) When the following dialogue window appears:
a) Check the item "Install one of the other drivers".
b) Click on "Next >" to continue.
(b)
(a)
81
Page 83

Troubleshooting on USB
7) When the following dialogue window appears:
a) Select the correct USB driver. In this case, you should select the USB 2.0
driver provided by Microsoft to replace the original driver.
b) Click on "Next >" to continue.
(a)
(b)
8) When the following dialogue window appears, click on "Finish" to complete the
installation.
82
Page 84

Troubleshooting on USB
9) Launch "Device Manager" and unfold the "Universal Serial Bus controllers"
container again. If the old driver has been replaced by the new one, the
installation is successfully completed.
10) After all the above steps are completed, reconnect the camera to the USB 2.0
port. Make sure that the PC Camera (Live mode) function can operate normally.
83
Page 85

Troubleshooting on USB
Windows XP users:
1) Launch "Device Manager" and unfold the "Universal Serial Bus controllers"
container.
2) Highlight the USB 2.0 controller ("NEC PCI to USB Enhanced Host Controller
(B1)" in this case) and right-click the mouse, a menu should pop up. Select the
"Update Driver..." item and the following window will appear. Check the "Install
from a list or specific location (Advanced)" item and then click on "Next >" to
continue.
84
Page 86

Troubleshooting on USB
3) Check the item "Don't search. I will choose the driver to install." Then click on
"Next >" to continue.
4) Select "Standard Enhanced PCI to USB Host Controller" and click on "Next >" to
continue.
85
Page 87

Troubleshooting on USB
5) The driver installation process is complete. Click on "Finish" to continue.
6) Launch "Device Manager" and unfold the "Universal Serial Bus controllers"
container. Make sure the USB 2.0 driver has been updated.
86
Page 88

Troubleshooting on USB
2. When you use your computer to view the video clips stored on the camera, the
bigger the file size is, the longer it would take to load the file. If you encounter
problems related to taking a long time loading video clips, we recommend you:
1) Copy the video clips to your computer and then view them on the computer.
2) Upgrade your media player to Media Player 9.0 or above, so that you can
benefit from the more efficient playing speed.
87
Page 89

Benutzerhandbuch
Page 90

Willkommen
Vielen Dank dafür, dass Sie sich für unser Produkt entschieden haben.
Viel Zeit und Mühe wurde in die Entwicklung dieses Produkts investiert.
Wir wünschen uns, dass Ihnen das Produkt viele Jahre problemlos dienen wird.
Sicherheitshinweise
1. Lassen Sie die Kamera nicht herunterfallen. Stoßen Sie die
Kamera nicht an, und bauen Sie sie nicht auseinander, damit
die Garantie nicht erlischt.
2. Halten Sie die Kamera von Wasser fern. Verwenden Sie die
Kamera bitte nur mit trockenen Händen.
3. Setzen Sie die Kamera keiner hohen Temperatur oder
direkten Sonneneinstrahlung aus. Die Kamera kann dadurch
beschädigt werden.
4. Gehen Sie vorsichtig mit der Kamera um. Vermeiden Sie es
die Kamera stark zu drücken.
5. Verwenden Sie die Kamera aus Sicherheitsgründen nicht,
wenn es ein Gewitter bzw. Blitze gibt.
6. Vermeiden Sie es Batterien verschiedener Marken oder
Typen gleichzeitig zu verwenden. Es besteht ansonsten
Explosionsgefahr.
7. Entfernen Sie die Batterien, wenn die Kamera für eine
längere Zeit nicht verwendet wird. Auslaufende Batterien
können die Kamerafunktion beeinträchtigen.
8. Entfernen Sie die Batterien, wenn sie defekt zu sein
scheinen.
9. Verwenden Sie nur das vom Hersteller mitgelieferte Zubehör.
10.Bewahren Sie die Kamera unzugänglich für Kinder auf.
01
Page 91

Inhaltsverzeichnis
Willkommen
Sicherheitshinweise
Inhaltsverzeichnis
Kamerakomponenten
Inbetriebnahme
Einlegen der Batterien
Einstecken und Entfernen der SD/MMC-Karte (optional)
Anbringen des Trageriemens (optional)
Halten Ihrer Kamera
Öffnen des Anschlussdeckels
Verwenden des Stativs (optional)
Grundbedienung
1
1
2
5
6
6
7
8
9
9
10
12
Einschalten der Kamera
Ausschalten der Kamera
Einstellen der Sprache
Aufnehmen eines Videoclips
- Aufnehmen eines Videoclips
- Einstellen des Fokus
- Zoomen
- Wählen eines Messmodus
Aufnehmen eines Bildes
Aufnehmen eines Bildes
- Verwenden des Blitzes
- Zoomen
- Wählen eines Messmodus
Aufnehmen einer Sprachnotiz
Wiedergeben Ihrer Aufnahmen
12
12
13
14
14
15
15
16
17
17
18
18
18
19
20
- Vollbildschirmansicht
- Miniaturansicht
- Wiedergabe eines Bildes
- Wiedergabe eines Video- oder Audioclips
Ein-/Ausschalten der OSD-Anzeige
Verbinden der Kamera mit Ihrem TV
20
21
22
23
24
25
02
Page 92

Inhaltsverzeichnis
Erweiterte Funktionen
Verwenden des Menüs
Video-Menü
- Ändern der Videoauflösung
- Einstellen der Belichtungskompensation
- Anwenden der Sondereffekte bei Videoclips
Bild-Menü
- Ändern der Bildauflösung
- Verwenden des Selbstauslösers
- Einstellen des Weißabgleichs
- Einstellen der Belichtungskompensation
- Anwenden der Sondereffekte an Bildern
- Verwenden des Datumsaufdrucks
Wiedergabemenü
- Löschen der Dateien
- Anzeigen der Dateiinformationen
- Sperren der Dateien
- Sortieren der Dateien
26
26
27
27
28
29
30
30
31
32
33
34
35
36
36
37
38
39
Wiedergeben von MP3-Musikdateien
- Kopieren von MP3-Dateien zur Kamera
- Wiedergeben von MP3-Dateien
MP3-Menü
- Wiederholen der Wiedergabe
- Einstellen der 3D-Verstärkung
- Einstellen des Basseffektes
- Anzeigen der MP3-Informationen
- Löschen der MP3-Dateien
- Tastensperre-Einstellung
Kameraeinstellungen
Aufrufen des Einstellungsmodus
Einstellen des Datums und der Uhrzeit
Einstellen der Jastentöne
40
40
41
42
42
43
44
45
46
47
48
48
48
49
Einstellen des Flimmerns
Einstellen des TV-Systems
Einstellen der Sprache
49
50
50
03
Page 93

Inhaltsverzeichnis
Einstellen der Auto-Ausschaltfunktion
Formatieren des Datenträgers
Wiederherstellen der Standardeinstellungen
Kopieren von Dateien zum PC
MoviePix M-330 Manager auf Ihrem PC installieren
Verbinden der Kamera mit dem PC
Kopieren von Dateien zum PC
Anzeigen/Wiedergeben von Dateien auf dem PC
Dateiposition
Verwendung das MoviePix M-330 Manager
MoviePix M-330 Manager installieren
Vor Starten des Programmes
Starten des Programmes
51
51
52
54
54
56
57
59
60
62
62
62
64
MoviePix M-330 Manager - Datei-Management
- Bildaufwertung
- Dateien auf Ihren PC herunterladen
- Diaschau
MoviePix M-330 Manager - PC-Kamera
- Aufnehmen eines AVI-Videoclips
- Schnappschuss
- Konfigurieren der Formatoptionen
- Konfigurieren der Eigenschaften
- Konfigurieren der Flimmeroptionen
Anhang
Flimmereinstellung
LED-Beschreibungen
Speicherkapazität
TV-Systemeinstellung
65
66
66
66
67
68
68
68
69
69
70
70
70
71
71
Batterielebensdauer
Systemmeldungen
Technische Daten
Fehlerbehebung
Nachtrag für USB-Fehlerbehebung
72
73
74
75
78
04
Page 94

Kamerakomponenten
㖀㖅㖃㕸 㖂㕵㕼㕵㕱㖃㕵
㖃㕴㕟㕽㕽 㕳
Stromschalter
Modusschalter
Aufnahme/Auslöser/Wiedergabe/Pause-Taste ( )
Richtungstaste ( )
Menü/OK-Taste ( )
INDEX-Taste ( )
Batteriefachdeckel
Batteriefach
Speicherkartensteckplatz
Trageriemenhalterung (1)
Status-LED
LCD-Bildschirm
LCD-Anzeigeschalter ( )
Mikrofon
Blitz
Fokusschalter
Linse
Selbstauslöser-LED
Anschlussfachdeckel
A/V-Ausgangsanschluss
Kopfhöreranschluss
USB-Anschluss
Trageriemenhalterung (2)
Lautsprecher
Modusschalterzeiger
Stativanschluss
05
Page 95

Inbetriebnahme - Einlegen der Batterien
Inbetriebnahme
Einlegen der Batterien
1. Schieben Sie den Batteriefachdeckel
in die angezeigte Richtung, um das
Fach zu öffnen.
2. Legen Sie die Batterie in das Fach ein.
Achten Sie bitte unbedingt auf die
㖀
㖅
㖃
㕸
㖃
㕴
㖂
㕟
㕵
㕽
㕼
㕽
㕵
㕱
㕳
㖃
㕵
richtige Polung (+ und -).
3. Machen Sie nach richtigem Einlegen
der Batterien den Batteriefachdeckel
wieder zu.
-
+
㖀
㖃
㕸㖅
㖃
㖂㕵
㕟
㕽
㕼
㕽㕴
㕵
㕱
㕳
㖃
㕵
Verwenden Sie Batterien verschiedener Marken oder verschiedenen Typs nicht
gleichzeitig.
Alkalibatterien oder wiederaufladbare NiMH-Batterien werden für eine höhere Leistung
empfohlen.
06
Page 96

Einstecken und Entfernen der SD/MMC-Karte (optional)
Die Kamera kann die Daten sowohl auf den
integrierten 16MB Flash-Speicher als auch auf
eine Secure Digital (SD)-Karte oder eine
Multimedia Card (MMC) speichern. Die
unterstützte Speichergröße ist 8MB bis 512MB.
Um eine SD/MMC-Karte einzustecken drücken
Sie bitte vorsichtig die Karte wie angezeigt, bis
die Karte das Ende des Steckplatzes erreicht.
Drücken Sie bitte zum Entfernen der Karte
vorsichtig einmal die Karte. Die Karte schnellt
daraufhin etwas heraus und kann dann aus
dem Steckplatz herausgenommen werden.
Inbetriebnahme - Einstecken und Entfernen der SD/MMC-Karte (optional)
Die SD-Karte ist mit einem Schreibschutz-Schalter ausgestattet. Wenn der
Schreibschutz-Schalter auf die Verrieglungs-Position gestellt ist, können keine
Daten auf die Karte geschrieben werden. Stellen Sie bitte vor dem Einstecken
der SD-Karte den Schreibschutz-Schalter auf die Entrieglungs-Position, um
einen reibungslosen Betrieb sicherzustellen.
Entrieglung
Verrieglung
Entfernen Sie die SD/MMC-Karte nicht, wenn die Kamera Daten verarbeitet (wenn die
LED rot leuchtet).
Wenn eine SD/MMC-Karte eingesteckt wurde, wird die Karte als Hauptdatenträger
verwendet. Sie können nicht auf die auf dem integrierten Speicher der Kamera
gespeicherten Daten zugreifen, bis die SD/MMC-Karte entfernt wird.
07
Page 97

Anbringen des Trageriemens (optional)
Inbetriebnahme - Anbringen des Trageriemens (optional)
1. Trennen Sie den Trageriemen wie
angezeigt in zwei Teile.
2. Befestigen Sie einen Teil des
Trageriemens an der
Trageriemenhalterung (1) auf der
Kamerarückseite.
3. Befestigen Sie den anderen Teil des
Trageriemens an der
Trageriemenhalterung (2) auf der
Kamerafrontseite.
4. Binden Sie den Trageriemen wie
angezeigt zusammen. Der
Trageriemen wird festgezogen, wenn
die Schleife nach rechts gezogen wird.
Umwickeln Sie den Trageriemen
anschließend mit dem Ledermantel.
08
Page 98

Halten Ihrer Kamera
Bitte führen Sie Ihre Hand durch den Trageriemen und halten die Kamera wie
angezeigt fest. Vermeiden Sie es die Linse während der Aufnahme von Bildern
oder Videoclips zu verdecken.
Inbetriebnahme - Halten Ihrer Kamera / Öffnen des Anschlussdeckels
Die Linse nicht verdecken.
Öffnen des Anschlussdeckels
Der Anschlussdeckel muss geöffnet werden, wenn Sie die Kamera mit einem PC,
TV oder Kopfhörer verbinden möchten. Öffnen Sie bitte den Deckel vorsichtig in
die angezeigte Richtung.
09
Den Anschlussdeckel öffnen.Den Deckel vorsichtig nach oben ziehen.
Page 99

Verwenden des Stativs (optional)
Inbetriebnahme -Verwenden des Stativs (optional)
Sie können ein Stativ an Ihre Kamera
anbringen, um das Verwackeln der
Kamera zu vermeiden und eine
Festziehen
optimale Bildqualität zu erhalten. Sie
können so auch Bilder von sich
selber oder lange Videoclips mit
hoher Qualität aufnehmen.
Lockern
10
Page 100

Grundbedienung
 Loading...