

Page 1

Page 2

MP3 PLAYER Ixa375i FM
USER INSTRUCTION MANUAL
Sa fe ty C autions
We re com men d tha t you read this c hapter c omp letely a nd wi th ca re and f oll ow
the ins truction s detailed . In d oin g th is, the cor rect fu nct ioning and the long
durat ion of the MP 3 p lay er are ensur ed. Pleas e k eep these instruct ion s
somew her e sa fe i n or der to b e ab le to hand them to a new owner in any eventual
case of s ale s.
You mu st guar d aga inst th e loss of y our import ant d ata by ma king ba cku p copies.
We d o not ass ume lia bil ity for any data loss or dam age to da ta s tor age uni ts, and
no claims can be ac cep ted for dam ages re sul tin g from the los s of data or an y
conse que nti al lo sses.
16 17
Page 3

Sa fe ty C autions
Keep t he pro duc t a way from d amp , p rot ect it from j olt s, dus t and h eat an d don't
expos e it to d ire ct su nlight, in orde r to av oid a ny op erational pro ble ms.
. Do not open t he product cas ing : this w oul d cause the forfeit o f t he gu ara nte e
and the e ven tua l dam age/destruc tio n of th e pro duct
. Do no t al low children to p lay with e lec tri cal products wit hou t th e supervi sio n of
an adul t: ch ild ren a re not able to eval uat e any p oss ible and real dan ger s.
. Af ter tra nsportation of t he pro duc t, w ait until the re is a sui tab le enviro n-m ent al
tempe rat ure b efo re pu tti ng it into op eration. In ca se of s ign ifi can t t her mal
varia tio ns or dam p, it is pos sib le tha t the for min g of cond ens ation can occur
which can caus e sho rt ci rcu its . Bef ore tra nsp ort ation, r eplace the cove r of th e
USB soc ket .
. Use onl y the U SB Ca ble s upplied with th e pro duc t.
Sa fe ty C autions
When yo u use the p roduct, fo llo w the dir ect ives on e lec tromagnetic c omp atibility
(EMV) . To avoid t he ri sk of d ama ge and the loss of on boa rd da ta, p osition the
devic e at le ast one me ter from h igh frequ enc y and m agn etic s our ces of
inter fer enc e (TV, stereo lo uds pea ker s, mobile phone , etc .)
Cl eaning
Gener all y, the equi pme nt do es no t need to be cle ane d.
. C aut ion! The p roduct do es not contain c omp onents th at nee d to be maint ain ed
or clea ned .
Be ca ref ul that the pr odu ct does not get dir ty. Do not use any solv ents or spr ay
corro siv e cleans ers . If abs olu tely nec ess ary, cl ean the pro duct cas ing w ith a
damp cl oth .
Le gal Cau ti on
The M P3 Pl aye r can only b e use d to cop y or encode m usic tra cks of which the
user o wns th e copy rig ht( s) or for whi ch he has pur chased or ha s been given the
right o f us e from the ho lde r or the c opy right. Any u ser who v iol ates th ese rig hts is
prose cut abl e a cco rding to the l aws an d / or s ubj ect to c lai ms from the ho lde r o f
the rig hts .
18 19
Page 4

FE ATURES
MP3, WM A pl ayb ack
Voice an d Lin e-i n Rec ording
2 Color O LED d isp lay
FM tune r
Suppo rt ID 3 tag
Suppo rt A-B r epe at/ Repeat 1/Repe at All
6 Play Mo des : Nor mal /Repeat One/R epe at All /Sh uff le/ Shuffl e and R epeat/
Intro
6 EQ Mode s: No rma l/R ock/Jazz/Cl ass ica l/P op/ Bass
USB mas s sto rag e, pl ug and play under W ind ows M e and a bove, softwar e
for Win dow s 98 on d isc .
Suppo rt mo re th an 6 ho urs continuou s pla yba ck wi th an AAA al kal ine
batte ry
Sa fe ty C autions
1.Neck S tra p Loo p 2.OL ED display
3.3.5m m ear pho ne ja ck 4.M ini USB li d
5.Menu butt on / Volu me +/ Vo lum e - / P rev iou s / Next
6.Batt ery c ove r 7.Po wer on / Pow er off / P lay / Pause
8.Micr oph one 9 .R e co r d b u t t o n
10.Hol d but ton
20 21
Page 5
Ca ution
BASIC OPERATION
The jo g dial doe s n ot support pr ess & s lide a t the s ame time. Oth erwise, t he jog
dial ma y be lo cke d/s tuck in the housi ng.
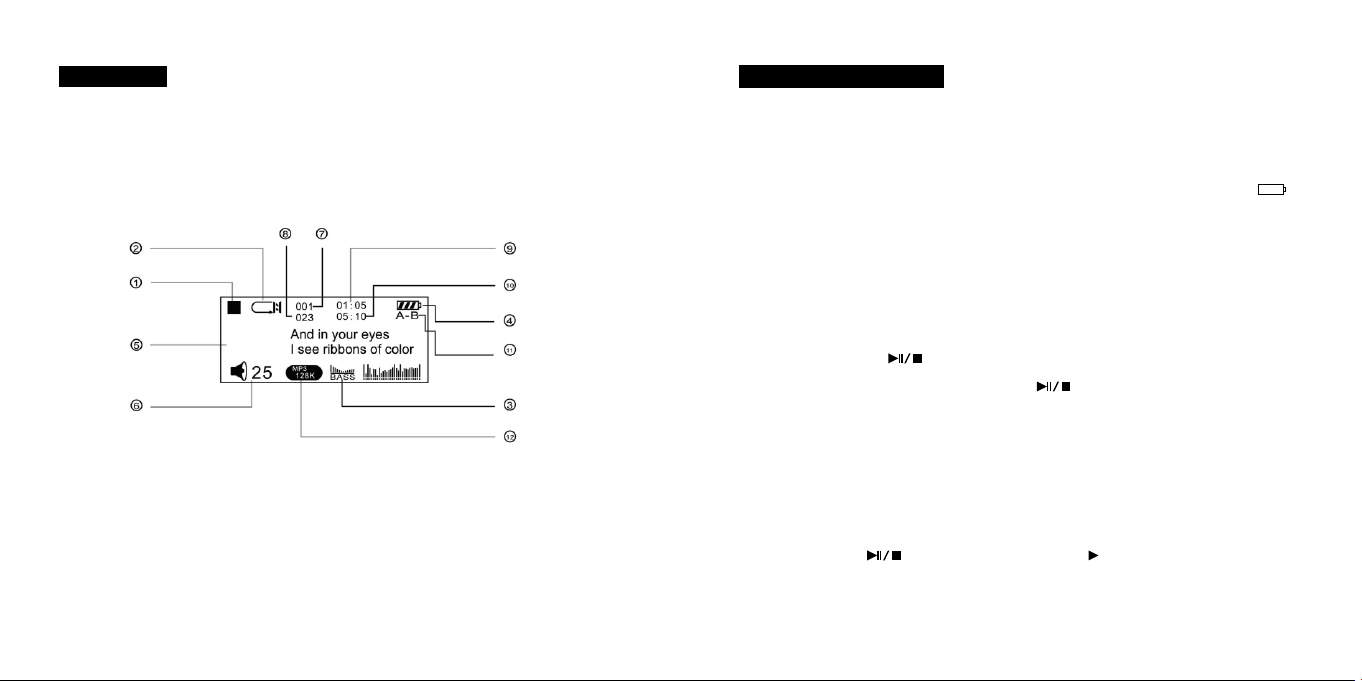
1.sto p sta tus
4.Bat ter y sta tus
7.cur ren t son g no.
10.Tota l son g tim e
2.pla y mod e
5.LCD d isp lay
8.Tot al no . of so ng
11.A -B repeat
3.EQ mo de
6.Volu me le vel
9.Pla y tim e of cu rre nt song
12.So ng bi t rat e
1. Insta ll th e bat ter y
Open th e bat tery compa rtm ent c over, insta ll 1 AAA battery(1. 5V) a cco rding to the
polar ity mar kin gs ( +ve fac ing out sid e) i nsi de t he b attery compartm ent ,A “ ”
sign wi ll fl ash o n the s creen if batter y pow er is l ow, th en replace with a n ew on e.
Note: Ple ase tak e ou t th e ba ttery if not use the MP3 p lay er f or a lon g pe rio d
of time .
2. Power O N/O FF
Press and ho ld the but ton to pow er on the MP3 pla yer. When the MP3
playe r i s P owe red on , p res s a nd hol d t he u nde r “ STO P■” stat us for more
than 3 se con ds, “BY E” wi ll show o n the s creen a nd th e MP3 pla yer w ill be
power ed off.
3. Play/ Pau se/ Sto p
1) When the MP3 player is po wer ed on, it wil l automatical ly en ter the STOP
statu s. Press the q uic kly to star t playi ng, a “ ” sign wi ll s how at the bo ttom
left c orn er of t he s creen. The cu rre nt song ti tle , track nu mbe r, playing tim e, pla y
22 23
Page 6

mode wi ll be d isp lay ed on the screen.
2) Press th e b utton q uic kly whe n the MP3 p layer i s under p lay “ ” sta tus
to pa use play ing , a ' ” sign will ap pea r, press the butt on again qu ick ly to
resum e pla yin g.
3) Press and ho ld the bu tto n f or 2 second s w hen play ing to s top , a “■”
sign wi ll sh ow at t he bo ttom left corne r of th e scr een .
4) AB repea t
While th e M P3 is pla yin g, with ► disp lay ed, pres s t he “ME NU” button bri efl y t o
selec t the s tar t poi nt A, an “A→” appear s on th e top l eft c orner of the disp lay.
5) Next son g/P rev iou s Son g
When t he M P3 player is u nder play “ ” st atu s, dial th e “M ENU ” button r igh twa rd
or left war d to sk ip to t he next song or pre vio us so ng.
Dial the “MEN U” bu tto n rightw ard or left ward and h old to fast g o forwar d or
backw ard w ith in th e current track , rel eas e the b utton to resume p lay ing .
6) Adjust Volume
Volume can be adjusted under both play “ ” a nd s top “■” sta tus . Pr ess the “+” or
“- “ b utton t o adjust the volume, th e volum e lev el i ndi cat or will i ncr ease or
decre ase a cco rdi ngly on the scree n.
RE CORDI NG
Press the Me nu but ton brief ly again t o s et the end po int B, a “ A→B ” s ign shows
on th e scre en and th e cont ent be twe en point A and po int B will be rep eat ed
conti nuo usl y. Pre ss th e “ME NU” b utton once m ore t o exi t the A→ B rep eat mode.
Befor e rec ord ing
Press and hol d the “M” but ton to enter the mai n men u, press th e “ ” or “ ”
butto n to selec t “S etting” c ate gor y, press th e “M” b utt on to e nte r. Press th e “ ”
or “ ”t o m ove Menu co ntr ol b utt on down t o s elect “Record Set ” b y push ing in
Menu bu tto n. W hen one o f the ite ms is hig hli ghted, pre ss the “M ” bu tto n to s ele ct
a desir ed op tio n. Aft er setting, sel ect “ exi t” to r eturn to the up one l eve l cat ego ry.
24 25
Page 7

the “ M” butto n t o enter the main m enu , press the “ ” o r “ ” b utt on to sele ct
Source: MIC LINE IN
Encoder: IMADPCM MSADPCM PCM
Sample 8000Hz 11025Hz 16000Hz 22050Hz 32000Hz
Bitrate Not
available
Mode Song Album
Exit
“Reco rd” category, pre ss the “M” button to st art recording. O r star tin g recordi ng
direc tly by press ing “REC” bu tto n. Pr ess the button to pause recording,
press butto n aga in to r esu me recording.
Remar ks: The hig her the Sa mpl e ra te, th e la rge r will be t he s ize of the recorded
file and sh ort er wil l b e t he tot al available reco rdi ng tim e. The re cor ded file is i n
WAV forma t.
To set Mod e at “Song” option , only one re corded file wi ll b e cr eat ed. To se t Mo de
at “Album” option, a co ntinual line-in recor din g c an be perform ed to save
different songs as d iffere nt re cor ded f iles.
War nin g: If th e s ilence b etw een 2 songs i s t oo short , t he encod er mig ht re cor d
both so ngs o n one unique f ile . If th e silence wi thi n a song is t oo lo ng, t he encoder
might brea k t he so ng into different file s. In th at case, yo u w ould bet ter use the
2) Save a rec ord ed vo ice f ile
Press the “RE C” butt on for 3 sec ond s and rel eas e to termin ate rec ord ing and
creat e a rec ord ed fi le.
The recorded file will b e s ave d u nde r the “VOICE ” categor y as a “wa v” fil e, e.g .
V001. wav.
Song Mo de to r eco rd ea ch song individ ual ly.
3) Play a rec ord ed vo ice f ile
1. VOICE R ECORD IN G
1) Start vo ice r eco rdi ng
Selec t “MIC” a s recor d source and sel ect a des ired en cod er t ype , press and h old
26 27
Press the “M” bu tto n to re tur n to th e ma in men u, pre ss the “ ” or “ ”
butto n to se lec t “VO ICE ”, press button to pl ay th e rec ord ed file.
For Mic r eco rdi ng, o nly Mono output c an be s ele cte d.
Page 8

2. LI NE IN MUS IC R ECORD ING
1) Start LI NE IN r eco rdi ng
Selec t “ LINE IN” as rec ord source and selec t a desire d encoder t ype. Con nec t
the MP 3 player w ith exter nal audio dev ice by the LINE I N ca ble pr ovi ded . Press
and ho ld the “M” but ton to ent er the mai n me nu, press the “ ” o r “ ” button to
selec t “Rec ord ” category, press the “M ” button to st art recording. Or st arting
recor din g directly by pressing “REC ” button. Pres s the button to pause
recor din g, pr ess bu tto n again to resume r eco rdi ng.
Remar ks: If screensa ver is activ ate d d uri ng rec ord ing , u ser need s t o pres s any
key fir st to d eac tiv ate t he screens ave r bef ore r ecording can be s top ped .
2) Save a rec ord ed LI NE IN f ile
Press the “RE C” butt on for 3 sec ond s and rel eas e to termin ate rec ord ing and
creat e a rec ord ed fi le.
The r eco rde d f ile will be save d u nder the “V OIC E” category as a “w av” file , eg.
L001. wav.
3) Play a rec ord ed LI NE IN f ile
Press the “M” bu tto n to re tur n to th e ma in men u, pre ss the “ ” or “ ”
butto n to se lec t “VO ICE ”, press button to pl ay th e rec ord ed file.
FM R ad io
Press a nd ho ld th e “Menu” button t o ent er th e main menu, d ial t he “M ENU” butto n
to s elect “ FM R adi o” c ate gor y, press t he “ MEN U” b utt on t o enter FM tu ner mod e.
Selec t FM Radio /Sc an/ S tor e/ Ex it by p res sing the “Menu” button under FM
mode.
1. FM rece ivi ng:
When a “Radio” s ign appea rs o n the S CRE EN, th e bu ilt-in FM tuner is r eceiving
progr am fr om pr e-s tored radi o sta tio n: Dial the “M enu ” but ton t o scroll thr oug h all
pre-s tor ed ra dio c hannels.
2. FM sca n an d Stor e: P res s the “ Men u” button to s wit ch to F M sc an sta tus , a
“Scan ” sig n app ear s on the SCREEN.
1) Automa tic sc an and St ore : D ial an d h old th e ”Men u” b utton to st art
autom ati c sc ann ing . Aut o sc anning will stop whe n a radi o fr equ enc y is sea rch ed
clear ly, then pre ss t he “ Men u” button to s wit ch t o FM store sta tus , a “ Sto re” sign
will appear on the scr een. Di al t he “ Men u” b utt on t o se lec t a channel you w ant to
save th e frequency sea rch ed and press th e button to co nfi rm saving. A
“YES” s ign w ill a ppe ar on the screen af ter s ucc ess fully stored.
2) Inchin g sc an and Sto re: Di al t he “Me nu” button br ief ly to s tar t the i nch ing
scan to se arc h th e de sir ed f requency, e very time you dia l th e “M enu ” bu tto n, t he
28 29
Page 9

FM t une r skip 0. 1 MH z fre quency for war d or b ackward. Af ter a des ire d fr equ enc y
is sea rch ed, pre ss t he “Menu” but ton to s wit ch to FM store sta tus , a “ Sto re” sign
will appear on the scr een. Di al t he “ Men u” b utt on t o se lec t a channel you w ant to
save the freq uen cy se arc hed and press the but ton to con fir m saving .
A“YES ” sig n wil l app ear on the screen a fte r suc ces sfully saving .
3. FM reco rdi ng.
Press ing RE C button c an start FM re cor ding o n cu rre nt chann el. St op FM
recor din g by pr ess ing REC button ag ain .
4. Exit FM
Press the “Menu” button till an “ Exit” s ign appears on the scr een , pr ess the
to conf irm e xit ing .
SE TT IN GS
1. EQ SET
Press a nd ho ld th e “Menu” button t o ent er th e main menu, d ial t he “M ENU” butto n
to select “Setting” catego ry, d ial th e “ MEN U” but ton agai n t o sele ct “EQ”. Press
and dia l the “ME NU” but ton to s ele ct Normal/ Roc k/J azz /Classical/ Pop /Ba ss,
Press the “ME NU” button to con fir m and retu rn t o th e up one le vel cat egory, d ial
the “ME NU” b utt on an d select “Exit” .
2. Play Mo de Se t
Press a nd ho ld th e “Menu” button t o ent er th e main menu, d ial t he “M ENU” butto n
to select “Se tti ng” cat egory, d ial the “MENU” butto n ag ain to s ele ct “ Pla y Mode”.
Press and dia l the “MENU” button to sel ect Norm al/ Rep eat o ne/ Rep eat
All/R and om/ Shu ffl e All/ Int ro.
Press the “ME NU” button to con fir m and retu rn t o th e up one le vel cat egory, d ial
the “ME NU” b utt on an d select “Exit” .
Repea t One : the c urr ent track will be r epe ate d con tinuously;
Repea t All : Aft er a ll t racks are pla yed , th e MP 3 pl ayer will sta rt t o pl ay f rom
the fir st trac k again a nd will n eve r st op un less th e power i s finis hed or b e
manua lly s top ped .
Rando m: All t he tra cks sa ved in th e MP3 p layer wil l b e p lay ed in a ra ndom
order, a fte r all t rac ks are played, th e MP3 p lay er wi ll stop.
Shuffle All: All track s sav ed in the MP3 player will be pl aye d in a r and om
30 31
Page 10

order. Aft er all tracks are p lay ed, the MP3 play er wil l s tart to pla y f rom the first
track again and wi ll ne ver s top u nle ss th e pow er is finishe d or be ma nua lly
stopp ed.
Intro : eac h track will be play ed for 10 seconds an d ski p to the next tra ck
autom ati cal ly.
3. Power s et
Press an d h old the “ME NU” butt on to ent er the main menu, di al and then pr ess
the “M ENU ” b utt on to s ele ct “Se tti ng” ca teg ory, dial t he “MENU” button ag ain to
selec t “Powe r set”. Press and dial the “ MENU” button to se lect Di sable /2 Mi ns/5
Mins/ 10 Mins . Press the “MENU” but ton to confirm and return to the up one lev el
categ ory, dial the “M ENU ” but ton a nd select “Exit ”.
If the re i s no ope ration after the aut o po wer off tim e customized , th e MP 3 pl ayer
will be p owe r off a uto mat ica lly. This f unc tio n hel ps to save the batt ery p owe r.
4. Recor d Set
Pleas e ref er to R eco rding Section a bov e.
6. Scree n Sav ing s
Selec t the scre en save r (mo vin g mus ic co des ) app ear anc e tim e (5s , 10s , 20s ,
30s, 40 s, 50 s, al l on) w hile there is no to uch o n any b utt on.
ER AS E FI LES.
Press a nd ho ld th e “Menu” button t o ent er th e main menu, d ial t he “M ENU” butto n
to s ele ct “Delete “ c ate gory, press t he “M ENU ” butto n to en ter. Dia l and P ress th e
“MENU ” but ton t o sel ect Delete Musi c/D ele te Voi ce/Delete Exi t.
ME MO RY SPACE QUERY
Press an d hold th e “MEN U” button to en ter th e main me nu, di al the “M ENU ”
butto n to select “Info” cate gor y, press the “MENU” button to enter and view
memor y spa ce in for mation.
VER: Fi rmw are v ers ion
INT: Total built- in me mor y cap acity
FREE: C urr ent f ree m emo ry space lef t
5. Langu age s ele cti on
Selec t the a ppr opr iate On-Scree n-D isp lay i n suitable lang uag e.
HO LD
Use the “ Hol d” bu tto n left or right to lo ck an d unl ock t he MP3 player.
32 33
Page 11

If the MP3 pla yer is l ocked and in o ff stat us, it c ann ot be powered on. If t he M P3
playe r is lo cked a nd i n on st atu s, pressing an y ke y will ha ve n ot function
(show ing L OCK ED) o n display.
3) Open “ My Com puter” o n y our PC. You sho uld see the n ew dev ice listed in
your di sk dr ive s.
CO MM UN ICATION WITH PC
1. Transf err ing f ile s from your PC
If y our comput er is run nin g Windo ws Me or la ter the MP3 P lay er does n ot r equ ire
any s pec ial soft ware. Wh en it is co nne cte d t o your P C i t will a ppe ar as a mas s
stora ge dev ice and as suc h can be used to store any PC f iles and fo lde rs. Th e
follo win g pr ocedure i s an example b ase d on a c omp ute r running Win dow s XP. It
assum es th at yo ur PC i s already power ed on .
1) Plug the MP3 Player into one of your PCs USB ports eithe r di rec tly or u sin g
the U SB ext ens ion cable s upp lie d. Press th e b utt on to power on and the
LCD scr een w ill s how “ Ready” when it is s ucc ess ful ly connected wi th PC .
2) A wind ow wil l op en on your PC s task bar sta tin g th at new har dware has
been fou nd an d that it is a mass stor age devi ce. Th is will the n cha nge to a
messa ge st ati ng th at the new hardwa re is r ead y to us e.
NOTE: If th e new drive is no t list ed it may be ne ces sar y to restar t your
compu ter.
4) You can s imply c opy f iles to t he new drive a s you wou ld an y other d isk d rive.
Simil arl y files can be dele ted from th e new dri ve as you wou ld any other disk
drive . Wh en files ar e be ing tr ans fer red , the s cre en will s how “Reading” o r
“Wr iting”.
NO TES: Do n ot d iscon ne ct your M P3 play er w hile fi le s are bei ng
trans fer red a s this will co rru pt th e dat a. The file st ruc tur e will be pres erv ed.
34 35
Page 12

When p lay ing fo r the f irs t time any files in the roo t dire cto ry will be playe d
first f oll owe d by an y fil es stored in fold ers .
5) Once t he file s hav e bee n tra nsf erred clic k on the “r emo ve ha rdw are saf ely ”
icon on t he PCs task bar. A win dow will open an d t he USB mass s torage device
will be listed . Cli ck on the USB m ass storag e dev ice. The PC will t hen s tate wh en
it is saf e to re mov e the h ardware.
2. Mass st ora ge
As s tat ed p rev iou sly you r Mp3 pla yer can be us ed to sto re a ny type o f fi le. It ca n,
for exa mpl e, be u sed to simply tra nsf er fi les from one c omp ute r to another or as a
backu p dev ice . Whe n transferrin g fil es th e fol der structure w ill b e pre ser ved.
NOTE: If your com put er is running Wind ows 98 you will nee d to load the
softw are suppli ed on the CD, th e sof twa re supp lie d wit h you r MP3 pla yer
works as a d riv er t o en abl e compute rs r unn ing Wi ndo ws 9 8 operating
syste m to tr ans fer file s. Load t he driver so ftware if your co mpu ter is
runni ng Windo ws 98 .
RE STORE OR UP GR AD E TH E SO FT WARE
Note: Unless th ere is anything abn ormal wit h the M P3 pla yer (for e xample,
it cann ot be s tar ted u p), d o not try to upgrad e the s oft war e.
1. Insta ll th e SET UP.ex e in yo ur PC .
6) Discon nec t the M P3 pl ayer and replac e the U SB co ver.
36 37
Page 13

4. Execu te the foll owi ng procedure s: Star t>P rog ram>Sigm aTel MSCN Audi o
Playe r>f irm war e dow nlo ad, (as s how n in th e upper right figu re) and a prog res s
bar wil l pop u p as sh own i n the following f igu re.
5. After the dialog box shown in the figure abo ve is au tom ati cal ly closed , a
dialo g box wil l po p up as s how n in the figure on t he righ t; Tick th e“format
datas hee t” o ption. Then s tar t fo rmatting by p res sin g “START ”, and press
“CLOS E” to c los e the p rogram.
2. Plug the MP3 Player into one of your PCs USB ports eith er d ire ctl y or usi ng
t h e U S B e x t e n s i o n c a b l e s u p p l i e d . R i g h t c l i c k “ M y
compu ter ”>“ Att ribute”>“De vic e man age r”.
3. Press a nd hold t he button un til “Play er Recovery Dev ice Cla ss”
appea rs on t he De vic e manager (See be low l eft f igu re); release th e butto n;
6. A window will open on you r PCs task bar sta ting that ne w hardw are has
been fou nd an d that it is a mass stor age devi ce. Th is will the n cha nge to a
messa ge st ati ng th at the new hardwa re is r ead y to us e.
Note: Please ba ckup t he fil es on y our MP 3 player before for matting. A ll dat a o n
your MP 3 pla yer w ill b e deleted after f orm att ing .
38 39
Page 14

Note: P lea se ba ckup the fil es on y our MP3 p lay er be fore fo rma tti ng. All da ta
on your M P3 pl aye r wil l be de leted afte r for mat tin g.
DRM
DRM prot ected so ngs w ill be skip ped i n the pl ayl ist and cannot be
playe d bac k
40
 Loading...