

Page 1

Page 2
MP3 PLAYER Ixa370i
USER INSTRUCTION MANUAL
FE ATURES
MP3/W MA pla yba ck
Voice re cor din g
AB repe at
2-col or OL ED Di spl ay(96*39)
Suppo rt ID 3 & lyr ics d isplay
6 EQ Mode s: No rma l/R ock/Jazz/Cl ass ica l/P op/Bass
USB 2.0 F S
1 AAA batte ry (1 .5V )
1110
Page 3
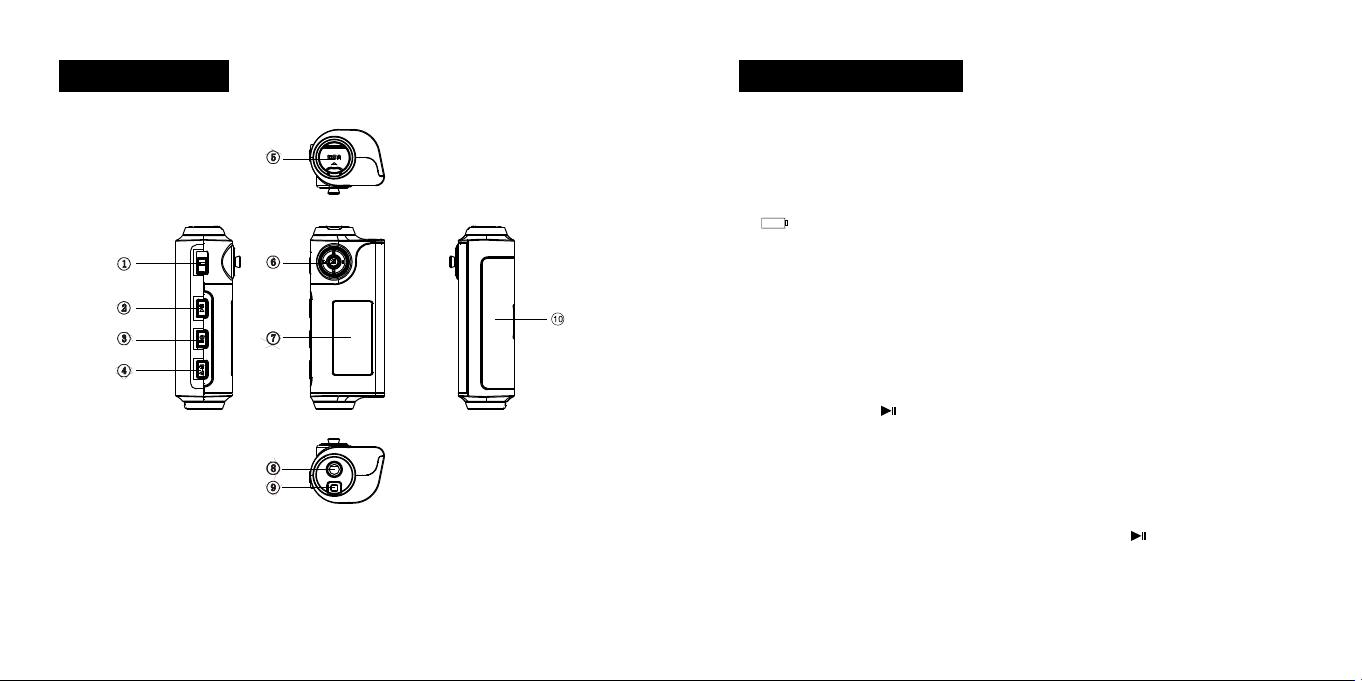
AP PEARANCE
1.Hold k ey 2.P owe r ON/ OFF /Play/Pa use /St op 3.E Q key 4 .A-B key
5.USB pl ug 6.M enu /VO L+/ VOL-/Nex t tra ck/ For war d 7.OLED disp lay
8.Earp hon e jac k 9.Ne ck st rap loop 10.Batt ery c ove r
BASI C OP ERATION
1. Insta ll th e bat ter y
Open th e batte ry co mpartment cov er, i nst all 1 AAA bat tery(1.5 V) ac cording to the
polar ity m ark ing s inside the batt ery c omp art ment
A” ” s ign will flash on the scre en if ba tte ry power is low, the n replac e w ith a
new one .
Note: Ple ase take out t he b att ery if not use the MP3 playe r fo r a long perio d
of time .
2. Power O N/O FF
Press an d h old th e button to pow er on the MP 3 p lay er, the blue backgrou nd
light w ill t urn on. E ach t ime a fter th e key i s pressed, t he ba ckg round l igh t wil l start
up for 3 secon ds (def ault). If no ot her key s ar e pressed with in 3 sec ond s, the
backg rou nd li ght w ill automatic all y go of f.
When the MP 3 pl aye r is Pow ere d on , pr ess and hold the again for mo re t han 3
secon ds, “BY EBY E” will sh ow o n th e screen a nd t he MP3 pla yer wil l be power ed
off .
1312
Page 4

3. Play/ Pau se/ Sto p
1) When the MP3 pl aye r is po wer ed on , it wi ll au tom ati cally ente r the STOP
statu s. P res s the qui ckl y to st art pla ying, a “ ” s ign wil l show at t he top rig ht
corne r of the scree n. The cur rent song ti tle , trac k numb er, pla yin g time , play
mode wi ll be d isp lay ed on the screen.
2) Press the butt on quickly w hen the MP3 p layer i s un der play “ ” status to
pause pla ying, a “ ” si gn wil l sh ow, pre ss t he but ton ag ain quickly t o resume
playi ng.
3) Press and hold th e button for 2 se conds w hen playing to sto p, a “■” sig n
will sh ow at t he to p rig ht corner of the sc ree n.
5) Next song/Pr evi ous S ong /Next Track/Fo rwa rd
When the MP3 pl aye r is und er play “ ” status, dia l the “M” button r igh tward or
leftw ard t o ski p to th e next song or prev iou s son g.
Dial t he “ M” button rig htw ard or lef twa rd and hol d to fast go fo rwa rd or b ack war d
withi n the c urr ent t rack, release t he bu tto n to re sume playing.
6) Adjust Volu me
Volume ca n b e a dju sted under bot h p lay “ ” an d s top “■” sta tus . Press the “M “
butto n up or down to adjust the volume, the volume in dic ato r will in cre ase or
decre ase a cco rdi ngly on the scree n.
4) A-B repeat
While the MP 3 i s p lay ing , w ith displayed, briefl y press and r elease th e “ A-B ”
butto n, an “A→ ” app ears on the top left corner of th e dis pla y. Pre ss the “A-B ”
butto n br ief ly a gai n to set the end point B, a “A- B” s ign sho ws o n th e screen and
the content between point A and poi nt B wil l be repeated continu ous ly. Press the
“A-B” b utt on on ce mo re to exit the A-B rep eat m ode .
VOICE RE CO RD ING
1.Start r eco rdi ng
Under stop sta tus , brie fly pr ess an d rele ase the “M ” bu tto n to ente r the mai n
menu, dial the “M” but ton rig htward or lef twa rd to select “RE CORD” cat ego ry,
press t he “M ” but ton t o sta rt recordi ng.
1514
Page 5

2.Save a vo ice f ile
Press button to stop rec ord ing . T he voice file reco rded wil l b e saved und er
the “VO ICE ” cat ego ry of the MP3 playe r as a .WAV f ile
3.Play a vo ice f ile
Press the “M” button to ret urn to the mai n me nu, dial the “ M” b utt on rightward or
leftw ard to selec t “VOICE” , pres s the “M” button to enter the “ VOICE” category,
press button to play th e voi ce fi le.
SE TTINGS
1. EQ SET
Brief ly pres s an d release the “M” but ton to ent er the main men u, dia l the “M”
butto n righ twa rd or lef tward to selec t “Set tin gs” ca tegory, dial the “M ” butt on
again to s ele ct “ EQ ”. Dial and the n pr ess the “M” butto n ri ght war d or leftward to
selec t No rma l/R ock /Jazz/Class ica l/P op/ Bass, Pre ss the “M ” bu tto n to co nfi rm
and ret urn t o the u p one l evel category, dial the “M ” but ton a nd se lec t “Exit”.
2. Play Mo de
Brief ly press and rel ease the “M” butto n to enter the main menu , dial th e “M ”
butto n rightward or left war d to sel ect “Set tin gs” cate gor y, dial the “M” butt on
right war d or le ftw ard aga in to sel ect “Play Mo de” . the n pre ss the “M ” but ton to
selec t Normal/R epe at One/Repea t All/Rando m/S huf fle All/ Int ro, press the “M”
butto n to confirm a nd return to t he up o ne level c ate gor y, di al the “M” button an d
selec t “Ex it” .
Repea t One : the c urr ent track will be r epe ate d con tinuously;
Repea t All : After all track s ar e play ed, the MP 3 pl ayer w ill start to p lay fr om
the first t rack ag ain and wil l ne ver stop unless the power is f ini shed or be
manua lly s top ped .
Rando m: All tra cks sav ed in the MP3 pla yer 's memory will be play ed in a
rando m ord er.
Intro : each tr ack will be played for 10 seconds and skip to the nex t tr ack
autom ati cal ly.
3. Scree n Sav ing s
Brief ly pr ess and release the “M” butt on to enter the main menu, dial and then
1716
Page 6

press the “M ” b utt on rig htw ard or le ftw ard to selec t “Set tin gs” ca teg ory, dial t he
“M” bu tto n up or dow n agai n to select “S cre en Saving s”. Pre ss the “M” button to
selec t 5/ 10/ 20/30/40/50 /60 scr een li ght ing time. Pre ss t he “M” but ton to con fir m
and ret urn t o the u p one l evel category, dial the “M ” but ton a nd se lec t “Exit”.
4. Power s et
Brief ly press and release the “M” butt on to ente r the main menu , dia l and then
press the “M ” b utt on rig htw ard or le ftw ard to selec t “Set tin gs” ca teg ory, dial t he
“M” button up o r do wn a gai n to sel ect “Po wer set ”. P res s th e “M ” butto n to select
Disab le/ 1 Min/ 2 Min/5 Min/10 M in. Pr ess the “M” button ri ghtward o r l eft war d t o
confi rm and return to the up on e lev el categ ory, dial the “M” butt on and se lec t
“Exit ”.
If there i s no ope rat ion after the aut o po wer off tim e cu sto miz ed, the MP3 playe r
will be p owe r off a uto mat ica lly. This f unc tio n hel ps to save the batt ery p owe r.
5. Langu age
Enter the mai n menu, di al a nd t hen press the “M” button ri ght war d or leftward to
selec t “Settin gs” ca tegory, di al the “M ” b utt on up or do wn again to se lect
“Lang uag e”. s ele ct your desired l ang uag e and p ress the “M” key to c onf irm .
ER ASE FILES
Brief ly press and rel ease the “M” butto n to enter the main menu , dial th e “M ”
butto n to sele ct “Delete “ cat egory, press th e “M” but ton to sele ct this fea ture.
Dial an d Pre ss th e “M” b utton rightwa rd or l eft war d to select Music /Voi ce/ Exi t
1. Delet e a mus ic fi le
1) If Mu sic is se lec ted in the st ep above, “Yes N o” is sho wn on the bottom r igh t
of the sc ree n and a s ong t itle is display ed.
2) Pre ss “M“ l eft war d or lef twa rd to sc rol l t hou gh th e s ong titl es an d s ele ct the
song to b e era sed .
3) D ial t he “M” bu tto n to select Yes or N o. I f Yes is selected, pr ess t he “ ” butt on
and the song will be del eat ed. If No is se lec ted , pr ess ing the “ ” button wil l
retur n to pl ay mo de.
2. Delet e a Voice file
1) If Vo ice is s elected in the step above, “Yes No” is shown on the bottom right
1918
Page 7

of the sc ree n and a v oic e title is displa yed .
2) P res s “M“ leftward o r l eft war d t o scro ll though the ti tle s a nd sel ect the vo ice
file to b e era sed .
3) Dia l th e “M” button to select Yes or No. If Yes is selec ted , press the “ ”
butto n and t he file will b e del eated. If No i s selected , pre ssi ng the “ ” button wi ll
retur n to pl ay mo de.
ME MORY SPACE QUERY
Brief ly pres s an d release the “M” but ton to ent er the main men u, dia l the “M”
butto n to sele ct “About” c ate gory, press t he “ M” bu tton to enter an d view me mory
space i nfo rma tio n.
INT: Total b uilt-in memor y cap aci ty
FREE: C urr ent f ree m emory space lef t
HO LD
When the MP3 play er is powere d on, press the “ “ bu tto ns at the sa me tim e to
lock th e but ton s. A hold “ ” si gn wi ll sh ow on t he screen.
Press the “ “ butt ons at the sa me time to un loc k the b uttons. T he hold “ ” si gn
disap pea rs.
Note: The ho ld fu nct ion is not availa ble when t he MP 3 pla yer is rec ord ing
voice o r era sin g fil es.
Sa fe ty C autions
1. This MP3 pla yer su ppo rts ly ric s sync hro niz ation. For every MP3 or WMA
song saved in this MP3 player, if saved together with an “.lrc” file with same file
name, then the lyri c text w ill b e displa yed on the LCD sc ree n when t he MP 3 or
WMA song is b ein g pla yed .
2. Tur n on Lyri cs s ynchroni zat ion : Wh en a cap ita l le tter “Y” is displayed on the
scree n, it m ean s t he lrc fil e i s avai lab le. Under “Play” st atus, pre ss and hold t he
“M” key t o tur n on Lyrics synchr oni zat ion .
*Lrc fi le: I t is text f ile w ith t ime cod e. It c an be cre ate d by lyrics ed it so ftw are
or can be d own loa ded f rom I nternet.
2120
Page 8

CO MMUNICATION WI TH P C
-
1. Tra nsf err ing files from yo ur PC
If y our comput er is run nin g Windows Me or la ter the M P3 Player do es not re qui re
any s pec ial soft ware. When it is connecte d t o y our PC i t w ill appe ar as a mas s
stora ge dev ice and as su ch can be used t o s tor e any PC fi les and folders. The
follo win g pr oce dure is an exa mple base d on a computer ru nni ng Windows XP. It
assum es th at yo ur PC i s already power ed on .
1) Plug t he M P3 P lay er i nto one of y our PCs USB por ts e ith er d ire ctl y or usi ng
the USB ext ens ion cabl e s upp lie d. Press the button to po wer on an d t he LCD
scree n wil l sho w “Re ady” when it is suc ces sfu lly c onnected with P C.
2) A wind ow will open on yo ur PCs tas k ba r stati ng that new ha rdw are has
been fou nd an d that i t is a mass storage de vice. This wil l the n change to a
messa ge st ati ng th at the new hardwa re is r ead y to us e.
3) Open “My Compu ter ” on you r PC. You sh oul d see the ne w device list ed in
your di sk dr ive s.
NOTE: If the new driv e is not li sted it may be necessary to rest art yo ur
compu ter .
4) You c an s imp ly copy files to the n ew d riv e as y ou w oul d an y other d isk dri ve.
Simil arl y files can be delete d from the new dri ve as you wou ld any oth er disk
drive . When fi les are b eing t ransferred, th e s cre en will s how “R eading” o r
“Wr iting”.
2322
Page 9

NOTES : Do no t disconn ect your M P3 pla yer while fil es are being tra nsf erred as
this wil l c orrupt t he dat a. The file stru ctu re wil l be pre ser ved . When p lay ing for
the fir st ti me any fi les i n the roo t dir ectory wil l be played fi rst f ollowed by a ny files
store d in fo lde rs.
5) Once the fil es h ave bee n transferre d cl ick on t he “remove ha rdw are saf ely”
icon o n t he PCs task b ar. A window will o pen an d the U SB mas s s tor age devic e
will be listed. Cli ck on the U SB mass s tor age dev ice . The PC wi ll th en s tat e whe n
it is saf e to re mov e the h ardware.
6) Disconnect t he MP 3 pla yer a nd replace the US B cov er.
2. Mass st ora ge
As stated previousl y yo ur Mp3 player can be used to sto re a ny t ype of f ile . It can,
for exa mpl e, be use d to s imp ly tran sfe r files f rom one c omp ute r to a not her or as a
backu p dev ice . Whe n transferrin g fil es th e fol der structure w ill b e pre ser ved.
NOTE: If your com puter is running Win dow s 98 you wil l ne ed to lo ad the
softw are sup pli ed on the CD, the sof tware suppli ed with you r MP3 pla yer
works as a dri ver to en abl e comp ute rs run ning W ind ows 98 op erating
syste m t o tran sfe r f ile s. Lo ad the driver sof tware if your co mpu ter is
runni ng Windo ws 98 .
RE STOR E OR U PG RADE THE SOFT WA RE
Note: Unles s th ere is an yth ing ab normal wi th the MP 3 pl aye r (for ex amp le, it
canno t be st art ed up ), do not try to upgr ade t he so ftw are.
1. Insta ll th e SET UP.ex e in yo ur PC .
2524
Page 10

2. Plug the MP3 Player into one of yo ur P Cs U SB p ort s ei the r di rectly or u sing
the U SB extens ion cable supplied . R igh t c lick “My com put er” >“Attribute ”
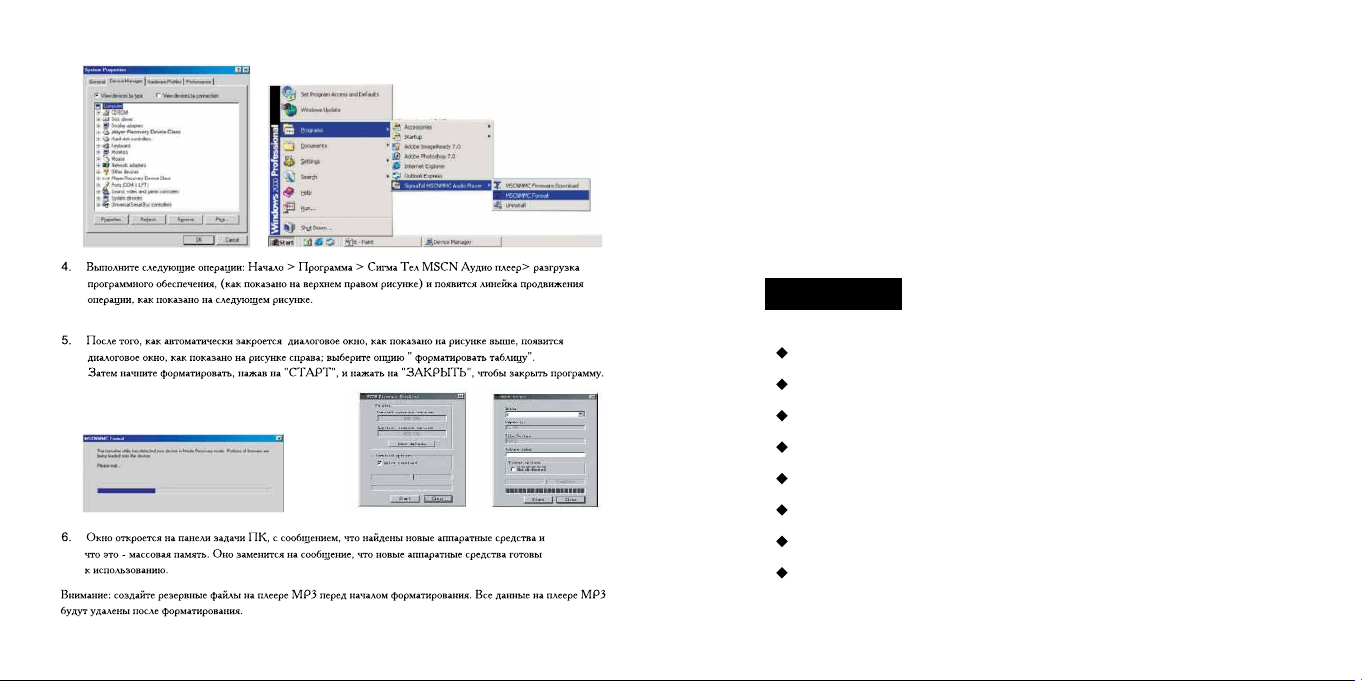
>“Dev ice m ana ger ”.
3. Press and h old the butt on until “Player Re covery Dev ice Cla ss” app ear s
on the De vic e man age r (See below left f igu re) ; rel ease the button;
4. Execu te the followin g pr oce dur es: Start>Pr ogr am> Sig maTel MSC N Audio
Playe r>f irm war e download ,(a s sho wn in the upper ri ght fig ure ) and a progre ss
bar wil l pop u p as sh own i n the following f igu re.
5. After the dialog box shown in the figure above is aut oma tically closed, a
dialo g box will pop up as shown in the figure on the right; Tick the“ form at
datas hee t” op tio n. Then start form att ing by pr ess ing “START”, an d p res s “
CLOSE” t o clo se th e pro gram.
2726
Page 11

6. A win dow wil l open on you r PC s task bar sta tin g th at new har dwa re has
been fou nd an d that i t is a mass storage de vice. This wil l the n change to a
messa ge st ati ng th at the new hardwa re is r ead y to us e.
Note: P lea se ba ckup the fil es on y our M P3 player be for e for matting. Al l dat a
on your M P3 pl aye r wil l be de leted afte r for mat tin g.
28
 Loading...