

Page 1
Index
Notice I
Pictures and functions of the Player
The Presented Accessories with the Player
MMC/SD Function
LCD
Open and Close the Player
Play the Music
Menu Function in the Play Mode
Recording Operation
Play Record
Set Recording Source
Set Recording Sampling Frequency
FM Function
Delete Files
MP3 Setting
Set the MP3 Equalizer
Set the Loop Mode
Use the Blue Backlight
Adjust LCD Contrast
MP3 Additional Function
Adjust the Automatically Closing Time
Repeating Function
View the Using Volume of the Player
The USB Connection
1-15
3
5
7
9
11
13
15
16
17-19
19-20
21-25
21
23
24
25
26-29
26
27
28
29
4
6
Page 2
Index
The Player Management Software
System Requirement for the Software
Installment Steps of the Management Software
Transfer Files to the Player
Files Uploading
Format the Memory of the Player
Delete Files
Refresh the USB Connection
Malfunction Diagnosis
Malfunction Diagnosis
Problem Solution
Technical Specifications
30-39
40-45
30
31
32
34
36
38
39
40
42
45
Page 3
Notice
Notice
If you plan not to use the player, please take out batteries to
avoid malfunction by soaking and eroding of batteries.
Don’t use the player in very hot, cold, dusty, or wet
environment.
Unlock the locked switch before using it
Don’t let the player fall do wn while being us ed because the
falling may causing nick
The life of batteries:
Battery Using life
No 7 lithium battery
(Closed the backlight)
*The life of batteries may be different because of using conditio n,
manufacturer and manufacturing time.
*Please replace your batteries under the following batteries
z The icon gets bright.
z LCD shows Low power.
z Operating button stroke has no response. When taking out
batteries and installing it again, there is still no response.
z To avoid static when using, please notice the following.
z If possible, please avoid to use it in rather dry environment.
z Please check whether the batteries are used up when the
player stops under normal operation
(Time unit: hour)
12
Page 4

Notice
I
Page 5
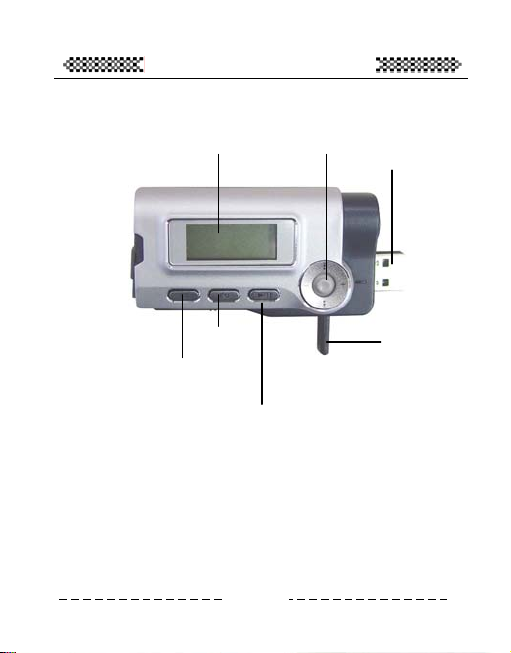
Pictures and Functions of the Player
p
The face
Play/Pause/Stop/Power
The wheel includes fast on, back, Volume +, Volume-, Menu
LCD
A-B/REC
The wheel
EQ
1
The USB port
The USB flex
ole
Page 6
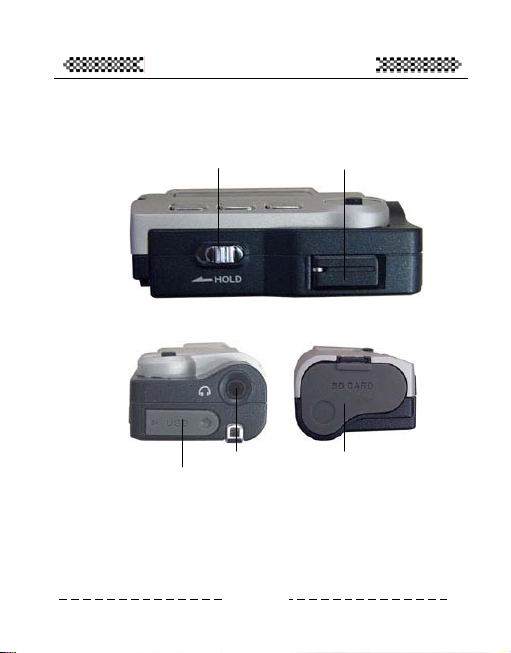
Pictures and Functions of the Player
The flank
The HOLD Button
USB Earphone plug MMC/SD plug
The USB flex pole
2
Page 7
Pictures and Functions of the Player
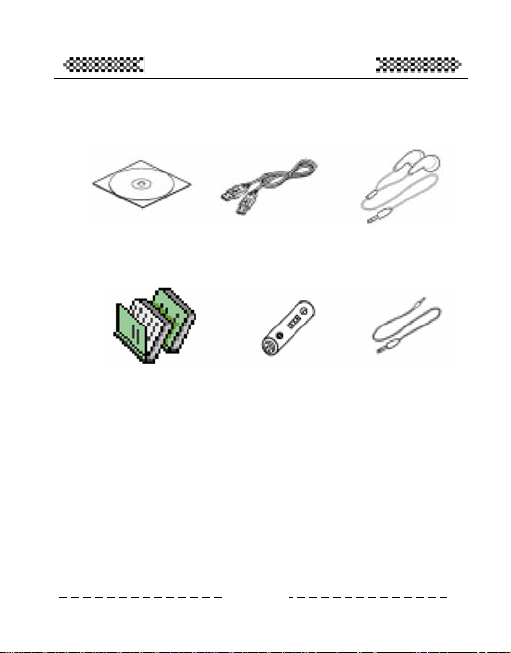
The Presented Accessories with the Player
Installing CD USB line Earphone
Manual/ guarantee AAA battery line-in
3
Page 8
Pictures and Functions of the Player
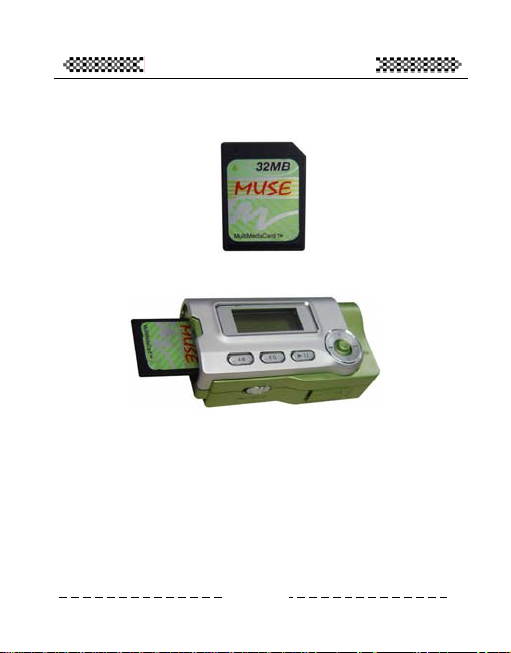
MMC/SD Function
Notice: the product supports the standard MMC/SD. Pay attention
to the direction of card plugging.
MMC
Usage
4
Page 9
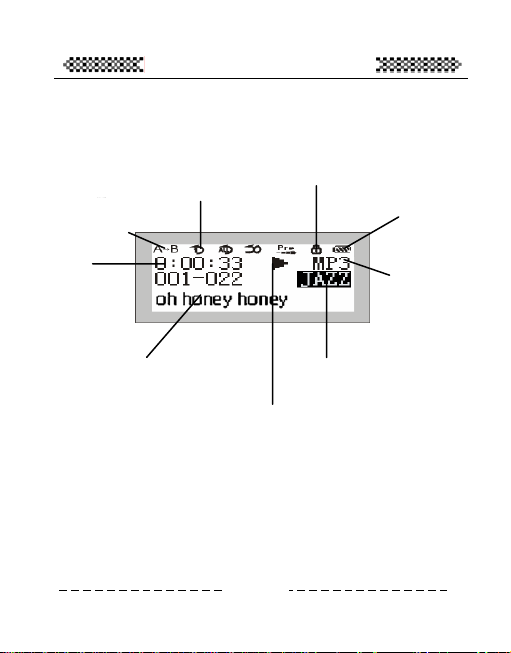
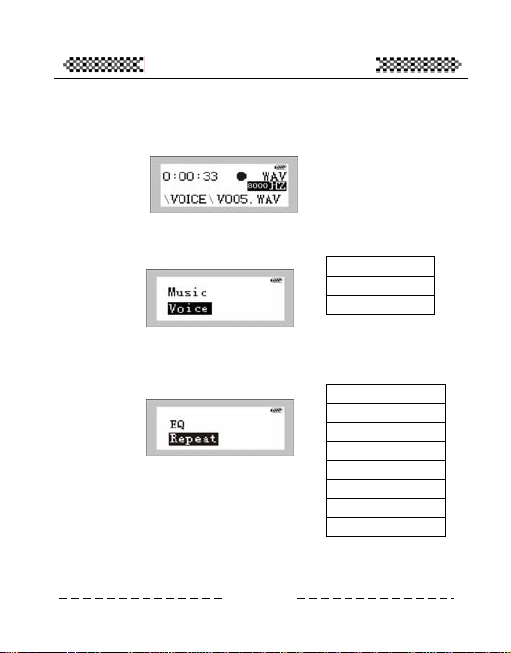
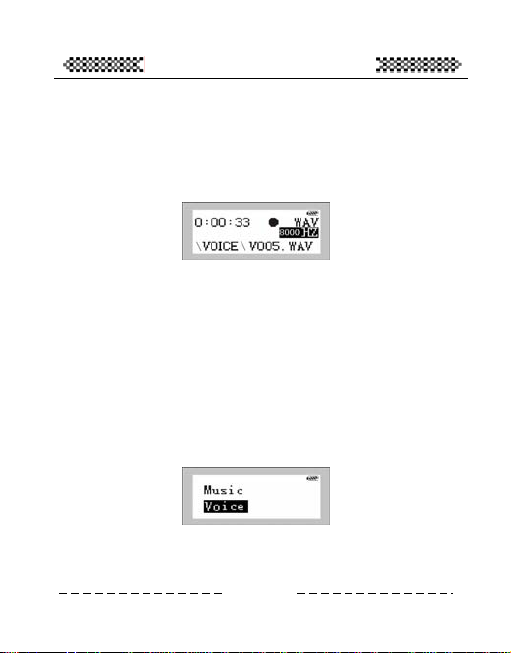
LCD
Pictures and Functions of the Player
Repeating sign
Playing time
The playing music
Loop mode
Locked status
Power volume
File name
Current status
EQ effect
The loop mode includes Repeat Track, Repeat all, Shuffle, Preview
mode, normal mode (normal mode is not shown in the picture)
5
Music type
Page 10
Pictures and Functions of the Player
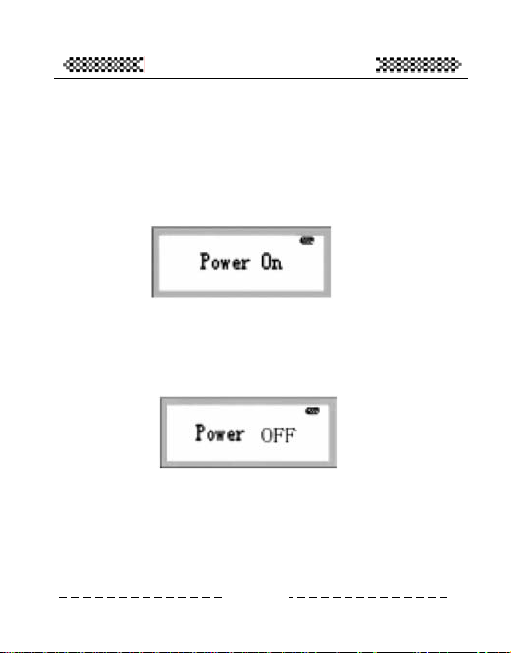
Open and Close the Player
When you open the player, you only need to press the PLAY/STOP
button. After 2 seconds, the beautiful blue picture will present
before you.
when the player is in playing or stopping, press PLAY/STOP until
the following picture shows, then you player will close. Such
closing mode will save the parameters while under power shutting
the parameters will not be saved.
6
Page 11
Pictures and Functions of the Player
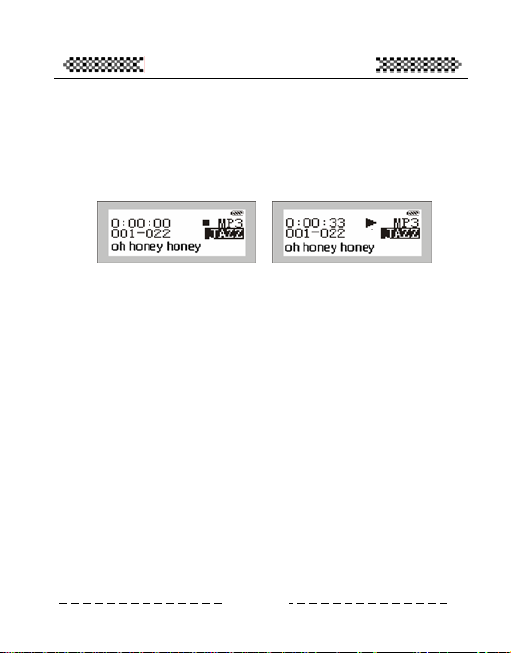
Play the Music
1. When you press PLAY/STOP, you will see the following
picture showing the player in music mode with the lowest
row present the music name.
2. When you press PLAY/STOP again, the picture is as the
above and right picture. The left shows the present music
serial number and playing time, and the low shows the
music name.
3. If you want choose to the next or the former music, dial the
wheel button up or down. And in playing, press
PLAY/STOP to stop the playing.
4. To close the player, press PLAY/STOP for 3 seconds
5. When the player is in playing or stopping, you can press
VOL+ and VOL- to adjust volume. Then the volume in the
picture will change. To press VOL once, the volume will
increase or decrease a level. Th e adjusting range of volume
is 32 levels.
7
Page 12
Pictures and Functions of the Player
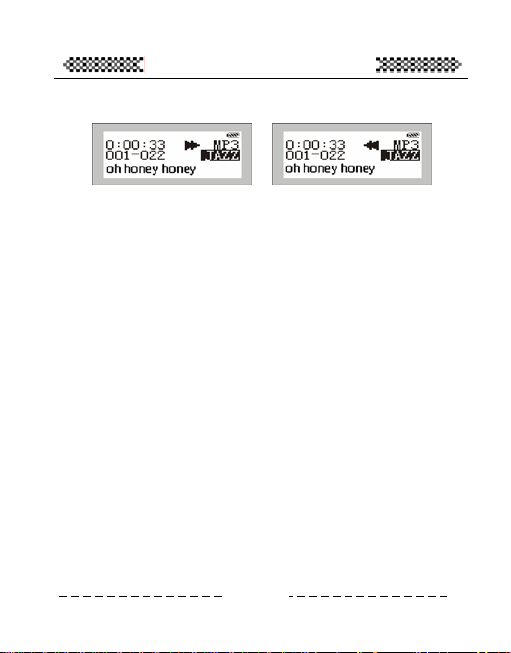
6. In Music mode, the present music will be fast on or fa st back
when you press the wheel button long enough.
7. Pressing PLAY/STOP long eno ugh will close the player with
all parameters saved.
Notice:
When the player is running, the bat tery volume may flop. The
reason is that different power in playing will cause the batter
volume librating.
8
Page 13
Pictures and Functions of the Player
Menu Function in the Play Mode
1. Press PLAY/STOP to open your player.
2. Press the menu button (the button in the midst of the wheel
button) long enough, you will see all the item in the menu
Music
Voice
You can choose each item in the
above table by pressin
g the wheel
button up or down. Pressing the mode
button in the midst button will go into
menu.
z Choose Music to go into music playing
ca
you n choose music to play.
FM Tuner
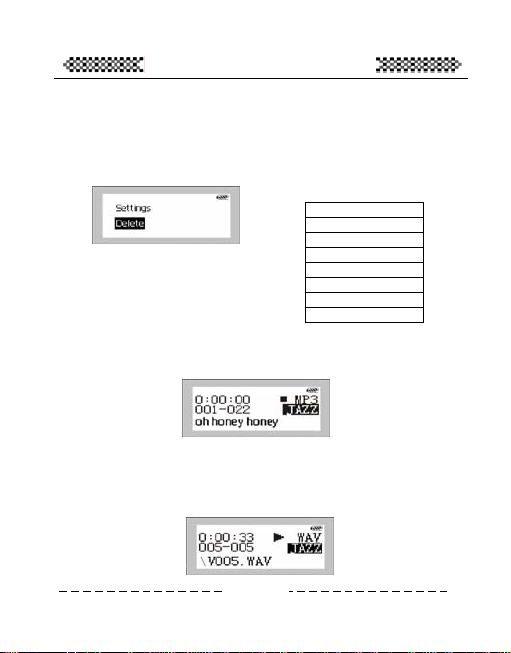
Settings
Delete
Memory Info
Record
Return
mode. In such status,
z Choosing Vo ile playing mode. In
h s
suc tatus, you can choose WAV file to play. In such status, you
ice to go into recording f
still can choose the corresponding function in the same menu, for
example, the Music menu item.
9
Page 14
Pictures and Functions of the Player
z Choose Record item to enter recording interface. If
recording setting is set to MIC, the record format is WAV. If the
record settings is set to Line-in, the format is MP3.
z Choose Deleting to enter file deleting interface. Ther e are
two items, Music and /Voice.
Choose Music to delete music files. And choose Voice to delete
record files.
z Choose Settings item to enter parameters se tting menu.
10
Music
Voice
Return
EQ
Repeat
LCD Contrast
Auto OFF
Record source
Encode Bitrate
Backlight
Return
Page 15
Pictures and Functions of the Player
Recording Operation
You have two ways to begin recording.
1. Reco
On the prese g file/total
recording file amount, recording time, left ing time, the
present recording file name and recording sa equency. As
the above picture shows, the present record seconds
and sampling frequency is 44.1KH z.
2. Choose to record in the menu
rding by one button
1) he player.
Press PLAY/STOP to open t
2) gh to record directly.
Press A-B/REC long enou
interface the player shows t nt recordin
3) You can press PLAY/STOP to stop recording. After
that, the player is back to Mu sic mode, and you can p lay t
recording file.
1) the m utton of the
Press the mode button (
wheel) to enter the menu.
2) Choose the items of Record by l up
or down).
3) Press the mode button to enter recording interface
directly.
he
record
mpling fr
ing time is 8
edial b
pressing the whee
11
he
Page 16

Pictures and Functions of the Player
The definition of recording interface is the same to the
former.
4) Press Stop to stop recording and back to Voice mode.
Press Mode to back to Music mode.
12
Page 17

Pictures and Functions of the Player
Play Record
Press PLAY/STOP to open1. the player. Press the mode button,
then you will see the pop menu.
2. Choose Voic enter record playing
mode
3. If there is no recording files or it’s the first time to enter, No
Files interface will appear.
4.
Choose the recording file that you want to play by pressing
the wheel button up and button, and press PLAY/STOP to
play the record. The playi ng p
interface:
5. At present, button (the medial
button in th the function menu to
finish all ch
ing recording, you can press PLAY/STOP
After finish6.
e in the menu, you will
icture is as the foll owing. If
re ithe s no recording files, you will see the following
when you press the mode
e wheel), you also can enter
oosing and the settings.
13
Page 18

Pictures and Functions of the Player
quickly to stop record ing an d b ack to the recor din g int erface .
Then you can choose the Music item in the menu to quit the
recording interface and enter MP3 mode. Or you can press
the mode button long enough to bac k to the Music mode.
14
Page 19

Pictures and Functions of the Player
t Recording Source
Se
At present, you can r , for example by the
microphone or the li
1.
Press PLAY/STOP to open the player.
2.
Press the mode button (the medial button in the wheel) to
open the menu.
3.
Press the wheel up or down to choose the Settings item in
the menu.
Press the mode button to choose the Rec Source item.
4.
Press the mode button to enter Rec Source setting menu as
5.
the following picture:
t present, two items, MIC and Line in cable, are offered to
A
.
choose
you choose MIC, the record will be got from outside. If you
If
Line in cable, the record will be got from the inner line in
choose
ble.
ca
otice: the power will be con sumed greatly by t he way of Line
N
cable. So suggest users to do the E ncode operat ion when the
in
ower is plenty to avoid the break-off or shutting-down in low
p
ower.
p
ecord with different ways
ne-in.
15
Page 20

Pictures and Functions of the Player
Set Recording Sampling Frequency
hen may adjust the recording
W you record by the microphone, you
mpling frequency o
sa f the file.
Press PLAY/STOP to open the MP3 player.
1.
Press the mode button (the medial button of the wheel) to
2.
open the menu
3. Press the wheel up or down to choose the Setting item in the
menu.
Press the mode cord Sample item.
4. button to choose the Re
Press the mode button to enter the Record Sample setting
5.
menu as the following picture:
You c
an choose 8000Hz, 11025Hz, 16000Hz, 22050Hz, 32000Hz,
The h
igher the frequency, the better the sound quality is, and the
ore s s.
pace it takem
otice: there may be nd is in Line in cable. But
N faint sound if no sou
is has no effect on the quality of re cording music.
th
16
Page 21

Pictures and Functions of the Player
FM Function
z Adjust frequency
1. Press PLAY/STOP to open the player.
2. Press the mode button to open the menu as the
following picture:
3. Use the Next/Last button in the wheel to
choose the FM Tuner item.
4. Press the mode button to enter Preset mode as
the following picture:
The Preset mode:
This mode has set 20 fixed channel. When you first
enter the mode, the player will automatically search
the channel. After searching, you can choose each
channel with the Next/Last button.
5. Press the mode button again to enter the
Manual mode as the following picture:
17
Page 22

Pictures and Functions of the Player
The Manual mode:
In the interface, you can adjust manually with the
Next/Last button. Dialing once will change 1000Hz.
Pressing the Next/Last long will change 1000Hz
continuously.
If you want to save the frequ
manually, you can press the A-B button for a short
n, the frequency will be saved in the Preset
time. The
mode o listen to in future.
z Reco
You can record in Manual and Preset mode. Press A
enter the recording interface as the following picture:
hen, the p will be recorded into
T rogram which you receive
MP3 files. Press PLAY/STOP to stop recording.
Press the mode button to quit FM adjusting.
Notice: the control of Volume + and – is still useful, but no
status is shown.
rding
18
ency that you adjust
-B to
Page 23

Pictures and Functions of the Player
Delete Files
To delete the files in the player, you can use the menu in the player
or the management software we present. Delete files according to
the following steps:
1. Press PLAY/STOP long enough to open the player.
2. Press the
3. Choose the Delete item by the Next/Last button.
4. Th
5. If cho r the music deleting
If you don’t want to delete the current m
choose the No. By the Next/Last button. Press the mode
button to enter the music that you want to delete. Then
choose Yes and press the mode button to delete the music.
After finishing deleting, the player will back to the deleting
mode automatically, and you can continue deleting the file.
mode button to open the menu.
en you can choose to delete musi c or voi ce files as
the following picture:
Music
Voice
Return
ose Music, you will ente
interf e:
ace as the following pictur
usic, you can
19
Page 24

Pictures and Functions of the Player
If you want to q
enough.
6. If you choose Voice, you will enter the voice deleting
interface as the fol
If you don’t want to delete the n
choose he No. by the Next/Last button. Press the mode
t
button to en
choose Yes a delete the music.
After in
finish g deleting, the player will back to the deleting
mode automa ntinue deleting the file.
If you want to back to the Play m n
long en gh.
ou
If you want to quit the deleting menu, you can choose
Return, de button to quit the Play mode.
then press the mo
uit deleting, press the mode button long
lowing picture:
current music, you ca
ter the music that you want to delete. Then
nd press the mode button to
tically, and you can co
ode, press the mode butto
20
Page 25

MP3 Setting
Set th
To enjoy the
according def e.
The eq
Pop.
You c choose each mode by the items of EQ menu. The Jazz
mode Classic mode
makes
feast p e Pop mode makes you feel perfect po p
music. And the Normal mode just keeps th e inward feat ure withou t
been o imized.
e MP3 Equalizer
music best, you can choose different equalizer mode
erent music typ
1.
Press PLAY/STOP to open the player.
2.
Press the mode button to open the me nu.
3.
Choose the Settings item.
4.
Choose EQ menu.
5. Choose each
ualizer has five modes, Nor mal, Rock, Jazz, Classical and
choose EQ will pop the list as the following picture: To
an
makes you feel perfect jazz music. And the
you enjoy perfect classic music. The Rock mode makes you
erfect rock music. Th
pt
item by the Next/Last button.
21
Page 26

MP3 Setting
6. If you don’t want to change the current settings,
After you finish the setting, the EQ mode name will show in the
playing interface as the following picture:
To qu
back to the M
choose Return to quit the menu.
it the setting interface, pr ess the mode butt on long enough t o
usic mode.
7. an a by pressing the
EQ button briefly.
22
djust EQIn the Play mode, you c
Page 27

Set the Loop Mode
MP3 Setting
When you pla nt loop mode. You
can ch ge the loop
y the music, you may need differe
an mode of the player.
Press PLAY/STOP to open the player.
1.
Press the mode button to open the menu.
2.
Choose the Settings item.
3.
4. Choose the Repeat menu.
5. In the menu, choose the repeating item by the
Next/Last button to pop the following picture. These
items will change the loop mode. They are Shuffle,
Normal, Repeat all, Repeat Track.
Their function is as the following:
Repeat Track: a certain piece of music plays loop.
Repeat all: all music plays continuously and orderly until
you do other operation.
Shuffle: play at shuffle without order.
Normal: all music plays orderl y once and the player stops
playing.
23
Page 28

MP3 Setting
Use the Blue Backlight
The blue background is attracting. There you can set the blue
background open time as your li
1. Press PLAY/STOP to open the player.
2. Press the mode button to open the menu.
3. Choose the Settings item.
4. Choose Backlight it
5. Press the mode button to enter the Backligh
the following picture.
Y
ou can choose to close the Backlight. And you can choose 5s, 10s,
1 he b
5s, 20s and all. When press the butt on each time, t acklight
will exist for the corresponding time.
Disable mean the backlight will start whenever. The choice can
prolong the life of battery.
These items, 5s, 10s, 15s and 20s, set 5 s, 10 s, 15 s and 20 s. When
press the button each time, the backlight will exist for the
corresponding tim
A
ll means the backlight is always open. (The way will decrease the
li
fe of your battery)
P
ress the mode button to quit the Settings interface and back to the
M
usic mode.
e.
ke.
em.
t menu as
24
Page 29

MP3 Setting
ju
Ad st LCD Contrast
The LCD Contrast is different wi th the weather changing. There
you can set the LCD Contrast as your like .
1. Pre player.
2. Press t he menu.
3. Choose
4. Choose
5. Press the mode button to enter LCD Contrast setting
ou can press the Next/Last button to change the contrast. When
Y
e contrast meet your demand, press the mode key to enter and
th
ack to Display menu. The contrast includes 32 levels.
b
ress the mode button to quit the Settings interface and back to the
P
usic mode.
M
ss PLAY/STOP to open the
he mode button to open t
the Settings item.
LCD Contrast item.
interface as t
he following picture.
25
Page 30

MP3 Additional Function
Adjust the Automatically Closing Time
You can set different closing time according your like.
1. Press PLAY/STOP to open
2. Press the mode button to open the menu
3. Choose the Settings item.
4. Choose Power Savings me
5. Press the mode button t
If ica
the setting is Disable, the player can’t close automat lly
whate
If the ayer will
close a
Pause
If you the mode button long
enoug
closing time setting menu as the follow ing picture:
You can choose the five items, Disable, 1 Min, 2 Min, 5 Min
and 10 Min. Choose the item that you need by the Next/Last
button. Press the mode button to enter and back to the menu
mode. If you don’t change the settings, press the mode
button long enough to back to the m usic mode.
ver under Stop or Pause m ode.
setting is 1 Min, 2 Min, 5 Min or 10 Min, the pl
utomatically after the corresponding minutes under Stop or
mode.
want to quit the Settings item, press
h to back to the Music mode directly.
26
the player.
.
nu.
o enter the automatically
Page 31

MP3 Additional Function
Repeating Function
When you need to listen to s ome se
this fu on. segment (the
ncti Press the A-B button to choose the
functio n
n ca be as the repeater in English study).
1. ss A e beginning point A.
Pre -B once in playing to set th
2. er a set the ending point B.
Aft while, you press again to
er
Aft setting the B point, the player begins to play the
repeat
3. playing, press A-B or Next/Last to choose another music
ed segment.
In
cancel A- owing:
to B. The picture is as the foll
Setting A Setting B
gment repeatedly, you can use
27
Page 32

MP3 Additional Function
of the Player
View the Using Volume
You can view the version number, the volum
using v me
olu .
1. Press PLAY/STOP to open the player.
2. Press the mode button to o
3. Choose the About item by th
the mode button to enter, then you can view the using
volume and the general volume
pict
Notice: if the general volume and the left volume are not
correctly show
ith the management software to insure the correct showing.
w
ure:
n in the player, please format the player again
28
e of the player and the
pen the menu.
e Next/Last button. Press
as the following
Page 33

MP3 Additional Function
The USB Connection
The pl ca
ayer n transfer music files by the USB.
1. anual of
Check the USB in your comput er. (Refer to the m
r c
you omputer)
2. ne with that of PC. (The
Con ct the USB port of the player
ed
add USB line can also be used)
3. After e
If you connect the player wi th PC for th e first time and you
4.
the USB port is connected, a sign will be shown on th
player as th
have installed the attached software in your computer, PC
will find the new device. If you have not installed it, please
installed it first and connect again.
e following picture.
29
Page 34

MP3 The Player Management Software
System Requirement for the Software
It’s very important to install the management software before the
connection between the player and PC.
Set the installing CD into the CD-ROM of PC, and the installing
application will run automatically.
m
Syste requirement:
IBM compatible computer
Processor: above Pentium 166 MHz
: the second version of W in 98, Win 2000,
Operational system
Win XP
USB port
mory in
Not less than 32MB me (64 MB is preferred for W
2000, XP)
Not less than 20MB harddisk
Not less than 4x CD-ROM
Sound
Network environment to Internet (recommended)
card (not necessary)
30
Page 35

MP3 The Player Management Software
Installment Steps of the Management Software
1. When you set the CD into your CD-ROM, it will run
ally. In the installing process, the installment
automatic
lic k Next in the
app ation will install Win98 driver, and clic
tin river of the
con uous windows. It will install the bottom d
er
play and the management software on PC. After finishing
the in
stallment, it will remind you to restart the system.
After
restarting, you will see the shortcut icon on the
deskto computer. And you can also the player
p of the
anagement system in the Start menu.
m
efore you use
B
e player and PC as th e f o l l owing
th
icture.
p
Then click the
player icon
the desktop, and you
will see the Chinese
interface of the
player management
system.
the player, connect
on
31
Page 36

MP3 The Player Management Software
Transfer Files to th e Player
Before transfer files to the player, please open the player and
connect it to the computer.
1. Double click the icon
2. To choose the files to transfer, first choose the file
folder from the left exp lorer, then the right will show
the files in the folder .
3. Click the download icon to download.
4. Enter and you will see the copy interface.
5. When you download other files but MP3 and WMA
files, the system will create a EDISK folder in the
mobile storage to keep these non music files.
32
.
Page 37

MP3 The Player Management Software
6. Th e system can ch eck the play er automat
you disconnect the player, the system will stop
working.
Suggestion:
Strongly suggest users to transfer MP3 and WMA files to the
MP3 folder, thus it can tran
If you only copy
copy 128 files in total.
★★★Warning:
Don’t up-plug the player with the computer while
download
If the play
out the battery for 3 minutes and pu t it a gain. Reco nnect
and reform
If you can’t find the files you
in the EDISK folder.
In downloading, the playe
with animation. Only the stopping of the anim
the player shows the end of th e transfer because of the
non synchronization between different operational
system and the player. For example, in Win 98, it shows
the end quickly on PC, but on the player it need to show
additional time to end truly. But in Windows XP, the
transferring speed of PC and the player is nearly the
same. After the downloading ends, don’t take the player
immediately. Please attach importance on i t to avo id files
corruption.
them in the root directory, you only can
ing files to avoid the malfunction of the player.
er can’t work well for some reason, pl ea s e take
at your player.
sfer more MP3 and WMA files.
download, try to find them
r screen simulates the process
33
ically. Once
ation on
Page 38

MP3 The Player Management Software
Files Uploading
The player can be as mobile storage, and you can upload files to PC
with t lay
he p er management software. The player only upload non
sound
files and can’t upload non sound files because of pro tecting
music
property.
1. Connect the player and PC.
2. Choose the file that you will upload.
3. Click the upload button on the interface of the
management software.
4. You will see the transferring interface.
34
Page 39

MP3 The Player Management Software
★★★Warning:
Don’t up-plug the player with the computer while
downloading files to avoid the malfunction of the player.
If the player can’t w
To prot
the t it again. Reconnect and
out battery for 3 minutes and pu
rm
refo at your player.
ect the property, the player can’t upload music files.
If you files, the system will remind
choose MP3 or WMA
ou.
y
ork well for some reaso n, please take
35
Page 40

MP3 The Player Management Software
m
For at the Memory of the Player
Before forma e open the player and connect it with PC.
tting, pleas
1. Run th
2. Click the Format button, and the Format dialog pops.
3. Choose the driver and click START. Then formatting
e player management icon on the desktop.
begins.
36
Page 41

MP3 The Player Management Software
Warni
ng:
Formatting will dele
Don’t up-plug the player while formatting, or it will
cause the player lose the system files and the system
can’t start.
Please use the formatting tool of the management
and don’t use the operational system formatting.
software
ou Windows XP or 2000,
If y want to use the Format of
s at because at
you hould choose FAT or FAT16 to form
sen
pre t the player does not support FAT32 and NTFS
forma can’t work well, and the
t. Or else your player
yer a”. Then you
pla will remind “Error, Reformat Medi
can format again with FAT or FAT16. If the player can’t
connect t.
the player, please contact the agen
te all files in the storage.
37
Page 42

MP3 The Player Management Software
Delete Files
Apa from the player, you can delete files in the player with the
rt
ement system.
manag
1. Co nnect the player
the management system.
2. Deleting the files you target to.
3. Click the Delete icon on the management system,
then click “Enter” to delete the file. You can also
choose the Delete menu item under the File menu.
Notice:
Once they have been deleted, the files can’t be
recovered.
with PC, open the player and r un
38
Page 43

MP3 The Player Management Software
Refresh the USB Connection
After y ha ing
ou ve connected the player and PC, to avoid the break
off of a
the c ble, you can click the connection icon of the player
management system to refresh the c onnection.
emory
M Volume
The pl er management system show memory volume with figures
ay
and gra hs.
p
39
Page 44

Malfunction Diagnosis
Malfunction Diagnosis
Press the Play
1. button to get no reaction on the player.
The ason and the solution: there is no battery or the power is used
re
eck whether there is batter y or replace the battery. Take out
up. Ch
ttery, and after 5 seconds, install it correctly again.
the ba
After opening the player, press the button to get no reaction.
2.
ason and the solution : the button is locked. Press the Hold
The re
to unlock.
button
In playing files, there is no sound.
3.
ason and the solution: the volume is too low, and adjust the
The re
e. Or the player is connecting to PC. Or no music
volum files exist.
4.
After connection, the player can’t download music.
T
he reason and the solution: you may not install the player
m
anagement software, or the application has been corrupted. Install
th
e application again. Or the mainboard has no USB port. And you
n
eed upgrade your mainboard.
5.
The time is shown in a mess when some music is played.
T
he reason and the solution: the mp3 files compressed with the
V
BR format will cause the time change in playing because the
ch
ange of rate. But playing is no problem. You can compress them
w
ith the fixed rate format to solve the time problem.
6.
Why does to up-plug the player sometimes bring out
abnorm
ity of the computer.
T
he reason and the solution: it’s for the plugging or up-plugging of
th
e USB. So we suggest users not to up-plug the USB while
40
Page 45

Malfunction Diagnosis
transferring to avoid the abnormity.
7. Why is the gene
m
the sa e?
The reason and the solut ion: because t he player need space to store
application and Chinese ch aracter lib rary. So the memory shown is
smaller than the actual
8. y
Wh does the player show “Error, Reformat Media” after
opening and c
The re on: If you format the player with FAT32 or NTFS in
as
win20 or wi ormat.
00 n XP, the player can’t recognize the f
The solution: rage and format
again AT or FAT 16 format.
after connecting, find the mobile sto
with F
ral memory shown and claimed in fact not
.
lose automatically?
41
Page 46

Problem Solution
◆ Problem Solution
Warning:
1. We strongly suggest users to install the player management
software first and format after that. And in win98, first install the
management software, then connect the player to recognize device.
2. Duri ng transfer proces s, the speed sh own
different because of the difference of wi n 9 8 , win 2000 and win XP.
e rding to the player. The transfer speed
So th speed should be acco
of the pla nimation. The stopping of animation
means the end of transfer.
Plug and play function is only for Win2000, Win XP while Win98
and Win98 Se
d
n
3. he Play button to get no reaction on th
T
u
th
4.
T
b
5.
b
T
m
th
p
yer is shown with a
river. The management system contain the driver, so you only
eed to install the management system.
Press t e player.
he reason and the solution: there is no battery or the power is used
p. Check whether there is b attery or replace the bat tery. Take out
e battery, and after 5 seconds, install it correctly again.
After opening the player, press the button to get no reaction.
he reason and the so lution: the button is locked. P ress the Hold
utton to unlock.
Af ter con nection, the mobil e storag e icon of the player can ’t
e found.
he reason and the solution: you may not install the player
anagement software, or the application has been corrupted. Install
e application again. Or the mainboard has no USB port. And
lease contact the mainboard agent to upgrade your mainboard.
has not the function and need users to install the
42
in the computer is
Page 47

6. The time is shown in a mes
The ason and the solution: the m
re p3 files compressed with the
VBR format will cause the time change in playing because the
cha of rate. But playing is no problem. You can compres
nge s them
with the fixed rate format to solve the time problem.
7. Why does to up-plug the player sometimes bring out
abnormity of the computer.
The reason and the solution: it’s for the plugging or up-p
the SB. So we suggest users not to up-plug the USB while
U
transferring to avoid the abnormity.
8. The music form
Laye , MPEG I Layer 1, MPEG2 La
r2
WMA.
The rate range of MP3: 32Kbps~256Kbps
The rate range of WMA: 64 Kbps~1 92Kbps
So if e player can’t play normall y, the response of press in th g button
is slow and the earphone is no t normal, t he comp ressed format may
be not supported by the system or the rate is beyond the above
range.
When you meet such situ ation, p
the sic according the standard with some tools again.
mu
Tip: take use of the play media (such as Winamp) to confirm the
format of the music after conn ecting the player with P C. View the
information to get the format.
9. Why is the general memory shown and claimed in fact not
the sa e?
m
The reason and the solut ion: because t he player need space to store
application and Chinese ch aracter lib rary. So the memory shown i s
s
maller than the actual.
Problem Solution
s when some music is played.
lugging of
at supported: MPEG I Layer 3, MPEG I
43
yer3, MPEG2.5 Layer3,
lease delete the music or c ompres s
Page 48

Problem Solution
10. Why do the preferences often lose?
The reason: because we often save preferences in Setting.dat. If you
delete the f
you need to set again.
ile or format the player, these preference will lose. So
44
Page 49

Technical Specifications
◆ Technical Specifications
Memory 64/128/256/512M(Build inside)
Battery An AAA lithium battery
LC 96*32 pixels, blue backlight D
Dimensions 70mm*37mm*23mm
Signal/noise 90dB
Earphone output 5mW+5mW
Frequency range 20Hz-20kH z
Record sampling frequency 8KHZ
Music format MP3, WMA
Record format ADPCM MP3 (Line-in)
Language library GB2312
Compressed rate 32kbps-256kbps
45
 Loading...