

Page 1

Page 2

Index
Safety Rules .......................................................1
About Data.......................................................... 2
About Website ...................................................3
Product Features ................................................4
Appearance ........................................................5
Basic Operation ..................................................6
Connecting the player to a PC ............................ 7
Recharging the battery........................................ 8
Auto Keylock function .........................................8
Screen saver power saving mode....................... 8
Copy music files to the player ............................. 8
Turning the player on and off .............................. 9
Main menu .......................................................... 9
Music Playback................................................. 10
Music submenu (EQ and Play mode)................ 11
Music submenu (Playlist Navigation) ................12
Voice Mode....................................................... 13
FM Tuner ..........................................................14
FM Radio submenu........................................... 15
FM Recording ...................................................16
Voice Recording................................................ 17
Delete file.......................................................... 19
Setting............................................................... 19
About this player ............................................... 22
Software Installation.......................................... 23
Firmware Upgrade ............................................25
Firmware Upgrade Failure ................................28
About Lyrics and Audio Synchronizing Software28
Troubleshooting ................................................ 30
Accessory List................................................... 30
Specification...................................................... 31
Page 3

Safety Rules
In order to use this player, please follow the rules depicted in this manual. Before using this device, please thoroughly
read and understand this manual.
z Follow the WARNINGS and CAUTIONS in the manual when using this device.
z Pay attention to the edges, uneven surface and metal parts of this device, its accessories and its package, to prevent
any possible injury and damage.
z Keep this device and its accessories out of reach of children. Also, this device is inedible, so do not put into
your mouth or swallow it.
z Do not modify, repair and dismantle this device on your own to avoid causing fire, electric shock, breakdown and so
on. All of the aforementioned will void the warranty.
z Do not use any diluents or volatile liquid to wipe this product. Please use a dry, clean cloth to wipe away the stains.
z Do not expose this product directly to sunlight, high temperature and high humidity (such as bathroom). Use this
product in a dust-free site.
z Do not insert foreign objects, such as pins, into this device.
z Do not touch this product with wet hands to avoid damaging the internal electrical circuits or receiving electric
shocks.
z Be extremely cautious while using headphone/earphones, because if they hook things accidentally, it could
cause strangling.
z If your skin feels irritated when in direct contact with the headphone/earphones, please stop using them or otherwise
it may cause skin rash and inflammation.
z Turn down the volume before using this device as a sudden loud sound may damage your hearing or ears.
z Do not turn up the volume of the device too high or otherwise it may damage your hearing or ears.
z Do not let the device fall or collide with other objects.
z When plugging in/out the headphone/earphones or wires please hold the device and jacks firmly to prevent breaking
of wires or dropping of the device.
z Do not wear the headphone/earphones when driving to avoid traffic accidents.
z If using the device while walking, please pay attention to the traffic situations and road conditions.
z Do not use this device in other hazardous locations.
z Do not use unqualified or uncertified USB adapters to recharge this product, otherwise it may damage the battery or
cause machine breakdown and void the warranty.
z If certain symptoms or problems occur while using the device, please stop using immediately.
1
Page 4

About Data
z Do not violate or infringe the copyright law and other international copyright laws while using this player for
recording.
z The copyright law forbids unauthorized reproduction of copyrighted music for any other purpose other than self-
entertainment without the author’s permission.
z Even for the purpose of self-entertainment, it is strictly prohibited to compile and disseminate copyrighted music
to the third party without the author’s permission.
z If intentionally disseminate copyrighted music by means of information network without the author’s permission, the
infringer will violate “the right of communication to the public” and “the right of distribution” and shall be subject to the
criminal responsibilities.
z This company, and the manufacturers, distributors and dealers of this player are not liable for any of the
above infringement acts.
z This company shall not be liable for any loss or damage (either anticipated or unanticipated losses) of
customers or other third parties by the usage of the player.
z Before loading into or using the player, please back-up all the essential information stored in PCs.
This company shall not be liable for any loss or damage by the usage of the player.
2
Page 5

About Website
z URL: http://www. mercurystyle .com
z From the website, you can learn more about our company. keep informed of the latest news about , read more
about our products, download related software and receive technical support.
z You can download the latest version of firmware to keep the player in optimal condition at all times.
Mercury makes no representation for the errors, omissions or updates of this document. Mercury
also makes no representation for the data or music files lost of the player. Users should download
the latest version of the user's manual from our website.
Mercury
is a registered trademark of KOBIAN PTE LTD.
Microsoft Windows Media and Windows are trademarks of Microsoft Corporation.
Trademarks of other products mentioned in this user's manual are owned by their respective
companies or organizations.
© 2006 KOBIAN PTE LTD. All rights reserved.
3
Page 6

Product Features
z Synchronous sound and lyrics display
This player supports ID3V2 / Lyrics3 V2.0 / LRC / ASF for simultaneous music playback with lyrics display. You can
listen to the music while viewing the lyrics at the same time, just like a small KTV machine. Learning new songs is
no longer a tedious task!
z 19 EQ options
This player provides 19 equalizer patterns such as Normal, Rock, Jazz, Classic, Pop, Ultra-Bass, Blues, Club,
Dance, Full Bass & Treble, Full Treble, Large Hall, Live, Party, Reggae, Ska, Soft Music, Soft Rock, and Te c h n o .
z Multilingual display Support
This player supports over 45 languages (covering text usage for more than 100 countries) and offers user interface in
10 different languages (still increasing).
z Audio Recording function
This player has a built-in microphone that is easy to operate for instant recording. Provides seven recording modes
for high-quality recording.
z Multiple audio file format support
This player supports MP3, WMA and ADPCM (WAVE) formats.
z Auto Keylock
Keylock function with timer to prevent inadvertent pressing of buttons.
z Firmware update function
Users can obtain the latest firmware from the download center on the website and update the latest firmware via the
USB port. Please visit the website frequently to upgrade firmware for better performance.
z FM tuner function
This player provides a high-performance FM Tuner that allows users to perform automatic channel search, set
“favorite” channels and record “favorite” programs.
z High-quality playback
Sound quality is higher than 95dB SNR (Signal – Noise Ratio).
z Plug and play portable storage
Allows high-speed data transfer to and from a PC with USB 1.1 / 2.0 Full-Speed interface. The Player is also a
portable storage device that supports Mass Storage Class without the need to install additional driver, except for
Win98SE.
z Quick charge
You can recharge the player battery by connecting the player to the USB port on the PC using an USB cable or USB
adapter. It takes about 4 hours to fully charge the battery. The battery gets 80% charged with a two-hour quick
charge. This player has a screen saver function to save power effectively and prolong the playing time.
4
Page 7
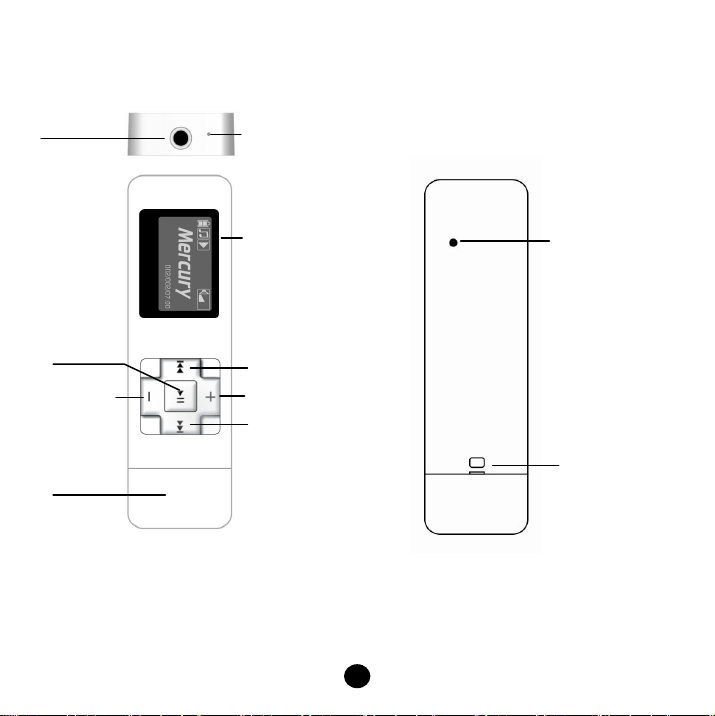
Appearance
[Front view] [Back view]
Earphone Jack
Play/Pause
Volume down
USB cap
(USB port inside)
Microphone
LCD screen
Previous
Volum e up
Next
Reset button
Strap holder
5
Page 8
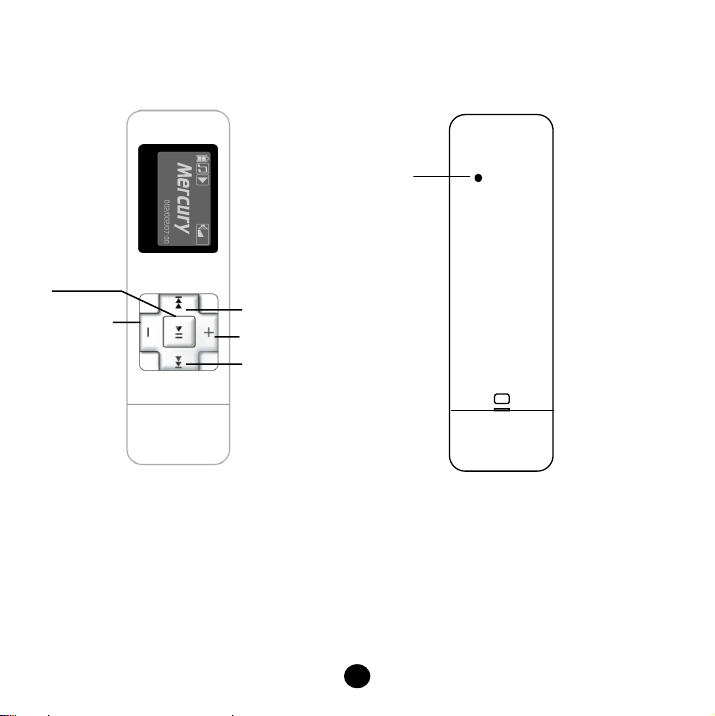
Basic Operation
[Button functions]
1
○
2
○
○1 Play button: Play/Pause/ Programmed FM channel switch
○2 Volume down - :Reduce volume
○3 Volume up ª :Increase volume
○4 Previous :Select l previous track/channel/file/item
○5 Next :Select next track/channel/file/item
○
○
○
4
3
5
○
6
○6 Hardware RESET button
6
Page 9
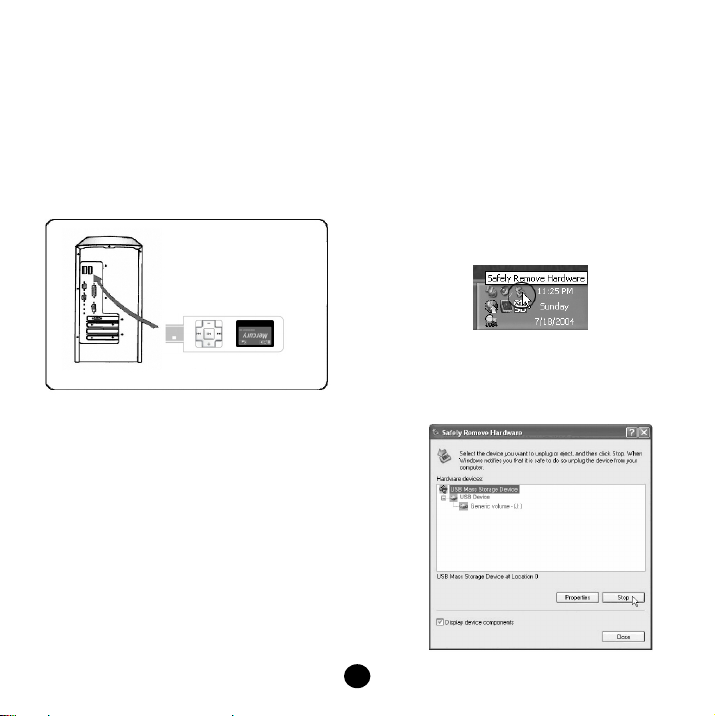
Connecting the player to a PC
[Operation procedure]
1. If you want to copy
to the player, connect it to a PC through the USB port
as shown in the picture below. If the PC cannot detect
the player, insert the tip of a pin or pointed object into
the RESET button on the back of the player to reset it.
music files or update the firmware
USB port on PC
2. Pay attention to the orientation of the USB ports on
the player and on the PC. Do not use an USB
extension cable or USB Hub, otherwise you may
experience abnormality in connection, file
transfer and firmware update.
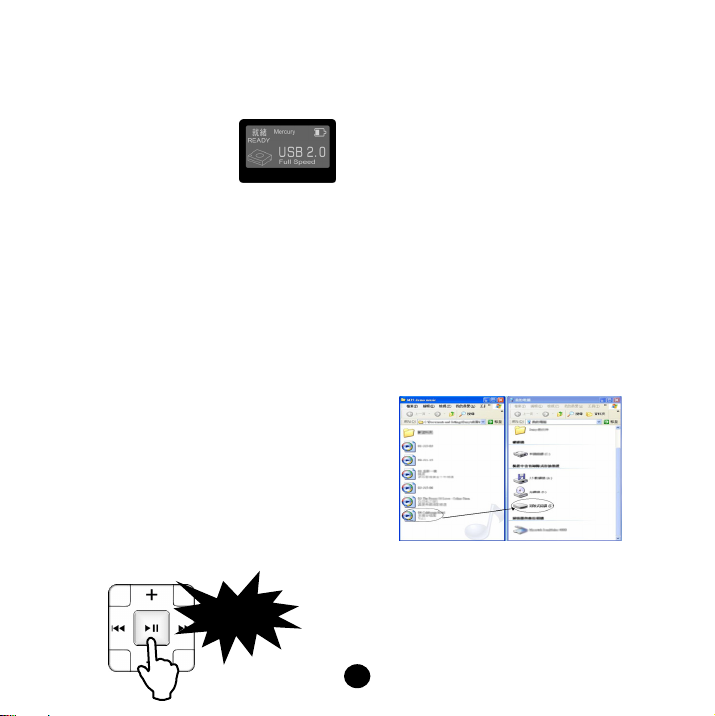
3.
After connecting the player to the PC, the OS will
automatically generate a Removable Disk in My
Computer. You can enter this device to access the
in the player. After connecting successfully, the
data
LCD screen on the player displays “READY”.
USB port on player
4. You can also access the player from the Window File
Explorer (Windows 2000/XP)/File Manager (Windows
98SE/ME) or My Computer, add your favorite music
files or other files to the player, and delete files.
5.
To remove the USB cable from the player after adding
or deleting files, follow the instructions below to avoid
damaging the files on the player.
Remove Hardware
1.
Double-click on the Remove Hardware icon in the
taskbar tray as shown in the picture below.
2.
Click
on the
pops up. When the message telling you that you can
remove the hardware safely appears on the screen,
remove the player.
Stop button when the following window
7
Page 10
Recharging the battery
1. Recharge this player before using it.
2. Before recharging, please refer to the [Connecting to
the PC] section in the previous chapter to connect the
player to the PC.
3. After connecting, the player
displays the recharge screen
(as shown on the right). When
the battery level is full and the
screen displays FULL, this
indicates that the battery is fully
charged.
4. If you follow the standard hardware removal procedure
in the Remove Hardware section (see page 7) while
recharging, the battery level display will be stopped but
if the player is still connected to the PC, the battery
continues charging (the battery level will not be
displayed accurately if you are using an USB charger).
After charging, follow the standard hardware removal
procedure in the Remove Hardware section to remove
the player.
5. Although the player has a built-in hardware protection
device but do not recharge continuously for more than
12 hours. During recharging, the player may be a bit
hot. Don’t worry, this is a normal condition.
6. The battery must be depleted several times to achieve
its optimal power storage condition.
Auto Keylock function
This player has an auto keylock function that you can set
up in the Setting menu (see page 19). The default value
is 3 minutes. When keylock is locked, the functions of all
the buttons on the front side of the player are locked and
ineffective while the keylock status on the screen
flashes. To release the keylock, press and hold the Play
() button until the release keylock motion ends. The
auto keylock function only works in music playback,
voice playback, FM tuner and menu.
Unlock Hold
Press and
hold
Screen saver power saving mode
This player has an auto screen saver power saving
mode that you can set up in the Setting menu (see page
22) with a default value of 60 seconds. When the
screen saver mode is enabled, the player will continue
to play music or receive broadcast programs but
without the screen display. To display the screen
again, just press any key.
Copy music files to the player
1. Please refer to the “Connecting the player to a PC”
section to connect the player to a PC. After connecting
the player to a PC successfully, there will be a new
“Removable Disk” in My Computer.
2. Search My Computer for the MP3 or WMA music files
and select them through your mouse. After selection,
right click on “Copy” above the music files and enter
the Removable Disk from My Computer, then right
click on “Paste” to copy the music files to the player.
Or, left-click and drag the desired music files to copy
them to the “Removable Disk”(as shown below).
3. After copying files into the player, please follow the
standard hardware removal procedure in the Remove
Hardware section to remove the player.
8
Page 11
Turning the player on
and off
z Turning the player on
z Turning the player off
z Hardware RESET
Press the Play () button to turn the player on.
Press and hold the Play () button for several
seconds. The screen enters into the power off motion.
Keep holding the Play () button until the screen
disappears, then
release the Play button.
If the player shows signs of errors, all buttons
lose their functions without entering auto
keylock, or the player cannot power on, you
can
insert the tip of a pin or pointed object into the
hardware RESET button on the back of the player to
reset it. Press the Play button to turn the player on.
Press
once
Press and
hold
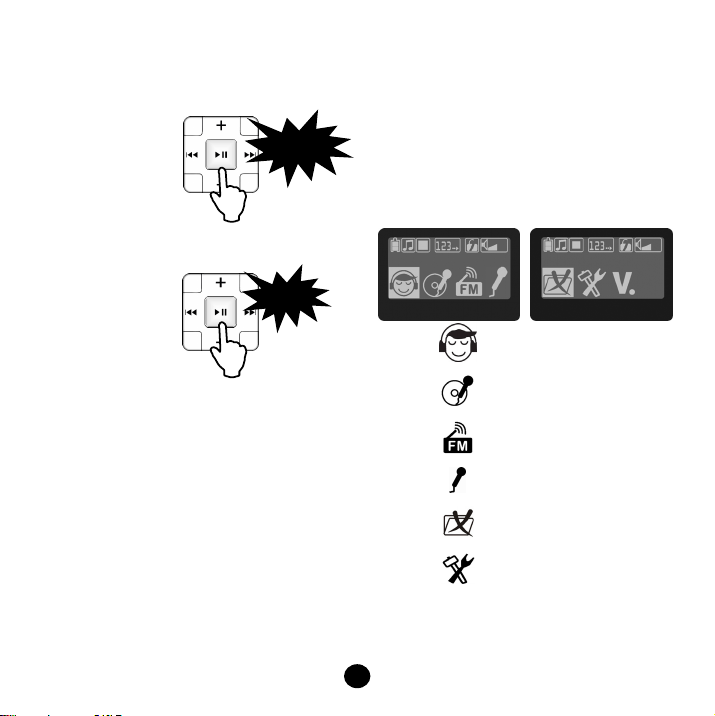
Main menu
Press and hold the Play button to enter the Main
menu. The screen displays four options at one time.
The selected function will be highlighted. Use the
Previous () or Next () button to move left or right to
select the desired function, then press the Play button once
to enter the selected function.
The following figure shows the Main menu icons.
[LCD display description]
MUSIC
Music Mode
Voice Mode
FM Radio Mode
Microphone Recording Mode
Delete Mode
Settings Mode
DELETE
About
V.
9
Page 12

Music Playback
r
[LCD display description]
Playback mode
Playback status
Current function
Battery level
ID3 singer
Album title
Display lyrics
ID3 subject
Playing time
Song’s length
[Auto Keylock]
Automatically activates the keylock function
when no button is pressed after the preset
time expires (see page 22), and all button
functions are useless at this time. To release
keylock, just press and hold the Play ()
button until the release keylock motion ends.
Volume indicato
Keylock status
PLALY MODE
EQ type
Track No. / Total tracks
[Operation procedure]
1. Select Music Playback
The first time you turn on the player, it will
automatically enter the Music Playback mode. If it is
not in Music Playback mode, just press and hold the
Play () button to enter the Main menu, then select
Music Playback to start playing automatically.
2. Play.Pause
Starts playing music once it enters the Music
mode. Press the Play () button once to
pause and press again to resume playing.
3. Previous: Press the Previous () once to start
playing the current music track at the beginning.
Press once again to skip to the previous track.
Press
once
Press
once
10
Page 13

Music Playback
[Operation procedure]
4. Next: Press the Next () button once.
Press
5. Fast forward: Press and hold the Next () button to
run forward. Release this button to resume normal
playback.
6. Fast rewind: Press and hold the Previous ()
button to run rewind. Release this button to resume
normal playback.
once
Press and
hold
Press and
hold
【Note】
Fast forward and fast rewind functions will not work
properly on music files in VBR format.
Music submenu (EQ and Play
mode)
Under Music Playback mode, pressing and holding the
Play () button will launch the Music submenu. Press
the Next () button once to select the next track or press
the Previous () button once to select the previous
track. Press the Play () button once to confirm
selection. The player automatically returns to Music
Playback if no button is pressed for 20 seconds.
[LCD display description]
Music submenu options:
EQ Setup, Play mode, Music play list, Play music, Exit.
Selecting Play music will let the player
return to the Play music menu. Select Exit to
enter the Main menu.
1. EQ Setup
Select the music playback
sound effect.
EQ options cycle:
Normal ¨ Rock ¨ Jazz
¨Classical ¨ Pop ¨ Ultra
Bass ¨Blues ¨ Club ¨ Dance ¨ Full Bass & Treble
¨ Full Treble ¨ Large Hall ¨ Live ¨ Party ¨
Reggae ¨ Soft ¨ Ska ¨ Soft Rock ¨ Techno
2. Set Playback mode
Sets the music playback
method.
Playback sequence:
Normal / Repeat One /
Repeat all / Random / Random and repeat all
EQ
ROCK
Normal
11
Page 14

Music submenu
(Playlist Navigation)
3. Music play list
List all music files in the player so that you
can select the desired tracks or directories for
playing. When a music file is selected, the
player automatically changes the Play mode
to Repeat single. When a directory is
selected, it will Repeat all the songs in the
directory non-stop.
[LCD display description]
Option icon:
a:/
My Music
Demo.mp3
Current directory. “a:/” indicates
the root directory.
Multi-layer directory with other
subdirectories under it.
Single layer directory
containing only music files.
Music file
[Operation procedure]
(1) Move option
The highlight bar represents the selected part,
directory or file displayed in merry-go-round.
Press the Volume up (+) or Volume down (-) bu tto n
to move the highlight bar up or down. When the
highlight bar has moved to the topmost part of
the list, moving up further will cause the bar to
remain on the topmost directory. When the
highlight bar has moved to the bottommost part
of the list, moving down further will cause the
bar to remain on the bottommost directory or
music file.
Move bar up Move bar down
or
(2) Enter or exit directory
Move the highlight bar to the multi-layer directory
or the single layer directory , then press the Next
() button once to enter this directory. Pressing the
Next button once does not function in the current
directory or music file. As long as the highlight bar is not
in the root directory (a:/), pressing the Previous ()
button once will return the player to the directory in
the next higher level. Pressing the Previous ()
button once does not function in the root directory.
Exit directory Enter directory
or
12
Press
once
Press
once
Page 15

Music submenu (Playlist
Navigation)
(3) Confirm selection
After moving the highlight bar to the desired
directory or track, press the Play () button
once to start playing music.
A. When a music file is selected, the
playback mode automatically changes to
Repeat Single. Press the Next () o r
Previous () button once to change to any
music file in the player but the Playback
mode still remains in Repeat Single.
B. When a multi- layer directory is selected,
the Playback mode automatically changes
to Repeat All. The Playback content
includes all music files under this directory
(including subdirectories).
C. When a single layer directory is
selected, the Playback mode automatically
changes to Repeat All. The Playback
content includes all music files under this
directory.
[Note]
After selecting the list, the player will continue playing
from the selected play list and playback mode the next
time you turn it on. To return the player to Repeat All,
just select the Music play list function and select the
topmost root directory (a:\) and press the Play
() button once to change the Music play list
to all music files in the player.
Voice Mode
[LCD display description]
[Operation procedure]
1. Voice Playback
Press and hold the Play () button until the player
enters the Main menu, then enter the [Voice]
function to view the recorded voice files. The
Playback method is the same as the Music
mode. Please refer to the “Music Playback”
section in page 10.
2. Voice submenu
Under Voice Playback mode, press and hold the
Play () button to enter the Voice submenu.
This submenu includes the Playback mode
setup, Voice and Exit options. Select Voice to
return to the Voice Playback mode and select
Exit to return to the Main menu. Playback mode
is used to set up the Voice playback method only
and cannot be used to select the Shuffle option.
Playback sequence:
Normal / Repeat One / Repeat All
13
VOICE
Directory
containing
recorded file
Name of recorded
file being played
Page 16

FM Tuner
Because the earphones have a built-in antenna,
please always insert the earphones into the
player; otherwise the player cannot receive the
FM channels.
Regarding the FM frequency bands, US/Europe (USEU) frequency standard is between 87 MHz and 108
MHz, which is also used in most countries.
Japanese frequency standard is between 76 MHz and
91 MHz.
[LCD display description]
FM radio mode
Battery level
Preset FM
channel
FM frequency
bands
Volume indicator
Keylock status
FM tuner
sensitivity
FM
frequency
step
[Auto Keylock]
Automatically activates the keylock when no
button is pressed after the preset time expires
(see page 22), and all button functions are
useless at this time. To release keylock, just
press and hold the Play () button until the
release keylock motion ends.
[Operation procedure]
1. Select FM Radio
Press and hold the Play () button to enter the
Main menu. Press the Previous () or Next ()
button to select [FM Radio]. Press the Play ()
button once to [FM Radio].
2. Preset and switch channels
This player has a FM channel frequency memory
function that can memorize up to 10 FM channels.
Press the Play () button once and select
preset channels CH01 to CH10.
3. Auto search
Press the Previous () or Next () button once,
the player will perform the automatic station
search to find the previous or next station with
the strongest signal.
Press
once
FM RADIO
or
14
Press
once
Press
once
Page 17

FM Tuner
4. FM frequency adjustment
Press and hold the Previous () or Next ()
button to adjust the frequency band.
Press and
hold
or
Press and
hold
5. FM frequency fine tune
To increase the frequency by 0.1MHz, press and hold
the Previous () or Next () button, release the
button and then press the Next () button once.
Pressing the Next () button once will increase
the frequency by 0.1 MHz while pressing the
Previous () once will decrease the frequency by 0.1
MHz (0.1 MHz range may vary due to the different
frequency step setting).
FM Radio submenu
Under the FM Radio mode, press and hold the Play
() button to enter the FM Radio submenu. Press the
Next () or Previous () button once to select the next or
previous option. Press the Play () button once to
confirm and enter this selection. The player
automatically returns to FM Radio if n o but to n is
pressed for 20 seconds.
[LCD display description]
FM Radio submenu options:
FM Recording, Recording format, FM frequency bands,
FM tuner sensitivity, FM frequency step, FM Radio and
Exit.
Select FM Radio to return to the FM Radio display and
select Exit to return to the Main menu.
1. FM Recording
Select this option to start recording the current FM
program. You can still listen to the FM program with
your earphones. Please refer to the page for more
information regarding FM Recording.
2. Recording format
Sets the sampling rate of the recording file for
FM Recording. A higher sampling rate means
higher recording sound quality but shorter
recording time. A lower sampling rate means
ordinary recording sound quality but longer
recording time. There are seven sampling rates:
8KHz, 1 1KHz, 16KHz, 22KHz, 32KHz, 44KHz and
48KHz. The default value is 32KHz.
FM REC.
15
Page 18

FM Radio submenu
3. FM frequency bands
US/Europe (US-EU) frequency standard is
between 87MHz and 108MHz. Japanese (JPN)
frequency standard is between 76MHz and
91MHz. In addition, all (ALL) frequencies are
between 76MHz and 108MHz.
4. FM tuner sensitivity (S1/S2/S3)
A total of 3 phases: High, Medium and Low. S1
means High sensitivity, S2 means Medium
sensitivity while S3 means Low sensitivity. The
default value is S2 (Medium sensitivity). A
smaller value means higher sensitivity. The
smaller sensitivity value may detect the stations
with weaker signals but may consider a strong
noise as a valid station.
5. FM frequency step
A total of 3 phases: 0.05 MHz (50 KHz), 0.1MHz
(100 KHz) and 0.2 MHz (200 KHz). In different
areas, FM frequency steps may vary. For example,
the frequency step in Taiwan is 0.1 MHz while US
has a frequency step of 0.2 MHz and Japan has a
frequency step of 0.05 MHz.
【Example】
Under Taiwan’s 87. 60 MHz frequency, if you wish to
search the desired channels backward, the sequence
is 87.60 MHz →87.50 MHz →87.40 MHz 90.60 MHz
and to search forward, the sequence is 87.60 MHz
→87.70 MHz →87.80 MHz. The same method
applies to all other areas.
FM Recording
[LCD display description]
Battery level
Recorded time
(HH:MM:SS)
Remaining
recording
time
[Operation procedure]
1. While listening to your favorite FM program, you
can record it by pressing and holding the Play
() button to enter the FM Radio submenu, select
FM Recording and start recording. The player will
start recording the FM broadcast program instead of
the voice from the micr op ho ne .
2. When the recording icon is flashing, there cording
begins (as shown in the following figure).
Recording Format
Recording file
name
Recording (Flashing)
16
Page 19

FM Recording
3. Press the Play () button to pause recording and
press it again to resume recording (as shown below).
Pause recording
4. To stop recording, just press and hold the Play
() button to return to the FM Radio mode. To
listen to the FM broadcast program you just recorded,
press and hold the Play () button until you return
to the Main menu, then enter the Voice mode and
select the just recorded F###.WAV file.
【Note】
During recording, the display will show “Device Full!” if
the flash memory is full. The recording will be stopped
and the recorded file will be automatically saved. No
further recording is possible.
During recording, the display will show “Low Battery” to
warn the user the battery is low. Recording will be
stopped and the voice file will be automatically saved. No
further recording is possible unless the battery is
recharged.
Since the recording function consumes more battery
power, no further recording is possible when the battery
power is low even though other functions may still be
used.
Voice Recording
[Operation procedure]
1. Select the Microphone function
Press and hold the Play () button to enter the
Main menu directly. Use the Previous () or
Next () button to select [Voice]. Press the
Play () button once to enter [Voice] and
start voice recording.
[LCD display description]
Battery level
Recorded time
(HH: MM:SS)
Remaining
recording
time
MIC. REC.
Recording format
Recording file name
17
Page 20

Voice Recording
1. When the recording icon is flashing, the recording
begins (as shown in the following figure).
2. Press the Play () button to pause recording and
press it again to resume recording (as shown below).
3. To stop recording, just press and hold the Play
() button to stop recording and automatically enter
the Voice playback mode. You can select the just
recorded voice file and play it directly.
Recording (flashing)
Pause recording
[Note]
During recording, the display will show “Device Full!” if
the flash memory is full. The recording will be stopped
and the recorded file will be automatically saved. No
further recording is possible.
During recording, the display will show “Low Battery” to
warn the user the battery is low. Recording will be
stopped and the voice file will be automatically saved. No
further recording is possible unless the battery is
recharged.
Since the recording function consumes more battery
power, no further recording is possible when the battery
power is low even though other functions may still be
used.
18
Page 21

Delete file
[Operation procedure]
1. Press and hold the Play () button to enter the
Main menu directly. Select [Delete] and press the
Play () button to confirm selection.
DELETE
Press
Î
2. Press the Previous () or Next () button to move
left or right and select the options including [Delete
One], [Delete All] and [Exit], then press the Play
button to confirm selection.
3. Use the Per vious () or Next () button to select the
file to be deleted. Press the Play () button to
confirm deletion. To cancel delete, let it idle
for 5 seconds or press and hold the Play
() button to return to the Main menu.
4. The display will show (Delete Done) if the file is
already deleted.
Delete One
Delete One
Setting
Setting allows the users to customize their settings. The
options may vary depending on the firmware version.
[Setting options]
Option Description
Language
Rec. type
Contrast Contrast P.21
Timer off
Reset Reset P.22
19
English / Traditional Chinese/
Simplified Chinese, and so on for
a total of 45 languages
48KHz / 44KHz / 32KHz / 22KHz
/ 16KHz / 11KHz / 8KHz
Stop off / Sleep off / Keylock
/ Display off
Ref.
Page
P.20
P.20
P.21
Page 22

Setting
[Operation procedure]
1. Press and hold the Play () button to enter the
Main menu. Select the [Setting] menu. Use
the Pervious () or Next ( ) button to select
the desired Setting option and press the Play
() button to confirm the selection.
2. After entering the selected Setting option, you can set
according to your personal preference and then press
the Play () button to confirm.
[Language]
1. After entering the [Setting] menu, select [Language].
SETTINGS
LANGUAGE
Î
2. There are 10 different language interfaces including
English, Traditional Chinese, Simplified Chinese,
Japanese, Korean, Russian, Spanish, German,
French and Italian. More languages will be added.
(The language options may vary depending on the
firmware versions.)
3. Press the Previous () or Next () button to move
left or right to select the desired language. Then
press the Play () button to confirm the
selection.
*The logo for each language option shown on the display
is an abbreviation.
ENGLISH
[Rec. type]
When selecting the sampling rate for recording, a h ig her
sampling rate means higher recording sound
quality but shorter recording time. A lower
sampling rate means ordinary recording sound
quality but longer recording time.
1. After entering the [Setting] menu, select [Rec. Type].
SETTINGS
2. After entering [Rec. Type], use the Previous () Next
() button to move left or right and select the desired
Rec. Type options, including [Mic. Rec.] and [FM
Rec]. Press the Play button to confirm and
enter the Sampling rate screen. The setting for
the FM Recording here is the same as the one in
the FM Radio submenu.
MIC. REC.
3. There are seven sampling rates: 8KHz, 11KHz,
16KHz, 22KHz, 32KHz, 44KHz and 48KHz. The default
value is 32KHz.
4. After setting is complete, press and hold the Play
button to return to the Main menu.
20
Î
or
REC. TYPE
FM REC.
Page 23

Setting
[Contrast]
1. After entering the [Setting] menu, select [Contrast].
SETTINGS
CONTRAST
Î
2. Press the Previous () or Next () button to move
left or right to adjust the Contrast ratio for the display.
Then press the Play () button to confirm and
exit.
CONTRAST
[Timer Off]
1. After entering the [Setting] menu, select [Timer Off].
SETTINGS
Î
TIMER OFF
2. Press the Previous () or Next () button to move
left or right to select the desired options including
[Stop Off], [Sleep Off], [Keylock] and [Display Off], then
press the () b u t t o n t o co n f i r m . SEC. Means
second; MIN. means minute; HR. means hour.
STOP OFF
[Stop Off]
To set the allowable idle time (including pause
playback/stop playback) before the player shuts down
automatically for power saving. The default value is 5
minutes.
[Sleep Off]
Set the time interval for the player to shut down
automatically. After completing setup, the player will shut
down after the time interval elapses. The default value is
∞. Once the player shuts down, this option shuts off
automatically.
STOP OFF
SLEEP OFF
21
Page 24

Setting
[Auto Keylock]
Set this player to activate the keylock function when no
button is pressed after a certain time period to prevent
advertent pressing of buttons while you listening to music
or broadcast programs. The default value is 3 minutes.
[Screen saver power-saving mode]
Set this player to close the screen after a certain time
period and enter the screen saver power-saving mode.
After setting and confirmation, the screen closes
whenever the time interval elapses until you press any
button to open the screen again. The default value is 30
seconds.
KEYLOCK
3 MIN.
DISPLAY OFF
30 SEC.
[Reset to default value]
Reset all the settings to the default values, including all
the settings under the “Setting” mode and clears all
preset FM stations. Reset however will not delete any
music, files or data stored in the player.
1. After entering the [Setting] menu, select [Reset].
SETTINGS
Î
RESET
About this player
Display the model number, firmware version and
available memory space for this player. When
downloading firmware from our website, kindly confirm
the model number and the firmware version of your
player.
1. Press and hold the Play () button to enter the
Main menu directly and select [About].
ABOUT
22
Page 25

Software Installation
1. Place the installation CD in the CD-ROM drive on the
PC and the following screen will display automatically.
(Display options may vary depending on the
different installation versions.)
2. If the installation program does not start automatically,
please manually run the autorun.exe file in the CD.
3. The installation CD includes drivers (firmware
upgrade program) and the User’s Manual.
4. Click on the ”Install” button to start driver
installation.
[Note]: If the Installation CD is not included in the
product package, kindly download the upgrade
firmware and latest version of the user’s manual from
the company website. To install the software after
downloading, refer to step 3 in the “Firmware upgrade”
section in page 25. Then, perform the software
installation procedure (see page 24).
[System requirements]
- Pentium 133MHz or faster CPU
- CD-ROM drive
- USB port
- Windows 98 SE / ME / 2000 / XP operating system
- 10 MB available memory space
1. This player supports the Mass Storage Class
standard for USB. Thus, this player supports
Windows XP/2000/ME operating systems that will
automatically detect this player and start performing
file transfer and other functions.
2. Windows 98 SE users are required to install the
software before connecting this player to a PC.
3. In addition, Windows XP/2000/Me users are required
to install the software before resetting the firmware to
the default setting.
4. Please use the “Firmware Download” program
installed by the installation program to upgrade the
latest version of the firmware to the player.
5. If want to uninstall the program, select [Start] Æ
[Program] Æ [Mercury iJive] Æ [Uninstall]
When the uninstall program begins, follow the screen
instructions to uninstall.
23
Page 26

Software Installation
[Software installation procedure]
1. Click on [Install] or [Software installation] to
install the drivers and the latest firmware
upgrade program.
3. Read the License Agreement carefully and if you
agree to it, click on [Yes].
2. Click on [Next].
4. Click on [Next].
24
Page 27

Software Installation
[Software installation procedure]
5. Click on [Next].
6. Installation is complete. Click on [Finish].
Firmware Upgrade
1. Firmware is the program used to control the
operation of this player. If you wish to retain the
default settings, then firmware installation is
not required. The programs in the CD-ROM can
be used to reset the player to the default
settings.
2. You can enhance this player’s functions
through firmware update and expand support
for other music formats and languages.
3. Please download the latest version of the upgrade
firmware from our website and select the right
version for your product.
The downloaded file will be decompressed to the
decompressed folder and runs automatically. If it
does not run automatically, assuming that the file is
decompressed and saved to the C:\temp folder, you
can access this folder through [My Computer] or
Windows Explorer, and double-click on setup.exe
file. (click on the icon ),
If Firmware Download already installed, it will
automatically delete (uninstall) the current program.
25
Page 28

Firmware Upgrade
[Operation procedure]
1. When the screen displays the following message,
click on [OK] to start the uninstallation procedure.
3. Run autorun.exe in this directory again and click on
[Install]. Follow the procedure in page 24.
2. Click on [Finish] to complete uninstalling the
software.
4. Select [Start] [Programs] [Mercury iJive]
[Firmware Download] as shown in the picture
below.
26
Page 29

Firmware Upgrade
[Operation procedure]
5. Since the upgrade program will update the firmware
and the data in the player, please back up the data
stored on the player prior to the upgrade to prevent
any data loss. Before upgrading the firmware, p lea se
check that the PC and the player are properly
connected. The upgrade program starts
running after detecting the player connection.
(Caution! Selecting the [Format Data Area]
option will delete all data and files including
music files and personal settings on the player
and reset the player to the default settings.
This option is recommended mostly for
firmware upgrade.)
6. After running the Firmware Download program,
select [Start] to start firmware upgrade.
z After installation is completed, click [Close]. Next,
please refer to page 7 to disconnect the player from
the PC.
z Do not disconnect the player while firmware upgrade
is in progress, otherwise, this may cause firmware
upgrade failure and inability to turn on the player.
z If firmware upload fails or you cannot turn on the
player after upgrading, please refer to next section
“Firmware Upgrade Failure.”
27
Page 30

Firmware Upgrade Failure
If you cannot turn on the player due to firmware upgrade
failure, please follow the procedures below:
(Recovery Mode)
1. Close the firmware upgrade program.
2. First disconnect the player from the PC.
3.
Insert the tip of a pin or pointed object into the RESET
button on the back of the player.
4. Press and hold the Play () button the player
and connect the player to the PC through the
USB port. Keep on holding the Play ()
button.
5. Open the Firmware Download program (see previous
page) and then release the Play () button after 5
seconds.
6. The firmware upgrade program should be able to
detect the player. Please check the [Format Data
Area] option and click on [Start] to upgrade the
firmware. If the firmware upgrade program did not
detect the player, please repeat steps 1 to 5 and keep
holding the Play () button until the firmware
upgrade program detects the player.
7. After installation is complete, follow the standard
procedure for hardware removal (see page 9) to
disconnect the player from the PC and then restart the
player.
About Lyrics and Audio
Synchronizing Software
Supporting ID3V2, Lyrics3 V2.0 or LRC, ASF standard
format for lyrics synchronized with audio output. Please
make the file name of lyrics file the same as the music
file if lyrics format in LRC. Please make sure the lyrics
display less than 80 characters each time when writing
lyrics due to the limitation of display size. The following is
the Windows Media Player 10 working technique of
writing lyrics:
To add static lyrics
1. Navigate to a Web site that includes song lyrics and
locate the artist, album, and song for which you want
lyrics. If you can't find the lyrics, or if you want to create
your own lyrics, type them in a text editor, such as
Notepad.
2. Select the text and copy it to the Clipboard by pressing
CTRL+C.
3. In Windows Media Player, click Library.
4. Right-click the file that you want to add lyrics to, and
then click Advanced Tag Editor.
5. Click the Lyrics tab. If you do not see a box that
contains a Language list, click Add.
6. (Optional) In the Language list, select the language that
you want.
28
Page 31

About Lyrics and Audio
Synchronizing Software
7. In the Text box, type or paste the lyrics that you
copied, as shown in the following screen shot. If you
want to create a set of synchronized lyrics from your
static lyrics, make sure that each line of verse is on its
own line.
5. To test how closely an assigned time value for the
appearance of a line of lyrics matches when you hear
it, click the line of verse under either the Time or
Value columns, and then click Play. The song plays
starting at the time value in the timeline, and a red bar
shows the song's progress. Click and drag the blinking
vertical bar forward or backward to match when you
hear the corresponding line, as in the following screen
shot. Note that your pointer becomes a doubleheaded arrow when you place it over the blinking
vertical bar.
To add synchronized lyrics
1. Complete the procedure for adding static lyrics earlier
in this article, but do not close the Advanced Tag
Editor dialog box.
2. Click Synchronized Lyrics, and then wait for the
Player to load the static lyrics data into the timeline
area. Note that each line of lyrics is assigned a
successive but arbitrary time on the timeline. The time
values (in minutes) that the Player assigns to your
lyrics determine when the lyrics appear in the Now
Playing feature as the song is played, and will
probably not match when you hear the vocals unless
you adjust them. See step 5.
3. (Optional) To add a description of the lyrics, click
<Type description here>, and then type your
description. The description does not show when the
song is played.
4. (Optional) Select a Language and a Content type.
6. Click Play again to test the new time value. Repeat
this until the line of verse appears when you hear the
matching vocals.
7. When you are satisfied with the lyrics, click OK to
close the Synchronized Lyrics dialog box.
8. On the Lyrics tab of the Advanced Tag Editor dialog
box, if you only want the synchronized lyrics to be
visible, and not the static lyrics, click Delete.
9. Click OK to close Advanced Tag Editor.
10. Before copying to MP3 player, please playback the
synchronized lyrics in Windows Media player 10 to
confirm the compilation completed.
29
Page 32

Troubleshooting
If you have problems operating your player, please check
the troubleshooting guide below.
Problem Check Item Page
No sound
from the
earphone
z Check if the earphones are
inserted completely into the
earphone jack.
z Click on the Volume up button
z The music you are playing
may be damaged. Connect
the player to the PC and play
the file through the PC to see
if it works.
P.5
P.6
P.7
Accessory List
□ User’s manual.
□ Earphone □ Stra ps
Cannot
download
music
Weak FM
channel
reception
No
response
while
pressing
any button
z Check the remaining memory
capacity on the player.
z Check if the connection is
normal between the player and
the PC.
z Remove or turn off the
interference sources close to
the player, including a PC and
other electronic devices.
z Adjust the location and angle
of the earphone cord and the
player because the earphone
cord has a built-in FM antenna.
z Tune FM sensitivity to high
z Check if the keylock function is
enabled. Disable the key-lock
function
z Insert the tip of a pin or pointed
object into the RESET button
on the back of the player.
P.22
P.7
P.19
P.8
P.5
z Product accessories may vary for different shipment
packages and retailers. Contact your retailer for
details.
z If the Installation CD is not included in the product
package, kindly download the upgrade firmware and
latest version of the user’s manual from the company
website.
z The accessories list is subject to change without prior
notice. Actual accessories might be different from the
figures shown in this document.
30
Page 33

Specification
e
e
Item Specification
Memory size
Dimensions
(mm)
Weight 29 g (including battery)
Digital signal
processor
Battery
FM frequency
range
FM antenna
Earphone output
Frequency
response
Sound/Noise
ratio (S/N ratio)
Total harmonic
distortion
File formats
Bit rate
Digital volume
control
ID3 tag Supported
256MB / 512MB / 1 GB
26 (W) x 92.5 (H) x 11.3 (D)
24 bits
Built-in rechargeable lithium-ion
battery
76 to 108 MHz full band
Earphone or headphone cord
antenna
3.5mm earphone jack.
(L) 18mW + (R) 18mW 16Ω at
max. volume
20~20KHz
MP3:>95dB FM: 77dB
< 1%
MPEG 1/2/2.5 Layer 3
WMA, WAV (ADPCM)
Bit rate: 8Kbps~320Kbps
VBR supported
32 levels
Sampling rate.
Playback mode
Equalizer (EQ)
Recording time
USB interface
Synchronized
lyrics and audio
Firmware
upgrade
Portable storag
device
Full-charge tim
Operating
temperature
31
Item Specification
48KHz / 44KHz / 32KHz / 22KHz /
16KHz / 11KHz / 8KHz
Normal / Repeat One /
Repeat All / Random /
Random and Repeat All
NORMAL / ROCK / JAZZ / CLASSIC/
POP / U.BASS / BLUES / CLUB /
DANCE / FULL BT / FULL TRE /
L.HALL / LIVE / PARTY / SOFT/
REGGAE / SKA / S.ROCK / TECHNO
256MB:
Default: 4.5 hours (128Kbps, 32KHz)
Maximum: 18 hours (32Kbps, 8KHz)
512MB:
Default: 9 hours (128Kbps, 32KHz)
Maximum: 36 hours (32Kbps, 8KHz)
1 GB:
Default: 18 hours (128Kbps, 32KHz)
Maximum: 72 hours (32Kbps, 8KHz)
USB 2.0 Full-Speed / USB 1.1
Yes
Yes
Yes
About 4 hours
(2-hour quick charge to 80% capacity)
-5℃ to 45℃
Page 34

 Loading...