

Page 1
D
igital Camera
User’s Manual
Page 2

Page 3

I
Preface
Congratulations on your purchase of this advanced digital
camera. Ensure that you read this manual carefully and keep it
in a safe place for future reference.
About this manual
Every effort has been made to ensure that the contents of this
manual are correct and up to date. However, no guarantee is
made regarding the accuracy of the contents. If the contents of
this manual are not tally with the camera, please take the
camera as a criterion, and our company reserves the right to
change the contents or technical rules without notice in
advance. Also, the manufacturer reserves the right to change
the technical specification without notice in advance.
If the accessories are not tally with the actual package, please
take the actual package as a criterion.
Copyright
© Copyright 2005.
All rights reserved. No part of this publication may be
reproduced, transmitted, transcribed, stored in a retrieval
system or translated into any language or computer language,
in any form or by any means, electronic, mechanical, magnetic,
optical, chemical, manual or otherwise, without the prior
written permission of the manufacturer.
Page 4

II
Safety
Do not attempt to recharge non-rechargeable batteries.
When using AA type batteries in this product, ensure
that they are inserted correctly. Inserting the batteries
upside down can cause damage to the product and
possibly start a fire.
Do not use or store the product in dusty, dirty, or sandy
areas, as its components may be damaged.
Do not store the product in hot areas. High temperatures
can shorten the life of electronic devices, damage
batteries and warp or melt certain plastics.
Do not store the product in cold areas. When the product
warms up to its normal temperature, moisture can form
inside, which may damage the electronic circuits.
Do not attempt to open the casing.
Do not drop or knock the product. Rough handling may
damage the internal components.
Do not use harsh chemicals, cleaning solvents or strong
detergents to clean the product. Wipe the product with a
soft cloth slightly dampened.
If the product or any of its accessories are not working
properly, take them to your nearest qualified service
center. The personnel there will assist you, and if
necessary, arrange for the product to be repaired.
Page 5

Table of contents
Preface .................................................................... I
About this manual...................................................... I
Copyright ....................................................................I
Safety… .................................................................... II
1. Introducing the camera................................. 1
1.1. System requirements .....................................1
1.2. Features.........................................................1
1.3. Unpacking .....................................................2
1.4. About the camera ..........................................3
1.4.1. Front view ..............................................................3
1.4.2. Top view.................................................................4
1.4.3. Back view ...............................................................4
1.4.4. Left view.................................................................5
2. Getting started ...............................................6
2.1. Inserting an SD card.....................................6
2.2. Inserting the batteries ...................................7
2.3. Turning on for the first time.........................8
2.4. Changing modes............................................8
2.5. Before you start.............................................9
2.5.1. Setting the date and time......................................9
2.5.2. Setting the language............................................10
i
Page 6

2.6. Taking still picture.......................................11
2.6.1. To take a still picture:..........................................11
2.6.2. To playback the picture: .....................................11
2.7. Shooting video.............................................12
2.7.1. To shoot a video clip:..........................................12
2.7.2. To playback the video clip .................................12
2.8. Voice recording............................................13
2.8.1. To take a voice recording: ..................................13
2.8.2. To playback a voice file: .....................................13
2.9. Connecting to a computer...........................14
2.10. Connecting to a TV .....................................14
3. Using the camera ......................................... 15
3.1. Using the camera buttons ...........................15
3.1.1 Back view .............................................................15
3.1.2 Top view...............................................................15
3.2. About the LEDs...........................................18
3.3. Photo mode..................................................19
3.3.1. Photo mode icons ................................................19
3.3.2. Scene selecting .....................................................21
3.3.3. Capture mode and self-timer function .............21
3.3.4. Setting the flash ...................................................22
3.3.5. Using the macro function...................................23
3.3.6. Using the zoom function ....................................23
3.4. Video mode ..................................................24
3.4.1. Video mode icons................................................24
ii
Page 7

3.5. REC mode....................................................25
3.5.1. REC mode icons...................................................25
3.6. Playback mode ............................................26
3.6.1. Displaying file information................................26
3.6.2. Playback mode icons...........................................27
3.6.3. Thumbnail mode.................................................28
3.7. USB mode....................................................28
3.7.1. Storage device mode...........................................28
4. Using the menus........................................... 29
4.1. Picture menu ...............................................29
4.1.1. Scene .....................................................................29
4.1.2. Size ........................................................................30
4.1.3. Date stamp ...........................................................30
4.1.4. Quality ..................................................................30
4.1.5. Color......................................................................31
4.1.6. White balance.......................................................31
4.1.7. Focus selection.....................................................31
4.1.8. Metering ...............................................................32
4.1.9. Exposure adjustment (EV) .................................32
4.1.10. ISO.........................................................................33
4.2. Video menu..................................................33
4.2.1. Video Quality.......................................................33
4.3. Playback menu............................................34
4.3.1. Delete all...............................................................34
4.3.2. Protect...................................................................34
4.3.3. Slide show ............................................................35
iii
Page 8

4.3.4. Copy to card.........................................................35
4.3.5. DPOF.....................................................................36
4.4. Setup menu..................................................36
4.4.1. Date/time.............................................................36
4.4.2. Set date type.........................................................36
4.4.3. Number reset .......................................................37
4.4.4. Beep.......................................................................37
4.4.5. Language..............................................................37
4.4.6. Power saving........................................................38
4.4.7. Default ..................................................................38
4.4.8. Format...................................................................38
4.4.9. USB Mode.............................................................39
4.4.10. TV..........................................................................39
5. Installing the software and drivers ............40
5.1. Drivers .........................................................40
5.1.1. Mass Storage ........................................................40
5.2. Presto! Video Works 6 .................................42
5.3. Presto! Mr. Photo 3.....................................43
Appendix ..............................................................44
Specifications ...........................................................44
iv
Page 9

1. Introducing the camera
Read this section to learn about the features and functions of
the camera. This chapter also covers system requirements,
package contents, and descriptions of the hardware
components.
1.1. System requirements
The camera requires a host PC with the following specifications:
Windows® XP, 2000, ME, 98SE operating system
Intel® Pentium 500 MHz CPU or higher
At least 256 MB of RAM or higher
Standard USB 1.1 port or higher
4x speed CD-ROM drive or higher
At least 200 MB of available disk space
Note: A USB 1.1 port will enable you to transfer files to and from your
host PC, but transfer speeds will be much faster with a USB 2.0 port.
1.2. Features
The camera is packed full of features and functions including:
Digital still camera (5.0 Megapixels)
Digital camcorder
Mass storage device
Additionally, the camera also features 3x optical zoom and 4x digital
zoom, voice recorder, card reader, and a direct print function.
1
Page 10

(Driver and application
1.3. Unpacking
All the following items should be present in the camera package. If any
item is missing or appears damaged, contact your dealer immediately.
2
Digital camera
Wrist strap AA batteries x2
CD-ROM
software)
Pouch
USB/AV cable
User manual
Page 11

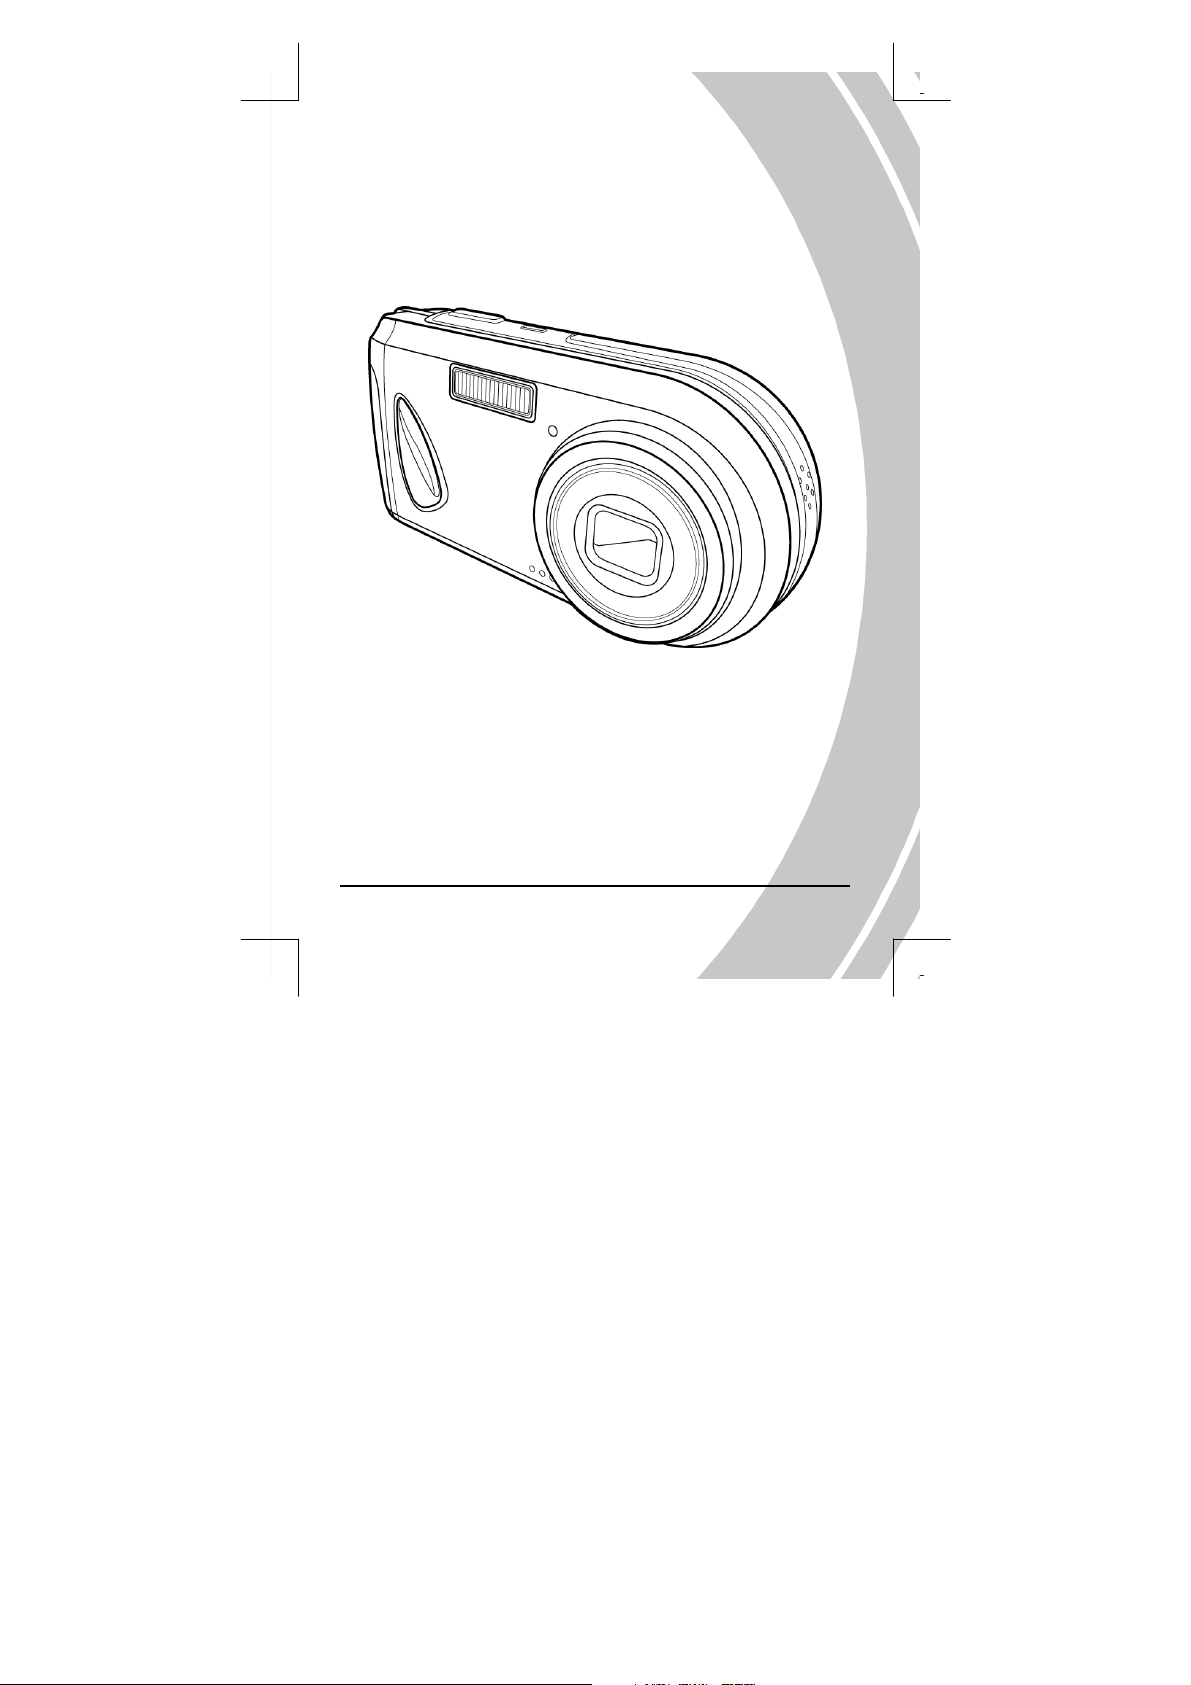
1.4. About the camera
Refer to the following illustrations to familiarize yourself with the
buttons and controls of the camera.
1.4.1. Front view
Flash
Shutter
Button
Power Button
Self-timer LED
Speaker
Lens assembly
Microphone
3
Page 12
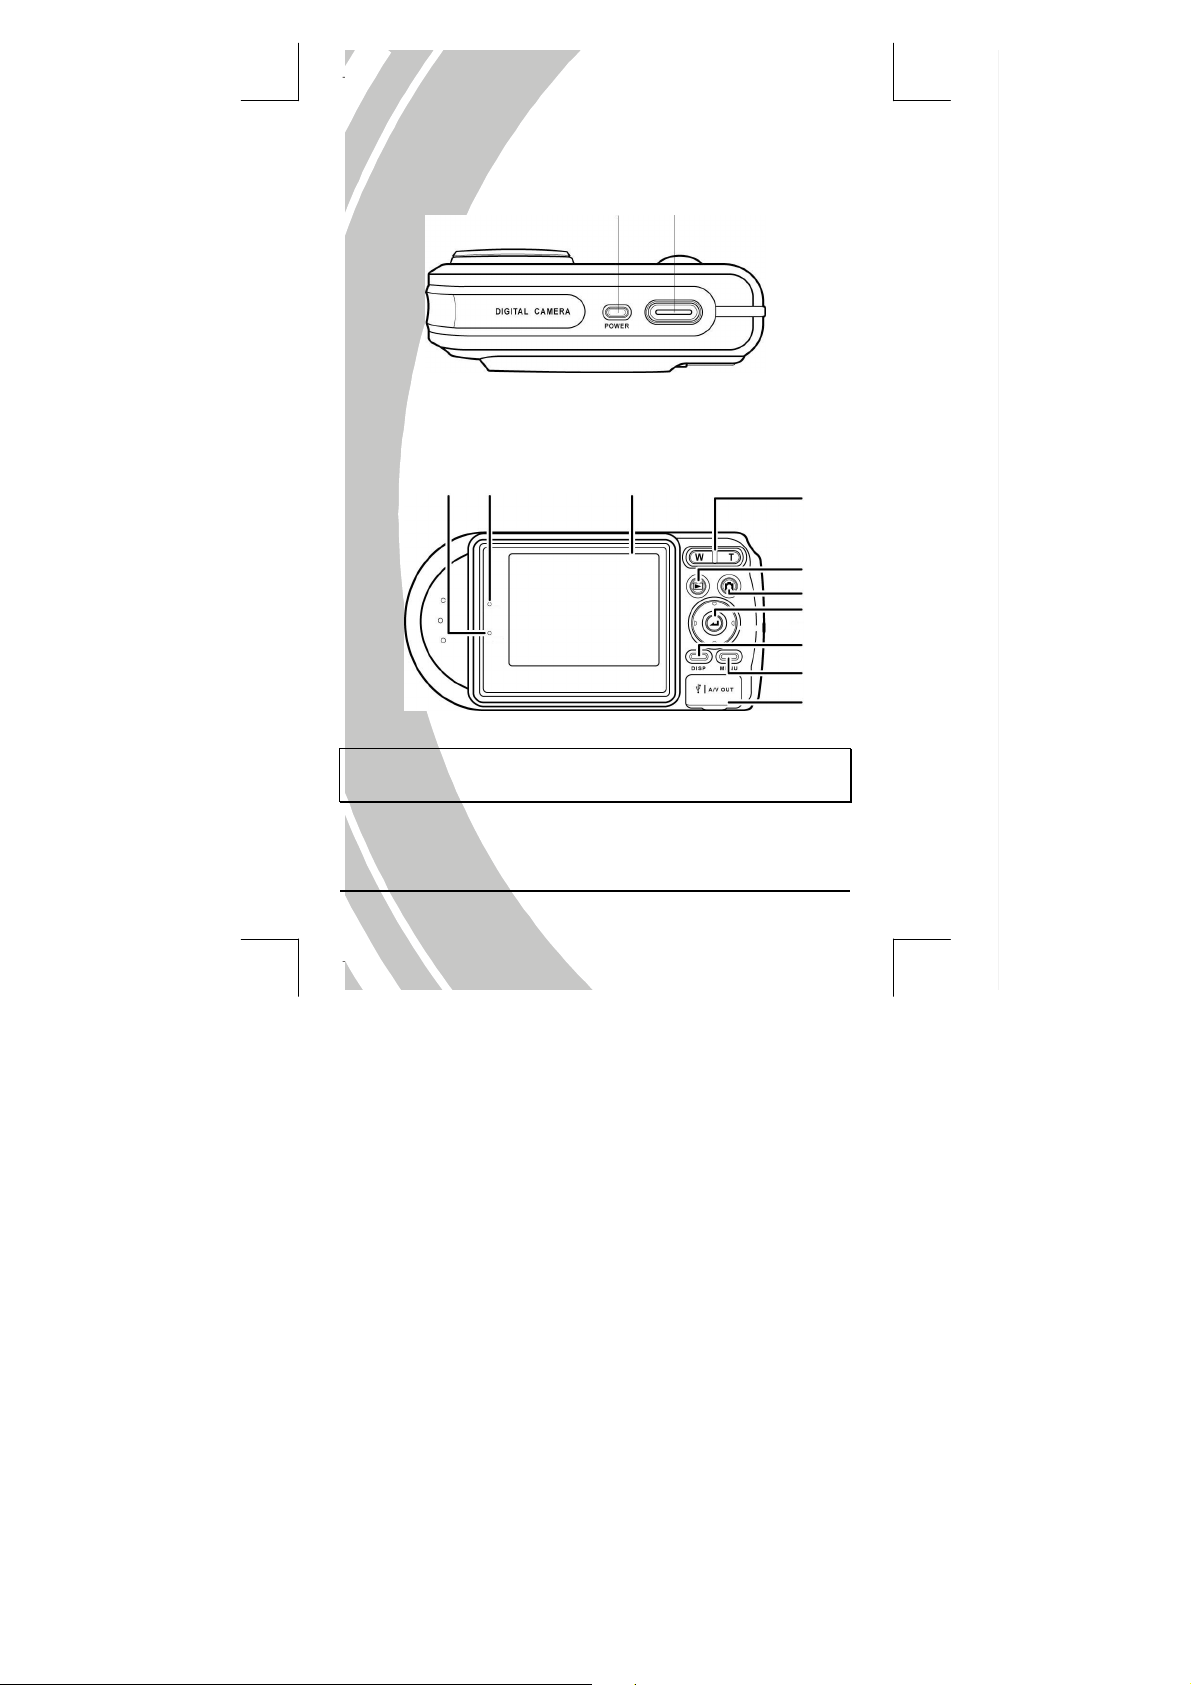
1.4.2. Top view
1.4.3. Back view
Busy LED
(Red)
Power LED
(Green)
Power button Shutter button
LCD screen
Zoom out/Zoom in
button
Playback button
Mode button
Joystick
(Multi selector)
Display button
Menu button
USB/AV port
Note: Refer to “About the LEDs” section for information on LED
indicators.
4
Page 13

1.4.4. Left view
Strap eyelet
Battery cover
5
Page 14

2. Getting started
Read this section to learn how to start using the camera. This
section covers only basic functions such as inserting the battery
and memory cards, turning it on, and making preliminary
settings. See later chapters for advanced functions.
2.1. Inserting an SD card
An SD card can be installed in the camera to provide additional
storage space for still images, video clips, or other files.
1. Open battery cover.
2. Insert SD card as shown. Make sure
the gold contacts are facing down as
shown.
3. Close the battery cover.
6
Page 15

2.2. Inserting the batteries
The camera is powered by two alkaline AA batteries.
Note: Install the batteries exactly as described here. Ensure that the
polarity of the batteries is correct. Installing the batteries incorrectly
could cause damage to the camera and possibly start a fire.
1.
Open the battery cover.
2.
Insert the batteries as shown.
3.
Close the battery cover.
7
Page 16

2.3. Turning on for the first time
Press and hold the power button about two seconds to turn on/off the
camera.
Power button
Shutter button
2.4. Changing modes
The camera can operate in four modes, Auto mode, Program mode,
Video mode, and Record mode. Press the Mode button
between modes.
to switch
Mode button
8
Page 17

2.5. Before you start
Before using the camera, some basic settings need to be configured and
are described in the following sections.
2.5.1. Setting the date and time
1. Turn on the camera, and press the MENU button to display the
menu screen.
2. Move the joystick right to show the setup menu and move it
down to highlight the Date/Time option. Press the joystick to
confirm.
3. Use the joystick to highlight each field, and adjust the value. After
the changes are done, and press the joystick to confirm.
4. Press the Menu button again to exit the menu.
9
Page 18

2.5.2. Setting the language
1. Turn the camera on, and press the MENU button to display the
menu screen.
2. Move the joystick right to show the setup menu and move it
down to highlight the language option. Press the joystick to
confirm.
3. Use the joystick to change between languages. After the language
is selected, press the joystick to confirm.
4. Press the Menu button again to exit the menu.
10
Page 19

2.6. Taking still picture
2.6.1. To take a still picture:
1.
Turn on the camera and make sure it is in photo mode.
2.
Use the LCD screen to frame the picture.
3.
Press the shutter button to capture the picture.
The picture will automatically be saved with a unique file name.
2.6.2. To playback the picture:
1. Press the Playback button, the most recent file will be shown
on the LCD screen.
2. Move the joystick left/right to select previous/next image.
3. Use the Zoom out/Zoom in buttons to enlarge/reduce the image.
4. Press the Mode button to return to Photo mode.
11
Page 20

2.7. Shooting video
2.7.1. To shoot a video clip:
1. Turn on the camera and make sure it is in Video mode.
2. Use the LCD screen to frame the video.
3. Press the shutter button to start recording.
4. Press the shutter button again to stop.
The video clip will automatically be saved with a unique file name.
2.7.2. To playback the video clip
1. Make sure the camera is in Video mode.
2. Press the Playback button, the most recent file will be
shown on the LCD screen.
3. Press the joystick to playback the video clip.
4. When reviewing the video clip, use the joystick up/down to
adjust the volume.
5. Press the joystick again to stop.
6. Press the Mode button to return to Video mode.
12
Page 21

2.8. Voice recording
2.8.1. To take a voice recording:
1. Turn on the camera and make sure it is in REC mode.
2. Press the shutter button to start recording.
3. Press the shutter button again to stop.
The voice file will automatically be saved with a unique file name.
2.8.2. To playback a voice file:
1. Press the Playback button, the most recent file will be
shown on the LCD screen.
2. Press the joystick to playback the voice file.
3. When reviewing a voice file, use the joystick up/down to
adjust the volume.
4. Press the joystick again to stop.
5. Press the Mode button to return to REC mode.
13
Page 22

2.9. Connecting to a computer
Read this section to learn how
to transfer files to a PC or use
the camera as a PC
web-camera for conferences.
Connect the camera to a
computer with the USB cable
provided.
2.10. Connecting to a TV
Connect the camera to a TV
as shown with the AV
cable provided.
14
Page 23

3. Using the camera
Read this section to learn how to use the camera.
3.1. Using the camera buttons
All buttons are located on the top and the back of the camera.
3.1.1 Back view
Busy LED
(Red)
3.1.2 Top view
Power LED
(Green)
LCD screen
Power button Shutter button
Zoom out/
Zoom in
Playback button
Mode button
Joystick
Display button
Menu button
USB/AV port
15
Page 24

16
See the table below for a description of each button’s function.
Button
Name
Zoom out
Zoom in
Playback
Mode
Joystick
Function
Press to zoom out/in while taking
pictures or shooting video clips.
Press to enlarge/ reduce images
while reviewing still images.
While in Playback mode, press the
Zoom out button to view
thumbnails of all files stored in
memory.
Press to playback images, video
clips, or recorded voice files.
Press to switch between photo
mode (auto), photo mode
(program), video mode, and REC
mode.
Use to navigate OSD menus.
In Photo mode, move right to use
self-timer/continuous shooting
function, move left to change flash
mode, and move down to use
macro function.
In Video mode, move down to use
macro function
Display
Press to switch between LCD
display modes.
Page 25

Menu
Shutter
Power
Press to display main OSD menu.
Press to capture a picture in Photo
mode.
Press to start/stop the video/voice
recording in Video/REC mode.
Press to turn power on/off.
17
Page 26

3.2. About the LEDs
The following tables explain the meaning of the LEDs.
Photo mode Power on Self-capture
Self-timer LED
Power LED (G)
Busy LED (R)
Video mode Power on Recording
Self-timer LED
Power LED (G)
Busy LED (R)
N/A
REC mode Power on Recording
Self-timer LED
Power LED (G)
Busy LED (R)
N/A
N/A
Legend:
LED turns on then off
blinking LED
– Steady LED
Shutter
button
N/A N/A
–/ N/A
–
Flash
charging
18
Page 27

3.3. Photo mode
Use Photo mode to capture still pictures and store them in internal
memory or on an SD card. There are two Photo modes: Auto mode
and Program mode .
3.3.1. Photo mode icons
Use the following picture to familiarize yourself with the photo mode
icons and symbols.
See the table below for a description of each icon and symbol.
Displays the number of available shots while using current
1
settings.
2 Optical/Digital zoom ratio status
3 Time and date
Focus zone.
4
The camera focuses on this area inside this frame.
5 Battery status indication
19
Page 28

Storage directory indicator
6
7
8 Flash mode indicator
9
10
: Internal memory space
: SD card memory space
Macro function indicator
This function is on when showing icon.
The icon will not be shown when this function is off.
Capture mode indicator
: Single shot
: Continuous shot
: Self-timer function (10 seconds)
Photo mode icon
: Auto
: Program (manual)
20
Scene choice:
Select scene setting according to different capturing
11
situations.
This selection is enabled only in program mode.
Resolution. The higher the resolution is, the bigger photo
12
size will be.
Color. This icon will be in color if the camera is set to take
color pictures.
13
Black/White: Taking black/white pictures.
Sepia tones: Taking sepia pictures.
ISO indicator, which indicates to ISO setting: Auto, 100, 200,
14
and 400.
This selection is enabled only in program mode.
Page 29

3.3.2. Scene selecting
Icon Name Description
Manual See “Scene” on 4.1.1.
Portrait
Landscape
Sporty
Night portrait
Night landscape
Sunset
Backlight
Fireworks
Beach
Party
Text
For capturing close subjects in good light
conditions.
For capturing distant subjects in good
light conditions.
For capturing moving objects.
For capturing close subjects in dark
environments.
For capturing distant subjects in low light
conditions.
For capturing sunsets or when shooting
towards the light
For capturing images with strong
backlight.
For capturing pictures of bright subjects in
dark environments. Ideal for fireworks.
For capturing images in bright sunlight
with large reflective surfaces.
For capturing action in low light
conditions with partly on-site bright light.
For capturing close subjects of high details
in good light conditions.
21
Page 30

Capture mode and self-timer function
Single shot: Only one picture will be taken.
Continuous shot: Three pictures will be taken when the shutter is
Self-timer: This function enables to take pictures of self by
Note: Continuous shot is not available when the camera is set to 8M (8
megapixels).
pressed.
adding a 10 seconds delay between the shutter is
pressed and the picture is actually taken.
3.3.3. Setting the flash
While in Photo mode, move the joystick left to switch between flash
modes.
See the table below for a description of each icon and symbol.
Flash is turned off
Automatic flash, fires only when needed.
Forced flash, flash is always on.
Flash fires automatically when needed and flashes
once before the picture is taken to reduce the red-eye
effect.
22
Flash is always on and fires once before the picture is
taken to reduce the red-eye effect.
Slow sync flash.
A flash mode designed for low light conditions with
long shutter speed.
Page 31

Zoom status
3.3.4. Using the macro function
This function can capture subjects very close to the lens. In macro mode,
subjects can be as close as 2 cm.
While in photo mode, move the joystick downward to activate macro
function, and an icon will appear on the LCD screen.
Move the joystick downward again to cancel the macro function.
3.3.5. Using the zoom function
The camera is equipped with 3x optical zoom and 4x digital zoom. The
zoom function will work in photo mode and video mode (before starts
shutting).
Press the zoom in button to get closer to a subject.
Press the zoom out button to move away from a subject.
The ratio status bar on the right of the screen indicates the zoom status.
23
Page 32

3.4. Video mode
Use Video mode to capture video clips and store them in internal
memory or on an SD card.
3.4.1. Video mode icons
Use the following picture to familiarize with the Video mode icons
and symbols.
See the table below for a description of each icon and symbol.
1 Zoom ratio status bar
2 Timer
3 Record/stop icons
4 Battery status indicator
5 Storage directory indicator.
: Internal memory space
: SD card memory space
6 Video mode icon
7 Focus zone.
The camera focuses on this area inside this frame.
24
Page 33

3.5. REC mode
Use REC mode to record a voice file and store them in internal
memory or on an SD card.
3.5.1. REC mode icons
Use the following picture to familiarize yourself with the REC mode
icons and symbols.
See the table below for a description of each icon and symbol.
1 REC mode icon
Storage directory indicator.
2
3 Battery status indication
4 Timer
5 REC start/stop icon
: Internal memory space
: SD card memory space
25
Page 34

3.6. Playback mode
Use Playback mode to review all the files stored in the camera.
3.6.1. Displaying file information
Basic information is displayed by default on each image or video when
viewed in Playback mode. Press the Display button to switch this
information on or off.
1. Turn on the camera and make sure it is in Playback mode.
2. The most recent file will be shown on the LCD screen with basic
information such as file type, storage directory, battery, etc.
3. Press the Display button for the first time to show detailed file
information when captured.
4. Press the Display button for the second time to remove all the
information on the screen and show only the picture.
5. Press the Display button for the third time to restore basic
information.
Note: Video files only show basic information. Pressing the display
button will remove the information from the screen. Pressing the
button again will restore it.
26
Page 35

3.6.2. Playback mode icons
Refer to the following picture to familiarize yourself with the Playback
mode icons and symbols.
See the table below for a description of each icon and symbol.
Display the number of current shot and total number of
1
pictures/video clips.
Counter shows the total time of current video.
2
Shows only for a video clip/voice file.
Play/stop icon.
3
Shows only for a video clip/voice file.
4 Battery status indication
Storage directory indicator.
5
6
7 Playback mode icon
: Internal memory space
: SD card memory space
Shows current file type.
: Still images
: Video clips
: Voice files.
27
Page 36

3.6.3. Thumbnail mode
When in Playback mode, press the zoom out button to show image
thumbnails.
1. Turn on the camera and make sure it is in Playback mode.
2. The most recent image will show on the screen. Press the Zoom
out button for the first time to view four thumbnails on LCD
screen, and press the button for the second time to view nine
thumbnails on the LCD screen.
3. Move the joystick to highlight an image, press the joystick to view
the image full screen size.
4. Press the Zoom out button again to return thumbnail mode.
Note: Voice files fill only show the icon in thumbnail mode.
3.7. USB mode
Before connecting to a PC, refer to “Installing the software and
drivers” section.
The camera can be set as a USB mass storage device when connected to
a PC via the USB cable.
3.7.1. Storage device mode
When set as a USB mass storage device, the camera appears as two
removable drives in Windows Explorer. One drive is the camera
internal memory, and the other is the mini SD card. Drag and drop
files to and from the removable drives just like any other drive.
28
Page 37

4. Using the menus
Read this section to learn how to configure the camera and use
the advanced features.
4.1. Picture menu
In Photo mode, press the Menu button to show the menu.
4.1.1. Scene
The scene option can be set to manual , where focus, white balance,
EV, ISO, and metering can be set manually.
There are also other preset scene options and all these variables are
preset. When a preset scene option is chosen, focus, white balance, EV,
ISO, and metering cannot be altered.
1. Turn the camera on and ensure it is in Photo mode.
2. Press the Menu button and move the joystick down to highlight
the Scene option.
3. Use the joystick to select a scene setting.
4. Press the Menu button again to exit the menu.
Note: The Scene option is enabled only when photo mode is set to
program (manual).
29
Page 38

4.1.2. Size
Use this option to set the size of the captured image. Bigger images
contain more detail and therefore use more memory space.
1. Turn the camera on and ensure it is in Photo mode.
2. Press the Menu button and move the joystick down to highlight
the Size option.
3. Use the joystick to select 8M, 5M, 4M, 3M, 2M, or VGA.
4. Press the Menu button again to exit the menu.
4.1.3. Date stamp
Use this option to turn on/off the date/time stamp when the photo is
captured.
1. Turn the camera on and ensure it is in Photo mode.
2. Press the Menu button and move the joystick down to highlight
the Date stamp option. Press the joystick to confirm.
3. Use the joystick to select whether the date stamp show on the
screen.
4. Press the Menu button again to exit the menu.
4.1.4. Quality
Use this option to set the quality of the captured image. Better quality
contains more details and therefore uses more memory space.
1. Turn the camera on and ensure it is in Photo mode.
2. Press the Menu button and move the joystick down to highlight
the Quality option.
3. Use the joystick to select from fine, normal, or basic.
4. Press the Menu button again to exit the menu.
30
Page 39

4.1.5. Color
The camera can capture standard color images, black and white images,
or sepia tone to give an old-fashioned look.
1. Turn the camera on and ensure it is in Photo mode.
2. Press the Menu button and move the joystick down to highlight
the Color option.
3. Use the joystick to select color, black and white, or sepia.
4. Press the Menu button again to exit the menu.
4.1.6. White balance
Use this option to correct color difference due to lighting conditions.
1. Turn the camera on and ensure it is in Photo mode.
2. Press the Menu button and move the joystick down to the second
page to highlight the WB option.
3. Use the joystick to select Auto, Sunny, Cloudy, Tungsten, or
Fluorescent.
4. Press the Menu button again to exit the menu.
4.1.7. Focus selection
Use this option to determine where the camera focuses.
1. Turn the camera on and ensure it is in Photo mode.
2. Press the Menu button and move the joystick down to the second
page to highlight the Focus Sel. option.
3. Use the joystick to select center , left , right , top
or bottom .
4. Press the Menu button again to exit the menu.
Note: The WB, and Focus Sel. option is enabled only when photo
mode is set to program (manual).
31
Page 40

4.1.8. Metering
Use this option to determine how the camera light metering is used to
calculate the exposure of the picture.
1. Turn the camera on and ensure it is in Photo mode.
2. Press the Menu button and move the joystick down to the second
page to highlight the Metering option.
3. Use the joystick to select matrix , a center weighted
value , or a spot value in the center of the scene .
4. Press the Menu button again to exit the menu.
4.1.9. Exposure adjustment (EV)
Use this setting to change the exposure for the pictures. Usually, this
value would be set to zero. Increase the value to light up a subject with
strong back lighting, or decrease the value if taking a picture of
something very bright.
1. Turn the camera on and ensure it is in Photo mode.
2. Press the Menu button and move the joystick down to the second
page to highlight the EV option.
3. Use the joystick to adjust EV value. The range is from –2.0 to +2.0.
4. Press the Menu button again to exit the menu.
Note: The Metering and EV option are enabled only when photo mode
is set to program (manual).
32
Page 41

4.1.10. ISO
This option is equivalent to the film speed setting on film cameras. In
brighter conditions, a low ISO film is needed, correspondingly, in
darker conditions, a high ISO film is needed.
1. Turn the camera on and ensure it is in Photo mode.
2. Press the Menu button and move the joystick down to the second
page to highlight the ISO option.
3. Use the joystick to select auto, 100, 200, or 400.
4. Press the Menu button again to exit the menu.
Note: The ISO Quality option is enabled only when photo mode is set
to program (manual).
4.2. Video menu
When in Video mode, press the Menu button to show video menu.
4.2.1. Video Quality
There are three different levels for video quality setting. Higher quality
video needs more memory storage space.
1. Turn the camera on and ensure it is in Video mode.
2. Press the Menu button and move the joystick downward to
highlight the Quality option.
3. Use the joystick to select fine, normal, or basic.
4. Press the Menu button again to exit the menu.
33
Page 42

4.3. Playback menu
Use the playback menu to manage the files stored in the
internal memory or on SD card.
4.3.1. Delete all
Use this function to delete files.
1. Turn the camera on and ensure it is in Playback mode.
2. Press the Menu button and move the joystick downward to
highlight the Delete all option.
3. Press the joystick to confirm and select No or Yes. Press the
joystick to confirm.
4. Press the Menu button again to exit the menu.
Note: Once deleted, files cannot be recovered. Make sure the files are
transferred to PC via USB cable or saved to other storage device.
Files that have been protected will not be deleted. See “Protect” section
for detailed information.
4.3.2. Protect
Use this function to protect files from accidental deletion.
1. Turn the camera on and ensure it is in Playback mode.
2. Press the Menu button and move the joystick down to highlight
the Protect option.
3. Use the joystick to select protect one , unprotect one ,
protect all , or unprotect all . Press the joystick to
confirm.
4. Press the Menu button again to exit the menu.
Note: Files that have been protected cannot be deleted. To delete a
protected file, you must unprotect it first.
34
Page 43

ERROR: stackunderflow
OFFENDING COMMAND: ~
STACK:
 Loading...