

Page 1
Cover
User Manual
This manual can guide you to use this camera with
proper operation and correct setting. Please read it
carefully and optimize the performance in
accordance
with your preference.
Page 2

Table Of Contents
Table Of Contents
Safety Notes ........................................................................ 04
Overall Introduction..........................................................05
Accessories..........................................................................................05
External View .....................................................................................06
Mode Dial (Working Mode)...............................................................07
Focus Range........................................................................................07
Icon Display ........................................................................................08
Icon Index Table.................................................................................09
Getting Ready..................................................................... 10
Switch On or Off the Camera ............................................................10
Loading the Batteries .......................................................................10
Using an AC Adapter..........................................................................11
Inserting an SD Card .........................................................................11
Removing an SD Card........................................................................12
Attaching the Wrist Strap..................................................................12
Getting Started ................................................................. 13
Basic Photography..............................................................................13
Advanced Functionality Settings....................................... 14
Under Shooting Mode ( ) ...............................................................14
Setting Focus Range .........................................................................................14
Turning On or Off the TFT LCD Monitor .........................................................14
Setting Flash Mode ......................................................................................... 14
Setting Self-timer ............................................................................................15
Setting Digital Zoom ......................................................................................16
Setting an Image Size (Resolution) ................................................................. 16
Setting Image Quality .....................................................................................17
Setting Voice Memo ........................................................................................18
Setting Exposure............................................................................................... 19
Setting White Balance ......................................................................................20
Under Playback Mode ( ) ...............................................................21
Exploring and Image......................................................................................... 21
Displaying Image Information ..........................................................................22
Playback of a Movie Clip ...............................................................................22
Thmbnail Images (Small Images) Display ...................................................... 23
Deleting Images .............................................................................................. 24
Formatting an SD Card ...................................................................................24
Formatting the Built-in Flash Memory .............................................................25
Setting Slide Show ...........................................................................................25
Setting Image Protection................................................................................... 26
Printing Out Images without a PC ....................................................................27
Under Movie Clip Mode ( )................................................................28
Setting the Recording Time of a Movie Clip ....................................................28
Under Setup Mode ( ) ........................................................................29
Setting Beep Sound ..........................................................................................29
Setting Auto Power Off ..................................................................................29
Setting Date Stamp ...........................................................................................30
Setting Date Type ............................................................................................. 30
Setting Date ......................................................................................................31
Setting Quick View...........................................................................................31
Setting Language ..............................................................................................32
Default Setting.................................................................................................. 32
PC Connectiony.................................................................. 33
Installing the Camera”s Driver...........................................................33
Under Microsoft Windows 98/98SE.................................................................33
Uunder Microsoft Windows 2000..................................................................... 35
Uunder Microsoft Windows ME/XP................................................................. 37
Uunder Mac 9.X or later ...................................................................................37
Installing Ulead Photo Explorer ........................................................38
Under Windows Operation System (Windows 98/98SE/2000/ME/XP) ............38
Under Windows Operating System (Mac 9.X or later) ..................................... 42
About Ulead Photo Explorer .............................................................44
Downloading the Image(s) ...................................................................52
Under Windows Operation System (Windows 98/98SE/2000/ME/XP) ............52
Downloading Images from Removable Disk ................................................52
Downloading Imagesf through Ulead Photo Explorer .................................. 52
Under Macintosh Operation System (Mac 9.X or later).................................... 53
Downloading Images from Removable Disk ................................................53
Downloading Imagesf through Ulead Photo Explorer .................................. 53
Appendix............................................................................. 54
Error Message Table ..........................................................................54
Specifications .....................................................................................54
2
3
Page 3
Safty Notes
Overall Introduction
Do not try to open the camera by yourself which may cause damage to the
camera or electric shock.
Do not fire the flash in a close distance (less than 1 meter) to human eyes.
Keep the camera away from the reach of children or animals to prevent
them from swallowing the batteries or small accessories.
Avoid using the camera if any form of liquid enters the camera. If it
happens, switch off the camera and contact the company that you bought
this camera from for help.
Do not operate this camera with wet hands which may cause electric
shock.
Do not place or store the camera in a high temperature environment which
may cause damage to the camera.
Do not mix to use different types of batteries or new and old batteries.
Take out the batteries to avoid electricity leakage which may damage the
camera when the camera is not in use for a long period.
Unplug the camera from the adapter (if used) to avoid damage to the
camera if the camera is not to be used in a long period.
It's normal that the temperature of the camera body rises after using for a
long period.
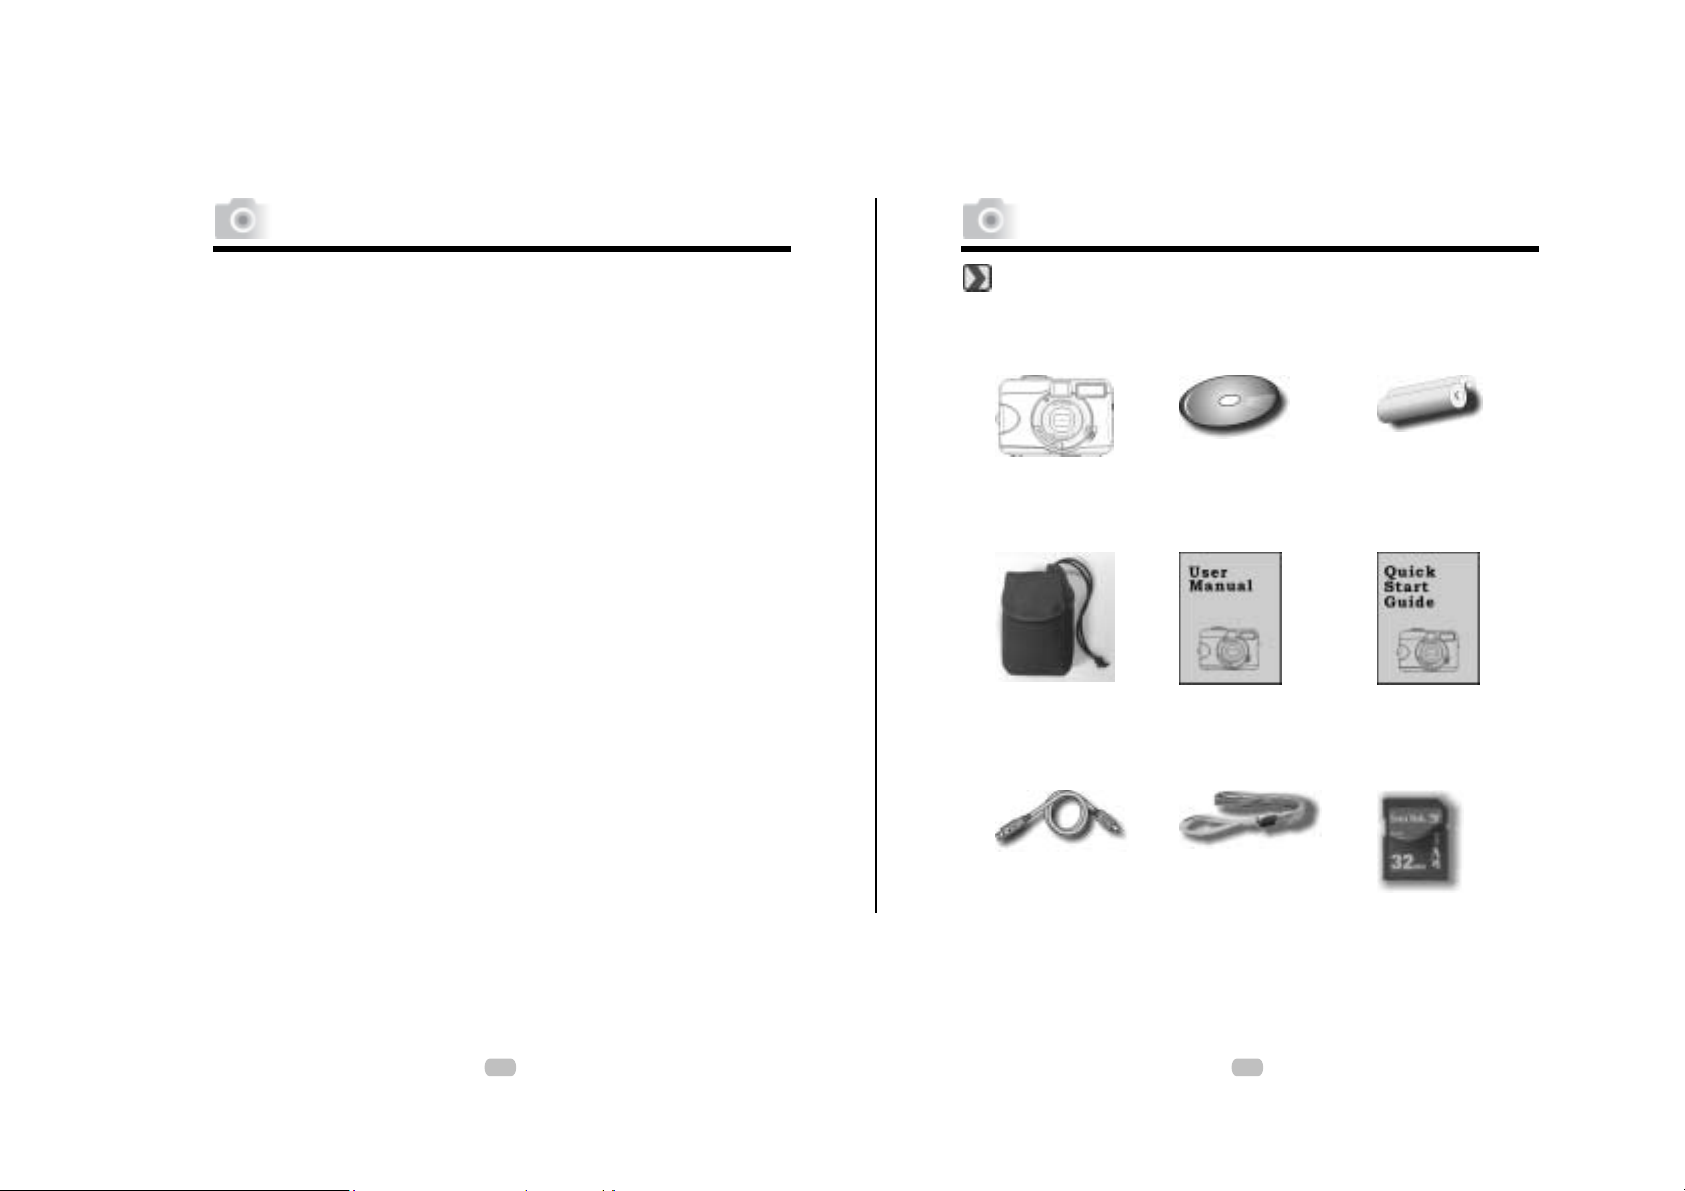
Accessories
Digital Camera Camera Driver
& Ulead Software
Camera Pouch User Manual Quick Start Guide
USB Cable Wrist Strap SD Card (Optional)
2 x AA Batteries
54
Page 4
Overall Introduction
Overall Introduction
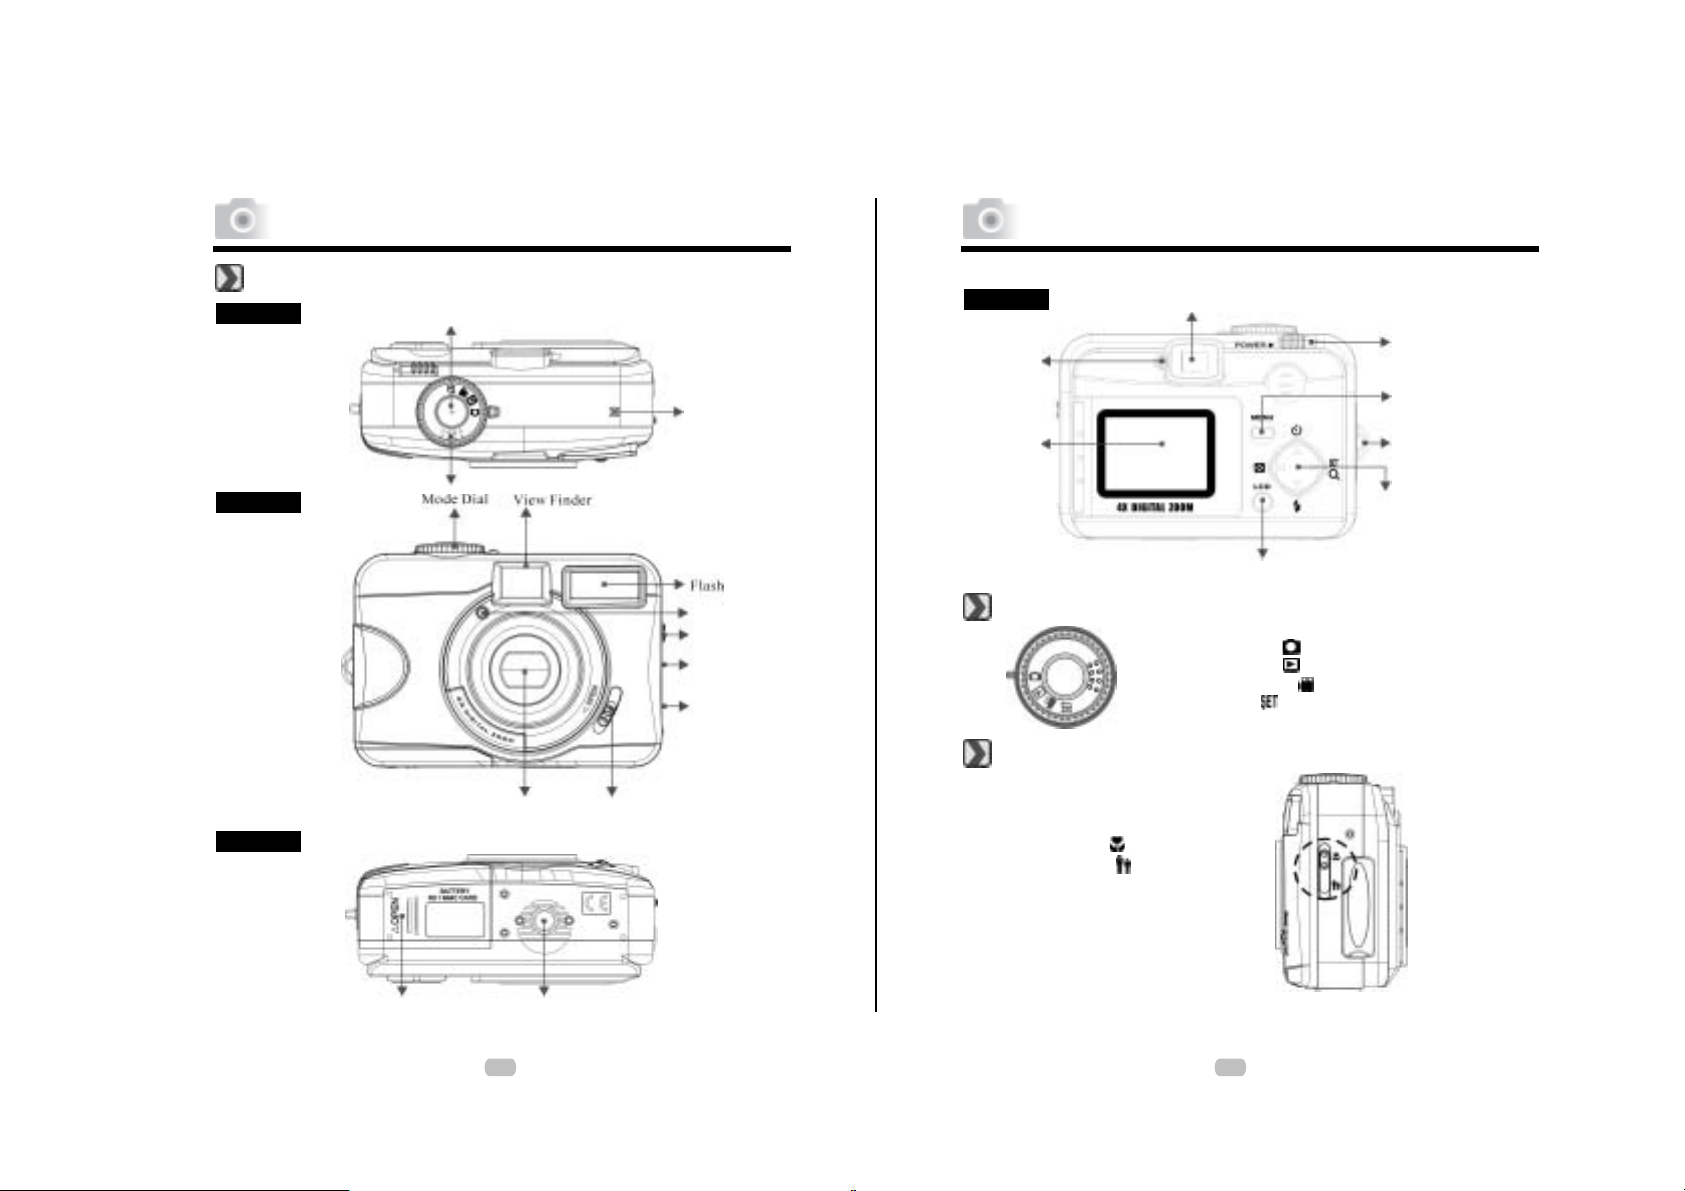
External View
Top
Front
Button
Shutter Button
Lens Cover Lens Cover Switch
MIC
Self-timer LED
Focus Switch
USB Connector
DC In Connector
Back
LED
Indicator
TFT LCD
Monitor
View Finder
TFT LCD Button
Mode Dial(Working Mode)
Shooting Mode (
Playback Mode ( )
Movie Clip Mode (
Setup Mode (
Focus Range
Macro (
Normal (
) : 0.2m
) : 0.8m~infinity
Power Switch
Menu Button
Strap Eyelet
Up (▲) Direction Button
Down (▼) Direction Button
Left (◄) Direction Button
Right (►) Direction Button
)
)
)
Battery/Memory Tripod Socket
Card Cover
76
Page 5
Overall Introduction
Overall Introduction
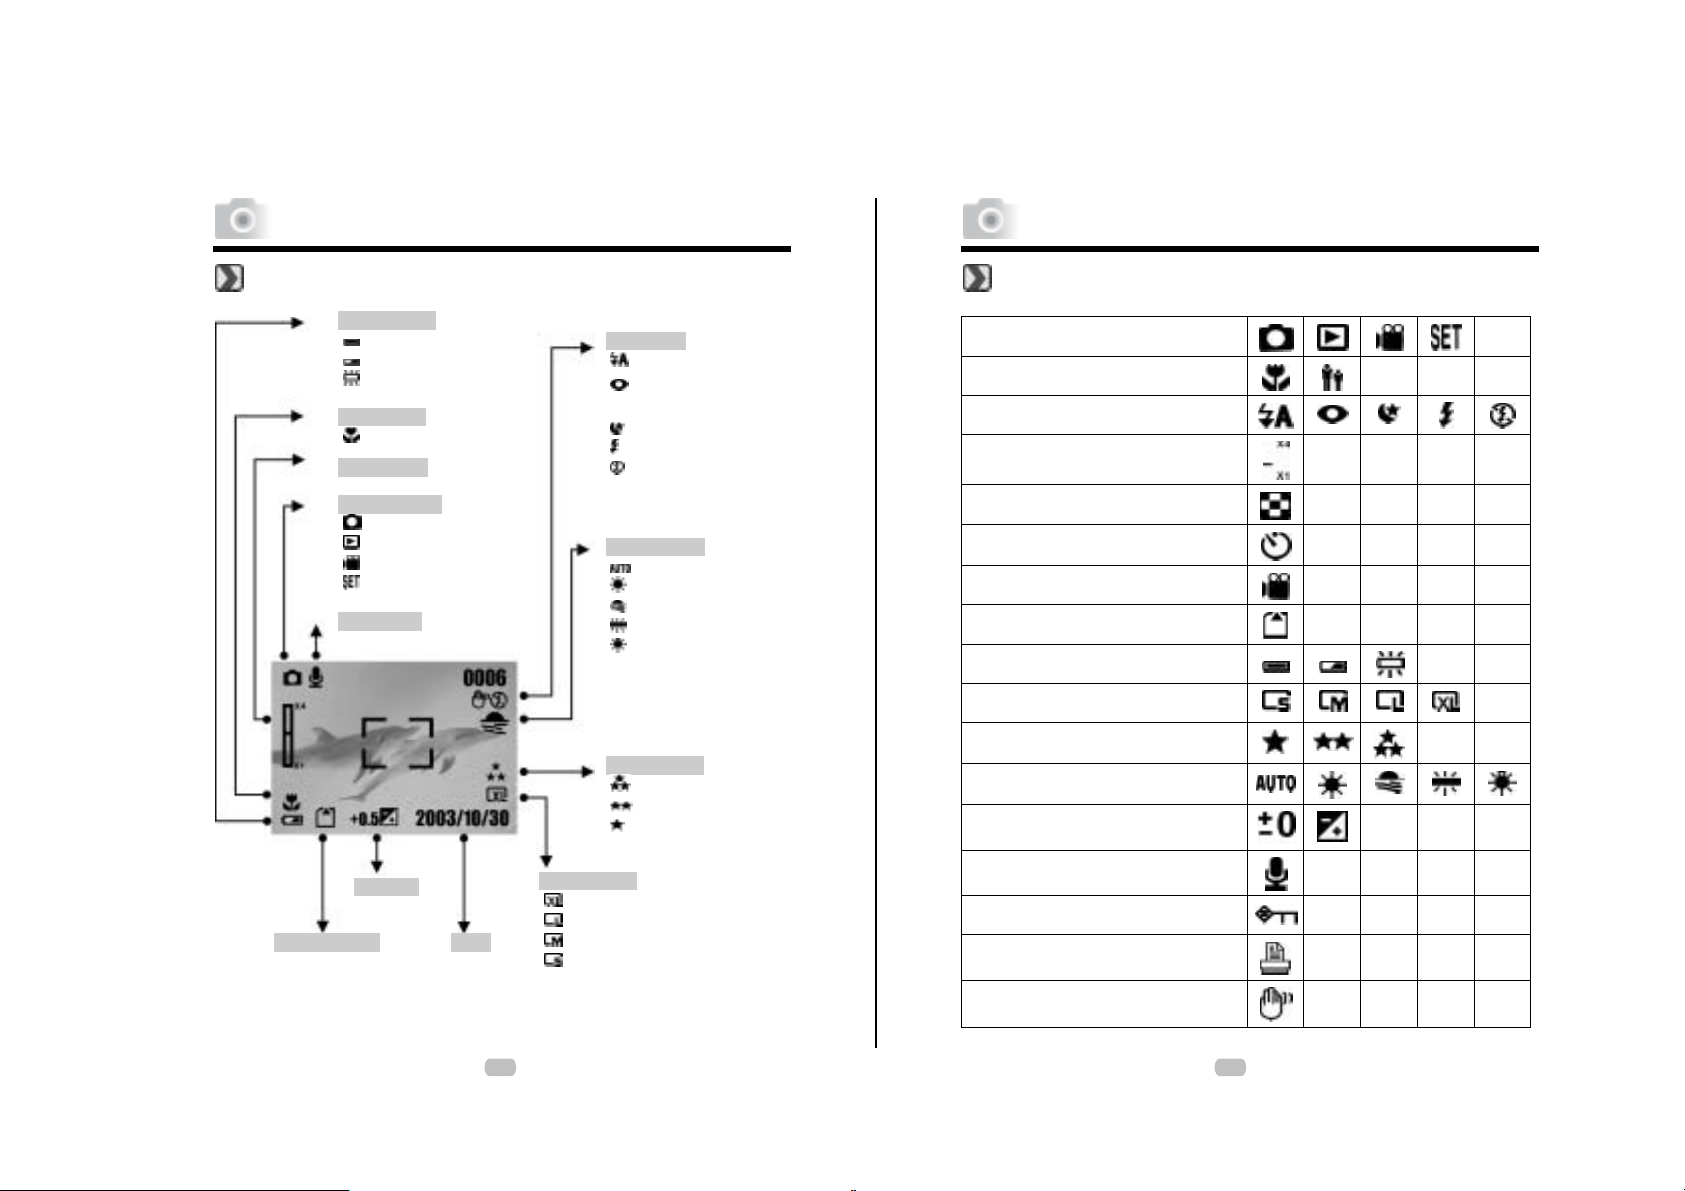
Icon Display
Battery Status
) Battery full
(
(
) Battery half drained
(
) Battery drained
Focus Range
) Macro
(
Digital Zoom
Working Mode
) Shooting mode
(
(
) Playback mode
(
) Movie clip mode
(
) Setup mode
Voice Memo
Memory Card Date
Exposure
Icon Index Table
Flash Mode
) Auto flash
(
) Auto flash with
(
red-eye reduction
) Night Scene
(
(
) Fill-in flash
(
Image Quality
) 2560x1920
(
(
) 2048x1536
(
) 1600x1200
(
) 1280x960
) Flash off
White Balance
) Auto
(
(
) Daylight
(
) Sunset
(
) Fluorescent
(
) Tungsten
Image Quality
( ) Super fine
(
) Fine
(
) Normal
Working Mode
Focus Range
Flash Modes
Digital Zoom
Thumbnails
Self-timer
Movie Clip
Memory Card Inside
Battery Status
Image Size (Resolution)
Image Quality
White Balance
Exposure
Voice Memo
Protected Image
Print (DPOF)
Darkness Warning
98
Page 6
Getting Ready
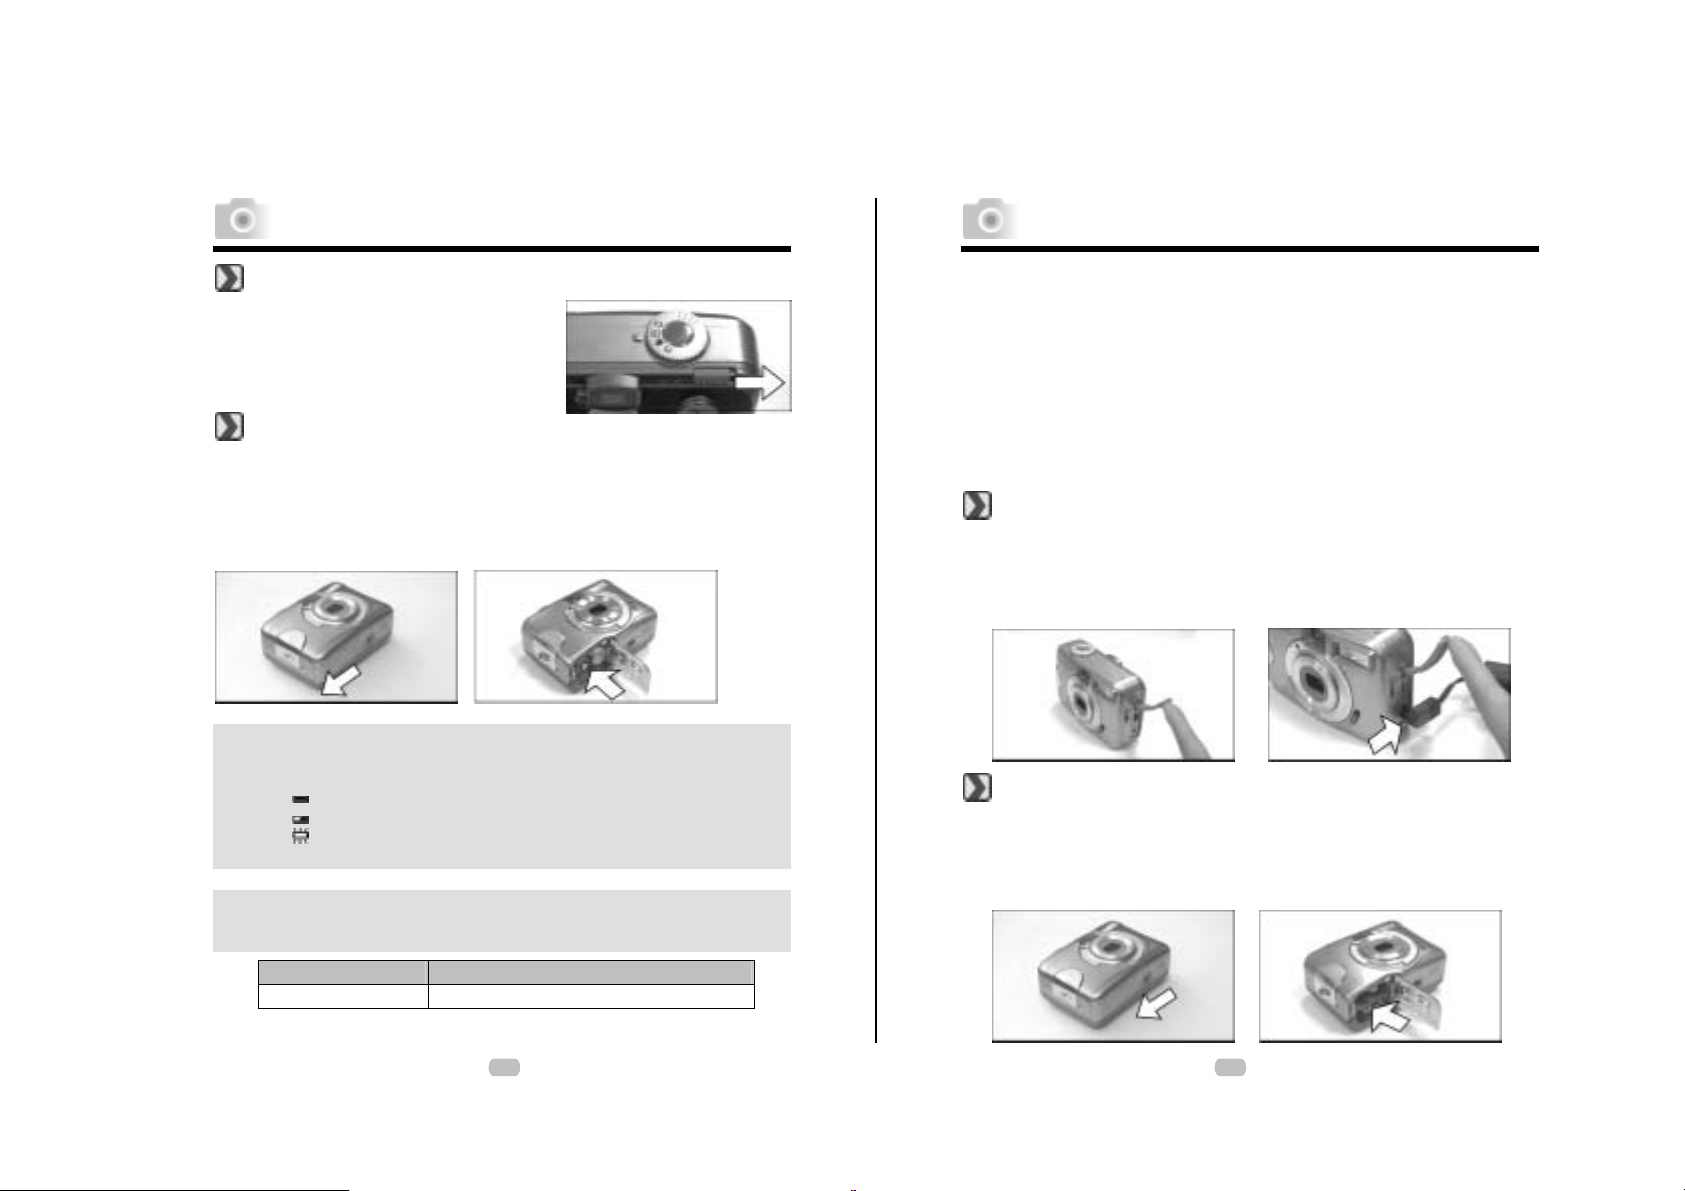
Switch On or Off the Camera
Slide the "POWER" switch sideways and
hold it awhile to switch on the camera.
the action above to switch off the camera.
Loading the Batteries
1.
Check if the camera is switched off.
2. Slide the Battery / Memory Card Co
3. Load 2 x AA batteries into the battery chamber, followin
indications.
4. Close the Battery / Memory Card Cover.
Repeat
ver out to open it.
g the polarity
Getting Ready
Note
Batteries may lose power if kept inside the camera for a long time without
using. Please remove the batteries while the camera is not in use.
Do not use manganese batteries since they cannot supply sufficient power
to support the camera's operation.
Batteries may not work normally under 0¢J.
It's normal that the temperature of the camera body goes up after being in
use for a long period.
Long time use is suggested to use an AC adapter.
In order to avoid any damage caused by bad quality AC adapters, please
contact the original company, selling you the camera.
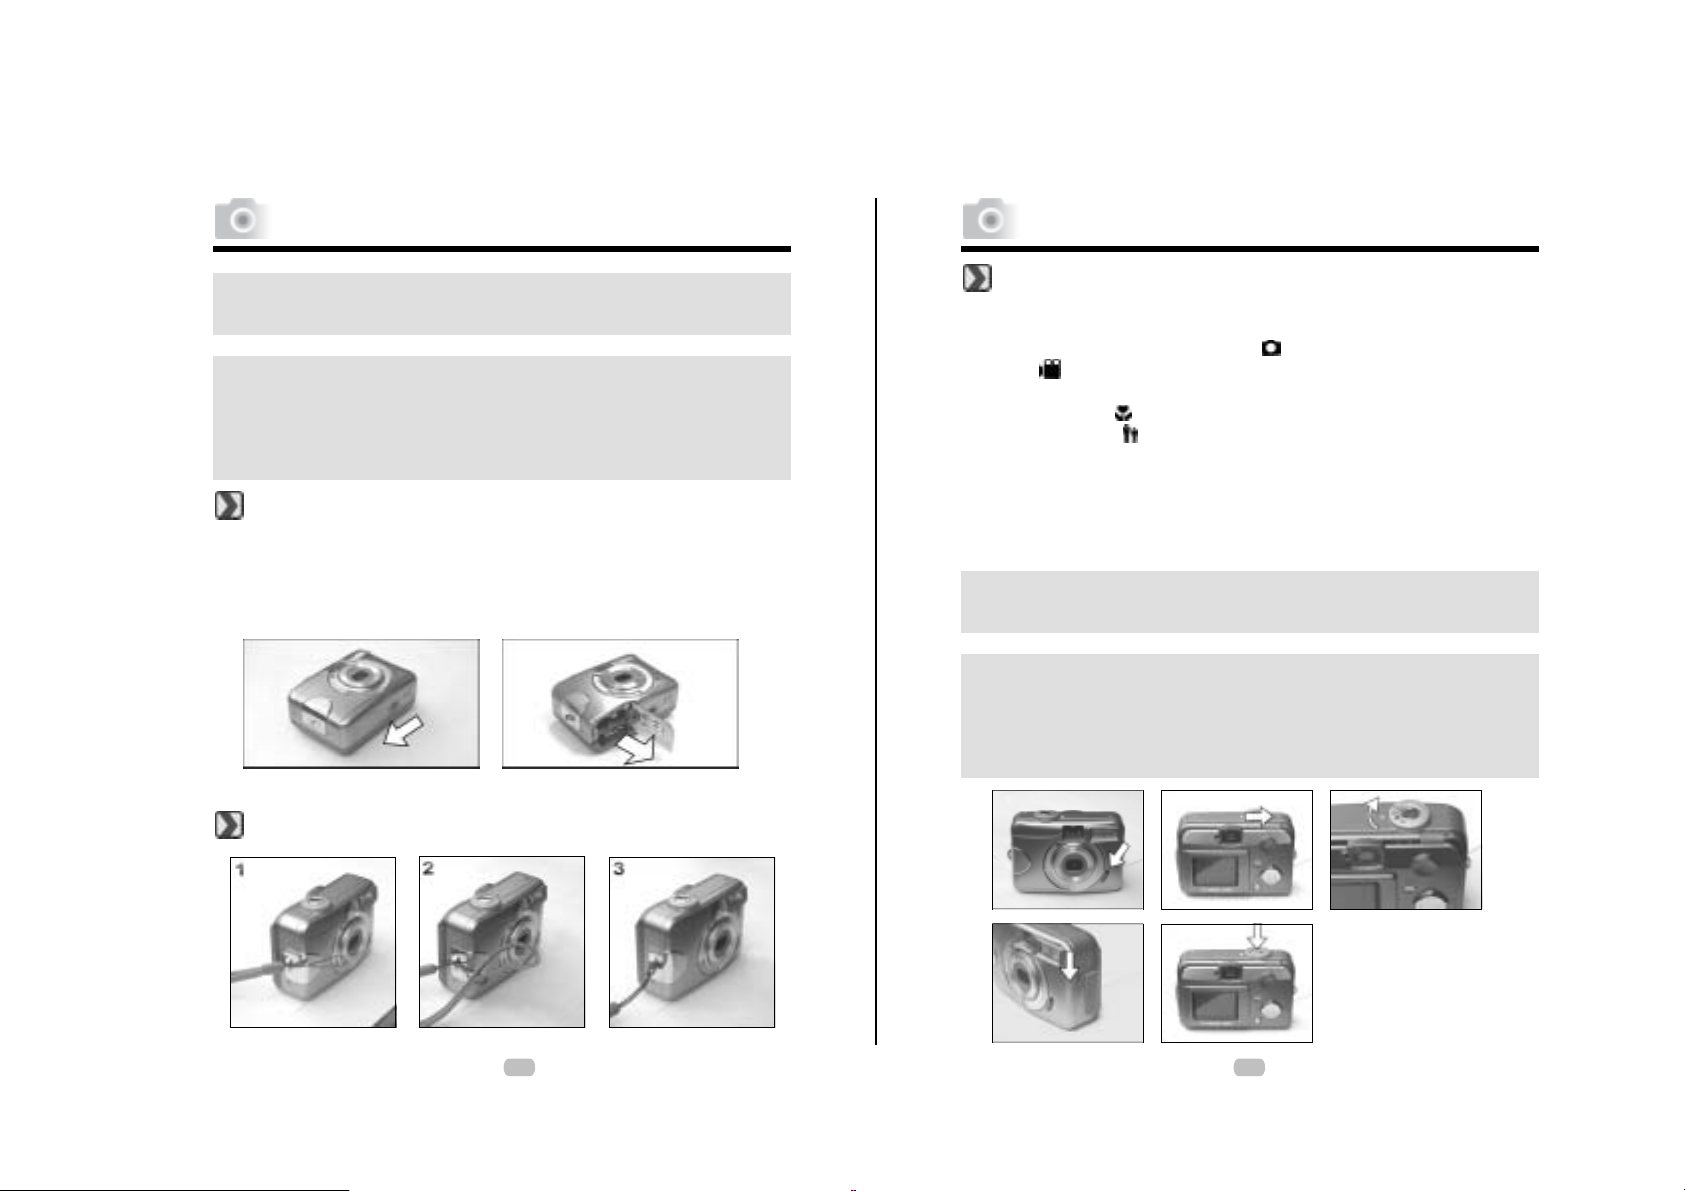
Using an AC Adapter
1. Check if the camera is switch off .
2. Make sure the AC adapter is 3.3V/2.0A.
3. Connect the AC adapter connector with the DC In socket on the camera.
4. Connect the adapter itself with the power outlet
5. Switch on the camera.
Note
The below symbols are the indication of the battery status on the TFT
LCD Monitor.
() : Battery power is full.
() : Battery power is half drained. Have new batteries ready.
() : Battery power is drained. Replace the batteries you are u is ng
now.
Note
Please refer to the suggested battery shown below to ensure the normal
operation of the camera.
Brand Type
Duracell(Ultra) ine Alkal
Inserting an SD Card
1. Switch off the camera.
2. Open the Battery / Memory Card Cover.
3. Insert the SD card into the card slot and press it down until a click sound
happens
4. Close the Battery / Memory Card Cover.
1110
Page 7
Getting Ready
Note
If a new SD card is used, you are required to format it first. Please refer
to page 24 for details.
Note
With a built-in flash memory, the image(s) can be stored either in it or in
memory card. Only if the memory card is inserted, the images will be
stored in the memory card rather than the built-in flash memory. On the
other hand,the images will be stored in the built-in flash memory only if
a memory card is not inserted.
Removing an SD Card
1. Check if the camera is switched off.
2. Open the Battery / Memory Card Cover.
3. Press down the SD card and the card will jump up.
4. Close the Battery / Memory Card Cover.
Attaching the Wrist Strap
Getting Started
Basic Photography
1. Open the lens cover.
2. Switch on the power.
3. Set the Mode Dial at Shooting Mode ( ) for still image or Movie Clip
Mode (
4. The setting of the focus range for still image capture is required as follows
► Macro ( ) : 0.2m
► Normal (
5. Refer to the next section -- Advanced Functionality Settings (page14) to set
up the features you prefer.
6. Hold still and press down the Shutter Button.
7. The LED Indicator starts blinking right after the Shutter Button is released.
8. Once the LED Indicator stops blinking, you are ready to take another shot.
Note
Note
123
S
) for video recording.
) : 0.8m~infinity
A message of "LENS COVER" blinking on the TFT LCD Monitor as a
warning is to remind you of opening the lens cover first.
A message of "Low Light!" appearing on the TFT LCD Monitor as a
warning is to remind you that the image that you are going to capture is
under a low light environment. To compose a good quality image, it is
strongly recommended to go to the Flash Mode to select Auto Flash or
Fill-in Flash tosupply more light sources.
4
5
1312
Page 8
Advanced Functionality Settings
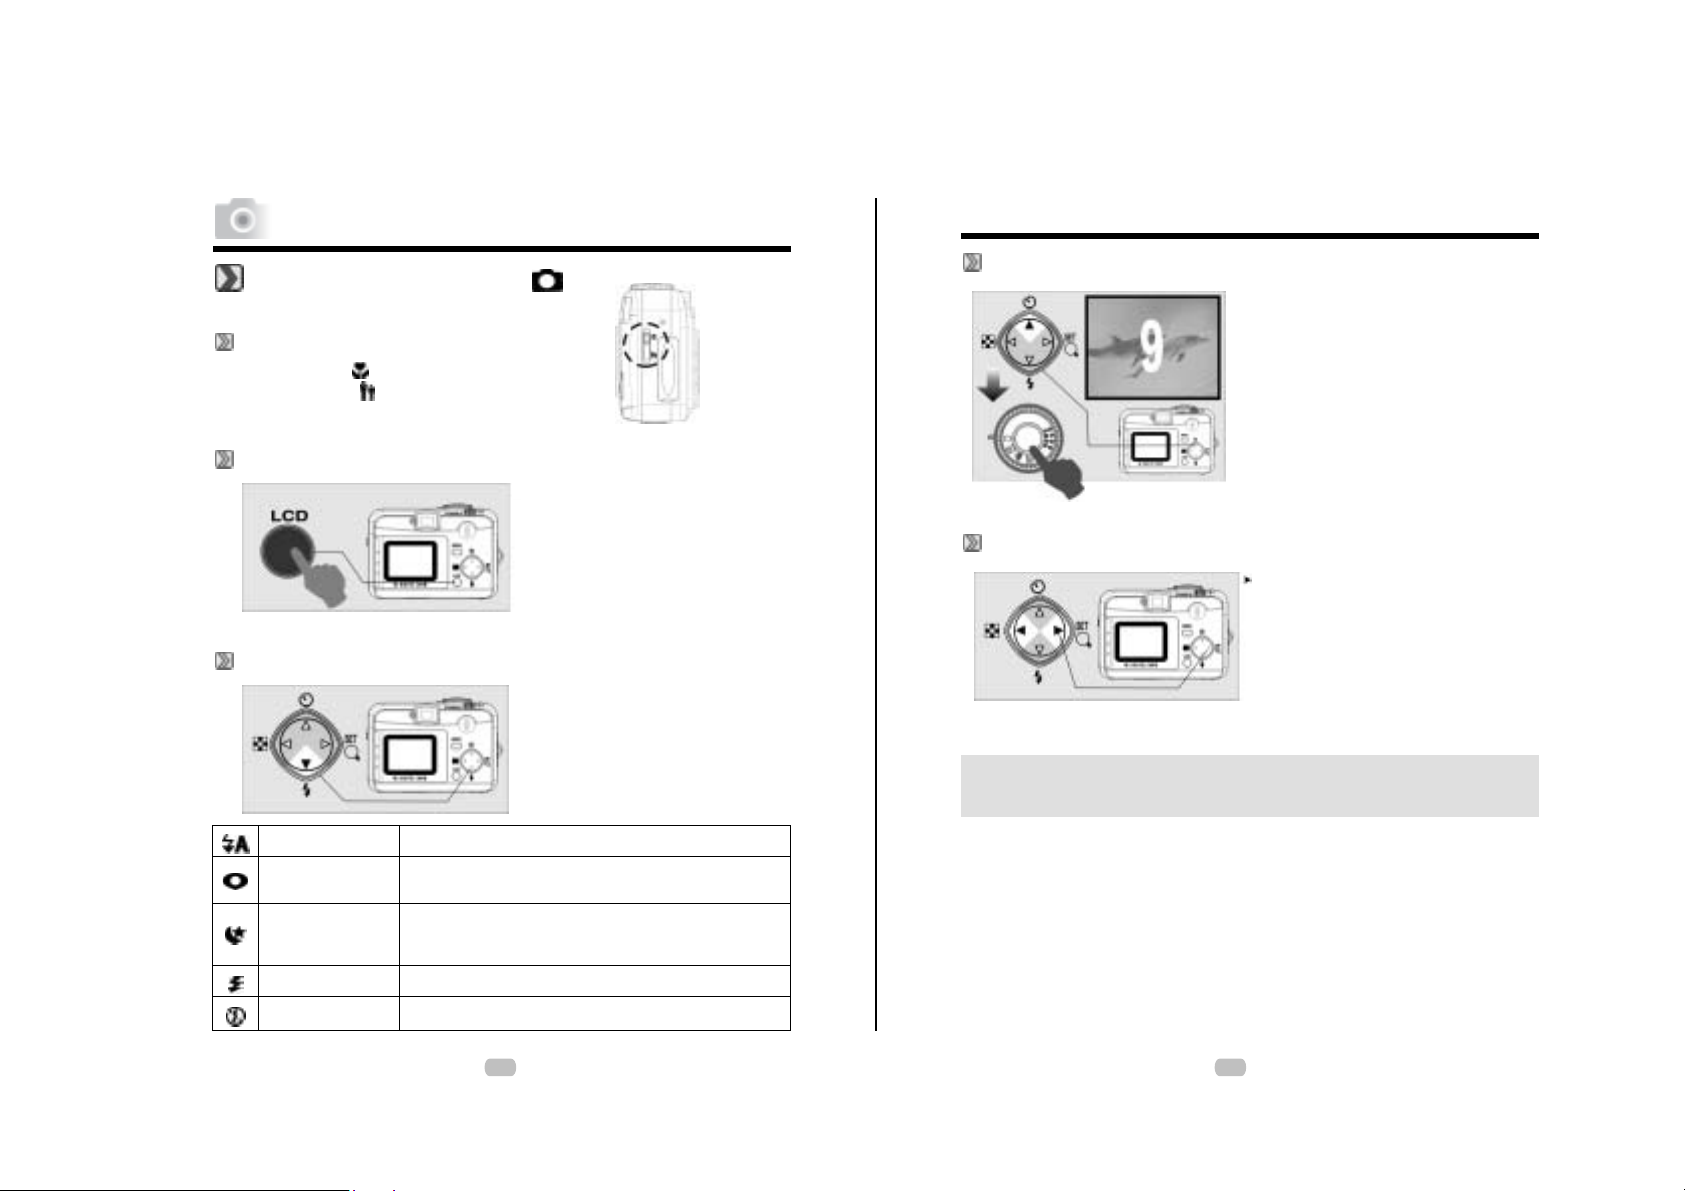
Under Shooting Mode ( )
Setting Focus Range
► Macro ( ) : 0.2m
► Normal (
Turning On or Off the TFT LCD Monitor (Preset: On)
Setting Flash Mode (Preset: Auto Flash)
Auto Flash
Auto Flash with
Red-eye Reduction
Night Scene
Fill-in Flash
Flash Off
) : 0.8m~infinity
!You can change the icon
display on the TFT LCD
Monitor, turn it off, and turn it
on again by pressing the LCD
button in order.
!You can change the flash mode
shown below according to the
environment.
The flash fires automatically as required under shooting mode.
To avoid the subject's eyes appear red in the picture, use this mode
can effectively minimize the likelihood of the red-eye effect.
The flash will flash and the exposure time is set to 1/4 second so
that the subject in the foreground and the background are properly
exposed.
The mode will enable the flash to fire in any circumstances.
The mode will disable the flash to fire in any circumstances.
Advanced Functionality Settings
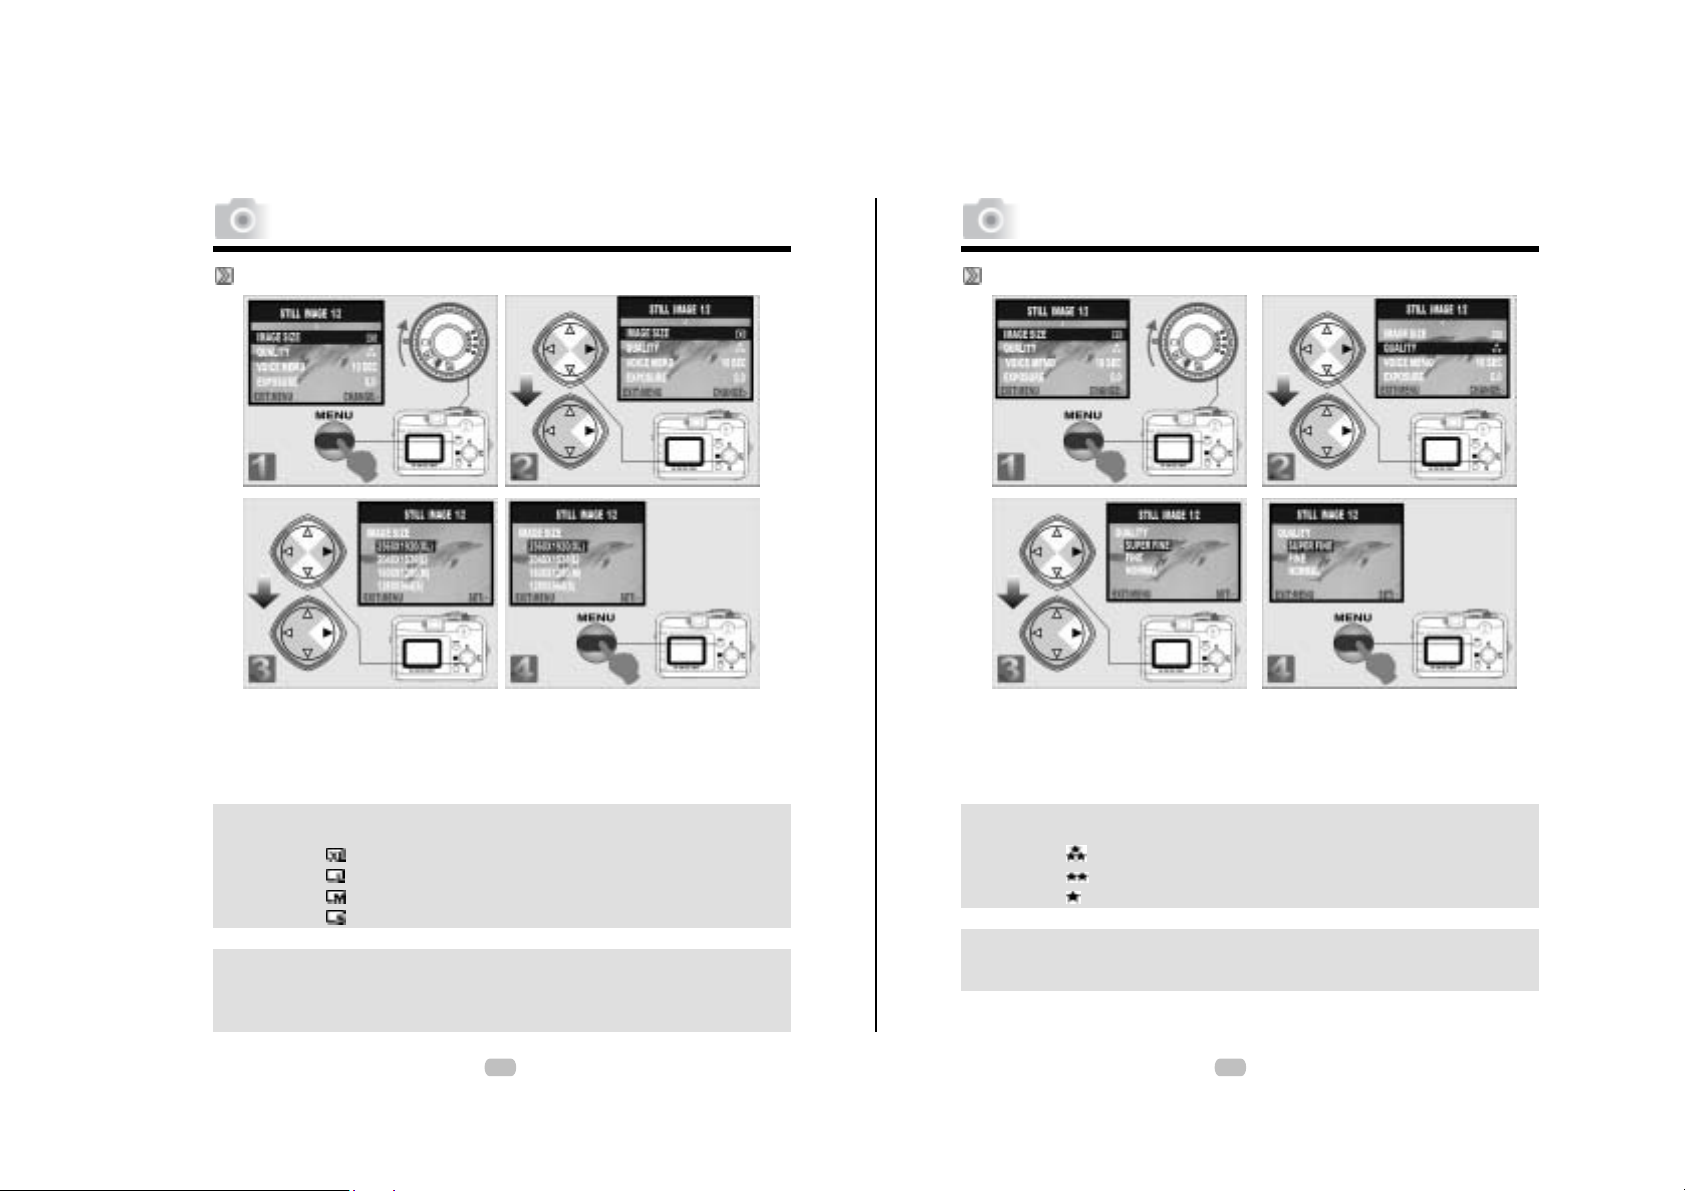
Setting Self-timer (Preset: Off)
!The self-timer starts with the
countdown for 10 seconds.
!The self-timer will be automatically
cancelled once the shoot is done.
Setting Digital Zoom ( 4X continuously )
The zoom bar, appearing on the left
on the TFT LCD monitor, shows the
current digital zoom position.
Note
Generally speaking, the digital-zoom image quality, compared with
non-digital-zoom, always decreases sharpness.
14 15
Page 9
Advanced Functionality Settings
Advanced Functionality Settings
Setting Image Size (Preset: 2048 x 1536)
Step 1 : To enter the setting mode
Step 2 : To select and confirm the option
Step 3 : To select and enter the option
Step 4 : To escape the setting
Note
Four resolutions provided can be selected as follows:
( ) 2560 x 1920 (XL)
( ) 2048 x 1536 (L)
( ) 1600 x 1200 (M)
( ) 1280 x 960 (S)
Note
You can easily check whether the setting is changed or not by the
resolution icon display on the right side of the LCD screen. If not,
please repeat the above steps.
Setting Image Quality (Preset: Fine Quality)
Step 1 : To enter the setting mode
Step 2 : To select and confirm the option
Step 3 : To select and enter the option
Step 4 : To escape the setting
Note
Three levels of image quality can be selected as follows:
( ) Super Fine
( ) Fine
( ) Normal
Note
The better the image quality is set, the less the number of images can be
stored in the built-in flash memory or the memory card.
16 17
Page 10

Advanced Functionality Settings
Advanced Functionality Settings
Setting Voice Memo (Preset: 10 SEC)
Step 1 : To enter the setting mode
Step 2 : To select and confirm the Option
Step 3 : To select and enter the option
Step 4 : To escape the setting
Note
With the Voice Memo, you can view the icon ( ) on the TFT LCD
Monitor.
Note
With the Voice Memo, the audio is stored in WAV file format. So you can
download both of the image in JPG and the Voice Memo in WAV on PC.
Setting Exposure (Preset: )
Step 1 : To enter the setting mode
Step 2 : To select and confirm the Option
Step 3 : To select and enter the option
Step 4 : To escape the setting
Note
The higher the value is, the brighter the image will be.
1918
Page 11

Advanced Functionality Settings
Advanced Functionality Settings
Setting White Balance (Preset: Auto)
Step 1 : To enter the setting mode
Step 2 : To select and confirm the Option
Step 3 : To select and enter the option
Step 4 : To escape the setting
Note
Five White Balance modes can be selected as follows:
Auto Adjusting the white balance automatically
Daylight Under strong light environment
Sunset Under sunset light environment
Fluorescent Under fluorescent light environment
Tungsten Under tungsten light environment
Note
It is suggested to stay AUTO mode for beginners.
Under Playback Mode ( )
Exploring an Image
Step 1 : To enter the setting mode
Step 2 : To explore the image
Step 3 : To zoom in/out and enter the option
Step 4 : To escape the setting
2120
Page 12

Advanced Functionality Settings
Advanced Functionality Settings
Displaying an Image Information
Playback of a Movie Clip
Note
Press Up (c) and Down (d) Direction Button to search for the movie
clip you record and press Right (f) Direction Button to see the movie
clip.
Thumbnail Images (Small Images) Display
Note
Press Up (c) and Down (d) Direction Button to search for the images
or movie clips and press Right (f) Direction Button to see the movie
clip.
Note
The appearance of icon of ( ) represents a movie clip, not a still image.
Note
The appearance of icon of ( ) represents a still image with voice memo.
22 23
Page 13

Advanced Functionality Settings
Advanced Functionality Settings
Deleting Image(s)
Step 1 : To enter the setting mode
Step 2 : To select and enter the
option
Step 3 : To select and enter the
option
Step 4 : To select and confirm the
option
Step 5 : To escape the setting
Formatting an SD Card
Please inset an SD Card in advance.
Follow the above steps, selecting "FORMAT" in step 3, "YES" in step 4.
Formatting the Built-in Flash Memory
Please make sure no memory card is inserted.
Refer to page 24 and follow the steps, selecting "FORMAT" in step 3 ,
"YES" in step 4.
Setting Slide Show (preset: 1 SEC)
Step 1 : To enter the setting mode
Step 2 : To select and confirm the option
Step 3 : To select and enter the option
Step 4 : To escape the setting
2524
Page 14

Advanced Functionality Settings
Advanced Functionality Settings
Setting Image Protection
Step 1 : To enter the setting mode
Step 2 : To select and confirm the option
Step 3 : To select and enter the option
Step 4 : To escape the setting
Note
After the above steps are done, please check if the ( ) is shown on
the right side of the TFT LCD screen. If it is not shown please repeat the
above steps.
For canceling this "PROTECT" function, please repeat the steps above
and select "UNLOCK" in the step 3 instead.
Printing Out Images without a PC(Preset : X0)
Step 1 : To enter the setting mode
Step 2 : To select and confirm the option
Step 3 : To select and enter the option
Step 4 : To escape the setting
Note
After the above steps are done, please check if the ( ) is shown on the
left down corner. If it is not shown, please repeat the steps.
You cannot see the "PRINT" function on the TFT LCD Monitor if a
memory card is not inserted.
26 27
Page 15

Advanced Functionality Settings
Advanced Functionality Settings
Under Movie Clip Mode ( ) (Preset :10 SEC)
Setting the Recording Time of a Movie Clip
Step 1 : To enter the setting mode
Step 2 : To select and confirm the
option
Step 3 : To escape the setting
Note
1. Once the Shutter Button is pressed, the camera will start and end
the recording automatically according to the time you select.
2. If "Manual" is selected, press the Shutter Button to start the
recording or press the Shutter Button again to stop the recording.
Note
The TFT LCD Monitor will show "Low Light!" as a warning to remind
you that the video that you are going to record is in a low light
environment.
Under Setup Mode ( )
Setting Beep Sound (Preset : On)
Step 1 : To enter the setting mode
Step 2 : To select and enter the option
Step 3 : To select and confirm the option
Step 4 : To escape the setting
Setting Auto Power Off (Preset : 2 Minutes)
Step 1 : To enter the setting mode
Step 2 : To select and enter the option
Step 3 : To select and confirm the option
Step 4 : To escape the setting
2928
Page 16

Advanced Functionality Settings
Advanced Functionality Settings
Setting Date Stamp (Preset : On)
Step 1 : To enter the setting mode
Step 2 : To select and enter the option
Step 3 : To select and confirm the option
Step 4 : To escape the setting
Note
Setting Date Type
Step 1 : To enter the setting mode
Step 2 : To select and enter the option
Step 3 : To select and confirm the option
Step 4 : To escape the setting
If "ON", the date in this image can
be printed out.
Setting Date
Setting Quick View
Step 1 : To enter the setting mode
Step 2 : To select and enter the option
Step 3 : To set up the date
Step 4 : To escape the setting
Step 1 : To enter the setting mode
Step 2 : To select and enter the option
Step 3 : To select and confirm the option
Step 4 : To escape the setting
Note
This can allow you to view the
image on the TFT LCD Monitor
right after you take a picture.
3130
Page 17

S
S
Advanced Functionality Settings
PC Connection
Setting Language
Default Setting
Step 1 : To enter the setting mode
Step 2 : To select and enter the option
Step 3 : To select and confirm the option
Step 4 : To escape the setting
Step 1 : To enter the setting mode
Step 2 : To select and enter the option
Step 3 : To select and confirm the option
Step 4 : To escape the setting
Installing the Camera’s Driver
Under Microsoft Windows 98/98SE
Step 1:
Insert the CD into the CDROM Drive. With the auto run
program in this CD, click
“Driver” to start with the
installation.
Note:
If the auto run program fails under certain situation, please go to the Start
Menu, click “Run” and key in “CD-ROM Drive:\ AutoRun.exe” and then click
“OK” Button.
Step 3:
The computer starts with the
installation.
tep 2:
A welcome window appears
and please click “Next” to the
next step.
tep 4:
The computer starts with the
installation of DirectX8.1 if necessary.
33
Page 18

PC Connection
S
PC Connection
Step 5:
Please select “Yes” and click “Finish” to
restart the computer.
Note:
If the computer has DirectX8.0 or later already, the installation procedure
will skip above step 4 and go to the following window directly completing
the driver installation.
Under Microsoft Windows 2000
Step 1:
Insert the CD into the CD-
ROM Drive. With the auto run
program in this CD, click
“Driver” to start with the
installation.
Note:
If the auto run program fails under certain situation, please go to the Start
Menu, click “Run: and key in “CD-ROM Drive\AutoRun.exe” and then
click “OK” Button.
tep 2:
Click “OK” to proceed the
installation of DirectX8.1.
3534
Page 19

PC Connection
S
PC Connection
Step 3
The computer starts with the
installation of DirectX8.1 if necessary.
Note:
Having DirectX 8.0 or later already, the computer will skip the installation
procedure from step 2 above and go to the following window directly.
please complete the driver installation with a “OK” Click.
tep 4
Please select “Yes” and click
“Finish”to
restart the computer
Under Microsoft Windows ME/XP
The camera”s driver is not required under Windows ME and Windows XP. So,
go th page38 for installation of Ulead Photo Explorer or go to page 52 to
download the stored image(s) onto the PC. Please click “OK”, if the below
window prompts.
Under Microsoft Windows ME/XP
This camera, supporting only Mac 9.X or later versions, allows you not to
install and driver. Please go to page 42 for installation of Ulead Photo Explorer
or go to page 53 to download the stored images onto the PC.
3736
Page 20

S
S
S
S
PC Connection
• Installing Ulead Photo Explorer
Under Windows
0peratingbystem(Windows98/98SE/2000/ME/XP)
Step 1:
Insert the CD into the CDROM Drive. Click “Photo
Explorer 7.0 SE Platinum:.
Step 3:
Choose operating language.9
languages offered can be
selected, which are Simplified
Chinese, Traditional Chinese,
English, French, German,
Italian, Japanese, Korean,
and Spanish.
tep 2:
Cick “Install Ulead Photo
Explorer 7.0 SE Platinum”.
tep 4:
As a welcome window appears,
Please click “Next” to go to
next step.
PC Connection
Step 5:
Please read the content of the
areement first and click
“Yes” to go the next step.
Step 7:
This software will be installed
at “ Disk C\Program Files \
Ulead Systems \Ulead Photo
Explorer 7.0” automatically if
you click “Next”. Or you can
click “Browse” to locate the
disk and folder you prefer.
38
tep 6:
Please enter your name and
your company’s name, clicking
“Next”.
tep 8:
Cick “Next” to go to next step.
Page 21

S
S
PC Connection
Step 9:
As a new folder named “Ulead
photo Explorer 7.0 SE
platinum “is generated, click
“Next” to go to next step.
Step 11:
The installation of “Ulead
Photo Explorer 7.0 ‘SE
Platinum” is starting now.
You can click “Cancel” to
Stop the installation.
39
tep 10
Set up the default TV system.
please select the country you
are in.
tep 12:
Select the fle association you
would like to set and click
“Next” to go to next step.
PC Connection
Step 13:
If the operating system you are
using is Windows 98, 98SE or
ME, restarting the computer to
complete the installation of
Ulead Photo Exlorer 7.0 SE
Platinum is required. Please
click “Finish” to complete the
installation and restart the
computer.
4140
Page 22

PC Connection
PC Connection
Under Macintosh Opersting System (Mac 9.X or later)
Step 1:
Turn on the computer.
Step 2:
Insert the CD inton then CD-ROM
Drive. The computer will
create an icon named “Driver
CD” onn the desktop.
Step 3:
Double clicksn onn the icon and
choose then language you
prefer by doublen clicking on
one of the below folders.
PEX 2.0: English
PEX 2.0F: French
PEX 2.0G: German
PEX 2.0I: Italian
PEX 2.0J: Japanese
PEX 2.0P: Portuguese
PEX 2.0S: Spanish
Step 4:
Choose “Ulead Photo
Explorer” and copy this file
to the desktop.
Step 5:
Click on the newly created
“Ulead Photo Explorer” icon
on the desktop and double
clicks onn “Photo Explorer”
folder to start Ulead Photo
Explorer.
Note
If a warning window shows
Please visit Apple’s official
Web-site http:/kbase.info.
apple.comm to download the latest
version of CarbonLib.
a. Key in “CarbonLib” in the
search bar and click
“Search” button.
b. Download the latest version
of CarbonLib.
c. Restart the computer.
d. Go to the desktop and
double click on the icon
“Ulead Photo Explorer” to
start Ulead Photo Explorer.
4342
Page 23

PC Connection
PC Connection
About Ulead Photo Explorer
Software license
The software described in this document is furnished under a license
Agreement which is included with the product. This Agreement
specifies the permitted and prohibited uses of the product.
Licenses and trademarks
ICI Library 1991-1992 C-Cube Microsystems.Ulead Systems, Inc.
And the Ulead logo are trademarks of Ulead Systems, Inc. All
other product names and any registered and unregistered
trademarks mentioned in this manual are for identification
purposes only and remain the exclusive property of their
respective owners.
Technical support
Registered users are entitled to Ulead technical support. Our Web
site has valuable up-to-date information about Photo Explorer,
other Ulead products, and free downloads. Visit our Web site at
www.ulead.com, or send an e-mail at support@ulead.com.tw.
Headquarters: North & South America:
Ulead Systems, Inc. Ulead Systems, Inc.
http://www.ulead.com.tw http://www.ulead.com
E-mail: info@ulead.com.tw E-mail: info@ulead.com
Japan: Asia-Pacific:
Ulead Systems, Inc. Ulead System, Inc.
http://www.ulead.co.jp http://www.asiapac.ulead.com
E-mail: info@ulead.co.jp E-mail: info@asiapac.ulead.com
Europe: China:
Ulead Systems GmbH Ulead Systems, Inc.
http://www.ulead.de http://www.ulead.com.cn
http://www.ulead.co.uk E-mail: info@ulead.com.cn
http://www.ulead.co.uk/fr
E-mail: info@ulead.de
44
Software license
Before installing Photo Explorer, make sure your computer meets
these requirements:
* Intel® Pentium® processors (or 100% compatible processors)
* Microsoft Windows?95/98, NT 4.0, 2000 or higher
* 32 MB RAM (or more)
* 17.8 MB available hard drive space for program files
* True Color or HiColor display adapter and monitor (recommended)
* 800 X 600 minimum display resolution
* Windows compatible pointing device
* Microsoft Internet Explorer 4.0 or higher
* Internet connection (recommended)
* 16-bit or better sound card and speakers (recommended)
* DirectX 6.0 or higher (for video functions only)
45
Page 24

PC Connection
r
y
d
PC Connection
The Browser
Just like Windows Explorer, Photo Explorer's Browser shows the hierarchy of
drives and folders in your computer at the left hand side and displays the files
in a selected folder at the right. What's special about Photo Explorer's Browser
is that multimedia files can be shown as visual thumbnails for easier
identification. Simply click a desired file to immediately get an idea of the
file's contents. You can preview images and actually play sound, video or even
GIF animation files without actually opening them. Basic image editing
functions are also available for enhancing images. In addition, you can bring
together images, videos and sounds to create a slide show.
Customizabl
Toolbar
older F
Tree
Prev
Pane
Photo Explorer's Browser gives you different folder views. In the Folder Tree,
you can switch to the Favorites list to create a collection of frequently visited
folders. The Browser also keeps track of Recent folders you accessed and lets
you return to them quickly.
iew
e
46
Address
Ba
Browse
Pane
Slide Show
boar
Stor
Using the Uleadn Photo Explorer Browser:
Area Icon Function
Open viewer
Open new viewer
Back
Forward
Rotate left
Rotate right
Delete
Digital camera wizard
TWAIN acquire
Slide show
Auto rename
Convert
Print thumbnails
Print images
Send to (Email out)
47
Main Toolbar
Page 25

PC Connection
Preview Pane
Slide Show
Pane
PC Connection
(files detail informationbig icon)
Slider of Zoom in/out
Number of selected files
Drop Spot
Share on Web
Display mode change
Photo properties
Help
Zoom in
Zoom out
Original size
Fit to screen
Rotate left
Invert
Rotate right
Image Properties
48
New
Create Slide Show Disc
49
Open
Save
Save As
Add
Remove
Move
Rotate
Slide Properties
Screen Saver
Export
Package
Stitch Panorama
Share
Show
Slide Show Options
Close
Page 26

PC Connection
P
PC Connection
The Viewer
Photo Explorer has a built-in Viewer integrated with the Browser. You can use the
built-in Viewer to:
Get a full-size or full-screen view
of images.
Navigate through images using
the keyboard, toolbar buttons, or
menu commands, or let Viewer
automatically step through the
images.
Copy, rename or delete an image file.
Copy an image for pasting onto your
desired image editor.
Rotate, flip and edit images, and
then save the changes.
Create wallpapers and screen savers
using your images.
A standalone image viewer, the
Ulead Instant Viewer, also comes
with Photo Explorer. It is a
simpler, independent applic
ation and its sole purpose is
only for displaying images. Use
Ulead Instant Viewer when you
want to compare two or more
full-size images. Each image will
be opened in a separate window.
You can also associate file types
like JPG, GIF and BMP image files
so that they will automatically
display in the Ulead Instant
Viewer.
hoto Explorer's built-in
50
Usin he Ulg t ead Photo Explorer Viewer:
PC Connection
51
Downloadingn the Image (s)
The Under Windows Operating System (Windows 98/98SE/2000/ME/XP)
Downloading Image(s) From Removable Disk
1. Turn on the PC.
2. Switch on the camera.
3. Connect the camera to the PC with USB
cable under any working mode. Please
make sure the USB cable is well
connected to the PC and camera.
4. When the USB cable is connected to the
PC, it will create a new hard disk named
Removable Disk .
5. The stored "image(s) can be found in"
Removable Disk\Dcim\100media .
6. View the image with double click.
Page 27

Downloading Image(s) Through Ulead Photo Explorer
1. Connect the camera to the PC with
USB cable under any working mode.
Please make sure the USB cable is
well connected to the PC and camera.
2. Start Ulead Photo Explorer 7.0 SE
Platinum .
3. Click "File \ Download From
Memory Card" to get the stored
image(s).
PC Connection
52
Downloadingn the Image (s)
Under Macintosh Operating System (Mac 9.X or later)
Downloading Image(s) From Removable Disk
1.Turn on the PC.
2. Switch on the camera.
3. Connect the camera to the PC with USB cable
under any working mode. Please make sure
the USB cable is well connected to the PC and
camera.
4. When the USB cable is connected to the PC, it
will create a new icon named "untitled" on the
desktop.
5. Double click on the icon.
6. The stored image(s) can be found in the folder
of DCIM \
100MEDIA \ .
7. View the image with double click.
Downloading Image(s) Through Ulead Photo Explorer
1. Connect the camera to the PC with
USB cable under any
working mode. Please make sure the
USB cable is well connected to the
PC and camera.
2. Start Ulead Photo Explorer 7.0 SE
Platinum .
3. Click File \ Download From Memory
Card to get the stored image(s).
53
 Loading...