

Page 1
KOBE Range Hoods
Brillia Series
Model No. INX2730SQB-700-2
INSTALLATION INSTRUCTIONS
AND OPERATION MANUAL
Page 2

IMPORTANT
READ THIS FIRST
READ BEFORE INSTALLATION
1. Carefully check all contents of packages.
2. Thoroughly inspect the unit for any shipping damages, cosmetic
damages or defects.
3. Have a certified contractor/electrician test the unit before installation.
IF THERE IS ANY PROBLEM:
1. DO NOT INSTALL THE UNIT AND KEEP ALL ORIGINAL
PACKAGING MATERIAL.
2. Have your original invoice as proof of purchase and product serial
number ready.
3. Contact your merchant for product replacement due to shipping
damages, cosmetic damages or defects.
4. For all other issues, call 1-877-BUY-KOBE (289-5623), or e-mail to
NO RETURN, NO REFUND, NO EXCHANGE IF:
1.
PRODUCT HAS BEEN INSTALLED
2.
KNOCK-OUT HOLES HAVE BEEN PUNCTURED
3.
MISSING ORIGINAL PACKAGING MATERIAL
AND/OR PARTS
Page 3

[ENGLISH]
- READ AND SAVE THESE INSTRUCTIONS -
CONTENTS
IMPORTANT SAFETY INSTRUCTIONS ........................................................................ 1
COMPONENTS OF PACKAGE ...................................................................................... 3
INSTALLATION ............................................................................................................... 4
OPERATING INSTRUCTIONS ....................................................................................... 8
MAINTENANCE .............................................................................................................. 9
SPECIFICATIONS ........................................................................................................ 10
MEASUREMENTS & DIAGRAMS................................................................................. 11
PARTS LIST .................................................................................................................. 13
CIRCUIT DIAGRAM ...................................................................................................... 15
TROUBLE SHOOTING ................................................................................................. 16
WARRANTY .................................................................................................................. 17
WARRANTY INFORMATION FORM ............................................................................ 19
- READ ALL INSTRUCTIONS CAREFULLY BEFORE STARTING -
AL L W IR IN G MU S T BE D O N E B Y A P R O FE SS IO N AL A ND I N
AC CO RD A N C E W I T H NA TI O NA L AN D LO C AL E LE C TR IC AL C O DE S
Page 4

IMPORTANT SAFETY INSTRUCTIONS
- PLEASE READ THIS SECTION CAREFULLY BEFORE INSTALLATION -
WARNING
1) Installation and electrical wiring must be done by qualified professionals and in accordance with all
applicable codes and standards, including fire-rated construction.
2) When cutting or drilling into wall or ceiling, be careful not to damage electrical wiring or other hidden
utilities.
3) Ducted fans must be vented to the outside.
a) Before servicing or cleaning unit, open the light panel and SWITCH POWER OFF AT SERVICE
PANEL.
b) Clean all grease laden surfaces frequently. To reduce the risk of fire and to disperse air properly,
make sure to vent air outside. DO NOT vent exhaust air into wall spaces, attics, crawl spaces or
garages.
NOTE - This warranty is invalid without an authorized agent’s receipt or if unit is
- KOBE RANGE HOODS will not be held responsible for any damages to
: TO REDUCE THE RISK OF FIRE, ELECTRIC SHOCK OR PERSONAL INJURY,
OBSERVE THE FOLLOWING:
damaged due to misuse, poor installation, improper use, mistreatment,
negligence or any other circumstances beyond the control of KOBE
RANGE HOODS authorized agents. Any repair carried out without the
supervision of KOBE RANGE HOODS authorized agents will
automatically void the warranty.
personal property or real estate or any bodily injuries whether caused
directly or indirectly by the range hood.
WARNING
- Keep all fan, baffle/spacer/filter/oil tunnel/oil container and grease-laden surfaces clean. Grease
should not be allowed to accumulate on fan, baffle/spacer/filter/oil tunnel/oil container.
- Always turn hood ON when cooking.
- Use high settings on cooking range ONLY when necessary.
- Do not leave cooking range unattended when cooking.
- Always use cookware and utensils appropriate for the type and amount of food prepared.
- Use this unit only in the manner intended by the manufacturer.
- Before servicing, switch power off at service panel and lock service panel (if possible) to prevent
power from switching on accidentally.
-
Clean ventilating fan frequently.
:
TO REDUCE THE RISK OF PERSONAL INJURY IN THE EVENT OF A RANGE
TOP GREASE FIRE:
1
Page 5
What to Do In The Event Of a Range Top Grease Fire
ELECTRICAL SHOCK HAZARD
–
Can result in serious injury or
• SMOTHER FLAMES with a tight fitting lid, cookie sheet, or metal tray, and then turn off the burner.
KEEP FLAMMABLE OR COMBUSTIBLE MATERIAL AWAY FROM FLAMES. If the flames do not go
out immediately, EVACUATE THE AREA AND CALL THE FIRE DEPARTMENT or 911.
• NEVER PICK UP A BURNING PAN – You May Get Burned.
• DO NOT USE WATER, including wet dishcloths or towels – a violent steam blast will result.
• Use an extinguisher ONLY if:
a) You have a Class A, B, C extinguisher and know how to operate it.
b) The fire is small and contained in the area where it started.
c) The fire department has been called.
d) You can fight the fire with your back to an exit.
What to Do If You Smell Gas
-
Extinguish any open flame.
-
Do not try to turn on the lights or any type of appliance.
-
Open all doors and windows to disperse the gas. If you still smell gas, call the Gas Company and
Fire Department right away.
CAUTION
1. For general ventilation use only. Do not use to exhaust hazardous or explosive materials and vapors.
2. To reduce the risk of fire, use only metal ductwork. Sufficient air is needed for proper combustion and
exhausting of gases through the flue (chimney) to prevent back drafting.
3. Follow the heating equipment manufacturer’s guideline and safety standards such as those published
by the National Fire Protection Association (NFPA), and the American Society for Heating,
Refrigeration and Air Conditioning Engineers (ASHRAE), and code authorities.
4. Activating any switch on may cause ignition or an explosion.
5. Due to the size and weight of this hood, two people installation is recommended.
death. Disconnect appliance from electric power before servicing.
If equipped, the fluorescent light bulb contains small amounts of
mercury, which must be recycled or disposed of according to Local,
State, and Federal Codes.
2
Page 6
COMPONENTS OF PACKAGE
(Must keep all material for returns or refunds)
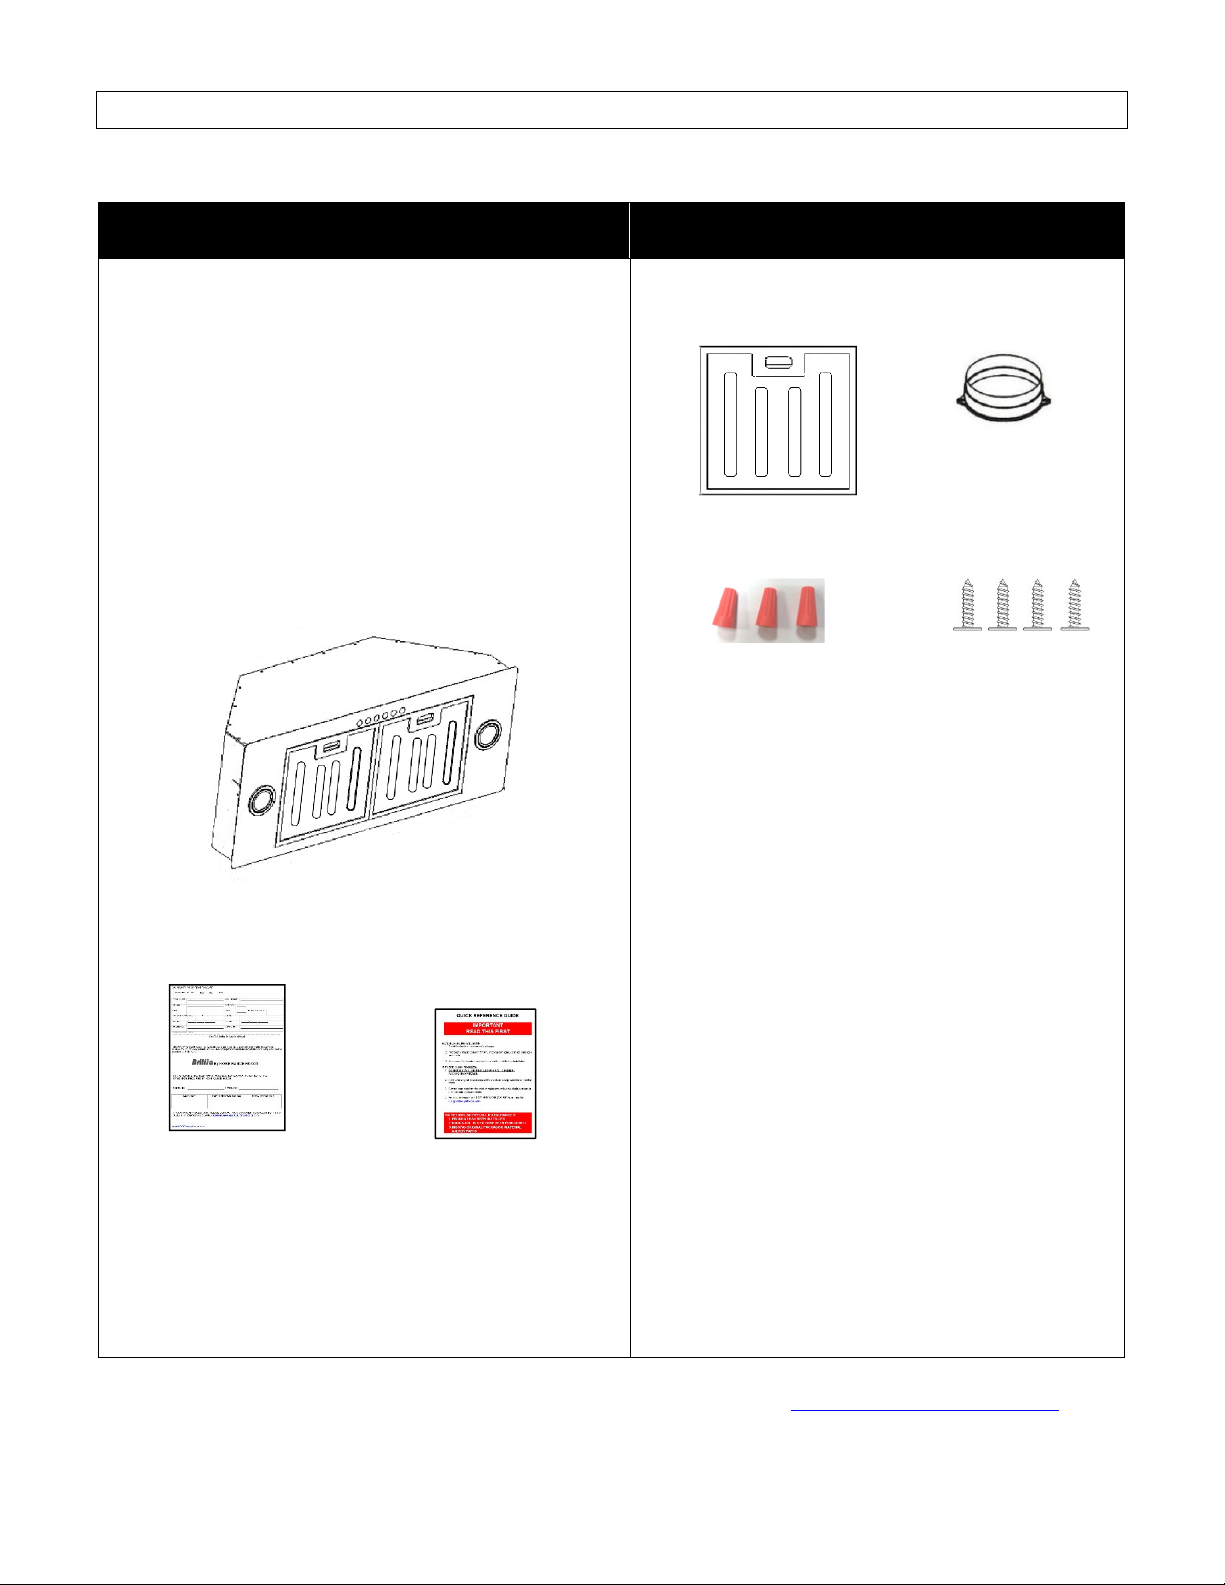
Range Hood Box
{A} KOBE Range Hood
{B} Warranty Registration Card
{C} Quick Reference Guide
{D} Baffle Filter x 2
{E} 6” Round Plastic Collar x 1
{F} Twist on wire connector
{G} Screw Package
{A}
{D} {E}
{F} {G}
M4 x 1/2" (4)
{B} {C}
{D} {E}
-
FOR MORE INFORMATION, PLEASE VISIT OUR WEBSITE www.koberangehoods.com OR
CONTACT KOBE RANGE HOODS AT (626) 775-8880.
3
Page 7
INSTALLATION
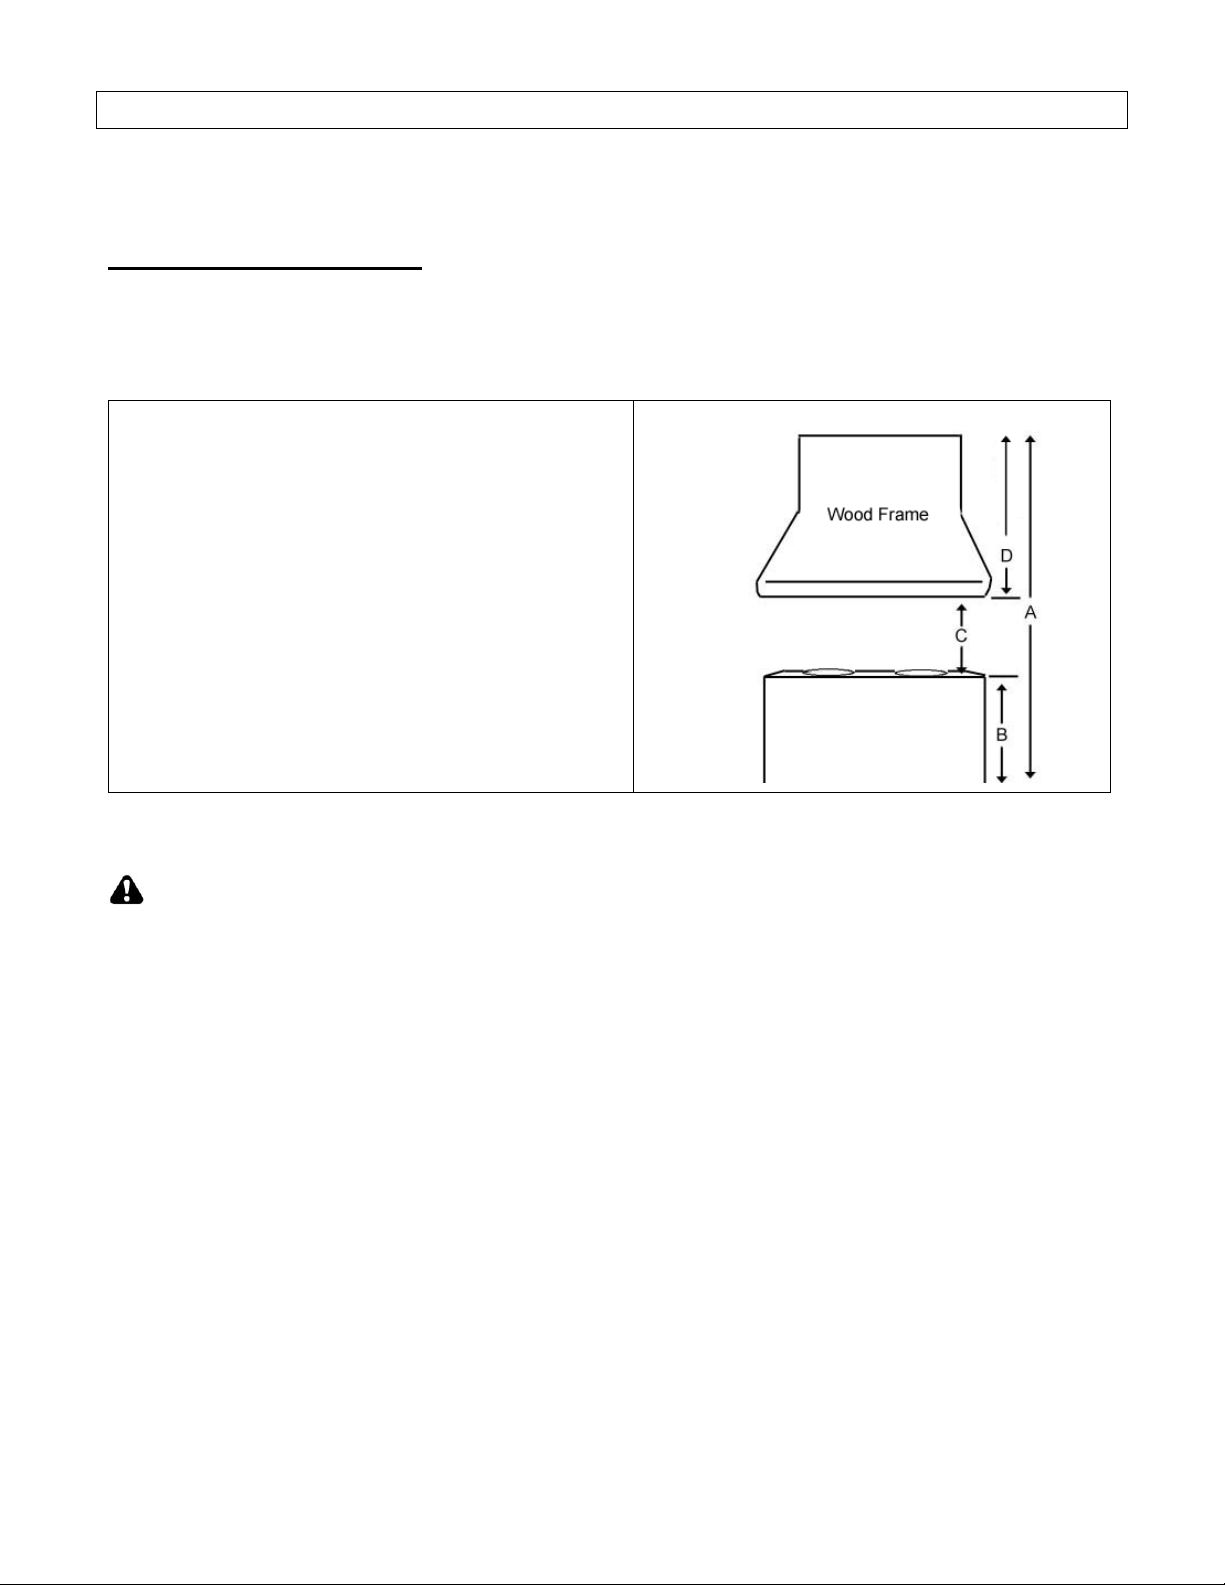
TABLE 1
PLEASE READ ENTIRE INSTRUCTIONS BEFORE PROCEEDING
Calculation before Installation
To calculate installation, please refer to TABLE 1. (All calculation in inches.)
- FOR UNDER THE CABINET -
A = Height of Floor to Ceiling
B = Height of Floor to Counter Top
(Standard: 36")
C = Height of Counter Top to Wood Frame
Bottom (Recommended 26" to 30")
D = Height of Wood Frame
SAFETY WARNING
HOOD MAY HAVE VERY SHARP EDGES; PLEASE WEAR PROTECTIVE GLOVES IF
REMOVING ANY PARTS FOR INSTALLING, CLEANING OR SERVICING.
NOTE: BE CAREFUL WHEN USING ELECTRICAL SCREWDRIVER, DAMAGE TO THE HOOD MAY
OCCUR.
4
Page 8
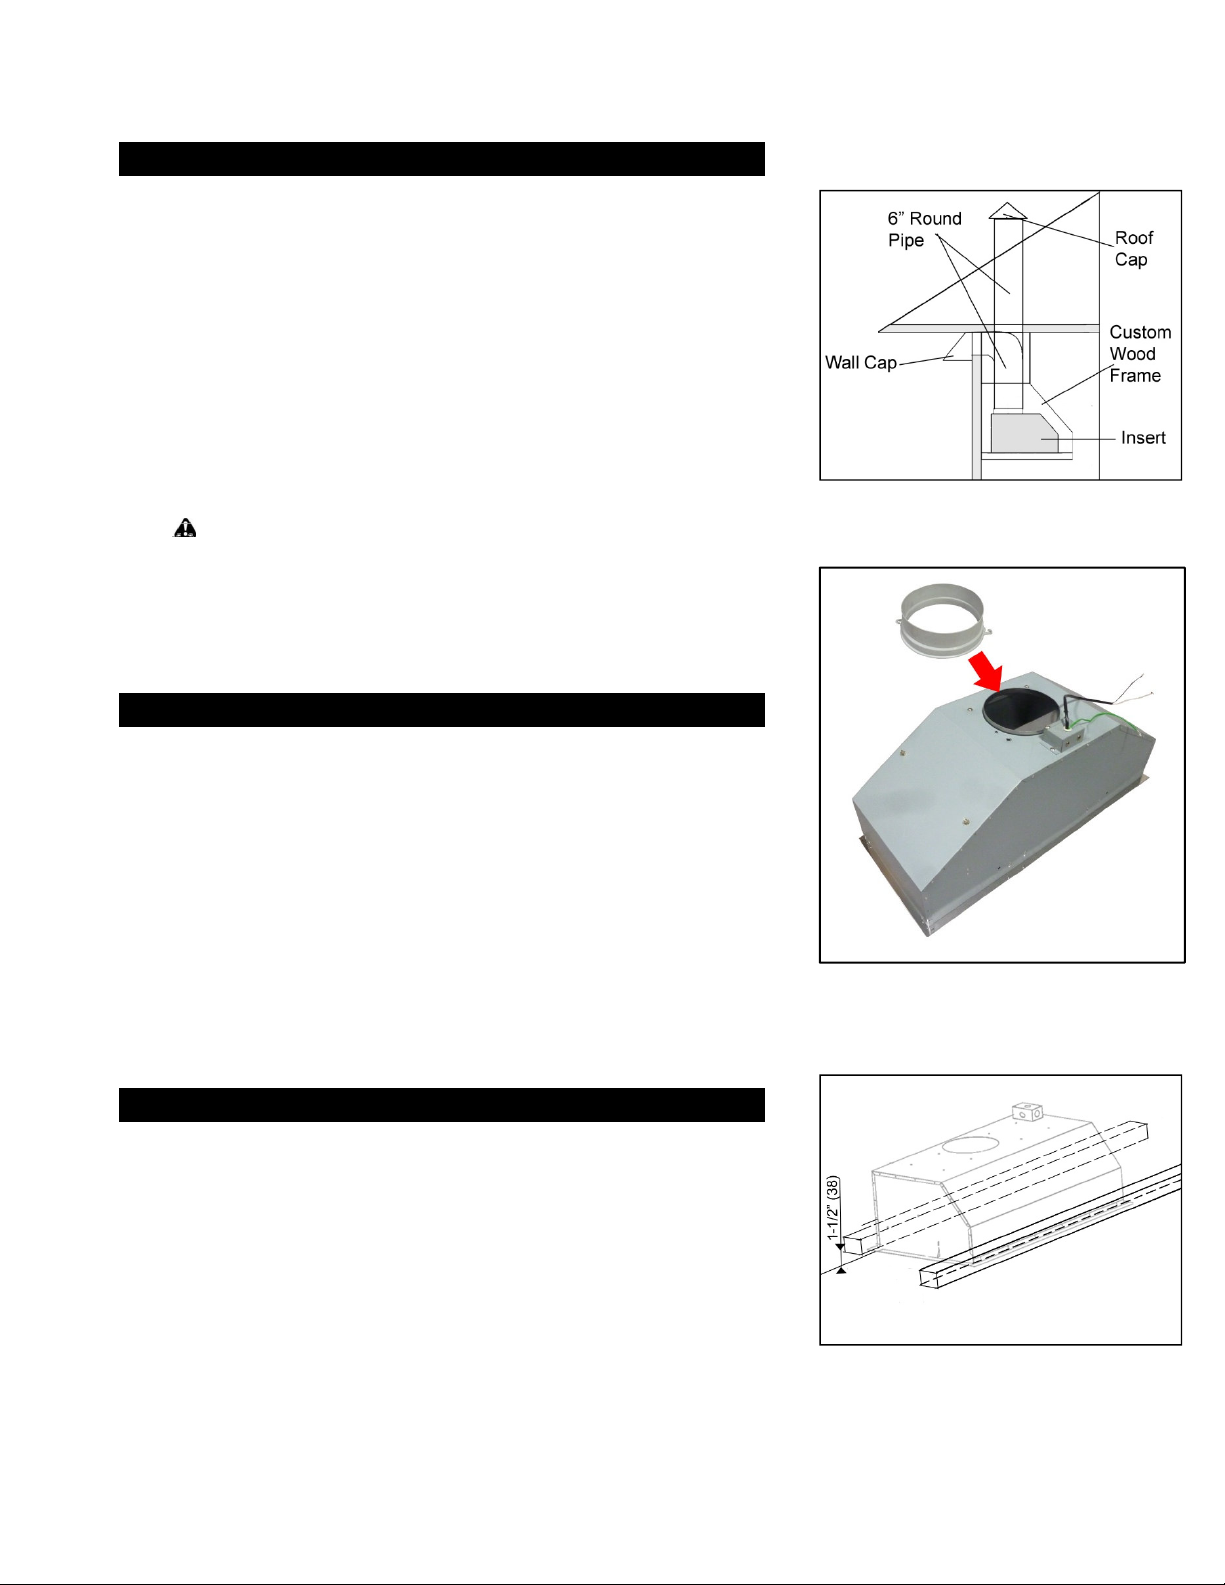
- For Insert installation -
screws.
It is recommended to install a rear and front stud support.
Preparation Before Installation
NOTE: TO AVOID DAMAGE TO YOUR HOOD, PREVENT
DEBRIS FROM ENTERING THE VENT OPENING.
•
Decide the location of the venting pipe from the hood to
the outside. Refer to Figure 1.
•
A straight, short vent run will allow the hood to perform
more efficiently.
•
Try to avoid as many transitions, elbows, and long run as
possible. This may reduce the performance of the hood.
•
Temporarily wire the hood to test for proper operation
before installing.
•
Important: Peel protective film off the hood, if any.
•
Use duct tape to seal joints between pipe sections.
CAUTION
necessary to install the hood, turn off the power in an
electric range at the main electrical box. SHUT OFF THE
GAS BEFORE MOVING A GAS RANGE. And use a
protective covering to protect cook top and/or
countertop from damage.
: If moving the cooking range is
Figure 1
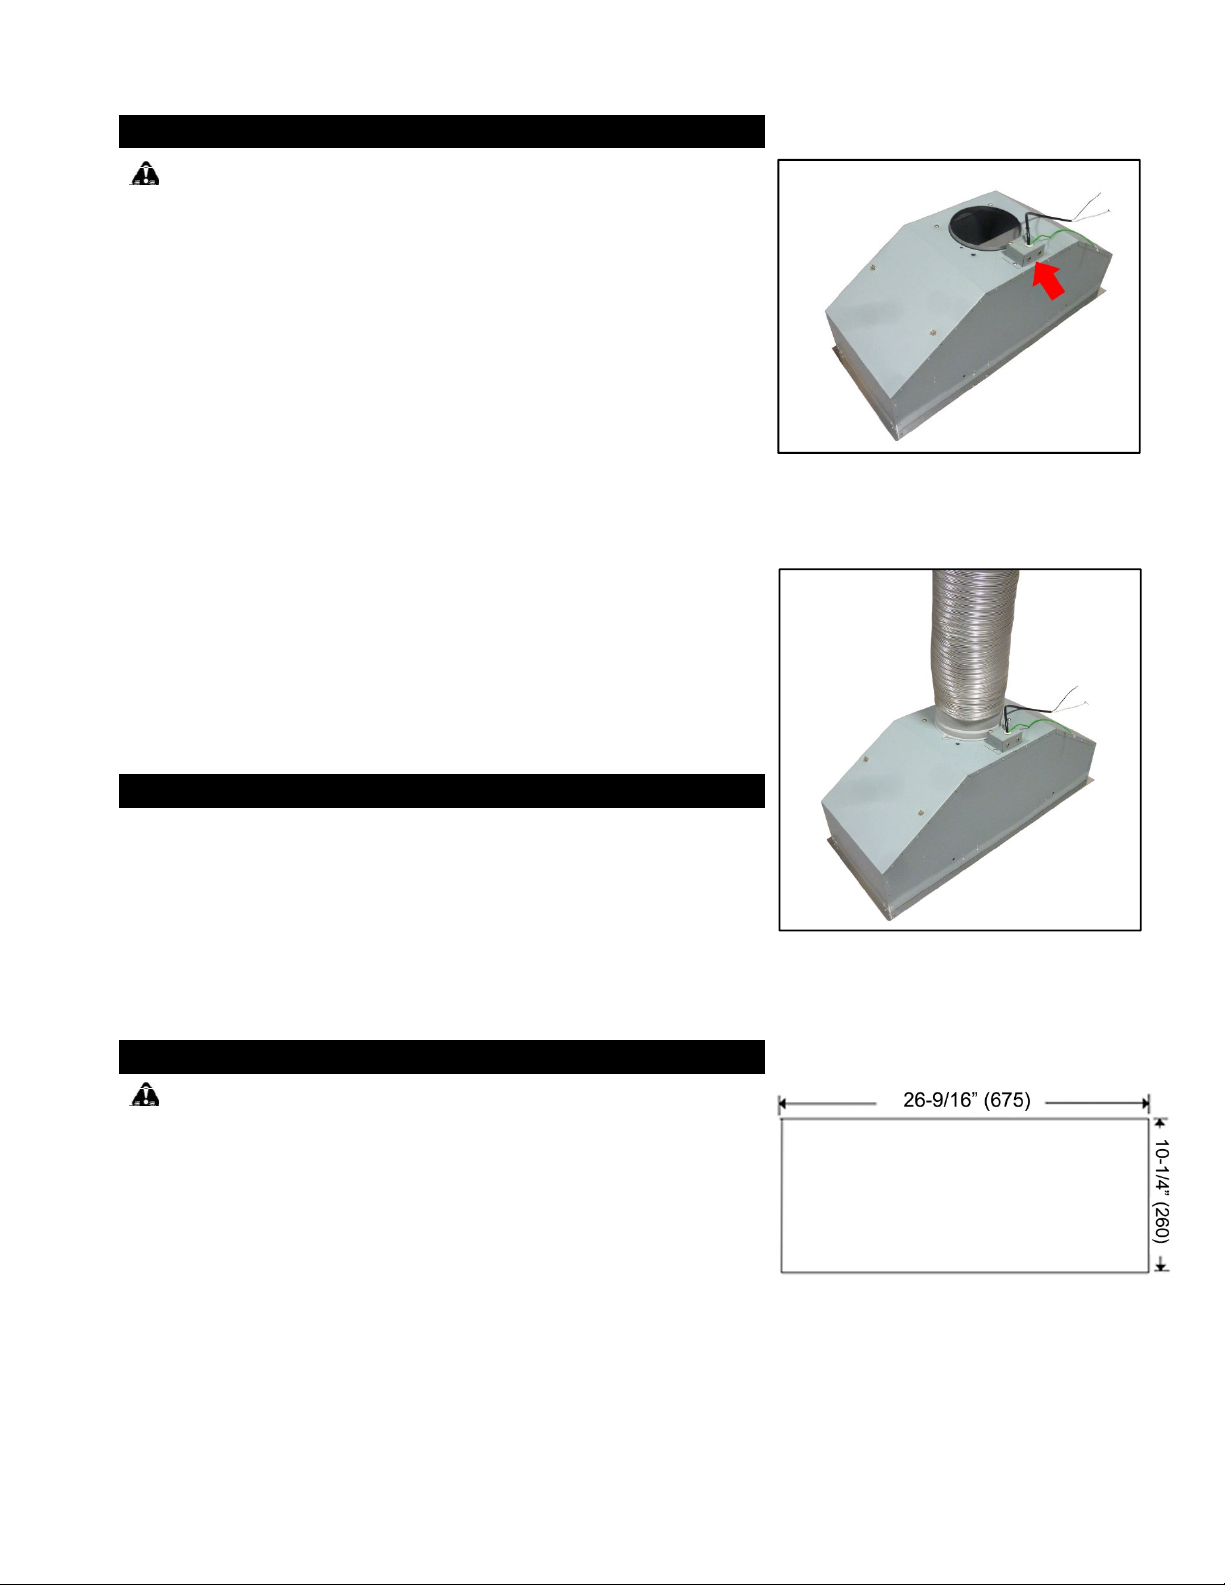
Figure 2
Custom Hood Preparation
1. The custom hood frame must be sized to shape and the
weight of the insert. Refer to Measurements and
Diagrams on Page 11.
2.
Install 6” Round Plastic Collar
Refer to Figure 2.
3. It must have a sturdy base (1/2 inch thick plywood
recommended) to sustain the weight of insert.
4. If an optional liner will be installed, the side of the wood
cabinet must be sturdy (1/2 inch thick plywood
recommended).
5.
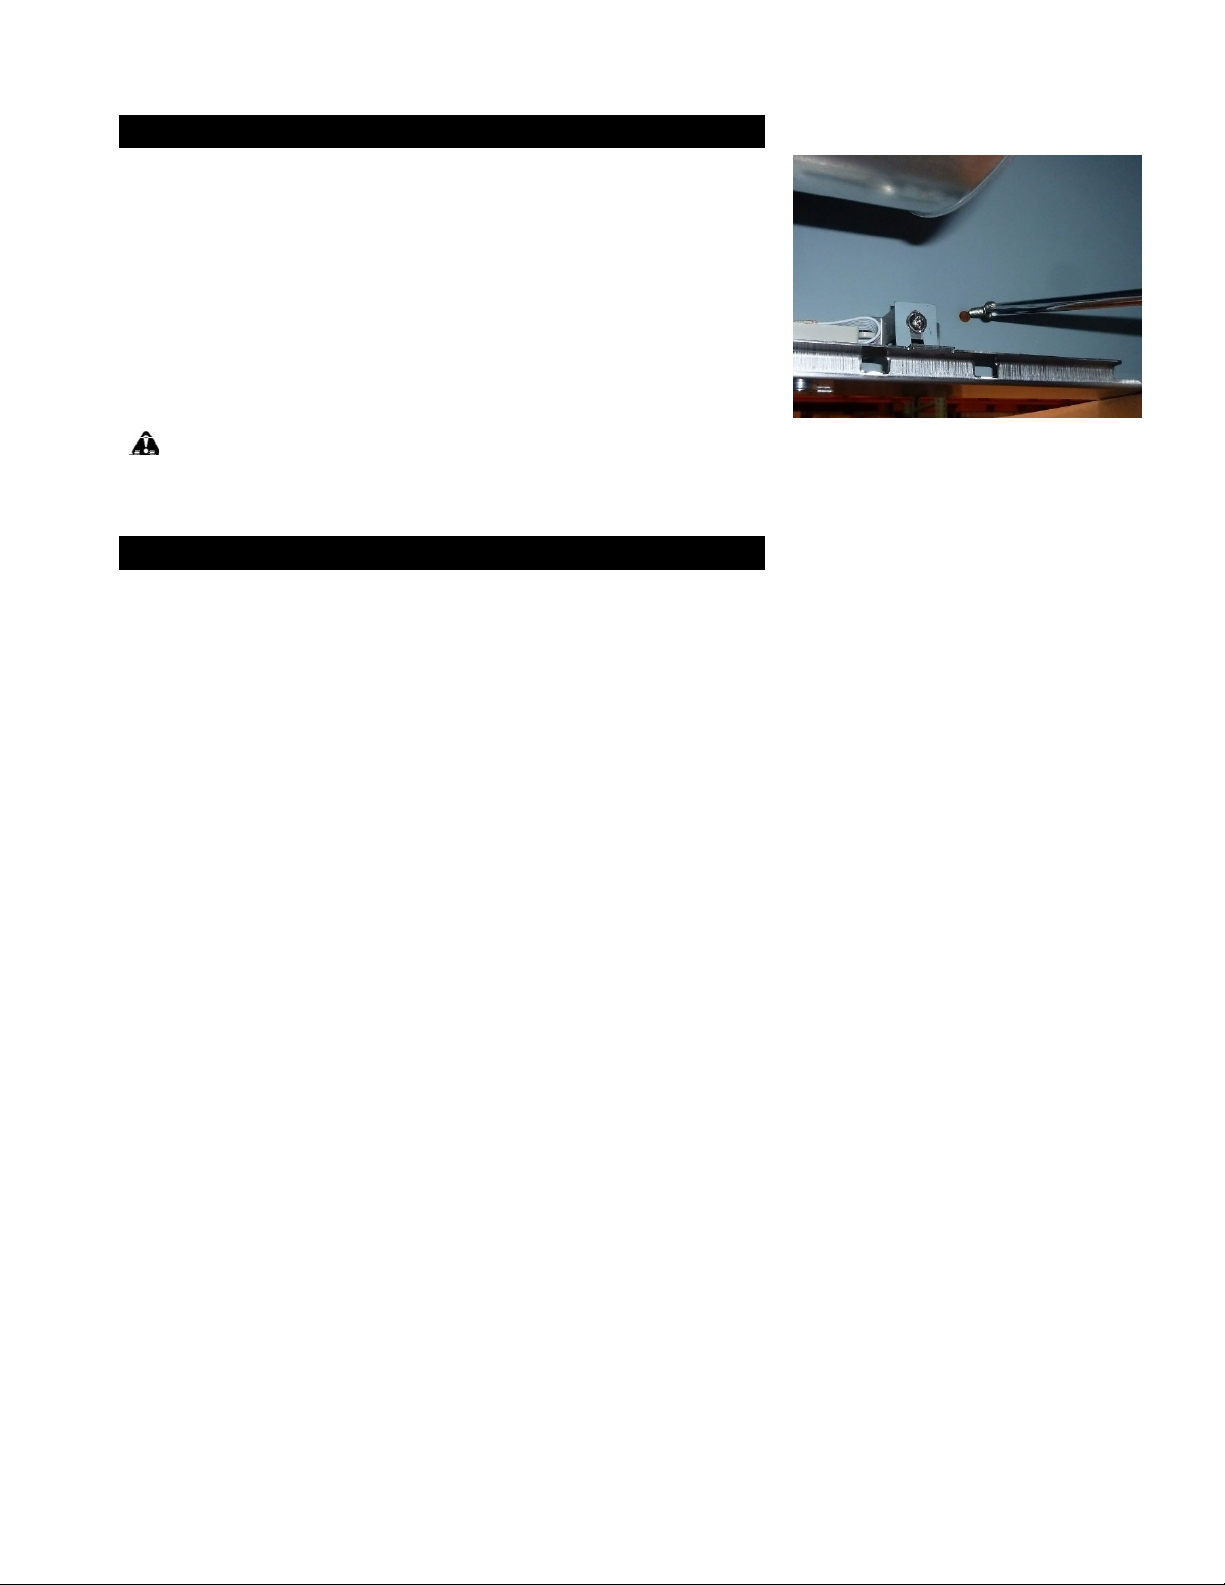
Refer to Figure 3. The stud supports are located 1-1/2”
up from the base of the wood frame.
using 2 attached
Liner Installation
6. The custom/wood hood must have a sturdy base to
accommodate the cut-out for the inset. The base must be
recessed to accommodate the height of the liner (See liner
dimension on Page 12)
7. Secure the liner to the bottom of the base using screws
(not included) appropriate for the size and material of your
wood frame.
8. Position the liner so that it aligns with the back edge of the
custom wood frame. Use a pen to trace the outline of the
pre-cut area. Remove the liner and proceed to Hood
Preparation before Installation on Page 6.
9. Install the liner with 5 screws (not provided).
Figure 3
5
Page 9
Wiring to Power Supply
APPLICABLE NATIONAL AND LOCAL ELECTRICAL CODES.
connect the ducting on the hood to the ductwork above.
SAFETY WARNING
RISK OF ELECTRICAL SHOCK. THIS RANGE HOOD MUST
BE PROPERLY GROUNDED. MAKE SURE THIS IS DONE BY
QUALIFIED ELECTRICIAN IN ACCORDANCE WITH ALL
BEFORE CONNECTING WIRES, SWITCH POWER OFF AT
SERVICE PANEL AND LOCK SERVICE PANEL TO PREVENT
POWER FROM BEING SWITCHED ON ACCIDENTALLY.
10. Temporarily wire the hood to test for proper operation
before installing. If the insert does not operate, check the
circuit breaker or house fuse. If the insert is still not
working, disconnect the power supply and check the
continuity of all wiring connections.
11. Connect electrical wires.
12. Connect three wires (black, white and green) to house
wires and cap with wire connectors. Connect wires
according to their colors (i.e. black to black, white to white,
and green to green). See Figure 4.
13. Store wires in the wiring box.
Note: Connect all electrical wires before installing insert. DO
NOT turn on the power until installation is complete.
Duct Work Installation
14. Use 6” steel pipe (follow building codes in your area) to
Use duct tape to seal and secure joints as shown in
Figure 5.
15. Please refer to local codes for the usage of a damper (not
included).
Hood Preparation Before Installation
CAUTION
to install the hood, turn off the power in an electric range at
the main electrical box. SHUT OFF THE GAS BEFORE
MOVING A GAS RANGE.
16. Determine and mark the centerlines on the base of the
wood frame where the insert will be installed.
17. Determine and make all necessary cuts in the wall or
ceiling for the ductwork. Note: Install the duct work
before installing the insert.
18. Cut out the opening where the insert will be installed.
Figure 6
: If moving the cooking range is necessary
Figure 4
Figure 5
Figure 6
6
Page 10
Hood Installation
Locate the screw holes (4) on each side of the insert.
19. Slide the hood to the opening where it will be installed.
20.
Adjust the level of the hood casing support according to
the thickness of the base (1/2 thickness plywood
recommended – Refer to Figure 3).
21. Secure the hood using screws holes that are located in
front and back of unit (Screws provided) Figure 7
22. Make sure the hood casing support is secure before
releasing.
CAUTION
: MAKE SURE HOOD IS SECURE BEFORE
RELEASING.
Final Assembly
23. Install Baffle Filters. Insert the filters towards the back
of the unit and push up.
24. Make sure the Baffle Filters are secure before
releasing.
Figure 7
7
Page 11
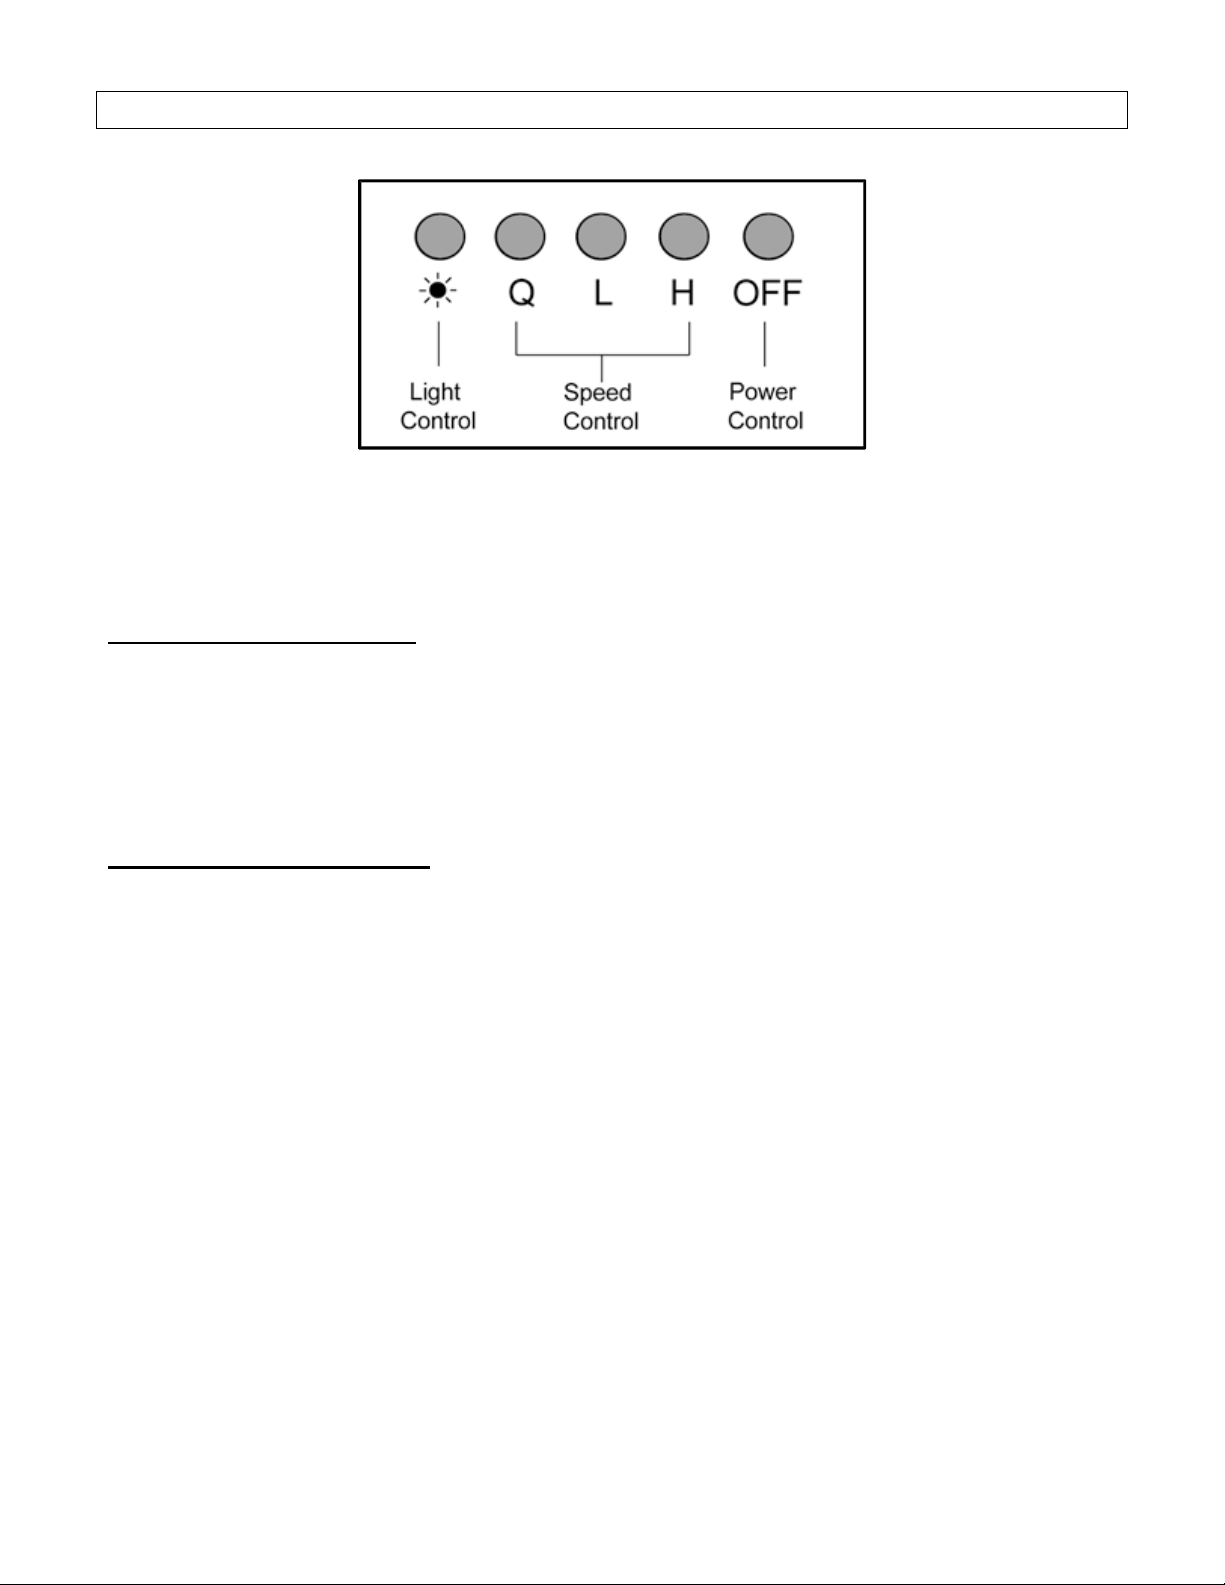
OPERATING INSTRUCTIONS
Note: For best results, turn fan on prior to any preparation or cooking and keep fans running while
cooking. Adjust speed as needed.
To operate the fan function
•
Press button to choose from speed.
o Q = QuietMode™ speed
o L = Low speed
o H = High speed
•
Press
“OFF”
to turn fan off.
To operate the light function
•
Press the Light Control to turn lights on and off.
8
Page 12

MAINTENANCE
SAFETY WARNING
NEVER PUT YOUR HAND INTO AREA HOUSING THE FAN WHILE THE FAN IS
OPERATING.
Cleaning Hood Surface
CAUTION
:
NEVER USE ABRASIVE CLEANERS, PADS, OR CLOTHS. DO NOT USE
PAPER TOWEL ON STAINLESS STEEL.
For optimal operation, clean range hood and all baffle/spacer/filter/oil tunnel/oil container regularly.
*** Regular care will help preserve the appearance of the hood.
1. Use only mild soap or detergent solutions. Dry surfaces using soft cloth.
2. If hood looks splotchy (stainless steel hood), use a stainless steel cleaner to clean the surface of
the hood. Avoid getting cleaning solution onto or into the control panel. Follow directions of the
stainless steel cleaner. Caution: Do not leave on too long as this may cause damage to
hood finish. Use soft towel to wipe off the cleaning solution, gently rub off any stubborn spots.
Use dry soft towel to dry the hood.
3. DO NOT allow deposits to accumulate or remain on the hood.
4. DO NOT use ordinary steel wool or steel brushes. Small bits of steel may adhere to the surface
and cause rusting.
5. DO NOT allow salt solutions, disinfectants, bleaches, or cleaning compounds to remain in contact
with stainless steel for extended periods. Many of these compounds contain chemicals, which
may be harmful. Rinse with water after exposure and wipe dry with a clean lint free cloth.
To Clean Baffle Filter
1. Remove all the baffle filters.
2. Wash with warm soapy water. Dry thoroughly before returning into place.
9
Page 13

MODEL / SIZE
COLOR
CONSUMPTION / AMPERE
VOLTAGE
NUMBER OF MOTORS
FAN TYPE: CENTRIFUGAL
EXHAUST
CONTROLS
HALOGEN LIGHTS
HOOD DIMENSION
OPTIONAL ACCESSORIES
HOOD WEIGHT (lbs)
Sone
SPECIFICATIONS
(W X D X H)
INX2730SQB-700-2
Commercial Stainless Steel
300W / 2.5A
120V 60Hz
1
Single Horizontal Squirrel Cage
Top 6” Round
Mechanical Push Button
3W-LED x 2
27-9/16” x 11-1/4” x 10-1/4”
(W X D X H)
Blower Air Capacity (CFM)
* One Sone is equivalent to 40 decibels.
**Specifications subject to change without notice.
Liner: INL36211A (36” X 21” X 2”)
Net Gross
INX2730SQB-700-2
QuietMode™ Low High
300 440 750
1.0 2.2 5.6
21.6 26.5
10
Page 14
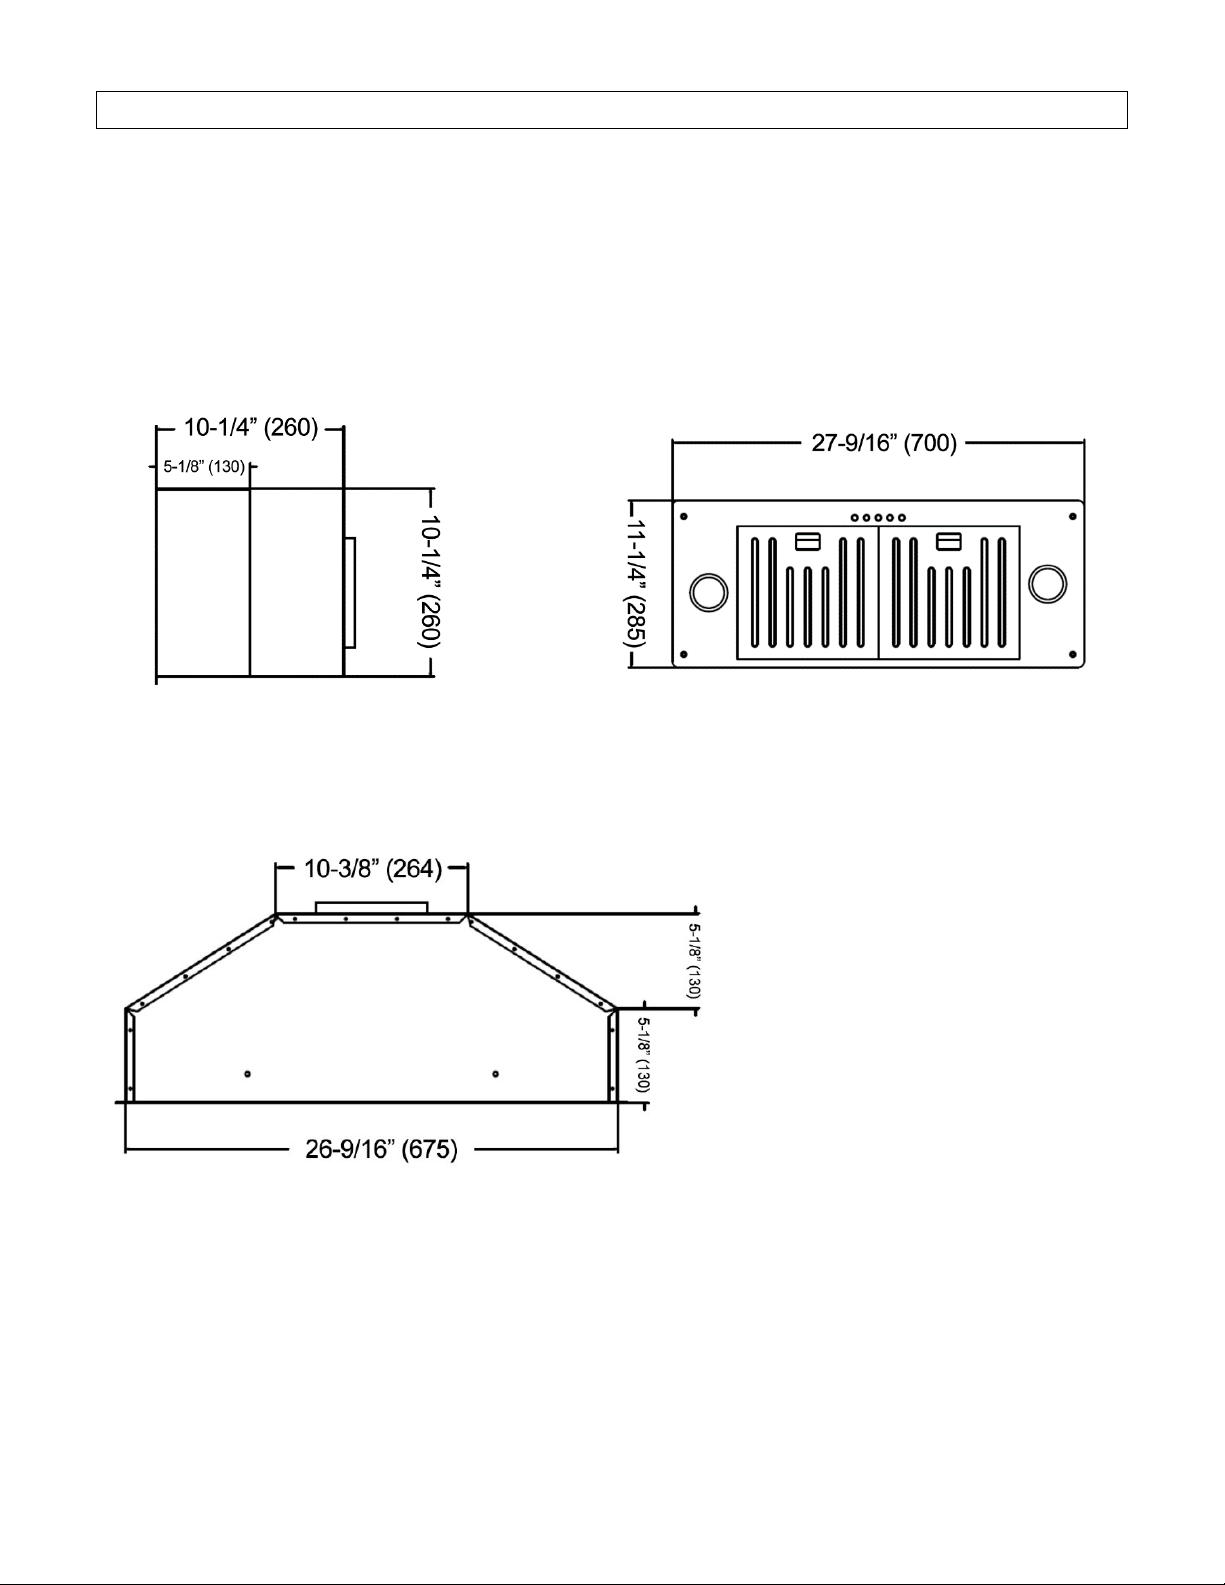
MEASUREMENTS & DIAGRAMS
All ( ) are in millimeter.
All inch measurements are converted from millimeters. Inch measurements are estimated.
MODEL NO: INX2730SQB-700-2
Side View Bottom View
Front View
11
Page 15
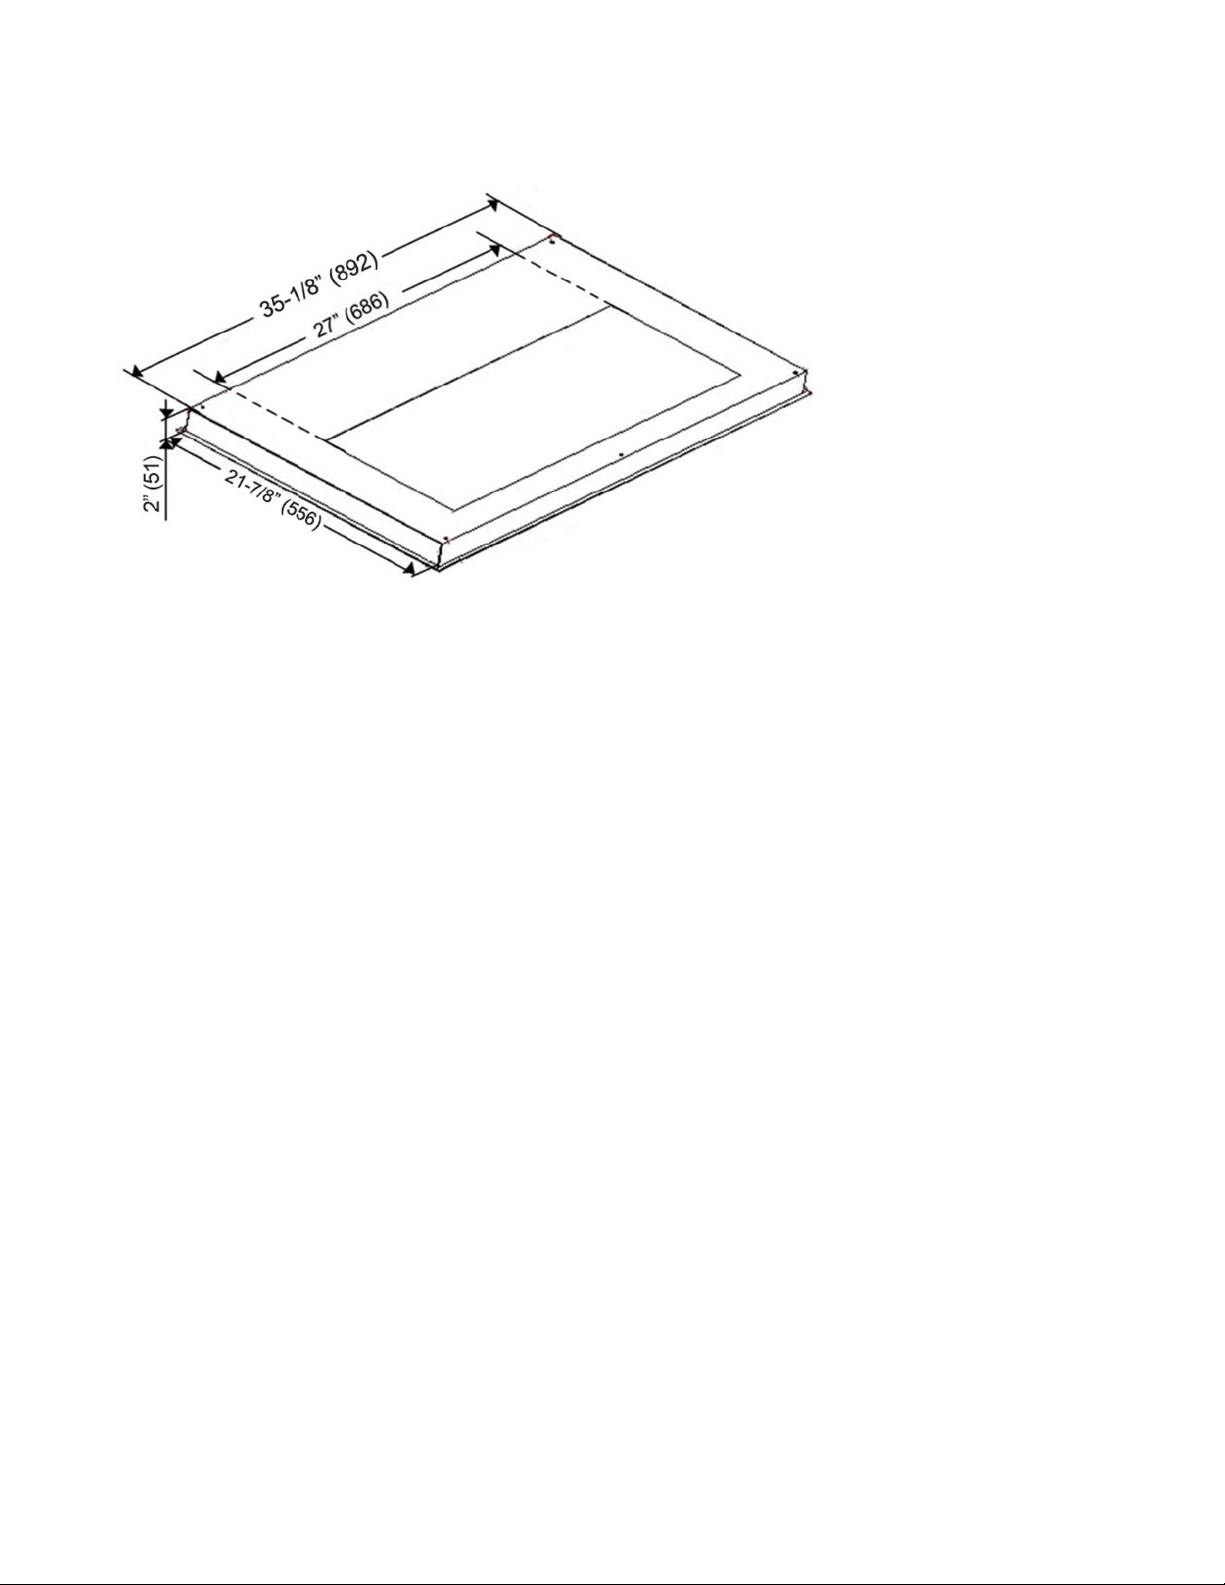
Stainless Steel Liner (Sold Separately)
Model No. INL36211A
12
Page 16
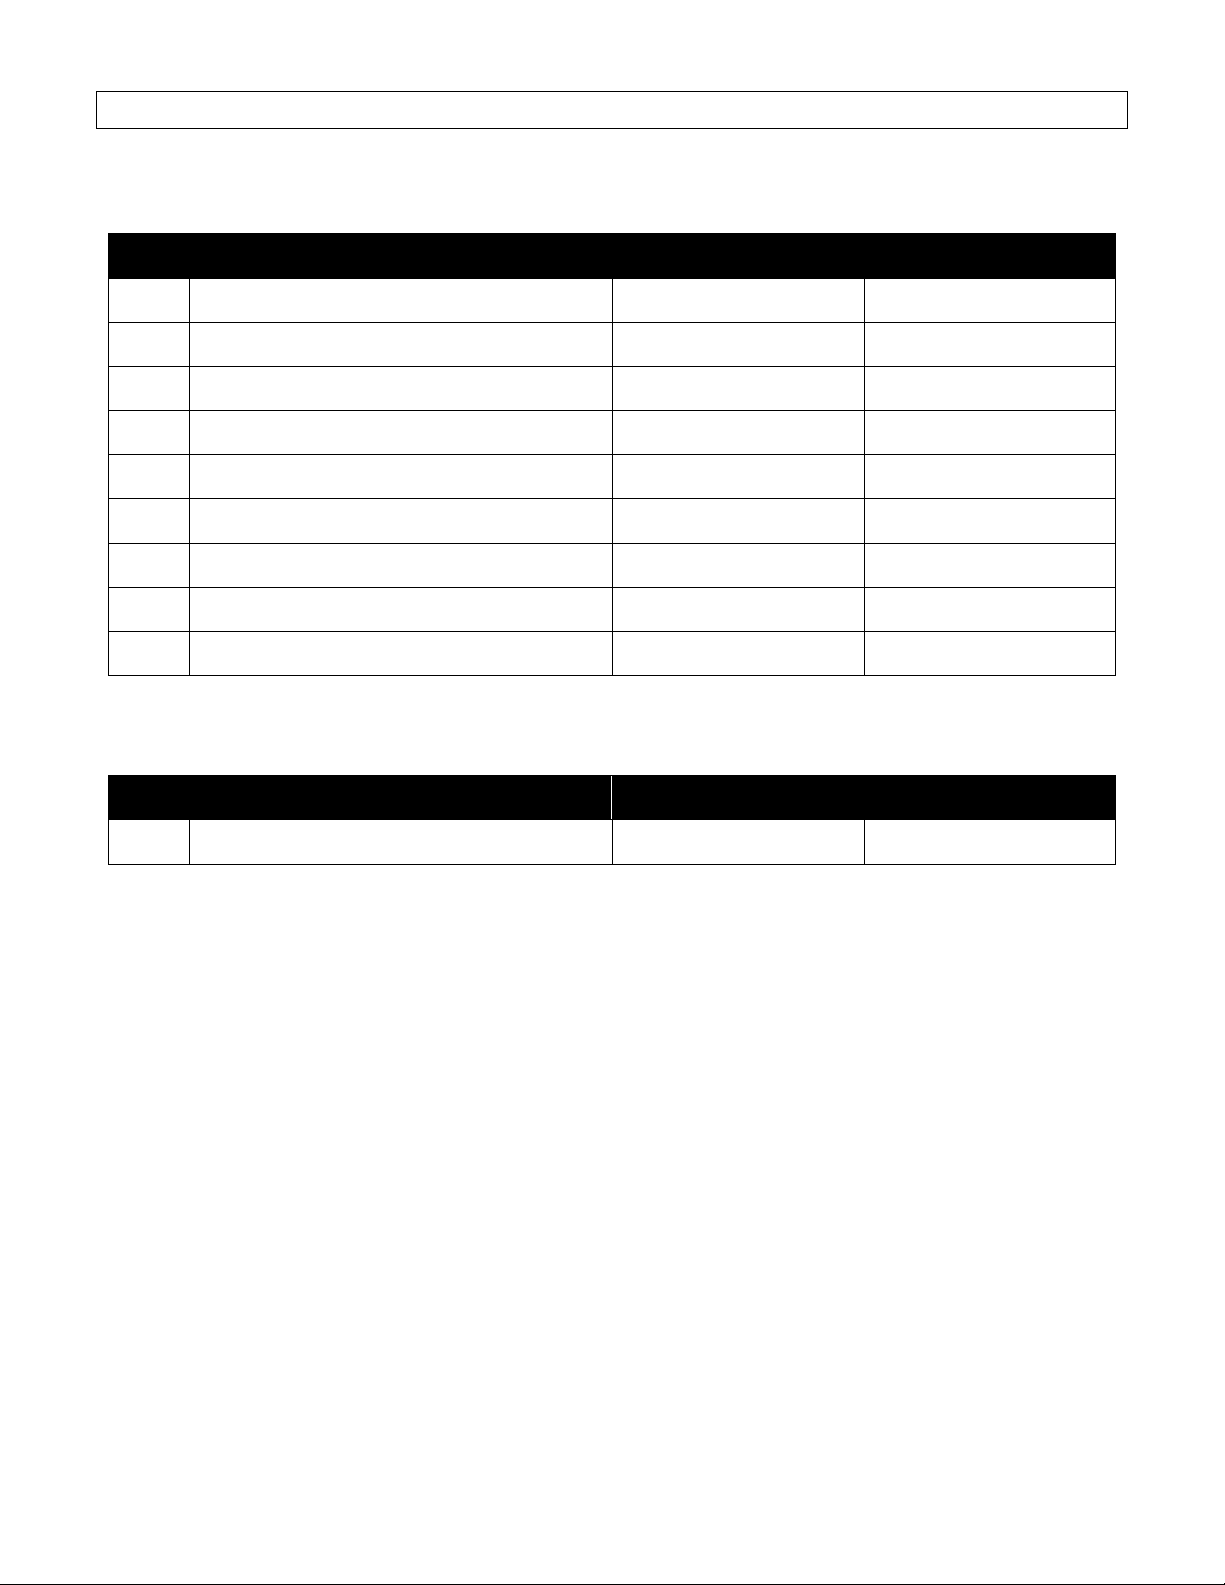
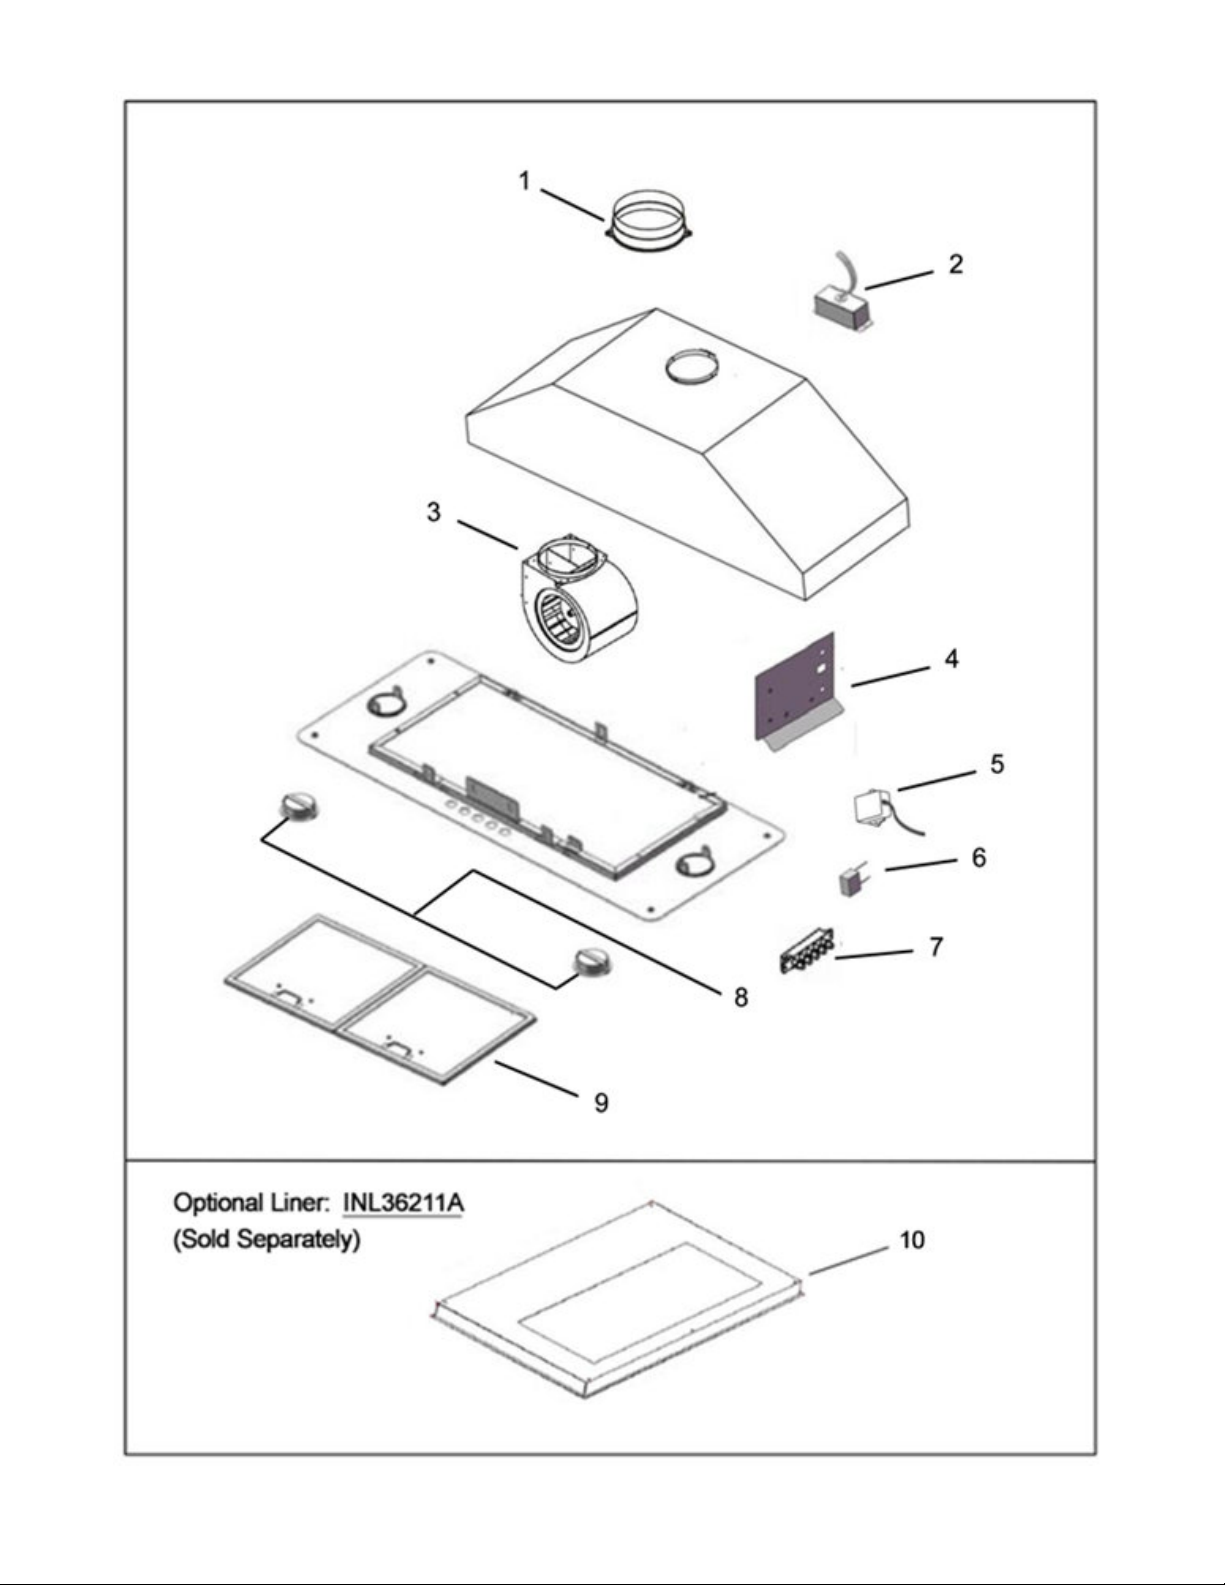
PARTS LIST
MODEL NO: INX2730SQB-700-2
NO. DESCRIPTION MODEL /SIZE PART NO.
1
6” Round Plastic Exhaust
2
Wiring Box
3
Blower System
4
Electronic Support Panel
5
LED Light Driver
6
Capacitor x 1PCS
7
Control Switch
8
LED Light (3W)
9
Baffle Filter
L1-0505-0003
L1-0231-2730
L1-0302-0120-802RO
L1-0201-2730
L1-0402-D001
L1-0401-0120-24
L1-0405-0301
L1-0403-0301
L1-0604-0027-B
Optional Liner
NO. DESCRIPTION MODEL /SIZE PART NO.
10
Liner INL36211A
IN2730-11-01
13
Page 17
14
Page 18
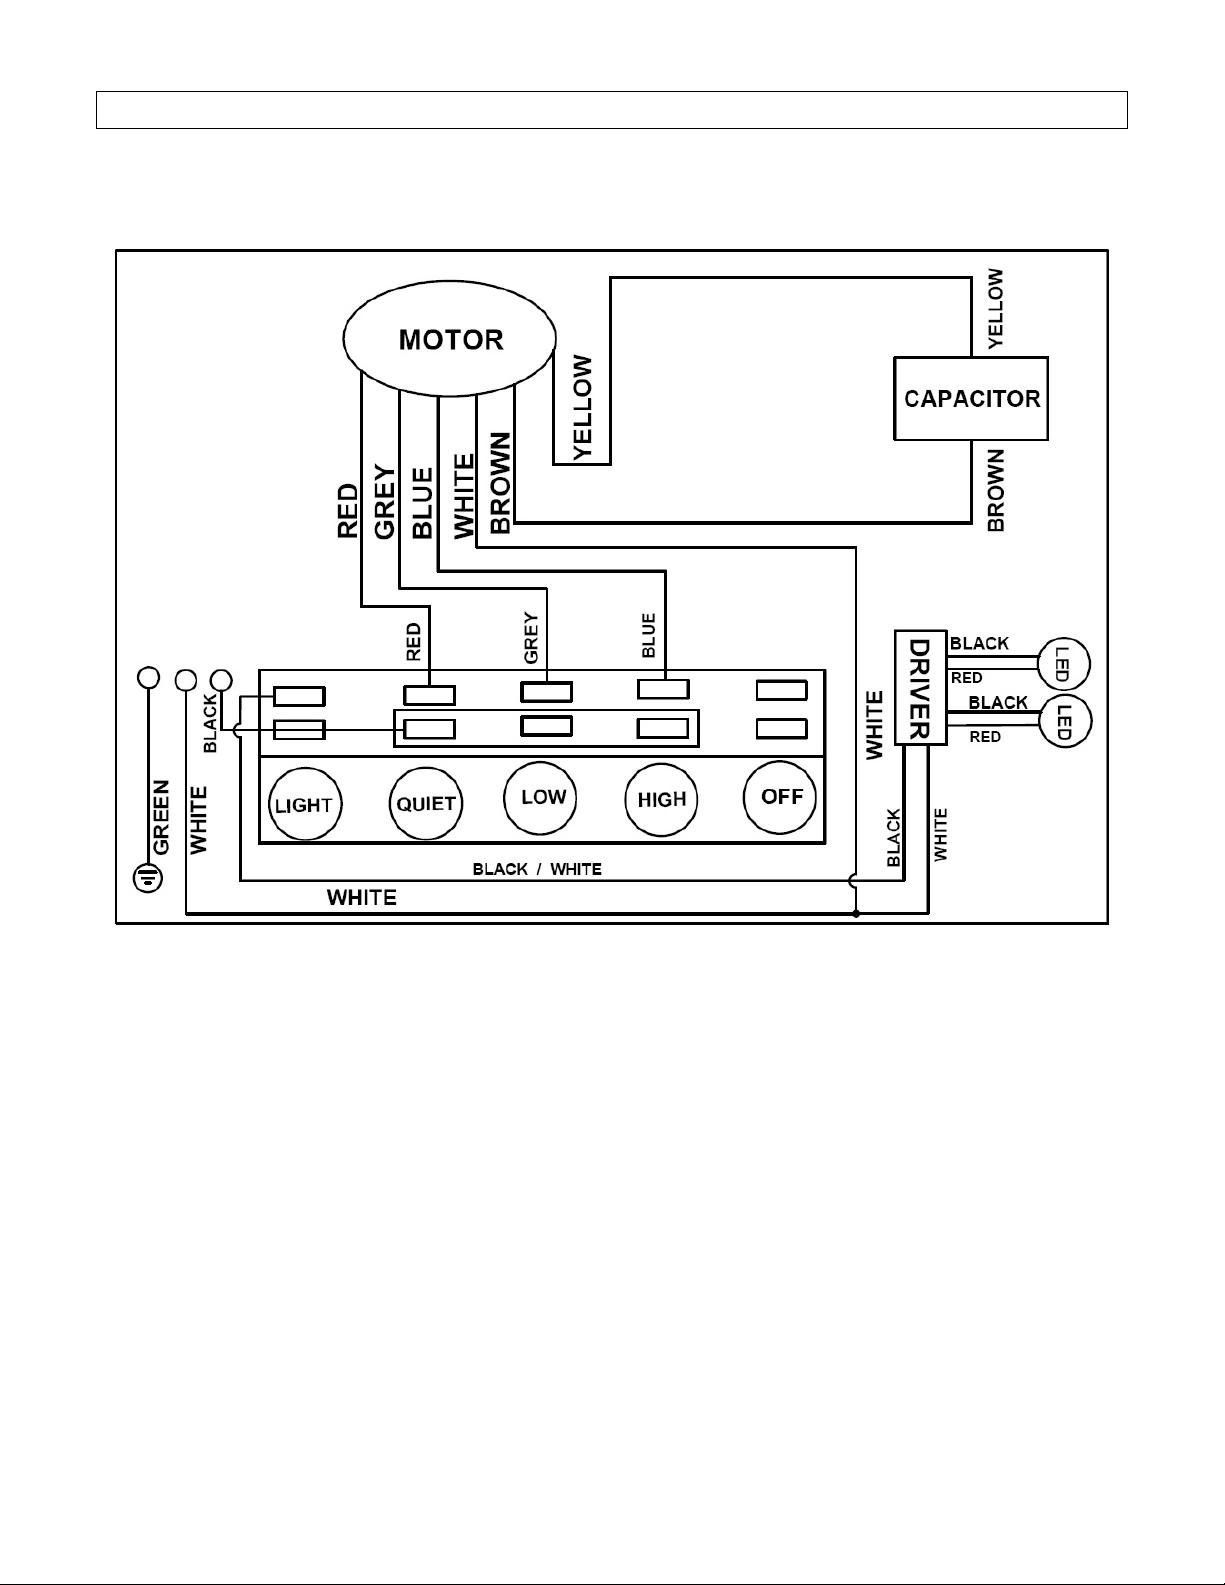
CIRCUIT DIAGRAM
MODEL NO.: INX2730SQB-700-2
15
Page 19
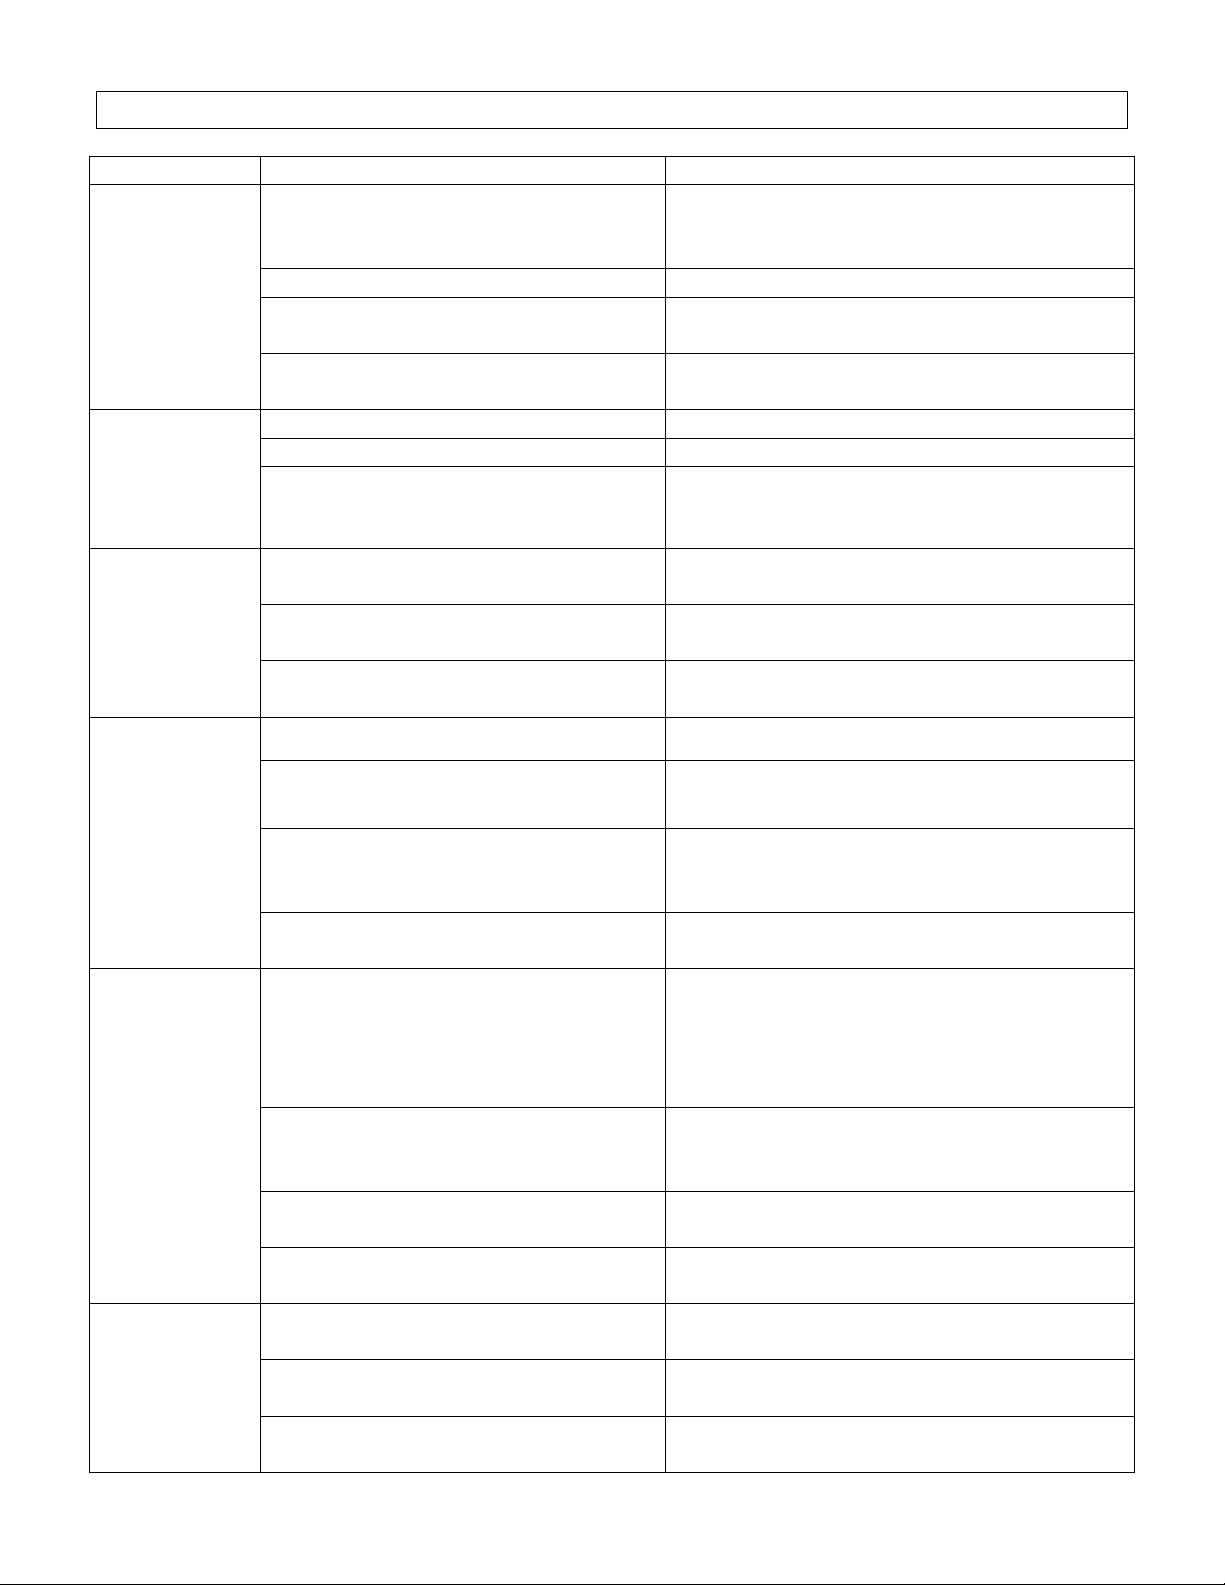
TROUBLE SHOOTING
Issue
Possible Cause
Solution
After
Installation,
both motors
and lights are
not working.
Lights are
working, but
motor(s) is
not.
The range
hood is
vibrating.
The motor is
working, but
the lights are
not working.
The range
hood is not
venting out
correctly.
Cold air is
coming into
the home.
The power is not on. Make sure the circuit breaker and the
unit’s power is ON. Use a voltage meter
to check the power supply.
The wire connection is not secure. Check and tighten wire connection.
The control panel and processor
board wiring are disconnected.
The control panel and processor
board is defective.
The motor(s) is defective. Replace the motor.
The capacitor(s) is defective. Replace capacitor(s).
The control panel or processor
board is defective.
The blower system is not secure.
The turbine impeller/squirrel cage is
not balanced.
Hood is not secured in place. Check the installation of hood, tighten the
LED driver is defective Replace LED Driver
LED light fixture(s) is defective Replace LED light fixture(s)
The light wiring(s) is loose.
The control panel or processor
board is defective.
The range hood is installed outside
of the manufacture recommended
clearance.
There is no make-up air inside the
house.
Obstacle blocking the pipe work.
The pipe size is smaller than the
suggested pipe size.
The pipe connection is not properly
sealed.
The damper is not properly installed
or is missing from the installation.
The damper is not installed. Installing the damper will help eliminate
Check wire continuity from control panel
to processor board.
Replace the control panel or processor
board.
Replace the control panel or processing
board.
Tighten the turbine impeller/squirrel cage
and air chamber.
Replace the turbine impeller/squirrel
cage.
mounting bracket.
Check wire continuity from processor
board to light transformer to LED light
fixture(s).
Replace the control panel or processing
board.
Adjust the clearance between the range
hoods and cook top to 26” to 30”. For
Island range hood, the clearance between
the range hoods and cook top is 30” to
36”.
Open the window to enhance the
performance of the range hood by
creating a sufficient make-up air.
Remove all obstacles from the duct work.
Change the ducting according to the
manufacture suggestion.
Check the pipe installation.
Check the damper installation.
air backflow.
16
Page 20

WARRANTY
WARRANTY CERTIFICATE
In order to obtain warranty service, you must provide proof of original purchase from a
KOBE authorized Dealer. Please keep a copy of your original invoice as proof of
purchase.
ONE-YEAR LIMITED LABOR WARRANTY ON KOBE BRILLIA SERIES:
For one year from the date of your original invoice from a KOBE authorized dealer, we will repair any
parts or components free of charge that failed due to manufacturing defects. KOBE reserves the right to
replace, rather than repair the product free of charge at our sole discretion.
It is your sole responsibility to ensure the product is readily accessible for the service technician to
perform repairs. The service technician will not, under any circumstance, remove, alter or modify
any fixture built around and/or connected to the product to gain access to perform repairs.
TWO-YEAR LIMITED PARTS WARRANTY ON KOBE BRILLIA SERIES:
For two years from the date of your original invoice from a KOBE authorized dealer, we will provide nonconsumable replacement parts or components free of charge that failed due to manufacturing defects.
Consumable parts such as lights bulbs, filters, fuses, and oil cups are not covered by this warranty.
WHAT IS COVERED:
This warranty is valid in the United States and Canada. It is non-transferable and applies only to the
original purchaser and does not extend to subsequent owner of this product. In Hawaii, Alaska and
Canada, this warranty is limited. There may be additional shipping charges for parts and service
technician travel costs in remote areas or locations 30 miles outside of KOBE authorized service area.
WHAT IS NOT COVERED:
1. Normal wear and tear, regular service and maintenance required for the product.
2. Consumable parts such as light bulbs, filters, fuses, and oil cups.
3. Chips, scratches or dents due to abuse or misuse of the product, use of corrosive and abrasive
cleaning products.
4. Damages caused by accident, fire, flood and other Acts of God.
5. Services in remote areas or locations 30 miles outside of KOBE authorized service area.
6. Labor cost incurred in connection with the removal of range hood, and reinstallation of
replacement range hood, nor does it cover any other contingent expenses.
7. Scratches inside the hood, back of the baffle filter, and inside the duct cover.
THIS WARRANTY WILL BE VOIDED WHEN:
1. Improper installation and failure to follow installation instructions.
2. Any repair, alteration, modification not authorized by KOBE.
3. Duct alteration, modification and connection.
4. Incorrect electric current, voltage or wiring.
5. Improper usage of the product such as commercially, outdoor or other usage other than its
intended purpose which is residential indoor usage only.
17
Page 21

6. Product is purchased from an unauthorized KOBE dealer.
7. Product is damaged due to negligence, misuse, abuse, accident.
If we determine that the warranty exclusions listed above applies or if you fail to provide all necessary
documentation for warranty service, you will be responsible for all expenses associated with the
requested service, including parts, labor, shipping, travelling, and any other expense related to the
service request.
TO REQUEST WARRANTY SERVICE, PLEASE CONTACT KOBE RANGE HOODS SERVICE
CENTER:
From the 48 contiguous states:
Toll Free: 1-877-BUY-KOBE (289-5623)
E-Mail: [email protected]
From Alaska, Hawaii, and Canada:
TEL: 1-626-775-8880
E-Mail: [email protected]
18
Page 22
WARRANTY INFORMATION FORM
Fill in the blanks and keep this paper with the original invoice in a
safe place for future service purpose.
1. Date of purchase :
2. Model No. :
3. Serial No. :
For warranty service or spare parts purchase contact:
KOBE Service Center (USA ONLY)
Toll Free: 1-877-BUY-KOBE (289-5623)
Email: [email protected]
For service in Canada and to report a problem, please contact:
Phone: 1-626-775-8880
Email: [email protected]
Your notes:
19
Page 23

only. We do not recommend
using this hood overseas as the power supply may not be compatible and may violate the
Using a KOBE hood overseas is at your own risk and
Unis et au Canada seulement. Il
n’est pas recommandé d’utiliser cette hotte à l’étranger puisque l’alimentation électrique
L’usage
Esta campana de extracción KOBE ha sido fabricada para ser utilizada únicamente en
EE.UU. y CANADÁ. No recomendamos la utilización de esta campana en el extranjero
energía podría no ser compatible y podría violar el código
Utilizar una campana KOBE en el extranjero será a su propio
KOBE Range Hoods
11775 Clark Street
Arcadia, CA 91006 USA
www.koberangehoods.com
This KOBE hood is made for use in the USA and CANADA
electrical code of that country.
will void your warranty.
Cette hotte KOBE est fabriquée pour usage aux Étatspourrait ne pas être compatible et enfreindre le code de l’électricité de ce pays.
de la hotte KOBE à l’étranger est à votre propre risque et la garantie sera annulée.
debido a que la fuente de
eléctrico de dicho país.
riesgo y anulará la garantía.
Ver. 170301
Information subject to change without notice.
 Loading...