

Page 1
KOBE
I
NDU STR IAL
POWER TOOLS
Always dispose of unwanted tools, accessories and packaging materials in an environmentally
friendly manner.
In observance of European Directive 2002/96/EC on Waste Electrical and Electronic Equipment
(WEEE) and its implementation in accordance with national law, electrical goods that have reached
the end of their life must be collected separately and returned to an environmentally compatible
recycling facility.
Do not dispose of electrical goods with domestic waste materials as inappropriate disposal may
cause potential hazards to the environment and human health.
For further information, please contact your local authority or the retailer from whom you purchased
the product.
This product does not contain any restricted substances in concentrations and applications which
are banned by the European RoHS Directive.
THE ENVIRONMENT
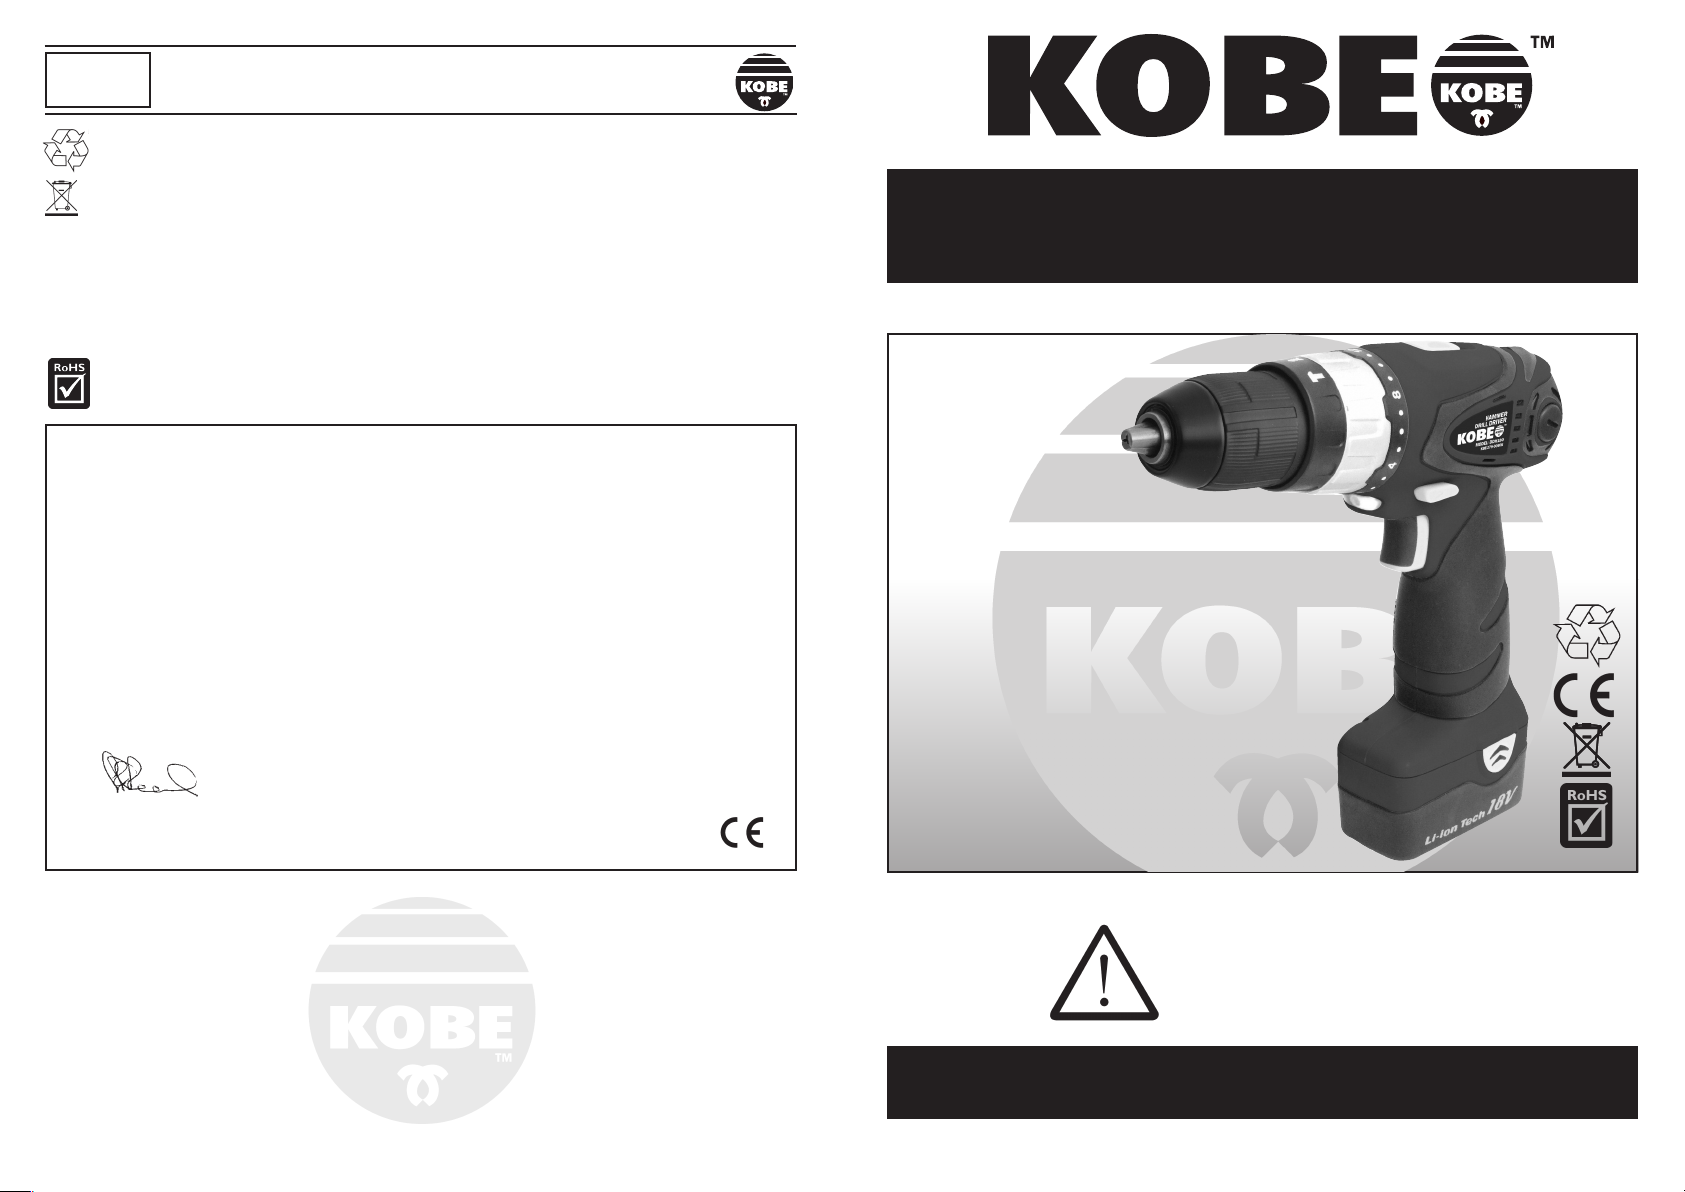
18V HAMMER
DRILL/DRIVER
MODEL DDH180
DECLARATION OF CONFORMITY
We hereby certify that
EN 60745-1: 2003/A1: 2003, EN60745-2-1:2003/A11: 2007 to EN60745-1:2009, EN60745-2-1: 2003/A11:2007/A1: 2009.
EN 60335-1: 2002 + A11: 2004 + A12: 2006 + A2: 2006, EN 60335-2-29: 2004, EN50366: 2003 + A1: 2006
CHARGER — EN 55014-1: 2006, EN55014-2: 1997 + A1: 2001, EN61000-3-2: 2006, EN61000-3-3: 1995 + A1: 2001 + A2: 2005
Signed:
Date: 1st March 2011
Name: Keith Read
Position: HSQE Team.
EC Electromagnetic Compatibility Directive 2004/108/EC
DRILL — EN 55014-1: 2006, EN55014-2: 1997 + A1: 2001
Wigston Works, Leicester, England, LE18 2FS
QUALITY GUARANTEE & WARRANTY
KOBE INDUSTRIAL POWER TOOLS carry one years manufacturers warranty.
KOBE INDUSTRIAL POWER TOOLS are designed & manufactured
Assuring the quality and performance required by all sectors of industry.
KOBE INDUSTRIAL POWER TOOLS are fully guaranteed against
Should they be found to be defective, they will either be repaired or replaced free of charge (fair wear and
Please retain supplier invoice as proof of purchase.
KOBE Cordless Hammer Drill/Driver Model: DDH180
(Incorporating Charger Model: DC18Li)
complies with all the relevant provisions of the
EC Machinery Directive 2006/42
Harmonised Standards Applied:
EC Low Voltage Directive 2006/95/EC
Harmonised Standards Applied:
Harmonised Standards Applied:
KENNEDY TOOLS
www.kennedy-tools.co.uk
Supplied by an ISO9001 approved company
to the highest standards & specifications
faulty materials & workmanship
tear and/or misuse excepted).
l Soft grip design
l Built in LED light
l 13mm keyless chuck
l Light-weight and well-balanced
l 20 stage torque adjustment collar
l Hammer-drill/drill-driver mode selection collar
l Variable speed with reversible control switch and
electric brake
l Complete with carry case, four 1.5Ah 18v Li-ion
battery packs and charger
ORDER CODE KBE-279-0090K
WARNING:
GIVEN INSIDE MUST BE READ AND
UNDERSTOOD BY ANY PERSON
USING, INSTALLING, REPAIRING
THE SAFETY INFORMATION
OR MAINTAINING THESE
TOOLS.
OPERATOR’S MANUAL
© The Kennedy Group Ltd. 05/13
Please r etain this i nfo r mation for future reference.
Page 2
You have purchased a quality product that is designed for high performance and long
service life. If correct use, safety and maintenance procedures are observed this
machine will last for many years.
KOBE
IND UST RIA L
A
IR TOOLS
OPERATION
SAFETY INSTRUCTIONS
KOBE POWER TOOLS
Your care and goo d judgement a re the best protection against injury, but always ensure that t he
appropriate safety equipment is worn. All possible hazards cannot be covered here, but the most important
ones have been highlighted.
l Keep your work area clean and well lit. Cluttered benches and dark areas invite accidents.
l Do not operate power tools in explosive atmospheres, such as in the presence of flammable liquids, gases, or
dust. Power tools create sparks which may ignite the dust or fumes.
l Keep bystanders, children, and visitors away while operating a power tool. Distractions can cause you to lose
control.
l Do not abuse the cord. Never use the cord to carry the tool. Keep cord away from heat, oil, sharp edges, or
moving parts. Replace damaged cords immediately. Damaged cords may create a fire.
l A battery operated tool with integral batteries or a separate battery pack must be recharged only with the
specified charger for the battery. A charger that may be suitable for one type of battery may create a risk of fire
when used with another battery.
l Use battery operated tool only with specifically designated battery pack. Use of any other batteries may create
a risk of fire.
l Stay alert, watch what you are doing, and use common sense when operating a power tool. Do not use tool
while tired or under the influence of drugs, alcohol, or medication. A moment of inattention while operating
power tools may result in serious personal injury.
l Dress properly. Do not wear loose clothing or jewelry. Contain long hair. Keep your hair, clothing, and gloves
away from moving parts. Loose clothes, jewelry, or long hair can be caught in moving parts.
l Avoid accidental starting. Be sure switch is in the locked or off position before inserting battery pack. Carrying
tools with your finger on the switch or inserting the battery pack into a tool with the switch on invites accidents.
l Remove adjusting keys or wrenches before turning the tool on. A wrench or a key that is left attached to a
rotating part of the tool may result in personal injury.
l Do not overreach. Keep proper footing and balance at all times. Proper footing and balance enable better
control of the tool in unexpected situations.
l Use safety equipment. Always wear eye protection. Dust mask, non-skid safety shoes, hard hat, or hearing
protection must be used for appropriate conditions.
l Use clamps or other practical way to secure and support the workpiece to a stable platform. Holding the work
by hand or against your body is unstable and may lead to loss of control.
l Do not force tool. Use the correct tool for your application. The correct tool will do the job better and safer at
the rate for which it is designed.
l Do not use tool if switch does not turn it on or off. A tool that cannot be controlled with the switch is dangerous
and must be repaired.
l Disconnect battery pack from tool or place the switch in the locked or off position before making any
adjustments, changing accessories, or storing the tool. Such preventive safety measures reduce the risk of
starting the tool accidentally.
l Store idle tools out of reach of children and other untrained persons. Tools are dangerous in the hands of
untrained users.
l Maintain tools with care. Keep cutting tools sharp and clean. Properly maintained tools with sharp cutting edge
are less likely to bind and are easier to control.
have been specifically designed to help you work SAFELY and EFFICIENTLY.
WORK AREA
ELECTRICAL SAFETY
PERSONAL SAFETY
TOOL USE AND CARE
General Drilling:
Use sharp drill bits only. For WOOD, use twist drill bits, spade bits, power auger bits, or hole saws. For METAL,
use high-speed steel twist drill bits, or hole saws. Be sure that the material to be drilled is anchored or clamped
firmly. If drilling thin material, use a “back-up” block to limit damage to the material. Always apply pressure in a
straight line with the bit. Always use enough pressure to keep the drill biting, but do not push too hard or you
could stall the motor or break the bit.
Hold the tool firmly to control the twisting of the drill.
IF DRILL STALLS, it is usually because it is being overloaded - RELEASE TRIGGER IMMEDIATELY, remove the drill
from the workpiece, and determine cause of stalling. DO NOT CLICK THE TRIGGER OFF AND ON IN AN ATTEMPT
TO START A STALLED DRILL - THIS CAN DAMAGE THE DRILL.
To minimize stalling or breaking through the material, reduce pressure on drill and ease the bit through the last
fractional part of the hole.
Keep the motor running when pulling the bit back out of a drilled hole. This will help prevent jamming.
With variable speed drills there is no need to center punch the point to be drilled. Use a slow speed to start the
hole until it is deep enough to drill without the bit skipping out, then use a higher speed to complete the drilling.
Drilling holes in Wood and Plastic: Use the same twist drills used for drilling metal. These bits may overheat
unless pulled out frequently to clear chips from the flutes. For large hole, use low speed wood bits. Work that is
likely to splinter should be backed up with a block of wood.
Drilling into Metals: Use a cutting lubricant when drilling into metals. The exceptions are cast iron and brass,
which should be drilled dry. The cutting lubricants that work best are sulphurized cutting oil or lard oil; bacon
grease can also serve the same purpose.
OPERATION AS A SCREWDRIVER
With the tool stopped, rotate mode selection collar to the screw symbol then set the torque adjustment collar (see
Fig. 2A) to torque range number. Select the desired speed range using the two speed gear selector on the top of
tool to match the speed to the planned operation. Insert the desired fastener accessory into the chuck, the same
as you would any drill bit. It is advisable to perform a few practice runs in scrap materials to determine the best
torque/speed settings for each application.
KOBE
IND UST RIA L
POWER TOOLS
MAINTENANCE/REPAIRS
CLEANING
Disconnect the charger from the AC outlet before performing any cleaning of the charger.
With the motor running, blow dirt and dust out of all air vents with dry air at least once a week. Wear safety glasses
when performing this. Exterior plastic parts may be cleaned with a damp cloth and mild detergent. Although these
parts are highly are solvent resistant, NEVER use solvent.
CHARGER CLEANING
Dirt and grease may be removed from the exterior of the charger using a cloth or soft non-metallic brush.
DO NOT use water or any cleaning solutions.
REPAIRS
IMPORTANT: To assure product SAFETY and RELIABILITY, repairs, maintenance and adjustment (including brush
inspection and replacement) should be performed by qualified service engineers, always using identical replacement parts.
2 7
Page 3

KOBE
IND UST RIA L
P
OWER TOOLS
ASSEMBLY
INSTALLING OR REMOVING BATTERY PACK
TO REMOVE BATTERY PACK:
Depress the battery release button (see Fig. 4A),
and pull battery pack out of tool.
TO INSTALL BATTERY PACK:
Align rails (see Fig 4B), on the tool with the four
tabs on the battery pack, and push battery pack
onto tool until it locks in place.
INSERTING AND REMOVING DRILL AND SCREWDRIVER BITS
CAUTION: Always set the reversing button (6) to the center (locked “OFF”)
1. The three-jaw chuck is designed for self-centering of the bit.
2. Clean and insert the smooth end of the bit as far as it will
3. While holding the bit with one hand, turn the sleeve
4. Tighten the chuck by turning the sleeve clockwise. Tighten securely.
position when installing and removing bits.
Open jaws large enough by turning the sleeve (see Fig. 5A)
counterclockwise, (when viewing the chuck from the front
end), so that the bit shank can be inserted easily.
go into the chuck, or up to the flutes for small bits.
clockwise until the bit is gripped in the chuck.
l Check for misalignment or binding of moving parts, breakage of parts, and any other condition that may affect the tool's
operation. If damaged, have the tool serviced before using. Many accidents are caused by poorly maintained tools.
l Use only accessories that are recommended by the manufacturer for your model. Accessories that may be
suitable for one tool may create a risk of injury when used on another tool.
BATTERY TOOL USE AND CARE
l Ensure the switch is in the off position before inserting battery pack. Inserting the battery pack into power tools
that have the switch on invites accidents.
l Recharge only with the charger specified by the manufacture. A charger that is suitable for one type of battery
pack may create a risk of fire when used with another battery pack.
l Use power tools only with specifically designated battery packs. Use of any other battery packs may create a
risk of injury and fire.
l When battery pack is not in use, keep it away from other metal objects like paper clips, coins, keys, nails,
screws, or other small metal objects that can make a connection from one terminal to another. Shorting the
battery terminals together may cause burns or a fire.
l Under abusive conditions, liquid may be ejected from the battery, avoid contact. If contact accidentally occurs,
flush with water. If liquid contacts eyes, additionally seek medical help. Liquid ejected from the battery may
cause irritation or burns.
SPECIFIC SAFETY RULES
l Hold tool by insulated gripping surfaces when performing an operation where the cutting tool may contact hidden
wiring. Contact with ‘live’ wire will also make exposed metal parts of the tool ‘live’ and shock the operator.
l Be aware that this tool is always in an operating condition, because it does not have to be plugged into an electrical
outlet. Always set the trigger switch to the locked OFF position when installing or removing the battery pack or bits.
l Do not use bits or sockets larger than those recommended. Large bits or drills may overload the drill/driver
and damage the motor and gears.
l Do not use if chuck jaws or other parts are cracked or worn.
l Never change direction of rotation until motor has completely stopped.
l Never hold work in your hand, lap, or against other parts of your body when screw driving or drilling.
l Do not use drill as a router or try to elongate or enlarge holes by twisting the drill bit. Drill bits may
break and cause injury.
l Keep hands away from rotating parts.
l Keep drill bit clear of yourself and all objects while installing and removing bit.
l Some wood contains preservatives which can be toxic. Take extra care to prevent inhalation and skin contact when
working with these materials. Request, and follow, all safety information available from your material supplier.
WARNING: Do not operate the drill motor while installing or removing bits. This action may cause the bit to be
5. To remove the bit, reverse the above procedure.
KOBE
IND UST RIA L
POWER TOOLS
Rotate the Torque Adjustment Collar (see Fig. 3B) to the Drill Position. Install and tighten the desired drill bit in the
chuck. Select the desired speed range using the two speed gear selector to match the speed to the planned
operation. Follow these instructions for best results when drilling.
thrown form the chuck, causing personal injury.
OPERATION
AUTOMATIC SHUT-OFF
The automatic shut-off feature will shut off power to the motor after the motor has been stalled.
If at the same time the tool overheats, (caused by the motor being overloaded) do not operate the
tool for at least five minutes, let it cool down.
OPERATION AS A DRILL
KOBE
IND UST RIA L
POWER TOOLS
SPECIFICATIONS
MODEL NUMBER . . . . . . . . . . . . . DDH180
OPERATING VOLTAGE . . . . . . . . . . 18V DC
BATTERY . . . . . . . . . . . . . . . . . . 18V Li-ion
CHARGING TIME . . . . . . . . . . . . . . . 30min
CHARGER INPUT . . . . . 230V-240V ~ 50Hz
CHARGER OUTPUT . . . . . . . . 20.6V DC 3A
CHARGER POWER CONSUMPTION . . 100W
NO LOAD SPEED . . . . . . 0 -400/0-1400rpm
NET WEIGHT . . . . . . . . . . . . . . . . . 4.05kg
MAXIMUM TORQUE . . . . . . . . . . . . 35Nm
DRILLING CAPACITIES:
STEEL . . . . . . . . . . . . . . . . . . . . . . . 13mm
ALUMINIUM . . . . . . . . . . . . . . . . . . 15mm
WOOD . . . . . . . . . . . . . . . . . . . . . . 28mm
MASONRY . . . . . . . . . . . . . . . . . . . 13mm
IMPACTS PER MINUTE . . . . . . . 0 - 21000
VIBRATION LEVEL . . . . . . . . . IS 6.93 m/s
N0-LOAD . . . . . . . . . . . . . . . . . . 8.19m/s
SOUND POWER LEVEL . . . . LWA=98.7dB(A)
SOUND PRESSURE LEVEL . LPA=87.7dB(A)
6 3
2
2
Page 4

KOBE
IND UST RIA L
POWER TOOLS
IDENTIFICATION
1. 13mm keyless chuck
2. Mode selection collar
3. Torque adjustment collar
4. 2 Speed gear selector
5. Variable speed trigger
6. Forward/reverse/lock sliding button
7. Built-in LED
8. Soft grip handle
9. Battery pack
KOBE
I
NDU STR IAL
POWER TOOLS
FUNCTIONS
A
B
MODE SELECTOR COLLAR
To change operational mode, release the trigger and wait for the
chuck to stop then simply choose mode you require by rotating
the collar until the symbol is opposite the arrow on the body of the
tool. (see Fig.3A)
7
8
Symbols on Mode Selector Collar:
Select this mode for high speed hammer
drilling of masonry or concrete.
Hammer-drill
Mode
Make sure the drill has stopped before
selecting this mode.
Screwdriver
Mode
Fig.3
Select this mode for screwdriving
and drilling.
Make sure the drill has stopped
before selecting this mode.
TORQUE ADJUSTMENT COLLAR
To adjust the torque clutch mechanism, release the trigger and wait for the chuck to stop then simply choose torque
setting you require for screw driving and fastener removal by rotating the collar until the number is opposite the
arrow on the body of the tool or for drilling mode rotate until the drill bit symbol is opposite the arrow. (see Fig.3B)
9
If you are not sure which torque lto use always start with a low setting and increase until the correct torque is set.
(working at too high a torque may damage your workpiece).
KOBE
IND UST RIA L
POWER TOOLS
FUNCTIONS
VARIABLE SPEED SWITCH
The variable speed switch allows a safe
slow start-up for the user when drilling and
screw driving.
To turn the tool on, squeeze the trigger
switch. To turn the tool off, release the
trigger switch (see Fig. 2A).
Your tool is equipped with a brake. The chuck will stop as
soon as the trigger switch is fully released. The variable
speed switch enables you to select the best speed for a
particular application. The more you squeeze the trigger,
the faster the tool will operate.
Use lower speeds for starting holes without a center punch, drilling metals or plastic, driving screws and drilling
ceramics, or in any application requiring high torque. Higher speeds are better when drilling in wood, wood
composites and for using abrasive and polishing accessories. For maximum tool life, use variable speed only for
starting holes or fasteners.
Fig.2
FORWARD / REVERSE CONTROL BUTTON
A forward/reverse control button determines the directional rotation of the tool and also serves as a lock off
button. To select forward rotation, RELEASE THE VARIABLE SPEED SWITCH, and depress the forward/reverse
control button, towards the left hand side of the tool. To select reverse, depress the forward/reverse control
button, towards the right hand side of the tool. The center position of the control button locks the tool in the OFF
position. When changing the position of the control button, make sure the trigger is released and chuck stopped.
NOTE: The first time the tool is run after changing the direction of rotation, you may hear a click on start up. This is
normal and does not indicate a problem.
1 — 20
Torque Range
Number
Max.= 35Nm
Circling the collar are numbers
ranging from 1 to 20. These
numbers are used to set the
clutch to deliver a torque range.
The higher number on the collars,
the higher torque and larger the
fastener which can be driven.
High Speed
Drilling
2 SPEED (Variable) GEARING
The 2 Speed feature of your Driver/Drill allows you to shift gears for greater versatility. To select the low speed,
high torque setting (position L), turn the tool off and allow it to stop. Push the dual range gear shifter forward
towards the chuck. To select the high speed, low torque setting (position H), turn the tool off and permit to stop.
Slide the dual range gear shifter back (away from chuck) (see Fig. 4A).
NOTE: Do not change gears whilst the tool is running. If you are having trouble changing gears, make sure that the
dual range gear button is either completely pushed forward or completely pushed back.
Fig.4
BUILT-IN LED WORK LIGHT
Your tool has a built-in LED light to illuminate the work area and improve vision when drilling/driving in areas with
insufficient light.
ELECTRIC BRAKE
The variable speed switch is equipped with a circuit designed electric brake function. The tool will promptly stop
rotating after the switch is fully released — This is the normal function of an electric brake.
Select this mode for high
speed drilling (Wood,
Aluminum, and Steel) and the
clutch will be locked. Release
the trigger to stop the motor
running when the chuck is
slipping or the shaft is locked.
4 5
 Loading...