

Page 1
KOBALT and the K Design are registered
trademarks of LF, LLC. All rights reserved.
®®
ATTACH YOUR RECEIPT HERE
Serial Number
Questions, problems, missing parts? Before returning to your retailer, call our
customer service department at 1-888-3KOBALT, 8 a.m. - 8 p.m., EST, Monday - Friday.
AB13431
Purchase Date
1
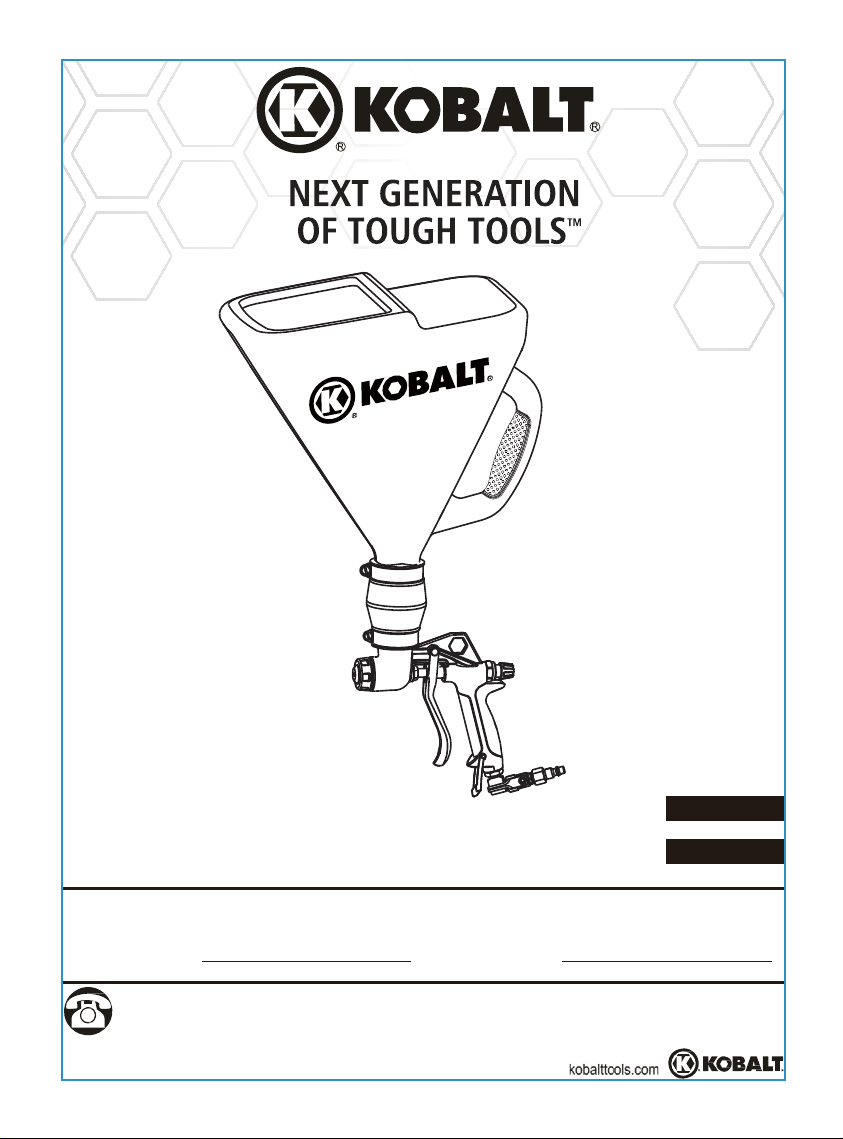
ITEM #0267315
AIR HOPPER GUN
MODEL SGY-AIR84TZ
Français p.15
Español p. 29
Page 2
TABLE OF CONTENTS
Safety Information ............................................................................................... 3
Product Specifications .......................... .............................................................. 5
Package Contents ............................................................................................... 6
Assembly Instructions .......................................................................................... 7
Operating Instructions .......................................................................................... 8
General Notes ....................................................................................................
10
Care and Maintenance ....................................................................................... 11
Troubleshooting ....................................
.............................................................. 12
Warranty ............................................................................................................. 13
Exploded Views .................................................................................................. 14
@
1.7
CFM25PSI
Tool Requirements
Exigences relatives aux outils
Requisitos de herramientas
IMPORTANT: To operate correctly, this tool requires airflow that is at least 1.7 cubic feet per
minute (CFM) at 25 pounds per square inch (PSI). Check the specifications of your air compressor
to be sure that it can support both the minimum CFM and PSI required. An air hose may cause
up to 15 PSI drop in pressure, so you may need to set the output higher to maintain the required
pressure at the tool.
2
Page 3

SAFETY INFORMATION
Please read and understand this entire manual before attempting to assemble, operate
or install the product. If you have any questions regarding the product, please call
customer service at 1-888-3KOBALT, 8:00 a.m.-8:00 p.m., EST, Monday-Friday.
FOR YOUR OWN SAFETY READ AND UNDERSTAND THE OWNER’S MANUAL
BEFORE USING ITEM. FAILURE TO OBSERVE AND FOLLOW THE BELOW
SAFETY INSTRUCTIONS COULD RESULT IN INJURY.
WEAR PROPER PROTECTIVE GEAR
Keep loose hair, loose clothing, or any hanging jewelry away from all moving parts.
Wear protective safety glasses or face shield to protect eyes.
To reduce the risk of hearing damage ensure you use proper ear protection to
safeguard your hearing.
Dress properly and wear protective clothing when needed.
Whenever possible, it’s recommended that electrically non-conductive clothing and
non-skid footwear be worn when using tools.
KEEP CHILDREN AWAY FROM WORK AREA AND TOOL
Keep tool out of reach of children and never allow children to handle equipment or tool.
Keep work area clear from clutter and other work hazards.
Do not use this product in unsafe work conditions.
WORK ENVIRONMENT HAZARDS
Be aware that extension cords and air hoses may present tripping hazards.
Always be aware of your work area surroundings and the people around the work area
to ensure your safety.
Do not operate tool if damaged during shipping, handling, or unsafe transportation of
item.
Using a damaged or unsafe tool can result in serious injury, death, and/or property
damage.
Always check air hoses for weak or worn connections before each use and make
certain that all connections are secure.
Repetitive motions, awkward positions, and exposure to vibration can be harmful to
hands and arms.
Keep hoses away from heat, oil, and sharp edges. Check hoses for weak or worn
connections before each use and make sure that all connections are secure before use.
Never spray in vicinity of flammable materials, open flame, or near ignition sources.
Never store flammable liquids or gases near air compressor or other compressed
materials under pressure.
ADDITIONAL SAFETY GUIDELINES
Every tool has a unique function and is designed to operate in a specific way.
Only use a tool for its intended function.
Always read the label or materials safety data sheet for the materials and/or chemicals
that may be used before you use an item to ensure its safe.
3
Page 4

SAFETY INFORMATION
Operators must be able to easily handle the bulk weight of the item so that the operator
has full control of the item 100% of the time.
Never operate tool if under the influence of drugs or alcohol.
Never operate tool if you are tired, as operator needs to be in control of tool at all times.
It’s always recommended to have a fire extinguisher and first aid kit near work area.
Keep proper footing at all times
Do not overreach, as slipping, tripping, and/or falling
can be a major cause of serious injury and/or death. Be aware of excess hose left in
working area or work surface. Do not abuse hoses or connectors.
When using air tools, always carry the tool by the handle. Never carry the tool by the
hose or yank it to disconnect it from the air or power supply.
Do not use pressure exceeding the operation pressure of any of the parts (hoses,
fittings, etc.) in the painting system.
If eyes or face come into direct contact with sprayed materials, contact your local
doctor or emergency room for immediate help.
Never aim or spray at yourself or anyone else, which could result in serious injury or
death.
Do not spray acids, corrosive materials, toxic chemicals, fertilizers or pesticides. Using
these materials could result in serious injury and/or death.
Always use a face mask and/or respriator and protective clothing when spraying.
Always spray in a well-ventilated area to prevent health and fire hazards.
Refer to material saftey data sheets (MSDS) of spray materials for details.
Certain materials that can be used with this device can cause skin irritation if they come
into direct contact with the skin. Read the label or materials safety data sheet for the
materials you intend to use to find out which materials may cause skin irritation.
Always disconnect tool from air supply before performing any maintenance.
Never use a tool which is leaking air, has missing or damaged parts, or requires repair.
Only use parts and accessories recommended by the manufacturer.
4
Page 5
SAFETY INFORMATION
Please read and understand this entire manual before attempting to assemble, operate
or install the product. If you have any questions regarding the product, please call
customer service at 1-888-3KOBALT, 8:00 a.m.-8:00 p.m., EST, Monday-Friday.
WARNING
Improper operation or maintenance of this product could result in serious injury and
property damage. Read and understand all warnings and operation instructions
before using this equipment. When using air tools, basic safety precautions should
always be followed to reduce the risk of personal injury.
WARNING
SOME DUST CREATED BY PAINT SPRAYING, POWER SANDING, SAWING,
GRINDING, DRILLING, AND OTHER RELATED ACTIVITIES IS KNOWN TO THE
STATE OF CALIFORNIA TO CAUSE CANCER, BIRTH DEFECTS, AND OTHER
REPRODUCTIVE HARM. A LISTING OF CHEMICALS CAN BE OBTAINED FROM
www.oehha.ca.gov UNDER PROPOSITION 65. SOME EXAMPLES OF THESE
CHEMICALS ARE:
LEAD FROM LEAD BASED PAINTS
CRYSTALLINE SILICA FROM BRICKS, CEMENT AND OTHER MASONRY
PRODUCTS
ARSENIC AND CHROMIUM FROM CHEMICALLY TREATED LUMBER
YOUR RISK FROM THESE EXPOSURES VARIES, DEPENDING ON HOW OFTEN
YOU DO THIS TYPE OF WORK. TO REDUCE YOUR EXPOSURE TO THESE
CHEMICALS WORK IN A WELL VENTILATED AREA, AND WORK WITH
APPROVED
WHICH ARE
SAFTEY EQUIPMENT, SUCH AS A RESPIRATOR OR DUST MASKS
SPECIALLY DESIGNED TO FILTER MICROSOPIC PARTICLES.
PRODUCT SPECIFICATIONS
COMPONENT
FEED TYPE
FLUID NOZZLE I.D.
MAX. WORKING PRESSURE
WORKING PRESSURE
REQ’D (SCFM @ 25 PSI)
AIR INLET
SPECIFICATIONS
GRAVITY
4.5 MM, 6 MM, 8 MM
30 PSI
25 PSI
1.7 SCFM
1/4 IN. NPT
5
Page 6

PACKAGE CONTENTS
A
B
C
H
H
PART
A
B
C
D
E
F
G
H
I
J
K
L
K
D
L M
I
DESCRIPTION
Hopper
Flexible Connector
Air Cap
Trigger
Main Housing
Air Shut-Off Valve
Quick Disconnect
Metal Stand
Brass Elbow
Air Inlet Fitting
Material Orifice A (d=4.5)
Material Orifice A (d=6)
Material Orifice A (d=8) 1M
E
J
F
QUANTITY
1
1
1
1
1
1
1
1
1
1
1
1
G
6
Page 7
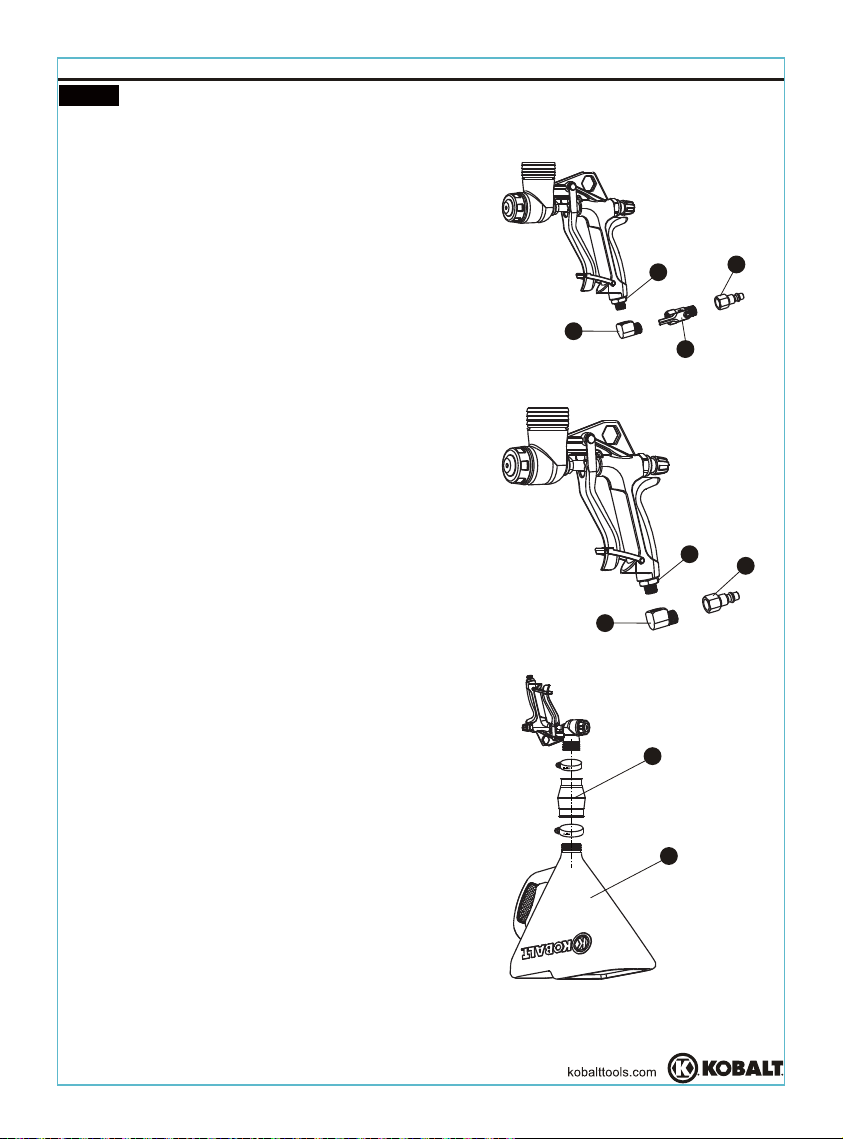
ASSEMBLY INSTRUCTIONS
NOTE There are two different types of air tank/air compressors which can be wsed
with this item.
FOR PISTON/TANK TYPE COMPRESSOR
A.Thread the 90° brass elbow (I) onto
the air inlet fitting (J) at the bottom of the
hopper gun handle.
B.Thread the air shut-off valve (F) onto the
brass elbow.
C.Thread the quick disconnect (G) onto
J
G
the air shut-off valve.
I
F
FOR ROTARY VANE TYPE COMPRESSOR
A.Thread the 90° brass elbow (I) onto
the air inlet fitting (J) at the bottom of the gun
handle.
B.Thread the quick disconnect (G)
onto the 90° brass elbow (I).
J
CAUTION: DO NOT install the air shut-off
G
valve(F) in the hopper gun unless your
compressor has a working pressure switch
for controlling the “on” and “off”.
I
Attaching The Hopper To The Gun
1. Place the hopper (A) upside down.
2. Place the large end of the flexible
connector (B) over the hopper neck and
slide the gun's hopper receiver onto the
small end of the flexible connector (B).
3. Face the hopper with the handle facing
the rear of the gun and tighten the hopper
clamps.
Estimated Assembly Time: 5-10 minutes
Tools Required for Assembly: Flat screwdriver (not included)
7
B
A
Page 8
OPERATING INSTRUCTIONS
You must consider and deal with the following variables in setting up your
hopper gun to ensure consistent and desired results:
Air Supply: The hopper gun requires a compressor that produces 7 CFM
at 25 PSI. The supply of
pressure ranges in spans between 10 and 30 PSI. Medium s platter & orange
peel are sprayed at 17-23 PSI.
Material Orifice:
Always use the largest material orifice (8 mm). Medium splatter & orange
peel use the medium material orifice (6 mm).
Trigger Pull Distance:
Distance with the knob on the back of the gun. Adjusting the distance is very
important to maintaining consistency.
air must remain consistent or it will affect the texture.
eht ,erusserp eht rewol ehT :erusserP heavier the texture. The normal
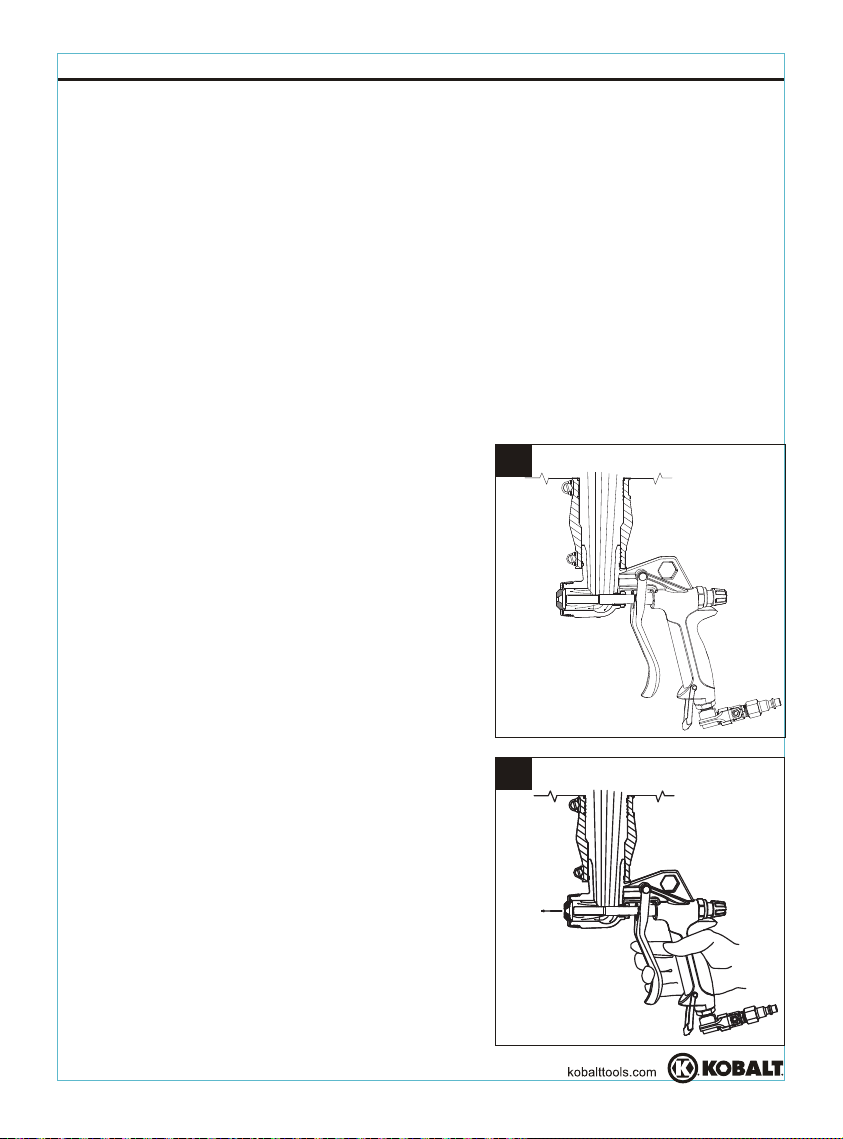
1. In this diagram, the hopper is full, the air
is on and flowing from the tip, no pressure
is being applied to the trigger, and no
material is being sprayed.
2. In this diagram, the hopper is full, the air
is on and flowing, partial pressure is being
applied to the trigger, and some material is
being released from the gun.
1
2
8
Page 9
OPERATING INSTRUCTIONS
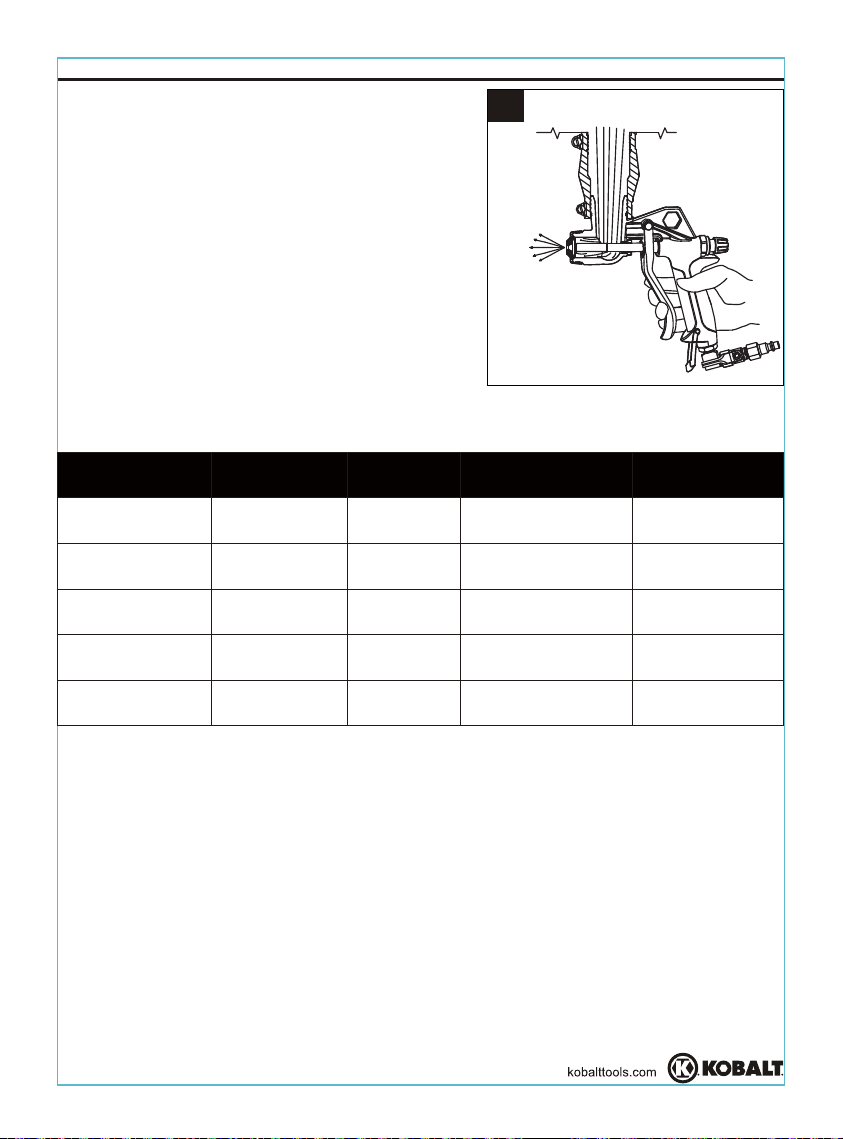
3. In this diagram, the hopper is full, the air
is on and flowing, full pressure is being
applied to the trigger, and material is being
released from the gun at an increased rate.
TEXTURE TABLE
TEXTURE
PRESSURE
TRIGGER
PULL
3
THICKNESS
OPENING
Acoustic
Heavy Splatter
Medium Splatter
Orange Peel
Light Splatter
BEFORE SPRAYING
1. Use tape and heavy canvas drop cloths to protect areas you don't want sprayed. Thin plastic
drop cloths will not provide adequate protection.
2. Do not spray 100% vertically or you will lose efficiency.
3. Plan your path and ensure you have mixed enough material before you begin to avoid
disruption of your work.
4. You should always spray test an old piece of plywood or cardboard before you begin.
5. Always make sure you wear the proper safety equipment when using this item
16-21
11-16
16-21
19-24
22-26
Completely
Completely
Two-Thirds
One-Half
One-Third
9
Product Directions
Thin
Thick
Thick
Thick
8 mm
8 mm
6 mm
6 mm
4.5 mm
Page 10

OPERATING INSTRUCTIONS
SPRAYING WALLS & VAULT CEILINGS VERTICALLY
A. Alw c lacitrev ro llaw ruoy morf .tf 5 ot 3 nigeb sya eiling.
B. Start from the top at an edge or a corner.
C. Move the gun up and down covering the wall vertically in your designated
space. From the bottom, move sideways and work your way up.
D. Repeat this motion from top to bottom, then sideways bottom to top, then
sideways until you have covered the wall.
E. Refill the hopper gun as needed.
SPRAYING CEILINGS AND HORIZONTAL SURFACES
A. Fill the hopper gun no more than 75% full with your spray material.
B. Open the shut-off valve and run air through the hopper gun.
C. Lift the hopper gun until it is approximately 1-1/2 to 2 ft. below the ceiling
and angle the gun between 25 and 60 degrees.
D. Always start near a corner or an edge.
E. Begin spraying and move tow eht dra opposite corner or edge.
F. Move backwa ts tuohtiw dr opping and move tow eht dra original starting
corner or edge.
Repeat these procedures until you have covered the entire ceiling.
G.
GENERAL NOTES
The hopper gun will shoot anything that can be gravity fed and atomized (the
degree of atomization is predicated on having the required PSI and CFM
available from the air source).
The compressor should provide a minimum of 7 CFM at 25 PSI.
Make sure your mix can be used with hopper guns by checking the label and
manufacturer's instructions.
You can test mixing one cup of joint compound per hopper to help the flow of
the spray.
Note that the hopper gun does not have an internal valve. If you do not want
air to continuously flow, install the shut-off valve where the hose enters the gun.
Never use the shut-off valve with the compressor. Only use the shut-off valve
with an air compressor that has a reserve tank and an automatic shut-off
switch.
To spray walls, your distance should be 3 to 4 ft.
To spray ceil uoy ,sgni
eht htiw woleb .tf 2 ot 2/1-1 eb dluohs hopper gun
angled 25 - 60 degrees.
10
Page 11
CARE AND MAINTENANCE
CLEANING YOUR HOPPER GUN
1. Use water to fill and then clean out the hopper. Then reconnect to the air
compressor and blow air through to remove any remaining debris.
2. Make sure the valve is open if you use an air shut-off valve.
3. Turn the hopper gun upside down and lubricate with household oil by
dropping oil in the quick disconnect (with the air shut-off valve in th e open
position). This lubricates the air stem and O-rings.
4. Pull the trigger several times and close the shut-off valve.
ASSEMBLING AND DISASSEMBLING YOUR HOPPER GUN
Taking Your Hopper Gun Apart
1. Take out the material orifice by turning the nut counterclockwise.
2. Remove the knurled knob by turning it counterclockwise until it comes out.
3. Using your finger push the center stem out of the gun through the rear.
TO REASSEMBLE:
1. Before you put the hopper gun back
together wipe a small amount of
lithium-based grease on the O-rings of
the adjustable stop assembly.
2.
Replace the center stem from the rear.
Make sure not to tear up the O-rings when
reassembling.
Replace the knurled knob by turning it
3.
clockwise.
Put in your material orifice and secure
4.
turning the nut clockwise.
Long Term Storage:
Make sure to store in dry secure location.
11
Page 12
TROUBLESHOOTING
SPRAY PATTERN
/CONDITION
a) Material orifice is
clogged.
b) Material around
outside of orifice has
dried.
a) O-ring (Part #9) gets
dry or worn out.
b) Air stem bushing
(Part #8) gets loose.
c) Material orifice loosely
installed, or dirt
between orifice and
body.
a) Adjusting nut
(Part #26) improperly
adjusted.
b) Sluggish air stem.
PROBLEM
a) Material cannot be
sprayed or sprayed
inefficiently.
b) Will not get a
satisfactory
atomization.
Intermittent spray
Will not get a
satisfactory spray.
CORRECTIVE ACTION
a) Soak material orifice in solvent
to loosen clog.
b) Trigger material orifice
several times.
c) Take off air cap and material
orifice, clean orifice using a
bamboo or wooden toothpick.
Then wipe off air cap and
orifice with a rag moistened
with thinner.
d) Reassemble orifice and screw
air cap tight.
a) Back up the gun, put a few
drops of machine oil or replace
with new O-ring.
b) Tighten air stem bushing.
c) Take off air cap and material
orifice, clean dirt and
reassemble orifice and tighten
air cap.
a) Have adjusting nut set to a
good condition.
b) Disassemble the adjusting stop
assembly (Part #18 to #29) as
per the instructions in manual,
wipe a small amount of lithium based grease on stem and
O-ring (Part #21), then
reassemble.
Material orifice and
stem worn out.
Gun held too far from
surface.
Gun held too close
from surface.
Dripping from
material orifice.
Thin, sandy
coarse finish.
Thick, dimpled
finish resembling
orange peel.
12
Replace with new orifice and
stem.
Move gun closer to surface as
per the instructions in manual.
Move gun further from surface as
per the instructions in manual.
Page 13

WARRANTY
This tool is warranted by the manufacturer to the original purchaser from the original
purchase date for three (3) years subject to the warranty coverage described herein.
This tool is warranted to the original user to be free from defect in material and
workmanship. If you believe that a tool is defective, return the tool, with proper proof
of purchase to the point of purchase. If it is determined that the tool is defective and
covered by this warranty, the distributor will replace the tool or refund the
purchase price.
This warranty is void if: defects in materials or workmanship or damages result from
repairs or alterations which have been made or attempted by others or the
unauthorized use of nonconforming parts; the damage is due to normal wear, damage
is due to abuse (including overloading of the tool beyond capacity), improper
maintenance, neglect or accident; or the damage is due to the use of the tool after
partial failure or use with improper accessories or unauthorized repair or alteration.
This warranty gives you specific legal rights, and you may also have other rights that
vary from state to state.
For warranty questions, call our customer service department at 1-888-3KOBALT,
8:00 a.m.-8:00 p.m. EST, Monday-Friday.
13
Page 14

EXPLODED VIEWS
.
/
0
J
I
Part No.
C
K
L
M
5
D
7
8
9
10
11
12
E
J
I
F
G
18
KOBALT® and the K Design® are registered
trademarks of LF, LLC. All rights reserved.
Description Qty.
Air Cap
Material Orifice A (d=4.5)
Material Orifice B (d=6)
Material Orifice C (d=8)
Trigger Fixing Bolt
Trigger
“E” Clip
Air Stem Bushing
O-Ring (9*1.8)
Clip Fixing Rivet
Trigger Clip Main Housing
“E” Clip
Main Housing
Air Inlet Fitting
Brass Elbow
Air Shut-Off Valve
Quick Disconnect
Threaded Body
1
1
1
1
1
1
1
1
1
1
1
1
1
1
1
1
1
1
Part No.
19
20
21
22
23
24
25
26
27
28
29
30
31
32
B
34
A
H
14
Description Qty.
O-Ring (13.5*1.5)
Adjusting Stem
O-Ring (10.6*1.8)
Washer
Adjusting Spring
O-Ring (7.2*1.9)
Screw Seal
Adjusting N
ut
Phillips Screw
Air Stem (back)
Air Stem (front)
O-Ring (33.3*3.5)
Hose Clamp (38-57)
Hose Clamp (44-64)
Flexible Connector
S
oft Grip
Hopper
Metal Stand
Printed in China
1
1
4
1
1
1
1
1
1
1
1
1
1
1
1
1
1
1
Page 15

ARTICLE #0267315
PISTOLET
PNEUMATIQUE
À TRÉMIE
MODÉL #SGY-AIR84TZ
KOBALT et le motif K & Design sont des
marques de commerce déposées de LF,
LLC. Tous droits réservés.
®®
JOIGNEZ VOTRE REÇU ICI
Numéro de série
Des questions, des problèmes, des pièces manquantes? Avant de
retourner l'article au détaillant, communiquez avec notre service à la
clientèle au 1 888 3KOBALT, entre 8 h et 20 h (HNE), du lundi au vendredi.
AB13431
15
Français p.15
Español p. 29
Date d'achat
kobalttools.com
Page 16

TABLE DES MATIÈRES
Consignes de sécurité ......................................................................................17
Carectéristiques du produit ................................................................................ 19
Instructions pour l’assemblage 12 .........................................................................
02 ................................................................................... egallabme'l ed unetnoC
........
Remarques générales ........................................................................................
...........................................................................Mode d’emploi
24
Entretien.............................................................................................................. 25
Dépannage ...........................................
.............................................................. 26
Entretien ............................................................................................................. 27
Vues éclatées
...
@
1.7
CFM25PSI
Tool Requirements
Exigences relatives aux outils
Requisitos de herramientas
IMPORTANT : Cet outil nécessite un débit d'air d'au moins 1.7 pi par minute à une pression de
25 lb/psi . Vérifiez les spécifications de votre compresseur d'air afin de vous assurer qu'il satisfait
aux exigencies minimales (pi /min et lb/psi ). L'utilisation d'un tuyau à air peut entraîner une chute
de pression de jusqu'à 15 lb/psi . Il peut donc s'avérer nécessaire d'augmenter la pression afin
2
3
2
2
3
de maintenir un niveau adéquat.
..................................................................................
22 ...............
82 ................
16
Page 17

CONSIGNES DE SÉCURITÉ
Assurez-vous de lire et de comprendre l’intégralité du présent manuel avant de tenter
d’assembler, d’utiliser ou d’installer l’outil. Si vous avez des questions, veuillez
communiquer avec notre service à la clientèle au 1-888-3KOBALT, entre 8 h et 20 h
(HNE), du lundi au vendredi.
POUR VOTRE SÉCURITÉ, ASSUREZ-VOUS DE LIRE ET DE COMPRENDRE LE
GUIDE D’UTILISATION AVANT D’UTILISER LE PRODUIT. LE NON-RESPECT DES
CONSIGNES DE SÉCURITÉ CI-DESSOUS PEUT ENTRAÎNER DES BLESSURES.
PORTEZ UNE TENUE DE PROTECTION ADÉQUATE.
Gardez les cheveux, les vêtements amples et tout bijou pendant loin des pièces
mobiles.
Portez des lunettes de sécurité ou un écran facial afin de protéger vos yeux.
Afin de réduire les risques de dommages auditifs, assurez-vous de porter des
protecteurs auditifs pour protéger votre ouïe.
Habillez-vous convenablement et portez des vêtements de protection, s’il y a lieu.
Dans la mesure du possible, il est recommandé de porter des vêtements non
conducteurs et des chaussures antidérapantes lorsque vous utilisez des outils.
NE LAISSEZ PAS LES ENFANTS UTILISER L’OUTIL ET GARDEZ-LES À
DISTANCE DE L’AIRE DE TRAVAIL.
Gardez l’outil hors de la portée des enfants et ne laissez jamais les enfants manipuler
l’équipement ou l’outil.
Gardez l’aire de travail dépourvue de débris et de toute autre source de danger.
N’utilisez pas cet article dans des conditions de travail dangereuses.
RISQUES LIÉS À L’AIRE DE TRAVAIL
N’oubliez pas que les rallonges et les tuyaux à air peuvent vous faire trébucher.
Pour votre sécurité, soyez toujours conscients de votre aire de travail et des personnes
se trouvant à proximité de celle-ci.
N’utilisez pas l’outil s’il a été endommagé lors de l’expédition, de la manipulation ou du
transport effectué sans précautions.
L’utilisation d’un outil endommagé ou dangereux peut entraîner des blessures graves,
la mort ou des dommages matériels.
Vérifiez toujours l’état des tuyaux à air avant chaque utilisation et assurez-vous qu’ils
sont correctement raccordés.
Les mouvements répétitifs, les positions inconfortables et l’exposition aux vibrations
peuvent présenter un danger pour les mains et les bras.
Tenez les tuyaux éloignés des sources de chaleur, de l’huile et des objets coupants.
Vérifiez l’état des tuyaux avant chaque utilisation et assurez-vous qu’ils sont
correctement raccordés.
Ne pulvérisez jamais de matières inflammables à proximité d’une flamme nue ou d’une
source d’inflammation.
Ne rangez jamais de liquides inflammables ou de gaz à proximité d’un compresseur
d’air ni d’autres matériaux comprimés. nfirmar que son seguros.
17
Page 18

CONSIGNES DE SÉCURITÉ
CONSIGNES DE SÉCURITÉ SUPPLÉMENTAIRES
Chaque outil a une fonction unique et est conçu pour fonctionner d’une manière précise.
Utilisez uniquement un outil pour l’usage auquel il est destiné.
Lisez toujours l’étiquette ou la fiche signalétique des matériaux ou des produits
chimiques afin de vous assurer que leur utilisation avec l’article est sécuritaire
Les opérateurs doivent être en mesure de supporter facilement le poids du produit
afin d’en assurer le plein contrôle en tout temps
N’utilisez jamais le produit lorsque vous êtes sous l’effet de l’alcool ou de drogues.
N’utilisez jamais le produit si vous êtes fatigué, car vous devez en avoir le contrôle e
n tout temps.
Il est toujours recommandé d’avoir un extincteur d’incendie et une trousse de premiers
soins à proximité de l’aire de travail.
Gardez une posture sécuritaire en tout temps. Ne vous étirez pas pour étendre votre
portée; vous risqueriez de glisser, de trébucher ou de tomber et de subir des blessures
graves ou mortelles. Faites attention à l’excédent de tuyau laissé dans l’aire de travail
ou sur la surface de travail. Ne faites pas un usage abusif des tuyaux ou des
connecteurs
Transportez toujours les outils pneumatiques par la poignée. Ne transportez jamais
l’outil en le tenant par le tuyau, et ne tirez jamais le tuyau pour le débrancher de
l’alimentation en air ou en électricité
Ne dépassez pas la pression de fonctionnement des pièces
(p. ex., tuyaux, raccords, etc.) de l’outil de peinture
Si les yeux ou le visage entrent en contact direct avec des matériaux vaporisés,
communiquez avec votre médecin ou avec une salle d’urgence pour obtenir de l’aide
immédiate
Ne pointez jamais le pistolet vers vous-même ou une autre personne, car vous
pourriez causer de graves blessures ou la mort
Ne pulvérisez pas d’acide, de matières corrosives, de produits chimiques toxiques,
de fertilisants ou de pesticides. L’utilisation de ces matières peut causer de graves
blessures, voire entraîner la mort
Portez toujours un masque facial ou un appareil respiratoire (ou les deux) ainsi que
des vêtements de protection pendant la pulvérisation.
Utilisez toujours le pistolet de pulvérisation dans un endroit bien aéré afin de prévenir
les risques d’incendie et les dangers pour la santé.
Pour de plus amples renseignements, consultez la fiche signalétique (FS) des
matériaux à pulvériser.
Certains matériaux pouvant être utilisés avec cet appareil peuvent causer une irritation
cutanée s’ils entrent en contact direct avec la peau. Lisez l’étiquette ou la fiche
signalétique des matériaux que vous désirez utiliser afin de déterminer s’ils sont
susceptibles de causer une irritation cutanée
Coupez toujours l’alimentation en air avant d’effectuer tout entretien.
18
Page 19

CONSIGNES DE SÉCURITÉ
N’utilisez jamais un outil qui présente une fuite d’air, auquel il manque des pièces,
dont des pièces sont endommagées ou qui nécessite une réparation.
N’utilisez que des pièces et des accessoires recommandés par le fabricant.
Veuillez vous assurer de lire et de comprendre l'intégralité du présent guide avant
d'assembler, d'utiliser ou d'installer ce produit. Si vous avez des questions concernant
ce produit, veuillez téléphoner au service à la clientèle au 1 888 3KOBALT, entre 8 h et
20 h (HNE), du lundi au vendredi.
AVERTI SSEMENT
Une utilisation ou un entretien inadéquat de ce produit peut causer des blessures
graves ou des dommages matériels. Assurez-vous de lire et de comprendre tous
les avertissements et toutes les instructions concernant ceproduit avant de l'utiliser.
Lorsque vous utilisez un outil pneumatique, observez toujours les mesures de
sécurité de base afin de réduire les risques de blessure.
AVERTI SSEMENT
LA POUSSIÈRE CRÉÉE PENDANT LE PONÇAGE, LE SCIAGE, LE POLISSAGE, LE
PERÇAGE ET D'AUTRES ACTIVITÉS PEUT CONTENIR DES PRODUITS CHIMIQUES
RECONNUS PAR L'ÉTAT DE LA CALIFORNIE COMME ÉTANT LA CAUSE DE CANCERS,
D'ANOMALIES CONGÉNITALES ET D'AUTRES PROBLÈMES LIÉS AUX FONCTIONS
REPRODUCTRICES. VOUS POUVEZ OBTENIR LA LISTE DES PRODUITS CHIMIQUES
AU www.oehha.ca.gov, CONFORMÉMENT À LA PROPOSITION 65. VOICI
QUELQUES-UNS DE CES PRODUITS CHIMIQUES :
DU PLOMB PROVENANT DE PEINTURES À BASE DE PLOMB;
DE LA SILICE CRISTALLINE PROVENANT DE LA BRIQUE, DU CIMENT OU
D'AUTRES MATÉRIAUX DE MAÇONNERIE;
DE L'ARSENIC ET DU CHROME PROVENANT DU BOIS D'ŒUVRE TRAITÉ AVEC
UN PRODUIT CHIMIQUE.
LES RISQUES LIÉS À L’EXPOSITION À CES PRODUITS VARIENT SELON LE NOMBRE
DE FOIS OÙ VOUS PRATIQUEZ CES ACTIVITÉS. AFIN DE LIMITER VOTRE
EXPOSITION À CES PRODUITS CHIMIQUES, TRAVAILLEZ DANS UN ENDROIT BIEN
VENTILÉ ET UTILISEZ DE L’ÉQUIPEMENT DE SÉCURITÉ APPROUVÉ, TEL QU’UN
APPAREIL RESPIRATOIRE OU UN MASQUE ANTIPOUSSIÈRE CONÇUS
SPÉCIALEMENT POUR FILTRER LES PARTICULES MICROSCOPIQUES.
CARACTÉRISTIQUES DU PRODUIT
COMPOSANTE
ALIMENTATION PAR GRAVITÉ
DIAM. INTÉRIEUR DE LA BUSE À PEINTURE
PRESSION DE SERVICE MAXIMALE
PRESSION DE SERVICE
PRODUCTION NÉCESSAIRE(PI³/MIN À 25 LB/PO²)
ENTRÉE D’AIR
WARNING
CARACTÉRISTIQUES
GRAVITY
4.5 MM, 6 MM, 8 MM
30 LB/PO²
25 LB/PO²
1.7 PI³/MIN
1/4 PO NPT
19
Page 20

CONTENU DE L’EMBALLAGE
A
B
C
H
H
PIÈCE
A
B
C
D
E
F
G
H
I
J
K
L
K
D
L M
I
QUANTITÉ
Trémie
Raccord flexible
Capuchon fileté
Gâchette
Manche du pistolet
Soupape d’arrêt d’air
Dispositif de déconnexion
rapide
Support en métal
Coude en laiton
Raccord d'entrée d'air
Bague A (diam.4,5)
Bague B (diam.6)
Bague C (diam.8)
E
J
F
QUANTITÉ
1
1
1
1
1
1
1
1
1
1
1
1
1M
G
20
Page 21

INSTRUCTIONS POUR L’ASSEMBLAGE
REMARQUE Veuillez noter qu’il y a deux types de réservoir d’air/compresseurs d’air
qui peuvent être utilisés avec cet outil.
COMPRESSEURS À PISTON OU À RÉSERVOIR
A. Vissez le coude en laiton à 90° (I) dans le
raccord d’entrée d’air (J) situé à la base du
manche du pistolet à trémie.
B. Vissez la soupape d’arrêt d’air (F) dans le
coude en laiton.
J
G
C. Vissez le dispositif de déconnexion
rapide (G) dans la soupape d’arrêt d’air.
I
F
COMPRESSEUR ROTATIF À PALETTES
A. Vissez le coude en laiton à 90° (I) dans le
raccord d’entrée d’air (J) situé à la base du
manche du pistolet à trémie.
B. Vissez le dispositif de déconnexion
rapide (G) dans le coude en laiton (I).
J
G
ATTENTION : NE fixez PAS la soupape
d’arrêt d’air (F) à votre pistolet à trémie, sauf
I
si votre compresseur est muni d’un interrupteur
de pression de service qui permet d’actionner les
fonctions de marche et d’arrêt.
Raccordement de la trémie au pistolet
1. Placez la trémie (A) à l’envers.
2. Placez l’extrémité la plus large du raccord
flexible (B) sur le goulot de la trémie, puis
glissez le récepteur de la trémie pour le
pistolet dans la plus petite extrémité du
raccord flexible (B).
3. Placez la poignée de la trémie de manière
à ce qu’elle pointe vers l’arrière du pistolet,
puis serrez les colliers de serrage de la trémie.
Temps d’assemblage approximatif : de 5 à 10 minutes
Outils nécessaires pour l’assemblage: tournevis plat (non inclus)
21
B
A
Page 22

MODE D’EMPLOI
Vous devez prendre connaissance et tenir compte des variables suivantes
pendant l’assemblage de votre pistolet à trémie afin d’obtenir les résultats
escomptés et d’en assurer l’uniformité.
Alimentation en air : Le pistolet à trémie nécessite l’utilisation d’un
compresseur qui produit 7,5 pi3/min à 25 lb/po2. L’alimentation en air doit
être constante, faute de quoi la texture pourrait être compromise.
Pression : Plus la pression est faible, plus la texture sera épaisse. La pression
normale se situe entre 10 et 30 lb/po2. Pour obtenir une projection moyenne ou
une texture de peau d’orange, vous devez régler la pression entre 17 et 23 lb/po2.
Bague :
Utilisez toujours la bague la plus large (8 mm). Pour obtenir une projection
moyenne ou une texture de peau d’orange, vous devez utiliser la bague
moyenne (6 mm).
Distance de la gâchette :
Réglez la distance à l’aide du bouton situé à l’arrière du pistolet. Il est très
important de régler la distance pour assurer
l’uniformité.
1
. Dans la figure ci-contre, la trémie est
1
pleine, l’alimentation en air est activée
et l’air circule à partir de l’embout, aucune
pression n’est appliquée sur la gâchette et
la peinture n’est pas pulvérisée.
2. Dans la figure ci-contre, la trémie est pleine,
l’alimentation en air est activée et l’air circule,
la personne applique une légère pression sur la
gâchette et une petite quantité de peinture sort
du pistolet.
2
22
Page 23

MODE D’EMPLOI
3. Dans la figure ci-contre, la trémie est
pleine, l’alimentation en air est activée et
l’air circule, la personne applique une forte
pression sur la gâchette et le débit de la
peinture est plus important.
TABLEAU DES TEXTURES
TEXTURE
Produit d’insonorisation
PRESSION
16-21
PRESSION
SUR LA GÂCHETTE
Pression complète
3
CONSISTANCE
Selon les instructions
liées au produit
OUVERTURE
8 mm
Projection forte
Medium Splatter
Orange Peel
Light Splatter
11-16
16-21
19-24
22-26
Pression complète
Pression aux
deux tiers
Pression à la
moitié
Pression au tiers
Mince
Épaisse
Épaisse
Épaisse
8 mm
6 mm
6 mm
4.5 mm
AVANT LA PULVÉRISATION
1. Utilisez du ruban et des toiles de protection robustes pour protéger les surfaces
sur lesquelles vous ne voulez pas vaporiser de produit. Les feuilles de pellicule
plastique mince n’assureront pas une protection adéquate.
2. Lorsque vous pulvérisez le produit, ne tenez pas le pistolet complètement à la
verticale, car vous diminuerez l’efficacité de ce dernier.
3. Planifiez votre trajet et assurez-vous d’avoir une quantité suffisante du produit
avant de commencer afin d’éviter toute interruption.
4. Vous devez toujours pulvériser le produit sur un vieux morceau de contreplaqué
ou de carton pour faire un essai avant de commencer.
5. Assurez-vous toujours de porter un équipement de sécurité approprié lorsque
vous utilisez l’outil.
23
Page 24

MODE D’EMPLOI
PULVÉRISATION SUR LES MURS ET LES PLAFONDS EN VOÛTE
A. Commencez toujours en vous plaçant à une distance de 0,91 m à 1,52 m
de votre mur ou de votre plafond en voûte.
B. Commencez par le haut : sur un bord ou dans un coin.
C. Déplacez le pistolet de haut en bas afin de couvrir de façon verticale la
surface choisie. Lorsque vous êtes rendu au bas de la surface, déplacez vous de côté, puis continuez de pulvériser le produit vers le haut.
D. Répétez le mouvement de haut en bas, puis de côté et ensuite de bas en
haut jusqu’à ce que le mur soit entièrement couvert.
E. Remplissez le pistolet à trémie au besoin.
PULVÉRISATION SUR LES PLAFONDS ET LES SURFACES HORIZONTALES
A. Remplissez le pistolet à trémie aux trois quarts, tout au plus.
B. Ouvrez la soupape d’arrêt et laissez l’air circuler dans le pistolet à trémie.
C. Levez le pistolet à trémie jusqu’à ce qu’il soit à une distance d’environ 0,
46 m à 0,61 m du plafond, puis inclinez le pistolet à un angle de 25° à 55°.
D. Commencez toujours près d’un coin ou d’un bord.
E. Commencez à pulvériser le produit, puis déplacez-vous vers l’autre coin
ou l’autre bord.
F. Une fois rendu, dirigez-vous vers le coin ou le bord où vous avez
commencé sans vous arrêter.
Répétez ces étapes jusqu’à ce que le plafond soit entièrement couvert.
G.
REMARQUES GÉNÉRALES
Le pistolet à trémie peut pulvériser n’importe quelle substance pouvant être
atomisée et soumise à la gravité (le degré d’atomisation dépend des
réglages en lb/po2 et en pi3/min qu’offre le compresseur d’air).
Le compresseur doit produire au minimum 7 pi³/min à 25 lb/po².
Assurez-vous que vous pouvez pulvériser votre produit à l’aide d’un pistolet
à trémie; pour ce faire, consultez l’étiquette du produit et les instructions du
fabricant.
Vous pouvez essayer de mélanger une tasse de pâte à joint par trémie
pour favoriser le débit du jet.
Prenez note que le pistolet à trémie n’est pas muni d’une soupape interne.
Si vous ne voulez pas que l’air circule sans arrêt, installez la soupape
d’arrêt là où le tuyau s’insère dans le pistolet. N’employez jamais la soupape
d’arrêt si vous utilisez le compresseur portable Wallboard. Employez-la
seulement si vous utilisez un compresseur d’air muni d’un réservoir et d’un
interrupteur d’arrêt automatique.
Pour vaporiser du produit sur les murs, vous devez vous placer à une
distance de 0,91 m à 1,22 m.
Pour vaporiser sur les plafonds, vous devez vous placer à une distance de
0,46 m à 0,61 m et incliner le pistolet à trémie à un angle de 25° à 60°.
24
Page 25

ENTRETIEN
NETTOYAGE DU PISTOLET À TRÉMIE
1. Remplissez la trémie d’eau, puis nettoyez-la. Ensuite, raccordez le
compresseur d’air et faites sortir suffisamment d’air pour déloger tout
résidu.
2. Assurez-vous que la soupape est ouverte si vous utilisez une soupape
d’arrêt d’air.
3. Placez le pistolet à trémie à l’envers et lubrifiez-le en faisant couler des gouttes d’huile pour un
usage domestique dans le dispositif de déconnexion rapide (ouvrez d’abord la soupape d’arrêt
d’air). Vous lubrifiez ainsi les tiges à air et les joints toriques.
4. Appuyez sur la gâchette plusieurs fois, puis fermez la soupape d’arrêt.
ASSEMBLAGE ET DÉMONTAGE DU PISTOLET À TRÉMIE
Démontage du pistolet à trémie
Retirez la bague en tournant l’écrou dans le sens contraire des aiguilles
1.
d’une montre.
Retirez le bouton moleté en le tournant dans le sens contraire des aiguilles
2.
d’une montre.
3. À l’aide de votre doigt, poussez la tige centrale vers l’arrière afin de la retirer
du pistolet.
RÉASSEMBLAGE :
1. Avant de réassembler le pistolet à trémie,
huilez les joints toriques et le dispositif d’arrêt
réglable à l’aide d’une petite quantité de
graisse à base de lithium.
2.
Replacez la tige centrale à partir de
l’arrière.Veillez à ne pas briser les
joints toriques lorsque vous réassemblez
le pistolet.
Replacez le bouton moleté en le tournant
3.
dans le sens des aiguilles d’une montre.
Insérez la bague, puis fixez-la en tournant
4.
l’écrou dans le sens des aiguilles d’une montre.
Entreposage à long terme :
Assurez-vous d’entreposer le pistolet dans un endroit sec et sécuritaire.
25
Page 26

DÉPANNAGE
TYPE DE JET/ÉTAT
a) La bague est
encrassée.
b) Le matériau entourant
la bague a séché.
a) Le joint torique (pièce
no 9) est sec ou usé.
b) La douille de la tige à
air (pièce no 8) est
desserrée.
c) La bague est mal installée
ou des saletés se sont
incrustées entre la bague
et le corps.
a) L’écrou de réglage
(pièce no 26) est mal
ajusté.
b) La tige à air est
desserrée.
PROBLÈME
a) Le liquide ne peut
être pulvérisé de façon
efficace.
b) La pulvérisation est
insatisfaisante.
Jet intermittent
Le jet obtenu est
insatisfaisant.
MESURE CORRECTIVE
a) Trempez la bague dans du solvant
pour la désencrasser.
b) Actionnez la gâchette à plusieurs
reprises.
c) Retirez le capuchon fileté et la bague
et nettoyez la bague à l’aide d’un
cure-dent en bambou ou en bois.
Essuyez ensuite le capuchon fileté et
la bague à l’aide d’un linge humecté
de diluant.
d) Remettez la bague en place et serrez
fermement le capuchon fileté.
a) Faites couler quelques gouttes
d’huile pour machine sur le joint
torique ou remplacez-le. Resserrez
la douille de la tige à air.
c) Retirez le capuchon fileté et la
bague, nettoyez les saletés et
remettez la bague et le capuchon
fileté en place.
a) Ajustez l’écrou de réglage.
b) Démontez le dispositif d’arrêt
réglable (pièces no 18 à 29) selon les
instructions du manuel, appliquez une
petite quantité de lubrifiant à base de
lithium sur la tige et le joint torique
(pièce no 21), puis réassemblez le
tout.
La bague et la tige sont
usées.
Le pistolet est trop loin
de la surface.
Le pistolet est trop
proche de la surface.
La bague fuit.
Le fini obtenu est mince
et rugueux.
Le fini obtenu est épais
et a la texture d’une
peau d’orange.
26
Remplacez la bague et la tige.
Rapprochez le pistolet de la
surface selon les instructions
du manuel.
Éloignez le pistolet de la surface
selon les instructions du manuel.
Page 27

ENTRETIEN
Il est recommandé d'installer une burette à huile sur la conduite d'air, car elle prolonge
la durée de vie de l'outil tout en lubrifiant ce dernier pendant les périodes d'utilisation
intensive. La burette doit être régulièrement vérifiée et remplie d'huile pour outil
pneumatique. Pour vérifier si la burette est réglée correctement, placez une feuille de
papier à côté des orifices d'échappement de l'outil et maintenez la soupape ouverte
pendant environ 30 secondes. Si une légère tache d'huile se forme sur le papier, le
réglage de la burette est adéquat. Évitez de lubrifier excessivement l'outil.
S'il vous faut ranger l'outil pour une période prolongée, lubrifiez-le abondamment.
Faites-le fonctionner pendant environ 30 secondes pour vous assurer que l'huile a été
répartie également dans l'outil. Rangez l'outil dans un endroit propre et sec.
Retirez toujours l'outil de la source d'alimentation en air avant d'effectuer tout entretien.
Lubrifiants recommandés : Utilisez de l'huile pour outil pneumatique ou toute autre
huile de qualité pour turbine contenant des absorbants d'humidité, des antioxydants
des agents d'arrosage de métal et un additif EP (extrême pression).
Entreposage
Outil rotatif pneumatique doit être bien nettoyée et légèrement lubrifiée.
Rangez Outil rotatif pneumatique dans un endroit sec et sûr, hors de la portée
des enfants.
27
Page 28

VUES ÉCLATÉES
.
/
0
J
I
No de pièce
C
K
L
M
5
D
7
8
9
10
11
12
E
J
I
F
G
18
KOBALT® et le motif K Design sont des marques de
commerce déposées de LF, LLC. Tous droits réservés.
Description
Capuchon fileté
Bague A (diam. 4,5)
Bague B (diam. 6)
Bague C (diam. 8)
Boulon de fixation de la gâchette
Gâchette
Attache en « E »
Douille de la tige à air
Joint torique (9 x 1,8)
Rivet de fixation pour l’attache
Attache pour la gâchette du manche
Attache en « E »
Manche du pistolet
Raccord d’entrée d’air
Coude en laiton
Soupape d’arrêt d’ai
Dispositif de déconnexion rapide
Corps fileté
Quantité
No de pièce
1
1
1
1
1
1
1
1
1
1
1
1
1
1
1
1
1
1
28
19
20
21
22
23
24
25
26
27
28
29
30
31
32
B
34
A
H
Description
Joint torique (13,5 x 1,5)
Tige de réglage
Joint torique (10,6 x 1,8)
Rondelle
Ressort de réglage
Joint torique (7,2 x 1,9)
Vis d’étanchéité
Écrou de réglage
Vis à tête cruciforme
Tige à air (arrière)
Tige à air (avant)
Joint torique (33,3 x 3,5)
Collier de serrage (38-57)
Collier de serrage (44-64)
Raccord flexible
Poignée à prise souple
Trémie
Support en métal
Imprimé en Chine
Quantité
1
1
4
1
1
1
1
1
1
1
1
1
1
1
1
1
1
1
Page 29

ARTÍCULO #0267315
PISTOLA DE TOLVA
NEUMÁTICA
MODELO #SGY-AIR84TZ
KOBALT y K & Design son marcas
registradas de LF, LLC. Todos los derechos
reservados.
ADJUNTE SU RECIBO AQUÍ
Número de serie
¿Preguntas, problemas, piezas faltantes? Antes de volver a la tienda,
llame a nuestro Departamento de Servicio al Cliente al 1-888-3KOBALT, de
8:00 a.m. a 8:00 p.m. hora estándar del Este, de lunes a viernes.
®®
AB13431
Français p.15
Español p. 29
Fecha de compra
kobalttools.com
29
Page 30

TABLE OF CONTENTS
Información de seguridad ................................................................................... 31
Especificaciones del producto............................................................................ 33
Contenido del paquete .......................... ............................................................... 34
Instrucclones de ensmaje .................... ................................................................ 35
Instrucclones de funcionamiento .......... ............................................................... 36
Notas generales...................................................................................................
38
Cuidado y mantenimiento ................................................................................... 39
Solución de problemas .........................
.............................................................. 40
Garantía ............................................................................................................. 41
Vistas detalladas .................................................................................................. 42
@
1.7
CFM25PSI
Tool Requirements
Exigences relatives aux outils
Requisitos de herramientas
IMPORTANTE: Para funcionar de manera correcta, esta herramienta requiere un flujo de aire de
por lo menos 1,7 pies cúbicos por minutos (CFM por sus siglas en inglés) para 25 libras por
pulgada cuadrada(PSI, por sus siglas en inglés). Revise las especificaciones de su compresora
de aire para asegurarse de que puede soportar tanto los CFM como las PSI mínimas requeridas.
Una manguera de aire comprimido puede causar una caída de hasta 15 PSI en la presión, de
m anera que puede necesitar configurar la potencia más alta para mantener la presión requerida
30
Page 31

INFORMACIÓN DE SEGURIDAD
Lea y comprenda completamente este manual antes de intentar ensamblar, usar o
instalar el producto. Si tiene preguntas relacionadas con el producto, llame al
Departamento de Servicio al Cliente al 1-888-3KOBALT, de lunes a viernes de
8 a.m. a 8 p.m., hora estándar del Este.
POR SU PROPIA SEGURIDAD, LEA Y COMPRENDA EL MANUAL DEL
PROPIETARIO ANTES DE USAR EL ARTÍCULO. NO CUMPLIR NI SEGUIR
LAS INSTRUCCIONES DE SEGURIDAD A CONTINUACIÓN PODRÍA PROVOCAR
UNA LESIÓN.
USE EQUIPO DE PROTECCIÓN ADECUADO
Mantenga el cabello suelto, la ropa suelta o cualquier tipo de joya alejados de
cualquier pieza en movimiento.
Use gafas de seguridad de protección o una careta protectora para proteger los ojos.
Para reducir el riesgo de daños a la audición asegúrese de usar la protección auditiva
adecuada para proteger los oídos.
Vista de forma correcta y use ropa de protección cuando sea necesario.
Siempre que sea posible, se recomienda usar ropa que no conduzca electricidad y
calzado antideslizante al utilizar las herramientas.
MANTENGA A LOS NIÑOS ALEJADOS DEL ÁREA DE TRABAJO Y LA
HERRAMIENTA
Mantenga la herramienta alejada del alcance de los niños y nunca permita que estos
manipulen el equipo o la herramienta.
Mantenga el área de trabajo libre de desorden y otros peligros para el trabajo.
No use este producto en condiciones de trabajo inseguras.
RIESGOS PARA EL ENTORNO DE TRABAJO
Tenga presente que las extensiones eléctricas y las mangueras de aire comprimido
pueden representar riesgos de tropiezo.
Siempre tenga presente los alrededores del área de trabajo y las personas que están
alrededor del área de trabajo para garantizar su seguridad.
No opere la herramienta si se dañó durante el envío, la manipulación o el transporte
inseguro del artículo.
El uso de una herramienta dañada o insegura podría provocar lesiones graves, la
muerte y/o daños a la propiedad.
Los movimientos repetitivos, las posiciones incómodas y la exposición a la vibración
pueden ser perjudiciales para las manos y los brazos.
Mantenga las mangueras alejadas del calor, el aceite y los bordes filosos. Inspeccione
las mangueras en busca conexiones deterioradas antes de cada uso y asegúrese de
que todas las conexiones estén seguras antes de su uso.
Nunca rocíe cerca de materiales inflamables, llamas abiertas o cerca de fuentes de
ignición.
Nunca almacene líquidos o gases inflamables cerca del compresor de aire u otros
materiales comprimidos bajo presión.
31
Page 32

INFORMACIÓN DE SEGURIDAD
PAUTAS DE SEGURIDAD ADICIONALES
Cada herramienta tiene una función única y está diseñada para funcionar de una
manera específica.
Solo use la herramienta para el fin para el cual fue concebida.
Siempre lea la hoja de datos de seguridad de materiales o la etiqueta de los
materiales y/o las sustancias químicas que podría usar antes de utilizar un artículo
para confirmar que son seguros.
Los operadores deben poder manejar fácilmente el peso de la masa del artículo, de
modo que el operador tenga completo control del artículo el 100% del tiempo.
Nunca use la herramienta bajo los efectos de drogas o alcohol.
Nunca use la herramienta si está cansado, ya que el operador necesita estar en control
de la herramienta en todo momento.
Se recomienda tener siempre un extintor de incendios y un kit de primeros auxilios
cerca del área de trabajo.
Mantenga un apoyo de pies correcto en todo momento. No se extienda demasiado ya
que podría resbalarse, tropezarse y/o caerse y estos accidentes pueden ser la causa
principal de lesiones graves y/o la muerte. Esté atento al exceso de manguera que
queda en la superficie o el área de trabajo. No maltrate las mangueras o los
conectores.
Cuando utilice herramientas neumáticas, transporte siempre la herramienta por el
mango. Nunca transporte la herramienta de la manguera ni jale de ella para
desconectarla del suministro de aire o electricidad.
No use una presión que exceda la presión de funcionamiento de cualquiera de las
piezas (mangueras, conectores, etc.) en el sistema de pintura.
Si los ojos o la cara entran en contacto directo con el material rociado, póngase en
contacto con su médico o la sala de emergencias local para solicitar ayuda inmediata.
Nunca se apunte ni se rocíe a sí mismo ni a otras personas, ya que podría provocar
lesiones graves o la muerte.
No rocíe ácidos, materiales corrosivos, sustancias químicas tóxicas, fertilizantes ni
pesticidas. El uso de estos materiales podría provocar lesiones graves y/o la muerte.
Use siempre una mascarilla y/o respirador y ropa protectora cuando rocíe.
Rocíe siempre en un área bien ventilada para evitar riesgos para la salud e incendios.
Consulte la hoja de datos de seguridad de materiales (MSDS, por sus siglas en inglés)
de los materiales de rociado para obtener detalles.
Algunos de los materiales que se pueden usar con este dispositivo pueden causar
irritación de la piel si entran en contacto con ella. Lea la hoja de datos de seguridad de
materiales o la etiqueta de los materiales que usará para saber cuáles de ellos pueden
provocar irritación.
Desconecte siempre la herramienta del suministro de aire antes de realizar cualquier
tarea de mantenimiento.
Nunca use una herramienta que tenga fugas de aire, le falten piezas o tenga piezas
dañadas o requiera reparación.
Use solo piezas y accesorios recomendados por el fabricante.
32
Page 33

INFORMACIÓN DE SEGURIDAD
rLea y comprenda completamente este manual antes de intentar ensambla , usar o
instalar el producto. Si tiene preguntas relacionadas con el producto, llame al
Departamento de Servicio al Cliente al 1-888-3KOBA T, de lunes a viernes de
L
8:00 a.m. a 8:00 p.m., hora estándar del Este.
ADVERTENCIA
El uso o mantenimiento inadecuado de este producto puede ocasionar lesiones
graves y daños a la propiedad. Lea y comprenda todas las advertencias e
instrucciones de funcionamiento antes de usar este equipo. Cuando utilice
herramientas neumáticas, siga siempre las medidas de precaución básicas para
reducir el riesgo de lesiones personales.
ADVERTENCIA
PARTE DEL POLVO PRODUCIDO POR EL LIJADO, EL SERRUCHADO, LA
TRITURACIÓN Y LA PERFORACIÓN ELÉCTRICA Y OTRAS ACTIVIDADES
RELACIONADAS CONTIENE QUÍMICOS RECONOCIDOS POR EL ESTADO DE
CALIFORNIA COMO CAUSANTES DE CÁNCER, DEFECTOS CONGÉNITOS U OTRO
DAÑOS EN EL APARATO REPRODUCTIVO. SE PUEDE OBTENER UNA LISTA DE LA
SUSTANCIAS QUÍMICAS EN www.oehha.ca.gov BAJO PROPOSITION 65 (PROPUESTA 65
ALGUNOS EJEMPLOS DE ESTAS SUSTANCIAS QUÍMICAS SON:
PLOMO DE PINTURAS A BASE DE PLOMO
SÍLICE CRISTALINA DE LADRILLOS, CEMENTO Y OTROS PRODUCTOS DE
MAMPOSTERÍA
ARSÉNICO Y CROMO DE MADERA TRATADA CON QUÍMICOS
SU RIESGO LUEGO DE ESTAS EXPOSICIONES VARÍA, DEPENDIENDO DE CUÁN
A MENUDO REALICE ESTE TIPO DE TRABAJO. PARA REDUCIR SU EXPOSICIÓN
A ESTOS QUÍMICOS, UTILICE UN EQUIPO DE SEGURIDAD APROBADO, COMO UN
RESPIRADOR O LAS MÁSCARAS PARA POLVO ESPECIALMENTE DISEÑADAS
PARA FILTRAR PARTÍCULAS MICROSCÓPICAS
S
S
)
.
ESPECIFICACIONES DEL PRODUCTO
COMPONENTE
FEED TYPE
D.I. DE LA BOQUILLA DE FLUIDO
PRESIÓN DE TRABAJO MÁXIMA
PRESIÓN DE TRABAJO
REQ. (SCFM A 25 PSI)
ENTRADA DE AIRE
ESPECIFICACIONES
GRAVEDAD
4.5 MM, 6 MM, 8 MM
30 PSI
25 PSI
1.7 SCFM
1/4 IN. NPT
33
Page 34

CONTENIDO DEL PAQUETE
A
B
C
H
H
PIEZA
A
B
C
D
E
F
G
H
I
J
K
L
K
L M
DESCRIPCIÓN
D
I
E
J
CANTIDAD
Tolva
Conector flexible
Capuchón de aire
Gatillo
Carcasa principal
Válvula de cierre de aire
Desconexión rápida
Base de metal
Codo de Latón
Montaje de entrada de aire
Orificio para el material A (d=4.5)
Orificio para el material A (d=6)
Orificio para el material A (d=8)
G
F
1
1
1
1
1
1
1
1
1
1
1
1
1M
34
Page 35

INSTRUCCIONES DE ENSAMBLAJE
NOTA Tenga en cuenta que hay dos tipos distintos de compresores de aire/tanques
de aire que se pueden usar con este artículo.
PARA COMPRESOR DE AIRE DE PISTÓN/TANQUE
A. Enrosque el codo de latón en 90° (I) en el
conector de la entrada de aire (J) en la parte
inferior del mango de la pistola de la tolva.
B.Enrosque la válvula de control del aire (F)
en el codo de latón.
J
G
C.Enrosque la desconexión rápida (G) en la
válvula de cierre de aire.
I
F
PARA COMPRESOR DE ÁLABE ROTATORIO
A.Enrosque el codo de latón en 90° (I) en el
conector de la entrada de aire (J) en la parte
inferior del mango de la pistola.
B.Enrosque la desconexión rápida (G) en el
codo de latón (I).
J
G
PRECAUCIÓN: NO instale la válvula de cierre
de aire (F) en la pistola de tolva a menos que su
I
compresor cuente con un interruptor de presión
de trabajo para controlar el encendido y el
apagado.
Fijación de la tolva a la pistola
1. Coloque la tolva (A) boca abajo.
B
2. Coloque el extremo grande del conector
flexible (B) sobre el cuello de la tolva y deslice
el receptor de la tolva de la pistola en el
extremo pequeño del conector flexible (B).
A
3. Coloque la tolva con el mango apuntando
hacia la parte posterior de la pistola y apriete
las abrazaderas de la tolva.
Tiempo estimado de ensamblaje: 5 a 10 minutos
Herramientas necesarias para el ensamblaje: destornillador plano (no se incluyen)
35
Page 36

INSTRUCCIONES DE FUNCIONAMIENTO
Debe tener en cuenta y lidiar con las siguientes variables al configurar su
pistola de tolva para asegurar resultados uniformes y deseados.
Suministro de aire: La pistola de tolva requiere un compresor que produzca
0,2 m³/min. a 25 PSI. El suministro de aire debe ser uniforme o afectará la
textura.
Presión: Mientras menor sea la presión, más densa será la textura. La
presión normal oscila en rangos de entre 10 y 30 PSI. El rociado medio y
la piel de naranja se rocían entre 17 y 23 PSI.
Orificio del material:
Utilice siempre el orificio más grande del material (8 mm). El rociado medio
y la piel de naranja utilizan el orificio medio del material (6 mm).
Distancia para jalar el gatillo:
Separe con la perilla en la parte posterior de la pistola. Es muy importante
regular la distancia para mantener la uniformidad.
1. En este diagrama, la tolva está llena, el aire
ingresa y fluye desde la punta, no se está
aplicando presión al gatillo y no se está
rociando ningún material.
2. En este diagrama, la tolva está llena, el aire
ingresa y fluye, se está aplicando presión
parcial al gatillo y se está rociando algo de
material de la pistola.
1
2
36
Page 37

INSTRUCCIONES DE FUNCIONAMIENTO
3. En este diagrama, la tolva está llena, el
aire ingresa y fluye, se está aplicando
máxima presión al gatillo y se está
rociando material desde la pistola en
incrementos.
TABLA DE TEXTURAS
TEXTURA
Acústica
Salpicaduras
gruesas
Salpicaduras
medias
Piel de naranja
PRESIÓN
16-21
11-16
16-21
19-24
JALE DEL
GATILLO
Completamente
Completamente
Dos tercios
Hasta la mitad
3
GROSOR
Instrucciones
del producto
Delgado
Grueso
Grueso
ABERTURA
8 mm
8 mm
6 mm
6 mm
Salpicaduras
leves
ANTES DE ROCIAR
1. Use cinta y un paño de lona gruesa para proteger las áreas que no desea rociar.
Los paños de plástico delgados no brindarán la protección suficiente.
2. No rocíe 100% verticalmente o perderá eficiencia.
3. Planifique su ruta y asegúrese de haber mezclado material suficiente antes de
comenzar para evitar interrupciones en su trabajo.
4. Siempre debe realizar una prueba de rociado en una pieza de madera
contrachapada o cartón antiguos antes de comenzar.
5. Siempre asegúrese de usar el equipo de seguridad adecuado al usar este artículo.
22-26
Un tercio
37
Thick
4 mm
Page 38

INSTRUCCIONES DE FUNCIONAMIENTO
SPRAYING WALLS & VAULT CEILINGS VERTICALLY
A. Comience siempre de 0,91 a 1,52 m desde la pared o techo vertical.
B. Comience por la parte superior en un borde o una esquina.
C. Mueva la pistola arriba y abajo, cubriendo la pared de manera vertical en
su espacio designado. Desde la parte inferior, muévase hacia los lados y
trabaje hacia arriba.
D. Repita este movimiento desde la parte superior hasta la inferior, luego
hacia los lados desde la parte superior hasta la parte inferior y luego hacia
los lados hasta que haya cubierto la pared.
E. Vuelva a cargar la pistola de tolva según sea necesario.
ROCIADO DE PAREDES Y TECHOS DE BÓVEDA DE MANERA VERTICAL
A. Cargue la pistola de tolva a no más del 75% de su capacidad con su
material de rociado.
B. Abra la válvula de cierre y deje pasar aire a través de la pistola de tolva.
C. Levante la pistola de tolva hasta que esté entre 45,72 cm y 60,96 cm por
debajo del techo y coloque la pistola en un ángulo entre 25 y 55 grados.
D. Comience siempre cerca de una esquina o un borde.
E. Comience a rociar y muévase hacia la esquina o borde opuesto.
F. Muévase hacia atrás sin detenerse y muévase hacia la esquina o borde
inicial.
Repita este procedimiento hasta que haya cubierto todo el techo.
G.
NOTAS GENERALES
La pistola de tolva disparará cualquier cosa que pueda alimentarse por
gravedad y atomizarse (el grado de atomización se basa en tener los
PSI y m³/min. disponibles desde la fuente de aire).
El compresor debe brindar un mínimo de 0,2 m³/min. a 25 PSI.
Asegúrese de que su mezcla sea apta para pistolas de tolva revisando la
etiqueta y las instrucciones del fabricante.
Puede probar mezclando una taza de compuesto para uniones por tolva
para ayudar al flujo de rociado.
Tenga en cuenta que la pistola de tolva no tiene una válvula interna. Si no
desea que el aire fluya de manera continua, instale la válvula de cierre
donde la manguera ingresa a la pistola. Nunca utilice la válvula de cierre
con el compresor portátil para paneles de fibra prensada. Solo use la válvula
de cierre con un compresor de aire que tenga un tanque de reserva y un
interruptor de apagado automático.
Para rociar paredes, debe estar a una distancia entre 0,91 y 1,22 m.
Para rociar techos, debe estar entre 45,72 y 60,96 cm debajo con la pistola
de tolva en un ángulo de entre 25 y 60 grados.
38
Page 39

CUIDADO Y MANTENIMIENTO
LIMPIEZA DE LA PISTOLA DE TOLVA
1. Use agua para cargar y limpiar la tolva. Luego, vuelva a conectarla al
compresor de aire y sople aire a través de este para eliminar cualquier
suciedad restante.
2. Asegúrese de que la válvula esté abierta si usa una válvula de cierre de
aire.
3. Coloque la pistola de tolva boca abajo y lubríquela con aceite doméstico vertiendo un poco en la
desconexión rápida (con la válvula de cierre de aire en la posición abierta). Esto lubrica el vástago
de aire y las juntas tóricas.
4. Jale el gatillo varias veces y cierre la válvula de cierre.
ENSAMBLAJE Y DESENSAMBLAJE DE LA PISTOLA DE TOLVA
Para separar la pistola de tolva
1.
Retire el orificio para el material girando la tuerca en dirección contraria a
las manecillas del reloj.
2.
Retire la perilla moleteada girándola en dirección contraria a las manecillas
del reloj hasta que salga.
3. Con su dedo, empuje el vástago central hacia fuera de la pistola a través de
la parte posterior.
PARA VOLVER A ENSAMBLAR:
1. Antes de volver a ensamblar la pistola de tolva,
vierta una pequeña cantidad de grasa a base
de litio en las juntas tóricas del ensamble del
tope de ajuste.
2.
Vuelva a colocar el vástago central desde
la parte posterior. Asegúrese de no romper
las juntas tóricas al volver a ensamblar.
Vuelva a colocar la perilla moleteada girándola
3.
en dirección de las manecillas del reloj.
Coloque el orificio para el material y asegúrelo girando
4.
la tuerca en dirección de las manecillas del reloj.
Almacenaje a largo plazo:
Asegúrese de almacenar el producto en una ubicación segura.
39
Page 40

SOLUCIÓN DE PROBLEMAS
MODALIDAD DE ROCIADO
/CONDICIÓN
a) El orificio para el material
está tapado.
b) El material alrededor de la
parte externa del orificio
está seco.
a)
La junta tórica (Pieza #9)
está seca o gastada.
b ) El conector de vástagos
de aire (Pieza #8) está
suelto.
c ) La tuerca de ajuste (Pieza
#26) no está bien ajustada.
a) La tuerca de ajuste (Pieza
#26) no está bien ajustada.
b) El vástago de aire está flojo.
PROBLEMA
a) No se puede rociar
material o no se rocía de
manera eficiente.
b) No se obtendrá una
atomización satisfactoria.
No se obtendrá un rociado
satisfactorio.
Rociado intermitente
ACCIÓN CORRECTIVA
a) Sumerja el orificio para el material en s
olvente para liberar la obstrucción.
b) Active el orificio para el material
varias veces.
c) Retire el capuchón de aire y el orificio
para el material, limpie el orificio con
un mondadientes de bambú o
madera. Luego limpie el capuchón
de aire y el orificio con un paño
humedecido con disolvente.
d) Vuelva a colocar el orificio y atornille
el capuchón de aire de manera que
quede apretado.
a) Desatornille ligeramente la pistola,
aplique unas gotas de aceite
lubricante o reemplace con la nueva
junta tórica.
b) Apriete el conector de vástagos de
aire.
c) Retire el capuchón de aire y el
orificio para el material, limpie la
suciedad, vuelva a instalar el orificio
y apriete el capuchón de aire.
a) Mantenga la tuerca de ajuste en
buen estado.
b) Desensamble el ensamble del tope
de ajuste (Piezas #18 a #29) según
las instrucciones del manual; limpie
el vástago y la junta tórica
(Pieza #21) con una pequeña
cantidad de grasa a base de litio y
vuelva a ensamblar.
El orificio para el material y el
vástago están gastados.
La pistola está demasiado
lejos de la superficie.
La pistola está demasiado
cerca de la superficie.
Hay goteo en el orificio para
el material.
El acabado es delgado,
arenoso y áspero.
El acabado es grueso y con
hendiduras, como la cáscara
de una naranja.
Reemplace con un orificio y un vástago
nuevos.
Acerque la pistola a la superficie según
las instrucciones del manual.
Aleje la pistola de la superficie según
las instrucciones del manual.
40
Page 41

GARANTIE
Cet outil est garanti par le fabricant pour une période de trois (3) ans à partir de la
date d'achat, selon les modalités décrites aux présentes.
Cet outil est garanti contre les défauts de matériaux et de fabrication. Si vous croyez
qu'il est défectueux, retournez-le, accompagné d'une preuve d'achat acceptable, au
point de vente d'origine. Si l'outil est jugé défectueux et qu'il est couvert par la
présente garantie, le distributeur l'échangera ou vous remboursera le prix d'achat.
Cette garantie sera annulée si : les défauts de matériaux ou de fabrication ou les
dommages résultent de réparations ou de modifications non autorisées, de
l'utilisation de pièces non conformes, de l'usure normale, d'un usage abusif
(notamment une surcharge de l'outil), d'un entretien inadéquat, d'une négligence,
d'un accident, d'une utilisation après une défaillance partielle ou de l'utilisation
d'accessoires inappropriés.
Cette garantie vous confère des droits précis. Il est possible que vous disposiez
également d'autres droits, qui varient d'un État ou d'une province à l'autre.
Pour toute question concernant la garantie, communiquez avec le service à la
clientèle au 1 888 3KOBALT, entre 8 h et 20 h (HNE), du lundi au vendredi.
41
Page 42

VISTAS DETALLADAS
.
/
0
J
I
Pieza No
C
K
L
M
5
D
7
8
9
10
11
12
E
J
I
F
G
18
KOBALT® y K Design® son marcas registradas
de LF, LLC. Todos los derechos reservados.
Descripción Cant.
.
Capuchón de aire
Orificio para el material A (d=4,5)
Orificio para el material B (d=6)
Orificio para el material C (d=8)
Perno de fijación del gatillo
Gatillo
Sujetador en E
Conector del vástago de aire
Junta tórica (9*1,8)
Remache de fijación del sujetador
Carcasa principal del sujetador del gatillo
Sujetador en E
Carcasa principal
Conector de entrada de aire
Codo de latón
Válvula de cierre de aire
Desconexión rápida
Cuerpo roscado
1
1
1
1
1
1
1
1
1
1
1
1
1
1
1
1
1
1
42
Pieza No.
19
20
21
22
23
24
25
26
27
28
29
30
31
32
B
34
A
H
Descripción Cant.
Junta tórica (13,5*1,5)
Vástago de ajuste
Junta tórica (10,6*1,8)
Arandela
Resorte de ajuste
Junta tórica (7,2*1,9)
Sello de tornillo
Tuerca de ajuste
Tornillo Phillips
Vástago de aire (posterior)
Vástago de aire (frontal)
Junta tórica (33,3*3,5)
Abrazadera para manguera (38 a 57)
Abrazadera para manguera (44 a 64)
Conector flexible
Soft Grip
Tolva
Base de metal
Impreso en China
1
1
4
1
1
1
1
1
1
1
1
1
1
1
1
1
1
1
 Loading...