

Page 1
Français p. 16
Español p. 31
ATTACH YOUR RECEIPT HERE
etaD esahcruP rebmuN laireS
Questions, problems, missing parts? Before returning to your retailer, call
our customer service department at 1-888-3KOBALT, 8:00 a.m.-8:00 p.m.,
EST, Monday-Friday.
1
ITEM #0075988
MODEL #SGY-AIR135TZ
AB13758
KOBALT®and the K Design®are registered
trademarks of LF, LLC. All Rights Reserved.
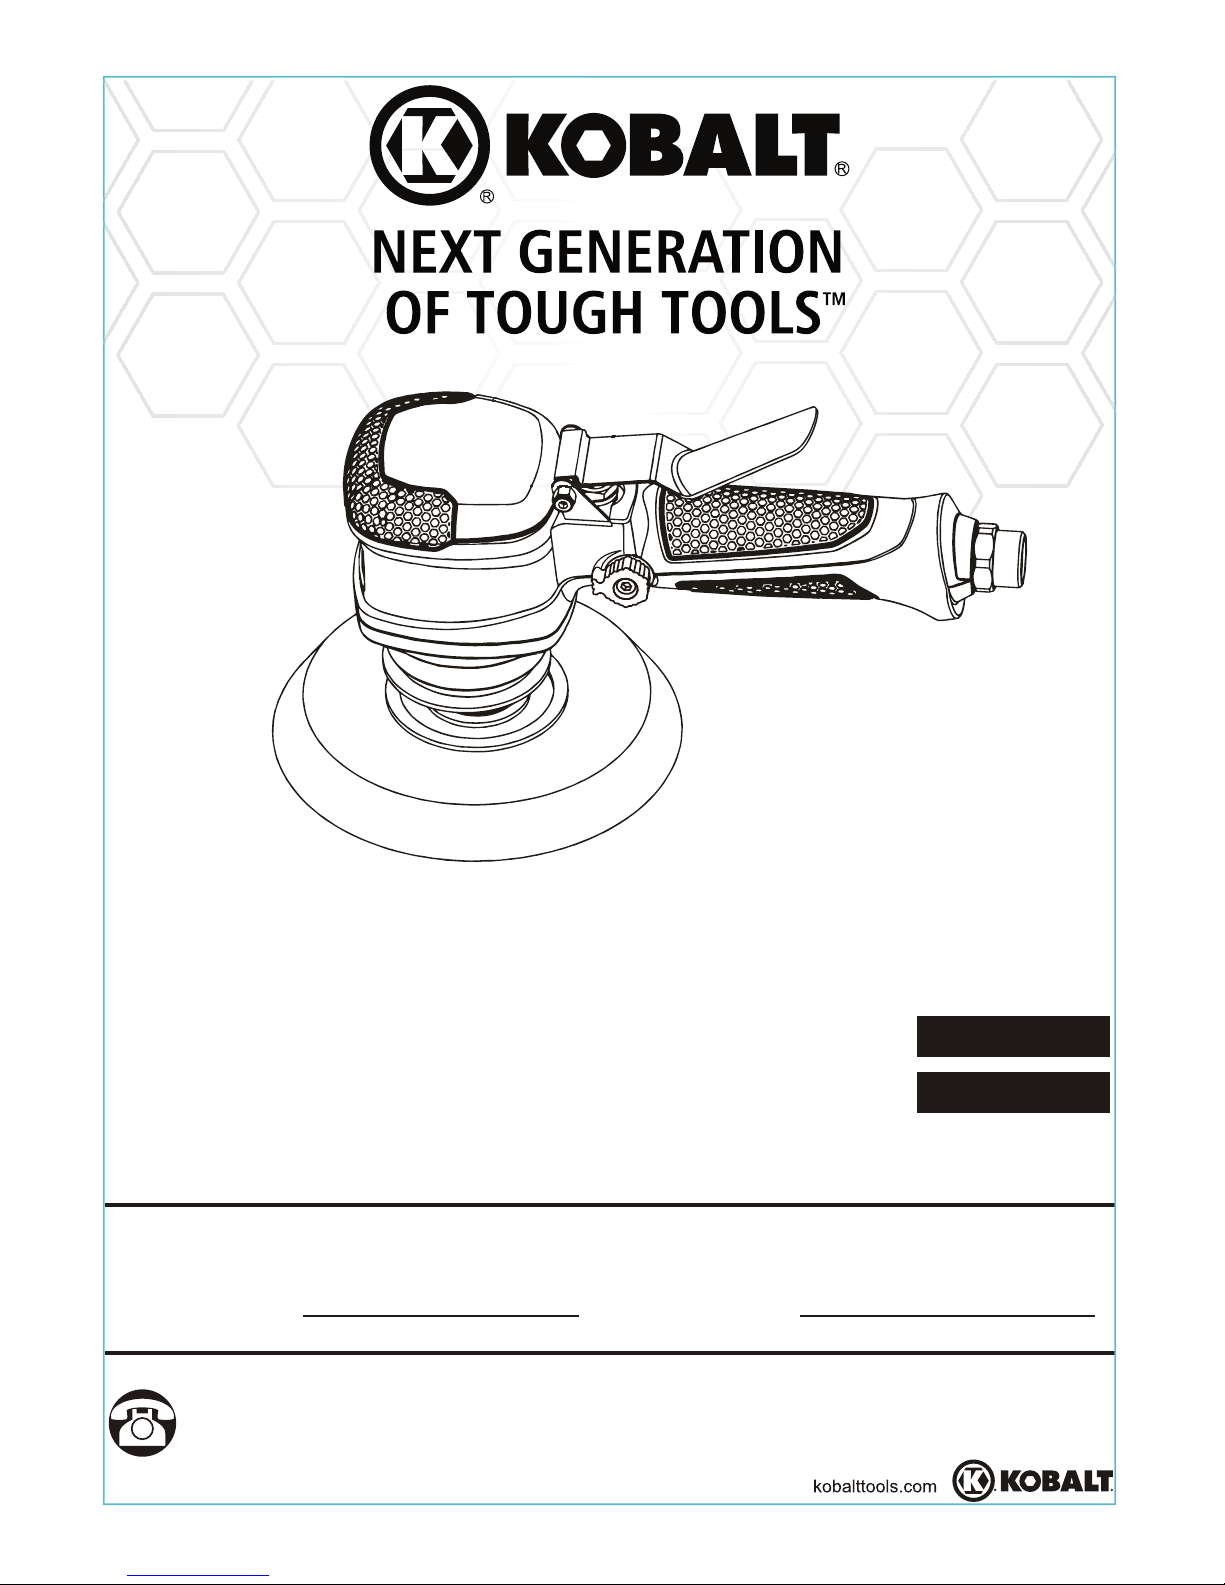
6 IN. DUAL ACTION SANDER
Page 2
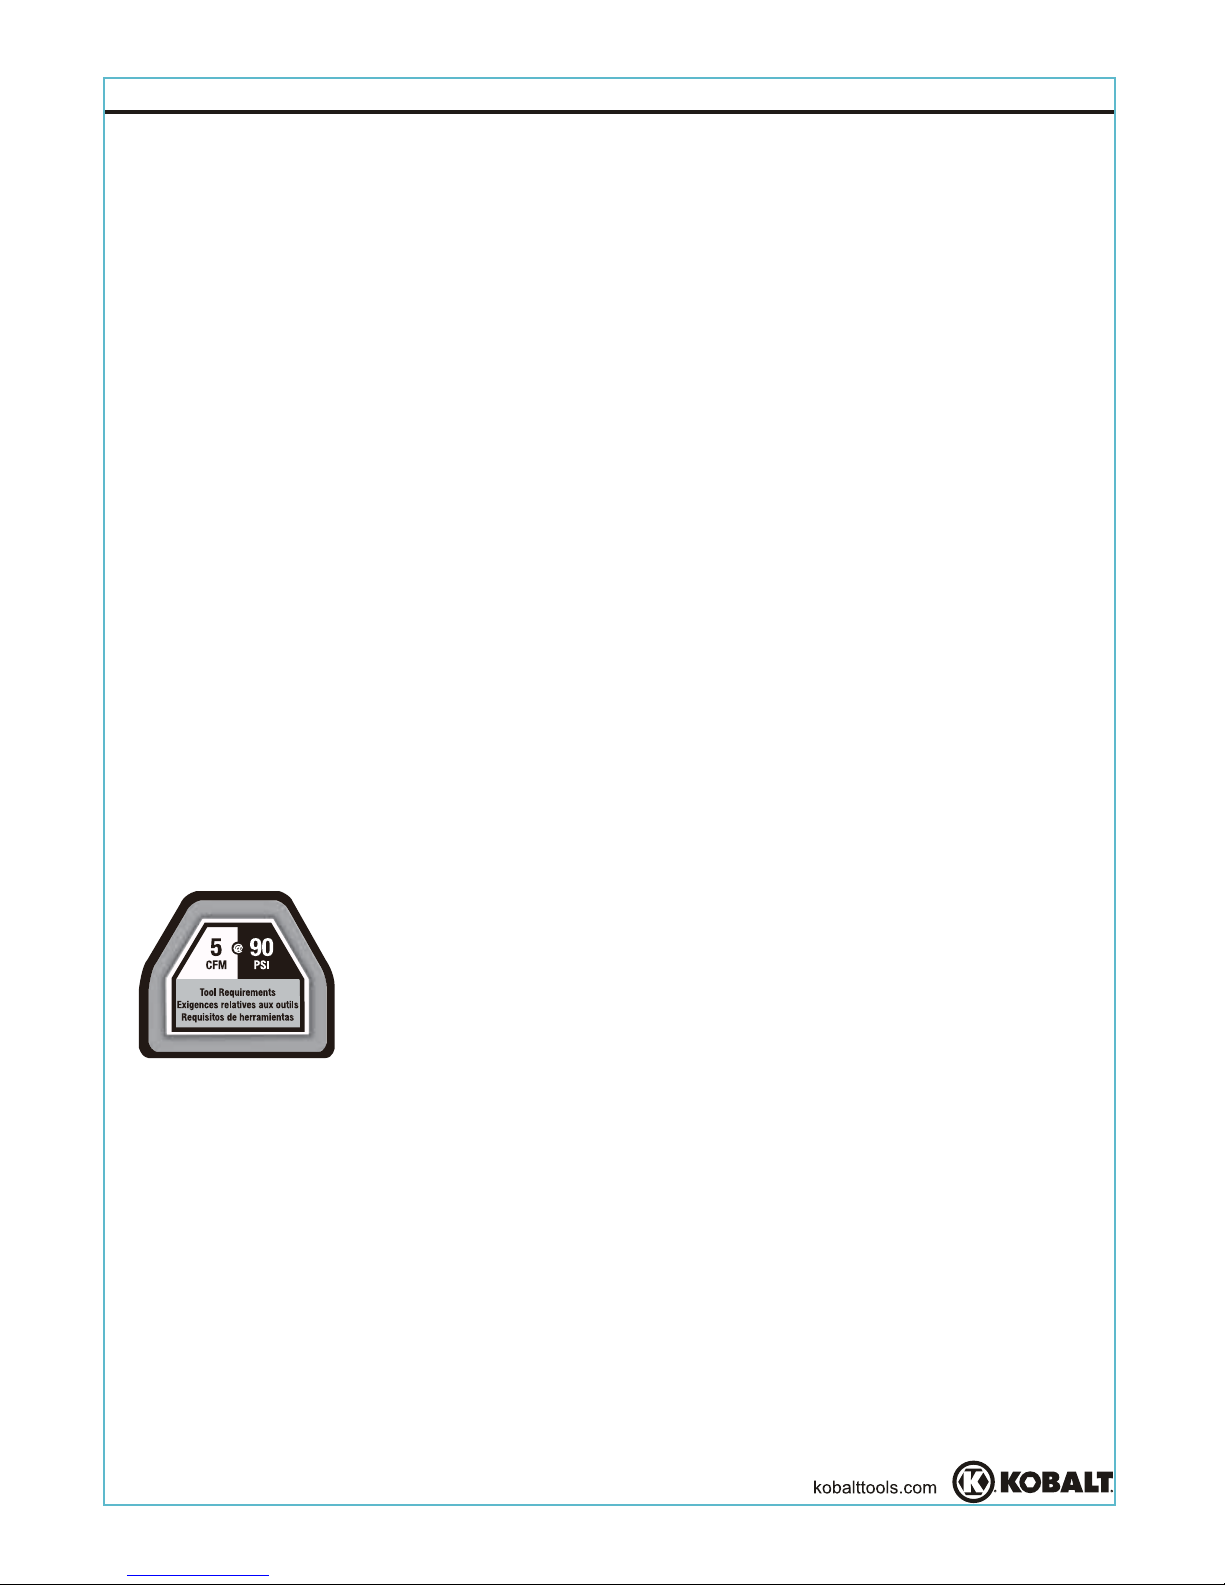
TABLE OF CONTENTS
2
Safety Information ............................................................................................... 3
Product Specifications ........................................................................................ 3
Package Contents ............................................................................................... 9
Preparation .......................................................................................................... 9
Assembly Instructions ........................................................................................ 10
Operating Instructions ........................................................................................ 12
Care and Maintenance ....................................................................................... 13
Troubleshooting .................................................................................................. 13
Warranty ............................................................................................................. 14
.................................................................................................... 15
IMPORTANT: To operate correctly, this tool requires airflow that is at least 5 cubic feet per
minute (CFM) at 90 pounds per square inch (PSI). Check the specifications of your air compressor
to be sure that it can support both the minimum CFM and PSI required. An air hose may cause
up to 15 PSI drop in pressure, so you may need to set the output higher to maintain the required
pressure at the tool.
Exploded View
Page 3
3
SPECIFICATIONS
6 IN.
10,000 RPM +/- 10%
5 CFM
1/4 IN. NPT
3/8 IN.
90 PSI
COMPONENT
PRODUCT SPECIFICATIONS
SAFETY INFORMATION
Please read and understand this entire manual before attempting to assemble, operate
or install the product. If you have any questions regarding the product, please call
customer service at 1-888-3KOBALT, 8:00 a.m.-8:00 p.m., EST, Monday-Friday.
Improper operation or maintenance of this product could result in serious injury and
property damage. Read and understand all warnings and operation instructions
before using this equipment. When using air tools, basic safety precautions should
always be followed to reduce the risk of personal injury.
WARNING
SOME DUST CREATED BY POWER SANDING, SAWING, GRINDING, DRILLING
AND OTHER RELATED ACTIVITIES CONTAINS CHEMICALS KNOWN TO THE
STATE OF CALIFORNIA TO CAUSE CANCER, BIRTH DEFECTS OR OTHER
REPRODUCTIVE HARM. A LISTING OF CHEMICALS CAN BE OBTAINED FROM
www.oehha.ca.gov UNDER PROPOSITION 65. SOME EXAMPLES OF THESE
CHEMICALS ARE:
LEAD FROM LEAD-BASED PAINTS
CRYSTALLINE SILICA FROM BRICKS, CEMENT AND OTHER MASONRY
PRODUCTS
ARSENIC AND CHROMIUM FROM CHEMICALLY-TREATED LUMBER
WARNING
YOUR RISK FROM THESE EXPOSURES VARIES, DEPENDING ON HOW OFTEN
YOU DO THIS TYPE OF WORK. TO REDUCE YOUR EXPOSURE TO THESE
CHEMICALS WORK IN A WELL VENTILATED AREA, AND WORK WITH
APPROVED
SAFTEY EQUIPMENT, SUCH AS A RESPRIATOR OR DUST MASKS
WHICH ARE SPECIALLY DESIGNED TO FILTER MICROSOPIC PARTICLES.
SANDING PAD
FREE SPEED
AVERAGE AIR CONSUMPTION
AIR INLET
AIR HOSE
WORKONG PRESSURE
Page 4
RISK OF EYE OR HEAD INJURY
WHAT COULD HAPPEN HOW TO PREVENT IT
This particular air powered tool can be
capable of propelling materials such as
fasteners, metal chips, sawdust, and
other debris at high speed which could
result in serious injury.
Compressed air can be hazardous and
propel objects and other particles that
can cause injury to soft tissue areas of
the body, such as eyes and ears.
Particles or objects propelled by the
stream can cause injury.
Tools attachments can become loose
or break and fly apart propelling articles
at the operator and others in the work
area.
Always wear ANSI approved Z87.1
safety glasses with side shields.
Never leave operating tool unattended.
Disconnect air hose when tool is not in
use, and place in a safe area.
For additional protection, use an
approved face shield in addition to
safety glasses.
Make sure that any attachments are
securely fastened and properly
assembled before use.
WARNING
Always use the tool at a safe distance
from others in the work area and ensure
the work area is safe at all times.
WHAT COULD HAPPEN HOW TO PREVENT IT
WARNING
A DA sander is capable of
generating sparks which can result
in ignition of flammable materials.
RISK OF FIRE OR EXPLOSION
Never operate tools near flammable
substances such as gasoline, naphtha,
cleaning solvents, etc.
Work in a clean, well ventilated area
free of combustible materials.
Never use oxygen, carbon dioxide or
other bottled gasses as a power source
for air tools.
4
SAFETY INFORMATION
WHAT COULD HAPPEN HOW TO PREVENT IT
WARNING
RISK OF LOSS OF HEARING
Always wear ANSI S3.19 hearing
protection.
Exposure to noise produced from the
operation of air tools can lead to
permanent hearing loss.
Page 5
5
SAFETY INFORMATION
Tools which contain moving elements
or drive other moving parts, such as
impact sockets, can become entangled
in hair, clothing, jewelry and other loose
objects, resulting in severe injury.
WHAT COULD HAPPEN HOW TO PREVENT IT
WARNING
RISK OF ENTANGLEMENT
Do not wear loose clothing, jewelry, or
anything that may get caught or tangled
when using tool.
Remove any jewelry which may be
caught by the tool.
Always keep hands and body parts
away from moving parts
Always wear proper fitted clothing and
other properly fitted safety equipment
when using this tool.
WHAT COULD HAPPEN HOW TO PREVENT IT
WARNING
RISK OF CUT OR BURNS
Keep the working part of the tool away
from hands and body.
A DA sander is capable of causing
serious injury if operated in an improper
way, or used in a manner which is not
intended for the tool.
WHAT COULD HAPPEN HOW TO PREVENT IT
WARNING
RISK OF ELECTRIC SHOCK
Air tool accessories such as impact
sockets that come into contact with
hidden electrical wiring could cause
electrocution or death.
Thoroughly investigate the work
piece/area for possible hidden wiring
before performing work.
Using air tools to attached electrical
wiring can result in electrical shock,
electrocution, or death.
This tool is not provided with an
insulated gripping surface. Contact with
a “live” wire will also make exposed
metal parts of the tool “live” and can
result in electrical shock, electrocution
or death.
Never use tools attached to electrical
wiring while energized.
Avoid body contact with grounded
surfaces such as pipes, radiators,
refrigerators, and ranges. There is
an increased risk of electrical shock if
your body is grounded.
Page 6
6
SAFETY INFORMATION
WHAT COULD HAPPEN HOW TO PREVENT IT
WARNING
RISK OF PERSONAL INJURY
A tool left unattended or with the air
hose attached can be activated by
unauthorized persons leading to their
injury or injury to others.
Air tools can propel fasteners or other
materials throughout the work area.
Always make sure to remove the
wrench key before operating. A wrench
key that is left attached to a rotating
part of the tool increases the risk of
personal injury.
Using inflator nozzles for duster
applications can cause serious injury.
Air tools can become activated by
accident during maintenance or tool
changes.
Air tools can cause the workpiece to
move upon contact, leading to injury.
Remove air hose when tool is not in use
and store tool in secure location away
from reach of children and untrained
users.
Use only parts, fasteners and accessories
recommended by the manufacturer.
Keep work area clean and free of
clutter. Do not allow children to operate
tool, and keep children away from the
work area.
Keep work area well lit.
Remove adjusting keys and wrenches
before turning the tool on.
DO NOT use inflator nozzles for duster
applications.
Remove air hose to lubricate or add
impact sockets to the tool.
Never carry the tool by the air hose.
Always carry the tool by the handle.
Avoid unintentional starting. Never carry
the tool with the trigger depressed or
engaged.
Only an authorized service
representative should do repair
servicing.
Use clamps or other devices to prevent
movement.
Loss of control of the tool can lead to
injury to self or others in the work area.
Never use the tool while using drugs or
alcohol.
Before changing accessories, when
making repairs, or when tool is not in
use, always first shut off air supply and
release/drain air pressure from hose.
Then disconnect tool from air supply or
hose and store in a safe location.
Page 7
7
SAFETY INFORMATION
Loss of control of the tool can lead to
injury to self of others in the work area.
Poor quality, improper or damaged
tools and attachments can fly apart
during operation, propelling particles
through the work area causing serious
injury.
Improperly maintained tools and
accessories can cause serious injury.
There is a risk of bursting if the tool is
damaged.
Keep proper footing at all times. Do not
overreach, as slipping, tripping, and or
falling can be a major cause of serious
injury and or death. Be aware of
excess air hose and power plugs in the
working area or work surface.
Keep handles dry, clean and free from
oil/grease.
Stay alert. Watch what you are doing.
Use common sense. Do not operate
tool when you are tired.
Always use tools attachments rated for
the speed of the power tool.
Never use tools, which have been
dropped, impacted, or are damaged.
Use only impact grade sockets with
this tool.
Do not apply excessive force to the tool;
let the tool perform the work.
Maintain the tool and accessories
with care.
Keep tools clean properly oiled for best
and safest performance.
Check for misalignment or binding of
moving parts, breakage of parts and
any other condition that affects the
tool's operation. If damaged, have the
tool serviced before using.
Never use a tool that is leaking air, has
missing or damaged parts, or requires
repairs.
Wiping or cleaning flammable waste
materials that may have been used on
tool must be placed in a tightly closed
metal container, and disposed of in
a proper manner.
WHAT COULD HAPPEN HOW TO PREVENT IT
WARNING
RISK OF PERSONAL INJURY
Page 8
8
There is a risk of bursting if the tool is
damaged.
Use of an accessory not intended for
use with a specific tool increases the
risk of injury to operator and anyone in
the work area.
Use of an accessory not intended for
use with the specific tools increases the
risk of injury to persons.
Follow lubrication instructions for best
and safest operation.
Follow assembly and repair instructions
on how to properly change accessories.
WHAT COULD HAPPEN HOW TO PREVENT IT
WARNING
RISK OF PERSONAL INJURY
WHAT COULD HAPPEN HOW TO PREVENT IT
WARNING
INHALATION HAZARD
Abrasive tools, such as grinders,
sanders and cut-off tools generate dust
and abrasive materials, which can be
harmful to human lungs and respiratory
system.
Some materials such as adhesives and
tar contain chemicals whose vapors
could cause serious injury with
prolonged exposure.
Always wear properly fitting facemask
or respirator when using such tools.
Always work in a clean, dry,
well-ventilated area.
SAFETY INFORMATION
Page 9
9
Before beginning the assembly of the product, make sure all parts are present.
Compare parts with package contents list. If any part is missing or damaged,
do not attempt to assemble the product. Contact customer service for replacement
parts.
Estimated Assembly Time: 5-10 minutes
Tools Required for Assembly (not included): Adjustable wrench
PACKAGE CONTENTS
PREPARATION
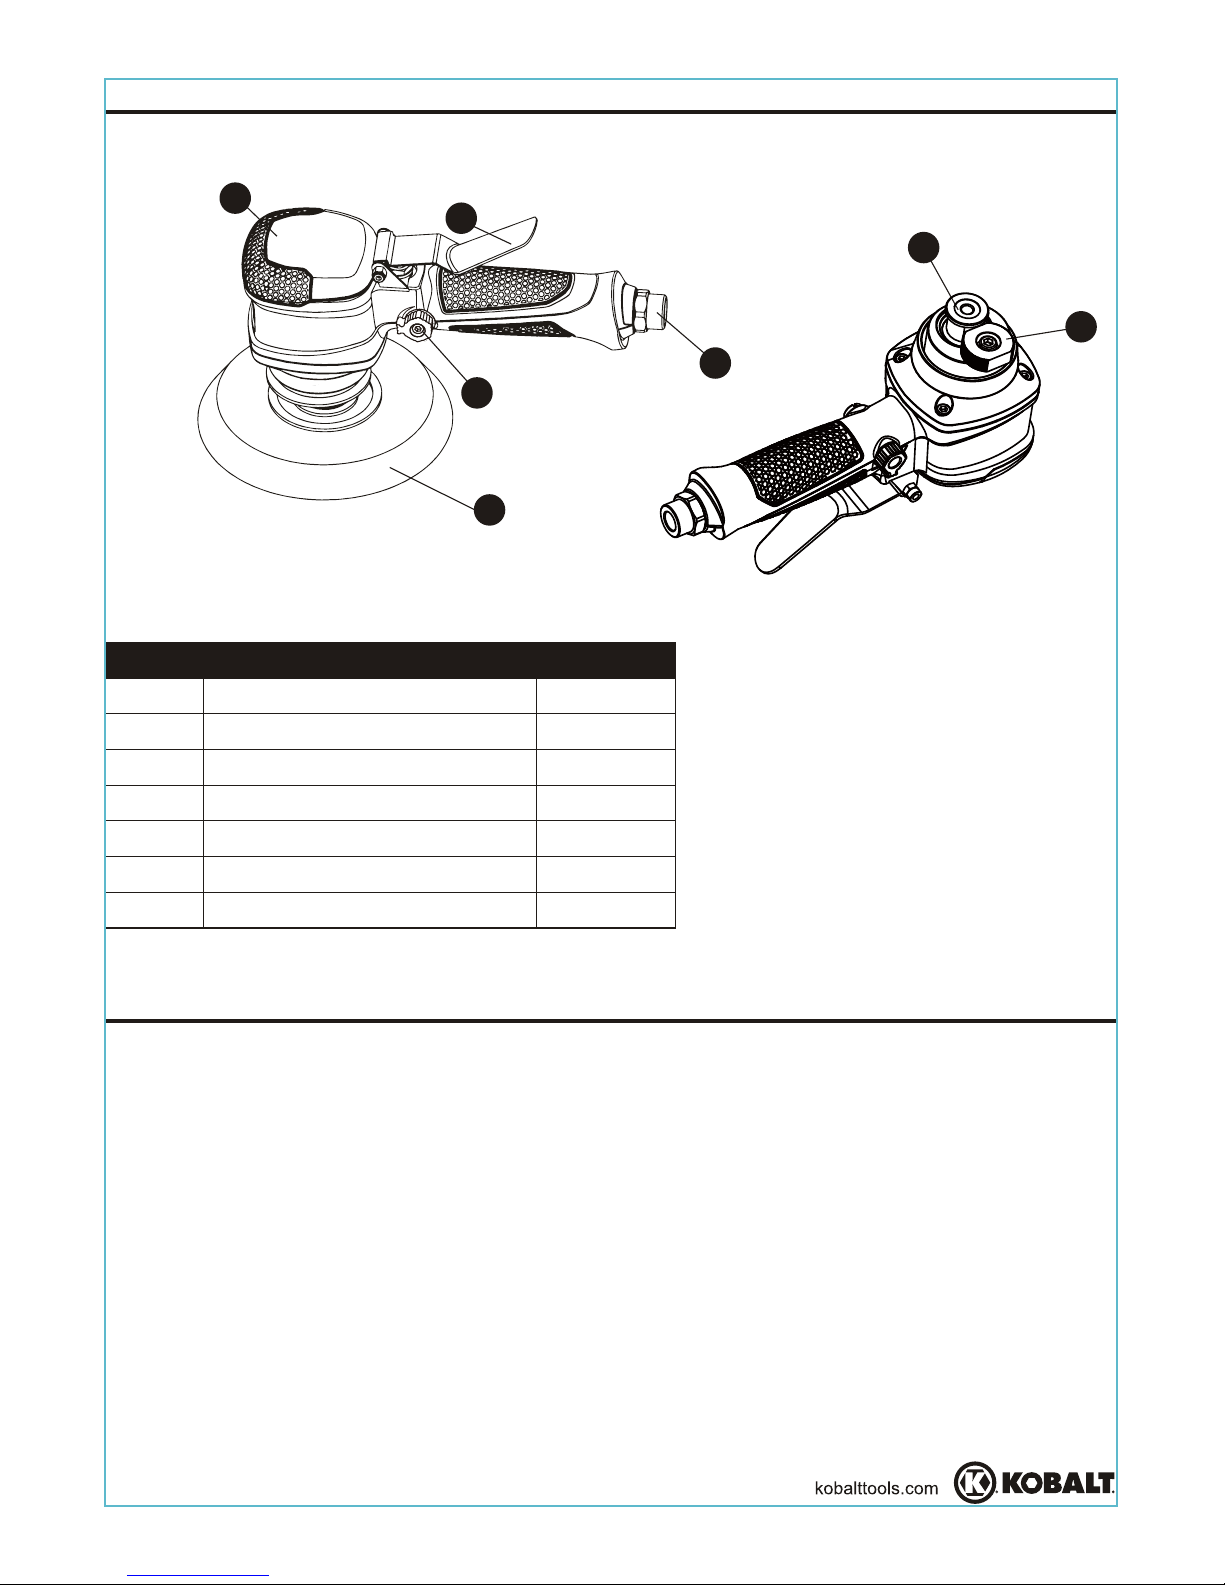
DESCRIPTION
6 in. DA Sander
Sanding Pad
Bearing Seat
Inertia Nut
Air Regulating Knob
Trigger
Air Inlet
QUANTITY
1
1
1
1
1
1
1
PART
A
B
C
D
E
F
G
A
F
B
E
G
C
D
Page 10
ASSEMBLY INSTRUCTIONS
10
2
3
1
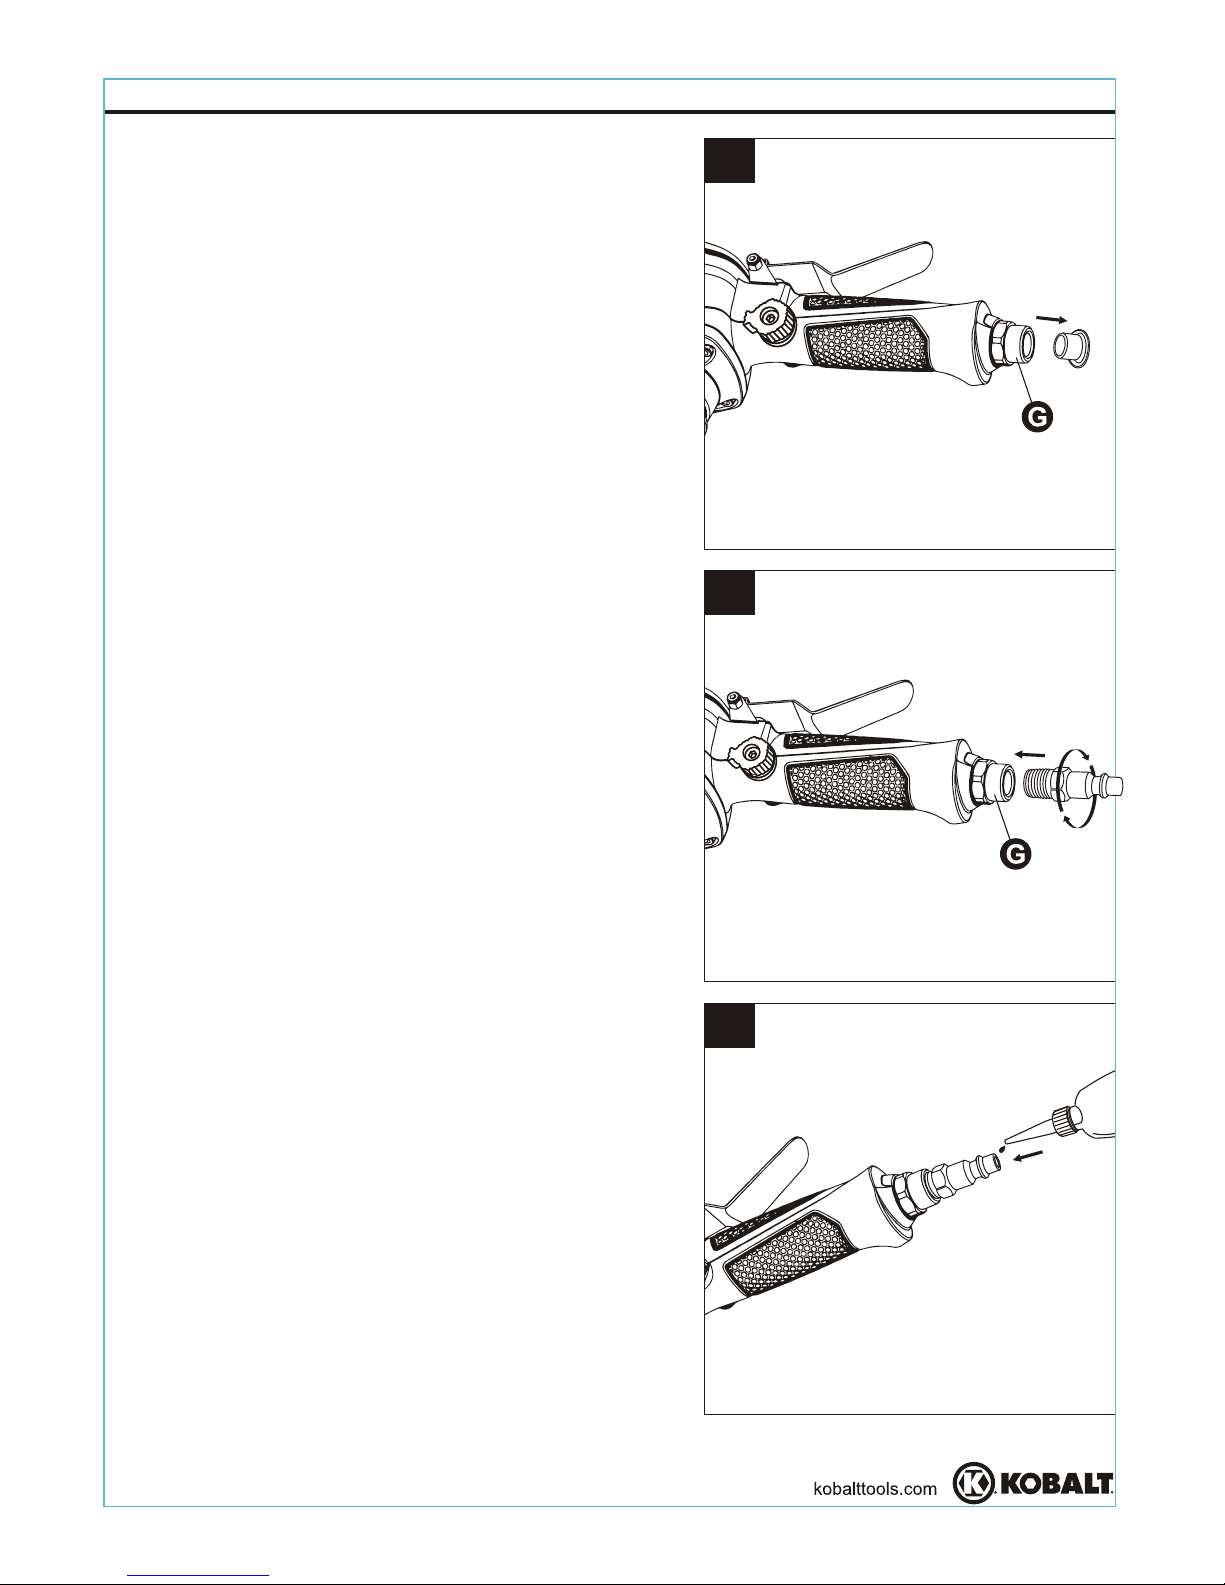
1. Remove the air inlet protective cap from the
air inlet (G) (See Figure 1).
3. Insert a male plug (not provided) by hand into
the air inlet (G) (See Figure 2).
4. Place 2-3 drops of air tool oil (not provided)
into the male plug before each use (See
Figure 3).
Use threaded sealant tape (not included) on the
threading of the male plug. Once sealant
tape is properly in place, tighten male plug
turning clockwise with a wrench (not included)
for air tight connection.
DO NOT OVERTIGHTEN.
2.
Page 11
ASSEMBLY INSTRUCTIONS
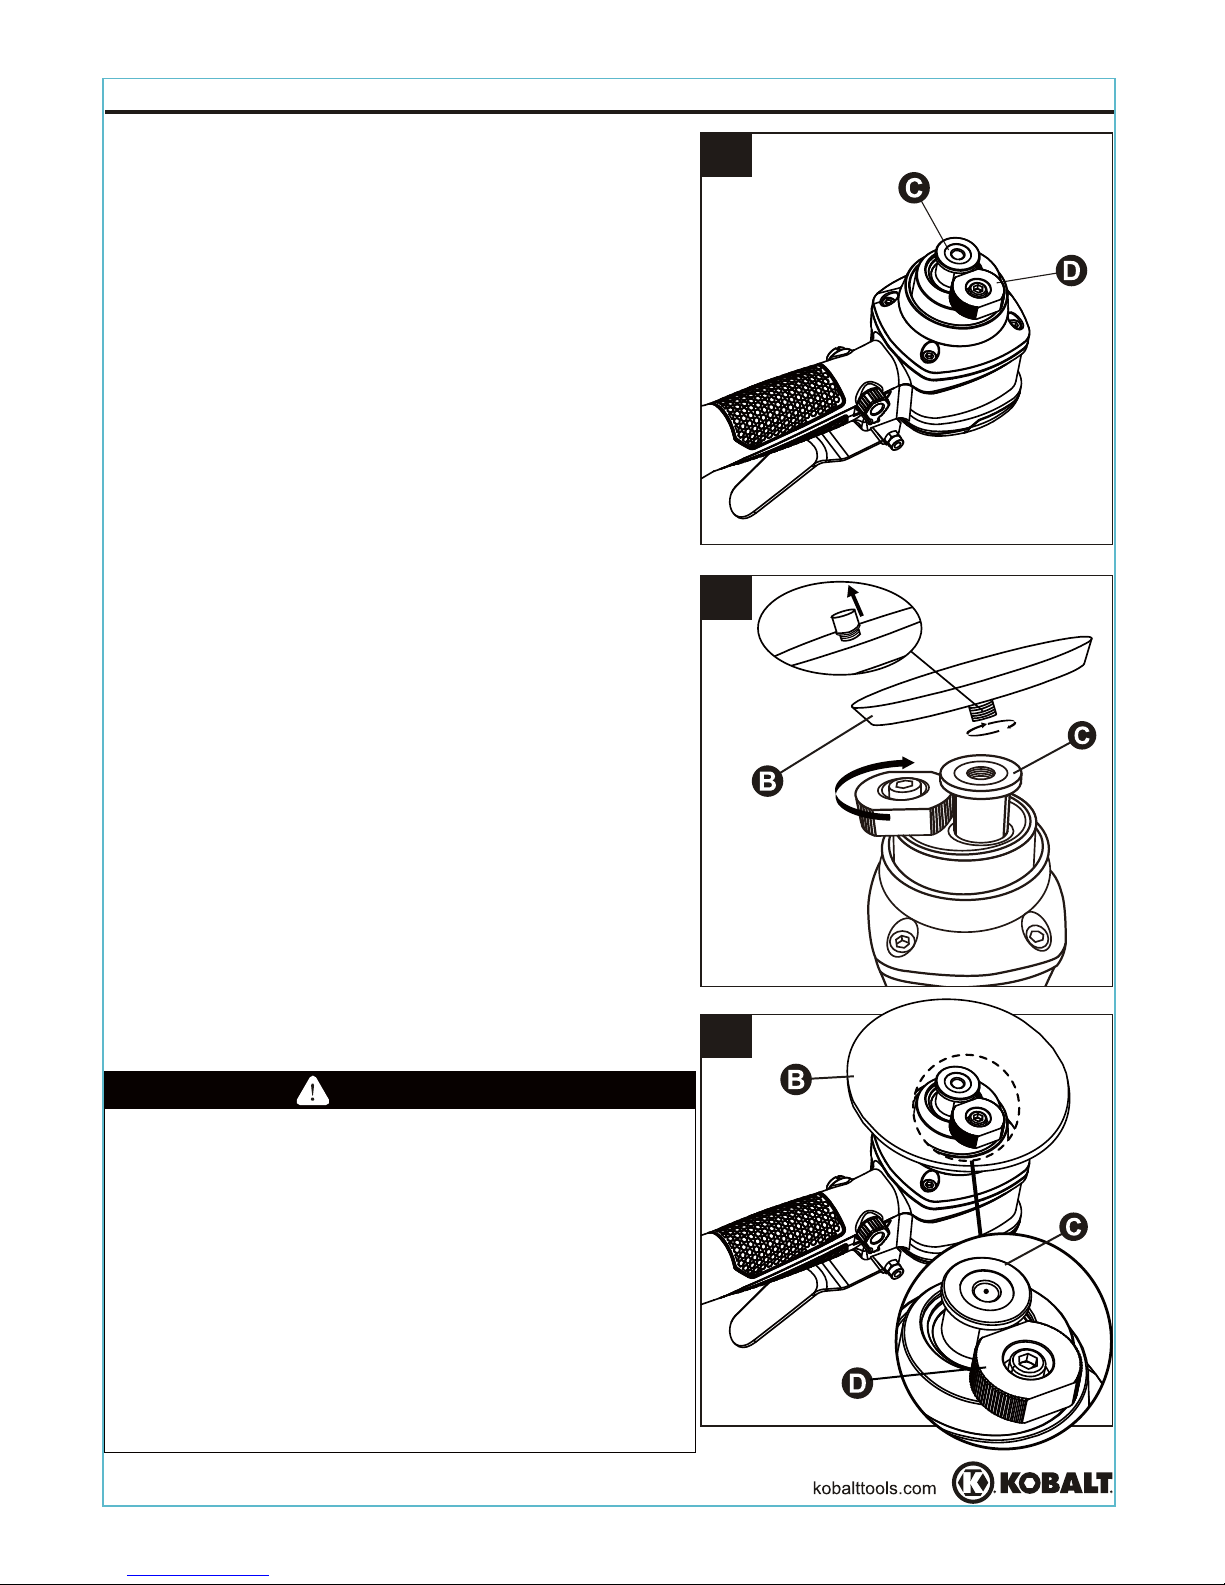
5. Rotate the inertia nut (D) and get the gear to
face the bearing seat (C). Then the bearing
seat (C) is locked and stable (See Figures 4)
6. To properly mount the sanding pad (B) to the
the bearing seat (C), remove the plastic
cap protecting the threads on the sanding
pad (B). Align the threads of sanding pad (B)
onto the bearing seat (C) and turn the pad
clockwise by hand. Make sure that the
sanding pad (B) is fixed tightly (See Figure 5).
11
7. Mount sanding paper (not provided) onto the
sanding pad (B).
4
Unlocked
WARNING
Only use sanding paper which has an RPM rating
equal or greater than 10,000 RPM.
Before using tool, always make sure attachments
are properly mounted/secured. If attachments are
not properly mounted/secured, they can present
a serious hazard and may cause bodily injury for
the operator or anyone in or around the work area.
Always follow the attachment manufacturer’s
specifications for properly attaching accessories
to tool.
5
plastic cap
Locked
6
Unlocked
After mounting of sanding pad (B), rotate the
inertia nut (D) 90°to unlocked position
(See Figure 6).
Page 12
1
2
OPERATING INSTRUCTIONS
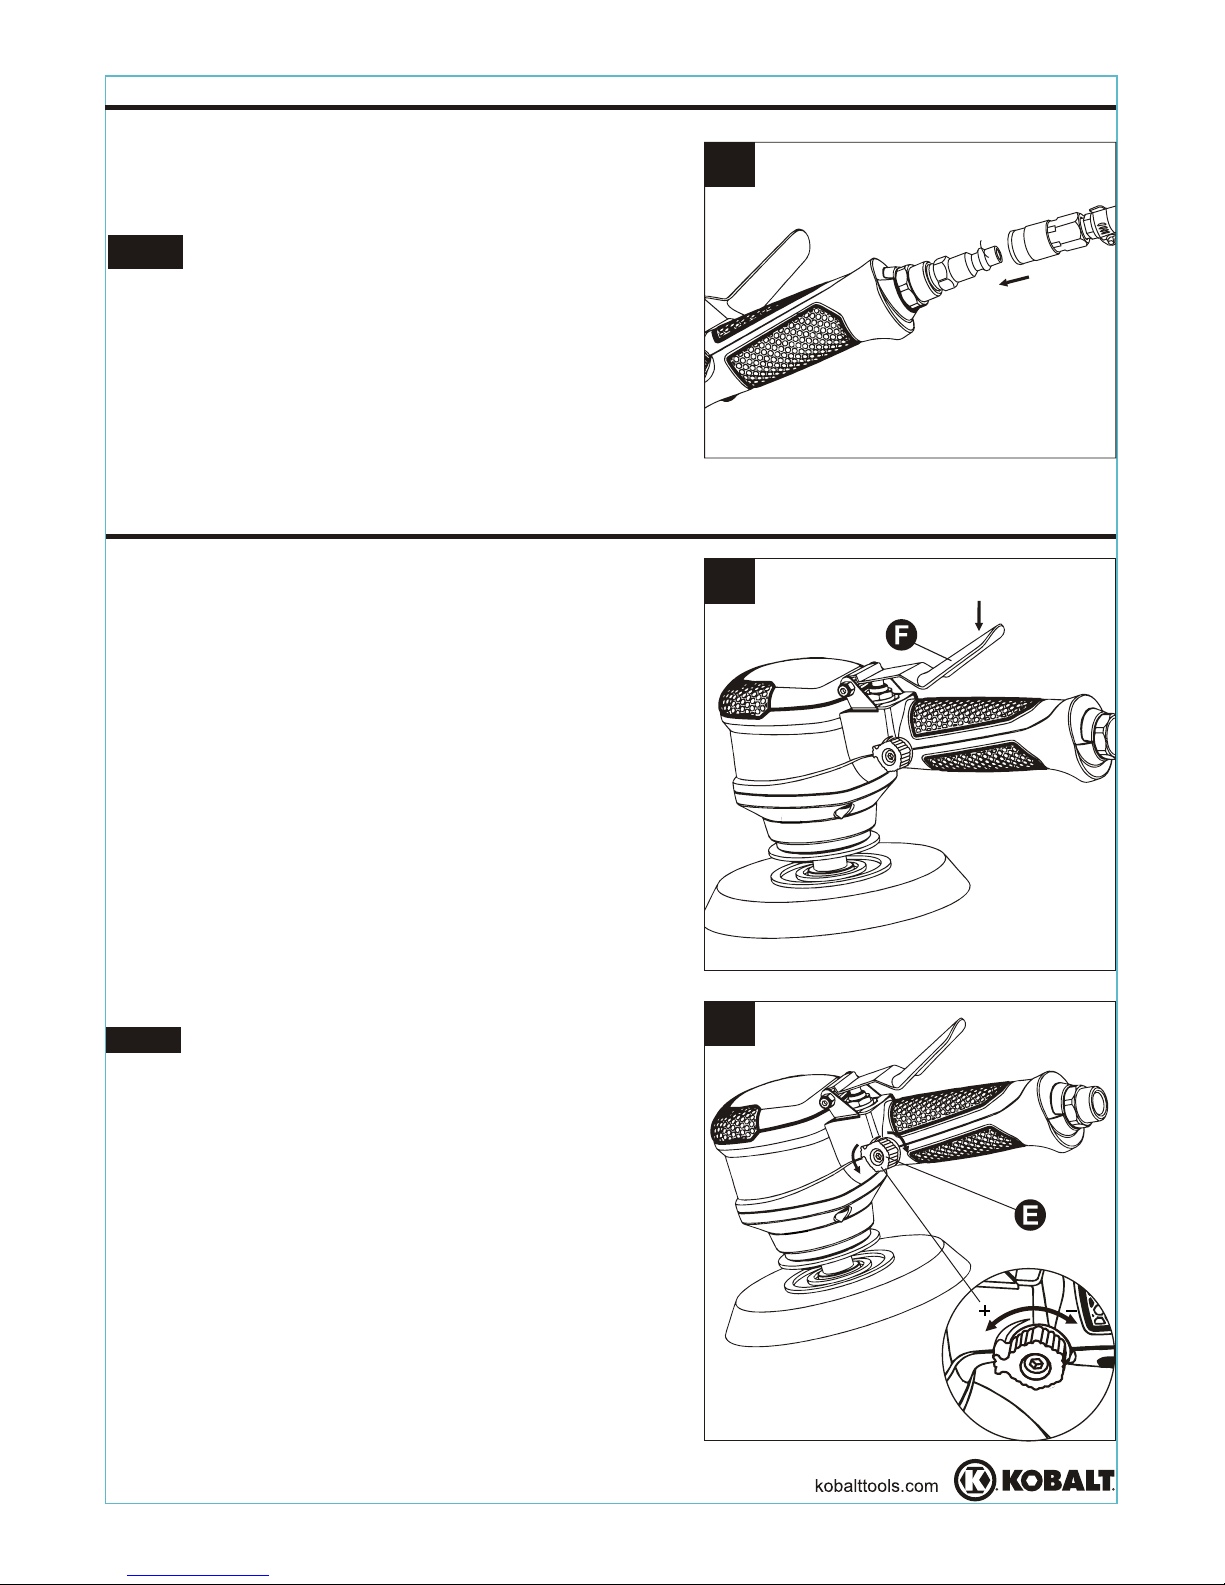
1. Press the trigger (F) to start the tool (See
Figure 1).
NOTE The tool features an air regulating knob
(E). The tool speed can be adjusted by turning
the air regulator knob (E) either clockwise or
counterclockwise. The maximum tool speed can
be obtained when the concave line on the knob
(E) is pointing at horizontal (See Figure 2).
12
When first making contact with the surface you
intend to sand, ensure the speed is set to the
lowest setting. Gradually increase the power/speed
as needed for your particular sanding application(s)
instead of using too much power/speed from the
start.
ASSEMBLY INSTRUCTIONS
7
Connect the air supply hose to the male plug. Set
the working pressure at 90 PSI for best tool
performance (See Figure 7).
NOTE Working pressure refers to the air line
pressure set to tool when tool is under working
conditions.
Page 13
13
CARE AND MAINTENANCE
1. Flush the tool with air-tool oil or gum
solvent.
2. Lubricate the tool.
3. a. Adjust the regulator on the tool to
maximum setting.
b. Adjust the compressor regulator to tool
maximum of 90 PSI.
4. Tighten and seal hose fittings if leaks are
found. Use sealing tape.
5. a. Be sure the hose is the proper size.
Long hose or tools using large volumes
of air may require a hose with an I.D. of
1/2 in. or larger depending on the total
length of the hoses.
b. Do not use a multiple number of hoses
with quick-connect fittings. This causes
additional pressure drop and reduces the
tool power. Always directly connect the
hoses together.
Tool runs
slowly or will
not operate
1. Grit or gum in tool.
2. No oil in tool.
3. Low air pressure.
4. Air hose leaks.
5. Pressure drops.
PROBLEM
TROUBLESHOOTING
CORRECTIVE ACTIONPOSSIBLE CAUSE
Always remove tool from air supply before performing any maintenance on tool.
An in-line oiler (not included) is recommended to be installed to air supply. It will help
increase tool life and keep the tool properly lubricated. The in-line oiler should be
regularly checked and filled with air tool oil as needed. To check if the in-line oiler is
properly lubricating the tool, place a sheet of paper next to the tool’s exhaust ports
while holding the throttle completely open for 30 seconds. The in line oiler is properly
set when a light stain of oil collects on the paper. Excessive amounts of oil should be
avoided. In the event that it becomes necessary to store the tool for an extended
period of time, the tool should receive a generous amount of lubrication right before
being stored. After being well lubricated, the tool should be run for approximately 30
seconds to ensure oil has been evenly distributed throughout the tool. The tool should
be stored in a clean and wet dry environment away from the reach of children.
Recommended lubricants: Use air-tool oil or any other high grade turbine oil
containing moisture absorbent, rust inhibitors, metal wetting agent and an EP
(extreme pressure) additive. Consult your local retailer for further assistance
in selecting which air tool oil is best suited for proper lubrication.
STORING:
Tool must be well cleaned and lightly lubricated before storing.
Store air tool in a dry safe place, out of the reach of children.
Page 14

14
WARRANTY
This tool is warranted by the manufacturer to the original purchaser from the original
purchase date for three (3) years subject to the warranty coverage described herein.
This tool is warranted to the original user to be free from defect in material and
workmanship. If you believe that a tool is defective, return the tool, with proper proof
of purchase to the point of purchase. If it is determined that the tool is defective and
covered by this warranty, the distributor will replace the tool or refund the
purchase price.
This warranty is void if: defects in materials or workmanship or damages result from
repairs or alterations which have been made or attempted by others or the
unauthorized use of nonconforming parts; the damage is due to normal wear, damage
is due to abuse (including overloading of the tool beyond capacity), improper
maintenance, neglect or accident; or the damage is due to the use of the tool after
partial failure or use with improper accessories or unauthorized repair or alteration.
This warranty gives you specific legal rights, and you may also have other rights that
vary from state to state.
For warranty questions, call our customer service department at 1-888-3KOBALT,
8:00 a.m.-8:00 p.m. EST, Monday-Friday.
TROUBLESHOOTING
PROBLEM CORRECTIVE ACTIONPOSSIBLE CAUSE
Tool runs
slowly or will
not operate
6. Worn rotor blade.
7. Moisture blowing
out of tool exhaust.
6. Replace rotor blade.
7. Water in tank; drain tank. (See air
compressor manual). Oil tool and run
until no water is evident. Oil tool again
and run 1-2 seconds.
Page 15

EXPLODED VIEW
Printed in China
15
C
E-ring
Washer
Bearing
Screw
Eccentric shaft
Screw M5x25
Screw M5x15
Spring washer
Front cover
Gasket
Nut M6
Inertia nut
Copper bush
Washer
Washer
Screw M6x33
Work spindle
Semi-round key
Bearing
Cylinder cover
Rotor blade
Rotor
Cylinder
E-ring 8
Housing
Housing cover
Bearing seat
Sanding pad
B
3
4
5
6
7
8
9
10
11
12
13
D
15
16
17
18
19
20
21
22
23
24
25
26
27
28
1
1
1
1
1
1
1
1
4
4
1
1
1
1
1
1
1
1
1
1
2
2
5
1
1
1
1
1
Part No.
Description
Qty.
29
30
31
32
33
34
E
36
37
38
G
40
41
42
43
44
45
46
47
48
49
F
52
51
53
Top cover
Pin 3x7
O-ring 7.5x1.8
Soft grip
Air regulator
O-ring 4.5x1.8
Air regulating knob
Screw M4x8
Soft grip
O-ring 18x1.8
Air inlet
Spring
O-ring 4x2
Valve stem
O-ring 3.5x1.5
O-ring 8x1.5
Valve seat
Trigger seat
Washer
Washer
Nut M10
Trigger
Screw M4x35
Nut M4
O-ring 11.2x1.6
1
1
1
1
1
2
1
1
1
1
1
1
1
1
1
1
1
1
1
1
1
1
1
1
1
Part No.
Description
Qty.
B
19
20
21
22
23
30
31
37
38
40
41
42
43
44
45
46
F
51
49
48
47
G
53
52
34
33
E
36
32
24
25
22
21
26
27 28
13
D1516
17
18
29
C3
4
5
6
7
8
910
11
12
KOBALT®and the K Design®are registered
trademarks of LF, LLC. All Rights Reserved.
Page 16

16
ARTICLE #0075988
MODÈLE #SGY-AIR135TZ
KOBALT® et le motif de K® sont des marques
de commerce déposées de LF, LLC. Tous droits
réservés.
JOIGNEZ VOTRE REÇU ICI
Numéro de série Date d'achat
Des questions, des problèmes, des pièces manquantes? Avant de
retourner l'article au détaillant, communiquez avec notre service à la
clientèle au 1 888 3KOBALT, entre 8 h et 20 h (HNE), du lundi au vendredi.
15,24 CM
PONCEUSE À
DOUBLE ACTION
Page 17

TABLE DES MATIÈRES
17
Consignes de sécurité ....................................................................................... 18
Caractéristiques du produit ................................................................................ 18
Contenu de l'emballage ..................................................................................... 24
Préparation ........................................................................................................ 24
Instructions pour l'assemblage .......................................................................... 25
Mode d'emploi ....................................... ............................................................ 27
Entretien ............................................................................................................ 28
Dépannage ........................................................................................................ 28
Garantie .............................................................................................................
29
Vues éclatées ....................................................................................................
30
de maintenir un niveau adéquat.
IMPORTANT : Cet outil nécessite un débit d'air d'au moins 5 pi par minute à une pression de
3
3
aux exigencies minimales (pi /min et lb/psi ). L'utilisation d'un tuyau à air peut entraîner une chute
2
90 lb/psi . Vérifiez les spécifications de votre compresseur d'air afin de vous assurer qu'il satisfait
2
de pression de jusqu'à 15 lb/psi . Il peut donc s'avérer nécessaire d'augmenter la pression afin
2
Page 18

18
CONSIGNES DE SÉCURITÉ
Veuillez vous assurer de lire et de comprendre l'intégralité du présent guide avant
d'assembler, d'utiliser ou d'installer ce produit. Si vous avez des questions concernant
ce produit, veuillez téléphoner au service à la clientèle au 1 888 3KOBALT, entre 8 h et
20 h (HNE), du lundi au vendredi.
Une utilisation ou un entretien inadéquat de ce produit peut causer des blessures
graves ou des dommages matériels. Assurez-vous de lire et de comprendre tous
les avertissements et toutes les instructions concernant ce produit avant de l'utiliser.
Lorsque vous utilisez un outil pneumatique, observez toujours les mesures de
sécurité de base afin de réduire les risques de blessure.
AVERTISSEMENT
AVERTISSEMENT
LA POUSSIÈRE CRÉÉE PENDANT LE PONÇAGE, LE SCIAGE, LE POLISSAGE, LE
PERÇAGE ET D'AUTRES ACTIVITÉS PEUT CONTENIR DES PRODUITS CHIMIQUES
RECONNUS PAR L'ÉTAT DE LA CALIFORNIE COMME ÉTANT LA CAUSE DE CANCERS,
D'ANOMALIES CONGÉNITALES ET D'AUTRES PROBLÈMES LIÉS AUX FONCTIONS
AU www.oehha.ca.gov, CONFORMÉMENT À LA PROPOSITION 65. VOICI
QUELQUES-UNS DE CES PRODUITS CHIMIQUES :
DU PLOMB PROVENANT DE PEINTURES À BASE DE PLOMB;
DE LA SILICE CRISTALLINE PROVENANT DE LA BRIQUE, DU CIMENT OU
D'AUTRES MATÉRIAUX DE MAÇONNERIE;
DE L'ARSENIC ET DU CHROME PROVENANT DU BOIS D'ŒUVRE TRAITÉ AVEC
UN PRODUIT CHIMIQUE.
REPRODUCTRICES. VOUS POUVEZ OBTENIR LA LISTE DES PRODUITS CHIMIQUES
LES RISQUES LIÉS À L’EXPOSITION À CES PRODUITS VARIENT SELON LE NOMBRE
DE FOIS OÙ VOUS PRATIQUEZ CES ACTIVITÉS. AFIN DE LIMITER VOTRE
EXPOSITION À CES PRODUITS CHIMIQUES, TRAVAILLEZ DANS UN ENDROIT BIEN
VENTILÉ ET UTILISEZ DE L’ÉQUIPEMENT DE SÉCURITÉ APPROUVÉ, TEL QU’UN
APPAREIL RESPIRATOIRE OU UN MASQUE ANTIPOUSSIÈRE CONÇUS
SPÉCIALEMENT POUR FILTRER LES PARTICULES MICROSCOPIQUES.
CARACTÉRISTIQUES
6 po
10 000 tours/minute +/- 10 %
3
5 pi /min
Filetage NPT 1/4 po
3/8 po
2
90 lb/p o
COMPOSANTE
TAMPON DE PONÇAGE
VITESSE LIBRE
CONSOMMATION D'AIR MOYENNE
ENTRÉE D'AIR
TUYAU À AIR
PRESSION DE SERVICE
CARACTÉRISTIQUES DU PRODUIT
Page 19

19
Cet outil pneumatique peut projeter des
fixations, des fragments de métal, des
sciures de bois et d’autres débris, ce qui
peut causer des blessures graves.
L’air comprimé peut être dangereux, car
il est susceptible de projeter des objets
et des particules pouvant causer des
blessures aux tissus mous du corps,
notamment les yeux et les oreilles. Les
débris et les objets propulsés par le jet
d’air peuvent causer des blessures.
Ne laissez jamais un outil en marche
sans supervision. Débranchez le tuyau
à air lorsque vous n’utilisez pas l’outil et
placez-le dans un endroit sécuritaire.
Assurez-vous que les accessoires sont
bien fixés et assemblés avant d’utiliser
l’article.
Utilisez toujours l’outil à une distance
sécuritaire des autres personnes présentes
dans l’aire de travail et assurez-vous que
l’aire de travail est sécuritaire en tout temps.
CONSIGNES DE SÉCURITÉ
conformes à la norme ANSI Z87.1 et
pourvues d'écrans latéraux.
Portez toujours des lunettes de sécurité
desserrer ou se briser et être projetés
en direction de l'utilisateur ou d'autres
personnes présentes dans l'aire de travail.
Les accessoires de l'outil peuvent se
facial approuvé en plus de lunettes de
sécurité.
Pour plus de protection, utilisez un écran
Une ponceuse à double action peut
produire des étincelles susceptibles
d’enflammer certains matériaux.
RISQUES D'INCENDIE OU
D'EXPLOSION
AVERTISSEMENT
RISQUE MESURES PRÉVENTIVES
N'utilisez jamais un outil à proximité
d'une substance inflammable comme
de l'essence, du naphta, des solvants
de nettoyage, etc.
Travaillez dans un endroit propre, bien
ventilé et dépourvu de matériaux
combustibles.
N'utilisez jamais d'oxygène, de dioxyde
de carbone ni d'autre gaz embouteillé
comme source d'alimentation pour les
outils pneumatiques.
RISQUE DE PERTE AUDITIVE
Portez toujours des protecteurs auditifs
conformes à la norme ANSI S3.19.
Une exposition prolongée au bruit
produit par l'utilisation d'outils
pneumatiques peut entraîner une perte
auditive permanente.
AVERTISSEMENT
RISQUE MESURES PRÉVENTIVES
RISQUES DE BLESSURE AUX
YEUX OU À LA TÊTE
RISQUE MESURES PRÉVENTIVES
AVERTISSEMENT
Page 20

20
Les outils qui contiennent ou déplacent
des pièces mobiles, par exemple les
douilles à choc, peuvent s'emmêler
dans les cheveux, les bijoux ou les
vêtements amples et causer des
blessures graves.
AVERTISSEMENT
RISQUE MESURES PRÉVENTIVES
RISQUE D'EMMÊLEMENT
Ne portez pas de vêtements amples, de
bijoux ni tout autre article qui pourrait
s’accrocher ou s’emmêler dans l’outil
lors de son utilisation.
Retirez tout bijou susceptible de
s’accrocher dans l’outil.
Gardez toujours vos mains et les autres
parties de votre corps à distance des
pièces en mouvement.
Portez toujours un respirateur ou un
écran facial bien ajusté lorsque vous
utilisez ce genre d'outils.
CONSIGNES DE SÉCURITÉ
Prenez garde à vos mains lorsque vous
utilisez l'outil.
Une ponceuse à double action peut causer
des blessures graves si elle n’est pas
utilisée adéquatement ou si elle est utilisée
d’une manière autre que celle pour laquelle
elle est conçue.
RISQUE DE COUPURE
OU DE BRÛLURE
AVERTISSEMENT
RISQUE MESURES PRÉVENTIVES
L'utilisation d'un outil pneumatique pour
fixer des fils électriques peut causer des
chocs électriques potentiellement mortels.
La poignée de cet outil n'est pas isolée.
Lorsque l'outil entre en contact avec un fil
sous tension, ses parties métalliques
exposées peuvent causer des chocs
électriques potentiellement mortels.
Le contact d'accessoires comme les
douilles à choc avec des fils électriques
dissimulés peut causer des chocs
électriques potentiellement mortels.
Ne fixez jamais des fils sous tension à
l'aide d'outils.
Évitez de toucher à des surfaces mises
à la terre, par exemple un tuyau, un
radiateur, une cuisinière ou un
réfrigérateur. Le contact de votre corps
avec une surface mise à la terre
augmente les risques de choc électrique.
Avant de commencer à travailler, vérifiez
soigneusement la surface pour déceler
les fils dissimulés.
RISQUE DE CHOC ÉLECTRIQUE
AVERTISSEMENT
RISQUE MESURES PRÉVENTIVES
Page 21

21
RISQUE DE BLESSURE
Assurez-vous de toujours retirer la clé
avant d’utiliser l’article. Une clé laissée
fixée à l’outil augmente les risques de
blessure.
Débranchez le tuyau à air avant de
lubrifier l’outil ou d’y fixer une douille à
choc.
Ne tenez jamais l’outil par le tuyau à air.
Tenez toujours l’outil par la poignée.
Afin d’éviter de mettre l’outil en marche
accidentellement, ne le transportez
jamais en maintenant la gâchette
enfoncée.
Seuls les représentants autorisés
devraient effectuer l’entretien et les
réparations de l’outil.
N’utilisez jamais l’outil sous l’effet de
drogues ou de l’alcool.
Coupez l’alimentation en air et évacuez
la pression d’air du tuyau avant de
changer les accessoires ou d’effectuer
des réparations, ainsi que lorsque vous
n’utilisez pas l’outil. Débranchez ensuite
l’outil de l’alimentation en air et
rangez-le dans un endroit sécuritaire.
CONSIGNES DE SÉCURITÉ
AVERTISSEMENT
Si vous laissez un outil sans surveillance
ou que vous ne débranchez pas son tuyau
à air lorsque vous cessez de l'utiliser, il
risque d'être mis en marche par une
personne non expérimentée et de la
blesser ou de blesser d'autres personnes.
Les outils pneumatiques peuvent projeter
des attaches ou d'autres matériaux dans
l'aire de travail.
Lorsque vous n'utilisez pas l'outil, rangez-le
dans un endroit sécuritaire, hors de la
portée des enfants et autres personnes
inexpérimentées, et débranchez le tuyau
à air.
accessoires recommandés par le fabricant.
N'utilisez que des pièces, attaches et
RISQUE MESURES PRÉVENTIVES
Gardez l’aire de travail propre et dépourvue
de débris. Ne laissez pas les enfants utiliser
l’outil et gardez les enfants à distance de
l’aire de travail.
Gardez l'aire de travail bien éclairée.
Avant de mettre l'outil en marche, retirez
les clés qui y sont fixées.
Les outils pneumatiques peuvent être
accidentellement mis en marche lorsque
vous les entretenez ou que vous changez
d'outil.
Maintenez les pièces en place à l'aide
d'attaches ou autres dispositifs de fixation.
les pièces que vous travaillez, ce qui peut
causer des blessures.
Les outils pneumatiques peuvent déplacer
Une perte de maîtrise de l’outil peut causer
des blessures à l’utilisateur ou aux autres
personnes présentes dans l’aire de travail.
L'utilisation d'un accessoire qui n'est pas conçu
pour l'outil augmente les risques de blessure.
N'utilisez que des accessoires
recommandés par le fabricant pour l'outil.
Page 22

22
Poor quality, improper or damaged
tools and attachments can fly apart
during operation, propelling particles
through the work area causing serious
injury.
Gardez une posture sécuritaire en tout
temps. Ne vous étirez pas pour étendre
votre portée; vous risqueriez de glisser,
de trébucher ou de tomber et de subir
des blessures graves ou mortelles.
Faites attention à l’excédent du tuyau à
air et aux prises d’alimentation de l’aire
de travail.
Gardez la poignée sèche, propre et
exempte d’huile et de graisse.
N’utilisez que des accessoires qui
conviennent à la vitesse de l’outil électrique.
N’utilisez que des douilles à choc avec
cet outil.
N’exercez pas une pression excessive
sur l’outil; laissez-le accomplir la tâche lui-même.
Entretenez soigneusement l’outil et les
accessoires.
Gardez les outils propres et adéquatement
huilés pour un rendement optimal et sécuritaire.
N’utilisez jamais un outil qui présente
une fuite d’air, auquel il manque des
pièces, dont des pièces sont endommagées
ou qui nécessite des réparations.
Les chiffons et autres matériaux
inflammables qui entrent en contact
avec l’outil doivent être jetés de manière
adéquate dans un contenant en métal
bien fermé.
Une perte de maîtrise de l’outil peut causer
des blessures à l’utilisateur ou aux autres
personnes présentes dans l’aire de travail.
vous faites et usez de votre jugement.
N'utilisez pas l'outil si vous êtes fatigué.
Soyez vigilant, prêtez attention à ce que
portée. Conservez un bon équilibre.
Évitez de vous étirer pour étendre votre
Les outils et accessoires mal entretenus
peuvent causer des blessures graves.
Vérifiez les pièces pour vous assurer
qu'elles ne sont pas désalignées, enrayées,
brisées, ou dans un quelconque état
pouvant nuire à leur fonctionnement. Si
e
lles sont endommagées, faites-les réparer
avant d'utiliser l'outil.
RISQUE DE BLESSURE
CONSIGNES DE SÉCURITÉ
AVERTISSEMENT
RISQUE MESURES PRÉVENTIVES
La poignée de cet outil n'est pas isolée.
Lorsque l'outil entre en contact avec un fil
sous tension, ses parties métalliques
exposées peuvent causer des chocs
électriques potentiellement mortels.
Page 23

23
L’utilisation d’un accessoire qui n’est pas
conçu pour l’outil augmente les risques
de blessure pour l’utilisateur et les
autres personnes.
Suivez les instructions pour la
lubrification afin d’assurer un
fonctionnement optimal et sécuritaire.
Suivez les instructions pour l’assemblage
et les réparations pour changer les
accessoires correctement.
La poignée de cet outil n'est pas isolée.
Lorsque l'outil entre en contact avec un fil
sous tension, ses parties métalliques
exposées peuvent causer des chocs
électriques potentiellement mortels.
RISQUES D'INHALATION
Les outils abrasifs comme les
meuleuses, les ponceuses et les outils
à tronçonner engendrent de la
poussière et des matériaux abrasifs
pouvant causer des dommages aux
poumons et au système respiratoire.
Certains matériaux, notamment les
adhésifs et le goudron, contiennent des
produits chimiques dont les vapeurs
peuvent être nocives après une
exposition prolongée.
Portez toujours un respirateur ou un
écran facial bien ajusté lorsque vous
utilisez ce genre d'outils.
Travaillez toujours dans un endroit
propre, sec et bien ventilé.
RISQUE MESURES PRÉVENTIVES
AVERTISSEMENT
AVERTISSEMENT
L'utilisation d'un accessoire qui n'est pas
conçu pour l'outil augmente les risques
de blessure.
RISQUE DE BLESSURE
CONSIGNES DE SÉCURITÉ
RISQUE MESURES PRÉVENTIVES
Page 24

24
CONTENU DE L'EMBALLAGE
PRÉPARATION
A
F
B
E
G
C
D
DESCRIPTION
Ponceuse de 6 po à double action
Tampon de ponçage
Siège de palier
L'écrou d'inertie
Commande de débit d'air
Gâchette
Entrée d'air
QUANTITÉ
1
1
1
1
1
1
1
PIÈCE
A
B
C
D
E
F
G
Avant de commencer l'assemblage du produit, assurez-vous d’avoir toutes les pièces.
Comparez le contenu de l’emballage avec la liste des pièces. S'il y a des pièces
manquantes ou endommagées, ne tentez pas d'assembler le produit.
Communiquez
avec le service à la clientèle pour obtenir des pièces de rechange.
Temps d'assemblage approximatif:de cinq à dix minutes.
Outil nécessaire pourl'assemblage (non inclus):Clé à molette.
Page 25

INSTRUCTIONS POUR L'ASSEMBLAGE
25
2
3
1
3. Insérez un connecteur mâle (non inclus) dans l’
entrée d’air (G) (consultez la figure 2).
2. Entourez le filetage du connecteur
mâle avec
du ruban d’étanchéité pour joints filetés (non
inclus). Serrez ensuite le connecteur mâle en
le tournant dans le sens des aiguilles d’une
montre à l’aide d’une clé (non incluse), afin que
le raccord soit étanche à l’air.
Évitez de serrer
excessivement.
1. Retirez le capuchon protecteur de l'entrée d'air
de l'outil (G) (Consultez la figure 1).
4. Versez deux ou trois gouttes d'huile à outil
pneumatique (non fourni) dans le connecteur
mâle avant chaque utilisation (Consultez la
figure 3).
Page 26

INSTRUCTIONS POUR L'ASSEMBLAGE
26
4
5
Déverrouillez
Fermé
AVERTISSEMENT
5. Tourner l'écrou d'inertie (D) et sortir le train
pour faire face au logement du roulement (C).
Ensuite, le logement de palier (C) est
verrouillé et stable (consultez les figures 4).
6. Pour monter correctement le plateau de
ponçage (B) au siège du palier (C) retirer le
capuchon en plastique protégeant les fils sur
le plateau de ponçage (B). Orienter les fils de
ponçage tampon (B) sur le siège de palier (C)
et tourner dans le sens horaire le tampon à la
main. Assurez-vous que le plateau de
ponçage (B) est bien fixé (Consultez la figure 5).
7. Installez un papier abrasif (non inclus) sur le
tampon de ponçage (B).
Avant d’utiliser l’outil, assurez-vous toujours que
ses accessoires sont bien installés et fixés. Si tel
n’est pas le cas, ils peuvent constituer un risque
de blessure grave pour l’utilisateur et pour toute
personne se trouvant dans l’aire de travail ou à
proximité de celle-ci. Suivez toujours les
instructions du fabricant des accessoires pour bien
fixer ces derniers à l’outil.
Capuchon
en plastique
N’utilisez que du papier abrasif prenant en charge
un nombre de tours/minute équivalent ou
supérieur à 10 000 tours/minute.
6
Déverrouillez
Après le montage des tampons de ponçage (B),
tournez l’écrou de blocage (D) de 90° pour le
mettre en position déverrouillée
(consultez la figure 6).
Page 27

1
2
MODE D'EMPLOI
INSTRUCTIONS POUR L'ASSEMBLAGE
27
Le premier contact de l’outil sur la surface à
poncer doit être effectué à la plus basse vitesse.
Augmentez graduellement la puissance et la
vitesse selon la tâche de ponçage que vous
effectuez plutôt que de régler une puissance et
une vitesse trop grandes dès le début.
1. Appuyez sur la gâchette (F) pour mettre l'outil
en marche. (Consultez la figure 1.)
REMARQUE Cet outil comprend un régulateur de
débit d'air (E) permettant de régler la vitesse de
l'outil, simplement en tournant le bouton. La
vitesse maximale est atteinte lorsque la ligne
concave du bouton (E) est à l'horizontale (Consultez
la figure 2).
7
REMARQUE La pression de service correspond
à la pression dans la conduite d'air quand l'outil
est utilisé.
Branchez le tuyau d’alimentation en air sur le
connecteur mâle. Pour un fonctionnement optimal,
réglez la pression de service à 90 lb/po2 (consultez
la figure 7).
Page 28

ENTRETIEN
Retirez toujours l’outil de la source d’alimentation en air avant d’effectuer tout
entretien.
Il est recommandé d’installer une burette (non incluse) sur l’alimentation en air. Ceci
contribuera à augmenter la durée de vie de l’outil et à bien le lubrifier en permanence.
La burette doit être régulièrement vérifiée et, au besoin, remplie d’huile pour outil
pneumatique. Pour vérifier si la burette lubrifie adéquatement l’outil, placez une
feuille de papier à côté des orifices d’échappement de ce dernier et maintenez la
soupape complètement ouverte pendant 30 secondes. Si une légère tache d'huile se
forme sur le papier, le réglage de la burette est adéquat. Évitez de lubrifier
excessivement l'outil. S'il vous faut ranger l'outil pour une période prolongée,
lubrifiez-le abondamment au préalable. Après avoir bien lubrifié l’outil, Faites-le
fonctionner pendant environ 30 secondes pour vous assurer que l'huile a été répartie
également dans l'outil. Rangez l’outil dans un endroit propre et sec, hors de la portée
des enfants. Lubrifiants recommandés : Utilisez de l’huile pour outil pneumatique ou
toute autre huile de qualité pour turbine contenant un absorbant d’humidité, des
antioxydants, des agents mouillant pour le métal et un additif EP (extrême pression).
Veuillez communiquer avec votre détaillant local pour savoir quelle huile pour outil
pneumatique offrira la meilleure lubrification de votre outil.
RANGEMENT:
Nettoyez adéquatement l’outil et lubrifiez-le légèrement avant de le ranger.
Rangez l’outil pneumatique dans un endroit sec et sûr, hors de la portée des enfants.
DÉPANNAGE
1. Rincez l'outil avec de l'huile pour outil
pneumatique ou du dissolvant de gomme.
2. Lubrifiez l'outil.
3. a. Réglez le régulateur de l'outil à son
maximum.
b. Réglez le régulateur du compresseur
de l'outil à sa pression manométrique
2
maximale, soit 90 lb/po .
4. Si vous décelez des fuites, serrez les
raccords du tuyau et scellez-le à l'aide de
ruban d'étanchéité.
L'outil est lent
ou ne
fonctionne pas.
1. De la gomme ou
des cailloux se sont
logés dans l'outil.
2. L'outil manque
d'huile.
3. La pression d'air
est trop faible.
4. Le tuyau à air fuit.
PROBLÈME
MESURE CORRECTIVE
CAUSE(S) POSSIBLE(S)
28
Page 29

29
DÉPANNAGE
5. a. Assurez-vous que le tuyau est de
dimensions appropriées. Un tuyau long ou
des outils utilisant de grandes quantités
d'air peuvent nécessiter un tuyau de
1/2 po de diamètre intérieur ou plus, selon
la longueur totale des tuyaux.
6. Remplacez la pale du rotor.
7. De l'eau s'est accumulée dans le réservoir,
évacuez-la (consultez le manuel du
compresseur d'air). Lubrifiez l'outil et
faites-le fonctionner jusqu'à ce qu'il n'y ait
plus de trace d'eau. Lubrifiez de nouveau
l'outil et faites-le fonctionner pendant une
ou deux secondes.
L'outil est lent
ou ne
fonctionne pas.
5. La pression chute.
6. La pale du rotor est
usée.
7. De l'humidité
s'échappe des
orifices de l'outil.
PROBLÈME
MESURE CORRECTIVE
CAUSE(S) POSSIBLE(S)
b. N’utilisez pas de multiples tuyaux reliés
par des raccords à branchement rapide.
ceux-ci engendrent des chutes de pression
additionnelles et diminuent la puissance de
l'outil. Raccordez toujours les tuyaux
directement les uns aux autres.
GARANTIE
Cet outil est garanti par le fabricant pour une période de trois (3) ans à partir de la
date d'achat, selon les modalités décrites aux présentes.
Cet outil est garanti contre les défauts de matériaux et de fabrication. Si vous croyez
qu'il est défectueux, retournez-le, accompagné d'une preuve d'achat acceptable, au
point de vente d'origine. Si l'outil est jugé défectueux et qu'il est couvert par la
présente garantie, le distributeur l'échangera ou vous remboursera le prix d'achat.
Cette garantie sera annulée si : les défauts de matériaux ou de fabrication ou les
dommages résultent de réparations ou de modifications non autorisées, de
l'utilisation de pièces non conformes, de l'usure normale, d'un usage abusif
(notamment une surcharge de l'outil), d'un entretien inadéquat, d'une négligence,
d'un accident, d'une utilisation après une défaillance partielle ou de l'utilisation
d'accessoires inappropriés.
Cette garantie vous confère des droits précis. Il est possible que vous disposiez
également d'autres droits, qui varient d'un État ou d'une province à l'autre.
Pour toute question concernant la garantie, communiquez avec le service à la
clientèle au 1 888 3KOBALT, entre 8 h et 20 h (HNE), du lundi au vendredi.
Page 30

VUES ÉCLATÉES
Imprimé en Chine
30
C
B
3
4
5
6
7
8
9
10
11
12
13
D
15
16
17
18
19
20
21
22
23
24
25
26
27
28
1
1
1
1
1
1
1
1
4
4
1
1
1
1
1
1
1
1
1
1
2
2
5
1
1
1
1
1
29
30
31
32
33
34
E
36
37
38
G
40
41
42
43
44
45
46
47
48
49
F
52
51
53
1
1
1
1
1
2
1
1
1
1
1
1
1
1
1
1
1
1
1
1
1
1
1
1
1
B
19
20
21
22
23
30
31
37
38
40
41
42
43
44
45
46
F
51
49
48
47
G
53
52
34
33
E
36
32
24
25
22
21
26
27 28
13
D1516
17
18
29
C3
4
5
6
7
8
910
11
12
KOBALT et le motif de K sont des marques de
commerce déposées de LF, LLC. Tous droits réservés.
®®
Description
O
N de pièce
Qté Description
O
N de pièce
Qté
Joint
Couvercle avant
Vis
Palier
Rondelle
Anneau en E
Siège de palier
Tampon de ponçage
Vis M5x25
Vis M5x15
Rondel le élastique
Écrou M6
Arbre à excentrique
L'écrou d'inertie
Boîtier
Pale du rotor
Anneau en E 8
Rotor
Cylindre
Rondelle
Rondelle
Palier
Broche
Clé semi-arrondie
Vis M6x33
Couvercle de cylindre
Cuivre brousse
Couvercle du boîtier
Couvercle
Poignée à prise souple
Régulateur de débit d'air
Tige 3x7
Joint torique 7.5x1.
8
Joint torique 4.5x1.8
Commande de débit d'air
Poignée à prise souple
Entrée d'air
Joint torique 18x1.8
Vis M4x8
Tige de soupape
Siège de soupape
Siège de gâchette
Gâchette
Rondelle
Rondelle
Joint torique 8x1.5
Joint torique 3.5x1.5
Joint torique 4x2
Ressort
Écrou M10
Joint torique 11.2x1.6
Vis M4x35
Écrou M4
Page 31

ARTÍCULO #0075988
MODELO #SGY-AIR135TZ
ADJUNTE SU RECIBO AQUÍ
Número de serie Fecha de compra
31
¿Preguntas, problemas, piezas faltantes? Antes de volver a la tienda,
llame a nuestro Departamento de Servicio al Cliente al 1-888-3KOBALT, de
8:00 a.m. a 8:00 p.m. hora estándar del Este, de lunes a viernes.
KOBALT y K & Design son marcas
registradas de LF, LLC. Todos los derechos
reservados.
15,24 CM
LIJADORA DE
DOBLE ACCIÓN
®®
Page 32

ÍNDICE
32
Información de seguridad ..................................................................................... 33
Especificaciones del producto .............................................................................. 33
Contenido del paquete ..........................................................................................39
Preparación ........................................... .............................................................. 39
Instrucciones de ensamblaje ................................................................................ 40
Instrucciones de funcionamiento .......................................................................... 42
Cuidado y mantenimiento ..................................................................................... 43
Solución de problemas......................................................................................... 43
Garantía ............................................................................................................... 45
................................................................................................... 46
Vistas detalladas
IMPORTANTE: Para funcionar de manera correcta, esta herramienta requiere un flujo de aire de
por lo menos 5 pies cúbicos por minutos (CFM por sus siglas en inglés) para 90 libras por
pulgada cuadrada(PSI, por sus siglas en inglés). Revise las especificaciones de su compresora
de aire para asegurarse de que puede soportar tanto los CFM como las PSI mínimas requeridas.
Una manguera de aire comprimido puede causar una caída de hasta 15 PSI en la presión, de
manera que puede necesitar configurar la potencia más alta para mantener la presión requerida
en la herramienta.
5
CFM90PSI
Tool Requirements
Exigences relatives aux outils
Requisitos de herramientas
@
Page 33

33
INFORMACIÓN DE SEGURIDAD
Lea y comprenda completamente este manual antes de intentar ensamblar, usar o
instalar el producto. Si tiene preguntas relacionadas con el producto, llame al
Departamento de Servicio al Cliente al 1-888-3KOBALT, de lunes a viernes de
8:00 a.m. a 8:00 p.m., hora estándar del Este.
El uso o mantenimiento inadecuado de este producto puede ocasionar lesiones
graves y daños a la propiedad. Lea y comprenda todas las advertencias e
instrucciones de funcionamiento antes de usar este equipo. Cuando utilice
herramientas neumáticas, siga siempre las medidas de precaución básicas para
reducir el riesgo de lesiones personales.
ADVERTENCIA
ADVERTENCIA
PARTE DEL POLVO PRODUCIDO POR EL LIJADO, EL SERRUCHADO, LA
TRITURACIÓN Y LA PERFORACIÓN ELÉCTRICA Y OTRAS ACTIVIDADES
RELACIONADAS CONTIENE QUÍMICOS RECONOCIDOS POR EL ESTADO DE
CALIFORNIA COMO CAUSANTES DE CÁNCER, DEFECTOS CONGÉNITOS U OTROS
DAÑOS EN EL APARATO REPRODUCTIVO. SE PUEDE OBTENER UNA LISTA DE LAS
SUSTANCIAS QUÍMICAS EN www.oehha.ca.gov BAJO PROPOSITION 65 (PROPUESTA 65).
ALGUNOS EJEMPLOS DE ESTAS SUSTANCIAS QUÍMICAS SON:
PLOMO DE PINTURAS A BASE DE PLOMO
SÍLICE CRISTALINA DE LADRILLOS, CEMENTO Y OTROS PRODUCTOS DE
MAMPOSTERÍA
ARSÉNICO Y CROMO DE MADERA TRATADA CON QUÍMICOS
SU RIESGO LUEGO DE ESTAS EXPOSICIONES VARÍA, DEPENDIENDO DE CUÁN
A MENUDO REALICE ESTE TIPO DE TRABAJO. PARA REDUCIR SU EXPOSICIÓN
A ESTOS QUÍMICOS, UTILICE UN EQUIPO DE SEGURIDAD APROBADO, COMO UN
RESPIRADOR O LAS MÁSCARAS PARA POLVO ESPECIALMENTE DISEÑADAS
PARA FILTRAR PARTÍCULAS MICROSCÓPICAS
ESPECIFICACIONES
6"
10.000 RPM +/- 10%
3
0,14 M /MIN.
NPT de 1/4"
3/8"
90 PSI
COMPONENTE
BASE DE LIJAD O
VELOCIDAD LIBRE
CONSUMO DE AIRE PROMEDIO
ENTRADA DE AIRE
MANGUERA DE AIRE COMPRIMIDO
PRESIÓN DE TRABAJ O
ESPECIFICACIONES DEL PRODUCTO
Page 34

34
RIESGO DE LESIONES EN LOS OJOS
O LA CABEZA
LO QUE PODRÍA OCURRIR CÓMO EVITARLO
Esta herramienta neumática en particular
puede lanzar materiales como sujetadores
astillas de metal, aserrín y otros residuos
a alta velocidad, lo cual puede provocar
lesiones graves a los ojos.
Use siempre gafas de seguridad con
protecciones laterales aprobadas por la
norma ANSI Z87.1.
ADVERTENCIA
INFORMACIÓN DE SEGURIDAD
Nunca deje la herramienta en
funcionamiento sin supervisión.
Desconecte la manguera de aire
comprimido cuando la herramienta no
esté en uso y colóquela en un área segura.
El aire comprimido puede ser peligroso
y lanzar objetos y otras partículas que
pueden causar lesiones a las zonas de
tejido blando del cuerpo, como los ojos,
orejas, etc. Las partículas o los objetos
lanzados por la corriente pueden causar
lesiones.
Para una protección adicional, use una
careta protectora además de las gafas
de seguridad.
Los accesorios de las herramientas
pueden soltarse o romperse y
desprenderse lanzando objetos al
usuario y las demás personas que
estén en la zona de trabajo.
Asegúrese de que todos los accesorios
estén bien fijados y ensamblados
adecuadamente antes del uso.
Siempre use la herramienta a una distancia
segura de las demás personas que se
encuentran en el lugar de trabajo y asegúrese
de que el área de trabajo sea segura en todo
momento
Nunca use herramientas cerca de
sustancias inflamables como gasolina,
nafta, solventes de limpieza, etc.
Trabaje en un área limpia y bien
ventilada libre de materiales combustibles.
Nunca utilice oxígeno, dióxido de
carbono u otros gases embotellados
como fuente de alimentación para las
herramientas neumáticas.
RIESGO DE INCENDIO O EXPLOSIÓN
ADVERTENCIA
ADVERTENCIA
LO QUE PODRÍA OCURRIR CÓMO EVITARLO
Use siempre protección para los oídos
aprobada por la norma ANSI S3.19.
La exposición a largo plazo al ruido
producido por el funcionamiento de
herramientas neumáticas puede producir
la pérdida permanente de la audición.
RIESGO DE PÉRDIDA DE LA AUDICIÓN
LO QUE PODRÍA OCURRIR CÓMO EVITARLO
Una lijadora de doble acción es capaz
de generar chispas que pueden provocar
el encendido de un material inflamable.
Page 35

35
INFORMACIÓN DE SEGURIDAD
Las herramientas que contienen
elementos móviles o impulsen otras
piezas móviles, tales como dados de
percusión, se pueden enredar en el
pelo, la ropa, joyas y otros objetos
holgados y causar lesiones graves.
LO QUE PODRÍA OCURRIR CÓMO EVITARLO
ADVERTENCIA
RIESGO DE ENREDOS
No use vestimenta suelta, joyas o
elementos que puedan atascarse o
enredarse cuando utilice la herramienta.
Sáquese las joyas que puedan atascarse
en la herramienta.
Mantenga siempre sus manos y partes
del cuerpo alejadas de las piezas en
movimiento.
Utilice siempre ropa de calce adecuado
y otro equipo de seguridad cuando use
la herramienta.
LO QUE PODRÍA OCURRIR CÓMO EVITARLO
ADVERTENCIA
RIESGO DE CORTES
O QUEMADURAS
Mantenga la pieza de trabajo de la
herramienta alejada de las manos y
el cuerpo.
El uso de herramientas neumáticas para
fijar cableado eléctrico puede causar
electrocución por descarga eléctrica o la
muerte.
Esta herramienta no se proporciona con
una superficie de agarre aislada. El
contacto con un cable energizado
también expondrá piezas de metal de la
herramienta energizada y puede
ocasionar electrocución o la muerte.
Los accesorios de la herramienta
neumática, tales como los brocas,
que entren en contacto con
un cableado eléctrico oculto pueden
causar electrocución o la muerte.
Nunca utilice herramientas para fijar
cableado eléctrico si éste está
energizado.
Evite el contacto del cuerpo con
superficies conectadas a tierra, como
tuberías, radiadores, extractores o
refrigeradores. Existe un gran riesgo de
descarga eléctrica si su cuerpo está en
contacto con tierra.
Inspeccione completamente la pieza de
trabajo en búsqueda de un posible
cableado oculto antes de realizar
trabajos.
RIESGO DE DESCARGA ELÉCTRICA
ADVERTENCIA
LO QUE PODRÍA OCURRIR CÓMO EVITARLO
Una lijadora de doble acción podría causar
lesiones graves si se opera de forma
inadecuada o si se utiliza de una manera
distinta a la de su función.
Page 36

36
INFORMACIÓN DE SEGURIDAD
RIESGO DE LESIONES PERSONALES
Asegúrese siempre de retirar la llave
antes de hacer funcionar la herramienta.
Si se deja una llave conectada a una pieza
giratoria de la herramienta, aumenta el
riesgo de lesiones personales.
Mantenga el área de trabajo limpia y
ordenada. No permita que los niños operen
la herramienta y manténgalos alejados
del área de trabajo.
Mantenga el área de trabajo bien iluminada.
Retire la manguera de aire comprimido
para lubricar o añada dados de percusión
a la herramienta.
Nunca transporte la herramienta por la
manguera de aire comprimido.
Siempre transporte la herramienta por el
mango.
Evite los encendidos accidentales. Nunca
transporte la herramienta con el gatillo
apretado o enganchado.
Solo un representante de servicio autorizado
debe realizar reparaciones.
Nunca use la herramienta si está bajo la
influencia del alcohol o drogas.
Siempre cierre el paso del suministro de
aire, libere/drene la presión de aire de la
manguera antes de cambiar los accesorios,
realizar reparaciones o cuando la herramienta
no esté en uso. Luego desconecte la
herramienta del suministro de aire o de la
manguera y almacene en una ubicación segura.
La pérdida del control de la herramienta
puede provocar lesiones al usuario o a
otras personas en el área de trabajo.
ADVERTENCIA
LO QUE PODRÍA OCURRIR CÓMO EVITARLO
Si se deja una herramienta sin
supervisión o con la manguera de aire
comprimido conectada, personas no
autorizadas pueden activarla y sufrir o
provocar lesiones.
Las herramientas neumáticas pueden
lanzar sujetadores u otros materiales en
el área del trabajo.
Cuando la herramienta no esté en uso,
retire la manguera de aire comprimido y
almacene la herramienta en una
ubicación segura y alejada del alcance
de niños y usuarios no capacitados.
Utilice sólo las piezas, sujetadores y
accesorios recomendados por el fabricante.
Retire las llaves de ajuste antes de
encender la herramienta.
El uso de boquillas de inflador para
aplicaciones de soplado puede causar
lesiones graves.
NO use boquillas de inflador para
aplicaciones de soplado.
Las herramientas neumáticas se
pueden activar accidentalmente durante
la realización de mantenimiento o el
cambio de herramientas.
Las herramientas neumáticas pueden
provocar que la pieza de trabajo se
mueva al tener contacto y causar lesiones.
Utilice abrazaderas u otros dispositivos
para evitar que se mueva.
Page 37

37
La pérdida del control de la herramienta
puede provocar lesiones al usuario o a
otras personas en el área de trabajo.
Mantenga un apoyo de pies adecuado en
todo momento. No se extienda demasiado,
ya que podría resbalarse, tropezarse o caer
y estos pueden ser la causa principal de
lesiones graves y/o la muerte. Tenga
cuidado con las mangueras de aire y
enchufes de alimentación excedentes en
el área o superficie de trabajo.
Mantenga las manijas secas, limpias y
libres de aceite y grasa.
Utilice siempre accesorios clasificados
para la velocidad de la herramienta eléctrica.
Nunca use herramientas que se hayan
caído, golpeado o dañado.
Use solo dados de percusión con esta
herramienta.
No aplique fuerza excesiva a la herramienta;
deje que esta realice el trabajo.
Realice un mantenimiento adecuado de
la herramienta y los accesorios.
Mantenga las herramientas limpias y bien
lubricadas para obtener un rendimiento
óptimo y seguro.
Verifique que no haya mala alineación o
trabas en las piezas móviles, piezas rotas
ni cualquier otra condición que afecte el
funcionamiento de la herramienta. Si se
daña, haga reparar la herramienta antes
de usarla.
Nunca use una herramienta que tenga fugas
de aire, que le falten piezas o tenga piezas
dañadas o que requiera reparaciones.
Los residuos de limpieza inflamables que
puedan haberse usado con la herramienta
deben colocarse en un recipiente metálico
herméticamente cerrado y desecharse de
manera adecuada.
INFORMACIÓN DE SEGURIDAD
RIESGO DE LESIONES PERSONALES
ADVERTENCIA
LO QUE PODRÍA OCURRIR CÓMO EVITARLO
Manténgase alerta. Preste atención a lo
que está haciendo. Use el sentido común.
No utilice la herramienta si está cansado.
Las herramientas y accesorios de mala
calidad, inadecuados o dañados pueden
desprenderse durante el uso y lanzar
partículas por el área de trabajo
causando lesiones graves.
Las herramientas y los accesorios con
mantenimiento inadecuado pueden
causar lesiones graves.
Si la herramienta se daña, existe el
riesgo de que reviente.
Page 38

38
Siga las instrucciones de lubricación para
un funcionamiento óptimo y seguro.
Siga las instrucciones de ensamblaje y
reparación sobre cómo cambiar
adecuadamente los accesorios.
INFORMACIÓN DE SEGURIDAD
RIESGO DE LESIONES PERSONALES
ADVERTENCIA
LO QUE PODRÍA OCURRIR CÓMO EVITARLO
Use sólo accesorios identificados por el
fabricante para utilizarse con
herramientas específicas.
El uso de accesorios que no estén
diseñados para utilizarse con las
herramientas específicas aumenta el
riesgo de provocar lesiones al operador
y a cualquiera.
Las herramientas abrasivas, tales como
amoladoras, lijadoras y herramientas
de corte, generan polvo y materiales
abrasivos, los cuales pueden ser
dañinos para los pulmones y el sistema
respiratorio.
Algunos materiales, tales como los
adhesivos y el alquitrán, contienen
sustancias químicas cuyos vapores
pueden causar lesiones graves tras la
exposición prolongada.
Siempre utilice una máscara o un
respirador del tamaño adecuado al
usar dichas herramientas.
Trabaje siempre en un área limpia,
seca y bien ventilada.
PELIGRO DE INHALACIÓN
ADVERTENCIA
LO QUE PODRÍA OCURRIR CÓMO EVITARLO
Si la herramienta se daña, existe el
riesgo de que reviente.
Page 39

39
CONTENIDO DEL PAQUETE
A
F
B
E
G
C
D
DESCRIPCIÓN
Lijadora de doble acción de 6"
Base de lijado
Alojamiento del rodamiento
Tuerca de inercia
Perilla reguladora de aire
Gatillo
Entrada de aire
CANTIDAD
1
1
1
1
1
1
1
PIEZA
A
B
C
D
E
F
G
Tiempo aproximado de ensamblaje: 5 a 10 minutos
Herramientas necesarias para el ensamblaje (no se incluyen): Llave inglesa
Antes de comenzar a ensamblar el producto, asegúrese de tener todas las piezas.
Compare las piezas con la lista del contenido del paquete y la lista de aditamentos.
No intente ensamblar el producto si falta alguna pieza o si éstas están dañadas.
Comuníquese con el Departamento de Servicio al Cliente para obtener piezas de
repuesto.
PREPARACIÓN
Page 40

INSTRUCCIONES DE ENSAMBLAJE
40
2
3
1
1. Retire la tapa protectora de la entrada de aire
de la entrada de aire (G) (Consulte la Figura 1).
3. Inserte a mano un enchufe macho (no se
incluye) en la entrada de aire (G). (Consulte la
figura 2).
4. Coloque de 2 a 3 gotas de aceite para
herramientas neumáticas (no se incluye) en el
conector macho antes de cada uso (Consulte la
Figura 3).
2. Use cinta selladora para roscas (no se
incluye)
en las roscas del enchufe macho. Cuando la
cinta selladora esté ubicada, apriete el enchufe
macho girándolo en dirección de las
manecillasdel reloj con una llave inglesa(no se
incluye) para una conexión hermética. No
apriete demasiado.
Page 41

INSTRUCCIONES DE ENSAMBLAJE
5. Girar la tuerca de inercia (D) y conseguir el
engranaje para hacer frente al asiento de
cojinete (C). Entonces el asiento de cojinete (C)
está bloqueado y estable (Consulte las figuras
4 ).
6. Para montar correctamente el disco de
soporte (B) en el asiento del cojinete de la (C)
Retirar el tapón de plástico que protege las
roscas en el disco de soporte (B). Alinee los
hilos de la almohadilla de lijado (B) en el
asiento del cojinete (C) y gire la almohadilla
hacia la derecha con la mano. Asegúrese de
que el disco de soporte (B) se fijará firmemente
(ver figura 5).
Luego de montar la almohadilla de lijado (B),
gire la tuerca de inercia (D) 90º a la posición
desbloqueada (consulte la figura 6).
41
4
7. Monte un papel de lija (no se incluye) en la
base de lijado (B).
5
Tapón de
plástico
Desbloqueado
Bloqueado
ADVERTENCIA
Antes de usar la herramienta, asegúrese de que
todos los accesorios estén bien montados y
asegurados. Si los accesorios no están montados
y asegurados de forma apropiada, pueden
presentar un riesgo grave y provocar lesiones
corporales para quienes trabajen en el área o
cerca de ella. Siempre siga las especificaciones del
fabricante del accesorio para fijar de forma
apropiada los accesorios a la herramienta.
Utilice solo papel de lija que tenga una clasificación
de 10.000 RPM o superior.
6
Desbloqueado
Page 42

1
2
INSTRUCCIONES DE FUNCIONAMIENTO
INSTRUCCIONES DE ENSAMBLAJE
1. Presione el gatillo (F) para arrancar la
herramienta (Consulte la Figura 1).
42
NOTA La herramienta cuenta con una perilla
reguladora de aire (E). La velocidad de la
herramienta se puede ajustar girando la perilla
reguladora de aire (E) ya sea en dirección de las
manecillas del reloj o viceversa. La velocidad
máxima de la herramienta se puede obtener
cuando la línea cóncava de la perilla (E) está en
posición horizontal (Consulte la Figura 2).
Al hacer contacto por primera vez con la superficie
que desea lijar, asegúrese de que la velocidad esté
establecida en la configuración más lenta. Aumente
la energía/velocidad gradualmente según sea
necesario para la aplicación específica de lijado en
vez de aplicar demasiada energía/velocidad desde
el principio.
7
Conecte la manguera de suministro de aire al
enchufe macho. Establezca la presión de trabajo
en 90 PSI para obtener el mejor rendimiento de la
herramienta. (Consulte la figura 7).
NOTA
La presión de trabajo se refiere a la presión
de manguera de aire establecida para la
herramienta cuando ésta está en condiciones
para trabajar.
Page 43

43
CUIDADO Y MANTENIMIENTO
Siempre retire la herramienta del suministro de aire antes de realizar cualquier tarea
de mantenimiento en ella.
Se recomienda instalar un lubricador en línea (no se incluye) en el suministro de aire.
Este ayudará a maximizar la vida útil de la herramienta y a mantener la herramienta
lubricada de forma apropiada. Se debe verificar regularmente el lubricador en línea y
llenarlo con aceite para herramientas neumáticas según sea necesario. Para verificar
si el lubricador en línea lubrica la herramienta de forma apropiada, coloque una hoja
de papel junto a los orificios de escape de la herramienta y mantenga el regulador
completamente abierto por 30 segundos. El lubricante en línea se ajusta
adecuadamente cuando se genera una leve mancha de aceite en el papel. Se deben
evitar las cantidades excesivas de aceite.
ALMACENAJE:
La herramienta debe estar bien limpia y ligeramente lubricada antes de almacenarla.
Almacene la herramienta neumática en un lugar seco y seguro, fuera del alcance de
los niños.
En caso de que sea necesario almacenar la herramienta por un período prolongado,
la herramienta debe recibir una cantidad generosa de lubricación justo antes de ser
almacenada. Luego de recibir una buena lubricación, La herramienta debe funcionar
por aproximadamente 30 segundos para garantizar que el aceite se haya distribuido
en forma pareja por toda la herramienta. la herramienta se debe almacenar en un
entorno limpio, húmedo y seco alejado del alcance de los niños. Lubricantes
recomendados: Use aceite para herramientas neumáticas o cualquier otro aceite de
alta calidad para turbinas que contenga absorbente de humedad, antioxidante,
agentes de humidificación de metales y un aditivo para presión extrema (EP, por sus
siglas en inglés). Consulte a su distribuidor local para obtener más ayuda para
seleccionar el aceite para herramienta neumática que mejor se adapte para una
lubricación apropiada.
PROBLEMA
SOLUCIÓN DE PROBLEMAS
ACCIÓN CORRECTIVACAUSA POSIBLE
La herramienta
no funciona o
lo hace
lentamente.
1. Hay polvo o goma
en la herramienta.
3. La presión de aire
es baja.
4. Hay fugas en la
manguera de aire
comprimido.
1. Enjuague la herramienta con aceite para
herramientas neumáticas o solvente
para goma.
2. No hay aceite en
la herramienta.
2. Lubrique la herramienta.
3. a. Ajuste el regulador en la herramienta
en la configuración máxima.
b. Ajuste el regulador del compresor al
máximo de la herramienta en 90 PSI.
4. Apriete y selle los conectores de la
manguera si se encuentran fugas. Use
cinta de sellado.
Page 44

44
PROBLEMA
SOLUCIÓN DE PROBLEMAS
ACCIÓN CORRECTIVACAUSA POSIBLE
La herramienta
no funciona o
lo hace
lentamente.
5. Hay bajas de
presión.
6. Las aspas del rotor
están desgastadas.
7. Sale humedad del
escape de la
herramienta.
5. a. Asegúrese de que la manguera sea
del tamaño adecuado. Las mangueras o
herramientas largas que usen grandes
volúmenes de aire pueden requerir una
manguera con un diámetro interno de
1/2" o mayor dependiendo del largo total
de las mangueras.
b. No utilice varias mangueras con
conectores de conexión rápida. Esto
causa bajas de presión adicionales y
reduce la potencia de la herramienta.
Siempre conecte las mangueras
directamente entre sí.
6. Remplace el aspa del rotor.
7. Vierta agua en el tanque; drene el tanque.
(Consulte el manual del compresor de
aire). Lubrique la herramienta y hágala
funcionar hasta que no haya evidencias
de agua. Vuelva a lubricar la herramienta
y hágala funcionar por 1 a 2 segundos.
Page 45

45
GARANTÍA
Esta herramienta está garantizada por el fabricante para el comprador original desde
la fecha de compra original por tres (3) años y está sujeta a la cobertura de garantía
que se describe en el presente.
Esta herramienta tiene una garantía para el usuario original contra defectos en los
materiales y la mano de obra. Si cree que una herramienta presenta defectos,
devuelva la herramienta con una adecuada prueba de compra al lugar de la compra.
Si se determina que la herramienta presenta defectos y estos están cubiertos por
esta garantía, el distribuidor reemplazará la herramienta o reembolsará el precio de
compra.
Esta garantía es nula si: Los defectos en los materiales o la mano de obra o los
daños han sido causados por reparaciones o modificaciones hechas o que se hayan
intentado hacer por parte de terceros o el uso no autorizado de piezas que
incompatibles; el daño es debido al desgaste normal; el daño es debido al abuso
(lo que incluye la sobrecarga de la herramienta por encima de su capacidad),
mantenimiento inadecuado, negligencia o accidente; o el daño es debido al uso de la
herramienta después de una falla parcial, el uso con accesorios inadecuados o
reparaciones o alteraciones no autorizadas.
Esta garantía le otorga derechos legales específicos, pero podría tener también otros
derechos que varían según el estado.
Si tiene preguntas acerca de la garantía, llame a nuestro Departamento de Servicio
al Cliente al 1-888-3KOBALT, de lunes a viernes de 8:00 a.m. a 8:00 p.m.,
Hora estándar del Este.
Page 46

VISTAS DETALLADAS
46
C
Anillo E
Arandela
Rodamiento
Tornillo
Eje excéntrico
Tornillo M5x25
Tornillo M5x15
Resorte arandela
Cubierta frontal
Empaquetadura
Tuerca M6
Tuerca de inercia
Cobre arbusto
Arandela
Arandela
Tornillo M6x33
Eje de trabajo
Llave semicircular
Rodamiento
Cubierta del cilindro
Aspa del rotor
Rotor
Cilindro
Anillo E 8
Carcasa
Cubierta de la carcasa
Alojamiento del rodamiento
Base de lijado
B
3
4
5
6
7
8
9
10
11
12
13
D
15
16
17
18
19
20
21
22
23
24
25
26
27
28
1
1
1
1
1
1
1
1
4
4
1
1
1
1
1
1
1
1
1
1
2
2
5
1
1
1
1
1
Pieza No.
Descripción
Cant.
29
30
31
32
33
34
E
36
37
38
G
40
41
42
43
44
45
46
47
48
49
F
52
51
53
Cubierta superior
Pasador 3x7
Junta tórica 7.5x1.8
Agarre suave
Regulador de aire
Junta tórica 4.5x1.8
Perilla reguladora de aire
Tornillo M4x8
Agarre suave
Junta tórica 18x1.8
Entrada de aire
Resorte
Junta tórica 4x2
Vástago de la válvula
Junta tórica 3.5x1.5
Junta tórica 8x1.5
Alojamiento de la válvula
Alojamiento del gatillo
Arandela
Arandela
Tuerca M10
Gatillo
Tornillo M4x35
Tuerca M4
Junta tórica 11.2x1.6
1
1
1
1
1
2
1
1
1
1
1
1
1
1
1
1
1
1
1
1
1
1
1
1
1
B
19
20
21
22
23
30
31
37
38
40
41
42
43
44
45
46
F
51
49
48
47
G
53
52
34
33
E
36
32
24
25
22
21
26
27 28
13
D1516
17
18
29
C3
4
5
6
7
8
910
11
12
Pieza No.
Descripción
Cant.
KOBALT® y K & Design® son marcas
registradas de LF, LLC. Todos los derechos reservados.
Impreso en China
 Loading...