

Page 1
ITEM #0771595
MODEL SGY-A11WH
VARIABLE SHADE
AUTO-DARKENING
WELDING HELMET
Français p.11
Español p.21
1
AB16565
ATTACH YOUR RECEIPT HERE
Serial Number
Purchase Date
Questions, problems, missing parts? Before returning to your retailer, call our customer
service department at 1-888-3KOBALT, 8:00 a.m.-8:00 p.m., EST, Monday-Friday.
kobalttools.com
Kobalt® is a registered trademark of LF, LLC.
All rights reserved.
Page 2

TABLE OF CONTENTS
Instructions for Adjusting Head Band ........................................................................................ 8
Instructions for Changing The Batteries ................................................................................... 8
Instructions for Installing New Batteries .................................................................................... 9
Operating Instructions ...........................................................................................................................10
Care and Maintenance ..........................................................................................................................10
Safety Information .................................................................................................................... 3
Package Contents .................................................................................................................... 4
Disassembly Instructions for the Lens and Automatic Filter..................................................... 5
Reinstallation Instructions for the Lens and Automatic Filter.................................................... 6
Instruction for Adjusting Angle of Helmet .................................................................................. 7
Instructions for Adjusting Headgear .......................................................................................... 7
Troubleshooting .................................................................................................................................
11
Warranty .................................................................................................................................
11
RECOMMENDEDSHADENUMBERS
WELDING PROCESS
Covered Electrode
MIG Plate Welding
MIG Sheet Metal
TIG
MAG
Arc Gouging
Plasma Cutting
Plasma Welding
2
PRODUCT SPECIFICATIONS
3.94in.× 3.64 in.
5.25in.×4.5in.×0.35in.
4
5-9 / 9-13 variable
Protectionupto16
Solarcell&replaceablebattery
Fullyautomatic
Inside & Adjustable dial
-5°C to 55°C (23°F to 131°F)
-10°C to 65°C (14°F to 149°F)
Nylon
610g
1/20,000ofasecond
0.15-0.80 of a second adjustable
Viewing Area
Filter Dimension
Light Shade Number
Dark Shade Number
UV/IR
Power Supply
Power On/Off
Light to Dark
Dark to Light (Delay Time)
Sensitivity
Operation Temperature
Storage Temperature
Helmet Material
Total Weight
Outside & Available
Grinding Function
Low Battery Warning Flash Yes
Arc Sensors 4
COMPONENT SPECIFICATIONS
kobalttools.com
Page 3
• Wear impact-resistant, primary eye protection, safety glasses or goggles that meet current ANSI
• Avoid work positions that would expose unprotected areas of the body to sparks, spatter,
• The KOBALT welding filter should always be used with original KOBALT inner and outer
• Never place the helmet on or near hot surfaces.
• Keep helmet and all of its components out of the reach of children.
• Never open or tamper with the filter cartridge.
• The manufacturer is not responsible for modifications to the welding filter or the use of the filter
in any other manufacturer’s helmet.
• Failure to follow these warnings and operating instructions could result in severe personal
• The welding helmet is not suitable for overhead welding applications, laser welding or laser
• The recommended operating temperature range for the welding lens is -5°C to 55°C (23°F to
131°F ). Do not use this device beyond these temperature limits.
cover lenses. Protection could be compromised if unapproved modifications are made.
specifications at all times when using this welding helmet.
direct and/or reflection radiation. Use adequate protection if exposure cannot be avoided.
injury.
cutting applications.
SAFETY INFORMATION
Please read and understand this entire manual before attempting to adjust, operate
the product. If you have any questions regarding the product, please call customer service at
1-888-3KOBALT, 8 a.m. - 8 p.m., EST, Monday - Friday.
3
• If the helmet is not in use, make sure the grind/weld switch is on weld function.
NOTE: The headgear has been installed by the factory and the angle adjustment screw has been
set in position 3, which has the headgear the furthest away from the automatic filter.
To adjust the headgear so you are closer to the automatic filter, follow the
Instructions for Adjusting Headgear on page 7.
R
R
kobalttools.com
Page 4
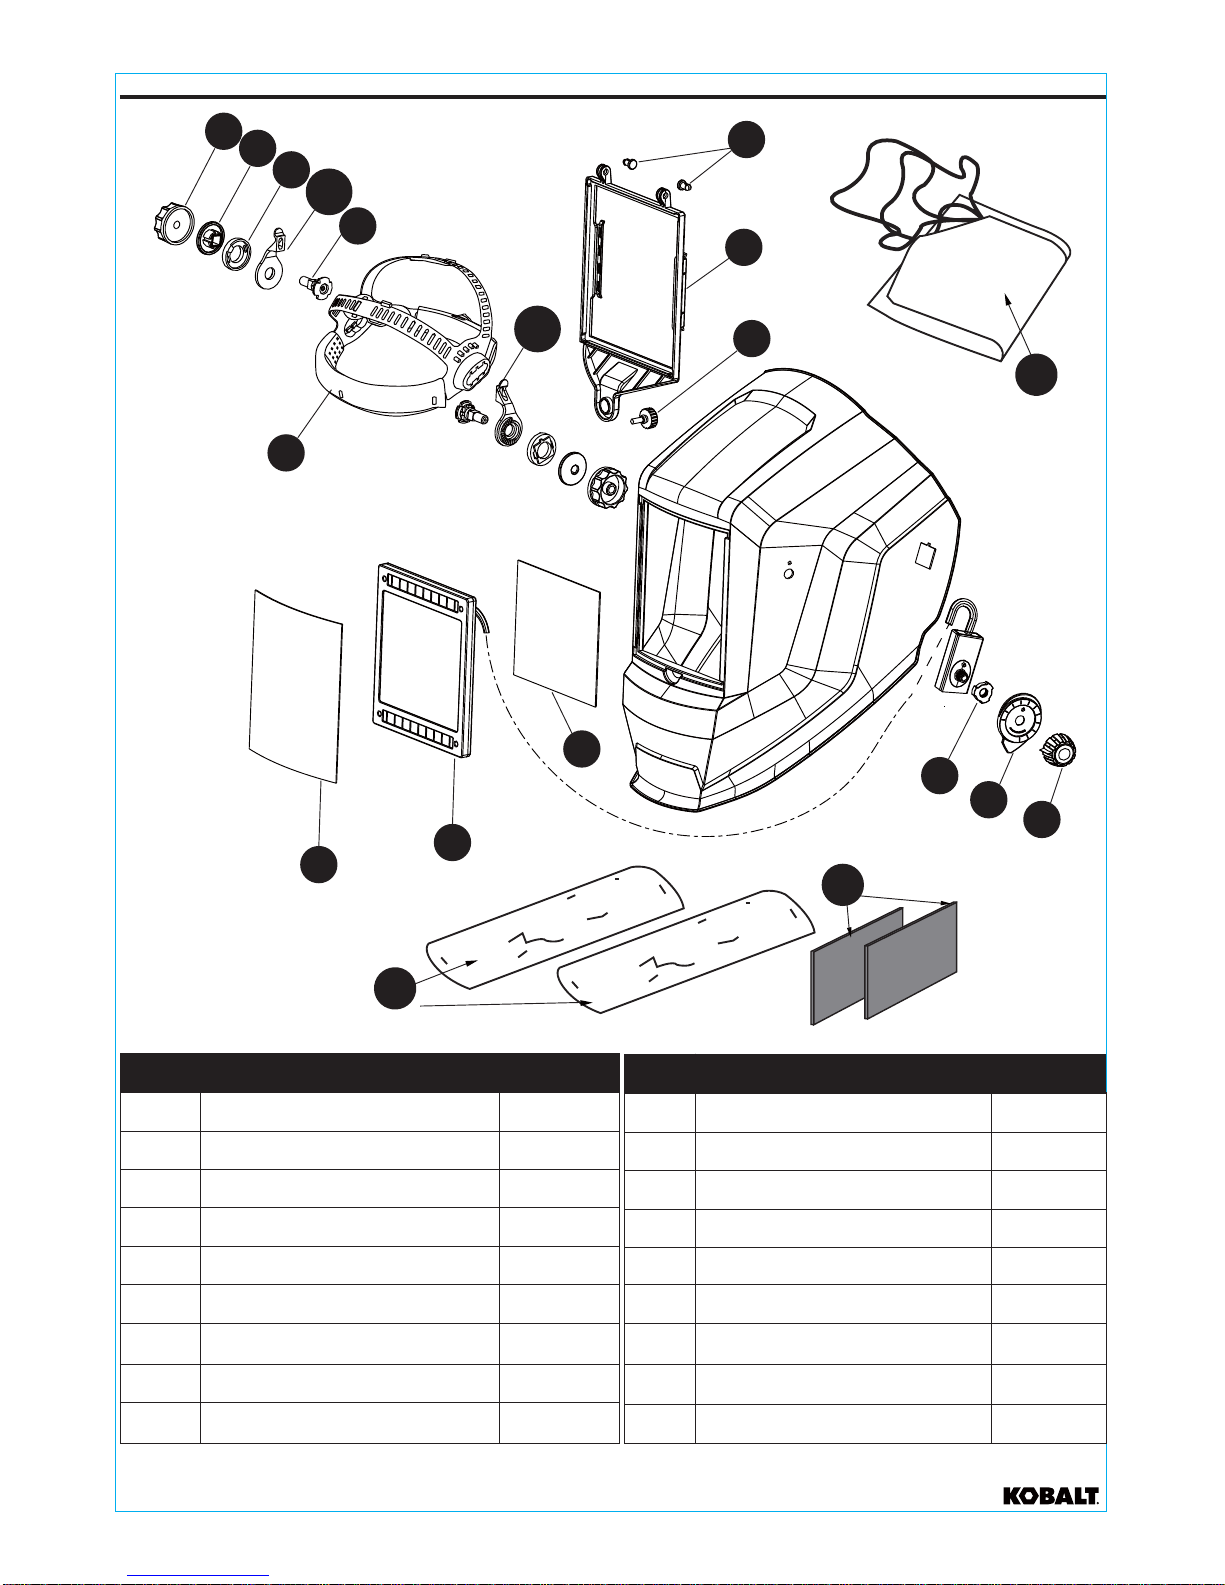
QUANTITYDESCRIPTIONPART
2A Headband adjusting nut
2B Outside square washer
2C
Inside square washer
2E Angle adjusting shaft
D1L,D2R
2 (L&R)Adjustable angle regulator
1F Headgear set
2G Filter frame bolt
1Outer protection lens
1Automatic filter
1Inner protection lens L
K
J
1Filter frame screw
2Filter frameH
I
2 M
Shade indicator fastener
2
2
2
2
1
N
O
P
Q
Shade indicator
Shade adjusting knob
Bag
Extra sweatbands
R Extra lenses
QUANTITYDESCRIPTIONPART QUANTITYDESCRIPTIONPART
PACKAGE CONTENTS
4
A
B
C
D2R
D1L
E
G
H
I
F
J
K
M
N
O
L
Q
P
R
kobalttools.com
Page 5
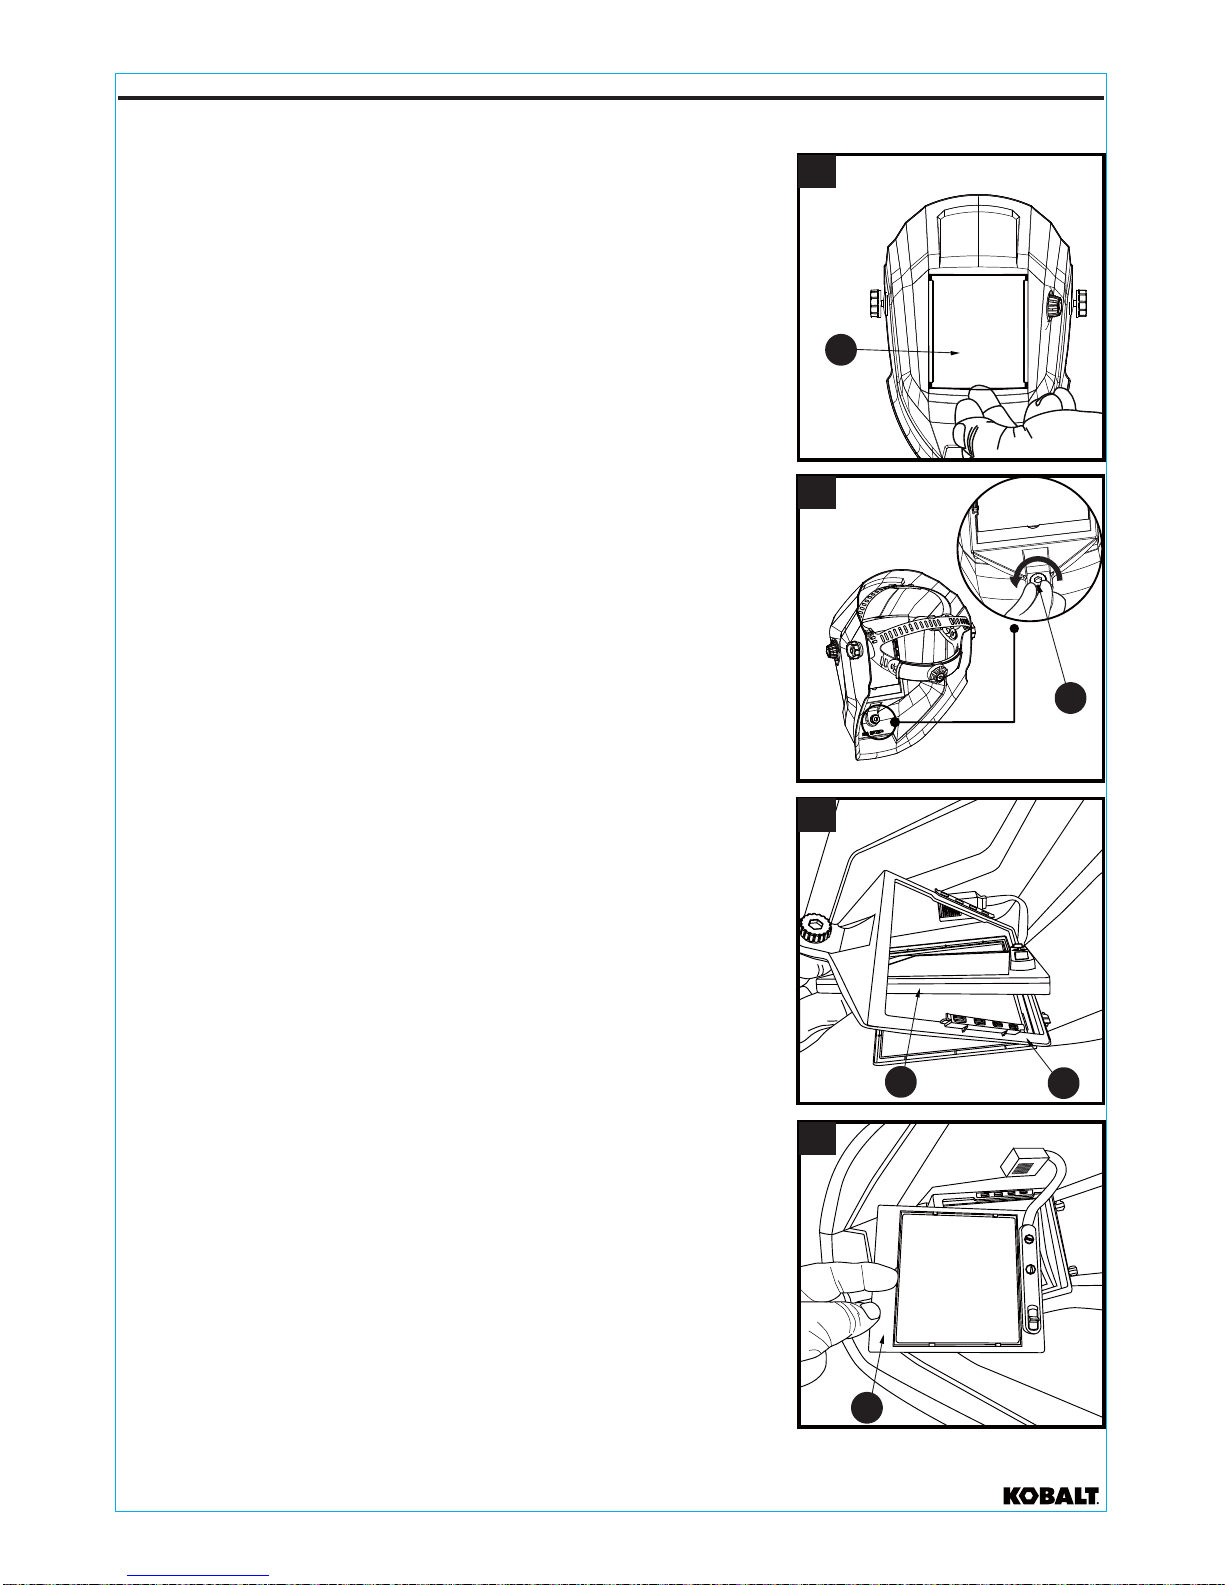
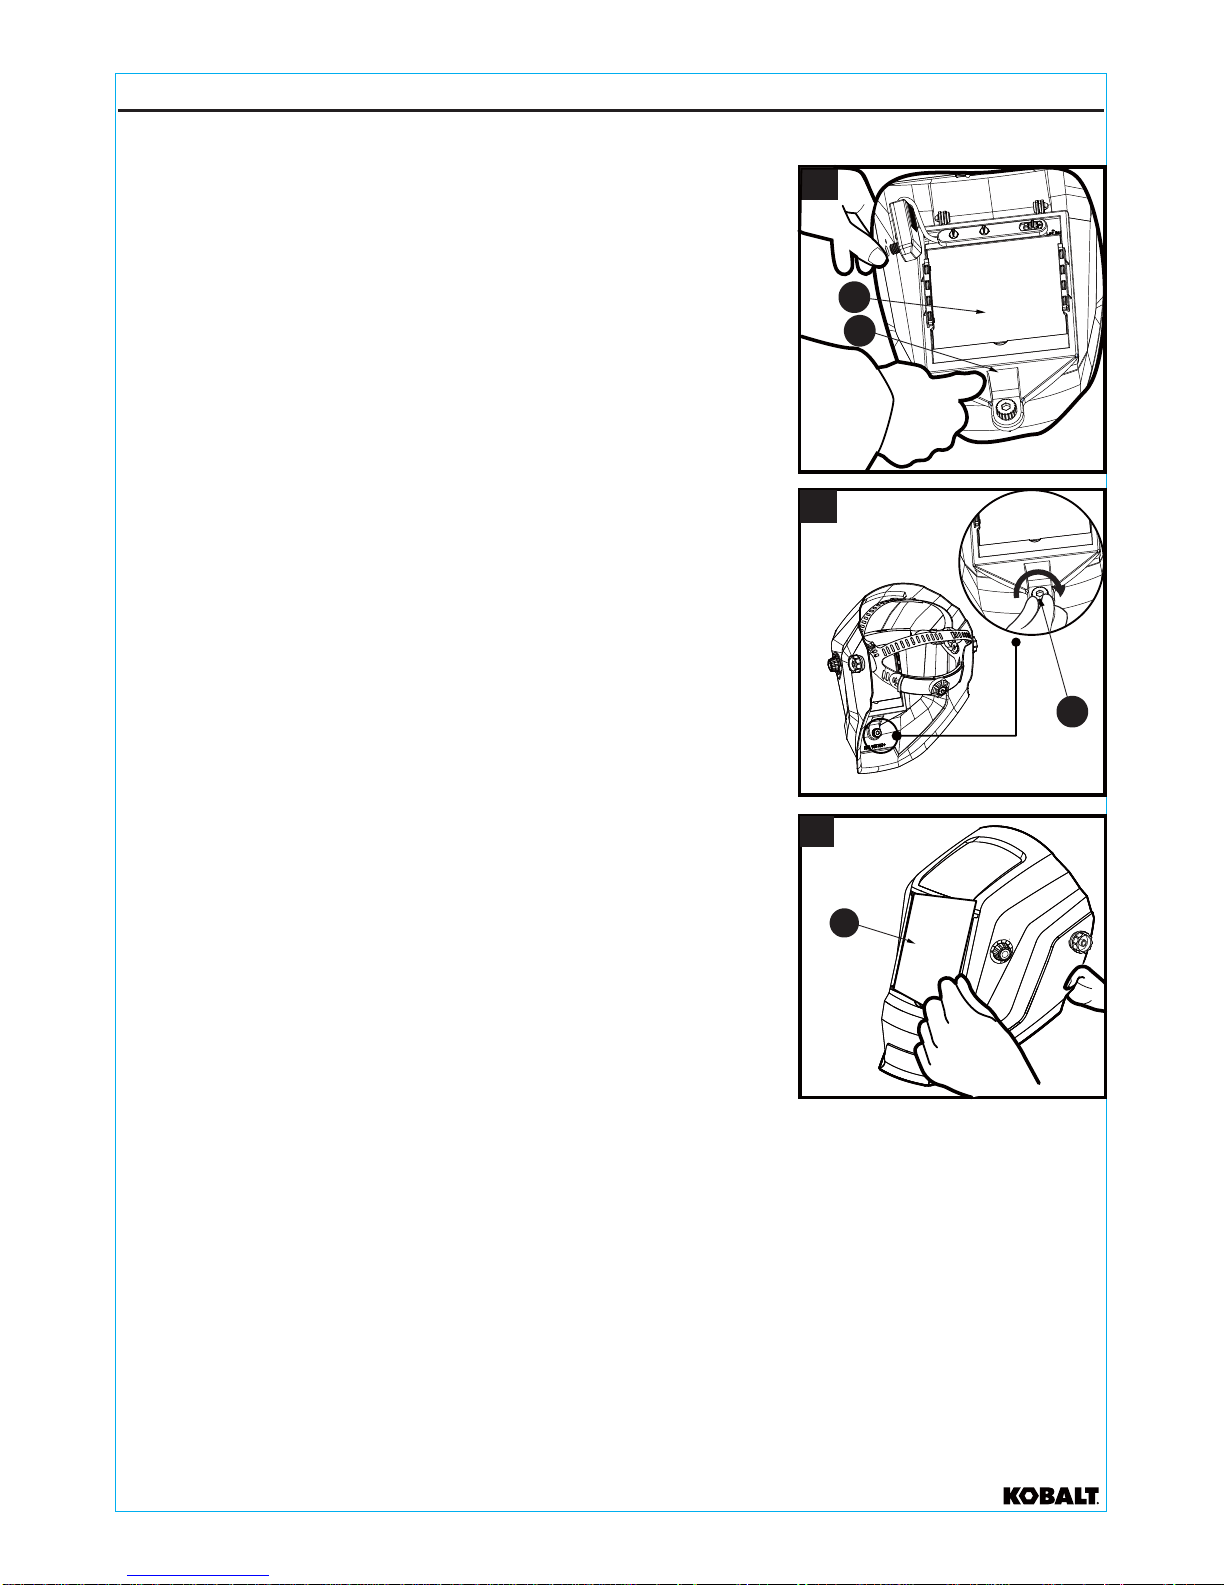
DISASSEMBLY INSTRUCTIONS FOR THE LENS AND AUTOMATIC FILTER
5
2. Loosen the filter frame screw (I) by turning the screw
counterclockwise.
3. Lift the filter frame (H) and remove the automatic
filter (K) by turning it sideways and pulling it through
the filter frame.
4. Remove the protective film on the automatic filter (K).
1. Insert a finger into the semicircular hole and pull out on the
outer protection lens (J). Remove protective film from lens.
J
3
4
H
K
K
1
2
I
kobalttools.com
Page 6
REINSTALLATION INSTRUCTIONS FOR THE LENS AND AUTOMATIC FILTER
1. Slide the automatic filter (K) through the filter frame and set
it back into the holding tray.
2. Lock the filter frame screw (I) by turning the screw clockwise.
Do not overtighten the nut or the threads may become stripped.
6
3. Place outer protection lens (J) back into the front of the
helmet by inserting one side of the lens into either side
slot and then bend the lens just enough that it will slip into
the other side slot.
1
K
H
3
J
2
I
kobalttools.com
Page 7
7
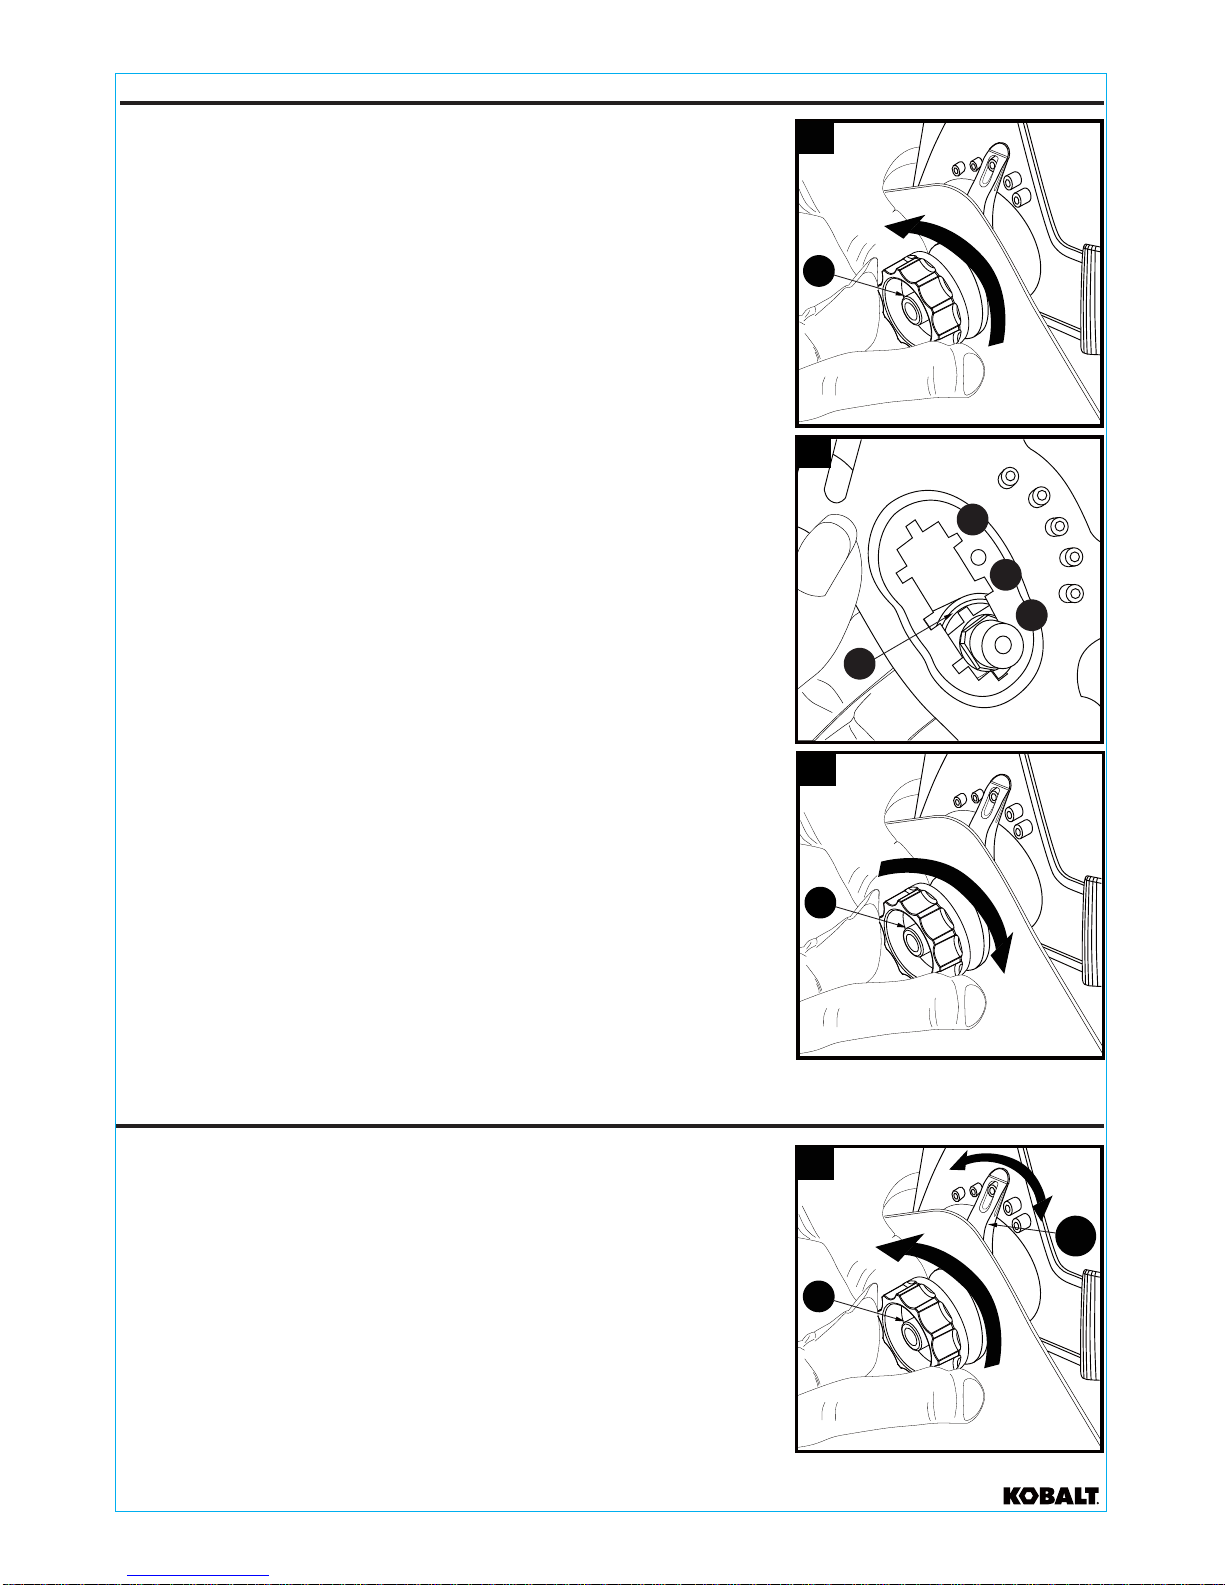
INSTRUCTIONS FOR ADJUSTING HEADGEAR
INSTRUCTION FOR ADJUSTING ANGLE OF HELMET
1. Loosen one of the headgear adjusting nuts (A) by turning the
nut counterclockwise.
2. Slide the angle adjustment shaft (E) to either position 1 or 2.
3. Tighten the headgear adjusting nut down by turning it clockwise.
Do not overtighten the nut as the threads may become stripped.
4. Repeat steps 1 - 3 on the other headgear adjusting nut.
1. Loosen one of the headgear adjusting nuts (A) by turning the
nut counterclockwise.
2. Move the adjustable angle regulator (D1L and D2R) to the
desired pin.
3. Tighten the headgear adjusting nut down by turning it
clockwise Do not overtighten the nut as the threads may
become stripped.
4. Repeat steps 1 - 3 on other side of headgear.
2
E
1
2
3
1
A
3
A
1
A
D1L
kobalttools.com
Page 8
8
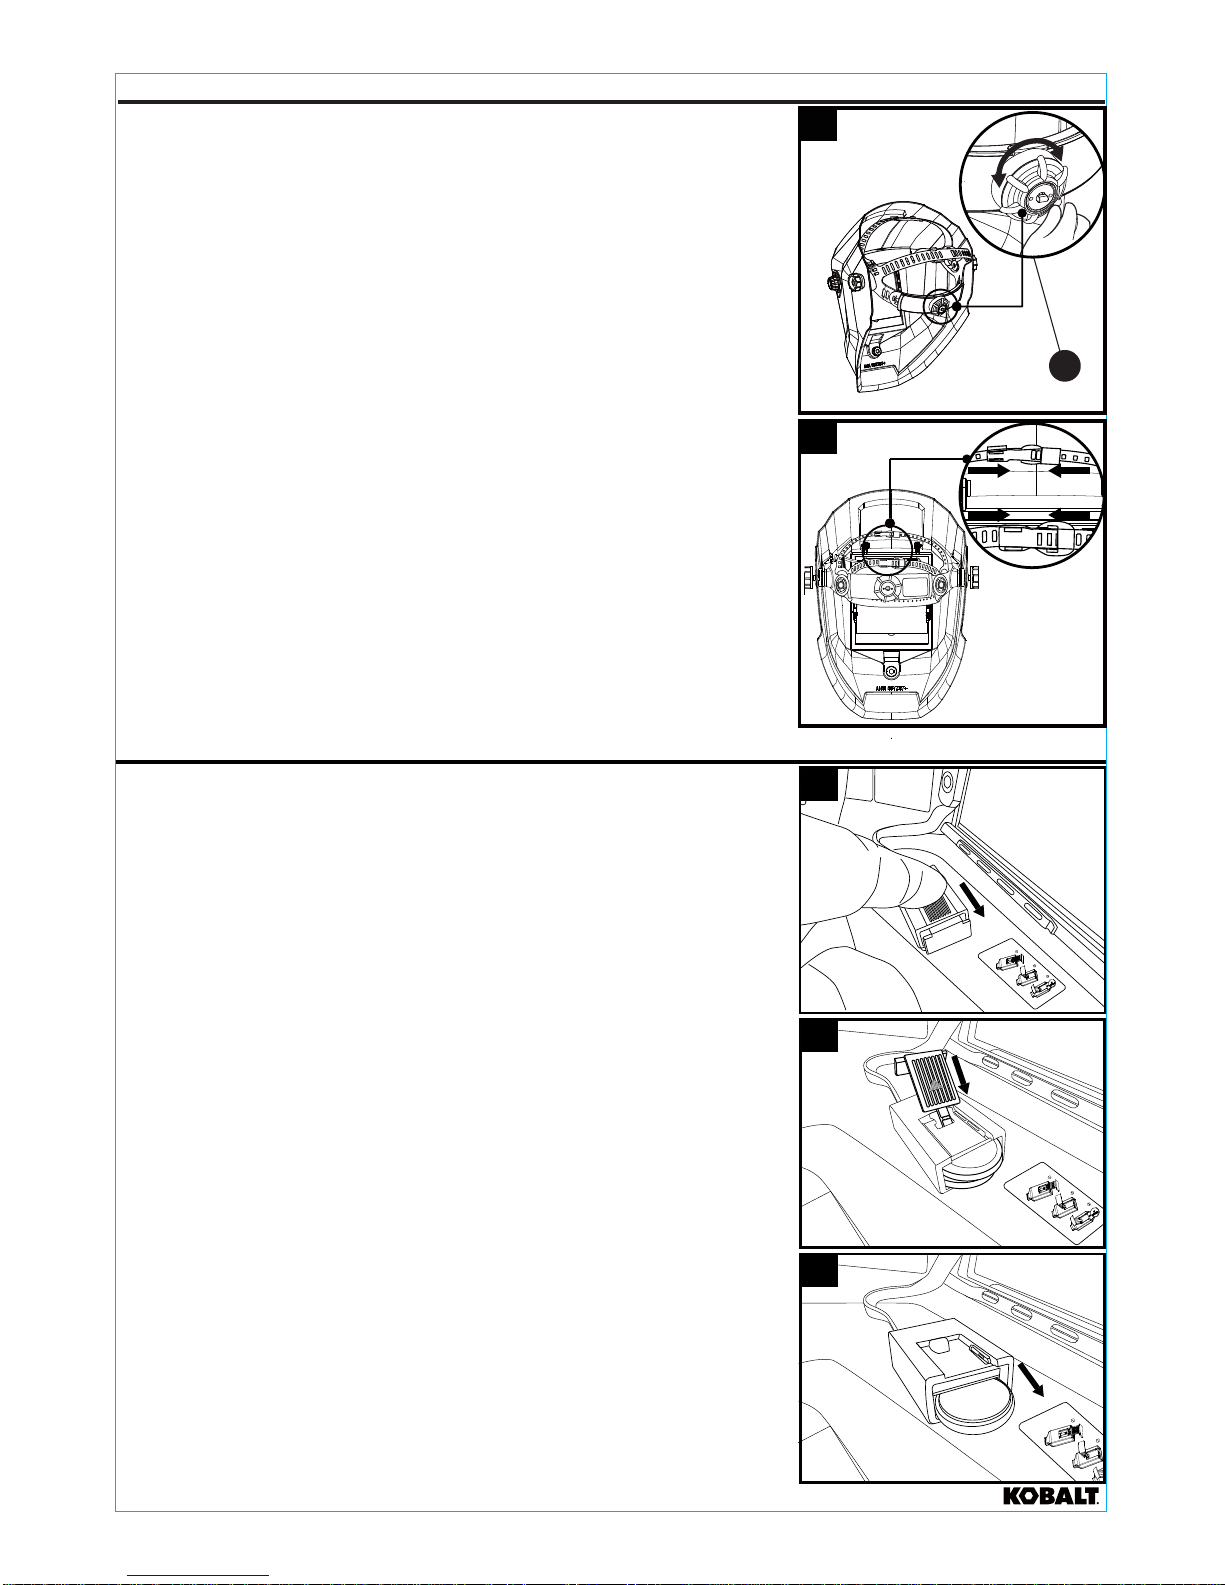
INSTRUCTIONS FOR ADJUSTING HEAD BAND
INSTRUCTIONS FOR CHANGING THE BATTERIES
1. To loosen or tighten the head gear, push in on the knob on the
back of the head gear and turn clockwise to tighten or
counterclockwise to loosen.
2. To adjust the size of the head band, unsnap the latch and slide
the strap in to tighten or slide the strap out to loosen.
Then, snap the latch into the chosen slot.
1. Pull down on the battery cover to remove.
2. Using the stem on the battery cover. Place the stem into the slot
and push the top battery out by pushing back on the battery
cover and stem until the battery is pushed out far enough
to grab with your fingers.
3. Repeat step 2 to remove the bottom battery
2
1
1
I
NOTICE
Press the button and
turn left to loosen.
Press the button
and
turn right to tighten.
kobalttools.com
USES TWO CR2032
BATTERIES
USES TWO CR2032
BATTERIES
USES TWO CR2032
BATTERIES
2
3
Page 9
9
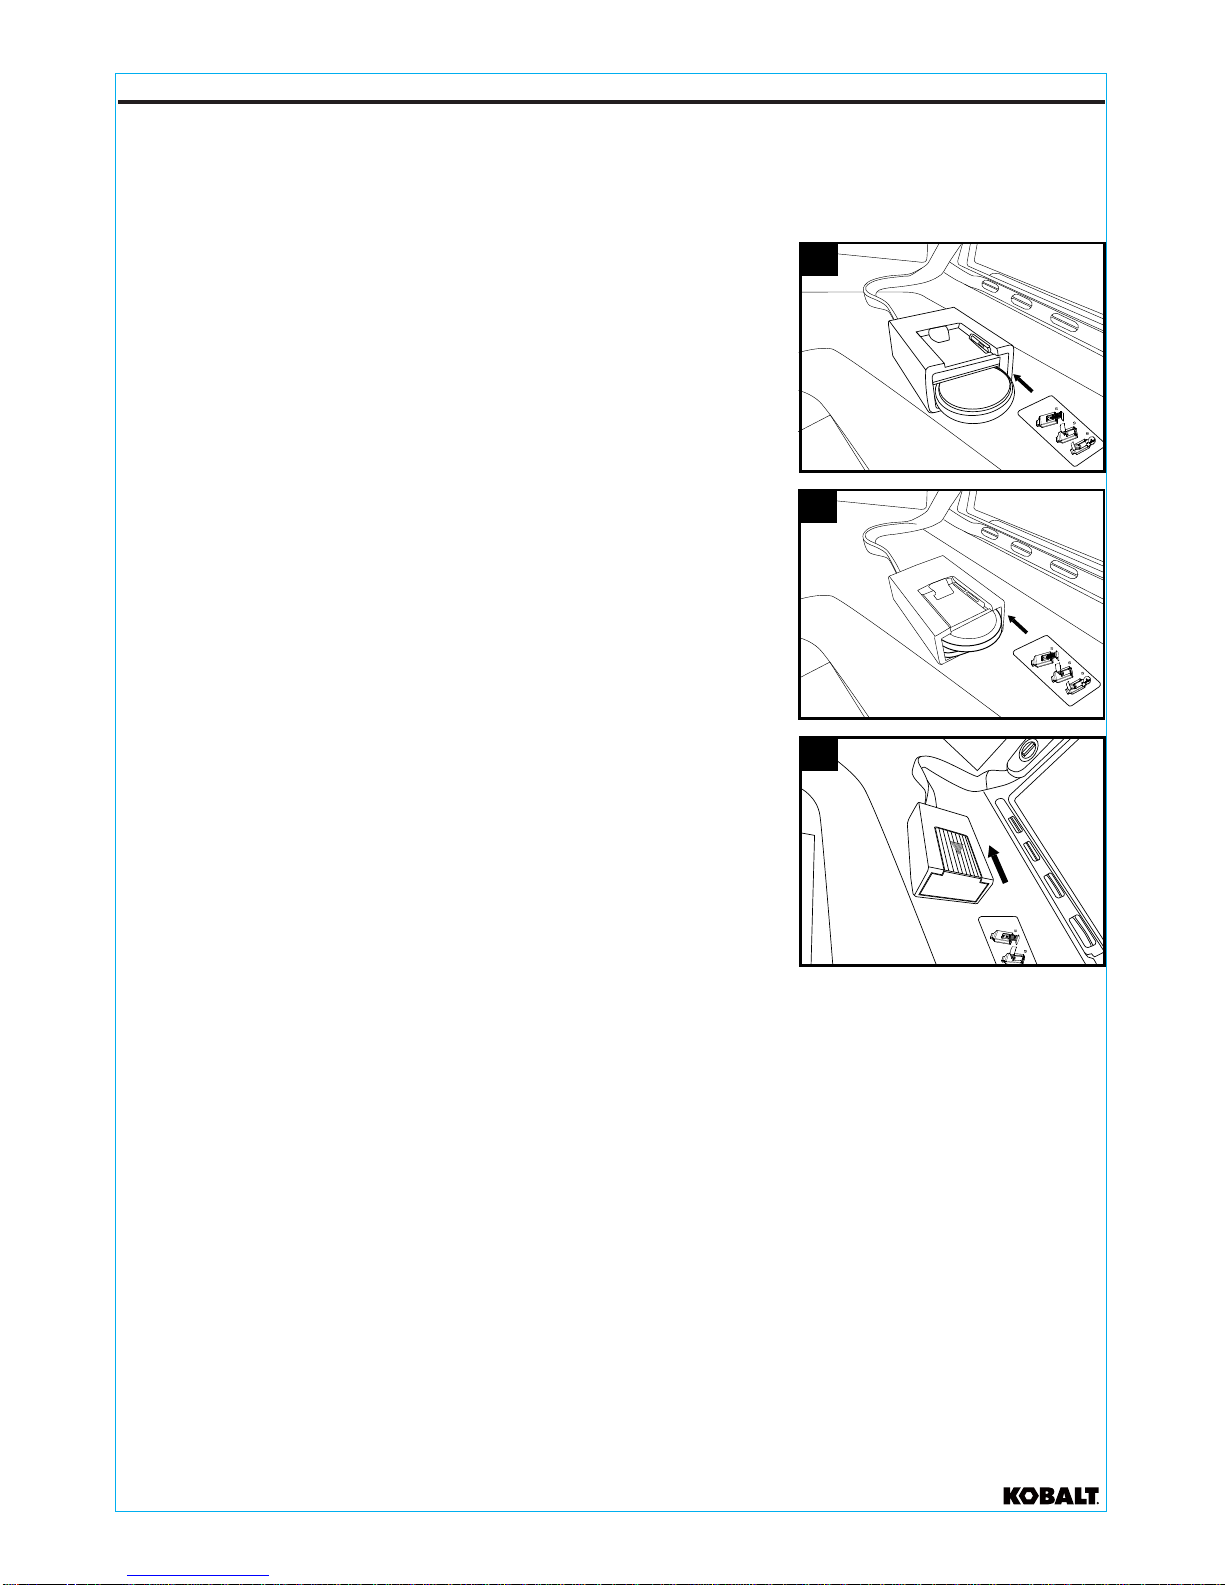
INSTRUCTIONS FOR INSTALLING NEW BATTERIES
1. Use two CR2032 batteries
2. Insert the bottom battery into the bottom slot of the battery
holder with the positive (+) side facing down.
3. Insert the top battery into the top slot of the battery holder with
the positive (+) side facing up.
4. Reinstall the battery cover.
kobalttools.com
USES TWO CR2032
BATTERIES
USES TWO CR2032
BATTERIES
1
3
USES TWO CR2032
BATTERIES
2
Page 10
OPERATING INSTRUCTIONS
2. On/off.
The solar unit automatically switches on when
exposed to light.
3. Select the shade number.
Five different shade numbers (9, 10, 11, 12 and
13) are available in the dark state. The shade
number can be selected by turning the shade
adjustment knob on the side of the helmet. The
shade setting is indicated by the arrow on the
switch.
4. Time delay selection.
By turning the delay selector knob on the top of the cartridge, the time taken from dark state
to clear state after welding is finished can be altered. This time delay range can be 0.15 - 0.8
seconds.
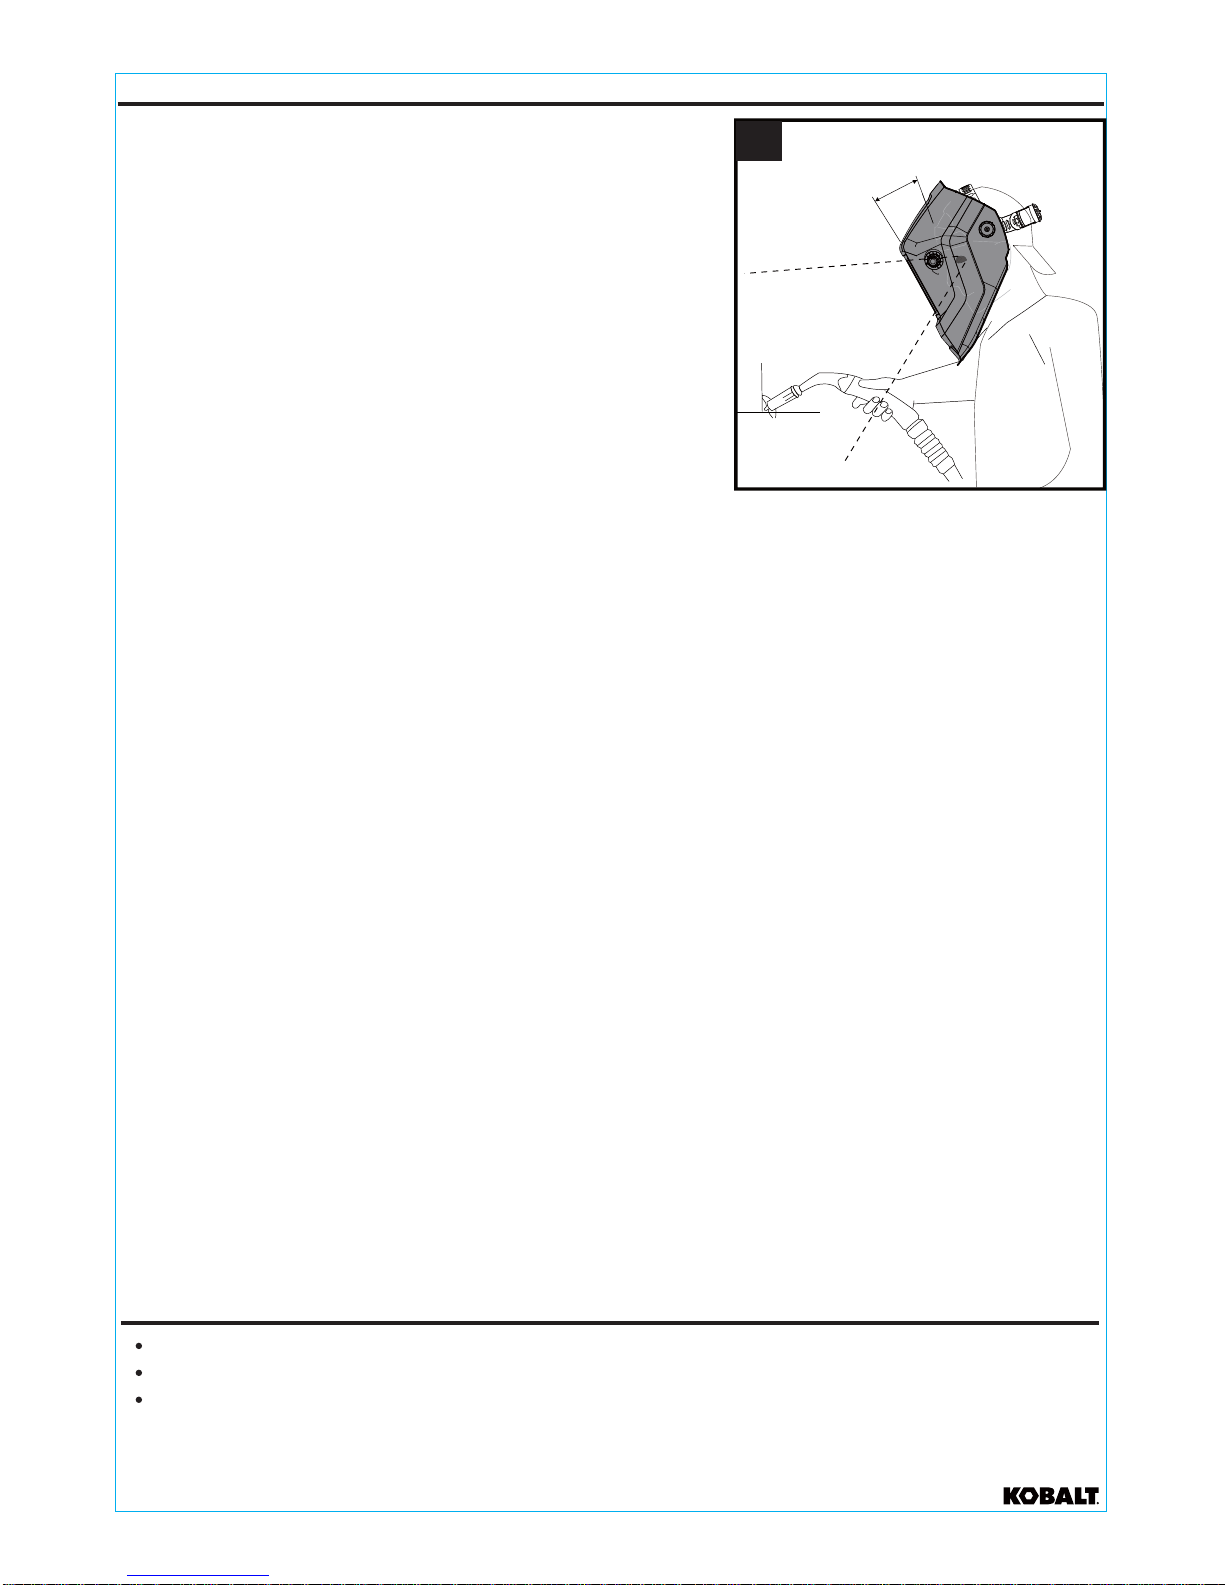
your individual requirements.
1. Adjust the welding helmet according to
Adjust the headband in both diameter and height.
Adjust the angle between the face and helmet
also. The recommended angle is 10° - 12°.
10° - 12°
1
approximately 0.15 second depending upon welding point temperature and shade setting.
This setting is ideal for tack welding or production welding with short weld cycles.
Turn to Min: This setting shortens the time delay after welding. The shortest setting is
Turn to Max: This setting lengthens the time delay to clear state from the dark state after
welding, with the longest delay being appoximately 0.8 seconds, depending upon welding
temperature and dark shade setting. This setting is ideal for high amperage welding where
there is a strong afterglow from the weld.
welding and welding in bright light conditions (lamp light or sunlight).
Turn to LO: The photosensitivity range is lower. This setting is suitable for high amperage
low amperage welding.
Turn to HI: This setting changes photosensitivity to a higher level. This setting is suitable for
5. Sensitivity selection.
6. Grind selection.
By turning the sensitivity selector knob on the top of the cartridge, the sensitivity to ambient
light change can be altered.
By switching the grind/weld switch to grind function, the helmet can be used during grinding.
10
CARE AND MAINTENANCE
Clean the helmet with mild soap in lukewarm water.
Clean the welding filter with a clean, lint-free tissue or cloth.
Do not immerse in water.
kobalttools.com
Page 11

If you are not completely happy with your purchase, simply return it along with your original sales
Three (3) year warranty:
receipt to the place of purchase. We’ll repair it, replace it or refund your money. See store for
details.This warranty does not cover product malfunctions or damages, which result from the
product being tampered with, misused or abused. The operating instructions must be followed;
failure to do so will void the warranty.
The manufacturer is not responsible for any indirect damage,
which arises out of the use of the product.
WARRANTY
Poor vision.
1. The cover lens and filter cartridges
are not clean.
2. Lighting conditions are too low.
3. The shade number is not correct.
4. Battery is low.
5. Replace battery.
1. Make certain the cover lens and
filter cartridges are clean.
3. Make certain the shade number
is correct and properly adjusted.
4. Replace both batteries. Make
5. Pull out the covers on the
automatic filter and replace both
CR2032 batteries. After batteries
have been replaced, insert the
covers back on the automatic
filter.
sure the polarity of the batteries
is correct when installing them
2. Make sure that there is enough
light to activate the auto
darkening lens by holding it to
the light and switching between
the grinding mode and welding
mode.
TROUBLESHOOTING
PROBLEM POSSIBLE CAUSE CORRECTIVE ACTION
Irregular
darkening.
1. When assembling the headgear to
the helmet, if one bolt is on the
upside of the hole, another bolt is on
the downside of the hole.
Auto-darkening
flickers or does
not darken.
1. Front cover lens is soiled.
2. Photo sensors are dirty.
1. Adjust the headband bolts on
both sides to assure they are
both up or both down on the
hole.
1. Clean or replace the front
cover lens.
2. Wipe clean with a soft, lint-free
cloth.
If you have any questions regarding the product, please call cu
stomer service at 1-888-3KOBALT,
8 a.m. - 8 p.m., EST, Monday - Friday.
11
Printed in China
This warranty does not cover batteries.
Kobalt® is a registered trademark of LF, LLC.
All rights reserved.
kobalttools.com
Page 12

ARTICLE#0771595
MODÈLE SGY-A11WH
MASQUE DE SOUDEUR
À OBSCURCISSEMENT
AUTOMATIQUE AVEC
TEINTE VARIABLE
12
kobalttools.com
Des questions, des problèmes, des pièces manquantes? Avant de retourner l'article au
détaillant, communiquez avec notre service à la clientèle au 1 888 3KOBALT, entre 8 h et
20 h (HNE), du lundi au vendredi.
JOIGNEZ VOTRE REÇU ICI
Kobalt des marques de commerce
déposées de LF, LLC. Tous droits réservés.
®
Numéro de série Date d'achat
Page 13

TABLE DES MATIÈRES
Consignes de sécurité............................................................................................................... 14
Contenu de l’emballage ............................................................................................................ 15
Instructions de démontage pour la lentille et le filtre automatique............................................. 16
Entretien ................................................................................................................................... 21
Dépannage................................................................................................................................. 22
Garantie ..................................................................................................................................... 22
Instructions pour la réinstallation de la lentille et du filtre automatique...................................... 17
Instructions pour le réglage du harnais...................................................................................... 18
Mode d’emploi............................................................................................................................ 21
Instructions pour le réglage de l’angle du masque .................................................................... 18
Instructions pour le réglage du serre-tête ..................................................................................19
Instructions pour le remplacement des piles.............................................................................. 19
Instructions pour l’installation des piles...................................................................................... 20
13
kobalttools.com
CARACTÉRISTIQUES DU PRODUIT
TEINTES RECOMMANDÉES
TIG
MAG
MÉTHODE DE SOUDAGE
Électrode enrobée
MIG (plaques)
MIG (tôle)
Gougeage à l’arc
Coupage à l’arc plasma
Soudage à l’arc plasma
INTENSITÉ DE COURANT
e t n i e Te t n i e Te t n i e Te t n i e T 9 e t n i e T
Teinte Teinte
Teinte
Teinte Teinte Teinte Teinte
Teinte Teinte Teinte
e t n i e Te t n i e T
Teinte
Teinte Teinte Teinte Teinte
Teinte
Teinte Teinte Teinte
Teinte
e t n i e Te t n i e Te t n i e T
10,00 cm x 9,30 cm
13,34 cm x 11,43 cm x 0,89 cm
4
Cellule solaire et pile remplaçable
Entièrement automatique
Nylon
610 g
Poids total
Extérieur et offert
en cas de piles faibles
Oui
Capteurs d’arc 4
COMPOSANTE
CARACTÉRISTIQUES
Visière
Dimension du filtre
Alimentation électrique
Cadranderéglage
Sensibilité
Température de fonctionnement
Température de rangement
Matériau du masque
Page 14

14
kobalttools.com
•
R
R
• Ce masque n’est pas prévu pour le soudage effectué au-dessus de la tête, ni pour le soudage
ou le découpage au laser.
• Les températures recommandées pour le fonctionnement du hublot de soudage sont de - 5 °C
à 55 °C (23 °F à 131 °F). N’utilisez pas cet appareil si les températures dépassent ces limites.
CONSIGNES DE SÉCURITÉ
Assurez-vous de lire et de comprendre l’intégralité de ce manuel avant de tenter de régler
ou d’utiliser le produit. Si vous avez des questions, veuillez communiquer avec notre
service à la clientèle au 1 888 3KOBALT, entre 8 h et 20 h (HNE), du lundi au vendredi.
• Ne portez pas ce masque sans porter également en tout temps une première protection des
yeux résistante aux chocs sous forme de lunettes ou de lunettes-masque de sécurité
satisfaisant aux normes ANSI.
• Évitez les positions de travail exposant les zones non protégées du corps à des étincelles, à
des projections ou à un rayonnement direct ou réfléchi. Utilisez un équipement de protection
adéquat si ce genre d’exposition ne peut être évité.
• Le filtre KOBALT pour le soudage devrait toujours être utilisé avec les lentilles extérieures
et intérieures KOBALT d’origine. Les modifications non autorisées pourraient compromettre
votre protection.
• Ne placez jamais ce masque sur une surface chaude ou à proximité d’une surface chaude.
• Gardez ce masque et ses composants hors de la portée des enfants.
• N’ouvrez ni ne manipulez jamais la cartouche du filtre.
• Le fabricant n’est pas responsable des modifications au filtre pour soudage ni de l’utilisation
de ce filtre dans un autre casque du fabricant.
• Ne pas tenir compte de ces avertissements et ne pas respecter le mode d’emploi peut
• Si vous n’utilisez pas le masque, assurez-vous que l’interrupteur meulage/soudage est placé à
soudage.
REMARQUE: Le harnais a été installé en usine et la vis servant à régler l’angle a été serrée à la
position 3, ce qui signifie que le harnais se trouve au point le plus éloigné du filtre
automatique. Pour rapprocher le harnais du filtre automatique, suivez les
instructions pour le réglage du harnais à la page 18.
entraîner des blessures graves.
Page 15

QUANTITYDESCRIPTIONPART
2A Écrou de réglage du harnais
2B
Rondelle à section carrée extérieure
2C Rondelle à section carrée intérieure
2E
Tige de réglage de l’angle
Régulateur d’angle réglable
1F Harnais
2G Boulon du cadre du filtre
1
Lentille de protection extérieure
1Filtre auto-obscurcissant
1 L
K
J
1Vis du cadre du filtre
2Cadre du filtreH
I
2 M
2
2
2
2
1
N
O
P
Q
R
QUANTITÉDESCRIPTIONPIÈCE QUANTITÉDESCRIPTIONPIÈCE
CONTENU DE L’EMBALLAGE
15
kobalttools.com
Lentille de protection intérieure
Pièce de fixation de l’indicateur de teinte
Indicateur de teinte
Bouton de réglage de la teinte
Sac
Bandeau supplémentaire
Lentille supplémentaire
D1L,D2R
2 (L&R)
A
B
C
D2R
D1L
E
G
H
I
F
J
K
M
N
O
L
Q
P
R
Page 16

INSTRUCTIONS DE DÉMONTAGE POUR LA LENTILLE ET LE FILTRE AUTOMATIQUE
16
2. Dévissez la vis du cadre du filtre (I) en la tournant
dans le sens contraire des aiguilles d’une montre.
3. Soulevez le cadre du filtre (H) et retirez le filtre
automatique (K) en le tournant, puis en le retirant du cadre.
4. Retirez la pellicule protectrice du filtre automatique (K).
1. Insérez un doigt dans le trou en demi-cercle et retirez la
lentille de protection extérieure (J). Retirez la pellicule
protectrice de la lentille.
J
kobalttools.com
3
4
H
K
K
1
2
I
Page 17

1. Faites glisser le filtre automatique (K) à travers le cadre du
filtre, puis replacez-le dans le plateau de réception.
2. Verrouillex la vis du cadre du filtre (I) en tournant la vis dans le
sens horaire. Évitez de serrer excessivement l’écrou, car les
filets pourraient s’arracher.
17
kobalttools.com
3. Replacez la lentille de protection extérieure (J) sur la partie
avant du masque en insérant d’abord un côté de la lentille
dans l’une des fentes prévues à cet effet, puis en incurvant
la lentille suffisamment pour pouvoir insérer l’autre côté de
la lentille dans l’autre fente latérale.
3
J
INSTRUCTIONS POUR LA RÉINSTALLATION DE LA LENTILLE ET DU FILTRE AUTOMATIQUE
2
I
1
K
H
Page 18

18
kobalttools.com
INSTRUCTIONS POUR LE RÉGLAGE DU HARNAIS
INSTRUCTIONS POUR LE RÉGLAGE DE L’ANGLE DU MASQUE
1. Desserrez l’un des écrous de réglage du harnais (A) en le
tournant dans le sens contraire des aiguilles d’une montre.
2. Placez l’axe de réglage de l’angle (E) à la position 1 ou 2.
3. Serrez l’écrou de réglage du harnais en le tournant dans le
sens des aiguilles d’une montre. Évitez de serrer
excessivement l’écrou, car les filets pourraient s’arracher.
4. Répétez les étapes 1 à 3 pour les autres écrous de réglage
du harnais.
1. Desserrez l’un des écrous de réglage du harnais (A) en le
tournant dans le sens contraire des aiguilles d’une montre.
2. Placez le régulateur d’angle réglable (D1L et D2R) sur la
goupille appropriée.
3. Serrez l’écrou de réglage du harnais en le tournant dans le
sens des aiguilles d’une montre. Évitez de serrer
excessivement l’écrou, car les filets pourraient s’arracher.
4. Répétez les étapes 1 à 3 pour l’autre côté du harnais.
2
E
1
2
3
1
A
3
A
1
A
D1L
Page 19

19
kobalttools.com
INSTRUCTIONS POUR LE RÉGLAGE DU SERRE-TÊTE
1. Pour serrer ou desserrer le harnais, appuyez sur le bouton
situé à l’arrière et tournez-le dans le sens des aiguilles d’une
montre pour serrer le harnais ou dans le sens contraire pour
le desserrer.
2. Pour régler la taille du harnais, détachez le loquet et ramenez
la courroie vers l’intérieur pour serrer ou vers l’extérieur pour
desserrer. Verrouillez ensuite le loquet à la position choisie.
2
1
I
NOTICE
Press the button and
turn left to loose
n.
Press the button and
turn right to tighten.
INSTRUCTIONS POUR LE REMPLACEMENT DES PILES
1. Tirez sur le couvercle du compartiment à piles pour le retirer.
2. Utilisez la tige du couvercle du compartiment à piles. Insérez
la tige dans la fente et retirez la pile supérieure en poussant
sur le couvercle du compartiment à piles et sur la tige jusqu’à
ce que la tige soit suffisamment soulevée pour la saisir avec
vos doigts.
3. Répétez l’étape 2 pour retirer la pile inférieure
1
USES
TWO CR2032
BA
TTERIES
USES TWO CR2032
B
ATTERIES
USES
TWO CR2032
BATTERIES
2
3
Page 20

20
INSTRUCTIONS POUR L’INSTALLATION DES PILES
1. Utilisez 2 piles CR2032.
2. Insérez la batterie inférieure dans la fente inférieure du
support de pile avec le côté positif (+) vers le bas.
3. Insérez la pile supérieure dans la fente supérieure du
compartiment à piles avec le côté positif (+) orienté vers le haut.
4. Replacez le couvercle du compartiment à piles.
kobalttools.com
USES
TWO CR2032
B
A
TTERIES
USES
TWO CR2032
BATTERIES
1
3
USES
TWO CR2032
BATTERIES
2
Page 21

MODE D’EMPLOI
10° - 12°
1
21
kobalttools.com
1. Ajustement du masque de soudeur selon vos
besoins
Réglez à la fois le diamètre et la hauteur du tour de tête.
Réglez l’angle du masque par rapport à votre visage.
Nous vous recommandons un angle allant de 10° à 12°.
2. Marche-arrêt
La cellule solaire s’active dès qu’elle est exposée
à la lumière.
3. Sélection du numéro de teinte
Cinq numéros de teinte (9, 10, 11, 12
et 13) sont offerts. Sélectionnez le numéro de
teinte en tournant le bouton de réglage situé sur le
côté du masque. Le réglage de teinte est indiqué
par la flèche sur l’interrupteur.
4. Vitesse de transition
Vous pouvez modifier la vitesse de transition du filtre du foncé au clair en tournant le bouton
situé à l’arrière de la cartouche. Le délai peut passer de 0,1 à 0,9 seconde.
Réglage Min : Ce réglage permet de passer plus rapidement à la teinte claire après le
soudage. Le délai le plus court est d’environ 0,15 seconde selon la température au point de
soudure et le réglage de la teinte. Ce réglage est idéal pour le soudage de pointage ou pour
le soudage industriel effectué en cycles courts.
Réglage Max :
Ce réglage permet de passer plus lentement à la teinte claire après le soudage.
Le délai le plus long est d’environ 0,9 seconde, selon la température au point de soudure et
le réglage de la teinte. Ce réglage est idéal pour se protéger du rayonnement résiduel
provoqué par le soudage à forte intensité de courant.
Réglage LO : La photosensibilité est plus faible. Ce réglage convient pour le soudage à forte
intensité de courant ou pour le soudage en milieu éclairé (éclairage par lampe ou lumière du
soleil).
Réglage HI :Ce réglage procure une plus grande photosensibilité. Approprié pour le soudage
à faible intensité de courant.
5. Sélection de la sensibilité
Vous pouvez régler le niveau de sensibilité du filtre à la lumière ambiante en tournant le
bouton de réglage situé à l’arrière de la cartouche.
6. Sélection du meulage.
En mettant l’interrupteur meulage/soudage à la position meulage, vous pouvez utiliser le
masque lorsque vous meulez.
ENTRETIEN
Nettoyez le masque avec un savon doux et de l’eau tiède.
Nettoyez la lentille passive à l’aide d’un papier-mouchoir ou d’un linge propre et non pelucheux.
Ne plongez pas l’article dans l’eau.
Page 22

5. Remplacez les piles.
5. Retirez les couvercles du filtre
automatique et remplacez les
deux piles CR2032. Une fois les
piles remplacées, réinsérez les
couvercles sur le filtre automatique.
2. Pour vous assurer qu’il y a
suffisamment de lumière pour
activer la lentille à
obscurcissement automatique,
orientez-la vers la lumière et
passez du mode meulage au
mode soudage.
22
kobalttools.com
DÉPANNAGE
Si vous avez des questions, veuillez communiquer avec notre service à la clientèle au
1 888 3KOBALT, entre 8 h et 20 h (HNE), du lundi au vendredi.
PROBLÈME CAUSE POSSIBLE MESURE CORRECTIVE
L’obscurcissement
est irrégulier.
1. Lorsque la coiffe a été assemblée
au masque, un boulon a été fixé à
la portion supérieure du trou et
l’autre boulon, à la portion inférieure.
Le filtre s’obscurcit
par intermittence
ou ne fonctionne
pas du tout.
1. La lentille extérieure est sale.
2. Les capteurs optiques sont sales.
1. Ajustez les écrous aux deux
côtés du tour de tête de façon
à ce qu’ils soient tous deux
serrés en haut ou en bas du trou.
1. Nettoyez ou remplacez la
lentille extérieure.
2. Nettoyez-les à l’aide d’un linge
doux non pelucheux.
La visibilité est
insuffisante.
4. La pile est faible.
1. La monture de lentille et la
cartouche du filtre sont sales.
2. L’éclairage ambiant est trop faible.
3. Le numéro de teinte n’est pas
approprié.
1. Assurez-vous que la monture
de la lentille et que la cartouche
du filtre sont propres.
3. Assurez-vous que le numéro de
teinte est adéquat et qu’il est
bien réglé
4. Remplacez les deux piles.
Assurez-vous de respecter la
polarité des piles lorsque vous
les installez.
Si vous n’êtes pas satisfait de votre achat, retournez simplement le produit ainsi que votre reçu de
vente original à l’endroit où vous l’avez acheté. Nous le réparerons ou le remplacerons, ou nous
Cette garantie ne couvre pas les piles.
Imprimé en Chine
Garantie de trois (3) ans :
GARANTIE
vous rembourserons. Pour plus de détails, adressez-vous à un associé en magasin. Cette garantie
ne couvre pas le mauvais fonctionnement ou les dommages causés par une modification du
produit ou par un usage inapproprié ou abusif du produit. Vous devez respecter le mode d’emploi.
Le non-respect de cette consigne annulera la garantie. Le fabricant n’est pas responsable des
dommages accessoires occasionnés par l’utilisation du produit.
Kobalt des marques de commerce
déposées de LF, LLC. Tous droits réservés.
®
Page 23

ARTÍCULO#0771595
MODELO SGY-A11WH
SOLDADORES CON
OSCURECIMIENTO PROPIO
DE MATIZ VARIABLE
23
ADJUNTE SU RECIBO AQUÍ
Número de serie
Fecha de compra
¿Preguntas, problemas, piezas faltantes? Antes de volver a la tienda, llame a nuestro
Departamento de Servicio al Cliente al 1-888-3KOBALT, de 8:00 a.m. a 8:00 p.m. hora
estándar del Este, de lunes a viernes.
Kobalt es marcas registradas
de LF, LLC. Todos los derechos reservados.
®
kobalttools.com
Page 24

ÍNDICE
Información de seguridad ..........................................................................................................25
Contenido del paquete ..............................................................................................................26
Cuidado y mantenimiento ........................................................................................................ 32
Solución de problemas ............................................................................................................. 33
Garantía .................................................................................................................................. 33
Instrucciones de desensamblaje para la mica y el filtro automático......................................... 27
Instrucciones de reinstalación para la mica y el filtro automático..............................................28
Instrucciones de funcionamiento............................................................................................... 32
Instrucciones para el ajuste de la protección para la cabeza................................................... 29
Instrucciones para el ajuste del ángulo de la protección para la cabeza ................................. 29
Instrucciones para el ajuste de la banda para la cabeza ......................................................... 30
Instrucciones para instalar las baterías nuevas ....................................................................... 31
Instrucciones para Ccolgar las baterías ................................................................................... 30
24
kobalttools.com
ESPECIFICACIONES DEL PRODUCTO
Cadran de réglage à l’intérieur
-5 °C a 55 °C (23 °F a 131 °F)
-10 °C a 65 °C (14 °F a 149 °F)
En dehors & Disponible
10,00 cm x 9,30 cm
13,34 cm x 11,43 cm x 0,89 cm
4
De 5 à 9/de 9 à 13 (variable)
Protección de hasta 16
Nylon
610g
UV/IR
Función de triturar
Parpadeo de advertencia
de batería baja
Sí
Sensores de arco 4
ESPECIFICACIONES
COMPONENTE
Área de visión
Dimensiones del filtro
Número de visor claro
Número de visor oscuro
Célulassolares
Completamenteautomático
Suministro de electricidad
Encendido / Apagado
1/20.000desegundo
Claro a oscuro
0,15 a 0,80 de segundo, ajustable
Oscuro a claro (tiempo de retardo)
Sensibilidad
Temperatura de funcionamiento
Temperatura de almacenamiento
Material del casco
Peso total
WELDING PROCESS
Covered Electrode
MIG Plate Welding
MIG Sheet Metal
TIG
MAG
Arc Gouging
Plasma Cutting
Plasma Welding
NÚMEROSDELVISORRECOMENDADOS
PROCESO DE SOLDADO
Electrodo cubierto
Placa de soldadura MIG
Lámina de metal MIG
TIG
MAG
Esmerilado en arco
Corte de plasma
Soldadura de plasma
Visor 9
Visor 10
Visor 10
Visor 10
Visor 10
Visor 10
Visor 11
Visor 12
Visor 12
Visor 12
Visor 12
Visor 12
Visor 13
Visor 13
Visor 13
Visor 13
Visor 13
Visor 14
Visor 14
Visor 14 Visor 15
Visor 13Visor 12
Visor 11
Visor 11
Visor 11
Visor 11
Visor 11
Visor 10
Visor 9
Page 25

25
kobalttools.com
• Si el casco no está en uso, asegúrese de que el interruptor de triturar/soldar esté en la función
de soldar.
NOTA: la protección para la cabeza se instaló en fábrica y el tornillo de ajuste del ángulo se
colocó en la posición 3; es decir, la protección para la cabeza está lo más alejada del filtro
automático. Para ajustar la protección para la cabeza a fin de estar más cerca del filtro
automático, siga las Instrucciones para el ajuste de la protección para la cabeza en la
página 29.
• Utilice lentes, anteojos o gafas de protección primarios y resistentes a los impactos que
cumplan con las especificaciones actuales de ANSI en todo momento al usar este casco
para soldar.
• Evite posiciones de trabajo que expondrían áreas del cuerpo sin protección a chispas,
salpicaduras, radiación directa y/o por reflejo. Use la protección adecuada si no se puede
evitar la exposición.
• El filtro de soldadura KOBALT siempre se debe usar con lentes de cobertura interior y
exterior KOBALT originales. Se podría afectar la protección si se realizan modificaciones
no aprobadas.
• Nunca coloque el casco sobre superficies calientes ni cerca de ellas.
• Mantenga el casco y todos sus componentes fuera del alcance de los niños.
• Nunca abra ni trate de forzar el cartucho del filtro.
• El fabricante no es responsable de las modificaciones al filtro de soldadura o al uso del filtro
en cualquier otro casco del fabricante.
• El incumplimiento de estas advertencias e instrucciones de funcionamiento podría ocasionar
lesiones personales graves.
• El casco para soldar no es adecuado para aplicaciones de soldadura en altura, soldadura
láser o aplicaciones de corte láser.
• El rango de temperatura de funcionamiento recomendado para el lente de soldadura es de
-5 °C a 55 °C (23 °F a 131 °F). No exceda estos límites al usar este dispositivo.
INFORMACIÓN DE SEGURIDAD
Lea y comprenda completamente este manual antes de intentar ajustar u operar el producto.
Si tiene preguntas relacionadas con el producto, llame al Departamento de Servicio al Cliente
al 1-888-3KOBALT, 8 a.m. A 8 p.m., hora estándar del Este, de lunes a viernes.
R
R
Page 26

QUANTITYDESCRIPTIONPART
2A
Tuerca de ajuste de la banda para la cabeza
2B Arandela cuadrada exterior
2C
Arandela cuadrada interior
2E Eje de ángulo ajustable
D1L,D2R
2 (L&R)
Regulador de ángulo ajustable
1F Juego de protección para la cabeza
2G Perno para estructura de filtro
1Lente de protección exterior
1Filtro automático
1Lente de protección interior L
K
J
1Tornillo para estructura de filtro
2Estructura del filtroH
I
2 M
Sujetador del indicador de tono
2
2
2
2
1
N
O
P
Q
Indicador de tono
Perilla de ajuste de tono
Bolsa
Bandas para sudor adicionales
R Lentes adicionales
CANTIDADDESCRIPCIÓNPIEZA CANTIDADDESCRIPCIÓNPIEZA
CONTENIDO DEL PAQUETE
26
kobalttools.com
A
B
C
D2R
D1L
E
G
H
I
F
J
K
M
N
O
L
Q
P
R
Page 27

INSTRUCCIONES DE DESENSAMBLAJE PARA LA MICA Y EL FILTRO AUTOMÁTICO
27
2. Gire el tornillo en dirección contraria a las manecillas del reloj
para soltar el tornillo del marco del filtro (I).
3. Levante la estructura del filtro (H) y retire el filtro
automático (K) girándolo hacia los lados y jalándolo a
través de la estructura del filtro.
4. Retire la película protectora del filtro automático (K).
1. Inserte un dedo en el orificio semicircular y jale del lente de
protección exterior (J). Retire la película protectora del lente.
J
kobalttools.com
3
4
H
K
K
1
2
I
Page 28

INSTRUCCIONES DE REINSTALACIÓN PARA LA MICA Y EL FILTRO AUTOMÁTICO
1. Deslice el filtro automático (K) a través de la estructura del
filtro y colóquelo nuevamente en la bandeja de sujeción.
2. Fijar el tornillo marco del filtro (I) girando el tornillo hacia la
derecha. No apriete demasiado la tuerca o el hilo podría
despojado.
28
3. Coloque el lente de protección exterior (J) nuevamente en
la parte frontal del casco insertando un lado del lente en
cualquier ranura lateral y luego doble el lente lo suficiente
para que se deslice en la otra ranura.
3
J
1
K
H
2
I
kobalttools.com
Page 29

29
kobalttools.com
INSTRUCCIONES PARA EL AJUSTE DE LA PROTECCIÓN PARA LA CABEZA
INSTRUCCIONES PARA EL AJUSTE DEL ÁNGULO DE LA PROTECCIÓN PARA LA CABEZA
1. Suelte una de las tuercas de ajuste de la protección para la
cabeza (A) girando la tuerca en dirección contraria a las
manecillas del reloj.
2. Coloque el eje de ajuste de ángulo (E) en la posición 1 o 2.
3. Gire en dirección de las manecillas del reloj para apretar la
tuerca de ajuste de la protección para la cabeza. No apriete
demasiado la tuerca ya que se pueden dañar las roscas.
4. Repita los pasos 1 a 3 en la otra tuerca de ajuste de la
protección para la cabeza.
1. Suelte una de las tuercas de ajuste de la protección para la
cabeza (A) girando la tuerca en dirección contraria a las
manecillas del reloj.
2. Mueva el regulador de ángulo ajustable (D1L y D2R) a la
clavija deseada.
3. Gire en dirección de las manecillas del reloj para apretar la
tuerca de ajuste de la protección de la cabeza. No apriete
demasiado la tuerca ya que se pueden dañar las roscas.
4. Repita los pasos 1 a 3 en el otro lado de la protección para la
cabeza.
2
E
1
2
3
1
A
3
A
1
A
D1L
Page 30

30
kobalttools.com
INSTRUCCIONES PARA EL AJUSTE DE LA BANDA PARA LA CABEZA
INSTRUCCIONES PARA CCOLGAR LAS BATERÍAS
1. Para soltar o apretar la protección para la cabeza, presione la
perilla en la parte posterior del equipo y gire en dirección de
las manecillas del reloj para apretar o en dirección contraria a
las manecillas del reloj para soltar.
2. Para ajustar el tamaño de la banda para la cabeza, retire el
pestillo e inserte la correa para apretar y saque la correa para
soltar. A continuación, presione el pestillo en la ranura elegida.
2
1
I
NOTICE
Press the button and
turn left to loosen.
Press the button and
turn right to tighten.
1. Jale la cubierta de la batería para retirarla.
2. Utilice el vástago en la cubierta de las baterías. Coloque el
vástago en la ranura y presione la batería de la parte superior
al colocar de vuelta la cubierta de la batería y el vástago hasta
que la batería esté lo suficientemente afuera para agarrarla
con los dedos.
3. Repita el paso 2 para retirar la batería inferior
1
USES
TWO CR2032
BATTERIES
USES TWO CR2032
BATTERIES
USES TWO CR2032
BATTERIES
2
3
Page 31

31
INSTRUCCIONES PARA INSTALAR LAS BATERÍAS NUEVAS
1. Utilice dos baterías CR2032
2. Inserte la batería inferior en la ranura inferior del portapilas
con el lado positivo (+) hacia abajo.
3. Inserte la batería superior en la ranura superior del soporte
de la batería con la polaridad positiva (+) hacia arriba.
4. Vuelva a colocar la cubierta de las baterías.
kobalttools.com
USES
TWO CR2032
B
A
TTERIES
USES
TWO CR2032
BATTERIES
1
3
USES
TWO CR2032
BATTERIES
2
Page 32

INSTRUCCIONES DE FUNCIONAMIENTO
10° - 12°
1
32
kobalttools.com
2. Encendido/apagado.
La unidad solar se enciende automáticamente al
exponerse a la luz.
3. *Seleccione el número del visor.
Hay cinco números de visor distintos, 9, 10, 11, 12
y 13, disponibles en el estado oscuro. El número
del visor se puede seleccionar girando la perilla
de ajuste del visor en el costado del casco. La
configuración del visor se indica mediante la flecha
en el interruptor.
1. Ajuste el casco para soldar de acuerdo con sus
requerimientos individuales.
Ajuste la banda para la cabeza tanto en diámetro como
en altura. También ajuste el ángulo entre la cara y
el casco. El ángulo recomendado es 10º a 12º.
4. Selección de retardo de tiempo.
Girando la perilla del selector de retardo de la parte posterior del cartucho, se puede alterar
el tiempo que se toma del estado oscuro al estado claro después de terminar de soldar.
Este rango de retardo de tiempo puede ser de 0,1 a 0,9 segundos.
Establezca el mínimo: Esta configuración acorta el retardo de tiempo después de soldar.
La configuración más corta es aproximadamente 0,15 segundos dependiendo de la
temperatura del punto de soldadura y de la configuración del visor. Esta configuración es
ideal para la soldadura por puntos o la soldadura de producción con ciclos de soldado cortos.
Establezca el máximo: Esta configuración alarga el retardo de tiempo al estado claro desde
el estado oscuro después de soldar, con el retardo más largo siendo de aproximadamente
0,9 segundos, dependiendo de a temperatura de soldado y de la configuración del visor
oscuro. Esta configuración es ideal para una soldadura de alto amperaje en donde hay una
luminiscencia residual fuerte que proviene de la soldadura.
EstablezcaenBAJA: El rango de fotosensibilidad es más bajo. Esta configuración es
adecuada para una soldadura de alto amperaje y una soldadura en condiciones de luz
brillante (luz de una lámpara o luz solar).
EstablezcaenALTA:Esta configuración cambia la fotosensibilidad a un nivel más alto. Esta
configuración es adecuada para una soldadura de bajo amperaje.
5. Selección de sensibilidad.
Girando la perilla del selector de sensibilidad de la parte posterior del cartucho, se puede
alterar la sensibilidad al cambio de luz ambiental.
6. Selección para triturar.
El casco puede utilizarse al triturar, cambiando el interruptor de triturar/soldar a la función
de triturar.
CUIDADO Y MANTENIMIENTO
Limpie el casco con jabón suave y agua tibia.
Limpie el filtro de soldadura con un pañuelo de papel o un paño limpio y sin pelusas.
No lo sumerja en agua.
Page 33

5. Reemplace la batería.
4. Reemplace ambas baterías.
Asegúrese de que la polaridad
de las baterías sea la correcta al
instalarlas
5. Jale las cubiertas en el filtro
automático y reemplace ambas
baterías CR2032. Después de
haber reemplazado las baterías,
coloque nuevamente las
cubiertas en el filtro automático.
2. Asegúrese de que haya
suficiente luz para activar el
lente con oscurecimiento propio
sosteniéndolo a la luz y
seleccionando entre el modo de
triturado y el modo de soldadura
SOLUCIÓN DE PROBLEMAS
33
kobalttools.com
Si tiene preguntas relacionadas con el producto, llame al Departamento de Servicio al Cliente al
1-888-3KOBALT, 8 a.m. A 8 p.m., hora estándar del Este, de lunes a viernes.
PROBLEMA CAUSA POSIBLE ACCIÓN CORRECTIVA
Visión deficiente
Oscurecimiento
irregular
El oscurecimiento
automático destella
o no se oscurece
1. Al ensamblar el equipo para la
cabeza en el casco, si uno de los
pernos está sobre el orificio, hay
otro perno abajo del orificio.
1. El lente de la cubierta frontal está
sucio.
2. Los fotosensores están sucios.
4. La batería está baja.
1. El lente de la cubierta y los
cartuchos del filtro no están limpios.
2. Las condiciones de luminosidad
son demasiado bajas.
3. El número del visor no está
correcto.
1. Ajuste los pernos de la banda
para la cabeza en ambos
costados para asegurarse de
que ambos están arriba o abajo
en el orificio.
1. Limpie o reemplace el lente de
la cubierta frontal.
2. Limpie con un paño suave y
sin pelusas.
1. Asegúrese de que el lente de
la cubierta y los cartuchos del
filtro estén limpios.
3. Asegúrese de que el número
del visor esté correcto y
debidamente ajustado.
GARANTÍA
Si no está completamente complacido con su compra, sencillamente devuélvala con su recibo de
venta original a la tienda. Repararemos el artículo, lo reemplazaremos o le reembolsaremos su
dinero. Consulte en la tienda para obtener detalles. Esta garantía no cubre el mal funcionamiento
o daños en el producto que sean el resultado de manipulación, mal uso o abuso del producto.
Las instrucciones de funcionamiento se deben seguir; no hacerlo anulará la garantía. El fabricante
no se hace responsable por ningún daño indirecto que surja de algo ajeno al uso del producto.
Tres (3) años de garantía:
Esta garantía no cubre las baterías.
Impreso en China
Kobalt es marcas registradas
de LF, LLC. Todos los derechos reservados.
®
 Loading...