

Page 1
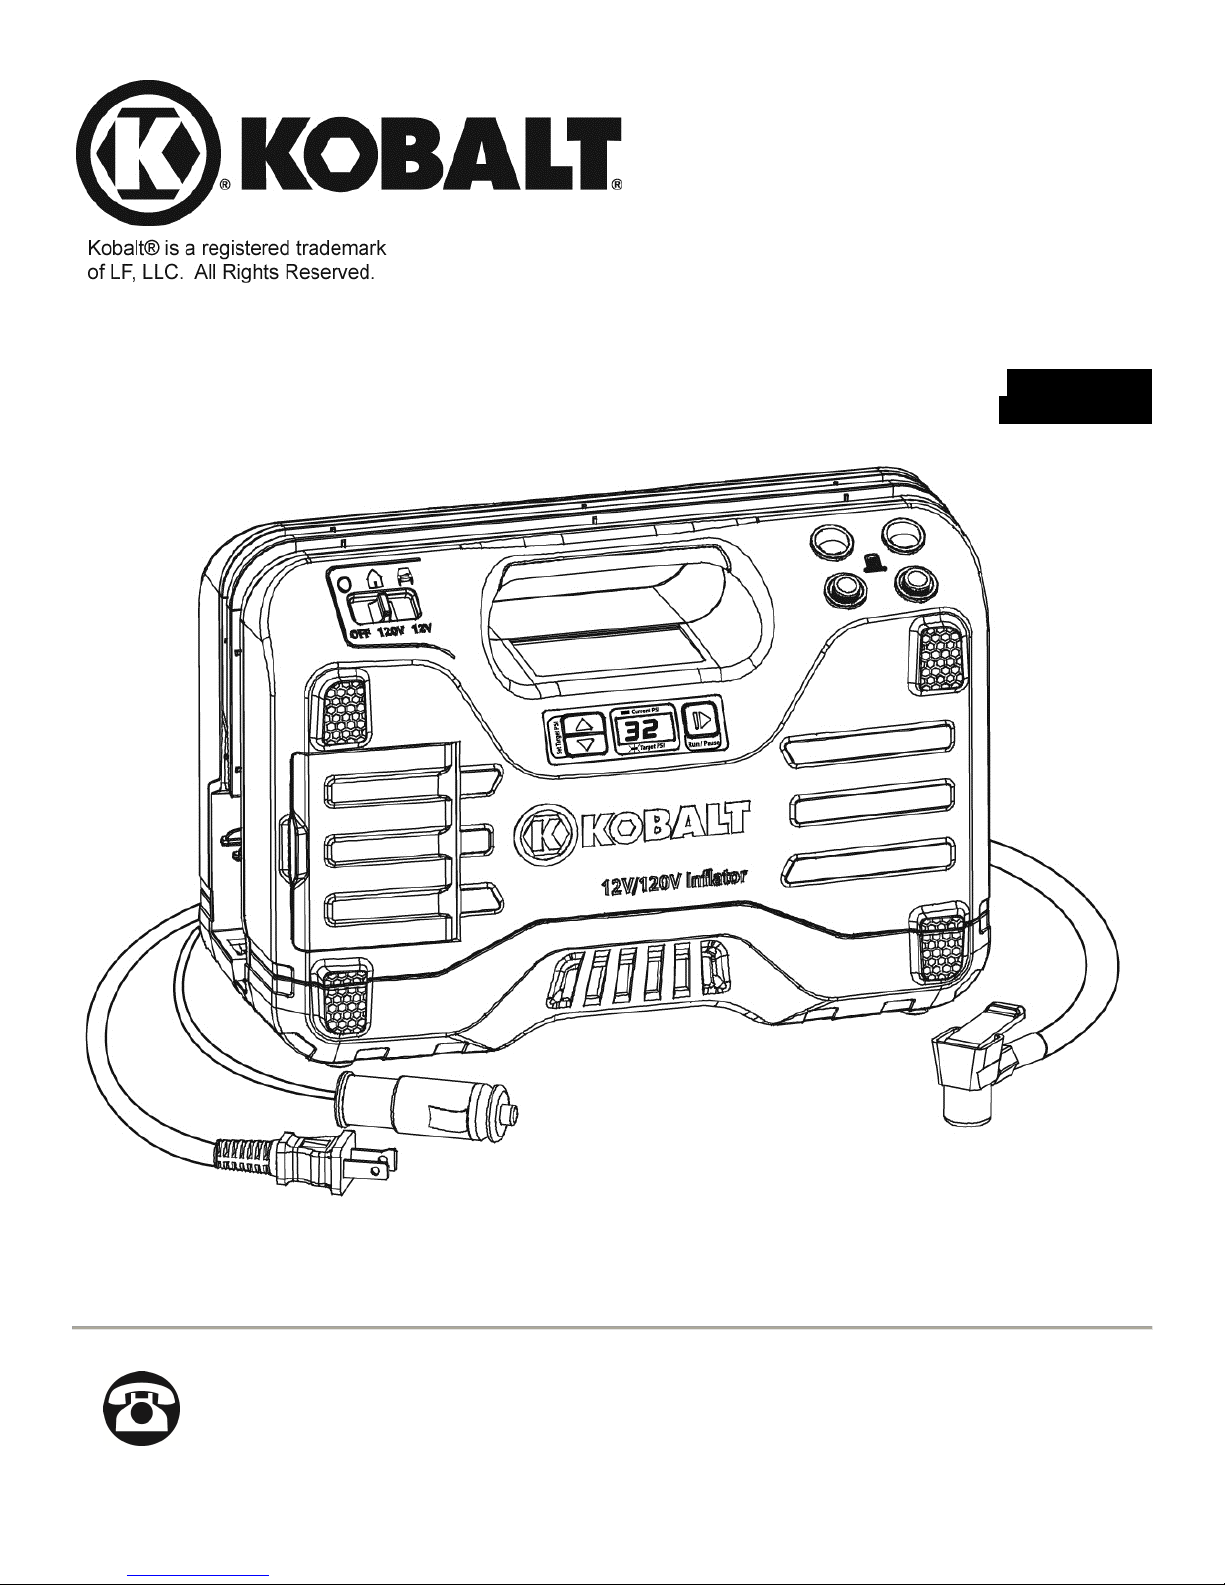
ITEM #0146781
DUAL POWER
INFLATOR
12 VOLT / 120 VOLT
MODEL #KL12120
Français p. 8
Español p. 16
Questions, problems, missing parts? Before returning to your retailer, call our
customer service department at 1-800-874-5771, 8:00 a.m. – 5:00 p.m., MST, Monday –
Friday.
1
Page 2
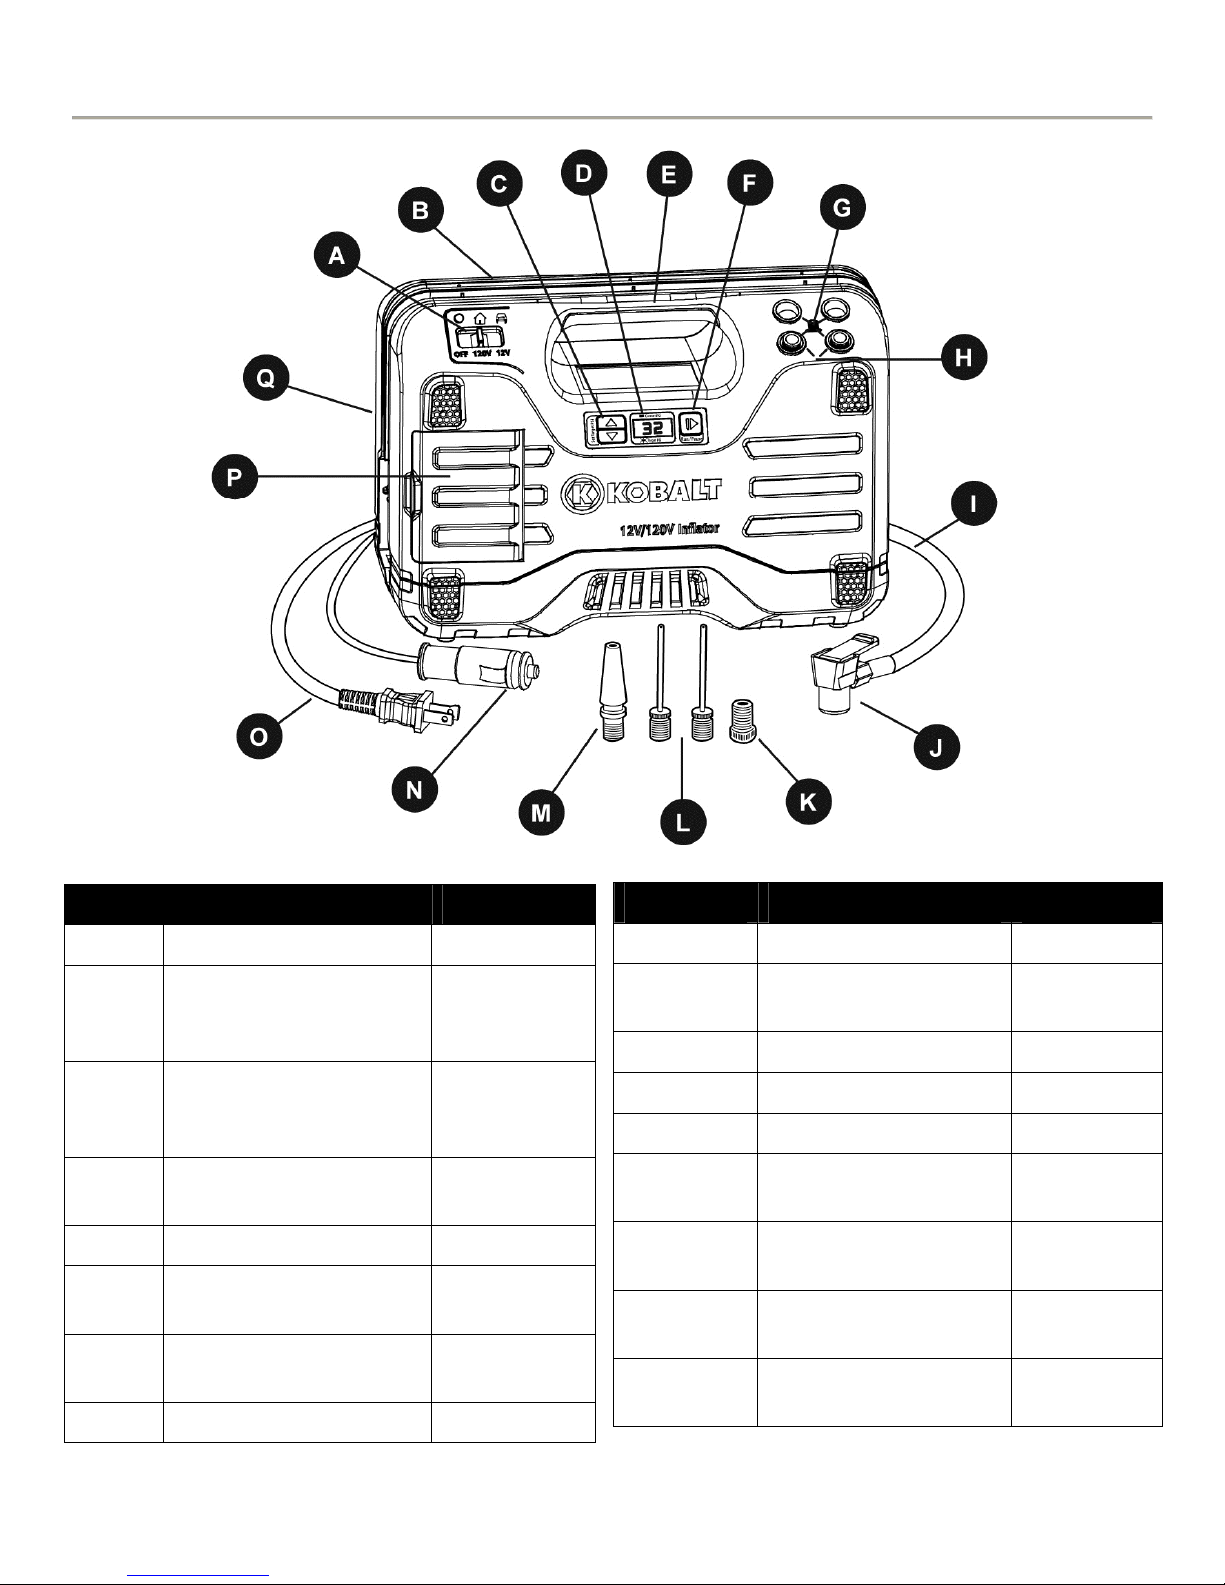
PACKAGE CONTENTS
PART DESCRIPTION QUANTITY
A Power Selector Switch 1
B Air Hose and 120 Volt
1
AC Power Cord
Storage
C Increase/Decrease
1
Preset PSI Level
Buttons
D Digital Pressure
1
Gauge
E Carrying Handle 1
F Run/Pause Power
1
Switch
G Tire Valve Cap
4
Storage
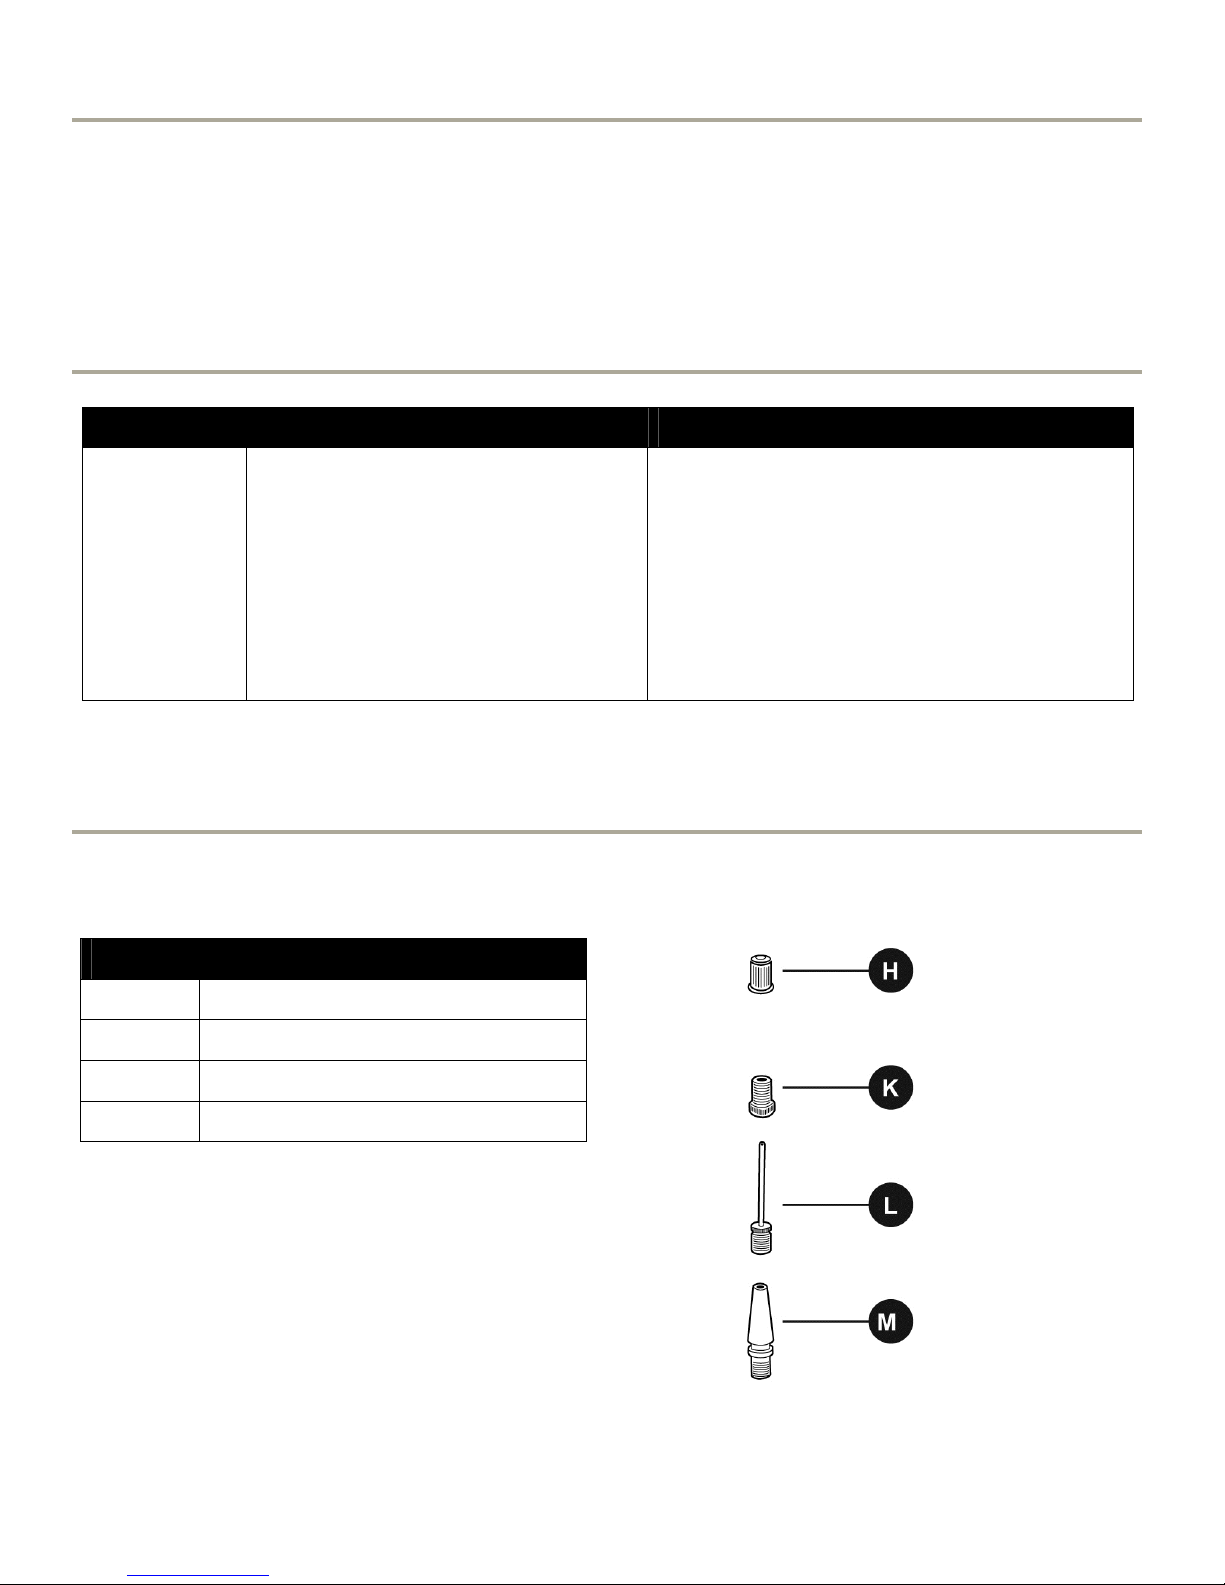
H Spare Tire Valve Cap 2
PART DESCRIPTION QUANTITY
I Air Hose 1
J Quick Connect Valve
Adaptor
K Presta Valve Adaptor 1
L Sports Needle 2
M Raft Nozzle 1
N 12 Volt DC Power
Cord
O 120 Volt AC Power
Cord
P Accessories Storage
Compartment
Q 12 Volt DC Power
Cord Storage
2
1
1
1
1
1
Page 3
SAFETY INFORMATION
Please read and understand this entire manual before attempting to assemble, operate or install the
product.
The safety instructions provided in this manual are not intended to cover all possible conditions that
may occur during product operation. Always use common sense and pay attention to all WARNING
and CAUTION statements in this manual.
Work Area: Keep your work area clean and well lit. Cluttered benches and dark areas increase
the possibility of personal injury or property damage
Do not operate power tools in explosive atmospheres, such as in the presence of flammable
liquids, gases or dust.
Keep bystanders, children and visitors away while operating a power tool. Distractions can
cause you to lose control.
PRODUCT SPECIFICATIONS
CAUTION: THIS INFLATOR OPERATES ON DC 12 VOLT AND AC 120 VOLT. DO NOT
ATTEMPT TO OPERATE THIS INFLATOR WITH ANY OTHER SOURCE OR VOLTAGE. DO NOT
REWIRE OR RECONFIGURE INFLATOR FROM ITS ORIGINAL DESIGN OR PERSONAL INJURY
OR BODILY HARM MAY OCCUR.
Model KL12120
Voltage/Hertz/Phase/Current 120/60/1/1.5A
Max Working Pressure 120 PSI
Voltage DC 12 V
Power Requirement DC 12 V – For use with 12 Volt DC Power Outlet Only
Max Working Pressure 120 PSI
Note: This unit is equipped with fuse protection. If at some point the inflator fails to
operate when using the 12 volt DC power method, check the fuse in the end of the 12 volt plug.
To replace the fuse, simply unscrew the 12 volt power plug tip, remove existing fuse, install new
fuse and reassemble power plug tip. Use only an AGC – 10 Amp replacement fuse.
3
Page 4

PREPARATION
Make sure that your vehicle 12 volt power outlet is free of any ash residue or debris. A dirty
12 volt power outlet can cause the inflator and power cord to overheat. Overheating can
cause damage to your inflator/vehicle and could cause bodily harm or injury. Disconnect
power when not in use.
It is recommended that your vehicle’s 12 volt battery be fully charged to get the best
performance from your inflator. If your vehicle battery is weak, the inflator will not work at
its maximum output level.
DANGER: For best results and more efficient power, it is recommended that you operate
your inflator with your VEHICLE’S ENGINE RUNNING, making absolutely sure you are
outside or in an open, well-ventilated area and NOT INSIDE A CONFINED AREA SUCH
AS A GARAGE as bodily injury or asphyxiation resulting in death could occur. ALWAYS
ALLOW FOR PROPER VENTILATION. Most vehicle 12 volt power outlets will operate
with vehicle ignition off; however, some vehicles require that the ignition be turned on.
This appliance has a polarized plug (one blade is wider than the other). This plug will fit in a
polarized outlet only one way. If the plug does not fit fully in the outlet, reverse the plug. If it
still does not fit, contact a qualified electrician to install the proper outlet. Do not change the
plug in any way.
Use only a 2-wire extension cord that has a 2-blade plug and a 2-slot receptacle that will
accept the plug on the product. Make sure your extension cord is in good condition. When
using an extension cord, be sure to use one heavy enough to carry the current your product
will draw. For lengths less than 6 feet, No. 18 AWG extension cords should be used. An
undersized cord will cause a drop in line voltage resulting in loss of power and overheating.
In a double-insulated product, two systems of insulation are provided instead of grounding.
No grounding means is provided on a double-insulated product, nor should a means for
grounding be added to the product. Servicing of a double-insulated product requires
extreme care and knowledge of the system, and should be done only by qualified service
personnel. Replacement parts for a double-insulated product must be identical to those
parts in the product. A double-insulated product is marked with the words “DOUBLE
INSULATION” or “DOUBLE INSULATED. The symbol may also be marked on the
product.
This inflator is designed to inflate car tires, bike tires, ATV tires, sports equipment, air
mattresses, beach toys and other inflatables. Do not use for any purpose other than
inflating. If you do so, bodily harm or personal injury can occur.
CAUTION: Allow inflator to cool down 10 minutes after each 10 minutes of continuous
operation.
After using, turn off power.
The inflator is not a toy. Keep away from children at all times.
Do not carry inflator by the air hose or power cord as damage may occur.
Do not leave the inflator unattended while in operation.
Do not overinflate. Please follow the manufacturer’s instructions for the item you are
inflating.
Keep the inflator away from flammable areas/liquids at all times.
Do not operate the inflator in wet or damp areas.
Operate the inflator only with the attachments that are included.
USE SAFETY GLASSES. Also use face or dust mask if operation is dusty.
This inflator is not designed to fill air tanks or air shocks.
4
Page 5
OPERATING INSTRUCTIONS 12 VOLT DC MODE
CAUTION: DO NOT OVERINFLATE ITEM BEING INFLATED.
Place inflator evenly on flat surface.
Insert the 12 Volt DC Power Cord into 12 Volt DC Power Outlet and this will automatically
provide continuous 12 volt current to your inflator.
Connect the Quick Connect Valve Adaptor to item you are inflating and push down the
Valve Lock Lever to secure the connection.
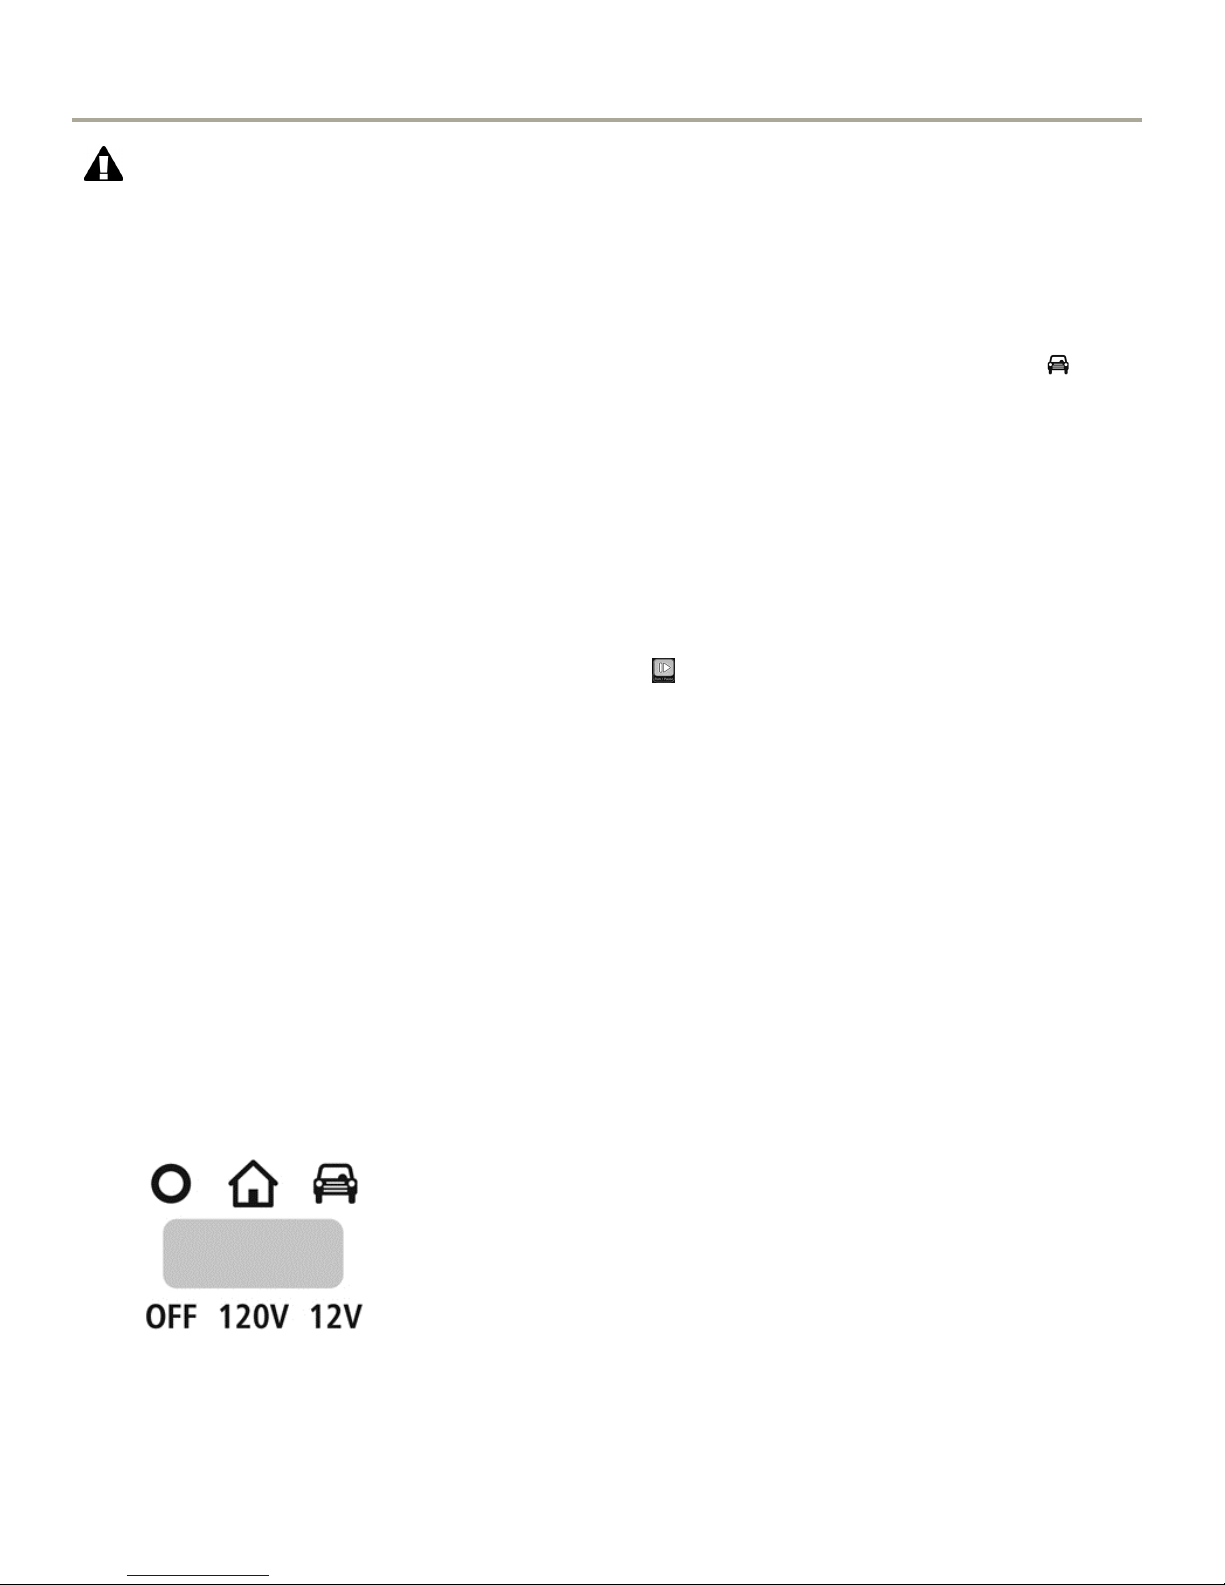
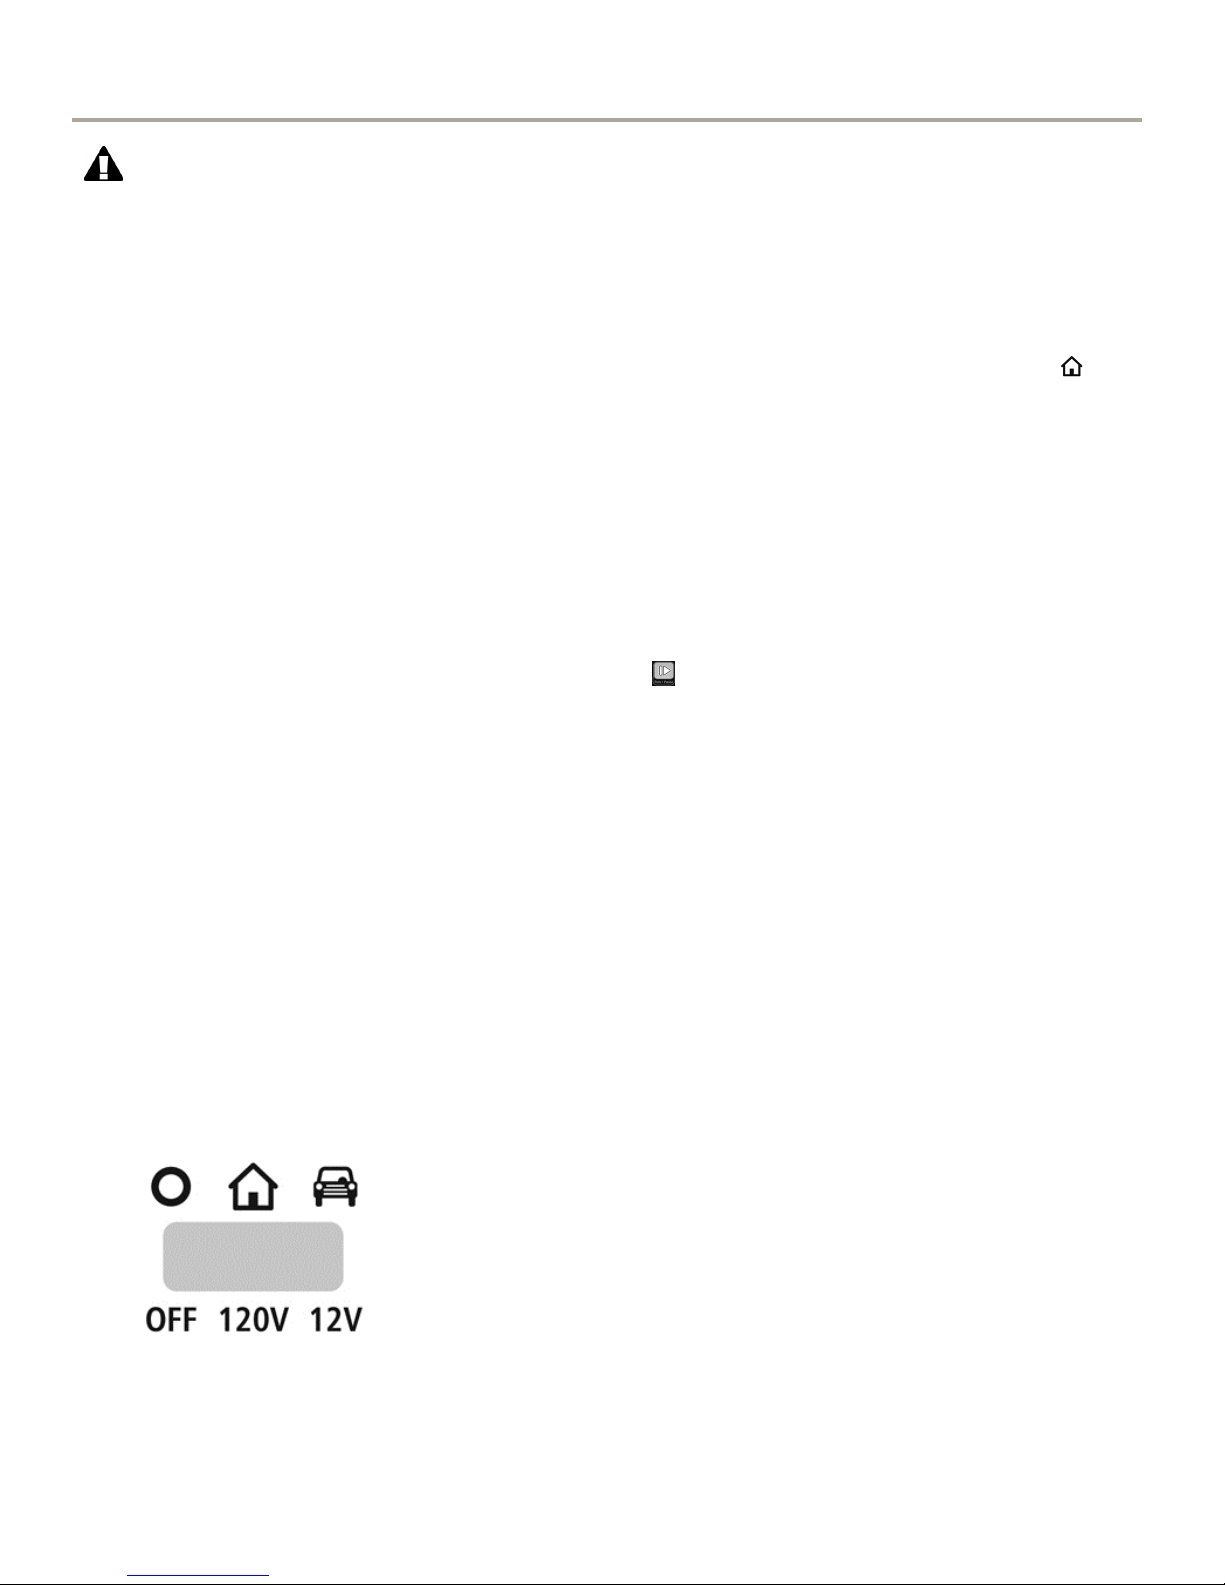
Push the Power Selector Switch in the top left corner of the inflator to the 12 Volt,
position. (Please see Image #1 below).
The Digital Pressure Gauge will display the current pressure of the item you are inflating.
When the LCD readout screen is displaying the current PSI, the LCD readout is static.
Press the ▲ button on the Digital Pressure Gauge to set the desired PSI. The Digital
Pressure Gauge preset range is 3 PSI minimum to 120 PSI maximum. When the LCD
readout screen is displaying the target PSI, the LCD readout will blink 3 times at the
desired preset level and it will then change back to the current PSI level of the item you are
inflating.
Note: If the current pressure of the item you are inflating is greater than the preset level,
the inflator will not turn on.
To turn the inflator on, push the Run/Pause, button. The preset PSI level can be
changed during inflation, simply press the ▲ or ▼buttons to new desired PSI level.
The inflator will shut off automatically at the desired preset PSI level that you have
programmed into the Digital Pressure Gauge.
Note: The inflator has a tolerance of + or – 2 PSI and will automatically shut off
accordingly.
To stop the inflator before it reaches the preset PSI level, push the Run/Pause button. To
resume inflation, simply press the Run/Pause button again.
Note: Disconnecting inflator from 12 Volt DC Power Outlet will clear the previous preset PSI
setting.
Image #1
5
Page 6
OPERATING INSTRUCTIONS 120 VOLT AC MODE
CAUTION: DO NOT OVERINFLATE ITEM BEING INFLATED.
Place inflator evenly on flat surface.
Insert the 120 Volt AC Power Cord into a grounded 120 Volt AC Outlet and this will
automatically provide continuous 120 volt current to your inflator.
Connect the Quick Connect Valve Adaptor to item you are inflating and push down the
Valve Lock Lever to secure the connection.
Push the Power Selector Switch in the top left corner of the inflator to the 120 Volt,
position. (Please see Image #2 below).
The Digital Pressure Gauge will display the current pressure of the item you are inflating.
When the LCD readout screen is displaying the current PSI, the LCD readout is static.
Press the ▲ button on the Digital Pressure Gauge to set the desired PSI. The Digital
Pressure Gauge preset range is 3 PSI minimum to 120 PSI maximum. When the LCD
readout screen is displaying the target PSI, the LCD readout will blink 3 times at the
desired preset level and it will then change back to the current PSI level of the item you are
inflating.
Note: If the current pressure of the item you are inflating is greater than the preset level,
the inflator will not turn on.
To turn the inflator on, push the Run/Pause, button. The preset PSI level can be
changed during inflation, simply press the ▲ or ▼buttons to new desired PSI level.
The inflator will shut off automatically at the desired preset PSI level that you have
programmed into the Digital Pressure Gauge.
Note: The inflator has a tolerance of + or – 2 PSI and will automatically shut off
accordingly.
To stop the inflator before it reaches the preset PSI level, push the Run/Pause button. To
resume inflation, simply press the Run/Pause button again.
Note: Disconnecting inflator from 120 Volt AC Outlet will clear the previous preset PSI setting.
Image #2
6
Page 7
CARE AND MAINTENANCE
Place Power Selector Switch to “Off” position and unplug the cord.
Wipe plastic parts clean using mild soap and warm water. Do not get moisture or water into
interior moving parts.
TROUBLESHOOTING
PROBLEM POSSIBLE CAUSE CORRECTIVE ACTION
Unit will not
start.
1. Preset pressure setting may
be below the actual pressure
of the item you are inflating.
2. Cord not plugged in.
3. Circuit breaker is tripped.
4. Fuse in 12 Volt DC power
cord blown.
1. Adjust Preset pressure setting to
higher pressure.
2. Plug into a working 120 Volt AC
Outlet or 12 Volt DC Power Outlet.
3. Reset circuit breaker.
4. Replace 10 Amp fuse in 12 Volt DC
power cord.
REPLACEMENT PARTS LIST
For replacement parts, call our customer service department at 1-800-874-5771, 8:00 a.m. – 5:00
p.m., MST, Monday – Friday.
PART DESCRIPTION
H Tire Valve Cap
K Presta Valve Adaptor
L Sports Needle
M Raft Nozzle
Printed in China
7
Page 8

ARTICLE #0146781
GONFLEUR À
ALIMENTATION
DOUBLE DE
12 VOLTS/120 VOLTS
MODÈLE #KL12120
Des questions, des problèmes, des pièces manquantes? Avant de retourner l’article au
détaillant, appelez notre service à la clientèle au 1 800 874-5771, entre 8 h et 17 h (HNR), du
lundi au vendredi.
8
Page 9

CONTENU DE L’EMBALLAGE
PIÈCE DESCRIPTION QUANTITÉ
A Commutateur
1
d'alimentation
B Compartiment de
1
rangement pour le
tuyau à air et le cordon
d’alimentation c.a. de
120 V
C Boutons de préréglage
1
du taux de lb/po2
(augmentation et
diminution)
D Manomètre numérique 1
E Poignée de transport 1
F Interrupteur (mise en
1
marche et interruption)
G Compartiment de
4
rangement pour
capuchon de valve de
pneu
H Capuchon de valve de
2
pneu de rechange
I Tuyau à air 1
PIÈCE DESCRIPTION QUANTITÉ
J Adaptateur pour
1
valve à branchement
rapide
K Adaptateur pour
1
valve Presta
L Pointeau pour articles
2
de sport
M Buse pour
1
pneumatique
N Cordon
1
d’alimentation de
12 V c.c.
O Cordon
1
d’alimentation de
120 V c.a.
P Compartiment de
1
rangement pour
accessoires
Q Compartiment de
1
rangement pour
cordon d’alimentation
de 12 V c.a.
9
Page 10

CONSIGNES DE SÉCURITÉ
Assurez-vous de lire et de comprendre l’intégralité de ce manuel avant de tenter d’assembler,
d’installer ou d’utiliser le produit.
Les consignes de sécurité contenues dans le présent manuel ne traitent pas de toutes les conditions
possibles pouvant se produire pendant l’utilisation de cet appareil. Usez toujours de votre jugement et
faites attention à tous les AVERTISSEMENTS et à toutes les MISES EN GARDE contenus dans le
présent manuel.
Espace de travail : Gardez votre espace de travail propre et bien éclairé. Un établi encombré et
peu éclairé augmente les risques de blessures ou de dommages matériels.
N’utilisez pas d’outils électriques dans un milieu explosif, par exemple où il y a présence de
liquides, de vapeurs ou de poussières inflammables.
Gardez les enfants et les autres personnes à l’écart lorsque vous utilisez un outil électrique.
Une distraction peut vous faire perdre la maîtrise de l’outil.
CARACTÉRISTIQUES DU PRODUIT
MISE EN GARDE : CE GONFLEUR NE PEUT ÊTRE ALIMENTÉ QUE PAR UNE TENSION DE
12 V. C.C. OU DE 120 V C.A. NE TENTEZ PAS DE FAIRE FONCTIONNER CE GONFLEUR SUR
D’AUTRES SOURCES D’ALIMENTATION ÉLECTRIQUE OU TENSIONS. NE RECÂBLEZ PAS LE
GONFLEUR ET NE MODIFIEZ PAS SA CONCEPTION D’ORIGINE, CAR DES BLESSURES
POURRAIENT EN DÉCOULER.
Modèle KL12120
Tension/Hertz/Phase/Courant 20/60/1/1,5 A
Pression de service maximale 120 lb/po2
Tension 12 V c.c.
Alimentation 12 V c.c.
Pression de service maximale 120 lb/po2
Remarque : Cet appareil est doté d’une protection par fusible. Si le gonfleur cesse de
fonctionner alors qu'il est en mode 12 V c.c., vérifiez le fusible se trouvant à l’extrémité de la
fiche de 12 V. Pour remplacer le fusible, dévissez simplement l’embout de la fiche
d’alimentation électrique de 12 V, retirez le fusible qui s’y trouve, installez un nouveau fusible et
replacez l’embout de la fiche d’alimentation électrique. Utilisez seulement des fusibles de
rechange de 10 A pour courant CAG.
10
Page 11

PRÉPARATION
Assurez-vous que la prise 12 V de votre véhicule est exempte de cendres et de saletés.
Une prise 12 V sale peut entraîner une surchauffe du gonfleur et du cordon d'alimentation.
Une surchauffe peut endommager le gonfleur ou le véhicule et causer des lésions ou des
blessures corporelles. Débranchez l’appareil lorsque vous ne l’utilisez pas.
Il est important que la batterie 12 V de votre véhicule soit entièrement chargée pour
assurer le rendement optimal de votre gonfleur. Si la batterie de votre véhicule est faible, le
gonfleur ne pourra fonctionner à son niveau maximal.
DANGER : Pour de meilleurs résultats et une plus grande puissance, nous vous
recommandons de faire fonctionner le gonfleur pendant que le MOTEUR DE VOTRE
VÉHICULE TOURNE. Prenez toutefois bien soin d’être à l’extérieur ou dans un endroit
ouvert et bien aéré, et NON PAS DANS UN ENDROIT FERMÉ COMME UN GARAGE, car
cela pourrait entraîner des blessures ou une asphyxie causant la mort. ASSUREZ-VOUS
TOUJOURS QUE LA VENTILATION EST ADÉQUATE. Les prises 12 V de la plupart des
véhicules fonctionnent lorsque le moteur est éteint. Cependant, certains véhicules
nécessitent que le système d'allumage soit sous tension.
Cet appareil est muni d’une fiche polarisée (une broche est plus large que l’autre). Cette
fiche ne peut être branchée sur une prise polarisée que dans un sens. Si la fiche ne
s’enfonce pas complètement dans la prise, essayez dans l’autre sens. Si elle ne s'y
enfonce toujours pas, faites appel à un électricien qualifié pour installer une prise
appropriée. Ne modifiez la prise d’aucune façon.
Utilisez uniquement des rallonges à deux fils dont la fiche est munie de deux broches et de
prises à deux fentes appropriées à la fiche du produit. Assurez-vous que la rallonge utilisée
est en bon état. Utilisez une rallonge qui convient au courant consommé par l’outil. Si la
distance à couvrir est de moins de 2 mètres, utilisez une rallonge de calibre 18 AWG. Si le
calibre est plus petit, il se produira une baisse de la tension secteur entraînant une perte de
puissance et une surchauffe.
Les produits à double isolation comportent deux systèmes d'isolation plutôt qu'un système
de mise à la terre. Un produit à double isolation n'est pas mis à la terre et ne doit pas l'être.
L'entretien d'un produit à double isolation exige une extrême prudence et une
connaissance du système, et ne doit être effectué que par un technicien qualifié. Les
pièces de rechange d'un produit à double isolation doivent être identiques aux pièces
d'origine de ce produit. Les mots « DOUBLE ISOLATION » apparaissent sur les produits à
double isolation. Le symbole peut également être utilisé pour identifier ces produits.
Cet appareil est conçu pour gonfler des pneus de voiture, de bicyclette et de véhicule tout
terrain, de l’équipement de sport, des matelas pneumatiques, des jouets de plage et autres
articles gonflables. Il ne doit pas servir à un usage autre que celui de gonfler. Le nonrespect de cette consigne peut entraîner des lésions ou des blessures.
MISE EN GARDE : Laissez le gonfleur se refroidir pendant 10 minutes après chaque
période de 10 minutes de fonctionnement en continu.
Coupez l’alimentation après l'utilisation.
Le gonfleur n’est pas un jouet. Gardez-le hors de la portée des enfants en tout temps.
Pour éviter d’endommager le gonfleur, ne le transportez pas en le tenant par le tuyau à air
ou le cordon d’alimentation.
Ne laissez pas le gonfleur sans surveillance lorsqu’il est en marche.
Évitez le surgonflage. Veuillez suivre les instructions du fabricant fournies avec l’article que
vous souhaitez gonfler..
Tenez le gonfleur loin de tout milieu ou liquide inflammable en tout temps.
11
Page 12

PRÉPARATION
Ne faites pas fonctionner le gonfleur dans des endroits mouillés ou humides.
Utilisez uniquement le gonfleur avec les accessoires qui sont inclus.
PORTEZ DES LUNETTES DE SÉCURITÉ. Portez aussi un masque facial ou un masque
antipoussières au besoin.
Ce gonfleur n’est pas conçu pour remplir des réservoirs d’air comprimé ou des
amortisseurs à air.
12
Page 13

MODE D’EMPLOI EN MODE 12 V C.C.
MISE EN GARDE : ÉVITEZ DE SURGONFLER L’ARTICLE.
Placez le gonfleur de niveau sur une surface plane.
Insérez le cordon d'alimentation de 12 V c.c. dans une prise 12 V c.c. pour fournir
automatiquement un courant continu de 12 V au gonfleur.
Posez l'adaptateur pour valve à branchement rapide sur l'article à gonfler et poussez le
levier de verrouillage de la valve vers le bas pour assurer un raccord solide.
Poussez le commutateur d'alimentation vers l'extrémité supérieure gauche du gonfleur
jusqu'à la position 12 V. (Consultez l'image 1 ci-dessous.)
Le manomètre numérique indiquera la pression actuelle de l'article que vous gonflez.
Lorsque l'écran d'affichage ACL indique la pression actuelle en lb/po2, il est statique.
Appuyez sur le bouton ▲ du manomètre numérique pour régler la pression voulue en
2
lb/po
. L'écart préréglé du manomètre numérique va de 3 lb/po2 minimum à 120 lb/po2
maximum. Lorsque l'écran d'affichage ACL indiquera la pression en lb/po2 cible, la valeur
préréglée clignotera trois fois, puis la pression en lb/po
2
actuelle de l'article que vous
gonflez s'affichera de nouveau.
Remarque : Si la pression actuelle de l'article que vous gonflez est supérieure à la
pression préréglée, le gonfleur ne se mettra pas en marche.
Pour mettre le gonfleur en marche, appuyez sur le bouton de mise en marche et
d'interruption. La valeur en lb/po2 préréglée peut être changée pendant le gonflage. Pour
ce faire, appuyez simplement sur les boutons ▲ ou ▼ jusqu'à ce que vous atteigniez la
valeur désirée.
Le gonfleur s'éteindra automatiquement lorsque la pression en lb/po2 préréglée à l'aide du
manomètre numérique sera atteinte.
Remarque : Le gonfleur a une tolérance de plus ou moins 2 lb/po2 et s'éteindra
automatiquement en fonction de la pression.
Pour interrompre le gonflage avant que la pression en lb/po2 préréglée soit atteinte,
appuyez sur le bouton de mise en marche et d'interruption. Pour reprendre le gonflage,
vous n'avez qu'à appuyer de nouveau sur le bouton de mise en marche et d'interruption.
Remarque : Si le gonfleur est débranché de la prise 12 V c.c., la pression en lb/po2 préréglée sera
perdue.
Image no 1
13
Page 14

MODE D'EMPLOI EN MODE 120 V C.A.
MISE EN GARDE : ÉVITEZ DE SURGONFLER L’ARTICLE.
Placez le gonfleur de niveau sur une surface plane.
Insérez le cordon d'alimentation de 120 V c.a. dans une prise 120 V c.a. pour fournir
automatiquement un courant continu de 120 V au gonfleur.
Posez l'adaptateur pour valve à branchement rapide sur l'article à gonfler et poussez le
levier de verrouillage de la valve vers le bas pour assurer un raccord solide.
Poussez le commutateur d'alimentation vers l'extrémité supérieure gauche du gonfleur
jusqu'à la position 120 V. (Consultez l'image 2 ci-dessous.)
Le manomètre numérique indiquera la pression actuelle de l'article que vous gonflez.
Lorsque l'écran d'affichage ACL indique la pression actuelle en lb/po2, il est statique.
Appuyez sur le bouton ▲ du manomètre numérique pour régler la pression voulue en
lb/po2. L'écart préréglé du manomètre numérique va de 3 lb/po2 minimum à 120 lb/po2
2
maximum. Lorsque l'écran d'affichage ACL indiquera la pression en lb/po
préréglée clignotera trois fois, puis la pression en lb/po
2
actuelle de l'article que vous
cible, la valeur
gonflez s'affichera de nouveau.
Remarque : Si la pression actuelle de l'article que vous gonflez est supérieure à la
pression préréglée, le gonfleur ne se mettra pas en marche.
Pour mettre le gonfleur en marche, appuyez sur le bouton de mise en marche et
d'interruption. La valeur en lb/po2 préréglée peut être changée pendant le gonflage. Pour
ce faire, appuyez simplement sur les boutons ▲ ou ▼ jusqu'à ce que vous atteigniez la
valeur désirée.
Le gonfleur s'éteindra automatiquement lorsque la pression en lb/po2 préréglée à l'aide du
manomètre numérique sera atteinte.
Remarque : Le gonfleur a une tolérance de plus ou moins 2 lb/po2 et s'éteindra
automatiquement en fonction de la pression.
Pour interrompre le gonflage avant que la pression en lb/po2 préréglée soit atteinte,
appuyez sur le bouton de mise en marche et d'interruption. Pour reprendre le gonflage,
vous n'avez qu'à appuyer de nouveau sur le bouton de mise en marche et d'interruption.
2
Remarque : Si le gonfleur est débranché de la prise 120 V c.A., la pression en lb/po
préréglée sera
perdue.
Image n
o
2
14
Page 15

ENTRETIEN
Placez le commutateur d'alimentation à « Off » (Arrêt) et débranchez l'appareil.
Nettoyez les parties en plastique avec du savon doux et de l’eau tiède. Protégez les parties
mobiles intérieures de l'humidité et de l'eau.
DÉPANNAGE
PROBLÈME CAUSE POSSIBLE MESURE CORRECTIVE
L'appareil ne
démarre pas.
1. La pression préréglée est
peut-être inférieure à la
pression actuelle de l'article
que vous gonflez.
2. Le cordon n’est pas
branché.
3. Un disjoncteur s'est
déclenché.
4. Le fusible du cordon
d’alimentation de 12 V c.a.
1. Augmentez la valeur de la pression
préréglée.
2. Branchez le cordon sur une prise de
120 V c.a. ou de 12 V c.c. qui
fonctionne.
3. Remettez le disjoncteur sous
tension.
4. Remplacez le fusible de 10 A
associé au cordon d’alimentation de
12 V c.a.
est grillé.
LISTE DES PIÈCES DE RECHANGE
Pour obtenir des pièces de rechange, communiquez avec notre service à la clientèle au 1 800 8745771, entre 8 h et 17 h (HNR), du lundi au vendredi.
PIÈCE DESCRIPTION
H Capuchon de valve de pneu
K Adaptateur pour valve Presta
L Pointeau pour articles de sport
M Buse pour pneumatique
15
Page 16

Imprimé en Chine
ARTÍCULO #0146781
ALIMENTACIÓN DOBLE
INFLADOR
12 VOLTIOS / 120 VOLTIOS
MODELO No. KL12120
¿Preguntas, problemas, piezas faltantes? Antes de volver a la tienda, llame a nuestro
Departamento de Servicio al Cliente al 1-800-874-5771, de lunes a viernes de 8:00 a.m. a
5:00 p.m., hora estándar de las montañas.
16
Page 17

CONTENIDO DEL PAQUETE
PIEZA DESCRIPCIÓN CANTIDAD
A Interruptor selector de
1
encendido
B Manguera de aire
1
comprimido y
almacenamiento de
cable de alimentación
de 120 voltios de CA
C Botones para
1
aumentar/disminuir el
nivel preajustado de
PSI
D Indicador de presión
1
digital
E Manija de transporte 1
F Interruptor de
1
encendido de
funcionamiento/pausa
G Almacenamiento de la
4
tapa de la válvula del
neumático Storage
H Tapa de la válvula del
2
neumático de repuesto
PIEZA DESCRIPCIÓN CANTIDAD
I Manguera de aire
comprimido
J Adaptador de válvula
de conexión rápida
K Adaptador de válvula
Presta
L Aguja para inflar
balones
M Boquilla de balsa 1
N Cable de
alimentación de 12
voltios de CC
O Cable de
alimentación de 120
voltios de CA
P Compartimiento para
almacenamiento de
accesorios
Q Almacenamiento del
cable de alimentación
de 12 voltios de CC
1
1
1
2
1
1
1
1
17
Page 18

INFORMACIÓN DE SEGURIDAD
Lea y comprenda completamente este manual antes de intentar ensamblar, usar o instalar el producto.
Las instrucciones de seguridad que se proporcionan en este manual no pretenden cubrir todas las
condiciones posibles que pudieran ocurrir durante el funcionamiento del producto. Siempre actúe con
sentido común y preste atención a todas las indicaciones de ADVERTENCIA y PRECAUCIÓN de
este manual.
Área de trabajo: Mantenga su área de trabajo limpia y bien iluminada. Los bancos desordenados
y las áreas oscuras aumentan la posibilidad de sufrir lesiones personales o daño a la propiedad.
No utilice herramientas eléctricas en atmósferas en las que exista riesgo de explosión, como
por ejemplo en presencia de líquidos inflamables, gases o polvo.
Mantenga a los transeúntes, niños y visitas alejados cuando esté usando una herramienta
eléctrica. Las distracciones pueden provocar que pierda el control.
ESPECIFICACIONES DEL PRODUCTO
PRECAUCIÓN: ESTE INFLADOR FUNCIONA CON 12 VOLTIOS DE CC Y 120 VOLTIOS DE
CA. NO INTENTE USAR ESTE INFLADOR CON NINGUNA OTRA FUENTE O VOLTAJE. NO
REINSTALE EL CABLEADO NI RECONFIGURE EL INFLADOR DE SU DISEÑO ORIGINAL O
PUEDE SUFRIR LESIONES PERSONALES O DAÑOS CORPORALES.
Modelo KL12120
Voltaje/Hercios/Fase/Corriente 20/60/1/1,5 A
Presión de trabajo máxima 120 PSI
Voltaje 12 V de CC
Requisito de alimentación 12 V de CC: sólo para uso con tomacorriente de 12
voltios de CC
Presión de trabajo máxima 120 PSI
Nota: Esta unidad está equipada con protección de fusibles. Si en algún punto el inflador
deja de funcionar usando el método de alimentación de 12 voltios de CC, revise el fusible al
final del enchufe de 12 voltios. Para reemplazar el fusible, simplemente desatornille la punta
del enchufe de alimentación de 12 voltios, retire el fusible actual, instale el fusible nuevo y
vuelva a ensamblar la punta del enchufe de alimentación. Utilice sólo un fusible de reemplazo
de 10 amperios AGC.
18
Page 19

PREPARACIÓN
Asegúrese de que el tomacorriente de 12 voltios de su vehículo no tenga residuos ni
desechos. Un tomacorriente de 12 voltios sucio puede hacer que el inflador y el cable de
alimentación se sobrecalienten. El sobrecalentamiento puede provocar daños al
inflador/vehículo y podría causar daños o lesiones corporales. Desconecte la alimentación
cuando no lo esté usando.
Le recomendamos cargar completamente la batería de 12 voltios del vehículo para obtener
el mejor resultado del inflador. Si la batería de su vehículo es débil, el inflador no trabajará
a su máximo nivel de salida.
PELIGRO: Para obtener mejores resultados y una alimentación más eficiente, se
recomienda hacer funcionar el inflador con el MOTOR DEL VEHÍCULO ENCENDIDO
asegurándose de estar en el exterior o en un área abierta y bien ventilada, y NO DENTRO
DE UN ÁREA CONFINADA, COMO UN GARAJE ya que se pueden producir lesiones
corporales o asfixia, resultando en la muerte. SIEMPRE PERMITA UNA VENTILACIÓN
ADECUADA. La mayoría de los tomacorrientes de 12 voltios de vehículos funcionarán
con el encendido del vehículo apagado; sin embargo, algunos vehículos se deben
encender.
Este electrodoméstico tiene un enchufe polarizado (una clavija es más ancha que la otra).
Este enchufe se inserta en un tomacorriente polarizado de una sola manera. Si el enchufe
no encaja por completo en el tomacorriente, inviértalo. Si aún no encaja en el
tomacorriente, comuníquese con un electricista calificado para instalar el tomacorriente
apropiado. No cambie el enchufe de ninguna manera.
Sólo use extensiones eléctricas de 2 conductores que tengan un enchufe de 2 aspas y un
receptáculo de 2 ranuras que acepten el enchufe del producto. Asegúrese de que su
extensión eléctrica esté en buenas condiciones. Cuando utilice una extensión eléctrica,
asegúrese de utilizar una que sea lo suficientemente pesada como para conducir la
corriente que su producto necesita. Para largos menores a 1,83 m se deben utilizar
extensiones eléctricas AWG No. 18. Un cable de tamaño menor que el requerido causará
una baja en el voltaje de la línea. Esto podría provocar un corte de energía y
sobrecalentamiento.
Los productos con doble aislamiento cuentan con dos sistemas de aislamiento en lugar de
uno de puesta a tierra. Estos productos no cuentan con una conexión de puesta a tierra ni
se les debe agregar. El mantenimiento de un producto con doble aislamiento requiere
extremo cuidado y amplios conocimientos del sistema, por lo que sólo debe estar a cargo
de personal de mantenimiento calificado. Las piezas de repuesto para un producto con
doble aislamiento deben ser idénticas a las piezas del producto. Un producto con doble
aislamiento se identifica con la frase “DOBLE AISLAMIENTO” o “CON DOBLE
AISLAMIENTO”. El símbolo sólo debe estar en el producto.
Este inflador está diseñado para inflar neumáticos de automóviles, de bicicletas, de
vehículos todo terreno, equipo deportivo, colchones inflables, juguetes de playa y otros
productos inflables. No utilice para ningún otro propósito que no sea inflar. Si lo hace, se
pueden producir daños corporales o lesiones personales.
PRECAUCIÓN: Deje que el inflador se enfríe 10 minutos después de cada 10 minutos de
funcionamiento continuo
Desconecte la alimentación después de usarlo.
El inflador no es un juguete. Mantenga alejado de los niños en todo momento.
No transporte el inflador jalando la manguera de aire comprimido o el cable de
alimentación ya que se pueden producir daños.
19
Page 20

PREPARACIÓN
No lo deje sin supervisión cuando esté en uso.
No infle demasiado. Siga las instrucciones de instalación del fabricante para el artículo que
está inflando.
Mantenga el inflador lejos de áreas o líquidos inflamables en todo momento.
No use el inflador en áreas húmedas o mojadas.
Use el inflador sólo con los aditamentos que se incluyen.
USE GAFAS DE SEGURIDAD. Use también una mascarilla antipolvo si se desprende
demasiado polvo.
Este inflador no está diseñado para llenar tanques de aire ni descargas de aire.
20
Page 21

INSTRUCCIONES DE FUNCIONAMIENTO DE MODO DE 12 VOLTIOS DE CC
PRECAUCIÓN: NO INFLE DEMASIADO EL ARTÍCULO.
Ubique el inflador sobre una superficie plana.
Inserte el cable de alimentación de 12 voltios de CC en un tomacorriente de 12 voltios de
CC y se proporcionará automáticamente corriente continua de 12 voltios al inflador.
Conecte el adaptador de válvula de conexión rápida al artículo que está inflando y presione
la palanca de bloqueo de la válvula para asegurar la conexión.
Presione el interruptor selector de encendido en la esquina superior izquierda del inflador a
la posición de 12 voltios. (Consulte la imagen 1 a continuación).
El indicador de presión digital mostrará la presión actual del artículo que está inflando.
Cuando la pantalla de lectura LCD muestra el nivel de PSI actual, la lectura LCD es
estática.
Presione el botón ▲ en el indicador de presión digital para configurar el nivel de PSI
deseado. El rango preajustado del indicador de presión digital es de 3 PSI mínimo a 120
PSI máximo. Cuando la pantalla de lectura LCD muestre el nivel de PSI objetivo, la lectura
LCD parpadeará 3 veces en el nivel preajustado deseado y luego cambiará de vuelta al
nivel de PSI actual del artículo que está inflando.
Nota: Si la presión actual del artículo que está inflando es mayor que el nivel
preajustado, el inflador no se encenderá.
Para encender el inflador, presione el botón de funcionamiento/pausa. El nivel preajustado
de PSI se puede cambiar durante la inflación, simplemente presionando los botones ▲ o
▼ para fijar el nuevo nivel de PSI deseado.
El inflador se apagará automáticamente en el nivel preajustado de PSI deseado que
programó en el indicador de presión digital.
Nota: El inflador tiene una tolerancia de + o – 2 PSI y se apagará automáticamente
según corresponda.
Para detener el inflador antes de que alcance el nivel preajustado de PSI, presione el
botón de funcionamiento/pausa. Para reanudar la inflación, simplemente presione el botón
de funcionamiento/pausa nuevamente.
Nota: Desconectar el inflador del tomacorriente de 12 voltios de CC borrará la configuración de
PSI preajustada con anterioridad.
Imagen #1
21
Page 22

INSTRUCCIONES DE FUNCIONAMIENTO DE MODO DE 120 VOLTIOS DE CA
PRECAUCIÓN: NO INFLE DEMASIADO EL ARTÍCULO.
Ubique el inflador sobre una superficie plana.
Inserte el cable de alimentación de 120 voltios de CA en un tomacorriente con puesta a
tierra de 120 voltios de CA y se proporcionará automáticamente corriente continua de 120
voltios al inflador.
Conecte el adaptador de válvula de conexión rápida al artículo que está inflando y presione
la palanca de bloqueo de la válvula para asegurar la conexión.
Presione el interruptor selector de encendido en la esquina superior izquierda del inflador a
la posición de 120 voltios. (Consulte la imagen 2 a continuación).
El indicador de presión digital mostrará la presión actual del artículo que está inflando.
Cuando la pantalla de lectura LCD muestra el nivel de PSI actual, la lectura LCD es
estática.
Presione el botón ▲ en el indicador de presión digital para configurar el nivel de PSI
deseado. El rango preajustado del indicador de presión digital es de 3 PSI mínimo a 120
PSI máximo. Cuando la pantalla de lectura LCD muestre el nivel de PSI objetivo, la lectura
LCD parpadeará 3 veces en el nivel preajustado deseado y luego cambiará de vuelta al
nivel de PSI actual del artículo que está inflando.
Nota: Si la presión actual del artículo que está inflando es mayor que el nivel
preajustado, el inflador no se encenderá.
Para encender el inflador, presione el botón de funcionamiento/pausa. El nivel preajustado
de PSI se puede cambiar durante la inflación, simplemente presionando los botones ▲ o
▼ para fijar el nuevo nivel de PSI deseado.
El inflador se apagará automáticamente en el nivel preajustado de PSI deseado que
programó en el indicador de presión digital.
Nota: El inflador tiene una tolerancia de + o – 2 PSI y se apagará automáticamente
según corresponda.
Para detener el inflador antes de que alcance el nivel preajustado de PSI, presione el
botón de funcionamiento/pausa. Para reanudar la inflación, simplemente presione el botón
de funcionamiento/pausa nuevamente.
Nota: Al desconectar el inflador del tomacorriente de 120 voltios CA se borrará el ajuste de PSI
predeterminado anterior.
Imagen #2
22
Page 23

CUIDADO Y MANTENIMIENTO
Coloque el interruptor selector de encendido en la posición “Off” (Apagado) y desenchufe el
cable.
Limpie las piezas plásticas con jabón suave y agua tibia. No humedezca ni moje el interior de
las piezas móviles.
SOLUCIÓN DE PROBLEMAS
PROBLEMA CAUSA POSIBLE ACCIÓN CORRECTIVA
La unidad no
arranca.
1. La configuración de presión
preajustada puede estar por
debajo de la presión real del
artículo que está inflando.
2. El cable no está enchufado.
3. El interruptor de circuito se
fundió.
4. El fusible del cable de
alimentación de 12 voltios
1. Regule la configuración de presión
preajustada a la mayor presión.
2. Enchufe en un tomacorriente de 120
voltios de CA o 12 voltios de CC que
funcione.
3. Reinicie el interruptor de circuito.
4. Reemplace el fusible de 10
amperios en el cable de
alimentación de 12 voltios de CC.
de CC se quemó.
LISTA DE PIEZAS DE REPUESTO
Para obtener piezas de repuesto, llame a nuestro Departamento de Servicio al Cliente al
1-800-874-5771, de lunes a viernes de 8:00 a.m. a 5:00 p.m., hora estándar de las montañas.
PIEZA DESCRIPCIÓN
H Tapa de la válvula del neumático
K Adaptador de válvula Presta
L Aguja para inflar balones
M Boquilla de balsa
Impreso en China
23
 Loading...