

Page 1
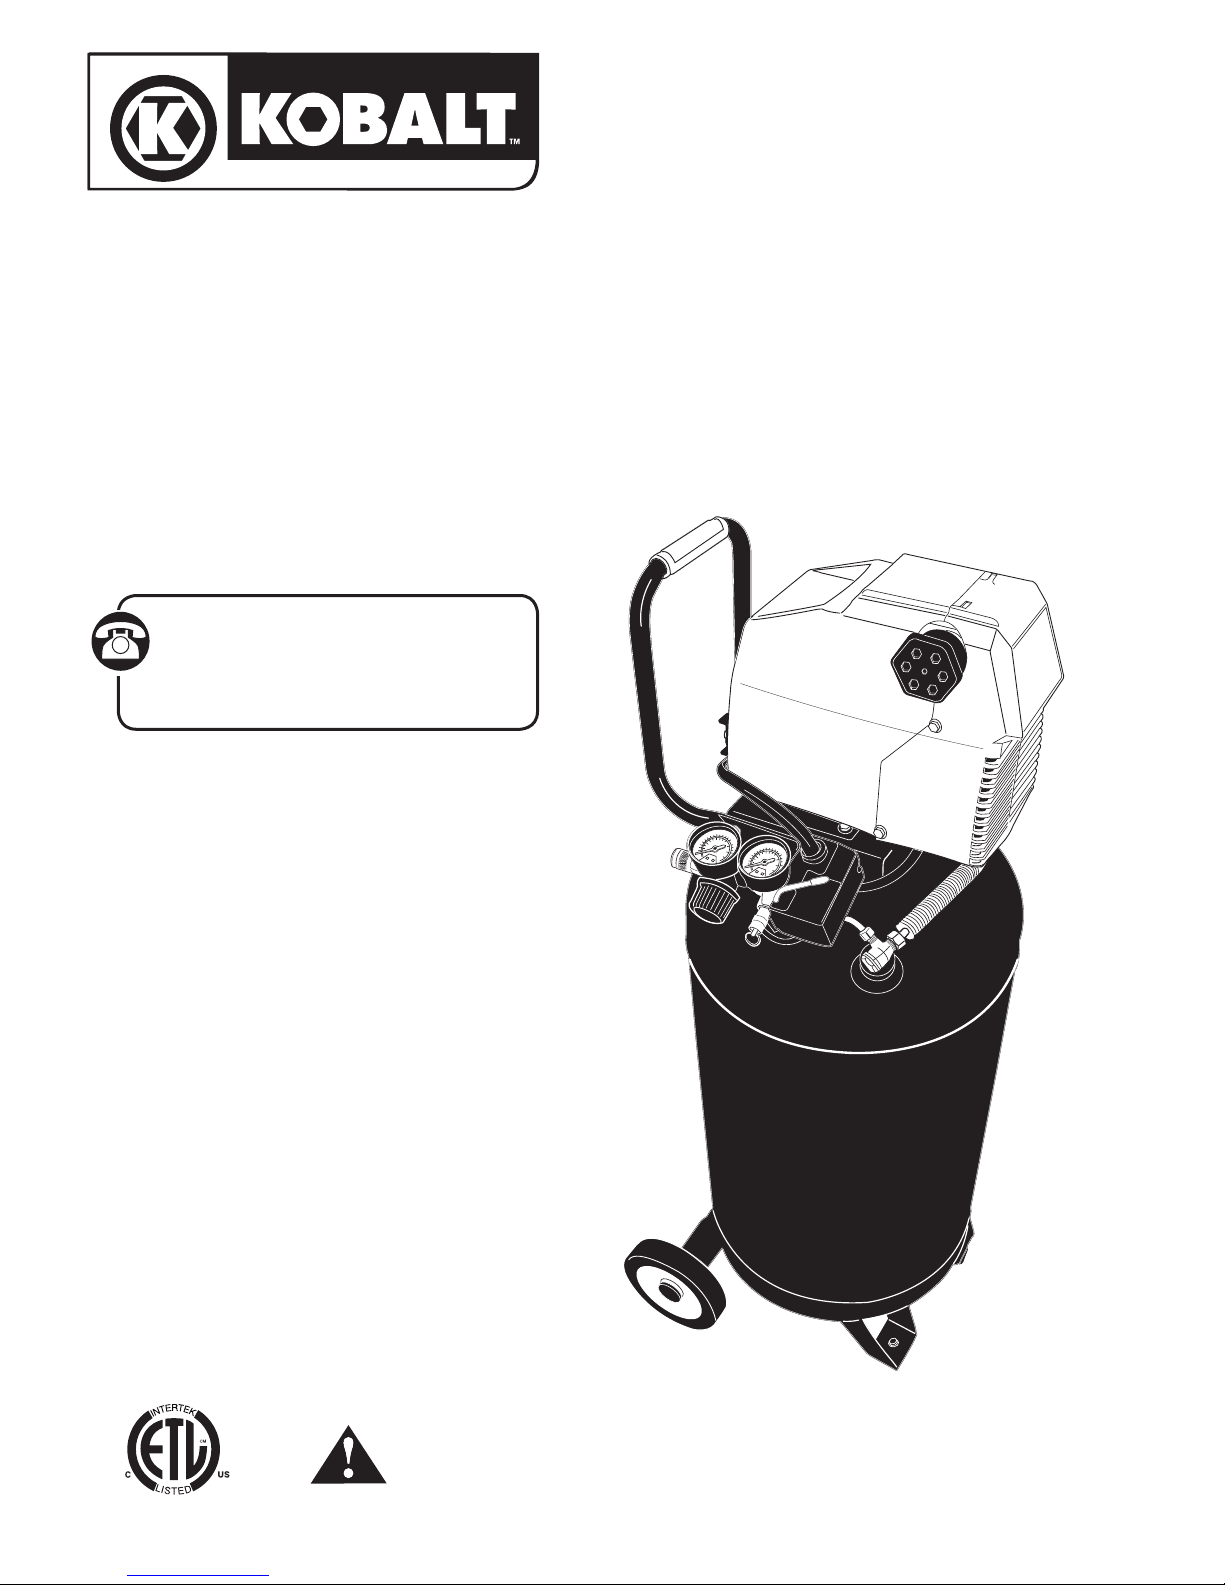
PORTABLE
AIR COMPRESSOR
DIRECT-DRIVE, OIL FREE
OWNER’S MANUAL
and Parts List
For customer service, contact:
1-800-628-8815 ext. 5000
M-F 8:00 AM - 5:00 PM CST.
Item #37296
Model #F226VWLVP
WARNING!
Read and understand all safety precautions and operating instructions before using portable air compressor.
8/20/2008 Printed in China Part No. E103490
Page 2

TABLE OF CONTENTS
Page
Safety Definitions ..................................................................................................................................... 1
Important Safety Instructions & Guidelines ........................ .......................................................... 1
Specifications ............................................................................................................................................. 2
Glossary ...................................... ................................................................................................................ 2
Duty Cycle ...................................... ............................................................................................................ 2
Parts & Features ........................................................................................................................................ 3
Operating Procedures ................................ ........................................................................................... 4
Maintenance .................................... ......................................................................................................... 6
Storage ..................................... .................................................................................................................. 6
Troubleshooting Guide ............................... .......................................................................................... 7
Exploded Parts Diagram ........................................................................................................................ 8
Parts List....................................................................................................................................................... 9
Limited Warranty ...................................................................................................................................... 10
Français ....................................................................................................................................................... 11
Español ....................................................................................................................................................... 23
DO NOT RETURN THIS
PRODUCT TO THE STORE!
Please call 1-800-628-8815 (ext. 5000)
STOP
for any questions regarding this product.
M-F 8:00 AM - 5:00 PM CST.
Thank You
Page 3
Safety Instructions
The information listed below should be read and understood by the operator. This information is given to protect
the user while operating and storing the air compressor. We utilize the symbols below to allow the reader to recognize
important information about their safety.
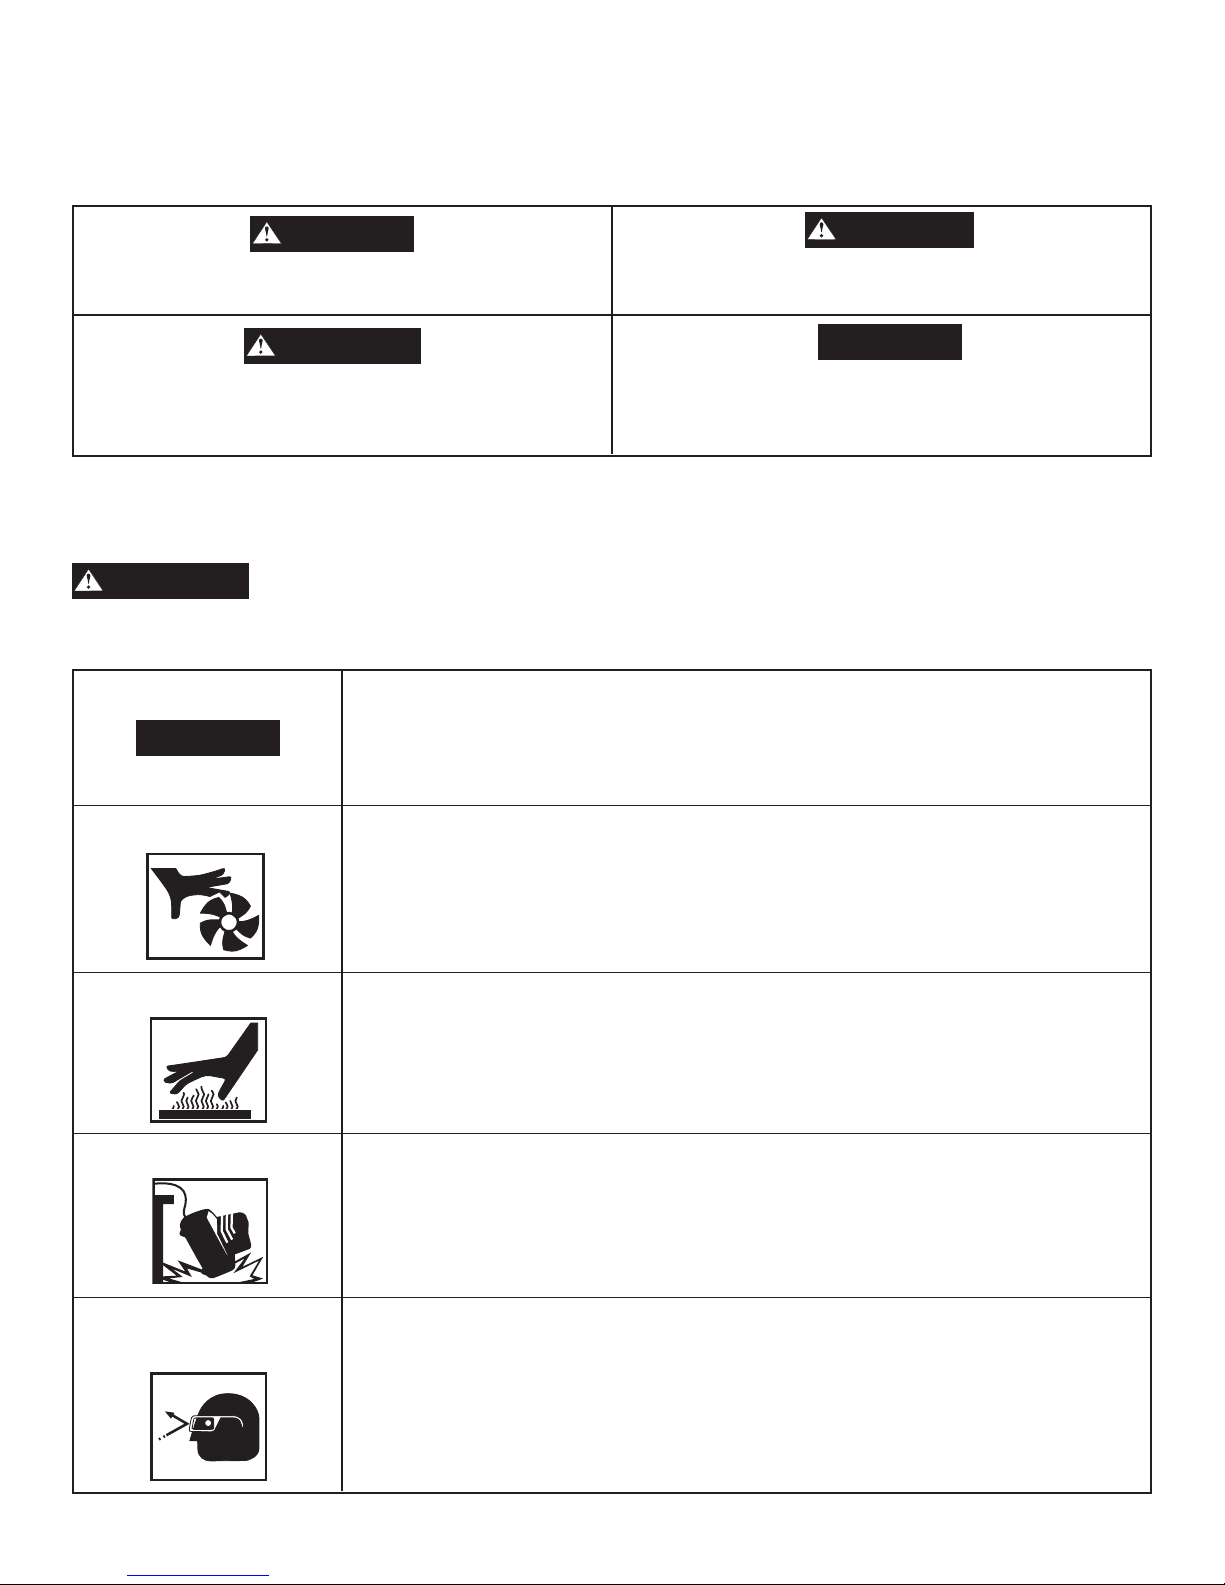
DANGER
Indicates an imminently hazardous situation which,
if not avoided, will result in death or serious injury.
WARNING
Indicates a potentially hazardous situation which, if
not avoided, could result in death or serious injury.
Indicates a potentially hazardous situation which, if
not avoided, may result in minor or moderate injury.
When used without the safety alert symbol indicates a
potentially hazardous situation which, if not avoided,
may result in property damage.
CAUTION
CAUTION
Important Safety Instructions and Guidelines
• Save all instructions
WARNING
Improper operation or maintenance of this product could result in serious injury and/or property damage. Read and
understand all of the warnings and safety instructions provided before using this equipment.
The air compressor should be operated on a dedicated 15 amp circuit. If the circuit
does not have 15 free amps available, a larger circuit must be used. Always use
CAUTION
more air hose before utilizing extension cords. All extension cords used must be 12
gauge with a maximum length of 25 ft. The circuit fuse type must be a time delay.
Low voltage could cause damage to the motor.
Risk of Moving Parts
Risk of Burns
Risk of Falling
Risk from
Flying Objects
If the air compressor is in operation, all guards and covers should be attached or
installed correctly. If any guard or cover has been damaged, do not operate the
equipment until the proper personnel has correctly repaired the equipment. The
power cord should be free of any moving parts, twisting and/or crimping while in
use and while in storage.
There are surfaces on your air compressor that while in operation and thereafter
can cause serious burns if touched. The equipment should be allowed time to cool
before any maintenance is attempted. Items such as the compressor pump and the
outlet tube are normally hot during and after operation.
Operation of the air compressor should always be in a position that is stable. Never
use the air compressor on a rooftop or elevated position that could allow the unit to
fall or be tipped over. Use additional air hose for elevated jobs.
Always wear ANSI Z87.1 approved safety glasses with side shields when the air
compressor is in use. Turn off the air compressor and drain the air tank before
performing any type of maintenance or disassembly of the hoses or fittings. Never
point any nozzle or sprayer toward any part of the body or at other people or
animals.
1
Page 4
Important Safety Instructions & Guidelines
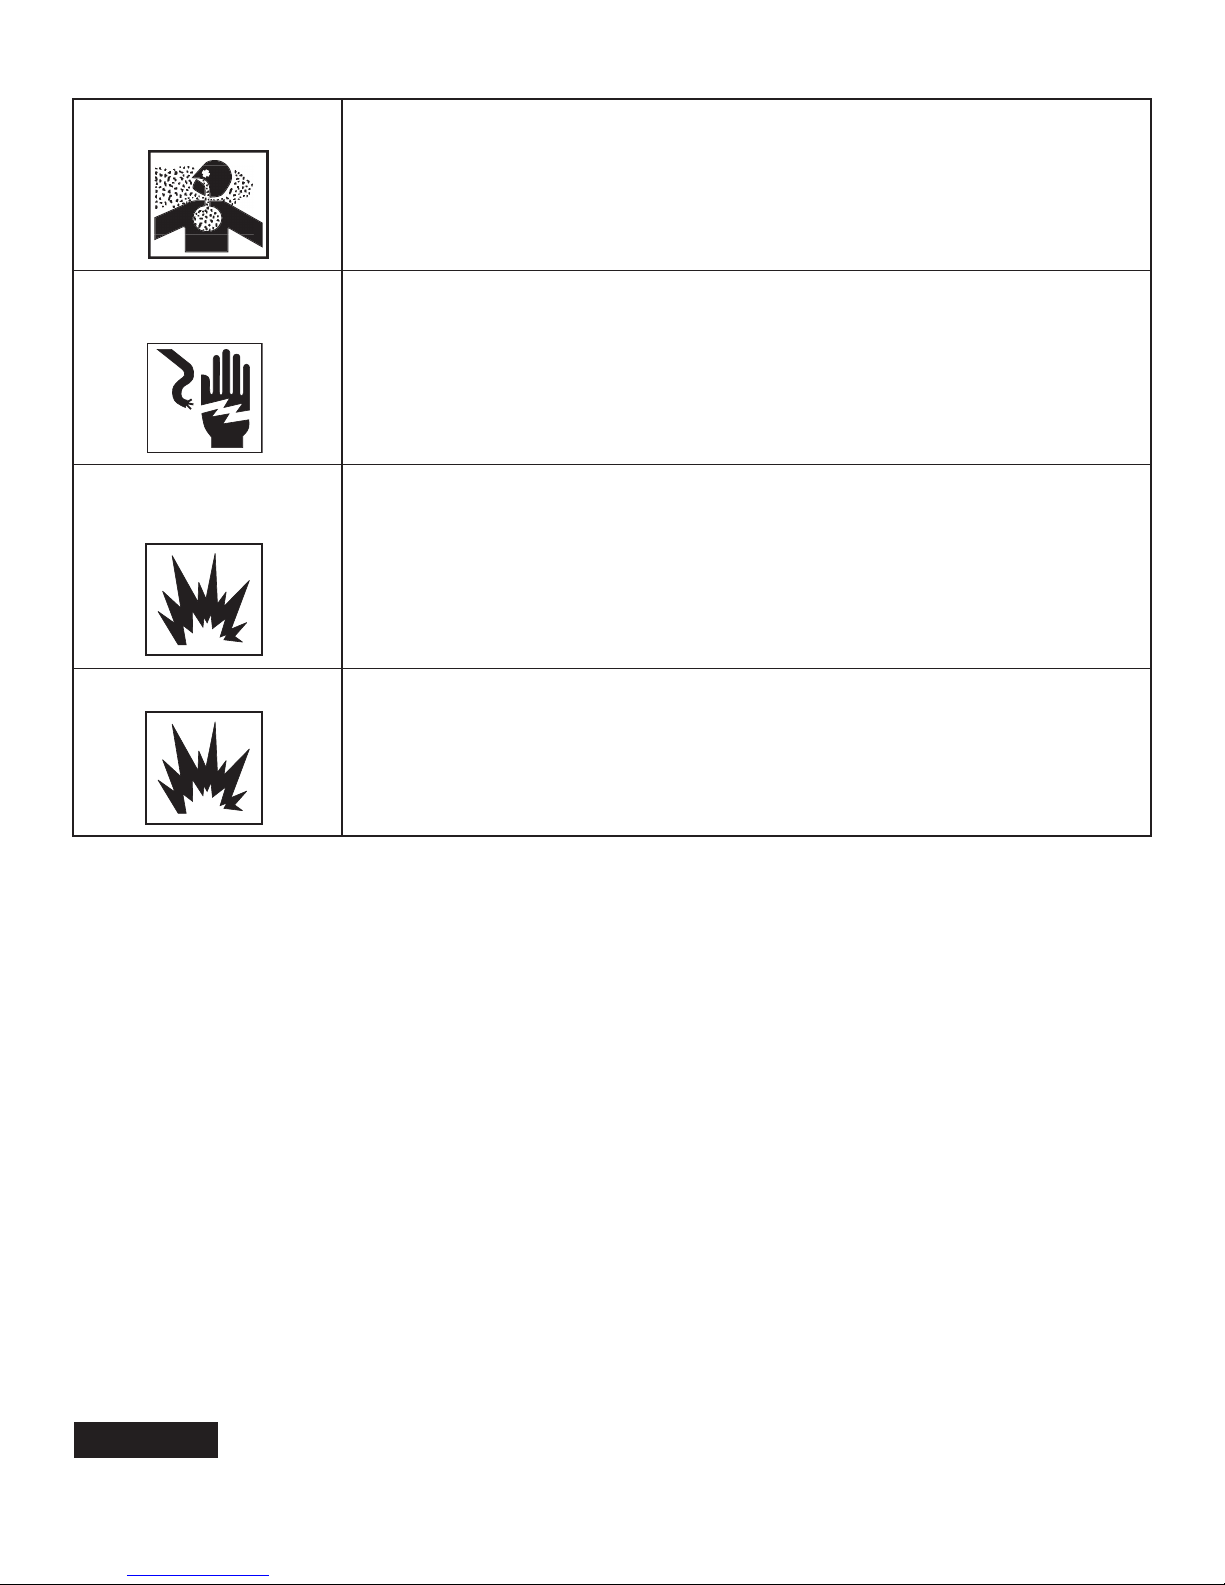
Risk to Breathing
Risk of
Electrical Shock
Risk of
Explosion or Fire
Risk of Bursting
Avoid using the air compressor in confined areas. Always have adequate space
(12 inches) on all sides of the air compressor. Also keep children, pets, and others out of
the area of operation. This air compressor does not provide breathable air for anyone or
any auxiliary breathing device. Spraying material will always need to be in another area
away from the air compressor to not allow intake air to damage the air compressor filter.
Never utilize the air compressor in the rain or wet conditions. Any electrical issues or
repairs should be performed by authorized personnel such as an electrician and should
comply with all national and local electrical codes. The air compressor should also have
the proper three prong grounding plug, correct voltage, and adequate fuse protection.
Never operate the compressor near combustible materials, gasoline or solvent vapors.
If spraying flammable materials, locate the air compressor at least 20 feet away from
the spray area. Never operate the air compressor indoors or in a confined area.
Always drain the air compressor tank daily or after each use. If the tank develops
a leak, then replace the air compressor. Never use the air compressor after a leak
has been found or try to make any modifications to the tank. Never modify the air
compressor’s factory settings which control the tank pressure or any other function.
Specifications
Pump ....................................Oil-free direct drive
Induction Motor.......................................1.5 HP
Bore ................................................. 2.48 in.
Stroke................................................ 0.87 in.
Voltage Single Phase ................................ 120 VAC
Minimum Circuit Requirement ......................15 Amps
Air Tank Capacity ................................. 26 Gallons
Cut-in Pressure .......................................120 PSI
Cut-out Pressure .....................................150 PSI
SCFM @ 40 PSI............................................5.0
SCFM @ 90 PSI............................................4.0
Glossary
CFM: Cubic feet per minute.
SCFM: Standard cubic feet per minute; a unit of measure
for air delivery.
PSIG: Pounds per square inch gauge; a unit of
measure for pressure.
ASME: American Society of Mechanical Engineers.
California Code: Unit may comply with California Code
462 (l) (2)/ (M) (2).
Cut-In Pressure: The air compressor will automatically
start to refill the tank when the pressure drops
below the prescribed minimum.
Cut-Out Pressure: The point at which the motor stops
when the tank has reached maximum air
pressure.
Code Certification: Products that bear one or more of
the following marks: UL, CUL, ETL, CSA, have
been evaluated by OSHA-certified independent
safety laboratories and meet the applicable
Underwriters Laboratories Standards for Safety.
Duty Cycle
CAUTION
This is a 50% duty cycle air compressor. Do not run the air compressor more than 30 minutes of one hour. Doing
so could damage the air compressor.
2
Page 5
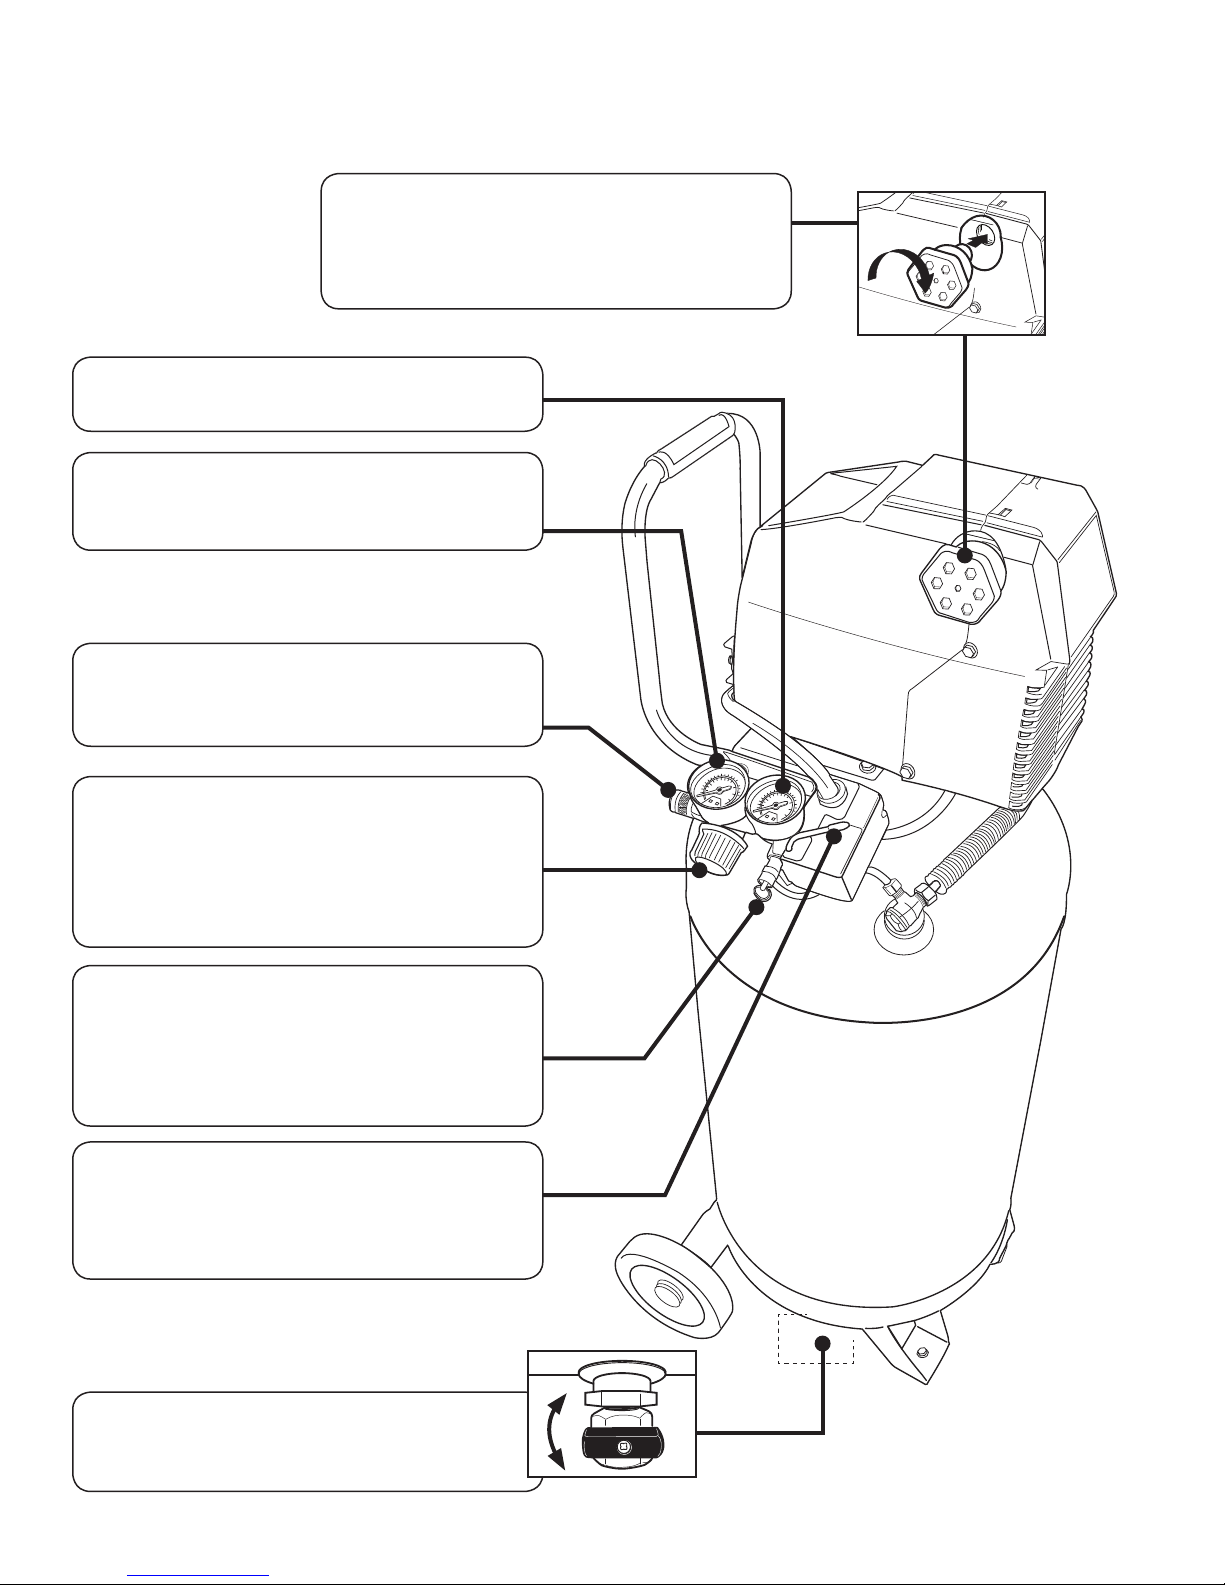
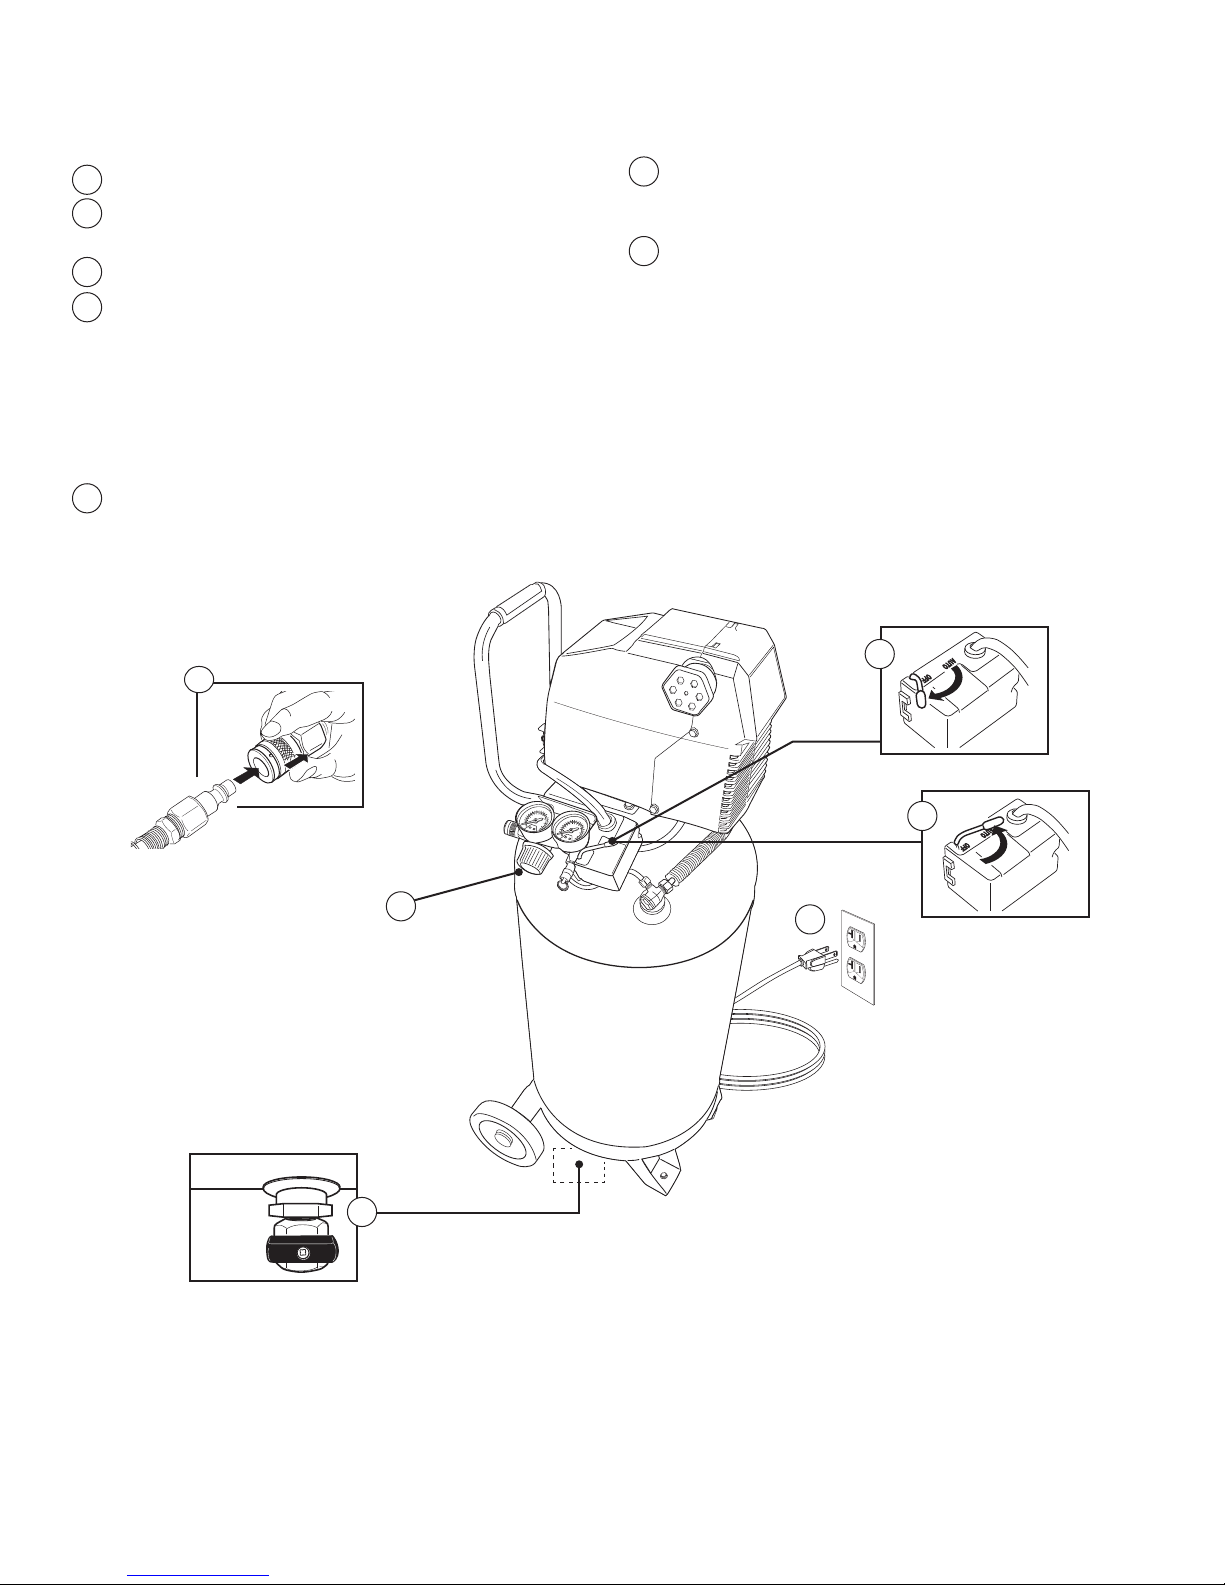
Parts & Features
See figures below for reference.
Air Intake Filter
Provides clean air to the pump and must
always be kept free of debris. Check on a daily
basis or before each use.
Tank Pressure Gauge
Indicates the reserve air pressure in the tank.
Regulator Gauge
Indicates the outgoing air pressure to the
tool and is controlled by the regulator.
Quick Connect
Offers a quick release feature for attaching and
removing the air hose.
Regulator
The air pressure coming from the air tank is
controlled by the regulator. To increase the
pressure turn the knob clockwise and to
decrease the pressure turn the knob
counterclockwise.
Tank Safety Valve
Used to allow excess tank pressure to escape
into the atmosphere. This valve should only
open when the tank pressure is above the
maximum rated pressure.
Power Switch
This controls the power to the cut-in/cut-out
pressure switch. The pressure switch serves as
the Auto-On/Off positions for the motor.
Tank Drain Valve
Used to drain condensation from the air tank.
Located at bottom of tank.
3
Page 6
Operating Procedures
WARNING
The air compressor should be turned off and unplugged
from the power source before any maintenance is
performed as well as the air bled from the tank and the
unit allowed time to cool. Personal injuries could occur
from moving parts, electrical sources, compressed
air or hot surfaces. The regulator assembly must be
attached before use. Failure to assemble correctly could
result in leaks and possible injury. If unsure of assembly
instructions or you experience difficulty in the assembly
please call customer service for further instruction.
Location of the Air Compressor
The air compressor should always be located in a
clean,
dry, and well ventilated environment. The unit should
have
at minimum, 12 inches of space on each side. The air
filter intake should be free of any debris or obstructions.
Check the air filter on a daily basis to be sure it is clean
and in working order.
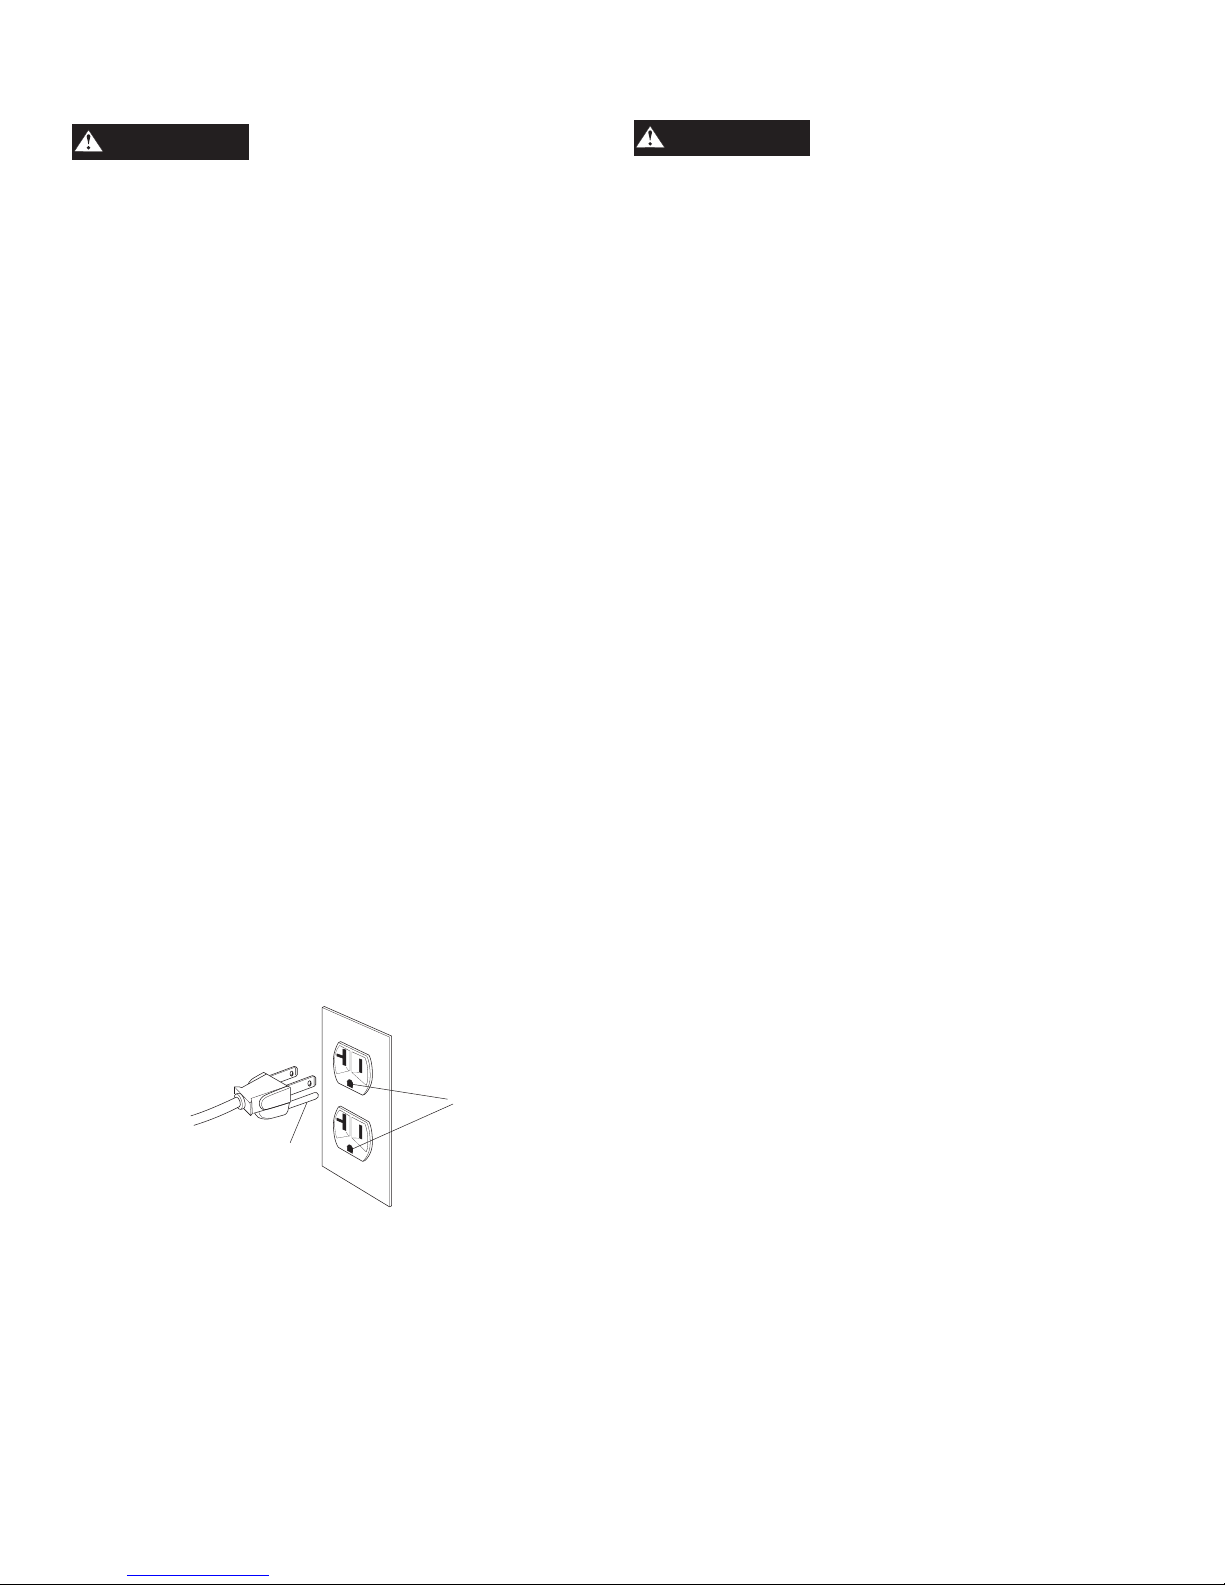
Grounding Instructions
This product should be grounded. In the event of an
electrical short circuit, grounding reduces the risk of
electric shock by providing an escape wire for the
electric current. This product is equipped with a cord
having a grounding wire with an appropriate grounding
plug. (See the figure below.) The plug must be plugged
into an outlet that is properly installed and grounded in
accordance with all local codes and ordinances. Check
with a qualified electrician or service personnel if these
instructions are not completely understood or if in doubt
as to whether the tool is properly grounded.
WARNING
Improper installation of the grounding plug will result in a
risk of electric shock. If repair or replacement of the
cord
or plug is necessary, do not connect the grounding wire
to either flat blade terminal. The wire with insulation
having an outer surface that is green with or without
yellow stripes is the grounding wire. Check with a
qualified electrician or serviceman if the grounding
instructions are not completely understood, or if in doubt
as to whether the product is properly grounded. Do not
modify the plug provided; if it will not fit the outlet, have
the proper outlet installed by a qualified electrician.
This product is for use on a circuit having a nominal
rating of 120 volts and is factory-equipped with a
specific electric cord and plug to permit connection to
a proper electric circuit. Make sure that the product is
connected to an outlet having the same configuration as
the plug. No adapter should be used with this product. If
the product must be reconnected for use on a different
type of electric circuit, qualified service personnel should
make the reconnection.
Extension Cords
Use only a 3-wire extension cord that has a 3-blade
grounding plug, and a 3-slot receptacle that will accept
the plug on the product. Make sure your extension cord
is in good condition. When using an extension cord, be
sure to use one heavy enough to carry the current your
product will draw. Cords must not exceed 25 feet and
No. 12 AWG size must be used. An undersized cord will
cause a drop in line voltage resulting in loss of power
and overheating.
Break-In Procedures
No break-in procedure is required by the user. This
product is factory tested to ensure proper operation and
performance.
Plug
Grounding Pin
Grounded
Outlet
4
Page 7
Daily Start-Up Procedures
1. Set the Power Switch to the Off position.
2. Check the air compressor visually for any damage
or obstruction.
3. Close the drain valve.
4. Connect the air hose to the quick connect socket on
the regulator assembly by inserting the quick connect
plug on the air hose into the quick connect socket.
The quick connect socket collar will snap forward and lock
the plug into place providing an air tight seal
between the socket and plug. To release the air hose
push the collar back on the quick connect socket.
5. Plug the power cord into the proper receptacle.
4
6. Turn the Power Switch to the On-Auto position and the
compressor will start and build air pressure in the tank
to cut-out pressure and then shut off automatically.
7. Adjust the regulator to a PSI setting that is needed for
your application and be sure it is within the safety
standards required to perform the task. If using a
pneumatic tool, the manufacturer should have
recommendations in the manual for that particular
tool on operating PSI settings.
NOTE: Always wear ANSI Z87.1 approved safety glasses
with side shields when the air compressor is in use.
Never point any nozzle or sprayer toward any part of
the body or at other people or animals.
Always wear the proper hearing protection.
1
Close
6
7
5
3
5
Page 8
Operating Procedures
Daily Shut-Down Procedures
1. Set the Power Switch to the Off position.
2. Unplug the power cord from the receptacle.
3. Set the outlet pressure to zero on the regulator.
4. Remove any air tools or accessories. When draining
the tank, always use ear and eye protection. Drain the
tank in a suitable location; condensation will be
present in most cases of draining.
5. Open the drain valve allowing air to bleed from the
tank. After all of the air has bled from the tank, close
the drain valve to prevent debris buildup in the valve.
Maintenance
NOTE: Any service procedure not covered in the
maintenance schedule below should be performed by
qualified service personnel.
WARNING
The air compressor should be turned off and unplugged
from the power source before any maintenance is
performed as well as the air bled from the tank and the
unit allowed time to cool. Personal injuries could occur
from moving parts, electrical sources, compressed air or
hot surfaces.
CAUTION
When draining the tank, always use ear and eye protection. Drain the tank in a suitable location; condensation
will be present in most cases of draining.
WARNING
Water that remains in the tank during storage will corrode
and weaken the air tank which could cause the tank to rupture. To avoid serious injury, be sure to drain the tank after
each use or daily.
CAUTION
To ensure efficient operation and longer life of the air
compressor unit, a routine maintenance schedule should
be followed. The following schedule is geared toward a
consumer whose compressor is used in a normal working
environment on a daily basis.
Items to Check/Change
Check Tank Safety Valve X
Overall Unit Visual Check X
Check Air Filter X
Drain Tank X
Before each
use or daily
Storage
For storing the air compressor, be sure to do the following:
1. Turn the unit off and unplug the power cord from the
receptacle.
2. Remove all air hoses, accessories, and air tools from
the air compressor.
3. Open the drain valve to bleed all air from the tank.
NOTES
4. Close the drain valve.
5. Perform the daily maintenance schedule.
6. Store the air compressor in a clean and dry location.
6
Page 9
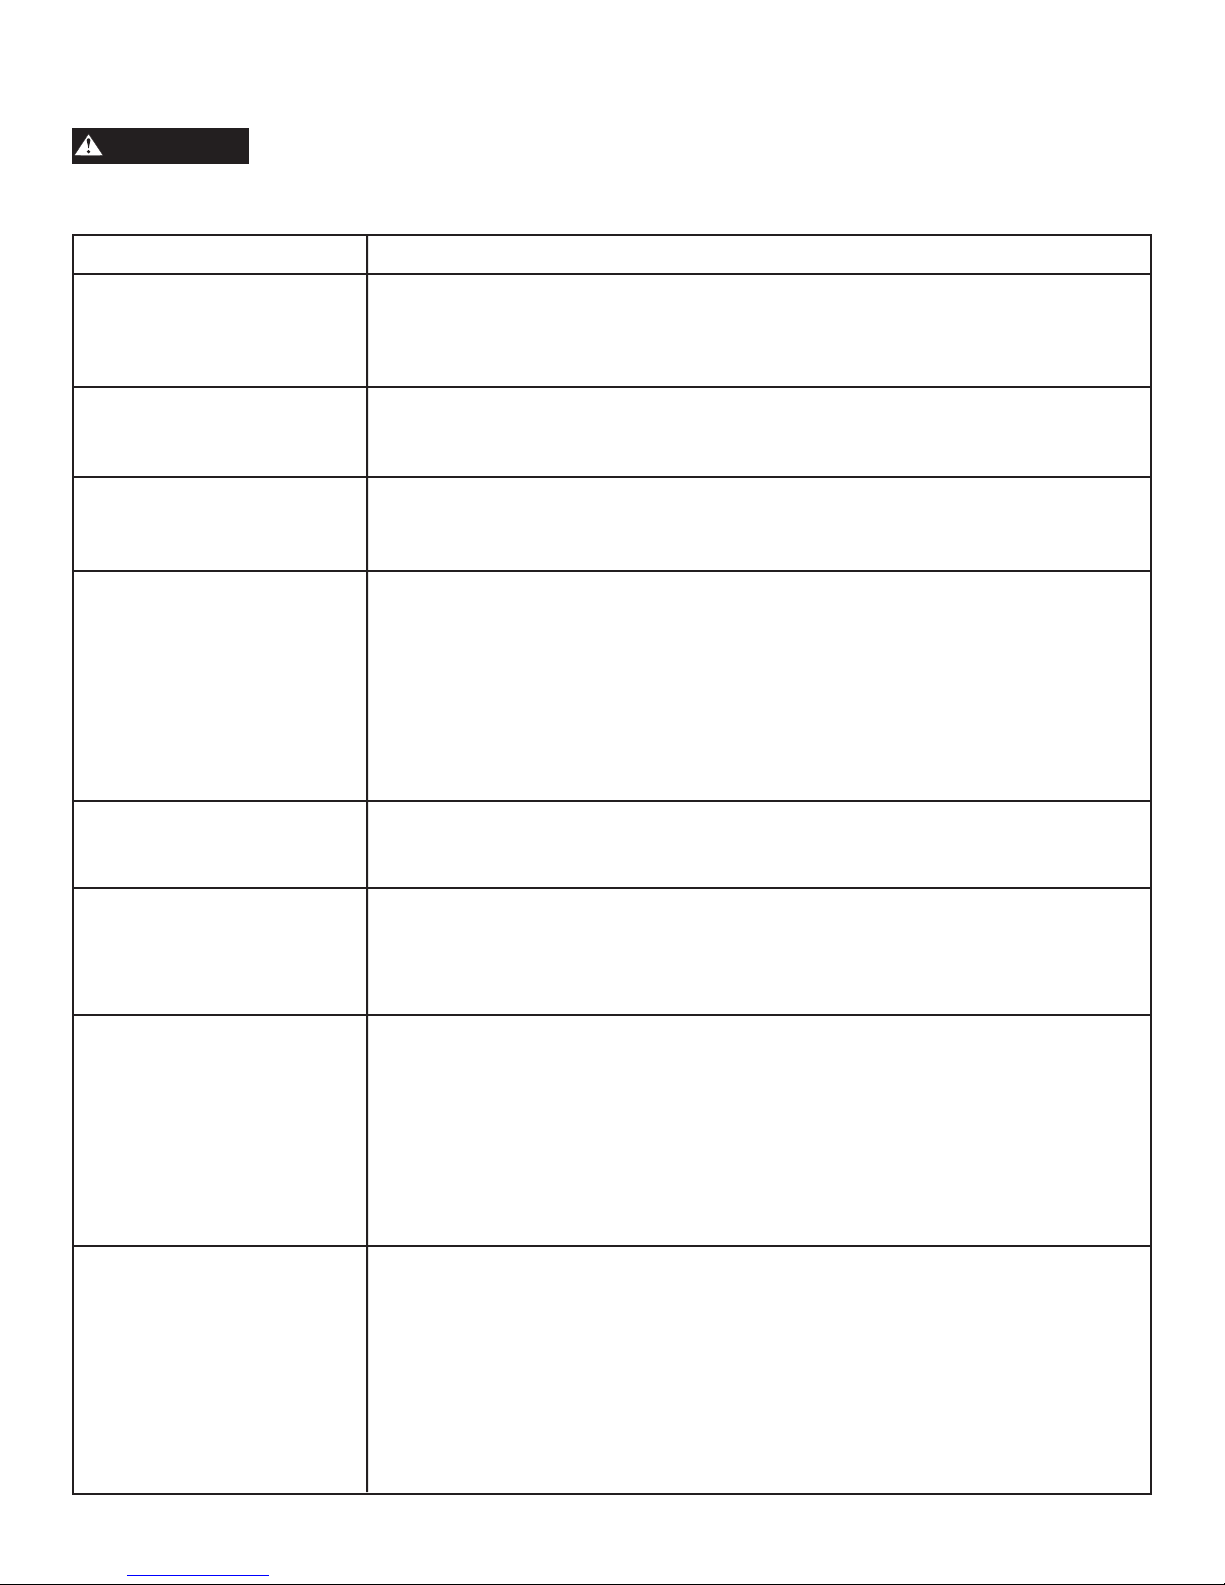
Troubleshooting Guide
WARNING
PROBLEM
Air leaks at the check valve or
at the pressure relief valve.
Air leaks between head and
cylinder.
Air leak from safety valve.
Pressure reading on the
regulated pressure gauge
drops when an accessory is
used.
The air compressor should be turned off and unplugged from the power source before any
maintenance is performed as well as the air bled from the tank and the unit allowed time to
cool. Personal injuries could occur from moving parts, electrical sources, compressed air, or hot
surfaces.
POSSIBLE CORRECTION
A defective check valve results in a constant air leak at the pressure relief valve
when there is pressure in the tank and the compressor is shut off. Drain the tank,
then remove and clean or replace the check valve.
Be sure of proper torque on head bolts. If leak remains, contact customer service
or technician.
Operate the safety valve manually by pulling on the ring. If the valve continues to
leak when in the closed position, it should be replaced.
If there is an excessive amount of pressure drop when the accessory is used,
replace the regulator.
NOTE:
Adjust the regulated pressure under flow conditions (while accessory is being used).
It is normal for the gauge to show minimal pressure loss during initial use of the
tool.
Excessive tank pressure.
Motor will not start.
Excessive moisture in the
discharge air.
Air leaks from the tank body or
tank welds.
Move the Power Switch to the Off position. If the unit doesn’t shut off, unplug it from the
power source and contact customer service or technician.
Make sure power cord is plugged in and the switch is on. Inspect for the proper size fuse in
your circuit box. If the fuse was tripped, reset it and restart the unit. If repeated
tripping occurs, replace the check valve or contact customer service or technician.
NOTE:
To reset the motor overload turn ON/OFF switch OFF and wait 10 minutes
(minimum). Restart unit.
Remove the water in the tank by draining after each use. High humidity
environments will cause excessive condensation. Utilize water filters on your air
line.
NOTE:
Water condensation is not caused by compressor malfunction. Be sure the compressor’s air
output is greater than your tool’s air consumption rate.
Never drill into, weld or otherwise modify the air tank or it will weaken. The tank canrupture
or explode. Compressor cannot be repaired. Discontinue use of the air compressor.
7
Page 10
4
5
6
7
8
9
10
11
12
13
14
15
9
17
18
19
20
21
22
23
24
25
26
27
28
29
30
31
32
33
34
35
36
17
17
37
38
39
40
42
43
43
44
45
46
47
48
46
49
50
51
52
56
55
54
53
58
59
60
61
16
2
3
1
41
57
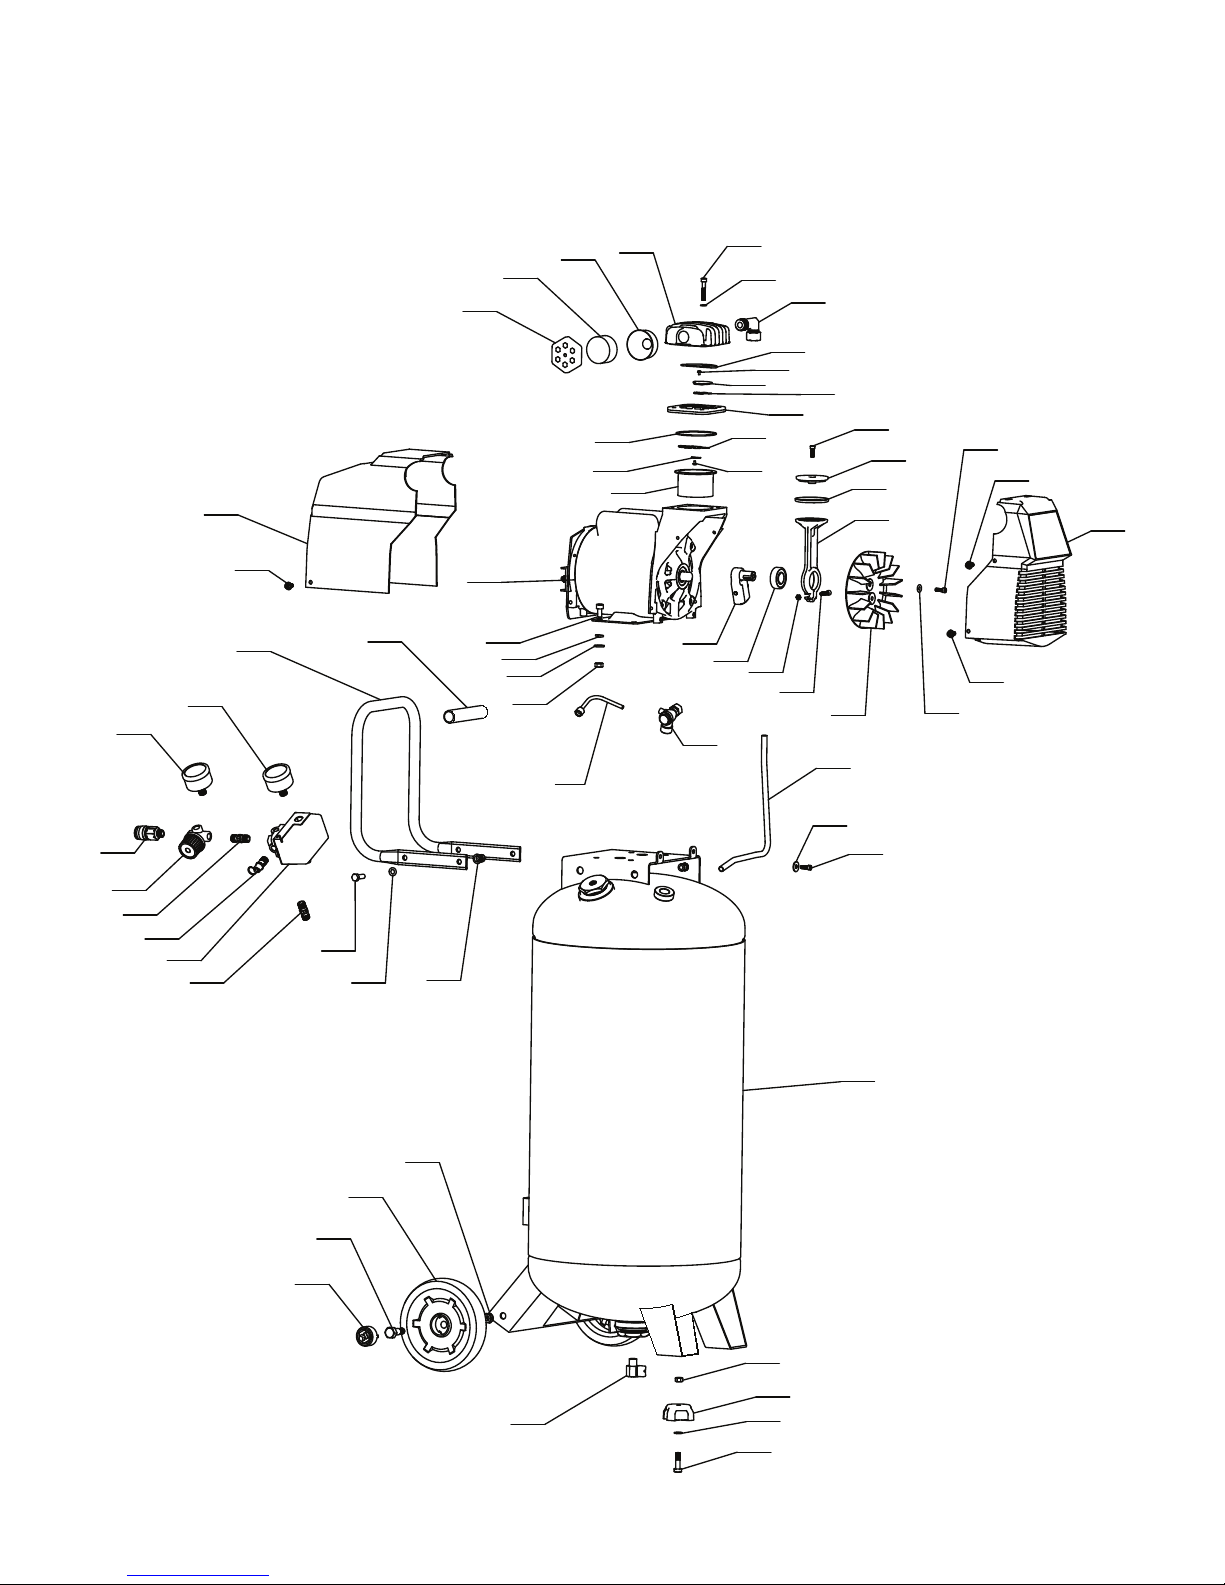
Air Compressor Item # 37296 / Model # F226VWLVP
Exploded Parts Diagram
8
Page 11

Air Compressor Item # 37296 / Model # F226VWLVP
Parts List
Ref. Kit Part
# # Number
1 1 Cover, Intake Filter 1
2 1 Element, Intake Filter 1
3 1 Housing, Intake Filter 1
4 Head, Cylinder 1
5 Bolt, m6 x 1 x 35mm SHCS 4
6 Washer, Lock 6mm 4
7 Fitting, 90 degree Elbow,
3/8” npt x 3/8 Flare 1
8 4 O-Ring, Head 1
9 4 Bolt, m3 x 4 x 5mm HFHS 2
10 4 Valve, Retainer, Outlet 1
11 4 Valve, Outlet 1
12 4 Valve Plate 1
13 4 O-Ring, Cylinder 1
14 4 Valve, Intake 1
15 4 Valve, Retainer, Intake 1
16 2 Cylinder 1
17 Screw, m6 x 1 x 12mm HFHS 6
18 E103492 Shroud, F2, Full, Rear, Gray 1
19 Pump/Motor 1
20 Bolt, m8 x 1 x 16mm 4
21 Washer, Lock, 8mm 4
22 Washer, Flat, 8mm 4
23 Nut, m8 x 1 x 25mm ZDC 4
24 E103287 Tube, Relief 1
25 E101362 Valve, Check 90 degree, Left 1
26 Eccentric 1
27 Bearing, Piston 1
28 2 Screw, m5 x 0.8 x 16mm SHCS 1
29 2 Piston Cap 1
30 2 Piston Ring 1
31 2 Piston 2
32 2 Nut, m5 x 8mm 1
33 2 Bolt, m5 x 0.8 x 25mm 1
34 E100297 Fan 1
35 Washer, Flat, 6mm 1
36 Bolt, m6 x 1 x 16mm SCHS 1
37 E103491 Shroud, F2, Full, Front, Gray 1
38 E103286 Tube, Outlet 1
Description Quantity
Ref. Kit Part
# # Number
39 Washer, Flat, 6mm 2
40 Bolt, m6 x 1 x 16mm SHCS 2
41 Handle, Grip 1
42 E103485 Handle 1
43 E101733 Gauge, 2”, 150 Redline,
Back Feed, Kobalt 2
44 E100307 Quick Connect, One Hand 1
45 Regulator 1
46 Nipple, 1/4 npt x 35mm 2
47 E102595 Safety Valve, 165 psi 1
48 E100957 Pressure Switch, 150 psi 1
49 Bolt, m8 x 1.25 x 25mm 4
50 Washer, Flat, 8mm 4
51 Nut, Insert m8 4
52 Tank, Asm 1
53 3 Nut, 10mm 2
54 3 Wheel, 7” Kobalt 2
55 3 Bolt, m10 x 1.25 x 20mm 2
56 3 Hubcap, Kobalt 2
57 E101717 Drain Valve, 1/4-Turn 1
58 Nut, m8 x 1 x 25mm ZDC 2
59 E101805 Isolator, Kobalt 2
60 Washer, Flat, m8 2
61 Bolt, m8 x 1 x 20mm 2
NOTE: Any part number field without a number listed is not available.
Descriptions are provided for reference only.
Kit numbers, descriptions, and included components are listed below:
Kit # Part # Kit Name Reference #
1 E101611 Air Filter Kit 1-3
2 E103495 Piston Kit 16, 28-33
3 E103496 Wheel Kit
(One Wheel Asm per Kit) 53-56
4 E103497 Valve Plate Assy Kit 8-15
Description Quantity
For replacement parts, please call 1-800-628-8815 ext. 5000.
9
Page 12

Limited Warranty
This warranty is limited to manufacturing defects in the compressor for a 36-month period, except for manufacturing
defects related to the compressor pump, check values, pressure switch and electric motor for which the warranty on
these “excluded items” shall be for a 12-month period. If at any time during the 36-month period your air compressor
fails due to a manufacturing defect take it to an authorized warranty repair center. If the repair center determines the
product has failed due to its workmanship it will be repaired at no charge. If the failure is due to normal wear and
tear or any malfunction, failure or defect resulting from misuse, abuse, neglect, alterations, modifications or repair by
anyone other than an authorized warranty service center the warranty is void.
LIMITED WARRANTY FOR COMMERCIAL USE
This warranty is limited to manufacturing defects. If at any time from the first 90 days of purchase date your air
compressor fails due to a manufacturing defect take it to an authorized warranty repair center. If the repair center
determines the product has failed due to its workmanship it will be repaired at no charge. If the failure is due to normal
wear and tear or any malfunction, failure or defect resulting from misuse, abuse, neglect, alterations, modifications or
repair by anyone other than an authorized warranty service center the warranty is void.
PROOF OF PURCHASE REQUIRED
NOTE: All warranty is contingent on the customer providing a valid receipt for proof of purchase.
If no receipt is provided, the manufactures date code will be used in place of purchase date.
Limited Warranty applies in the U.S. and Canada only and gives you specific legal rights. You may also have other
rights that vary from State to State or country to country. To find your authorized
warranty service center, please call 1-800-628-8815, ext. 5000.
10
Page 13

Article N°37296
Modèle # F226VWLVP
COMPRESSEUR
D’AIR PORTABLE
TRANSMISSION DIRECTE, SANS HUILE
MODE D’EMPLOI
et liste des pièces
Pour le service à la clientèle,
appelez le : 1-800-628-8815,
poste 5000
L-V 8 h 00 – 17 h 00, heure
centrale.
AVERTISSEMENT !
Veuillez lire et bien comprendre toutes les mesures de sécurité et les
instructions relatives au fonctionnement du compresseur d’air portable
avant de l’utiliser.
8/20/2008 Imprimé en Chine Article No. E103499
Page 14

TABLE DES MATIÈRES
Page
Définitions des termes de sécurité ....................................................................... 13
Importantes consignes et directives de sécurité .................................................. 13
Caractéristiques techniques ................................................................................. 14
Glossaire ............................................................................................................... 14
Cycle d’emploi ...................................................................................................... 14
Pièces et caractéristiques .................................................................................... 15
Installation et assemblage .................................................................................... 4
Consignes d’emploi .. ........................................................................................... 16
Entretien ..... ......................................................................................................... 18
Entreposage ......................................................................................................... 18
Guide de dépannage . .......................................................................................... 19
Diagramme des pièces (vue éclatée) ................................................................... 20
Nomenclature des pièces. .................................................................................... 21
Garantie limitée .................................................................................................... 22
Espagnol ............................................................................................................. 23
NE RETOURNEZ PAS CE PRODUIT
AU MAGASIN !
Veuillez appeler le 1-800-628-8815 (poste
arrêt
5000) pour toute question concernant ce
produit.
L-V 8 h 00 – 17 h 00, heure centrale.
Merci
12
Page 15

Consignes de sécurité
Les indications décrites ci-dessous devraient être lues et comprises par l’utilisateur. Elles ont pour objet de protéger
l’utilisateur durant l’utilisation et l’entreposage du compresseur d’air. Les symboles décrits ci-dessous, permettent au
lecteur d’identifier d’importantes informations concernant sa sécurité.
DANGER
Signale une situation imminente et dangereuse qui, si
elle n’est pas évitée, entraînera la mort ou des blessures graves.
AVERTISSEMENT
Signale une situation potentiellement dangereuse
susceptible, si elle n’est pas évitée, d’entraîner la mort
ou des blessures graves.
Signale une situation potentiellement dangereuse
susceptible, si elle n’est pas évitée, de causer des
blessures de mineures à moyennes.
Utilisé sans le symbole d’alerte de sécurité, signale une
situation potentiellement dangereuse susceptible, si elle
n’est pas évitée, de causer des dégâts matériels.
MISE EN GARDE
MISE EN GARDE
Importantes consignes et directives de sécurité
• Conserver toutes ces directives
AVERTISSEMENT
Une utilisation ou un entretien incorrects de ce produit, peut entraîner de graves blessures et/ou des dégâts matériels.
Veuillez lire et comprendre tous les avertissements et consignes de sécurité suivants, avant d’utiliser cet équipement.
Le compresseur doit être alimenté par un circuit de 15 ampères qui lui est propre. Si
le circuit ne possède pas une disponibilité de 15 ampères, un circuit de plus grande
MISE EN GARDE
Pièces en mouvement
dimension doit être utilisé. Toujours utiliser un boyau d’air plus long, avant d’ajouter
une rallonge électrique. Toute rallonge utilisée doit être de calibre 12 et d’une
longueur maximale de 7,5 m. Le fusible du circuit doit être de type temporisé. Les
basses tensions peuvent endommager le moteur.
Tous les capots et protecteurs du compresseur doivent être correctement fixés
ou installés, lorsque le compresseur d’air est en marche. En cas de dommage de
quelconque des capots ou des protecteurs, ne pas utiliser le matériel avant qu’il
n’ait été correctement réparé par du personnel compétent. Lors de l’utilisation ou de
l’entreposage de l’appareil, s’assurer que le cordon d’alimentation est à l’écart des
pièces en mouvement et qu’il n’est ni vrillé, ni pincé.
Risques de brûlures
Risques de chute
Risques de projection
d’objets
Certaines surfaces du compresseur d’air peuvent causer des brûlures graves, si elles
sont touchées pendant et après le fonctionnement. Laisser au matériel le temps de
refroidir, avant de procéder à toute opération d’entretien. Certaines pièces telles que
la pompe de compression et le tube de sortie, sont habituellement chaudes pendant
et après le fonctionnement.
Le compresseur d’air doit toujours être utilisé et fonctionner dans une position de
stabilité. Ne jamais utiliser le compresseur d’air sur un toit ou dans une position
élevée,de laquelle il pourrait tomber ou basculer. Rallonger le boyau d’air pour les
travaux en hauteur.
Toujours porter des lunettes de sécurité à écrans latéraux, homologuées ANSI Z87.1,
lorsque le compresseur d’air est en marche. Éteindre le compresseur et vidanger
le réservoir d’air avant de procéder à toute opération d’entretien ou de démontage
des boyaux ou raccords. Ne jamais pointer une buse ou un pulvérisateur vers une
quelconque partie du corps, d’autres personnes ou des animaux.
13
Page 16

Importantes consignes et directives de sécurité
Risques pour
la respiration
Risques de choc
électrique
Risques d’explosion
ou d’incendie
Éviter d’utiliser le compresseur d’air dans un espace clos. Toujours prévoir un dégagement suffisant (30 cm) tout autour du compresseur d’air. Veiller également à tenir les
enfants, animaux et autres personnes, hors de la zone de travail. Ce compresseur
d’air n’est pas destiné à fournir de l’air respirable à des personnes ou à l’usage de
dispositifs respiratoires. Afin d’éviter d’endommager le filtre de prise d’air du compresseur d’air, éloigner le compresseur d’air des travaux de pulvérisation et ne jamais
pulvériser en direction du compresseur d’air.
Ne jamais utiliser le compresseur d’air sous la pluie ou dans un milieu détrempé.
Toute intervention ou réparation électrique doit être effectuée par du personnel
autorisé, tel un électricien et être conforme à toutes les réglementations nationales et
locales d’électricité. Le compresseur doit présenter une fiche appropriée avec broche
de mise à la terre, la tension électrique requise et une protection adéquate par fusible.
Ne jamais utiliser le compresseur à proximité de matières combustibles, d’essence
ou de vapeurs de solvants. Pour la pulvérisation de substances inflammables,
placer le compresseur à au moins 6 mètres de l’aire de travail. Ne jamais utiliser le
compresseur d’air à l’intérieur ou dans un espace clos.
Risques d’éclatement
Vidanger le réservoir du compresseur à chaque jour ou après chaque utilisation. En
cas de fuite du réservoir, remplacer le compresseur d’air au complet. Ne jamais utiliser
le compresseur d’air, après avoir détecté une fuite, ni tenter d’apporter une quelconque
modification au réservoir. Ne jamais modifier les réglages d’usine, contrôlant la
pression du réservoir ou toute autre fonction du compresseur d’air.
Caractéristiques techniques
Pompe . . . . . . . . . . . . . . .Transmission directe sans huile
Moteur d’induction ..........................1.5 HP
Alésage..................................2,84 po
Course ..................................0,87 po
Tension monophasée......................120 VAC
Glossaire
CFM: (Cubic Feet per Minute) Pieds cubes par minute
(équivalent à 28,3 l/min).
SCFM: (Standard Cubic Feet per Minute) Pieds cubes par
minute standard; unité de mesure de débit d’air.
PSIG: (Pounds per Square Inch Gauge) Livres par
pouce carré manométrique ; unité de pression.
(équivalent à 6.894 kPa).
ASME: American Society of Mechanical Engineers.
Société américaine d’ingénieurs en mécanique
Code de Californie: L’appareil peut être conforme au
Code 462 (l) (2)/ (M) (2) de la réglementation de
la Californie.
Alimentation électrique minimum ..........15 ampères
Capacité du réservoir d’air ................26 Gallons
Pression d’enclenchement ..................120 PSI
Pression de coupure ...................... 150 PSI
Pi3/mn à 40 psi ..............................5,0
Pi3/mn à 90 psi ..............................4,0
Cut-In Pressure: The air compressor will automatically
start to refill the tank when the pressure drops
below the prescribed minimum.
Cut-Out Pressure: The point at which the motor stops
when the tank has reached maximum air
pressure.
Homologation: Les produits portant l’une ou plusieurs
des marques suivantes : UL, ULc, ETL, CSA, ont
été évalués par des laboratoires de sécurité
indépendants agréés par l’OSHA et
sont conformes aux normes de
sécurité d’Underwriters Laboratories.
Cycle d’emploi
MISE EN GARDE
Ce compresseur d’air possède un cycle d’emploi de 50%. Ne pas faire fonctionner le compresseur d’air pendant plus de
30 minutes à la fois. Une telle procédure pourrait l’endommager.
14
Page 17

Pièces et caractéristiques
Consulter les diagrammes ci-dessous pour référence.
Manomètre de réservoir
Indique la pression de l’air comprimé dans le
réservoir.
Manomètre de réservoir
Indique la pression de l’air comprimé dans le
réservoir.
Manomètre de régulateur
Indique la pression de la sortie d’air vers
l’outil, contrôlée par le régulateur.
Connexion rapide
Équipé d’un mécanisme de déclenchement
rapide pour la fixation et le retrait du tuyau
à air.
Régulateur
Contrôle la pression de l’air à la sortie du
réservoir du compresseur. Tourner le bouton
dans le sens des aiguilles d’une montre pour
augmenter la pression et dans le sens inverse
pour la réduire.
Soupape de sûreté de réservoir
Utilisée pour libérer l’excédent de pression du
réservoir dans l’atmosphère. Cette soupape
ne doit s’ouvrir, que si la pression du réservoir
excède la pression nominale maximale.
Interrupteur d’alimentation
Cet interrupteur contrôle l’alimentation de
l’interrupteur pression (enclenchement/
déclenchement). L’interrupteur pression
comprend les positions de mise en marche/
arrêt automatique pour le moteur.
Soupape de vidange de réservoir
Utilisée pour vidanger la condensation du
réservoir d’air. Située à la partie inférieure
du réservoir.
15
Page 18

Consignes d’emploi
AVERTISSEMENT AVERTISSEMENT
Avant de soumettre le compresseur à tout entretien,
s’assurer de l’éteindre et le débrancher de sa source de
courant, ainsi que de vidanger l’air du réservoir et de
laisser à l’appareil le temps de refroidir. Les pièces en
mouvement, les sources de courant, l’air comprimé et les
surfaces chaudes présentent des risques de blessures.
L’assemblage à raccord rapide doit être fixé en place,
avant d’utiliser le compresseur d’air. Négliger d’effectuer
correctement cette procédure pourrait provoquer des
fuites et des blessures. En cas d’incertitude au sujet des
directives ou de difficulté à procéder à l’assemblage,
veuillez contacter votre département de service local,
pour obtenir des directives supplémentaires.
Emplacement du compresseur d’air
Le compresseur doit toujours être placé dans un endroit,
comportant un environnement propre, sec et bien ventilé.
Prévoir un dégagement de 30 cm minimum, sur chaque
côté de l’unité. La prise du filtre à air doit être exempte
de tout débris ou obstruction. Vérifier quotidiennement la
propreté et le bon état de marche du filtre à air.
Directives de mise à la terre
Ce produit doit être muni d’une connexion de mise à la
terre. Dans l’éventualité d’un court-circuit électrique, la
mise à la terre réduit les risques de choc électrique, en
offrant un fil de décharge du courant électrique.
Ce produit est équipé d’un cordon d’alimentation,
possédant un fil de mise à la terre et muni d’une
fiche appropriée à cet effet. (voir illustration cicontre).
Cette fiche doit être branchée dans une prise
de courant correctement installée et munie d’une
connexion de mise à la terre, conformément à toute la
réglementation locale d’électricité en vigueur. En
cas de problème de compréhension de ces directives
ou de doute, quant à la mise à la terre adéquate de
cet appareil, consulter un électricien ou technicien
d’entretien qualifié.
Une installation inadéquate de la fiche de mise à la
terre présente un risque de choc électrique. S’il est
nécessaire de réparer ou de remplacer le cordon ou la
fiche, ne raccordez jamais le fil de mise à la terre, à l’une
ou l’autre des broches plates de la fiche. Le fil de mise
à la terre est recouvert d’une gaine isolante de couleur
verte, avec ou sans rayures jaunes. En cas de problème
de compréhension de ces directives ou de doute, quant
à la mise à la terre adéquate de cet appareil, consulter
un électricien ou technicien d’entretien qualifié. Ne pas
modifier la fiche fournie; si celle-ci ne convient pas à
la prise de courant, faire installer une prise de courant
adéquate par un électricien qualifié.
L’utilisation de cet appareil est conçue pour un circuit de
tension nominale de 120 V et celui-ci est équipé en usine,
d’un cordon et d’une fiche d’alimentation spécifiquement
prévus pour le raccordement à un circuit électrique
adapté.S’assurer de bien brancher l’appareil sur une prise
de courant, présentant la même configuration que la fiche.
Ne pas utiliser de fiche d’adaptation avec cet appareil. Si
l’appareil doit être recâblé pour permettre son utilisation
sur un circuit électrique de type différent, confier
Rallonges électriques
S’assurer d’utiliser seulement une rallonge à 3 fils, munie
d’une fiche à 3 broches avec mise à la terre et branchezla
dans une prise à 3 fentes, compatible avec la fiche
de ce produit. S’assurer que la rallonge est en bon état
de fonctionnement. Lors de l’utilisation d’une rallonge,
s’assurer que celle-ci est de calibre suffisant pour
l’intensité de courant requise par cet appareil. Utiliser des
rallonges de calibre 12 AWG, d’une longueur maximale
de 7,5 m. Une rallonge de calibre insuffisant produira une
chute de la tension d’alimentation et provoquera une perte
de puissance et une surchauffe.
Rodage
No break-in procedure is required by the user. This
product is factory tested to ensure proper operation and
performance.
Fiche
Broche de mise
à la terre
Prise de
courant
avec mise à la
terre
16
Page 19

Consignes de démarrage quotidien
/ .
/ & &
1. Placez l’interrupteur d’alimentation dans la position
d’arrêt.
2. Vérifiez visuellement que le compresseur d’air n’est
pas endommagé ou obstrué.
3. Fermez la soupape de vidange.
4. Branchez le boyau d’air sur la douille du raccord rapide
de l’assemblage du régulateur, en introduisant l’embout
mâle du boyau dans la douille du raccord rapide. Le
collet de la douille du raccord rapide s’imbriquera vers
l’avant et verrouillera l’embout en place, procurant ainsi
un joint étanche et hermétique à l’air, entre l’embout et
la douille. Pour libérer le boyau d’air, poussez le collet
du raccord rapide vers l’arrière.
5. Branchez le cordon d’alimentation dans une prise de
courant appropriée.
6. Faites tourner l’interrupteur d’alimentation jusqu’à
la position « On-Auto » et le compresseur se mettra
en marche, accumulera de la pression dans le
réservoir jusqu’à atteinte de la pression de
déclenchement, puis il s’arrêtera automatiquement.
7. Réglez le régulateur au niveau de pression (kPa/PSI)
requis, selon l’application souhaitée, en vous assurant
que le niveau de pression est conforme aux normes
de sécurité requises pour effectuer la tâche. En cas
d’utilisation d’un outil pneumatique, reportez-vous aux
réglages de pression de service (kPa/ PSI)
recommandés par le fabricant dans le manuel de l’outil
utilisé.
REMARQUE : Portez toujours des lunettes de sécurité
conformes à ANSI Z87.1 et munies d’écrans latéraux
quand vous utilisez le compresseur d’air. Ne pointez
jamais un gicleur ou un pulvérisateur en direction d’une
partie de votre corps, d’une autre personne ou d’un
animal. Portez toujours un dispositif de protection de
l’ouïe approprié.
4
Close
1
6
7
5
3
17
Page 20

Consignes d’emploi
Consignes d’arrêt quotidien
1. Placez l’interrupteur d’alimentation dans la position
d’arrêt.
2. Débranchez le cordon d’alimentation de la prise de
courant.
3. Réglez la pression de sortie à zéro sur le régulateur.
4. Retirez tous les outils à air ou accessoires. Durant la
procédure de vidange du réservoir, assurez-vous de
toujours porter une protection auditive et
oculaire.Procédez à la vidange du réservoir dans un
endroit approprié; habituellement lors de la vidange,
l’air expulsé contient de la condensation.
5. Ouvrez la soupape de vidange pour libérer l’air présent
et vidanger le réservoir. Après avoir complété la
procédure de vidange du réservoir, fermez la soupape
de vidange, pour prévenir l’accumulation de débris
dans la soupape.
MISE EN GARDE
Durant la procédure de vidange du réservoir, s’assurer de
toujours porter une protection auditive et oculaire. Procéder
à la vidange du réservoir dans un endroit approprié; habituellement lors de la vidange, l’air expulsé contient de la
condensation.
AVERTISSEMENT
En présence d’eau à l’intérieur durant l’entreposage, le
réservoir subira un processus de corrosion qui le fragilisera et pourrait en provoquer l’éclatement. Pour éviter de
sérieuses blessures, s’assurer de vidanger le réservoir à
chaque jour ou après chaque utilisation.
Entretien
MISE EN GARDE
REMARQUE: Toute procédure d’entretien non indiquée
dans le tableau du calendrier d’entretien, doit être confiée
àdu personnel d’entretien qualifié.
AVERTISSEMENT
Avant de réaliser la moindre opération de maintenance,
le compresseur d’air doit être arrêté et débranché de sa
source d’alimentation, l’air doit être purgé du réservoir et
l’appareil doit avoir eu le temps de refroidir. Sans quoi
des dommages corporels pourraient être causés par des
pièces en mouvement, des sources électriques, de l’air
comprimé ou des surfaces chaudes.
Avant de soumettre le compresseur à tout entretien,
s’assurer de l’éteindre et le débrancher de sa source de
courant, ainsi que de vidanger l’air du réservoir et de
laisser à l’appareil le temps de refroidir.
Éléments à
vérifier / remplacer
Vérifier la soupape de sûreté
de réservoir
Vérifier l’aspect visuel global
de l’appareil
Vérifier le filtre à air
Vidanger le réservoir X
Entreposage
Pour entreposer le compresseur d’air, s’assurer de bien suivre les consignes suivantes:
1. Fermez l’appareil et débranchez le cordon
d’alimentation de la prise de courant.
2. Retirez tous les boyaux à air, accessoires et outils
pneumatiques du compresseur d’air.
3. Procédez aux étapes du calendrier d’entretien
quotidien.
4 Ouvrez la soupape de vidange pour libérer l’air
présentet vidanger le réservoir.
5. Fermez la soupape de vidange
6. Entreposez le compresseur d’air dans un endroit pro
pre et sec.
À chaque jour ou
avant chaque usage
X
X
X
Remarques
18
Page 21

Guide de dépannage
AVERTISSEMENT
Avant de soumettre le compresseur d’air à tout entretien, s’assurer de l’éteindre et le débrancher
de sa source d’alimentation électrique, ainsi que de vidanger l’air du réservoir et de laisser à
l’appareil le temps de refroidir. Les pièces en mouvement, les sources d’alimentation électrique, l’air
comprimé et les surfaces chaudes présentent des risques de blessures.
PROBLÈME
Fuites d’air au niveau du
clapet anti-retour ou de la
soupape de surpression.
Fuites d’air entre la culasse
et le cylindre.
Fuite d’air par la soupape
de sûreté.
À l’usage d’un accessoire,
il se produit une chute de
la mesure de pression
sur le manomètre de
régulateur.
Pression excessive du
réservoir.
Le moteur ne démarre pas.
CORRECTION POSSIBLE
Un clapet anti-retour défectueux produit une fuite d’air constante au niveau
de la soupape de surpression, lorsque le réservoir est sous pression et que le
compresseur est fermé. Vidangez le réservoir et par la suite, retirez et nettoyez ou
changez le clapet anti-retour.
Vérifiez qu’une force de torsion appropriée a été appliquée sur les boulons bruts. Si la
fuite persiste, appelez le service à la clientèle ou un technicien.
Actionnez la soupape de sûreté à la main, en tirant sur l’anneau. Si la soupape
continue à fuir en position fermée, elle devrait être remplacée.
En cas de chute de pression excessive à l’usage d’un accessoire, changez le
régulateur.
Remarques:
Ajustez la pression régulée en mode de débit (durant l’utilisation d’un
accessoire). Il est normal que le manomètre affiche une légère chute de pression,
durant l’utilisation initiale d’un outil.
Placez l’interrupteur dans la position d’arrêt. Si l’appareil ne s’éteint pas, débranchez-le de sa source d’alimentation et appelez le service à la clientèle ou un technicien.
Assurez-vous que le cordon d’alimentation est bien branché et que l’interrupteur est
dans la position de marche. Vérifiez que les fusibles dans votre boîte de disjonction
sont de la bonne taille. Si le fusible a disjoncté, réenclenchez-le et remettez l’appareil
en marche. Si plusieurs disjonctions se produisent, remplacez le clapet anti-retour,
ou appelez le service à la clientèle ou un technicien.
REMARQUE :
Pour une remise à l’état initial après une surcharge du moteur, mettez l’interrupteur
de MARCHE/ARRÊT dans la position d’arrêt et attendez 10 minutes (minimum).
Remettez l’appareil en marche.
Présence d’humidité
excessive dans l’air
expulsé.
Fuites d’air dans la
structure ou aux ponts de
soudure du réservoir.
Retirez l’eau du réservoir, en le vidangeant après chaque utilisation. Les
environnements très humides produisent une condensation excessive. Utilisez des
filtres à eau sur la ligne d’air comprimé.
REMARQUE :
La condensation de l’eau n’est pas provoquée par un mauvais fonctionnement du
compresseur. Assurez-vous que le débit d’air du compresseur est supérieur à la
consommation de l’outil pneumatique utilisé.
Ne percez, ni soudez ou modifiez jamais de quelque manière le réservoir, sinon
il se fragiliserait. Le réservoir pourrait se rompre ou exploser. Arrêtez l’usage du
compresseur d’air.
19
Page 22

4
5
6
7
8
9
10
11
12
13
14
15
9
17
18
19
20
21
22
23
24
25
26
27
28
29
30
31
32
33
34
35
36
17
17
37
38
39
40
42
43
43
44
45
46
47
48
46
49
50
51
52
56
55
54
53
58
59
60
61
16
2
3
1
41
57
Compresseur d’air Article N° 37296 / Modèle #
F226VWLVP
Explosé Sépare le Diagramme
20
Page 23

Compresseur d’air Article N° 37296 / Modèle #
F217HKL
Nomenclature des pièces
No No Numéro de Description Quantité
référence trousse pièce
No No Numéro de Description Quantité
référence trousse pièce
1 1 Couvercle du filtre d’entrée 1
2 1 Élément du filtre d’entrée 1
3 1 Bâti du filtre d’entrée 1
4 Tête de cylindre 1
5 Boulon, m6 x 1 x 35 mm SHCS 4
6 Rondelle d’arrêt de 6 mm 4
7 Coude à 90 degrés, filetage npt
3/8 po x raccord conique 3/8 1
8 4 Joint torique de la tête 1
9 4 Boulon, m3 x 4 x 5 mm HFHS 2
10 4 Clapet de retenue, sortie 1
11 4 Clapet de sortie 1
12 4 Plaque porte-clapet 1
13 4 Joint torique du cylindre 1
14 4 Clapet d’aspiration 1
15 4 Clapet de retenue, entrée 1
16 2 Cylindre 1
17 Vis, m6 x 1 x 12 mm HFHS 6
18 E103492 Protecteur arrière complet, F2, gris 1
19 Pompe/moteur 1
20 Boulon, m8 x 1 x 16 mm 4
21 Rondelle d’arrêt de 8 mm 4
22 Rondelle plate de 8 mm 4
23 Écrou, m8 x 1 x 25 mm ZDC 4
24 E103287 Tuyau de décharge 1
25 E101362 Clapet anti-retour gauche, 90 degrés 1
26 Excentrique 1
27 Palier de piston 1
28 2 Boulon, m5 x 0,8 x 16 mm SHCS 1
29 2 Couvercle de piston 1
30 2 Segment de piston 1
31 2 Piston 2
32 2 Écrou, m5 x 8 mm 1
33 2 Boulon, m5 x 0,8 x 2 5 mm 1
34 E100297 Ventilateur 1
35 Rondelle plate, 6 mm 1
36 Boulon, m6 x 1 x 1 6 mm SCHS 1
37 E103491 Protecteur frontal complet, F2, gris 1
38 E103286 Tube de sortie 1
39 Rondelle plate, 6 mm 2
40 Boulon, m6 x 1 x 16 mm SHCS 2
41 Poignée de préhension 1
42 E103485 Poignée 1
43 E101733 Manomètre Kobalt de 2 po ,
150 Redline, alimentation arrière, 2
44 E100307 Connexion rapide, à une main 1
45 Régulateur 1
46 Mamelon, 1/4 npt x 35 mm 2
47 E102595 Clapet de sécurité, 165 psi 1
48 E100957 Interrupteur pression, 150 psi 1
49 Boulon, m8 x 1,25 x 25 mm 4
50 Rondelle plate, 8 mm 4
51 Écrou d’insertion m8 4
52 Ensemble de réservoir 1
53 3 Écrou, 10 mm 2
54 3 Roue Kobalt de 7 po 2
55 3 Boulon, m10 x 1,25 x 20 mm 2
56 3 Chapeau de moyeu Kobalt 2
57 E101717 Robinet de purge quart de tour 1
58 Écrou, m8 x 1 x 25 mm ZDC 2
59 E101805 Isolateur Kobalt 2
60 Rondelle plate, m8 2
61 Boulon, m8 x 1 x 20 mm 2
Remarque: Tout élément ne comportant pas de numéro de trousse
ou de pièce n’est pas disponible. Leur description est à titre informatif seulement. La colonne de numéros de trousse indique
qu’une pièce est disponible dans une trousse spécifique. Une pièce
de chaque par trousse.
Les numéros de trousses et les pièces incluses sont les suivants :
Numéro Numéro Description de trousse Numéro de
de trousse de pièce référence
1 E101611 Kit de filtre à air 1-3
2 E103495 Kit de piston 16, 28-33
3 E103496 Kit de roue
(un ensemble par kit) 53-56
4 E103497 Kit d’ensemble de plaque
porte-clapet 8-15
Pour les parties de remplacement, s’il vous plaît appeler
1-800-628-8815 ext. 5000.
21
Page 24

GARANTIE LIMITÉE
Cette garantie est limitée à des défauts de fabrication dans le compresseur pour une période de 36 mois, à l’exception
des défauts de fabrication liés à la pompe du compresseur, aux clapets anti-retour, à l’interrupteur pression et au moteur
électrique, (collectivement appelés les « articles exclus »), pour lesquels la garantie s’appliquera pour une période de 12
mois. Si à un moment quelconque durant cette période de 36 mois votre compresseur d’air tombe en panne à cause
d’un défaut de fabrication, apportez-le à un centre agréé pour les réparations couvertes par la garantie. Si le centre de
réparation détermine que le produit est tombé en panne à cause d’un défaut d’exécution il sera réparé gratuitement. Si la
panne est due à une usure normale, ou à un dysfonctionnement, une défaillance ou un défaut quelconques résultant d’un
mésusage, d’un usage abusif, d’une négligence, d’altérations, de modifications ou de réparations effectuées par quiconque
autre qu’un centre agréé pour les réparations couvertes par la garantie, alors la garantie est nulle et non avenue.
GARANTIE LIMITÉE POUR UTILISATION COMMERCIALE
Cette garantie est limitée à des défauts de fabrication. Si à un moment quelconque au cours des premiers 90 jours à
partir de la date d’achat votre compresseur d’air tombe en panne à cause d’un défaut de fabrication, apportez-le à un
centre agréé pour les réparations couvertes par la garantie. Si le centre de réparation détermine que le produit est tombé
en panne à cause d’un défaut d’exécution il sera réparé gratuitement. Si la panne est due à une usure normale, ou
à un dysfonctionnement, une défaillance ou un défaut quelconques résultant d’un mésusage, d’un usage abusif, d’une
négligence, d’altérations, de modifications ou de réparations effectuées par quiconque autre qu’un centre agréé pour les
réparations couvertes par la garantie, alors la garantie est nulle et non avenue.
PREUVE D’ACHAT EXIGÉE
NOTE: REMARQUE : toute garantie dépend de la fourniture par le client d’un reçu valide constituant une preuve
d’achat..
Si aucun reçu n’est fourni, le code de date du fabricant sera utilisé au lieu de la date d’achat.
La Garantie limitée s’applique uniquement aux É-U. et au Canada et elle vous confère des droits spécifiques reconnus
par la loi. Vous pouvez également avoir d’autres droits qui varient d’un État à un autre, d’une province à une autre ou
d’un pays à un autre. Pour trouver votre centre agréé pour les réparations couvertes par la garantie, veuillez appeler le
1-800-628-8815, poste 5000.
22
Page 25

Modelo # F226VWLVP
COMPRESOR DE AIRE
PORTÁTIL
IMPULSIÓN DIRECTA, SIN ACEITE
Manual del propietario
y lista de partes
Para servicio al cliente llame al:
1-800-628-8815 ext. 5000
L-V 08:00 - 17:00 (Hora central)
Artículo # 37296
¡ADVERTENCIA!
Lea y entienda todas las precauciones de seguridad y las instrucciones de
operación, antes de utilizar el compresor de aire portátil.
8/20/2008 Impreso en China Part No. E103490
Page 26

ÍNDICE DE MATERIAS
Página
Instrucciones de seguridad . . . . . . . . . . . . . . . . . . . . . . . . . . . . . . . . .......................25
Instrucciones y pautas de seguridad importantes . . . . . . . . . . . . . . . . . . . . . . . . . . . . . . . . . . .25
Especificaciones . . . . . . . . . . . . . . . . . . . . . . . . . . . . . . . . . . . . . . . . . . . . . . . . . . . . . . . . . . . . . . . . . .26
Glosario . . . . . . . . . . . . . . . . . . . . . . . . . . . . . . . . . . . . . . . . . . . . . . . . . . . . . . . . . . . . . . . . . . . . . . . . .26
Ciclo de trabajo . . . . . . . . . . . . . . . . . . . . . . . . . . . . . . . . . . . . . . . . . . . . .......................26
Piezas y características . .. . . . . . . . . . . . . . . . . . . . . . . . . . . . . . . . . . . . .......................27
Instalación y ensamblaje . .. . . . . . . . . . . . . . . . . . . . . . . . . . . . . . . . . . . . .....................28
Procedimientos de operación . . . . . . . . . . . . . . . . . . . . . . . . . . . . . . . . . . ....................29
Mantenimiento . . . . . . . . . . . . . . . . . . . . . . . . . . . . . . . . . . . . . . . . . . . . . . .....................30
Almacenamiento . .. . . . . . . . . . . . . . . . . . . . . . . . . . . . . . . . . . . . . . . . . . . .....................30
Diagnóstico y corrección de fallas . . . . . . . . . . . . . . . . . . . . . . . . . . . . . . . . . . . . . . . . . . . . . . . . . 31
Diagrama de los componentes . . .. . . . . . . . . . . . . . . . . . . . . . . . . . . . . . . ...................32
Lista de las piezas. . . . . . . . . . . . . . . . . . . . . . . . . . . . . . . . . . . . . . . . . . . . . . . . . . . . . . . . . . . . . . . . .33
Garantía limitada. . . .. . . . . . . . . . . . . . . . . . . . . . . . . . . . . . . . . . . . . . . . . . . . . . . . . . . . . . . . . tapa trasera
¡NO DEVUELVA ESTE PRODUCTO
A LA TIENDA!
Favor llamar al 1-800-628-8815 ext. 5000
PARE
para obtener información con relación
a este producto
L-V 08:00 – 17:00 (Hora central)
Gracias
24
Page 27

Instrucciones de seguridad
El operador debe leer y entender la información descrita a continuación. Esta información se ofrece para proteger al
usuario al operar y almacenar el compresor de aire. Los símbolos siguientes son los que se utilizan para indicar al
lector información que es importante para su seguridad.
PELIGRO
Indica una situación de riesgo inminente que, de no
evitarse, provocará lesiones graves o la muerte.
ADVERTENCIA
Indica una situación potencialmente peligrosa que,
de no evitarse, podría provocar lesiones graves o la
muerte.
Indica una situación potencialmente peligrosa que,
de no evitarse, podría provocar lesiones menores o
moderadas.
Cuando aparezca sin el símbolo de alerta de seguridad, indica que hay una situación potencialmente
peligrosa que, de no evitarse, podría causar daños
materiales.
PRECAUCIÓN
PRECAUCIÓN
Instrucciones y pautas de seguridad importantes
• Conserve todas las instrucciones •
ADVERTENCIA
La operación y el mantenimiento inadecuados de este producto pueden provocar lesiones graves y daños materiales.
Antes de utilizar este equipo, lea y entienda las advertencias e instrucciones de seguridad aquí contenidas.
El compresor de aire se debe operar desde un circuito especial de 15 amperios. Si
el circuito no dispone de una capacidad de 15 amperios, se debe usar un circuito de
PRECAUCIÓN
mayor capacidad. Si es necesario, antes de emplear una extensión eléctrica, añada
una manguera del aire más larga. Todas las extensiones eléctricas utilizadas deben
ser de calibre 12 y tener una longitud máxima de 7,6 m. El fusible del circuito debe
ser de acción retardada. Un voltaje demasiado bajo puede dañar el motor.
Riesgo por causa de
partes en movimiento
Riesgo de quemaduras
Riesgo de caída
Riesgo de lanzamiento
de objetos
Al operar el compresor, todos los protectores y cubiertas deben estar fijados e
instalados correctamente. Si alguno de los protectores o cubiertas está dañado,
no opere el equipo hasta que personal calificado repare el problema. El cable de
corriente debe mantenerse alejado de las partes móviles del equipo y no debe
torcerse ni prensarse durante su empleo, ni al almacenarse.
En su compresor hay superficies que, al ser tocadas durante y después de su
operación, pueden causar quemaduras graves. Antes de darle mantenimiento al
equipo, se debe dejar enfriar. Por lo normal, durante y después de su operación,
ciertas partes como la bomba del compresor y el tubo de salida estarán calientes.
El compresor siempre debe ser operado en una posición estable. Nunca utilice
el compresor sobre un techo o en una posición elevada ya que podría caer o
volcarse.
Al trabajar en posiciones elevadas, utilice una manguera de aire más larga.
Al emplear el compresor, siempre utilice anteojos de seguridad con protectores
laterales que cumplan con la norma ANSI Z87.1. Antes de llevar a cabo cualquier
clase de mantenimiento y antes de desconectar las mangueras y los acopladores,
apague el compresor y drene el tanque de aire. Nunca apunte la boquilla o el
rociador hacia ninguna parte del cuerpo, ni hacia otras personas o animales.
25
Page 28

Instrucciones y pautas de seguridad importantes
Riesgo para la
respiración
Riesgo de
descargas eléctricas
Riesgo de
explosión y fuego
Riesgo de estallido
Evite utilizar el compresor de aire en áreas encerradas. Siempre tenga un espacio
libre adecuado (30 cm.) alrededor del compresor. También mantenga fuera del área
de operación a las mascotas, niños y otras personas. Este compresor de aire no
provee aire que pueda ser respirado ni empleado con un dispositivo respiratorio
auxiliar. El material de rociado siempre deberá estar en otra zona, alejado del
compresor de aire, para evitar que el aire aspirado dañe al filtro del compresor.
Nunca utilice el compresor de aire bajo lluvia o en lugares mojados. Los problemas
eléctricos deben ser reparados por personal autorizado, tal como sería un
electricista, y deben cumplir con las normas eléctricas nacionales y locales. El
compresor también debe tener el enchufe adecuado de tres clavijas con conexión
a tierra y contar con un suministro eléctrico que sea del voltaje correcto y con un
fusible de protección adecuado.
Nunca opere el compresor cerca de materiales combustibles, gasolina, ni vapores
de solventes. Si está rociando materiales inflamables, coloque el compresor a
una distancia de cuando menos 6 metros de la área de rociado. Nunca opere el
compresor de aire en interiores o en lugares cerrados.
Siempre drene el compresor diariamente o después de cada utilización. Si el
tanque tiene una fuga, reemplace el compresor. Nunca utilice el compresor si se ha
detectado una fuga, ni trate de modificar el tanque. Nunca modifique los ajustes
de fábrica del compresor que controlan la presión del tanque o cualquier otra
función.
Especificaciones
Bomba . . . . . . . . . . . . . . . . . . . . De impulsión directa, sin
aceite
Motor por inducción ...................................1,5 HP
Diámetro . . . . . . . . . . . . . . . . . . . . . . . . . . . . . . . . . . . . . . . . . . 2,48 pulg.
Carrera . . . . . . . . . . . . . . . . . . . . . . . . . . . . . . . . . . . . . . . . . . . . 0,87 pulg.
Voltaje monofásico . . . . . . . . . . . . . . . . . . . . . . . . . . . . . . . . . .120 VAC
Capacidad mínima del circuito . . . . . . . . . . . . . . . . . . . . . . . 15 Amp.
Capacidad del tanque de aire . . . . . . . . . . . . . . 17 gal / 64,4 litros
Presión de arranque. . . . . . . . . . . . . . . . . . . . . . . . . . . . . . . . . . . 120 PSI
Presión de parada .....................................150 PSI
Pies cúbicos por minuto (SCFM)@ 40 PSI ...................5,0
Pies cúbicos por minuto (SCFM)@ 90 PSI ...................4,0
Glosario
CFM: Pies cúbicos por minuto.
SCFM: Pies cúbicos estándar por minuto; unidad de
medición de suministro del aire.
PSIG: Libras por pulgada cuadrada sobre la presión
atmosférica; unidad de medición de presión.
ASME: Sociedad estadounidense de ingenieros
mecánicos.
Código de California: La unidad puede cumplir con el
código de California 462 (l) (2)/ (M) (2).
Presión de arranque: El compresor arranca automática-
Presión de parada: El motor se para cuando el tanque
Certificación de código: Los productos que tienen
mente cuando la presión baja a menos del mínimo
prescrito.
alcance la presión máxima de aire.
alguna o varias de las siguientes marcas han
sido evaluados por laboratorios de seguridad independientes certificados por OSHA,
y cumplen con las normas de seguridad de
Underwriters Laboratories: UL, CUL, ETL, CSA.
Ciclo de trabajo
PRECAUCIÓN
Este compresor tiene un ciclo de trabajo de 50%. Nunca opere el compresor de aire por más de 30 minutos cada
hora. Ya que al hacerlo, podría dañar el compresor de aire.
26
Page 29

Piezas y características
Como referencia, vea las figuras abajo.
Filtro del aire
Suministra aire limpio a la bomba. Siempre
debe conservarlo limpio. Revíselo diariamente
o antes de cada uso.
Manómetro de presión del tanque
Indica la presión de la reserva del aire del
tanque.
Manómetro de presión de salida
Indica la presión de salida del aire a la
herramienta, la cual es controlada por el
regulador.
Conector de acoplamiento rápido
Permite conectar y desconectar
rápidamente la manguera del aire.
Regulador
La presión del aire que sale del tanque es
controlada por el regulador. Para aumentar
la presión, gire la perilla en sentido horario;
para disminuirla, gire el botón en dirección
anti-horario.
Válvula de seguridad del tanque
Permite que el exceso de presión en el tanque
escape hacia el medio ambiente. Esta válvula
sólo se abrirá cuando la presión en el tanque
esté por encima de la presión máxima nominal
del modelo.
Interruptor
Controla la potencia del interruptor de presión
de arranque / Presión de parada.
Utilice el conmutador de contactos a presión,
para las posiciones Auto-On/Off del motor.
Válvula de drenaje
Sirve para drenar la condensación acumulada en
el fondo del tanque.
Se encuentra en la parte inferior del tanque.
27
Page 30

Instalación y ensamblaje
ADVERTENCIA
Antes de darle cualquier tipo de mantenimiento al
compresor de aire, se debe apagar y desconectar
de la fuente de alimentación eléctrica, además de
purgar el aire del tanque y darle suficiente tiempo
para enfriarse. Existe el riesgo de que las partes
móviles, las fuentes eléctricas, el aire comprimido y las
superficies calientes provoquen lesiones. El ensamblaje
del regulador debe estar instalado, antes de usar el
compresor. Un ensamblaje inadecuado puede ser causa
de fugas y posiblemente de lesiones. Si no está seguro
de entender las instrucciones de ensamblaje o tiene
dificultad para llevar a cabo el armado, por favor llame
a su departamento local de servicio para obtener más
instrucciones.
Ubicación del compresor del aire
El compresor del aire siempre debe estar en un medio
ambiente limpio, seco y bien ventilado. La unidad debe
tener por lo menos 30 cm de espacio libre en cada lado.
La toma del filtro del aire debe estar limpia y sin ningún
tipo de obstrucción. Por favor revise diariamente el filtro
del aire para comprobar que esté limpio y funcione correctamente.
Instrucciones de conexión a tierra
Este producto se debe conectar a tierra. En el caso de
que haya un cortocircuito, la conexión a tierra reduce
el riesgo de descargas eléctricas al ofrecer una ruta de
escape para la corriente eléctrica. Este producto cuenta
con un cable que tiene un alambre de tierra y un enchufe
con terminal de tierra (vea la figura a continuación). La
clavija debe enchufarse en un tomacorriente instalado y
puesto a tierra según las normas locales. Hable con un
electricista o agente de servicio calificado si no entiende
completamente estas instrucciones, o si tiene dudas
sobre la correcta puesta a tierra de la herramienta.
vicio calificado. No modifique el enchufe que viene con
el equipo; si no puede enchufarlo en el tomacorriente,
llame a un electricista calificado para que le instale el
tomacorriente adecuado.
Este producto está diseñado para trabajar en un circuito
con un voltaje nominal de 120 voltios y está equipado
en la fábrica con un cable y enchufe especificados,
que permiten una conexión a un circuito eléctrico apropiado. Asegúrese de que el producto esté conectado
a un tomacorriente con la misma configuración que el
enchufe. No se debe usar un adaptador con este equipo.
Si debe conectar el equipo con un circuito eléctrico de
diferente tipo, consiga la ayuda de personal calificado
para realizar la reconexión.
Cables de extensión
Sólo utilice un cable de extensión de tres (3) alambres
con un enchufe con extensión a tierra de tres (3) terminales que pueda enchufarse en un tomacorriente de tres
(3) orificios. Asegúrese de que el cable de extensión esté
en buenas condiciones. Si utiliza un cable de extensión,
compruebe que sea de la capacidad de la corriente que
requiere su equipo. Las extensiones no deben ser de
más de 25 pies (7,6 m) de largo y deben tener cable de
calibre 12 AWG. Un cable más delgado provocará una
caída en el voltaje de la línea, lo que ocasionaría una
pérdida de potencia y sobrecalentamiento.
Procedimiento inicial de preparación
No se requiere un procedimiento inicial de preparación.
Este producto ha sido probado en la fábrica para asegurar su operación y rendimiento adecuados.
Clavija
Terminal de tierra
Tomacorriente
con conexión a
ADVERTENCIA
Una conexión a tierra inadecuada puede provocar una
descarga eléctrica. Si necesita reparar o cambiar el
cable o el enchufe, no conecte el alambre de tierra con
ninguna de los terminales planos. El cable de tierra es de
color verde, con o sin franjas amarillas. Si no entiende
completamente las instrucciones de conexión a tierra,
o si tiene dudas sobre la correcta puesta a tierra de la
herramienta, hable con un electricista o agente de ser-
tierra
28
Page 31

Procedimientos de operación
/ .
/ & &
Procedimiento diario de arranque
1 Ponga el interruptor en la posición de apagado (Off).
2 Verifique visualmente que el compresor del aire no
tenga daños ni obstrucción.
3 Cierre la válvula de drenaje.
4 Conecte la manguera del aire al acoplamiento de
conexión rápida del ensamblaje del regulador, inser
tando el enchufe de conexión rápida en la manguera
del aire, dentro del acoplamiento de conexión rápida.
El collarín del acoplamiento de conexión rápida saltará
hacia adelante, sujetando el enchufe en su lugar y pro
porcionará una junta hermética el acoplamiento y el
enchufe. Para desconectar la manguera del aire,
empuje hacia atrás el collarín del acoplamiento de
conexión rápida.
5 Enchufe el cable de corriente en un tomacorriente
apropiado.
6 Gire el interruptor hacia la posición de encendido
(Auto-On); el compresor deberá arrancar, acumulando la
presión del aire en el tanque hasta llegar a la
presión de apagado, momento en el cual se apagará
automáticamente.
7 Ajuste el regulador a la presión de aire recomendada
(PSI) para su aplicación, cerciorándose de que esté
dentro de las normas de seguridad para llevar a cabo
la tarea. Para las herramientas neumáticas, el manual del
fabricante debe tener recomendaciones sobre la
presión de operación (PSI).
NOTA: Ahora el compresor de aire está listo para ser
usado. Los siguientes accesorios de inflado y de
limpieza, los cuales vienen con esta unidad, sólo se
deben operar a una presión máxima de 20-30 PSI:
soplete, boquilla cónica, agujas para inflar, adaptador
de soplete. Espere al menos 5 segundos después de
apagar el motor del compresor, antes de volver a
encenderlo.
NOTA: Al emplear el compresor, siempre utilice anteojos
de seguridad con protectores laterales que cumplan
con la norma ANSI Z87.1. Nunca apunte la boquilla o
el rociador hacia ninguna parte del cuerpo, ni hacia
otras personas o animales.
Siempre lleve una protección apropiada para el oído.
4
Close
1
6
7
5
3
29
Page 32

Procedimientos de operación
Procedimiento diario de apagado
1. Ponga el interruptor en la posición de apagado (Off).
2. Desconecte el cable del tomacorriente.
3. Ponga en cero el regulador de presión de salida.
4. Desconecte las herramientas y los accesorios de aire.
Siempre use protección para los oídos y los ojos al
drenar el tanque. Drene el tanque en un lugar
adecuado; en casi todos los casos habrá presencia de con
densación en el drenaje.
5. Abra la válvula de drenaje permitiendo que escape el aire
del tanque. Cuando haya salido del tanque todo
el aire, cierre la válvula de drenaje para evitar la
acumulación de suciedad en la válvula.
Mantenimiento
NOTA: Cualquier procedimiento de servicio que no
esté cubierto en el programa de mantenimiento que
sigue, deberá ser efectuado por el personal de servicio
calificado.
ADVERTENCIA
Antes de dar mantenimiento al equipo, se debe apagar
y desconectar del tomacorriente, así como purgar el aire
del tanque y permitir que la unidad se enfríe. Las partes
en movimiento, las fuentes eléctricas, el aire comprimido
y las superficies calientes pueden provocar lesiones.
PRECAUCIÓN
A fin de asegurar una operación eficiente y una larga
vida del compresor de aire, se debe seguir un programa
PRECAUCIÓN
Al drenar el tanque utilice protección para los oídos y
los ojos. Drene el tanque en un lugar apropiado; en casi
todos los casos habrá presencia de condensación en el
drenaje.
ADVERTENCIA
Si no drena el tanque al almacenarlo, en su interior
quedará agua que lo corroerá y debilitará, lo cual puede
provocar su ruptura. Para evitar lesiones graves, drene
de mantenimiento de rutina. El siguiente programa
de mantenimiento está enfocado al consumidor cuyo
compresor es usado en un medio ambiente normal y
diariamente.
Puntos para verificar/cambiar
Revisar la válvula de X
seguridad del tanque
Revisar visualmente el aspecto X
general de la unidad
Revisar el filtro de aire X
Drenar el tanque X
Antes de cada uso
o diariamente
Almacenamiento
Para almacenar el compresor de aire, asegúrese de hacer lo siguiente:
1. Apague la unidad y desconecte el cable eléctrico del
tomacorriente.
2. Retire del compresor de aire las mangueras, acceso-
rios y herramientas de aire.
3. Abra la válvula de drenaje para drenar el aire del
tanque.
4. Cierre la válvula de drenaje.
5. Lleve a cabo el programa de mantenimiento de ruti-
6. Guarde el compresor de aire en un lugar limpio y
NOTAS
na.
seco.
30
Page 33

Diagnóstico y corrección de fallas
ADVERTENCIA
PROBLEMA
Fugas del aire en la válvula de
retención o en la válvula de
alivio.
Fugas del aire entre la cabeza
y el cilindro.
Fuga del aire en la válvula de
seguridad.
La presión indicada en
el manómetro de presión
regulada bajará cuando se
utiliza un accesorio.
Antes de dar mantenimiento al equipo, se debe apagar y desconectar del tomacorriente,
así como purgar el aire del tanque y permitir que la unidad se enfríe. Las partes en
movimiento, las fuentes eléctricas, el aire comprimido y las superficies calientes pueden
provocar lesiones.
POSIBLE CORRECCIÓN
Una válvula de retención defectuosa provoca una fuga del aire constante en la válvula de alivio cuando el compresor esté apagado y tenga presión del aire. Drene el
tanque, quite y limpie o cambie la válvula de retención.
Asegúrese de que tenga un par adecuado sobre los pernos de la cabeza. Si
continúa la fuga, comuníquese con el servicio a la clientela o con un técnico de
servicio.
Opere manualmente la válvula de seguridad, jalando el anillo. Si el tanque continúa
teniendo una fuga estando la válvula en posición cerrada, deberá cambiarla.
Si al utilizar un accesorio hay una disminución excesiva de presión, cambie el regulador.
NOTA:
Ajuste la presión regulada bajo condiciones de flujo (mientras se utiliza un accesorio). Es normal que el manómetro indique una disminución de presión mínima, al
comenzar a utilizar la herramienta.
Presión excesiva en el
tanque.
El motor no arranca.
Humedad excesiva en el aire
de salida.
Fugas de aire en el cuerpo o la
soldadura del tanque.
Mueva el interruptor hacia la posición de apagado (Off). Si la unidad no se apaga, desconéctela
del tomacorriente y comuníquese con el servicio a la clientela o con un técnico de servicio.
Compruebe que el cable de corriente esté enchufado y que el interruptor esté encendido
(ON). Compruebe que el fusible de la caja de circuitos sea de la capacidad adecuada. Si se ha
disparado, restablézcalo y vuelva a arrancar la unidad. Si el fusible se dispara con frecuencia,
reemplace la válvula de retención o comuníquese con el servicio a la clientela o con un técnico
de servicio.
NOTA :
Para restablecer la protección de sobrecarga, mueva el interruptor hacia la posición
de apagado (Off ) y espere 10 minutos (Mínimo). Vuelva a arrancar la unidad.
Saque el agua del tanque, drenándolo después de cada vez que se use. En un medio ambiente de alta humedad habrá un exceso de condensación; utilice filtros de agua en el conducto de aire.
NOTA :
La condensación no es provocada por una falla en el compresor. Compruebe que
la salida del aire del compresor sea mayor que el consumo de aire de su herramienta.
Nunca taladre, suelde o modifique de ninguna manera el tanque, pues se
debilitará.
El tanque podría romperse o explotar. El tanque no puede ser reparado. Suspenda
el uso del compresor de aire.
31
Page 34

4
5
6
7
8
9
10
11
12
13
14
15
9
17
18
19
20
21
22
23
24
25
26
27
28
29
30
31
32
33
34
35
36
17
17
37
38
39
40
42
43
43
44
45
46
47
48
46
49
50
51
52
56
55
54
53
58
59
60
61
16
2
3
1
41
57
Compresor de aire - Artículo # 37296 / Modelo #
F226VWLVP
Diagrama de los componentes
32
Page 35

Compresor de aire - Artículo # 37296 / Modelo # F226VWLVP
Lista de las piezas
# de Juego Número Descripción Cantidad
ref. # de pieza
1 1 Cubierta, filtro de admisión 1
2 1 Elemento, filtro de admisión 1
3 1 Carcasa, filtro de admisión 1
4 Culata, cilindro 1
5 Perno, M6 x 1 x 35 mm SHCS 4
6 Arandela, de seguridad, 6 mm 4
7 Accesorio, codo de 90°,
3/8” NPT x 3/8” abocinado 1
8 4 Arosello, culata 1
9 4 Perno - M3 x 4 x 5 mm HFHS 2
10 4 Válvula, retenedor, salida 1
11 4 Válvula, salida 1
12 4 Placa de válvula 1
13 4 Arosello, cilindro 1
14 4 Válvula, de admisión 1
15 4 Válvula, retenedor, admisión 1
16 2 Cilindro 1
17 Tornillo, M6 x 1 x 12 mm HFHS 6
18 E103492 Cubierta protectora, F2, completa,
posterior, gris 1
19 Bomba / Motor 1
20 Perno, M8 x 1 x 16 mm 4
21 Arandela, de seguridad, 8 mm 4
22 Arandela, plana, 8 mm 4
23 Tuerca, M8 x 1 x 25 mm ZDC 4
24 E103287 Tubería, de alivio 1
25 E101362 Válvula, de retención, 90°, izquierda 1
26 Excéntrica 1
27 Cojinete, pi 1
28 2 Tornillo, M5 x 0.8 x 16 mm SHCS 1
29 2 Casquillo de pistón 1
30 2 Aro de pistón 1
31 2 Pistón 2
32 2 Tuerca, M5 x 8 mm 1
33 2 Perno, M5 x 0.8 x 25 mm 1
34 E100297 Ventilador 1
35 Arandela, plana, 6 mm 1
36 Perno, M6 x 1 x 16 mm SHCS 1
37 E103491 Cubierta protectora, F2,
completa, frontal, gris 1
38 E103286 Tubería, salida 1
39 Arandela, plana, 6 mm 2
# de Juego Número Descripción Cantidad
ref. # de pieza
40 Perno, M6 x 1 x 16 mm SHCS 1
41 Asidero, empuñadura 1
42 E103485 Asidero 1
43 E101733 Manómetro, 51 mm (2”), 10.3 bar (150 psi)
Redline, alimentación por detrás, Kobalt 2
44 E100307 Conexión rápida, con una mano 1
45 Regulador 1
46 Entrerrosca, 1/4 NPT x 35 mm 1
47 E102595 Válvula de seguridad, 11.4 bar (165 psi) 1
48 E100957 Interruptor automático por caída
de presión, 10.3 bar (150 psi) 1
49 Perno, M8 x 1.25 x 25 mm 4
50 Arandela, plana, 8 mm 4
51 Tuerca, inserto, M8 4
52 Tanque, conjunto 1
53 3 Tuerca, 10 mm1 2
54 3 Rueda, de 7”, Kobalt 2
55 3 Perno, M10 x 1.25 x 20 mm 2
56 3 Tapacubos, Kobalt 2
57 E101717 Válvula de drenaje, Vuelta Cuarta 1
58 Tuerca, M8 x 1 x 25 mm ZDC 2
59 E101805 Aislador, Kobalt 2
60 Arandela, plana, M8 2
61 Perno, M8 x 1 x 20 mm 2
NOTA: Solamente los componentes que tengan un número listado
de pieza/ juego están disponibles. Las descripciones se proveen
solamente como referencias.
La columna con el número de juego indica que la pieza ofrecida está
disponible como parte de un juego.
# de juego # de pieza Nombre del juego # de referencia
1 E100794 Juego del filtro de aire 1-3
2 E103495 Juego del pistón 16, 28 - 33
3 E103496 Juego de ruedas
(un conjunto por juego) 53-56
4 E103497 Juego de conjunto de
placa de válvula 8-15
Para obtener repuestos
favor llamar al 1-800-628-8815 ext. 5000
33
Page 36

Garantía limitada
La garantía se limita a los defectos de manufactura en el compresor por un periodo de 36 meses, excepto los
defectos de manufactura con relación a la bomba del compresor, los valores de verificación, el conmutador a presión
y el motor eléctrico y así la garantía para estos mismos “artículos excluidos” tendrá un periodo de 12 meses. Si en
cualquier momento durante el periodo de 36 meses, el compresor de aire falla debido a un defecto de manufactura,
devuélvalo a un centro autorizado de reparación que cubra la garantía. Si el centro de reparación determina que el
producto falló, debido a la mano de obra, será reparado sin costo. La garantía se invalidará, si el fallo es debido a un
uso normal o a cualquier funcionamiento defectuoso, fallo o defecto causado por uso indebido, abuso, negligencia,
alteraciones, modificaciones o reparación por alguien, excepto un centro autorizado de reparación que cubra la
garantía.
GARANTÍA LIMITADA PARA USO COMERCIAL
La garantía se limita a los defectos de manufactura. Si en cualquier momento dentro de los primeros 90 días de la
fecha de compra, el compresor de aire falla debido a un defecto de manufactura, devuélvalo a un centro autorizado de
reparación que cubra la garantía. Si el centro de reparación determina que el producto falló, debido a la mano de obra,
será reparado sin costo. La garantía se invalidará, si el fallo es debido a un uso normal o a cualquier funcionamiento
defectuoso, fallo o defecto causado por uso indebido, abuso, negligencia, alteraciones, modificaciones o reparación
por alguien, excepto un centro autorizado de reparación que cubra la garantía.
SE NECESITA UNA PRUEBA DE COMPRA
NOTA: Cualquier tipo de garantía está supeditado al consumidor y éste debe proveer un recibo válido, como prueba
de compra. Si no puede proveer ningún recibo, el código de la fecha de manufactura será utilizado, en lugar de la
fecha de compra.
La garantía limitada se aplica solamente en los Estados Unidos y en Canadá y le otorga específicos derechos legales.
También, puede tener otros derechos que varían de estado a estado, o de país a país. Para encontrar un centro
autorizado de servicio que cubra la garantía, llame al número, 1-800-628-8815 ext. 5000.
34
 Loading...