

Page 1
KOBALT® and the K & Design® are registered
trademarks of LF, LLC. All rights reserved.
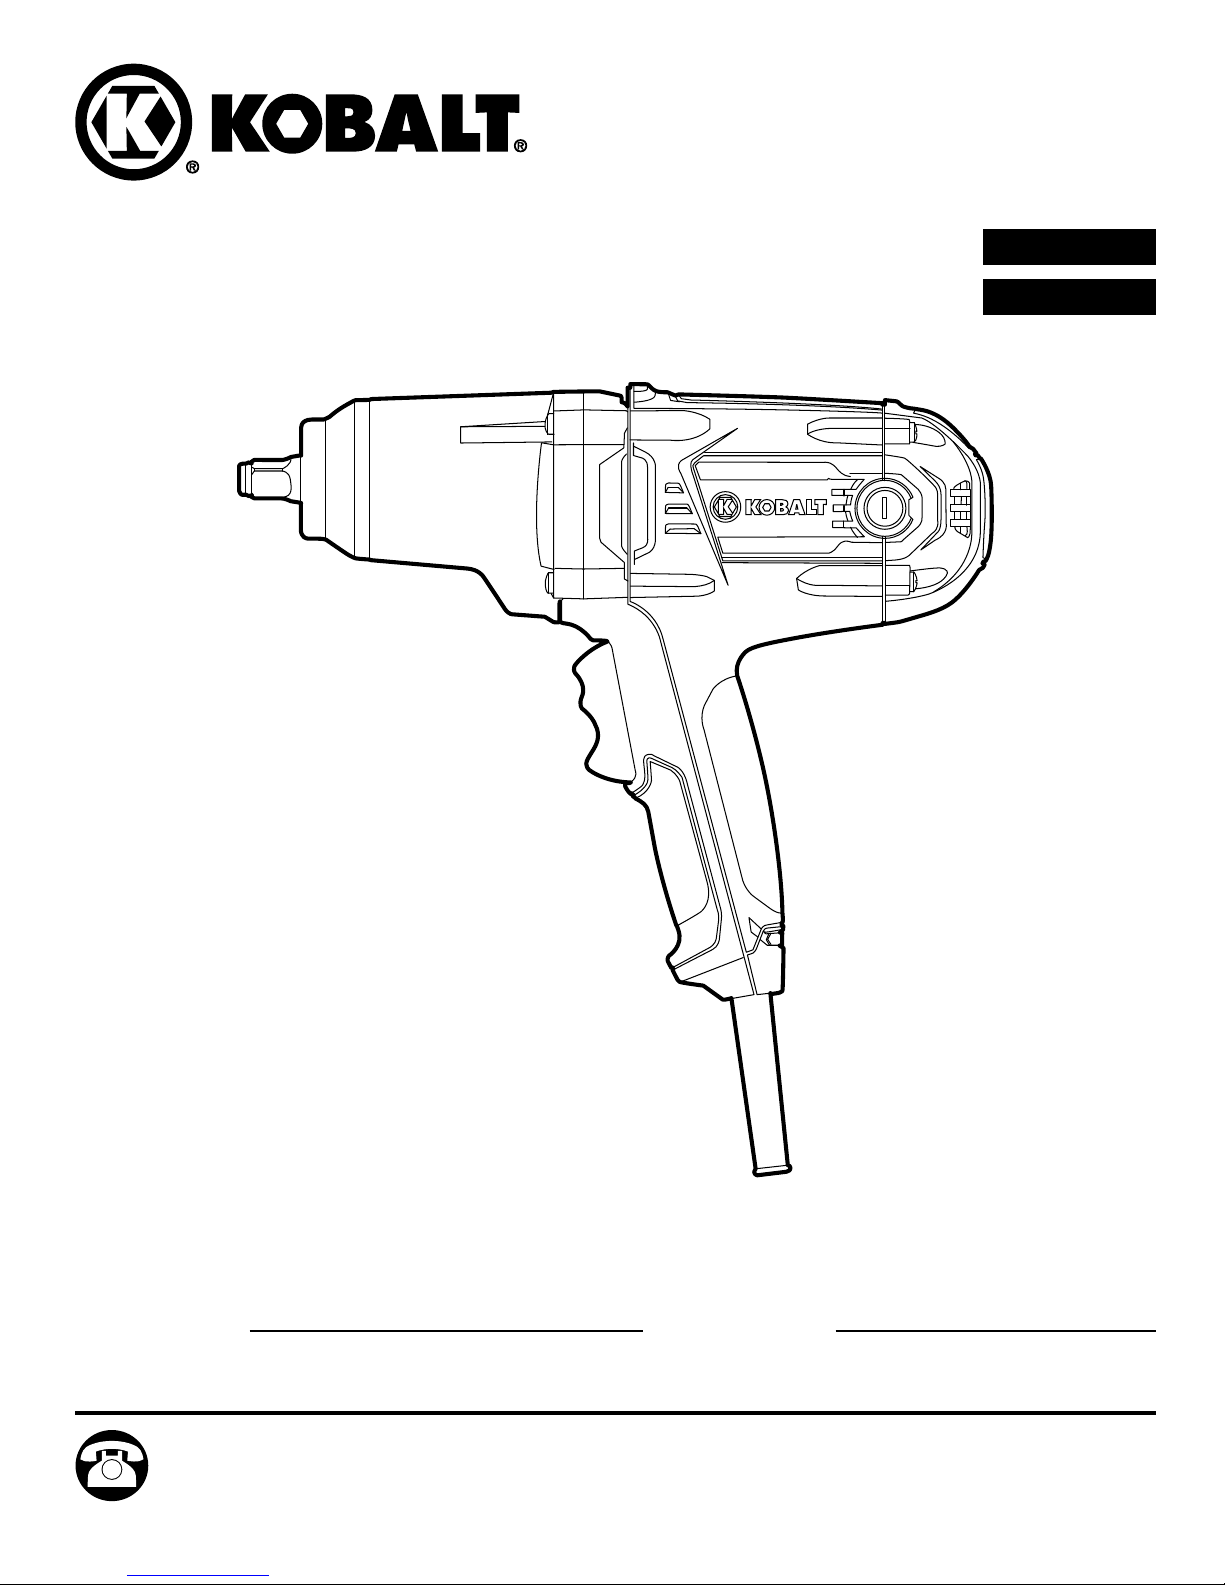
ITEM #0028180
8 AMP IMPACT WRENCH
MODEL #6904
Français p. 11
Español p. 22
ATTACH YOUR RECEIPT HERE
Serial Number Purchase Date
Questions, problems, missing parts? Before returning to your retailer, call our customer
service department at 1-888-3KOBALT (1-888-356-2258), 8 a.m. - 8 p.m., EST, Monday Friday.
Page 2

TABLE OF CONTENTS
Safety Information ...............................................................3
Package Contents ...............................................................6
Preparation. . . . . . . . . . . . . . . . . . . . . . . . . . . . . . . . . . . . . . . . . . . . . . . . . . . . . . . . . . . . . . . . . . . . . 7
Assembly Instructions ............................................................8
Operating Instructions ............................................................8
Care and Maintenance ............................................................9
Troubleshooting ................................................................10
Warranty ......................................................................10
PRODUCT SPECIFICATIONS
COMPONENT SPECIFICATIONS
Motor 120 V, 60 Hz , 8 A
No-load speed 2,100 RPM
Impacts per minute 2,700 IPM
Anvil size 1/2 in. (12.7 mm)
Maximum fastening torque 350 ft. lbs.
Capacity (Standard bolt) M12 - M20 (1/2 in. - 3/4 in.) (12.7 mm - 19.1 mm)
Capacity (High-tensile bolt) M12 - M16 (1/2 in. - 5/8 in.) (12.7 mm - 15.9 mm)
7-pc socket set 11/16 in., 3/4 in., 13/16 in., 7/8 in., 17 mm, 19 mm, 21 mm
2
Page 3

SAFETY INFORMATION
KNOW THE TOOL
To operate this tool, carefully read this manual and all labels afxed to the impact wrench before
using. Keep this manual available for future reference.
IMPORTANT
This tool should only be serviced by a qualied service technician.
READ ALL INSTRUCTIONS THOROUGHLY
GENERAL SAFETY RULES FOR ALL POWER TOOLS
WARNING: Some dust created by using power tools contains chemicals known to the
State of California to cause cancer and birth defects or other reproductive harm.
WARNING: Read and understand all instructions. Failure to follow all instructions listed below
may result in electric shock, re and/or serious personal injury.
SAVE THESE INSTRUCTIONS
WORK AREA
Keep your work area clean and well-lit. Cluttered benches and dark areas invite accidents.
Do not operate power tools in explosive environments, such as in the presence of
flammable liquids, gases, or dust. Power tools create sparks that may ignite the dust or fumes.
Keep bystanders, children, and visitors away while operating a power tool. Distractions can
cause you to lose control.
Make the workshop child-proof with padlocks, master switches, or by removing starter keys.
Use the right tool. Don’t force a tool or attachment to do a job for which it was not designed.
ELECTRICAL SAFETY
Double-insulated tools are equipped with a polarized plug (one blade is wider than the
other). This plug will fit in a polarized outlet only one way. If the plug does not t in the outlet,
reverse the plug. If it still does not t, contact a qualied electrician to install a polarized outlet.
Do not change the plug in any way. Double insulation eliminates the need for a three-wire,
grounded power cord and grounded power-supply system.
Avoid contact with grounded surfaces such as pipes, radiators, ranges and refrigerators.
There is an increased risk of electric shock if your body is grounded while using the tool.
Do not expose power tools to rain or wet conditions. A wet power tool will increase the risk of
electric shock.
Do not abuse the cord. Never use the cord to carry the tool or to pull the plug from an outlet. Keep
the cord away from heat, oil, sharp edges, or moving parts.
Replace damaged cords immediately. Damaged cords increase the risk of electric shock.
3
Page 4
SAFETY INFORMATION
When operating a power tool outside, use an outdoor extension cord marked “W-A” or “W”.
These cords are rated for outdoor use and reduce the risk of electric shock. The following table
shows the correct size to use, depending on cord length and nameplate amperage rating of the
tool. When in doubt, use the next heavier gauge. Always use UL and CSA listed extension cords.
Recommended sizes of extension cords
VOLTS TOTAL LENGTH OF CORD IN FEET
AMPERE RATING
25 ft. 50 ft. 100 ft. 150 ft.
A. W. G.
0~6 18 16 16 14
120 V~
6~10 18 16 14 12
10~12 16 16 14 12
12~16 14 12 not recommended
SAVE THESE INSTRUCTIONS
Some of the following symbols may be used on this tool. Please study them and their meaning.
Proper interpretation of these symbols will allow you to operate the tool better and more safely.
V .................................... Volts
A .................................... Amps
Hz .................................... Hertz
W .................................... Watts
min .................................... Minutes
.................................... Alternating Current
.................................... Direct Current
no .................................... No-load Speed
.................................... Class II construction
.../min .................................... Revolutions or Strokes per minute
.................................... Indicates danger, warning, caution. It means attention!
Your safety is involved.
4
Page 5

SAFETY INFORMATION
PERSONAL SAFETY
WARNING: The operation of any power tool can result in foreign objects being thrown into
your eyes, which can result in severe eye damage. Before beginning power-tool operation, always
wear safety goggles or safety glasses with side shields and a full-face shield, when needed. We
recommend using a wide vision safety mask over eyeglasses or standard safety glasses with
shields. Always use eye protection marked to comply with ANSI Z87.1.
Stay alert, watch what you are doing and use common sense when operating a power tool.
Do not use the tool while tired or under the influence of drugs, alcohol, or medication. A
moment of inattention while operating power tools may result in serious personal injury.
Dress properly. Do not wear loose clothing or jewelry. Keep your hair, clothing, and gloves
away from moving parts. Loose clothes, jewelry, or long hair can be caught in moving parts.
Avoid accidental starting. Be sure the switch is off before plugging in the tool. Carrying tools
with your nger on the switch or plugging in tools that have the switch on invites accidents.
Remove adjusting keys or wrenches before turning the tool on. A wrench or a key that is left
attached to a rotating part of the tool may result in personal injury.
Do not overreach. Keep proper footing and balance at all times. Proper footing and balance
enables better control of the tool in unexpected situations.
Use safety equipment. A dust mask, non-skid safety shoes, hard hat, or hearing protection must
be used for appropriate conditions.
Before connecting the tool to a power source (receptacle, outlet, etc.), be sure that the
voltage supplied is the same as that specified on the nameplate of the tool. A power source
with voltage greater than that specied for the tool can result in serious injury to the user as well as
damage to the tool.
TOOL USE AND CARE
Use clamps or another practical means to support and secure the workpiece to a stable
platform. Holding the work by hand or against your body is unstable and may lead to loss of
control.
Do not force the tool. Use the correct tool for your application. The correct tool will do the job
better and more safely at the rate for which it is designed.
Do not use tool if the switch does not turn it on or off. Any tool that cannot be controlled with
the switch is dangerous and must be repaired.
Disconnect the plug from the power source before making any adjustments, changing
accessories, or storing the tool. Such preventive safety measures reduce the risk of starting the
tool accidentally.
Store idle tools out of the reach of children and other untrained persons. Tools are dangerous
in the hands of untrained users.
Check for misalignment or binding of moving parts, breakage of parts, and any other
condition that may affect the tool’s operation. If damaged, have the tool serviced before using.
Many accidents are caused by poorly maintained tools.
Use only accessories that are recommended by the manufacturer for your model.
Accessories that may be suitable for one tool may become hazardous when used on another tool.
Do not alter or misuse tool. These tools are precision built. Any alteration or modication not
specied is misuse and may result in a dangerous condition.
5
Page 6

SAFETY INFORMATION
SERVICE
Tool service must be performed only by qualied repair personnel. Service or maintenance
performed by unqualied personnel could result in a risk of injury.
When servicing a tool, use only identical replacement parts. Follow instructions in the
maintenance section of this manual. Use of unauthorized parts or failure to follow maintenance
instructions may create a risk of electric shock or injury.
SPECIFIC SAFETY RULES FOR IMPACT WRENCH
Hold the tool by the insulated gripping surfaces when performing an operation where the
tool may contact hidden wiring or its own cord. Contact with a “live” wire will make exposed
metal parts of tool “live” and shock the operator.
Check the socket carefully for wear, cracks or damage before installing it on the impact wrench.
Hold the tool rmly with both hands.
Always be sure that you have a rm footing. Be sure that no one is below you when using the
tool in elevated locations.
Check the torque required with a torque wrench. The proper fastening torque may vary
depending on the type or size of the bolt.
Use of accessories that are not recommended for use with this tool may create hazardous
conditions.
WARNING: Some dust created by power sanding, sawing, grinding, drilling and other
construction activities contains chemicals known to the State of California to cause cancer,
birth defects or other reproductive harm.
SOME EXAMPLES OF THESE CHEMICALS ARE:
• Lead from lead-based paints.
• Crystalline silica from bricks, cement, and other masonry products.
• Arsenic and chromium from chemically-treated lumber.
Your risk from these exposures varies, depending upon how often you do this type of work.
To reduce your exposure to these chemicals:
• Work in a well-ventilated area.
• Work with approved safety equipment, such as dust masks that are specially designed to lter out
microscopic particles.
Avoid prolonged contact with dust from power sanding, sawing, grinding, drilling, and other
construction activities. Wear protective clothing and wash exposed areas with soap and water.
Allowing dust to get into your mouth or eyes or to lie on the skin may promote absorption of
harmful chemicals.
PACKAGE CONTENTS
Impact wrench, 7 pc. socket set, socket holder, instruction manual
6
Page 7
PREPARATION
KNOW YOUR IMPACT WRENCH
Before attempting to use this impact wrench, become familiar with all of its operating features and
safety requirements. For optimum performance and safety, read the following operating instructions
carefully before using the impact wrench.
WARNING: Do not allow familiarity with your impact wrench to make you careless. Remember
that a careless fraction of a second is sufcient to cause severe injury.
WARNING: Remove the impact wrench from the package and examine it carefully. Do not
discard the carton or any packaging material until all parts have been examined.
WARNING: If any part of the impact wrench is missing or damaged, do not plug the tool in
or use it until the part has been repaired or replaced. Failure to heed this warning could result in
serious injury.
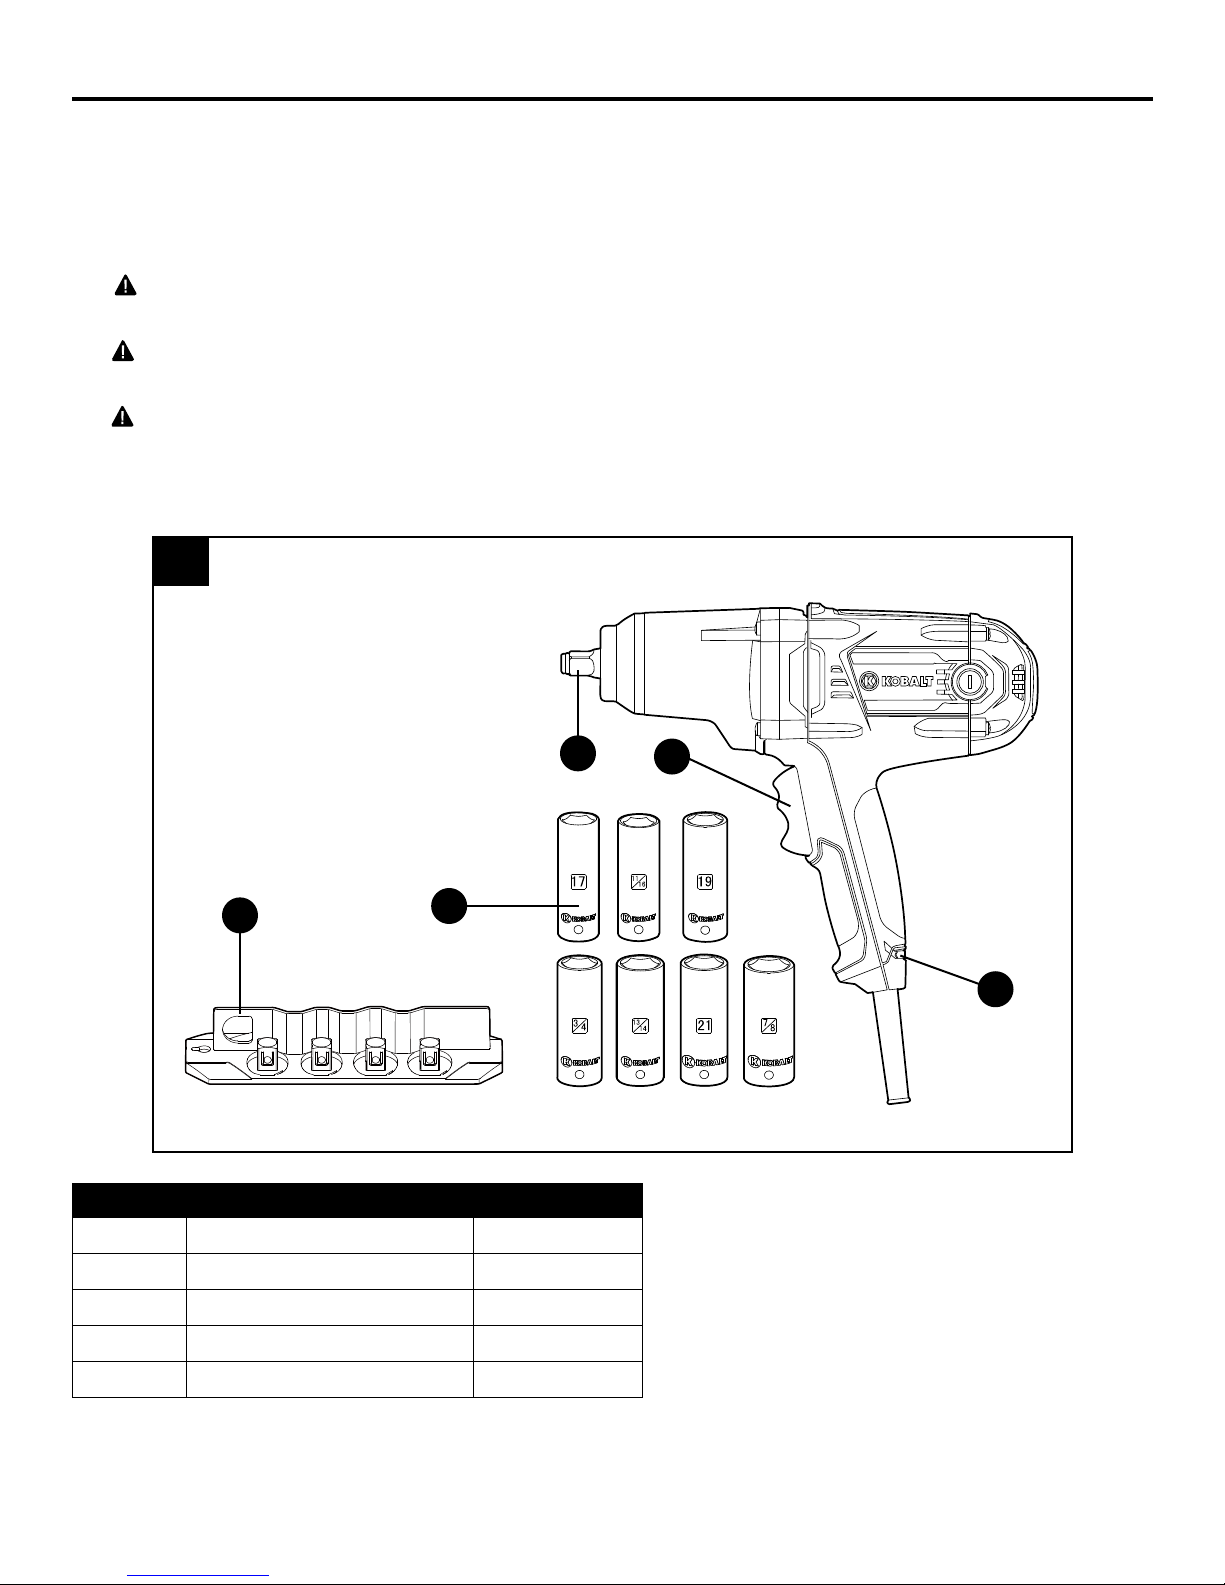
1
A
E
PART DESCRIPTION QUANTITY
A Anvil 1
B Trigger switch 1
C Live-circut indicator 1
D
B
C
D Sockets 7
E Socket holder 1
7
Page 8
OPERATING INSTRUCTIONS
SELECTING THE CORRECT SOCKET
CAUTION: Always verify that the tool is switched off
and unplugged before installing any accessories on the
tool.
Always use the correct size socket for bolts and nuts. An
incorrect socket will result in inaccurate and inconsistent
fastening torque and/or damage to the bolt or nut.
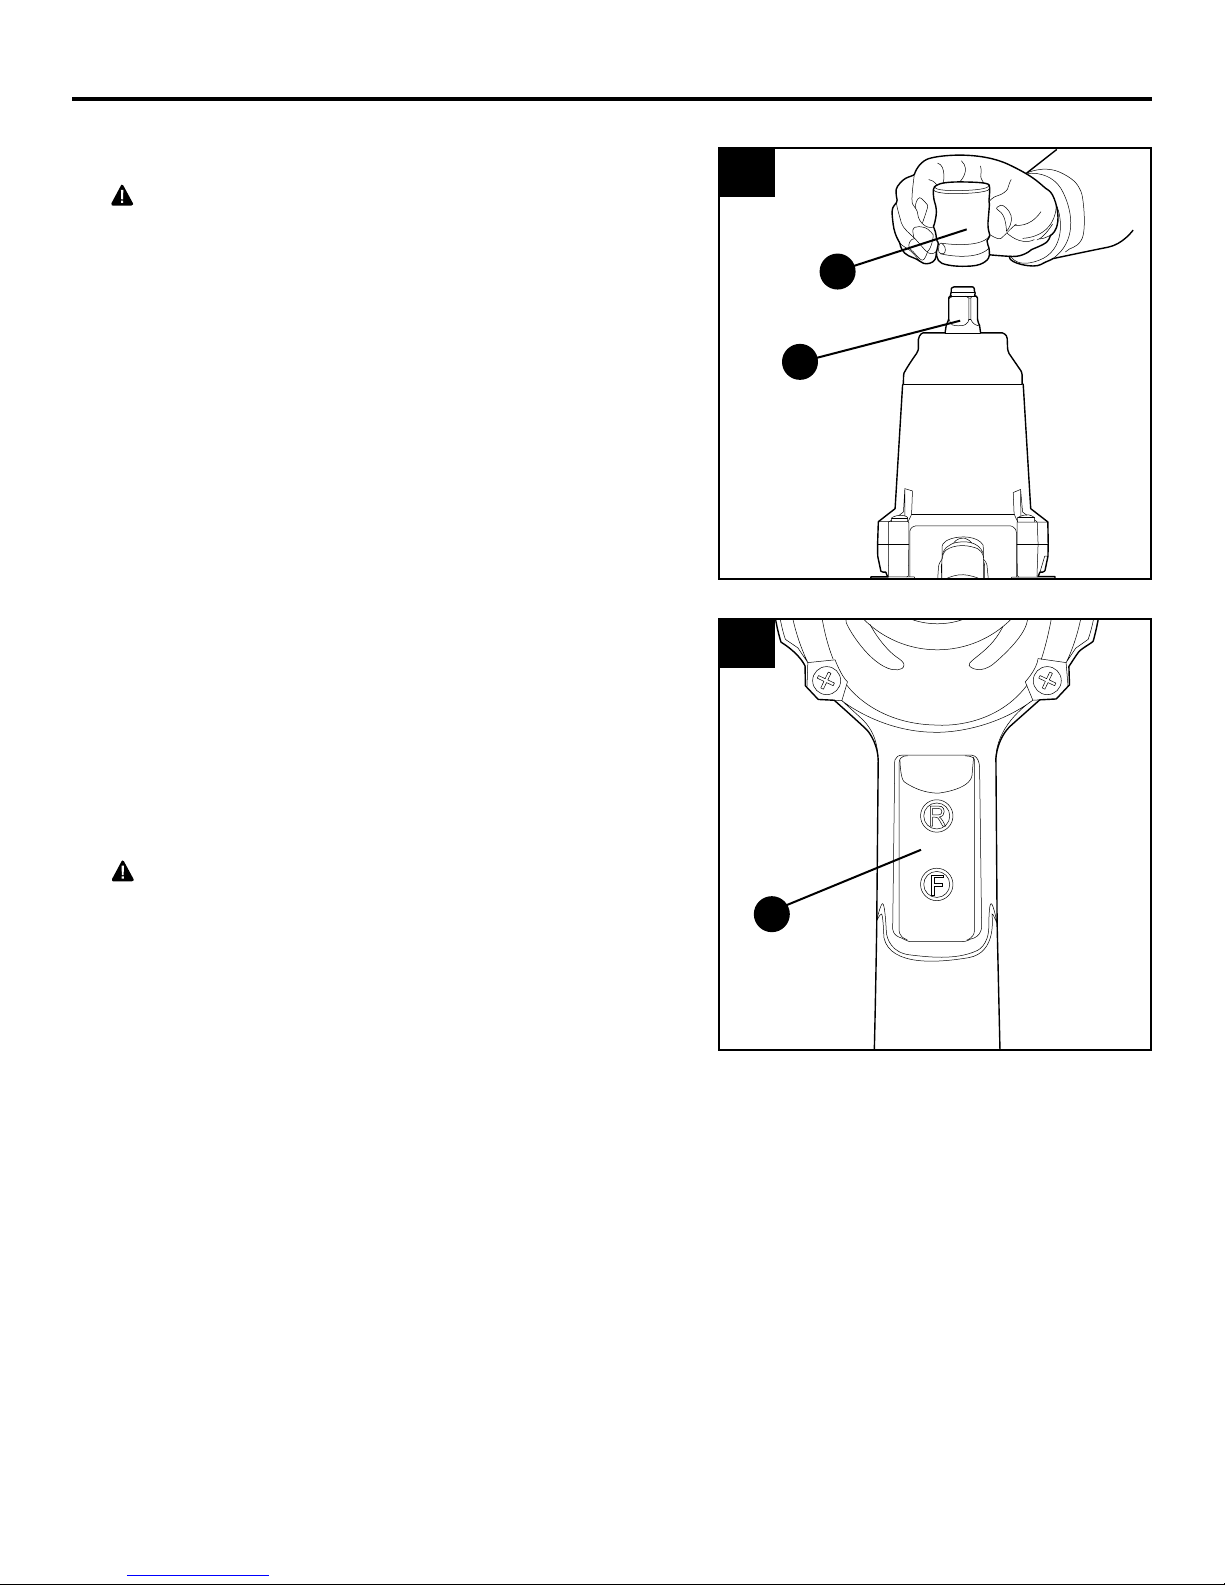
INSTALLING AND REMOVING A SOCKET (Fig. 2)
To install a socket (D), push it onto the anvil (A) of the
tool until it locks into place.
To remove the socket, simply pull it off.
TURNING ON THE IMPACT WRENCH (Fig. 3)
1. Note that the trigger switch (B) on the impact wrench
is marked with R for reverse and F for forward.
2
D
A
2. Connect the power cord of your impact wrench to a
standard household power outlet.
3. Depress the lower part of the switch marked F to run
the tool in the forward direction (clockwise rotation).
4. Depress the upper part of the switch marked R to
reverse the direction (counter-clockwise rotation).
5. Release the switch to stop the tool.
CAUTION: Do not allow familiarity with your
impact wrench to make you careless. Remember that
a careless fraction of a second is sufcient to cause
severe injury.
IMPACTING TECHNIQUES
Tightening fasteners with the impact wrench
The proper fastening torque may differ depending on the type or size of the bolt, the material of
the workpiece to be fastened, etc. Before starting your job, always perform a test operation to
determine the proper fastening time for your bolt or nut.
1. Hold the tool rmly and place the socket over the bolt or nut.
2. Turn the tool on and fasten the bolt or nut to the proper torque.
3
B
3. After fastening, always check the torque with a torque wrench.
NOTE: Hold the tool straight along the axis of the bolt or nut.
NOTE: Excessive fastening torque may damage the bolt/nut or socket.
8
Page 9

OPERATING INSTRUCTIONS
Practice with various fasteners, noting the length of time required to reach the desired torque.
Check the tightness with a torque wrench. If the fasteners are too tight, reduce the impacting time.
If they are not tight enough, increase the impacting time.
The fastening torque is affected by a wide variety of factors, including the following:
• Voltage
A voltage reduction will cause a reduction in the fastening torque.
• Socket
Failure to use the correct size socket will cause a reduction in the fastening torque.
A worn socket (wear on the hex end or square end) will cause a reduction in the fastening torque.
• Bolt
Although the torque coefcient and the class of bolt may be the same, the proper fastening torque
will differ according to the diameter of the bolt.
Although the diameters of bolts may be the same, the proper fastening torque will differ according
to the torque coefcient, the class of bolt and the bolt length.
• The use of a universal joint or an extension bar (both available separately) will somewhat reduce
the fastening force of the impact wrench. Compensate by fastening for a longer period of time.
• The manner of holding the tool or the material to be fastened will affect the torque.
Loosening fasteners with the impact wrench
The torque that is required to loosen a fastener averages 75% to 80% of the tightening torque,
depending on the condition of the contacting surfaces. However, if rust or corrosion causes seizing,
more torque may be required.
CARE AND MAINTENANCE
WARNING: To ensure safety and reliability, all repairs should be performed by a qualied
service technician.
WARNING: When servicing, use only identical replacement parts. The use of any other parts
may create a hazard or cause damage to the product.
WARNING: Unplug the impact wrench from the power source before cleaning or performing any
maintenance.
Before each use:
• Inspect the impact wrench, the switch, and the cord for damage.
• Check for damaged, missing, or worn parts.
• Check for loose screws, misalignment or binding of moving parts, or any other condition that may
affect the operation.
9
Page 10

CARE AND MAINTENANCE
• If abnormal vibration or noise occurs, turn the impact wrench off immediately and have the
problem corrected before further use.
Using compressed air may be the most effective cleaning method. Always wear safety goggles
when cleaning tools with compressed air.
WARNING: Do not allow brake uids, gasoline, petroleum-based products, penetrating oil, etc.,
to come into contact with plastic parts. These substances contain chemicals that can damage,
weaken, or destroy plastic.
TROUBLESHOOTING
PROBLEM POSSIBLE CAUSE CORRECTIVE ACTION
The tool does not work.
1. Plugs have not been fully
connected.
2. Incorrect voltage.
1. Verify that plugs are fully
connected.
2. Check that the power source
voltage is 120 V.
Fasteners cannot be
loosened.
The torque exceeded the
tool's capacity.
Use a more powerful wrench.
5-YEAR HASSLE-FREE WARRANTY
This impact wrench is warranted to the original purchaser from the original purchase date for
ve (5) years subject to the warranty coverage described herein.
This impact wrench is warranted for the original user to be free from defects in material and
workmanship.
If you believe that the impact wrench is defective at any time during the specied warranty period,
simply return the impact wrench along with proof of purchase to the place of purchase for a free
replacement or refund, or call 1-888-3KOBALT for warranty service.
This warranty is void if: defects in materials or workmanship or damages result from repairs
or alterations which have been made or attempted by others or the unauthorized use of
nonconforming parts; the damage is due to normal wear, damage is due to abuse (including
overloading of the tool beyond capacity), improper maintenance, neglect or accident; or the
damage is due to the use of the tool after partial failure or use with improper accessories or
unauthorized repair or alteration.
This warranty excludes blades, bits, bulbs and accessories.
This warranty gives you specic legal rights, and you may also have other rights that vary from
state to state.
Printed in China
10
Page 11

ARTICLE #0028180
CLÉ À CHOCS DE
KOBALT® et le motif K & Design® sont des
marques de commerce déposées de LF, LLC.
Tous droits réservés.
8 AMPÈRES
MODÈLE #6904
JOIGNEZ VOTRE REÇU ICI
Numéro de série Date d’achat
Des questions, des problèmes, des pièces manquantes? Avant de retourner l’article
au détaillant, appelez notre service à la clientèle au 1 888 3KOBALT (1 888 356-2258),
entre 8 h et 20 h (HNE), du lundi au vendredi.
Page 12

TABLE DES MATIÈRES
Consignes de sécurité ...........................................................13
Contenu de l’emballage ..........................................................16
Préparation. . . . . . . . . . . . . . . . . . . . . . . . . . . . . . . . . . . . . . . . . . . . . . . . . . . . . . . . . . . . . . . . . . . . 17
Instructions pour l’assemblage. . . . . . . . . . . . . . . . . . . . . . . . . . . . . . . . . . . . . . . . . . . . . . . . . . . . . 18
Mode d’emploi .................................................................18
Entretien ......................................................................19
Dépannage. . . . . . . . . . . . . . . . . . . . . . . . . . . . . . . . . . . . . . . . . . . . . . . . . . . . . . . . . . . . . . . . . . . . 20
Garantie ......................................................................20
CARACTÉRISTIQUES DU PRODUIT
COMPOSANTE CARACTÉRISTIQUES
Moteur 120 V, 60 Hz, 8 A
Vitesse à vide 2100 tours par minute
Chocs par minute 2700 chocs par minute
Taille de la butée 1/2 po (12,7 mm)
Couple de serrage maximal 350 lb pi
Capacité (boulon standard) M12 – M20 (12,7 mm – 19,1 mm) (1/2 po – 3/4 po)
Capacité (boulon à haute
M12 – M16 (12,7 mm – 15,9 mm) (1/2 po – 5/8 po)
résistance à la traction)
Ensemble de 7 douilles 11/16 po, 3/4 po, 13/16 po, 7/8 po, 17 mm, 19 mm et 21 mm
12
Page 13

CONSIGNES DE SÉCURITÉ
SACHEZ BIEN COMMENT UTILISER L’OUTIL
Veuillez lire attentivement ce manuel et toutes les étiquettes apposées sur la clé à chocs avant
de l’utiliser. Veuillez conserver ce manuel pour vous y référer ultérieurement.
IMPORTANT
L’entretien de cet outil doit être effectué seulement par un technicien qualié.
LISEZ ATTENTIVEMENT TOUTES LES INSTRUCTIONS
RÈGLES DE SÉCURITÉ GÉNÉRALES POUR TOUS LES OUTILS ÉLECTRIQUES
AVERTISSEMENT : La poussière créée lors de l’utilisation d’un outil électrique peut
contenir des produits chimiques reconnus par l’État de la Californie comme étant la
cause de cancers, d’anomalies congénitales ou d’autres problèmes liés aux fonctions
reproductrices.
AVERTISSEMENT : Assurez-vous de lire et de comprendre toutes les instructions.
Le non-respect des instructions ci-dessous peut entraîner un choc électrique, un incendie
ou des blessures graves.
CONSERVEZ CES INSTRUCTIONS
AIRE DE TRAVAIL
Gardez l’aire de travail propre et bien éclairée. Un établi encombré et peu éclairé augmente les
risques d’accident.
N’utilisez pas d’outils électriques dans un milieu explosif, par exemple où il y a présence
de liquides, de vapeurs ou de poussières inflammables. Les outils électriques produisent des
étincelles pouvant causer un incendie en raison de la poussière et des vapeurs.
Gardez les gens, les enfants et les visiteurs à l’écart lorsque vous utilisez un outil
électrique. Une distraction peut vous faire perdre la maîtrise de l’outil.
Empêchez les enfants d’accéder à l’atelier en utilisant des cadenas et un interrupteur général ou
en retirant les clés du commutateur d’allumage.
Utilisez le bon outil. Ne tentez pas d’utiliser un outil ou l’un de ses accessoires pour effectuer un
travail pour lequel il n’est pas conçu.
CONSIGNES DE SÉCURITÉ RELATIVES À L’ÉLECTRICITÉ
Les outils à double isolation sont dotés d’une fiche polarisée (l’une des broches est plus
large que l’autre). Cette fiche ne peut être branchée sur une prise polarisée que dans un
sens. Si la che n’entre pas dans la prise, essayez dans l’autre sens. Si elle ne s’y enfonce
toujours pas, faites appel à un électricien qualié pour installer une prise polarisée.
Ne modifiez la prise d’aucune façon. La double isolation élimine la nécessité d’une che de mise
à la terre à trois broches et d’un système d’alimentation mis à la terre.
Évitez de toucher à des surfaces mises à la terre, par exemple un tuyau, un radiateur, une
cuisinière ou un réfrigérateur. Lorsque vous utilisez l’outil, le contact de votre corps avec une
surface mise à la terre augmente les risques de choc électrique.
N’exposez pas les outils électriques à la pluie ou à tout autre environnement humide.
Les risques de choc électrique sont plus élevés lorsqu’un outil électrique est mouillé.
N’utilisez pas le cordon d’alimentation de façon abusive. Ne transportez jamais un outil
électrique en le tenant par son cordon, et ne tirez jamais sur le cordon pour débrancher la che.
Tenez le cordon d’alimentation éloigné des sources de chaleur, de l’huile, des objets coupants et
des pièces mobiles.
Remplacez immédiatement les cordons endommagés. Les risques de choc électrique sont
plus élevés si le cordon d’alimentation est endommagé.
13
Page 14

CONSIGNES DE SÉCURITÉ
Lorsque vous utilisez un outil électrique à l’extérieur, servez-vous d’une rallonge utilisable
à l’extérieur et marquée W-A ou W. Ces rallonges sont conçues pour un usage à l’extérieur et
réduisent les risques de choc électrique. Le tableau suivant indique la grosseur de l appropriée
selon la longueur de la rallonge et l’intensité nominale inscrite sur la plaque signalétique de
l’outil. En cas de doute, utilisez une rallonge de calibre supérieur. Utilisez toujours des rallonges
homologuées UL ou CSA.
Longueurs recommandées pour les rallonges électriques
VOLTS
LONGUEUR TOTALE DU CORDON
INTENSITÉ
NOMINALE
7,62 m 15,24 m 30,48 m 45,72 m
EN MÈTRES
Calibre américain des ls (a.w.g.)
0 à 6 18 16 16 14
120 V~
6 à 10 18 16 14 12
10 à 12 16 16 14 12
12 à 16 14 12 non recommandé
CONSERVEZ CES INSTRUCTIONS
Les symboles suivants peuvent gurer sur l’outil. Familiarisez-vous avec eux et leur signication.
En comprenant ces symboles, vous serez en mesure de faire fonctionner cet outil de façon
adéquate et sécuritaire.
V .................................... Volts
A .................................... Ampères
Hz .................................... Hertz
W .................................... Watts
min .................................... Minutes
.................................... Courant alternatif
.................................... Courant continu
no .................................... Vitesse à vide
.................................... Appareil de classe II
.../min .................................... Tours ou coups par minute
.................................... Indique un danger, un avertissement ou une mise
en garde. Attention!
Votre sécurité est en jeu.
14
Page 15

CONSIGNES DE SÉCURITÉ
SÉCURITÉ PERSONNELLE
AVERTISSEMENT : Les outils électriques peuvent projeter des corps étrangers, présentant ainsi
des risques de blessure aux yeux. Lorsque vous utilisez un outil électrique, portez toujours des lunettes
de sécurité pourvues d’écrans latéraux de protection et d’un écran facial panoramique, au besoin. Nous
vous recommandons de porter un masque facial à vision étendue sur vos lunettes ou vos lunettes de
sécurité avec écrans. Portez toujours des lunettes de sécurité conformes à la norme ANSI Z87.1.
Soyez vigilant, prêtez attention à ce que vous faites et usez de votre jugement lorsque vous
utilisez un outil électrique. N’utilisez pas l’outil lorsque vous êtes fatigué ou sous l’effet de
drogues, d’alcool ou de médicaments. Un moment d’inattention pendant que vous utilisez des outils
électriques peut occasionner des blessures graves.
Habillez-vous convenablement. Ne portez pas de vêtements amples ni de bijoux. Gardez vos
cheveux, vos vêtements et vos gants loin des pièces mobiles. Les vêtements amples, les bijoux et
les cheveux longs risquent de se prendre dans les pièces mobiles.
Évitez les mises en marche accidentelles de l’appareil. Assurez-vous que l’interrupteur de l’outil
est à la position d’arrêt avant de le brancher. Transporter les outils avec le doigt sur l’interrupteur ou
lorsqu’ils sont branchés et sous tension augmente les risques d’accident.
Avant de mettre l’outil en marche, retirez les clés qui y sont fixées. Une clé laissée xée à un outil
rotatif peut occasionner des blessures graves.
Ne vous étirez pas pour étendre votre portée. Gardez une posture sécuritaire et un bon équilibre en
tout temps. Cela vous permet de mieux maîtriser l’outil lorsque des situations inattendues se présentent.
Utilisez de l’équipement de sécurité. Un masque antipoussières, des chaussures de sécurité
antidérapantes, un casque de protection et des protecteurs auditifs doivent être portés lorsque
les conditions l’exigent.
Avant de brancher l’appareil à une source d’alimentation (rallonge, prise électrique, etc.),
assurez-vous que la tension de celle-ci correspond à celle inscrite sur la plaque signalétique de
l’outil. Une source d’alimentation dont la tension est plus élevée que celle appropriée pour l’outil peut
occasionner des blessures graves à l’utilisateur et endommager l’outil.
UTILISATION ET ENTRETIEN DE L’OUTIL
Utilisez des pinces ou tout autre moyen pratique pour supporter et fixer la pièce à travailler sur
une plateforme stable. Tenir la pièce dans sa main ou contre son corps créé une situation précaire et
pourrait causer une perte de maîtrise.
Ne forcez pas l’outil. Utilisez l’outil approprié à l’utilisation que vous envisagez. Avec l’outil approprié,
vous obtiendrez de meilleurs résultats et assurerez votre sécurité, si toutefois vous l’utilisez pour le type
de travail pour lequel l’outil est conçu.
N’utilisez pas l’outil si l’interrupteur ne fonctionne pas. Tout appareil qui ne peut pas être contrôlé
par l’interrupteur est dangereux et doit être réparé.
Débranchez l’appareil avant d’effectuer des réglages, de changer d’accessoire ou de le ranger.
Ces mesures de sécurité préventives réduisent les risques de mettre accidentellement l’outil en marche.
Rangez les outils inutilisés hors de la portée des enfants et d’autres personnes qui ne savent
pas s’en servir. Les outils sont dangereux s’ils se retrouvent entre les mains d’utilisateurs qui ne savent
pas s’en servir.
Vérifiez les pièces mobiles pour vous assurer qu’elles ne sont pas désalignées, enrayées,
brisées, ou dans un quelconque état qui pourrait nuire à leur fonctionnement. Si elles sont
endommagées, faites-les réparer avant d’utiliser l’outil. De nombreux accidents sont provoqués par
des outils mal entretenus.
N’utilisez que les accessoires recommandés pour ce modèle par le fabricant. Les accessoires
peuvent entraîner une situation dangereuse s’ils sont utilisés avec un outil pour lequel ils n’ont pas été
conçus.
Ne modifiez pas l’outil et n’en faites pas un usage inapproprié. Ces outils sont conçus avec
précision. Toute modication non recommandée est considérée comme un usage inapproprié et
pourrait en compromettre la sécurité.
15
Page 16

CONSIGNES DE SÉCURITÉ
RÉPARATION
Toute réparation doit être effectuée par un technicien qualié. Une réparation ou un entretien
effectué par une personne incompétente peut entraîner des risques de blessure.
Lors de la réparation de l’outil, n’utilisez que des pièces de rechange identiques aux pièces
d’origine. Suivez les instructions de la section sur l’entretien de ce manuel. L’utilisation de pièces
non autorisées et le non-respect des instructions d’entretien peuvent entraîner un choc électrique
ou des blessures.
RÈGLES DE SÉCURITÉ PROPRES À LA CLÉ À CHOCS
Tenez l’outil par la poignée isolée lorsqu’il pourrait entrer en contact avec des ls
dissimulés ou avec son propre cordon. Lorsque l’outil entre en contact avec un l sous tension,
ses parties métalliques exposées peuvent causer des chocs à l’utilisateur.
Vériez soigneusement si la douille est usée, fendue ou endommagée avant de l’installer sur
la clé à chocs.
Tenez l’outil fermement avec vos deux mains.
Assurez-vous de toujours avoir un bon équilibre. Assurez-vous que personne ne se trouve en
dessous lorsque vous utilisez l’outil dans un endroit surélevé.
Trouvez le couple approprié à l’aide d’une clé dynamométrique. Le couple de serrage
approprié peut varier selon le type et la taille des boulons.
L’utilisation d’accessoires qui ne conviennent pas à cet outil peut engendrer des conditions
dangereuses.
AVERTISSEMENT : La poussière créée pendant le ponçage, le sciage, le polissage,
le perçage et d’autres activités liées à la construction peut contenir des produits chimiques
reconnus par l’État de la Californie comme étant la cause de cancers, d’anomalies
congénitales et d’autres problèmes liés aux fonctions reproductrices.
VOICI QUELQUES EXEMPLES DE CES PRODUITS CHIMIQUES :
• du plomb provenant de peintures à base de plomb;
• de la silice cristalline provenant de la brique, du ciment ou d’autres matériaux de maçonnerie;
• de l’arsenic et du chrome provenant du bois d’œuvre traité avec un produit chimique.
Les risques liés à l’exposition à ces produits varient selon le nombre de fois où vous
pratiquez ces activités. An de limiter votre exposition à ces produits chimiques :
• travaillez dans un endroit bien ventilé;
• munissez-vous de l’équipement de sécurité approuvé tel que des masques antipoussières conçus
spécialement pour ltrer les particules microscopiques;
• évitez l’exposition prolongée à la poussière causée par le ponçage mécanique, le sciage,
le polissage, le perçage et d’autres activités liées à la construction;
• portez un équipement de protection et lavez à l’eau et au savon toutes les parties exposées.
Les poussières pénétrant dans votre bouche ou dans vos yeux et les poussières se
déposant sur votre peau peuvent causer l’absorption de produits chimiques dangereux.
CONTENU DE L’EMBALLAGE
Clé à choc, ensemble de 7 douilles, porte-douille, manuel d’instruction
16
Page 17

PRÉPARATION
APPRENDRE À CONNAÎTRE SA CLÉ À CHOCS
Avant d’utiliser cette clé à chocs, familiarisez-vous avec toutes ses caractéristiques et fonctions
ainsi qu’avec les mesures à suivre en matière de sécurité. Pour un fonctionnement optimal en toute
sécurité, veuillez lire attentivement le mode d’emploi avant d’utiliser la clé à chocs.
AVERTISSEMENT : Prenez garde à ne pas devenir moins vigilant à mesure que vous prenez
l’habitude de vous servir de votre clé à chocs. Gardez en tête qu’il suft d’être négligent une
fraction de seconde pour se blesser gravement.
AVERTISSEMENT : Retirez la clé à chocs de l’emballage et examinez-la soigneusement.
Ne jetez ni la boîte ni le matériel d’emballage avant d’avoir examiné toutes les pièces.
AVERTISSEMENT : Si un élément de la clé à chocs est manquant ou endommagé, évitez de
brancher le cordon d’alimentation ou d’utiliser l’appareil tant que l’élément n’a pas été réparé ou
remplacé. Le non-respect de cet avertissement pourrait entraîner de graves blessures.
1
A
E
PIÈCE DESCRIPTION QUANTITÉ
A Butée 1
B Interrupteur marche/arrêt 1
D
B
C
C Indicateur de circuit sous tension 1
D Douilles 7
E Porte-douille 1
17
Page 18

MODE D’EMPLOI
CHOISIR LA DOUILLE APPROPRIÉE
MISE EN GARDE : Assurez-vous toujours que
l’outil est hors tension et débranché avant d’y xer
un accessoire.
Utilisez toujours des douilles dont la taille correspond
aux boulons et aux écrous. L’utilisation d’une douille
inappropriée aura pour résultat un couple de serrage
imprécis et inégal ou la détérioration des boulons et
des écrous.
INSTALLATION ET RETRAIT DES DOUILLES
(gure 2)
Pour xer une douille (D), poussez-la dans la butée (A)
de l’outil jusqu’à ce qu’elle s’enclenche en position.
Pour enlever la douille, il suft de la tirer.
METTRE LA CLÉ À CHOCS SOUS TENSION
(gure 3)
2
D
A
3
1. Vous trouverez deux inscriptions sur l’interrupteur
(B) de la clé à chocs : R, pour reverse (dévissage);
et F pour forward (vissage).
2. Branchez le cordon d’alimentation de votre clé
à chocs sur une prise de courant standard.
3. Pour visser (rotation dans le sens des aiguilles
d’une montre), appuyez sur la partie inférieure
de l’interrupteur où se trouve le F.
4. Pour dévisser (rotation dans le sens contraire
des aiguilles d’une montre), appuyez sur la partie
supérieure de l’interrupteur où se trouve le R.
5. Relâchez l’interrupteur pour arrêter l’outil.
MISE EN GARDE : Prenez garde à ne pas devenir
moins vigilant à mesure que vous prenez l’habitude de vous servir de votre clé à chocs. Gardez en
tête qu’il suft d’être négligent une fraction de seconde pour se blesser gravement.
TECHNIQUES D’UTILISATION
Serrer les pièces de xation avec la clé à chocs
Le couple de serrage approprié peut varier selon le type et la taille des boulons, le matériau de la
pièce de xation, etc. Avant de commencer, effectuez toujours une opération test an de trouver le
temps de serrage approprié pour votre boulon ou votre écrou.
1. Tenez l’outil fermement et placez la douille sur le boulon ou l’écrou.
2. Mettez l’outil sous tension et serrez le boulon ou l’écrou au couple de serrage approprié.
3. Après le serrage, vériez toujours le couple à l’aide d’une clé dynamométrique.
B
REMARQUE : Tenez l’outil aligné sur l’axe du boulon ou de l’écrou.
REMARQUE : Un couple de serrage trop élevé peut endommager le boulon, l’écrou ou la douille.
18
Page 19

MODE D’EMPLOI
Faites des essais avec plusieurs pièces de xation et notez le temps nécessaire à l’obtention
du couple désiré. Vériez si la pièce est serrée correctement à l’aide d’une clé dynamométrique.
Si les pièces de xation sont trop serrées, réduisez le temps de serrage. Si elles ne sont pas
assez serrées, allongez le temps de serrage.
Le couple de serrage varie selon différents facteurs, dont ceux qui suivent :
• Tension
Une baisse de tension produira un couple de serrage plus bas.
• Douille
L’utilisation d’une douille de la mauvaise taille produira un couple de serrage plus bas.
Une douille usée (usure de l’embout hexagonal ou carré) produira un couple de serrage plus bas.
• Boulon
Même si le coefcient du couple et la classe du boulon correspondent, le couple de serrage
approprié variera en fonction du diamètre du boulon.
Même si les diamètres des boulons sont les mêmes, le couple de serrage approprié variera
en fonction du coefcient de couple ainsi que de la classe et de la longueur du boulon.
• L’utilisation d’un adaptateur cardan ou d’une rallonge (vendues séparément) réduira quelque
peu la force de serrage de la clé à chocs. Pour y compenser, vous devrez allonger le temps
de serrage.
• La façon dont vous tenez l’outil ou la pièce de xation inuera sur le couple.
Desserrer les pièces de xation avec la clé à chocs
Le couple nécessaire pour desserrer une pièce de xation se situe entre 75 % et 80 % du couple
de serrage, selon l’état des surfaces de contact. Toutefois, si de la rouille ou de la corrosion cause
un grippement, un couple plus grand pourrait être nécessaire.
ENTRETIEN
AVERTISSEMENT : Pour en assurer la sûreté et la abilité, toute réparation doit être effectuée
par un technicien qualié.
AVERTISSEMENT : Lors de l’entretien, utilisez seulement des pièces de rechange identiques
aux pièces d’origine. L’utilisation de toute autre pièce peut endommager le produit ou être source
de danger.
AVERTISSEMENT : Débranchez la clé à chocs de la source d’alimentation avant de la nettoyer
ou d’effectuer tout entretien.
Avant chaque utilisation :
• Vériez si la clé à chocs, l’interrupteur et le cordon sont endommagés.
• Vériez s’il y a des pièces endommagées, manquantes ou usées.
• Vériez les pièces mobiles pour vous assurer qu’elles ne sont pas désalignées, enrayées ou
dans un quelconque état qui pourrait nuire à leur fonctionnement. Vériez aussi que les vis qui
les maintiennent en place ne sont pas desserrées.
19
Page 20

ENTRETIEN
• S’il y a des vibrations ou des sons anormaux, mettez immédiatement la clé à chocs hors tension
et faites-la réparer avant de l’utiliser à nouveau.
L’utilisation d’air comprimé est la meilleure technique de nettoyage. Portez toujours des lunettes de
sécurité lorsque vous nettoyez des outils avec de l’air comprimé.
AVERTISSEMENT : Ne laissez jamais de liquide de frein, d’essence, de produits à base de
pétrole, d’huile pénétrante, etc. entrer en contact avec des pièces de plastique. Ces substances
contiennent des produits chimiques qui risquent d’endommager, d’affaiblir ou de détruire le
plastique.
DÉPANNAGE
PROBLÈME CAUSE POSSIBLE MESURE CORRECTIVE
L’outil ne fonctionne pas.
1. Le cordon d’alimentation
est mal branché.
2. La tension est incorrecte.
1. Vériez si le cordon
d’alimentation est bien branché.
2. Vériez si la source d’alimentation
est réglée à la tension de 120 V.
Les pièces de xation ne se
desserrent pas.
Le couple est trop élevé pour
la force de l’outil.
Utilisez une clé plus puissante.
GARANTIE SANS TRACAS DE 5 ANS
Le fabricant offre à l’acheteur initial de cette clé à chocs une garantie de cinq (5) ans à partir de la
date d’achat, selon les modalités décrites par la présente.
Cette clé à chocs est garantie contre les défauts de matériaux et de fabrication.
Si vous croyez que la clé à chocs est défectueuse pendant la période de garantie,
retournez-la simplement, accompagnée d’une preuve d’achat, là où vous l’avez achetée
pour obtenir un remplacement ou un remboursement. Vous pouvez également composer
le 1 888 3KOBALT pour effectuer une réclamation au titre de la garantie.
Cette garantie sera annulée si : les défauts de matériaux ou de fabrication, ou les dommages,
résultent de réparations ou de modications non autorisées, de l’utilisation de pièces non
conformes, de l’usure normale, d’un usage abusif (notamment une surcharge de l’outil), d’un
entretien inadéquat, d’une négligence, d’un accident, d’une utilisation après une défaillance
partielle ou de l’utilisation d’accessoires inappropriés.
Cette garantie exclut les lames, les forets, les ampoules et les accessoires.
Cette garantie vous confère des droits précis. Il est possible que vous disposiez également
d’autres droits, qui varient d’un État ou d’une province à l’autre.
Imprimé en Chine
20
Page 21

ARTÍCULO # 0028180
LLAVE DE PERCUSIÓN
KOBALT® y K & Design® son marcas registradas
de LF, LLC. Todos los derechos reservados.
DE 8 AMPERIOS
MODELO # 6904
ADJUNTE SU RECIBO AQUÍ
Número de serie Fecha de compra
¿Preguntas, problemas, piezas faltantes? Antes de volver a la tienda, llame a nuestro
Departamento de Servicio al Cliente al 1888-3KOBALT (1-888-356-2258), de lunes
a viernes de 8 a.m. a 8 p.m., hora estándar del Este.
Page 22

ÍNDICE
Información de seguridad. . . . . . . . . . . . . . . . . . . . . . . . . . . . . . . . . . . . . . . . . . . . . . . . . . . . . . . . . 23
Contenido del paquete ...........................................................26
Preparación ...................................................................27
Instrucciones de ensamblaje ......................................................28
Instrucciones de funcionamiento ...................................................28
Cuidado y mantenimiento ........................................................29
Solución de problemas. . . . . . . . . . . . . . . . . . . . . . . . . . . . . . . . . . . . . . . . . . . . . . . . . . . . . . . . . . . 30
Garantía ......................................................................30
ESPECIFICACIONES DEL PRODUCTO
COMPONENTE ESPECIFICACIONES
Motor 120 V, 60 Hz, 8 A
Velocidad sin carga 2100 RPM
Impactos por minuto 2700 IPM
Tamaño del yunque 12,7 mm (1/2 pulg.)
Torque de sujeción máximo 48,39 kg-m
Capacidad (pernos estándar) M12 - M20 (1/2 pulg. - 3/4 pulg.) (12,7 mm – 19,1 mm)
Capacidad (pernos de alta
M12 - M16 (1/2 pulg. - 5/8 pulg.) (12,7 mm – 15,9 mm)
resistencia a la tensión)
Juego de dados de 7 piezas 11/16 pulg., 3/4 pulg., 13/16 pulg., 7/8 pulg., 17 mm,
19 mm, 21 mm
22
Page 23

INFORMACIÓN DE SEGURIDAD
CONOZCA LA HERRAMIENTA
Para operar esta herramienta, lea detenidamente este manual y todas las etiquetas jadas en la
llave de percusión antes de usarla. Guarde este manual para referencia futura.
IMPORTANTE
Sólo un técnico calicado puede reparar esta herramienta.
LEA TODAS LAS INSTRUCCIONES COMPLETAMENTE
REGLAS DE SEGURIDAD GENERALES PARA TODAS LAS HERRAMIENTAS ELÉCTRICAS
ADVERTENCIA: Parte del polvo que se crea al usar herramientas eléctricas contiene
sustancias químicas reconocidas por el estado de California como causantes de cáncer,
defectos congénitos u otros daños en el aparato reproductivo.
ADVERTENCIA: Lea y comprenda todas las instrucciones. El incumplimiento de las
instrucciones que se detallan a continuación puede provocar descargas eléctricas, incendios y/o
lesiones personales graves.
GUARDE ESTAS INSTRUCCIONES
ÁREA DE TRABAJO
Mantenga el área de trabajo limpia y bien iluminada. Los bancos desordenados y las áreas
oscuras propician los accidentes.
No utilice herramientas eléctricas en entornos en los que exista riesgo de explosión, como
por ejemplo en presencia de líquidos inflamables, gases o polvo. Las herramientas eléctricas
producen chispas que podrían encender el polvo o los vapores.
Mantenga a los transeúntes, niños y visitas alejados cuando esté usando una herramienta
eléctrica. Las distracciones pueden provocar que pierda el control.
Haga que el taller sea a prueba de niños por medio de candados e interruptores maestros,
o retirando las llaves de arranque.
Use la herramienta correcta. No fuerce la herramienta o un accesorio para hacer un trabajo para
el que no fueron diseñados.
SEGURIDAD ELÉCTRICA
Las herramientas con doble aislamiento cuentan con un enchufe polarizado (una clavija es
más ancha que la otra). Este enchufe se inserta en un tomacorriente polarizado de una sola
manera. Si el enchufe no encaja en el tomacorriente, inviértalo. Si aún no encaja, póngase en
contacto con un electricista calicado para instalar un tomacorriente polarizado.
No cambie el enchufe de ninguna manera. El doble aislamiento elimina la necesidad de un
cable de alimentación con puesta a tierra de tres conductores y de un sistema de suministro de
electricidad con puesta a tierra.
Evite el contacto con superficies conectadas a tierra, como tuberías, radiadores, estufas
y refrigeradores. Existe un gran riesgo de descarga eléctrica si su cuerpo tiene conexión a tierra
al usar la herramienta.
No exponga las herramientas eléctricas a la lluvia o a condiciones de humedad.
Una herramienta eléctrica mojada aumentará el riesgo de descarga eléctrica.
No maltrate el cable. Nunca use el cable para transportar la herramienta ni jale del enchufe
si está conectado a un tomacorriente. Mantenga el cable alejado del calor, el aceite, los bordes
losos o las piezas en movimiento.
Reemplace los cables dañados inmediatamente. Los cables dañados aumentan el riesgo
de descargas eléctricas.
23
Page 24

INFORMACIÓN DE SEGURIDAD
Cuando utilice una herramienta eléctrica en exteriores, use una extensión eléctrica para uso
en exteriores etiquetada con “W-A” o “W”. Estas extensiones están calicadas para su uso en
exteriores y reducen el riesgo de descarga eléctrica. La siguiente tabla muestra el tamaño de uso
correcto según el largo del cable y el amperaje que gura en la placa de datos de la herramienta.
Si tiene dudas, utilice el siguiente calibre mayor. Siempre utilice extensiones eléctricas
homologadas por UL y CSA.
Tamaños recomendados de extensiones eléctricas
VOLTIOS LARGO TOTAL DEL CABLE EN METROS
AMPERAJE
7,62 m 15,24 m 30,48 m 45,72 m
A. W. G.
0~6 18 16 16 14
120 V~
6~10 18 16 14 12
10~12 16 16 14 12
12~16 14 12 no se recomienda
GUARDE ESTAS INSTRUCCIONES
Algunos de los siguientes símbolos pueden aparecer en esta herramienta. Obsérvelos y aprenda
su signicado. La interpretación correcta de estos símbolos le permitirá utilizar la herramienta de
manera ecaz y segura.
V .................................... Voltios
A .................................... Amperios
Hz .................................... Hertz
W .................................... Vatios
min .................................... Minutos
.................................... Corriente alterna
.................................... Corriente continua
no .................................... Velocidad sin carga
.................................... De clase II para construcción
…/min .................................... Revoluciones o pasadas por minuto
.................................... Indica peligro, advertencia, precaución. Signica ¡atención!
Su seguridad está comprometida.
24
Page 25

INFORMACIÓN DE SEGURIDAD
SEGURIDAD PERSONAL
ADVERTENCIA: La operación de cualquier herramienta eléctrica puede arrojar objetos extraños
a sus ojos y, de esta manera, causar graves daños oculares. Use siempre gafas de seguridad con
protecciones laterales y, cuando sea necesario, una máscara que cubra todo el rostro antes de
comenzar a operar una herramienta eléctrica. Recomendamos usar una máscara de seguridad de
visión amplia sobre los lentes o gafas de seguridad con protecciones estándar. Siempre use lentes
de protección que cumplan con la norma ANSI Z87.1.
Manténgase alerta, preste atención a lo que hace y utilice el sentido común cuando utilice una
herramienta eléctrica. No utilice la herramienta si está cansado o bajo la influencia de drogas,
alcohol o medicamentos. Un momento de desatención mientras opera herramientas eléctricas
puede provocar lesiones personales graves.
Use ropa adecuada. No use ropa holgada o joyas. Mantenga el cabello, ropa y guantes lejos de
las piezas en movimiento. Las ropas holgadas, joyas o el cabello largo pueden quedar atrapados en
las piezas en movimiento.
Evite los arranques accidentales. Asegúrese de que el interruptor esté apagado antes de
enchufar la herramienta. Transportar herramientas eléctricas con el dedo en el interruptor o enchufar
herramientas eléctricas que tienen el interruptor encendido aumenta las posibilidades de accidentes.
Retire las llaves de ajuste o las llaves de tuercas antes de encender la herramienta. Si se deja
una llave de tuercas o una llave de ajuste conectada a una pieza giratoria de la herramienta, se
pueden producir lesiones personales.
No se extienda demasiado. Mantenga un apoyo de pies y un equilibrio adecuados en todo
momento. Un apoyo de pies y equilibrio adecuados permiten un mejor control de la herramienta
en situaciones inesperadas.
Utilice un equipo de seguridad. Se deben utilizar una mascarilla antipolvo, zapatos de seguridad
antideslizantes, un casco o protección para los oídos para contar con las condiciones apropiadas.
Antes de conectar la herramienta a una fuente de alimentación (receptáculo, tomacorriente,
etc.), asegúrese de que el voltaje suministrado sea el mismo que se especifica en la placa de
datos de la herramienta. Una fuente de alimentación con un voltaje superior al que se especica
para la herramienta puede causar lesiones graves al usuario y daño a la herramienta.
USO Y CUIDADO DE LA HERRAMIENTA
Utilice abrazaderas u otro método práctico para asegurar y sostener la pieza de trabajo en
una plataforma estable. Sostener la pieza de trabajo con una sola mano o apoyada en el cuerpo
es inestable y puede causar la pérdida del control.
No fuerce la herramienta. Utilice la herramienta adecuada para su aplicación. La herramienta
adecuada realizará un trabajo más seguro y de mejor calidad al ritmo para el que fue diseñada.
No use la herramienta si el interruptor no la enciende ni la apaga. Cualquier herramienta que
no pueda controlarse con el interruptor es peligrosa y debe repararse.
Desconecte el enchufe de la fuente de alimentación antes de realizar cualquier ajuste, cambiar
accesorios o almacenar la herramienta. Este tipo de medidas de seguridad preventivas reduce el
riesgo de arranques accidentales de la herramienta.
Almacene las herramientas inactivas fuera del alcance de los niños y de otras personas sin
capacitación. Las herramientas son peligrosas en manos de usuarios sin capacitación.
Verifique que no existan piezas móviles mal alineadas o trabadas, piezas rotas ni cualquier
otra condición que pueda afectar el funcionamiento de la herramienta. Si se daña, haga reparar
la herramienta antes de usarla. Muchos accidentes son producto del mal mantenimiento de las
herramientas.
Sólo use accesorios recomendados por el fabricante para su modelo. Los accesorios que
pueden ser adecuados para una herramienta pueden ser peligrosos al usarlos en otra herramienta.
No modifique ni use indebidamente la herramienta. Estas herramientas están construidas con
precisión. Cualquier alteración o modicación no especicada es considerada uso inadecuado
y podría causar una condición peligrosa.
25
Page 26

INFORMACIÓN DE SEGURIDAD
REPARACIÓN
Sólo personal de reparación calicado puede llevar a cabo la reparación de la herramienta.
Si un personal no calicado realiza la reparación o el mantenimiento, puede causar riesgo de
lesiones.
Cuando repare una herramienta, utilice sólo piezas de repuesto idénticas a las de
fabricación. Siga las instrucciones en la sección de mantenimiento de este manual. El uso de
piezas no autorizadas o no seguir las instrucciones de mantenimiento podría crear el riesgo de
descargas eléctricas o lesiones.
NORMAS ESPECÍFICAS DE SEGURIDAD PARA LA LLAVE DE PERCUSIÓN
Sostenga la herramienta por las supercies de agarre aisladas cuando realice una
operación en la que la herramienta pueda entrar en contacto con cableado oculto o con su
propio cable. El contacto con un cable energizado también expondrá las piezas de metal de la
herramienta energizada y le puede provocar una descarga al operador.
Verique cuidadosamente que el dado no esté desgastado, agrietado ni dañado antes de
instalarlo en la llave de percusión.
Sostenga rmemente la herramienta con ambas manos.
Asegúrese siempre de tener un apoyo de pies adecuado. Asegúrese de que no haya
transeúntes cuando utilice la herramienta en altura.
Verique el torque adecuado con una llave de torque. El torque de sujeción adecuado puede
variar dependiendo del tipo y el tamaño del perno.
El uso de accesorios que no estén recomendados para usarse con esta herramienta puede
crear condiciones peligrosas.
ADVERTENCIA: Parte del polvo causado por el lijado eléctrico, el serruchado, la
trituración, el taladrado y otras actividades de construcción contiene sustancias químicas
reconocidas por el estado de California como causantes de cáncer, defectos congénitos u
otros daños en el aparato reproductivo.
ALGUNOS EJEMPLOS DE ESTOS QUÍMICOS SON:
• Plomo presente en las pinturas a base de plomo.
• Sílice cristalina de ladrillos, cemento y otros productos de mampostería.
• Arsénico y cromo de la madera tratada con químicos.
El riesgo que corre debido a la exposición a estos químicos varía dependiendo de la
frecuencia con que realiza este tipo de trabajo. Para disminuir su exposición a estas
sustancias químicas:
• Trabaje en un área bien ventilada.
• Trabaje con un equipo de seguridad aprobado, como las mascarillas antipolvo especialmente
diseñadas para ltrar partículas microscópicas.
Evite el contacto prolongado con el polvo producido por el uso de lijas, sierras, trituradoras,
taladros eléctricos y otras actividades de construcción. Use ropa protectora y lave todas las áreas
expuestas del cuerpo con agua y jabón.
Si permite que el polvo llegue a su boca o a sus ojos, o que caiga sobre la piel, puede
fomentar la absorción de químicos dañinos.
CONTENIDO DEL PAQUETE
Llave de percusión, juego de dados de 7 piezas, soporte para dados, manual de instrucciones
26
Page 27

PREPARACIÓN
CONOZCA SU LLAVE DE PERCUSIÓN
Antes de intentar utilizar esta llave de percusión, familiarícese con todas las funciones de
operación y los requisitos de seguridad. Para obtener un rendimiento y seguridad óptimos, lea
detenidamente las siguientes instrucciones de funcionamiento antes de usar la llave de percusión.
ADVERTENCIA: No permita que la familiaridad con la llave de percusión lo vuelva descuidado.
Recuerde que un descuido de una fracción de segundo es suciente para causar una lesión grave.
ADVERTENCIA: Retire la llave de percusión del paquete y examínela cuidadosamente.
No deseche la caja ni ningún material de embalaje hasta después de examinar todas las piezas.
ADVERTENCIA: Si falta alguna pieza o alguna pieza está dañada, no enchufe ni use la
herramienta hasta reparar o reemplazar la pieza. No seguir esta advertencia podría provocar
lesiones graves.
1
A
E
PIEZA DESCRIPCIÓN CANTIDAD
A Yunque 1
B Interruptor de gatillo 1
C Indicador de circuito encendido 1
D
B
C
D Dados 7
E Soporte para dados 1
27
Page 28

INSTRUCCIONES DE FUNCIONAMIENTO
SELECCIÓN DEL DADO CORRECTO
PRECAUCIÓN: Siempre verique que la
herramienta esté apagada y desenchufada
antes de instalar cualquier accesorio.
Siempre utilice dados del tamaño correcto para pernos
y tuercas. El uso de un dado inadecuado hará que el
torque de sujeción sea impreciso e inconsistente y/o
dañará el perno o la tuerca.
PARA INSTALAR Y RETIRAR EL DADO (Fig. 2)
Para instalar el dado (D), insértelo en el yunque (A)
de la herramienta hasta que quede jo en su lugar.
Para retirar el dado, simplemente jálelo.
ENCENDIDO DE LA LLAVE DE PERCUSIÓN (Fig. 3)
1. Tenga presente que el interruptor de gatillo (B)
de la llave de percusión tiene marcada una R que
indica la reversa y una F que indica la dirección
hacia delante.
2
D
A
3
2. Conecte el cable de alimentación de la llave de
percusión a un tomacorriente doméstico estándar.
3. Presione la parte inferior del interruptor, marcada
con una F, para que la herramienta funcione en la
dirección hacia delante (rotación en dirección de las
manecillas del reloj).
4. Presione la parte superior del interruptor, marcada
con una R, para que la herramienta funcione
en reversa (rotación en dirección contraria a las
manecillas del reloj).
5. Suelte el interruptor para detener la herramienta.
PRECAUCIÓN: No permita que la familiaridad con
la llave de percusión lo vuelva descuidado. Recuerde
que un descuido de una fracción de segundo es
suciente para causar una lesión grave.
TÉCNICAS DE PERCUSIÓN
Para apretar sujetadores con la llave de percusión
El torque de sujeción adecuado puede variar dependiendo del tipo y el tamaño del perno, el
material de la pieza de trabajo, etc. Antes de comenzar el trabajo, siempre realice una operación
de prueba para determinar el tiempo de sujeción adecuado para cada perno y tuerca.
B
1. Sostenga rmemente la herramienta y coloque el dado sobre el perno o tuerca.
2. Encienda la herramienta y apriete el perno o la tuerca usando el torque adecuado.
3. Después de apretar, siempre verique el torque con una llave de torque.
NOTA: Mantenga la herramienta perpendicular al eje del perno o tuerca.
NOTA: Un torque de sujeción excesivo puede dañar el perno, la tuerca o el dado.
28
Page 29

INSTRUCCIONES DE FUNCIONAMIENTO
Practique con varios sujetadores, jándose en la cantidad de tiempo que se requiere para
alcanzar el torque deseado. Verique la sujeción con una llave de torque. Si los sujetadores están
muy apretados, reduzca el tiempo de percusión. Si los sujetadores no están lo sucientemente
apretados, aumente el tiempo de percusión.
El torque de sujeción puede verse afectado por una amplia variedad de factores, incluyendo
los siguientes:
• Voltaje
Una reducción del voltaje reducirá el torque de sujeción.
• Dado
Si no se utiliza un dado del tamaño correcto, se reducirá el torque de sujeción.
Un dado desgastado (con desgaste en el extremo hexagonal o en el extremo recto) reducirá
el torque de sujeción.
• Perno
Aunque el coeciente de torque y la clase de perno sean iguales, el torque de sujeción adecuado
variará según el diámetro del perno.
Aunque los diámetros de los pernos sean iguales, el torque de sujeción adecuado variará según
el coeciente de torque y el tipo y el largo de los pernos.
• El uso de una junta universal o una barra de extensión (disponibles por separado) reducirán en
cierta medida la fuerza de sujeción de la llave de percusión. Compense la pérdida de sujeción
apretando los sujetadores por más tiempo.
• La manera de sostener la herramienta o el material a jar afectará al torque.
Para aojar sujetadores con la llave de percusión
El torque que se requiere para aojar un sujetador corresponde en promedio al 75% a 80% del
torque de sujeción, dependiendo de las condiciones de las supercies de contacto. Sin embargo,
si el óxido o la corrosión hacen que la herramienta se trabe, puede que sea necesario utilizar un
torque mayor.
CUIDADO Y MANTENIMIENTO
ADVERTENCIA: Para garantizar la seguridad y conabilidad, toda reparación debe ser
realizada sólo por un técnico de reparación calicado.
ADVERTENCIA: Al realizar una reparación, utilice sólo piezas de repuesto idénticas a las de
fabricación. El uso de cualquier otra pieza puede crear un peligro o causar daños en el producto.
ADVERTENCIA: Desenchufe la llave de percusión de la fuente de alimentación antes de
limpiar o realizar cualquier mantenimiento.
Antes de cada uso:
• Verique que la llave de percusión, el interruptor y el cable no estén dañados.
• Verique que no falten piezas y que las piezas no estén dañadas o desgastadas.
• Verique que no haya tornillos sueltos, piezas móviles mal alineadas o trabadas ni cualquier
otra condición que pueda afectar el funcionamiento.
29
Page 30

CUIDADO Y MANTENIMIENTO
• Si nota ruidos o vibraciones anormales, apague la llave de percusión de inmediato y solucione el
problema antes de seguir utilizándola.
El uso de aire comprimido puede ser el método de limpieza más ecaz. Siempre use gafas de
seguridad al usar herramientas de limpieza con aire comprimido.
ADVERTENCIA: No permita que líquidos para frenos, gasolina, productos a base de petróleo,
aceites penetrantes, etc., entren en contacto con las piezas plásticas. Los químicos pueden dañar,
debilitar o destruir el plástico.
SOLUCIÓN DE PROBLEMAS
PROBLEMA CAUSA POSIBLE ACCIÓN CORRECTIVA
La herramienta no funciona.
1. Los enchufes no están
completamente conectados.
2. El voltaje es incorrecto.
1. Verique que los enchufes estén
completamente conectados.
2. Verique que el voltaje de la
fuente de alimentación sea
de 120 V.
No se pueden aojar
los sujetadores.
El torque excede la capacidad
de la herramienta.
Use una llave de tuercas más
potente.
5 AÑOS DE GARANTÍA SIN PROBLEMAS
Esta llave de percusión está garantizada para el comprador original desde la fecha de compra
original durante cinco (5) años y está sujeta a la cobertura de garantía que se describe en el
presente documento.
Esta llave de percusión tiene una garantía para el usuario original contra defectos en los materiales
y la mano de obra.
Si cree que la llave de percusión presenta fallas en cualquier momento durante el período de
garantía especicado, simplemente devuélvala, junto con un comprobante de compra, al lugar
donde lo compró para obtener un reemplazo o reembolso sin cargo, o llame al 1-888-3KOBALT
para obtener el servicio de garantía.
Esta garantía es nula si: Los defectos en los materiales o la mano de obra o los daños han sido
causados por reparaciones o modicaciones hechas o que se hayan intentado hacer por parte
de terceros o el uso no autorizado de piezas incompatibles, el daño es debido al desgaste normal,
el daño es debido al abuso (lo que incluye la sobrecarga de la herramienta por encima de su
capacidad), mantenimiento inadecuado, negligencia o accidente o el daño es debido al uso de
la herramienta después de una falla parcial, el uso con accesorios inadecuados o reparaciones
o modicaciones no autorizadas.
Esta garantía no cubre hojas, brocas, bombillas ni accesorios.
Esta garantía le otorga derechos legales especícos, pero podría tener también otros derechos
que varían según el estado.
Impreso en China
30
 Loading...