

Page 1
ITEM #0362020
MODEL #SGY-AIR166
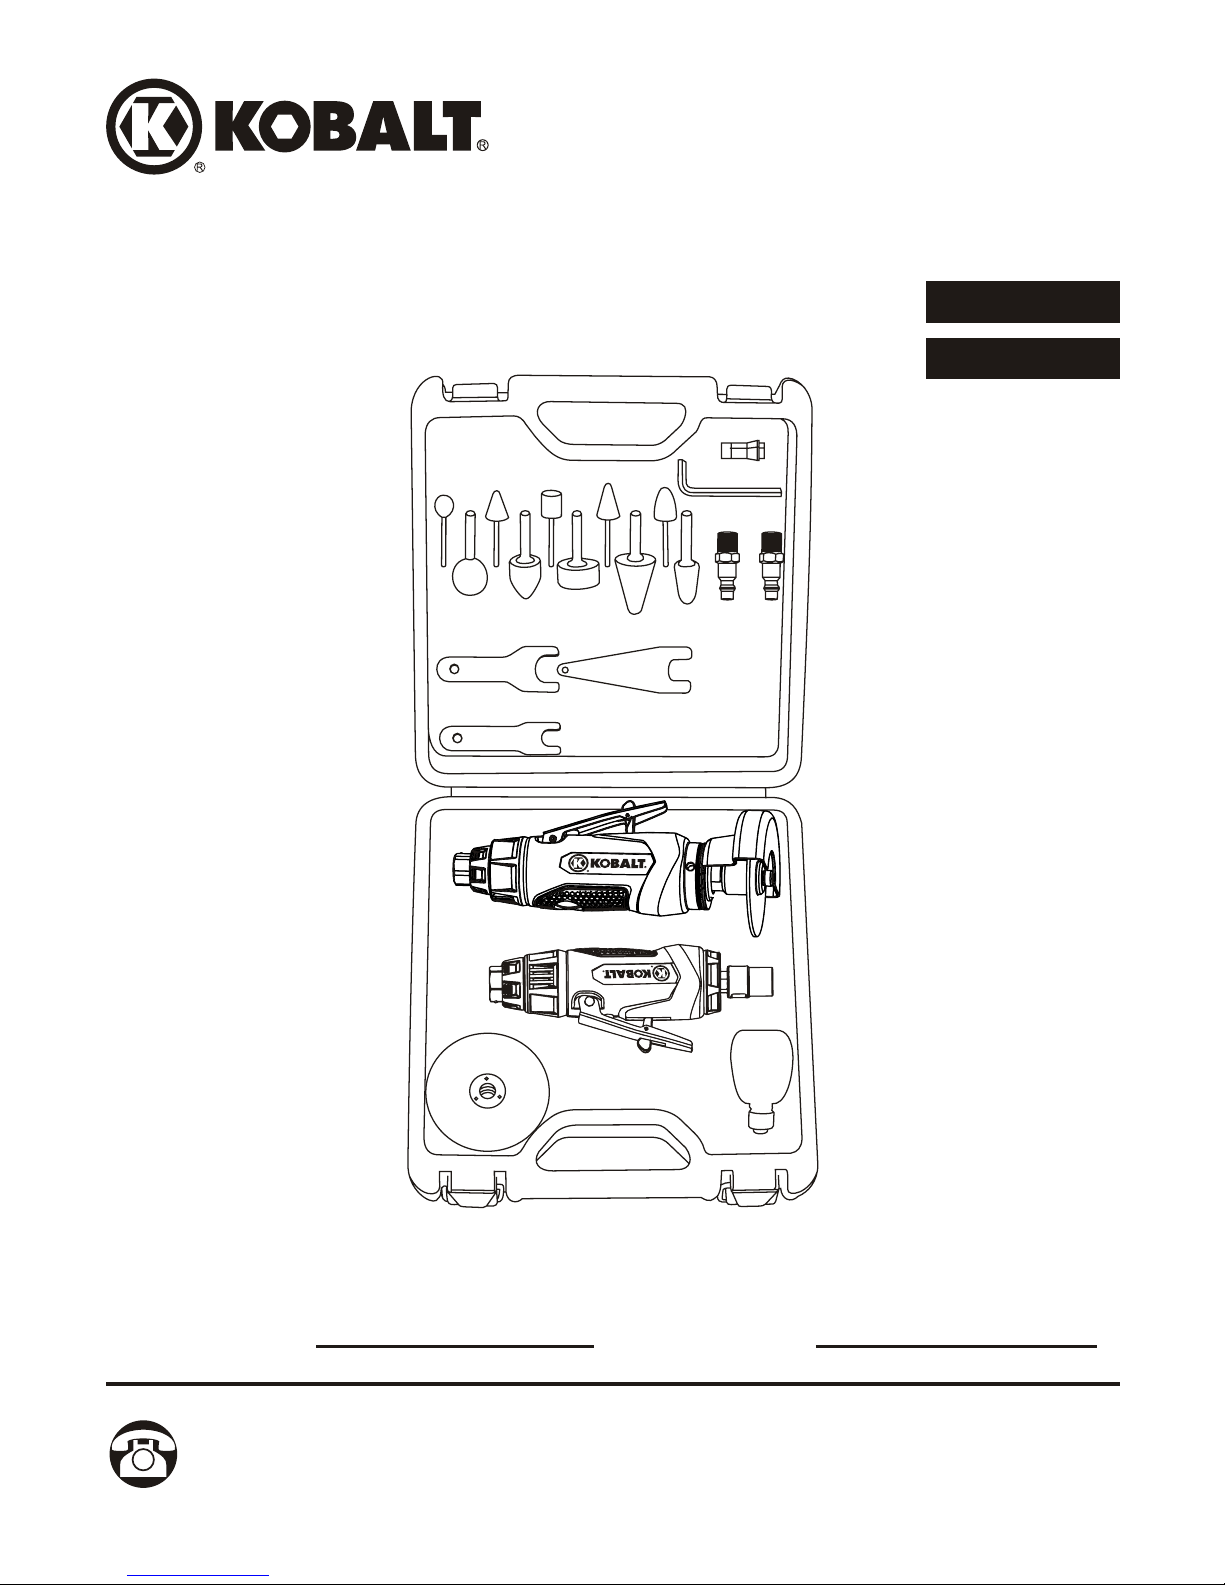
33-PIECE AIR TOOL KIT
Français p. 21
Español p. 42
ATTACH YOUR RECEIPT HERE
Serial Number Purchase Date
Questions, problems, missing parts? Before returning to your retailer, call
our customer service department at 1-888-3KOBALT (1-888-356-2258),
8:00 a.m. - 8:00 p.m., EST, Monday - Friday.
1
KOBALT® and the K & Design® are registered
trademarks of LF, LLC. All rights reserved.
MAX R.P.M. 25,0
00
3” X 1/16” X 3/8”
WARNING:
WEAR SAFE
TY GOGGLES
USE GUARDS
MPA90909
COLLET
HEX KEY
PLUGS
GRINDING STONES
WRENCHES
CUT OFF TOOL
ROTARY TOOL
CUTTING WHEELS
OIL BOTTLE
Page 2

TABLE OF CONTENTS
2
Safety Information ............................................................................................... 3
Package Contents ............................................................................................... 8
Preparation .......................................................................................................... 10
Assembly Instructions .......................................................................................... 10
Operating Instructions ........................................................................................ 14
Care and Maintenance ....................................................................................... 17
Troubleshooting .................................................................................................. 18
Warranty ............................................................................................................. 18
Parts List ............................................................................................................. 19
Page 3

3
SAFETY INFORMATION
Please read and understand this entire manual before attempting to assemble, operate
or install the product.
Improper operation or maintenance of this product could result in serious injury and
property damage. Read and understand all warnings and operating instructions
before using this equipment. When using air tools, basic safety precautions should
always be followed to reduce the risk of personal injury.
WARNING
Some dust created by power sanding, sawing, grinding, drilling and other related
activities contains chemicals known to the State of California to cause cancer, birth
defects or other reproductive harm. A list of chemicals can be obtained from
www.oehha.ca.gov under Proposition 65. Some examples of these chemicals are:
Lead from lead-based paints
Crystalline silica from bricks, cement and other masonry products
Arsenic and chromium from chemically-treated lumber
Users of these tools should review the chemical composition of the work surface
and any products in conjunction with the operation of these tools for any such
chemicals prior to engaging in any activity that creates dust and/or microscopic
particles.
Users should obtain the material safety data sheets from all identified chemicals,
either from the manufacturer or their employer, and proceed to study, understand,
and follow all instructions and warnings for exposure to such chemicals. Your risk
from these exposures varies depending on how often you do this type of work.
To reduce your exposure to these chemicals, work in a well-ventilated area and
work with approved safety equipment, such as dust masks that are specially
designed to filter out microscopic particles.
WARNING
This product contains one or more chemicals known to the State of California to
cause cancer and birth defects or other reproductive harm. Wash hands after
handling.
WARNING
Page 4
RISK OF EYE OR HEAD INJURY
WHAT COULD HAPPEN HOW TO PREVENT IT
Air powered equipment and power tools
are capable of propelling materials such
as fasteners, metal chips, sawdust and
other debris at high speed which could
result in serious eye injury.
Compressed air can be hazardous. The
air system can cause injury to soft
tissue areas such as eyes, ears, etc.
Particles or objects propelled by the
stream can cause injury.
Tool attachments can become loose or
break and fly apart, propelling particles
at the operator and others in the work
area.
WARNING
WHAT COULD HAPPEN HOW TO PREVENT IT
WARNING
Abrasive tools such as sanders and
grinders, rotating tools such as drills,
and impact tools such as nailers,
staplers, wrenches, hammers and
reciprocating saws are capable of
generating sparks, which could result in
ignition of flammable materials.
Exceeding the maximum pressure
rating of tools or accessories could
cause an explosion resulting in
serious injury.
RISK OF FIRE OR EXPLOSION
Never operate tools near flammable
substances such as gasoline, naphtha,
cleaning solvents, etc.
Work in a clean, well-ventilated area
free of combustible materials.
Never use oxygen, carbon dioxide or
other bottled gases as a power source
for air tools.
Use compressed air regulated to a
maximum pressure at or below the
rated pressure of any attachments.
Never connect to an air source that is
capable of exceeding 200 PSI.
Always verify prior to using the tools
that the air source has been adjusted
to the rated air pressure range.
WHAT COULD HAPPEN HOW TO PREVENT IT
WARNING
RISK OF LOSS OF HEARING
Always wear ANSI S3.19 hearing
protection.
Long term exposure to noise produced
from the operation of air tools can lead
to permanent hearing loss.
4
Always wear ANSI approved Z87.1
safety glasses with side shields.
Never leave operating tool unattended.
Disconnect air hose when tool is not
in use.
For additional protection use an
approved face shield in addition to
safety glasses.
Make sure that any attachments are
securely assembled.
Page 5
WHAT COULD HAPPEN HOW TO PREVENT IT
WARNING
INHALATION HAZARD
Always wear a properly fitting facemask
or respirator when using such tools.
Always work in a clean, dry,
well-ventilated area.
WHAT COULD HAPPEN HOW TO PREVENT IT
WARNING
RISK OF INJURY
A tool left unattended, or with the air
hose attached, can be activated by
unauthorized persons leading to
their injury or injury to others.
Air tools can propel fasteners or other
materials throughout the work area.
A wrench or a key that is left attached to
a rotating part of the tool increases the
risk of personal injury.
Using inflator nozzles for duster
applications can cause serious injury.
Air tools can become activated by
accident during maintenance or tool
changes.
Air tools can cause the workpiece to
move upon contact, leading to injury.
Remove air hose when tool is not in
use and store tool in secure location
away from reach of children and
untrained users.
Use only parts, fasteners and accessories
recommended by the manufacturer.
Keep work area clean and free of
clutter. Keep children and others away
from tool while it is in operation.
Keep work area well-lit.
Remove adjusting keys and wrenches
before turning the tool on.
DO NOT use inflator nozzles for duster
applications.
Remove air hose to lubricate or add
grinding attachments, impact sockets,
chisels, etc., to the tool.
Never carry the tool by hose.
Avoid unintentional starting. Don't carry
hooked-up tool with finger on trigger.
Only an authorized service
representative should complete repairs.
Use clamps or other devices to prevent
movement.
5
Abrasive tools such as grinders,
sanders and cut-off tools generate dust
and abrasive materials, which can be
harmful to human lungs and the
respiratory system.
Some materials such as adhesives and
tar contain chemicals whose vapors
could cause serious injury with
prolonged exposure.
Page 6
Loss of control of the tool can lead to
injury to self or others.
Poor quality, improper or damaged tools
and attachments can fly apart during
operation, propelling particles
throughout the work area causing
serious injury.
Improperly maintained tools and
accessories can cause serious injury.
There is a risk of bursting if the tool is
damaged.
Use only accessories identified by the
manufacturer to be used with specific
tools.
Never use tool while using drugs or
alcohol.
Don't overreach. Keep proper footing
and balance.
Keep handles dry, clean and free from
oil/grease.
Stay alert. Watch what you are doing.
Use common sense. Do not operate
tool when you are tired.
Always use tool attachments rated for
the speed of the power tool.
Never use tools, which have been
dropped, impacted or damaged by use.
Use only impact grade sockets on an
impact wrench.
Do not apply excessive force to the tool;
let the tool perform the work.
Maintain the tool and accessories
with care.
Keep the tool clean. A properly
maintained tool reduces the risk of
binding and is easier to control.
Check for misalignment or binding of
moving parts, breakage of parts and
any other condition that affects the
tool's operation. If damaged, have the
tool serviced before using.
Use of an accessory not intended for
use with specific tools increases the risk
of injury.
WHAT COULD HAPPEN HOW TO PREVENT IT
WARNING
RISK OF INJURY
WHAT COULD HAPPEN HOW TO PREVENT IT
WARNING
RISK OF ELECTRIC SHOCK
Using air tools to attach electrical wiring
can result in electrocution or death.
This tool is not provided with an
insulated gripping surface. Contact with
a “live” wire will also make exposed
metal parts of the tool “live” and can
result in electrocution or death.
Never use tools to attach electrical
wiring while energized.
Avoid body contact with grounded
surfaces such as pipes, radiators,
ranges and refrigerators. There is an
increased risk of electric shock if your
body is grounded.
6
Page 7
Tools which contain moving elements,
or drive other moving parts, such as
grinding accessories, sockets, chisels,
etc., can become entangled in hair,
clothing, jewelry and other loose
objects, resulting in severe injury.
WHAT COULD HAPPEN HOW TO PREVENT IT
WARNING
RISK OF ENTANGLEMENT
Never wear loose fitting clothes or
apparel that contain loose straps or
ties, etc., which could become
entangled in moving parts of the tools.
Remove any jewelry, watches,
identifications, bracelets, necklaces,
etc., which might become caught by
the tool.
Keep hands away from moving parts.
Tie up or cover long hair.
Always wear proper fitting clothing and
other safety equipment when using
the tool.
WHAT COULD HAPPEN HOW TO PREVENT IT
WARNING
RISK OF CUT OR BURNS
Keep the working part of the tool away
from hands and body.
Tools that impact, rotate, chisel, etc.,
are capable of causing serious injury.
7
WHAT COULD HAPPEN HOW TO PREVENT IT
WARNING
RISK OF ELECTRIC SHOCK
Air tool accessories such as impact
sockets, chisels and grinding stones
that come into contact with hidden
electrical wiring could cause
electrocution or death.
Thoroughly investigate the workpiece
for possible hidden wiring before
performing work.
Page 8
MAX R.P.M. 25,000
3” X 1/16” X
3/8”
WARNING:
WEAR SAFETY G
OGGLES
USE GUARDS
MPA90909
COLLET
HEX KEY
PLUGS
GRINDING STONES
WRENCHES
CUT OFF TOOL
ROTARY TOOL
CUTTING WHEELS
OIL BOTTLE
PRODUCT SPECIFICATIONS
1/4 IN. AIR ROTARY TOOL
SPECIFICATIONS
1/4 in.
25,000 RPM +/- 10%
4 CFM
1/4 in. NPT
3/8 in.
90 PSI
COMPONENT
Collet
Free speed
Average air consumption
Air inlet
Air hose
Working pressure
3 IN. AIR CUT OFF TOOL
8
SPECIFICATIONS
3 in.
20,000 RPM +/- 10%
5 CFM
1/4 in. NPT
3/8 in.
90 PSI
COMPONENT
Cutting wheel
Free speed
Average air consumption
Air inlet
Air hose
Working pressure
A
B
D
C
E
F
G
H
I
J
K
L
M
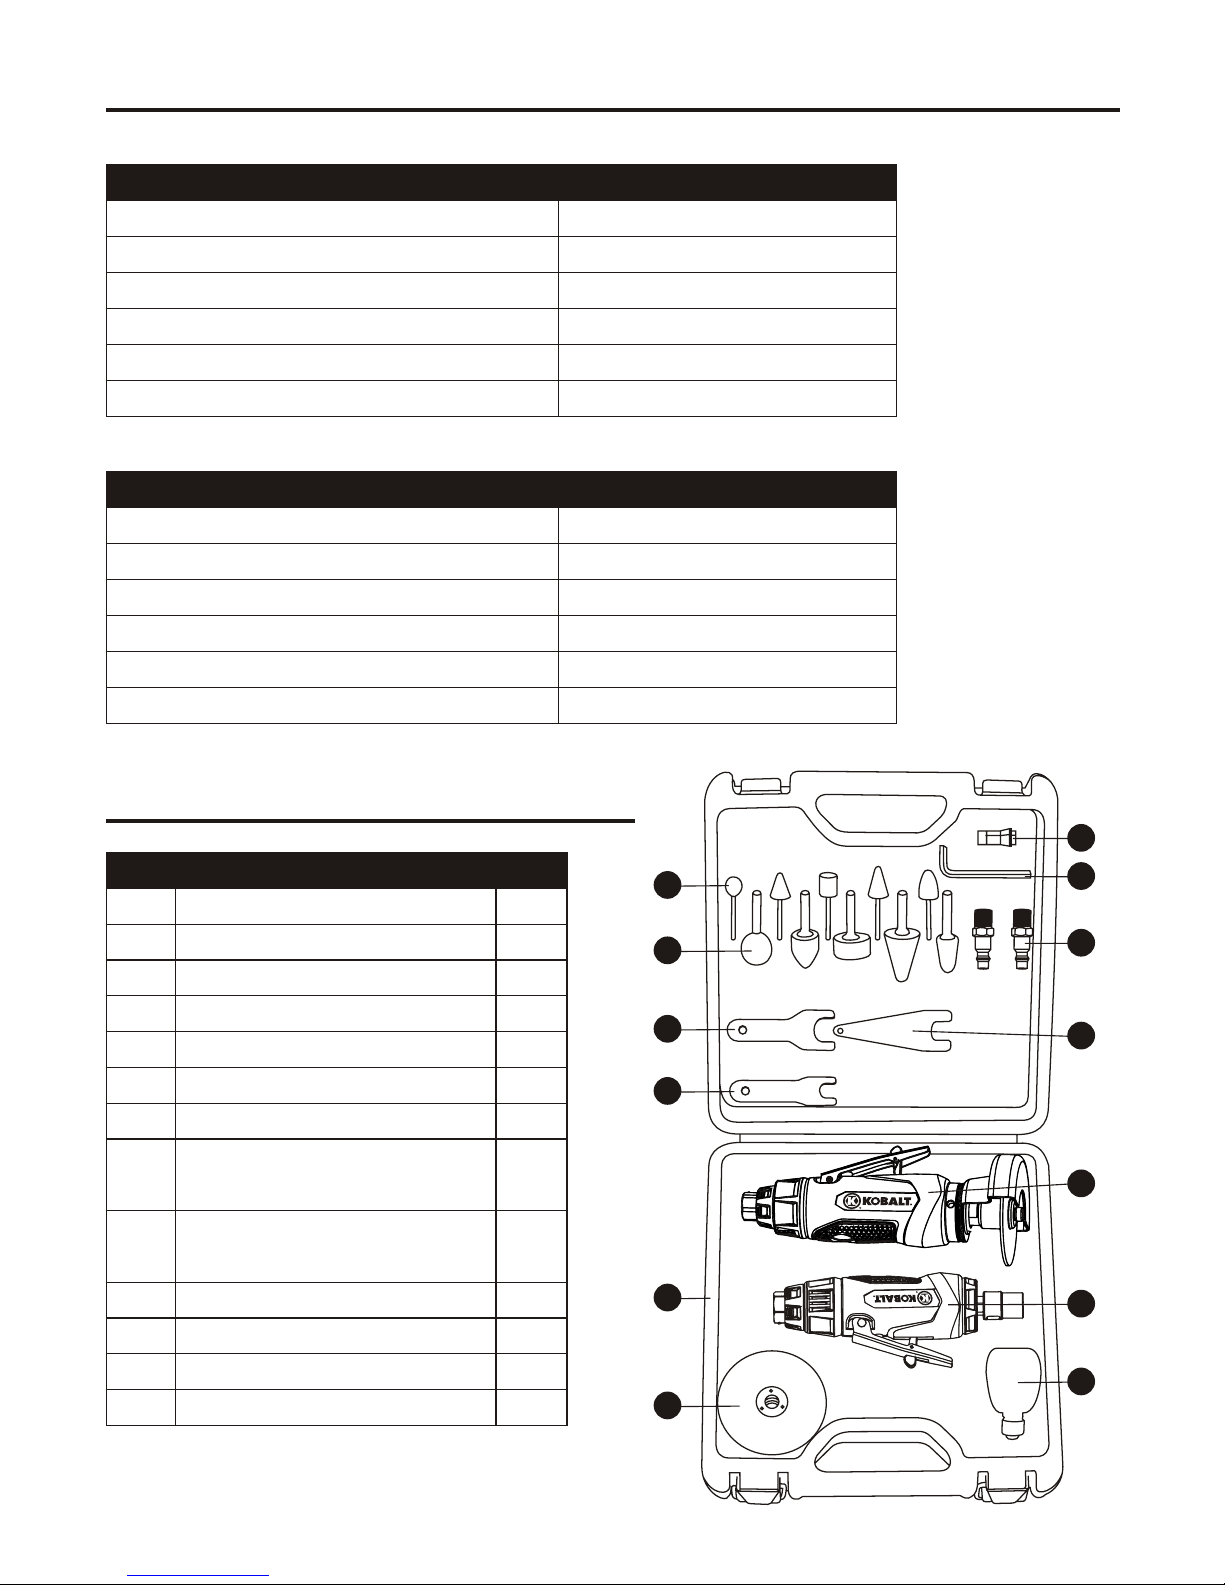
PACKAGE CONTENTS
DESCRIPTION
3 in. Air Cut Off Tool
1/4 in. Air Rotary Tool
Cutting Wheel
Oil Bottle
Large Wrench
Small Wrench
Wrench
1/4 in. Shank Grinding
Stone
1/8 in. Shank Grinding
Stone
Hex Key
1/8 in. Collet
Male Plug
Case
QTY.
1
1
12
1
1
1
1
5
5
1
1
2
1
PART
A
B
C
D
E
F
G
H
I
J
K
L
M
Page 9
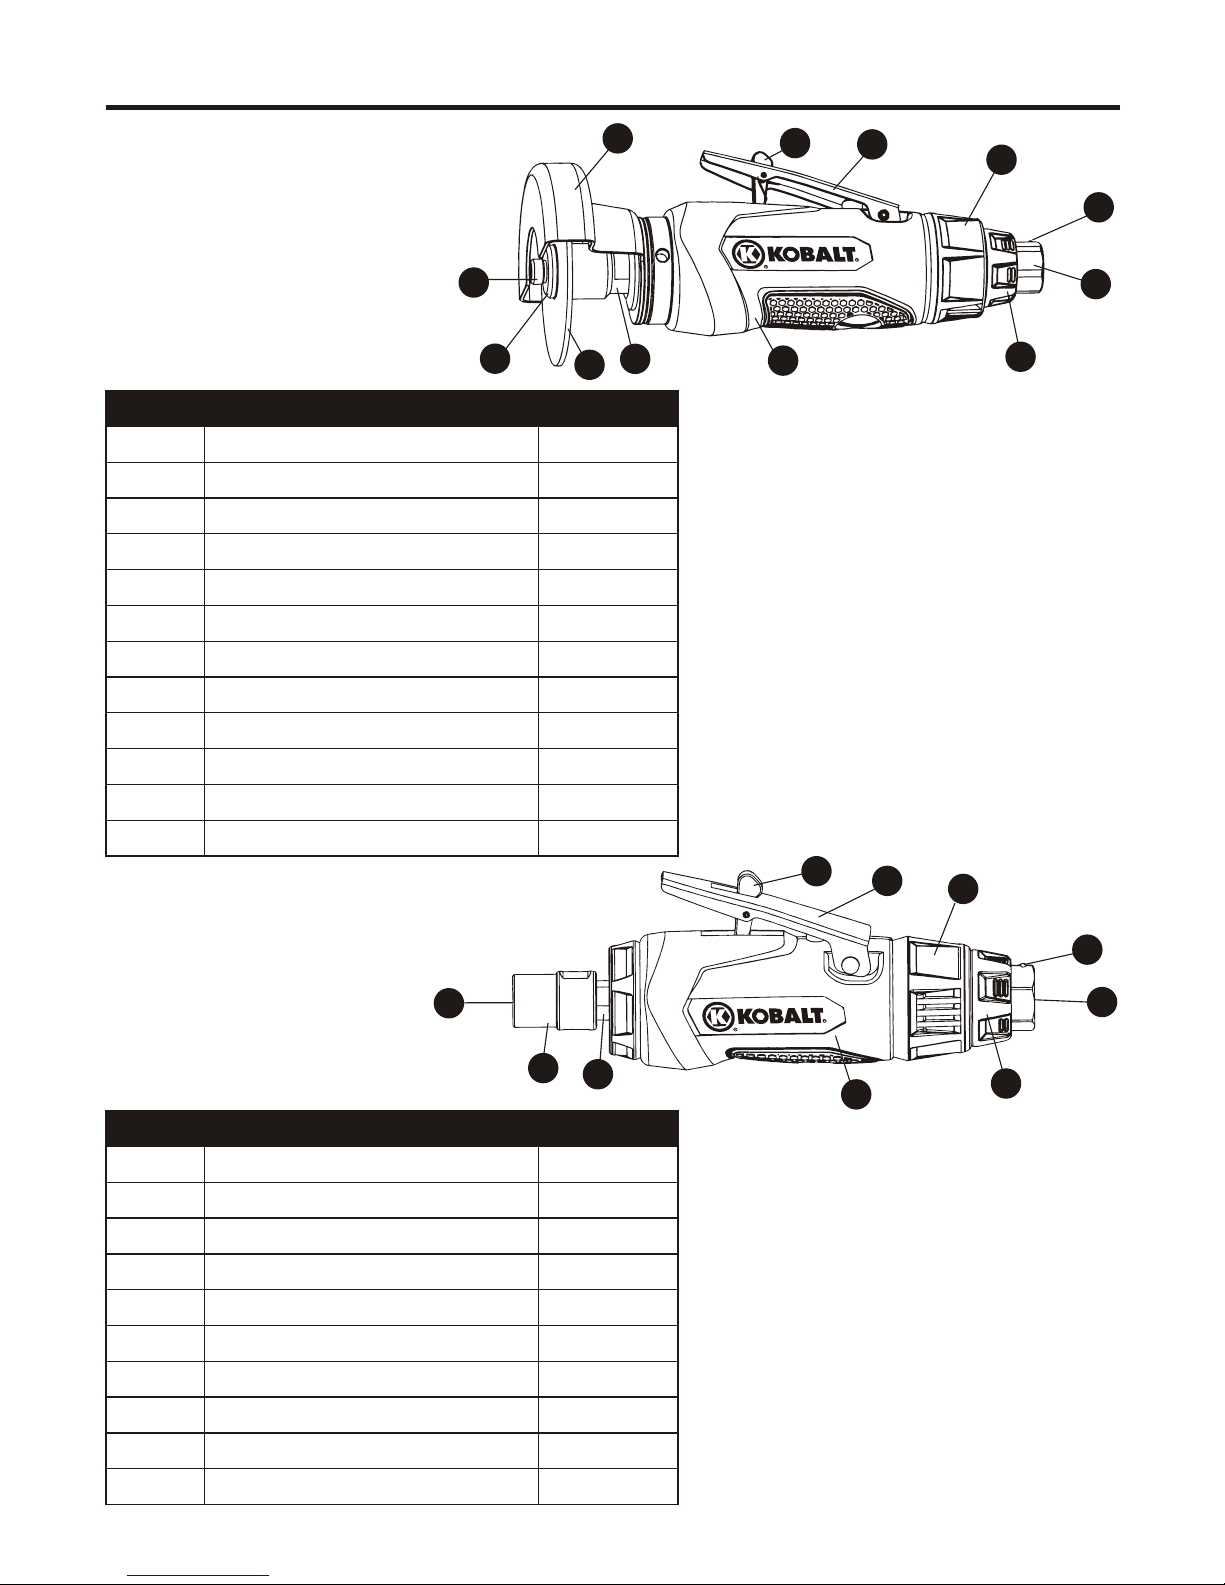
DESCRIPTION
3 in. Air Cut Off Tool
3 in. Cutting Wheel
Metal Guard
Air Regulator
Bolt
Washer
Collet Holder
Trigger
Lever
Exhaust Deflector
Steel Ball
Air Inlet
QUANTITY
1
1
1
1
1
1
1
1
1
1
1
1
PART
A1
B1
C1
D1
E1
F1
G1
H1
I1
J1
K1
L1
A1
D1
C1
H1
I1
G1
B1
F1
E1
J1
K1
L1
PACKAGE CONTENTS
DESCRIPTION
1/4 in. Air Rotary Tool
Collet Jacket
Collet Holder
Collet
Trigger
Lever
Air Regulator
Exhaust Deflector
Steel Ball Indicator
Air Inlet
QUANTITY
1
1
1
1
1
1
1
1
1
1
PART
A2
B2
C2
D2
E2
F2
G2
H2
I2
J2
A2
B2
C2
D2
G2
E2
F2
I2
H2
J2
1/4 IN. AIR ROTARY TOOL
3 IN. AIR CUT OFF TOOL
9
Page 10
PREPARATION
Before beginning assembly of product, make sure all parts are present. Compare
parts with package contents list. If any part is missing or damaged, do not attempt to
assemble the product.
Estimated Assembly Time: 5 - 10 minutes
Tools Required for Assembly (not included): Adjustable wrench, thread sealant tape,
air tool oil.
ASSEMBLY INSTRUCTIONS
10
3 IN. AIR CUT OFF TOOL
2
1
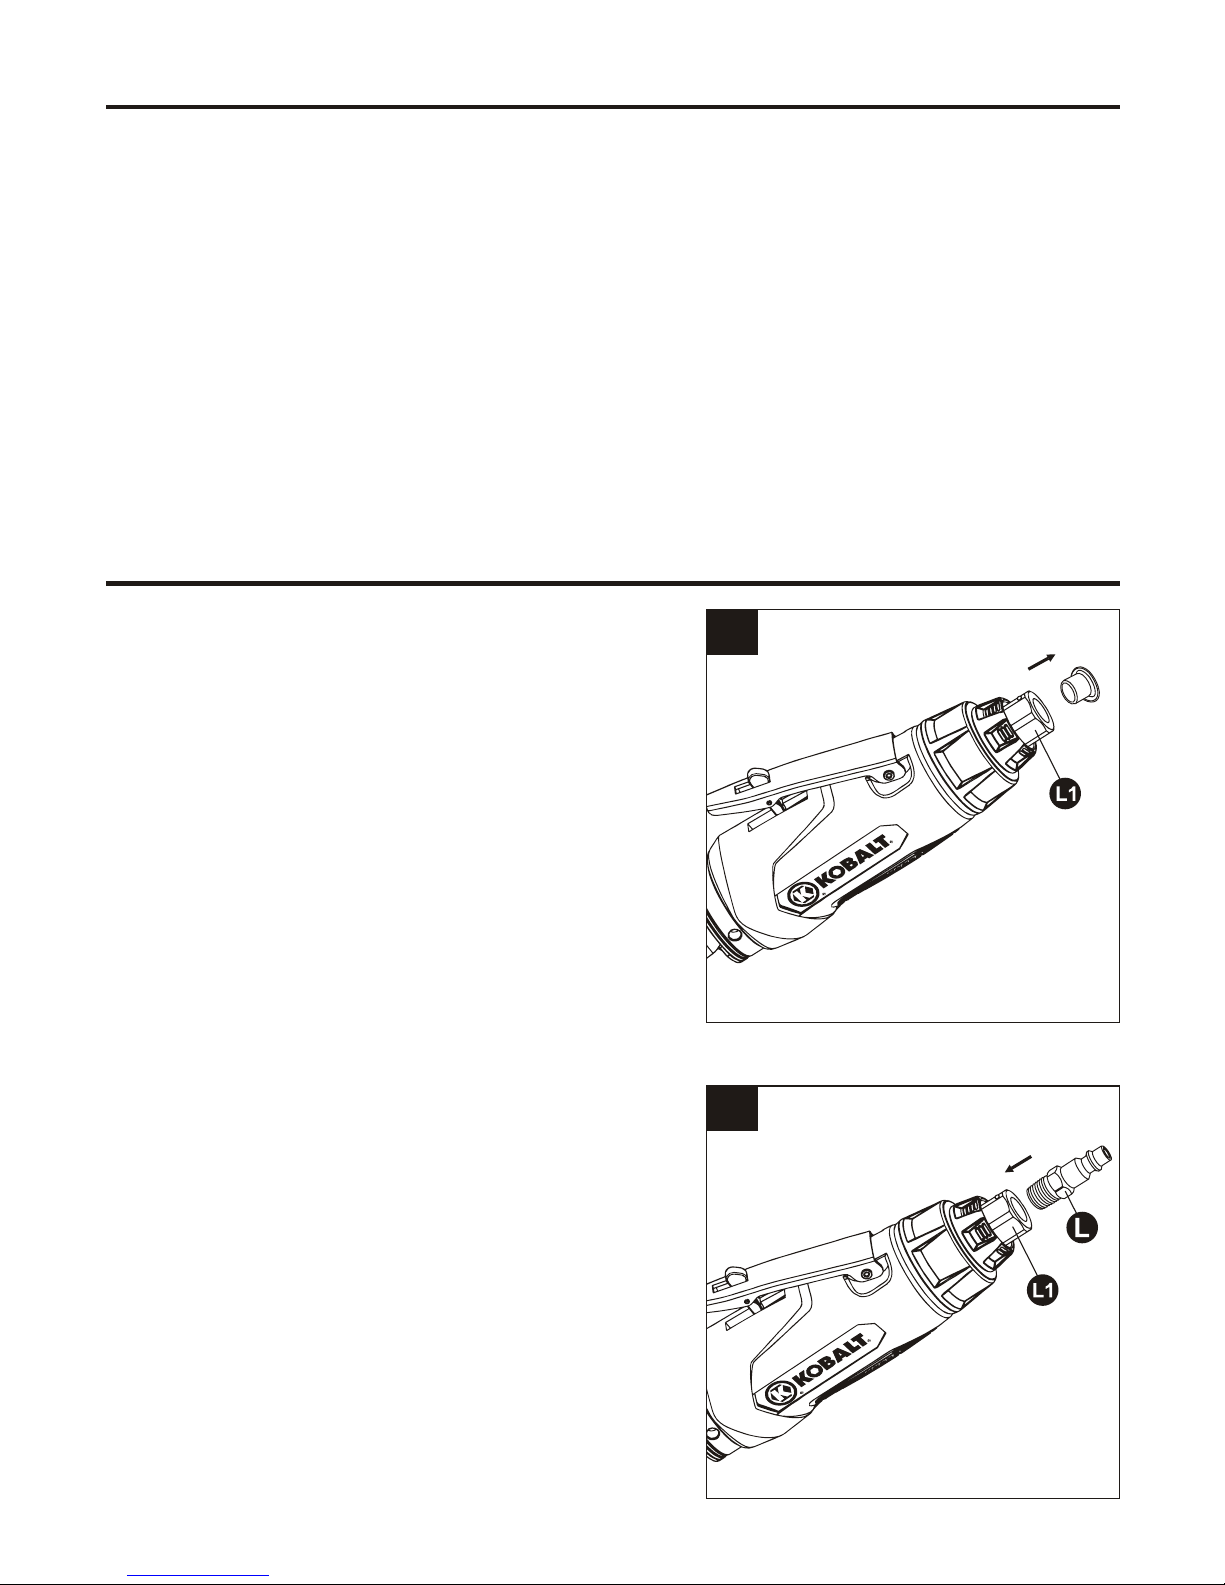
1. Remove the air inlet protective cap from the
air inlet (L1).
2. Mount a male plug (L) by hand into the air
inlet (L1).
NOTE: Use thread sealant tape (not included) on
the male plug and tighten it with a wrench (not
included) for airtight connection. Do not
overtighten.
Page 11
3
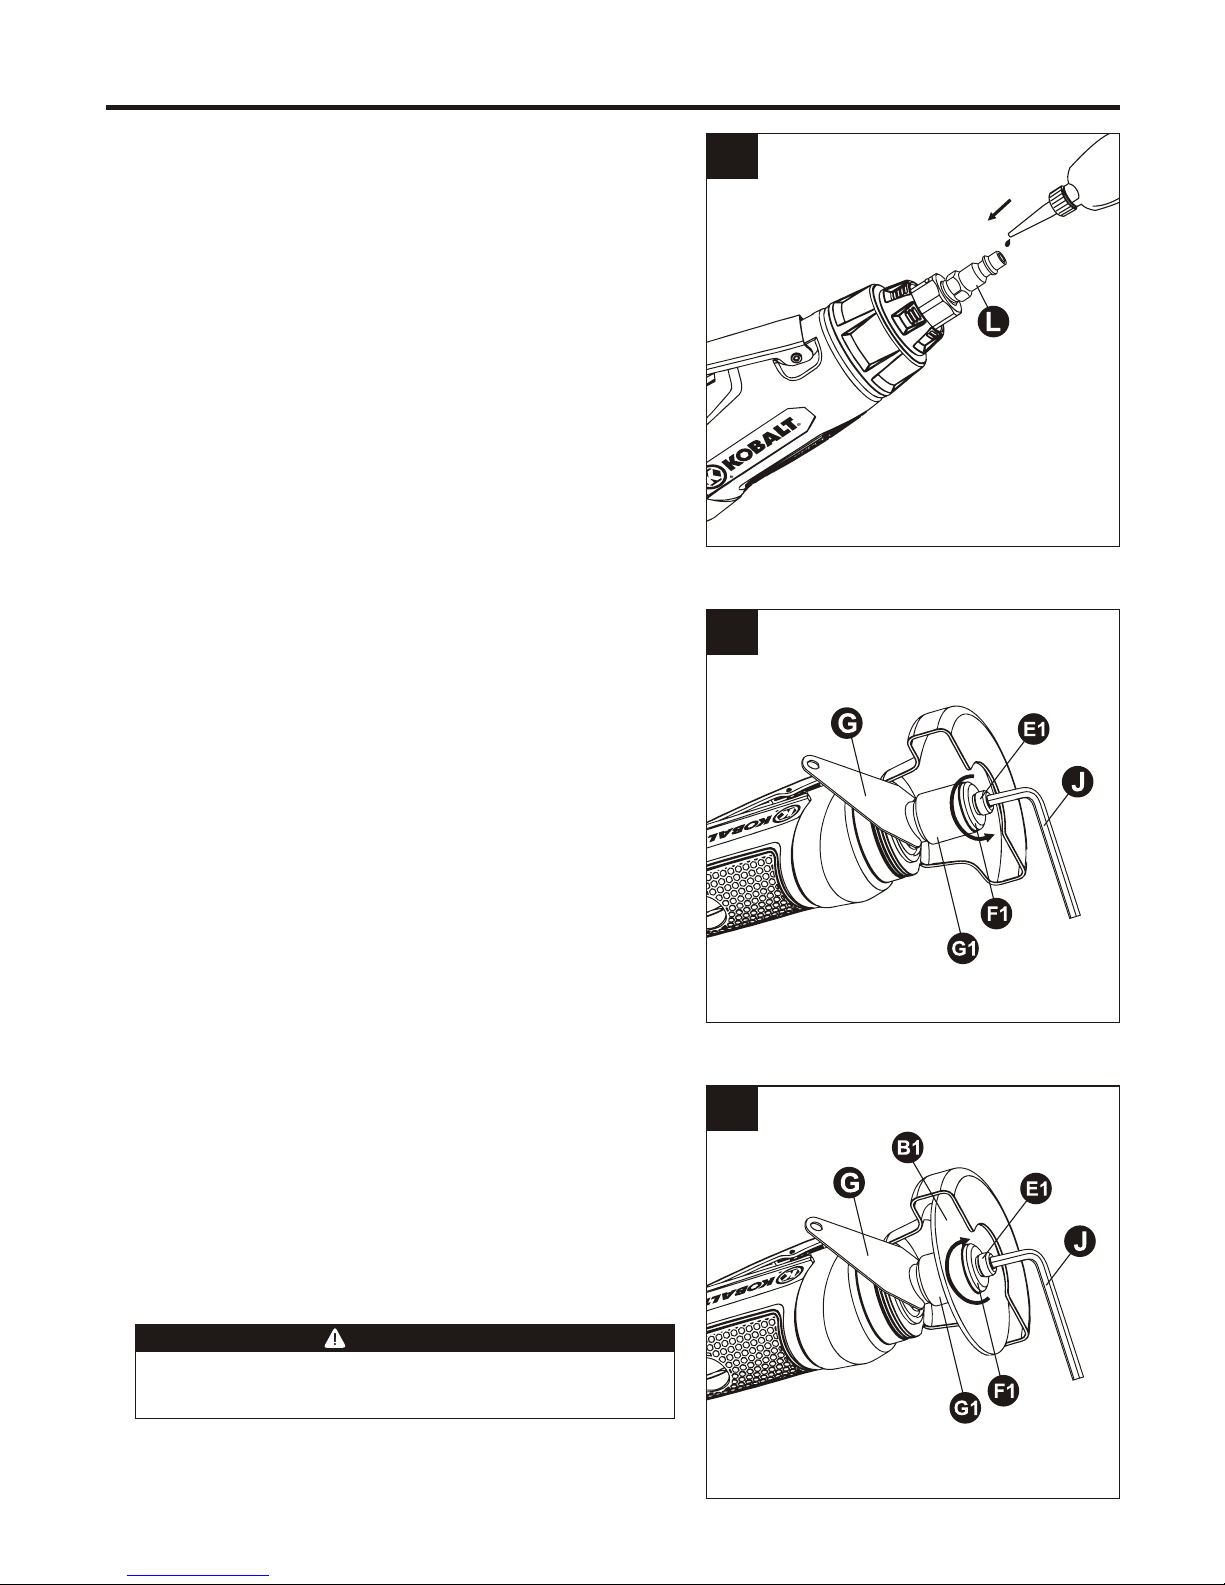
3. Place 2 to 3 drops of air tool oil (not included)
into the male plug (L) before each use.
ASSEMBLY INSTRUCTIONS
4
5
4. Release the bolt (E1) and washer (F1) with the
hex key (J) by turning counterclockwise
while holding the wrench (G) on the flats of
the collet holder (G1).
5. Mount a cutting wheel (B1) onto the 3 in. air
cut off the washer (F1)
and bolt (E1) with the hex key (J) by turning
clockwise while holding the wrench (G) on the
flats of the collet holder (G1). Make sure the
cutting wheel (B1) is installed securely and
tightly.
tool (A1). Re-attach
Only use cutting wheels that have an RPM
rating equal to or greater than the tool itself.
WARNING
11
Page 12
ASSEMBLY INSTRUCTIONS
6
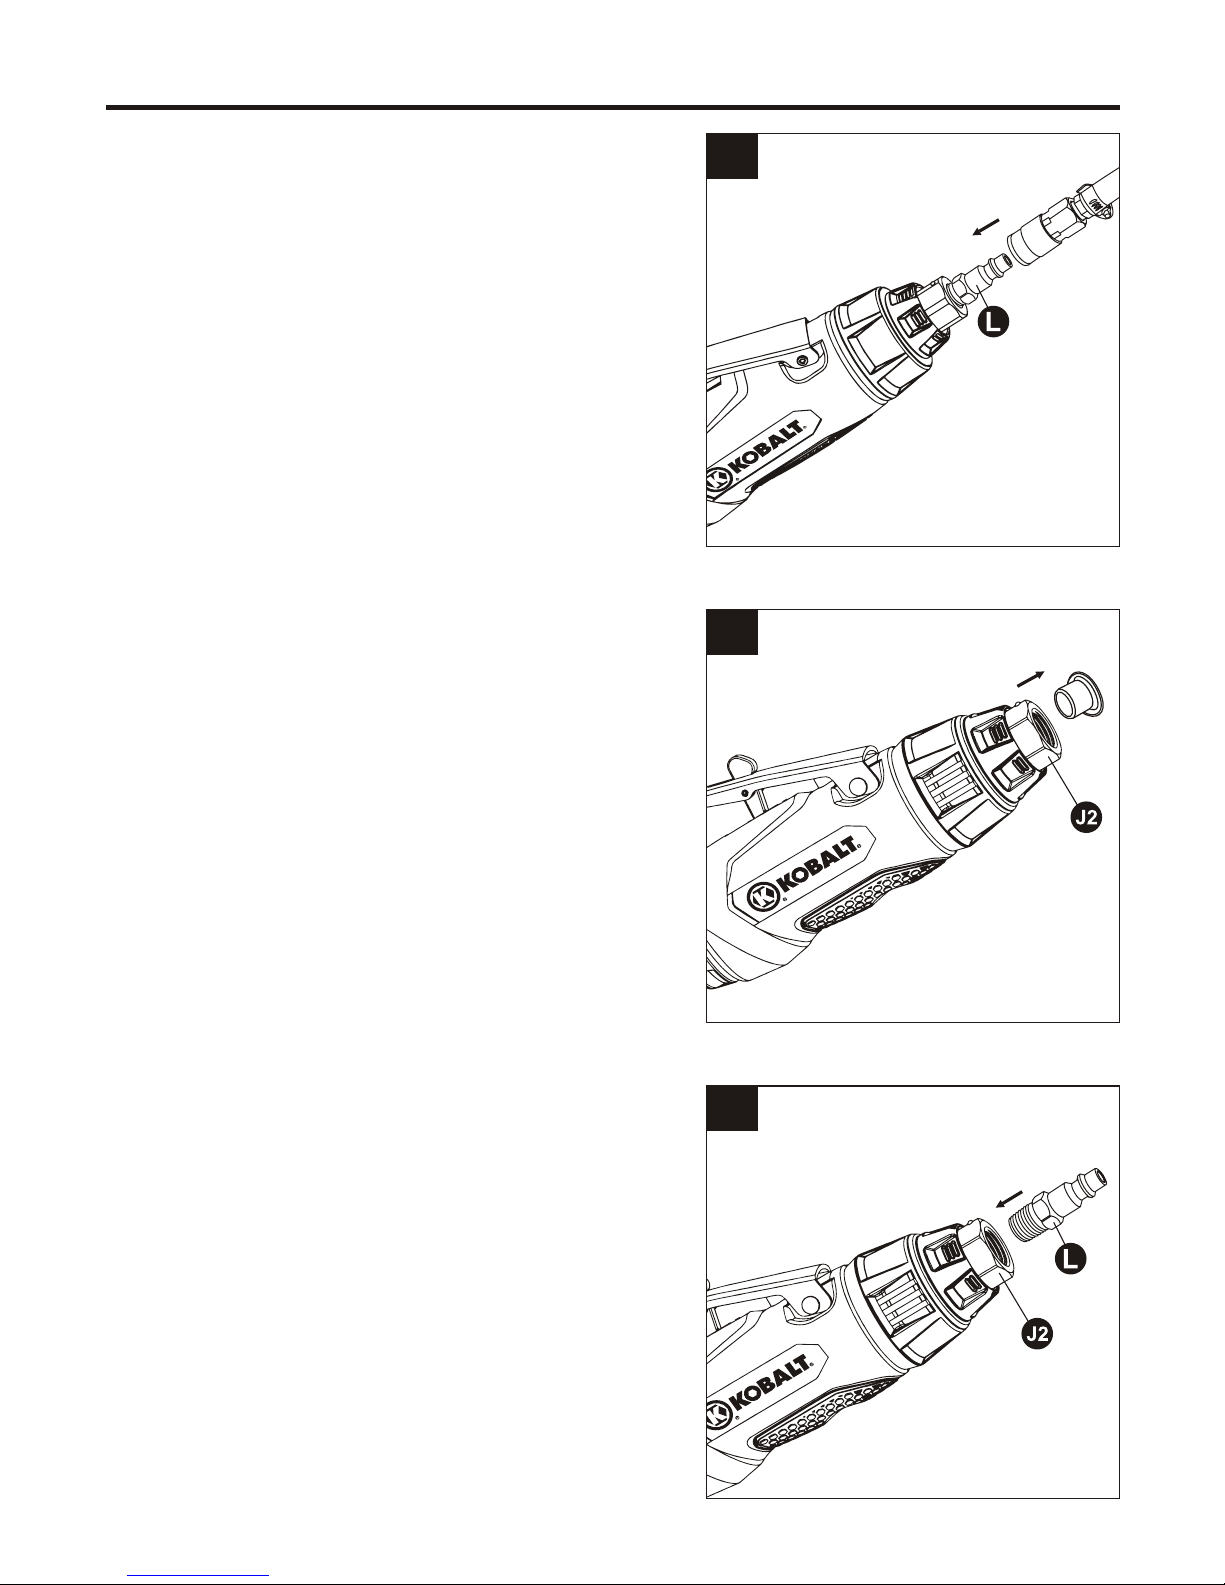
6. Connect air supply hose to the male plug (L).
Set the working pressure at 90 PSI for best tool
performance.
NOTE: Working pressure refers to the air line
pressure applied to tool when tool is under
working conditions.
8
7
7. Remove the air inlet protective cap from the
air inlet (J2).
8. Mount a male plug (L) by hand into the
air inlet (J2).
NOTE: Use thread sealant tape on the male plug
and tighten it with a wrench (not included) for
airtight connection. Do not overtighten.
1/4 IN. AIR ROTARY TOOL
12
Page 13

ASSEMBLY INSTRUCTIONS
9
9. Place 2 to 3 drops of air tool oil (not included)
into the male plug (L) before each use.
13
10
11
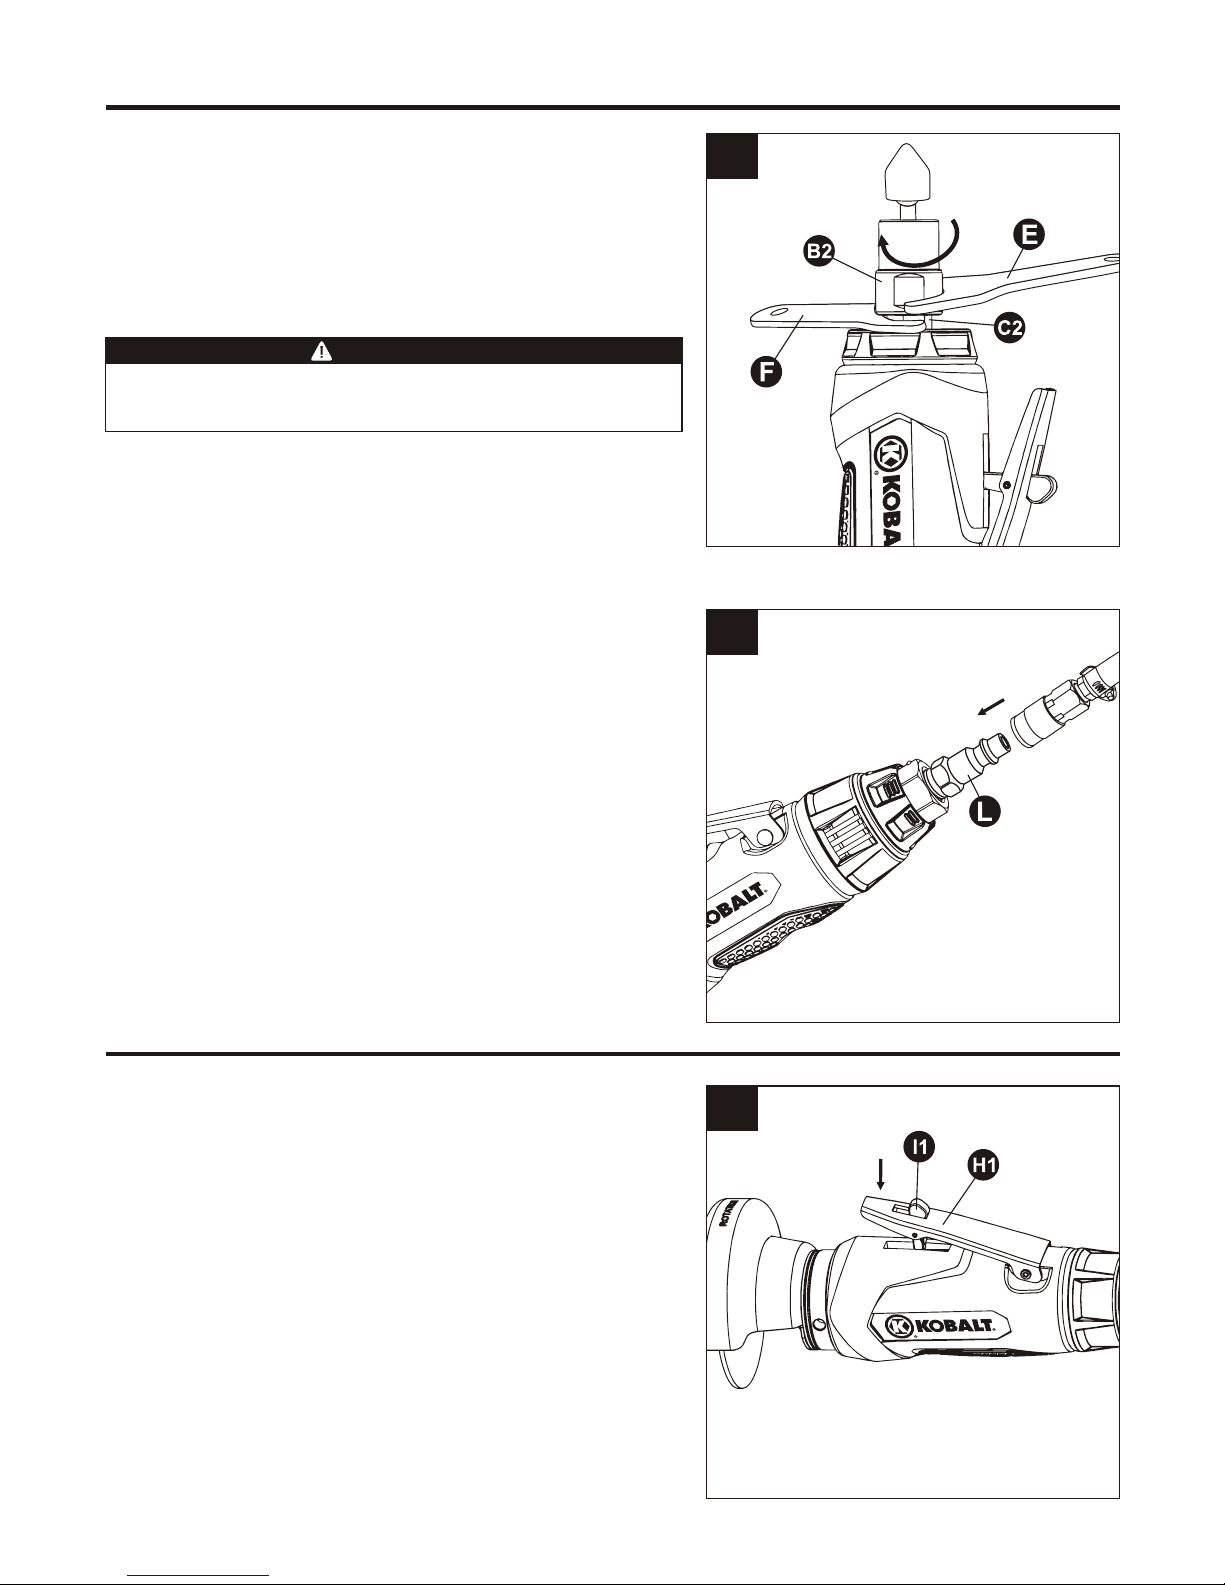
10. Loosen the collet jacket (B2) counterclockwise
by hand or with the large wrench (E) while
holding the small wrench (F) on the flats of the
collet holder (C2).
11. Insert a grinding accessory like a grinding
stone into the collet (D2).
Page 14
ASSEMBLY INSTRUCTIONS
12
12. Tighten the collet jacket (B2) clockwise with the
large wrench (E) while holding the small
wrench (F) on the flats of the collet holder (C2).
Make sure that the grinding stone is installed
securely and tightly.
Only use grinding accessories that have an RPM
rating equal to or greater than the tool itself.
WARNING
14
13
13. Connect air supply hose to the male plug (L).
Set the working pressure at 90 PSI for best
tool performance.
NOTE: Working pressure refers to the air line
pressure applied to tool when tool is under working
conditions.
OPERATING INSTRUCTIONS
3 IN. AIR CUT OFF TOOL
1
Push lever (I1) forward and press down on the
trigger (H1) to start the tool.
Page 15
15
2
3
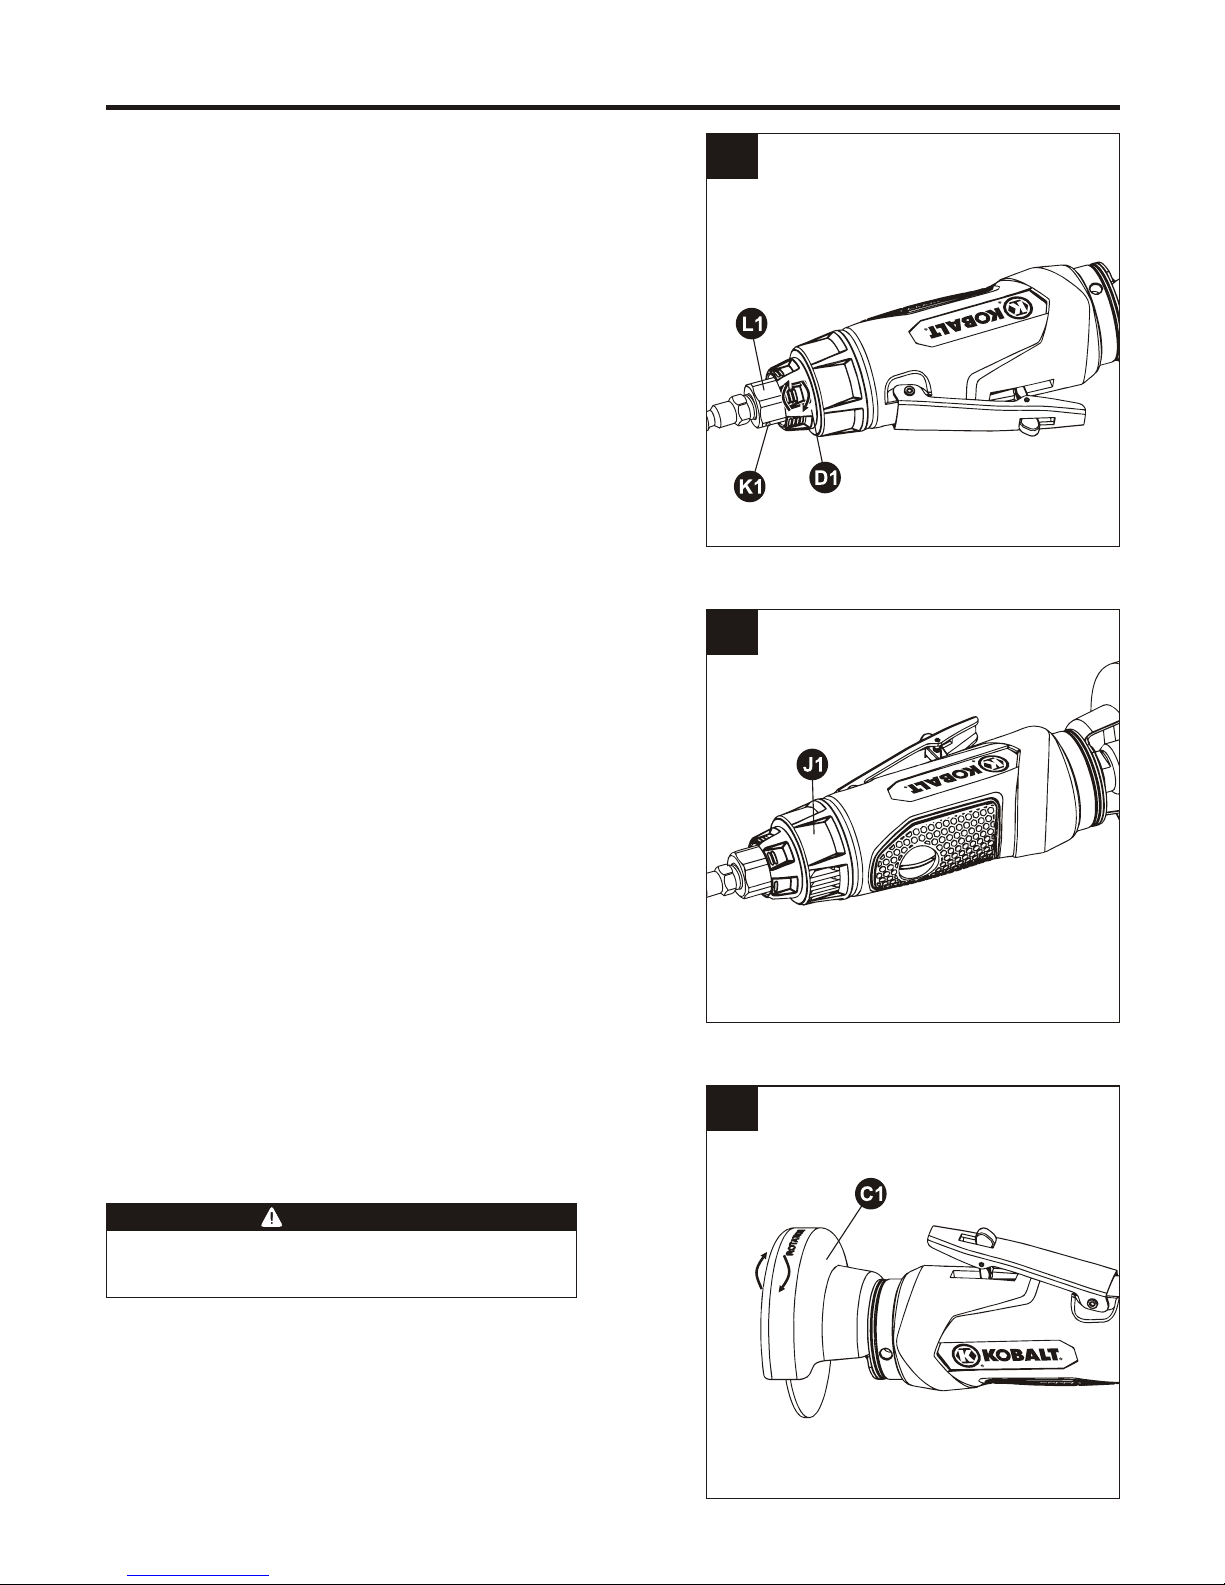
NOTE: This tool features a power regulator valve.
Rotate the air regulator (D1) until desired output is
achieved. The settings 1, 2, 3, 4 are only for
reference and do not denote a specific power
output. “Setting 1” (one-line symbol) is the lowest
speed while “Setting 4” (four-line symbol) is the
highest speed. Rotate the air regulator (D1) until
the desired setting is lined up with the small steel
ball (K1) on air inlet (L1).
NOTE: This tool also features an exhaust
deflector (J1) that deflects exhaust air downward.
4
NOTE: The metal guard (C1) can be rotated by
hand to any position to protect workpiece from
sparks.
Before adjusting the metal guard (C1),
disconnect tool from air supply.
WARNING
OPERATING INSTRUCTIONS
Page 16
1/4 IN. AIR ROTARY TOOL
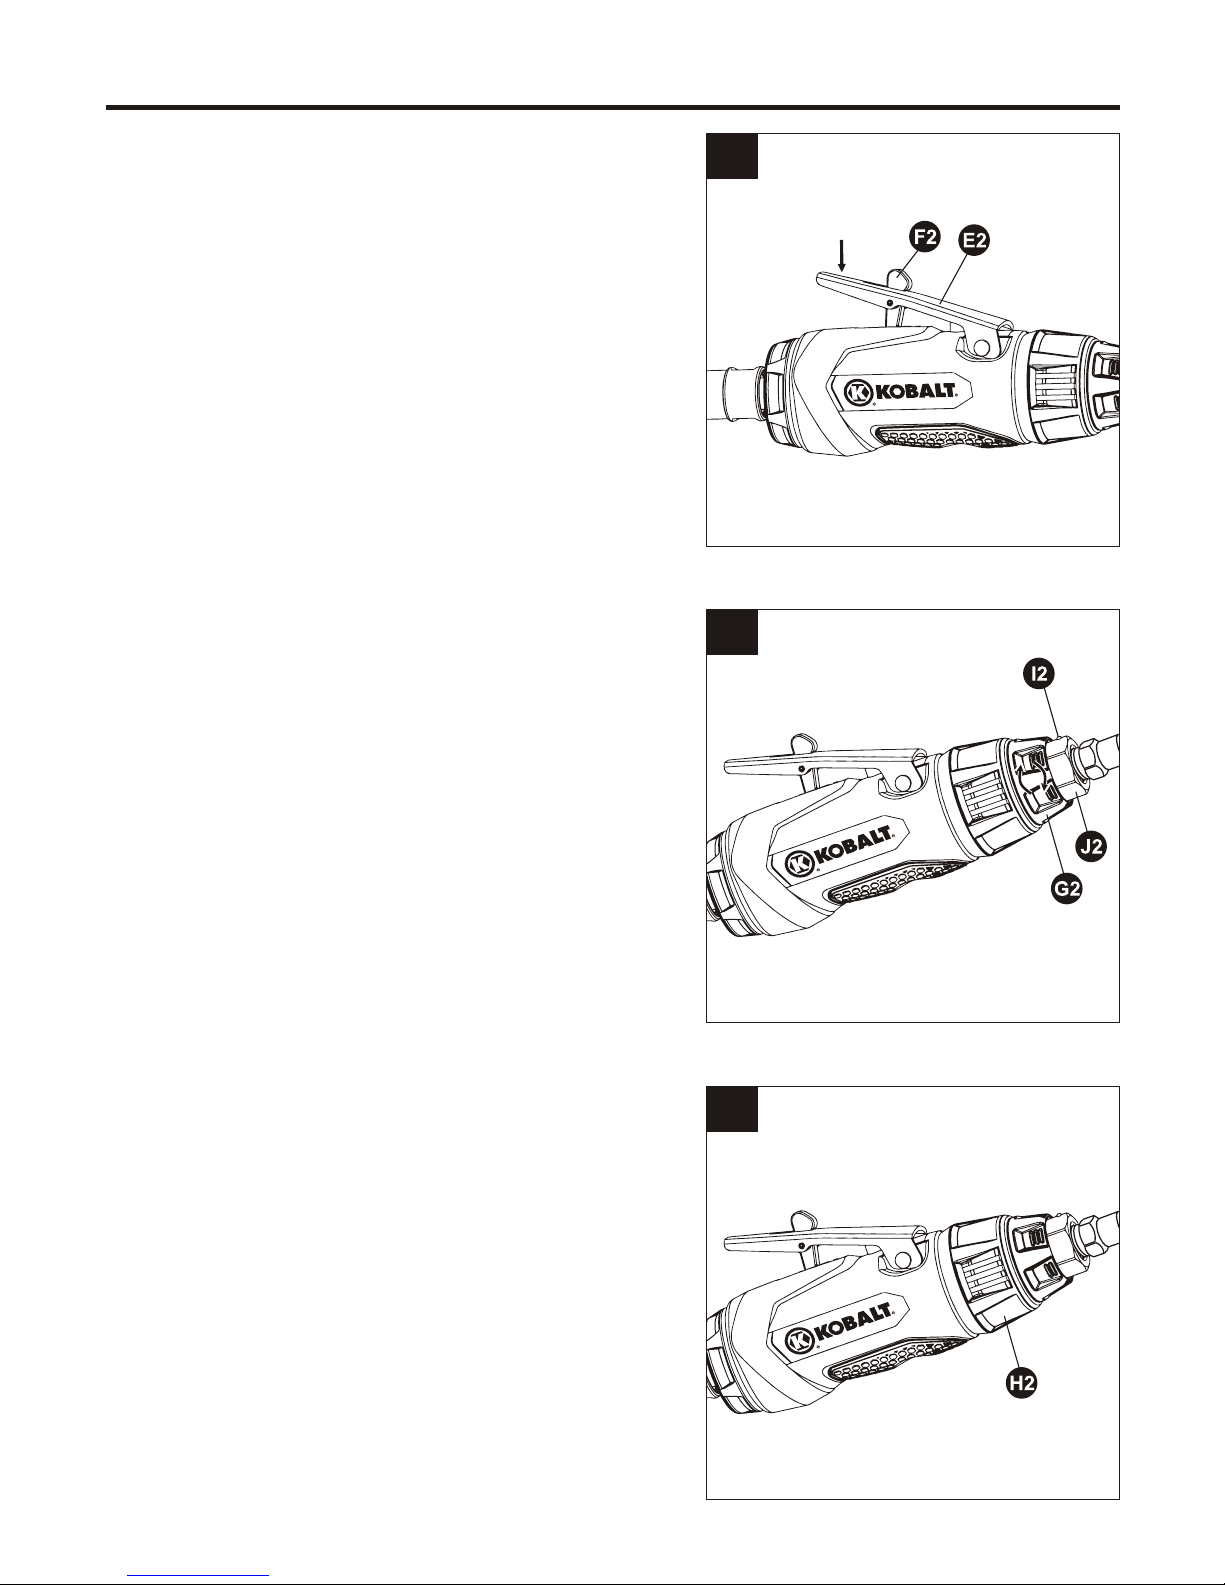
Push lever (F2) forward and press down on the
trigger (E2) to start the tool.
1
2
NOTE: This tool features a power regulator valve.
Rotate the air regulator (G2) until desired output is
achieved. The settings 1, 2, 3, 4 are only for
reference and do not denote a specific power
output. “Setting 1” (one-line symbol) is the lowest
speed while “Setting 4” (four-line symbol) is the
highest speed. Rotate the air regulator (G2) until
the desired setting is lined up with the small steel
ball indicator (I2) on air inlet (J2).
OPERATING INSTRUCTIONS
NOTE: This tool also features an exhaust
deflector (H2) that deflects exhaust air downward.
3
16
Page 17

17
OPERATING INSTRUCTIONS
CARE AND MAINTENANCE
An in-line oiler is recommended to be installed on air supply line as it increases tool
life and keeps the tool in sustained operation. The in-line oiler should be regularly
checked and filled with air-tool oil. Proper adjustment of the in-line oiler is performed
by placing a sheet of paper next to the tool’s exhaust ports and holding the throttle
open approximately 30 seconds. The in-line oiler is properly set when a light stain of
oil collects on the paper. Excessive amounts of oil should be avoided.
In the event that it becomes necessary to store the tool for an extended period of
time, it should receive a generous amount of lubrication at that time. The tool should
be operated for approximately 30 seconds to ensure oil has been evenly distributed
throughout the tool. The tool should be stored in a clean and dry environment.
Recommended lubricants: use air-tool oil or any other high-grade turbine oil
containing moisture absorbent, rust inhibitors, metal wetting agents and an EP
(extreme pressure) additive.
Clean the tool with a cotton rag after each use. Keep the tool in a dry and safe place
out of reach of children.
4
NOTE: This tool is equipped with 1/4 in. collet
from factory. When mounting an 1/8 in. shank
grinding accessory onto tool, you need to first
replace the collet (D2) with the 1/8 in. collet (K)
using the large wrench (E) and small wrench (F).
Release the collet jacket (B2) with the large
wrench (E) by turning counterclockwise while
holding the small wrench (F) on the flats of the
collet holder (C2). Insert the 1/8 in. collet (K) into
the collet holder (C2). Mount the collet jacket (B2)
onto tool and tighten it with the large wrench (E)
and the small wrench (F).
Page 18

18
THREE-YEAR LIMITED WARRANTY
1. Flush the tool with air-tool oil or gum
solvent.
2. Lubricate the tool.
3. a. Adjust the regulator on the tool to
maximum setting.
b. Adjust the compressor regulator to tool
maximum of 90 PSI.
4. Tighten and seal hose fittings if leaks are
found. Use sealing tape.
5. a. Be sure the hose is the proper size.
Long hose or tools using large volumes
of air may require a hose with an I.D. of
1/2 in. or larger depending on the total
length of the hoses.
b. Do not use multiple hoses connected
together with quick-connect fittings. This
causes additional pressure drops and
reduces the tool power.
Directly connect the hoses together.
6. Replace rotor blade.
7. Water in tank; drain tank. (See air
compressor manual). Oil tool and run
until no water is evident. Oil tool again
and run 1 - 2 seconds.
Tool runs
slowly or will
not operate.
1. Grit or gum in tool.
2. No oil in tool.
3. Low air pressure.
4. Air hose leaks.
5. Pressure drops.
6. Worn rotor blade.
7. Moisture blowing
out of tool exhaust.
PROBLEM
TROUBLESHOOTING
CORRECTIVE ACTION
POSSIBLE CAUSE
This tool is warranted by the manufacturer to the original purchaser from the original
purchase date for three (3) years subject to the warranty coverage described herein.
This tool is warranted to the original user to be free from defect in material and
workmanship. If you believe that a tool is defective, return the tool with proper proof
of purchase to the point of purchase. If it is determined that the tool is defective and
covered by this warranty, the distributor will replace the tool or refund the
purchase price.
This warranty is void if: defects in materials or workmanship or damages result from
repairs or alterations which have been made or attempted by others or the
unauthorized use of nonconforming parts; the damage is due to normal wear, damage
is due to abuse (including overloading of the tool beyond capacity), improper
maintenance, neglect or accident; or the damage is due to the use of the tool after
partial failure or use with improper accessories or unauthorized repair or alteration.
This warranty gives you specific legal rights, and you may also have other rights that
vary from state to state.
For warranty questions, call our customer service department at 1-888-3KOBALT,
8:00 a.m. - 8:00 p.m., EST, Monday - Friday.
Page 19
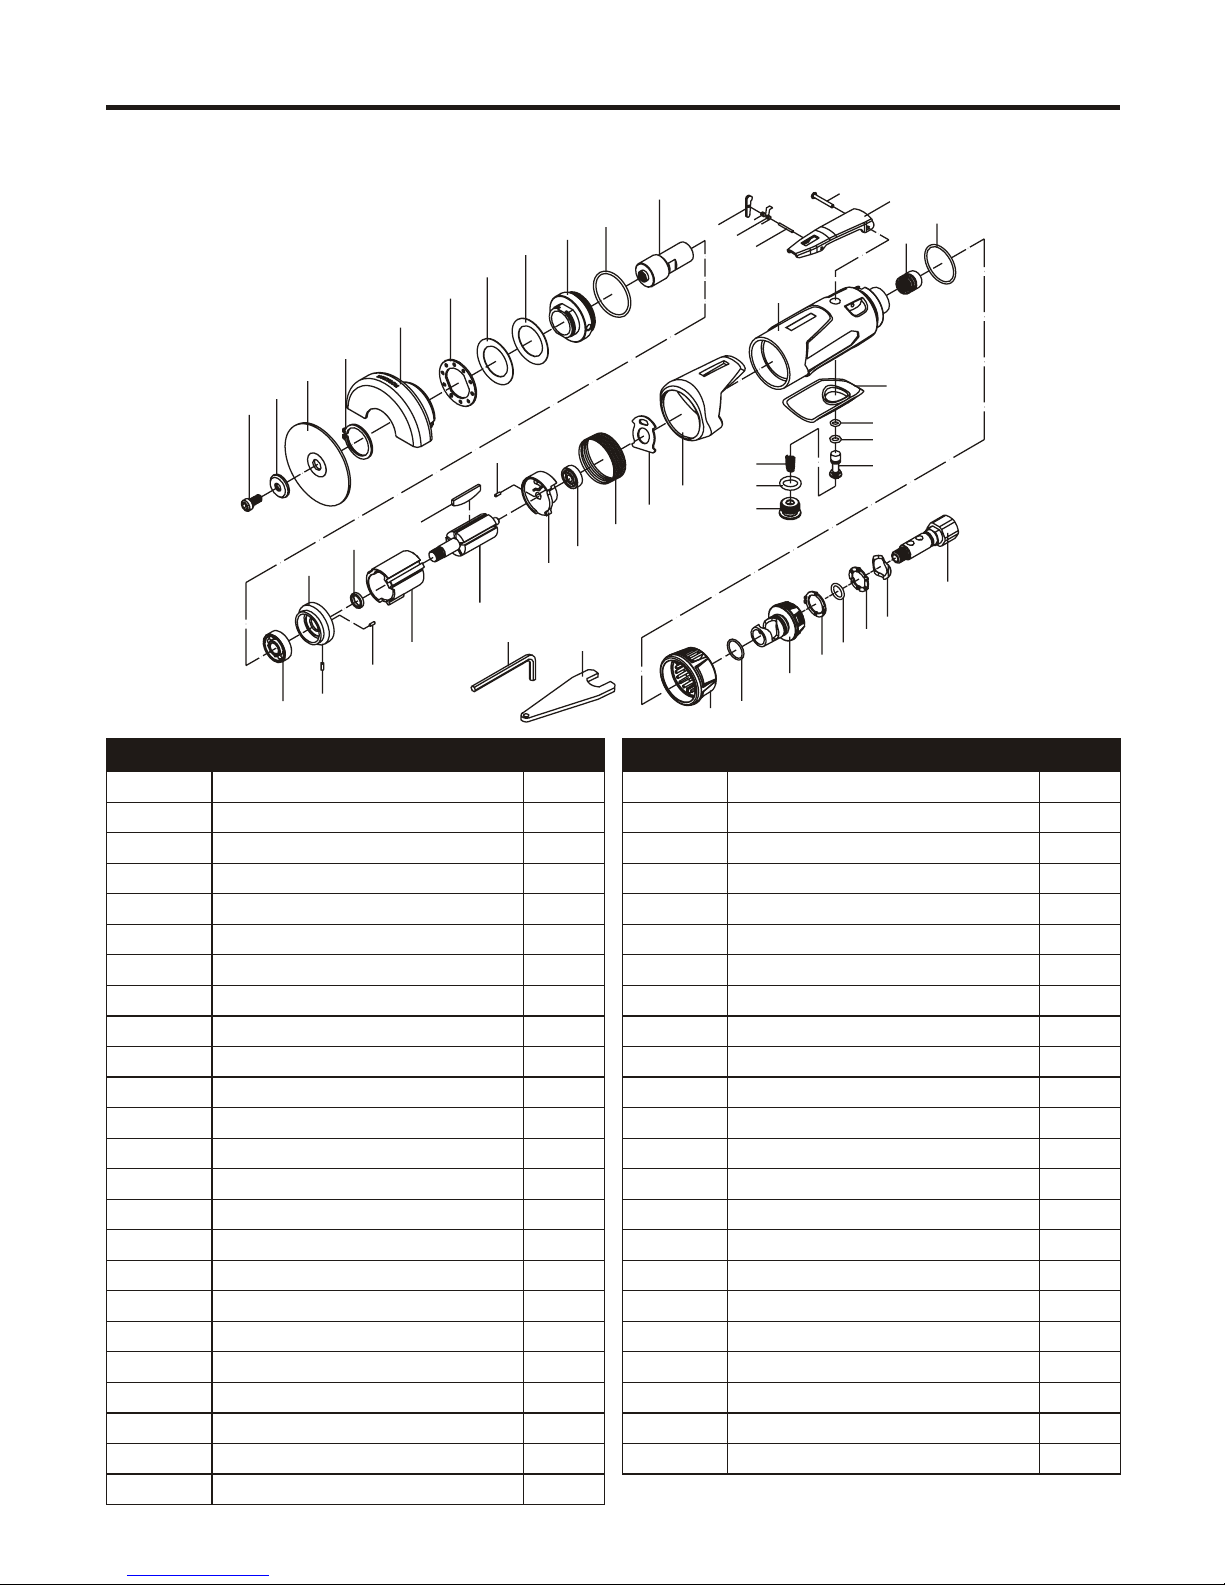
REPLACEMENT PARTS LIST
25
26
27
28
29
30
31
32
33
34
35
G1
37
38
39
40
C1
42
B1
F1
E1
J
G
Housing
Valve bushing
Trigger
Trigger pin
Lever
Spring
Pin
O-ring
Exhaust deflector
O-ring
Air regulator
Set plate
O-ring
Set plate
Washer
Air inlet
Soft grip
O-ring
O-ring
Valve stem
Spring
O-ring
Valve plug
Housing cover
Gasket
Bushing
Bearing
Rear plate
Pin
Rotor
Rotor blade
Cylinder
Washer
Front plate
Bearing
Collet holder
O-ring
Retainer ring
Washer
Angle retainer
Metal guard
Detent spring
Cutting wheel
Washer
Bolt
Hex key
Wrench
1
2
H1
4
I1
6
7
8
J1
10
D1
12
13
14
15
L1
17
18
19
20
21
22
23
24
1
1
1
1
1
1
1
1
1
1
1
1
1
1
1
1
1
1
1
1
1
1
1
1
1
1
1
1
3
1
5
1
1
1
1
1
1
1
2
1
1
1
1
1
1
1
1
PART NO.
DESCRIPTION QTY.
1
2
8
4
I1
6
7
J1
10
26
27
28
30
32
29
29
35
J
G
29
31
33
34
E1
F1
B1
42
C1
40
39
39
38
G1
D1
12
13
14
H1
25
37
24
19
18
17
22
21
15
L1
20
23
For replacement parts, call our customer service department at 1-888-3KOBALT
(1-888-356-2258), 8:00 a.m. - 8:00 p.m., EST, Monday - Friday.
3 IN. AIR CUT OFF TOOL
19
PART NO.
DESCRIPTION QTY.
Page 20

J2
24
25
26
27
28
29
30
31
32
33
34
35
36
37
38
C2
D2
B2
F
E
Housing
Trigger
Lever
Spring
Pin
Trigger pin
Soft grip
O-ring
O-ring
Valve stem
Valve spring
O-ring
Valve plug
Valve bushing
O-ring
Exhaust deflector
O-ring
Air regulator
Set plate
O-ring
Set plate
Gasket
Air inlet
Housing cover
Gasket
Bearing
Rear plate
Pin
Rotor
Rotor blade
Cylinder
Rotor collar
Front plate
Pin
Bearing
Valve bushing
Clamp nut
Protector
Collet holder
Collet
Collet jacket
Small wrench
Large wrench
1
E2
F2
4
5
6
7
8
9
10
11
12
13
14
15
H2
17
G2
19
20
21
22
1
1
1
1
1
1
1
1
1
1
1
1
1
1
1
1
2
1
1
1
1
1
1
1
1
1
1
2
1
4
1
1
1
1
1
1
1
1
1
1
1
1
1
Printed in China
21
22
J2
7
B2
33
35
25
4
F2
5
17
24
D2
C2
38
37
36
28
E2
6
G2
19
20
17
H2
15
14
1
28
30
29
27
26
31
32
F
E
10
11
12
13
8
9
34
1/4 IN. AIR ROTARY TOOL
20
REPLACEMENT PARTS LIST
PART NO.
DESCRIPTION
QTY.
PART NO.
DESCRIPTION
QTY.
Page 21

JOIGNEZ VOTRE REÇU ICI
Numéro de série Date d'achat
Des questions, des problèmes, des pièces manquantes? Avant de retourner
l'article au détaillant, appelez notre service à la clientèle au 1 888 3KOBALT
(1 888 356-2258), entre 8 h et 20 h (HNE), du lundi au vendredi.
ARTICLE #0362020
MODÈLE #SGY-AIR166
KOBALT® et le motif de K® sont des marques
de commerce déposées de LF, LLC. Tous droits
réservés.
ENSEMBLE D'OUTILS
PNEUMATIQUES DE
33 PIÈCES
21
MAX R.P.M. 25,0
00
3” X 1/16” X 3/8”
WARNING:
WEAR SAFE
TY GOGGLES
USE GUARDS
MPA90909
COLLET
HEX KEY
PLUGS
GRINDING STONES
WRENCHES
CUT OFF TOOL
ROTARY TOOL
CUTTING WHEELS
OIL BOTTLE
Page 22

TABLE DES MATIÈRES
Consignes de sécurité .......................................................................................... 23
Contenu de l'emballage ........................................................................................ 28
Préparation ........................................................................................................... 30
Instructions pour l'assemblage ............................................................................. 30
Mode d'emploi ...................................................................................................... 34
Entretien .............................................................................................................. 37
Dépannage .......................................................................................................... 38
Garantie ............................................................................................................... 39
Liste des pièces de rechange ........................................................................... 40
22
Page 23

CONSIGNES DE SÉCURITÉ
Assurez-vous de lire et de comprendre l'intégralité de ce manuel avant de tenter
d'assembler, d'installer ou d'utiliser le produit.
Une utilisation ou un entretien inadéquat de ce produit peut causer des blessures
graves ou des dommages matériels. Assurez-vous de lire et de comprendre tous
les avertissements et toutes les instructions concernant ce produit avant de
l'utiliser. Lorsque vous utilisez un outil pneumatique, observez toujours les mesures
de sécurité de base afin de réduire les risques de blessure.
La poussière créée pendant le ponçage, le sciage, le polissage, le perçage et
d'autres activités peut contenir des produits chimiques reconnus par l'État de la
Californie comme étant la cause de cancers, d'anomalies congénitales et d'autres
problèmes liés aux fonctions reproductrices. Vous pouvez obtenir la liste des
produits chimiques au www.oehha.ca.gov, conformément à la Proposition 65. Voici
quelques-uns de ces produits chimiques :
du plomb provenant de peintures à base de plomb;
de la silice cristalline provenant de la brique, du ciment ou d'autres matériaux de
maçonnerie;
de l'arsenic et du chrome provenant du bois d'œuvre traité avec un produit
chimique.
Les utilisateurs d'outils doivent passer en revue la composition chimique de la
surface de travail et de tout produit utilisé avec les outils pour vérifier s'ils
contiennent lesdits produits chimiques avant de commencer toute activité qui crée
de la poussière ou des particules microscopiques.
Les utilisateurs doivent se procurer auprès de leur employeur ou auprès du
fabricant les fiches signalétiques portant sur les produits chimiques auxquels ils
seront exposés, et lire, comprendre et suivre les consignes et les avertissements
relatifs à l'exposition à ces produits. Les risques liés à l'exposition varient en
fonction du nombre de fois où vous exercez les activités mentionnées ci-dessus.
Afin de limiter votre exposition à ces produits chimiques, travaillez dans un
endroit bien ventilé et utilisez de l'équipement de sécurité approuvé, comme un
masque antipoussière conçu spécialement pour filtrer les particules microscopiques.
AVERTISSEMENT
AVERTISSEMENT
AVERTISSEMENT
Cet article contient au moins un produit chimique qui, en Californie, est reconnu
comme étant la cause de cancers ou d'anomalies congénitales et d'autres
problèmes liés aux fonctions reproductrices. Lavez-vous les mains après l'avoir
manipulé.
23
Page 24

RISQUES DE BLESSURE AUX
YEUX OU À LA TÊTE
RISQUE MESURES PRÉVENTIVES
Les outils pneumatiques et électriques
peuvent projeter des attaches, des
fragments de métal, des sciures de bois
et d'autres débris, ce qui peut causer des
blessures graves aux yeux.
L'air comprimé peut causer des blessures
aux tissus mous, par exemple les yeux et
les oreilles. De plus, les débris et les
objets propulsés par le jet d'air peuvent
entraîner des blessures.
Les accessoires de l'outil peuvent se
desserrer ou se briser et être projetés en
direction de l'utilisateur ou d'autres
personnes présentes dans l'aire de travail.
Portez toujours des lunettes de sécurité
conformes à la norme ANSI Z87.1 et
pourvues d'écrans latéraux.
Ne laissez jamais un outil en marche
sans supervision. Débranchez le tuyau
à air lorsque vous n'utilisez pas l'outil.
Pour plus de protection, utilisez un écran
facial approuvé en plus de lunettes de
sécurité.
Assurez-vous que les accessoires sont
bien fixés.
AVERTISSEMENT
RISQUES D'INCENDIE OU
D'EXPLOSION
N'utilisez jamais un outil à proximité
d'une substance inflammable telle que
de l'essence, du naphta, des solvants
de nettoyage, etc.
Travaillez dans un endroit propre, bien
ventilé et dépourvu de matériaux
combustibles.
N'utilisez jamais d'oxygène, de dioxyde
de carbone ou autre gaz embouteillé
comme source d'alimentation pour les
outils pneumatiques.
N'utilisez que de l'air comprimé dont la
pression est régularisée sous la
capacité de pression maximale de tous
les accessoires de l'outil.
Ne branchez jamais ce produit à une
source d'alimentation en air pouvant
2
excéder les 200 lb/po .
Avant d'utiliser un outil pneumatique,
vérifiez toujours que la source
d'alimentation en air a été réglée en
fonction de la capacité de pression
de l'outil.
AVERTISSEMENT
RISQUE MESURES PRÉVENTIVES
24
Les outils abrasifs (tels que les
ponceuses et les meuleuses), les outils
rotatifs (tels que les perceuses) et les
outils à percussion (tels que les
cloueuses, les marteaux agrafeurs, les
clés, les marteaux et les scies
alternatives) peuvent produire des
étincelles susceptibles d'enflammer
certains matériaux.
Si vous dépassez la capacité de
pression maximale des outils et
accessoires, vous risquez de provoquer
une explosion pouvant causer des
blessures graves.
Page 25

RISQUE DE PERTE AUDITIVE
Portez toujours des protecteurs auditifs
conformes à la norme ANSI S3.19.
Une exposition prolongée au bruit
produit par l'utilisation d'outils
pneumatiques peut entraîner une perte
auditive permanente.
AVERTISSEMENT
RISQUE MESURES PRÉVENTIVES
RISQUES D'INHALATION
Les outils abrasifs tels que les
meuleuses, les ponceuses et les outils
à tronçonner engendrent de la
poussière et des matériaux abrasifs
pouvant causer des dommages aux
poumons et au système respiratoire.
Certains matériaux, notamment les
adhésifs et le goudron, contiennent des
produits chimiques dont les vapeurs
peuvent être nocives après une
exposition prolongée.
Portez toujours un respirateur ou un
écran facial bien ajusté lorsque vous
utilisez ce genre d'outils.
Travaillez toujours dans un endroit
propre, sec et bien ventilé.
RISQUE MESURES PRÉVENTIVES
AVERTISSEMENT
RISQUES DE BLESSURE
Si vous laissez un outil sans surveillance
ou que vous ne débranchez pas son tuyau
à air lorsque vous cessez de l'utiliser, il
risque d'être mis en marche par une
personne non expérimentée et de la
blesser ou de blesser d'autres personnes.
Les outils pneumatiques peuvent projeter
des attaches ou d'autres matériaux dans
l'aire de travail.
Une clé laissée fixée à l'outil augmente les
risques de blessure.
L'utilisation d'un embout de gonflage pour
l'époussetage peut causer des blessures
graves.
Lorsque vous n'utilisez pas l'outil, rangez-le
dans un endroit sécuritaire, hors de la
portée des enfants et autres personnes
inexpérimentées, et débranchez le tuyau
à air.
N'utilisez que des pièces, attaches et
accessoires recommandés par le fabricant.
Gardez l'aire de travail propre et dépourvue
de débris. Gardez les enfants et autres
personnes non autorisées à l'écart lorsque
vous utilisez l'outil.
Gardez l'aire de travail bien éclairée.
Avant de mettre l'outil en marche, retirez
les clés qui y sont fixées.
N'utilisez PAS d'embout de gonflage pour
l'époussetage.
AVERTISSEMENT
RISQUE MESURES PRÉVENTIVES
25
Page 26

RISQUES DE BLESSURE
AVERTISSEMENT
RISQUE MESURES PRÉVENTIVES
Débranchez le tuyau à air avant de lubrifier
l'outil ou d'y fixer une meuleuse, un disque
abrasif, une perceuse, etc.
Ne tenez jamais l'outil par son tuyau.
Pour éviter de mettre l'outil en marche
accidentellement, ne gardez pas votre
doigt sur la gâchette inutilement.
Seuls les représentants autorisés devraient
effectuer l'entretien et les réparations
de l'outil.
Maintenez les pièces en place à l'aide
d'attaches ou autres dispositifs de fixation.
N'utilisez jamais l'outil sous l'effet de
drogues ou de l'alcool.
Évitez de vous étirer pour étendre votre
portée. Conservez un bon équilibre.
Gardez le manche sec, propre et exempt
d'huile et de graisse.
Soyez vigilant, prêtez attention à ce que
vous faites et usez de votre jugement.
N'utilisez pas l'outil sous l'effet de la fatigue.
N'utilisez que des accessoires qui
conviennent à la vitesse de l'outil électrique.
N'utilisez jamais d'outils qui ont subi un
impact ou qui ont été endommagés par
l’utilisation.
Pour les clés à chocs, n'utilisez que des
douilles à chocs.
N'exercez pas une pression excessive sur
l'outil; laissez-le accomplir la tâche lui-même.
Entretenez soigneusement l'outil et les
accessoires.
Assurez-vous que l'outil est toujours propre.
Un outil bien entretenu risque moins de
s'enrayer et est plus facile à maîtriser.
Vérifiez les pièces pour vous assurer
qu'elles ne sont pas désalignées, enrayées,
brisées, ou dans un quelconque état
pouvant nuire à leur fonctionnement. Si
elles sont endommagées, faites-les réparer
avant d'utiliser l'outil.
N'utilisez que des accessoires
recommandés par le fabricant.
Les outils pneumatiques peuvent être
accidentellement mis en marche lorsque
vous les entretenez ou que vous changez
d'outil.
Les outils pneumatiques peuvent déplacer
les pièces que vous travaillez, ce qui peut
causer des blessures.
Une perte de maîtrise de l'outil peut causer
des blessures à l'utilisateur ou à d'autres
personnes.
Des outils ou des pièces de mauvaise
qualité, endommagés ou inappropriés
peuvent se détacher lors de leur utilisation
et projeter des débris dans l'aire de travail,
ce qui peut entraîner des blessures graves.
Les outils et accessoires mal entretenus
peuvent causer des blessures graves.
Un outil endommagé présente des risques
de rupture.
N'utilisez que des accessoires
recommandés par le fabricant pour l'outil.
26
Page 27

L'utilisation d'un outil pneumatique pour
fixer des fils électriques peut causer des
chocs électriques potentiellement mortels.
La poignée de cet outil n'est pas isolée.
Lorsque l'outil entre en contact avec un fil
sous tension, ses parties métalliques
exposées peuvent causer des chocs
électriques potentiellement mortels.
Le contact d'accessoires comme les
douilles à choc, burins, meules avec des
fils électriques dissimulés peut causer
des chocs électriques potentiellement
mortels.
Ne fixez jamais des fils sous tension à
l'aide d'outils.
Évitez de toucher à des surfaces mises
à la terre, par exemple un tuyau, un
radiateur, une cuisinière ou un
réfrigérateur. Le contact de votre corps
avec une surface mise à la terre
augmente les risques de choc électrique.
Avant de commencer à travailler, vérifiez
soigneusement la surface pour déceler
les fils dissimulés.
RISQUE DE CHOC ÉLECTRIQUE
AVERTISSEMENT
RISQUE MESURES PRÉVENTIVES
27
Les outils qui contiennent ou déplacent
des pièces mobiles, par exemple des
accessoires à meuler, des douilles et
des burins, peuvent s'emmêler dans les
cheveux, les bijoux ou les vêtements
amples et causer des blessures graves.
Ne portez jamais de vêtements amples
ou comportant des lanières, des lacets
ou autres éléments similaires pouvant
s'emmêler dans les pièces mobiles
de l'outil.
Enlevez tout bijou, montre, porte-nom,
bracelet, collier, etc., pouvant se
prendre dans l'outil.
Gardez vos mains éloignées des pièces
mobiles. Attachez ou couvrez vos
cheveux s'ils sont longs.
Portez toujours des vêtements bien
ajustés et l'équipement de protection
approprié lorsque vous utilisez l'outil.
Prenez garde à vos mains lorsque vous
utilisez l'outil.
Les outils à percussion et ceux qui
servent à percer et à buriner,
notamment, peuvent causer des
blessures graves.
AVERTISSEMENT
RISQUE MESURES PRÉVENTIVES
RISQUE DE COUPURE
OU DE BRÛLURE
AVERTISSEMENT
RISQUE MESURES PRÉVENTIVES
RISQUE D'EMMÊLEMENT
Page 28

OUTIL ROTATIF PNEUMATIQUE DE 1/4 PO
CARACTÉRISTIQUES DU PRODUIT
CARACTÉRISTIQUES
1/4 po
25 000 tours/minute +/- 10 %
3
4 pi /min
Filetage NPT 1/4 po
3/8 po
2
90 lb/po
COMPOSANTE
Pince
Vitesse libre
Consommation d'air moyenne
Entrée d'air
Tuyau à air
Pression de service
28
CARACTÉRISTIQUES
3 po
20 000 tours/minute +/- 10 %
3
5 pi /min
Filetage NPT 1/4 po
3/8 po
2
90 lb/po
COMPOSANTE
Roulette de coupe
Vitesse libre
Consommation d'air moyenne
Entrée d'air
Tuyau à air
Pression de service
OUTIL À TRONÇONNER PNEUMATIQUE DE 3 PO
CONTENU DE L'EMBALLAGE
DESCRIPTION
Outil à tronçonner
pneumatique de 3 po
Outil rotatif pneumatique de
1/4 po
Roulette de coupe
Bouteille d'huile
Grande clé
Petite clé
Clé
Meule à tige de 1/4 po
Meule à tige de 1/8 po
Clé hexagonale
Mandrin de 1/8 po
Connecteur mâle
Étui
1
1
12
1
1
1
1
5
5
1
1
2
1
A
B
C
D
E
F
G
H
I
J
K
L
M
QUANTITÉ
PIÈCE
MAX R.P.M. 25,000
3” X 1/16” X
3/8”
WARNING:
WEAR SAFETY G
OGGLES
USE GUARDS
MPA90909
COLLET
HEX KEY
PLUGS
GRINDING STONES
WRENCHES
CUT OFF TOOL
ROTARY TOOL
CUTTING WHEELS
OIL BOTTLE
A
B
D
C
E
F
G
H
I
J
K
L
M
Page 29

DESCRIPTION
Outil rotatif pneumatique de 1/4 po
Chemise du mandrin
Porte-mandrin
Mandrin
Gâchette
Levier
Régulateur de débit d'air
Déflecteur d'éjection
Bille d'acier
Entrée d'air
QUANTITÉ
1
1
1
1
1
1
1
1
1
1
PIÈCE
A2
B2
C2
D2
E2
F2
G2
H2
I2
J2
OUTIL ROTATIF
PNEUMATIQUE DE 1/4 PO
29
CONTENU DE L'EMBALLAGE
A1
D1
C1
H1
I1
G1
B1
F1
E1
J1
K1
L1
A2
B2
C2
D2
G2
E2
F2
I2
H2
J2
DESCRIPTION
Outil à tronçonner pneumatique de 3 po
Roulette de coupe de 3 po
Protecteur métallique
Régulateur de débit d'air
Boulon
Rondelle
Porte-mandrin
Gâchette
Levier
Déflecteur d'éjection
Balle en acier
Entrée d'air
QUANTITÉ
1
1
1
1
1
1
1
1
1
1
1
1
PIÈCE
A1
B1
C1
D1
E1
F1
G1
H1
I1
J1
K1
L1
OUTIL À TRONÇONNER
PNEUMATIQUE DE 3 PO
Page 30

Avant de commencer l'assemblage du produit, assurez-vous d'avoir toutes les
pièces. Comparez les pièces dans l'emballage avec la liste ci-dessus. S'il y a des
pièces manquantes ou endommagées, ne tentez pas d'assembler le produit.
Temps d'assemblage approximatif : de 5 à 10 minutes
Outils nécessaires pour l'assemblage (non inclus) : clé à molette, ruban pour joints
filetés et huile pour outil pneumatique
PRÉPARATION
30
INSTRUCTIONS POUR L'ASSEMBLAGE
1
1. Retirez le capuchon protecteur de l'entrée d'air
de l'outil (L1).
2. Fixez manuellement le connecteur mâle
(L) dans l'entrée d'air (L1).
REMARQUE: Pour que le raccord soit étanche à
l'air, entourez le connecteur mâle avec du ruban
d'étanchéité (non inclus), puis serrez-le avec une
clé (non incluse). Évitez de serrer excessivement.
2
Page 31

31
INSTRUCTIONS POUR L'ASSEMBLAGE
4
5
3. Versez deux ou trois gouttes d'huile à outil
pneumatique (non inclus) dans le connecteur
mâle (L) avant chaque utilisation.
4. Desserrez l'écrou (E1) et la rondelle (F1) à
l'aide de la clé à tête hexagonale (J) en
tournant dans le sens contraire des aiguilles
d'une montre tout en tenant l'autre clé (G) sur
les facettes du porte-mandrin (G1).
5. Installez une roulette de coupe (B1) sur l'outil
(A1). Réinstallez la rondelle (F1) et l'écrou (E1)
à l'aide de la clé à tête hexagonale (J) en
tournant dans le sens des aiguilles d'une
montre tout en tenant l'autre clé (G) sur les
facettes du porte-mandrin (G1). Assurez-vous
que la roulette de coupe (B1) est bien installée
et serrée.
N'utilisez que des roulettes de coupe prenant
en charge un nombre de tours/minute
équivalent ou supérieur à celui de l'outil.
AVERTISSEMENT
3
Page 32

32
INSTRUCTIONS POUR L'ASSEMBLAGE
6. Branchez le tuyau à air sur le connecteur
mâle (L). Pour un fonctionnement optimal,
2
réglez la pression de service à 90 lb/po .
REMARQUE: La pression de service correspond
à la pression dans la conduite d'air quand l'outil
est utilisé.
7. Retirez le capuchon protecteur de l'entrée d'air
de l'outil (J2).
8. Fixez manuellement le connecteur mâle (L)
dans l'entrée d'air (J2).
OUTIL ROTATIF PNEUMATIQUE DE 1/4 PO
REMARQUE: Pour que le raccord soit étanche à
l'air, entourez le connecteur mâle avec du ruban
d'étanchéité, puis serrez-le avec une clé
(non incluse). Évitez de serrer excessivement.
6
8
7
Page 33

33
INSTRUCTIONS POUR L'ASSEMBLAGE
9. Versez deux ou trois gouttes d'huile à outil
pneumatique (non incluse) dans le connecteur
mâle (L) avant chaque utilisation.
10. Desserrez la chemise du mandrin (B2) dans
le sens contraire des aiguilles d'une montre
manuellement ou à l'aide de la grande clé (E)
tout en tenant la petite clé (F) sur les facettes
du porte-mandrin (C2).
11. Insérez un accessoire à meuler, comme une
meule, dans le mandrin (D2).
9
10
11
Page 34

34
INSTRUCTIONS POUR L'ASSEMBLAGE
1
12. Serrez la chemise du mandrin (B2) dans le
sens des aiguilles d'une montre manuellement
ou à l'aide de la grande clé (E) tout en tenant
la petite clé (F) sur les facettes du porte mandrin (C2). Assurez-vous que la meule est
bien installée et serrée.
N'utilisez que des accessoires à meuler
prenant en charge un nombre de tours/minute
équivalent ou supérieur à celui de l'outil.
AVERTISSEMENT
13. Branchez le tuyau à air sur le connecteur
mâle (L). Pour un fonctionnement optimal,
2
réglez la pression de service à 90 lb/po .
REMARQUE: La pression de service correspond
à la pression dans la conduite d'air quand l'outil
est utilisé.
MODE D'EMPLOI
OUTIL À TRONÇONNER PNEUMATIQUE
DE 3 PO
Poussez le levier (I1) vers l'avant et appuyez sur
la gâchette (H1) pour mettre l'outil en marche.
12
13
Page 35

2
3
4
MODE D'EMPLOI
REMARQUE: Cet outil comprend un régulateur de
puissance. Tournez le régulateur de débit d'air (D1)
jusqu'à la position souhaitée. Les réglages 1, 2, 3,
4 sont à titre de référence seulement et n'indiquent
pas une vitesse déterminée. Le réglage 1
(symbolisé par une ligne unique) correspond à la
la vitesse la plus lente tandis que le réglage 4
(symbolisé par quatre lignes) est plus rapide.
Tourner le régulateur de débit d'air (D1) jusqu'à ce
que s'alignent le réglage désiré et la petite bille
d'acier (K1) se trouvant sur l'entrée d'air (L1).
REMARQUE: Cet outil comprend également un
déflecteur (J1) qui dirige vers le bas l'air qui
s'échappe.
REMARQUE : Le protecteur métallique (C1) se
tourne manuellement afin de protéger la pièce
travaillée des étincelles.
Débranchez l'outil de l'alimentation d'air avant
d'ajuster le protecteur métallique (C1).
AVERTISSEMENT
35
Page 36

OUTIL ROTATIF PNEUMATIQUE DE 1/4 PO
Poussez le levier (F2) vers l'avant et appuyez sur
la gâchette (E2) pour mettre l'outil en marche.
36
MODE D'EMPLOI
REMARQUE: Cet outil comprend un régulateur
de puissance. Tournez le régulateur de débit
d'air (G2) jusqu'à la position souhaitée. Les
réglages 1, 2, 3 et 4 sont fournis à titre de
référence seulement et n'indiquent pas une
vitesse déterminée. Le réglage 1 (représenté par
une ligne unique) correspond à la vitesse la plus
lente tandis que le réglage 4 (représenté par
quatre lignes) est le plus rapide. Tournez le
régulateur de débit d'air (G2) jusqu'à ce que
s'alignent le réglage désiré et la petite bille d'acier
(I2) se trouvant sur l'entrée d'air (J2).
REMARQUE: Cet outil comprend également un
déflecteur (H2) qui dirige vers le bas l'air qui
s'échappe.
1
2
3
Page 37

37
ENTRETIEN
Il est recommandé d'installer une burette à huile sur la conduite d'air, car elle prolonge
la durée de vie de l'outil en lubrifiant ce dernier pendant les périodes d'utilisation
intensive. La burette doit être régulièrement vérifiée et remplie d'huile pour outil
pneumatique. Pour vérifier si la burette est réglée correctement, placez une feuille de
papier à côté des orifices d'échappement de l'outil et maintenez la soupape ouverte
pendant environ 30 secondes. Si une légère tache d'huile se forme sur le papier, le
réglage de la burette est adéquat. Évitez de lubrifier excessivement l'outil.
S'il vous faut ranger l'outil pour une période prolongée, lubrifiez-le abondamment.
Faites-le fonctionner pendant environ 30 secondes pour vous assurer que l'huile a été
répartie uniformément dans l'outil. Rangez l'outil dans un endroit propre et sec.
Lubrifiants recommandés : Utilisez de l'huile pour outil pneumatique ou toute autre
huile de qualité pour turbine contenant des absorbants d'humidité, des antioxydants,
des agents d'arrosage de métal et un additif EP (extrême pression).
Nettoyez l'outil en entier à l'aide d'un linge en coton après chaque utilisation. Rangez
l'outil dans un endroit propre et sécuritaire, hors de la portée des enfants.
4
REMARQUE : Cet outil est muni d'un mandrin de
1/4 po posé en usine. Pour fixer un accessoire à
meuler à tige de 1/8 po à l'outil, vous devez
d'abord remplacer le mandrin (D2) par le mandrin
de 1/8 po (K) à l'aide de la grande clé (E) et de la
petite clé (F). Desserrez la chemise du mandrin
(B2) en la tournant dans le sens contraire des
aiguilles d'une montre à l'aide de la grande clé
(E) tout en tenant la petite clé (F) sur les facettes
du porte-mandrin (C2). Insérez le mandrin de
1/8 po (K) dans le porte-mandrin (C2). Fixez la
chemise du mandrin (B2) à l'outil et serrez-la à
l'aide de la grande clé (E) et de la petite clé (F).
MODE D'EMPLOI
Page 38

1. Rincez l'outil avec de l'huile pour outil
pneumatique ou du dissolvant de gomme.
2. Lubrifiez l'outil.
3. a. Réglez le régulateur de l'outil à son
maximum.
b. Réglez le régulateur du compresseur
de l'outil à sa pression manométrique
2
maximale, soit 90 lb/po .
4. Si vous décelez des fuites, serrez les
raccords du tuyau et scellez-le à l'aide de
ruban d'étanchéité.
5. a. Assurez-vous que le tuyau est de
dimensions appropriées. Un tuyau long ou
des outils utilisant de grandes quantités
d'air peuvent nécessiter un tuyau de
1/2 po de diamètre intérieur ou plus, selon
la longueur totale des tuyaux.
b. N'utilisez pas des tuyaux multiples
reliés par des raccords à branchement
rapide; ceux-ci engendrent des chutes de
pression additionnelles et diminuent la
puissance de l'outil. Raccordez les tuyaux
directement.
6. Remplacez la pale du rotor.
7. De l'eau s'est accumulée dans le réservoir,
évacuez-la (consultez le manuel du
compresseur d'air). Lubrifiez l'outil et
faites-le fonctionner jusqu'à ce qu'il n'y ait
plus de trace d'eau. Lubrifiez de nouveau
l'outil et faites-le fonctionner pendant une
ou deux secondes.
L'outil est lent
ou ne
fonctionne pas.
1. De la gomme ou
des cailloux se sont
logés dans l'outil.
2. L'outil manque
d'huile.
3. La pression d'air
est trop faible.
4. Le tuyau à air fuit.
5. La pression chute.
6. La pale du rotor est
usée.
7. De l'humidité
s'échappe des
orifices de l'outil.
PROBLÈME
DÉPANNAGE
MESURE CORRECTIVE
CAUSE(S) POSSIBLE(S)
38
Page 39

Cet outil est garanti par le fabricant pour une période de trois (3) ans à compter de la
date d'achat, selon les modalités décrites aux présentes.
Cet outil est garanti contre les défauts de matériaux et de fabrication. Si vous croyez
qu'il est défectueux, retournez-le, accompagné d'une preuve d'achat acceptable, au
point de vente d'origine. Si l'outil est jugé défectueux et qu'il est couvert par la
présente garantie, le distributeur l'échangera ou vous remboursera le prix d'achat.
Cette garantie sera annulée si : les défauts de matériaux ou de fabrication, ou les
dommages résultent de réparations ou de modifications non autorisées, de
l'utilisation de pièces non conformes, de l'usure normale, d'un usage abusif
(notamment une surcharge de l'outil), d'un entretien inadéquat, d'une négligence,
d'un accident, d'une utilisation après une défaillance partielle ou de l'utilisation
d'accessoires inappropriés.
Cette garantie vous confère des droits précis. Il est possible que vous disposiez
également d'autres droits, qui varient d'un État ou d'une province à l'autre.
Pour toute question concernant la garantie, communiquez avec le service à la
clientèle au 1 888 3KOBALT (1 888 356-2258), entre 8 h et 20 h (HNE), du lundi au
vendredi.
GARANTIE LIMITÉE DE TROIS ANS
39
Page 40

40
Pour obtenir des pièces de rechange, communiquez avec notre service à la clientèle
au 1 888 3KOBALT (1 888 356-2258), entre 8 h et 20 h (HNE), du lundi au vendredi.
25
26
27
28
29
30
31
32
33
34
35
G1
37
38
39
40
C1
42
B1
F1
E1
J
G
Boîtier
Guide de soupape
Gâchette
Douille de la gâchette
Levier
Ressort
Tige
Joint torique
Déflecteur d'éjection
Joint torique
Régulateur de débit d'air
Plaque de guidage
Joint torique
Plaque de guidage
Rondelle
Entrée d'air
Poignée à prise souple
Joint torique
Joint torique
Tige de soupape
Ressort
Joint torique
Soupape
Couvercle du boîtier
Joint
Douille
Palier
Plaque arrière
Tige
Rotor
Pale du rotor
Cylindre
Rondelle
Plaque avant
Palier
Porte-mandrin
Joint torique
Bague de retenue
Rondelle
Dispositif d'arrêt d'angles
Protecteur métallique
Ressort d'arrêt
Roulette de coupe
Rondelle
Boulon
Clé à tête hexagonale
Clé
1
2
H1
4
I1
6
7
8
J1
10
D1
12
13
14
15
L1
17
18
19
20
21
22
23
24
1
1
1
1
1
1
1
1
1
1
1
1
1
1
1
1
1
1
1
1
1
1
1
1
1
1
1
1
3
1
5
1
1
1
1
1
1
1
2
1
1
1
1
1
1
1
1
Description
Qté
O
Ndepièce
Description
Qté
1
2
8
4
I1
6
7
J1
10
26
27
28
30
32
29
29
35
J
G
29
31
33
34
E1
F1
B1
42
C1
40
39
39
38
G1
D1
12
13
14
H1
25
37
24
19
18
17
22
21
15
L1
20
23
O
N de pièce
LISTE DES PIÈCES DE RECHANGE
Page 41

J2
24
25
26
27
28
29
30
31
32
33
34
35
36
37
38
C2
D2
B2
F
E
Boîtier
Gâchette
Levier
Ressort
Tige
Douille de la gâchette
Poignée à prise souple
Joint torique
Joint torique
Tige de soupape
Ressort de soupape
Joint torique
Soupape
Guide de soupape
Joint torique
Déflecteur d'éjection
Joint torique
Régulateur de débit d'air
Plaque de guidage
Joint torique
Plaque de guidage
Joint
Entrée d'air
Couvercle du boîtier
Joint
Palier
Plaque arrière
Tige
Rotor
Pale du rotor
Cylindre
Collier du rotor
Plaque avant
Tige
Palier
Guide de soupape
Protecteur
Porte-mandrin
Mandrin
Chemise du mandrin
Petite clé
Grande clé
1
E2
F2
4
5
6
7
8
9
10
11
12
13
14
15
H2
17
G2
19
20
21
22
1
1
1
1
1
1
1
1
1
1
1
1
1
1
1
1
2
1
1
1
1
1
1
1
1
1
1
2
1
4
1
1
1
1
1
1
1
1
1
1
1
1
1
Imprimé en Chine
41
Écrou de serrage de collier
OUTIL ROTATIF PNEUMATIQUE DE 1/4 PO
21
22
J2
7
B2
33
35
25
4
F2
5
17
24
D2
C2
38
37
36
28
E2
6
G2
19
20
17
H2
15
14
1
28
30
29
27
26
31
32
F
E
10
11
12
13
8
9
34
Description
Qté
O
Ndepièce
Description
Qté
O
N de pièce
LISTE DES PIÈCES DE RECHANGE
Page 42

ARTÍCULO #0362020
MODELO #SGY-AIR166
ADJUNTE SU RECIBO AQUÍ
Número de serie Fecha de compra
42
¿Preguntas, problemas, piezas faltantes? Antes de volver a la tienda, llame a
nuestro Departamento de Servicio al Cliente al 1-888-3KOBALT (1-888-356-2258),
de lunes a viernes de 8 a.m. a 8:00 p.m., hora estándar del Este.
KOBALT® y K & Design® son marcas
registradas de LF, LLC. Todos los derechos
reservados.
JUEGO DE 33 HERRAMIENTAS
NEUMÁTICAS
MAX R.P.M. 25,0
00
3” X 1/16” X 3/8”
WARNING:
WEAR SAFE
TY GOGGLES
USE GUARDS
MPA90909
COLLET
HEX KEY
PLUGS
GRINDING STONES
WRENCHES
CUT OFF TOOL
ROTARY TOOL
CUTTING WHEELS
OIL BOTTLE
Page 43

ÍNDICE
Información de seguridad .................................................................................. 44
Contenido del paquete ...................................................................................... 50
Preparación ...................................................................................................... 52
Instrucciones de ensamblaje ............................................................................ 52
Instrucciones de funcionamiento ...................................................................... 56
Cuidado y mantenimiento ................................................................................. 59
Solución de problemas ..................................................................................... 60
Garantía ............................................................................................................ 61
Lista de piezas de repuesto ............................................................................. 62
43
Page 44

INFORMACIÓN DE SEGURIDAD
Lea y comprenda completamente este manual antes de intentar ensamblar, usar o
instalar el producto.
El uso o mantenimiento inadecuado de este producto puede ocasionar lesiones
graves y daños a la propiedad. Lea y comprenda todas las advertencias e
instrucciones de funcionamiento antes de usar este equipo. Cuando utilice
herramientas neumáticas, siga siempre las medidas de precaución básicas para
reducir el riesgo de lesiones personales.
Parte del polvo producido por el lijado, el serruchado, la trituración, la perforación
eléctrica y otras actividades relacionadas contiene químicos reconocidos por el
estado de California como causantes de cáncer, defectos congénitos u otros daños
en el aparato reproductivo. Se puede obtener una lista de las sustancias químicas
en www.oehha.ca.gov, en la sección Proposition 65 (Propuesta 65). Algunos
ejemplos de estas sustancias químicas son:
Plomo de pinturas a base de plomo
Sílice cristalina de ladrillos, cemento y otros productos de mampostería
Arsénico y cromo de madera tratada con químicos
Antes de realizar cualquier actividad que produzca polvo y/o partículas
microscópicas, los usuarios de estas herramientas deben revisar la composición
química de la superficie de trabajo y de cualquier producto que se utilice en
conjunto con estas herramientas, con el fin de detectar la presencia de estas
sustancias químicas.
Los usuarios deben obtener, ya sea de parte del fabricante o de su empleador,
las hojas de datos de seguridad de materiales de todas las sustancias químicas
identificadas, y estudiar, comprender y seguir todas las instrucciones y advertencias
sobre la exposición a dichas sustancias químicas. El riesgo que corre debido a la
exposición a estos químicos varía dependiendo de la frecuencia con que realiza
este tipo de trabajo.
Para reducir su exposición a estas sustancias químicas, trabaje en un área bien
ventilada y utilice un equipo de seguridad aprobado, como las máscaras para polvo
especialmente diseñadas para filtrar partículas microscópicas.
Este producto contiene una o más sustancias químicas reconocidas por el estado
de California como causantes de cáncer y defectos congénitos u otros daños en el
aparato reproductivo. Lávese las manos después de manipularlo
ADVERTENCIA
ADVERTENCIA
ADVERTENCIA
44
Page 45

RIESGO DE LESIONES EN LOS OJOS
O LA CABEZA
LO QUE PODRÍA OCURRIR CÓMO EVITARLO
El equipo neumático y las herramientas
eléctricas pueden lanzar materiales
como sujetadores, astillas de metal,
aserrín y otros residuos a alta velocidad,
lo cual puede provocar lesiones graves
a los ojos.
El aire comprimido puede ser peligroso.
El sistema de aire puede causar
lesiones a las zonas de tejido blando
como los ojos, orejas, etc. Las
partículas o los objetos lanzados por la
corriente pueden causar lesiones.
Los accesorios de las herramientas
pueden soltarse o romperse y
desprenderse lanzando objetos al
usuario y las demás personas que
estén en la zona de trabajo.
Use siempre gafas de seguridad con
protecciones laterales aprobadas por la
norma ANSI Z87.1.
Nunca deje la herramienta en
funcionamiento sin supervisión.
Desconecte la manguera de aire
comprimido cuando la herramienta no
esté en uso.
Para una protección adicional, use una
careta protectora además de las gafas
de seguridad.
Asegúrese de que todos los accesorios
estén ensamblados firmemente.
ADVERTENCIA
Las herramientas abrasivas como
lijadoras y moledoras, las herramientas
giratorias como taladros, y las
herramientas de percusión como
clavadoras, engrapadoras, llaves,
martillos y sierras alternativas pueden
generar chispas, lo cual puede
ocasionar la inflamación de materiales
inflamables.
Exceder el índice de presión máxima
de las herramientas o los accesorios
podría causar una explosión y
ocasionar lesiones graves.
Nunca use herramientas cerca de
sustancias inflamables como gasolina,
nafta, solventes de limpieza, etc.
Trabaje en un área limpia y bien
ventilada libre de materiales combustibles.
Nunca utilice oxígeno, dióxido de
carbono u otros gases embotellados
como fuente de alimentación para las
herramientas neumáticas.
Use el aire comprimido regulado a una
presión máxima que sea igual o inferior
a la indicada para cualquiera de los
accesorios.
Nunca conecte a una fuente de aire que
pueda exceder los 200 PSI.
Antes de usar las herramientas, siempre
verifique que la fuente de aire se haya
regulado según el rango de presión de
aire indicado.
RIESGO DE INCENDIO O EXPLOSIÓN
ADVERTENCIA
LO QUE PODRÍA OCURRIR CÓMO EVITARLO
45
Page 46

Use siempre protección para los oídos
aprobada por la norma ANSI S3.19.
La exposición a largo plazo al ruido
producido por el funcionamiento de
herramientas neumáticas puede producir
la pérdida permanente de la audición.
RIESGO DE PÉRDIDA DE LA AUDICIÓN
ADVERTENCIA
LO QUE PODRÍA OCURRIR CÓMO EVITARLO
Las herramientas abrasivas, tales como
amoladoras, lijadoras y herramientas
de corte, generan polvo y materiales
abrasivos, los cuales pueden ser
dañinos para los pulmones y el sistema
respiratorio.
Algunos materiales, tales como los
adhesivos y el alquitrán, contienen
sustancias químicas cuyos vapores
pueden causar lesiones graves tras la
exposición prolongada.
Siempre utilice una máscara o un
respirador del tamaño adecuado al
usar dichas herramientas.
Trabaje siempre en un área limpia,
seca y bien ventilada.
Si se deja una herramienta sin
supervisión o con la manguera de aire
comprimido conectada, personas no
autorizadas pueden activarla y sufrir o
provocar lesiones.
Las herramientas neumáticas pueden
lanzar sujetadores u otros materiales en
el área del trabajo.
Si se deja una llave conectada a una
pieza giratoria de la herramienta,
aumenta el riesgo de lesiones personales.
El uso de boquillas de inflador para
aplicaciones de soplado puede causar
lesiones graves.
Cuando la herramienta no esté en uso,
retire la manguera de aire comprimido y
almacene la herramienta en una
ubicación segura y alejada del alcance
de niños y usuarios no capacitados.
Utilice sólo las piezas, sujetadores y
accesorios recomendados por el fabricante.
Mantenga el área de trabajo limpia y
ordenada. Mantenga a los niños y otras
personas alejados de la herramienta
mientras esté en funcionamiento.
Mantenga el área de trabajo bien
iluminada.
Retire las llaves de ajuste antes de
encender la herramienta.
NO use boquillas de inflador para
aplicaciones de soplado.
PELIGRO DE INHALACIÓN
ADVERTENCIA
LO QUE PODRÍA OCURRIR CÓMO EVITARLO
RIESGO DE LESIONES
ADVERTENCIA
LO QUE PODRÍA OCURRIR CÓMO EVITARLO
46
Page 47

Las herramientas neumáticas se
pueden activar accidentalmente durante
la realización de mantenimiento o el
cambio de herramientas.
Las herramientas neumáticas pueden
provocar que la pieza de trabajo se
mueva al tener contacto y causar lesiones.
La pérdida del control de la herramienta
puede provocar lesiones al usuario o a
otras personas.
Las herramientas y accesorios de mala
calidad, inadecuados o dañados pueden
desprenderse durante el uso y lanzar
partículas por el área de trabajo
causando lesiones graves.
Las herramientas y los accesorios con
mantenimiento inadecuado pueden
causar lesiones graves.
Retire la manguera de aire comprimido
para lubricar o agregar accesorios para
moler, discos para lijar, taladros, etc. a la
herramienta.
Nunca transporte la herramienta de la
manguera.
Evite los encendidos accidentales. No
transporte la herramienta con el dedo
en el gatillo.
Sólo un representante de servicio
autorizado debe realizar reparaciones.
Utilice abrazaderas u otros dispositivos
para evitar que se mueva.
Nunca use la herramienta cuando esté
bajo la influencia del alcohol o drogas.
No se extienda demasiado. Mantenga
una posición y un equilibrio adecuados.
Mantenga las manijas secas, limpias y
libres de aceite y grasa.
Manténgase alerta. Preste atención a lo
que está haciendo. Use el sentido común.
No utilice la herramienta si está cansado.
Utilice siempre accesorios clasificados
para la velocidad de la herramienta
eléctrica.
Nunca use herramientas que se hayan
caído, golpeado o dañado con el uso.
Use sólo dados de percusión en esta
herramienta.
No aplique fuerza excesiva a la
herramienta; deje que ésta realice el
trabajo.
Realice un mantenimiento adecuado de
la herramienta y los accesorios.
Mantenga la herramienta limpia. Una
herramienta mantenida adecuadamente
no se trabará con frecuencia y será más
fácil de controlar.
RIESGO DE LESIONES
ADVERTENCIA
LO QUE PODRÍA OCURRIR CÓMO EVITARLO
47
Page 48

RIESGO DE LESIONES
ADVERTENCIA
LO QUE PODRÍA OCURRIR CÓMO EVITARLO
Si la herramienta se daña, existe el
riesgo de que reviente.
Use sólo accesorios identificados por el
fabricante para utilizarse con
herramientas específicas.
Verifique que no haya mala alineación o
trabas en las piezas móviles, piezas
rotas ni cualquier otra condición que
afecte el funcionamiento de la
herramienta. Si se daña, haga reparar la
herramienta antes de usarla.
El uso de accesorios que no estén
diseñados para utilizarse con las
herramientas específicas aumenta el
riesgo de provocar lesiones a las
personas.
El uso de herramientas neumáticas
para fijar cableado eléctrico puede
causar electrocución o la muerte.
Esta herramienta no se proporciona con
una superficie de agarre aislada. El
contacto con un cable energizado
también expondrá piezas de metal de la
herramienta energizada y puede
ocasionar electrocución o la muerte.
Los accesorios de la herramienta
neumática, tales como los dados de
percusión, cinceles, piedras de amolar,
que entren en contacto con un
cableado eléctrico oculto pueden
causar electrocución o la muerte.
Nunca utilice herramientas para fijar
cableado eléctrico si éste está
energizado.
Evite el contacto del cuerpo con
superficies conectadas a tierra, como
tuberías, radiadores, extractores o
refrigeradores. Existe un gran riesgo de
descarga eléctrica si su cuerpo está en
contacto con tierra.
Inspeccione completamente la pieza de
trabajo en búsqueda de un posible
cableado oculto antes de realizar
trabajos.
RIESGO DE DESCARGA ELÉCTRICA
ADVERTENCIA
LO QUE PODRÍA OCURRIR CÓMO EVITARLO
48
Page 49

Las herramientas que contengan
elementos móviles o impulsen otras
piezas móviles, como accesorios para
amolar, dados, cinceles, etc., se
pueden enredar en el cabello, ropa,
joyas y otros objetos sueltos y causar
lesiones graves.
Nunca use ropa holgada que contenga
correas o lazos sueltos, etc., que se
puedan enredar en las piezas móviles
de las herramientas.
Sáquese todas las joyas, relojes,
identificaciones, brazaletes, collares,
etc., que puedan ser atrapados por la
herramienta.
Mantenga las manos alejadas de las
piezas móviles. Amárrese o cubra el
cabello largo.
Utilice siempre ropa de calce adecuado
y otro equipo de seguridad cuando use
la herramienta.
Mantenga la pieza de trabajo de la
herramienta alejada de las manos y
el cuerpo.
Las herramientas que impactan, rotan,
cincelan, etc., pueden causar lesiones
graves.
RIESGO DE ENREDOS
ADVERTENCIA
LO QUE PODRÍA OCURRIR CÓMO EVITARLO
RIESGO DE CORTES
O QUEMADURAS
ADVERTENCIA
LO QUE PODRÍA OCURRIR CÓMO EVITARLO
49
Page 50

HERRAMIENTA DE CORTE NEUMÁTICA DE 3”
ESPECIFICACIONES DEL PRODUCTO
HERRAMIENTA ROTATIVA NEUMÁTICA DE 1/4"
50
CONTENIDO DEL PAQUETE
DESCRIPCIÓN
Herramienta de corte
neumática de 3"
Herramienta rotativa neumática
de 1/4”
Rueda de corte
Botella de aceite
Llave grande
Llave pequeña
Llave
Piedra de amolar con vástago
de 1/4"
Piedra de amolar con vástago
de 1/8"
Llave hexagonal
Mandril de 1/8"
Conector macho
Estuche
1
1
12
1
1
1
1
5
5
1
1
2
1
A
B
C
D
E
F
G
H
I
J
K
L
M
CANTIDAD
PIEZA
ESPECIFICACIONES
1/4"
25.000 RPM +/- 10%
3
0,11 M /MIN.
NPT de 1/4"
3/8"
90 PSI
COMPONENTE
Mandril
Velocidad libre
Consumo de aire promedio
Entrada de aire
Manguera de aire comprimido
Presión de trabajo
ESPECIFICACIONES
3 pulgadas
20.000 RPM +/- 10%
3
0,13 M /MIN.
NPT de 1/4"
3/8"
90 PSI
COMPONENTE
Rueda de corte
Velocidad libre
Consumo de aire promedio
Entrada de aire
Manguera de aire comprimido
Presión de trabajo
MAX R.P.M. 25,000
3” X 1/16” X
3/8”
WARNING:
WEAR SAFETY G
OGGLES
USE GUARDS
MPA90909
COLLET
HEX KEY
PLUGS
GRINDING STONES
WRENCHES
CUT OFF TOOL
ROTARY TOOL
CUTTING WHEELS
OIL BOTTLE
A
B
D
C
E
F
G
H
I
J
K
L
M
Page 51

DESCRIPCIÓN
Herramienta rotativa neumática de 1/4”
Cubierta del mandril
Soporte del mandril
Mandril
Gatillo
Palanca
Regulador de aire
Deflector de escape
Indicador de bola de acero
Entrada de aire
CANTIDAD
1
1
1
1
1
1
1
1
1
1
PIEZA
A2
B2
C2
D2
E2
F2
G2
H2
I2
J2
HERRAMIENTA ROTATIVA
NEUMÁTICA DE 1/4"
51
CONTENIDO DEL PAQUETE
A1
D1
C1
H1
I1
G1
B1
F1
E1
J1
K1
L1
A2
B2
C2
D2
G2
E2
F2
I2
H2
J2
DESCRIPCIÓN
Herramienta de corte neumática de 3"
Rueda de corte de 3”
Protector metálico
Regulador de aire
Perno
Arandela
Soporte del mandril
Gatillo
Palanca
Deflector de escape
Bola de acero
Entrada de aire
CANTIDAD
1
1
1
1
1
1
1
1
1
1
1
1
PIEZA
A1
B1
C1
D1
E1
F1
G1
H1
I1
J1
K1
L1
HERRAMIENTA DE
CORTE NEUMÁTICA DE 3”
Page 52

Antes de comenzar a ensamblar el producto, asegúrese de tener todas las piezas.
Compare las piezas con la lista del contenido del paquete anterior. No intente
ensamblar el producto si falta alguna pieza o si éstas están dañadas.
Tiempo estimado de ensamblaje: 5 a 10 minutos
Herramientas necesarias para el ensamblaje (no se incluyen): Llave ajustable, cinta
selladora para roscas, aceite para herramientas neumáticas.
PREPARACIÓN
INSTRUCCIONES DE ENSAMBLAJE
2
1
1. Retire la tapa protectora de la entrada de aire
de la entrada de aire (L1).
2. Instale a mano un conector macho (L) en la
entrada de aire (L1).
NOTA: Use cinta selladora para roscas (no
incluida) en el conector macho y apriétela con una
llave (no incluida) para una conexión hermética.
No apriete demasiado.
HERRAMIENTA DE CORTE NEUMÁTICA DE 3”
52
Page 53

53
INSTRUCCIONES DE ENSAMBLAJE
3
4
5
3. Coloque de 2 a 3 gotas de aceite para
herramientas neumáticas (no se incluye) en el
conector macho (L) antes de cada uso.
4. Suelte el perno (E1) y la arandela (F1) con la
llave hexagonal (J) girándola en dirección
contraria a las manecillas del reloj mientras
sostiene la llave (G) en las secciones planas
del soporte del mandril (G1).
5. Monte una rueda de corte (B1) en la
herramienta (A1). Vuelva a colocar la arandela
(F1) y el perno (E1) con la llave hexagonal (J)
girándola en dirección contraria a las
manecillas del reloj mientras sostiene la llave
(G) en las secciones planas del soporte del
mandril (G1). Asegúrese de que la rueda de
corte (B1) esté instalada de forma segura y
apretada.
Utilice sólo ruedas de corte que tengan una
clasificación de RPM igual o superior a la de
la herramienta.
ADVERTENCIA
Page 54

54
INSTRUCCIONES DE ENSAMBLAJE
6
8
7
6. Conecte la manguera de suministro de aire al
conector macho (L). Establezca la presión de
trabajo en 90 PSI para obtener el mejor
rendimiento de la herramienta.
NOTA: La presión de trabajo se refiere a la presión
de manguera de aire establecida para la
herramienta cuando ésta está en condiciones
para trabajar.
7. Retire la tapa protectora de la entrada de aire
de la entrada de aire (J2).
8. Monte a mano un conector macho (L) en la
entrada de aire (J2).
NOTA: Enrolle cinta selladora para roscas en el
conector macho y apriételo con una llave inglesa
(no se incluye) para una conexión hermética. No
apriete demasiado.
HERRAMIENTA ROTATIVA NEUMÁTICA
DE 1/4"
Page 55

9. Coloque de 2 a 3 gotas de aceite para
herramientas neumáticas (no se incluye) en el
conector macho (L) antes de cada uso.
55
INSTRUCCIONES DE ENSAMBLAJE
9
10
11
10. Afloje la cubierta del mandril (B2) girando en
dirección contraria a las manecillas del reloj a
mano o con la llave grande (E) mientras
sostiene la llave pequeña (F) en las secciones
planas del soporte del mandril (C2).
11. Inserte un accesorio de amolar como una
piedra de amolar en el mandril (D2).
Page 56

56
INSTRUCCIONES DE ENSAMBLAJE
12. Apriete la cubierta del mandril (B2) girando la
llave grande (E) en dirección de las manecillas
del reloj mientras sostiene la llave pequeña (F)
en las secciones planas del soporte del
mandril (C2). Asegúrese de que la piedra de
amolar esté instalada de forma segura y firme.
Use sólo accesorios para amolar que tengan
una clasificación de RPM igual o superior a la
de la herramienta.
ADVERTENCIA
12
13
1
Empuje la palanca (I1) hacia adelante y presione
el gatillo (H1) para arrancar la herramienta.
13. Conecte la manguera de suministro de aire al
conector macho (L). Establezca la presión de
trabajo en 90 PSI para obtener el mejor
rendimiento de la herramienta.
NOTA: La presión de trabajo se refiere a la presión
de la manguera de aire establecida para la
herramienta cuando ésta está en funcionamiento.
INSTRUCCIONES DE FUNCIONAMIENTO
HERRAMIENTA DE CORTE NEUMÁTICA DE 3”
Page 57

INSTRUCCIONES DE FUNCIONAMIENTO
57
2
3
4
NOTA: Esta herramienta cuenta con una válvula
reguladora de potencia. Gire el regulador de aire
(D1) hasta alcanzar la potencia deseada. Las
configuraciones 1, 2, 3 y 4 son sólo para
referencia y no representan una potencia de
salida específica. La “Configuración 1” (símbolo
de una línea) es la velocidad más lenta, mientras
que la “Configuración 4” (símbolo de cuatro
líneas) es la más rápida. Gire el regulador de
aire (D1), hasta alinear la configuración deseada
con la bola de acero pequeña (K1) en la entrada
de aire (L1).
NOTA: Esta herramienta también cuenta con un
deflector de escape (J1) que desvía el aire de
descarga hacia abajo.
NOTA: El protector metálico (C1) puede girarse
a mano a cualquier posición para proteger la
pieza de trabajo de las chispas producidas.
Antes de ajustar el protector metálico (C1),
desconecte la herramienta del suministro
de aire.
ADVERTENCIA
Page 58

HERRAMIENTA ROTATIVA NEUMÁTICA
DE 1/4”
Empuje la palanca (F2) hacia delante y presione
el gatillo (E2) para arrancar la herramienta.
NOTA: Esta herramienta cuenta con una válvula
reguladora de potencia. 2 Gire el regulador de
aire (G2) hasta alcanzar la potencia deseada.
Las configuraciones 1, 2, 3 y 4 son sólo de
referencia y no representan una potencia de
salida específica. La “Configuración 1” (símbolo
de una línea) corresponde a la velocidad más
lenta, mientras que la “Configuración 4” (símbolo
de cuatro líneas) es la más rápida. Gire el
regulador de aire (G2) hasta alinear la
configuración deseada con el indicador de bola
de acero pequeña (I2) de la entrada de aire (J2).
NOTA: Esta herramienta también cuenta con un
deflector de escape (H2) que desvía la descarga
de aire hacia abajo.
58
INSTRUCCIONES DE FUNCIONAMIENTO
1
2
3
Page 59

INSTRUCCIONES DE FUNCIONAMIENTO
CUIDADO Y MANTENIMIENTO
Se recomienda instalar un lubricador en línea en la tubería de suministro de
aire ya que aumenta la vida útil de la herramienta y la mantiene en
funcionamiento continuo. Se debe revisar regularmente el lubricador en línea
y llenarlo con aceite para herramientas neumáticas. El ajuste adecuado del
lubricador en línea se realiza colocando una hoja de papel junto a los orificios
de escape de la herramienta y manteniendo el regulador abierto por 30
segundos aproximadamente. El lubricador en línea estará ajustado
adecuadamente si se genera una leve mancha de aceite en el papel. Se deben
evitar las cantidades excesivas de aceite.
En caso de que sea necesario almacenar la herramienta por un período
prolongado, tendrá que proporcionarle una abundante cantidad de lubricación
en dicho momento. Deberá hacer funcionar la herramienta por
aproximadamente 30 segundos para asegurarse de que el aceite se haya
distribuido en forma pareja por toda la herramienta. La herramienta se debe
almacenar en un entorno limpio y seco.
Lubricantes recomendados: Use aceite para herramientas neumáticas o
cualquier otro aceite de alta calidad para turbinas que contenga absorbente
de humedad, antioxidantes, agentes de humidificación de metales y un aditivo
para presión extrema (EP, por sus siglas en inglés).
Limpie bien la herramienta con un trapo de algodón después de cada uso.
Mantenga la herramienta en un lugar fresco y seco, fuera del alcance de los
niños.
59
4
NOTA: Esta herramienta viene equipada de
fábrica con un mandril de 1/4”. Al instalar un
accesorio para amolar con vástago de 1/8” en la
herramienta, es necesario reemplazar primero el
mandril (D2) con el mandril de 1/8” (K) con ayuda
de la llave grande (E) y de la llave pequeña (F).
Libere la cubierta del mandril (B2) con la llave
grande (E) girándola en el sentido contrario a las
manecillas del reloj mientras sostiene la llave
pequeña (F) en las secciones planas del soporte
del mandril (C2). Coloque el mandril de 1/8” (K)
en el soporte del mandril (C2). Apriete la cubierta
del mandril (B) girando la llave grande (AA) en
dirección de las manecillas del reloj mientras sostiene la llave pequeña (BB) en las
secciones planas del soporte del mandril (C). Coloque la cubierta del mandril (B2) en
la herramienta y apriétela con la llave grande (E) y la llave pequeña (F).
Page 60

1. Enjuague la herramienta con aceite para
herramientas neumáticas o solvente
para goma.
2. Lubrique la herramienta.
3. a. Ajuste el regulador en la herramienta
en la configuración máxima.
b. Ajuste el regulador del compresor al
máximo de la herramienta en 90 PSI.
4. Apriete y selle los conectores de la
manguera si se encuentran fugas. Use
cinta de sellado.
5. a. Asegúrese de que la manguera sea
del tamaño adecuado. Las mangueras o
herramientas largas que usen grandes
volúmenes de aire pueden requerir una
manguera con un diámetro interno de
1/2" o mayor dependiendo del largo total
de las mangueras.
b. No utilice varias mangueras
conectadas entre sí con conectores de
conexión rápida. Esto causa bajas de
presión adicionales y reduce la potencia
de la herramienta. Conecte las
mangueras directamente entre sí.
6. Remplace el aspa del rotor.
7. Vierta agua en el tanque; drene el
tanque. (Consulte el manual del
compresor de aire). Lubrique la
herramienta y hágala funcionar hasta
que no haya evidencias de agua. Vuelva
a lubricar la herramienta y hágala
funcionar por 1 a 2 segundos.
La herramienta
no funciona o
lo hace
lentamente.
1. Hay polvo o goma
en la herramienta.
2. No hay aceite en
la herramienta.
3. La presión de aire
es baja.
4. Hay fugas en la
manguera de aire
comprimido.
5. Hay bajas de
presión.
6. Las aspas del rotor
están desgastadas.
7. Sale humedad del
escape de la
herramienta.
PROBLEMA
SOLUCIÓN DE PROBLEMAS
ACCIÓN CORRECTIVA
CAUSA POSIBLE
60
Page 61

Esta herramienta está garantizada por el fabricante para el comprador original por
tres (3) años a partir de la fecha de compra original y está sujeta a la cobertura de
garantía que se describe en el presente documento.
Esta herramienta tiene una garantía para el usuario original contra defectos en los
materiales y la mano de obra. Si cree que una herramienta presenta defectos,
devuelva la herramienta con una prueba adecuada de compra al lugar de la compra.
Si se determina que la herramienta presenta defectos y estos están cubiertos por
esta garantía, el distribuidor reemplazará la herramienta o reembolsará el precio de
compra.
Esta garantía es nula si: Los defectos en los materiales o la mano de obra o los
daños han sido causados por reparaciones o modificaciones hechas o que se hayan
intentado hacer por parte de terceros o el uso no autorizado de piezas incompatibles;
el daño es debido al desgaste normal; el daño es debido al abuso (lo que incluye la
sobrecarga de la herramienta por encima de su capacidad), mantenimiento
inadecuado, negligencia o accidente; o el daño es debido al uso de la herramienta
después de una falla parcial, el uso con accesorios inadecuados o reparaciones o
alteraciones no autorizadas.
Esta garantía le otorga derechos legales específicos, pero podría tener también otros
derechos que varían según el estado.
Si tiene preguntas acerca de la garantía, llame a nuestro Departamento de Servicio
al Cliente al 1-888-3KOBALT (1-888-356-2258), de lunes a viernes de 8:00 a.m.
A 8:00 p.m., hora estándar del Este.
TRES AÑOS DE GARANTÍA LIMITADA
61
Page 62

Para obtener piezas de repuesto, llame a nuestro Departamento de Servicio al Cliente
al 1-888-3KOBALT (1-888-356-2258), de lunes a viernes de 8:00 a.m. a 8:00 p.m., hora
estándar del Este.
62
LISTA DE PIEZAS DE REPUESTO
1
2
8
4
I1
6
7
J1
10
26
27
28
30
32
29
29
35
J
G
29
31
33
34
E1
F1
B1
42
C1
40
39
39
38
G1
D1
12
13
14
H1
25
37
24
19
18
17
22
21
15
L1
20
23
HERRAMIENTA DE CORTE
NEUMÁTICA DE 3”
25
26
27
28
29
30
31
32
33
34
35
G1
37
38
39
40
C1
42
B1
F1
E1
J
G
Carcasa
Conector de la válvula
Gatillo
Pasador del gatillo
Palanca
Resorte
Pasador
Junta tórica
Deflector de escape
Junta tórica
Regulador de aire
Placa de fijación
Junta tórica
Placa de fijación
Arandela
Entrada de aire
Agarre suave
Junta tórica
Junta tórica
Vástago de la válvula
Resorte
Junta tórica
Tapón de la válvula
Cubierta de la carcasa
Empaquetadura
Conector
Rodamiento
Placa posterior
Pasador
Rotor
Aspa del rotor
Cilindro
Arandela
Placa frontal
Rodamiento
Soporte del mandril
Junta tórica
Anillo de retención
Arandela
Protector metálico
Resorte de tope
Rueda de corte
Arandela
Perno
Llave hexagonal
Llave
1
2
H1
4
I1
6
7
8
J1
10
D1
12
13
14
15
L1
17
18
19
20
21
22
23
24
1
1
1
1
1
1
1
1
1
1
1
1
1
1
1
1
1
1
1
1
1
1
1
1
1
1
1
1
3
1
5
1
1
1
1
1
1
1
2
1
1
1
1
1
1
1
1
Pieza No.
Descripción
Cant.
Descripción
Cant.
Pieza No.
Dispositivo de retención en ángulo
Page 63

63
HERRAMIENTA ROTATIVA NEUMÁTICA DE 1/4"
LISTA DE PIEZAS DE REPUESTO
21
22
J2
7
B2
33
35
25
4
F2
5
17
24
D2
C2
38
37
36
28
E2
6
G2
19
20
17
H2
15
14
1
28
30
29
27
26
31
32
F
E
10
11
12
13
8
9
34
J2
24
25
26
27
28
29
30
31
32
33
34
35
36
37
38
C2
D2
B2
F
E
Carcasa
Gatillo
Palanca
Resorte
Pasador
Pasador del gatillo
Agarre suave
Junta tórica
Junta tórica
Vástago de la válvula
Resorte de la válvula
Junta tórica
Tapón de la válvula
Conector de la válvula
Junta tórica
Deflector de escape
Junta tórica
Regulador de aire
Placa de fijación
Junta tórica
Placa de fijación
Empaquetadura
Entrada de aire
Cubierta de la carcasa
Empaquetadura
Rodamiento
Placa posterior
Pasador
Rotor
Aspa del rotor
Cilindro
Anillo del rotor
Placa frontal
Pasador
Rodamiento
Conector de la válvula
Tuerca de la abrazadera
Protector
Soporte del mandril
Mandril
Cubierta del mandril
Llave pequeña
Llave grande
1
E2
F2
4
5
6
7
8
9
10
11
12
13
14
15
H2
17
G2
19
20
21
22
1
1
1
1
1
1
1
1
1
1
1
1
1
1
1
1
2
1
1
1
1
1
1
1
1
1
1
2
1
4
1
1
1
1
1
1
1
1
1
1
1
1
1
Impreso en China
Pieza No.
Descripción
Cant.
Descripción
Cant.
Pieza No.
 Loading...