

KOB PYROMAT ECO SERIES, PYROMAT ECO 35, PYROMAT ECO 151, PYROMAT ECO 55 Operating And Maintenance Instructions Manual
Page 1
Operating and Maintenance Instructions for the
PYROMAT ECO 35 to 151
ID: 104642-B English
Page 2

© by KÖB Holzfeuerungen GmbH
Flotzbachstrasse 33
A-6922 Wolfurt
All rights reserved, including photomechanical
reproduction and storage in electronic media.
Viessmann Group
Page 3

1 General information_________________________________________________ 4
1.1 Foreword _______________________________________________________________________ 4
1.2 Latest developments in the technology ______________________________________________ 4
1.3 Intended use ____________________________________________________________________ 4
1.4 Technical specs _________________________________________________________________ 4
1.5 Documented information __________________________________________________________ 4
1.6 CE-Symbol______________________________________________________________________ 4
2 Important information _______________________________________________ 5
2.1 Safety information________________________________________________________________ 5
2.2 Excess temperature & power failures________________________________________________ 5
2.3 Suitable and approved fuels _______________________________________________________ 6
3 Burner design______________________________________________________ 7
4 Starting up / Operation ______________________________________________ 8
4.1 Initial start-up ___________________________________________________________________ 8
4.2 Starting up______________________________________________________________________ 8
4.2.1 Filling___________________________________________________________________________ 8
4.2.2 Heating up_______________________________________________________________________ 8
4.2.3 Operation _______________________________________________________________________ 9
4.2.4 Adding fuel ______________________________________________________________________ 9
4.3 Oil burners_____________________________________________________________________ 10
4.3.1 Burner slide_____________________________________________________________________ 10
4.3.2 Operation with oil burners__________________________________________________________ 10
5 The ECOTRONIC Control System ____________________________________ 11
5.1 General information _____________________________________________________________ 11
5.1.1 Battery replacement ______________________________________________________________ 11
5.2 The functions of the buttons ______________________________________________________ 11
5.3 Boiler, F3 ______________________________________________________________________ 12
5.3.1 F3 Key "PYROMAT parameters" ____________________________________________________ 12
5.4 The F4-F8 extended control systems _______________________________________________ 13
5.4.1 Room heating unit________________________________________________________________ 13
5.4.2 Utility water heater _______________________________________________________________ 15
5.4.3 Air heater ______________________________________________________________________ 16
5.4.4 Neighbouring buildings ____________________________________________________________ 17
5.4.5 Pipeline________________________________________________________________________ 18
5.4.6 Additional boilers_________________________________________________________________ 19
5.4.7 Solar __________________________________________________________________________ 20
6 Cleaning _________________________________________________________ 21
7 Shutdowns _______________________________________________________ 22
8 Waste disposal____________________________________________________ 22
9 Enclosures
- Spec Sheet 1010-1, 2
- Error Reports / Error Correction
Page 4

4
1 General information
1.1 Foreword
Dear System Owner, you have made a good
selection in the PYROMAT ECO. In conjunction
with a heat storage unit, it will provide you with all
the advantages of a modern, economically efficient
heating system. It will provide you with all the
advantages of a modern, economically efficient
heating system. Fully developed technology in
combination with a sturdy design guarantee a high
degree of operational reliability and long service
life.
These Operating and Maintenance Instructions
contain important information for the intended use,
correct operation and proper maintenance of the
PYROMAT ECO.
Non-compliance with the Operating and Maintenance Instructions will result in loss of the
guarantee.
If you still need any further information after studying the Operating and Maintenance Instructions:
The Assembly and Installation Instructions contain
important information about:
- Standards and regulations,
- Structural surroundings of the burner
- Transport & assembly
- Water installation and electrical installation,
- Fire protection,
- Starting up,
as well as an appendix with diagrams of connections and dimensions as well as the complete technical specifications.
Our sales and services offices will be glad to provide you with any further information. Their addresses can be found on the reverse side of these
Operating and Maintenance Instructions.
1.2 Latest developments in the technology
The Operating and Maintenance Instructions are in
keeping with the PYROMAT ECO at the time it is
delivered. In the interest of our customers, we reserve the right to make, without any notification requirement, the following changes resulting from
further technology developments.
1.3 Intended use
The intended use of the PYROMAT ECO is for incinerating wood fuels.
The intended use of the PYROMAT ECO is stipulated:
- in the regulations of the Assembly and Installation Instructions
- by the limits of the technical specifications
- in the section, "Suitable and approved fuels"
- by the safety regulations in these Operating and
Maintenance Instructions.
Any other use of the PYROMAT ECO or use of it
going beyond this will be considered as unintended
use unless written approval by the manufacturer
has been obtained.
The following, among other things, will be considered as unintended use:
- Operation of the PYROMAT ECO by unqualified
personnel, without any training or knowledge of
the Operating and Maintenance Instructions.
- Disabling the safety or monitoring devices on the
PYROMAT ECO.
- Removal of any protective covers or cladding on
the PYROMAT ECO by unauthorised individuals.
- Making any conversions or alterations to the PYROMAT ECO without approval by the manufac-
turer.
- Using spare parts or accessories from other
manufacturers without approval by the manufacturer.
The operating organisation will be liable for
any damage or accidents in case of any unintended use.
1.4 Technical specs
The following important limits apply to the PYROMAT ECO heating boiler:
- Max. operating pressure allowed: 3.0 bar
- Max. boiler temperature allowed: 100°C
- Min. return temperature: 65°C
The complete technical specifications listed in the
appendix of the Assembly and Installation Instructions.
1.5 Documented information
The Operating Instructions contain the information
required according to the EC Directive on Machinery 98/37/EEC, Appendix 1, Number 1.7.4.
Issue: 2007-08_English
Prepared by: KabW/SclM
1.6 CE-Symbol
The PYROMAT ECO is delivered with a CEsymbol on its type plate an EC attestation of conformity in accordance with II A or the EC Directive
on Machinery 98/37/EEC.
If the PYROMAT ECO is altered by equipment
from other manufacturers being added, or the
safety equipment or control system are combined
with a different system and/or integrated into an
overriding system (building control system), then in
the European Union a new attestation of conformity has to be issued before it is put on the market.
Page 5
5
2 Important information
2.1 Safety information
When carrying out work on the heating system,
such as cleaning and maintenance, wear appropriate protective equipping when required.
There is a danger of getting injured through:
burning, knocking against corners and edges,
crushing in moving parts and noise.
Mains supply: 230V
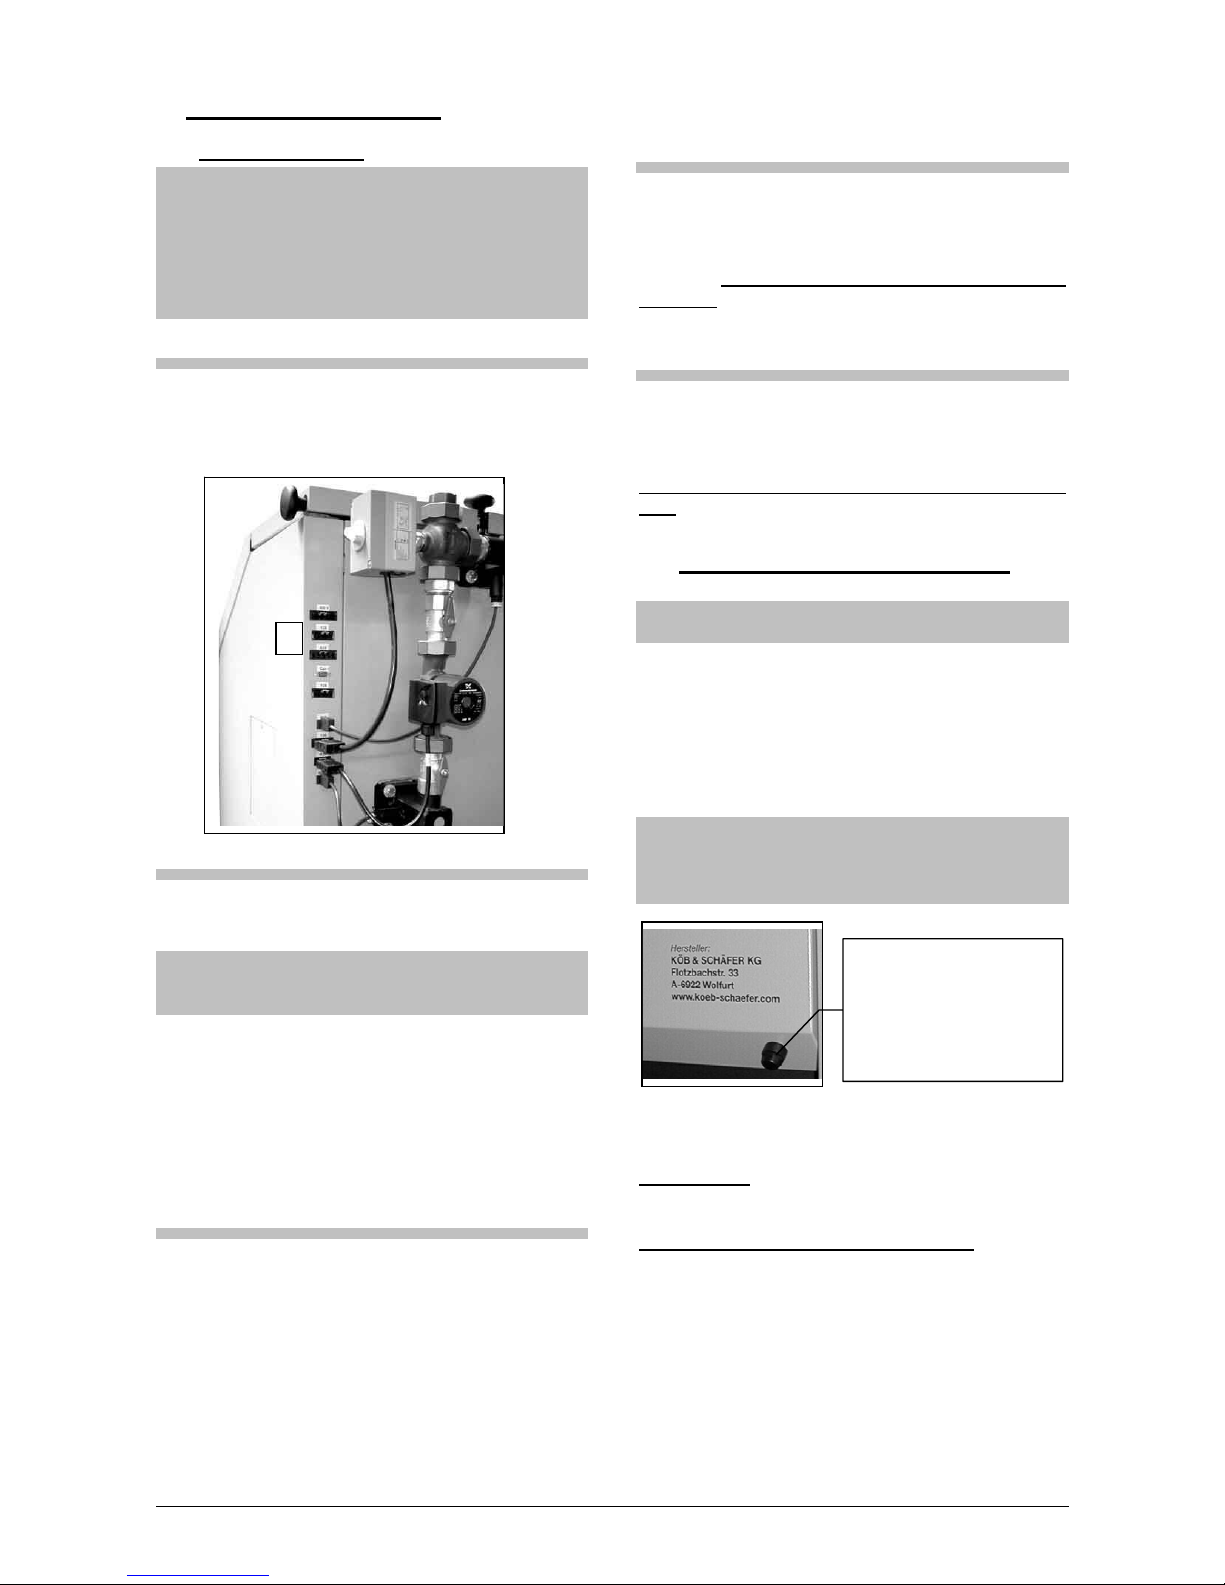
In a risky situation, the PYROMAT ECO can be
disconnected from the electrical mains at all the
leads by plug connector on the rear of the boiler
(1).
Doors
When the access door is not opened all the way, it
automatically falls back shut.
The burner must never be operated with the
doors open!
Any burning bits that escape could result in a fire.
Only open doors during the starting phase and the
burn-out phase (for refilling, exhaust gas temperature less than 130°C). If the doors were opened
during operation, sparks and tongues of fire could
leap out.
Equipment for dissipating excess heat
The functioning of the thermal run-off safety valve
must be inspected every year by a competent specialist.
The safety heat exchanger must not under any circumstances be used as an operational heat exchanger.
Seals
It is important for the functioning and controllability
of the burner that no unwanted air be able to enter
unchecked through leaks.
The doors and lids have to close tightly without
leakage. Any damaged seals must be immediately
replaced. Tighten snugly the fastening bolts and
handles.
Operation, cleaning & maintenance
Bear in mind that only if operated and maintained
properly can even the best of products fulfil their
functions well, for a long time and free of malfunctions.
Compliance with the "Cleaning" section is mandatory!
2.2 Excess temperature & power failures
Do not open the doors or lids on the burner!
- Switch on additional heat consumers.
- The exhaust fan goes out of operation.
- The temperature-limiting safety switch triggers.
- The valve for the thermal run-off safety valve
opens at approx. 95°C. The excess heat is
conducted off into the channel.
If the temperature-limiting safety switch (TLSS)
has triggered, then it has to be manually unlocked.
To reset, unscrew the black cap and press the button.
IMPORTANT
: Resetting is only possible at a boiler
temperature of less than 70° C.
Possible causes for excess temperature
:
- Incorrect setting on the control module.
- Defective component of the system (pump or
valve).
1
The TLSS (temperature-limiting safety
switch) is situated in
the front metal plate
beneath the refill access lid.
Page 6

6
2.3 Suitable and approved fuels
The KÖB PYROMAT ECO is designed for heating
chopped wood and wood waste and can be optionally equipped with an oil or gas burner.
Important prerequisites for the wood
The wood must be air-dry. One to two and a half
years are necessary for natural drying. This drying
can be carried out outdoors (covered) in part and
should then be continued for at least one year in a
suitable shed. The water content should amount to
a maximum of 25% (w 25).
Bear in mind:
Wood that has been stored for too short a time
and is still moist only has about half of its potential thermal power!
Types of wood
The KÖB PYROMAT ECO is especially well suited
for the types of wood listed below:
- Air-dry, chopped wood in its natural state, such
as split wood, billet wood and round wood.
Hardwood: max. ∅ 15 cm
Soft wood: max. ∅ 12 cm
Guideline figures for storage (for dry storage)
Hardwood: 2 to 2½ years
Soft wood: 1 to 1½ years
- Non-pelletised wood in its natural state (max.
water content of 25%) in the form of coarse
chips, woodchips, including bark adhering with
an edge length of Æ greater than 5 cm
- Compressed wood from chips, unless manufactured using bonding agent. Diameter Æ greater
than 4 cm
- Carpentry shop waste in the form of glued
wood and wood remnants, provided no wood
preservatives have been applied or are contained.
Edge length Æ greater than 5 cm
- Addition of a max. of 20% of brown coal briquettes to extend the combustion time.
Length of wood
Pyromat 35, 45, 55, 65, 75, 85 Æ max. ½ m
Pyromat 61, 81, 101, 151 Æ max. 1 m
Be sure to note:
The boiler is only suited for incinerating the wood
fuels and wood mixtures listed here.
If different fuels are used, KÖB will not assume
any liability for the functioning or service life of
the boiler.
It is not allowed to incinerate wastes or wood in
these heating systems that has been treated with
wood preservatives or the coating of which consists of halogenated organic compounds. In addition to the development of highly toxic exhaust
gases, severe corrosion damage may also occur in
the boiler due to these chemical compounds (hydrochloric acid).
The following must not be incinerated:
- Hard coal or coke
- Wood waste with coatings made of halo-
genated organic compounds (PVC)
Operation with an oil/gas burner:
Fuel: Extra-light heating oil
Page 7
7
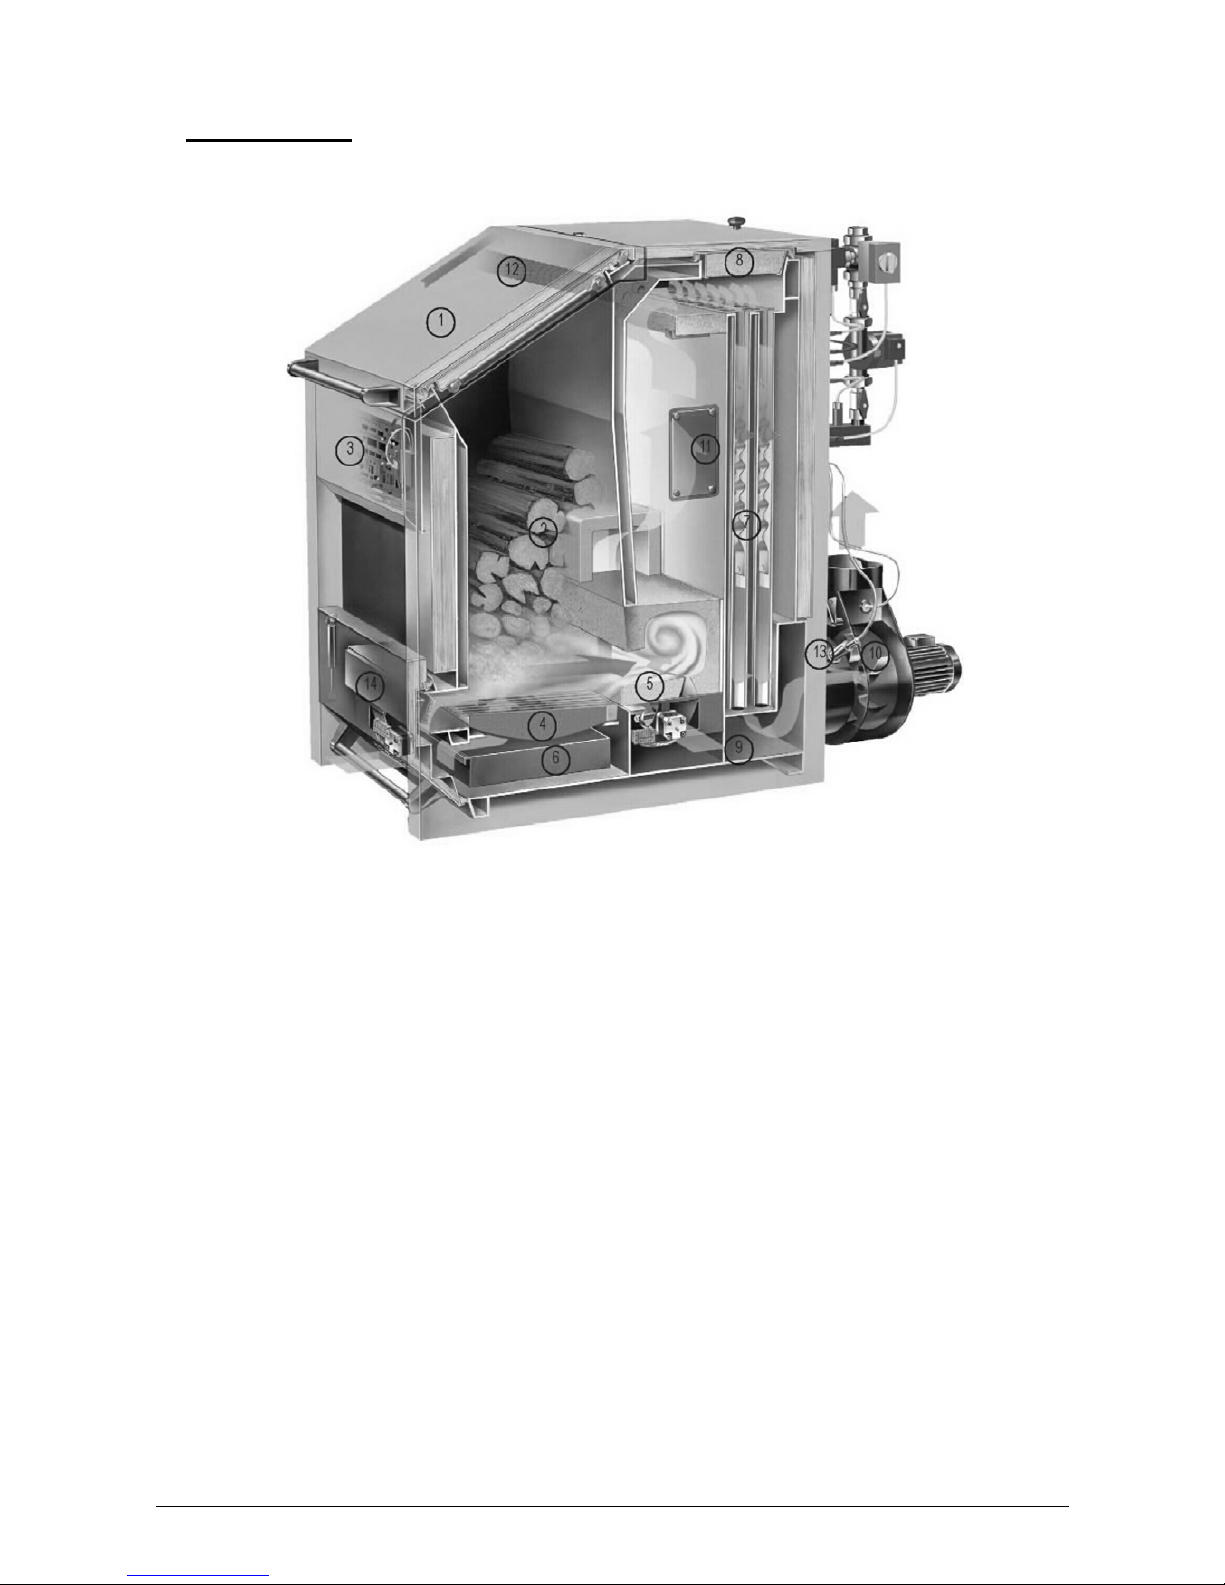
3 Burner design
(Picture: PYROMAT ECO 55)
(1) Large firebox with easily accessible access
door
(2) Downwardly conical firebox
(3) Electronic boiler control panel
(4) Degasification zones with cast iron grating and
fireclay bed
(5) Hot tunnel made of highly refractory concrete
for re-incineration
(6) Large, easily accessible ash pan for the grate
ash
(7) Vertical pipe-type heat exchanger
(8) Cleaning lid on top
(9) Ash container under heat exchanger
(10) Exhaust fan
(11) Maintenance cover or burner connection
(12) Safety heat exchanger
(13) Lambda sensor
(14) Ash pan lid
Page 8
8
4 Starting up / Operation
4.1 Initial start-up
The initial start-up is carried out either by KÖB
Holzfeuerungen GmbH or another heating specialist.
Be absolutely sure to follow the instructions in
the Assembly and Installation Instructions. No
guarantee may be claimed in cases of initial
start-ups carried out improperly by oneself.
First check:
- Is there enough water in the heating system?
- Has the heating system been bled?
- Are the slide valves open to the heating forward
and reverse flow?
- Can enough fresh air get into the heating
room?
- Are the doors and lids on the burner all closed
leak-tight?
4.2 Starting up
Check the storage unit temperature!
Check
whether the storage unit temperature has dropped
so far that heating up is practical, and whether the
amount of heat to be expected can be accepted or
stored.
Maximum storage unit temperature: 90°C
4.2.1 Filling
CAUTION: Never fill shavings or woodchips di-
rectly from the grate Æ There is a danger such
going up in flames suddenly!
- The slots in the grate have to be free of ash.
Only charcoal (approx. 2 cm) may remain lying
on the grate. Evenly spread out paper on this
(better than cardboard) and easily combustible
wood over the entire width of the burner
(approx. 25 cm high). Position the pieces of
wood crosswise such that a layer permeable to
air is created.
Finer material may only be filled on the layer of
chopped wood.
- Neatly lay the billet wood and logs horizontally
and compactly over the entire width of the firebox.
- Only refill as much wood as energy that the
storage unit can still accommodate until the
maximum storage unit temperature of 90°C is
reached.
- When closing the access door, be sure that
the supporting surface for the refill access lid
seal is clean.
Note that even a small ember remaining can
also inadvertently ignite the kindling wood.
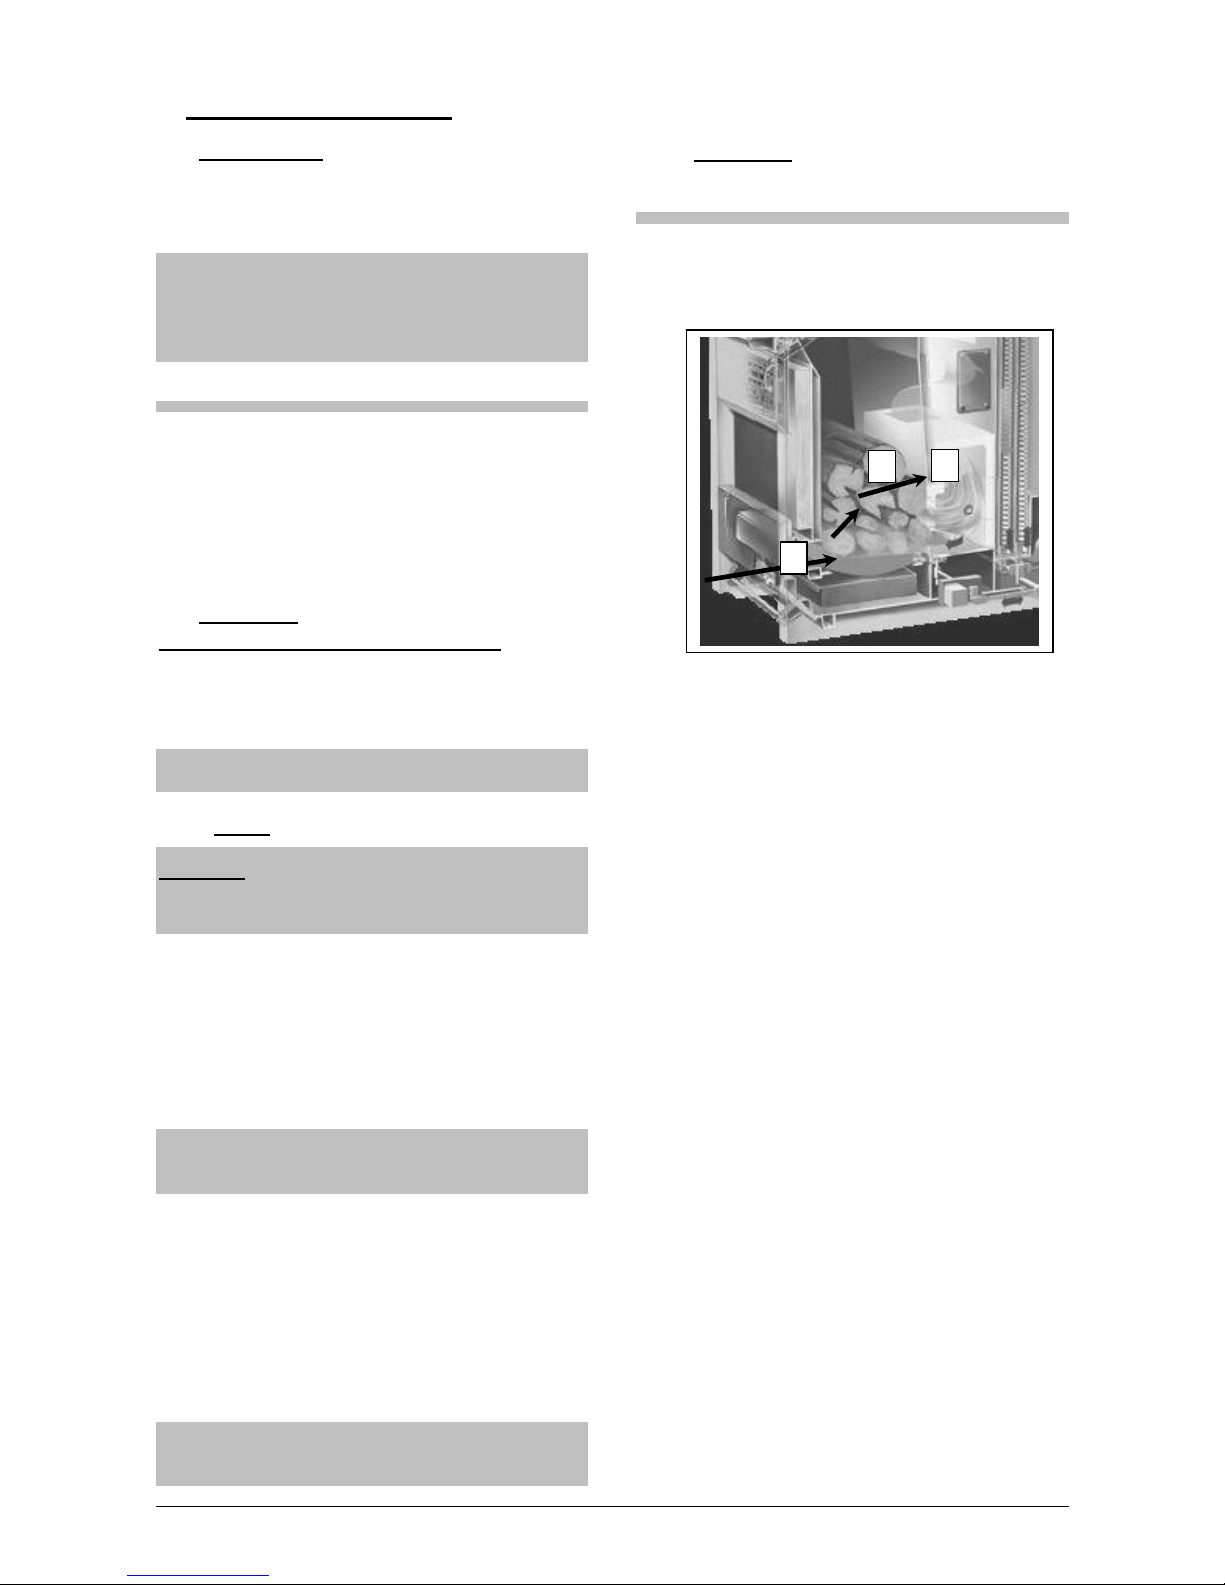
4.2.2 Heating up
Kindling
- Is the airway (1) to (3) clear through the entire
area of the grate, through fuel at the bottom and
into the combustion chamber? Is the lower part
of the wood loaded (2) permeable to air?
- Open the ash pan lid. Ignite, ideally doing so
over the entire width of the firebox,
- such that the fire spreads over the entire area
of the grate as quickly as possible.
Aim to keep the heating-up procedure short,
quickly producing a lot of heat and embers.
Rapid heating up of the combustion chamber
rapidly produces perfect incineration.
- Press the F1 button "PYROMAT Wood".
- Leave the ash pan lid approx. 10 cm open until
the material to be burned has started to burn
well.
- When the temperature of the exhaust gas
reaches approx. 110°C, close the ash pan lid.
1
3
2
Page 9

9
4.2.3 Operation
- All the lids and doors have to be closed with no
leakage during the burn-off.
- The temperature of the exhaust gas should rise
to 130°C to 150°C in just a few minutes, and be
between 160°C and 200°C in continuous operation.
- If the temperature of the exhaust gas prematurely drops back down during the burn-off, you
have a hollow fire.
Cause:
Pieces of wood have been poorly
stacked or are irregular.
Remedy:
Carefully open the ash pan lid and
with a poker spread the wood over the entire
bed of embers.
Combustion time for:
- Each loading of wood from deciduous trees:
approx. 4 hours
- Each loading of wood from coniferous trees:
approx. 3 hours
4.2.4 Adding fuel
First check:
- Check the storage unit temperature! Can the
energy to be expected be accepted or stored?
Maximum storage unit temperature: 90°C.
- Is the burner already in the burn-out phase (ex-
haust gas temperature below 130°C)?
- Is the exhaust gas fan already out of operation?
Adding fuel:
- If the exhaust gas fan is already out of opera-
tion:
Press the F1 button "PYROMAT Wood".
- If the exhaust gas fan is still in operation:
Before adding
, press the F1 button "PYROMAT
Wood" (Add Fuel function). This will bring
about fast stabilisation of the operation.
- First only raise the access door slightly,
so that
any accumulation of low-temperature gas present in the upper part of the firebox can be suctioned off.
- Then unlock the safety lock (1) and open the lid
all the way.
- Neatly lay the billet wood and logs horizontally
and compactly over the entire width of the firebox. Only refill as much wood as energy that
the storage unit can still accommodate.
I M P O R T A N T: Do not put any wood shavings or fine chips directly onto the embers Æ
There is a DANGER such GOING UP IN FLAMES SUDDENLY!
- Close access door. Be sure that the supporting
surface for the refill access lid seal is clean.
Afterwards check:
- The surface of the ceramic combustion chamber should remain white.
- The vertical pipe-type heat exchanger must not
have any shining soot or tar deposits.
- The ash content is very low when the wood incinerates in a controlled fashion (approx. 1 percent by weight). The ash should be grey!
1
Page 10

10
4.3 Oil burners
The initial start-up has to be carried out by a heating systems specialist. Be sure to also follow the
instructions in the Installation Instructions.
4.3.1 Burner slide
Running out the oil burner
(for operation with wood):
- Pull the burner slide to the rear and close the
shutter.
Running in the oil burner
(for operation with oil burner):
- First pull the burner slide to the rear a bit and
open the shutter.
- Run the oil burner all the way in.
CAUTION:
If the burner remains run in during operation
with wood, trouble with the burner might result.
4.3.2 Operation with oil burners
- Run the oil burner in.
- Press the F2 key "PYROTMAT OIL" (pre-
selection).
- The oil burner will be started automatically
when there is a prompt for heat.
- The air vents will be closed automatically.
Service function (only for specialists)
NOTE: This function can only be activated in the
operating mode "UTILISATION OF RESIDUAL
HEAT" or "WITHDRAW FROM STORAGE UNIT".
- Press and hold down the "OK" button.
- Then press the F2 key "PYROTMAT OIL" once.
- Then release the "OK" button.
- The relevant information will appear on the con-
trol panel.
CAUTION: No regulating of temperature during
the service function Æ Danger of excess temperature. Be sure to watch the boiler temperature.
Completing the service function
:
- Press the F2 key "PYROTMAT OIL"
Page 11

11
5 The ECOTRONIC Control System
5.1 General information
The ECOTRONIC facility control system is a decentralised microprocessor system (CAN-BUS)
developed by KÖB with various modules that are
connected by a data transmission line.
Its function
The ECOTRONIC records all the data relevant to
operation and controls the supply of and demand
for heat.
Thus the burner system is continuously monitored
during all the operating phases and kept within an
optimum range in terms of emissions.
Factory settings (pre-settings)
All the parameters in the ECOTRONIC, including
set point values and switching times, are pre-set
and can be called back up at any time. The figures
for the factory settings are given in brackets for the
various parameters.
5.1.1 Battery replacement
There is a battery built in beneath the removable
lid on the control module (type: Panasonic Lithium
BR2330). It is for buffering the time, date and settings.
- The battery needs replacing every five
years!
- Do not disconnect the mains voltage while
changing the battery (do not turn off master
switch)!
5.2 The functions of the buttons
F1 (PYROTMAT Wood)
Switch on wood-burning operation.
F2 (PYROTMAT Oil)
Switch the oil burner on the PYROMAT on or off.
F3 (PYROMAT parameters)
Set parameters, set point values, time and date.
F4 (Group 1)
Setting parameters and set point values
(heat distribution, Group 1)
F5 (Group 2)
Setting parameters and set point values
(heat distribution, Group 2)
F6 (Group 3)
Setting parameters and set point values
(heat distribution, Group 3)
F7 (Group 4
Setting parameters and set point values
(heat distribution, Group 4)
F8 ((Group 5)
Setting parameters and set point values
(heat distribution, Group 5)
< Go one page to the left in menu masks
> Go one page to the right in menu masks
∧ Go one line up
(Only possible when the scroll up symbol Ï is
displayed.)
∨ Go one line down
(Only possible when the scroll down symbol
Ð is displayed.)
+ Change numeric values and set point values
- Change numeric values and set point values
OK Adopt (acknowledge) settings and/or changes
The following applies to the F3, F4, F5, F6, F7 &
F8 buttons:
- Pressing once will take you to the respective
menu. As feedback, the relevant LED will blink.
- If a set point value is changed and not confirmed with "OK", then it will not be adopted.
- Pressing the function button again will bring
back the normal display
- When no button is pressed for a period of sixty
seconds, the normal display automatically reappears.
NOTE:
Depending on the execution and setting, some
menus and texts do not appear.
Page 12

12
5.3 Boiler, F3
5.3.1 F3 Key "PYROMAT parameters"
(mask number ) parameter (factory setting)
(01) Storage unit temperatures ( - ):
Indication of all the storage unit temperatures
(02) Return flow, burner (70°C):
Set point value for burner return circuit valve
(03) Forward flow, burner (80°C):
Set point value for storage unit loading temperature
(only when controlled storage unit loading is
"YES", or oil/gas burner Æ Service menu)
(04 ) Exha u s t g as , b u r n e r (200°C):
Limit of maximum exhaust gas temperature
(05) Exh aust gas, residual O2 (7%):
Set point value for residual oxygen for air vent control
(06) O2-control (ON):
Switch O
2
-control on and off
(07) Air vents without O2-control (30%):
Position of the air vents with O
2
-control switched
off
(08) Carry away excess heat at (95°C):
Limit temperature for carrying away excess heat
(12) System Temperature Set Point Minimum
(50°C):
Minimum forward flow temperature for heat distribution provided by customer (only if System Temperature Set Point Minimum YES Æ Service Menu)
(14) Wood-burning operation ( 0 ):
Operating hours/minutes, wood-burning operation,
PYROTMAT ECO
(15) Date / Year (current):
Set year
(16) Datum - Monat ( aktuell ):
Einstellung Monat
(17) Date / Day (current):
Set day
(18) Date / Day of week (current):
Set day of week
(19) Date / Hours (current):
Set hours
(20) Date / Minutes (current):
Set minutes
(22) Enter permanent code (-):
Additional parameters for oil/gas burner on the
Pyromat ECO (factory setting)
(. .) Loading of storage unit with oil/gas operation (NO):
Select storage unit loading YES/NO.
(. . ) Load storage unit with oil/gas operation to
storage unit (storage unit, bottom):
Select storage unit loading level for oil/gas burner
operation (only when storage unit loading with
oil/gas burner operation is YES).
(. . ) Loading storage unit with oil/gas operation
to (70°C):
Temperature set for storage unit (only when storage unit loading with oil/gas burner operation is
YES).
(. . ) Oil/gas operation ( 0 ):
Operating hours, oil/gas burner on the Pyrotmat
ECO
Page 13

13
5.4 The F4-F8 extended control systems
The F4 to F8 buttons are assigned customerspecific extended control systems as desired.
Each extended control system is assigned a separate button.
5.4.1 Room heating unit
Function (ECO-H):
Weather-controlled regulation of heating with digital timer for lowerable operation according to a
daily or weekly programme, with pump control,
frost protection function, ECOcircuit and limited
supply temperature.
Operating modes
- Off:
The room heating unit is switched off.
- Day / Night:
Heating operation according to clocked programme. Normal temperature during the day
and reduced temperature at night.
- Day / Off:
Heating operation according to clocked programme. Normal temperature during the day
and switched off at night.
- Day:
Normal temperature continuously.
- Night:
Reduced temperature continuously.
- Manual:
Pump on; valve is not controlled (emergency
operation)
(Mask number) Parameter (Factory setting)
(01) Operating mode (Day / Night)
Selection of operating mode
(02) Number of heating periods (1)
The weekly programme has to be entered in the
form of heating periods. Each weekly programme
consists of the heating day, start and end. A
maximum of seven heating periods is available.
(03) Heating Day 1; Heating days (MON to SUN)
Day or days on which the switching times apply.
Select the heating days with Buttons F1 (for Monday) to F7 (for Sunday). Press the button once Æ
selects the day, pressing the button again Æ drops
the day.
Only with the operating modes Day/Night or
Day/Off
(04) Heating Period 1; Start (6:00)
The switch-over time from lowered temperature (or
Off) to normal temperature
Only with operating modes Day/Night and Day/Off.
(05) Heating Period 1 / End (22:00)
The switch-over time from normal temperature to
lowered temperature (or Off)
Only with the operating modes Day/Night or
Day/Off.
(06-23) Heating Periods 2-7
These depend on the number of heating periods
(see Mask 2), consisting of heating days, start and
end.
(24) Temperature of flow / at +5°C (43°C)
Desired flow temperature at atmospheric temperature of +5°C (see heating curve).
(25) Temperature of flow; at -15°C (64°C)
Desired flow temperature at atmospheric temperature of -15°C (see heating curve).
(26) Temperature Room Day (20°C)
Setting for temperature of room during daytime
operation. (Only with the room thermostat option)
(27) Temperature Room Night (15°C)
Setting for temperature of room during night-time
operation. (Only with the room thermostat option)
(28) Night-time lowering of flow temperature
by (-6°C)
This temperature set is subtracted from the flow
temperature calculated for night-time lowering.
(29) Flow temperature / Maximum (70°C)
Maximum limit of flow temperature.
(30) ECOcircuit (YES)
The ECO automatic savings system makes the
heating switch on and off as required.
(31) Switch off below system temperature (NO)
Should the room heating unit group be switched off
when a minimum system temperature is fallen
short of?
(32) Frost protection function (YES)
With the frost protection function switched on, the
room heating unit is turned on when there is a
danger of frost.
(33) Carry off excess heat (NO)
In case of danger of the PYROMAT ECO
overheating (e.g. owing to being refilled with too
much fuel), there is the option of the excess heat
being carried off. The room unit adjusts to "Flow
temperature / Maximum".
Page 14

14
¥Auto
e
The heating curve
The correspondence of the flow temperature to the
outdoor temperature can be set directly and read
directly. The setting is carried out by two points:
Point 1:
Flow temperature at atmospheric temperature of
+5°C (setting range from 20°C to 90°C).
Point 2:
Flow temperature at atmospheric temperature of
-15°C (setting range from 20°C to 90°C).
I M P O R T A N T:
Point 2 always has to be higher than Point 1!
The two points marked indicate the factory setting.
Point 1 is set to 43°C and Point 2 to 64°C. This is
equivalent to a steepness of approx. 1.5.
Room thermostat (option):
The Model QAA 35 Room Thermostat can be used
with or without influence by the room temperature.
Possible switch positions
:
- Position:
Heating operation following clocked programme
according to setting in the ECOTRONIC.
- Position:
Continuous normal temperature.
(The operating mode set in the ECOTRONIC
will be ignored.)
- Position:
Continuous reduced temperature.
(The operating mode set in the ECOTRONIC
will be ignored.)
+5°C
Point 1
-15°C
Point 2
(Fig: Heating curve)
Page 15

15
5.4.2 Utility water heater
Function:
- ECO-B1
When the temperature of the utility water drops,
it is reheated by the built-in heat exchanger
from the burner or from the heat accumulator.
The condition for this is a relevant difference in
temperature (choice of preset temperature difference or fixed preset temperature).
The heating periods (daily and weekly programmes) can be set using the integrated
timer.
- ECO-B2
When the temperature of the utility water drops,
it is reheated by the built-in heat exchanger
from the burner or from the heat accumulator.
The condition for this is a relevant difference in
temperature (choice of preset temperature difference or fixed preset temperature).
The flow rate of the heating water is controlled
by the return temperature (quantity control).
This produces optimum storage stratification
with long-lasting high temperature on the storage unit flow pipe.
The heating periods (daily and weekly programmes) can be set using the integrated
timer.
Operating modes:
- Off:
The utility water heating system is switched off.
- Timer:
Utility water heating following clocked
programme. (The boiler is only warmed up
during the heating period.)
- On:
The boiler is heated up on request for heat and
when there is sufficient system temperature.
- Manual:
Pump on; valve is not controlled (emergency
operation)
(Mask number) Parameter (Factory setting)
(01) Operating mode (timer)
Select operating mode
(02) Number of heating periods (1)
The weekly programme has to be entered in the
form of heating periods. Each weekly programme
consists of the heating day, start and end. A maximum of seven heating periods is available.
(Only with TIMER operating mode)
(03) Heating Period 1 / Heating days (MON to
SUN)
Days on which the boiler loading is cleared for.
Select the heating days with Buttons F1 (for Monday) to F7 (for Sunday). Press the button once Æ
selects the day, pressing the button again Æ drops
the day.
(Only with TIMER operating mode)
(04) Heating Period 1 / Start (6:00)
Start, clearance, utility water heating
(Only with TIMER operating mode)
(05) Heating Period 1 / End (22:00)
End, clearance, utility water heating
(Only with TIMER operating mode)
(06-23) Heating Periods 2-7
These depend on the number of heating periods
(see Mask 2), consisting of heating days, start and
end.
(24) Temperature of utility water (60°C)
Set the desired temperature of the utility water.
Additional parameters for ECO-B2
(Mask number) Parameter (Factory setting)
- Temperature of return flow __°C higher than
the temperature of the utility water (20°C)
Desired set-point temperature of return flow:
actual boiler temperature plus the amount set
here.
Page 16

16
5.4.3 Air heater
Function (ECO-L):
The air heaters are supplied with maximum flow
temperature from the burner storage system. The
fans are connected by switches or controllers provided by the customer. The flow rate of the heating water is controlled by the temperature of the return flow and thus adjusted to the air heater's
thermal output (quantity control). This produces
optimum storage stratification with long-lasting
high temperature on the storage unit flow pipe.
The heating periods (daily and weekly programmes) can be set using the integrated timer.
Operating modes:
- Off:
The air heater is switched off
- Day / Off:
Heating operation following clocked
programme. During the day the system is
adjusted to the set point value for return flow,
and at night it is off.
- Day:
Adjusted to the set point value for return flow
(continuous operation)
- Manual:
Pump on; the valve is not controlled (emergency operation)
(Mask number) Parameter (Factory setting)
(01) Operating mode (Day / Off)
Select operating mode
(02) Number of heating periods (1)
The weekly programme has to be entered in the
form of heating periods. Each weekly programme
consists of the heating day, start and end. A maximum of seven heating periods is available.
(03) Heating Period 1 / Heating days (MON to
SUN)
Day or days on which the switching times apply.
Select the heating days with Buttons F1 (for Monday) to F7 (for Sunday). Press the button once Æ
selects the day, pressing the button again Æ drops
the day.
(Only with the operating mode Day/Off)
(04) Heating Period 1 / Start (6:00)
Time to switch on air heater
(Only with the operating mode Day/Off)
(05) Heating Period 1 / End (22:00)
Time to switch off air heater
(Only with the operating mode Day/Off)
(06-23) Heating Periods 2-7
These depend on the number of heating periods
(see Mask 2), consisting of heating days, start and
end.
(24) Temperature of return flow (60°C)
Desired temperature of return flow
(25) ECOcircuit (YES)
The ECO automatic savings system makes the
heating switch on and off as required.
(26) Switch off below system temperature (NO)
Should the air heater group be switched off when a
minimum system temperature is fallen short of?
(27) Frost protection function (YES)
With the frost protection function switched on, the
air heater is turned on when there is a danger of
frost.
(28) Carry off excess heat (NO)
In case of danger of the PYROMAT DYN
overheating (e.g. through too much fuel added in
manual operation), there is the option of the
excess heat being carried off. The air heater adjusts to "Flow temperature / Maximum".
Page 17

17
5.4.4 Neighbouring buildings
Function (ECO-N):
The pipeline is usually supplied with a lowered
temperature required by the weather-guided heating control system. The utility water heater is
loaded with the maximum flow temperature set.
To do so, the heating water is re-channelled by a
valve to the utility water heater. The integrated
timer shifts this to non-productive times, where the
room heating unit is quickly interrupted.
Operating modes for the room heating unit
- Off:
The room unit is switched off.
- Day / Night:
Heating operation following clocked programme. Normal temperature during the day,
and reduced temperature at night.
- Day / Off:
Heating operation following clocked programme. Normal temperature during the day,
and off at night.
- Day:
Normal temperature continuously
- Night:
Reduced temperature continuously
- Manual:
Pump on; the valve is not controlled
(emergency operation)
(Mask number) Parameter (Factory setting)
(01) Operating mode (Day / Night)
Select operating mode
(02) Number of heating periods (1)
The weekly programme has to be entered in the
form of heating periods. Each weekly programme
consists of the heating day, start and end. A maximum of seven heating periods is available.
(03) Heating Period 1; Heating days (MON to
SUN)
Day or days on which the switching times apply.
Select the heating days with Buttons F1 (for Monday) to F7 (for Sunday). Press the button once Æ
selects the day, pressing the button again Æ drops
the day.
Only with the operating modes Day/Night or
Day/Off.
(04) Heating Period 1 / Start (6:00)
Switch-over time from lowered temperature (or Off)
to normal temperature.
Only with the operating modes Day/Night or
Day/Off.
(05) Heating Period 1 / End (22:00)
Switch-over time from normal temperature to
lowered temperature (or Off).
Only with the operating modes Day/Night or
Day/Off.
(06-23) Heating Periods 2-7
These depend on the number of heating periods
(see Mask 2), consisting of heating days, start and
end.
(24) Flow temperature; at +5°C (43°C)
(25) Flow temperature; at -15°C (64°C)
(26) Temperature, Room, Day (20°C)
Set point room temperature, daytime operation.
(Only with the room thermostat option)
(27) Temperature, Room, Night (15°C)
Set point room temperature, nighttime operation.
(Only with the room thermostat option)
(28) Nighttime lowering of the flow temperature
by (-6°C)
This temperature set is subtracted from the flow
temperature calculated for nighttime lowering.
(29) Flow temperature; maximum (70°C)
The maximum limit for the flow temperature
(30) ECOcircuit (YES)
The ECO automatic savings system makes the
heating switch on and off as required.
(31) Switch off below system temperature (NO)
Should the room heating unit group be switched off
when a minimum system temperature is fallen
short of?
(32) Frost protection function (YES)
With the frost protection function switched on, the
room heating unit is turned on when there is a
danger of frost.
(33) Carry off excess heat (NO)
In case of danger of the PYROMAT ECO
overheating (e.g. through too much fuel added in
manual operation), there is the option of the
excess heat being carried off. The room unit
adjusts to "Flow temperature / Maximum".
The heating curve
See "Extended control system for room heating
unit"
Room heating unit:
See "Extended control system for room heating
unit"
Page 18

18
Operating modes of the utility water heater:
- Off:
The utility water heating system is switched off.
- Timer:
Utility water is heated following a clocked
programme (the boiler is only heated during the
heating period).
- On:
The boiler is heated on request for heat and
when there is sufficient system temperature.
- Manual:
Pump on; the valve is not controlled
(emergency operation).
Utility water heater (Mask number) Parameter
(Factory setting)
(34) Operating mode (timer)
Select operating mode
(35) Number of heating periods (1)
The weekly programme has to be entered in the
form of heating periods. Each weekly programme
consists of the heating day, start and end. A maximum of seven heating periods is available.
(Only with TIMER operating mode)
(36) Heating Period 1; Heating days (MON to
SUN)
Day or days on which the switching times apply.
Select the heating days with Buttons F1 (for Monday) to F7 (for Sunday). Press the button once Æ
selects the day, pressing the button again Æ drops
the day.
(Only with TIMER operating mode)
(37) Heating Period 1 / Start (6:00)
Start, clearance, utility water heating
(Only with TIMER operating mode)
(38) Heating Period 1 / End (22:00)
End, clearance, utility water heating
(Only with TIMER operating mode)
(39-56) Heating Periods 2-7
These depend on the number of heating periods
(see Mask 35), consisting of heating days, start
and end.
(57) Temperature of utility water (60°C)
Set the desired temperature of the utility water.
5.4.5 Pipeline
Function (ECO-F):
This is for neighbouring buildings with a separate
heat distribution system, which is supplied with
heat via a pipeline. According to requests by the
heat distribution system, the temperature of the
pipeline is pre-adjusted for the lowest loss in the
line.
Operating modes:
- Off
Pump off; valve closed
- Automatic
Adjustment to the temperature requested
- Manual
Pump on; the valve is not controlled
(emergency operation).
(Mask number) Parameter (Factory setting)
(01) Heating / Operating mode (Automatic)
Select operating mode
(02) Frost protection function (YES)
With the frost protection function switched on, the
pipeline is turned on when there is a danger of
frost.
(03) Flow temperature; minimum (20°C)
Minimum temperature desired
(04) Flow temperature; maximum (60°C)
Maximum temperature desired
Page 19

19
5.4.6 Additional boilers
Function:
- Boiler, single (ECO-KE)
To cover the heat requirement (single operation), an additional boiler is automatically connected after the heat is removed from the storage unit. Loading of the storage unit is only
possible with the PYROMAT ECO. When it is
put into operation, the additional boiler switches
off, and the closed shut-off valve prevents it
from being flowed through.
- Boiler, single, gliding (ECO-KG)
To cover the heat requirement (single operation), an additional boiler is automatically connected after the heat is removed from the storage unit. Loading of the storage unit is only
possible with the PYROMAT ECO. When it is
put into operation, the additional boiler switches
off, and the closed shut-off valve prevents it
from being flowed through. The boiler temperature is adjusted in gliding fashion to the minimum temperature according to the heat requirement.
- Boiler, parallel (ECO-KP)
An additional boiler is automatically connected
when required. This may take place to cover
the heat requirement after the heat is removed
from the storage unit (single operation). Or the
additional boiler serves to cover peaks in heat
requirements (parallel operation to the PYRO-
MAT ECO). For parallel operation, a burner
group is necessary to carry off heat that simultaneously provides for keeping up the return
flow.
Operating modes:
- Off:
The additional boiler is switched off.
- Automatic:
Automatic clearance of the additional boiler
through a request by a heat consumer, or (only
ECO-KP) when an adjustable connecting temperature for the wood-powered boiler is fallen
short of.
- On:
The additional boiler has been cleared.
- Manual:
The additional boiler has been cleared, and
(only ECO-KP) the pump is on; the valve is not
controlled (emergency operation).
(Mask number) Parameter (Factory setting)
(01) Operating mode (automatic)
Select operating mode
(02) Delay before connecting (15 min)
Clearance is given when the time set is up.
(03) Connecting temperature, system set-point
temperature (-15°C)
If the system temperature falls by this amount below the system set-point temperature, the delay
before connecting (Fig 2) begins to lapse.
(04) Switch-off temperature for system setpoint temperature (- 5°C)
Switch-off difference with parallel operation and
loading of storage unit: NO
(05) Forward flow, burner / Maximum (80°C)
(06) Forward flow, burner / Minimum (20°C)
(07) Set-point temperature of return flow (50°C)
The set-point value for the temperature of the return flow
(08) Loading, storage unit (NO)
Should the storage unit be heated up by the additional boiler?
(09) Loading, storage unit up to (storage unit
top)
Up to which heat storage sensor should the storage unit be heated up?
(10) Loading, storage unit up to (70°C)
Up to what temperature at the heat storage sensor
selected should the additional boiler heat up the
storage unit?
(12) Service function of additional boiler
A maintenance function for the specialist
(13) Operating hours counter
Page 20

20
5.4.7 Solar
Function (ECO-S1):
This is used in simple solar systems with a single
control circuit to heat the utility water in the solar
utility water heater (Art No: WSS- ...). The ECOS1 controller is an additional component for the
ECO-B1(2) controller for the utility water heater.
When the solar collector is hotter than the utility
water at the bottom, it is heated up by the solar
collector.
Operating modes
- Off:
Pump off; valve shut
- Automatic:
Automatic heating of the solar utility water
heater by means of difference-based control.
- Manual:
Emergency operation: Pump on.
(Mask number) Parameter (Factory setting)
(01) Operating mode (automatic)
Select operating mode
(02) Temperature of utility water / Maximum
(65°C)
The maximum temperature of the utility water with
solar heating
(04) Collector / Utility water;
Set difference (10°C)
The difference between the solar collector and the
utility water heater at the bottom
(10) Operating hours counter
Function (ECO-S3):
This is used in large solar systems to heat the utility water in a solar utility water heater (Art. No:
WSS-...) and for supplying heat to the heat storage
tank by means of a triple control circuit. The first
circuit is for heating up the utility water, the second
circuit is for heating up the heat storage tank at the
rear/bottom, and the third circuit is for heating up
the heat storage tank in front/at the top. The heating storage unit is heated up by an externally situated plate-type heat exchanger. On switchover
from utility water heater to heating storage unit, the
secondary pump is switched on, which is then in
operation with the solar pump. For optimised functioning, the flow rate in the secondary circuit has to
be adapted to the primary circuit (e.g. with flow
rate gauges in the primary and secondary circuits).
Operating modes
- Off:
Pump off; valve shut
- Automatic:
Automatic heating of the solar utility water
heater by means of difference-based control.
- Manual:
Emergency operation Æ Solar pump and secondary pump on; valves are not controlled
(emergency operation).
(Mask number) Parameter (Factory setting)
(01) Operating mode (automatic)
Select operating mode
(02) Temperature of utility water; maximum
(65°C)
The maximum temperature of utility water with solar heating.
(03) Priority to utility water (optimised)
- Optimised:
Priority to loading utility water, but if the solar output is not sufficient to finish loading the utility water
heater, there is a switchover to solar heated heating. If the solar output rises (cyclical examination)
so much that heating of utility water is possible,
there is again a switchover to solar heated utility
water.
- Absolutely:
Loading utility water has absolute priority, i.e. solar
heated heating is not allowed until the utility water
heater has been completely loaded.
- No:
Solar heating of utility water / Heating according to
the temperature difference between the collector
and the utility water at the bottom or the collector
and the storage unit at the bottom
(04) Collector / Utility water; set difference
(10°C)
The temperature difference between the collector
and the utility water at the bottom for solar utility
water heating.
(05) Collector / Storage unit; set difference
(15°C)
The temperature difference between the collector
and the storage unit at the bottom for solar heating
system heating.
(10) Operating hours counter
Page 21

21
Exhaust gas deduster (option)
6 Cleaning
Regular cleaning of the facility is the customer's most important job for years of trouble-free operation and to obtain the greatest possible output with the best efficiency.
The cleaning intervals may vary, depending on the fuel, the amount of fine matter and the operating
method.
CAUTION – RISK OF INJURY: Before beginning cleaning work, put the facility out of operation. Be
absolutely sure to wear protective gloves, protective eyewear if required and use the cleaning utensils that come with the facility – danger of blow-ups, burns and getting crushed!
Every two weeks:
Pull the exhaust turbulators out of the pipes
and dust or sweep them off. (Only with PY-
ROMAT ECO- 45, 65, 85, 81 and 151).
Then go through the bundle of tubes with the
cleaning brush that comes with the system.
Twice per year:
Unplug the plug from the exhaust gas fan,
unscrew the thumb screws, pull out the
motor with the running wheel and clean
with broom or wire brush. IMPORTANT:
DANGER OF GETTING INJURED!
Twice per year:
The fireclay-lined combustion chamber
has to be cleaned by a chimneysweep
using a vacuum cleaner from the front
through the opened ash pan lid.
Every day:
Open ash pan lid and with a poker move the fine ash through
slots in the grate into the ash pan.
If a lot of paper has been burned, completely remove the ash
from the grate.
If only wood has been burned, it is sufficient to evenly distribute
the charcoal.
When a lot of paper and cardboard are burned, the inlet into the
combustion chamber might also be clogged. If necessary, clear
with a poker.
Check ash pan and empty before it is completely full.
Twice per year:
Take off the panelling, undo the
thumb screws, take off the lid and
clean the combustion chamber
with a vacuum cleaner.
Weekly:
Unscrew win
g
nuts, take off lid and take out ash.
Monthly:
Take off lid and check the exhaust gas route for clear passage.
Every four weeks:
Open lid on the side (possible on both sides) and clean
the secondary air duct.
Every two weeks:
Open the lid on the side. Remove soot
and dust using the rear ash pan.
Page 22

22
7 Shutdowns
Heating boiler
- Pipe-type heat exchanger
When the PYROMAT ECO is put out of operation for a long period (such as for summer
breaks), be sure to carefully clean the pipe-type
heat exchanger with a steel brush required.
- Prevent high-temperature corrosion when
chipboards are incinerated:
If the heating room is moist or there is any other
atmosphere that promotes corrosion (e.g. poor
ventilation, residual enamel near the heating
room, etc.), after carrying out the cleaning, also
spray the pipe-type heat exchanger with biodiesel.
- Remove encrustation from the walls of the
firebox and boiler with a trowel or flat scraper.
- If there is a danger of frost, empty the heating
system, following the heating installer's rules, or
have anti-frost agent filled.
Control system
Even when the PYROMAT ECO is put out of operation for long periods, the power supply to the
control system should not be interrupted (do not
turn off master switch).
Why
?
- The "intermittent control system" switches the
consumer pumps on for five seconds every 24
hours. This prevents the pumps from jamming
during long standstills. This saves on expensive repairs.
- Avoid the formation of condensation in the
lambda sensor.
- Extend the service life of the buffer battery.
8 Waste disposal
Shutting down operation
- Burn out the PYROMAT ECO and let it cool
down.
- Disconnect the mains connection to the control
cabinet.
IMPORTANT: DANGEROUS VOLTAGE!
Only licensed electrical firms are allowed to
disconnect and dismantle the connection to
the electrical network.
- Close the forward flow and return flow slide
valves.
- Open the drain tap on the bottom of the boiler
of the PYROMAT ECO and drain water.
Only heating system installers may drain the
boiler and dismantle the connections to the
heating system.
- Disconnect the forward flow pipe and return
flow pipe from the PYROMAT ECO.
Instructions regarding transport to a different
location
The personnel who carry out transports to different
locations have to know the dangers involved of accidents that might arise in doing so and use suitable measures to prevent such from happening.
Instructions regarding waste disposal
- Comply with customary laws and regulations on
disposing waste.
- Contract a disposal firm to dispose of and recycle waste in an environmentally friendly fashion.
Page 23

Spec Sheet
Wood Fuels
Minimum Requirements / Information
KÖB Holzfeuerungen GmbH, Flotzbachstr. 33, A-6922 Wolfurt, Tel. +43/5574/6770-0, Fax 65707, E-Mail: office@kob.cc
Subject to technical changes
1010/d-1
2007-09-12_E
A prerequisite for approval is the express permission for such by the public authority responsible. For claims to
the warranty according to Section 11 of our General Terms and Conditions of Delivery, wood fuels have to meet
the following conditions. If those conditions are not met, then approval is possible with restrictions (warranty,
maintenance, operational safety) with a written statement by the manufacturer in reference to the facility.
1) Non-combustible substances contained
No wood fuels may contain any foreign bodies, such as pieces of metal, stones, masonry remnants or plastics. Nor
must the following limits (per kg of dry fuel) for non-combustible substances contained (ash analysed at a
temperature of 815°C) be exceeded or fallen short of:
Limit Comparison with untreated forest wood
1.1) Chlorine Cl: max. 300 mg/kg 10 mg/kg
1.2) Sulphur S: max. 1000 mg/kg
120 mg/kg
1.3) Total Cl, S: max. 1000 mg/kg 130 mg/kg
1.4) Ash content, total: max. 15.0 g/kg 5.0 g/kg
1.5) Alkali oxides in the ash (K
2
O and Na2O): max. 1.0 g/kg 0.35 g/kg
1.6) Sintering point of the ash: min. 1000°C approx. 1200°C
Consequence of substantial overstepping of limits (1.1, 1.2, 1.3, 1.5, 1.6):
a) Hot-gas corrosion in the heat exchanger → Special maintenance instructions for heat exchanger
→ Shortened service life of heat exchanger
b) Early sintering and melting of the ash → Special maintenance instructions for firing,
→ Increased maintenance costs (firing, boiler door)
If the maintenance instructions are not followed, a process will be created that builds up in a negative fashion with:
→ Cinders change the airflow → Temperature peaks → more slag → etc, until there is fast destruction of the
refractory materials
1.7) Additives in remnant and used wood: Free of heavy metals and halogen compounds
2) Superfines & dust (wood particles smaller than 1.0 mm as per ÖNORM M 7133)
2.1) Without pre-dryer, max. 10.0% of the total mass; consequence of substantial overstepping of limit:
Temperature peaks → Slag formation → Even higher temperature → etc, to the point of destruction;
→ Special maintenance instructions for firing;
Elevated values are especially critical for remnant wood in combination with elevated values as per 1.1, 1.2
2.2) For forest wood chips with pre-dryer, max 4.0% of the total mass; consequence of substantial overstepping of
limit:
→ Moving the exhaust air lines → Special maintenance instructions for cleaning exhaust air line
3) Origin and treatment
3.1) Forest wood and plantation wood (complete trees and trunk wood untreated)
Mature wood from trunks and branches, untreated, chopped as billet wood or chips
3.2) Compressed wood, pellets (conforming to standards, such as: ÖNORM M 7135)
Untreated wood with limited bark content, compressed by machine and calibrated
3.2) Increased proportion of bark, tree cuttings from roadside trees (untreated)
Remnants from the forestry and sawmill industries or from conservation of the countryside (elevated ash
content).
3.3) Remnants from derived timber products
Usually a mixture of untreated and treated wood in the form of shavings from processing machinery and chips
from choppers that run slowly. In cases of elevated proportions of dust and/or limited storage volumes, these
shavings are compressed into briquettes.
3.4) Used wood
This is essentially untreated wood that has been used prior to its energetic utilisation (e.g. pallets). It is reduced
in size by shredders for thermal utilisation. The metal parts have to be removed afterwards (by magnetic
separators).
4) Particle size: adjustment of the conveyor augers
4.1) G30/G50 chips from untreated wood as per ÖNORM M 7133:
made by fast-running and cutting tools;
max. coarse fraction with cross-section and length
G 30 of 20% max. 3 cm
2
max. 8.5 cm;
G 50 of 20% max. 5 cm
2
max. 12 cm;
Required cross-sections of the loading: depends on the boiler output:
up to 150 kW up to 500 kW from 500 kW
Conveyor auger D min. 12 cm; min. 15 cm; min. 20 cm
Drop cross-section A min. 175 cm2 min. 300 cm2 min. 600 cm
2
Page 24

Spec Sheet
Wood Fuels
Minimum Requirements / Information
KÖB Holzfeuerungen GmbH, Flotzbachstr. 33, A-6922 Wolfurt, Tel. +43/5574/6770-0, Fax 65707, E-Mail: office@kob.cc
Subject to technical changes
1010/d-2
2007-09-12_E
4.2) Chips not from the forest; origin as per 3.2, 3.3, 3.4; briquettes, origin as per 3.3
Size essentially as per ÖNORM M 7133 G50, additionally, however:
- Fraction of one-offs max. 5% with cross-section of max. 5 cm² up to a length of max. 16 cm
- Frayed surface by chopping tools (shredders) or slow-running choppers
- Briquettes, diameter max. D 60 mm (hydraulic compressors, pressure geared to loading system)
Conveyor augers diameter min. 20 cm; drop-off route, rotary valve cross-section min. 600 cm
2
Consequence of overstepping particle size:
- Extra expenditures for correcting malfunctions
- Shortened service life of the conveyor augers and drives
5) Bulk density S (kg/m³), water content W (%), size G (mm) as per ÖNORM M 7133
In automatically loaded boiler plants, the wood fuels that come to be used should be individually listed in offers and
orders as follows:
a) S 130 W10 to W20 G30/50 Sawdust, untreated (planing shop)
b1) S 200 W20 to W35 G30/50 Sawdust, untreated (sawmill)
b2) S 200 W20 G30/50 Forest wood chips, soft, untreated
c1) S 250 W20 to W35 G30/50 Forest wood chips, soft, untreated
c2) S 250 W35 to W50 G30/50 Sawdust, untreated (sawmill)
d1) S 300 W20 to W35 G30/50 Forest wood chips, soft/hard, untreated
d2) S 300 W35 to W50 G30/50 Forest wood chips, soft, untreated
e1) S 350 W20 to W35 G30/50 Forest wood chips, hard, untreated
e2) S 350 W35 to W50 G30/50 Forest wood chips, soft/hard, untreated
e3) S 350 W50 to W60 G30/50 Forest wood chips, soft, untreated
f1) S 400 W35 to W50 G30/50 Forest wood chips, hard, untreated
f2) S 400 W50 to W60 G30/50 Forest wood chips, soft/hard, untreated
g) S 130 less than W15 G30/50 Shavings & chips from wood remnants, dry, mixed
h) S 200 less than W15 G30/50 Shavings & chips from wood remnants, dry, mixed
i) S 250 less than W15 G30/50 Shavings & chips from wood remnants, dry, mixed
j) S 350 less than W15 G30/50 Briquettes from wood remnants D 40 to 60 mm
k1) S 650 less than W10 Pellets conforming to standards, untreated D 6 to 10 mm
k2) S 650 less than W10 Pellets conforming to standards, untreated D 11 to 15 mm
6) Maximum water content allowed, W, (percentage by weight of th e total mass)
The maximum water content allowed in the fuel when entering the furnace should be taken from the spec sheets for
the furnace series. With a pre-dryer installed between the furnace and the fuel storage site, extra water content can
be in the fuel stored (see specifications in reference to the order). The water content influences the maximum
furnace output possible, the heat emission required to the pre-dryer and thus the maximum heat emission possible
to the consumers.
7) Other information
7.1) Ash and cleaning
Untreated wood without bark has a proportion of ash less than 0.5% of the fuel mass supplied. All the
specifications regarding cleaning involved are based on untreated wood with bark attached with an ash amount
of 0.8%. The cleaning and maintenance involved for other wood fuels should be adapted according to the
amount, the specific weight and the behaviour of the ash.
7.2) Changing fuels
A great change in fuel quality, such as bulk density, water content, dust proportion or ash content might make a
manual correction of the firing parameters necessary (see Operating Manual).
8) Non-woody fuels from biomass
Non-woody fuels from biomass, such as needles, foliage, grain, straw, fruit pits, etc, are usually unsuited as fuel for
trouble-free operation and thus are not approved.
9) Wood fuels: rules, regulations and standards
Germany: 1
st
BImSchV1 dated 14 Mar 97, amended on 2 Aug 2001; page: Fuels nos. 5 to 7
Austria: FAV dated 18 Nov 1997 "Feuerungsanlagenverordnung" (Furnaces Act § 3.(1) 3. Solid Fuels
Switzerland: Luftreinhalteverordnung LRV (Swiss Clean Air Act) dated 16 Dec 1985 (Standing: 28 Mar 2000)
DIN 51731 Compressed Wood from Untreated Wood (1993)
ÖNORM M 7135 Compressed Wood from Untreated Wood or Untreated Bark (1998)
ÖNORM M 7136 Wood Pellets, Quality Assurance, Transport Logistics and Storage Logistics
ÖNORM M 7133 Wood Chips for Energetic Purposes (1998)
EN 303-5 Heating Boilers for Solid Fuels, Table 8 "Test Fuels“
CEN/TS 14961 Solid Organic Fuels
1
BImSchV = Bundes-Immissionsschutzverordnung [German Federal Emissions Control Act]
Page 25

Malfunction report / malfunction remedy
Pyromat ECO 2006-07-28_E.doc Page 1 of 1
Heat Generation
No.
Text displayed for malfunc-
tion
Malfunction alarm Possible cause Check / Remedy
01
Excess temperature
(F1, F2, F3 lights up red)
- Temperature-limiting safety switch (TLSS) in
the front metal plate for the refill access lid.
- Filled with too much wood
- Incorrect setting on the control module
- Defective component (pump, valve or temperature
sensor)
- Check storage temperature before heating up and before re-
feeding. Can the anticipated energy be collected or stored?
- Control burner circuit pump, burner control valve and tempera-
ture sensor.
- Activate the function “Dissipate excess heat”.
- On the TLSS, screw off the protective cap and press the reset
button (not possible until the burner temperature is less than
70°C) and press OK.
03-17
Interruption or short-circuit,
sensor
(F3 lights up red)
- Sensor . . .
- Damage to the sensor connecting line
- Malfunction alarm defective
- Call in electrician
09
Lambda sensor
(F3 lights up red)
- Lambda sensor on the back of the burner
- Malfunction alarm very soiled
- Malfunction alarm defective
- Error in the electronics
- Readjust lambda sensor
- Acknowledge with OK
18
Permanent code
(F3 lights up red)
- Operating hours lapsed before the perma-
nent code has been entered.
- Permanent code has not been entered - Call burner supplier
19
Repeat heating up
(F3 lights up red)
- Exhaust gas sensor
- Lambda sensor
- Fuel too moist
- Lambda sensor imprecise
- Poorly filled with logs
- Use suitable, dry fuel.
- Readjust lambda sensor.
- Acknowledge with OK
81-93
BUS error, no connection to
the . . .
(F3 lights up red)
- Data transmission line for the bus connec-
tion
- Bus connection interrupted
- Check plug connections
- Briefly disconnect power supply
- Replace data transmission line
- Call supplier
Heat Distribution
No.
Text displayed for malfunc-
tion
Malfunction alarm Possible cause Check / Remedy
01-27
Interruption or short-circuit,
sensor . . .
(F… lights up red)
- Sensor . . .
- Damage to the sensor connecting line
- Malfunction alarm defective
- Call in electrician
Page 26

Leerseite für Notizen:
Blank page for notes:
Page en blanc pour des notationes:
Page 27

Leerseite für Notizen:
Blank page for notes:
Page en blanc pour des notationes:
Page 28

KÖB Holzfeuerungen GmbH, Flotzbachstrasse 33, A-6922 Wolfurt
Tel +43 55 74 / 67 70-0, Fax +43 55 74 / 65 7 07
office@kob.cc, www.koeb-holzfeuerungen.com
Viessmann Group
Verkaufs-Niederlassungen und dazugehörige Service-Außenstellen:
ZENTRALE:
Flotzbachstrasse 33, A-6922 Wolfurt
Tel +43 55 74 / 67 70-0
Fax +43 55 74 / 65 7 07
office@kob.cc
ÖSTERREICH – NORD / OST
A-4906 Eberschwang
Tel +43 77 53 / 32 65
Fax +43 77 53 / 32 65
helmut.fuchsberger@kob.cc
ÖSTERREICH – SÜD / OST
A-8230 Hartberg Greinbach
Tel +43 33 32 / 64 2 12
Fax +43 33 32 / 63 6 16
martin.nussdorfer@kob.cc
VERTRIEBSTOCHTER SCHWEIZ
KÖB Wärmetechnik AG
CH-9430 St. Margrethen
Tel +41 848 / 87 08 10
Fax +41 848 / 87 08 11
SCHWEIZ – ZENTRAL / OST
CH-9243 Jonschwil
Tel +41 71 / 92 38 2 80
Fax +41 71 / 92 38 2 82
josef.meier@kob.cc
SCHWEIZ – ZENTRAL / NORD
CH-4704 Niederbipp
Tel +41 32 / 63 30 7 10
Fax +41 32 / 63 30 7 11
adrian.rippstein@kob.cc
DEUTSCHLAND – SÜD / WEST
D-72639 Neuffen
Tel +49 70 25 / 80 42
Fax +49 70 25 / 83 69 6
gerald.sieler@kob.cc
DEUTSCHLAND – SÜD / MITTE
D-89278 Nersingen
Tel +49 73 08 / 91 00 10
Fax +49 73 08 / 52 66
hans.amann@kob.cc
DEUTSCHLAND – SÜD / OST
D-82549 Königsdorf
Tel +49 8179 / 92 95 65
Fax +49 8179 / 92 95 66
roland.metzner@kob.cc
●
DEUTSCHLAND – NORD / WEST
D-44579 Castrop-Rauxel
Tel +49 23 05 / 7 38 91
Fax +49 23 05 / 8 37 62
koeb-nw@t-online.de
●
DEUTSCHLAND – MITTE / OST
D-89278 Nersingen
Tel +49 7308 / 811347
Fax +49 7308 / 811387
tobias.amann@kob.cc
DEUTSCHLAND – NORD / OST
D-16727 Oberkrämer/ OT Eichstätt
Tel +49 33 04 / 31 70 8
Fax +49 33 04 / 31 70 8
wolfgang.ratzka@kob.cc
KOB Italia S.r.l.
I-36063 Marostica
Tel +39 0424 8 10 50
Fax +39 0424 47 34 45
italia@kob.cc
LUXEMBOURG
D-72639 Neuffen
Tel +49 70 25 / 80 42
Fax +49 70 25 / 83 69 6
gerald.sieler@kob.cc
FRANCE
F-04300 Forcalquier
Tel. +33 492 / 73 10 80
Fax: +33 492 / 73 10 80
servicefrance@kob.cc
●
FRANCE - OVEST
F-79160 Coulonges/L‘Autize
Tel. +33 549 / 06 06 60
Fax +33 549 / 06 00 60
energie79@wanadoo.fr
1 Serviceleitstelle Zentrale Wolfurt
KÖB Holzfeuerungen GmbH, Flotzbachstrasse 33, A-6922 Wolfurt
Tel +43 55 74 / 67 70-0, Fax +43 55 74 / 65 7 07, office@kob.cc
2 Serviceleitstelle für Italien
KOB Italia S.r.l., I-36063 Marostica
Tel +39 0424 78 10 50, Fax +39 0424 47 34 45, italia@kob.cc
3 Serviceleitstelle für Frankreich
F-04300 Forcalquier, Tel. +33 492 / 73 10 80, Fax: +33 492 / 73 10 80
servicefrance@kob.cc
SERVICE – EST: Electromatic – sarl, F-67550 Vendenheim
Tel +33 607 / 64 06 31, Fax +33 38 / 86 93 7 60. servicefrance@kob.cc
● Verkaufsorganisation mit eigenem Service
●
NORGE
AS Morgan
N-3933 Porsgrunn
Tel. +47 355 / 693 00
Fax: +47 355 / 693 15
fyk@asmorgan.no
●
NEDERLAND / BELGIE
LVB Wood Drying + Energy Systems BV
NL-4141 BE Leerdam
Tel. +31 345 / 61 97 88
Fax: +31 345 / 61 69 05
office@lvb-wood.nl
●
UNITED KINGDOM
3G Energi
UK – TD5 7BH, Kelso
Tel. +44 1573 22 91 98
Fax. +44 870 706 2555
enquiries@3genergi.co.uk
●
KÖB SVERIGE AB
S-65350 Karlstad
Tel. +46 54 53 69 87
Fax. +46 54 53 18 43
bengt.nilsson@fbp.se
●
IRLAND
Clearpower Ltd.
Dublin 2
Tel. +35 31 66 90 979
Fax. + 35 31 66 90 978
info@clearpower.ie
●
CANADA
Fink Machine Inc.
Enderby B.C
Tel. (001) 250 83 80 077
Fax. (001) 250 83 800 68
fink@jetstream.net
1
1
1
1
1
1
1
1
1
1
2
3
1
 Loading...