

Page 1

Installation and
Operating Instructions
for use by engineers and heating contractors
KPT 390 to KPT 1250 Series
Wood-fired Boiler
Max. output: 390 to 1250 kW (1331 to 4266 MBH)
Min. output: 98 to 370 kW (334 to 1263 MBH)
Pyrotec
r
IMPORTANT
Please ensure that these instructions are
read and understood before commencing
installation and start-up. Failure to comply
with these Installation Instructions will
render all warranties null and void.
Working on the equipment
The installation, adjustment, service and
maintenance of this product must be
performed by a licensed professional heating
contractor, who is qualified and
experienced in the installation, service
and maintenance of hot water heating
boilers. There are no user serviceable
parts on the boiler or control.
Ensure main power supply to equipment,
the heating system and all external
controls has been deactivated.
Take precautions in all instances to avoid
accidental activation of power during
service work.
Improper installation, service or
maintenance can cause product/property
damage, severe personal injury, and/or
loss of life.
H
5603 882 - 01 07/2014
Product may not be exactly as shown
IMPORTANT
Read and save these instructions
for future reference
.
Please file in Service Binder
Page 2
Introduction
Pyrotec Installation & Operating
Safety, Installation and Warranty Requirements
Please ensure that these instructions are read and understood before commencing installation and service. Failure
to comply with the instructions listed below and details printed in this manual can cause product/property damage,
severe personal injury, and/or loss of life. Ensure all requirements below are understood and fulfilled (including detailed
information found in manual subsections).
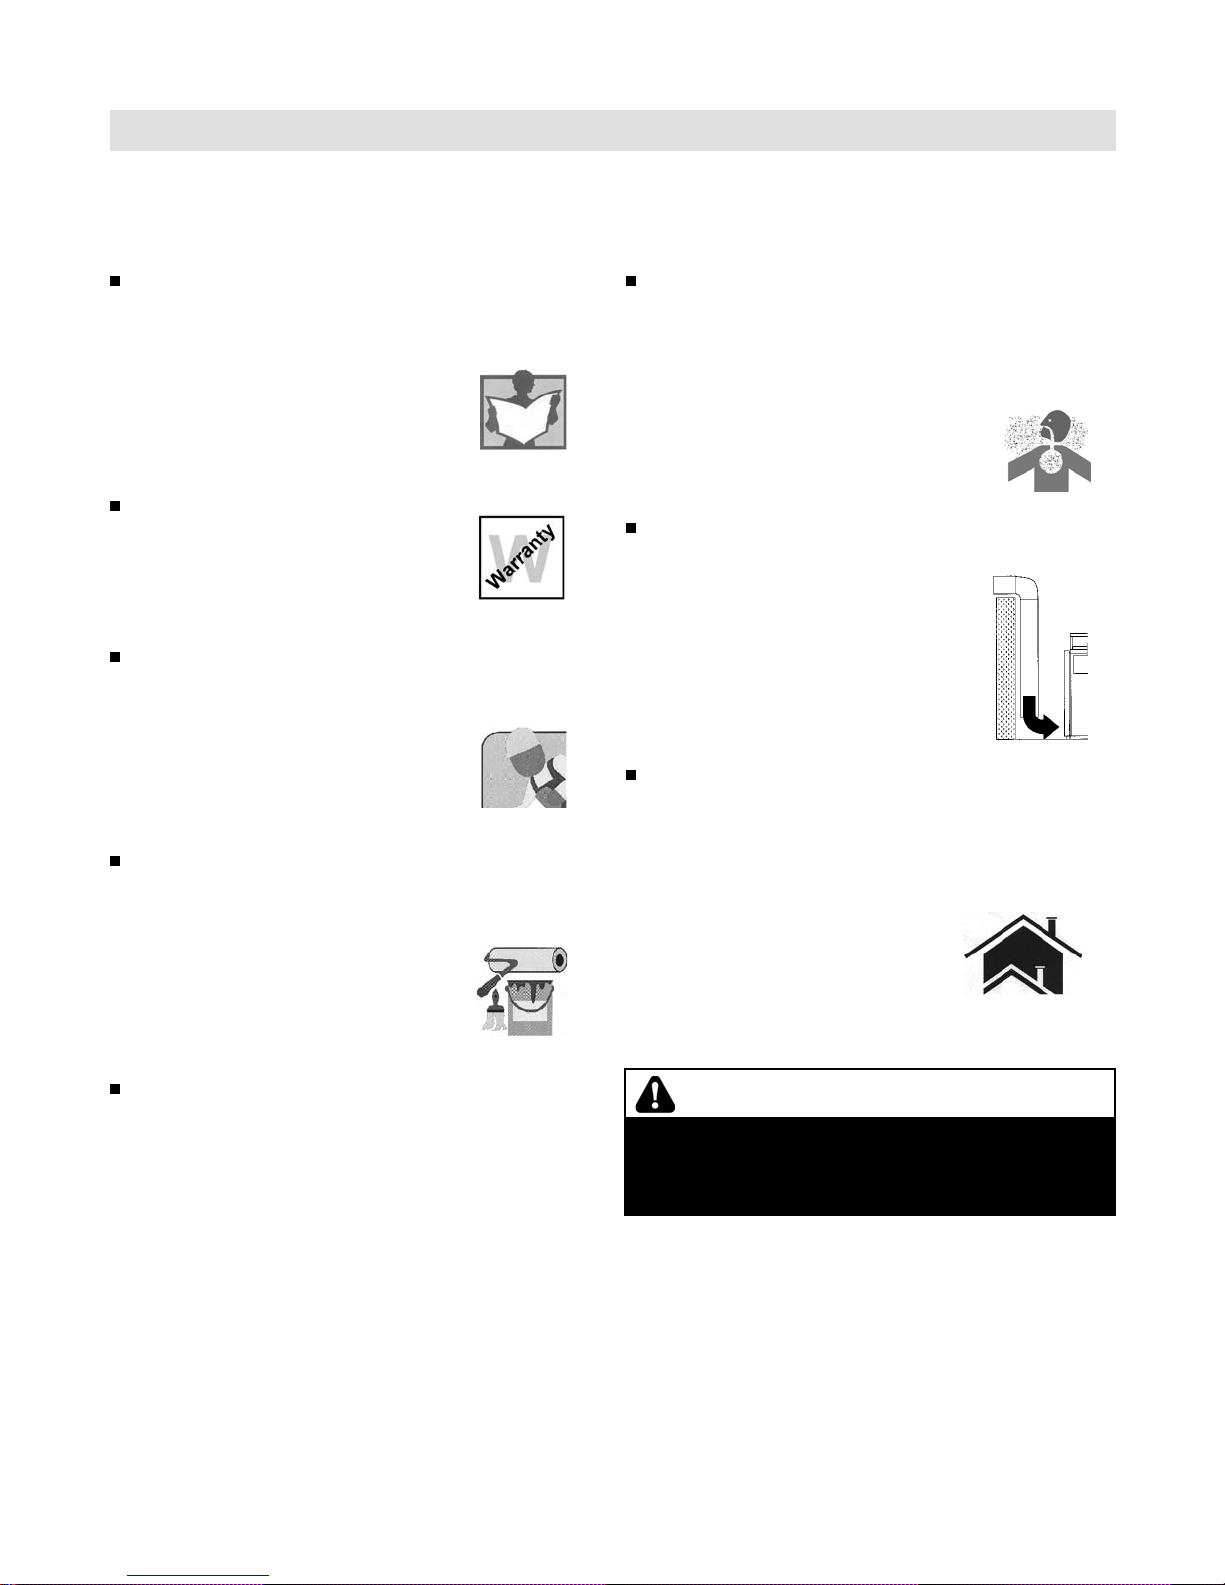
Product documentation
Read all applicable documentation before commencing
installation. Store documentation near boiler in a
readily accessible location for reference in the future
by service personnel.
For a listing of applicable literature,
please see section entitled “Important
Regulatory and Safety Requirements”.
Warranty
Information contained in this and
related product documentation must
be read and followed. Failure to do
so renders the warranty null and void.
Licensed professional heating contractor
The installation, adjustment, service and maintenance
of this equipment must be performed by a licensed
professional heating contractor.
Please see section entitled
“Important Regulatory and Installation
Requirements”.
Contaminated air
Air contaminated by chemicals can cause by-products
in the combustion process, which are poisonous to
inhabitants and destructive to Viessmann equipment.
For a listing of chemicals which
cannot be stored in or near the
boiler room, please see subsection
entitled “Mechanical Room”.
Carbon monoxide
Improper installation, adjustment, service and/or
maintenance can cause flue products to flow into
living space. Flue products contain poisonous carbon
monoxide gas.
For information pertaining to the proper
installation, adjustment, service and
maintenance of this equipment to avoid
formation of carbon monoxide, refer
to the “Safety” section.
Fresh air
This equipment requires fresh air for
safe operation and must be installed
ensuring provisions for adequate
combustion and ventilation air exist.
For information pertaining to the
fresh air requirements of this product,
refer to the “Combustion Air Supply”
section.
Equipment venting
Never operate boiler without an installed venting
system. An improper venting system can cause
carbon monoxide poisoning.
For information pertaining to
venting and chimney requirements,
refer to the “Safety” section. All
products of combustion must be
safely vented to the outdoors.
Advice to owner
Once the installation work is complete, the heating
contractor must familiarize the system operator/
ultimate owner with all equipment, as well as safety
precautions/requirements, shutdown procedure, and
the need for professional service. Refer to the Service
and Maintenance Instructions for details.
2
WARNING
Installers must follow local regulations with respect
to installation of carbon monoxide detectors. Follow
manufacturer’s maintenance schedule of the boiler
contained in the ”Service and Maintenance Instructions”.
5603 882 - 01
Page 3
Pyrotec Installation & Operating
About These Instructions
Take note of all symbols and notations intended to draw attention to potential hazards or important
product information. These include ”WARNING”, ”CAUTION”, and ”IMPORTANT”. See below.
Indicates an imminently hazardous situation which,
WARNING
Warnings draw your attention to the presence of potential
hazards or important product information.
CAUTION
Cautions draw your attention to the presence of potential
hazards or important product information.
IMPORTANT
if not avoided, could result in death, serious injury or
substantial product/property damage.
Indicates an imminently hazardous situation which,
if not avoided, may result in minor injury or product /
property damage.
Helpful hints for installation, operation or maintenance
which pertain to the product.
Introduction
Note: Viessmann Manufacturing Company Inc. reserves
the right to make product changes or updates
without notice and will not be held liable for
typographical errors or omissions in the product
literature.
This symbol indicates to note additional information
This symbol indicates that other instructions must be
referenced.
5603 882 - 01
3
Page 4

Table of Contents
Pyrotec Installation & Operating
Page
Introduction
General Information
Safety
Mechanical
Safety, Installation and Warranty Requirements..............2
About These Instructions..............................................3
Important Regulatory and Installation Requirements ........6
Codes...................................................................6
Mechanical room...................................................6
Working on the equipment......................................6
Technical literature................................................6
Product Information.....................................................7
Boiler Description........................................................8
Transport and Installation.............................................9
Lifting...................................................................9
Delivery Condition.....................................................10
Standard delivery condition....................................10
Wood Fuel Requirements...........................................11
Allowed fuels......................................................11
Non-wood fuels....................................................12
Maximum water content.......................................12
Limitation super fines and dust............................12
Suitable fuel types for Pyrotec systems..................12
Content limits for non-combustable substances.......13
Other information.................................................13
Carbon Monoxide......................................................14
Hazardous Materials..................................................15
Fiberglass wool and ceramic fiber materials.............15
First aid measures...............................................15
Power Failure Provision..............................................16
Venting Requirements................................................16
Mechanical Room.....................................................17
Mechanical room conditions...............................18
Sources of combustion and ventilation
contaminants......................................................18
Combustion Air Supply..............................................19
Codes................................................................19
General..............................................................19
Confined spaces..................................................19
Unconfined spaces...............................................19
Louvers and grilles...............................................19
4
Technical Data.........................................................20
Boiler Dimensions......................................................21
Boiler Components....................................................22
Flue Gas Cyclone......................................................23
Recirculation System.................................................24
Safety Devices
Fire extinguishing water tank.................................26
Expansion...........................................................26
The boiler system with 3-way mixing valve.............26
Drain inspection port............................................26
Piping and Installation of Safety Devices......................28
Fire Protection..........................................................30
Power failure provision..........................................30
Protection against back-burn for the boiler plant.......30
Back-burn safeguard for the fuel supply system.......31
Automatic triggering system for fuel supply system.....31
Slide valve..........................................................31
Rotary valve........................................................31
Double rotary valve pressure compensation system...31
Down pipe..........................................................31
Fire protection for fuel storage space......................31
.........................................................26
5603 882 - 01
Page 5

Pyrotec Installation & Operating
Mechanical (continued)
Table of Contents
Page
Fire Extinguishing System.........................................32
Assembly of the Fire Extinguishing System...................33
Negative Pressure Monitoring Assembly........................34
Electrical
Operation
Control Panel...........................................................35
Mounting of control panel....................................35
Electrical connection............................................35
General safety instructions...................................35
Vitocontrol-C Pyrocontrol KPT..............................36
Electrical Components...............................................38
Fuel Transport and Extraction Systems........................40
Rotary valve........................................................40
In-feed auger.......................................................41
Pipe/trough conveyor auger...................................41
Pellet extraction auger..........................................42
Spring extraction system.......................................42
Horizontal extraction system..................................43
Walking floor auger...............................................44
Hydraulic unit......................................................44
Thermal Storage Tank...............................................45
Boiler Wiring.............................................................46
Commissioning......................................................47
Initial startup...................................................47
Filling the heating system..................................47
Fuel for the commissioning................................47
Commissioning and hand over............................47
Filling the Fuel Storage Unit....................................48
Horizontal extraction system and
spring extraction system....................................48
Pellet extraction auger.......................................48
By dumping.........................................................48
By blowing in......................................................48
Fixing malfunctions in the feed systems..................48
Excess Conditions.....................................................49
Excess temperature/power failure..........................49
Low water/excess water pressure.........................49
Pyrocontrol Control System........................................50
Export of operational data via Mod-bus Pyrocontrol..50
Touch screen, Screen 1-8....................................51
Screen 1, Object Indicator Light............................52
Screen 2, Alarm list.............................................53
Screen 3, Managing the user status.......................54
Screen 4, Adjusting settings and parameters...........55
Screen 7, Overview wood powered boiler...............56
Screen 8, Additional boilers...................................57
Pyrotec control system parameters ........................58
Pyrotec controller parameter reference
guide for the technician.........................................59
Operating Modes.......................................................62
Full load operation................................................63
Output control.....................................................63
Sustain...............................................................63
“Cycle for underfeed auger sustain” too high.........63
“Cycle for underfeed auger sustain” too low..........63
Standby..............................................................63
Transition in output..............................................63
Switching off......................................................63
Emergency operation.............................................63
Measurement operation.........................................63
Heating Up Manually.................................................64
5603 882 - 01
5
Page 6

General Information
Pyrotec Installation & Operating
Important Regulatory and Installation Requirements
Take note of all symbols and notations intended to draw attention to potential hazards or important
product information. These include ”WARNING”, ”CAUTION”, and ”IMPORTANT”.
Codes
The installation of this unit shall be in accordance with
local codes. In the absence of local codes, use: B 365-01,
Installation Code for Solid-Fuel Burning Appliances and
Equipment.
All electrical wiring is to be done in accordance with the
latest edition of CSA C22.1 Part 1 and/or local codes. In
the U.S. use the National Electrical Code ANSI/NFPA 70
where required by the authority having jurisdiction.
Mechanical room
Ensure the mechanical room complies with the requirements
listed in this manual. See section entitled Mechanical Room.
Working on the equipment
The installation, adjustment, service, and maintenance
of this boiler must be done by a licensed professional
heating contractor who is qualified and experienced in
the installation, service, and maintenance of hot water
boilers. There are no user serviceable parts on the boiler,
or control.
Ensure main power supply to equipment, the heating
system, and all external controls have been deactivated.
Take precautions to avoid accidental activation of power
during service work.
Please carefully read this manual prior to attempting
installation. Any warranty is null and void if these
instructions are not followed.
For information regarding other Viessmann
System Technology componentry, please reference
documentation of the respective product.
We offer frequent installation and service seminars
to familiarize our partners with our products. Please
inquire.
The completeness and functionality of field supplied
electrical controls and components must be verified
by the heating contractor. These include low-water
cut-offs, flow switches (if used), staging controls,
pumps, motorized valves, air vents, thermostats, etc.
Technical literature
Literature applicable to all aspects of the Pyrotec woodfired boiler:
- Installation and Operating Instructions
- Service and Maintenance Instructions
- Field Wiring Diagram
Leave all literature at the installation site and advise
the system operator/ultimate owner where the
literature can be found. Contact Viessmann for
additional copies.
This product comes with several safety instruction
labels attached.
Do not remove!
Contact Viessmann immediately if replacement labels
are required.
6
5603 882 - 01
Page 7

Pyrotec Installation & Operating
Product Information
General Information
Viessmann solid-fuel boiler may only be installed and
serviced by trained personnel.
Steel wood-fired hot water heating boiler.
For operation primarily with modulating boiler water
temperatures in closed loop forced circulation hot water
heating systems. Under certain conditions, open loop
systems may also be considered. Contact Viessmann
for details.
Maximum allowable working pressure (water)...30 or 60 psi
Maximum water temperature…..250° F (120° C) (closed loop)
Maximum boiler temperature………210° F (99° C) (open loop)
This boiler does not require a flow switch.
WARNING
Exposing the boiler to pressures and temperatures in
excess of those listed will result in damages and will
render the warranty null and void.
Note: “Pyrotec“ is an alternate / interchangeable trade
name with “Pyrtec”.
Codes
CSA B366.1-M91
Solid Fuel Fired Central Heating Appliances
CSA C.22.2#3-M88 (R2004)
Electrical Features of Fuel Burning Equipment
UL2523
Solid Fuel-Fired Hydronic Heating Appliances, Water
Heaters and Boilers
CSA B365-10
Installation Code for Solid Fuel Burning Appliances
and Equipment
5603 882 - 01
7
Page 8

General Information
Boiler Description
Pyrotec Installation & Operating
Description
The PYROTEC Grate Firing System (patent no: EP 0 905
442 B1) was developed for automatic combustion of all dry
to moist wood fuels (remnant wood, pellets and forest wood
chips to max. W50, (see section “Wood Fuel Requirements”)
and combines the benefits of underfeed firing with the
benefits of grate firing.
The PYROTEC Grate Firing System is characterized by
highest efficiencies and perfect combustion in all load
stages. The PYROTEC Boiler Plant has been built to
ASME Sec. IV and has CRN for Canada. It is tested and
approved to the applicable CSA / UL safety standards.
Function:
- The solid, powerful and heat-resistant in-feed auger
moves the fuel over the burner trough into the
descending and moving grate zone. An electrical and
mechanical temperature sensor to operate the
thermal extinguishing valve are located on the in-feed
auger. Above the auger is the metering container with
a light barrier for setting the level of the fuel insulating
layer.
- The fuel is either ignited manually or automatically with
an automatic igniter (optional). The boiler features
a reliable burner trough, a descending grate and
a moving burn-out grate made from highly-refractory
cast steel [approx. b in. (12 mm)]. These items allow
to achieve excellent performance control and highest
safety against back-burn in conjunction with an automatic
de-ashing assembly with ash container (optional)
for the combustion chamber.
The solid, horizontally positioned and large-volume
combustion chamber door has been optimized in terms
of combustion, consists of a high-quality refractory
brick lining and has multiple layers of insulation for the
lowest possible surface temperatures. A variable speed
primary air blower provides preheated air to the
combustion grates in the combustion chamber door.
- In the upper part of the combustion chamber door, the
secondary air is blown into the gas space of the firing
system by variable speed blower via an encircling ring
with individually adjustable nozzles to achieve high
turbulence. This mixes the fuel gases with fresh
secondary air to achieve perfect combustion and very
low emissions. The combustion chamber door is
solidly constructed, air-cooled and very well insulated.
The combustion chamber door is equipped with solid
double-jointed hinges for easy maintenance. The heat
is transferred to the water in the horizontal heat
exchanger. The boiler is well insulated and highly
accessible through the heat exchanger door on the
front. A pneumatic cleaning system (optional) can be
installed at the insulated heat exchanger door.
- The flue gas exhaust blower has been specially
designed for wood burning boilers and quiet operation.
The spring-suspended motor has a solid, heat-resistant
design with a heat dissipation hub. The blower housing
on the intake can be mounted radial by 360° and has a
variable rotation speed and a round blow-out nozzle. It
is mounted directly on the boiler or on the flue gas
cyclone (optional).
8
Supplied with:
- Boiler with combustion chamber and pressure vessel/
heat exchanger including supply and return
temperature sensors and over pressure monitor
- Combustion chamber with burner trough, descending
grate, moving burn-out grate and light barriers for
ember monitoring
- In-feed auger including insulating layer, safety end
switch for maintenance lid, back-burn temperature
sensor, thermostatic valve for extinguishing assembly,
extinguisher water container with mounting bracket
- Flue gas exhaust blower including flue gas temperature
sensor and oxygen sensor
- Boiler cleaning tools for the combustion chamber
and heat exchanger
- Installation fittings including pressure relief valve, drain
valve, low water cut off, safety temperature limiter,
temperature and pressure gauges
- Control cabinet with integrated Pyrocontrol control
system
Customer supplied:
- Counter flanges for the boiler supply and return
- Piping to the 3-way mixing valve, boiler pump and
thermal storage tank
- Piping for the safety heat exchanger
- Wiring to the control panel
- Insulation for the flue gas re-circulation line, the flue
gas recirculation system is optional
Accessories for PYROTEC Grate Firing System:
- Flue gas cyclone 63 USG (240 L)
- Flue gas cyclone 211 USG (800 L)
- Automatic de-ashing assembly with ash container,
63 USG (240 L)
- Automatic de-ashing assembly with ash container,
211 USG (800 L)
- Pneumatic cleaning system
- Automatic igniter
- Set of displacement rods (for Pyrotec 720, 950 and
1250 only)
- Operating pressure 30 or 60 psi
- Two-stage in-feed auger
- Flue gas recirculation system
- Thermal safety flush valve
- Slide valve / Rotary valve
- Boiler pump and boiler mixing valve
- Pyrocontrol control system options:
- 5 sensor thermal storage tank management system
- External control module for field supplied extraction
system
- Output module / Input module
- Input module 0-10V
- ModBus
- BacNet gateway
- Visualization
5603 882 - 01
Page 9
Pyrotec Installation & Operating
Transport and Installation
IMPORTANT
Precautions must be taken to avoid accidents and injury
during the transportation of the boiler.
Only hoist the boiler when it is entirely empty of water,
fuel and ash.
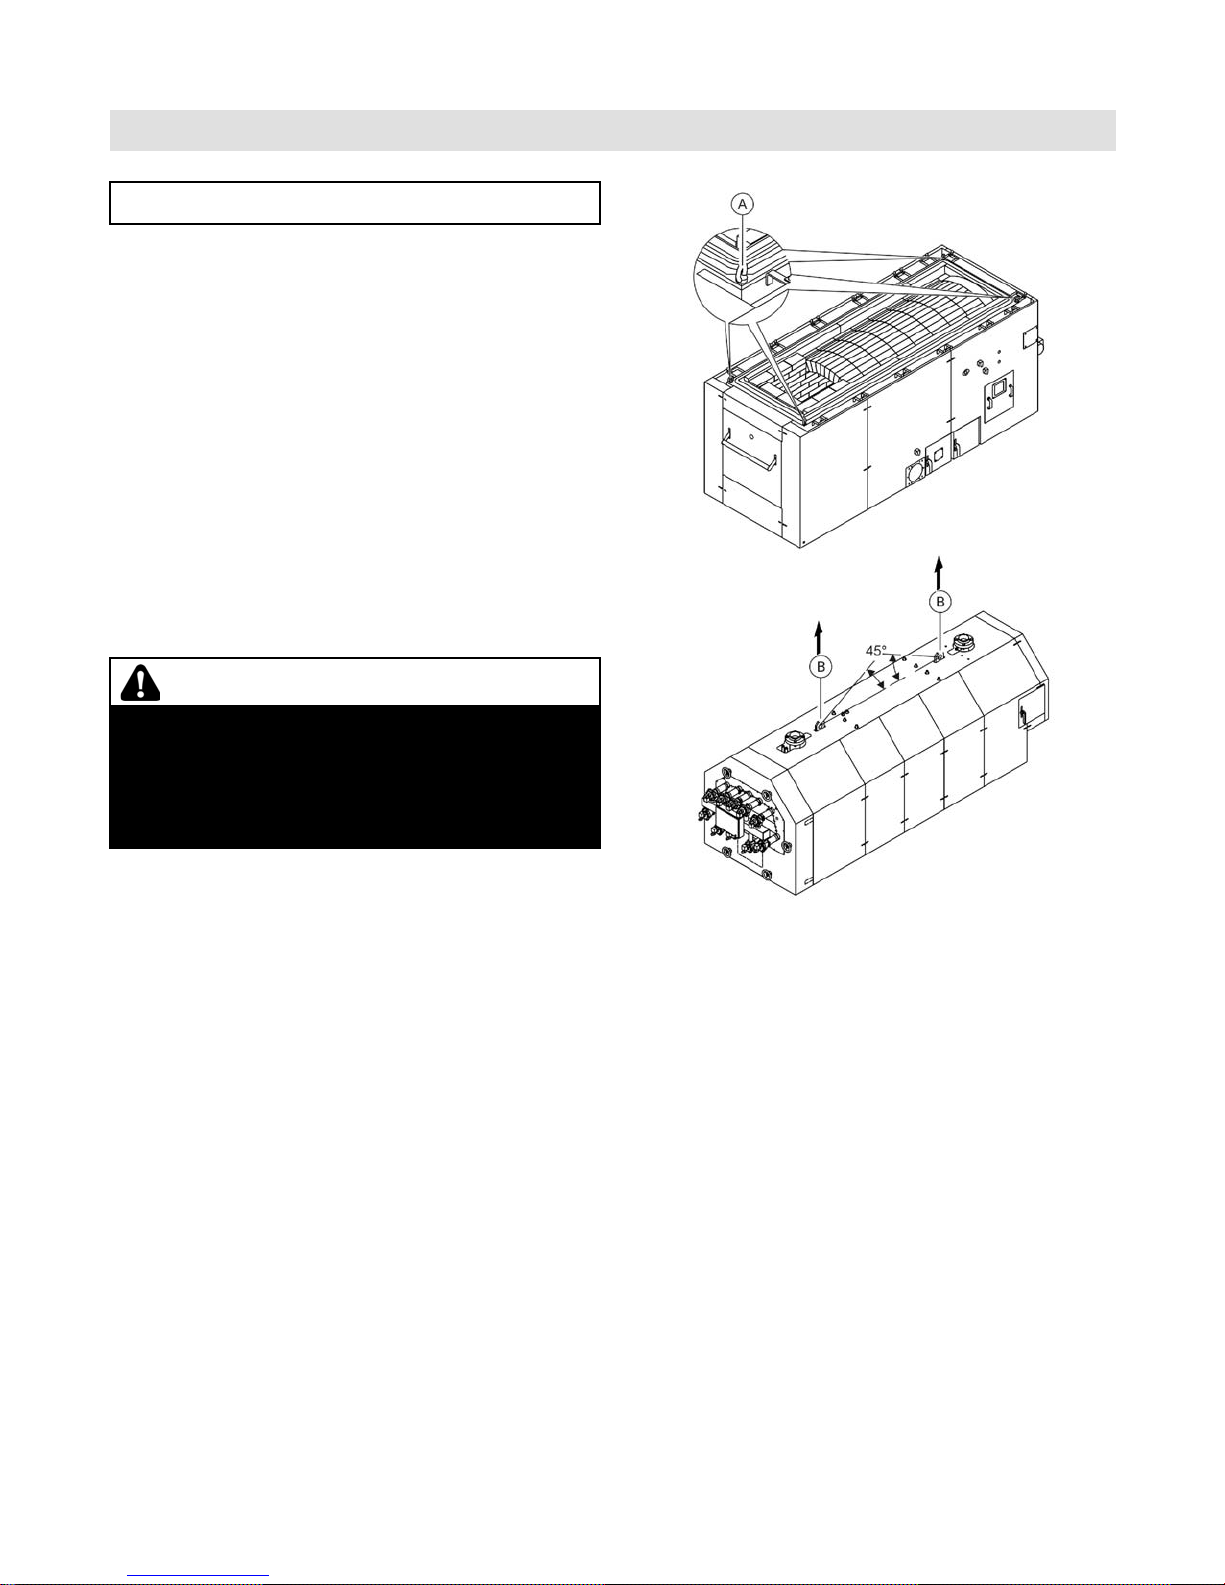
Lifting
The combustion chamber has four lifting lugs that must
be screwed in before lifting. Lifting gear can be attached to
these lifting lugs.
The pressure vessel of the PYROTEC has two lifting lugs
to which lifting gear may be attached.
A special crane (provided by the customer on site) is
required to lift the combustion chamber and the pressure
vessel.
Recommended minimum clearances to walls for
installation and maintenance work must be observed.
An anti-vibration boiler support should be provided if
anti-vibration measures are required.
General Information
WARNING
Follow instructions for proper installation.
For wood-fired installations:
This wood-fired boiler must be installed in accordance
with local codes if any; if not, follow B365-10,
Installation Code for Solid-Fuel Burning Appliances
and Equipment.
A Lifting lugs (screw in before lifting)
B Lifting lugs (pressure vessel)
5603 882 - 01
9
Page 10

General Information
Pyrotec Installation & Operating
Delivery Condition
Standard delivery condition
The standard delivery condition of the Pyrotec boiler includes pre-assembled components as well as components
that need to be assembled by the contractor in the field.
Components that are attached to the boiler at time of delivery:
- Heat exchanger door is mounted to the heat exchanger
- Combustion chamber door is mounted to the combustion chamber
- Flue gas collector is attached to the heat exchanger
- Pneumatic cleaning system (optional) is attached to the heat exchanger door
Components that are not attached or installed to the boiler at time of delivery (scope of the contractor):
- The pressure vessel is not mounted to the combustion chamber
- Brickwork to connect the combustion chamber and the heat exchanger, bricks and mortar are included
- Electrical components which include temperature sensors, oxygen sensor, light barriers for the combustion chamber,
igniter, low water cut off, fixed high limit, negative pressure monitoring assembly and light barriers for
the complete extraction system
- All wiring to the control cabinet
- Installation fittings which include pressure relief valve, drain valve, temperature and pressure gauges
- Drive for the combustion chamber grate is detached
- De-ashing assembly with ash container (optional) and drive for the de-ashing system
- Air compressor (optional) and connection to the pneumatic cleaning system (optional)
- The flue gas exhaust blower is not attached to the flue gas collector
- Primary air blowers are not attached to the combustion chamber
- Secondary air blowers are not attached to the combustion chamber
- Re-circulation system (optional)
- Flue gas cyclone (optional) comes in two pieces
- The in-feed auger is detached from the combustion chamber
- Fire extinguishing system for the in-feed auger
- Slide valve (optional) or rotary valve (optional)
- All components of the extraction system (optional), welding for flanges and support legs required
- Glass fiber insulation between any auger connections
Measurements for the combustion chamber as standard delivery condition
Boiler model KPT390 KPT530 KPT720 KPT950 KPT1250
Minimum size
door (W x H)
Minimum ceiling
opening (W x H)
Measurements for the pressure vessel as standard delivery condition
Boiler model KPT390 KPT530 KPT720 KPT950 KPT1250
Minimum size
door (W x H)
Minimum ceiling
opening (W x H)
59 in. x 59 in.
(1500 mm x
1500 mm)
59 in. x 149 in.
(1500 mm x
3800 mm)
59 in. x 59 in.
(1500 mm x
1500 mm)
59 in. x 112a in.
(1500 mm x
2850 mm)
63 in. x 69 in.
(1600 mm x
1750 mm)
63 in. x 157b in.
(1600 mm x
4000 mm)
63 in. x 69 in.
(1600 mm x 1750
mm)
63 in. x 112a in.
(1600 mm x
2850 mm)
63 in. x 69 in.
(1600 mm x
1750 mm)
63 in. x 196c in.
(1600 mm x
5000 mm)
63 in. x 69 in.
(1600 mm x
1750 mm)
63 in. x 126 in.
(1600 mm x
3200 mm)
74c in. x 73c in.
(1900 mm x
1850 mm)
74c in. x 196c in.
(1900 mm x
5000 mm)
74c in. x 73c in.
(1900 mm x
1850 mm)
74c in. x 130 in.
(1900 mm x
3300 mm)
74c in. x 78c in.
(1900 mm x
2000 mm)
74c in. x 216b in.
(1900 mm x
5500 mm)
74c in. x 78c in.
(1900 mm x
2000 mm)
74c in. x 137c in.
(1900 mm x
3500 mm)
10
5603 882 - 01
Page 11
Pyrotec Installation & Operating
Wood Fuel Requirements
General Information
The Pyrotec is only suitable for burning fuels listed in this
section. A prerequisite for approval is of a fuel by
Viessmann is the approval for the fuel by the responsible
public authorities.
Warranty claims for Viessmann Biomass boilers are
excluded if the following fuel conditions are not met.
IMPORTANT
If different fuels are used, Viessmann will not assume any
liability for the functioning or service life of the boiler plant.
Refer to the “Warranty” section in the General Terms and
Conditions of Delivery.
- Burn wood only
- Do not use chemicals or fluids to start fire.
- Do not burn garbage, gasoline, naphtha, engine oil,
or other inappropriate materials.
Allowed fuels
- Forest wood and plantation wood (complete untreated trees and trunk wood):
Mature wood from trunks and branches, untreated, chopped to chips
- Compressed wood, pellets conforming to standards, as per CAN/CSA-B366.1-M91, size P1, P2, P4.
Untreated wood with limited bark content, compressed by machine and calibrated
Fuel Minimal Diameter Maximal Diameter
P1 - Pellets Small --P2 - Pellets Medium
P4 - Briquettes (Pellets Large)
e in. (10 mm) c in. (20 mm)
c in. (20 mm) 2b in. (60 mm)
e in. (10 mm)
- Wood with an increased proportion of bark, tree cuttings from roadside trees (untreated):
Wood remnants from the forestry and sawmill industries or from landscape conservation (likelihood of elevated ash content).
- Remnants from derived timber products:
Usually a mixture of untreated and treated wood in the form of shavings from processing machinery and chips from
choppers.
- Used wood:
This is untreated wood that has been used prior to its energetic utilization (e.g. pallets). It is reduced in size by
shredders for thermal utilization. The metal parts have to be removed by magnetic separators.
Size of Wood Chips as per CAN/CSA-B366.1-M91, Grade C7
Total mass 100% G 30 Fine G 50 Medium
Coarse percentage max. 20% Max. cross-section in.
Max. length in. (cm)
Coarse sieve nominal mesh width in. (mm)
Main percentage 60 to 100% Medium sieve nominal mesh width in. (mm)
Percentage of fines
Fine sieve nominal mesh width in. (mm)
2
(cm2)
b (3) c (5)
3g (8.5) 4c (12)
f (16) 1a (31.5)
d (2.8) a (5.6)
1
/
(1)
25
1
/
25
(incl. ultrafine content) max. 20%
CAUTION
Chips have to pass through a 1 in. (25 mm) sieve,
additionally, a fraction of max. 5% of the fuel with a
cross-section of max. c in.² (500 mm²) up to a length
of max. 6a in. (160 mm) can be tolerated.
Size of briquettes:
2
- Fraction of one-offs. max. 5% with cross-section of max. c in.
- Frayed surface by chopping tools (shredders) or slow-running choppers.
- Briquettes, diameter max. 2e in. (60 mm).
Consequences of overstepping particle size:
- Increased maintenance because of a substantially higher risk of malfunction
- Shortened service life of the conveyor augers and drives
(500 mm2) up to a length of max. 6a in. (160 mm).
(1)
5603 882 - 01
11
Page 12

General Information
Pyrotec Installation & Operating
Wood Fuel Requirements (continued)
Maximum water content
The maximum allowable water content of the fuel for Pyrotec systems is limited to 50%.
The water content impacts the maximum boiler output.
Non-wood fuels
Non-wood fuels even if consisting of biomass, such as needles, foliage, grain, straw, fruit pits, etc, are unsuited
as fuel for boiler operation and may not be used.
Limitation super fines and dust [wood particles smaller than
Max. 10.0% of the total mass; if fuel does not comply with this limit the following process may occur:
- Temperature peaks
- Slag formation
- Even higher temperature
- This process leads to damage by overheating and can affect refractory materials.
Elevated values are especially critical for remnant wood in combination with elevated values of Chlorine and Sulphur.
Suitable fuel types for Pyrotec systems
3
- Bulk density S in kg/m³ [lb/ft
Note: Fuel for Pyrotec systems allow for a max. of 50% water content (W).
Saw dust
Fuel code Bulk Density kg/m³ [lb/ft³] Water content % Fuel Size Description
a S130 [8.1]
b1 S200 [12.5] W20 to W35 C1 Sawdust, untreated (sawmill)
c2 S250 [15.6] W35 to W50 C1 Sawdust, untreated (sawmill)
Wood chips
Fuel code Bulk Density kg/m³ [lb/ft³] Water content % Fuel Size Description
b2 S200 [12.5]
c1 S250 [15.6]
d1 S300 [18.7]
d2 S300 [18.7]
e1 S350 [21.8]
e2 S350 [21.8]
f1 S400 [24.9]
], water content (W) in %, size C1, C7, P1, P2, P4 as per CAN/CSA-B366.1-M91.
W10 to W20 C1 Sawdust, untreated (planing shop)
W20 C7 Forest wood chips, soft, untreated
W20 to W35 C7 Forest wood chips, soft, untreated
W20 to W35 C7 Forest wood chips, soft/hard, untreated
W35 to W50 C7 Forest wood chips, soft, untreated
W20 to W35 C7 Forest wood chips, hard, untreated
W35 to W50 C7 Forest wood chips, soft/hard, untreated
W35 to W50 C7 Forest wood chips, hard, untreated
1
/32 in. (1.0 mm)]
Shavings and chips
Fuel code Bulk Density kg/m³ [lb/ft³] Water content % Fuel Size Description
g S130 [8.1] Less than W15 C7
h S200 [12.5] Less than W15 C7
i S250 [15.6] Less than W15 C7
Pellets and briquettes
Fuel code Bulk Density kg/m³ [lb/ft³] Water content % Fuel Size Description
j S350 [21.8] Less than W15 P4
k1 S650 [40.6] Less than W10 P1
k2 S650 [40.6] Less than W10 P2
Note: For size of wood chips, see page 11.
12
Shavings & chips from wood remnants,
dry, mixed
Shavings & chips from wood remnants,
dry, mixed
Shavings & chips from wood remnants,
dry, mixed
Briquettes from wood remnants c in. (20
mm) to max. 2 in. (60 mm)
untreated up to e in. (10 mm)
untreated e in. to c in. (11 mm to 20 mm)
5603 882 - 01
Page 13

Pyrotec Installation & Operating
General Information
Wood Fuel Requirements (continued)
Content limits for non-combustible substances
- No wood fuels may contain any foreign bodies, such as pieces of metal, stones, masonry remnants or plastics.
The following limits (per lb/kg of dry fuel) of contained non-combustible substances apply [ash analyzed at a
temperature of 1500° F (815° C)]:
Substance Limit Comparative value untreated forest wood
Chlorine (Cl) max. 300 ppm (300 mg/kg) 10 ppm (10 mg/kg)
Sulphur (S) max. 1000 ppm (1000 mg/kg) 120 ppm (120 mg/kg)
Total Cl, S max. 1000 ppm (1000 mg/kg) 130 ppm (130 mg/kg)
Ash content, total max. 0.25 oz/lb (15.0 g/kg) 0.08 oz/lb (5.0 g/kg)
Alkali oxides in the ash (K2O and Na2O) max. 0.016 oz/lb (1.0 g/kg) 0.006 oz/lb (0.35 g/kg)
Sintering point of the ash min. 1800° F (1000° C) approx. 2200° F (1200° C)
If fuel does not comply with these limits, there is a risk of corrosion within the heat exchanger and early sintering and
melting of the ash which leads to:
- Shortened life of the heat exchanger
- Increased maintenance costs (firing, combustion chamber door)
The maintenance instructions need to be complied with in order to avoid a process, which will increasingly cause
damage to the boiler.
If maintenance instructions are not complied with the following process may occur:
- Cinders change the airflow
- Temperature peaks
- More slag is produced
- More cinder builds up and changes the airflow more
This process leads to damage by overheating and may affect refractory materials.
Additives in remnant and used wood have to be free of heavy metals and halogen compounds.
Other information
- Ash and cleaning:
Untreated wood without bark produces less than 0.5% ash of the fuel mass supplied. All the specifications
regarding cleaning are based on untreated wood with bark attached with an ash amount of 0.8% of the fuel mass.
If the ash content is higher and/or the ash melting point is lower, increased maintenance and/or cleaning are required.
- Changing fuels:
A substantial change in fuel quality, such as bulk density, water content, dust proportion or ash content might require
a manual correction of the firing parameters (see Operating section).
5603 882 - 01
13
Page 14
Safety
Carbon Monoxide
Pyrotec Installation & Operating
The U.S. Consumer Product Safety Commission strongly
recommends the installation of carbon monoxide detectors
in buildings in which wood-burning equipment is installed.
Carbon monoxide (CO) is a colorless, odorless gas, which
may be produced during incomplete combustion of fuel
and/or when the flame does not receive an adequate
supply of combustion air. Carbon monoxide can cause
severe personal injury or loss of life.
Therefore, carbon monoxide detectors that are in
compliance with a nationally recognized standard
(e.g. ANSI/UL 2034-2002, CSA 6.19-01) should be
installed and maintained in buildings that contain woodburning equipment.
Note: Viessmann does not test any detectors and makes
no representation regarding any brand or type of
detector.
For safe operation
We recommend that you frequently:
- Check for debris which could obstruct the flow of
flue gases. The vent or chimney must not be blocked.
A blocked or partially blocked vent or chimney can
cause flue gases to leak into the structure. Flue gases
leaking into the house can cause injury or death.
Blocked or partially blocked chimneys must have the
blockage removed by a qualified heating contractor.
- Check the pressure gauge for correct system (water)
pressure. Check for water on the floor from the
discharge pipe of the pressure relief valve or any
other pipe, pipe joint, valve or air vent.
- Check for moisture, water, or appearance of rust
on the flue gas pipes, their joints as well as vent
dampers, or side wall vent terminals (if so equipped).
- Ensure that nothing is obstructing the flow of
combustion and ventilation air and no chemicals,
garbage, gasoline, combustible materials, flammable
vapors and liquids are stored (not even temporarily)
in the vicinity of the boiler.
- DO NOT allow unsupervised children near the boiler.
Service/inspection of the boiler and the system must be
performed on a regular basis. Maintenance, service and
cleaning are specified in the “Service and Maintenance
Instructions”.
Before the heating season begins, it is recommended that
the boiler be serviced by a qualified heating contractor.
WARNING
As there are no user-serviceable parts on the boiler,
or control, the end-user must not perform service
activities of any kind on system components. Failure
to heed this warning can cause property damage,
severe personal injury, or loss of life.
WARNING
Improper installation, adjustment, service, or maintenance
can cause flue products to flow into living space. Flue
products contain poisonous carbon monoxide gas, which
can cause nausea or asphyxiation resulting in severe
personal injury or loss of life.
WARNING
The operator/ultimate owner is required to have the
heating boiler and controls checked, as a minimum
once per year, by the original installer or by a competent
heating contractor familiar with the equipment. Defects
must be corrected immediately.
CAUTION
Do not use this boiler if any part has been under water.
Immediately call a qualified heating contractor to inspect
the boiler and to replace any part of the control system
which has been under water.
14
5603 882 - 01
Page 15
Pyrotec Installation & Operating
Hazardous Materials
Safety
Fiberglass wool and ceramic fiber materials
WARNING
Inhaling of fiberglass wool and/or ceramic fiber
materials is a possible cancer hazard. These materials
can also cause respiratory, skin and eye irritation.
The state of California has listed the airborne fibers of
these materials as a possible cancer hazard through
inhalation. When handling these materials, special care
must be applied.
WARNING
Appliance materials of construction, products of
combustion and the fuel contain alumina, silica, heavy
metals, carbon monoxide, nitrogen oxides, aldehydes
and/or other toxic or harmful substances which can
cause serious injury or loss of life and which are known
to the State of California to cause cancer, birth defects
and other reproductive harm. Always use proper safety
clothing, respirators and equipment when servicing or
working nearby the appliance.
First aid measures
- If eye contact occurs, flush eyes with water to
remove dust. If symptoms persist, seek medical
attention.
- If skin contact occurs, wash affected areas gently
with soap and warm water after handling.
Suppliers of ceramic fiber products recommend the
following first aid measures
- Respiratory tract (nose and throat) irritation:
If respiratory tract irritation develops, move the
person to a dust free location.
- Eye irritation:
If eyes become irritated, flush immediately with
large amounts of lukewarm water for at least 15
minutes. Eyelids should be held away from the
eyeball to ensure thorough rinsing. Do not rub eyes.
- Skin irritation:
If skin becomes irritated, remove soiled clothing.
Do not rub or scratch exposed skin. Wash area of
contact thoroughly with soap and water. Using a
skin cream or lotion after washing may be helpful.
- Gastrointestinal irritation:
If gastrointestinal tract irritation develops, move
the person to a dust free environment.
Suppliers of fiberglass wool products recommend the
following precautions be taken when handling these
materials
- Avoid breathing fiberglass dust and contact with
skin and eyes.
- Use NIOSH approved dust/mist respirator.
- Wear long-sleeved, loose fitting clothing, gloves
and eye protection.
- Wash work clothes separately from other clothing.
Rinse washer thoroughly.
- Operations such as sawing, blowing, tear-out and
spraying may generate airborne fiber concentration
requiring additional protection.
5603 882 - 01
15
Page 16

Safety
Power Failure Provision
Power Failure Provision
Venting Requirements
Pyrotec Installation & Operating
Customers must ensure that there is a supply of water
independent of the electrical supply. This design ensures
that in case of a power failure, the boiler will be reliably
cooled by the thermal safety flush valve.
The PYROTEC Grate Firing System is equipped with
a flue gas exhaust blower.
This boiler must be properly vented. Use a vent material
certified for use with solid-fuel fired equipment.
This boiler shall be connected to:
a) a masonry chimney conforming to local regulations
or, in the absence of such regulations, to the
requirements of the National Building Code
b) a certified factory-built chimney (refer to the NFPA
211 standard).
A flue pipe serving this boiler shall be constructed of
steel or other suitable material with a melting point of
not less than 2000° F (1100° C).
IMPORTANT
Do not use galvanized steel
For installations in Canada:
The boiler venting system must be tested and listed by
a Nationally Recognized Testing Lab such as ULC/CSA
for solid fuel burning appliances.
The PYROTEC Grate Firing System is output-controlled
within a range from 30%-100% of the rated boiler output.
This produces flue gas temperatures from min. 212° F
(100° C) to max. 482° F (250° C).
An insulated chimney should be provided to prevent sooting.
The distance from the flue gas exhaust blower to the
chimney should be as short as possible. 90° elbows
should be avoided if possible. Flue gas pipes of more than
3 ft. (1 m) in length must be insulated.
The connection to the chimney should be made such that
it rises at an angle of 30°- 45° (to prevent excess ash
accumulating in the lateral section of the vent pipe).
The flue gas line, including the lead-in into the chimney,
must be gas-tight.
16
5603 882 - 01
Page 17
Pyrotec Installation & Operating
Mechanical Room
Safety
Ensure the mechanical room complies with the requirements
in these instructions and local codes.
Viessmann recommends the installation of an additional
electrical disconnect switch and a fuel shut-off valve (if
possible) outside the mechanical room or enclosed area
of installation.
A separate, dry heating room must always be provided
for the PYROTEC Grate Firing System. No combustible
materials may be stored in the heating room. The heating
boiler may only be set up on a fire and temperatureresistant floor.
No temperature-sensitive pipes or lines may be installed
in the floor beneath the heating boiler.
The temperature in the heating room must not exceed
104° F (40° C) while the system is in operation
(in the area approx. 3 ft. (1 m) away from the boiler).
The temperature in the heating room must not fall below
50° F (10° C) while the system is in operation (measured
at the inner side of exterior walls).
The load-bearing capacity of the heating room floor must
be designed for the weight of the system plus filling with
water and fuel. The load-bearing capacity of the floor in
the area of the boiler bearing surface must be 512 lb/ft²
(2500 kg/m²).
IMPORTANT
Always follow the most up-to-date local, municipal and
building regulations and codes.
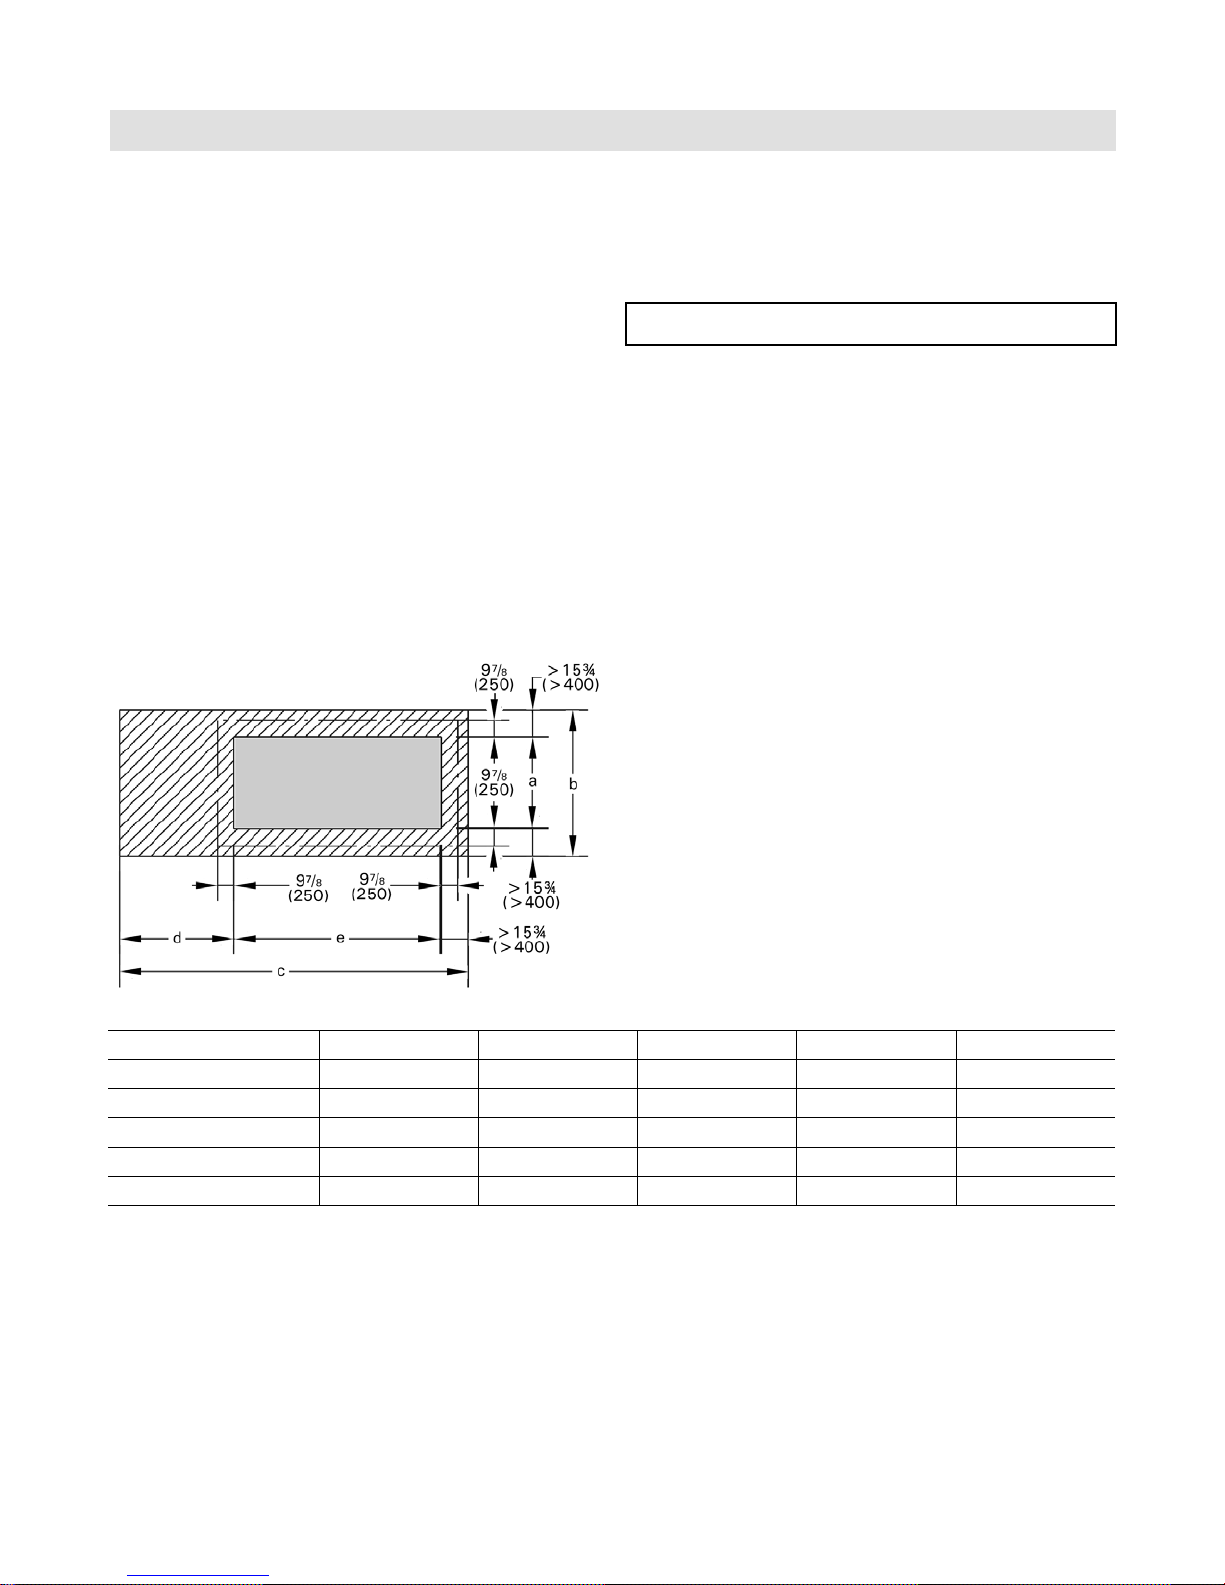
The minimum distance to the walls and ceiling required
according to the table of dimensions for proper cleaning
and maintenance of the boiler must be complied with.
A sufficient supply of fresh air must be provided directly
from outdoors into the heating room. Induced ventilation is
necessary for heating rooms that are confined or enclosed.
Dimensions shown in. (mm)
Hatched surface Heat-resistant floor
Medium grey surface Boiler supporting surface
Foundation dimensions
Boiler Model KPT- 390 530 720 950 1250
a in. (mm)
b in. (mm) 71
c in. (mm)
d in. (mm)
e in. (mm) 100
40e (1026) 40e (1026) 43c (1112) 53b
7
/8 (1826)
7
/8 (1826) 75a (1912)
71
(1360) 53b (1360)
85 (2160) 85 (2160)
166d (4221) 166d (4721) 193e (4912) 200f (5096)
1
/8 (1400) 641/8 (6030)
49f (1260) 49f (1260)
7
/8 (2561)
120b (3061) 122b (3112) 120c (3066) 142d (3611)
55
1
222
/8 (5641)
64d (1630)
5603 882 - 01
17
Page 18
Safety
Mechanical Room (continued)
Pyrotec Installation & Operating
WARNING
Incorrect ambient conditions can lead to damage to
the heating system and put safe operation at risk.
Mechanical room conditions
Prevent the air from becoming contaminated by homogenate
hydrocarbons (e.g. as contained in paints solvents or
cleaning fluids) and excessive dust (e.g. through grinding
or polishing work). Combustion air for the heating
process, and ventilation of the boiler room must be free of
corrosive contaminants. To that end, any boiler must be
installed in an area that has no chemical exposure.
For the main, currently known sources refer to “Sources
of combustion and ventilation air contaminants”.
Avoid continuously high levels of humidity (e.g. through
frequent drying of laundry).
Never close existing ventilation openings.
WARNING
The boiler must not be located in areas or rooms where
chemicals are stored, or aggressive vapors (i.e. bleach,
hair spray, methyl chloride, carbon tetrachloride or
perchloroethylene) or high dust levels or humidity levels
are present. Heat exchanger corrosion might occur and
reduce the lifetime of the boiler significantly. If above
criteria are not properly observed and boiler damage
results, any warranty on the complete boiler and related
components will be null and void.
IMPORTANT
Components which are not tested with the heating
system may damage the heating system or affect its
functions. Installation or replacement may only be carried
out be a qualified heating contractor.
Sources of combustion and ventilation air contaminants
Areas likely to contain contaminants:
- New building construction
- Swimming pools
- Remodeling areas, hobby rooms
- Garages with workshops
- Furniture refinishing areas
- Dry cleaning/laundry areas and establishments
- Auto body shops
- Refrigeration repair shops
- Metal fabrication plants
- Plastic manufacturing plants
- Photo processing plants
- Beauty salons
Products containing contaminants:
- Chlorine-type bleaches, detergents and cleaning
solvents found in household laundry rooms
- Paint and varnish removers
- Hydrochloric acid, muriatic acid
- Chlorine-based swimming pool chemicals
- Spray cans containing chlorofluorocarbons
- Chlorinated waxes and cleaners
- Cements and glues
- Refrigerant leaks
- Calcium chloride used for thawing
- Sodium chloride used for water softening salt
- Permanent wave solutions
- Adhesives used to fasten building products and other
similar items
- Antistatic fabric softeners used in clothes dryers
18
5603 882 - 01
Page 19
Pyrotec Installation & Operating
Combustion Air Supply
Safety
Codes
Provision for combustion and ventilation air must be made
in accordance with applicable local codes.
In the absence of local codes, use:
CSA B365-10, Installation Code for Solid Fuel Burning
Appliances and Equipment.
Always use latest edition codes.
WARNING
Failure to provide an adequate supply of fresh combustion
air can cause poisonous flue gases to enter living space.
Flue gases entering living space can cause carbon
monoxide poisoning which can result in severe personal
injury or loss of life.
WARNING
Never cover the boiler or store debris or other materials
near the boiler, or in any way block the flow of adequate
fresh air to the boiler. Never cover the combustion air
opening. Advise system operator / ultimate owner
accordingly.
General
This equipment requires fresh air for safe operation
and must be installed ensuring provisions for adequate
combustion and ventilation air exist.
Whenever possible, install boiler near an outside wall so
that it is easy to duct fresh air directly to the boiler area.
The boiler location must never be under negative pressure.
Flue gas exhaust blowers, attic blowers, or dryer blowers
may cause air to be exhausted at a rate higher than air
can enter the structure for safe combustion.
The heating contractor shall ensure all of the following
requirements are met:
- An adequate supply of combustion air must be
available to ensure proper combustion.
- Ambient air temperatures must be maintained within
safe operating limits.
- When a damper is provided in any opening intended
to admit combustion air into the room within which
the appliance is installed, the damper shall be
interlocked to prevent any burner from starting
before the damper is fully open.
- Each duct used to convey air from the outdoors shall
have:
1. a cross-sectional area throughout its length at
least equal to the free area of the inlet and outlet
openings which it connects,
2. making a provision for outside combustion air,
the intake shall not be less than 1 ft. (0.3 m)
above the anticipated snow level for the location.
- The heating contractor must check with local
authorities (municipal building department) for
combustion air requirements particular to the area.
5603 882 - 01
Confined spaces
When a furnace or boiler is enclosed in a space that has
a volume less than 20% of that to be heated by the
appliance, the space shall:
a. have a permanent opening or openings for natural air
circulation with a minimum net free area of 1.5 in² /
1000 Btu/h (3300 mm² / kW) input, and
b. connect to another space or spaces such that the total
volume of air available for natural air circulation is
at least 30% of the total volume to be heated by the
appliance.
The minimum dimension of any opening specified in item
(a) shall be no less than 1 in. (25 mm) The lower edge of
at least one opening shall be located within 1.5 ft. (0.5 m)
of the floor of the enclosed space, and the upper edge of
at least one opening shall be located within 1.5 ft. (0.5 m)
of the ceiling of the enclosed space.
Note: The intent of this Clause is to allow either one
long vertical opening or two shorter horizontal
openings, one high and the other low, to allow
for air circulation to prevent overheating of the
appliance.
Unconfined spaces
Where the boiler is located in an unconfined space in
a building having insufficient infiltration, additional air
for combustion and ventilation shall be obtained from
outdoors or from spaces freely communicating with the
outdoors. Under these conditions, permanent opening(s)
shall be provided so that the total air received through
these openings will be at least as much as would be
admitted by openings having a total free area of 1 in² /
5,000 Btu/h or (450 mm² / kWh) of the total input rating
of all wood-fired appliances.
Louvers and grilles
In calculating free area as specified, consideration shall
be given to the blocking effect of louvers, grilles, or
screens that protect openings. Screens shall be no
smaller than ¼ in. (6 mm) mesh and shall be readily
accessible for cleaning. If the free area through a design
of louver or grilles is known, it shall be used in calculating
the size of opening required to provide the free area
specified. If the design and free area are not known, it
shall be assumed that wood louvers have 20 - 25% free
area and metal louvers and grilles have 60 - 75% free
area.
19
Page 20

Mechanical
Pyrotec Installation & Operating
Technical Data
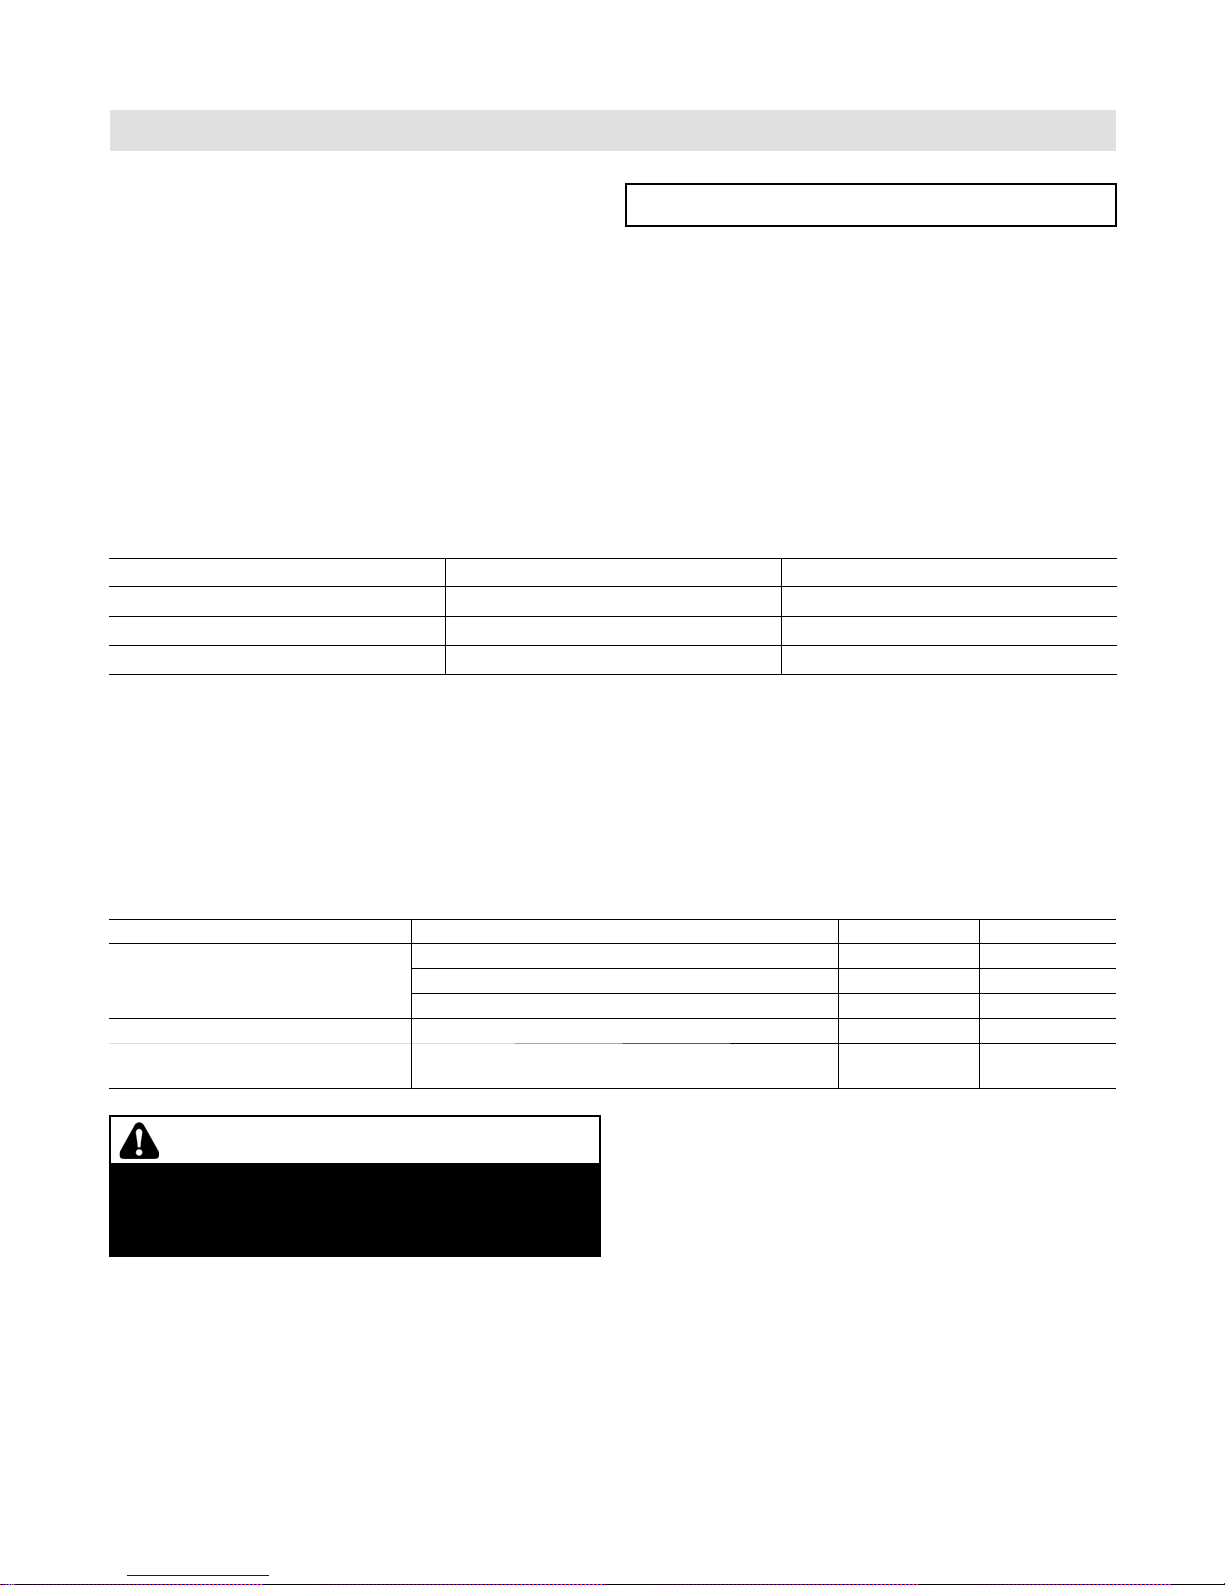
Boiler model KPT- 390 530 720 950 1250
Maximum output MBH (kW) 1331 (390) 1808 (530) 2457 (720) 3242 (950) 4265 (1250)
Minimum output
Efficiency
Fuel Moisture content
Size of wood chips
Flue gas figures
Connection flue gas pipe
Mass flow rate; W5; O2 6%
Volume flow; W5; O2 6%; 302°F (150ºC)
Mass flow rate; W35; O2 8%;
Volume flow;W35; O2 8%; 302°F (150ºC)
Average flue gas temperature at full load
Average flue gas temperature at partial load
Chimney draft required
Electrical connections
Electrical connections, total
Ignition device
Flue gas exhaust blower
In-feed auger
Primary air blower
Primary air blower
Secondary air blower
Grate drive unit
Electric power consumption at full load
Electric power consumption at partial load
Heating
Water side resistance (diff. 27° F / 15 K)
Boiler water volume
Heating surface
Volume on heating gas side
Volume of ash container for grate ash
Volume of ash container for flue gas cyclone
Test pressure
Maximum allowable working pressure (water)
Maximum water temperature
Minimum return temperature
Weight
Weight of combustion chamber
Weight of pressure vessel (30 psi)
Weight of pressure vessel (60 psi)
Weight of displacement rods
Weight of flue gas exhaust blower
Weight of in-feed auger
Total weight without water (30psi)
Total weight without water (60psi)
Total weight with water (30psi) 7
Total weight with water (60psi)
1
Minimum load: Operation with modulated control (Infinitely variable power control)
1
2
3
4
7 A
5
5
1
2
6
7
7
7
Low load with ON Qmin / OFF (Stop-and-go mode)
2
Moist fuels: Efficiency: Specification with displacement rods and flue gas recirculation system
or dry fuels (W5 to W20) without flue gas recirculation system-reduced values
3
Wet fuels: >W35 further limitations regarding output, degree of efficiency and control behavior
4
Specification: See Section Wood Fuel Requirements
5
Flue gas temperature: An increase is possible by removing the displacement rods [Full load 86° F (30° C);
Partial load 50° F (10° C)]
6
Pressure: Per ASME Sec. IV
7
Overall weight: Includes displacement rods
Other influences: Fuel, water content, ash content, pneumatic cleaning system yes/no; track time (number of
operating hours without cleaning). Specifications for the start of the track time [toward the end
of the track time there is an increase in the flue gas temperature by approx. 59° F (15° C)
20
MBH (kW) 334 (98) 450 (132) 614 (180) 812 (238) 1065 (312)
85%
% W 50
G 30 / G 50 as per CAN/CSA-B366. 1-M91
ft³/s (m³/s)
ft³/s (m³/s)
“wc (mbar)
6
in. mm
lb/s (g/s)
lb/s (g/s)
°F (°C)
°F (°C)
USG (L)
ft² (m²)
USG (L)
USG (L)
USG (L)
psi (bar)
psi (bar)
°F (°C)
°F (°C)
lb (kg)
lb (kg)
lb (kg)
lb (kg)
lb (kg)
lb (kg)
lb (kg)
lb (kg)
lb (kg)
lb (kg)
Pa
kW
kW
kW
kW
kW
kW
kW
kW
kW
kW
13b (350)
0.48 (219)
9.18 (0.26)
0.67 (303)
13 (0.37)
6.42
1.6
1.5
1.1
0.14
1.0
.9
0.12
3.36
2.75
5.12 (13)
303 (1150)
291.8 (27.1)
407 (1540)
6570 (2970)
4993 (2265)
4993 (2265)
644 (292)
132 (60)
337 (153)
12820(5815)
12820(5815)
15355(6965)
15355(6965)
13c (350)
0.65 (297)
12.71 (0.36)
0.91 (412)
17.5 (0.50)
8.28
1.6
2.2
1.5
0.3
1.0
1.5
0.12
4.68
3.83
9.23 (23)
383 (1450)
457.5 (42.5)
602 (2280)
9343 (4238)
7094 (3218)
7094 (3218)
721 (327)
172 (78)
337 (153)
17780(8065)
17780(8065)
20964(9509)
20964(9509)
13c (350)
0.89 (404)
17 (0.48)
1.23 (560)
23.6 (0.67)
320 (160)
248 (120)
±0
8.28
1.6
2.2
1.5
0.3
1.0
1.5
0.12
4.68
3.83
17.26 (43)
488 (1850)
597.4 (55.5)
774 (2830)
63 (221) - 240 (800)
63 (221) - 240 (800)
113 (7.8)
30 or 60 (2 or 4)
250 (120)
149 (65)
10919 (4953)
9275 (4207)
9936 (4507)
869 (394)
178 (78)
3.37 (153)
21572(9785)
22234(10085)
25675(11646)
26336(11946)
805.2 (74.8)
1070 (4050)
12740(5779)
12965 (5881)
13627 (6181)
27492(12470)
28153(12770)
31775(14413)
32437(14713)
15c (400)
1.17 (532)
22 (0.63)
1.62 (736)
31 (0.88)
9.51
1.6
2.2
2.2
0.48
1.0
1.85
0.12
5.29
4.28
10.5 (26)
515 (1950)
1186 (538)
181 (82)
419 (190)
17c (450)
1.54 (700)
29 (0.83)
2.13 (968)
40.6 (1.15)
11.31
1.6
4.0
2.2
0.48
1.0
1.85
0.12
6.91
5.6
18 (45)
660 (2500)
979.6 (91.0)
1367 (5210)
14374(6520)
14643 (6642)
15525 (7042)
1186 (538)
236 (107)
419 (190)
30858(13997)
31740(14397)
36330(16479)
37212(16879)
5603 882 - 01
Page 21

Pyrotec Installation & Operating
Specifications
Boiler Dimensions
Mechanical
BR
BS
BR Boiler Return
BS Boiler Supply
Dimensions
Boiler Model KPT- 390 530 720 950 1250
a in. (mm)
b in. (mm)
c in. (mm)
d in. (mm)
e in. (mm)
f in. (mm)
g in. (mm)
h in. (mm)
k in. (mm)
l in. (mm)
m in. (mm)
n in. (mm)
o in. (mm)
p in. (mm)
5603 882 - 01
5
/
93
(2378) 99
8
5
/
91
8 (2328) 97
172 (4370) 191¾ (4870) 207 (5257) 214½ (5447) 235
1
/
87
8 (2060) 100¾ (2560) 100
22¾ (577) 22¾ (577) 22¾ (577) 25
47¼ (1200) 47¼ (1200) 47¼ (1200) 50¼ (1275) 50¼ (1275)
94¾ (2405) 114
42¾ (1086) 42¾ (1086) 54
5
/
31
8 (803) 31
7
/
17
8 (453) 17
81¾ (2077) 91¾ (2331) 98
1
/
12
8 (308) 12
1
/
50
8 (1274) 50
49¾ (1263) 55¾ (1417) 55
7
/
(2536) 111
8
7
/
8 (2486) 109
3
/
8 (2905) 117
5
/
8 (803) 31
7
/
8 (453) 17
1
/
8 (308) 12
1
/
8 (1274) 54
5
/
(2834) 119½ (3035) 127
8
5
/
8 (2784) 117
7
/
8 (2562) 100
7
/
8 (2993) 112
3
/
8 (1380) 63½ (1612) 63½ (1612)
5
/
8 (803) 36
7
/
8 (453) 18
1
/
8 (2491) 96¼ (2444) 103
1
/
8 (308) 17
3
/
8 (1380) 63½ (1612) 63½ (1612)
5
/
8 (1413) 51
3
/
8 (2981) 125 (3176)
7
/
8 (2562) 122
7
/
8 (657) 25
5
/
8 (2861) 134
5
/
8 (929) 36
7
/
8 (479) 18
3
/
8 (440) 17
7
/
8 (1317) 61
5
1
/
(3230)
8
7
/
8
(5992)
3
/
8 (3107)
7
/
8 (657)
1
/
8 (3406)
5
/
8 (929)
7
/
8 (479)
7
/
8 (2639)
3
/
8 (440)
/
8 (1566)
21
Page 22

Mechanical
Pyrotec Installation & Operating
Boiler Dimensions (continued)
a
Legend
A Boiler return
B Motor for de-ashing assembly with ash container
(optional)
C Primary air blower 1
D Boiler supply
Dimensions
Boiler Model KPT- 390 530 720 950 1250
3
/
129
a in. (mm)
b in. (mm)
16 (3282) 149 (3782) 152
5
/
149
8 (3800) 169
5
/
16 (4300) 174
b
E Secondary air blower
F In-feed auger
5
/
8 (3877) 151 (3835) 172
9
/
16 (4434) 173 (4392) 194
1
/
2 (4380)
3
/
8 (4937)
Boiler Components
Legend
BS Boiler supply
BR Boiler return
A De-ashing assembly with ash container
B Cleaning cover, heat exchanger
C Combustion chamber temperature sensor
D Negative overpressure monitoring assembly
E Light barrier, combustion chamber
F Igniter (optional)
G Cleaning cover trough
H Cleaning cover, external grate
K Light barrier de-ashing system
L Heat exchanger door
M Pneumatic cleaning system
N Combustion chamber door
O Limit switch, combustion chamber door
P Primary air blower 2
Q Drive, in-feed grate
R Temperature sensor in-feed auger
S Limit switch, maintenance cover
T Light barrier, in-feed auger
U Extinguishing water connection
V Boiler drain and fill valve
22
5603 882 - 01
Page 23

Pyrotec Installation & Operating
Flue Gas Cyclone
Mechanical
The flue gas cyclone minimizes dust emissions and is
designed as a multi cyclone with axial function. The
cyclone is fully insulated and has three covers for cleaning.
The crude gas chamber is cleaned via the side cleaning
cover. The clean gas chamber is cleaned via the upper
or back cleaning cover (unused blower connection).
The ash box has a carriage and is connected to the cyclone
with quick-action fasteners. It can easily be pulled out for
emptying. The flue gas exhaust blower can be installed
either on the side or the top.
to the
from the
furnace
chimney
D
E
F
G
Supplied with:
- 1 flue gas cyclone
- 1 ash container 63 USG (240L) or 211 USG (800L)
CAUTION
The effects of heat can create dangerous conditions.
Legend
A Flue gas exhaust blower (with variable rotation)
- Either top or side
- Unused connection as cleaning cover
- Alternate mounting of the flue gas exhaust blower
(shown in dark grey)
B Flue gas temperature sensor
C Oxygen sensor
D Flue gas exhaust blower - choice of top or side -
unused connection as cleaning lid, variable rotation,
clean gas chamber
E Cleaning lid crude gas chamber
F Cyclone (axial cyclone)
G Ash bin support frame 63 USG (240 L) or 211 USG (800 L)
G
to the
from the
furnace
chimney
Ash bin support frame: positioning is possible in 4 x 90
(extraction, ash container) Drawn with extraction to the right
Top
Top
Top
Boiler Model KPT- 390 530 720 950 1250
11
A in. (mm) 13¾ (350) 13¾ (350) 13¾ (350) 15¾ (400) 17
7
a in. (mm) 81
c in. (mm) 92
/
(2080) 92
8
7
/
(2359) 92
8
j in. (mm) 125½ (3186) 125½ (3186) 133 (3378) 135
3
/
k in. (mm) 52
(1330) 52
8
l in. (mm) 49½ (1256) 49½ (1256) 49½ (1256) 51
5
m in. (mm) 23
n in. (mm) 17
q in. (mm) 49
/
(600) 23
8
5
/
(447) 17
8
5
/
(1260) 49
8
7
/
(2359) 98
8
7
/
(2359) 98
8
3
/
(1330) 57
8
5
/
(600) 26 (660) 27
8
5
/
(447) 18
8
5
/
(1260) 49
8
1
/
(2491) 96¼ (2444) 103
16
1
/
(2491) 96¼ (2444) 103
16
9
/
(1462) 57
16
1
/
(461) 22
8
5
/
(1260) 40
8
7
/
(3452) 146
8
9
/
(1462) 65¼ (1657)
16
3
/
(1300) 51
16
1
/
(690) 30 (760)
8
7
/
(579) 22
8
1
/
(1020) 40
8
/
7
/
7
/
3
/
3
/
16
7
/
1
/
8
r in. (mm) 24½ (620) 24½ (620) 24½ (620) 37½ (950) 37½ (950)
t in. (mm) 65¾ (1670) 65¾ (1670) 68 (1730) 82 (2083) 84¾ (2153)
5603 882 - 01
º
(450)
16
(2639)
8
(2639)
8
(3717)
8
(1300)
(579)
8
(1020)
23
Page 24

Mechanical
Recirculation System
Pyrotec Installation & Operating
24
5603 882 - 01
Page 25

Pyrotec Installation & Operating
Mechanical
Recirculation System (continued)
Item Boiler Model KPT- 390 530 720 950 1250
no. Description Quantity Quantity Quantity Quantity Quantity
1 Pipe adaptor primary air 1 11111
2 Pipe adaptor primary air 2 11111
3 Elbow 130 x 0.9/90°
with PD
4 Flue damper blade
D=5d in. (130 mm)
5 Pipe 130 x 0.6
7
/
8 in. (250 mm)
L=9
6 Pipe 130 x 0.6
L=19f in. (500 mm)
7 Pipe 130 x 0.6
L=39d in. (1000 mm)
8 Clamping band 130
with gasket
9 Distributor 11111
10 Fan DMVL 11111
11 Intake cone 11111
12 Recirculation bracket 11111
13 Threaded rod M12
L=7b in. (190 mm)
14 Threaded rod M12
7
/
8 in. (250 mm)
L=9
15 Pipe clamp 125-130 M12 22222
16 Fan bracket 11111
17 Mesh 8 x 8 11111
18 Pipe insulation
L=39e in (1000 mm)
19 Bolt M12 x 1 in. (25 mm) 44444
20 Nut M12 44444
21 Lock washer M12 88888
22 Bolt M8 x 1 in. (25 mm) 66666
23
Bolt M8 x c in. (20 mm)
24 Nut M8 66666
25 Lock washer M8 14 14 14 14 14
26
Bolt M5 x c in. (20 mm)
27 Lock washer M5 44888
x Distance between the
27e in. (695 mm) 27e in. (695 mm)
recirculation fan and the
supply flange.
y Height of the horizontal
41b in. (1055 mm) 51a in.(1303 mm) 49b in.(1258 mm) 51d in. (1299 mm)
recirculation section.
Note: Items 6 and 7 need to be lengthened by the customer.
55555
44444
2 -- 1 -- --
1[1x L=8
(225 mm)]
7
/
8 in.
3[1x L=8
7
/
(225 mm)]
8 in.
1[1x L=9 in.
(228 mm)]
3[1x L=12d in.
(308 mm)],
1[1x L=12d in.
(308 mm)]
1[1x L=16d in.
(409 mm)]
3[1x L=31c in.
(805 mm)],
1[1x L=36 in.
(914 mm)]
3[1x L=31c in.
(805 mm)],
1[1x L=32f in.
(830 mm)],
1[1x L=36 in.
(915 mm)]
5[1x L=18d in.
(460 mm)],
1[1x L=28e in.
(720 mm)],
1[1x L=33a in.
(845 mm)]
4[1x L=36 in.
(915 mm)]
5[1x L=36 in.
(915 mm)]
18 18 18 19 20
21222
--1------
45566
88888
44888
7
/
8 in. (735 mm)
28
33a in. (845 mm) 33a in. (845 mm)
7
/
71
8 in.(1825 mm)
5603 882 - 01
25
Page 26
Mechanical
Safety Devices
Pyrotec Installation & Operating
1. Install the pressure relief valve, discharge pipe, air
vent and pressure gauge as illustrated in section piping
and installation of safety devices.
A 30 or 60 psi pressure relief valve is supplied with
the boiler (standard equipment).
The KPT 1250, 30 psi will have 2 PRVs.
2. Install a discharge pipe on the pressure relief valve.
The end of the pipe must not be threaded. The pressure
relief discharge pipe should extend to a floor drain and
end approximately 6 in. (150 mm) above the drain.
IMPORTANT
DO NOT install a shut-off valve in the discharge pipe.
DO NOT reduce the discharge pipe diameter.
DO NOT pipe the discharge to outdoors!
IMPORTANT
Install an approved factory supplied pressure relief valve.
Air vent(s) in the system supply must be installed to
purge the air from the system. To ensure the boiler can
be purged of all air, ensure supply / return water lines do
not contain restrictive piping where air could be trapped.
WARNING
Expansion
With closed expansion, the supply pressure to the
expansion tank should be equal to the max. amount
of the system pressure plus 3 psi (0.2 bar).
The boiler system with 3-way mixing valve
To reliably prevent boiler corrosion through condensation
of the flue gases, the boiler return flow temperature must
never be below 149° F (65° C).
The stepless control of the PYROTEC Grate Firing System
output requires a constant flow through the boiler of the
water to be heated. The boiler circuit, the boiler pump and
boiler-mixing valve must therefore be installed according
to section piping and installation of safety devices.
The boiler circuit should be designed that the temperature
difference between the boiler supply and the boiler return
temperature is equal to or less than 27° F (15° C).
The activation of the boiler pump and boiler mixing valve
is integrated in the custom control panel.
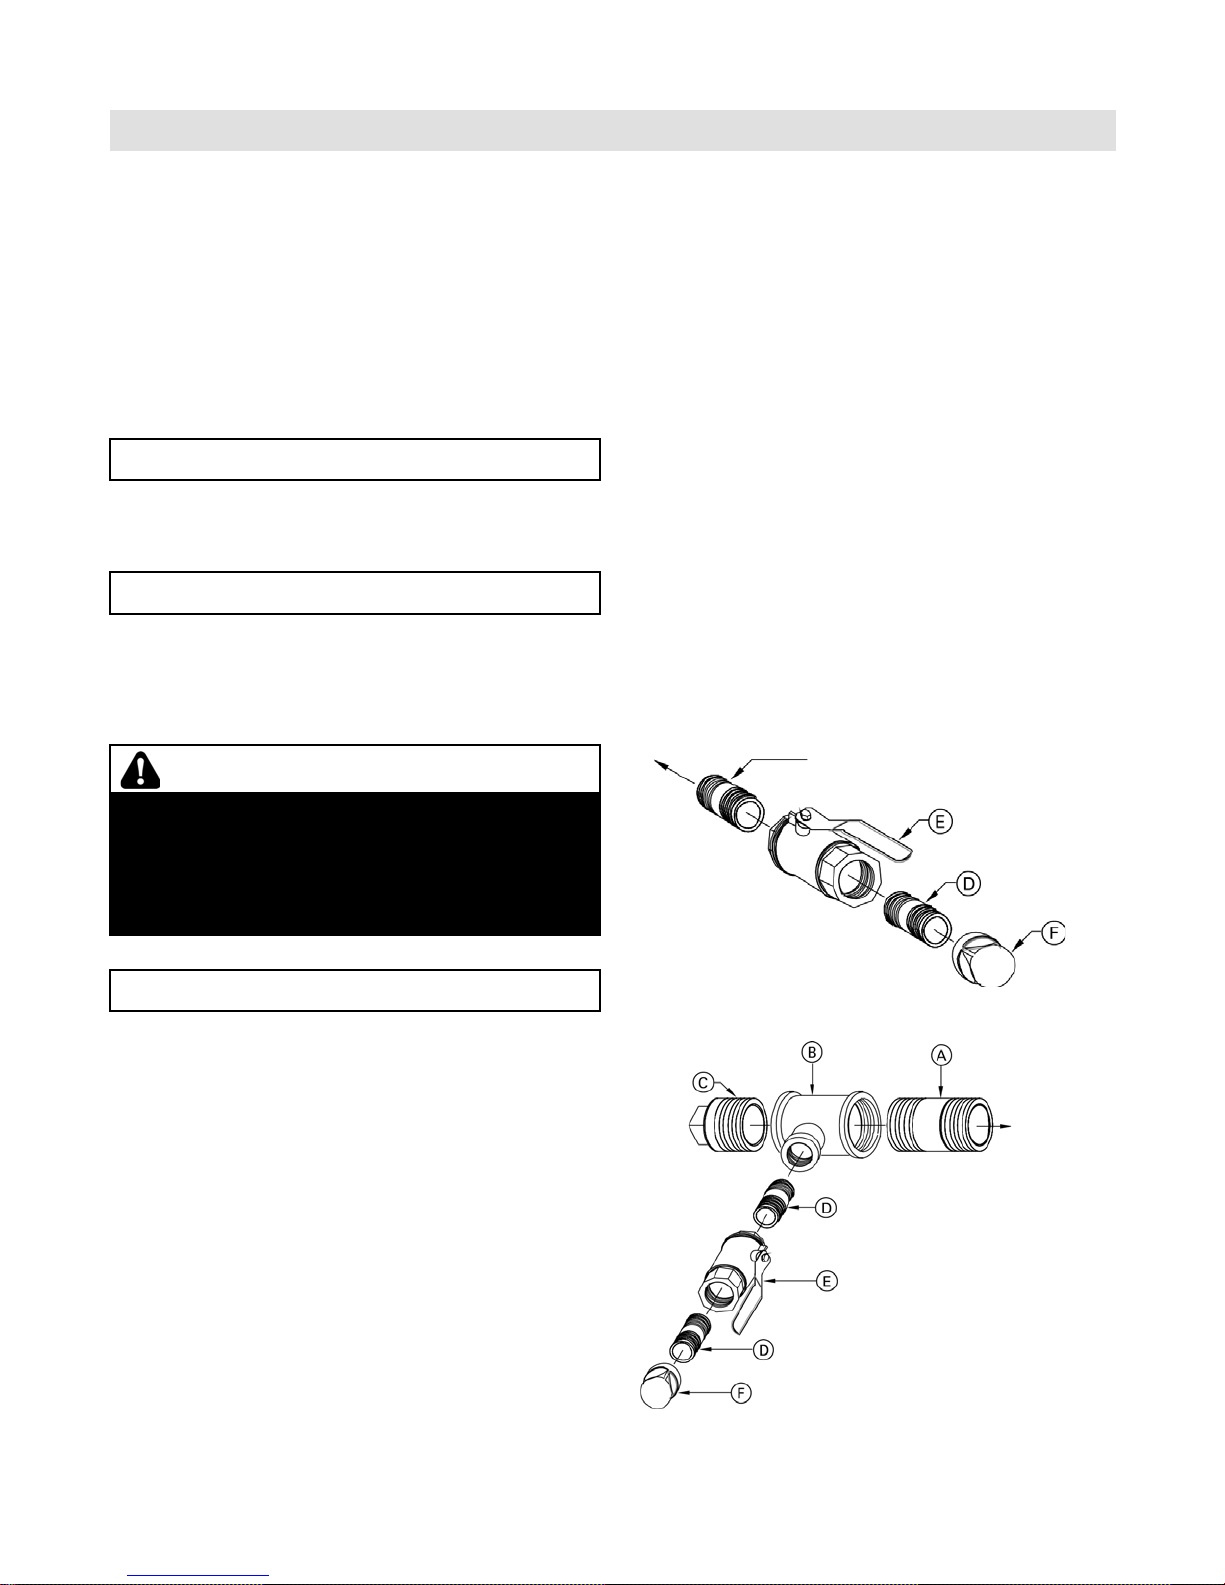
Drain inspection port
KPT 390 - 720
G
Do not install an isolation valve between the boiler and
the pressure relief valve. The discharge pipe for the
pressure relief valve must be oriented to prevent scalding
of attendants. Pipe the pressure relief valve discharge
pipe close to floor drain. Never pipe the discharge pipe to
the outdoors.
IMPORTANT
This boiler does not require a flow switch.
A low water cut-off may be required by local codes.
If the boiler is installed above radiation level, a low water
cut-off device of approved type must be installed in all
instances. Do not install an isolation valve between boiler
and low water cut-off.
Fire extinguishing water tank
The self-activating extinguishing device must be installed
next to the boiler feed system. Refer to section fire
extinguishing systems for the assembly.
The fire suppression is performed by means of an
extinguishing valve, which is not dependent on an electric
current. A float-type switch monitors the water level and
should be electrically connected (see field wiring diagram).
KPT 950 - 1250
Legend
A 3 in. x 5 in. Nipple
B 3 in. x 3 in. x 1b in.
Reducing Tee
C 3 in. Plug
D 1b in. x 2 in. Nipple
E 1b in. Ball Valve
F 1b in. Cap
G 1b in. x 5 in. Nipple
26
5603 882 - 01
Page 27

Pyrotec Installation & Operating
Mechanical
Safety Devices (continued)
The safety equipment for the heating installation must be installed by a heating contractor authorized to do so.
Legend
A Nipple, c in. x 1b in.
B Reducing coupling, c in. x b in.
C Boiler water temperature gauge
D Bushing c in. x a in.
E Nipple a in. x 2b in.
F Ball valve a in.
G Pressure gauge
H Sensor well - fixed high limit (sensor supplied)
I Safety heat exchanger connections, NPTM b in.
J PRV Pressure Relief Valve connection cap
2
K Reducing bushing
L Nipple
M Pressure relief valve, 30 psi or 60 psi
N Reducing bushing (KPT 1250, 30 psi only)
O Nipple (KPT 1250, 30 psi only)
1
P Pressure relief valve, 30 psi or 60 psi
(KPT 1250, 30 psi only)
Q 4 in. or 6 in. Boiler supply flange
3
R Supply sensor well (sensor supplied)
S 4 in. or 6 in. Boiler return flange
3
T Return sensor well (sensor supplied)
U Sensor wells for thermal safety flush valve (Rb in.)
(sensor supplied)
P
Q
M
L
J
O
I
N
R
I
G
K
C
F
I
E
B
D
H
T
I
A
S
U
1 See section Piping and Installation of Safety Devices
2
Two PRVs must be installed on the KPT 1250 - 30 psi boiler. One PRV must be installed and the other PRV
connection must be capped on the KPT 1250 - 60 psi boiler. All other models have only one PRV connection.
3
4 in. boiler flange for Pyrotec 390-720, 6 in. boiler flange for Pyrotec 950-1250
Note: All fittings shown and sensors indicated are
factory supplied. The size and quantity are
matched to the specific boiler model.
5603 882 - 01
27
Page 28

Mechanical
Piping and Installation of Safety Devices
Drain
inspection
port
Pyrotec Installation & Operating
System fill
Safety heat exchanger top view
4 heat
exchanger
loops and
2 TS2430
for Pyrotec
720, 950
and 1250
Legend
A Additional heat source
B Thermal storage tank as low loss header
(option A, 5 sensors)
C Distributor, heat consumer
D Thermal storage tank #1
E Thermal storage tank #2
F Two thermal storage tanks as low loss header
(option B, 5 sensors)
System fill
3-Way mixing valve
System return line
Blocked
port
Boiler return line
1, 2 and 3 indicates system connections
Adjustment
Bypass line
Valve adjustment must
be facing forward
28
5603 882 - 01
Page 29

Pyrotec Installation & Operating
Piping and Installation of Safety Devices (continued)
Mechanical
Note: To reliably prevent boiler corrosion caused by
condensation of flue gases, the boiler return flow
temperature must not under any circumstances be
below 150° F (65° C).
A Viessmann sized boiler pump with a boiler mixing
valve are provided according to the tables below.
The boiler circuit should be designed such that the
temperature difference between the supply and the
return temperature is equal to or less than ∆t 27° F
(15° C).
The expansion tank has to be connected to the
boiler without any shut-offs.
Safety equipment supplied by Viessmann:
- M 20 Boiler pump
- Y 20 Boiler mixing valve
- PRV Pressure relief valve, pressure set to 30 or 60 psi
- TS2430 Thermal safety flush valve R ¾ in., approved
component; special-purpose, designed for opening at
a temperature of 122°- 248° F (50°- 120° C), (safety
heat exchanger loop built into boiler). The Pyrotec 390
and Pyrotec 530 have two safety heat exchanger loops
and require one thermal run-off safety valve.
The Pyrotec 720 to Pyrotec 1250 have four safety heat
exchanger loops and require two thermal run-off safety
valves.
- LWCO Low water cut-off
- PG Pressure gauge
- TG Temperature gauge (thermometer)
- SHE Safety heat exchanger, water volume 1.1 USG
(4.2L) per loop, NPTM b in.
Customer supplied:
- PDP Pressure relief valve drain pipe
- DCW Cold water inlet, min. 36 psi (2.5 bar), max.
51 psi (3.5 bar)
- AV Air separator / vent
- EXP Expansion tank closed;
- for safety heat exchanger required (size according
to volume of safety heat exchanger loops and volume
of piping
- for heating system (optional)
- WSL Water supply line for safety heat exchanger
- WLV Water supply line for thermal run-off safety valve
- SDP Safety heat exchanger drain pipe
- SRL System return line to the boiler from the system
- SSL System supply line from the boiler to the system
- BPL Bypass line
- BR Boiler return
- BS Boiler supply
Note: The KPT 1250, 30 psi will have 2 PRVs.
Design Recommendation:
Thermal safety flush valve
Boiler Model KPT- Thermal safety
flush valve
TS-2430
(Quantity)
Water through-
put required at
36 psi
(2.5 bar)
Supply line
WSL
L/h GPM
390 1 1637 7.2
530 1 2224 9.8
R c in. R c in.
R c in. R c in.
720 2 3020 13.3 R 1 in.
950 2 3986 17.6 R 1 in.
1250 2 5246 23.0
R 1a in. R c in.
Pressure relief valve
Boiler model KPT- Pressure relief valve Conbraco
1
30 psi 60 psi 30 psi 60 psi
390
530
1a in.
1b in. 1a in.
720 2 in.
950 2 in.
1 in.
1a in. 2b in. 1b in.
1b in. 2b in.
1250 2 in. 2 in.
Supply line
WLV
Drain pipe
SDP
R 1 in.
R 1 in.
R c in.
R c in.
R 1 in.
R 1 in.
R 1 in.
Drain pipe PDP
2
1b in. 1a in.
2 in.
1b in.
2 in.
2b in.
2 in.
2
1
Threaded connection for supply line
2
Length of the drain pipe up to 13 ft. (4.0 m)
5603 882 - 01
29
Page 30

Mechanical
Pyrotec Installation & Operating
Piping and Installation of Safety Devices (continued)
Design Recommendation (continued):
Boiler pump
Boiler model KPT- Pump Frequency Voltage and phase
390 UPS 50-80/4 F 60 Hz 3 x 208-230 V
530 UPS 50-80/4 F 60 Hz 3 x 208-230 V
720 UPS 80-160 F 60 Hz 3 x 208-230 V
950 UPS 80-160 F 60 Hz 3 x 208-230 V
1250 TP 100-80/4 60 Hz 3 x 208-230 / 460 V
Mixing valve Viessmann ASME recommended tank sizes (U-stamped)
Boiler model KPT- Nominal
pipe size
390 3 in. 3-way mixing valve
530 4 in. 3-way mixing valve
720 5 in. 3-way mixing valve
950 5 in. 3-way mixing valve
1250 6 in. 3-way mixing valve
Valve
Boiler model KPT- Tank size
L USG
390 3785 1000
530 5678 1500
720 6624 1750
950 9464 2500
1250 12492 3300
Fire Protection
Follow local regulations for wood-fired heating systems.
Power failure provision
The customer must ensure that there is a supply of water
independent of the electrical supply. This design ensures
that in case of a power failure, the boiler will be reliably
cooled by the thermal run-off safety valve.
Protection against back-burn for the boiler plant
The following safeguards are part of the scope of
delivery for the PYROTEC Grate Firing System:
- Preventing overfilling of the combustion chamber door
A level monitor must be installed to prevent overfilling
of the combustion chamber door. The PYROTEC Grate
Firing System has a light barrier to monitor the embers.
- Preventing back-burn
With a temperature sensor directly on the in-feed auger,
any danger of back-burn initiation will be detected and
quickly counteracted at an early stage by increasing the
fuel conveyance speed into the combustion chamber
door.
- Back flash safeguard
The PYROTEC Grate Firing System is operated with
continuous negative pressure and is equipped with
a back flash prevention device. This device prevents
back flashes caused by flying embers or combustible
gases that may ignite the fuel system.
- Automatic in-feed auger extinguishing system
The supplied fire extinguishing system is necessary on
the in-feed auger. This system should reliably prevent
back- burn in case of a malfunction (such as a power
failure). For safety reasons and to prevent damage by
flooding, connecting the extinguishing system directly
to the water network is not advisable.
This extinguishing system must be equipped with a
6.6 USG (25 L) extinguishing water tank with a float type switch and an adjustable Danfoss extinguisher
valve. The tank for the extinguishing system must be
equipped with a level monitoring system.
If there is a shortage of water, the PYROTEC Grate
Firing System will switch off automatically.
In case of excess temperature, the in-feed auger will
be flooded reliably but in a limited fashion.
IMPORTANT
The heating contractor must perform the installation of
the fire extinguishing system as specified in section Fire
Extinguishing Systems.
30
5603 882 - 01
Page 31

Pyrotec Installation & Operating
Fire Protection (continued)
Mechanical
Back-burn safeguard for the fuel supply system
The fire extinguishing system for the conveyor auger and
the down pipe depends on specific requirements (location,
size of the fuel storage site, material, pressure conditions
and regulations), these being accessories to the scope
of delivery ordered from Viessmann according to their
descriptions.
Automatic triggering system for the fuel supply system
Approved in part as a variation to the shut-off valve in
pressure-less fuel storage units.
Slide valve
The slide valve is approved in pressure-less fuel storage
units and is a suitable safeguard against back-burn.
The slide valve is optional and closes in case of standstill,
danger of back-burn, or power failure with the help of a
spring return motor.
IMPORTANT
We recommend installing a rotary valve for the PYROTEC
Grate Firing System. In addition to being a safeguard
against back-burn, this will also prevent any penetration
by air leaking in via the in-feed auger.
Rotary valve
The rotary valve is optional and used if remnant wood
is moved into fuel storage spaces with blowers, then, in
order to reduce pressure applied, at least one rotary valve
is necessary to reduce pressure between the fuel storage
unit and the boiler. The rotary valve is suited to reduce
pressure and at the same time is considered a suitable
safeguard against back-burn.
Max. overpressure allowed in fuel storage unit:
+500 Pa / +2.00”wc.
Max. negative pressure allowed in fuel storage unit:
+0 Pa / +0”wc.
Double rotary valve with pressure compensation system
If, due to special circumstances, any mechanically
produced negative pressures or extraordinarily high
overpressures are expected in the fuel storage unit,
then two rotary valves must be installed in the material
transport route according to the respective project plan
with a pressure compensation line to the outdoors.
Max. overpressure allowed in fuel storage unit:
+3000 Pa /+12”wc.
Max. negative pressure allowed in fuel storage unit:
-3000 Pa / –12”wc.
IMPORTANT
The supplier of the silo must confirm the maximum weight
that is to be expected on the rotary valve.
The rotary valve below the silo extraction system can
become leaky due to wear of the sealing elements or
through large pieces of wood that cannot be conveyed.
This leakage can make it possible for low-temperature
gases to flow back from the boiler into the silo.
A smoke alarm must be installed between the rotary
valve and the silo extraction system, which, when
triggered, will disconnect the system and create negative
pressure in the silo.
Down pipe
A vertical drop-off section interrupts the connected line
of burning material.
Fire protection for fuel storage space
Viessmann does not provide fire protection for the fuel
storage space.
IMPORTANT
The local building codes and regulations must be followed
by the heating contractor.
5603 882 - 01
31
Page 32

Mechanical
Fire Extinguishing System
Pyrotec Installation & Operating
The fire extinguishing system functions independent from
the electrical power and is flooding the material which is
still remaining in the in-feed auger in case of back-burn.
The activation temperature is approximately 200° F (95° C)
Fire extinguishing system for the in-feed auger
Note: The fire extinguishing system for the in-feed auger
is part of the boiler.
- Line from the extinguishing water container to the b in.
valve (as short as possible).
- Valve thermostatic, Danfoss AVTA 15 122° F-194° F
(50°- 90°C) position 3 equals approximately
176° F (80° C).
- The lines must be executed as hard piping in metal (b in.).
- It must not be possible to shut off the cold water inlet
without the aid of tools.
- Be especially sure to comply with the instruction in the
Fire Protection section.
Fire extinguishing system for the conveyor auger
Note: The fire extinguishing system for the conveyor
auger is optional.
Fire extinguishing system for the down pipe
Note: The fire extinguishing system for the down pipe
is optional.
Legend
A Combustion
B Metering Container
C Fuel supply
D Extinguishing water container 6.6 USG (25 L)
E N25 floater switch
CW Cold water supply b in. min. 30 psi (2.0 bar),
max. 45 psi (3.0 bar)
32
Note: A slide valve is required as standard for
an unpressurized material store or a rotary valve
for a material storage with overpressure or
underpressure (charging with blower, e.g. wood
processing operations).
The lines must be executed as hard piping in metal (b in.).
It must not be possible to shut off the cold water inlet
without the aid of tools.
Be especially sure to comply with the instruction in the
Fire Protection section.
5603 882 - 01
Page 33

Pyrotec Installation & Operating
Assembly of the Fire Extinguishing System
Connection to the extinguishing
water container or cold water
supply piping (field supplied).
Mechanical
deburr drill hole
Item No. Quantity Description
1 1 Floater switch (N25)
2 4 Washer
3 2 Hex nut M6
4 2 Threaded rod M6
52
6 1 Mounting bracket
7 1 Plastic container 6.6 USG (25 L)
8 2 Clamping band
91
10 1
11 1
5603 882 - 01
Stud anchor e in. x 4a in.
(10 mm x 108 mm)
Duct b in.
90° street elbow b in.
Strainer b in.
Item No. Quantity Description
12 1
13 1 Danfoss AVTA
14 1
15 1
16 1
17 1
18 1
19 1 Clamp
20 3 Bracket
21 3 Strain washer
22 3 Hex nut
23 1 Sensor
Connector b in.
Reducer c in. - b in.
Union c in.
Gasket c in.
90° street elbow c in.
Weld on nipple c in.
33
Page 34

Mechanical
Assembly of the Fire Extinguishing System (continued)
Pyrotec Installation & Operating
The following assembly instructions for the fire
extinguishing system are to be used with the layout
and description shown on page 31.
- Install the mounting bracket (6) near the in-feed auger
at a minimum height of 20 in. (500 mm) with the stud
anchors (5) for wall mount.
- Install the plastic container (7) to the mounting
bracket (6) with the clamping bands (8), the threaded
rods (4), washers (2) and the hex nuts (3).
- Attach the 90° street elbow (10) to the duct (9)
- Assemble the strainer (11), connector (12),
thermostatic valve (13), reducer (14), union (15),
gasket (16) and the 90° street elbow (17) and
connect the assembly to the weld on nipple (18).
Negative Pressure Monitoring Assembly
Note: The Weld on nipple (18) is pre-installed at the
metering container. The Weld on nipple (18) needs
to be welded on for the fire extinguishing system
for the conveyor auger and the fire extinguishing
system for the down pipe (18). The fire extinguishing
system for the conveyor auger and the fire-
extinguishing system for the down pipe are optional.
- Install a ½ in. line from the 90° street elbow (10) to the
strainer (11). This piping is field supplied.
- Install the sensor (23) to the in-feed auger with the clamp
(19), the bracket (20) which is welded onto the in-feed
auger, the strain washer (21) and the hex nut (22)
Note: Make sure the bending radius of the capillary tube
does not exceed 2 in. (50 mm).
5
9
Legend
1 Nipple 1 in. x 1 in.
2 Tee 1 in. x b in. x b in.
3 Extension with hole
4 Sensor well b in.
5 Differential pressure transducer
34
6 90° street elbow b in.
7 Adapter b in.
8 Pressure hose
9 STB-RAK
qP Screw
5603 882 - 01
Page 35

Pyrotec Installation & Operating
Control Panel
Electrical
Mounting of the control panel
A certified electrician shall mount the control panel.
Optimum positioning of the control panel will minimize
the time and costs of the installation.
The control panel should be in an area where the heat
radiation (front side of boiler, rear side of boiler with
flue gas cyclone and flue gas exhaust blower as well as
recirculation line) and the exposure to dust during cleaning
is at a minimum.
The ambient temperature for the control panel approx.
4 in. (100 mm) away from the control cabinet) should not
exceed 104° F (40° C) while the system is in operation.
The minimum temperature must not be less than 50° F
(10° C) In case of doubt, preference should be given to
placing the control panel outside the mechanical room
near the heating room door.
Electrical connection
- Install the control panel according to the field wiring
diagram. The field wiring diagram is supplied with the
control panel.
- In the area of hot parts (flue gas exhaust blower, flue
gas pipe), the lines should be installed in steel pipes at
an appropriate distance so as to be protected from
excessive temperatures. See section Boiler Wiring.
- The cable bushings to the motors and equipment must
be dust-tight and provided with a strain relief.
General safety instructions
- Retighten all wire holding screws inside the control
panel before start-up.
- Provide fusible disconnect means according to local
code.
- DHW safety aquastat is to be installed in the tank well.
The aquastat can be installed on the DHW building supply
line if a recirculating DHW pump is used. Please check the
local building code. The DHW safety aquastat does NOT
replace scald protection devices requied by local code.
CAUTION
The Viessmann supplied field wiring diagram is not a
complete system drawing. It is the installer’s responsibility
to assure that the control is suitable for the respective
installation, and all necessary safety equipment is installed.
CAUTION
The information about wire type, wire number and wire
gauge made in the wiring diagrams is not obligatory.
The final decision of these settings has to be made by
the executing installation company taking into consideration
the local codes and regulations.
CAUTION
Any alteration of the control cabinet will void the warranty.
5603 882 - 01
35
Page 36

Electrical
Control Panel (continued)
Vitocontrol - C, Pyrocontrol KPT
Pyrotec Installation & Operating
Mains supply 208V, 3 phase, 60 Hz, see field wiring diagram for details.
Customer terminal tag Description
-X1 Line voltage connections
-X2 24V connections
-X3 Dry contact outputs
-X4
36
Alarm outputs
5603 882 - 01
Page 37

Pyrotec Installation & Operating
Electrical
Control Panel (continued)
Device tags and designations may vary from project to project. Please refer to the field wiring diagram for details.
The wiring diagram will be supplied after the control panel is built or with the receipt of the control panel.
Components Installed in the Control Panel
Device tag Description
-4F2 Circuit breaker
-4F3 Circuit breaker
-4F4 Fuse
-5F1 Circuit breaker
-12F12 Circuit breaker
-13F13 Circuit breaker
-16F1 Fuse
-17F1 Fuse
-4A1 Power supply 24 VDC
-32D01 CAN Gateway
-33D02 Digital input module
-34D03 Digital input module
-35D04 Digital input module
-36D05 Digital input module
-37D06 Analog input module
-39D07 Analog input module
-39D08 Digital input module
-40D09 Analog input module
-41D10 Analog input module
-42D11 Digital input module
-30K1S Contactor
-30K12S Contactor
-30K12.1S Contactor
-4T1 Transformer
-29K21 Relay
-30K70S Relay
-31K5S1 Relay
-31L5S2 Relay
-35K0 Relay
-35K01 Relay
-35K20.1 Relay
-35K20.2 Relay
-35K24 Relay
-39K70 Relay
-39K70.1 Relay
-39K71 Relay
-39K72 Relay
-39K73 Relay
-39K74 Relay
-39K75 Relay
-39K76 Relay
-39K77 Relay
-39K78 Relay
-39K79 Relay
-39K80 Relay
5603 882 - 01
Components Installed in the Control Panel
Device tag Description
-5U1 Variable frequency drive
-12U12 Variable frequency drive
-13U13 Variable frequency drive
-27T26 Transformer
-43K12.1 Relay
-43K12.2 Relay
-43K12.3 Relay
-43K12.4 Relay
-27F1 Fuse
-22D1G Timer
-23D2 Timer
-24D3 Timer
-25D4 Timer
-26D14 Timer
-4Q1 Motor circuit controller
-6F2 Motor circuit controller
-7F3 Motor circuit controller
-8F4 Motor circuit controller
-9F6 Motor circuit controller
-11F1 Fuse
-14F14 Motor circuit controller
-15F15 Motor circuit controller
-16F16 Circuit breaker
-17F20 Motor circuit controller
-17K1 Relay
-35K11 Relay
-4F1 Fuse
-35K2 Solid state relay
-31K2S Contactor
-36K3 Contactor
-36K4 Contactor
-36K6 Contactor
-36K14 Contactor
-36K15 Contactor
-36K16.1 Contactor
-36K16.2 Contactor
-35K20 Contactor
Components Installed in the Control Panel Door
Device tag Description
-32BK Touch screen
-4H1 Panel light
-4M1 Filter blower
-4Q0 Disconnect
-4S1 Door switch
-4U1 Temperature Regulator
37
Page 38

Electrical
Electrical Components
Pyrotec Installation & Operating
38
5603 882 - 01
Page 39

Pyrotec Installation & Operating
Electrical Components (continued)
M High voltage B sensors N Sensors
Y Low voltage S Switches
High Voltage
Number Designation Device tag Description
1 M1 -3M1 Flue gas exhaust blower (not shown)
2 M11 -9M11 Grate drive
3 M13 -13M13 Secondary air blower (not shown)
4 M14 -14M14 De-ashing auger
5 M15 -15M15 De-ashing ascending conveyor auger (not shown)
6 M16 -16M16 Igniter (not shown)
7 M20 -17M20 Boiler pump (not shown)
Low Voltage
8 Y20 -18Y20 Mixing valve actuator (not shown)
9 Y71 -20Y71 Solenoid valve 1
10 Y72 -20Y72 Solenoid valve 2
11 Y73 -20Y73 Solenoid valve 3
12 Y74 -20Y74 Solenoid valve 4
13 Y75 -20Y75 Solenoid valve 5
14 Y76 -20Y76 Solenoid valve 6
15 Y77 -20Y77 Solenoid valve 7
16 Y78 -20Y78 Solenoid valve 8
17 Y79 -20Y79 Solenoid valve 9
18 Y80 -20Y80 Solenoid valve 10
19 Y81 -20Y81 Solenoid valve 11
20 Y82 -20Y82 Solenoid valve 12
Electrical
Temperature sensors
21 B1 -107B1 Flue gas temperature sensor (not shown)
22 B20 -107B20 Boiler supply temperature sensor
23 B20.1 -107B20.1 Boiler return temperature sensor
24 B27 -73B27 Combustion chamber temperature sensor (not shown)
Light barriers
25 B1G/1 -61B1G/1 Light barrier embers (Transmitter) (not shown)
26 B1G/2 -61B1G/2 Light barrier embers (Receiver) (not shown)
27 B2/1 -61B2/1 Light barrier in-feed auger (Transmitter)
28 B2/2 -61B2/2 Light barrier in-feed auger (Receiver)
29 B14/1 -61B14/1 Light barrier de-ashing auger (Transmitter)
30 B14/2 -61B14/2 Light barrier de-ashing auger (Receiver)
Sensors
31 B26 -91B26 Oxygen sensor (not shown)
32 U26 -91U26 Oxygen sensor transducer (not shown)
33 N25 -69N25 Floater switch for fire extinguishing water container (not shown)
34 N21 -72N21 Fixed high limit (not shown)
35 U1 -17U1 Low water cut-off (not shown)
36 N23 -72N23 Water safety pressure switch (not shown)
37 S1 -60S1 Limit switch for the combustion chamber door
38 B70 -67B70 Differential pressure transmitter for the combustion chamber (not shown)
39 N70 -72N70 Pressure switch for the combustion chamber RAK (not shown)
5603 882 - 01
39
Page 40

Electrical
Fuel Transport and Extraction Systems
Rotary Valve
Pyrotec Installation & Operating
Number Designation Device tag Description
A
40
M9 -9 M9 Motor for rotary valve
5603 882 - 01
Page 41

Pyrotec Installation & Operating
Fuel Transport and Extraction Systems (continued)
In-feed auger
Number Designation Device tag Description
40 M2 -4M2 Motor for in-feed auger
41 S2 -68S2 Limit switch for maintenance lid
42 B31.1 -11B31.1 Light barrier metering container (Transmitter)
43 B31.2 -11B31.2 Light barrier metering container (Receiver)
44 M10.1 -8M10.1 Slide valve T30
45 M10.2 -8M10.2 Slide valve T30
46 B02 -107B02 In-feed auger temperature sensor
Electrical
Note: For details on designation see field wiring diagram.
Pipe/trough conveyor auger
Number Designation Device tag Description
47 M4.1 -5M4.1 Motor for pipe/trough conveyor auger
48 S4.1 -68S4.1 Limit switch for maintenance lid
49 B4.1/1 -61B4.1/1 Light barrier conveyor auger (Transmitter)
50 B4.1/2 -61B4.1/2 Light barrier conveyor auger (Receiver)
Note: For details on designation see field wiring diagram.
5603 882 - 01
41
Page 42

Electrical
Fuel Transport and Extraction Systems (continued)
Pellet extraction auger
Number Designation Device tag Description
51 M32 -12M32 Motor for pellet extraction auger
52 S32.1 -12S32.1 Limit switch for maintenance lid
53 S32.2 -12S32.2 Limit switch for silo door (not shown)
Pyrotec Installation & Operating
Note: For details on designation see field wiring diagram.
Spring extraction system
Number Designation Device tag Description
54 M32 -12M32 Motor for spring extraction system
55 S32.1 -12S32.1 Limit switch for maintenance lid
56 S32.2 -12S32.2 Limit switch for silo door (not shown)
Note: For details on designation see field wiring diagram.
42
5603 882 - 01
Page 43

Pyrotec Installation & Operating
Fuel Transport and Extraction Systems (continued)
Horizontal extraction system
Electrical
Number Designation Device tag Description
57 M32 -12M32 Motor for extraction auger
58 M33 -12M33 Motor for agitator
59 B32 -12B32 Light barrier for extraction auger
60 S32.1 -12S32.1 Safety switch for maintenance lid
61 S32.2 -12S32.2 Safety switch for silo door (not shown)
Note: For details on designation see field wiring diagram.
5603 882 - 01
43
Page 44

Electrical
Fuel Transport and Extraction Systems (continued)
Walking floor auger
Number Designation Device tag Description
62 M2 -4M2 Motor for walking floor auger
63 S3 -68S3 Safety switch for maintenance lid
64 S3.1 -68S3.1 Safety switch for auger cover
65 B3/1 -61B3/1 Light barrier walking floor auger (Transmitter)
66 B3/2 -61B3/2 Light barrier walking floor auger (Receiver)
67 B6.1/1 -61B6.1/1 Light barrier silo distribution top (Transmitter)
68 B6.1/2 -61B6.1/2 Light barrier silo distribution top (Receiver)
69 B6.2/1 -61B6.2/1 Light barrier silo distribution bottom (Transmitter)
70 B6.2/2 -61B6.2/2 Light barrier silo distribution bottom (Receiver)
Note: For details on designation see field wiring diagram.
Note: Items 67 to 70 only apply to the walking floor with filling function.
Pyrotec Installation & Operating
Hydraulic unit
Number Designation Device tag Description
71 M6 -7M6 Motor for hydraulic unit
72 Y6.1 -25Y6.1 Solenoid valve to change between silo lid and walking floor
73 Y6.9 -7Y6.9 Change silo distribution
74 N6.1 -7N6.1 Hydraulic temperature
75 N6.2 -7N6.2 Hydraulic level
Note: For details on designation see field wiring diagram.
Note: Items 72 and 73 are optional.
44
5603 882 - 01
Page 45

Pyrotec Installation & Operating
Fuel Transport and Extraction Systems (continued)
Silo Lid
Number Designation Device tag Description
76 Y6.3 -22Y6.3 Solenoid valve silo lid open
77 Y6.4 -22Y6.4 Solenoid valve silo lid close
78 S6.1 -22S6.1 Key operated switch for silo lid
79 M901 -24M901 Vibration motor 1
80 M902 -24M902 Vibration motor 2
81 M903 -24M903 Vibration motor 3
82 S901 -24S901 Key operated switch for vibration motor
83 S5.1 -68S5.1 Safety switch for silo lid
Note: For details on designation see field wiring diagram.
Note: The quantity of items 79 to 81 will depend on the size of the silo lid.
Thermal Storage Tank
Thermal storage tank
Electrical
Number Designation Device tag Description
84 B28.1 -109B28.1 Thermal storage tank sensor (top)
85 B28.2 -109B28.2 Thermal storage tank sensor (top/middle)
86 B28.3 -109B28.3 Thermal storage tank sensor (middle)
87 B28.4 -109B28.4 Thermal storage tank sensor (middle/bottom)
88 B28.5 -110B28.5 Thermal storage tank sensor (bottom)
89 B60 -110B60 Outdoor temperature sensor (not shown)
Note: For details on designation see field wiring diagram.
5603 882 - 01
45
Page 46

Electrical
Boiler Wiring
Pyrotec Installation & Operating
CAUTION
The Viessmann supplied field wiring diagram is not a
complete system drawing. It is the installer’s responsibility
to assure that the control is suitable for the respective
installation, and all necessary safety equipment is installed.
CAUTION
Any alteration of the control cabinet will void the warranty.
- Lines arranged in metal pipe with minimum distance
of 6 in. (150 mm) to the base. Use support with cable
routing for light barrier. No support on base.
- Screw cable channel (metal design) onto the foot plate
on top of the boiler with minimum distance of b in.
(10 mm).
- Fasten cable channel (metal design) on casing with
minimum distance of c in. (20 mm).
- Cable channel (metal design) over entire width of boiler:
fastening on the bottom of the boiler jacket (it is not
water-bearing).
- Mount cable channel (metal design) with minimum
distance of 7c in. (200 mm) to the feed auger:
no support on the feed auger.
CAUTION
The information about wire type, wire number and wire
gauge made in the wiring diagrams is not obligatory. The
final decision of these settings has to be made by the
executing installation company taking into consideration
the local codes and regulations.
- Arrange lines in protective cable hose with sufficient
leeway to open and close the door (mind the door stop).
46
5603 882 - 01
Page 47

Pyrotec Installation & Operating
Commissioning
Operation
Initial startup
Only a Viessmann or another trained specialist may put
a newly installed system into operation for the first time.
Before the system is commissioned, the system must be
filled with water, and the fuel for the commissioning and
the installation itself must be inspected.
Note: It is mandatory to complete the Viessmann biomass
project pre-commissioning form.
IMPORTANT
Be absolutely sure to follow the instructions. No
warranties may be claimed for damages in cases of initial
start-ups carried out improperly at one’s own initiative.
First check:
- Is there enough water in the heating system?
- Has the heating system been bled of air?
- Are the slide valves open for the heating-system’s
supply and return flow?
- Can enough fresh air get into the heating room?
- Is the ash bin empty?
- Are the doors and lids on the boiler closed leak-tight?
- For safety, keep firing and ash pit doors tightly closed.
Filling the heating system
The first filling is usually performed with chemically
untreated filtered water free of any suspended solids.
Ensure that the air is carefully bled out while filling the
boiler. Use appropriate water treatment specific to the
local water conditions.
Note: The system fill pressure when the system is cold
should be approximately 1.5 psi (0.1 bar) greater
than the supply pressure of the closed expansion tank.
Fuel for the commissioning
For the commissioning, sufficient dry fuel (max. W 20%)
should be stored for approx. 10-24 full operating hours:
PYROTEC 390 approx. 5100 lb.
PYROTEC 530 approx. 6600 lb.
PYROTEC 720 approx. 8800 lb.
PYROTEC 950 approx. 11660 lb.
PYROTEC 1250 approx. 14960 lb.
Since the boiler plant will be cold, and residual moisture
will be drawn from the refractory concrete during the
initial operation, the material to be burned for the initial
operation has to be at least air dry. For the first three hours,
the heating-up process should be carried out at low output.
To ensure that the silo extraction system is functioning
properly, only place a minimal amount of fuel in the silo
in case there is a problem. This enables the extraction
system to be cleaned out quickly and the problem to be
identified and corrected.
CAUTION
Ensure that a Viessmann or another trained specialist
is present for the boiler start-up and that it is done in
a timely manner.
The warranty becomes null and void if this procedure
is not followed.
Commissioning and hand over
A qualified person from the owner’s side must be present
for the commissioning and hand over.
The heat dissipation from the boiler plant has to be
assured by the operating organization or by the heating
contractor.
The heating contractor must confirm that the installation
has passed inspection and signed off.
Compliance with these Installation Instructions and the
Operating Instructions will ensure a safe and convenient
heating with wood.
5603 882 - 01
IMPORTANT
These Installation and Operating Instructions should be
kept near the system on a permanent basis.
47
Page 48

Operation
Filling the Fuel Storage Unit
Pyrotec Installation & Operating
When storage facilities for wood are required, the wood
should be kept at least 5 ft. (1.5 m) from the heating
appliance.
Horizontal extraction system and spring extraction system
If any excess or negative pressure develops in the silo
during the filling, the facility has to be switched off using
the function button on the control panel. After doing so,
complete filling the silo evenly and turn the facility back
on, using the function button on the control panel. Carry
out refilling in the same manner.
Pellet extraction auger
Switch off the facility using the function button on the control
panel and wait until there is no more fuel in the feed auger.
Slowly and evenly fill the silo until the extraction auger
is covered approx. 10 in. to 12 in. (250 mm to 300 mm)
high over the entire open area. Level out any mounds that
form from pouring.
Switch on the facility using the function button on the
control panel and wait until the metering container on the
feed auger has filled.
If any excess or negative pressure develops in the silo
during the filling, the facility has to be switched off again
using the function button on the control panel.
After doing so, complete filling the silo slowly and evenly.
The facility can then be turned back on using the function
button on the control panel. Carry out refilling in the same
manner.
By dumping
Horizontal extraction system and spring extraction system
Heating system in operation: if the articulated arms or
spring-mounted plates are still covered by fuel, refilling
can be carried out immediately.
- If the articulated arms or spring-mounted plates are
no longer covered by fuel, fill the silo evenly to
approx. 12 in. (300 mm) above the articulated arm or over
the spring-mounted plates. As soon as the articulated
arms or spring-mounted plates have retracted through
a request for material, the refilling can be continued.
Heating system not in operation:
- If the articulated arms or spring-mounted plates are still
covered by fuel, refilling can be carried out immediately.
- If the articulated arms or spring-mounted plates are
no longer covered by fuel, fill the silo evenly to approx.
12 in. (300 mm) above the articulated arm or over the
spring-mounted plates. Then activate the “SILO FILLING”
function. To do so, press the LOADER SYSTEM button
(F4) and then the left arrow button (<).
Select “YES” and confirm with “OK”. Wait until
the articulated arms or the spring-mounted blades
move under the cup washer, complete by evenly filling
the silo. The “SILO FILLING” function enables the
filling of the combustion chamber.
Note: The “SILO FILLING” function cannot be activated
until the heating system has been shut off for one
hour.
Walking floor: fuel can be refilled at any time.
Funnel extraction system: it is mandatory that
the heating system
is in operation!
By blowing in
IMPORTANT
The heating system has to be shut off (danger of excess
pressure or negative pressure caused by the action of
blowing-in). Filling procedure as described in the section
“By dumping”.
Fixing malfunctions in the feed system
Refer to the Installation and Operating Instructions for
details on the automatic fuel-feeding device.
If fuel hopper is installed, do not alter equipment in any
way. The cause of motor malfunctions in-feed systems
is usually clogging by large pieces of wood or foreign
matter.
Switch off the facility using the function button on the
control panel and wait until there is no more fuel in the
feed auger. Fill the silo evenly to approximately 12 in. (300
mm) above the articulated arm or over the spring-mounted
blades, switch on the facility using the function button on
the control panel and wait until the articulated arms or the
spring-mounted blades go under the cup washer.
CAUTION
DANGER OF INJURY:
Always turn OFF the main switch before carrying out any
repair of a malfunction on feed systems and every time
before a maintenance lid is opened or a protective device
is removed!
Because of the automatic operation of the system it is
impossible to foresee the time the conveying equipment
will be turned on.
Note: Viessmann recommends the installation of carbon
monoxide detector(s) inside the fuel storage area.
IMPORTANT
The fuel storage area/room must be designed, operated
and maintained to national, provincial and local codes and
requirements.
WARNING
The wood chip/pellet storage room must be adequately
and permanently ventilated. Ensure the door or latches
are securely locked open during presence in the room.
No smoking, fires or open flames are permitted.
48
5603 882 - 01
Page 49

Pyrotec Installation & Operating
Excess Conditions
Operation
Excess temperature/power failure
CAUTION
DANGER OF THIS EQUIPMENT SUDDENLY GOING UP
IN FLAMES:
DO NOT open the doors or lids on the boiler plant!
- Switch on additional heat loads.
- The flue gas exhaust blower shuts down.
- The temperature-limiting safety switch triggers.
- The thermal safety flush valve opens at approx.
203° F (95° C). The excess heat is being dissipated
into the drain.
IMPORTANT
If the fixed high limit has triggered, it has to be manually
unlocked. The fixed high limit is situated at the top of the
boiler.
To reset, unscrew the black cap and press the button.
Note: Resetting is only possible when the temperature
has fallen to approx. 158° F (70° C).
Possible causes for excess temperature:
- Incorrect setting on the control module.
- Defective component of the system (pump or valve).
- Sudden drop in output to zero. The in-feed auger still
has to be emptied. The heat yet produced by this can
result in surplus temperature.
Activate “DISSIPATE SURPLUS HEAT” function!
Low water/excess water pressure
Possible causes:
Low water: Leakage in the heating system.
Excess water pressure: The expansion tank is not
functioning.
In either case, the boiler should be examined by a qualified
heating contractor.
Note: Unlock this malfunction with either the reset button
for the water level control system or for the
negative overpressure monitoring assembly, and by
pressing the OK button on the control panel.
5603 882 - 01
49
Page 50

Operation
Pyrocontrol Control System
Pyrotec Installation & Operating
The control system for the Pyrotec boiler firing process
(Pyrocontrol) is controlled by a Programmable Logic
Controller (PLC), which visualizes the system on a touch
screen and provides an interface for navigation and
entering settings.
Export of operational data via Mod-bus Pyrocontrol
As an option, the Pyrocontrol boiler control unit can be
extended with the Mod-bus (PYR-SED) extension module.
This extension module enables the exchange of operating
data between the higher control unit (Modbus master) and
the Pyrocontrol control unit (Modbus slave) via a serial
interface (RS232).
Note: This module is optional and must be ordered
separately. Please refer to the export of Operational
data via Mod-bus Pyro control for details.
The soft touch keys in Screen 1
Switch on boiler
When touched, the color changes
(from light to dark)
Soft touch key 1
Switch off boiler
When touched, a confirmation is
requested, and then the color
changes (from light to dark).
Soft touch key 2
Lock screen / Unlock screen
When touched, a confirmation
is requested.
Soft touch key 3
Open settings
Touching it opens Screen 4 to
enter settings.
Soft touch key 4
Soft touch key 7
Screen for Kob boiler
Soft touch key 8
Symbol
Overview, wood-fired boiler
Touching it opens Screen 7.
Overview, additional boilers
Touching it opens Screen 8.
Important: Screen 8 is only available
with optional multiple-boiler systems.
An additional boiler can be manually
switched on or off, and automatic
operation can be selected. The
operating hours counter is located
in the centre left of the screen.
50
5603 882 - 01
Page 51

Pyrotec Installation & Operating
Pyrocontrol Control System (continued)
Operation
Touch screen, Screen 1-8
The touch screen is 6¼ in. (160 mm) wide, 4¾ in. (120
mm) high and has a resolution of 640 x 480 pixels. The
screen is a color display monitor. After switching “ON”
the main switch, the PLC starts up, and the Overview
appears (Screen 1).
Navigation: The navigation program “Pyrocontrol” is a
product of KÖB Viessmann Manufacturing Company Inc.
It is operated following the same patterns like MS
Windows programs. Select a soft touch key with the
fingertip or fingernail.
The arrangement of the soft touch keys is always the
same throughout, i.e. once a keypad occurs; it is located
in the same position in all screens, with the exception of
the BACK key (arrow in blue circle) in Screens 7 and 8.
The hierarchy of Screens 1-7 (optional 8) ranges over
the following levels:
Screen 2
Screen 1 Overview
In Screen 1 you can choose between 7 or 8 different
Screens (8 being for an optional additional boiler).
When choosing by tapping one of the two boilers
soft touch key (photo and optional symbol), either 7
“Overview of wood-powered boiler” or, optionally, 8
“Overview of additional boilers” appears (optional only
with multiple-boiler systems) in the Screen title.
Settings can be changed in screen 1-8 by touching the
respective soft touch key. This opens new windows
with new input fields or soft touch keys.
Screen 3
Alarm list
Screen 4
Settings
Screen 7 Screen 8
Overview,
wood-powered boiler
Overview,
additional boilers
Change user status
5603 882 - 01
51
Page 52

Operation
Pyrocontrol Control System (continued)
Pyrotec Installation & Operating
The following applies to all screens. The screen title
and user status are shown at the top. The screen title
indicates which Screen (1-8) is active. The areas for
display and call-up for entering settings are always
located in the centre of the screen. The soft touch keys
for navigation and input are located at the bottom, with
the exception of the combined user status display and
the call for input.
Changeable soft touch keys for input are white (light).
Display windows are grey (dark). Soft touch keys for
navigation are in color.
Area of Screen 1 Overview Description
Screen
Top
E
A
G
F
Centre
B
C
Bottom
Screen 1, Object indicator light
Displays operational status of boiler pump and additional
boilers. If the object indicator lights up green, the
component is active.
Example: The pump is running and an additional boiler
is in operation. If the object indicator light is grey, the
respective object (pump or additional boiler) is shut down.
IMPORTANT
The object indicator light does not provide information
about the operating mode of the system.
Screen title, e.g. “Overview”
User status (top right)
Alarm line (bottom left, red)
Date/Time (bottom right)
A Display of operating status
of KÖB boiler (top left, grey),
e.g. “OFF” (no heating
operation)
Display of actual data of
boiler (grey)
D
B Flue gas temperature
(top left)
C Residual O2 (bottom left)
D Displays of accumulator
charge status (grey)
E Button for KÖB boiler (photo)
F Object indicator light
(green/grey)
G Button for additional boilers
(option)
Sets of buttons, bottom left:
Navigation (orange) for
Screens 4, 5 & 6: Settings,
Analysis, Archive
52
Sets of buttons, bottom right:
Boiler ON (green)
Boiler OFF (red)
Lock screen (yellow)
5603 882 - 01
Page 53

Pyrotec Installation & Operating
Pyrocontrol Control System (continued)
Screen 2, Alarm list
Touching the red Alarm line soft touch key (in Screen
1) opens Screen 2 (Alarm List with alarm logs, red). All
error messages which have been registered but not yet
acknowledged are listed here.
Area of Screen 2 Description
Screen
Touching an alarm log line allows the respective error
message to be displayed in detail or acknowledged.
A history of acknowledged error messages can
be called up in Screen 2.
Operation
Top
Centre
Bottom
The “Acknowledge all” soft touch key (bottom left)
acknowledges error messages listed in the centre of the
Screen. The cause of the error should be remedied before
acknowledging the error message. Otherwise the error
message will continue to be maintained. (It will be
shown again in the Alarm List after a short period of time).
Screen title, e.g. “Alarm List”
User status (top right)
Alarm logs (red) in rows
according
to time
Back button (back to Screen 1)
Display alarm logs
Acknowledge all
Touching the soft touch key “Display alarm log” (bottom
right) will list all past error messages. The soft touch key
“Ascertain alarms in history” is displayed in the lower
left of this new page. By touching this soft touch key,
the period for which the alarms to be displayed can be
specified.
5603 882 - 01
53
Page 54

Operation
Pyrocontrol Control System (continued)
Pyrotec Installation & Operating
Screen 3, Managing the user status
Touching the soft touch key “Status Level 0”, …1, 2 or 4
(at the top right of the Screen), the user level can be changed
and thus the access rights for entering settings stipulated.
To change the user level, no user name needs to be entered,
but all four possible levels are provided as buttons.
Area of Screen 3 Description
Screen
Top
Centre
When the user level desired (0-4) is selected, a password
in the form of a 4-digit code will be asked for, which has
to be entered and confirmed with ENTER by touching the
white input cell using the pop-up number keypad. The
password will then appear in four asterisks (****) and
has to be confirmed again with OK.
Screen title “User Status”
Soft touch key for selecting
the user level desired
Password query window:
Always confirm with OK.
Input number keypad: Enter
the 4-digit code here and
confirm with
.
Display: current level
Bottom
After making these entries, the newly selected status applies with the following user rights associated with it:
User level Password Rights
Standard Level 0
Customer Level 1 1111 No selection of parameters with the trend display (Point 5.1)
Customer Level 2 2222 Parameter selection is possible
Administrator Level 4 No specification Administrator, access to Win CE Desktop as well as software
By introducing these user levels, Viessmann is making an effort to maintain the parameters essential for quality-assured
businesses. This guarantees good operational practice, as certain parameter changes are reserved only for Viessmann
technicians. This gives the user greater certainty that one cannot accidentally make any changes that would be
technically less favorable.
No password (
jump back to standard after
standstill period > 5 minutes).
automatic
No rights, no changing (only display)
updating possible
Back button (back to Screen1)
54
5603 882 - 01
Page 55

Pyrotec Installation & Operating
Pyrocontrol Control System (continued)
Screen 4, Adjusting settings and process parameters
In the Settings menu, adjustable categories can be
chosen and their parameters changed.
In the centre the parameters to be set are listed with
their current values.
If an attempt is made to change a parameter that is not
cleared for change in the current user status, Screen 3
will be called up automatically. By changing the user
status, the authorisation required can be cleared (see
“Screen 3, managing the user status”).
The value changes when the white “Setting input cell”
is touched, which opens a pop-up number keypad.
Enter the value desired and confirm with
Area of Screen 4, settings Description
Screen
Top
Centre
.
The new value is immediately valid in the furnace firing
and/or heat recovery process. If the value selected is
outside the setting range, then the maximum or minimum
value possible will be automatically accepted.
Factory setting (default setting):
All the parameters in the Pyrocontrol, such as set point
values and switching times, are already pre-set and can
be produced in Screen 4 as “Set-point values”.
The values of the factory setting can be restored in
User Level 2 or higher in the internal settings.
Screen title “Settings >
Auto Boiler Cleaning” (left)
User status (right)
Display
Parameters set
White fields can be changed by
touching, a valid user status is
required.
Operation
Bottom
Soft touch key categories (orange)
The active category is yellow.
Parameters can then be changed.
Back button (back to Screen 1)
5603 882 - 01
55
Page 56

Operation
Pyrotec Installation & Operating
Pyrocontrol Control System (continued)
Screen 7, Overview, wood-powered boiler
Touching the KÖB Boiler soft touch key (photo in Screen 1)
opens Screen 7 (sectional view of the boiler).
Here the most important process parameters, activity modes
and operating hours are displayed. The operating mode
display is located in the centre upper left of the screen.
Area of Screen 7, overview, wood-powered boiler Description
Screen
Top
A
Centre
E
G
Bottom
Soft touch key, left bottom:
Navigation (orange) for
Screens 2, 3 & 4:
Settings, Analysis, Archive
B
Soft touch key, bottom right:
Boiler ON (green)
Boiler OFF (red)
Lock screen (yellow)
(For explanation on the text display, see “Operating modes”).
Measurement operation, emergency operation and the
activity of the de-ashing assembly with ash container as
well as that of the underfeed auger can all be operated
manually here.
Screen title, e.g.
“Overview, Wood-powered Boiler”
Alarm line (bottom left, red)
User status (top right)
Date/Time (bottom right)
Back button (back to Screen 1)
A Display of operating mode
(top left, grey), e.g. “Load”
C
F
F
D
(heating operation)
B Display of supply/return
flow temperature (grey)
C Display of flue gas
parameters (right, grey)
D Display of furnace-firing
parameters (grey)
E Display of supply air blower
(left, grey)
F Object indicator light
(green/grey)
G Displays of operational
statistics
Flue gas parameters, centre of screen:
Flue gas exhaust blower power (top), residual oxygen
(centre),
flue gas temperature (bottom).
Object indicator light (centre of screen, green or grey
squares):
Light barriers for embers and metering container:
If the object indicator light, lights up green, then there
is no blockage of the light barrier. If the object indicator
light is grey, the light barrier has been blocked (maximum
height of embers reached or metering container full).
The object indicator light gives no information about the
presence of any malfunction.
Operational statistics:
Here the respective sum of operating periods are listed
for load, maintenance and standby.
56
Soft touch key (Screen 7, centre):
-Measurement operation (see ‘Operating Mode’ section)
- Emergency operation (see ‘Operating Mode’ section)
- Ash, manual: When the soft touch key is touched,
the color of the field changes (dark/light). The
de-ashing auger runs until the soft touch key is
touched again or until a change is made to another
screen.
- Underfeed Stop: When the soft touch key is touched,
the color of the field changes (dark/light). The supply
of material into the combustion chamber door is
interrupted until the soft touch key is touched again
or until a change is made to another screen.
- Underfeed ON: When the soft touch key is touched
and held, the color of the field changes (dark/light).
Material is supplied into the combustion chamber door
until the soft touch key is released again.
5603 882 - 01
Page 57

Pyrotec Installation & Operating
Pyrocontrol Control System (continued)
Screen 8, Additional boilers
When the soft touch key for additional boilers is touched
(symbol in Screen 1), Screen 8 opens (symbol for oil or
gas boiler, enlarged).
Here the supply flow and return flow temperature of the
additional boiler is displayed. The KÖB Boiler operating
mode display is located in the centre upper left of the screen.
Area of Screen 8, overview of additional boilers Description
Screen
Top
Centre
C
A
(For explanation on the text displays, see “Operating modes”).
Here the additional boiler can be manually switched on
or off, and automatic operation can be selected. The
operating hours counter is located in the centre left of
the screen.
Screen title, “Overview of
Additional Boilers”
Alarm line (bottom right, red)
User status (top right)
Date/Time (bottom right)
BACK key (back to Screen 1)
A Display of operating mode
for KÖB Boiler (top left, grey)
B Displays of supply/return
flow temperature (grey)
C Display for operating hours
B
Soft touch key for additional boilers:
Additional boiler, manual (dark/light)
Additional boiler, automatic (dark/light)
Additional boiler, OFF (dark/light)
Operation
Bottom
Soft touch key, left bottom:
Navigation (orange) for
Screens 4, 5 & 6: Settings,
Analysis, Archive, Display of
operational statistics
Object Indicator Light (Screen 8, centre):
Status indication for burner: If the object indicator light
lights up green, then the burner is in operation; if the
object indicator light is grey, the burner is inactive.
The object indicator light gives no information about
the presence of any malfunction.
Soft touch key for KÖB boiler:
Boiler ON (green)
Boiler OFF (red)
Lock screen (yellow)
IMPORTANT
The additional boiler can only be switched on, off or to
automatic operation in screen 8. The soft touch key
selected will turn light. The operation selected is displayed
in the operating mode display.
IMPORTANT
In Screen 7 and 8 (optional for additional boilers), the
BACK keys are positioned in the centre of the screen.
5603 882 - 01
57
Page 58

Operation
Pyrotec Installation & Operating
Pyrocontrol Control System (continued)
Pyrotec control system parameter
Parameters boiler Unit Min. Max. Default Detailed definition
1 Boiler temperature,
forward(out) flow
2 Boiler temperature, return(in)
flow
3 Residual oxygen, boiler % 4.0 15.0 8.0 Oxygen setting, 7-9 for pellets, 8-11 for chips
4 Boiler temperature,
combustion chamber
5 Negative pressure, boiler,
combustion chamber
6 Underfeed auger cycle, maintain % 1 30 1 Auger speed for maintain mode
7 Underfeed auger cycle,
emergency operation
8 Boiler output for emergency
operation
Lower reciprocating screw Unit Min. Max. Default Detailed definition
1 Underfeed pipe temperature °C 50.0 120.0 70.0 Set point for in-feed auger temperature to prevent
2 Underfeed auger filling time Sec. 50 999 60 In-feed auger fill time
3 Combustion chamber filling
time
4 Empty running time, metering
container, underfeed auger
5 Underfeed auger starting cycle
after maintain is reached
6 Underfeed auger starting
cycle after ignition
7 Underfeed auger, pellet
operation
°C 70 110 85.0 Set point for supply temperature, system design
temperature
°C 65 95 70.0 Set point for return temperature
°C 400 999 750 Set point for combustion chamber temperature
sensor
Pa 20 250 100 Set point for negative pressure in combustion
chamber
% 5 100 30 Auger speed for emergency mode
% 25 100 100 Boiler output for emergency mode
back-burn
Sec. 50 999 90 Combustion chamber fill time
Sec. 1 90 25 In-feed auger metering bin, delay on time if sensor
is free
% 1 100 10 In-feed auger speed to fill, warm start
% 1 100 5 In-feed auger speed to fill, cold start
On/
Off
Off On for pellet operation
Regulator temperature Unit Min. Max. Default Detailed definition
1 Boiler forward flow
controller, P(proportional)-
factor
2 Boiler forward flow controller,
D(derivative)-factor
3 Boiler forward flow
controller, I(integral)-factor
4 Boiler forward flow
controller, P-factor
5 Boiler forward flow
controller, D-factor
6 Boiler forward flow
controller, I-factor
7 Hysteresis(lagging behind)
preservation (warm start) ON
8 Hysteresis(lagging behind)
preservation (warm start) OFF
58
0 99.9 3.0 Factor for supply, only active when boiler supply
flow temperature is being used. Value 1-3
DO NOT CHANGE SETTING
0 99.9 3.0 DO NOT CHANGE SETTING
0 99.0 0 DO NOT CHANGE SETTING
0 99.0 5.0 Factor for return
DO NOT CHANGE SETTING
0 99.0 3.0 DO NOT CHANGE SETTING
0 99.9 0 DO NOT CHANGE SETTING
°C 4 20 6.0 A call for heat will start the boiler from maintain
mode, DO NOT CHANGE SETTING
°C 0 20 2.0 Shut off the boiler from maintain mode.
DO NOT CHANGE SETTING
5603 882 - 01
Page 59

Pyrotec Installation & Operating
Pyrocontrol Control System (continued)
Pyrotec controller parameter reference guide for the technician
Regulator temperature Unit Min. Max. Default Detailed definition
Hysteresis(lagging behind)
9
standby (boiler off) ON
Hysteresis(lagging behind)
10
standby (boiler off) OFF
Minimum time for standby Min. 0 999 10 Minimum time the boiler will be in standby before
11
Temp. for carrying off excess
12
heat (outflow thermometer)
°C 4 20 10.0 Value is calculated by value in 7 + value in 9,
puts boiler in standby mode, when boiler is On.
DO NOT CHANGE SETTING
°C 0 20 2.0 Value is calculated by value in 8 + value in 10,
puts boiler in standby mode, when boiler is Off.
DO NOT CHANGE SETTING
turning off, Initiated by value in 9
°C 50 120 100.0 Controls a contact in the control panel. Connect
to an alarm or value to dissipate additional heat.
Operation
Limit values firing up
Combustion chamber temp. for
1
heat up, cold start
Combustion chamber temp.
2
for burnout, off mode
Flue gas temperature for heat
3
up, cold start
Flue gas temperature for burn-
4
out, off mode
Combustion chamber
5
temperature, maximum
Residual oxygen, after-running,
6
full load
Speed of flue gas exhaust
7
blower, maintain
Light barrier delay off,
8
combustion chamber sensor
Residual oxygen, minimum % 3.0 10.0 4.0 Minimum value of oxygen, if below this value the
9
Igniter switch off delay, cold
10
start
Boiler output at min. load % 10.0 90 20 Set point for output at minimum load
11
Negative pressure in
12
combustion chamber, at
maintain
Automatic boiler cleaning
Pneumatic boiler tubing
1
cleaning system
Moving grate pause Sec. 0 999 80 Pause time after grate movement
2
Combustion chamber
3
de-ashing assemlby with
ash container, emergency
operation, pause
Combustion chamber de-ashing
4
assembly with ash container,
operating mode
Unit Min. Max. Default Detailed definition
°C 150 500 180 From cold start, will go to full load after reaching
this set point, works with 3
°C 250 500 350 Shut down at this temp when in burn out.
°C 50 150 90 When set point is reached, the boiler will go to full
load, controls ID blower speed, works with 1
°C 50 150 110 Switch off ID blower when set point is reached at
burn out
°C 600 1200 900 Set point for the combustion chamber
temperature
% 10.0 20.0 13.5 Set point for oxygen at full load
% 0.0 50 18 Normal operation of flue gas exhaust blower
Sec. 0 999 90 In-feed auger turn off delay
in-feed auger will stop
Sec. 10 500 30 Delay to switch off igniter to cool down, minimum
should be 60 seconds.
Pa 5 200 5 Set point for under pressure in the combustion
chamber
Unit Min. Max. Default Detailed definition
Min. 0 999 40 Real time value for cleaning cycle
Min. 6 999 40 Not used in current control system
Not used in current control system
Fuel loading
Switch-on delay, auger after
1
in-feed auger 1
Switch-on delay, auger after
2
in-feed auger 2
Extraction/silo system run time Sec. 2 30 5 Pulse time of silo auger, initiated by auger 1
3
Extraction/silo system pause time Sec. 0 30 0 Pause time of silo auger, initiated by auger 1
4
Extraction system reversing
5
interval
5603 882 - 01
Unit Min. Max. Default Detailed definition
Sec. 0 50 2 Switch on delay time of in-feed auger 1
Sec. 0 50 2 Switch on delay time of in-feed auger 2
Sec. 0 9 99 240 Reverse jog to prevent binding of material in the
silo auger
59
Page 60

Operation
Pyrotec Installation & Operating
Pyrocontrol Control System (continued)
Pyrotec controller parameter reference guide for the technician (continued)
Fuel loading Unit Min. Max. Default Detailed definition
6 Extraction system direction of advance On/Off Off Changes direction of extraction system
7 Switch-on delay for hydraulic system Sec. 0 20 5 Walking floor switch on delay
8 Light barrier delay for hydraulic system Sec. 0 9.9 2.0 Walking floor switch off delay
9 Hydraulic system auger run time max. Sec. 2 0 999 80 Walking floor on time
10 Hydraulic drive emergency operation
jog
11 Light barrier delay for auger after
in-feed auger 1
12 Light barrier delay for auger after
in-feed auger 2
Regulator firing up Unit Min. Max. Default Detailed definition
1 Output controller, P-factor 0 99.9 5.0 Factor for how fast the boiler
2 Output controller, D-factor 0 99.9 5.0 DO NOT CHANGE SETTING
3 Output controller, I-factor 0 99.9 0 DO NOT CHANGE SETTING
4 Fuel controller, P-factor 0 99.9 7.0 Factor for how fast material is fed into
5 Fuel controller, D-factor 0 99.9 5.0 DO NOT CHANGE SETTING
6 Fuel controller, I-factor 0 99.9 0 DO NOT CHANGE SETTING
7 Combustion chamber negative
pressure controller, P-factor (under
pressure of the combustion chamber
8 Combustion chamber negative
pressure controller, D-factor
9 Combustion chamber negative
pressure controller, I-factor
Sec. 10 999 90 Walking floor pulse time
Sec. 0 9.9 0.5 Feed auger sensor off delay of walking
floor
Sec. 0 9.9 0.5 Feed auger sensor off delay of walking floor
heats up (output power),
DO NOT CHANGE SETTING
the system (underfeed auger)
DO NOT CHANGE SETTING
0 99.9 2.0 PID ramp up factor for how fast negative
pressure is controlled or adjusted.
(flue gas exhaust blower speed).
DO NOT CHANGE SETTING
0 99.9 1.0 DO NOT CHANGE SETTING
0 99.9 0 DO NOT CHANGE SETTING
Internal settings Unit Min. Max. Default Detailed definition
1 External request from other system
such as primary boiler or outdoor reset
2 External output specification from
external control system
3 Controller address, serial interface 0 999 110 Controller address, Not used only if
4 Enter permanent code 0 9999 Not used
5 Load Factory setting On/Off Off DO NOT CHANGE SETTING
6 Adjust oxygen sensor (lambda) On/Off Off Calibrate oxygen sensor if set to On *
7 Boiler forward flow temperature On/Off Off If set to Off uses return temperature
Accumulator management system Unit Min. Max. Default Detailed definition
1 Accumulator management system
operating mode
2 Accumulator management system
model
3 Accumulator monitoring in
accumulator sensor, selected sensor
4 Accumulator monitoring in
accumulator sensor, selected temp.
* Auto reset, after calibration is complete.
60
On/Off Off External start/stop input ONLY, to turn
boiler On or Off
On/Off Off External load regulation 0-10V DC input,
outdoor reset, controls output of boiler
addition visualization is used
If set to On uses supply temperature
Auto/
Manual
/Off
Kob/QM Ko b Kob or other system
B28.1
B28.5
°C 30 120 85 Design temperature for the thermal
Auto Controlled by accumulator system with
5 sensors
B28.5 Sensor to be monitored in the thermal
storage tank for design temperature
storage tank
5603 882 - 01
Page 61

Pyrotec Installation & Operating
Pyrocontrol Control System (continued)
Pyrotec controller parameter reference guide for the technician (continued)
Accumulator management system Unit Min. Max. Default Detailed definition
5 Starts boiler when temperature falls
below selected sensor in acc
6 Accumulator set-point for
atmospheric temp. of +5 °C
7 Accumulator set-point for
atmospheric temp. of -15 °C
8 Accumulator temperature set-point
maximum
9 Accumulator temperature set-point
minimum
10 Light barrier delay for auger after
in-feed auger 1
Accumulator management system Unit Min. Max. Default Detailed definition
1 Accumulator controller, P-factor 0 99.9 3.0 Factor for thermal storage
2 Accumulator controller, D-factor 0 99.9 10.0 DO NOT CHANGE SETTING
3 Accumulator controller, I-factor 0 99.9 0 DO NOT CHANGE SETTING
B28.1
B28.5
°C 10 110 80 Outdoor reset, at 41° F (5° C)
°C 10 110 85 Outdoor reset, at 5° F (-15° C)
°C 10 110 80 Monitored by 3
°C 10 110 75 Monitored by 5
°C 10 110 75 Monitored by 1
B28.1 Sensor used to start boiler when below
value in 4
tank management system.
DO NOT CHANGE SETTING
Operation
Additional boiler Unit Min. Max. Default Detailed definition
1 Additional boiler operating mode Auto/
Manual
/Off
2 Return flow temperature °C 30 120 65 Used with multiple boiler systems
3 Accumulator loading to accumulator
sensor
4 Accumulator loading to sensor °C 30 120 80 Used with multiple boiler systems
5 Temperature for connecting additional
boiler, delayed
6 Switch-on delay for additional boiler Min. 0 90 10 Used with multiple boiler systems
7 Temperature for connecting additional
boiler, without delay
8 Minimum running time for additional
boiler
9 After-running of pump for additional
boiler
10 Return flow controller, P-factor 0 99.0 5.0 Factor for supply of additional boiler
11 Return flow controller, D-factor 0 99.9 3.0 DO NOT CHANGE SETTING
12 Return flow controller, I-factor 0 99.9 0 DO NOT CHANGE SETTING
B28.1
B28.5
°C 50 95 80 Used with multiple boiler systems
°C 5 50 120 Used with multiple boiler systems
Min. 0 90 10 Used with multiple boiler systems
Min. 0 20 2 Used with multiple boiler systems
Auto Used with multiple boiler systems
B28.1 Used with multiple boiler systems
if controlled by Pyrotec controller.
DO NOT CHANGE SETTING
5603 882 - 01
61
Page 62

Operation
Operating Modes
Pyrotec Installation & Operating
The following terms are displayed in the operating mode
line depending on the situation.
Off The boiler is switched off.
Filling Cold start. The combustion chamber
trough is being filled by the underfeed
auger.
Auger filling Direct or hot start with combustion
chamber still warm. The auger module
is being filled.
Igniting The igniter is running.
The system is being started.
Heating up The system is being slowly started.
Full load The boiler is running in regular operation.
Sustain Embers being sustained. Boiler set-point
temperature and the switching threshold
“Sustain on” have been exceeded.
Standby The boiler temperature is above the
switching threshold for standby and
no prompt.
Auger idling The isolating valve closes, the boiler
switches to standby. Example: After
malfunctions or the boiler set-point
temperature being exceeded. Upon
a prompt for heat there will be an
automatic new start.
Burn-out There is a malfunction or Soft touch
key 2 “Boiler OFF” has been touched.
The combustion chamber is cooling
down.
Emergency Non-optimized operation with adjustable
operation operational set-point values.
Example:
If a sensory mechanism necessary for
optimized operation is defective, the
switchover is being carried out
automatically.
Required sensory mechanisms:
lambda-sensor, combustion chamber
temperature sensor and negative
pressure measuring system.
62
Measurement The output control is blocked to
operation guarantee constant full load operation
during the measurement.
5603 882 - 01
Page 63

Pyrotec Installation & Operating
Operating Modes (continued)
Operation
Full load operation
As soon as a combustion chamber temperature of
approximately 356° F (180° C) is reached (adjustable
value), the system switches, depending on the boiler
temperature, to operating mode “FULL LOAD” or
“SUSTAIN”, which is shown in the upper left of the
display.
Output control
The heat output to be produced is adapted to the heat
consumption in a range from 25% to 100% of the boiler’s
nominal output. Depending on the deviation of the boiler
temperature from the boiler set-point temperature of
167° F to 203° F (75° C to 95° C), the airflow rate
is set by means of a blower with variable speed. The
combustion chamber and residual oxygen control then
re-supplies the optimum amount of fuel for lowest
emissions.
If, through a corresponding rise in the boiler temperature,
the heat consumption drops below 25% of the rated
output, the system switches to “SUSTAIN”, which is
shown in the upper left of the display.
Sustain
In the operating mode “SUSTAIN”, the flue gas exhaust
blower only runs at a minimum speed. The supply air
blowers does not run.
Supplying material via the underfeed auger has to be
greater than the speed of back-burn and can be set as a
set-point value by touching Soft touch key 4 “Settings”
in Screen 4 (CYCLE for underfeed auger SUSTAIN). This
depends on the material (light shavings require more
supply of material than wood chips).
“Cycle for underfeed auger sustain” too high
Too much material is pushed into the burner trough so that
the embers are too large for the sustain load operation.
The further consequence of this might cause the
malfunction back burn, excess temperature or overfilling
of the combustion chamber.
“Cycle for underfeed auger sustain” too low
Not enough material is pushed into the burner trough so
that there are too less embers to sustain the load. This
can cause back burn or the fire will go out.
Standby
If too much heat is generated in sustain load operation,
the control system automatically goes into standby
operation. When this threshold value is reached, first the
isolating valve shuts, and the auger module is slowly idled
in the sustain mode.
For the standby mode, all the drive activities (blowers and
auger modules) are stopped. Only then “Standby” appears
in the operating mode display.
When the boiler temperature drops or a minimum standby
period lapses, in the case of a call for heat an automatic
new start is carried out.
Transition in output
To obtain a good structure of the fire and thus low
emissions of harmful substances, the switchover from
“SUSTAIN” to “FULL LOAD” is not carried out suddenly
but rather gently.
Switching off
Touching Soft touch key 2 “Boiler OFF” shuts down the
furnace firing process properly. “Burn-out” is indicated
on the display. The firing control system continues to run
until there is no more fuel in the underfeed auger or the
combustion chamber temperature is below the set-point
value and then it switches off.
CAUTION
DO NOT use the main switch to switch off DANGER OF BACK BURN!
Emergency operation
The firing optimization function can be switched off in
Screen 7 by touching the “Emergency operation” soft
touch key. If a sensory mechanism is defective, the
switching off takes place automatically. Text shown
on display: “SYSTEM PRESENTLY RUNNING WITHOUT
OPTIMIZATION”. The quantities of material and air are
then manually set as set-point values under “Emergency
operation output” and “Emergency operation cycle of
underfeed auger”. The negative pressure is no longer
corrected automatically. For this reason the blower
settings must be checked. No positive pressure must
develop in the burner. In case positive pressure should
develop, adjust the mechanical means of throttling on
the supply air blowers.
Measurement operation
It is possible to switch the boiler control system into
“MEASUREMENT OPERATION” in Screen 7 by touching
the soft touch key “Measurement operation” while the
indicator in the upper left of the display is indicating
“FULL LOAD”. In “MEASUREMENT OPERATION” the
output control is blocked to guarantee constant full load
operation during the measurement.
IMPORTANT
In measurement operation the system does not switch
to “SUSTAIN”. Ensure heat consumption Danger of
excess temperature!
5603 882 - 01
63
Page 64

Heating Up Manually
Pyrotec Installation & Operating
Filling the burner trough
When the system has been switched off properly, there is
no more fuel in the burner trough or in the underfeed auger.
With the fire block cooled down (combustion chamber
temperature below 482° F (250° C), touching soft touch
key 1 “Boiler ON” will automatically fill the burner trough
with fuel.
Heating up
Light a fire with paper and kindling wood in the
combustion chamber. After this, use a shovel to push
the fire back to the filled burner trough. Then press Soft
touch key 1 “Boiler ON” again (Soft touch key 1 “Boiler
ON” is then dark green). Operating mode “HEAT UP”
shows in the upper left of
the display.
Fuel >W 40
- With fuel that has water content greater than W40,
preheat the boiler with a chopped wood fire. To do
so, manually light chopped wood in the combustion
chamber and use a shovel to push it into the burner
trough. If necessary, add more chopped wood. Heat
up the fireclay brick lining like this for approx. one
hour.
- Starting up the facility: Soft touch key 1 “Boiler ON”
The soft touch key “Underfeed ON” is for manually
activating the underfeed auger in automatic operation
(= manual prompt for material). As long as this soft
touch key is touched, the underfeed auger conveys
fuel into the burner trough. With the underfeed auger
stopped (soft touch key “Stop underfeed” light-grey),
the manual prompt for material cannot be activated.
Check heat up successful
The combustion chamber temperature should be over 356°
F (180° C) in 30 minutes (adjustable value). Otherwise
the system will automatically shut down. In such case
press Soft touch key 1 “Boiler ON”.
Heating up with automatic ignition
The boiler is simple to switch on:
- Press Soft touch key 1 “Boiler ON”. The loader
modules will be switched on in the appropriate order.
When the auger filling time or combustion chamber
filling time has lapsed and there is enough fuel in the
combustion chamber, the loader system switches off.
- The automatic ignition then takes place. The ignition
process stops as soon as the fire is started.
The boiler then automatically switches to full load
operation. (If the material should be too moist, it
might be necessary to proceed following section
“Heating Up” above.)
(recycled and recyclable) paper.
Technical information subject to change without notice. Printed on environmentally friendly
5603 882 - 01
 Loading...