


1
VoIP Phone
ZD Series User Manual

2
Safety Notices
Please read the following safety notices before installing or using this phone. They are crucial for the safe
and reliable operation of the device.
Please use the external power supply that is included in the package. Other power supplies may
cause damage to the phone, affect the behavior or induce noise.
Before using the external power supply in the package, please check with the power voltage.
Inaccurate power voltage may cause fire and damage.
Please do not damage the power cord. If power cord or plug is impaired, do not use it, it may cause
fire or electric shock.
The plug-socket combination must be accessible at all times because it serves as the main
disconnecting device.
You are in a situation that could cause bodily injury. Before you work on any equipment, be aware of
the hazards involved with electrical circuitry and be familiar with standard practices for preventing
accidents.
1. Introduction
Thank you for your purchasing our SIP phone, it is a rugged telephone that provides voice communication
over the same data network that your computer uses.
This phone is designed for use in harsh, dusty, wet and noisy conditions such as mining, subway, tunnel,
marine, off-share, industrial and outdoor sites
This guide will help you easily use the phone.
The phone has two Network ports: The LAN port . Before you connect the power source, please carefully
read Safety Notices below
2. Initial connecting and Setting
2.1. Connect the phone
Step 1: Connect the IP Phone to the corporate IP telephony network. Before you connect the phone to the
network, please check if your network can work normally.

3
You can do this in one of two ways, depending on how your workspace is set up.
Direct network connection—by this method, you need at least one available Ethernet port in your
workspace. Use the Ethernet cable in the package to connect LAN port on the back of your phone to the
Ethernet port in your workspace. you can make direct network connect. The following two figures are for
your reference.
Shared network connection—Use this method if you have a single Ethernet port in your workspace with
your desktop computer already connected to it. First, disconnect the Ethernet cable from the computer
and attach it to the LAN port on the back of your phone. Next, use the Ethernet cable in the package to
connect LAN port on the back of your phone to your desktop computer. Your IP Phone now shares a
network connection with your computer. The following figure is for your reference.
3. Basic Functions
3.1. Accepting a call
Picking up handset or press the button to accept incoming calls. If only on/off button, you can set
auto-answer.
3.2. Making a call
3.2.1 Free dial
Picking up handset or press the button and then press the number, it will dial out.
3.2.2 Hot-line dial
Picking up handset or press the hot-line button, it will dial out directly. Set hot-line in advance.
3.3. Ending a call
4
Hang back the handset to end calls.
Model No.
Item
KNZD-05 KNZD-07A
KNZD-07B KNZD-10
KNZD-27 KNZD-31
KNZD-03 KNZD-06
KNZD-15 KNZD-29
KNZD-63
KNZD-09 KNZD-11
KNZD-13 KNZD-17
KNZD-39 KNZD-36
KNZD-45A KNZD-45
KNZD-63A KNZD-43
KNZD-14
KNZD-28
Free dial√√××
Hotline××√√
Handset√××√
Keypad√√××
ON/OFF
button
×√√
×
Dial 9 * 9 * 200, the phone will broadcast IP address.
Dial 9 * 9 * 100, it will restore the factory setting.
4. Operation
4.1 Setting via Web Browse
Set the computer and telephone in same LAN network;
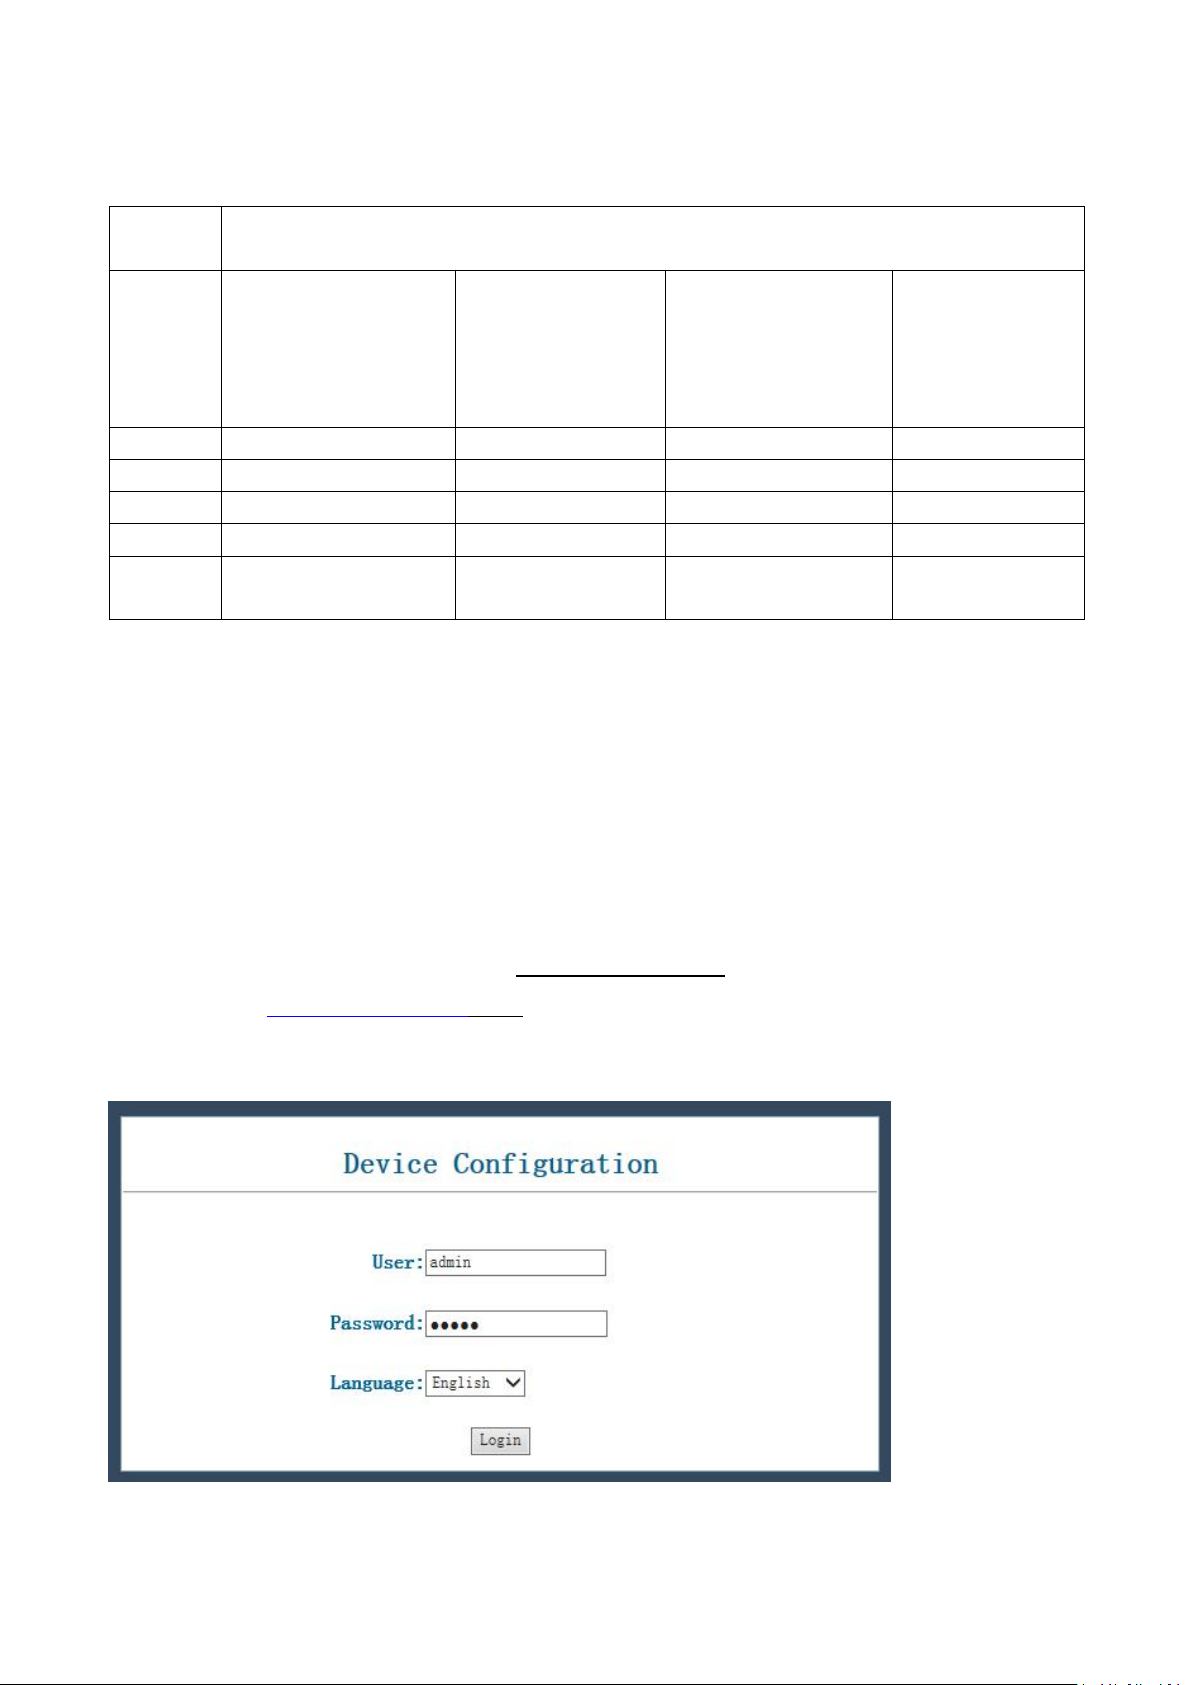
When this phone and your PC are connected to network, open the Internet Explorer and then enter the IP
address of the LAN port in this phone (e.g. http://xxx.xxx.xxx.xxx). (If the log port is not standard port 80,
you should input http://xxx.xxx.xxx.xxx:xxxx/) See the following web interface.
User: admin
Password: admin
5
If you didn’t save the setting, the system would the configuration last time when powered on next time.
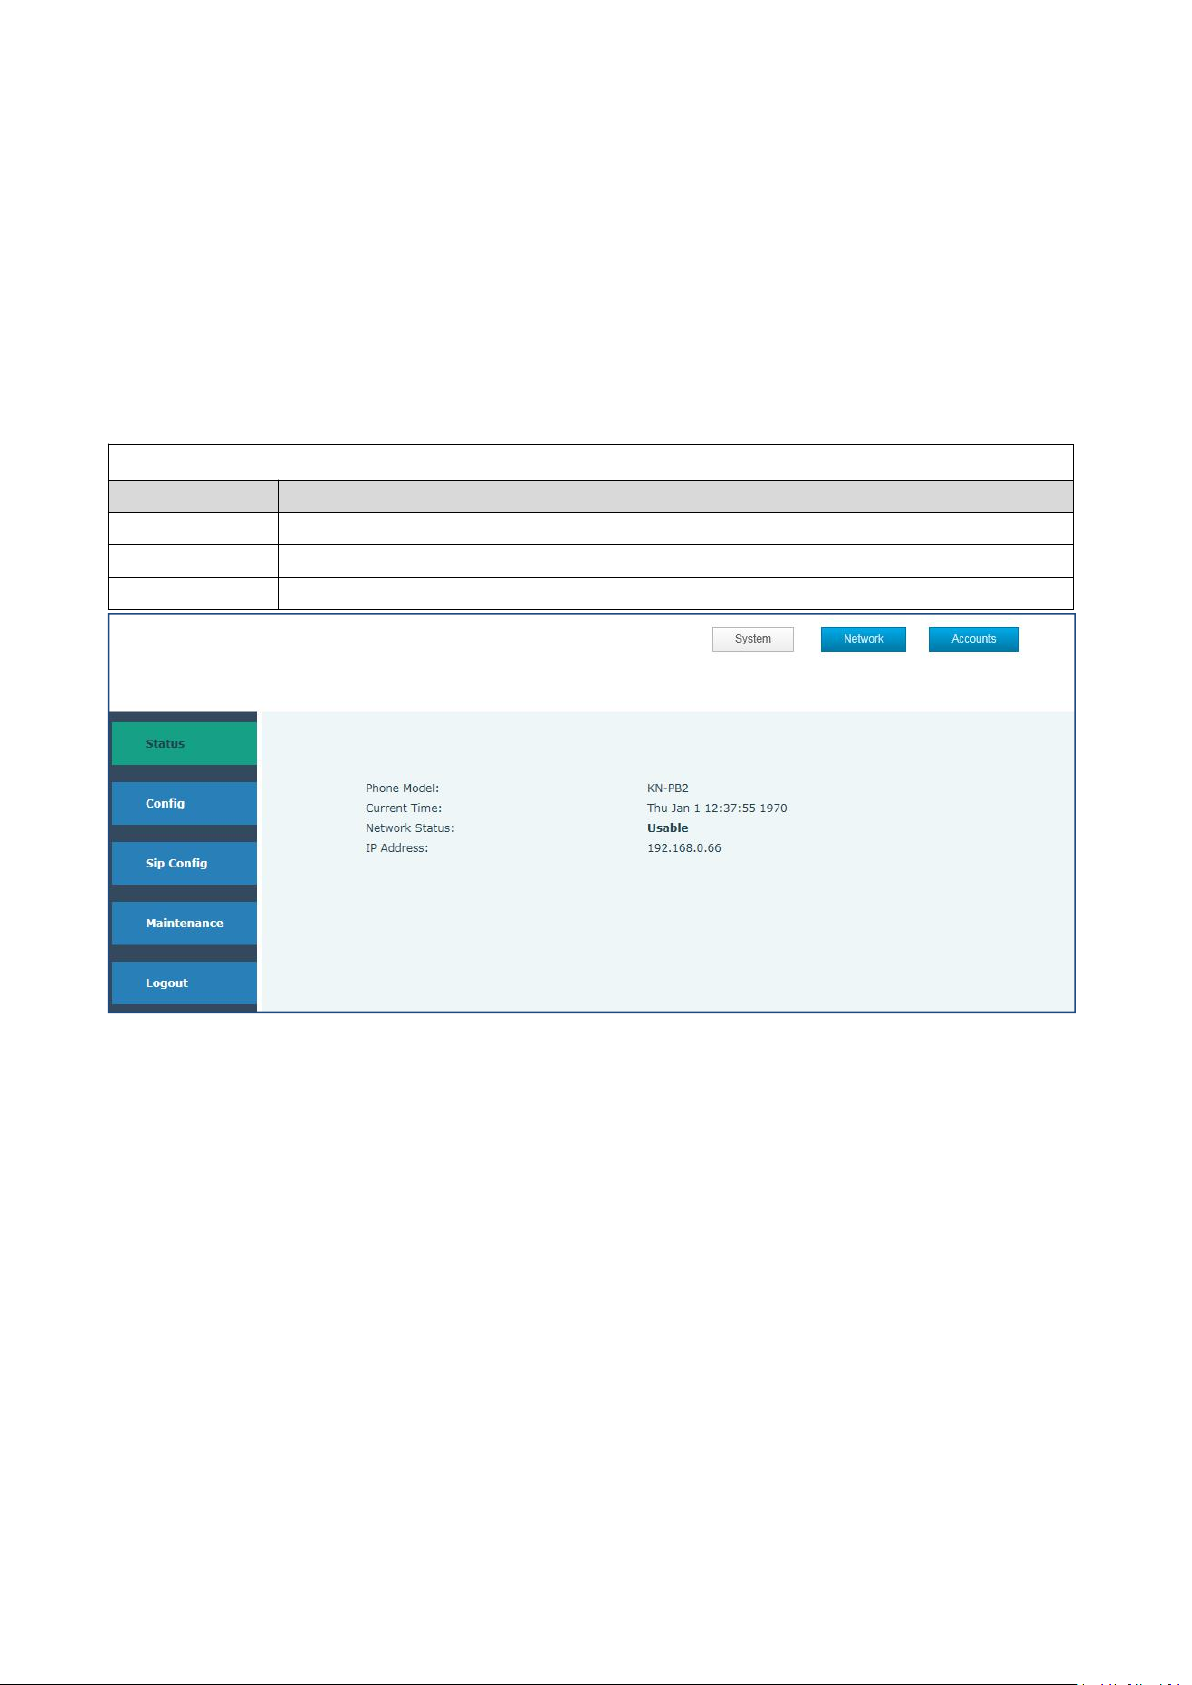
STATUS
Field Name
Explanation
System
Shows the model number, and current time, status and IP address
Network
Shows the status of connection and other information
Accounts
Shows the status of registration
※
After changing the parameter, click
MANINTENANCE】→【CONFIG】→【SAVE】, the configuration
【
will be saved and take effect soon.
Before the below steps, please register the phone on your server. The solution【SIP CONFIG
INPUT THE SERVER INFORMATION
4.2 WEB Configuration
4.2.1 Status
】→
4.2.2 SIP config
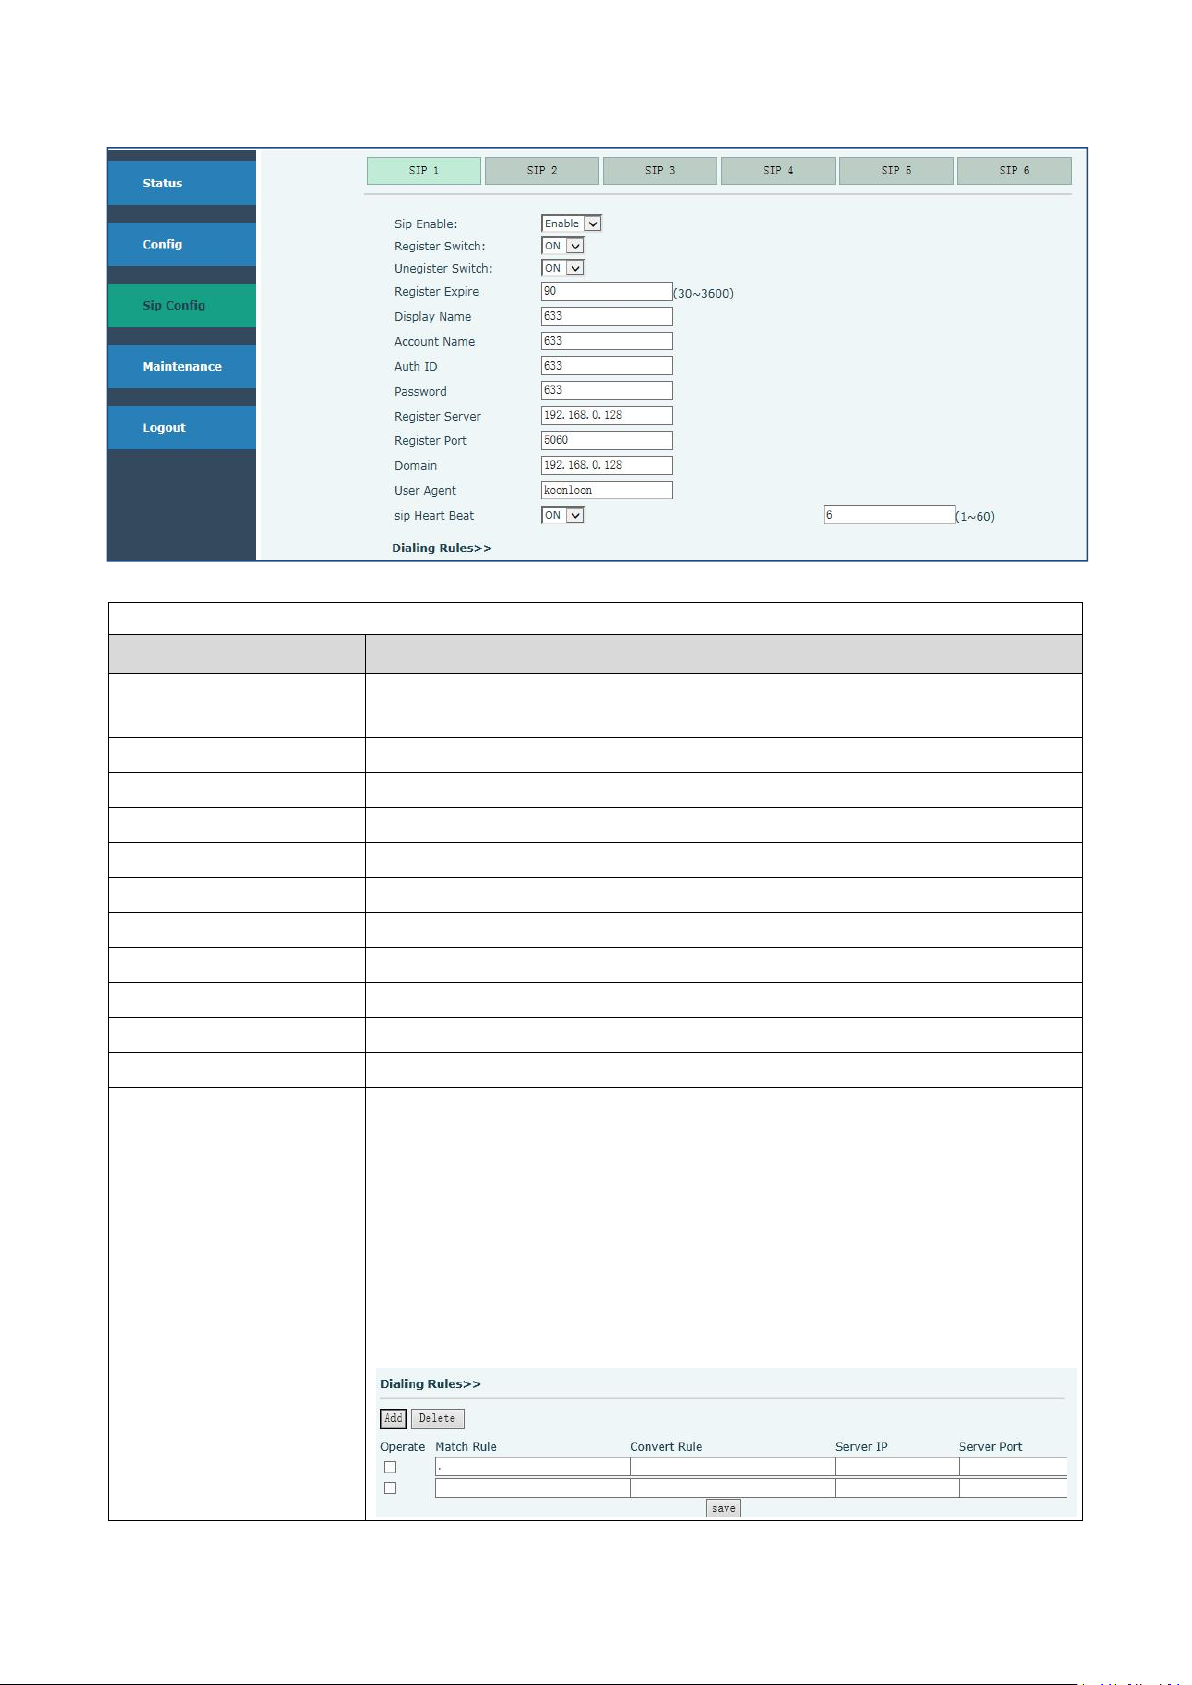
Get your SIP account from your server
Fill the IP address, port,account name, password and number as below.
6
SIP Config
Field Name
Explanation
Sip Enable
If the phone registered on your server successfully the status is Enable, or
it shows Unabble
Register Switch
ON
Unegister Switch
OFF
Display Name
Set the display name.This can be English name or telephone number
Account Name
Set the server name.
Auth ID
Input your SIP server ID
Password
Set your SIP server password
Register Server
Config SIP server’s IP address
Register Port
Config SIP server’s port
Domain
Config SIP server’s IP address
SIP Heart Beat
The interval time for detecting with server
Dialing Rules
1: Add ”00” in the corresponding location
Eg: (a:00)
2: Delete the digit in the corresponding location
(d)
3: Modify the numbers to “89”
Eg: (m:89)
You can config the server IP and port. This setting go into effect after
rebooting
7
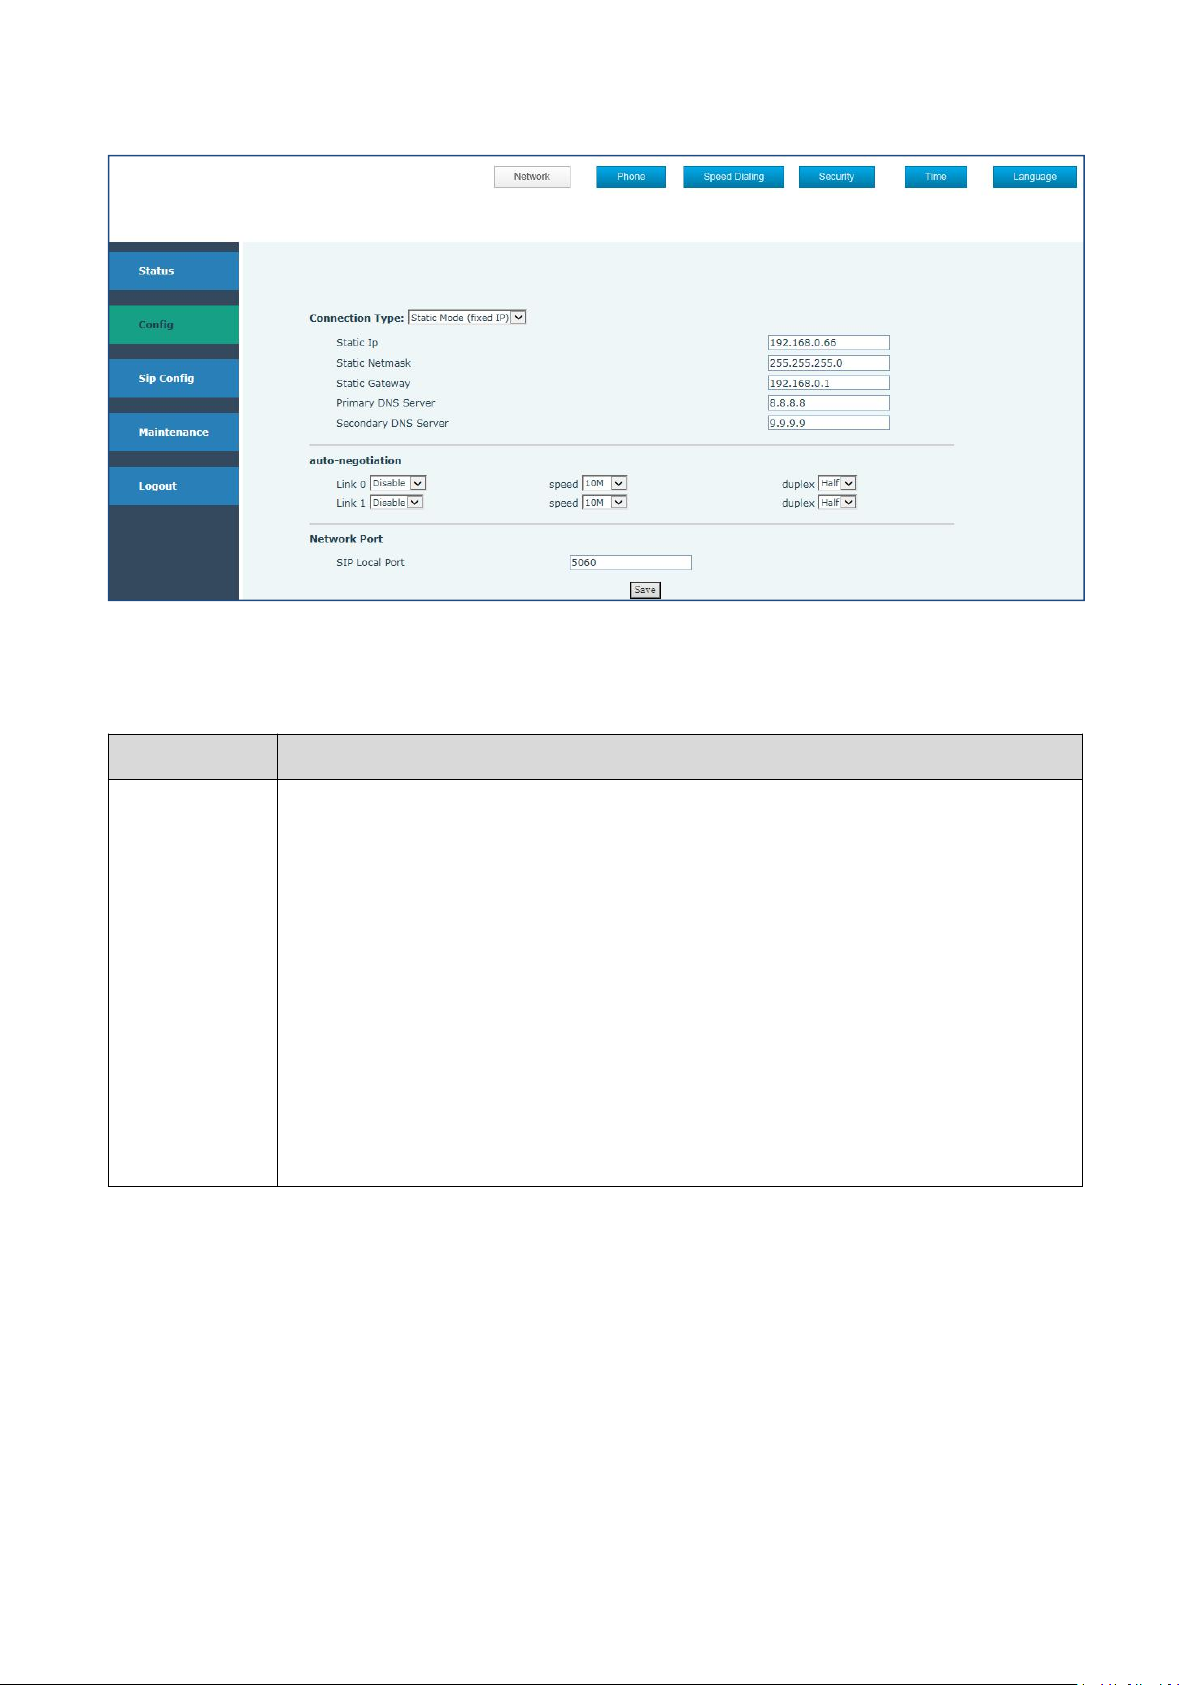
4.2.3 Config
Field Name
Explanation
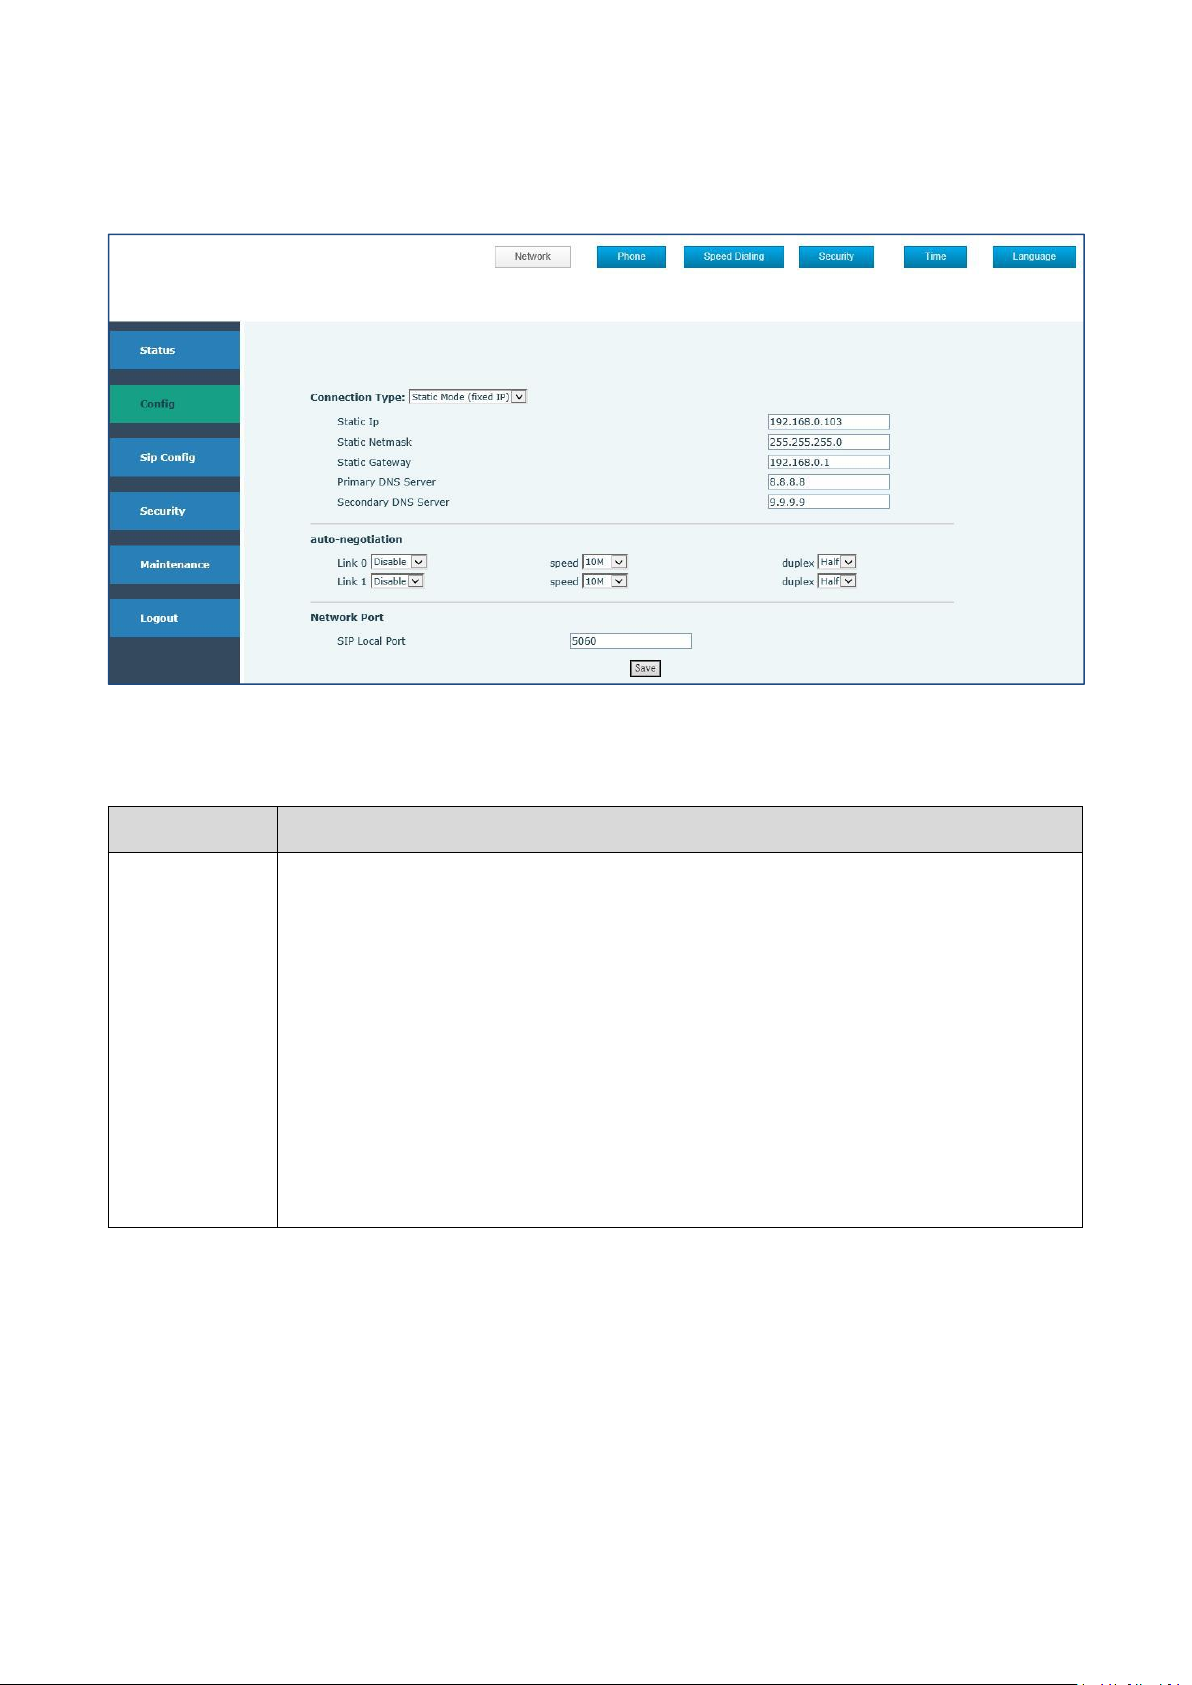
Network
Displays the configuration information on LAN port, including the connect mode of
LAN port (Static, DHCP, ), MAC address, the IP address of LAN port, ON or OFF of
DHCP mode of LAN port.
Please select the proper network mode according to the network condition. Three
different network settings:
Static: If your ISP server provides you the static IP address, please select this
mode, then finish Static Mode setting. If you don’t know about parameters of
Static Mode setting, please ask your ISP for them.
DHCP: In this mode, you will get the information from the DHCP server
automatically; need not to input this information artificially.
4.2.3.1 Network
You can set the connection type, auto-negotiation and network port.
8
4.2.3.2 Phone
Field Name
Explanation
Phone
Shows the time of auto-answer and automatic a on-hook, volume of ringing tone,
mic, speaker, voice codec and etc.
Notes: Codecs Setting
Preference 1
G.711A/u,G.729,G726
Preference 2
G.711A/u,G.729,G726, Nonuse
Preference 3
G.711A/u,G.729,G726, Nonuse
Preference 4
G.711A/u,G.729,G726, Nonuse
Preference 5
G.711A/u,G.729,G726, Nonuse
You can set auto-answer, hookOn wait time, ringer tone, volume settings and codecs settings.
Setting hot-line:
Status: ON
Phone: inputting the telephone number
Line: SIP1

9
4.2.3.3Security
Field Name
Explanation
Security
Supports 2 output setting
Supports modification on Output Level, Output Trigger Mode (Ring, on hook,
talking, DTMF)
Supports 2 output setting
Supports modification on
Output Level, Output Trigger Mode (
Ring, on hook, talking, DTMF)

10
4.2.3.4 Time
Field Name
Explanation
Time
1. Configure primary NTP Server Address and server port
2. Configure secondary NTP Server Address and server port
3. Configure Time Zone
4. Interval time for synchronizing with server. Default is 60 seconds.
NTP Enable: Yes means synchronizing the time automatically via DHCP mode.

11
4.2.3.5 Language
Field Name
Explanation
Reboot
If you save the above setting, click 'Reboot' button to restart the phone.
Config
1.Click save, and then will save your config file. File format is .txt or .xml
2. Upload the config file: click view to find the config files and download it
3.Click clear and then will clear your configuration information. Or you can
press 9*9*100# on the keyboard. The default IP address is
192.168.100.155.
Upgrades
Select a file to update the system(You can get the file from original factory)
Change the system language in Chinese or English
4.2.4 Maintenance
If the configuration finished, click “the reboot” on the phone to restart the phone.

12
User setting
Resetting the user name and password
Network Capture
1. Click “Start”to capture and click confirm;
2. Click 'Stop' button to stop capture;
3. Click 'Download' button to download the package file.
Debug
Please enter command. This is for engineer to detect.
Logout
Click 'Logout' button to logout the system. You need to input the username
and password next time.

13
4.2.5 No sip server point to point configuration:
1.IP phones that need to do point-to-point communication, set the IP address
of the network port to a fixed IP. The setting method is the same as the 4.2.3
Config chapter of the manual.
Make sure there are no duplications and conflicts with each IP address.

14
Log in to the IP phone configuration page, select the mode as Static mode in the
Setting->Network option, and fill in the IP address, subnet mask, and exit
gateway information into the information you need. The IP address set in this
example is 192.168.1.199, subnet mask 255.255.255.0, gateway 192.168.1.1.
2.Enter the SIP config settings page to fill in the phone number of this IP phone,
as shown below.
In the SIP config settings -> SIP 1 settings, configure the phone number of
this IP phone. The IP phone supports 2 phone numbers. Under normal
circumstances, just fill one number is enough, and fill like the above picture,
fill in the phone number at the Display Name and Account Name. The phone
number in this test case is 9264. Note that OFF is selected at the Register
Switch.

15
3.In the SIP config settings -> SIP 1 settings, add a call path, we assume that the
IP address of the other IP phone is 192.168.1.11, the phone number is 9265,
then we add a corresponding rule in the Dialing Rules so that the IP phone can
call the 9265 IP phone when dialing the 9265 number, just fill in the default port
5060 at the Server Port.
(Note: The configuration method of the IP phone of 9265 is the same from
setting up the network, adding the phone number, and doing the call routing
method. The only difference is that the content of 9265 Dialing Rules is the
phone number of 9264 and the 9264 IP phone’s IP address)

16
4.Add hotline function to achieve auto dialing. As shown below:
Go to the Setting->Phone setting, select ON in the Hot Line option, and
configure the phone number of the other IP phone to apply it.
5.After setting it, save it and restart the device to use it normally.

17
4.2.6 Logout
Click the Log out button to leave the web operation

18
6.Installation
KNZD-05
KNZD-06
KNZD-07A/KNZD-07B

19
KNZD-09/KNZD-11
KNZD-10/KNZD-15
KNZD-13

20
KNZD-14
KNZD-27
KNZD-28

21
KNZD-36
KNZD-45/KNZD-45A/KNZD-43/KNZD-43A
KNZD-63/KNZD-63A

22
KNZD-14
KNZD-027
KNZD-043

23
7. Packaging Information
Packaging Information
Model
One Unit
Two Units
Three Units
Four Units
KNZD-04
50*43*40 13.9kg
KNZD-05L
CD-IP
34*21*21 3.23kg
34*19*37 6.1kg
KNZD-09
31*18*12 2.1kg
KNZD-09
A
45*31*43 10.3kg
KNZD-10
33*18*18 2.7kg
34*21*39 6.83kg
KNZD-11
21*15*11 1.1kg
31*20*11 1.97kg
KNZD-13
23*19*14 2kg
KNZD-15
31*17*11 1.5kg
KNZD-41
82.5*56.5*38 20.4kg
KNZD-45
32*17*12 1.97kg
37*32*18 6.4kg
37*35*27 8.7kg
KNZD-60
61*36*18 7.05kg
KNZD-63
31*12*6 0.4kg
32*23*16 1.3kg
8.After-service
(1) Avoid the water insert into the telephone in raining days.
(2) Check the power supply and wire cables regularly.
(3) Keep the handset dry and clean.
(4) Do not disassembled the telephone under the condition of no engineer.
(5) Please operate following this user manual
(5) Coat the anti-rust oil when appears rusty parts.
Thanks a lot for purchasing this product! Please share your valuable comments! Your support and
suggestion helps us to build an century-old factory.

24
 Loading...