

Knoll Pixel KCXE6030G, Pixel KCXE7230G, Pixel KTXE6036G, Pixel KTXE7236G Installation Instructions Manual
Page 1

PIXEL™ Installation Instructions
C-Leg Electric Height Adjustable Tables
Glides only
Related tables:
KCXE6030G
KCXE7230G
Unboxing
You should have received your top plus two boxes per table.
Box 1 includes:
C-Leg assemblies, feet castings, electrical controller box and
screws, control switch with cable and screws, leg extension
cables, main power cable, hardware in a red plastic bag, and
installation instructions.
Box 2 includes:
C-Leg rail kit
Please pay close attention to torque requirements.
Step 1.
Lay the inverted table top on the floor.
Parts list
1 Table top
2 C-Leg assemblies
2 Feet castings
1 C-Leg rail kit
1 Electrical controller box
and screws
1 Control switch with cable
and screws
2 Leg extension cables
1 Main power cable
Hardware
24 Pan head sheet metal #10 x 1.00 screws
12 Socket button head M6 x 12mm screws
2 Pan head sheet metal #10 x 2.00 screws
8 Socket head cap M6 x 55mm screws
2 Vertical wire management clips
(clear plastic)
4 Horizontal wire management clips
with wood screws
Tools needed
Allen wrenches
Torque wrench
Phillips screwdriver
A
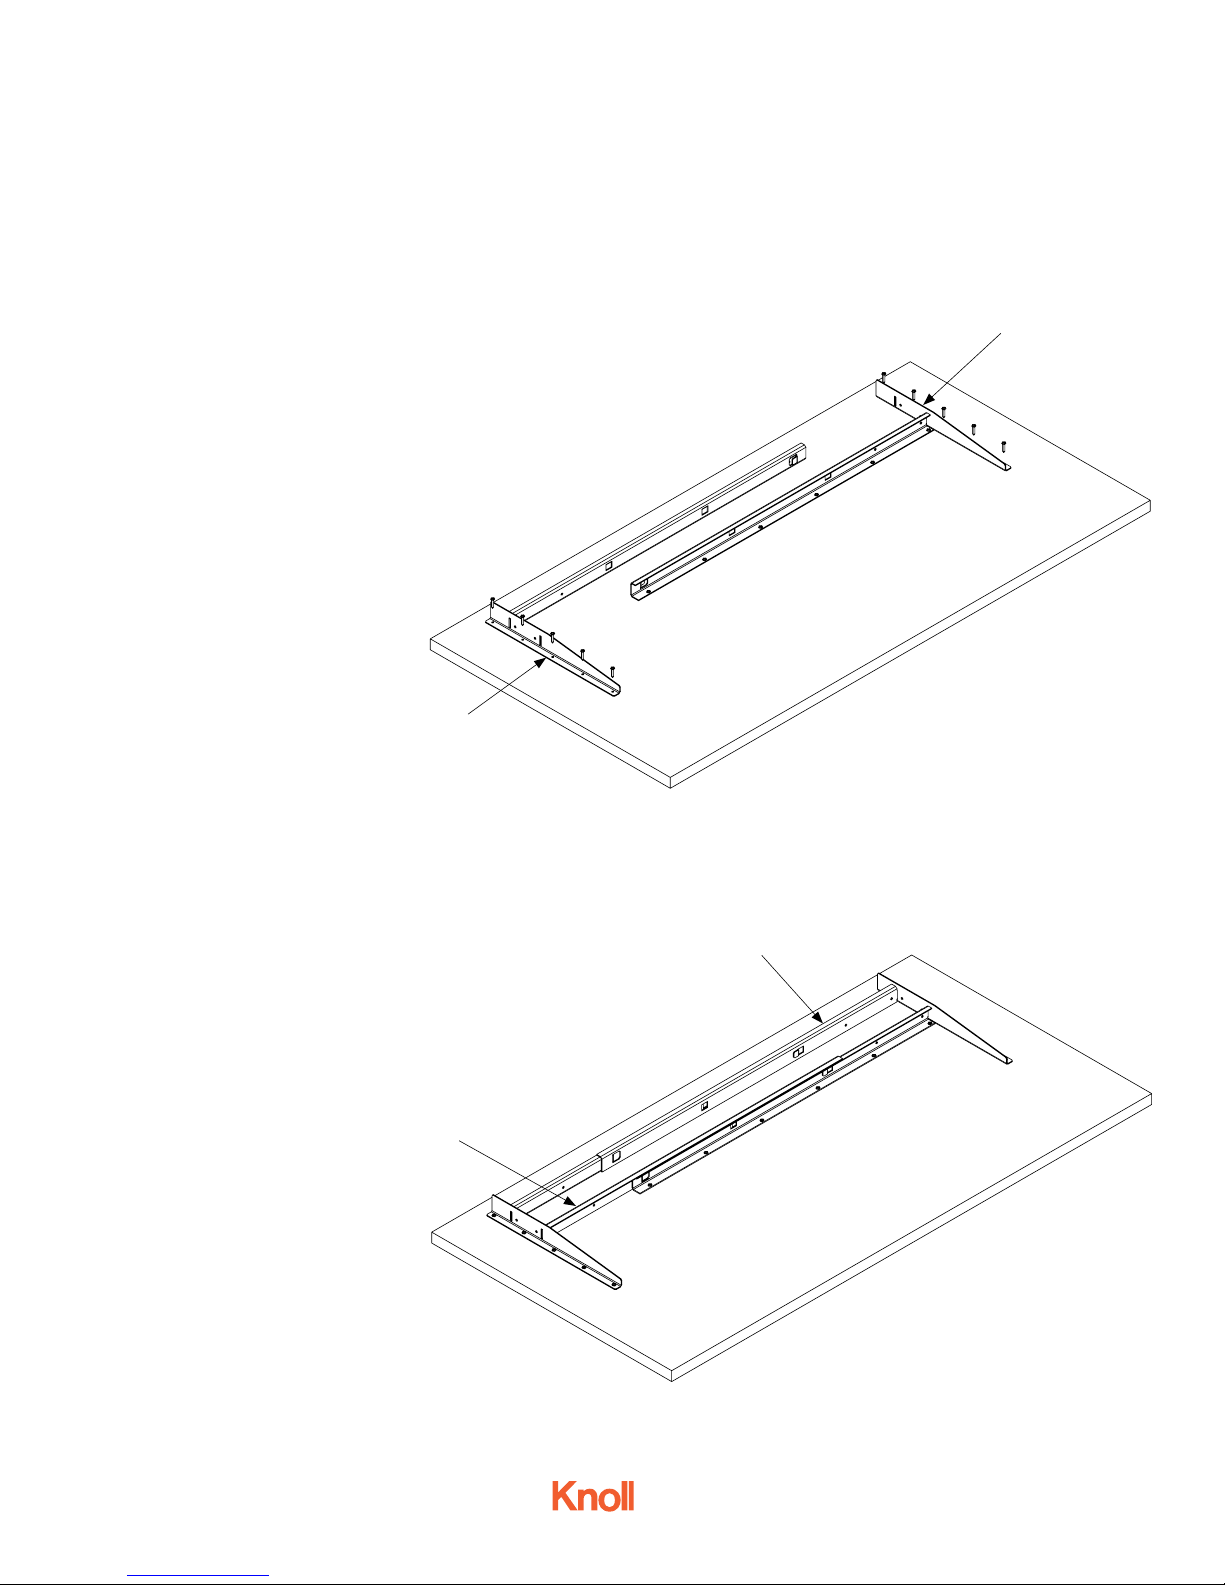
Step 2.
Align the two “C” section rail (A) holes with the top
pilot holes. Attach the rails to the top using pan
head sheet metal #10 x 1.00 screws, 6 per rail,
torque: 20 in/lb.
4AU6004 - Oct 2015
Page 1 of 6
Fig. 1
Page 2
PIXEL™ Installation Instructions
C-Leg Electric Height Adjustable Tables
Step 3.
Align the two end bracket (B) holes with the top pilot holes.
Attach the brackets to the top using pan head sheet metal
#10 x 1.00 screws, 5 per rail, torque: 20 in/lb.
B
Fig. 2
B
Step 4.
Align the two ‘L’ section rails (C) with the ‘C’ section rails and
slide into the notched holes so that the end of the rails slides
into the end bracket.
C
C
Fig. 3
4AU6004 - Oct 2015
Page 2 of 6
Page 3

PIXEL™ Installation Instructions
C-Leg Electric Height Adjustable Tables
Step 5.
Attach feet castings (D) to C-Leg 3 stage assemblies (E)
using socket head cap M6 x 55mm screws (F), 4 per leg,
torque: 20 in/lb.
F
D
E
Fig. 4
Step 6.
Insert the 3 staged motorized leg assemblies (G) into the
rail frame. Attach using socket button head M6 x 12mm
screws (H), 6 per leg, torque: 20 in/lb.
G
H
H
G
H
H
H
Fig. 5
H
4AU6004 - Oct 2015
Page 3 of 6
Page 4

PIXEL™ Installation Instructions
C-Leg Electric Height Adjustable Tables
Step 7.
Attach the controller box (I) in
the desired position between the
rails and legs motors using two
pan head sheet metal #10 x 2.00
screws (J).
Step 8.
Attach the control switch (K) on
the desired side of the table top
using two pan head sheet metal
#10 x 1.00 screws (H).
K
L
J
Step 9.
Connect all cables: two motor cables between controller box and leg
motors (M), (controller box features
cable passages); one switch cable
(N) between the switch and controller box; and the main power cable
(O) that connects to the controller
box and a wall outlet.
Step 10.
Turn the assembled table into the
upright position.
Note: Use horizontal wire management clips to secure wires under
table.
M
I
Fig. 6
N
O
M
N
Fig. 7
4AU6004 - Oct 2015
Page 4 of 6
Page 5

PIXEL™ Installation Instructions
C-Leg Electric Height Adjustable Tables - Operating Instructions
Parallel drive
The arrow buttons (A).
Hold down the button to activate the parallel drive.
Memory drive
Small buttons with dots (B).
Press one of the memory buttons and the system will
start driving to the pre-programmed memory position.
Keep the button pressed until the position is reached.
Store memory
S button (C).
Press the button and within two seconds press one of
the small buttons with dots (B), and the current position
will be stored at this button.
Table Height
In standing position, table height should be just below
the elbow.
Fig. 8
Fig. 9
A B C
4AU6004 - Oct 2015
Page 5 of 6
Page 6

PIXEL™ Installation Instructions
C-Leg Electric Height Adjustable Tables - Troubleshooting
1. The desk does not drive at all
Check: Is the main power connected to the control box?
Try/Solution: Try to connect a lamp or similar to the main
power supply to check that the supply voltage is OK.
Check: Are all plugs mounted correctly in the control box
and to the leg?
Try/Solution: Check all connections.
Check: Are there any visible damages on cables, controls,
the control box or legs?
Try/Solution: Contact Knoll Customer Service.
Check: Is something blocking the movement: cables,
furniture or other objects?
3. The desk can only drive downward (Error code E01)
The desk must be initialized.
How to initialize:
Press the down button and drive to the lowest position.
Hold the button until the desk stops completely.
Reactivate the down button and hold until the desk stops
completely.
Now the desk can drive up.
Try/Solution: Remove items that are blocking the table.
2. The desk will not drive fully upwards. Always stops in
the same position.
The system has set a new upwards stop position. To erase
this position, the desk must be initialized again. See #3.
4AU6004 - Oct 2015
Page 6 of 6
 Loading...