

Page 1
KNF Flodos AG BA_NF2-35_EN_02_164912
Translation of original Operating and Installation Instructions Keep for future reference!
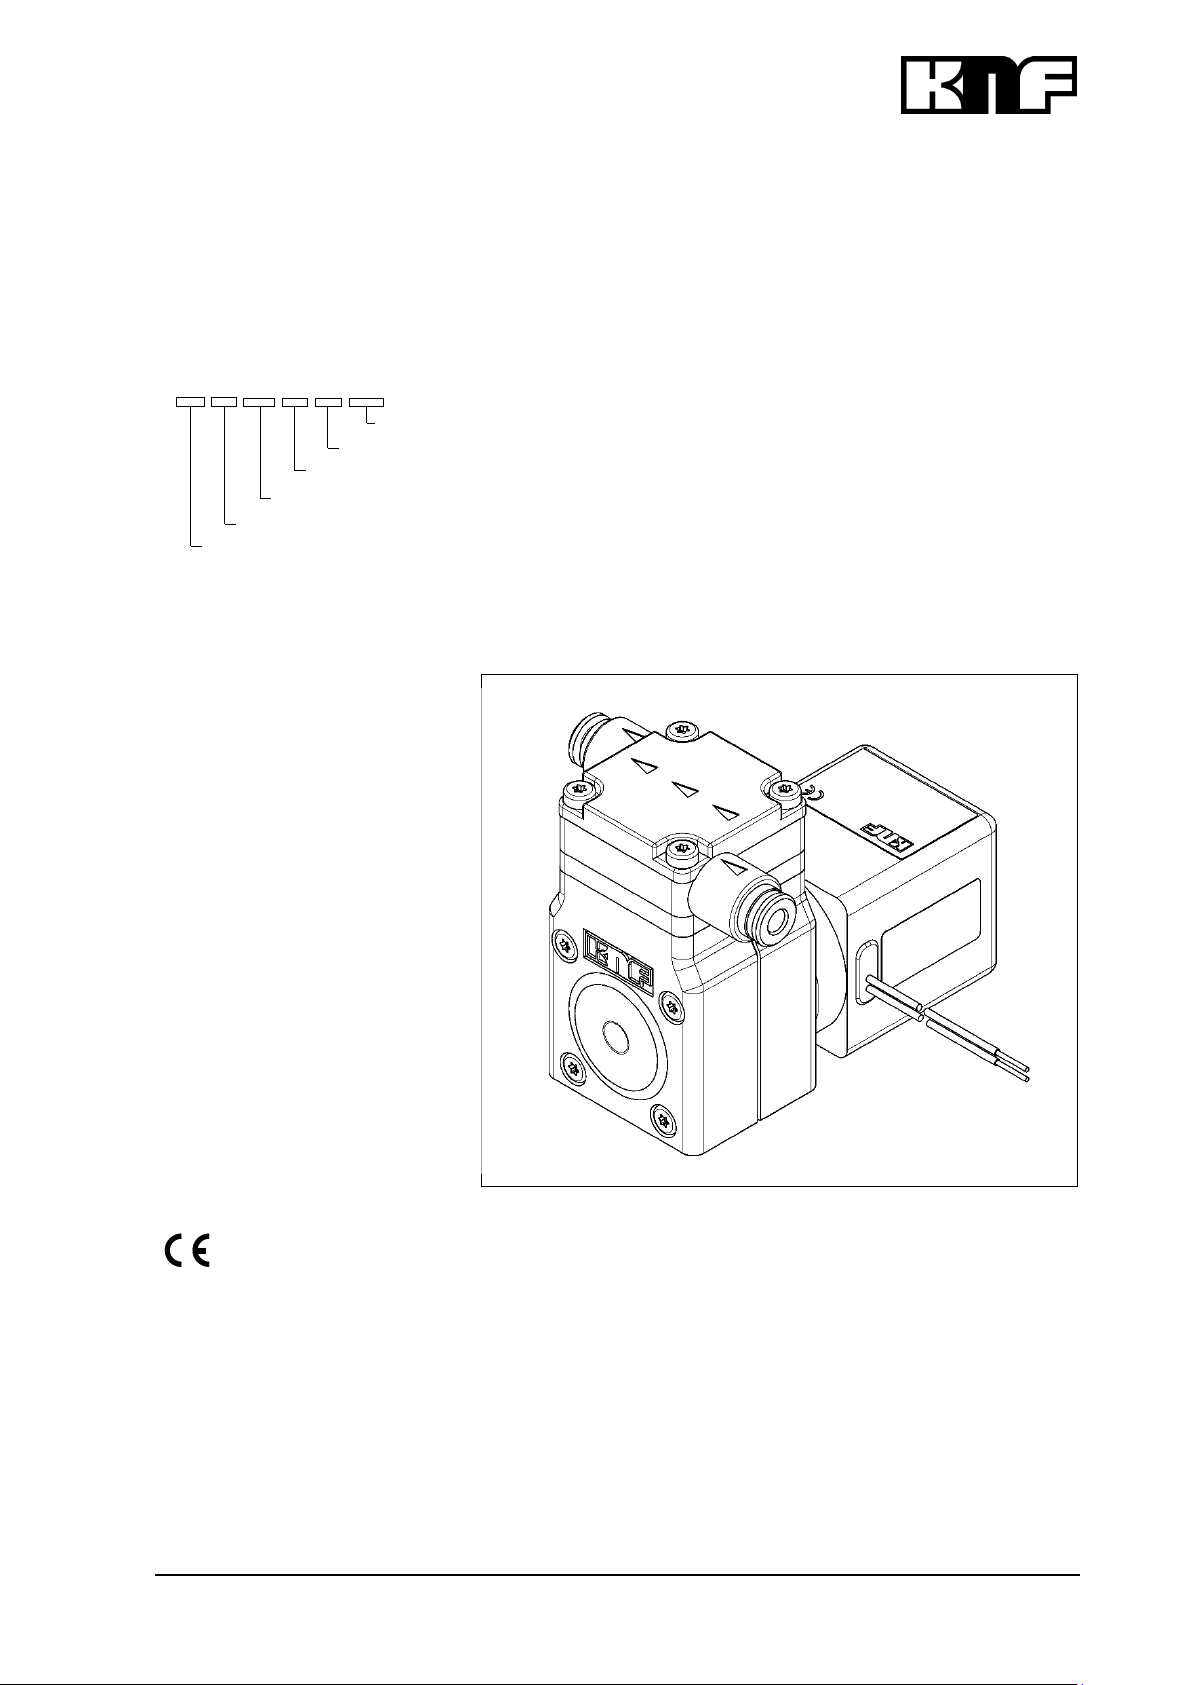
DIAPHRAGM LIQUID PUMP
NF 2.35
Operating and
Installation
Instructions
Read and observe these Operating and Installation Instructions!
An additional letter prefixing
the NF model code is a country-specific designation, with no
technical relevance.
Contents Page
1. About this document ................................................................. 2
2. Use ........................................................................................... 3
3. Safety ....................................................................................... 4
4. Technical data .......................................................................... 6
5. Assembly and function ............................................................. 8
6. Installation and connection ....................................................... 9
7. Operation ................................................................................ 13
8. Servicing ................................................................................. 15
9. Troubleshooting ...................................................................... 17
10. Decontamination declaration .................................................. 19
KNF Flodos AG
Wassermatte 2
6210 Sursee, Switzerland
Tel +41 (0)41 925 00 25
Fax +41 (0)41 925 00 35
www.knf-flodos.ch
[email protected]
NF 2.35 XP DC 24V
- / PMLxxxx / PLxxxx [Ch. 1]
NF
2.35
XP / XT [Ch. 4]
DCB-B / DCB-4B
Supply voltage [Ch. 4]
Page 2
Diaphragm liquid pump NF 2.35 About this document
KNF Flodos AG BA_NF2-35_EN_02_164912
Translation of original Operating and Installation Instructions 2
1. About this document
Disclaimer of liability
KNF accepts no liability for any damage caused by failure to
follow the operating instructions.
1.1. Use of the Operating and Installation Instructions
The Operating and Installation Instructions are part of the pump.
➔ Forward the Operating and Installation Instructions to any
subsequent owners of the pump.
Customer-specific project pumps (pump models which begin with
"PL" or "PML") may differ from the Operating and Installation
Instructions.
➔ In the case of project pumps, take note of any additionally
agreed specifications.
1.2. Symbols and markings
Warning
WARNING
This symbol indicates a potential danger.
It also indicates the possible consequences of failure
to observe the warning. The signal word (e.g. "Warning") indicates the level of danger.
➔ Here you will see actions for avoiding the danger
and potential consequences.
Danger levels
Signal word
Meaning
Consequences if not observed
DANGER
warns of immediate danger
Consequences include death or
serious injuries and/or serious
property damage
WARNING
warns of potential
danger
Death or serious injuries and/or
serious property damage are
possible
CAUTION
warns of a potentially dangerous
situation
Minor injuries or damage to
property are possible
Tab. 1
Other information and symbols
➔ This indicates an activity (step) that must be carried out.
This indicates the first step of an activity to be carried out. Any
additional steps required are numbered consecutively.
This symbol indicates important information.
Project pumps
Page 3
Diaphragm liquid pump NF 2.35 Use
KNF Flodos AG BA_NF2-35_EN_02_164912
Translation of original Operating and Installation Instructions 3
2. Use
2.1. Intended use
The pumps are intended for transferring liquids.
Owner's responsibility
The pumps must only be installed and operated under the operating parameters and conditions described in Chapter 4, Technical
data.
Before transferring or metering a medium, check whether the
medium can be transferred danger-free in the specific application
case.
Before using a medium, check the compatibility of the materials of
the pump head, pump housing, diaphragm and valves with the
medium.
The temperature of the medium must lie within the permissible
temperature range (see Chapter 4).
The transferred medium should not contain particles as these can
prevent the pump from working correctly. If this cannot be guaranteed, a filter < 50 m with sufficiently large filter area must be used
upstream of the pump.
2.2. Improper use
DANGER
The pumps must not be operated in an explosive
atmosphere.
DANGER
The pumps must not be used to transfer liquids in
systems in which there is a risk of bursting due to
overpressure.
For special modifications outside the standard technical specifications, please contact your KNF technical adviser.
Operating parameters and
conditions
CAUTION
The pump and hoses generate vibrations
➔ The pump and hoses must be secured before
the pump is switched on.
➔ Only completely installed pumps may be taken
into service.
Requirements for
transferred medium
Risk of explosion
Risk of bursting
Page 4
Diaphragm liquid pump NF 2.35 Safety
KNF Flodos AG BA_NF2-35_EN_02_164912
Translation of original Operating and Installation Instructions 4
3. Safety
Observe the safety precautions in Chapters
6. Installation and connection and 7. Operation.
The pumps are built according to the generally recognised rules of
technology and in accordance with the pertinent occupational
safety and accident prevention regulations. Nevertheless, dangers
may occur during their use which may lead to injuries to the user or
others, or to damage to the pump or other property.
Only use the pumps when they are in a good technical and proper
working order, in accordance with their intended use, observing the
safety advice within the Operating and Installation Instructions, at
all times.
Make sure that only trained and instructed personnel or specially
trained personnel work on the pumps. This especially applies to
assembly, connection and servicing work.
Make sure that all personnel have read and understood the Operating and Installation Instructions, and in particular the "Safety"
chapter.
Always ensure adherence to all pertinent accident prevention and
safety regulations when working on and operating the pump.
When transferring dangerous media, observe the safety regulations for handling such media and read and observe the safety
data sheets.
Always ensure adherence to all information stickers on the pumps,
such as flow direction arrows and type plates, and keep stickers in
legible condition.
All replacement parts should be properly stored and disposed of in
accordance with the applicable environmental protection regulations. Ensure adherence to the pertinent national and international
regulations. This especially applies to parts contaminated with toxic
substances.
Dispose of all packaging in an environmentally-appropriate
manner. The packaging materials are recyclable.
Ensure that the old appliance is disposed of in an environmentally-appropriate manner. Use appropriate waste
collection systems for the disposal of end-of-life equipment. Used pumps contain valuable recyclable materials.
Personnel
Working in a
safety-conscious manner
Handling dangerous media
Information
Environmental protection
Disposal
Page 5

Diaphragm liquid pump NF 2.35 Safety
KNF Flodos AG BA_NF2-35_EN_02_164912
Translation of original Operating and Installation Instructions 5
The pumps comply with the fundamental requirements of Directive
2011/65/EU (RoHS2).
The pumps comply with the safety requirements regarding electromagnetic compatibility in Directive 2004/108/EG.
For the purposes of the Machinery Directive 2006/42/EG, pumps
are “partly completed machinery", and are therefore to be regarded
as not ready for use. Partly completed machinery may not be
commissioned until such time as it has been determined that the
machine in which the partly completed machinery is to be assembled conforms to the provisions of the Machinery Directive
2006/42/EG. The essential requirements of Annex I of Directive
2006/42/EG (general principles) are applied and observed.
The following harmonised standards are met:
NF 2.35 DCB-B / DCB-4B
▪ IEC/EN 61000-6-2
▪ IEC/EN 61000-6-3
All repairs to the pump(s) must be carried out by the relevant KNF
customer service team.
Only use genuine parts from KNF for servicing work.
EU directives/standards
Customer service and
repairs
Page 6
Diaphragm liquid pump NF 2.35 Technical data
KNF Flodos AG BA_NF2-35_EN_02_164912
Translation of original Operating and Installation Instructions 6
4. Technical data
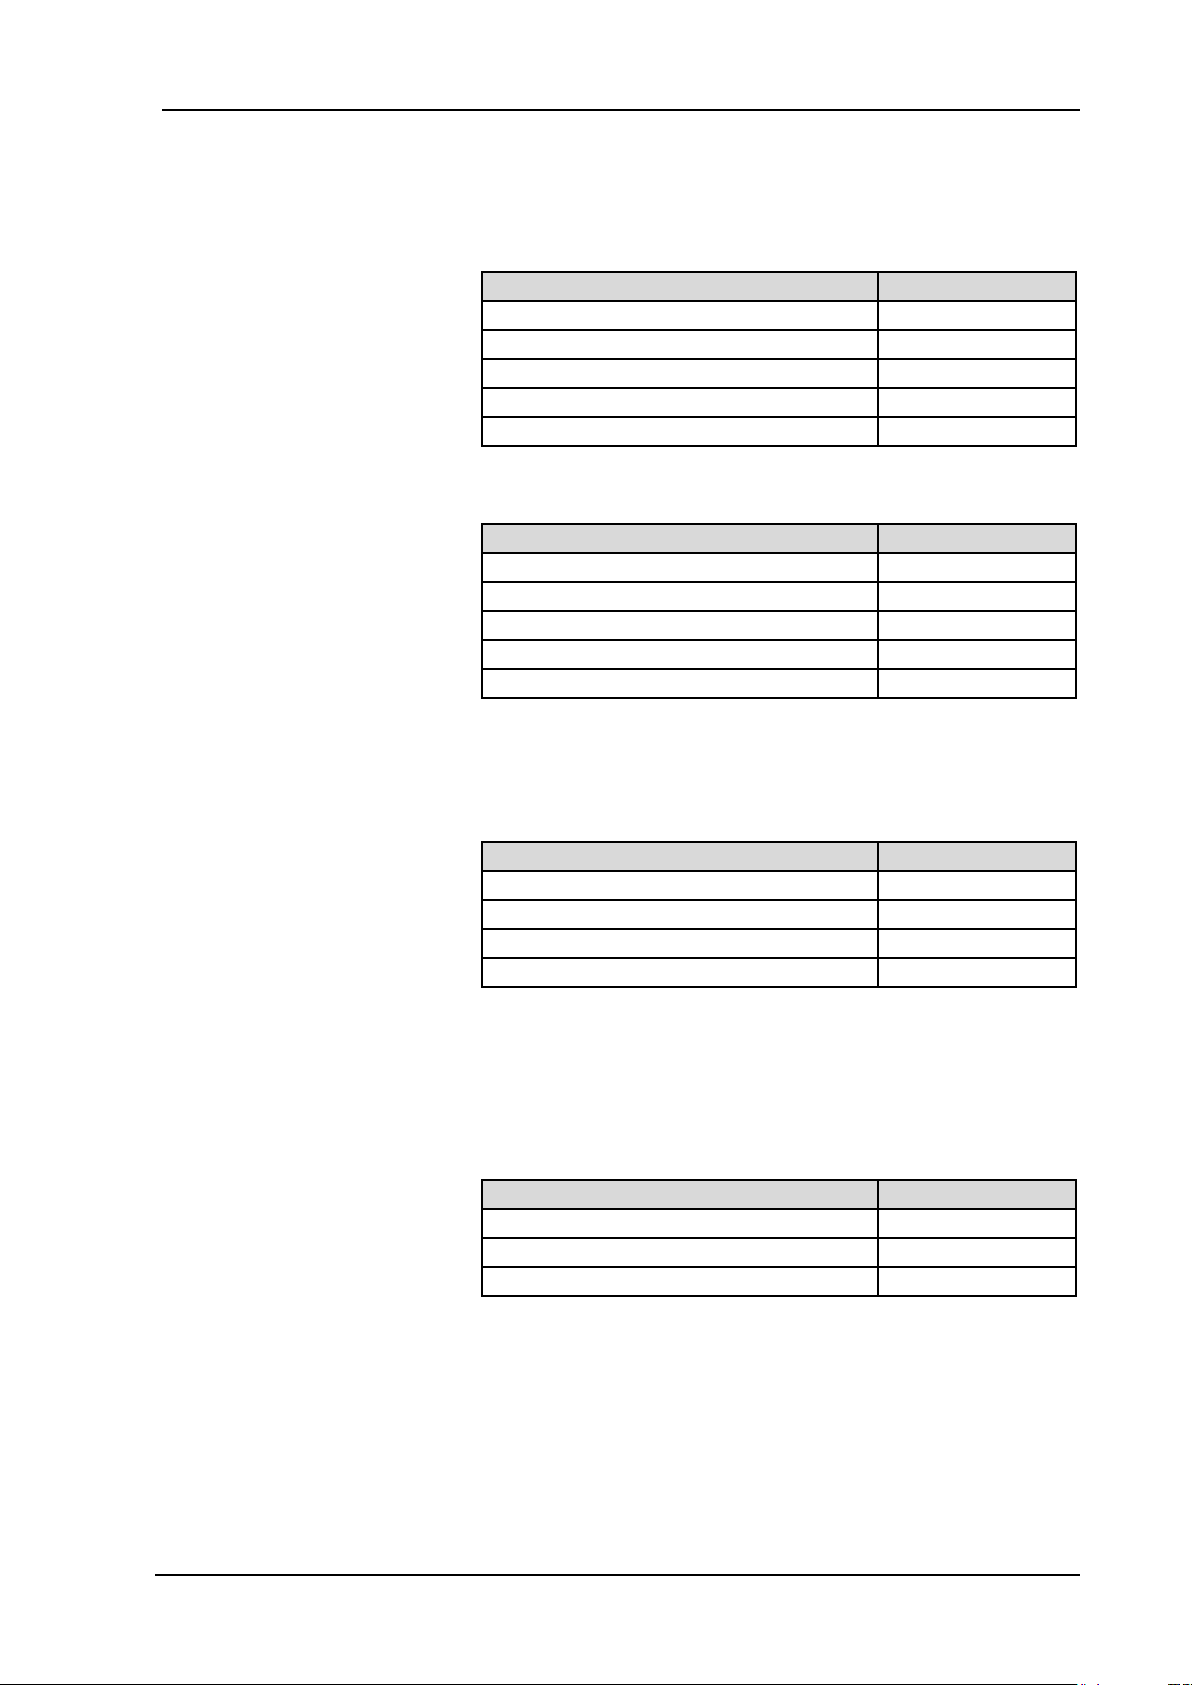
Pump materials
The pump type XP stands for:
Parts in contact with media
Material1)
Pump head
2)
PEEK
Valve plate
EPDM
O-ring
EPDM
Diaphragm
EPDM
Resonating Diaphragm
PTFE
Tab. 2
The pump type XT stands for:
Parts in contact with media
Material1)
Pump head 2)
PEEK
Valve plate
FFKM
O-ring
FFKM
Diaphragm
PTFE
Resonating diaphragm
PTFE
Tab. 3
1)
according to DIN ISO 1629 and 1043.1
2)
The pump head comprises an intermediate plate and a connecting plate
Hydraulic ratings
Parameter
Value
PN (nominal pressure) [bar g] 3)
16
Flow rate [ml/min] 4)
350
Max. suction head [mWG]
3
Max. inlet pressure [bar]
3)
0.5
Tab. 4
3)
Higher pressures are possible on a project basis
4)
Measured with water at 20 °C. Flow rates may vary from the values
shown, depending on fluid viscosity, pump head material and the hoses/hose connectors used.
Hydraulic connections
Parameter
Value
Push-in fittings external Ø [mm]
4 ± 0.1
Push-in fittings external Ø [inches]
5/32 ± 0.004
Recommended hose OD x ID [mm]
4.0 x 2.5
Tab. 5
Page 7
Diaphragm liquid pump NF 2.35 Technical data
KNF Flodos AG BA_NF2-35_EN_02_164912
Translation of original Operating and Installation Instructions 7
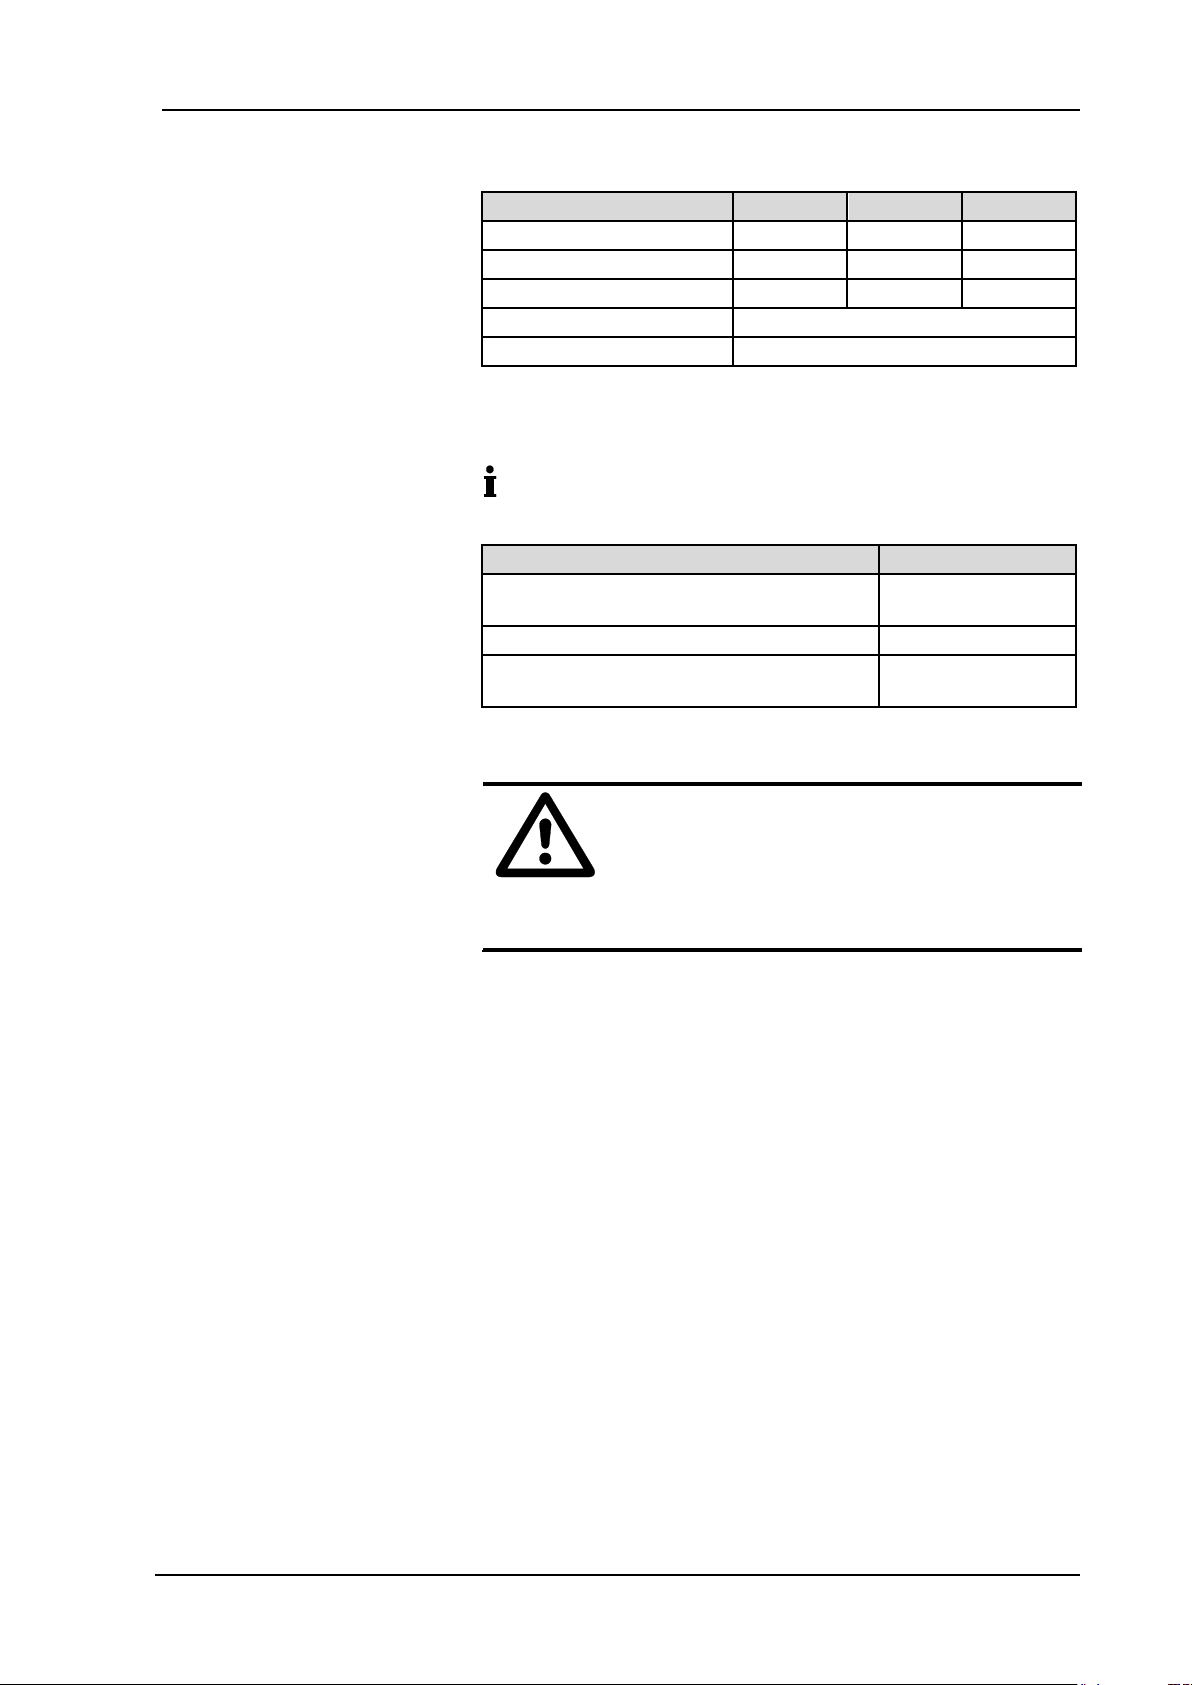
Specifications NF 2.35 DCB-B / DCB-4B
Motor variant
DCB-B
DCB-B
DCB-4B
Supply voltage [V]
12
24
10..26.4
Power consumption [W]
10.3
11
12.3
Max. I load [A]
0.86
0.46
1.1..0.44
Protection class [-]
IP50
Weight [g] 1)
260
Tab. 6
1)
The weight may differ slightly from the stated value, depending on the
version.
Electrostatic sensitive components (ESD)
Other parameters
Parameter
Value
Permissible
ambient temperature range [°C]
+5 to +40
Permissible media temperature range [°C]
+5 to +80
Permissible kinematic viscosity of medium
[cSt]
≤150
Tab. 7
CAUTION
Risk of burns when transferring hot media
➔ Do not touch the pump or the media transfer
system.
➔ Avoid contact with flammable materials.
Page 8
Diaphragm liquid pump NF 2.35 Assembly and function
KNF Flodos AG BA_NF2-35_EN_02_164912
Translation of original Operating and Installation Instructions 8
5. Assembly and function
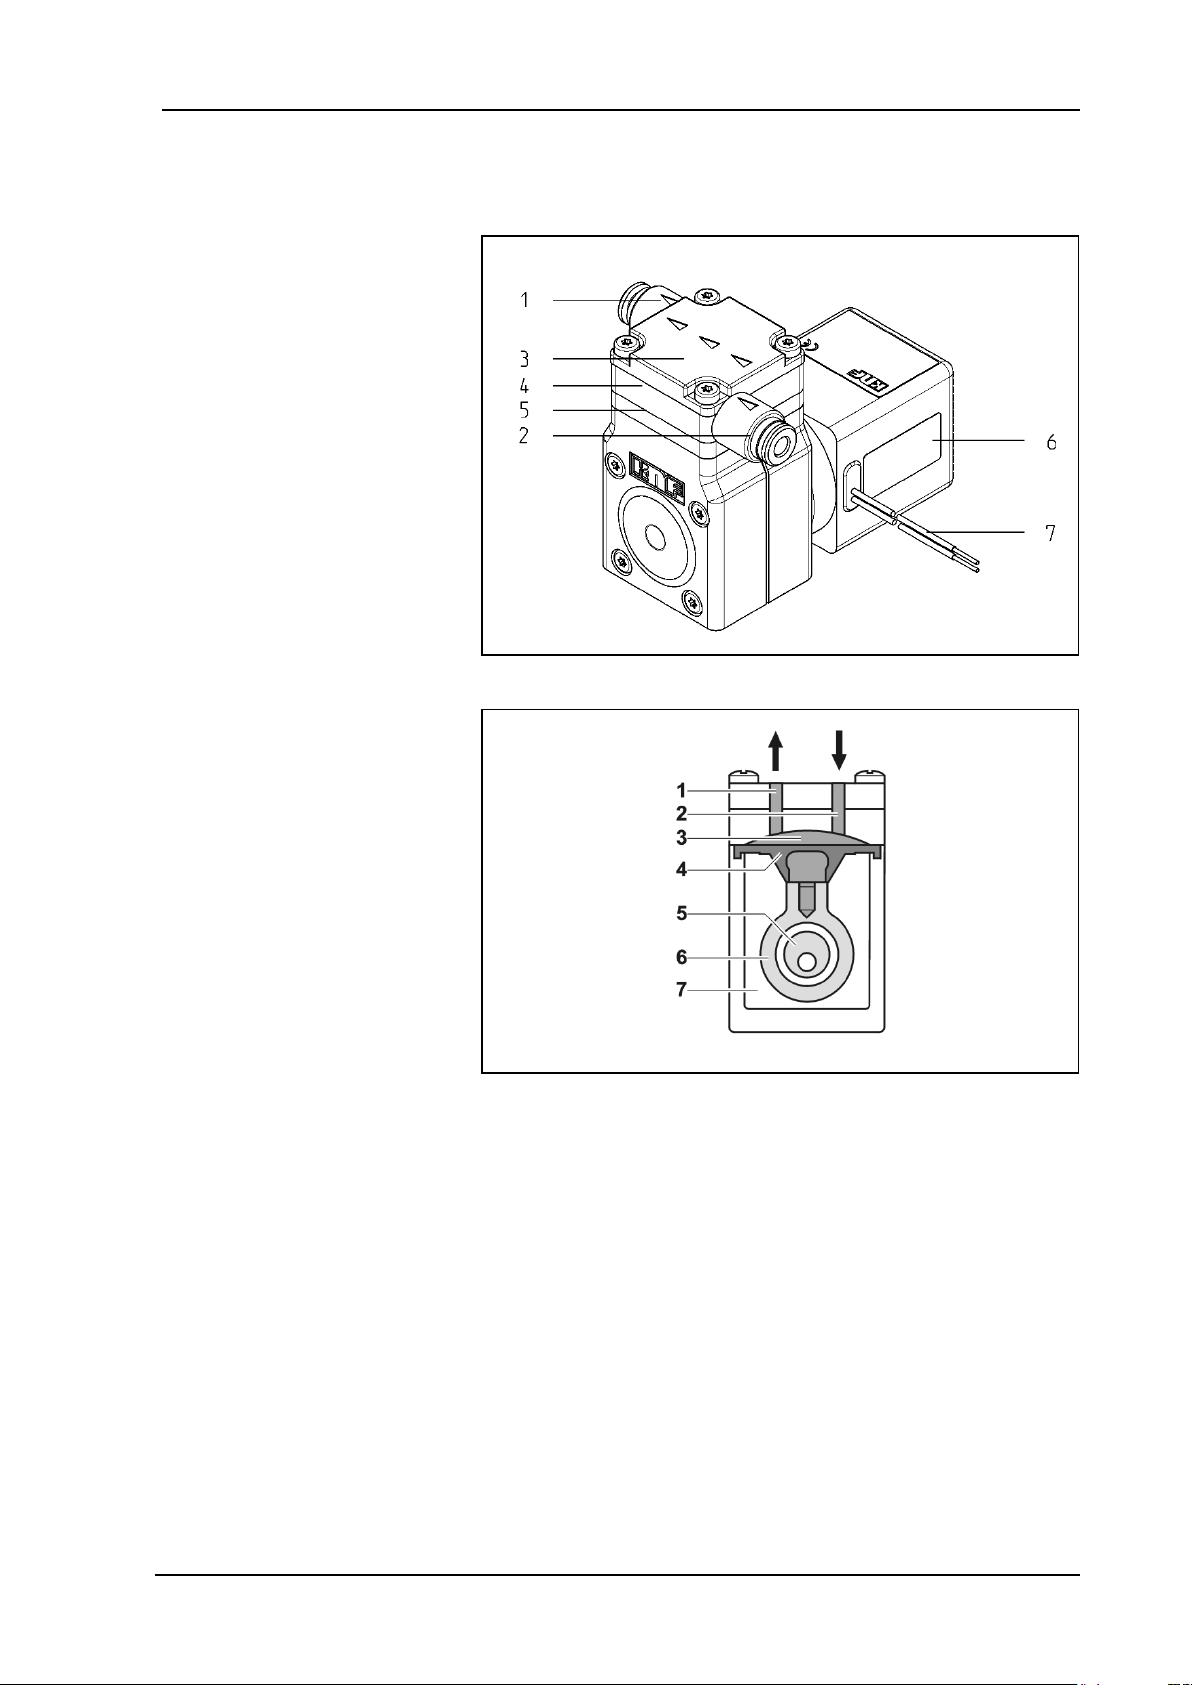
Assembly
1 Outlet
2 Inlet
3 Head plate
4 Connecting plate
5 Intermediate plate
6 Motor
7 Connecting lead
Fig. 1: Diaphragm liquid pump
1 Outlet valve
2 Inlet valve
3 Working chamber
4 Diaphragm
5 Eccentric
6 Connecting rod
7 Pump drive
Fig. 2: Pump assembly
The diaphragm liquid pumps are based on reciprocating displacement pump technology. The elastic diaphragm (4) is moved up and
down by the eccentric (5) and the connecting rod (6). In the downward stroke it aspirates the medium to be transferred via the inlet
valve (2). In the upward stroke, the diaphragm pushes the medium
out of the pump head via the outlet valve (1). The diaphragm
hermetically seals off the working chamber (3) from the pump drive
(7).
Page 9
Diaphragm liquid pump NF 2.35 Installation and connection
KNF Flodos AG BA_NF2-35_EN_02_164912
Translation of original Operating and Installation Instructions 9
6. Installation and connection
Please note:
Chapter 2 Use
Chapter 3 Safety
Chapter 4 Technical data
Only install the pumps under the operating parameters and conditions permitted in these instructions.
➔ Before installation, store the pump at the installation location to
bring it up to ambient temperature.
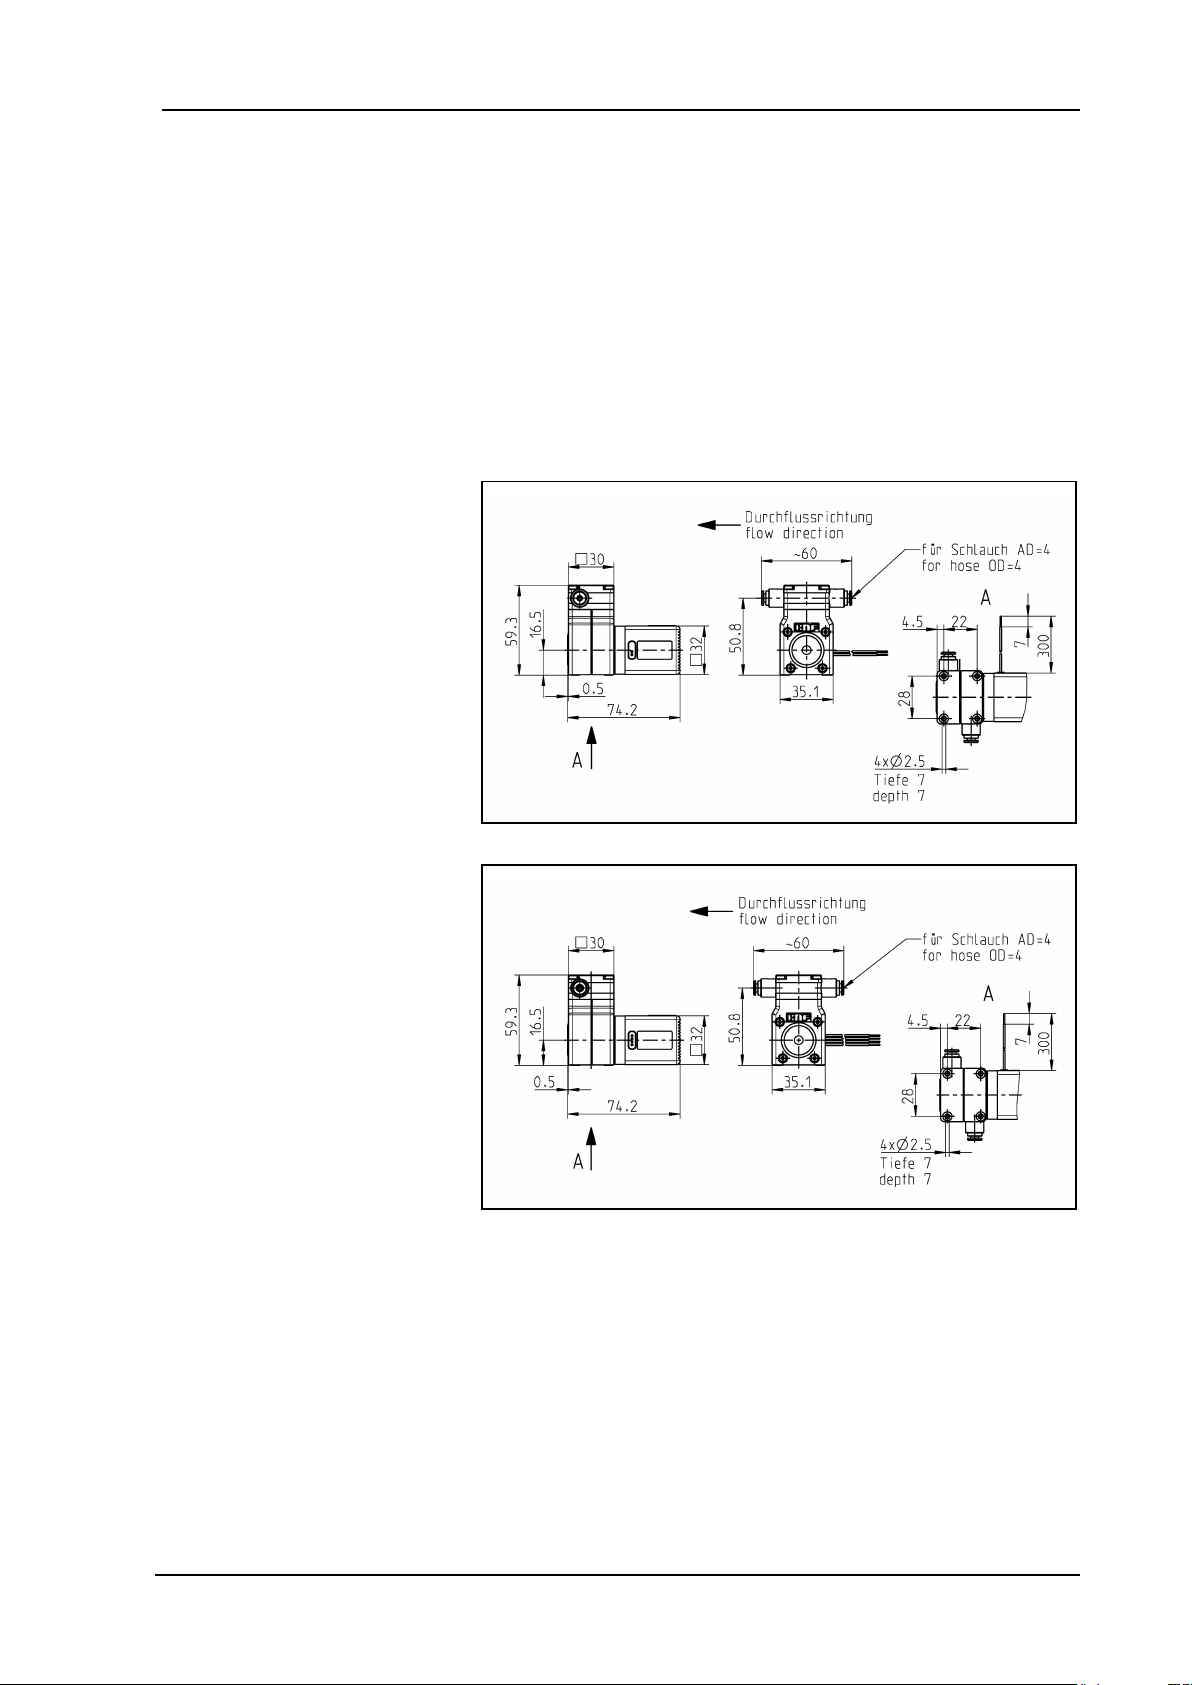
➔ Mounting dimensions (see Fig. 3 and 4)
Fig. 3: Mounting dimensions NF 2.35 DCB-B
Fig. 4: Mounting dimensions NF 2.35 DCB-4B
➔ Make sure that the installation location is dry and the pump is
protected against water in the form of rain, spray, splashes and
drips.
➔ Protect the pump against dust.
➔ Protect the pump against vibration and impact.
➔ The pump can be mounted in any orientation.
Mounting dimensions
Installation location
Installation position
Page 10
Diaphragm liquid pump NF 2.35 Installation and connection
KNF Flodos AG BA_NF2-35_EN_02_164912
Translation of original Operating and Installation Instructions 10
6.1. Electrical connection
➔ Only have the pump connected by an authorized specialist.
➔ Only connect the pump when the power supply is disconnected.
➔ When connecting the device to a power source, the applicable
norms, directives, regulations and technical standards must be
observed.
Connecting the pump
Make sure that the power supply data match the data on the
motor's type plate. The current consumption can be found on
the type plate.
Connect motor lead For electrical data see Chapter 4.
Note the proper polarity.
red motor lead: +
black motor lead: -
Page 11
Diaphragm liquid pump NF 2.35 Installation and connection
KNF Flodos AG BA_NF2-35_EN_02_164912
Translation of original Operating and Installation Instructions 11
6.2. Hydraulic connection
➔ Only connect components to the pump that are designed to
handle the hydraulic data of the pump (see
Chapter 4, Technical data).
➔ Only use hoses that are suitable for the maximum possible
operating pressure and the maximum possible operating temperature of the liquids to be transferred.
➔ Only use hoses that are sufficiently chemically resistant to the
liquids being pumped.
6.2.1. Connecting the pump
Arrows on the pump head indicate the flow direction.
Remove the protective caps from the connections.
Connect the suction and pressure lines. (See Installing the
plug-in coupling on the next page)
Keep the suction line as short as possible in order to facilitate
the priming process.
Check that the hoses and transition joints are fitted correctly
and securely.
Check that the system is leak-tight.
WARNING
The bursting of unprotected parts of the system
may cause fatal injury.
The pump has no built-in pressure limitation. When
the pump is transferring liquids in closed systems,
the pressure can increase to a very high level, and
this may result in the bursting of pressure vessels,
pipes or other parts of the system.
The pump will be permanently damaged if operated
against pressures which exceed those stated in the
technical data.
➔ It is essential to protect any system in which the
pump is installed against overpressure by means
of a suitable safety device.
One means of preventing excessive pressure and the
inherent dangers thereof is to place a bypass line with a
pressure relief valve between the pressure and suction
sides of the pump. For further information, contact your
KNF technical adviser (for contact details, see last page).
Connected
components
Hoses
Protect against overpressure
Page 12
Diaphragm liquid pump NF 2.35 Installation and connection
KNF Flodos AG BA_NF2-35_EN_02_164912
Translation of original Operating and Installation Instructions 12
C C D
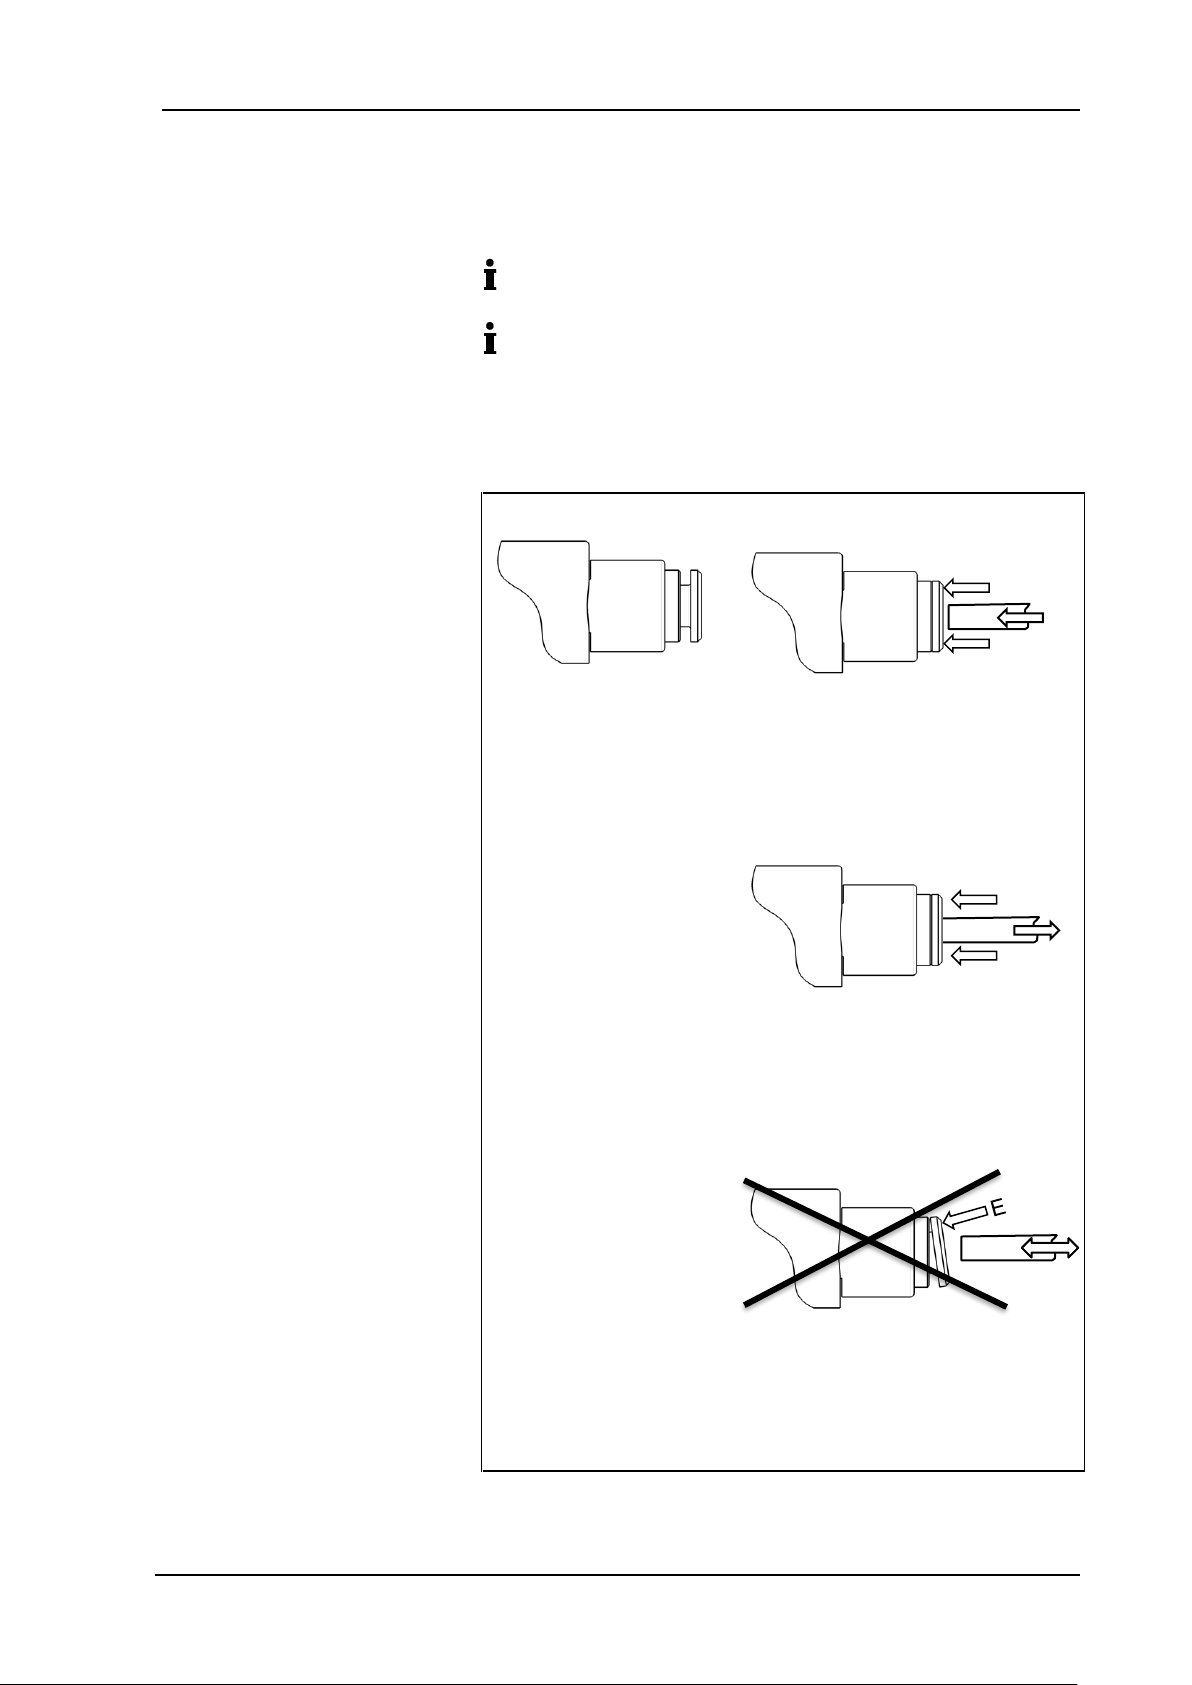
Plug-in couplings are a particularly easy way of permanently connecting the pump to pressure-resistant plastic hoses and plastic
pipes.
The hoses or plastic pipes must be cut straight and have a
smooth, undamaged surface.
If one or both of the plug-in couplings is unfastened during
servicing, it is recommended to use a new head plate with new
rubber part to ensure continued maximum leak-tightness.
Service Kit Pump Head NF 2.35 XP item no. 165 704
NF 2.35 XT item no. 165 705
Plug-in connector not actuated
Correct fitting:
Keep release ring pressed in as far
as it will go on both sides (A). Push
hose in as far as it will go (B). Let go
of release ring.
Correct releasing:
Keep release ring pressed in as far
as it will go on both sides (C). Remove hose (D). Let go of release
ring.
Incorrect fitting and removal:
If release ring is pressed in on one
side only (E), the hose can neither
be fitted nor released.
Fig. 5
Installing the plug-in coupling
A A B
Page 13
Diaphragm liquid pump NF 2.35 Operation
KNF Flodos AG BA_NF2-35_EN_02_164912
Translation of original Operating and Installation Instructions 13
7. Operation
➔ Only operate the pumps under the operating parameters and
conditions permitted in these instructions (see especially Chapter 4, Technical data).
➔ Make sure that the pumps are being used properly (see Chap-
ter 2.1).
➔ Avoid improper use of the pumps (see Chapter 2.2).
➔ Observe the safety precautions (see Chapter 3).
➔ The pumps are components that are intended to be incorpo-
rated into another machine. Before putting them into service it
must be established that the machinery or systems in which
they are installed meet the relevant regulations.
CAUTION
Risk of burning
The motor heats up.
➔ Avoid contact with the pump motor.
➔ Avoid contact with flammable materials.
One means of preventing excessive pressure and the
inherent dangers thereof is to place a bypass line with a
pressure relief valve between the pressure and suction
sides of the pump. For further information, contact your
KNF technical adviser (for contact details, see last page).
➔ If the pump stops running, restore the system to normal at-
mospheric pressure.
For pumps with thermal switch or electronic overload protection:
WARNING
Personal injury or damage to pumps or the connected system as a result of automatic start-up
If the pump overheats and pump operation is
stopped by the thermal switch / electronics, the pump
will restart automatically as soon as it has had time to
cool down.
➔ Take steps to ensure that this cannot produce a
hazardous situation.
Replace filter (accessory) if dirty.
Check the pump regularly for external damage or leaks.
Switching the pumps on and off
The motor speed of the pump, and thus the flow rate, is adjustable
and can also be regulated to some extent
.
Pump standstill
Filter
Check the pump
Setting and regulating motor
speed
Page 14
Diaphragm liquid pump NF 2.35 Operation
KNF Flodos AG BA_NF2-35_EN_02_164912
Translation of original Operating and Installation Instructions 14
Duty cycle / short cycle operation
KNF pumps are designed for continuous operation.
If the pump is operated with short cycles in your application,
please contact a KNF technical adviser for further information
(for contact details, see last page).
Switching on the pump
➔ In order to guarantee that the pump can start every time it is
advisable to reduce the counterpressure to an acceptable level. If you experience a brief power interruption, check for the
presence of pressure or vacuum before restarting.
For more specific information contact your KNF technical
adviser.
Switching off the pump
➔ KNF recommends: If transferring aggressive liquids, the pump
should be flushed thoroughly prior to switch off (see Chapter
8.2.1), as this will help to lengthen the service life of the diaphragm.
➔ Restore the system to normal atmospheric pressure (release
hydraulic pressure in pump).
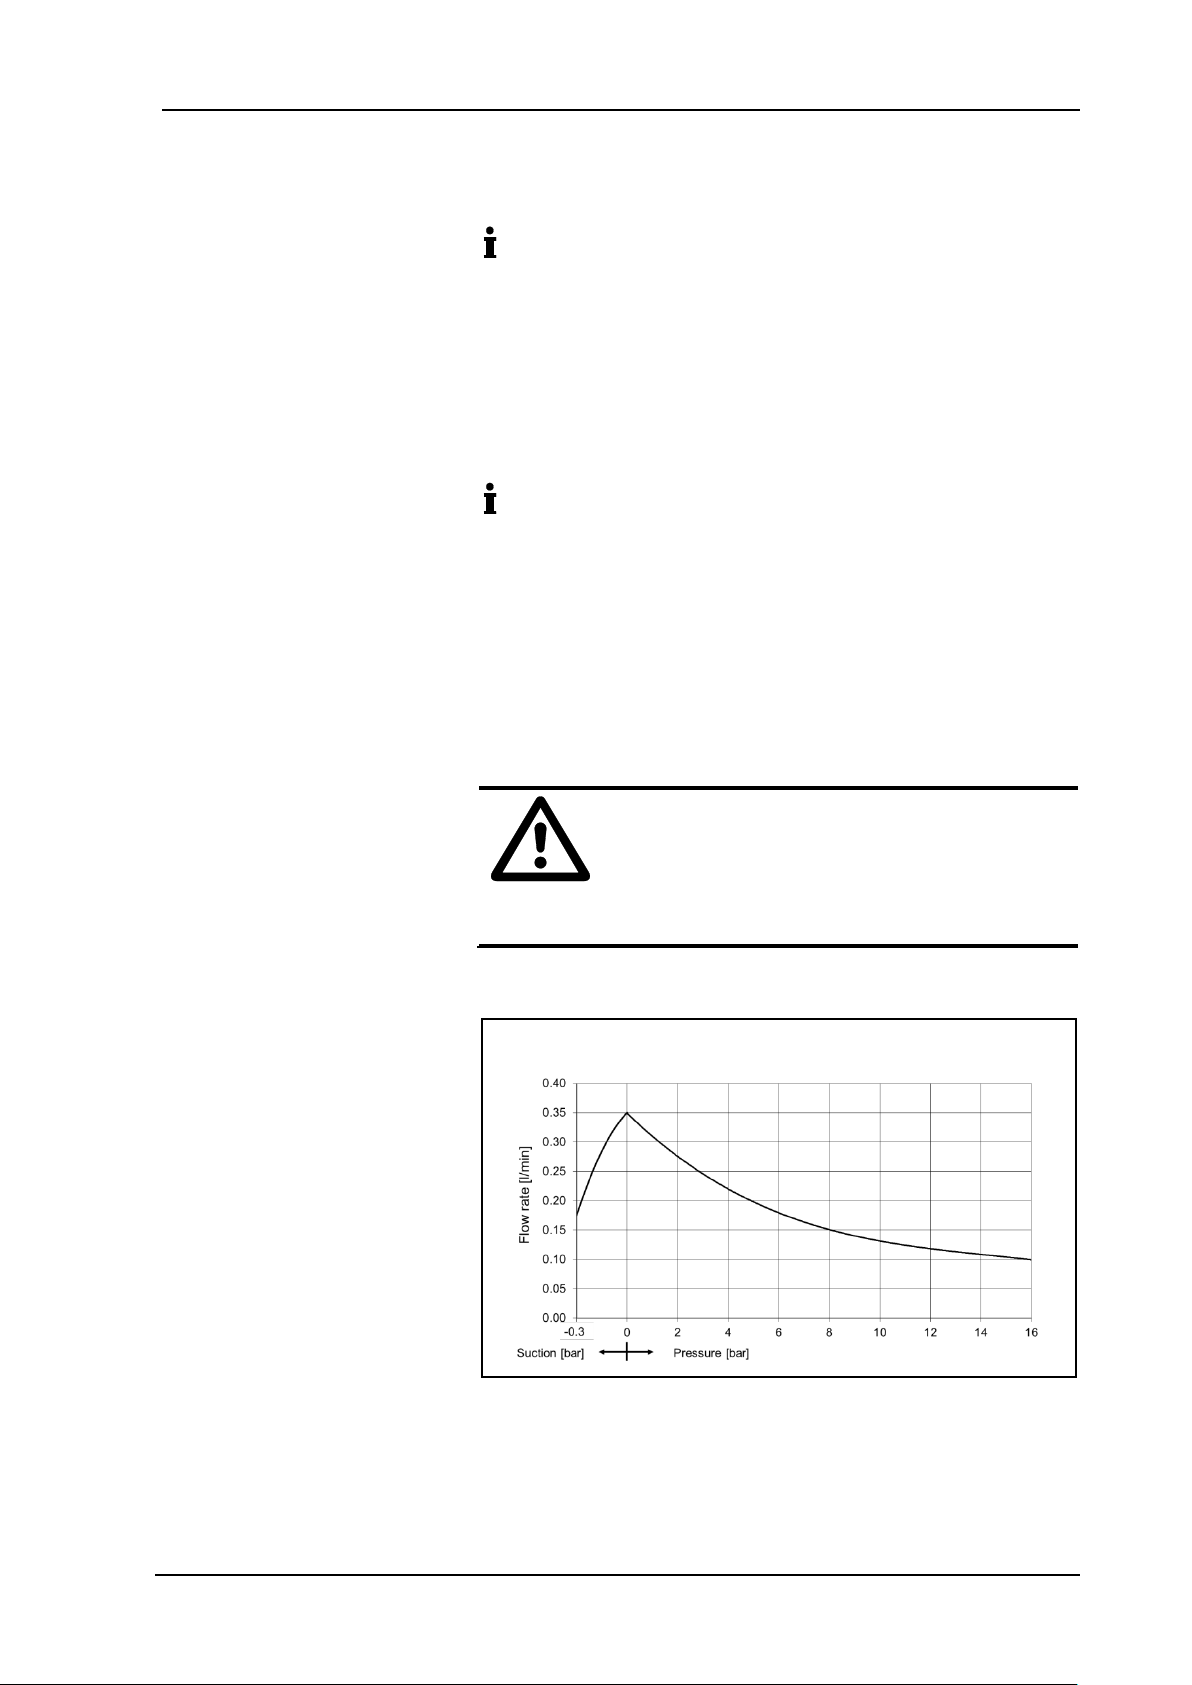
Flow rate NF 2.35
Fig. 6: Flow rate of the pump NF 2.35 DCB-B / DCB-4B
Impulse operation
CAUTION
Overpressure on the suction side causes medium to flow through the switched-off pump
➔ Take steps to ensure that this cannot produce a
hazardous situation.
Page 15
Diaphragm liquid pump NF 2.35 Servicing
KNF Flodos AG BA_NF2-35_EN_02_164912
Translation of original Operating and Installation Instructions 15
8. Servicing
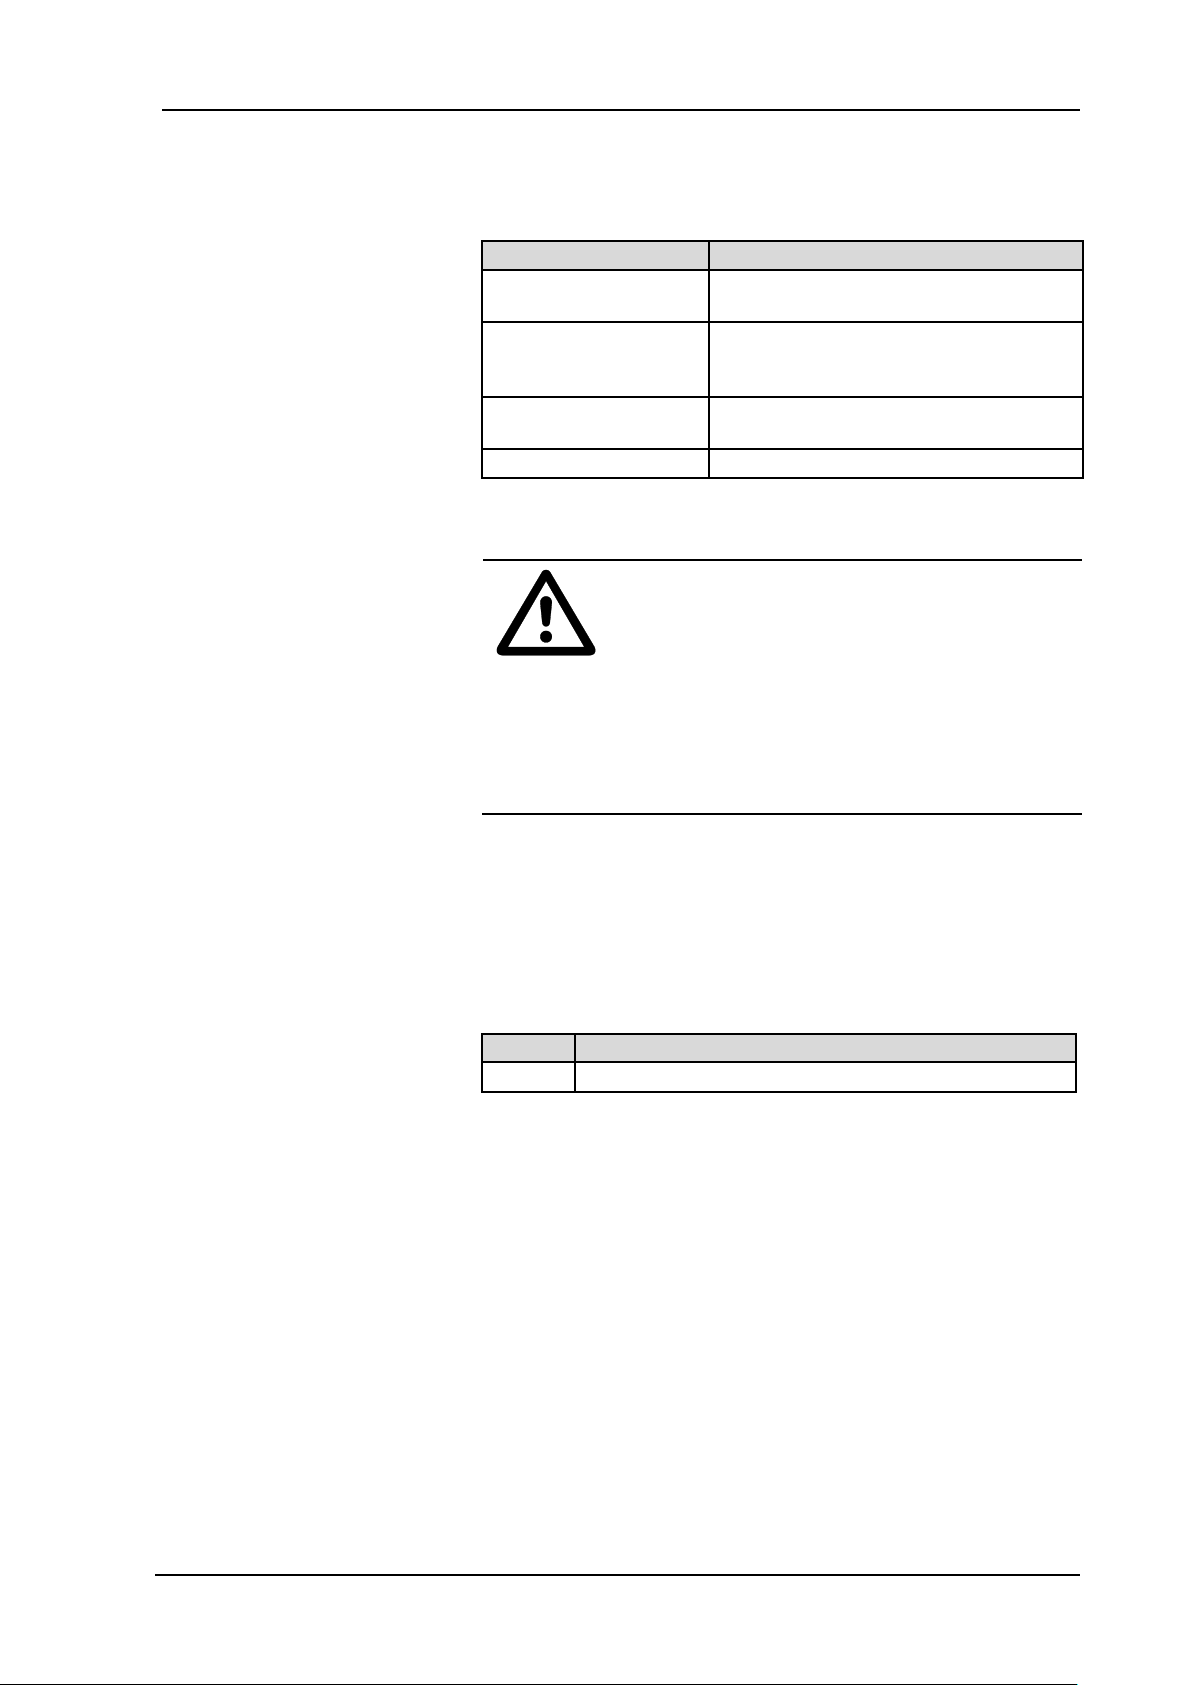
8.1. Servicing schedule
Component
Servicing interval
Pump
- Regular inspection for external
damage or leaks
Pump head
- Clean if the flow rate decreases, the
pump does not work or no vacuum
is created (Chapter 8.2)
Diaphragm, valve
plates and seals
- Change as soon as pumping capac-
ity decreases, preferably sooner
Filter (accessory)
- Change if it is dirty
Tab. 8
8.2. Disassemble pump head
WARNING
Health hazard due to dangerous
substances in the pump
Depending on the medium transferred, caustic burns
or poisoning are possible.
➔ Wear protective clothing if necessary, e.g. pro-
tective gloves.
➔ Flush the pump with a neutralising liquid and
pump empty.
8.2.1. Preparations for disassembly
1. Flush the pump with a suitable neutralising liquid, and make
sure that no dangerous substances are left in the pump
2. Empty the pump
3. Separate electrical connections
4. Disconnect hoses from pump head
Qty
Tool
1
T10 Torx screwdriver
Tab. 9
Information on procedure
Tool
Page 16
Diaphragm liquid pump NF 2.35 Servicing
KNF Flodos AG BA_NF2-35_EN_02_164912
Translation of original Operating and Installation Instructions 16
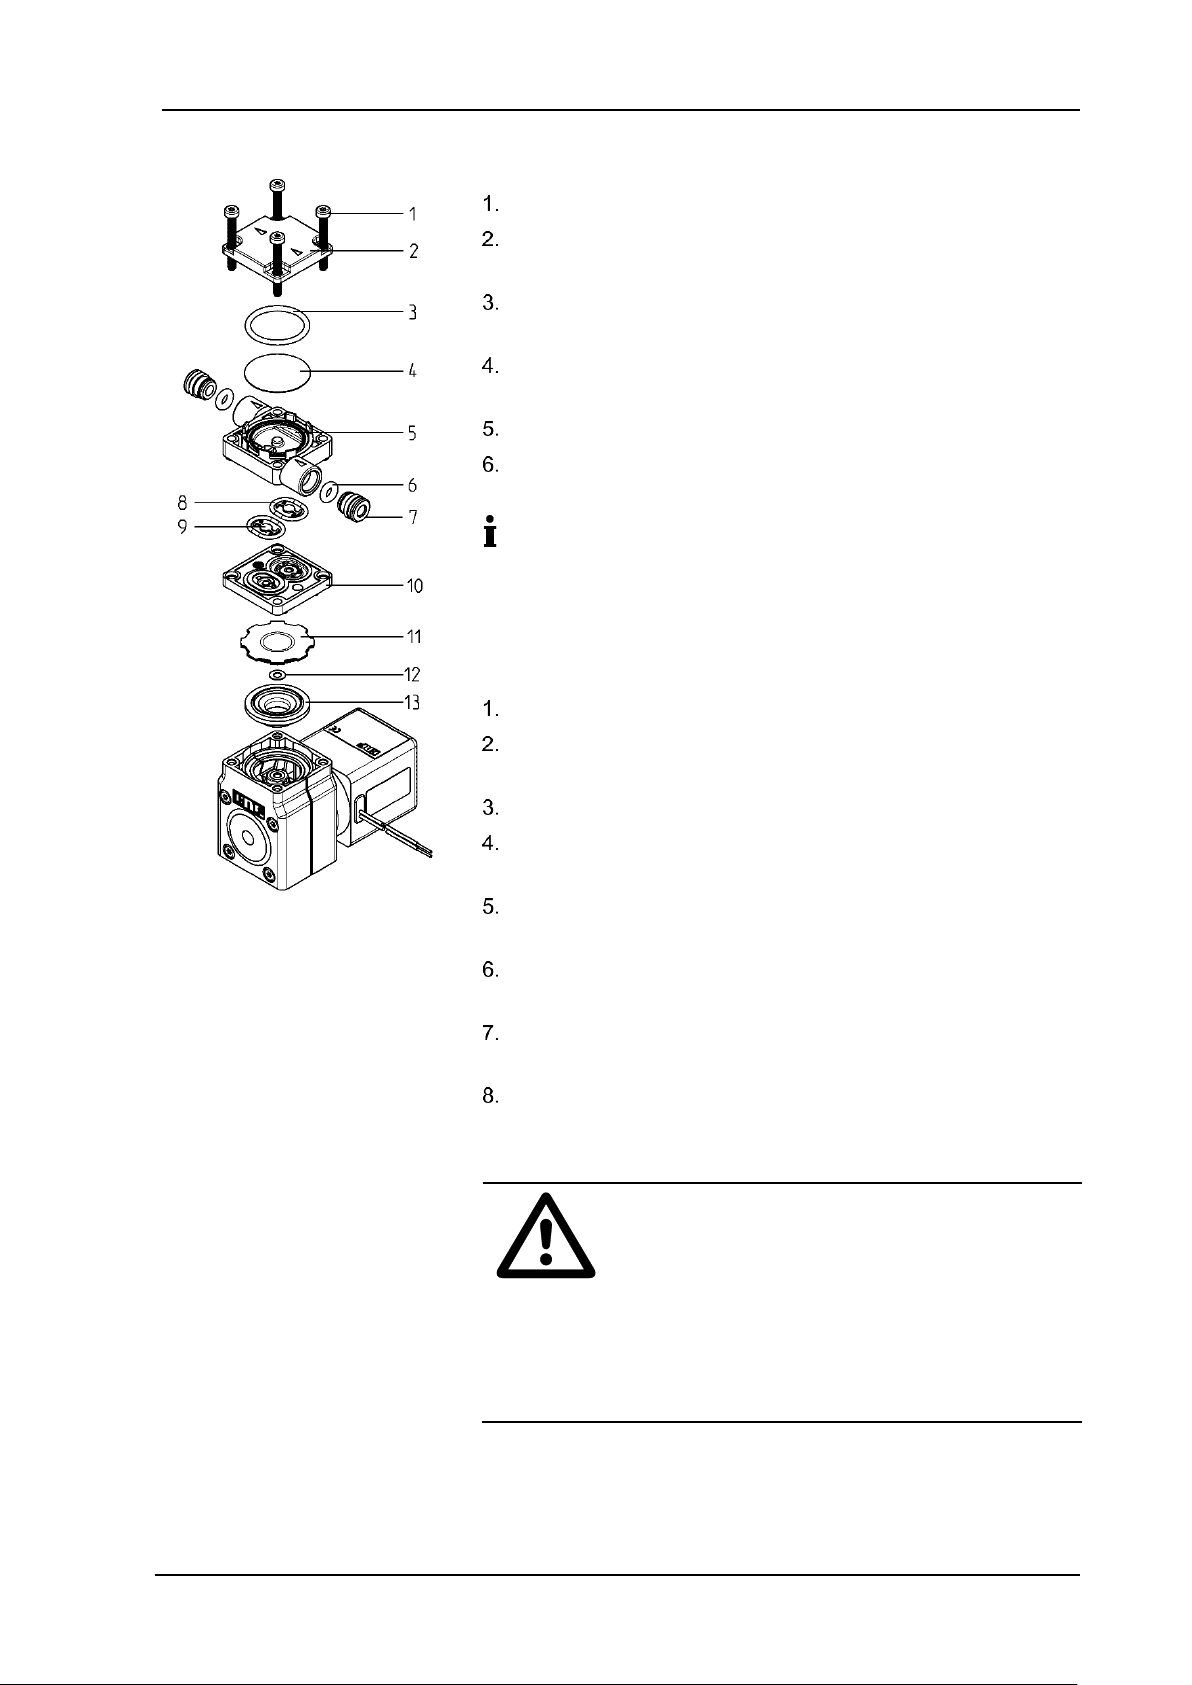
8.2.2. Disassembling the pump head
Loosen the four head screws (1).
Remove resonating diaphragm (4) and seal (3) from the con-
necting plate (5).
Take both O-rings (8) and anchor valves (9) out of the connect-
ing plate (5), together with the intermediate plate (10).
Remove diaphragm (11) by hand. Make sure that no washers
(12) fall into the pump housing.
Remove insert ring (13).
Clean any residues thoroughly off all parts. Purge and dry with
compressed air.
For maximum leak-tightness it is recommended that, after
opening the pump head, the rubber parts { diaphragm (11),
anchor valves (9), seals (8), seal(3) },
resonating diaphragm (4) and connecting plate (5) should be
replaced and new hoses used.
8.2.3. Assembling the pump head
Place insert ring (13) in pump housing.
Screw diaphragm (11) with washer (12) into connecting rod.
Make sure that no washers (12) fall into the pump housing.
Fully tighten the diaphragm by hand.
Place O-rings (8) and anchor valves (9) in intermediate plate
(10) and connecting plate (5).
Bring together intermediate plate (10) and connecting plate (5),
making sure that they are aligned correctly with one another.
Place intermediate plate (10) and connecting plate (5) on the
pump housing together.
Place resonating diaphragm (4) and seal (3) in connecting
plate (5).
Place head plate (2) on connecting plate (5) and secure using
the 4 head screws (1).
CAUTION
Escaping liquid
After assembly the pump may not be leak-tight due
to incorrect assembly, damaged or soiled seal faces,
or other reasons.
➔ Run pump for several minutes with a harmless
liquid at maximum operating pressure.
➔ Check that pump is leak-tight.
Fig. 7: Head parts
1 Head screws
2 Head plate
3 Seal
4 Resonating diaphragm
5 Connecting plate
6 Seals
7 Plug insert
8 Seals
9 Anchor valves
10 Intermediate plate
11 Pump diaphragm
12 Washers
13 Insert ring
Page 17
Diaphragm liquid pump NF 2.35 Troubleshooting
KNF Flodos AG BA_NF2-35_EN_02_164912
Translation of original Operating and Installation Instructions 17
9. Troubleshooting
➔ Disconnect the pump from the power supply before working on
the pump.
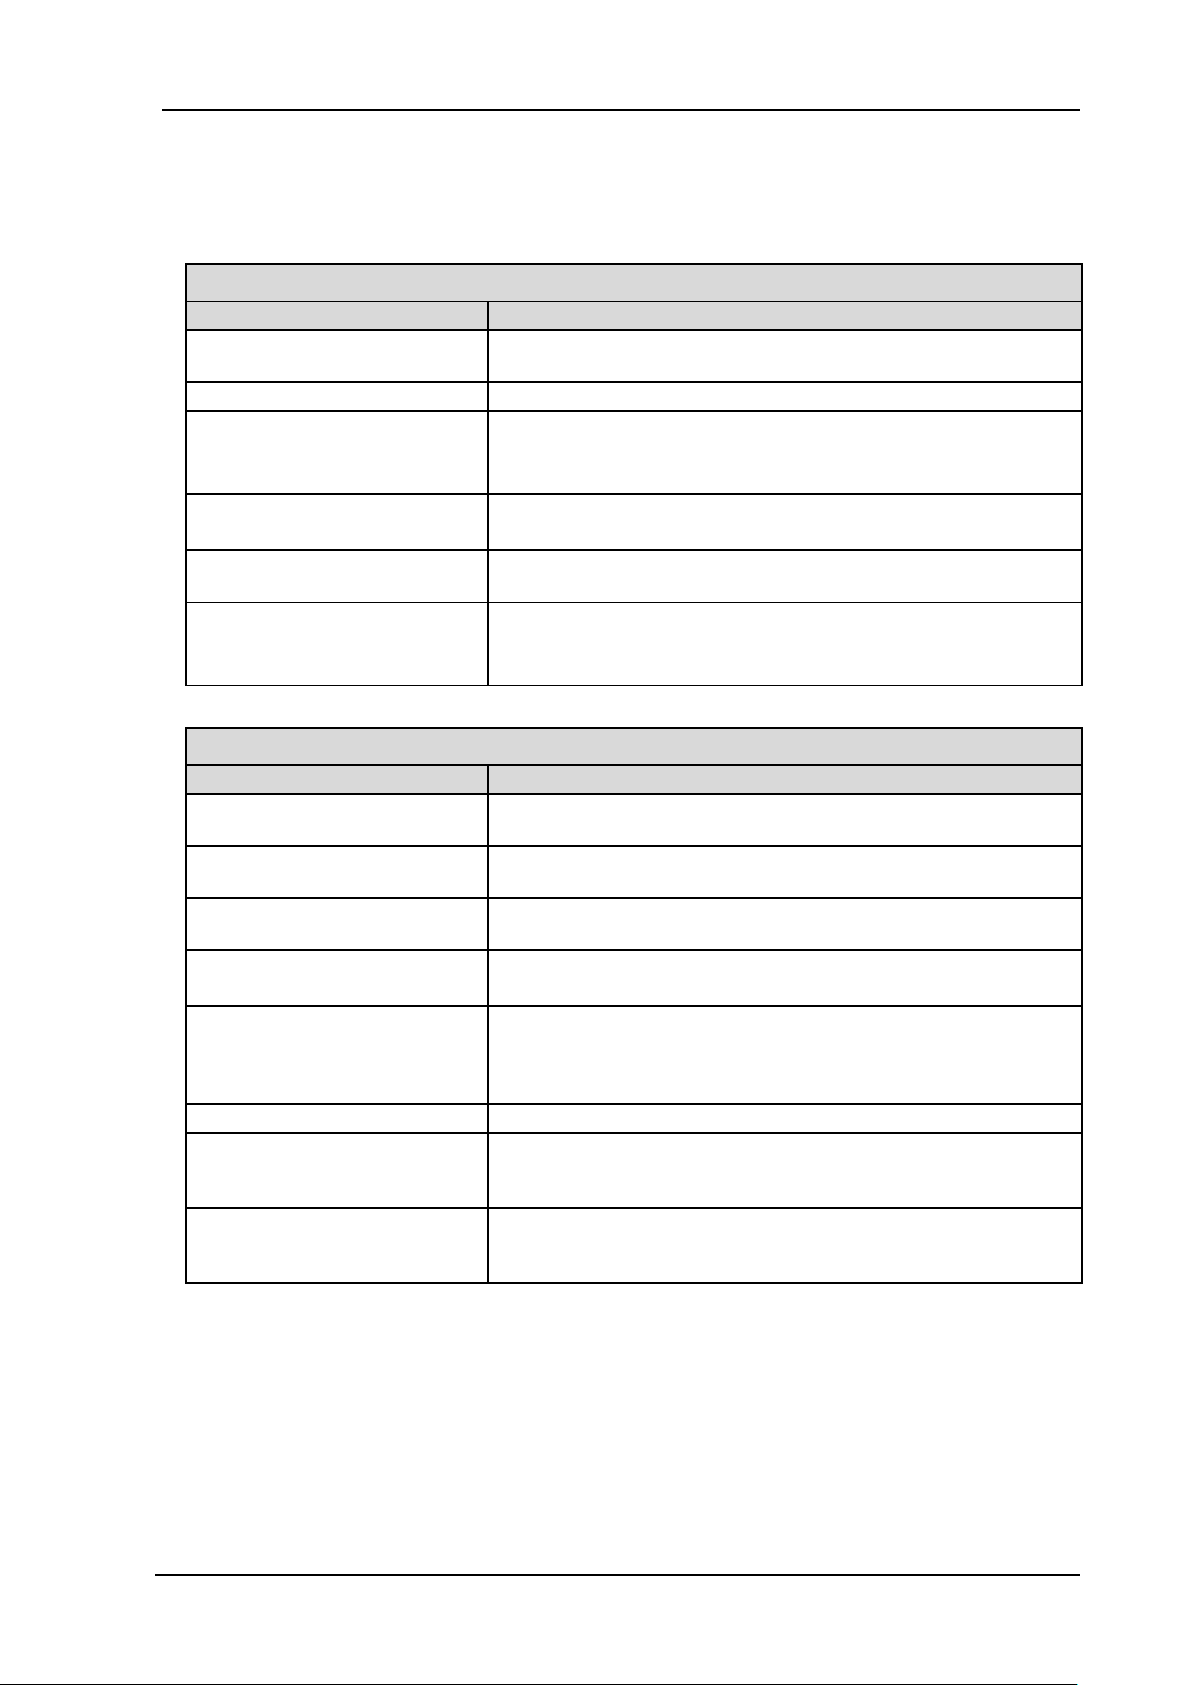
Pump does not work
Possible cause
Fault remedy
Pump not connected to power
supply
➔ Connect pump to power supply
Power supply is not switched on
➔ Switch on power supply
Thermal switch or pump electronics have tripped
➔ Disconnect pump from the mains
➔ Allow pump to cool
➔ Identify and eliminate cause of overheating/overload
Connections or hoses are
blocked
➔ Check connections and hoses
➔ Remove blockage
External valve is closed or filter
is clogged
➔ Check external valves and filters
Diaphragm, valve plates or
seals are worn
➔ Replace diaphragm, valve plates and seals
(see Chapter 8.2)
➔ Replace pump
Tab. 10
Pump is not priming
Possible cause
Fault remedy
Suction side of pump not connected
➔ Connect the suction side of the pump
Liquid in the priming container is
too low
➔ Fill priming container
Hose connections are not leaktight
➔ Secure transition joints between hose and connections with
clamps or other clamping elements
System valve is closed or filter
is clogged
➔ Open system valve
➔ Clean filter
Pump head is filled with gas.
The system is unable to handle
the pressure on the pressure
side
➔ Reduce pressure at pressure side
Particles in the pump
➔ Clean the pump head (see Chapter 8.2)
The pump parts are not resistant to the medium to be
pumped
➔ Replace the pump head with a compatible version
Incorrect interchange of pressure and suction line connections
➔ Remove pressure and suction lines and re-connect correctly
Tab. 11
Page 18
Diaphragm liquid pump NF 2.35 Troubleshooting
KNF Flodos AG BA_NF2-35_EN_02_164912
Translation of original Operating and Installation Instructions 18
Flow rate, suction head or pressure head is too low
The pump does not achieve the performance stated in the technical data or on the data sheet.
Possible cause
Fault remedy
Components in the system
connected to the suction and
pressure sides, such as hoses,
valves or filters, are causing too
much resistance
➔ Modify installation, check cross-sections of components
Hose connections are not leaktight
➔ Secure transition joints between hose and hose connectors
with clamps or other clamping elements
Particles in the pump
➔ Clean the pump head, install suction-side filter if required
(see Chapter 8.2).
Viscosity of the transferred
medium is too high
➔ Contact KNF
Incorrect interchange of pressure and suction line connections
➔ Remove pressure and suction lines and re-connect correctly
The pump parts are not resistant to the medium to be
pumped
➔ Replace the pump head with a compatible version
Tab. 12
Fault cannot be rectified
If you are unable to identify any of the above causes, please send
the pump to KNF customer service (see address on last page).
Flush the pump with a suitable neutralising liquid to free the
pump head of dangerous or aggressive substances
Dismantle the pump
Clean the pump
Make sure that no dangerous substances are left in the
cleaned pump
Send the pump, with completed decontamination declaration
(see Chapter 11), to KNF customer service stating the nature
of the pumped medium
Page 19
Diaphragm liquid pump NF 2.35 Decontamination declaration
KNF Flodos AG BA_NF2-35_EN_02_164912
Translation of original Operating and Installation Instructions 19
10. Decontamination declaration
KNF shall only undertake to repair the pump on condition that
the customer provides certification of the transferred media
and the cleaning of the pump (decontamination declaration).
➔ In order to send a product back use the decontamination
declaration, which either was delivered with the product or is
available on http://www.knf.com (Downloads).
Please fill in the pump type, serial number, pumped media and all
other required information. Send the signed form together with the
product to your KNF representative.
Page 20
KNF worldwide
Please find your local KNF partners at: www.knf.com
 Loading...