

K'Nex GEAR ACTION 20 MODEL BUILDING SET, Imagine-Build-Play BUILDING FUN VALUE TUB Building Instructions
Page 1

Page 2

CAUTION: Keep hands, face, hair
and clothing away from
all moving parts.
WHAT’S INCLUDED
INSTRUCTIONS
GEAR ASSEMBLY 1 . . . . . . . . . . . . . 4
EAR ASSEMBLY 2 . . . . . . . . . . . . . 5
G
EAR-EYED FISH. . . . . . . . . . . . . . . 6
G
WING RIDE . . . . . . . . . . . . . . . . . . . 7
S
AND DRILL . . . . . . . . . . . . . . . . . . 10
H
ELICOPTER . . . . . . . . . . . . . . . . . . 12
H
OBO MOUSE . . . . . . . . . . . . . . . . 16
R
TEAM LOCOMOTIVE . . . . . . . . . . 20
S
T
ANK . . . . . . . . . . . . . . . . . . . . . . . . 24
HOMPING FISH . . . . . . . . . . . . . . 29
C
INSPIRATIONAL MODELS
KANGAROO . . . . . . . . . . . . . . . . . . 34
GG BEATER . . . . . . . . . . . . . . . . . 34
E
ADAR ANTENNA ROTOR . . . . . . 34
R
LYING MACHINE . . . . . . . . . . . . . 35
F
WING . . . . . . . . . . . . . . . . . . . . . . . 35
S
YCLE GAS STATION . . . . . . . . . . 35
C
AILROAD PUMP CAR . . . . . . . . . 36
R
EMENT TRUCK . . . . . . . . . . . . . . 36
C
OLLERBLADE. . . . . . . . . . . . . . . . 36
R
OBOT . . . . . . . . . . . . . . . . . . . . . . 36
R
“Hi! I’m your K NEX Building Buddy.
Need help... I’m here!
Look for me to guide you
as you select models
with the right level
of challenge.”
’
PARTS LIST
Before you start building, be sure to compare the
parts in your set with the parts listed here.
If anything is missing, check out the back cover
of this instructions booklet for ways to contact us.
We’re here to help!
2
Page 3
Here’s how you can help your child
PARENTS!
build with KNEX!
START BUILDING
To begin your model, find the and follow the
numbers. Each piece has its own shape and color.
Just look at the picture, find the pieces in your
set that match what
you see, and snap
them together.
Try to hold your
model in the same
direction as in the
picture so you’ll
attach your
pieces to the right
place.
NEXT STEP
The faded colors tell
you this section is
already built.
You’ll want to
connect the new
section to the place
where the arrows are
pointing.
These pieces will be
in full color.
1
3
1 3
1
4
-
2
l
CONNECTORS
These Connectors have
long slots so you can
join them. They slide
together as you see in
the picture. Push them
together until
you hear a "click."
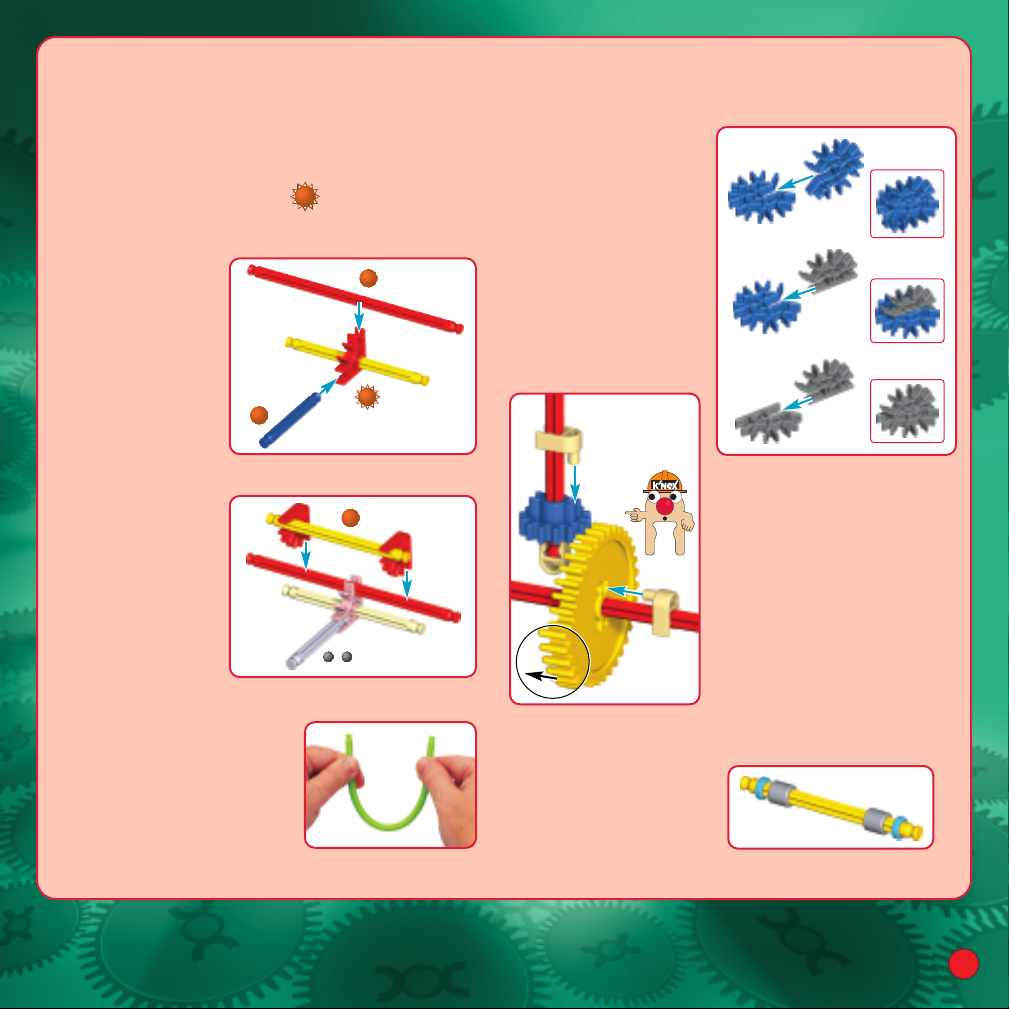
GEARS
To engage the Gears, push
the tan Lock into the holes.
Note the position of the Gear
and the direction of the teeth.
Make sure the Gears mesh.
FLEXI-RODS
A Flexi-rod is a Rod that you
bend to make curves. It will
be easier to attach to your
model if you bend it back and
forth first.
SPACERS
Some models use
different colored Spacers.
Be sure that you use
correct color, size and
number of Spacers.
3
Page 4

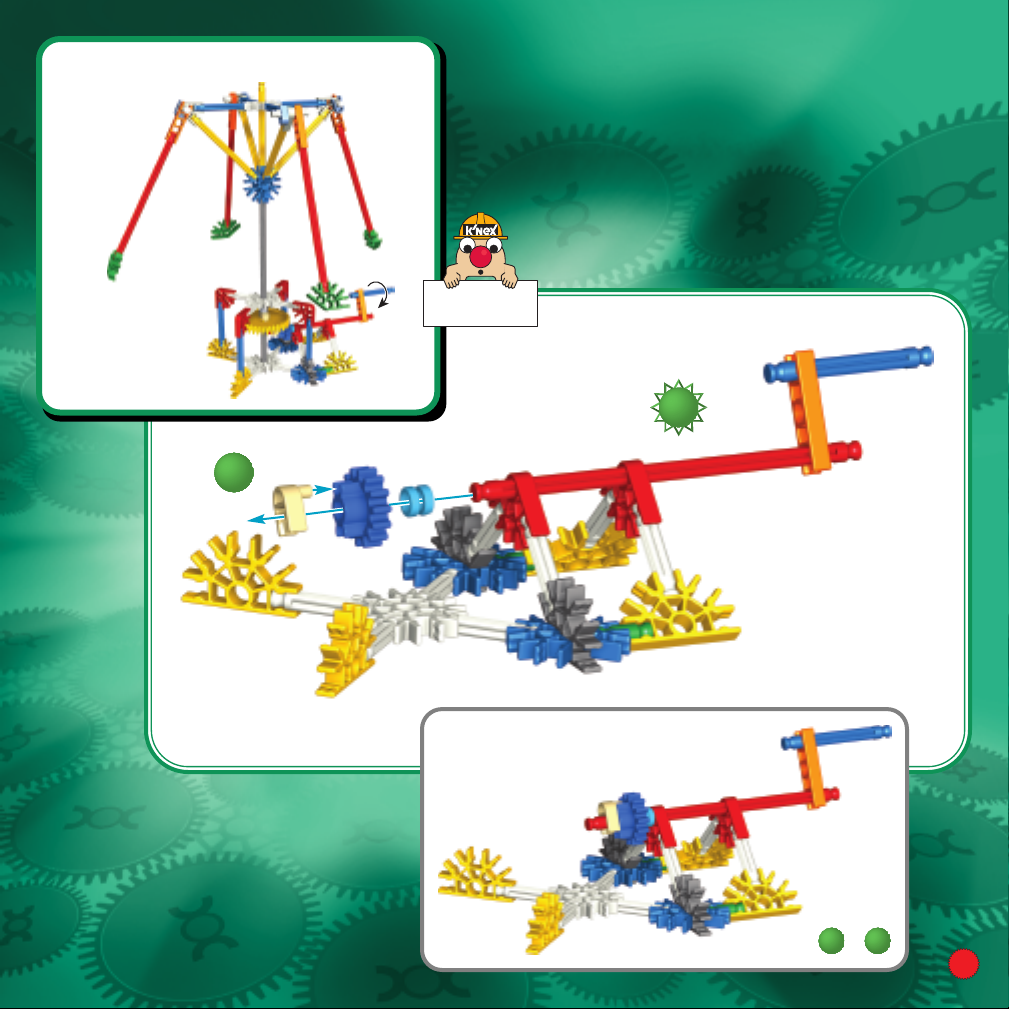
GEAR ASSEMBLY 1
FRIENDLY
CHALLENGE
FRIENDLY
CHALLENGE
2
3
5
4
4
1
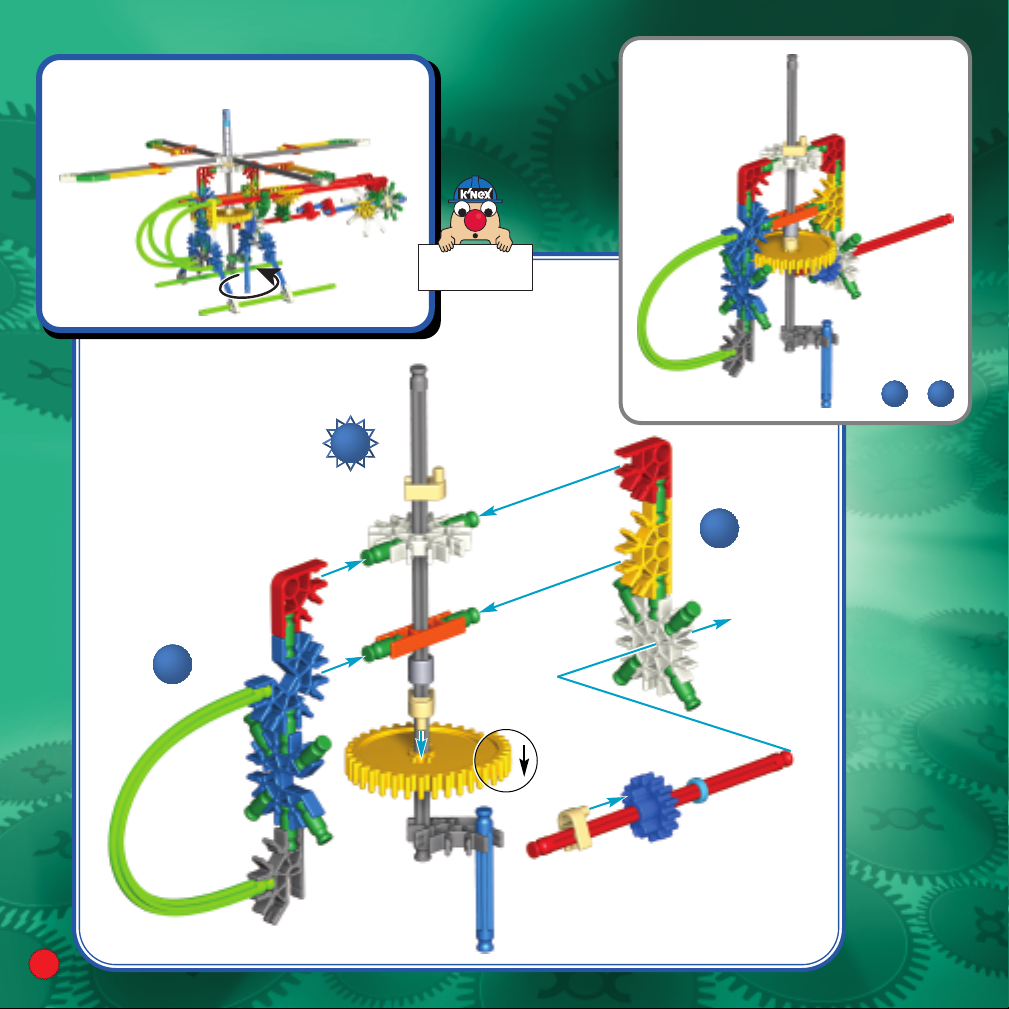
Page 5

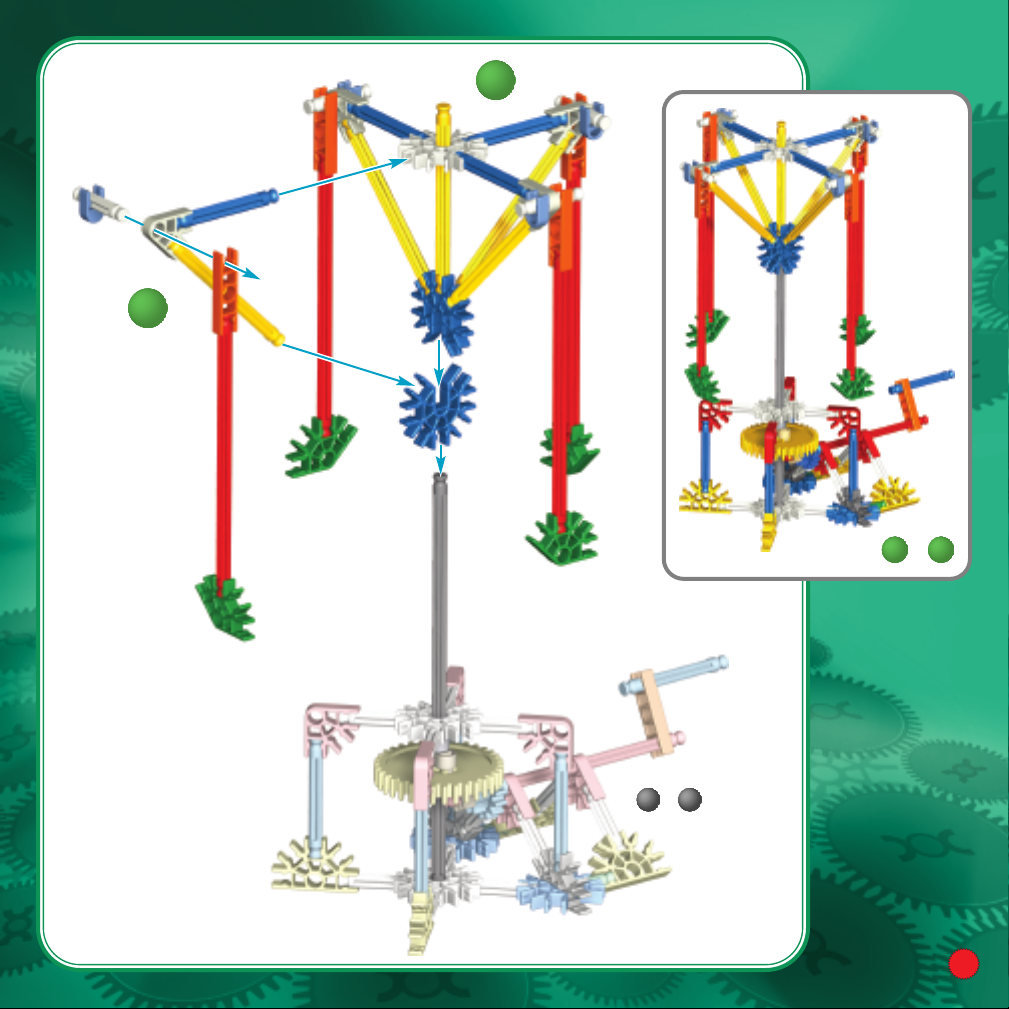
GEAR ASSEMBLY 2
FRIENDLY
CHALLENGE
FRIENDLY
CHALLENGE
4
3
2
1
1
1
5
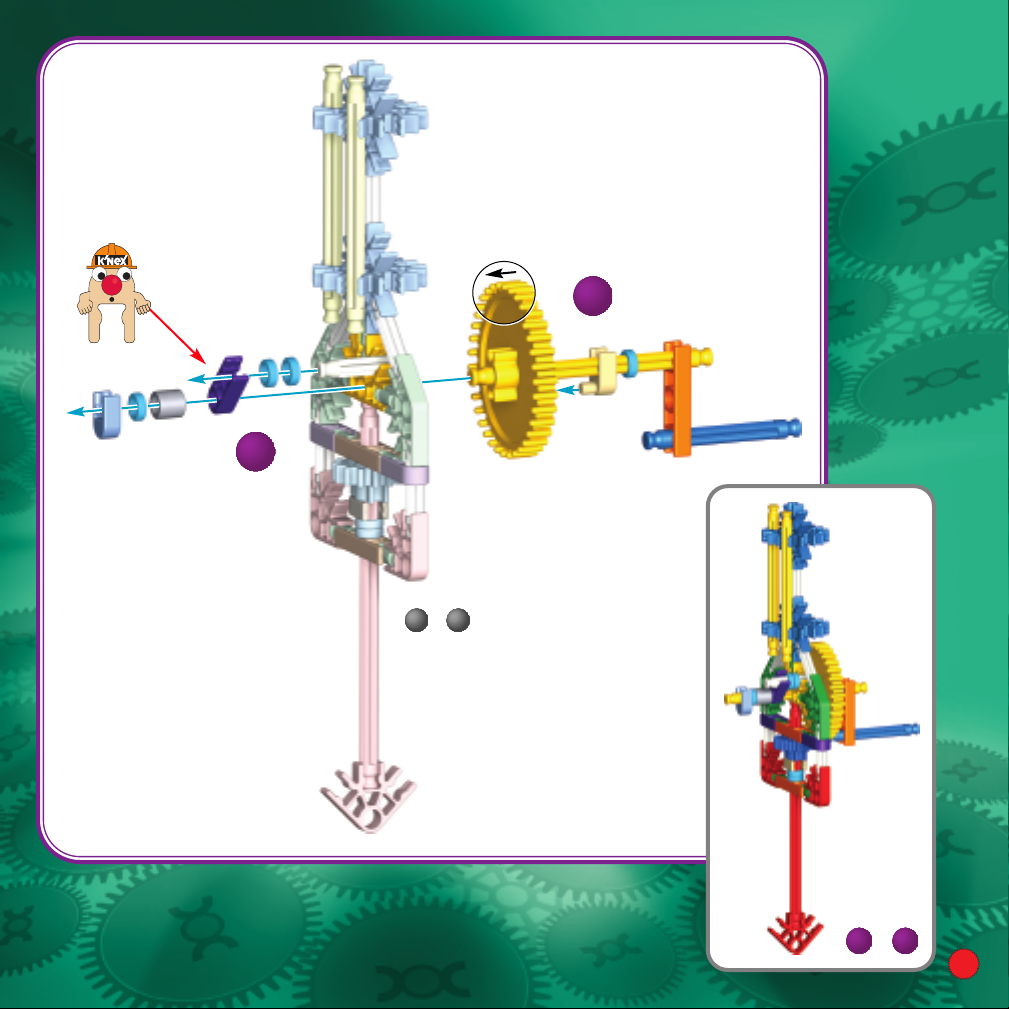
Page 6

GEAR-EYED FISH
FRIENDLY
CHALLENGE
FRIENDLY
CHALLENGE
3
4
6
1
2
Page 7
SWING
MODERATE
CHALLENGE
MODERATE
CHALLENGE
RIDE
1
2
1 2
-
7
Page 8

3
1 2
-
1 3
-
8
Page 9
5
4
1 5
-
1 3
-
9
Page 10

HAND DRILL
MODERATE
CHALLENGE
MODERATE
CHALLENGE
2
3
1010
1
1 3
-
Page 11
4
1 3
-
5
1 5
-
11
Page 12
HELICOPTER
GREATER
CHALLENGE
GREATER
CHALLENGE
2
1
3
1 3
-
1212
Page 13

4
1 3
-
EN
e sure to position all blue Connectors correctly.
B
FR
Veillez à orienter correctement tous les
connecteurs.
ES
Asegúrate de orientar todos los conectores
correctamente.
DE
Achte auf die richtige Ausrichtung der
Verbindungsstücke.
IT
Accertati di orientare tutte le connessioni
correttamente.
PT
Certifica-te de que orientas os conectores
correctamente.
NL
Verzeker je ervan alle koppelstukken juist
af te richten.
5
1 5
-
SV
Kontrollera, att du placerat alla blå kopplingar rätt.
DA
Sørg for at sætte alle de blå samlestykker i den rigtige stilling.
NO
Pass på å plassere all de blå skjøtemunnstykkene på rett
måte.
FI
Taivuta nämä tangot ensin ennen kuin kiinnität ne malliin.
13
Page 14

7
6
1414
10
8
1 5
-
6 7
-
9
1
10
-
Page 15

11
EN
Be careful not to spin the Helicopter
blades close to your face or eyes.
FR
Faites attention de ne pas faire tournerles
pales de l’Helicopter près de votre visage
ou vos yeux.
ES
Ten cuidado de no hacer girar las paletas
del Helicopter cerca de la cara o los ojos.
DE
Sei vorsichtig, dass die Rotorblätter
des Helicopter dem Gesicht und
den Augen nicht zu nahe
kommen.
IT
Fare attenzione a non far
girare le pale dell’Helicopter
vicino al viso o agli occhi.
PT
Devem ter cuidado para não
rodopiarem as pás do
Helicopter próximo da face
ou dos olhos.
NL
Verzeker je ervan de bladen
van de Helicopter niet
kort bij je gezicht of
ogen te doen draaien.
SV
Var försiktig så att du inte snurrar
Helicopter-rotorn nära ansiktet
eller ögonen.
DA
Pas på ikke at snurre Helicopterpropelbladene rundt i nærheden
af dit ansigt eller øjnene.
12
NO
Vær forsiktig slik
at du ikke snurrer
Helicopter-bladene
for nære ansiktet
eller øynene.
FI
Vältä Helicopter-roottorin
pyörittämistä lähellä
kasvoja tai silmiä.
1 10
-
1
12
-
15
Page 16

ROBO MOUSE
GREATER
CHALLENGE
GREATER
CHALLENGE
3
1
2
16
1 2
-
Page 17

4
1 3
-
1 4
-
17
Page 18

5
6
1 4
-
1818
1 6
-
Page 19

7
8
1 6
-
1 8
-
19
Page 20

STEAM
GREATER
CHALLENGE
GREATER
CHALLENGE
LOCOMOTIVE
3
2
1
20
1 3
-
Page 21

EN
e sure to position all red
B
onnectors correctly.
C
FR
Veillez à orienter correctement
tous les connecteurs.
ES
Asegúrate de orientar todos los
conectores correctamente.
D
E
Achte auf die richtige
Ausrichtung der
Verbindungsstücke.
IT
Accertati di orientare
tutte le connessioni
correttamente.
PT
Certifica-te de
que orientas os
conectores
correctamente.
4
NL
erzeker je ervan alle koppel-
V
tukken juist af te richten.
s
SV
Kontrollera, att du placerat alla
röda kopplingar rätt.
DA
Sørg for at sætte alle de røde
samlestykker i den rigtige stilling.
N
O
Pass på å plassere alle de røde
skjøtemunnstykkene på rett
måte.
FI
Varmista, ettö olet asettanut
kaikki punaiset liittimet oikein.
5
7
1 7
-
1 3
-
6
21
Page 22

8
9
1 7
-
11
1 11
-
22
10
Page 23

13
12
1 11
-
14
1 14
-
23
Page 24

TANK
GREATER
CHALLENGE
GREATER
CHALLENGE
2
1
1 4
-
24
3
4
Page 25

6
5
5 7
-
7
25
Page 26

5 7
-
8
1 4
-
26
1 8
-
Page 27

11
9
1 11
-
10
1 8
-
27
Page 28

13
12
14
1 11
-
1 14
-
28
Page 29

CHOMPING
GREATER
CHALLENGE
GREATER
CHALLENGE
FISH
2
5
1 5
-
1
3
4
29
Page 30

8
9
1 5
-
1
1 9
-
6
7
30
Page 31

EN
Bend these Rods first before attaching
o the model.
t
FR
Courber ces tiges premièrement
avant de les attacher au modèle.
ES
Doble estas Varillas primero
antes de conectarlos al modelo.
DE
Biegen Sie diese Stäbe zuerst
vor Befestigen sie zum Modell.
NL
Buig deze Stangen eerst voor het
bevestigen van hen naar het model.
IT
Pieghi queste Verghe prima di fissarle
dentro il modello.
11
PT
Dobre estas varetas primeiras antes de unir
os ao modelo.
NL
Buig deze Stangen eerst voor het bevestigen
van hen naar het model.
SV
Taivuta nämä tangot ensin ennen kuin
kiinnität ne malliin.
DA
Bøj disse stænger først, før de sættes fast
på modellen.
NO
Bøy disse stengene først før du fester de til
modellen.
FI
Taivuta nämä tangot ensin ennen kuin
kiinnität ne malliin.
10
1 9
-
1 11
-
31
Page 32

1 14
-
12
14
13
32
1 11
-
Page 33

17
1 14
-
1
17
-
15
16
33
Page 34

INSPIRATIONAL
4
5
2
3
MODELS
KANGAROO
EGG
BEATER
RADAR
ANTENNA
Want Full Instructions?
No Problem!
Go to
www.knex.com/casesets
and enter code 12 0 5 6 .
34
ROTOR
Page 35

FLYING MACHINE
SWING
CYCLE GAS STAT I O N
35
Page 36

RAILROAD PUMP CAR
ROLLERBLADE
CEMENT
TRUCK
ROBOT
36
Page 37

FR
Français
(Page 2) - ATTENTION : Garde les cheveux, les doigts, la figure et les
vêtements à l'écart de toutes les pièces mobiles.
“BONJOUR ! Je suis ton camarade de montage K'NEX. Si tu as
besoin d’un coup de main… Je suis là ! Cherche-moi que je
puisse te guider et t’aider à sélectionner les modèles
correspondant à ton niveau.”
(Page 3) - PARENTS ! Voilà comment vous pouvez aider votre
enfant à construire à l’aide de K'NEX !
PRÊT À MONTER
Pour commencer ton modèle, trouve le 1 et suis les chiffres. Chaque
pièce a sa propre forme et sa propre couleur. Il suffit de regarder les
illustrations pour retrouver les pièces correspondantes dans le jeu et
de les connecter ensemble. Essaye de situer ton modèle dans le
même sens que les instructions durant le montage.
SUITE…
Les couleurs dégradées indiquent que cette section est déjà montée.
Tu dois connecter la section suivante à l'endroit indiqué par les
flèches. Les nouvelles pièces ajoutées auront une couleur vive.
TIGES FLEXIBLES
Un Flexi-rod est une tige que tu peux courber pour faire des courbes.
Elle pourra être attachée plus aisément à ton modèle si tu la plies en
avant et en arrière plusieurs fois.
CONNECTEURS
Tu trouveras des connecteurs bleus et argentés comportant des
fentes extra-longues. Ils se glissent l'un dans l'autre tel qu'illustré.
Pousse les pièces ensemble jusqu'à ce que tu entendes un “déclic.”
Vérifie que les engrenages s’enclenchent bien les uns dans les
autres.
PIÈCES D'ÈCARTEMENT
Il y a des endroits dans ton modèle où tu dois ajouter des pièces
d'écartement bleues et argentées. Assure-toi d'utiliser la couleur
exacte et de compter les pièces avec soin.
ES
Español
(Página 2) - PRECAUCIÓN: Mantén el cabello, los dedos, la cara y la
ropa alejada de las piezas móviles.
“¡HOLA! Soy tu compañero en la construcción. Si necesitas
ayuda... ¡aquí estoy! Búscame para que te guíe mientras eliges
modelos que corresponden al nivel de tus capacidades.”
(Página 3) - ¡PADRES! ¡Aquí encontrarán cómo pueden ayudar a
su niño para qu construya con K'NEX!
TODO LISTO, COMIENZA A CONSTRUIR
Para comenzar tu modelo, busca el 1 y sigue los números. Cada
pieza tiene su propia forma y color. Simplemente mira los dibujos,
busca las piezas correspondientes en tu juego y después conéctalas.
Mientras construyes, trata de colocar tu modelo en la misma
dirección que se muestra en las instrucciones.
CONTINÚA
Los colores desteñidos muestran que esta sección ya está construida. Conecta las nuevas secciones en los lugares señalados por las
flechas. Las nuevas piezas que agregues estarán en colores vivos.
VARILLAS FLEXIBLES
Una Varilla Flexible es una Varilla que se puede doblar para formar
urvas. Serán más fáciles de conectar a tu modelo si primero las
c
oblas hacia atrás y hacia adelante.
d
CONECTORES
Hay conectores azules y plateados con ranuras largas especiales.
Se enganchan deslizándose como ves en los dibujos. Conecta estas
piezas empujándolas hasta que oigas “clic”.
Asegúrate de que los engranajes concuerdan.
ESPACIADORES
Hay lugares en tu modelo donde tendrás que agregar Espaciadores
azules y plateados. Cerciórate de usar el color correcto y cuéntalos
con cuidado.
DE
Deutsch
(Seite 2) - VORSICHT: Haare, Finger, Gesicht und Kleidungsstücke
nicht mit beweglichen Teilen in Berührung kommen lassen.
“HALLO, ich bin dein K'NEX-Bauhelfer. Ich helfe dir jederzeit!
Zum Beispiel bei der Auswahl der Modelle mit dem richtigen
Schwierigkeitsgrad.”
(Seite 3) - ELTERN! So können Sie ihrem Kind beim Bauen mit
K'NEX helfen!
AUF DIE PLÄTZE, FERTIG, LOS! DAS BAUEN BEGINNT
Um mit dem Bauen deines Modells zu beginnen, suche die
1 und folge den laufenden Nummern. Jedes Teil hat seine
Nummer
eigene Form und Farbe. Schau dir einfach die Abbildungen an, such
die Teile in deinem Bausatz, die so aussehen wie das, was du auf der
Abbildung siehst und steck sie ineinander. Versuche, dein Modell
beim Zusammenbauen so zu orientieren, dass es in die gleiche
Richtung weist, wie es in den Anleitungen beschrieben und gezeigt
wird.
UND WEITER GEHT'S
Blasse Farben weisen darauf hin, dass dieser Streckenabschnitt
bereits zusammengebaut ist. Der neue Streckenabschnitt wird dort
befestigt, worauf die Pfeile deuten. Die neuen Teile, die du anbaust,
sind knallbunt angezeigt.
FLEXI-LASCHEN
Eine Flexi-Lasche ist eine Lasche, die du zu einer Kurve zurechtbiegen kannst. Sie lassen sich leichter an dein Modell anschließen,
wenn du sie mehrmals hin- und herbiegst, um sie flexibler zu
machen, bevor du sie das erste Mal benutzt.
STECKANSCHLÜSSE
Blaue und silberfarben Steckanschlüsse haben besonders lange
Schlitze. Wie du auf der Abbildung sehen kannst, lassen sie sich
ineinander schieben. Achte beim Aneinanderfügen dieser Teile
darauf, dass du ein Klickgeräusch hörst. Erst dann sind die Teile fest
miteinander verbunden.
Vergewissere dich, dass die Zahnräder ineinander greifen.
ABSTANDSSTÜCKE
An bestimmten Stellen in deinem Modell musst du Abstandshalter,
sogenannte Spacer, einbauen. Diese Abstandshalter sind blau
und silberfarben. Achte darauf, dass du die richtige Farbe wählst und
dass du die richtige Anzahl davon verwendest.
37
Page 38

IT
Italiano
(Pagina 2) - A
lontano da tutte le parti in movimento.
“CIAO, sono il tuo amico costruttore K’NEX. Troverai modelli per
tre livelli di costruzione. Cercami ogni volta che vuoi iniziare a
costruire qualcosa e mi troverai con un segnale che mostra la
difficoltà di ogni modello.”
(Pagina 3) - GENITORI! Ecco come potete aiutare i vostri figli a
costruire con K'NEX!
PRONTI, PARTENZA, VIA ALLA COSTRUZIONE
Per iniziare il modello, cerca il numero 1 e segui i numeri. Ogni pezzo
ha una sua forma e un suo colore. Guarda la figura, trova i pezzi
corrispondenti nel set e mettili insieme. Cerca di tenere il modello
nella stessa direzione della figura e in tal modo sarà più semplice
attaccare i pezzi nei posti giusti.
ANDIAMO AVANTI
I colori spenti ti dicono che questa sezione è già stata costruita.
Dovrai collegare la nuova sezione al punto indicato dalla punta della
freccia. Questo pezzo avrà un colore brillante.
ASTE FLESSIBILI
Un'asta flessibile può essere piegata per fare le curve. Sarà più facile
attaccarla al modello se prima la pieghi per alcune volte.
CONNETTORI
È molto importante posizionare i connettori blu e argento in una
specifica direzione. Presta molta attenzione alle istruzioni e posiziona
i connettori orizzontalmente o verticalmente proprio come illustrato.
Spingi con forza fino ad udire un “clic”.
TTENZIONE:tenere i capelli, le dita, il viso e i vestiti
Accertati che le marce ingranino.
SPAZIATORI
Ci sono punti nel tuo modello a cui dovrai aggiungere spaziatori blu e
argento. Accertati si contarli attentamente.
PT
Português
(Página 2) - CUIDADO: Mantém o cabelo, os dedos, a cara e a roupa
afastados de todas as peças móveis.
“OLÁ! Eu sou o teu companheiro que te vai ajudar a montar o
teu K’NEX. Encontrarás modelos destinados a três diferentes
níveis de dificuldade de construção. Procura-me antes de
começares a montar cada construção; eu estarei segurando
num letreiro para te mostrar qual o grau de dificuldade que
apresenta cada modelo.”
(Página 3) - PAIS! Eis como os pais podem ajudar os filhos a fazer
as suas construções com K'NEX!
ESTÁS PRONTO? COMEÇA POIS A CONSTRUIR
Para começar o teu modelo, procura o 1 e segue os números. Cada
peça tem a sua própria forma definida e cor. Basta simplesmente
olhares para a ilustração, procurar as peças do teu jogo
correspondentes às que estás a ver e, em seguida, conectar umas
nas outras. Enquanto estás a montar as peças, tenta manter o teu
modelo na mesma direcção, conforme mostrado na ilustração, para
assim ligares as peças correctamente.
CONTINUANDO
As cores desbotadas indicam que esta secção já está montada.
assarás então a fazer a conexão da nova secção no local indicado
P
elas setas. Esta peça terá uma cor viva.
p
VARETAS FLEXÍVEIS
Uma vareta flexível é uma vareta que podes dobrar para formar
curvas. Para montares no teu modelo, será mais fácil se dobrares
primeiro a vareta para trás e para a frente.
CONECTORES
É muito importante que posiciones os conectores azuis e cor de
prateados numa direcção específica. Presta muita atenção às
instruções e coloca estes conectores horizontal ou verticalmente,
exactamente conforme se mostra nas ilustrações. Junta as partes
simultaneamente e com firmeza até ouvires um “estalido.”
Assegura-te que as engrenagens ficam engrenadas.
ESPAÇADORES
Existirão certos pontos no teu modelo que necessitam a colocação
de espaçadores azuis e prateados. Assegura-te que os contas
cuidadosamente.
NL
Nederlands
(Bladzijde 2) - OPGEPAST: Hou het haar, de vingers, het gezicht en
kledij verwijderd van alle bewegende onderdelen.
“HOI! Ik ben je K'NEX bouwvriend. Heb je hulp nodig … Hier ben
ik dan. Kijk naar me uit voor inlichtingen wanneer je modellen
kiest met de gepaste moeilijkheidsgraad.”
(Bladzijde 3) - OUDERS! Op deze manier kunt u uw kind helpen
met K’NEX bouwen!
KLAAR OM TE BOUWEN
Om met je model te beginnen, vind eerst het nummer 1 en volg de
nummers. Elk stuk heeft zijn eigen vorm en kleur. Kijk gewoonweg
naar de afbeeldingen, vind de overeenstemmende stukken terug in je
geheel en maak ze aan mekaar vast. Tracht je model in dezelfde
richting te plaatsen als de aanwijzingen terwijl je bouwt en monteert.
VERDER NOG …
De vervaagde kleuren duiden aan dat dit deel reeds is opgebouwd.
Gelieve het nieuwe deel vast te koppelen op de plaats aangeduid
door de pijlen. De nieuwe delen die je toevoegt verschijnen in volle
kleur.
FLEXI-RODS
Een Flexi-rod is een stang die kan gebogen worden om bochten of
curves te maken. Ze maken zich gemakkelijker vast aan je model
wanneer je ze eerst een paar keer heen en weer buigt.
KOPPELSTUKKEN
Er zijn blauwe en zilveren koppelstukken met speciale lange gleuven.
Ze schuiven in mekaar zoals je kunt zien op de afbeeldingen.
Duw deze onderdelen in mekaar tot je een “klik” hoort.
Verzeker je ervan dat de tandwielen in mekaar passen.
TUSSENSTUKKEN
In je model zijn er plaatsen waar blauwe en zilveren tussenstukken
moeten toegevoegd worden. Verzeker je ervan de juiste kleur te
gebruiken en tel ze zorgvuldig.
38
Page 39

SV
Svenska
Sida 2 - V
från alla rörliga delar.
HEJ, jag är din K’NEX byggkompis. Behöver du hjälp... Jag finns
här.
Sida 3 - PLATSERNA, FÄRDIGA, BYGG
Hitta nummer 1 och följ numreringen. Varje del har sin egen form och
färg. Titta på bilden, rikta upp motsvarande delar och tryck dem på
plats.
FORTSÄTT
De bleka färgerna anger att denna sektion redan är byggd. Koppla
den nya sektionen till stället som anges av pilarna. Dessa delar visas
i klara färger.
FLEXI-RODS
En Flexi-rod är en stång som du böjer för att göra kurvor. Det är
lättare om du först böjer den fram och tillbaka.
KOPPLINGAR
Det finns blå och silverfärgade kopplingar med speciellt långa hål
som skjuts samman. Tryck ihop delarna tills du hör ett klick-ljud.
ARNING!Håll håret, fingrarna, ansiktet och kläderna borta
Kontrollera att kugghjulen är av rätt typ.
MELLANSTÄNGER
Det finns ställen i din modell där du måste placera mellanstänger.
Använd rätt typ och räkna dem omsorgsfullt.
DA
Dansk
Side 2 - FORSIGTIG: Hold hår, fingre, ansigt og påklædning på afs-
tand af alle bevægelige dele.
HEJ, jeg er din K’NEX byggekammerat. Hvis du har brug for
hjælp … så kom bare til mig.
Side 3 - PARAT, PÅ MÆRKERNE, BYG
Find nummer 1 og følg numrene. Hvert stykke har sin egen form og
farve. Se på billedet, match stykkerne til hinanden og snap dem
sammen.
SÅ FORTSÆTTER VI
De falmede farver betyder, at dette afsnit allerede er bygget. Sæt det
nye afsnit sammen på det sted, som pilene peger mod. Disse dele vil
være i klare farver.
FLEKSI-STÆNGER
En fleksi-stang er en stang, som du bøjer til at lave buer. Det bliver
lettere, hvis stangen bøjes frem og tilbage først.
SAMLESTYKKER
Der er blå og sølvfarvede samlestykker med særlige lange slidser,
som skydes sammen. Skub delene sammen, indtil du hører et “klik”.
Sørg for at gearene griber ind i hinanden.
AFSTANDSSTYKKER
Der er steder i modellen, hvor du får brug for at tilføje
afstandsstykker. Sørg for at bruge de rette stykker og tæl den
omhyggeligt.
NO
Norsk
Side 2 - A
alle bevegelige deler.
HEI, jeg er din K’NEX byggekamerat. Trenger du hjelp… er jeg
her.
Side 3 - KLAR, FERDIG, BYGG
Finn tallet 1 og følg numrene. Hver del har sin egen form og farge.
Se på bildet, finn tilsvarende deler og smekk dem sammen.
FORTSETT
De bleke fargene viser deg at denne delen allerede er bygget.
Fest den nye delen der pilen peker. Disse delene har sterke farger.
FLEKSISTENGER
En fleksistang er en stang som du bøyer for å lage buer. Det blir
lettere hvis du bøyer den frem og tilbake først.
SKJØTEMUNNSTYKKER
Det er blå og sølvfargede skjøtemunnstykker med spesielt lange
åpninger, som glir sammen. Skyv delene sammen inntil du hører et
klikk.
DVARSEL:Hold hår, fingre, ansikt og klesplagg borte fra
Pass på at girene griper inn i hverandre.
MELLOMLEGG
Noen steder må du bruke mellomlegg i modellen din. Pass på å
bruke de riktige mellomleggene og tell dem nøye.
FI
Suomi
Sivu 2 - VAROITUS! Pidä hiukset, sormet, kasvot ja vaatteet loitolla
kaikista liikkuvista osista.
HEI, olen K’NEX rakennuskaverisi. Tarvitsetko apua ... olen
paikalla.
Sivu 3 - PAIKOILLANNE, VALMIIT, RAKENTAKAA
Löydä numero 1 ja seuraa numerointia. Jokaisella osalla on oma
muotonsa ja värinsä. Katso kuvaa, sovita osat ja paina ne yhteen.
JATKA
Himmeät värit osoittavat, että tämä kokonaisuus on jo rakennettu.
Liitä uusi kokonaisuus nuolien osittamaan paikkaan. Nämä osat
näkyvät kirkkain värein.
FLEXI-RODS
Flexi-rod on tanko, jonka taivutat kun haluat tehdä kaarteita.
On helpompaa, jos ensin taivutat sitä edestakaisin.
LIITTIMET
Sarjassa on sinisiä ja hopeanvärisiä liittimiä, joissa on erityisen pitkiä
aukkoja, jotka työnnetään toisiinsa. Työnnä osat yhteen kunnes
kuulet napsahduksen.
Varmista, että hammaspyörät sopivat.
VÄLITANGOT
Mallissasi on paikkoja joihin sinun on lisättävä välitankoja. Varmista,
että käytät oikeita ja laske ne huolellisesti.
39
Page 40

 Loading...