

Page 1
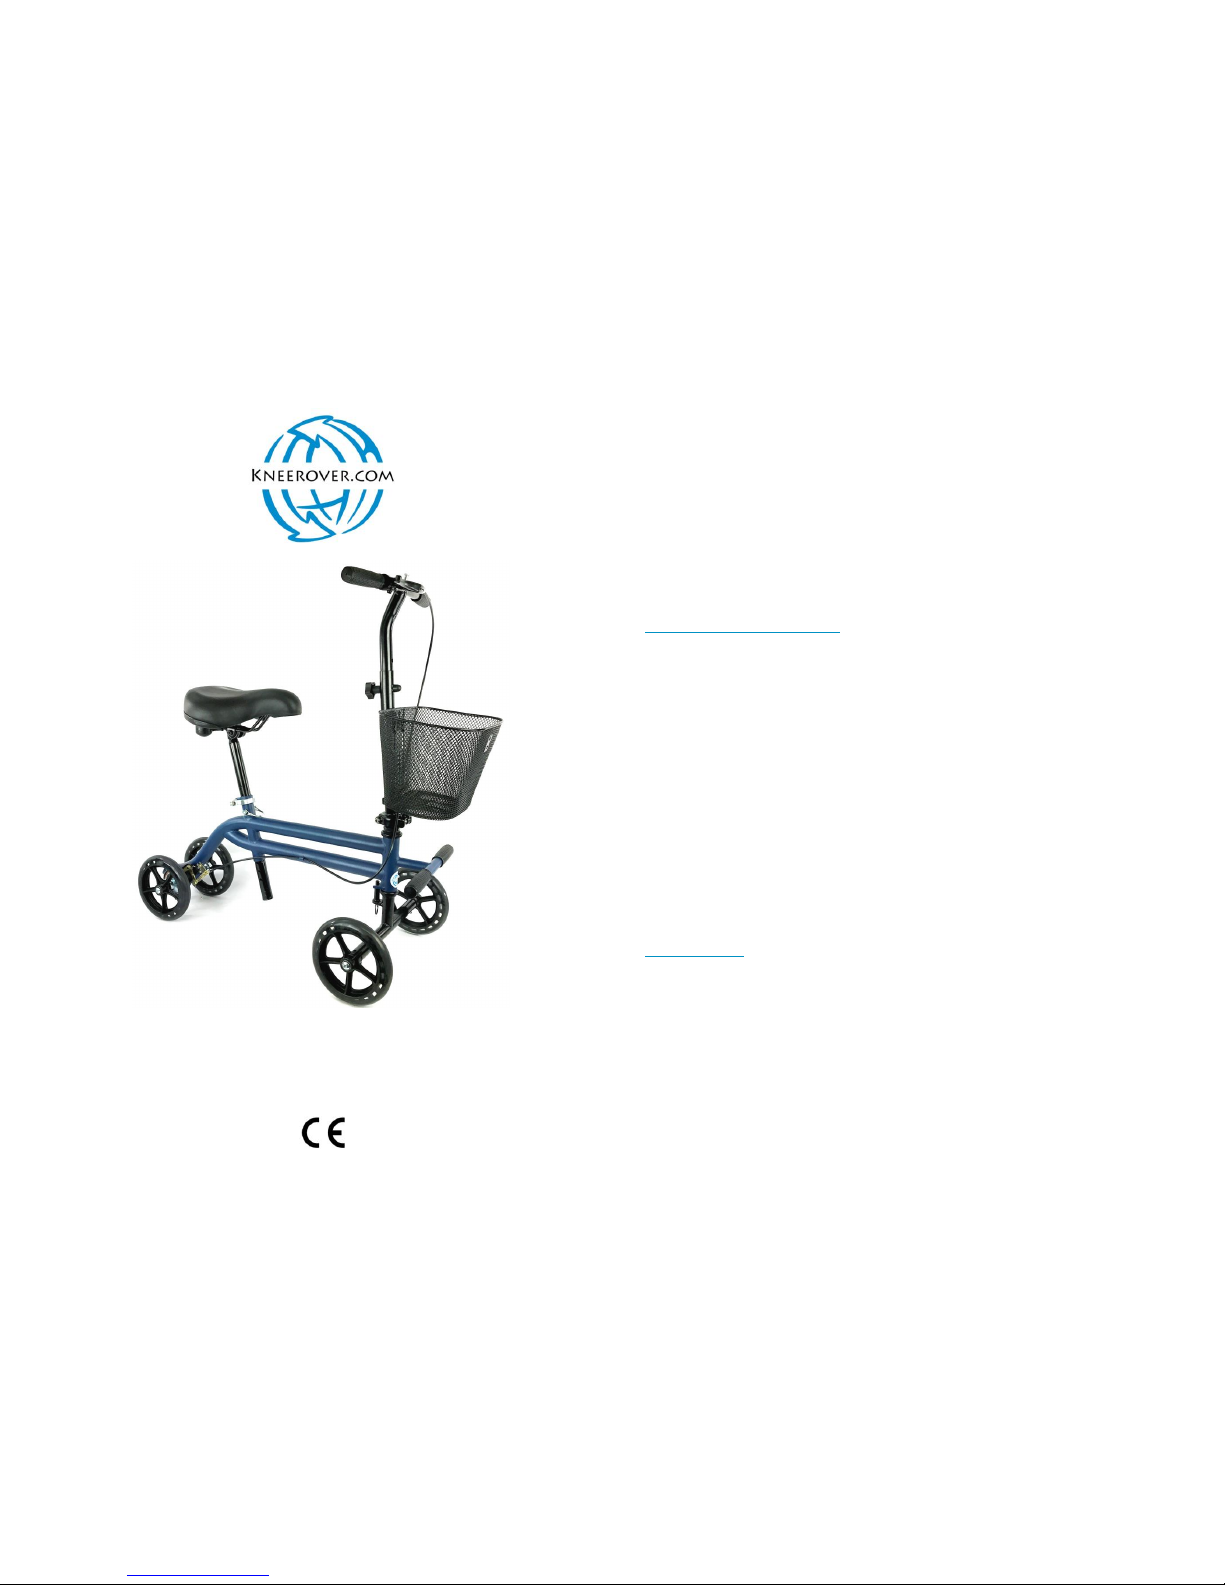
KneeRover® Evolution Scooter
User Manual
Congratulations on your purchase of the KneeRover
®
Evolution Scooter!
The versatile KneeRover® Evolution seated scooter provides a new
level of freedom to users recovering from knee or leg injuries. The
large gel padded seat and convenient front leg stand allows the
patient to rest in comfort while elevating the non-weight bearing
leg. Increase your mobility without the use of painful crutches.
Operating Instructions:
This KneeRover
®
scooter is designed to maximize mobility during your
recovery from foot/ leg surgery or injury.
It is important to set the seat and handlebar at a comfortable and safe
operating position. The best position for the handlebar is approximately at
hip level, with the seat at a comfortable height for propelling the
KneeRover® scooter and resting your injured leg.
Ensure that the hand brake is fully engaged and locked before mounting the
KneeRover® scooter. Place your hands on the handgrips and while seated,
place the heel of the injured leg on the leg rest. Now release the parking
brake and propel yourself using your good leg. Allow the KneeRover®
scooter to glide, and as it slows down, push again.
Safety First:
The KneeRover® Evolution scooter is designed for easy steering and
stopping and should be used to carefully move about at slow, controlled
speeds. When turning the scooter, you should have the brake applied and
be moving at a slow, safe, controlled speed. It is easy to tip the scooter if
you are making a turn with too much speed. Use caution and balance and
operate at your own risk.
With routine use, nuts and bolts on the steering column and brake
mechanism can and likely will become loose. Periodically check nuts and
bolts after use and re-tighten as appropriate.
Page 2
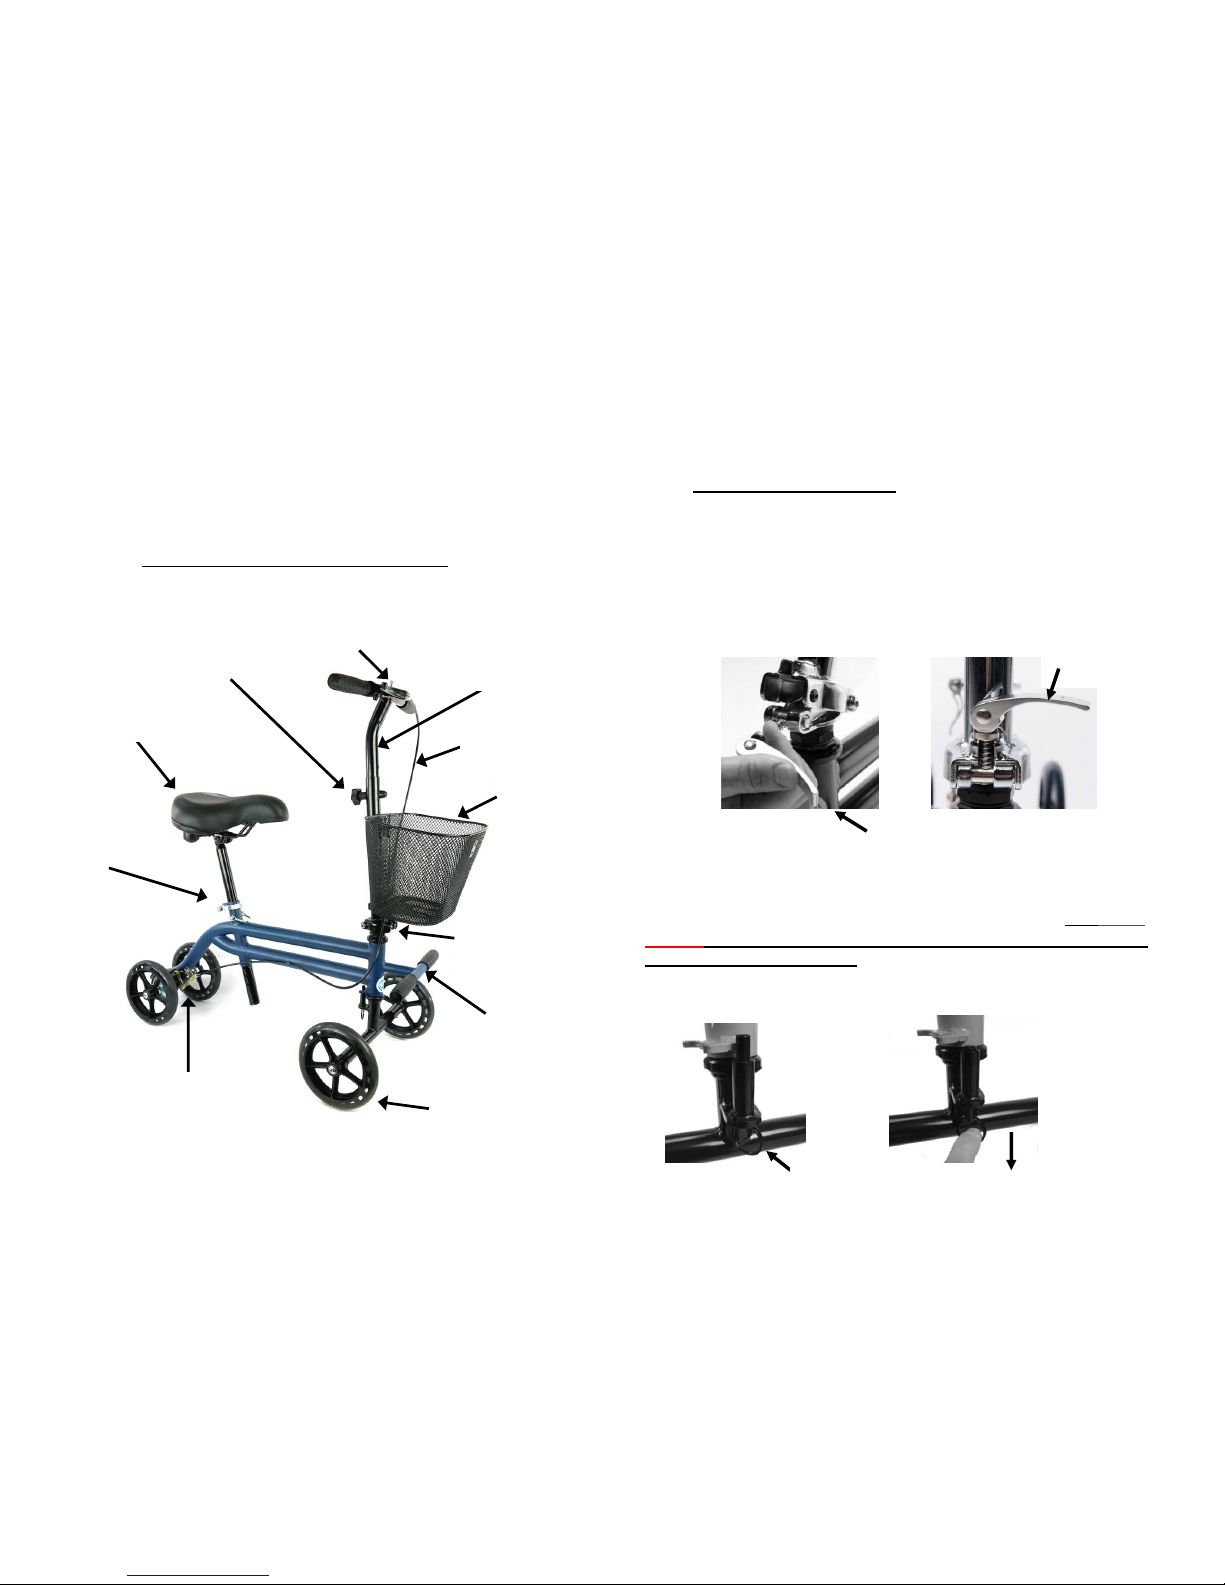
Evolution Set Up Instructions:
Please follow the step by step instructions on the following pages to
properly assemble your KneeRover® Evolution scooter. The diagram
below identifies the key components of the scooter to aid with
assembly. Visit kneerover.com for assembly videos.
Setup Instructions:
Step 1: Install Handlebars & Steering Column
Please carefully complete all steps before operating your new
KneeRover® scooter. The steering column and handlebars will be separate
and in a folded position when unpacking. Insert the handlebars into the
steering column, making sure not to twist the brake cable. Next, raise the
steering column and push the clamp lever to the left to allow security pin to
lock into place (as shown below). Raise the clamp lever upward and tighten
by turning it clockwise. Finally, push clamp lever down firmly to secure the
steering column (as shown below). Reverse these steps when needing to
lower steering column for transport.
Step 2: Rotate Front Wheels & Set Guide Pin
Pull down the guide pin ring as shown below, and turn the handlebars so
that the front wheels and brake handles are facing forward. The BACK
sticker MUST be facing back toward the rear wheels with the guide
pin between the guide stops. (see photo on top of next page). Be sure that
the brake cables are not twisted. The front of the scooter should look
similar to the picture on the previous page.
Hand Brake Lever
7.5” Non
Marking Wheels
Basket
Handlebar Height
Adjustment Knob
Quick Release
Clamp
Steering Column
Brake Cable
Rear Brake
Mechanism
Weight Capacity = 300 pounds
Leg Rest
Adjustable Seat
Seat Post
Clamp Lever
Push Clamp Lever to Left
Clamp Lever
Guide Pin Ring
Pull Ring Down
Page 3
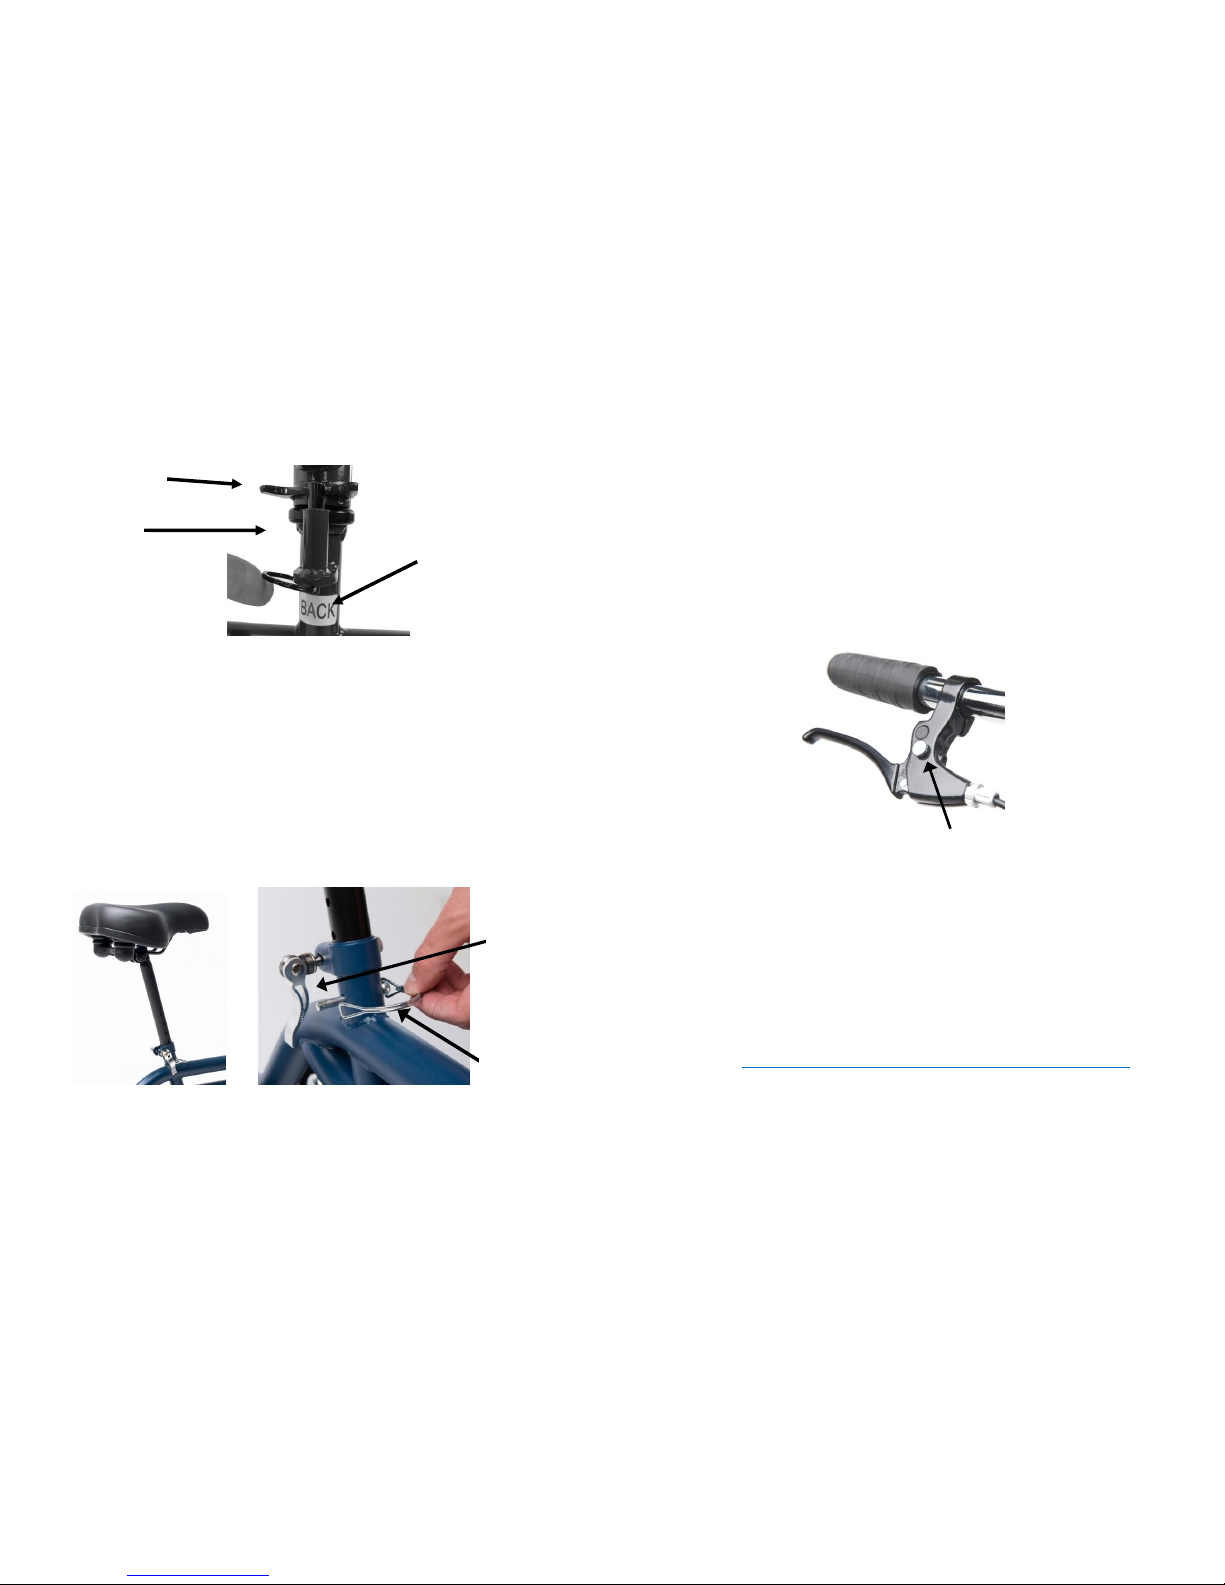
Step 2: Rotate Front Wheels & Set Guide Pin (cont.)
Step 3: Install Seat & Attach Basket
The KneeRover® Evolution scooter is designed to be used for right or left
leg injuries. To setup the seat and/or adjust the height, remove the locking
pin and place the seat at the desired height then reinsert the pin. Pull the
clamp lever downward so the end of the lever is pointing towards the
ground to lock the seat in the desired position (rotate the lever counter
clockwise to loosen and clockwise to tighten the pressure on the lever).
Removable basket attaches to the steering column.
Step 4: Brake Operation
To engage the hand brake, squeeze the brake lever on handle bar.
The KneeRover® Evolution scooter comes equipped with a brake lock /
parking brake. Simply squeeze brake handle firmly and press the
button to engage the lock. To release the lock, squeeze the brake
handle again.
Ongoing Maintenance
With routine use, nuts and bolts on the steering column and brake
assembly can become loose. To ensure safe operation of this
KneeRover
®
scooter it is important to periodically inspect the knee
walker for loose nuts and bolts and re-tighten as appropriate.
Please visit kneerover.com/pages/kneerover-maintenance-videos
for additional support in maintaining your KneeRover.
Clamp
Locking
Pin
BACK sticker
MUST face
back toward
rear wheels
Steering
Guide Stops
Steering
Guide Pin
Brake Lock
Page 4

Your Satisfaction is Our Top Priority:
Thank you for your business – we appreciate having you as a customer!
We are committed to providing innovative and affordable mobility
solutions to get you moving as soon as possible after injury or surgery
and for the duration of your recovery – free to go about your busy,
active life – and have a little fun doing it.
We hope that you are completely satisfied with your purchase. If you
have any issues, please contact us and we will do everything possible
to help you. Reviews have a significant impact on our small business.
If you purchased this product on Amazon or eBay, we would greatly
appreciate a review once you’ve had a chance to use your new
KneeRover® scooter. We hope we’ve earned a 4 or 5 star review – if
not, please give us the opportunity to help you before leaving a review.
Thank you for your support. We appreciate you!
Need Help – Contact Us:
Phone: 877-737-9877
Email: [email protected]
Web: www.kneerover.com
Assembly Support: kneerover.com/pages/assembly-video
EU AUTHORIZED REPRESENTATIVE
Murray's Medical Equipment Ltd
Airton Park, Airton Road, Tallaght,
Dublin 24 (Eircode D24 DY09), Ireland
T: 00 353 1 855 5696
www.murrays.ie
Limited Lifetime Warranty
This warranty applies only to the original purchaser.
This device was built to exacting standards and carefully inspected
prior to shipment. Your KneeRover® brand product is warranted to
be free of defects in materials and workmanship for a period of one
year from the date of purchase. The side frames and cross braces
are warranted for the lifetime of the KneeRover® scooter.
This warranty does not cover device failure due to owner misuse,
negligence, or normal wear and tear. The warranty does not extend
to non-durable components, which are subject to normal wear and
need periodic replacement. These components include, but are not
limited to tires, grips, brake pads and upholstery.
The warranty shall not apply for damages or defects caused by
unauthorized parts, attachments or repairs, negligence, accident, or
any circumstances beyond the control of KneeRover®, such as
improper operation, maintenance or storage.
If you have any questions regarding your KneeRover® product or
this warranty, please contact our Customer Care Team. We are
available, for your convenience, toll free at 1-877-737-9877,
Monday – Friday from 9 am to 5 pm Eastern.
Need Parts or Accessories?
Add an accessory like a knee pad cover, cup holder or headlight to
enhance your experience on your new KneeRover® scooter. Keep
your scooter operating in top shape with original manufacturer
parts. Visit kneerover.com, to explore our full range of parts and
accessories.
KneeRover® is a registered trademark of Rover Mobility, LLC.
 Loading...