

Page 1

Status 08.2018 ■ Version 1.1 | Translation
Operating Instructions
Hand Knife Grinding Attachment
HV 150
Page 2

Operating Instructions
3
Hand Knife Grinding Attachment HV 150
Manufacturer
KNECHT Maschinenbau GmbH
Witschwender Straße 26
88368 Bergatreute
Germany
Phone +49-7527-928-0
Fax +49-7527-928-32
mail@knecht.eu
www.knecht.eu
Documents for machine operator
Operating Instructions
Date of issue of the operating Instructions
August 24, 2018
Copyright
The copyright for these operating Instructions as well as other documents for the machine operator is held
by KNECHT Maschinenbau GmbH. They are provided only to customers and operators of our products and
are included with the machine.
These documents may neither be reproduced, nor made accessible to third parties, in particular rival firms,
without our express permission.
Page 3

4
1. Operation 5
1.1 Intended purpose 5
1.2 Mounting the HV 150 hand knife grinding attachment 5
1.2.1 Mounting the CBN grinding wheels 5
1.2.2 Mounting the HV 150 hand knife grinding attachment 8
1.3 Grinding hand knives 9
1.3.1 Switching on the grinding machine 9
1.3.2 Coolant regulation 9
1.3.3 Grinding hand knives 10
2. Care and maintenance 11
2.1 Cleaning 11
2.2 Lubrication schedule and lubricant table 11
3. Disassembly and disposal 12
3.1 Disassembly 12
3.2 Disposal 12
4. Service, spare parts and accessories 13
4.1 Postal address 13
4.2 Service 13
4.3 Spare parts 13
4.4 Accessories 14
4.4.1 Abrasives used 14
Table of Contents
Page 4
5
1.1 Intended purpose
The HV 150 hand knife grinding attachment is used to grind hand knives. This attachment is
meant to be installed onto KNECHT grinding machines of the USK 160 S series.
1.2 Mounting the HV 150 hand knife grinding attachment
1.2.1 Mounting the CBN grinding wheels
Mount two CBN grinding wheels in order to grind
hand knives using the HV 150.
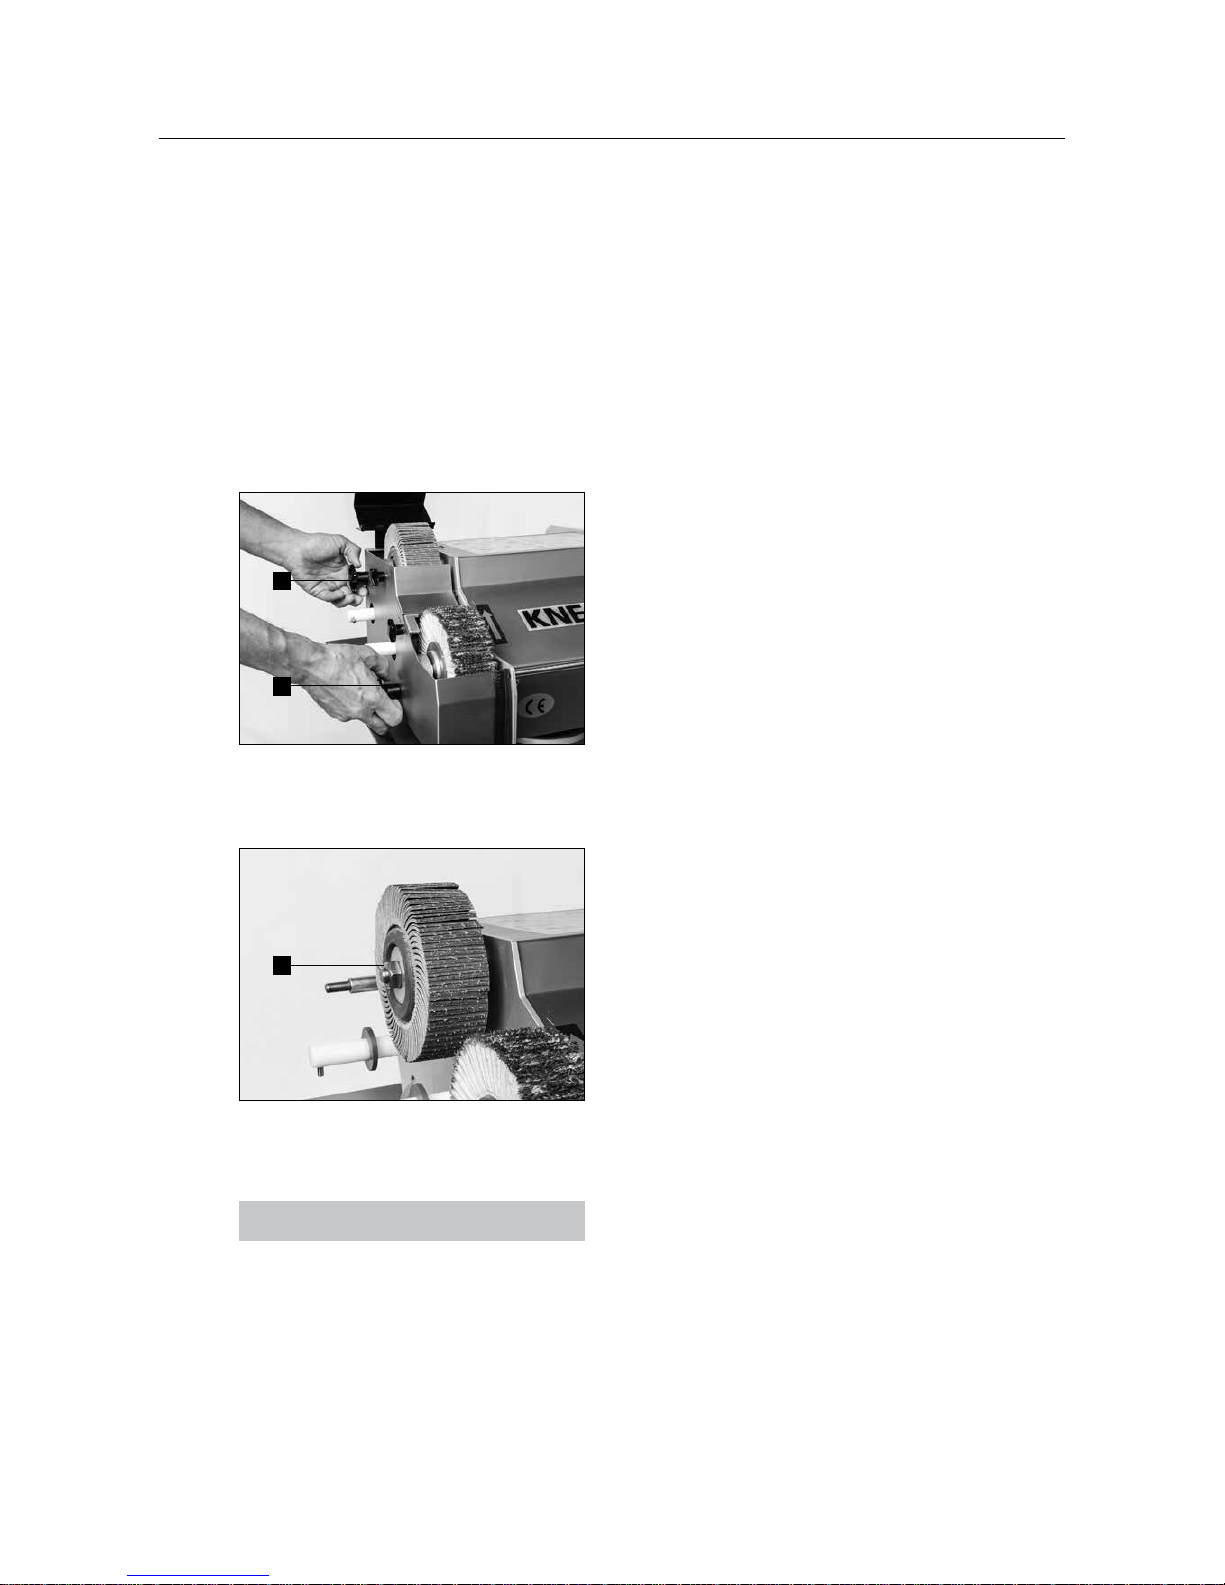
To do so, loosen the star handles (1-1/1) on the
left-hand side of the machine and remove the
protection hood. Then remove the finned grinding
wheel.
Use a spanner wrench (SW 22) to loosen the nut
(1-2/1) of the grinding spindle.
Loosen = turn left (in the direction of rotation)
Tighten = turn right (against the direction of
rotation)
Pull the finned grinding wheel off the grinding
spindle.
NOTICE
If the grinding spindle turns too, counter it
with a spanner wrench (SW 10) on the end of
the shaft.
1. Operation
Figure 1-2 Removing the finned grinding wheel
1
Figure 1-1 Removing the protection hood
1
1
Page 5

6
1. Operation
Push the intermediate flange (1-3/1) to the stop
on the grinding spindle.
Push the first CBN grinding wheel (1-4/1) to the
intermediate flange (1-4/2).
NOTICE
The recess on the grinding wheel (1-4/1) must
be pointing in the direction of the machine.
Push another intermediate flange (1-5/1) to
the first grinding wheel (1-5/2) on the grinding
spindle.
Figure 1-3 Inserting the intermediate flange
Figure 1-4 Mounting the grinding wheel
1
2
Figure 1-5 Inserting the intermediate flange
2
1
1
Page 6

7
Figure 1-7 Clamping the grinding wheel with
the clamping flange
Figure 1-6 Mounting the second CBN grinding
wheel
1
1
2
Push the second CBN grinding wheel (1-6/1) to
the intermediate flange (1-6/2) on the grinding
spindle.
NOTICE
The recess on the grinding wheel (1-6/1) must
be pointing outwards.
Push on the clamping flange (1-7/1) and turn the
nut (1-7/2) onto the thread by hand.
Then reattach the nuts (1-7/2) with both spanner
wrenches (SW 10 and SW 22).
If not yet in place, mount the stripper (1-8/1) using
the Allen key SW 4 and align it with the grinding
wheels.
1. Operation
1
Figure 1-8 Mounting the stripper
2
Page 7

8
Figure 1-11 Affixing the HV 150
2
1
Remount the protection hood and affix using both
star handles (1-9/1).
1.2.2 Mounting the HV 150 hand knife grinding attachment
Insert the HV 150 hand knife grinding attachment
into both notches (1-10/1) from above.
Screw on the HV 150 from the left and rear sides
using both star handles (1-11/1) and (1-11/2).
1. Operation
Figure 1-10 Attaching the HV 150
1
1
Figure 1-9 Mounting the protection hood
1
1
Page 8

9
There is a risk that hands, hair, and clothing may be pulled in while the
grinding machine is switched on.
Serious injury may result.
CAUTION
1.3 Grinding hand knives
1.3.1 Switching on the grinding machine
Turn the main switch (1-12/1) of the USK 160 S to
the “I” position.
1.3.2 Coolant regulation
The water supply must be turned on when using
the CBN grinding wheels. If it is not activated,
push the rubber on the water nozzle (1-13/1) behind the hole (1-13/2) on the water nozzle.
The quantity of coolant is regulated by the water
nozzle (7-13/1).
Turning clockwise = more water
Turning counterclockwise = less water
1. Operation
Figure 1-12 Switching on the grinding machine
1
Figure 1-13 Opening the water nozzle
1
2
Page 9

10
1.3.3 Grinding hand knives
To grind the hand knife, place the knife shaft in
the slit (1-14/1) from above and slowly pull towards to the tip.
Repeat this process alternating between the right
and left sides until the desired knife sharpness is
achieved.
NOTE
Always begin the grinding process on the
knife shaft.
Then deburr and polish the hand knife on the
finned brush (1-16/1) as described in the operating instructions for the USK 160 S.
Switch off the grinding machine after the grinding
process is finished.
To do so, switch the “I / 0” main switch (1-12/1) to
the “0” position.
1. Operation
Figure 1-14 Grinding hand knives
Figure 1-15 Grinding hand knives
Figure 1-16 Grinding hand knives
1
1
Page 10

11
For all work on the HV 150 hand knife grinding attachment, the locally
applicable safety and accident prevention regulations as well as instructions in the "Safety" and "Important notes" section of the USK 160 S
universal wet-grinding machine operating instructions must be observed.
Use only original replacement and wear parts. When using external
parts, it cannot be guaranteed that they are constructed and manufactured to be suitable and safe.
CAUTION
2.1 Cleaning
Clean the hand knife grinding attachment after each sharpening in order to prevent the grinding
sludge from drying and making it harder to remove.
After cleaning, lightly grease the hand knife grinding attachment with non-corrosive oil (also refer
to the lubrication schedule, Chapter 2.2).
2.2 Lubrication schedule and lubricant table
Lubrication
work
Cycle OEST SHELL EXXON
Mobil
DEA
Lubricate the
threads of star
handles and
clamping levers
4 weeks Multi-purpose
grease L 2
Gadus S2
V100 2
Mobilith SHC
100
Dolon E2
Lubricate machine parts after
cleaning
After each
grinding
Paraffinum
perliquidum
16 L
Shell Risella
917
Marcol 82 Merkur
pharma ceutical
white oil 40
2. Care and maintenance
Page 11

12
3. Disassembly and disposal
3.1 Disassembly
Dispose of all operating materials properly.
Secure moving parts against slippage.
Disassembly must be conducted by qualified trained personnel.
3.2 Disposal
After the machine has reached the end of its service life, it must be disposed of by qualified
trained personnel. In certain situations, and after consultation with KNECHT Maschinenbau
GmbH, the machine may be returned.
Operating materials (e.g. grinding wheels, etc.) must also be disposed of properly.
Page 12

13
4. Service, spare parts and accessories
4.1 Postal address
KNECHT Maschinenbau GmbH
Witschwender Straße 26
88368 Bergatreute
Germany
Phone +49 -7527-928-0
Fax +49 -7527-928-32
mail@knecht.eu
www.knecht.eu
4.2 Service
Service line:
For address, see postal address
service@knecht.eu
4.3 Spare parts
If you are in need of spare parts, please use the spare parts list provided with the machine. Please
make your order using the format provided in the following.
When ordering, please always provide: (Example)
Machine type (USK160S)
Machine number (12530953160S)
Assembly designation (base plate, USK160S)
Designation of individual part (pump, USK160S)
Item no. (9)
Drawing no. (013E-01-0000)
Quantity (1)
We are always happy to answer any questions.
Page 13

14
4. Service, spare parts and accessories
4.4 Accessories
4.4.1 Abrasives used
Designation Dimensions Order number Note
Set of 2 CBN grinding wheels d.150x7xd.15H7 B76 412F-83-0150-76
ATTENTION
Do not use any other abrasives without the
approval of KNECHT Maschinenbau GmbH.
KNECHT Maschinenbau GmbH is not liable in
the event that other abrasives are used.
If you require grinding wheels or other accessories, please contact our sales staff, dealers, or
KNECHT Maschinenbau GmbH directly.
Thank you for choosing KNECHT!
Page 14

KNECHT Maschinenbau GmbH
Witschwender Straße 26
■ 88368 Bergatreute ■ Germany ■ T + 49
-
7527- 928-0 ■ F + 49 -7527- 928-32
mail@knecht.eu
■ www.knecht.eu
 Loading...