

Knape & Vogt Shelf-Made 0140-24BK, Shelf-Made 0140-36WT, Shelf-Made 140-36BK, Shelf-Made 0140-24WT Installation Instructions Manual

Installation Instructions
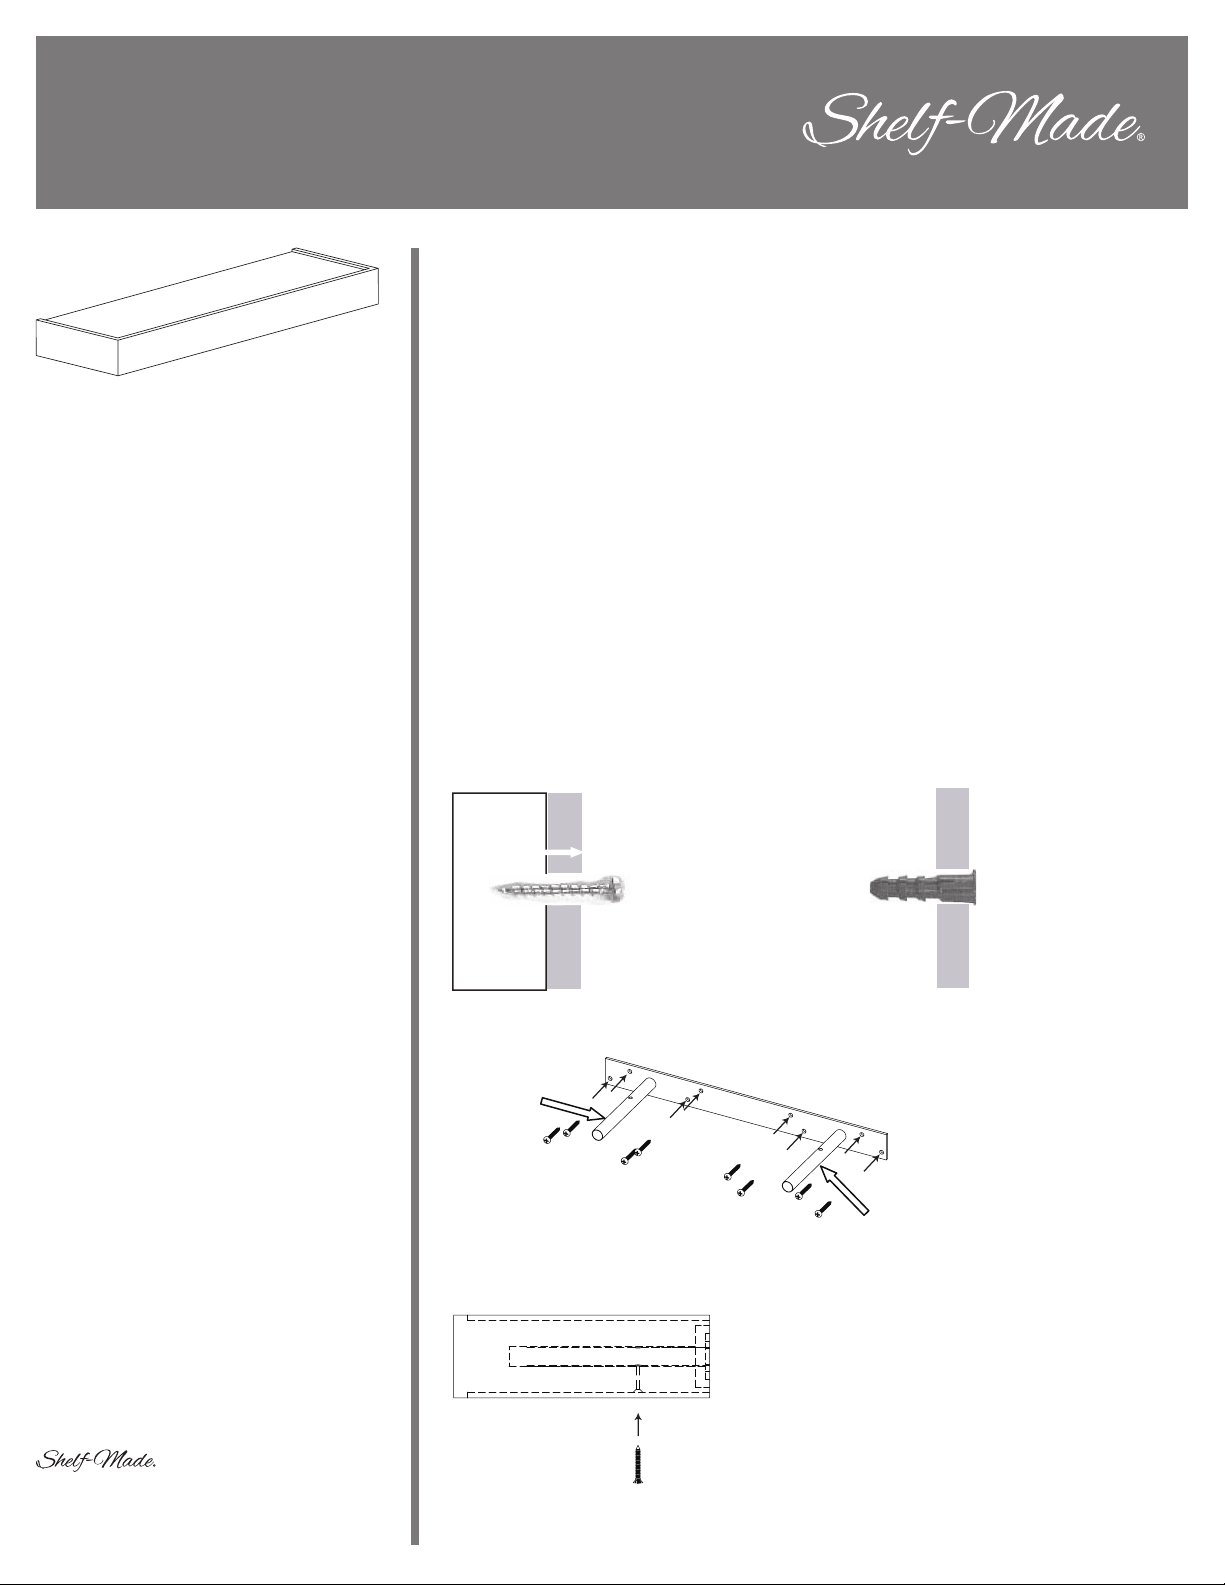
Floating Shelf
0140-24BK | 0140-24WT | 0140-36BK | 0140-36WT
Installation:
STEP 1: Select the desired location for the shelf.
STEP 2: Draw a line on the wall, using the level, and then hold the backplate in position
along the line in order to determine where the screw holes will be located. Mark the
positions of the screw holes.
NOTE: If the screws are being driven directly into a stud, pre-drill the screw holes
Tools Required (not included):
- Power Drill
- 1/8" Drill Bit or 1/4" Drill Bit
- Screwdriver
- Tape Measure
- Level
Installation Materials (included):
- Floating Shelf
- Backplate
- Mounting Hardware
NOTE: If the screws are being driven into drywall and not into a stud, drill the screw
STEP 3: Mount the backplate to the wall using the screws, as shown in Figure 3.
STEP 4: Slide the shelf onto the backplate, with the screw holes facing down,
as shown in Figure 4.
STEP 5: Align the holes on the bottom of the shelf with the holes in the backplate
tubes, and then tighten the screws through the holes until the shelf is securely
attached to the backplate.
using a 1/8" drill bit, as shown in Figure 1. (Skip to STEP 3)
holes using a 1/4" drill bit, and then insert the anchors into the holes as shown in
Figure 2.
Load Rating:
- 24" shelf, 50 lbs when mounted
onto studs
- 36" shelf, 30 lbs when mounted
onto studs
Stud
Figure 1
Backplate Tube
Figure 3
Backplate Tube
Shelf
Wall Surface
Backplate
Wall Surface
Figure 2
Backplate Tube
2700 Oak Industrial Dr. NE
Grand Rapids, MI 49505
800-253-1561
www.kv.com
customer.service@kv.com
Figure 4
©2015 Knape & Vogt. KV and the KV logo are trademarks of Knape & Vogt. 310457/0715
Instructions d’installation
Tablette ottante
0140-24BK | 0140-24WT | 0140-36BK | 0140-36WT
Installation:
ÉTAPE 1: Choisissez l’emplacement désiré pour la tablette.
ÉTAPE 2: Tracez une ligne sur le mur à l’aide du niveau, puis placez la plaque arrière le
long de la ligne afin de déterminer l’emplacement des trous de vis. Marquez l’emplacement
des trous.
REMARQUE: Si les vis doivent être vissées directement dans un montant du mur,
Outils requis (en sus):
- Perceuse électrique
-Mèche de 1/8 po ou de 1/4 po
- Tournevis
- Ruban à mesurer
- Niveau
REMARQUE: Si les vis doivent être vissées dans un panneau de gypse et non dans un
ÉTAPE 3: Fixez la plaque arrière au mur à l’aide des vis, tel qu’illustré à la Figure 3.
pré-percez les trous à l’aide d’une mèche de 1/8 po, tel qu’illustré à la Figure 1.
(Passez à l’ÉTAPE 3.)
montant du mur, pré-percez les trous à l’aide d’une mèche de 1/4 po, puis insérez les
ancrages dans les trous, tel qu’illustré à la Figure 2.
Pièces pour installation (incluses):
- Tablette flottante
- Plaque arrière
- Quincaillerie d’installation
Charge maximale:
- Tablette de 24 po: 22,68 kg lorsque fixée
à un montant du mur
- Tablette de 36 po: 13,61 kg lorsque fixée
à un montant du mur
ÉTAPE 4: Glissez la tablette sur la plaque arrière, en orientant les trous de vis vers le bas,
tel qu’illustré à la Figure 4.
ÉTAPE 5 : Alignez les trous situés sous la tablette avec les trous des tubes de la plaque
arrière, puis enfoncez les vis dans les trous jusqu’à ce que la tablette soit fixée à
la plaque arrière.
Montant
Figure 1
Plaque arrière
Surface
du mur
Figure 2
Plaque arrière
Surface
du mur
2700 Oak Industrial Dr. NE
Grand Rapids, MI 49505
800-253-1561
www.kv.com
customer.service@kv.com
Figure 3
Figure 4
Tablette
Tube de la plaque arrière
©2015 Knape & Vogt. KV and the KV logo are trademarks of Knape & Vogt. 310457/0715
Tube de
la plaque
arrière
 Loading...