

Page 1
Installation and Operation Guide
KMD-5210 LAN Controller
KMD-5210–001 LAN Controller with BACnet 802.3
KMD-5210–002 LAN Controller with BACnet MS/TP
Revision E
883-019-07E
Page 2

KMC Controls
Important notices ©2012, KMC Controls, Inc.
WinControl and WinControl XL is a registered trademark of KMC Controls, Inc.
TotalControl is a trademark of KMC Controls, Inc.
All rights reserved. No part of this publication may be reproduced, transmitted,
transcribed, stored in a retrieval system, or translated into any language in any form
by any means without the written permission of KMC Controls, Inc.
Printed in U.S.A.
Disclaimer The material in this manual is for information purposes only. The contents
and the product it describes are subject to change without notice. KMC
Controls, Inc. makes no representations or warranties with respect to this
manual. In no event shall KMC Controls, Inc. be liable for any damages, direct
or incidental, arising out of or related to the use of this manual.
KMC Controls
P.O. Box 497
19476 Industrial Drive
New Paris, IN 46553
U.S.A.
TEL: 1.574.831.5250
FAX: 1.574.831.5252
E-mail: info@kmccontrols.com
Revision E2
Page 3

KMD–5210 Installation and Operation
Contents
Section 1
About the LAN controller
Introduction .......................................................................................................................... 5
BACnet options .................................................................................................................... 5
Specifications ........................................................................................................................ 6
Options and Accessories ..................................................................................................... 9
Controls and Connections ................................................................................................ 10
Safety Considerations ....................................................................................................... 11
Section 2
Installation
Mounting ............................................................................................................................ 13
Network connections ........................................................................................................ 14
EIA–485 networks .............................................................................................................. 16
BACnet networks ............................................................................................................... 18
Planning for input and output modules ........................................................................ 20
Module installation ........................................................................................................... 21
Connecting Power ............................................................................................................. 22
Connecting to a Computer ............................................................................................... 23
Section 3
Operation
Applying power .................................................................................................................27
Lights and indicators ......................................................................................................... 27
Resetting the controller ..................................................................................................... 29
Section 4
Configuration and programming
Related materials ............................................................................................................... 31
Programming Considerations .......................................................................................... 31
Configuring a controller with HCM ............................................................................... 32
Programming for BACnet in WinControl XL ................................................................ 36
Access to the LAN Controller from BACnet ................................................................. 37
Firewalls and network communications ........................................................................ 37
System time keeping ......................................................................................................... 37
Revision E 3
Page 4

KMC Controls
Revision E4
Page 5

KMD–5210 Installation and Operation
SECTION 1
About the LAN controller
This section provides a general introduction to the KMD-5210 LAN
Controller. It also introduces safety information. Review this
material in its entirety before installing or operating the controller.
Introduction The KMD-5210 LAN Controller is a programmable, direct digital controller
used to facilitate high-level, peer-to-peer network communications for
facilities management purposes. The LAN Controller may be operated in a
stand alone configuration or as part of a fully networked digital system to
intelligently monitor and control HVACR equipment.
The KMD-5210 uses a token passing protocol in Tier 1 networks using an
Ethernet network to communicate with other LAN Controllers. The LAN
Controller also supports Tier
Up to 32 KMD-5210 controllers can be integrated into a single peer-to-peer
network, each supporting up to 124 nodes on a Tier
The controller also supports remote access through a modem port and
provides two ports for direct connection with up to two PCs. The firmware in
the controller uses a high-level, easy-to-learn programming language to
ensure reliability, rapid programming, and compatibility with future KMC
system. This programming function is available from within the KMC
Controls WinControl application.
2 networks with two dedicated EIA–485 ports.
2 network.
BACnet options BACnet 802.3 The KMD-5210-001 adds BACnet functionality to the LAN
Controller. Through Control Basic statements the controller communicates
with 802.3 BACnet devices on the same Ethernet broadcast segment.
BACnet MS/TP The KMD-5210-002 adds BACnet MS/TP functionality to the
LAN Controller functionality. By using Control Basic programming, the
controller exchanges data with native BACnet devices on an MS/TP network.
Revision E 5
Page 6

About the LAN controller
Specifications
Specifications
KMC Controls
Processor Motorola 68360, 32–bit, 33 MHz
Memory
Flash 2 megabytes, nonvolatile, operating programs
and data storage
RAM 2 megabytes, 72–hour capacitor backup
Inputs and Outputs The KMD-5210 controller includes eight
universal I/O ports for optional input and
output modules. Connect up to eight KMD-5220
input modules, eight KMD-5221 output
modules or a combination of input and output
modules in any combination.
I/O Ports Eight, 16–pin connectors. Software selectable as
analog or digital standard or custom units of
measure.
Inputs 16–bit analog-to-digital (A/D)
Software selectable as analog or digital standard
or custom units of measure. Install up to 8, 16
input modules for up to 128 universal inputs.
Output 12–bit digital to analog (D/A)
Communications
Tier 1 EIA–485 protocol at rates up to 38 kilobaud.
Connector type is a three-screw terminal block,
12–22 AWG wire.
Note: Use the Tier 1 connection only when
replacing KMD–5110 MultiNet controllers and
Ethernet is not available. Contact KMC Controls
techncial support for networking details.
Tier 2 A and B EIA–485 protocol at rates up to 38 kilobaud.
Connectors are three-screw terminal blocks,
12–22 AWG wire. Two ports, each of which
support up to 124 KMC Tier
2 controllers.
EIA–485 EIA–485 protocol at rates up to 38 kilobaud.
Connector is a three-screw terminal block,
AWG wire. Supports BACnet MS/TP in
12–22
KMD-5210–002.
Modem EIA–232 in parallel with Computer B. Dial-in
and dial-out for with alarm and paging
capability, 9–Pin (DB-9).
Computer A and B Two EIA–232 ports, operate up to 38.4 kilobaud.
Connectors are three-screw terminal blocks,
12–22 AWG wire.
Ethernet 10baseT, RJ–45 supports up to 31 networked
1 controllers and BACnet 802.3 in KMD-
Tier
5210–001
6
Revision E
Page 7

KMD–5210 Installation and Operation
Programmable Features
Control Basic Programs 128 user-definable program areas
Networked Points In 512 from each Tier 2 network
Networked Points Out 64 to each Tier 2 network
PID Control Loops 64 PID control loops
Program Variables 256 - Software selectable as analog or digital
Time keeping Real-time clock with power backup.
Ta bl es 5 user defined
Logging
Trend Logs 96 trend logs each supporting up to 6 analog,
Runtime Logs 28 runtime logs with time/date stamp and
About the LAN controller
Specifications
127 from Tier 1 network
64 out to a Tier 1 network
with standard or custom ranges, manually set or
program driven values
Programmable for automatic daylight saving
time by date, day of month and time of day.
digital, or virtual elements or points
cumulative runtime
Schedules
Weekly Schedule 32 schedules with 2 override days
Annual Schedule 16 for holiday schedules
Alarms Alarm buffering for up to 128 alarms
50 alarm messages for distribution
On-board 68-character alarm or maintenance
text messages
Power Loss Power fail with auto restart
On-board real-time clock with 72–hour
capacitor backup.
Security Six operator access levels
256 operator names with passwords
Custom Graphics 64 system groups each of which can manage 160
points with animated and color graphics.
Regulatory UL 916 Energy Management Equipment listed
CE compliant
FCC Class B, Part 15, Subpart B
SASO PCP Registration KSA R-103263
Revision E
7
Page 8
About the LAN controller
C
A
B
D
E
F
Specifications
KMC Controls
Power Supply Requires KMD–5563, International-ready 120/
240 VAC, 1.35 ampere power supply
Environmental Limits
Operating 32° to 120° F (0° to 49° C)
Shipping –40° to 140° F (–40° to 60° C)
Humidity 0–95% RH, non-condensing
Weight 1.8 pounds (816 grams)
Compatibility
Software WinControl XL Plus 1.06 or later
TotalControl 1.8.1 or later
Controllers Compatible with Tier 1 controllers firmware
build 2.01 or later
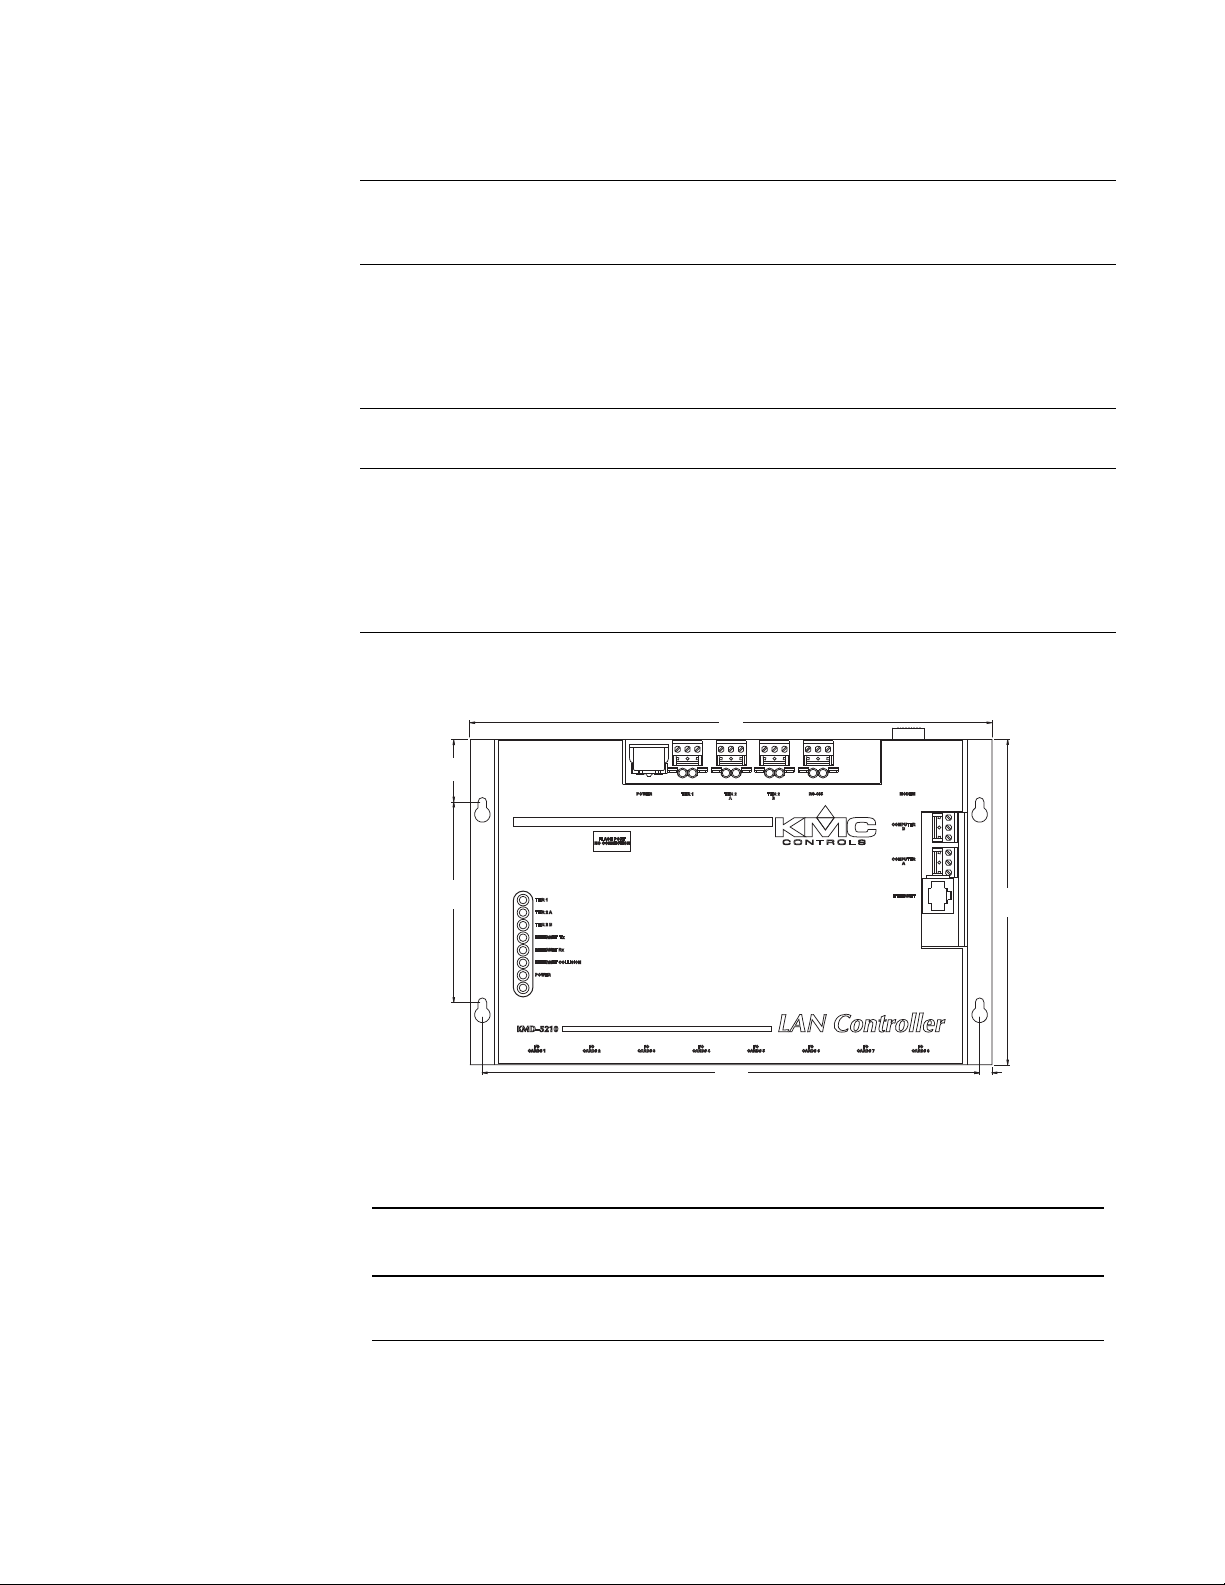
Dimensions
Illustration 1-1 KMD-5210 Components
Table 1-1 KMD-5210 Dimensions
ABCDEF
10.50 in. 6.50 in. 0.25 in. 10.00 4.00 in. 1.25 in. 0.98 in.
267 mm 165 mm 6 mm 254 mm 102 mm 32 mm 25 mm
Height
(not shown)
8
Revision E
Page 9

KMD–5210 Installation and Operation
Options and Accessories Modules
KMD-5220 Input Module
KMD-5221 Output Module
Ribbon Cables for Input and Output Modules
KMD-5660 6 inch (15 cm) ribbon cable
KMD-5668 9 inch (23 cm) ribbon cable
KMD-5661 14 inch (36 cm) ribbon cable
KMD-5662 19 inch (48 cm) ribbon cable
KMD-5663 24 inch (61 cm) ribbon cable
Power
KMD-5563 International-ready power supply, 120/240
XEE-6112-100 100 VA Transformer, 24 volts AC (required only
About the LAN controller
Options and Accessories
volts AC, 1.35 amperes
for KMD-5221 output module)
Upgrades
HTO-1102 Flash Kit Module; KMD/BAC-5XXX,
BAC-7XXX (Replaces KMD-5696)
Enclosures
HCO-1035 Panel Enclosure (20 x 24 x 6 inches)
x 610 x 152 mm)
(508
HCO-1036 Panel Enclosure (24 x 36 x 6 inches)
x 914 x 152 mm)
(610
Revision E
9
Page 10
About the LAN controller
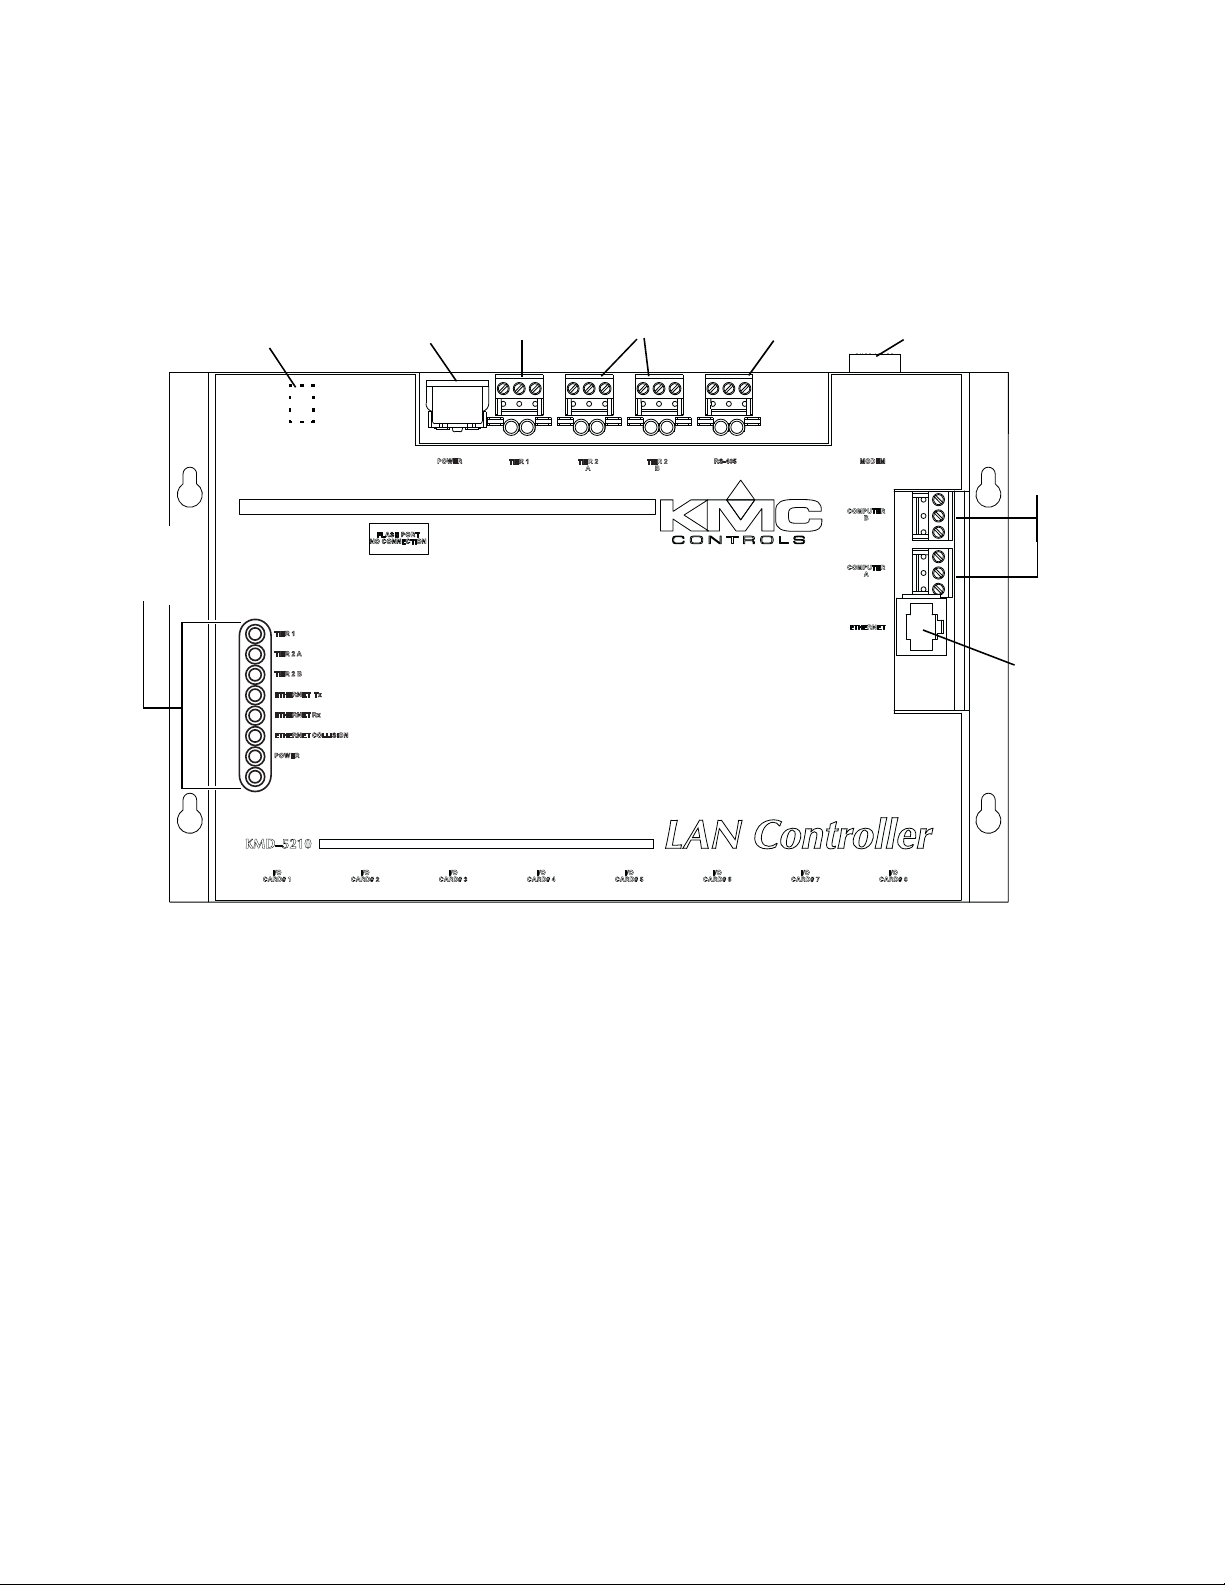
Reset button
(Beneath cover)
Power
Tier 1
EIA–485
Tier 2
EIA–485 Modem
BACnet
MS/TP
EIA–232
for PC
Ethernet
and
BACnet
802.3
LED
Status
Display
Controls and Connections
KMC Controls
Controls and
Connections Before installing the KMD-5210 LAN Controller, take some time to become
familiar with the controller layout and components.
10
Illustration 1-2 Controls and indicators
Revision E
Page 11
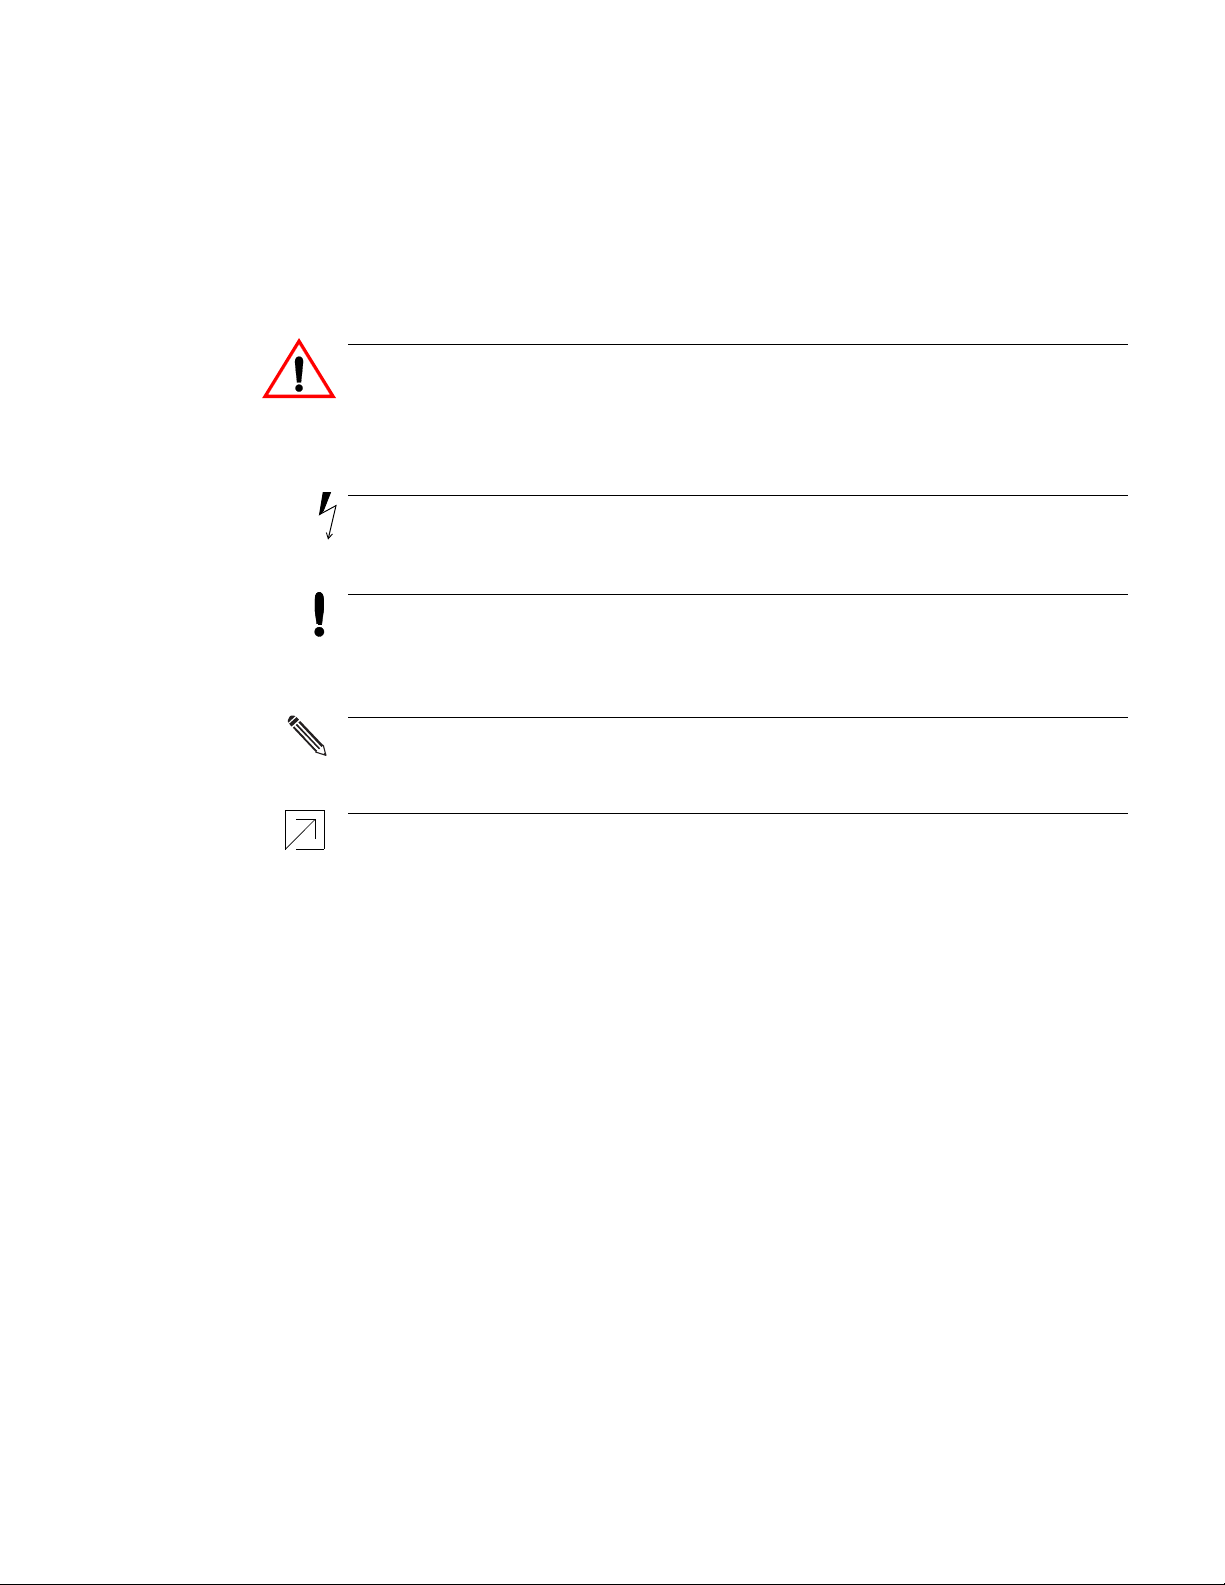
Danger
Warning
Caution
Note
Detail
KMD–5210 Installation and Operation
About the LAN controller
Safety Considerations
Safety
Considerations KMC controls assumes the responsibility for providing you with a safe
product and safety guidelines for its proper use. Safety means protection to all
individuals who install, operate and service the equipment as well as
protection of the equipment itself. To promote safety, we use hazard alert
labeling in this manual. Follow the associated guidelines to avoid hazards.
Danger represents the most severe hazard alert. Bodily harm or death will
occur if danger guidelines are no t followed.
Warning represents hazards which could result in severe injury or death.
Caution indicates potential personal injury or equipment or property damage
if instructions are not followed.
Notes provide additional important information.
Provides programming tips and shortcuts which may save time.
Revision E
11
Page 12

About the LAN controller
Safety Considerations
KMC Controls
12
Revision E
Page 13

Note
Allow 1.5 in. (3.8 cm) for cables
Allow 3.0 in. (7.6 cm) for cables
Mounting
holes
Mounting
holes
KMD–5210 Installation and Operation
SECTION 2
Installation
This section provides important instructions and guidelines for
installing the KMD-5210 LAN Controller. Carefully review this
information prior to installation.
Mounting Mount the controller inside of a metal enclosure. KMC Controls recommends
using a UL-approved Enclosed Energy Management Equipment Panel such as
a KMC model HCO–1034, HCO–1035 or HCO–1036. Insert #6 or #8 hardware
through the two mounting holes on each side of the controller to securely
fasten it to a flat surface. See
locations and dimensions. To maintain RF emission specifications, use either
shielded connecting cables or enclose all cables in conduit.
Illustration 1-2 on page 10 for mounting hole
Provide sufficient clearance around the controller for cables and wiring.
◆ Allow a minimum of 3 inches (7.6 cm) of clearance at the top edge of the
controller for the power and modem connectors.
◆ Allow a minimum of 1.5 inches (3.8 cm) of clearance for the ribbon cables
at the bottom of the controller.
Illustration 2-1 Mounting details
Revision E 13
Page 14

Installation
~
+
1
+
2
+
3
+
4
+
5
+
6
+
7
+
8
+
9
+
10
+
11
+
12
+
13
+
14
+
15
+
16
STATUS
KMD-5210
CONNECTOR
OUTPUTS
SC
1-4
SC
5-8
SC
9-12
SC
13-16
SWITCHED
COMMONS
24 VAC
STATUS H O A
STATUS H O A
O-R
O-R
O-R STATUS H O A
O-R STATUS H O A
O-R STATUS H O A
O-R STATUS H O A
O-R STATUS H O A
O-R STATUS H O A
1
2
3
4
5
6
7
8
STATUS H O A
STATUS H O A
O-R
O-R
O-R STATUS H O A
O-R STATUS H O A
O-R STATUS H O A
O-R STATUS H O A
O-R STATUS H O A
O-R STATUS H O A
1
2
3
4
5
6
7
8
+
1
+
2
+
3
+
4
+
5
+
6
+
7
+
8
+
9
+
10
+
11
+
12
+
13
+
14
+
15
+
16
STATUS
KMD-5210
CONNECTOR
INPUT JUMPERS
4-20 MA
1K PULL-UP
10K PULL-UP
NO PULL-UP
TRANSDUCER
POWER
OUT 1
OUT 2
OUT 3
OUT 4
OUT 5
OUT 6
15 VDC
INPUT
+
INPUTS
Modem
Power
Supply
RS-485
Tier 1
VAV
TERMINAL
CONTROLLER
U.V.
Terminal
Controller
Local
Controller
HEAT PUMP
TERMINAL
CONTROLLER
Vav
Terminal
Controller
Local
Controller
Tier 1 KMC Ethernet
(BACnet 802.3
Optional)
RS-485
(Optional BACnet
MS/TP)
INPUT MODULE
KMD-5220
INPUT MODULE
KMD-5220
OUTPUT MODULE
KMD-5221
OUTPUT MODULE
KMD-5221
Network connections
Network
KMC Controls
connections
Prior to making network connections, determine which connections will be
used and how the network will be configured. An example of a typical
installation is shown in
Illustration 2-2.
Each KMD-5210 in a KMC digital network may operate in either a stand-alone
mode or connected by network to other controllers. The LAN Controller may
be connect to other controllers using one or more of four network
technologies.
◆ KMC Tier 1 networks using standard 10BaseT, CAT 5 Ethernet cabling or
EIA–485 wiring and hardware.
◆ KMC Tier 2 networks using EIA–485 wiring and hardware.
◆ BACnet 802.3 networks using standard 10BaseT CAT 5 Ethernet cabling
(KMD-5210-001 only)
◆ BACnet MS/TP using EIA–485 wiring and hardware (KMD-5210-002
only)
Illustration 2-2 Typical network configuration
14
Revision E
Page 15

Note
Ethernet hub
or router
KMD–5210 Installation and Operation
Up to 32 LAN Controllers can be connected to the same Ethernet backbone in
a common Ethernet network. This configuration also allows multiple PCs to
access the system through the Ethernet network.
Connect the controller to the network by connecting a standard 10BaseT
Ethernet cable (CAT 5) to the Ethernet/BACnet port on the controller and to a
port on the network hub or router. (See “Ethernet Settings” later in this guide
for recommended Ethernet Software Settings.)
For reliable operation, use CAT 5 or equivalent Ethernet cables for all
connections. If cables are custom made, they must meet the CAT 5
specification.
Installation
Network connections
Revision E
Illustration 2-3 Typical Ethernet network configuration
15
Page 16

Installation
Note
Note
EIA–485 networks
KMC Controls
EIA–485 networks The KMD-5210 LAN Controller provides four active EIA–485 connection
ports.
◆ Tier 1
◆ Tier 2A
◆ Tier 2 B
◆ EIA–485 for BACnet MS/TP
Use the Tier 1 port (marked Main Net on older controllers) to connect several
KMD-5210. This is an alternative to connecting LAN Controllers to each other
with Ethernet. This port will allow up to 31 controllers to be connected
together by network.
The Tier 1 EIA–485 port is disabled when the controller is assigned an IP
address for operation on an Ethernet network. Tier 2 A and Tier 2 B will
function normally. Ethernet IP addresses are configured with Hardware
Configuration manager.
The Tier 2 A and Tier 2 B ports are for connection to Tier 2 networks. Each port
supports up to 124 individual controllers.
For reliable operation, use Belden cable model #82760 or equivalent (18 gauge,
twisted, shielded, 50 picofarads or less) for all EIA–485 network wiring.
Wiring notes
All EIA–485 network segments (KMC protocol or BACnet) use the same
wiring principles.
◆ Use approved shielded cable and the following principles when
connecting a controller to a Tier 2 (sub LAN) network:
◆ Connect no more than 31 KMC addressable controllers or devices to the
Tier 1 RS-485 connector.
◆ Connect no more than 124 KMC programmable controllers to the
Tier 2 A or Tier 2 B connectors.
◆ Connect the A terminal in parallel with all other A terminals.
◆ Connect the B terminal in parallel with all other B terminals.
◆ Connect the shields of the cable together at each controller.
◆ Connect the shields to an earth ground (if available) or chassis ground
only at one end of the segment; tape back the shield ground at the other
end.
◆ Use a KMD–5575 repeater between every 32 Tier 2 controllers or if the
cable length of a Tier 1 or Tier 2 network exceeds 4000 feet (1220 meters).
Use no more than seven repeaters per network.
◆ Place a KMD–5567 surge suppressor in the cable where it exits a
building.
16
Revision E
Page 17

G
A
B
G
G
B
A
G
B
A
A
B
KMC controller
connections
Input termination jumpers
(Two at each EIA–485 connector)
Jumpers set for end-of-line
termination removed.
KMD–5210 Installation and Operation
Refer to Illustration 2-4 for an example of typical EIA–485 connections.
Installation
EIA–485 networks
Illustration 2-4 Typical EIA–484 Wiring Configuration
End-of-line termination
Each EIA–485 network segment requires end-of-line termination for proper
operation of the network. Proper termination prevents signal degradation and
EMI type interference with other system wiring. Termination jumpers are
located on both sides of each EIA–485 connector (one each for the A and B
terminals; see
To activate the end-of-line termination, leave the jumpers in place. If
termination is not required, position the jumpers so they only cover one pin
on the header.
Illustration 2-5.)
Illustration 2-5 End-of-line Termination Jumpers
Revision E
17
Page 18

Installation
Note
Note
Install jumpersRemove jumpers
Install jumpers
BACnet networks
KMC Controls
The controller with only one EIA–485 cable connected is normally the
end-of-line. This is also the controller where the cable shield ground is tied to
earth or a chassis ground
.
Illustration 2-6 End-of-line termination jumper sample for a Tier 1 network
BACnet networks The KMD-5210 LAN Controller supports an optional Class 3 Conformance
Level of the BACnet specification. The BACnet protocol is implemented using
either one or the other of the following network configurations.
◆ Ethernet 802.3 specification in KMD-5210-001
◆ MS/TP EIA–485 in KMD-5210—002.
See the section Programming for BACnet in WinControl XL on page 36 for details on
BACnet features.
The BACnet options are licensed for each controller. To upgrade a KMD-5210
controller to BACnet, contact KMC Controls for license information.
BACnet 802.3
The KMD-5210–001, the BACnet 802.3 version of the LAN controller, connects
to the LAN in the same manner as the standard LAN controller. See
connections on page 14.
The BACnet internetwork most likely will use one or more BACnet routers to
manage the BACnet internetwork and devices. The KMD-5210–001 must be
connected to the same Ethernet broadcast domain segment as at least one
BACnet router and the router must be enabled for BACnet 802.3 traffic. To
configure a KMD-5210–002 for network connections, see
BACnet configuration
on page 35.
Network
18
Revision E
Page 19

Shield + –
KMD–5210 Installation and Operation
BACnet MS/TP
Connect a KMD-5210–002 controller to a BACnet MS/TP network at the
connector
techniques. To configure a KMD-5210–002 for network connections, see
BACnet configuration on page 35.
Installation
BACnet networks
EIA–485. See EIA–485 networks on page 16 for network wiring
Illustration 2-7 BACnet MS/TP connections
Revision E
19
Page 20

Installation
Planning for input and output modules
Planning for input
and output
KMC Controls
modules
To connect inputs or output devices to a KMD-5210 controller, use KMD-5220
input and KMD-5221 output modules. The KMD-5210 controller includes
eight universal I/O ports for up to eight KMD-5220 input modules, eight
KMD-5221 output modules or any combination of up to eight modules.
Each module connects to the controller using a flat ribbon cable. When
connecting input and output modules, use the following guidelines.
◆ Connect the first KMD-5220 input module to connector I/O Card 1; add
continue adding input modules from left to right
◆ Connect the first KMD-5221 output module to connector I/O Card 8 and
continue adding output modules from right to left.
◆ Use ribbon cables no longer than 24 inches (61 cm).
◆ KMD-5221 output modules require an output transformers.
20
Illustration 2-8 Typical input and output module connection
Revision E
Page 21

Note
Pin 1 edge
(Red)
I/O port
connection
Input/Output card
connection
Fold gently
Pin 1 edge
(Red)
Fold back
KMD–5210 Installation and Operation
Module installation
Installation
Module installation 1. Position and mount the modules in the enclosure using the supplied
mounting holes.
2. Connect the ribbon cable to the LAN Controller. Estimate the required
cable length and select from one of the cables from KMC Controls. See
Ribbon Cables for Input and Output Modules on page 9 in the Options and
Accessories section.
Observe the orientation of the cable header. If the pin 1 edge is reversed, the
controller will not communicate with the module.
Illustration 2-9 Ribbon cable orientation
3. Connect the other end of the ribbon cable to the input or output module.
You may find it necessary to fold the cable to properly route it to the
module.
To accommodate turns, fold the cable gently to change direction. To make a
fold, overlay the cable at a right angle and press gently until the cable holds
the fold as shown in
Illustration 2-10.
Illustration 2-10 Ribbon cable fold
Revision E
21
Page 22

Installation
Caution
Caution
Connecting Power
KMC Controls
Do not crimp the cable in a tight fold. This may result in separation of cable
strands and result in unreliable operation of the module.
4. Connect input and output devices to the modules. Refer to the manuals
supplied with the KMD-5220 input module and the KMD-5220 output
module for details.
Connecting Power Each KMD-5210 LAN Controller requires a KMD–5563 power supply for
operating power. Mount the power supply in a convenient location near the
KMD-5210 and route the supply cable to the controller.
The controller will automatically power on when the power connection is
complete. The controller does not use an power switch. See
page 27 for additional information.
Applying power on
Use only a KMC Controls power supply. Powering the controller with an
improper supply may result in damage to the controller.
22
Revision E
Page 23

Note
KMD–5569
modem
Standard 9–pin to
25–pin cable.
KMD–5210 Installation and Operation
Connecting to a Computer
Installation
Connecting to a
Computer To program the controller with WinControl, a computer must be able to access
the controller. Choose from one of the following connection methods.
◆ Modem
◆ Ethernet
◆ EIA–232 connection
Installing a modem interface
By adding an optional modem to the modem port, an off-site computer can
access the controller through a dial-up connection. The modem connection
also supports dial-in and the Control Basic functions TPAGE and NPAGE. If
the modem port is enabled, Computer B port is disabled and is not available
for direct connection with a computer.
KMC Controls recommends using U.S. Robotics modems for off-site
communications. KMC does not offer support for other modem installations.
Revision E
Illustration 2-11 KMD–5569 modem connection to KMD-5210 controller
To install a modem:
1. Connect a a standard DB-9 to DB-25 computer-to-modem cable between
the KMD–5569 modem and a serial port on a computer on which
WinControl is installed. This cable is available from computer supply
sources.
2. Connect the modem to a telephone line dedicated to the network system.
23
Page 24

Installation
Pin 2–Red
Pin 3–Black
Pin 5–Green
Red–Transmit
Ground–-Green
Black–Recieve
KMD–5672
Connecting to a Computer
KMC Controls
3. Verify the configuration switches on the back of the modem are in the
correct position for the firmware in the controller.
Table 2-1 Configuration switches: Firmware 4.0 and later
12345678
Up Up Down Down Down Up Up Down
Table 2-2 Configuration switches: Firmware earlier than 4.0
12345678
Up Up Down Down Up Up Up Down
4. Use HCM to initialize Computer Port B for modem operation.
Connecting a KMD-5210 to an Ethernet LAN
To connect a PC to the controller via the Ethernet, the PC a must have a valid
IP address on the Ethernet network that connects to the controller and install
the PC on the Ethernet. Refer to the section
page 32 for additional information.
Configuring a controller with HCM on
Direct Serial Port Connection
Two RS-232 ports are provided on the controller for connecting a PC directly
to the controller. Connect the PC to the controller using a KMD–5672 PC to
Controller cable. Refer to
Illustration 2-12.
24
Illustration 2-12 PC-controller cable connection
Revision E
Page 25

Note
KMD–5210 Installation and Operation
EIA–232 port B is assigned the same address as the modem port. When the
modem port is in use, a PC cannot be connected to the controller through serial
port B.
Installation
Connecting to a Computer
Revision E
25
Page 26

Installation
Connecting to a Computer
KMC Controls
26
Revision E
Page 27

KMD–5210 Installation and Operation
Operation
Applying power
SECTION 3
Operation
This section provides general operating instructions for your
KMD-5210 LAN Controller. Included are a description of the
Isolation Bulbs, the LED status display, and instructions for resetting
the controller. Carefully review this information as it applies to the
task at hand.
Applying power The KMD-5210 LAN Controller is automatically powered when the power
supply module is connected and plugged in. Verify all external connections
are complete before applying power to the controller.
If an error in an EIA–485 network is indicated by a glowing lamp near one of
the EIA–485 connectors, remove power and troubleshoot the circuit before
you reapply power to the controller. (See Isolation Bulbs in the following
section.)
Lights and indicators
The controller provides a number of different status and diagnostic indicators.
These are described in this section.
Isolation bulbs
Located near each EIA–485 connector you will find two small glass bulbs.
These serve as protective isolation devices for the Tier
EIA–485 networks. The bulbs serve three functions:
◆ When illuminated they indicate improper network phasing. Improper
phasing occurs when the ground potential of the controller is higher than
the phase or the ground potential of other controllers on the network.
◆ The bulbs protect the controller from damage by limiting the input
signal. If voltage or current exceeds safe operating conditions, the bulbs
will act as fuses and open the connections between the controller and the
network.
◆ By removing the bulbs from their sockets you can isolate the controller
from the associated network.
The illustration Isolation bulbs on page 28 locates the isolation bulbs on the LAN
Controller.
2 and BACnet MS/TP,
Revision E
27
Page 28

Operation
Isolation bulbs
(Two at each EIA–485 connector)
Lights and indicators
KMC Controls
Illustration 3-1 Isolation bulbs
LED Indicators
The LAN Controller uses seven LEDs to indicate the status of the controller
and the different networks connected to the controller. The following table
lists the LEDs and their functions.
Table 3-1 Status LED descriptions
LED Function
Tier 1 This green LED indicates the status of the MAIN EIA–485 network.
This LED blinks whenever the controller is transmitting data.
Tier 2A This yellow LED indicates the status of the Tier 2 A EIA–485
network. This LED blinks whenever the controller is transmitting
data.
Tier 2B This yellow LED indicates the status of the Tier 2 B EIA–485
network. This LED blinks whenever the controller is transmitting
data.
Ethernet Tx This green LED blinks when the controller is transmitting data to
the Ethernet network.
Ethernet Rx This green LED blinks when the controller is receiving data from
the Ethernet network.
Ethernet Collision This red LED blinks when there is a collision of data packets on
the Ethernet. While collisions are normal, excessive collisions
indicate a problem somewhere in the network.
Power The green power LED indicates the status of the controller:
Steady Blink – If the controller is operating normally, the LED
blinks at a steady rate.
Dark/Not Lit – If the LED is not lit, it may indicate the controller is
locked or does not have power. You can try resetting the controller
or you can reload the panel information using the KMC Flash
Wizard.
28
Erratic or Repeating Pattern Blink – If the LED is blinking, but not
at a steady rate, the controller is indicating there is a problem with
the license. Contact KMC Controls for assistance.
Revision E
Page 29

Caution
Reset button
KMD–5210 Installation and Operation
Resetting the
Operation
Resetting the controller
controller
Should the controller appear to lock up or stop operating, you must reset the
controller to the factory default state. After the controller is reset, you must
reload any existing panel files to restore normal operation. (See the section
Configuring a controller with HCM on page 32 for additional details
Locate the Reset Button beneath the cover in the upper left corner of the
controller. See
Illustration 3-2 for the reset button location.
Illustration 3-2 Reset button location
To reset the LAN Controller:
1. Remove power from the controller by unplugging the power supply.
2. Remove the EIA–485 three–terminal connector blocks for all connected
EIA–485 ports. Also, remove Ethernet cables, modem cables, and any PC
connections.
3. Unplug all I/O ribbon cables.
4. Depress and hold the Reset Button while reestablishing power to the
LAN Controller.
5. Continue to hold the reset button until MAIN, Tier 2 A and Tier 2 B LEDs
light.
Revision E
Do not remove power during the reset process. Damage may result to the
board if this happens.
6. Release the Reset Button and allow the controller to continue to power
up steady blink Power LED).
7. Remove power from controller.
8. Return all cables and terminal blocks to their proper positions.
9. Reapply power to the LAN Controller and allow it to return to the
normal operating state (blinking Power LED).
10.If this is a new installation, the controller must be configured before it can
be placed into operation. Refer to
Configuration and programming on page 31
of this guide for instructions.
11.If you are resetting the controller but not replacing it, use the HCM
program to reload panel files.
12.Cycle power to the controller to establish the newly configured operating
parameters.
29
Page 30

Operation
Resetting the controller
KMC Controls
30
Revision E
Page 31

KMD–5210 Installation and Operation
Configuration and programming
Related materials
SECTION 4
Configuration and programming
This section describes the individual configuration instructions used
to establish the operating parameters for the KMD-5210 LAN
Controller. This section includes basic configuration, Ethernet
configuration, BACnet configuration and Ethernet verification.
Related materials In addition to the material presented in this installation and operation guide,
review and have available the following reference materials.
◆ WinControl XL Plus User’s Manual and installed help
◆ HCM reference guide
◆ TotalControl Design Studio Reference Guide
◆ System plans with controller addresses
Programming Considerations
The design of the KMD-5210 LAN Controller provides areas where specific
user programs may be stored. This allows a great deal of versatility and
function in the way the controller is used. It also allows for changes to the
system to meet changing requirements or conditions.
All programming functions are accomplished using the WinControl
WinControl XL Plus applications from KMC Controls. Please refer to the
current version of the WinControl User’s Manual for programming
instructions and functions.
Revision E
31
Page 32

Configuration and programming
Caution
Note
Configuring a controller with HCM
Configuring a
controller with
KMC Controls
HCM
Before placing a controller into service, it must be initialized and addressed
with the KMC
distributed with application programs; complete instructions for HCM are
included in the
help system built into HCM.
The Hardware Configuration Manager sets all controllers on the Tier 2
network to the same parameters. To prevent disruption to other controllers on
the network, disconnect the network cables or remove the isolation bulbs on
the controller prior to starting HCM.
1. Start HCM, connect the controller to the computer and establish
communications with the controller.
2. Make the entries as described in the section KMC digital network
configuration on page 33.
3. Setup the Ethernet routing table. See Ethernet routing table
4. If applicable, enter BACnet parameters. See BACnet configuration
page 35.
5. Cycle the power to the controller. The controller can now be connected to
a network and additional programming can be performed with
WinControl XL or the Acuity Configuration tool.
Hardware Configuration Manager (HCM) software. HCM is
Hardware Configuration Manager manual and the context sensitive
on page 34.
on
Ethernet settings do not take effect in a controller until the power is cycled.
32
Revision E
Page 33

KMD–5210 Installation and Operation
KMC digital network configuration
The entries in the table HCM Configuration Screen setup fields on page 33 are
required for controller-to-controller communications on a KMC controls
digital network.
Setting Description
Address Enter the address that is assigned to the controller on the network.
Last Panel Check this box only if the controller is assigned to the highest
SubLAN A
SubLAN B
Main Network
BACnet
Modem String For Firmware 4.0 and later: The string AT&A &B1 &C1 &D2 &H1
Configuration and programming
Configuring a controller with HCM
Table 4-1 HCM Configuration Screen setup fields
Valid numbers are 1–31. This address is also the BACnet MS/TP
MAC address in KMD-5210–002 controllers.
address number in the system. This controls token passing in the
network. Last Panel is not applicable for Tier 1 controllers
connected with Ethernet.
Sets the connection speed of the Tier1, Tier 2 or BACnet MS/TP port
to which the LAN controller is connected. Set each baud to match
the baud of the other controllers on each network.
&K0 &R1 is stored in Flash memory and cannot be changed. Entries
in Modem String are sent to the modem after the default string is
sent. This provides a method to override settings in the default
string. For example, entering ATS0=5 sets the modem to answer on
the fifth ring.
Firmware earlier than 4.0: The controller automatically transmits the
default initialization string AT&A &B1 &C1 &D2 &H1 &K0 &R1 to
the modem. The default string can be modified by making changes
in Modem String.
See Installing a modem interface
and switch settings.
Computer A Use this field to set the communication speed if a PC is directly
connected to this port.
Computer B Use this field to set the communication speed if a PC is directly
connected to this port. If you are using the modem port on the LAN
controller, check the Modem box to indicate a modem is attached
to the controller. If you have a modem attached, you cannot use the
Computer B connector.
I/O Card
Configuration
Use the fields in this area to enable communications with input or
output cards connected to the controller. Click on the button to step
through the choices. Input cards are connected to the controller
starting at position #1; output cards are connected starting at
position #8. If a port is unused, leave it marked as Unused in HCM.
on page 23 for modem installation
Revision E
33
Page 34

Configuration and programming
Note
Configuring a controller with HCM
Ethernet routing table
The Ethernet routing table is a list that associates the KMC network addresses
assigned to Tier 1 controllers with the IP addresses required by the LAN
protocol. If the controller is not configured correctly, it will not communicate
with other controllers and may cause problems with the rest of the network.
Before starting the HCM initializing process you will need information about
the controller and the LAN which is listed in
Setting Description
IP address Supplied by network administrator. Enter the address next to the
MTU 1400 or as supplied by system administrator
Gateway Use default (255.255.255.255) unless a router (gateway) is located
MAC address The MAC address is located on the white label on front of controller.
Broadcast
sever
Interval Sets the interval for the broadcast message. The broadcast message is
Subnet mask Set the Subnet Mask address to 255.255.255.0. or as supplied by
KMC Controls
Table 4-2.
Table 4-2 Tier 1 (LAN) controller Ethernet settings
panel address of the LAN Controller.
between two Tier 1 controllers. The router IP address is supplied by
the network system administrator.
MAC addresses for KMC Controls products begins with 00-D0-6F.
For controllers 1 - 16, select the Broadcast Server check box only for
the controller to which HCM is connected.
Select the Broadcast Server check box for all other controllers.
for KMD controllers and not a LAN broadcast message. The default
setting is 20 seconds.
network system administrator.
34
Ethernet settings do not take effect in a controller until the power is cycled.
Ethernet troubleshooting
If the controller does not appear Network Status in the WinControl program,
try the following.
1. Obtain a crossover cable (available in most stores that carry network
products).
2. Connect the crossover cable between the Ethernet connection on your
computer and the Ethernet connector on the LAN Controller.
3. Open an MS-DOS window on your computer and Ping the controller’s IP
address. If the controller is operating correctly, you should receive a
response to the ping command.
If you are unfamiliar with the above steps, contact KMC Controls for
assistance.
Revision E
Page 35

Detail
KMD–5210 Installation and Operation
BACnet configuration
If the controller is configured for BACnet and connected to a BACnet network,
the controller must be configured to communicate with the network. BACNet
is a licensed option in models listed below. This procedure applies only to
these models.
◆ KMD-5210–001 (BACnet 802.3)
◆ KMD-5210–002 (BACnet MS/TP)
Setting Description
Instance The device instance number as assigned by the BACnet system
Name A required 16-character label of the device. Name must be unique
Location Optional information used to further identify a piece of equipment.
Description Optional information used to further identify a piece of equipment.
APDU Timeout Indicates the period—in milliseconds— between retransmissions of
Max Master Enter the highest MAC address the controller will attempt to locate
Token Timeout Enter the period a controller must wait to see if a remote node
Configuration and programming
Configuring a controller with HCM
Table 4-3 Tier 1 BACnet settings
designer. Instance numbers are required, must be unique among all
devices on the internetwork and range from 0 to 4,194,303.
among all devices on the internetwork. The set of characters used
in Name is restricted to printable characters.
an APDU requiring an acknowledgement for which no
acknowledgment has been received. The default value is 3000
milliseconds.
while polling for a master device on the local network.
responds to a request or starts using the token. The range is 20-100
milliseconds.
Revision E
BACnet device settings are covered in more detail in the BACstage Reference
Guide that is available in Adobe Acrobat format on the KMC Controls web site.
See the topic Device Objects in the section The Object Menu.
35
Page 36

Configuration and programming
Programming for BACnet in WinControl XL
Programming for
BACnet in
KMC Controls
WinControl XL
The LAN Controller supports the BACnet object types listed in Table 4-4.
Table 4-4 Supported BACnet object types
Mnemonic Object type
AI Analog Input
AO Analog Output
BI Binary Input
BO Binary Output
AV Analog Value
BV Binary Value
Program the LAN Controller as would other KMD series controllers. Observe
the following details when programing an interface to a BACnet internetwork:
◆ Only inputs, outputs and variables within the LAN Controller appear as
objects in a device on the BACnet internetwork.
◆ A point configured as a KMD digital point will appear as a BACnet
binary object. Analog points appear as analog objects.
◆ To be visible as an object to BACnet devices or operator workstation,
configure the KMD point with both a description and a label in
WinControlXL Plus. In TotalControl configure the point with both a
description and name.
◆ Use BAC-SET, BAC-GET and BAC-RLQ in Control Basic to read and
write other objects on other BACnet devices.
36
KMC Controls recommends that all BACnet services have adequate error
handling protocols within your control program. A sample Control Basic code
segment is provided below to demonstrate reading the state of Binary Input 8
in a BACnet device with instance number 1.
Example: 250 G = BAC-GET( 1 , BI8 ) : REM BACnet read
260 ON-ERROR 280 : REM If error, bad read, don’t use it
270 1-VAR16 = G : REM Read was good, use the value.
280 WAIT 0:00:15 : REM Release so other CB programs can
run
290 END
Revision E
Page 37

Note
KMD–5210 Installation and Operation
Access to the LAN Controller from BACnet
To access the LAN Controller, use a BACnet operator workstation such as
BACstage.
◆ The LAN Controller will appear in the BACstage device list but cannot
be selected. Its objects are not accessible for configuration from the
BACstage Object menu.
◆ The configured points within the KMD-5210 are the only points visible in
BACnet.
◆ In BACstage, use BACnet Read/Write Property under the System menu in
BACstage to manually view or change properties.
◆ KMC BACnet controllers and third-party devices may read and write to
the objects in the KMD-5210 with off-panel reads and writes.
Firewalls and network communications
Firewalls are commonly installed on networks to prevent unauthorized traffic
or electronic probes from entering the network. If the LAN Controller must
communicate with a network where a firewall is in place the following actions
must be taken.
Configuration and programming
Access to the LAN Controller from BACnet
System time keeping
LAN controllers communicate through one of three Ethernet Ports:
◆ WinControl to LAN Controller: UDP 21068
◆ LAN Controller to LAN Controller: UDP 21069
◆ LAN Controller to LAN Controller: UDP 21070
These ports must be open for communications to pass through a firewall.
If the LAN Controller resides behind a Network Address Translation (NAT)
router, the IP address for the controller must be preceded by the lowercase
letter ‘r’ in the system menu. (For example, r128.1.1.5.)
Adding this prefix letter will cause WinControl to disregard the IP table and
download from the panel itself.
If you use this method you will only be able to connect one LAN Controller
through the router.
The controllers feature real-time clocks. Once the clock is set with
WinControl
loss. A KMC digital network uses the lowest addressed Tier
XL, the controller maintains accurate time even during power
1 (LAN)
controller with a real-time clock as the system time keeper.
Revision E
37
Page 38

Configuration and programming
System time keeping
KMC Controls
38
Revision E
 Loading...