

Page 1
Kit Identification
FlexStat Firmware Upgrade (and CO2 Calibration Adapter) Kit
HTO-1103
Installation Guide
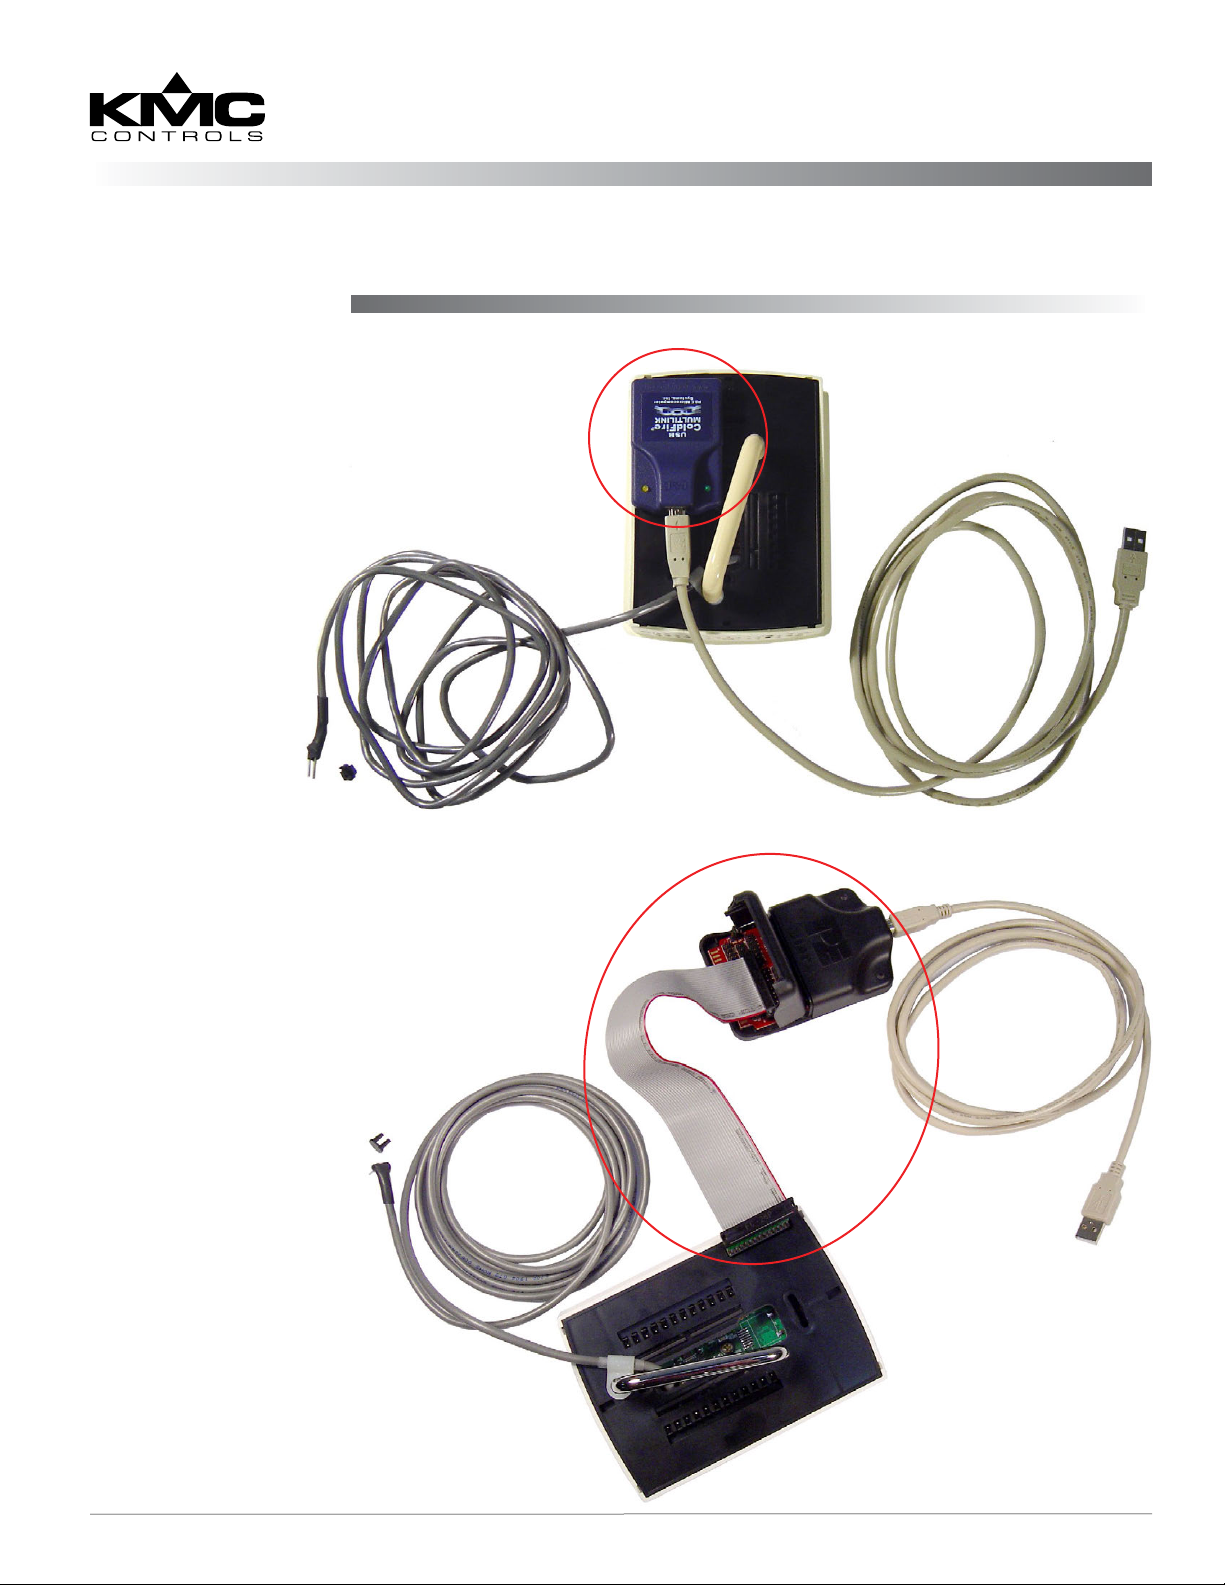
HTO-1103 (formerly KMD-5699)
If you have a kit containing a BLUE integrated
programming pod and connector that plugs
directly into the back of the FlexStat (with a
pin extender for CO
instructions in THIS document to upgrade the
rmware in your FlexStat.
model FlexStats), use the
2
HTO-1104
If you have a kit containing a BLACK
“universal” programming pod with a
ribbon cable (and pin extender) that
plugs into the back of the FlexStat, see
the connection information in the
Firmware Upgrade Tool
instructions (905-019-
03). The HTO-1104 kit
also has several other
narrower ribbon cables
for other types of KMC
controllers.
NOTE: The KMD-5699 part
number was changed
to HTO-1103 in Aug.
2010.
NOTE: Orientation of
the ash port
connection
in either kit
depends on the
FlexStat model.
See Illustration
6 on page 4.
HTO-1103 FlexStat Firmware Flash Upgrade Kit 1 Installation Guide, Rev. N
NOTE: Both kits also
include multiple
FlexStat backplates
(see Illustration 6
on page 4) and
calibration
a CO
2
tube adapter (see
Illustration 14 on
page 8).
Page 2
Software and Firmware Installation
NOTE: FlexStat rmware is upgraded using the
(software) Firmware Upgrade Tool and the
(hardware) adapter plate and programming
pod in the kit. You will need Version 2.1.0.3
or later of the Firmware Upgrade Tool.
Download and install the latest FlexStat
rmware and the Firmware Upgrade Tool
software before connecting the FlexStat to
the computer.
NOTE: To use the KMC Firmware Upgrade Tool
software, the Windows XP, Vista, 7, or
8 operating system as well as Microsoft
.NET Framework (ver. 4 or later) must be
installed on the computer.
To verify that the correct version of
Microsoft .NET Framework is installed:
select Start > Control Panel > Add or Remove
Programs (or Programs and Features). Scroll
through the list of programs to locate the
versions of Microsoft .NET. If Microsoft
.NET 4 or later is in the list, close the dialog
box. No further action is required.
If .NET 4 or later is not installed, it is
available as a free download from the
Microsoft web site (www.microsoft.com).
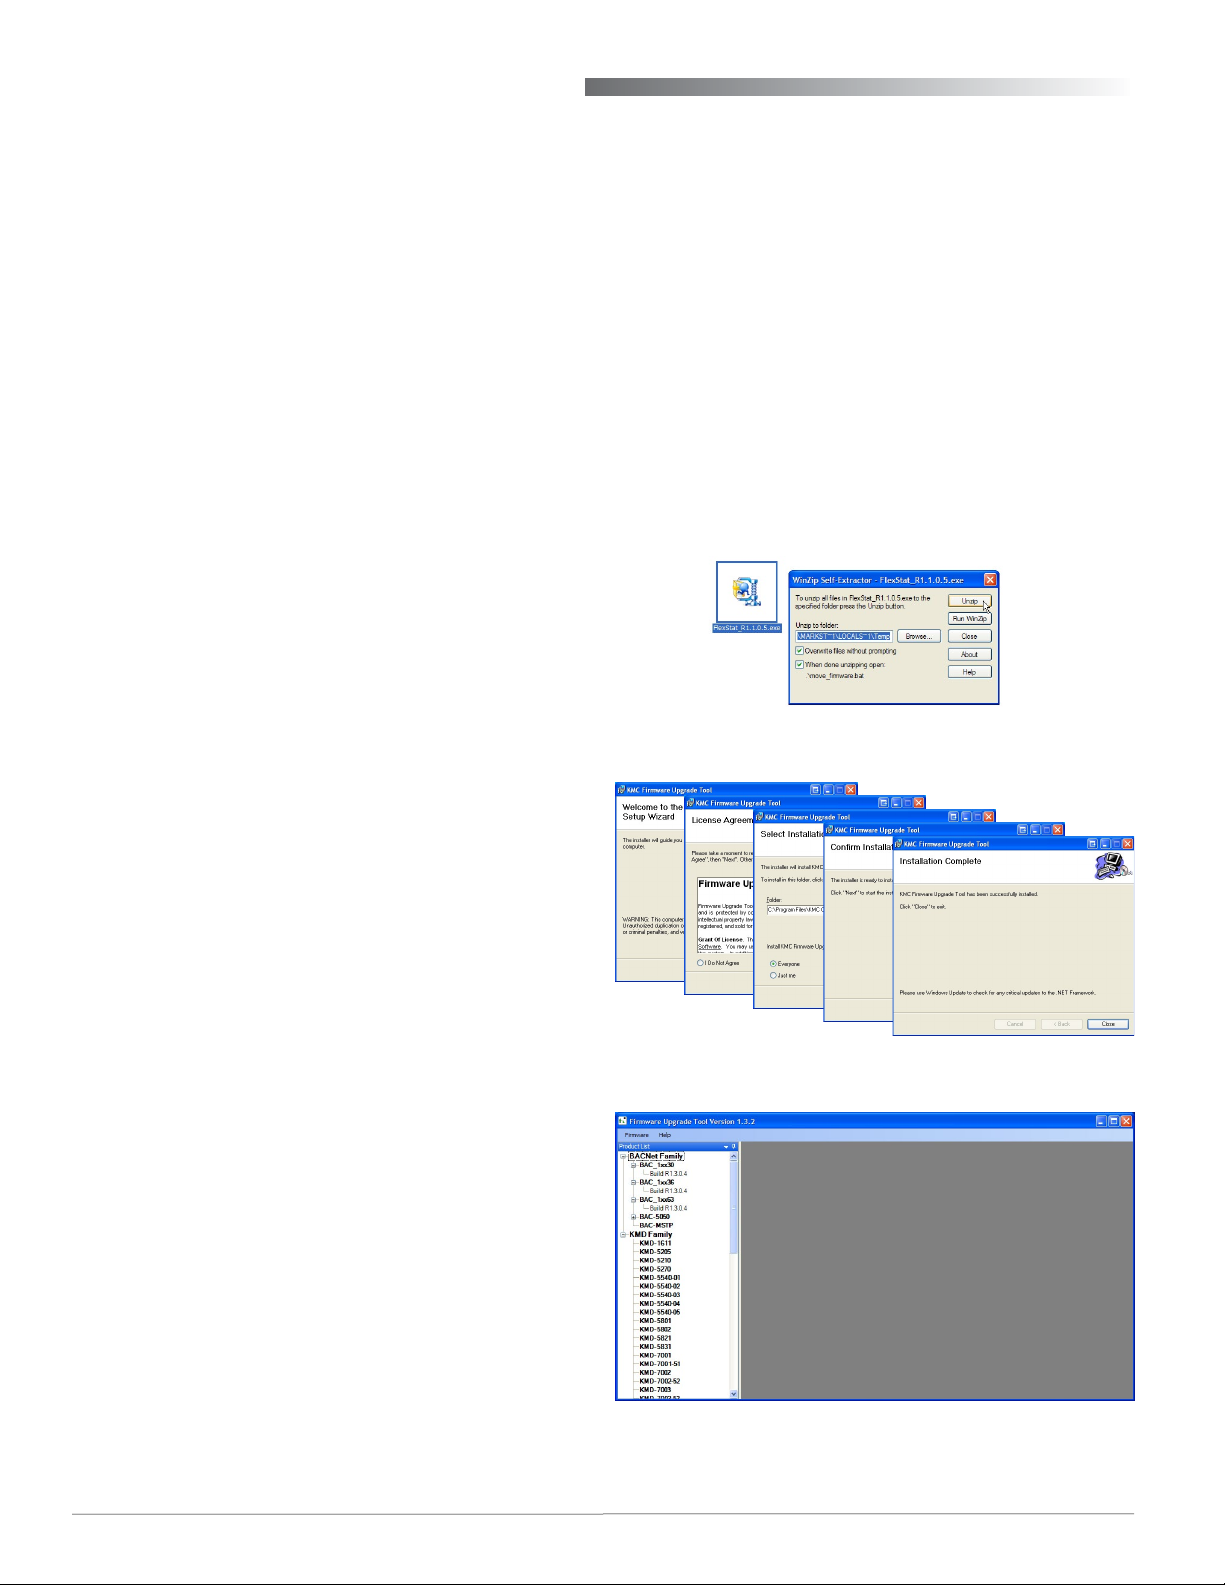
2. From the Partner Portal web site, download the
latest Firmware Upgrade Tool software, double-
click the zipped le, extract/copy the les to a
convenient place, and double-click the SETUP le.
3. Follow the prompts and allow it to install in the
default directory. (See Illustration 2.)
NOTE: If installing over an older version of the
software, you may need to rst uninstall
the older version using Add or Remove
Programs in the Windows Control Panel.
4. Double-click the new icon to open the Firmware
Upgrade Tool software. (See Illustration 3.)
5. Connect the FlexStat to the computer. (See Con-
nections on page 3.)
Illustration 1—Unzip and Install the FlexStat FIRMWARE
The installation program will automatically
check for Microsoft.NET. If it is not
installed, a dialog opens during installation
with a link to Microsoft.NET on the
Microsoft web site. Follow the link and
choose version 4.0. If you choose Microsoft.
NET version 4.0 you will also have to install
Silverlight.
NOTE: Before installing the KMC Firmware
Upgrade Tool, exit all open programs.
Turn
off screen savers and hibernation modes.
As an alternative, set screen savers and
hibernation to 30 minutes or longer.
NOTE: Get the latest FlexStat rmware from KMC’s
web site or through the Firmware Upgrade
Tool after it is installed. (See Downloading
New Firmware Versions on page 7.)
1. To get new rmware directly from the web site,
log-in to KMC’s Partner Portal web site (partners.
kmccontrols.com), download the latest FlexStat
rmware (not the tool) from the Downloads sec-
tion, double-click the zipped le, extract/copy the
les to a convenient place, and double-click the
rmware’s EXE le. Allow it to install rmware in
the default directory. (See Illustration 1.)
Illustration 2—Install the Firmware UPGRADE TOOL
Illustration 3—Open the Firmware Upgrade Tool
HTO-1103 FlexStat Firmware Flash Upgrade Kit 2 Installation Guide, Rev. N
Page 3
Connections
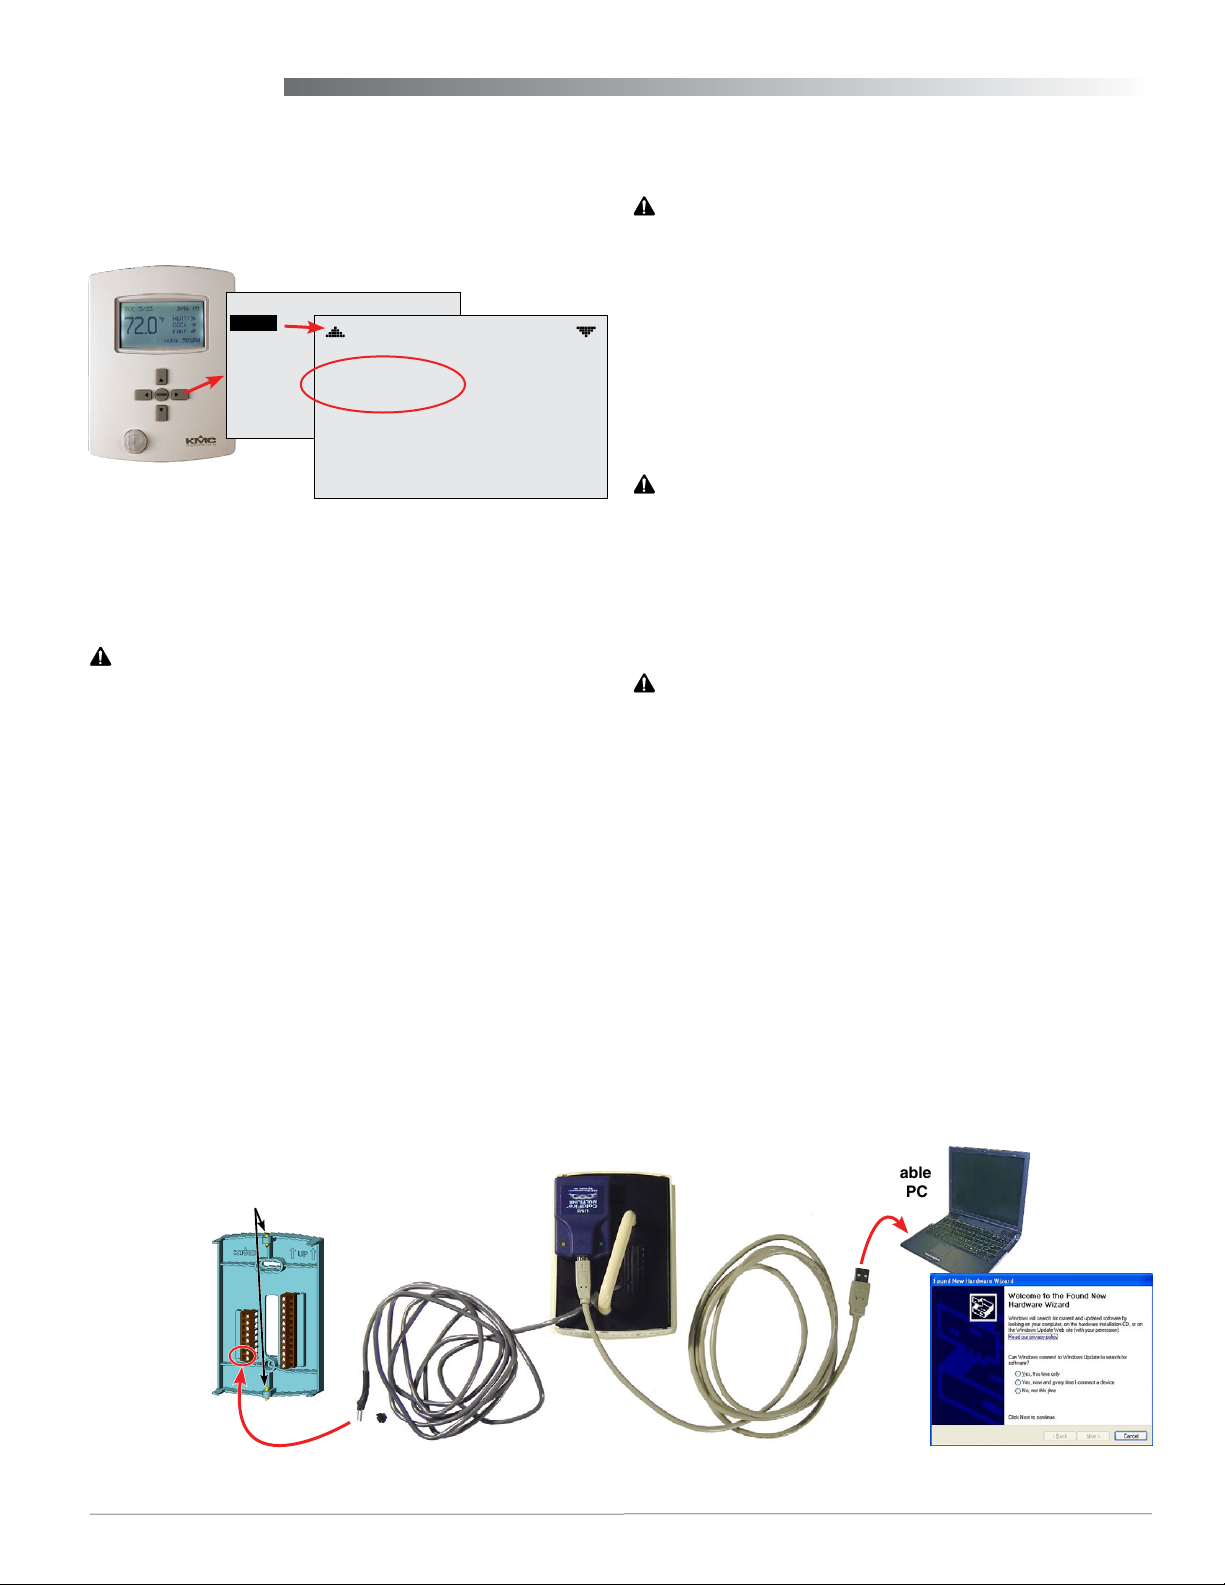
NOTE: A FlexStat’s existing rmware is displayed
in the FlexStat’s About menu. Before
making connections, check to see if the
latest rmware is already installed. (See
Illustration 4.)
MAIN MENU
ABOUT
ADVANCED
ALARM
DATE/TIME
SCHEDULE
SETPOINTS
SYSTEM
ABOUT FLEXSTAT
MODEL: BAC–11163C
FW: FLEXSTAT
R2.0.0.12
APP: AIR HANDLER
OPT: MOD H / MOD C
MORE
Illustration 4—Check Current Firmware Version
1. Turn the hex screws in the boom and top of the
FlexStat CLOCKWISE (only) until they clear the
cover. (See Illustration 5.)
CAUTION
To prevent mounting screw heads from touching
the circuit board in the thermostat, use only the
mounting screws supplied by KMC Controls. Do not
turn the screw in farther than necessary to remove
the cover.
2. Carefully pull the cover away from the wallmounted backplate (mounting base).
3. Temporarily remove—but do not discard—the
WD (watchdog) jumper (from the two pins closest to the center of the board—see Illustration 6
on page 4). To avoid losing the jumper, temporar-
ily put the jumper on one pin only.
NOTE: To replace a lost WD jumper, use a standard
2.54 mm computer jumper sourced locally. A
KMC HPO-0063 jumper can also be used if
the nger tab is cut o to clear the backplate.
4. Aach the appropriate adapter plate to the back
of the cover.
CAUTION
To prevent damage, never plug the programming
pod into a FlexStat that is powered. Always attach
the power cable last.
5. Aach the programming pod to the FlexStat’s
ash port. See Illustration 6 for the proper orien-
tation for the respective model. The BAC-13xxxx
and BAC-14xxxx CO2 model ports require the
914-001-10 ash pod pin extender card.
CAUTION
To prevent damaging the FlexStat or programming
pod, be sure all the pins align properly with the
sockets!
6. Plug the USB cable into the pod and then the
other end into the USB port of the computer.
CAUTION
To prevent the possibility of damage caused by
a ground loop between the FlexStat transformer
and the computer power supply, using an optically
isolated USB hub or using a laptop operating on
batteries only is recommended.
7. When the Found New Hardware Wizard pops up
on the screen, let it install the required drivers.
8. After the Wizard is nished, remove the protec-
tive rubber cap and insert the power adaptor
cable’s two pins into the power section of the
wall-mounted terminal blocks. See Illustration 6
for the proper terminals for the respective model.
(Keep the cap on the pins when not in use.)
9. Use the Firmware Upgrade Tool to update the
rmware. (See Updating the Firmware on page 5.)
1 & 2. Turn cover hex
screws CLOCKWISE
and remove cover
8. Connect
cable’s
two pins to
the power
terminals
(LAST)
3–5. Remove WD jumper
and attach adapter plate
and “pod” to back
6. Connect USB cable
between pod and PC
7. Install
drivers
Illustration 5—Make Kit Connections (BAC-10000 Series Shown)
HTO-1103 FlexStat Firmware Flash Upgrade Kit 3 Installation Guide, Rev. N
Page 4

HTO-1103
Programming
Pod
Backplate
Connectors
WD Jumper
Flash Port
Wiring
BAC-10000
Series
(WD Jumper
Shown in Normal
Operating
Position, Toward
Center of Board—
REMOVE for
Firmware Update)
BAC-10000 Series
24 VAC Power Terminals
HTO-1103
Programming
Pod
WD
Jumper
Flash Port
Backplate
Wiring
Connectors
BAC-12xxxx
BAC-13xxxx/14xxxx
Flash
Port
(WD Jumper
Shown in
Normal Operat-
ing Position,
Toward Center
of Board—
REMOVE for
Firmware
Update)
BAC-12xxxx
24 VAC Power Terminals
HTO-1103
Programming
Pod with Pin
Extender
WD
Jumper
Backplate
Wiring
Connectors
(WD Jumper Shown
in Normal Operating
Position, Toward Center
of Board—REMOVE for
Firmware Update)
BAC-13xxxx/14xxxx
24 VAC Power Terminals
Illustration 6—Flash Port, WD Jumper, Programming Pod, and Power Terminals in Each Series
HTO-1103 FlexStat Firmware Flash Upgrade Kit 4 Installation Guide, Rev. N
Page 5

Updating the Firmware
CAUTION
Before updating a FlexStat’s firmware for
the first time, back up the FlexStat (using
the Firmware Upgrade Tool, TotalControl, or
BACstage).
If your FlexStat has CUSTOM or PRE-RELEASE
firmware (Ex.x.x.x instead of Rx.x.x.x), options
and points may have changed in the released
versions. See Updating Nonreleased Firmware
on page 7 before proceeding!
1. Under BACnet Family > BAC-1xxxxx (desired
FlexStat model) in the left panel of the Firmware
Upgrade Tool, double-click the rmware ver-
sion you wish to install. (See Illustration 7.)
Ensure rmware for the correct model is selected.
NOTE: Click the + signs to expand the tree.
2. In Select Port, select the USB port to which the
programming pod is aached (if not already
selected).
NOTE: If the USB port does not appear in the drop-
down list or an error message appears after
clicking Start, see Troubleshooting on page
6.
3. Click Start and OK.
NOTE: Burn Progress will show the back-up rst (if
selected) and then show (after clicking Yes)
the upgrade progress. The progress bar may
bounce back and forth the rst few times
the kit is used, but it will do so less as it
“learns” the approximate time updates take
on that computer.
CAUTION
During the upgrade process, if you wish to cancel,
click the Cancel button and then Yes to stop the
upgrade process after the current stage (which
may take up to several minutes). (See Illustration
8.) Clicking the No button will allow the process
to continue. Clicking Yes and then Cancel again
will allow you to stop the process immediately but
may also corrupt the firmware, requiring that the
FlexStat’s firmware and configuration be reinstalled
before it will operate properly.
Illustration 7—Double-Click Desired Firmware
Illustration 8—If Needed, Cancel (Stop After Current Stage)
NOTE: A PDF version of this document can be
accessed by clicking Help and then the
model number. Clicking Tool launches
the Help system that contains general
information about the Firmware Upgrade
Tool as well as information about updating
4. In the Replace Firmware box, ensure that the
rmware versions are correct and click Yes. (See
Illustration 9.) (Replacing the rmware takes sig-
nicantly less time than backing-up the FlexStat.)
KMC devices other than the FlexStat.
NOTE: If Create Image First is left selected
(recommended), this backs up the FlexStat’s
existing rmware and conguration before
installing the new version. The rmware
and conguration can be backed up
separately (Create Panel Image) or restored
(Restore Panel Image). Change the default
backup image le name as desired, and
ensure the correct backup le is selected
Illustration 9—Replace Firmware
when restoring.
HTO-1103 FlexStat Firmware Flash Upgrade Kit 5 Installation Guide, Rev. N
Page 6

5. When nished, close the software and unplug
power to the FlexStat.
CAUTION
Remove the power, then the USB cable, then the
pod, and then the backplate. Do not remove the
backplate with the pod still attached. Do not
remove either while power is still applied.
6. Remove the USB cable (before the pod).
7. Remove the pod.
8. Carefully remove the adapter plate and reinstall
the WD jumper on the proper pins. (See Illus-
tration 6 on page 4.)
9. Carefully reinstall the FlexStat on the backplate
while being careful not to pinch or dislodge
any wiring.
10. Back the hex screws (counterclockwise) out of the
brackets until they engage the FlexStat cover and
hold it in place.
• After the update process is over, if the FlexStat
display remains blank but the backlight is on
or the display locks up at a later time, check
that the WD jumper is reinstalled on the CORRECT pins. (See Illustration 6 on page 4.)
• If the USB port does not appear in the drop-
down list, close the tool, remove power to the
FlexStat, disconnect the FlexStat from the USB
port, reconnect the FlexStat to the USB port,
restore power to the FlexStat, and restart the tool.
• For any communication error (such as an “Oper-
ation has failed!” message) check all connections
and restart the Firmware Upgrade Tool. If the
HTO-1103 kit was received prior to Feb. 7, 2012
and has Rev. D on the silver label of the program-
ming pod, see the FlexStat Programming Pod
Jumper Position Service Bulletin SB0212A to
check for the correct jumper position within the
pod.
• For display/interface issues in the Firmware
Upgrade Tool, right-click in the rmware panel
(on the right) and select Restore Defaults.
Troubleshooting
NOTE: See the cautions on pages 2 and 4!
• If a message appears that the operation has
failed, ensure the WD (watch dog) jumper is
TEMPORARILY removed during the upgrade
process! (See Illustration 6 on page 4.) Reinstall
the jumper after the upgrade process is complete! After the update, a FlexStat with a missing
jumper may seem to be operating correctly, but it
may lock up at a later time.
NOTE: To replace a lost WD jumper, use a standard
2.54 mm computer jumper sourced locally. A
KMC HPO-0063 jumper can also be used if
the nger tab is cut o to clear the backplate.
• To view and download rmware updates from
within the tool or from KMC’s Partner Portal web
site (partners.kmccontrols.com), you must log-in
with a valid user name and password.
• Ensure rmware for the correct model is selected in the Firmware Upgrade Tool. If rmware
for the wrong model is accidentally installed, the
outputs will not match the applications/conguration on the display.
NOTE: Backing up the existing seings and
rmware image before or during the
upgrade process (using the Firmware
Upgrade Tool, TotalControl, or BACstage)
is recommended practice.
NOTE: If custom Contol Basic programs are
installed, see Custom Control Basic Issues
on page 8.
HTO-1103 FlexStat Firmware Flash Upgrade Kit 6 Installation Guide, Rev. N
Page 7

Updating Nonreleased Firmware
Tips and Additional Information
If your FlexStat has CUSTOM or PRE-RELEASE
rmware (Ex.x.x.x instead of Rx.x.x.x), options and
points may have changed in the released versions.
You may need to recongure the FlexStat and even
rewire terminals.
1. BACK UP YOUR FLEXSTAT BEFORE
PROCEEDING! Use the back-up function in the
Firmware Upgrade Tool, TotalControl, or BACstage.
2. Before the update, capture the object list of the
old rmware with your selected application.
NOTE: The easiest way to compare the before-
and-after object lists is to open BACstage’s
Object List (F11 and select the appropriate
FlexStat from the list), do a series of screen
captures (Alt Print Screen), and paste each
screen capture into Microsoft Word. (See
Illustration 10.)
3. Perform the update.
4. Ensure the same application is still selected and
capture the object list of the new rmware.
5. Compare the two object lists BEFORE using
the FlexStat to control equipment.
6. Recongure and rewire the FlexStat as needed to
use the new released rmware.
Application Guide and/or relevant (according to
model) Installation Guide.
See the FlexStat
Downloading New Firmware Versions
KMC periodically releases new rmware for its
various BACnet and KMDigital devices. The latest
available rmware can be downloaded by following these steps (after the Firmware Upgrade Tool is
installed):
1. From the menu, select Firmware > Check for New
Firmware. (See Illustration 11.)
2. Select the desired FlexStat rmware.
3. Enter your log-in information (which is the
same log-in information used to access the KMC
Partner Portal web site).
4. Click Download Selected and OK.
5. The new rmware will show up in the Product
List (left panel).
Illustration 11—Available New KMC Firmware Versions
Deleting Old Firmware Versions
Unneeded versions of older rmware can be deleted
from the Firmware Upgrade Tool list by right-clicking the old version and selecting Delete Firmware
from the menu. (See Illustration 12.) (Keeping at
least one version of older rmware is recommended
in case of le corruption.)
Illustration 10—Object List in BACstage
HTO-1103 FlexStat Firmware Flash Upgrade Kit 7 Installation Guide, Rev. N
Illustration 12—Deleting Old Firmware Versions
Page 8

Custom Control Basic Issues
If custom Control Basic programs are installed and
set to autorun, whenever the rmware is updated,
ALL (factory and custom) programs are halted.
If custom Control Basic programs are installed but
NOT set to autorun, whenever the rmware is
updated, factory programs are restarted but any
(manual) running custom programs are halted at
restart.
Change the state of each custom program by using
the Update Manager (see Illustration 13) or loading/
running each program from the CB Programs menu
(or BACstage or TotalControl).
UPDATE MANAGER
PROGRAM CONFIG ERROR
ENABLE FACTORY:
ENABLE CUSTOM: NO
EDIT CB PROGRAMS
DONE
Illustration 13—Update Manager
NO
To calibrate the CO2 sensor in BAC-14xxxx Flex-
Stats, the clear plastic tubing adapter from this kit
will be needed. The 3.5"-long clear tubing is needed
to connect the FlexStat to the larger diameter tubing
that typically comes with calibration gas kits. One
end ts over one of the FlexStat calibration tube
ings (after the protective caps are removed). The
other end ts inside the standard 1/4" OD tubing
that comes from the regulator. (See Illustration 14.)
The BAC-13xxxx/14xxxx backplate adapter (with attached power cable) is also needed to provide power
to the FlexStat during the calibration procedure. (See
Illustration 5 on page 3 and Illustration 6 on page 4.)
NOTE: It may be easier to aach the adapter tubing
to the ing before aaching the backplate
to the FlexStat.
NOTE: The programming pod and USB cable
are not used during CO
calibration. The
2
BAC-13xxxx/14xxxx backplate adapter is
used for both CO2 calibration and rmware
upgrading for those models.
NOTE: A GE Telaire 2075 (or equivalent) calibration
kit and gas must also be purchased
separately elsewhere.
CO2 Calibration Adapters
Calibration
Gas Cylinder
Kit Tubing
Adapter
CO2 Sensor Fittings
(Push Adapter Over
Either Fitting)
Illustration 14—CO2 Calibration Tubing Adapter
See the FlexStat Application Guide for
the complete calibration procedure!
Cylinder Tubing
(Push Adapter
Inside the Tubing)
Important Notices
The material in this document is for information
purposes only. The contents and the product it
describes are subject to change without notice. KMC
makes no representations or warranties with respect
to this document. In no event shall KMC be liable for
any damages, direct or incidental, arising out of or
related to the use of this document.
KMC Controls, Inc.
19476 Industrial Drive
New Paris, IN 46553
574.831.5250; Fax 574.831.5252
www.kmccontrols.com
info@kmccontrols.com
© 2013 KMC Controls, Inc. 913-019-04N
HTO-1103 FlexStat Firmware Flash Upgrade Kit 8 Installation Guide, Rev. N
 Loading...