

Page 1
Mounting
Two-Pipe, Single-Setpoint, Pneumatic, Room Thermostats
CTC-1621/1622
Installation Guide
Location
For optimum performance, the thermostat must be
mounted on an interior wall and away from heat
sources, sunlight, windows, air vents, and air circulation obstructions (e.g., curtains, furniture). Units may
be mounted horizontally or vertically to either a 2" x
4" electrical box or a hollow wall.
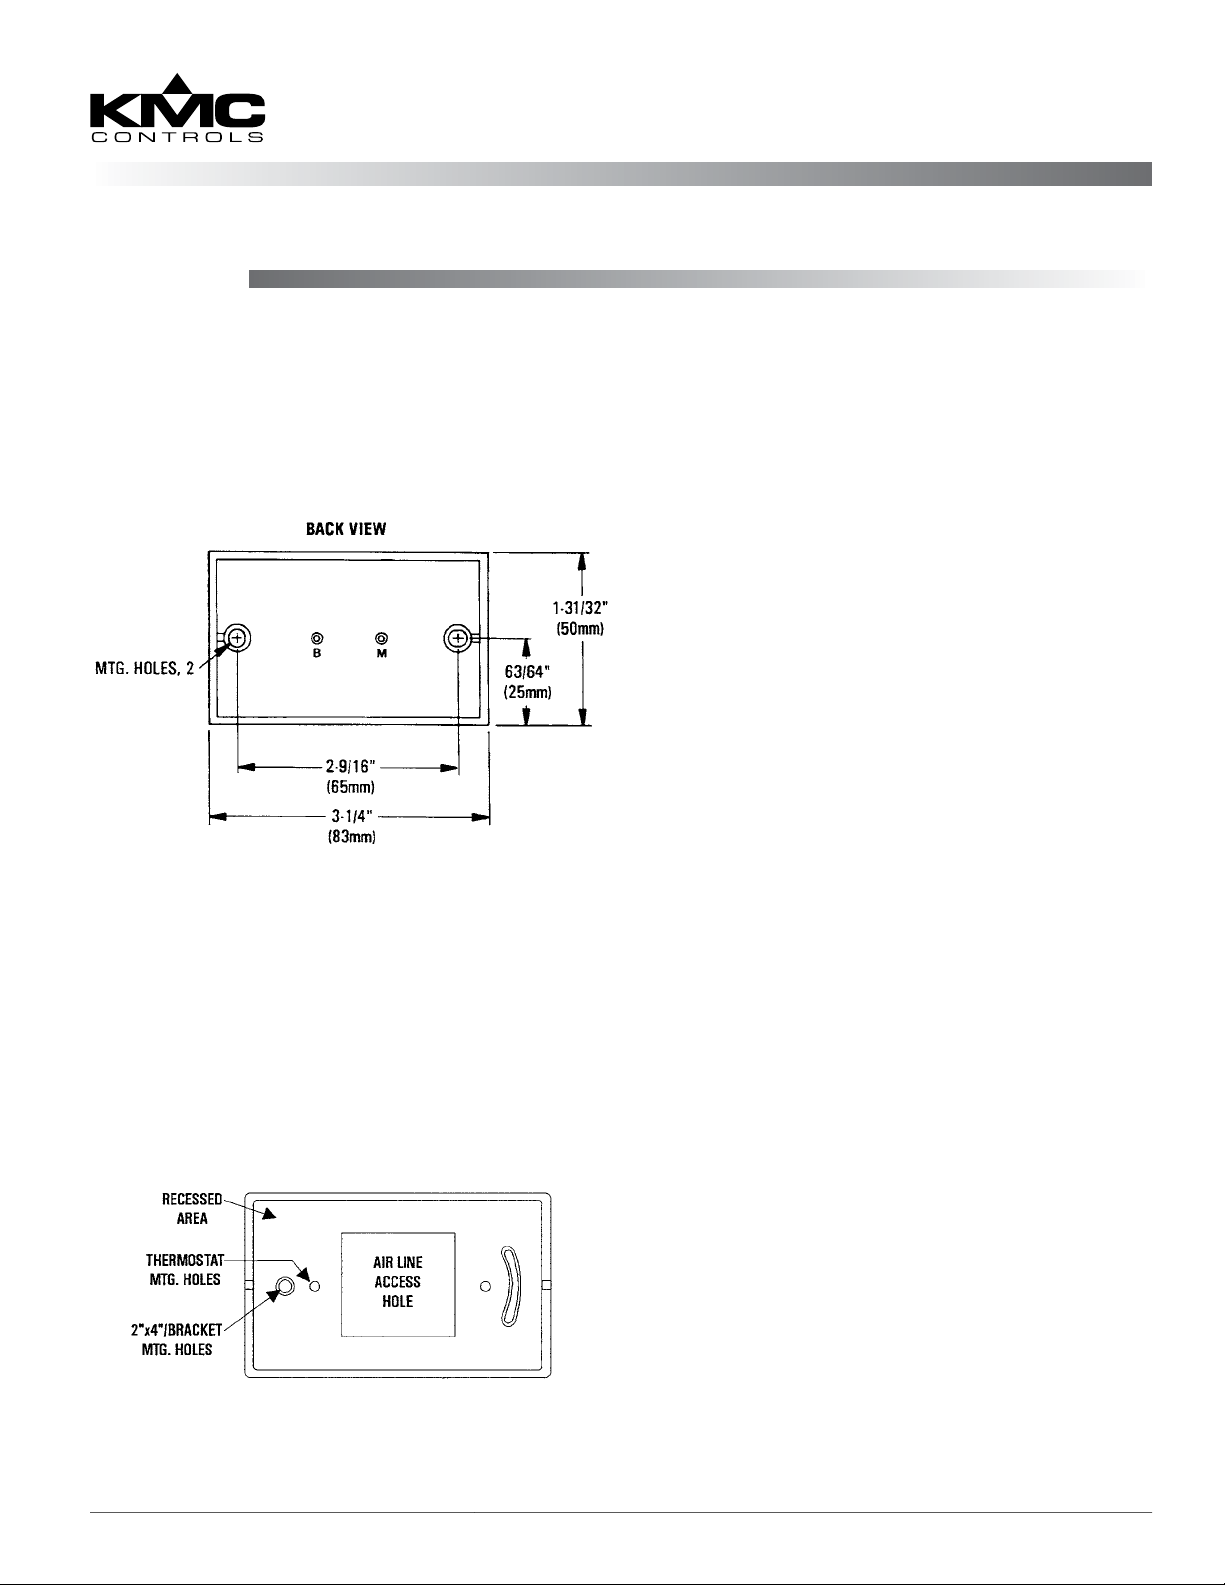
CTC-1621/1622 Back
Electrical Box Mounting
1. Aach the desired HMO-50xx backplate to the
box with the two 6-32 screws supplied.
2. Level the box using the slot in the backplate.
3. Fit the aluminum plate into the recess.
4. Pass the 3/32" ID tubing through access hole.
5. Make connections (see the Connections section).
6. Mount the thermostat to the backplate with two
6-20 x 2" screws supplied with the thermostat.
HMO-50xx
1. Using the template printed on the HMO-5023
package, make a 2-11/16" x 1-1/2" cutout.
2. Loosely mount the bracket to the thermostat with
the two 6-32 x 2" screws supplied.
3. Make connections (see the Connections section).
4. Insert the bracket diagonally through the wall.
5. Center the thermostat and tighten the screws.
Scale Plate
All adjustments must be made with the scale plate
removed. Complete adjustments before installing the
scale plate. (See the Adjustments section.)
1. Remove the gauge tap’s rubber cap.
2. Slide the scale plate under the setpoint indicator.
3 Insert the retaining pins (two supplied), twisting
to lock into place.
4. Reinstall the gauge tap’s rubber cap.
Setpoint Options
If the setpoint indicator is not needed, simply snip
o the indicator with a wire cuer. Limit or lock the
range of the setpoint by installing setpoint stops
(HFO-0027) in the slider track.
Cover
Covers are available in two styles:
♦ Window-insert covers include a symbol-coded
label strip (HPO-1320) for setpoint indication.
Apply the label in the recessed area underneath
the window.
♦ Blank covers require the removal of the setpoint
thumb adjuster. Insert a small screwdriver in the
slot between the thumb adjuster and the cam and
pry apart. Discard the adjuster.
To install a cover:
1. Ensure the thermostat is mounted securely and
the gauge tap cap and accessories are installed.
2. Slide the cover over the base.
Hollow Wall Mounting
NOTE: Thermostats may be mounted on hollow
walls up to 5/8" with the HMO-5023 kit.
CTC-1621/1622 1 Installation Guide
3. Using a 1/16" hex wrench, turn both cover
mounting screws on the thermostat base CCW
(outward) until the cover is secured. (See the
illustration in the Adjustments section.)
Page 2

Connections
The CTC-1611/1612 requires an HFO-0028 tubing
kit.
1. Connect the Main Air to Port M.
2. Connect the Branch Air to Port B.
3. Connect the open side of the Branch Air with
tubing to the nal device actuator (DA unit for
the CTC-1621 or RA unit for the CTC-1622).
Adjustments
NOTE: TR
ADJUSTMENT
NOT SHOWN
(UNDER COVER)
Throttling Range (TR)
Throling range is the temperature required to
change the thermostat output pressure from 3–15 psi.
All CTC-1600 series thermostats are factory-set for
a 3° F throling range. The approximate TR seing
is stamped on each lever in both °F and °C. If it is
necessary to change this seing, reverify calibration
after adjustment.
1. Remove the scale plate (see the Scale Plate
section).
2. Slide the black TR adjuster to appropriate value/
location. The hole in the TR adjuster ts a 1/16"
hex wrench. Gently rotate the adjuster back and
forth while sliding. Do not turn excessively!
3. Rotate the TR adjuster back to a “square” position
if needed after adjustment.
4. Reinstall the scale plate.
Maintenance
Remove dust as necessary from the slots. Clean the
window with a soft, damp cloth and mild soap.
Calibration
These thermostats are factory-calibrated and do not
require further calibration at installation. Should
it be necessary to change calibration, perform the
following steps:
1. Remove the cover and gauge tap rubber cap.
2. Install a gauge on the gauge tap using 3/32" ID
tube.
3. Measure the ambient temperature with an
accurate thermometer.
4. Move the setpoint slider to the measured ambient
temperature.
5. Use a 1/16" hex wrench and turn the calibration
adjustment until the test gauge indicates the
desired pressure. (Clockwise rotation decreases
the output pressure.)
6. Replace the gauge tap rubber cap after
calibrating.
Care should be taken to keep the unit clean
from dust during installation. Each component is
designed for dependable, long-term reliability, and
performance. Careful installation will also ensure
long-term reliability and performance.
Important Notices
The material in this document is for information
purposes only. The contents and the product it de-
scribes are subject to change without notice. KMC
Controls, Inc. makes no representations or warranties with respect to this document. In no event shall
KMC be liable for any damages, direct or incidental,
arising out of or related to the use of this document.
Additional Resources
For specications and accessories,
see the CTC-1621/1622 Data Sheet
on the KMC web site.
7. Place the setpoint slider to the desired
temperature and replace the cover.
www.kmccontrols.com; info@kmccontrols.com
CTC-1621/1622 2 Installation Guide
© 2014 KMC Controls, Inc. 510-019-02B
KMC Controls, Inc.
19476 Industrial Drive
New Paris, IN 46553
574.831.5250
 Loading...