

Page 1

KÖNIG & MEYER GmbH & Co. KG
Kiesweg 2, 97877 Wertheim, www.k-m.de
14032-000-55 / 14033-000-55 Rev.07 03-80-656-00 10/17
TECHNISCHE DATEN / SPEZIFIKATION
Material
Rückenlehne, Verstellhalterung: Stahl, gepulvert, schwarz
Vebindungselemente: Stahl, verzinkt
Führungsleiste, Griffe: PA, schwarz
Rückenpolster: Kunstleder oder Stoff, schwarz
Abmessungen Rückenpolster: 400 x 235 mm; Lehne: 430 x 185 x 45 x 6 mm
Karton 470 x 325 x 90 mm
Gewicht brutto: 2 kg, netto 2,35 kg
14032/33 Rückenlehne
- die sinnvolle Ergänzung für eine Vielzahl an
- K&M-Drummersitzen, -Stehhilfen, -Piano- sowie -Bühnenhocker
- jederzeit schnell montier- und demontierbar, d.h. äußerst Tour tauglich
- verstellbar in Höhe und Tiefe
SICHERHEITSHINWEISE
Vielen Dank, dass Sie sich für dieses Produkt entschieden haben. Diese Anlei tung informiert
Sie über alle wich tigen Schritte bei Aufbau und Handhabung.
Wir empfehlen, sie auch für den späteren Gebrauch aufzubewahren.
- Vor und nach Benutzung ist am Produkt eine Sichtprüfung vorzunehmen,
- ob alle Bestandteile vorhanden und soweit erkennbar in Ordnung sind.
- Beschädigte Teile dürfen entweder nicht weiter eingesetzt bzw. sie
- müssen zuvor einer qualifizierten Reparatur unterzogen werden.
- Die Möglichkeit am Produkt diverse Einstellungen zu ändern birgt naturgemäß
- Einklemmgefahren. Umsichtige Handhabung ist daher unverzichtbar.
- Klemmschrauben fest anziehen - jedoch ohne Einsatz von Werkzeugen.
- Handkraft genügt völlig, zumal überfestes Anziehen die Bauteile belastet
- Verwendung nur im Innenbereich
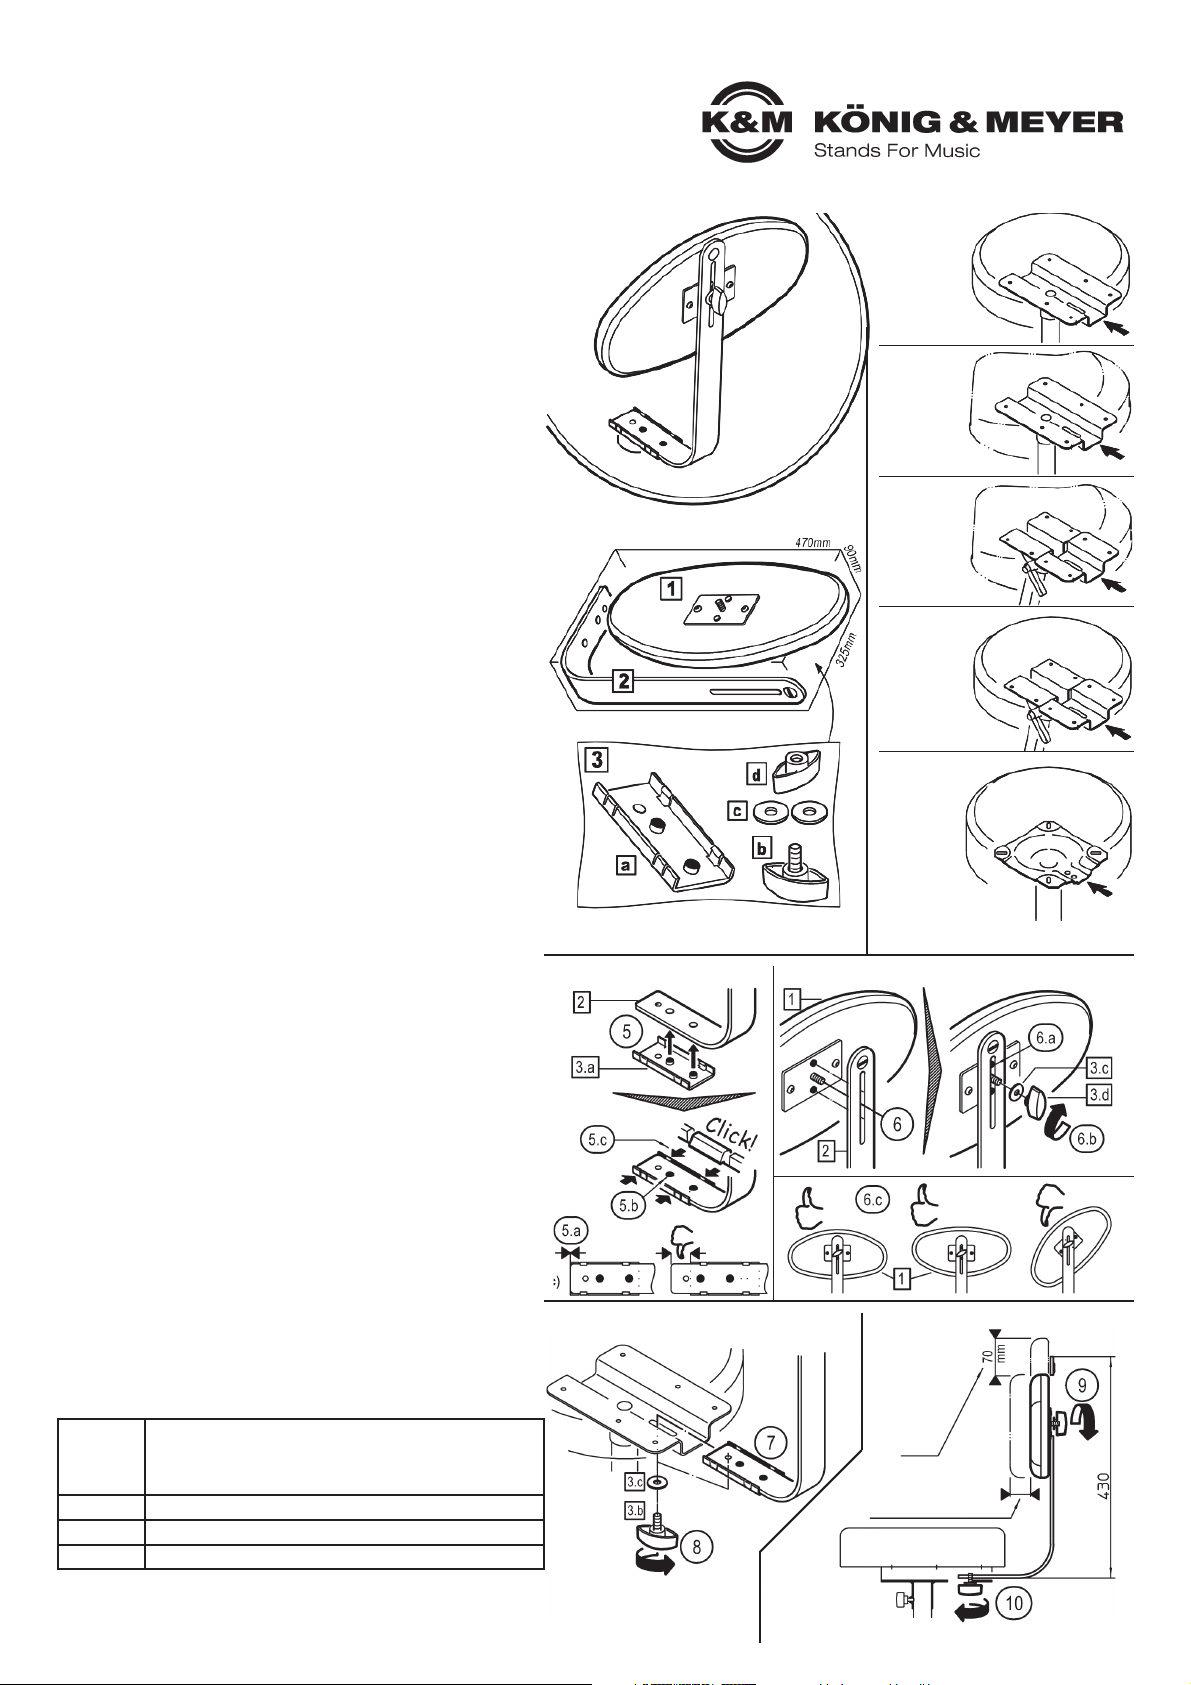
BESTANDTEILE
1 Rückenpolster mit Gewindebolzen - 2 Rückenlehne - 3 Zubehörbeutel: a Führungs-
leiste - b Klemmschraub M8 x 18 mm - c U-Scheibe ø 8,4 mm (2x) - d Klemmmutter M8
4 a 14015/16
Drummersitz
-Sitz drehbar-
4 b 14052/53
Stehhilfe
14055/56
Drummersitz
»Nick«
-Sitz drehbar-
MONTAGE & FUNKTION
WAHL des SITZES (4 a-e)
4 Die Rückenlehne ist konzipiert zur Montage an K&M-Drummersitzen und Stehhilfen:
4 a-d 14015/16, 14044/45, 14046/47, 14052/53, 14055/56 und 14060/61
4 a-d sowie die Piano- und Bühnenhocker:
4 e 14092-017-55 und 14094-017-55
4 e Unter deren Sitzpolstern befinden sich die notwendigen U-Halteschellen
MONTAGE DER RÜCKENLEHNE
5 Die Führungsleiste 3 a auf den kurzen Schenkel des L-Bügels 2 clipsen.
5 (BEACHTE: NICHT benötigt wird die Führungsleiste für Sitze der Kategorie 4 e)
6 Die Verbindung ist in Ordnung wenn:
5 a ...die Führungsleiste und der Schenkel vorne bündig abschließen
5 b ...die beiden Noppen der Leiste die zwei Bohrungen des L-Bügels ausfüllen
5 c ...die vier Widerhaken der Leiste hörbar am Schenkel des L-Bügels einrasten
6 Das Gewinde des Rückenpolsters 1 durch den Schlitz des L-Bügels 2 stecken.
6a Damit das Rückenpolster nicht verdreht werden kann und in waagerechter
6aStellung bleibt, müssen die beiden Noppen in den Schlitz des L-Bügels tauchen.
6b Nun die Scheibe 3 c aufbringen und die Flügelmutter 3 d fest anziehen
6c Für gewöhnlich zeigt die große Rundung des Rückenpolsters 1 nach oben.
6cDas Polster kann aber auch um 180° verdreht befestigt werden.
RÜCKENLEHNE AM SITZ BEFESTIGEN
7 Den kurzen Schenkel des L-Bügels in die Halteschelle unterhalb des
7 Sitzpolsters schieben.
8 Nun die Flügelschraube 3 b mit zwischenliegender U-Scheibe 3 c von
8 untendurch das Langloch (4 a-d) bzw. eine der beiden Bohrungen (4 e)
8 der Halteschelle führen und in das Innengewinde des L-Bügels eindrehen
8 und fest anziehen.
RÜCKENPOLSTER POSITIONIEREN
19 Höhe: Flügelmutter 3 d etwas lösen und Rückenpolster in gewünschte
10 Höhe: Stellung schieben. Flügelmutter wieder festziehen.
10 Tiefe: Für Sitze 4 a-d: Flügelschraube 3 b etwas lösten und L-Bügel in
10 Tiefe: gewünschte Stellung schieben. Flügelschraube wieder festziehen.
10 Tiefe: Für Sitze 4 e: Flügelschraube komplett herausschrauben und die
10 Tiefe: andere der beiden Bohrungen der Halteschelle des Sitzen nutzen.
FEHLER (F) & BESEITIGUNG (B)
F: Rückenlehne wackelt: B: Flügelschraube 9 fest anziehen
F: Rückenlehne wackelt: B: Führungsleiste richtig installiert? (siehe 6 a, b, c)
F: Rückenlehne wackelt: B: Halteschelle 3 auf Festsitz prüfen
F: Rückenpolster wackelt bzw. verdreht sich:
F: Rückenlehne wackelt: B: Flügelmutter 6 b fest anziehen
F: Rückenlehne wackelt: B: Beide Noppen 6 a, 6 c müssen in den Schlitz eintauchen
WARTUNG
- bei Wartungsarbeiten auf evtl. Gefährdungen (Einklemmen?) achten
- zur Reinigung ein leicht feuchtes Tuch und ein nicht scheuerndes
- Reinigungsmittel benutzen
BESTANDTEILE
WAHL des SITZES
MONTAGE DER RÜCKENLEHNE
RÜCKENLEHNE AM SITZ BEFESTIGEN RÜCKENPOLSTER POSITIONIEREN
Beutel
Karton
Verstellbereich
Höhe
Verstellbereich Tiefe
(Sitze: 4 a-d = 40 mm
(Sitze: 4 e-d = 20 mm)
4 c 14044/45
Stehhilfe
14046/47
Stehhilfe mit
Gasdruckfeder
-Sitz neigbar-
4 d 14060/61
Stehhilfe
-Sitz neigbar-
4 e 14092
Pianohocker
14094
Bühnenhocker
-Sitz drehbar-
Page 2
KÖNIG & MEYER GmbH & Co. KG
Kiesweg 2, 97877 Wertheim, www.k-m.de
14032-000-55 / 14033-000-55 Rev.07 03-80-656-00 10/17
TECHNICAL DATA
Material
Backrest, adjustment bracket: Steel, powder coating, black
Connection elements: Steel, galvanized
Guide bracket, handles: PA, black
Backrest cushion: imitation leather or fabric, black
Dimensions Backseat cushion: 400 x 235 mm; Backrest: 430 x 185 x 45 x 6 mm
Box 470 x 325 x 90 mm
Weight gross: 2 kg, net: 2.35 kg
14032/33 Backrest
- a useful addition to several:
- K&M-Drummer thrones, -Sstools, -piano- and -stage stools
- easy to setup and break down, great for on the road
- height and depth adjustabl
SAFETY NOTES
Thank you for choosing this product. The instructions provide directions to all of the
important set up and handling steps. We recommend you keep these instructions for
future reference.
- Prior and after use the stand should undergo visual inspection, to ensure that all compo-
- nents are there and to ensure that the product is in working order, to the extent visible.
- Damaged stands may not be used i.e. they must undergo a repair by a qualified technician.
- The option to adjust various settings on the product can result in the risk of pinching/
- wedging your fingers. Careful and attentive handling during setup, operation and
- disassembly is indispensable.
- Tighten the clamp screws - without the use of tools.
- Manual strength is enough, over-tightening can negatively affect the components.
- Only to be used indoors
COMPONENTS
1 Backrest cushion with threaded bolt - 2 Backrest - 3 Accessory bag: a Guide bracket
b Clamping screw M8 x 18 mm - c washer ø 8,4 mm (2x) - d Clamping nut M8
4 a 14015/16
Drummer's
throne
-Seat rotates-
4 b 14052/53
Stool
14055/56
Drummer's
throne »Nick«
-Seat rotates-
INSTALLATION & FUNCTION
SELECTION of the SEAT (4 a-e)
4 The backrest was designed for K&M Drummer Thrones:
4 a-d 14015/16, 14044/45, 14046/47, 14052/53, 14055/56 und 14060/61
4 a-d as well as the piano and stage stools:
4 e 14092-017-55 und 14094-017-55
4 e The required U holding bracket is located on the bottom of the seat cushions
ATTACH THE BACKREST
5 Clip the guide rail 3 a to the short section of the L-bracket 2.
5 (BEACHTE: NICHT benötigt wird die Führungsleiste für Sitze der Kategorie 4 e)
6 The connection is good if:
5 a ...the guide rail and the L-bracket are lined up properly
5 b ...both of the guide rail knobs fit into the two drill holes of the L-bracket
5 c ...the four barbs click into place on the L-bracket
6 The bolt of the backrest cushion 1 is placed through the slit in the L-bracket 2.
6a To ensure that the backrest cushion does not twist and remains in a horizontal
6aposition, both knobs must be placed in the L-bracket slit.
6b Now place the washer 3 c and securely tighten the wing nut 3 d
6c The rounded section of the backrest cushion 1 faces upwards.
7cThe cushion may also be turned 180° and attached.
ATTACH THE BACKREST TO THE SEAT
7 Place the short section of the L-bracket in the holding bracket below
7 the seat cushion.
8 Now coming in from below place the clamping screw 3 b with the
8 washer 3 c into the long slit (4 a-d) or one of the two holes 4 e of the
8 holding bracket into the female thread of the L-bracket and tighten.
POSITION THE BACKREST
19 Height: Loosen the wing nut 3 d somewhat and place the
19 Height: backrest in the desired position. Re-tighten the wing nut.
10 Depth: For seats 4 a-d: Loosen the clamping screw 3 b somewhat and place
10 Depth: the L-bracket in the desired position. Re-tighten the finger screw.
10 Depth: For seats 4 e: Loosen the clamping screw completely and use the
10 Depth: other of the two holes in the retaining clamp of the seat.
FAULT-FINDING (F) and REPAIR (R)
F: The backrest is not stable: R: Tighten the clamping screw 8
F: Rückenlehne wackelt: R: The guide is not installed properly? (refer to 5 a, b, c)
F: Rückenlehne wackelt: R: Tighten the holding bracket underneath the seat
F: Rückenlehne wackelt: R: cushion
F: The backrest is not stable and twists:
F: Rückenlehne wackelt: B: Tighten the wing nut 6 b
F: Rückenlehne wackelt: B: Both knobs 6 a, 6 b must disappear into the slit
MAINTENANCE
- In the event of workstation maintenance pay attention to possible risks
- (wedging or pinching of fingers)
- To care for the product, use a damp cloth and a non-abrasive cleaning agent
COMPONENTS
SELECTION
of the SEAT
ATTACH THE BACKREST
ATTACH THE BACKREST TO THE SEAT POSITION THE BACKREST
Beutel
Karton
Adjustment
Area
Height
Depth Adjustment
(Seat: 4 a-d = 40 mm
(Seat: 4 e-d = 20 mm)
4 c 14044/45
Stool
14046/47
Pneumatic
stool
-Seat tilts-
4 d 14060/61
Stool
-Seat tilts-
4 e 14092
Piano stool
14094
Stage stool
-Seat rotates-
 Loading...