

Klutch 190932 Owner's Manual
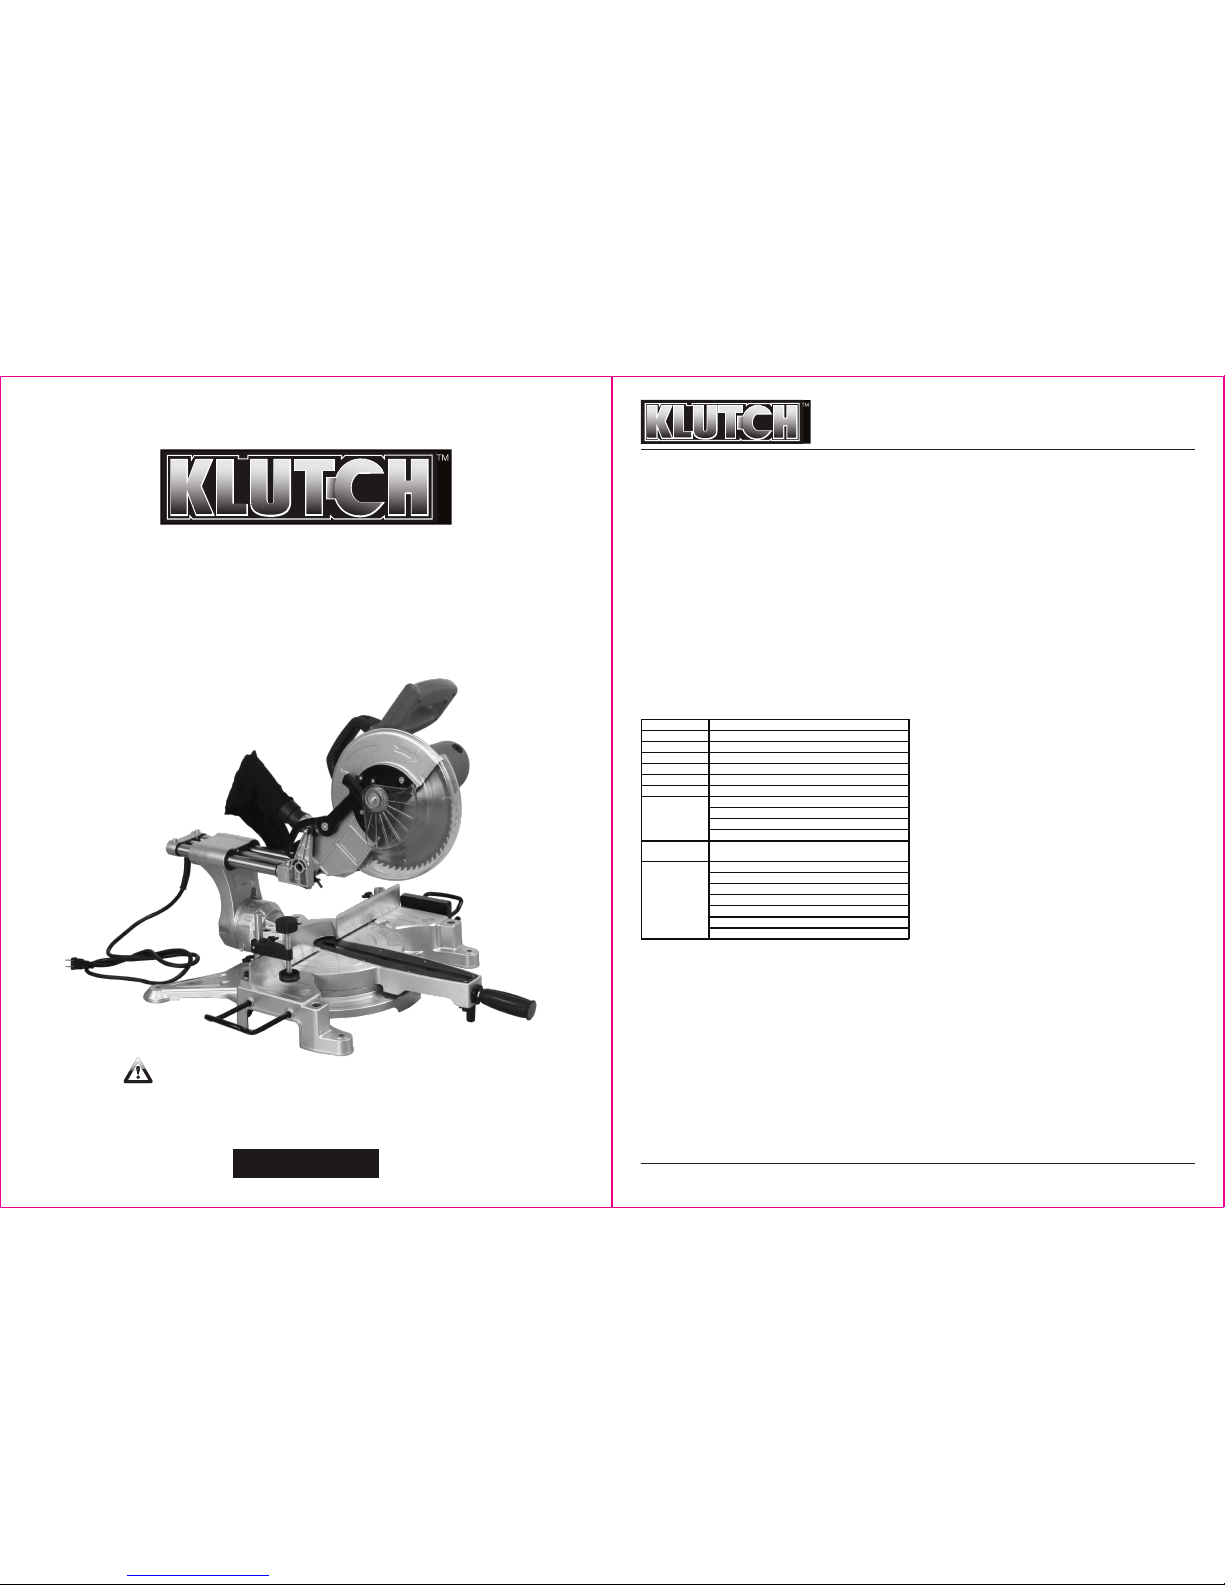
10in.LASER GUIDE COMPOUND MITER SAW
OWNER’S MANUAL
WARNING:
Read carefully and understand RULES FOR SAFE OPERATION and instructions
before operating. Failure to follow the safety rules and other basic safety
precautions may result in serious personal injury.
Item# 190932
10in. LASER GUIDE COMPOUND
MITER SAW OWNER’S MANUAL
1 of 9
Thank you very much for choosing a NORTHERN TOOL +
EQUIPMENT CO., INC., Product! For future reference, please
complete the owner’s record below:
Model: _______________ Purchase Date: _______________
Save the receipt, warranty and these instructions. It is
important that you read the entire manual to become familiar
with this product before you begin using it.
This machine is designed for certain applications only.
Northern Tool + Equipment strongly recommends this machine
is not modified and/or used for any application other than that
for which it was designed. If you have any questions relative to
a particular application, DO NOT use the machine until you
have first contacted Northern Tool + Equipment to determine if
it can or should be performed on the product.
For technical questions and replacement parts, please call
1-800-222-5381.
TECHNICAL SPECIFICATIONS
PRODUCT FEATURES
• Powerful, precise compound saw that makes accurate and
repeatable angle cuts.
• The electric blade-brake stops the blade in seconds for
safety.
• External access Block Brushes makes maintenance and
replacement of the Motor Brushes convenient.
•A dust bag keeps the work area clean and improves viewing
of the workpiece during cutting.
• Precision machined-table with graduated scale and pin
presets.
• The Vise Assembly and Support Brackets improve cutting
accuracy.
• A transparent, retractable Blade Guard improves safety while
providing good visibility.
GENERAL SAFETY WARNINGS AND PRECAUTIONS
• Keep the work area clean and dry. Damp or wet work areas
will lead injuries.
• Keep children away from the work area. Do not allow
children to operate this product.
• Store idle equipment. When not in use, tools and
equipment should be stored in a dry location to inhibit rust.
Always lock up tools and equipment and keep them out of
the reach of children.
• Do not use this product if under the influence of alcohol or
drugs. Read warning labels on prescriptions to determine if
your judgment or reflexes are impaired while taking drugs. If
there is any doubt, do not attempt to use this product.
• Dress properly. Do not wear loose clothing or jewelry.
Contain long hair. Keep your hair, clothing, and gloves away
from moving parts. Loose clothes, jewelry or long hair can be
caught in moving parts.
• Avoid accidental starting. Be sure the switch is OFF before
plugging in the tool. Carrying tools with your finger on the
switch or plugging in tools that have the switch ON invites
accidents.
• Remove all adjusting keys and wrenches. Make a habit of
checking that the adjusting keys and wrenches are removed
from the tool before turning it on.
• Do not overreach. Keep proper footing and balance at all
times. Proper footing and balance allows for better control of
the tool in unexpected situations.
• Use safety equipment. Eye protection should be worn at all
times when operating this machine. Use NIOSH approved
safety glasses. Everyday eyeglasses only have impact
resistance lenses. They are NOT safety glasses. A dust mask,
respirator, non-skid safety shoes, a hard hat, or hearing
protection must be used in appropriate conditions.
• Industrial applications must follow OSHA requirements.
• Stay alert. Watch what you are doing at all times. Use
common sense. Do not use this product when you are tired
or distracted from the job at hand.
• Check for damaged parts. Before using this product,
carefully check to ensure that the saw will operate properly
and perform its intended function. Check for damaged parts
and any other conditions that may affect the operation of this
product. Replace or repair damaged or worn parts
immediately.
• Replacement parts and accessories. When servicing, use
only approved replacement parts. Only use accessories
intended for use with this product. Approved accessories are
available from northern tool.
• Maintain this product with care. Keep this product clean
and dry, and keep the Saw Blades clean and sharp for better
and safer performance.
• For your safety, service and maintenance should be
ITEM DESCRIPTION
Motor No-Load Speed: 4600RPM
Power Supply 120V / 60Hz / 2.4HP /Single Phase / 15Amps
Power Cord 14 Gauge UL Approved
Laser Wavelength 650nm, 1mW Maximum Output, Class II
Arbor Diameter 1in.
Blade Diameter 10in.
0° x 0° 3in. x 11 7/8in.
0° x 45° 3in. x 8 1/4in.
45° x 45° 1 1/2n. x 8 1/4in.
45° x 0° 1 1/2in. x 11 7/8in.
Overall
Dimensions
29 1/4in. x201/4in. x 22in.
10in.x 60Tc2 Carbide Tipped Blade
Workpiece-Holding Clamp Assembly
Workpiece -Supporting Brackets
Stopper for Repeating The Same Size Cuts.
Hex Sleeve Spanner
Dust Bag
Additio
nal Block Brushes
Cutting Capacity
Accessories
10in. LASER GUIDE COMPOUND
MITER SAW OWNER’S MANUAL
10in. LASER GUIDE COMPOUND
MITER SAW OWNER’S MANUAL
2 of 9
performed regularly by a qualified technician.
• Use the right product for the right job. There are certain
applications for which this product was designed. Do not use
small equipment, tools or attachments to do the work of
larger industrial equipment, tools or attachments.
• Do not use this product for a purpose for which it was not
intended.
• Avoid exposure. Laser radiation is emitted from the laser.
Hazardous electromagnetic radiation is emitted from the
laser. Do not stare into the beam.
ELECTRICAL SAFETY
• Ground this product. The electrical power cord for this
product is equipped with a 2-prong plug. Never modify the
plug in any way. Do not use adapter plugs with this product.
When in use, make sure this product is always plugged into a
grounded electrical receptacle with an appropriate breaker
switch.
• Make sure the power switch is in the “off” position before
plugging in the power cord.
• Do not abuse the power cord. Do not use the cord to pull
the 2-prong plug from the power outlet. Keep the cord away
from heat, oil, sharp edges and moving parts. Replace a
damaged cord immediately. Route the power cord safely.
Protect it from being damaged by other equipment in the
shop. Do not route the cord where it can be walked on or
tripped over.
• To avoid accidental electric shock, do not let your body
come in contact with grounded surfaces such as pipes,
radiators, ranges and refrigerators.
• If you use an extension cord, make sure to use only
UL-approved cords having the correct gauge and length (see
chart a).
CHART A
PRODUCT-SPECIFIC SAFETY
• Place the Miter Saw on a flat, level and stable surface
capable of supporting the weight of the miter saw and the
weight of workpiece that will be cut.
• Maintain a safe work environment. Do not use this product
on or near damp or wet areas. Do not expose this product to
rain. Make sure there is adequate surrounding workspace.
Use this product in a well-ventilated area.
• Do not operate this product in the presence of flammable
liquids, gases or dust.
• Do not force the equipment. This product will do the work
better and safer at the speed and capacity for which it was
designed.
• Keep all guards in place and in working order. Do not
operate without the guard in place.
• Remove all adjusting wrenches from the product before
turning on the Miter Saw.
• Make sure that when installing the Saw Blade the saw
teeth point away from your body and toward the rear of the
miter saw.
• Avoid unintentional starting. Make sure you are prepared to
begin work before turning the saw on.
• Do not use this product for cutting metals, brittle, or
dangerous materials, such as asbestos, which can cause
harmful dust or vapors.
CAUTION: Some woods contain preservatives such
as copper chromium arsenate (CCA) that can be toxic. When
cutting these materials extra care should be taken to avoid
inhalation and minimize skin contact.
• Before using the miter saw, make sure the Saw Blade is
properly mounted on the saw spindle. Make sure the Saw
Blade is balanced, and is not bent or cracked.
• Allow the Saw Blade to reach full speed before feeding
wood into it. When turning it off, allow the Saw Blade to spin
down and stop on its own. Do not press against the Saw
Blade to stop it.
• Do not force the Saw Blade into the workpiece being cut.
Apply moderate pressure, allowing the Saw Blade to cut
without being forced.
• Never attempt to remove material stuck in the moving
parts of the miter saw while the saw is plugged in and
running.
• The Saw Blade will become hot while cutting. Allow the
Saw Blade to completely cool before touching.
• Whenever possible, use clamps or other safe, practical
ways to hold and support the workpiece.
• Always disconnect the saw from its electrical supply
source before leaving the work area, moving the product
from one location to another, changing the Saw Blade or
cleaning sawdust from the unit.
• Never reach around saw. Keep hands out of path of saw
blade. Never reach in back of the fence.
UNPACKING
When unpacking, check to make sure that all the parts shown
on the Parts List and Diagram are included. If any parts are
missing or broken, please call Northern Tool & Equipment at
the number shown in this manual as soon as possible.
OPERATING INSTRUCTIONS
NOTE: All parts below refer to the parts listed in this manual.
HOW TO TRANSPORT THE COMPOUND MITER SAW
1. The Compound Miter Saw is portable, and can easily be
moved to the worksite.
3 of 9
2. Unplug the saw from the power source.
3. Hold the handle down to make sure the blade touches the
slot of the Kerf Board (#45), then pull out the lock pin
assembly (#55-58) and turn it clock-wise 90 degree before
securing it. Release the handle. The cutting head should lift
on its own.
4. Wrap up the power cord.
5. Take away the Supporting Brackets (#6) on the sides of
the Base (#4) and then take hold of the sides of the Base
(#4), and lean the saw slightly against the body.
WARNING:The lock pin is for moving and storing
and is not to be used for any cutting operations.
NOTE: Do not carry the saw by the Handle, as this can cause
damage to the unit.
HOW TO ASSEMBLE THE ACCESSORIES
WARNING:The saw must be unplugged before
adding or removing any accessories.
1. The Compound Miter Saw comes with several accessories
you may wish to attach to the unit.
2. The Vise Jaw (part #7-12) can be inserted into the hole on
either side of the worktable (part #23) and locked in place
with the Adjusting Handle (part #12). (We recommend you
insert on the left side of the plate. As the motor will touch the
Vise Jaw if you insert the Vise Jaw on the right side of plate.)
3. Insert the Supporting Brackets (#6) to the holes on the
base (#4). Lock the bracket with Butterfly Screw (#27). Slide
the Plastic Stopper (part #32) onto one of the Supporting
Bracket (part #6).
HOW TO MOUNT THE COMPOUND MITER SAW
1. When in use, the saw should be securely mounted to a flat,
level, stable table or workbench capable of supporting the
weight of the saw, accessories, and the workpiece being
cut.
2. There are two 1/4in. mounting holes on the rear side of the
Base (part #4). Using the two mounting holes on the saw
base as a template, mark the two 1/4in. holes on the table or
workbench that are to be drilled through. Drill the holes and
secure the saw to the table or workbench, using two 1/4in.
bolts, lock washers, and nuts (not provided)
3. Use two C-clamps (not provided) to secure the front side
of the Base (part #4) to the table or workbench.
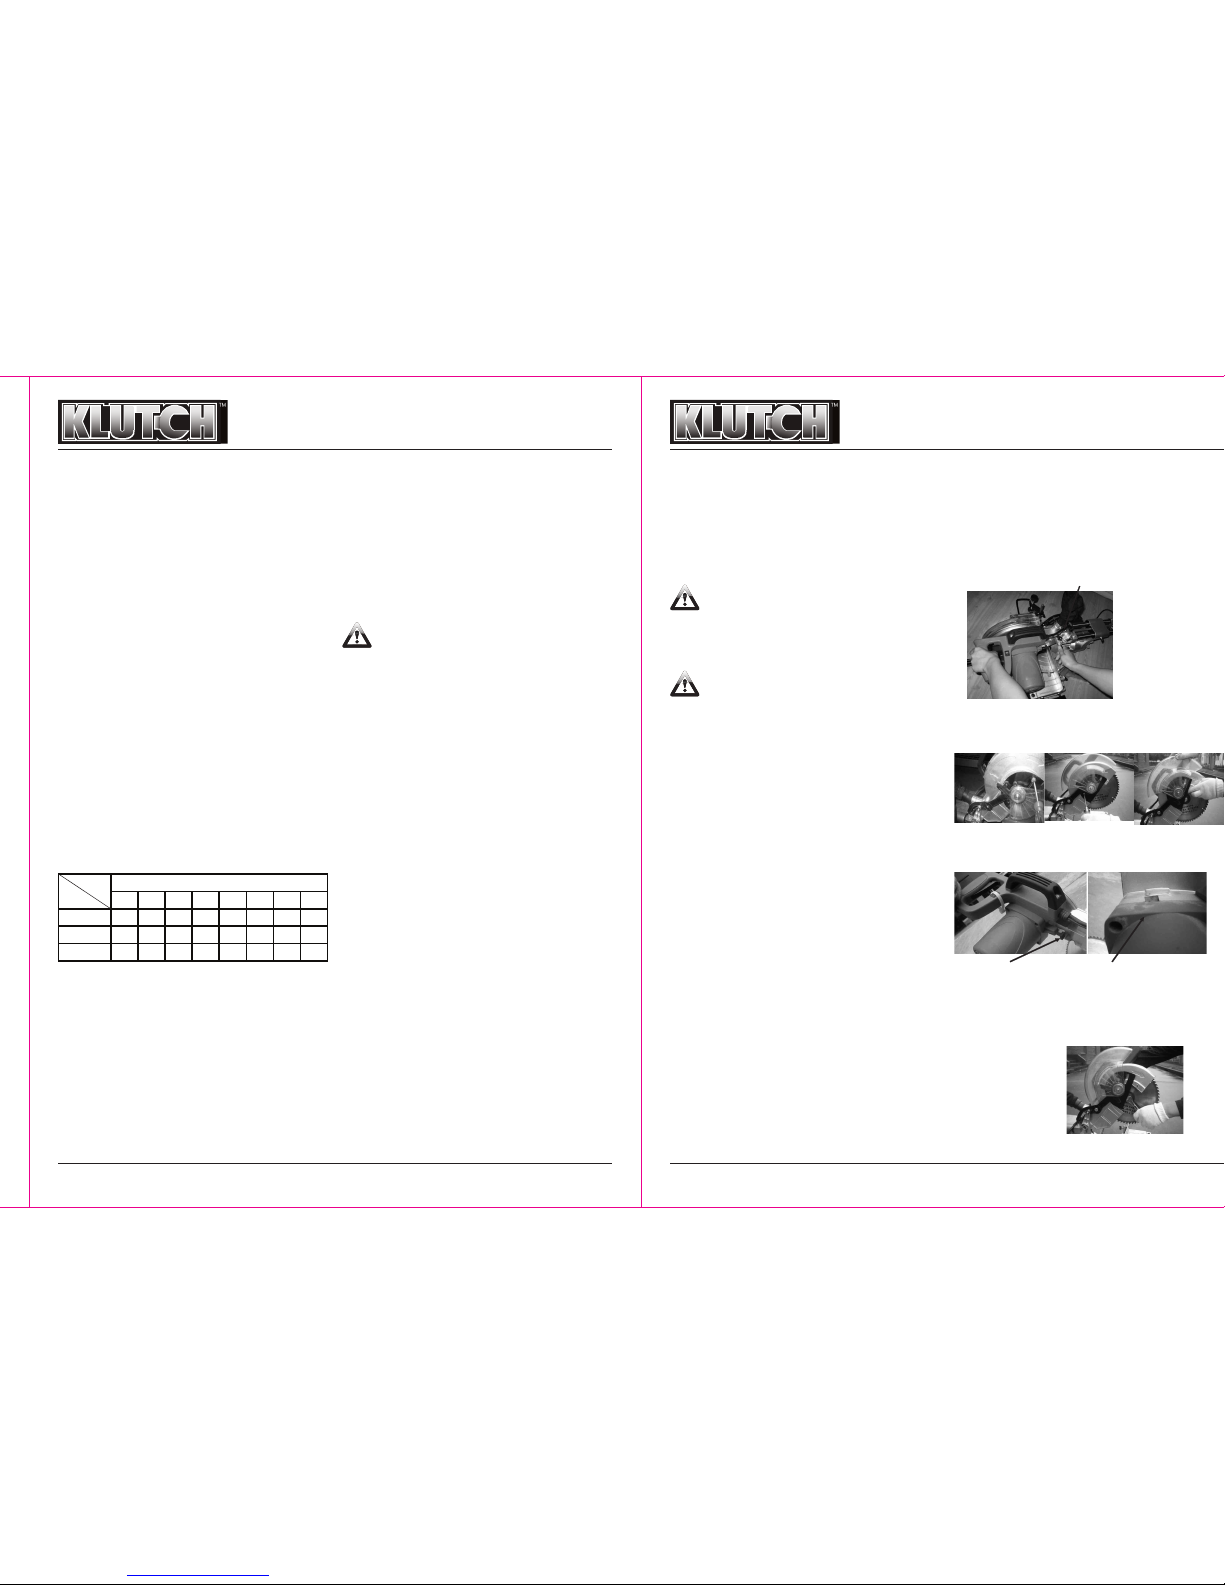
HOW TO INSTALL OR REPLACING THE SAW BLADE
1. WARNING! Prior to performing any assembly and/ or
adjustment procedures, make sure the power cord of the
Miter Saw is unplugged from its electrical outlet. Make sure
the unit has completely cooled, and wear heavy-duty work
gloves.
2. When replacing the saw blade, make sure the new saw
blade has a diameter of 10in., an RPM rating of at least 4600,
and an arbor hole of 5/8in. or 1in. diameter. The arbor hole
can be switched to 1in. by adding the adjusting ring(part
#107). Also the new saw blade should be suitable for the
type of workpiece being cut. Abrasive cutoff wheels cannot
be used with this saw.
3. Lock the saw blade in its upward position. To do so, pull
out the Lock Pin Assembly (#55-58) and turn it clockwise
90°before securing it. (Figure A)
4. Loosen the Triangle Bolt (#78) that holds the Fasten Plate
(#77) in place (Figure B). Then remove the Bolt (#81) (Figure
C). Do not loosen the two Bolts (#80) (Figure D).
5. Depress the Rotor Clamp Assembly to keep the saw blade
from turning. (Figure E)
6. Using the Hex Sleeve Spanner (#161), remove the Arbor
Fasten Bolt (#74), the Arbor Flat Washer (#73) and Outer
Flange (#72) which are connected with the Arbor (#112)
NOTE: Remove the Arbor Fasten Bolt (#74) by turning it
CLOCKWISE. (Figure F)
Lock Pin Assembly (#55-58)
Figure A
Figure B Figure C Figure D
Rotor clamp assembly
(#137-139)
Rotor clamp assembly
up position
Figure F
25 50 75 100 125 150 175 200
0-10
18
guage18 guage16guage16guage14 guage14guage12guage12guage
10. 1-13
16
guage16 guage14guage14guage14guage12guage12guage12guage
13. 1-15
14
guage14guage12guage12guage12guage12guage12guage - -
Total Extension Cord Length (in Feet)
AMP
RATING
Length
 Loading...