

KlisLite 40IR-OSD, 50IR-OSD Operation Manual

KLIS Lite COLOR CAMERA
with OSD MENU
(On-Screen Display)
OPERATION MANUAL
For Box camera, Dome camera & Waterproof IR camera
(OSD Menu Optional)
Thanks for purchasing our product, before operating the unit, please read the
instructions carefully and keep this manual for future reference.

Table of Contents
1. Features------------------------------------------------------------ 1
2. Cautions ----------------------------------------------------------- 2
3. Configurations---------------------------------------------------- 3
4. Menu Contents--------------------------------------------------- 5
5. Settings------------------------------------------------------------- 6
6. Specifications----------------------------------------------------- 16
■ Features
Horizontal Resolution 450/520 TV Lines
Clear image quality has been achieved by
employing a SONY CCD, which provides a
horizontal resolution of 450 or 520 TV lines.
OSD Menu
The camera can be controlled by the OnScreen Display Menu
Privacy Function
Unique Privacy function, the privacy function
can conceal up to 4 areas where you do not
wish to appear on the screen.
Motion Detection
Unique Motion Detection function, this function
allows you to detect the motions in the selected
area, when any motion is detected, the
selected area will alarm by flickering on the
screen.
DNR (Digital Noise Reduction)
The amount of low illuminance noise has been
significantly reduced, and the signal-to-noise
ratio (S/N ratio) as well as horizontal resolution
have been improved, resulting in a clear and
sharp image even in the dark.
Manual adjust the electronic shutter
User can manually adjust the electronic shutter
between 1/50(60)~1/100,000(120,000) second.
Day & Night Switch
The camera has a function of Day/Night
Method, it provides Color image in full light
condition (Day) and provides B/W image in low
light condition (Night) to reach the best effect.
Additional Functions
The camera has Mirror function as well as
manually adjusting picture quality function
(Such as Contrast/Sharpness/Color etc.).

Cautions
1. Before installing and operating the unit, please read the manual carefully.
2. Precision components are contained in the camera, so please avoid violent vibration during the
course of transit, maintenance and installation. For the sake of safety, please do not connect to
power before installation completion.
3. Please abide by all the electric codes when using the unit.
4. Do not use corrosive or abrasive detergent for cleaning. Use lens paper or cotton stick with
alcohol to clean the sensor board.
5. Under no circumstances to direct the camera to the sunlight or strong light sources, in order to
avoid any damage to the lens and sensor.
6. Do not use the camera in situations beyond the rated operating temperature (-10~50ºC),
humidity (less than 85%) or power source.
7. In times of malfunction, do not attempt to dismantle and service the camera by yourself .
Please refer to qualified serving personnel to repair or contact our technical department to solve
the problems.
Notice:
Please make sure that the power satisfies the normal specification before connecting
the camera.

Configurations 1--Box Camera
Figure 1: Rear panel of box camera
1. Video Out: Composite video signal output
2. PL: Power indicator
3. Power input (DC 12V, please use regulated DC12V power supply.)
DC12V:connect Positive(+) and Negative(-) polar to the corresponding power terminals.
4. Auto Iris Connector (on the side)
5. DC and Video Drive Auto Iris Lens select switch.
Select the correct position of switch to match the Auto Iris Lens on the camera.
6. Button: Press these buttons to enter and adjust the menu.
7. LEVEL: Adjust Basic level for DC drive Lens
Auto Iris Connector
Figure 2: Auto iris Connector Jack
Pin Video Drive DC Drive
1 Power Damp2 Null Damp+
3 Video signal Drive+
4 Ground Drive-
Configurations 2--Dome Camera
Remove the dome cover first, the setting buttons are on the back panel of the camera
module.
Figure 3: Setting buttons of Dome camera
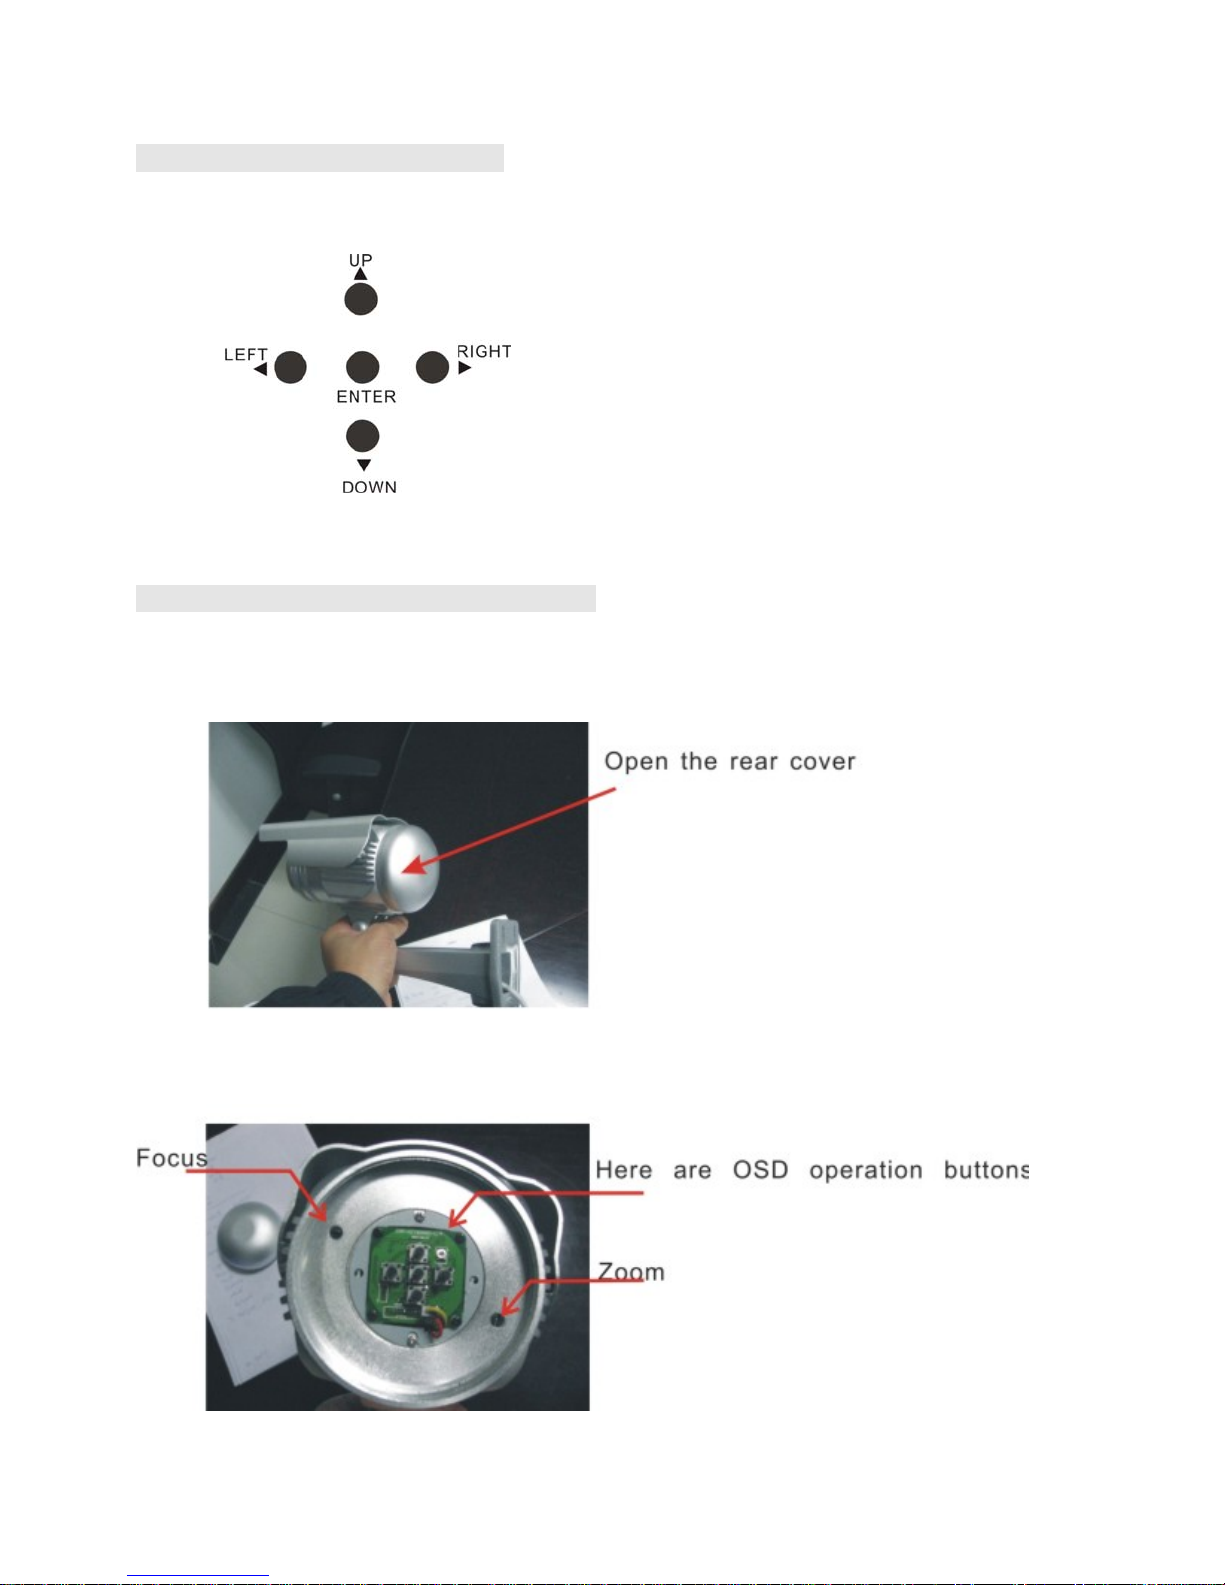
Configurations 3--Waterproof IR Camera
Remove the rear cover of the camera with anti-clockwise, the setting buttons will appear,
the rest of two screws are for adjusting zoom and focus of the varifocal lens inside.
Figure 4: Setting buttons of Waterproof IR camera

Menu Contents
LENS MANUAL
SHUTTER AUTO
BLC ON
AGC ON
WHITE BAL. ATW
SETUP MENU
VIDEO
DC
FLK
FIXED
MANUAL
OFF
OFF
AWB
FIXED
MANUAL
FUNCTION CAMERA ID
MIRROR
DAY NIGHT
MOTION
PRIVACY
GAMMA
LANGUAGE
RESET
ADJUST CONTRAST (0~255)
SHARPNESS (0~31)
CB_GAIN (0~255)
CR_GAIN (0~255)
EXIT
 Loading...