

Page 1

THX ULTRA2 SURROUND PREAMPLIFIER
STAGE ONE
Page 2
STAGE ONE
THX SURROUND PREAMPLIFIER
IMPORTANT SAFETY INSTRUCTIONS
CAUTION:
RISK OF ELECTRIC SHOCK!
DO NOT OPEN!
CAUTION! To reduce the risk of electric shock and fire, do not
remove the cover or back plate of the device enclosure. There are
no user serviceable parts inside. Refer servicing to an Aragon
authorized service center.
CAUTION! The international symbol of a lightning bolt inside a triangle is intended to alert the user to uninsulated "dangerous voltage"
within the device enclosure. The international symbol of an exclamation point inside a triangle is intended to alert the user to the
presence of important operating, maintenance and servicing information in the manual accompanying the device.
WARNING! To reduce the risk of fire or electrical shock, do not
expose this equipment to rain or moisture.
1. Read Instructions – All safety and operating instructions should be read
before operating the device.
2. Retain Instructions – The safety and operating instructions should be
retained for future reference.
3. Heed Warnings – All warnings on the device and in the operating instructions should be adhered to.
4. Follow Instructions – All operating and safety instructions should be followed.
5. Attachments – Do not use attachments not recommended by the product
manufacturer as they may cause hazards.
6. Water and Moisture – Do not use this product near water (for example,
near a bath tub, wash bowl, kitchen sink, or laundry tub; in a wet basement; or near a swimming pool; and the like).
7. Ventilation – Slots and openings in the cabinet are provided for ventilation
and to ensure reliable operation of the product and to protect it from overheating, and these openings must not be blocked or covered. The openings should never be blocked by placing the product on a bed, sofa, rug,
or other similar surface. This product should not be placed in a built-in
installation such as a bookcase or rack unless proper ventilation is provided or the manufacturer’s instructions have been adhered to.
8. Heat – This product should be situated away from heat sources such as
radiators, heat registers, stoves, or other products that produce heat.
9. Power Sources – This product should be operated only from the type of
power source indicated on the marking label. If you are not sure of the
type of power supply in your home, consult with your product dealer or the
local power company. For products intended to operate from battery
power, or other sources, refer to the operating instructions.
10. Grounding – This product is equipped with a three-wire grounding-type
plug, a plug having a third (grounding) pin. This plug will only fit into a
grounding-type power outlet. This is a safety feature. If you are unable to
insert the plug into the outlet, contact your electrician to replace your obsolete outlet. Do not defeat the safety purpose of the grounding-type plug.
11. Power Cord Protection – Power supply cords should be routed so that
they are not likely to be walked on or pinched by items placed upon or
against them, paying particular attention to cords at plugs, convenience
receptacles, and the point where they exit from the product.
12. Overloading – Do not overload wall outlets, extension cords, or integral
convenience receptacles as this can result in a risk of fire or electrical
shock.
13. Lightning and Periods of Non-Use – For added protection for this product during a lightning storm, or when it is left unattended and unused for
long periods of time, unplug it from the wall outlet and disconnect the
antenna or cable system. This will prevent damage to the product due to
lightning and powerline surges.
14. Cleaning – Unplug this product from the wall outlet before cleaning. Do
not use liquid cleaners or aerosol cleaners. Use a damp cloth for cleaning.
15. Object and Liquid Entry – Never push objects of any kind into this product through openings as they may touch dangerous voltage points or
short-out parts that could result in a fire or electric shock. Never spill liquid
of any kind on the product.
16. Damage Requiring Service – Unplug this product from the wall outlet and
refer servicing to qualified service personnel under the following conditions:
a) When the power supply cord or plug is damaged,
b) If liquid has been spilled, or objects have fallen into the product,
c) If the product has been exposed to rain or water,
d) If the product does not operate normally by following the operating
instructions. Adjust only those controls that are covered by the operating instructions as an improper adjustment of other controls may result
in damage and often will require extensive work by a qualified technician to restore the product to its normal operation,
e) If the product has been dropped or damaged in any way, and
f) When the product exhibits a distinct change in performance – this indi-
cates a need for service.
17. Replacement Parts – When replacement parts are required, be sure the
service technician has used replacement parts specified by the manufacturer or that have the same characteristics as the original parts.
Unauthorized substitutions may result in fire, electric shock, or other hazards.
18. Safety Check – Upon completion of any service or repairs to this product,
ask the service technician to perform safety checks to determine that the
product is in proper operating condition.
19. Servicing – Do not attempt to service this product yourself as opening or
removing covers may expose you to dangerous voltage or other hazards.
Refer all servicing to qualified service personnel.
If this unit is purchased outside of the U.S., please contact your local dealer
or distributor for service center information. If purchased inside the U.S. and
dealer service is not available, contact Aragon Customer Service for a return
authorization (RA) number before shipping. For further service information,
contact:
ARAGON CUSTOMER SERVICE
1-866-781-7284
137 COUNTY RD 278
HOPE, AR USA 71801
2
Page 3

Welcome to the Aragon Stage One.
We designed the Stage One as a high-performance multi-channel preamp/processor that would eliminate the need for separate home theater and two-channel
music systems. It integrates an audiophile-quality analog stereo preamplifier (based on the design of the Aragon Aurum), an eight-channel analog preamplifier
for connection to a DVD-Audio player, SACD player, or other multi-channel source with analog outputs, and an advanced THX® Ultra2 digital surround sound
processor.
Sophisticated design should mean more than just great performance. A central goal in the development of the Stage One was ease of use without the sacrifice
of operational flexibility. We believe that in this respect the Stage One breaks new ground. The Stage One combines the ease of use of a good stereo
preamplifier with the most advanced surround-sound processing available today plus numerous features that allow precise tailoring to the rest of your
audio/video system.
The Stage One itself will lead you through the basics so that you can start enjoying your system almost as soon as you have finished making connections
between components. This manual exists to help you take the processor to its limits, to answer your questions, and to guide you through any troubleshooting
that might be required. To get the most out of your Stage One, look through the opening sections before installation and read the entire manual at your leisure
afterward.
The version number of the owner’s manual is located at the bottom of this page. Updates will be provided on our Web site at
http://www.aragonelectronics.com/
Click on Help Center at the top of that page to download the latest version of the manual in Adobe Acrobat pdf format. Adobe’s free Acrobat Reader is required
to view the downloaded manual on your computer, and our Web site provides a link for downloading it as well.
Please send in your warranty card or register online in the Help Center so that we can keep you informed about updates to the Stage One and other important
developments.
Mondial Designs Worldwide Headquarters
3502 Woodview Trace
Suite 200
Indianapolis, IN 46268
866-781-7284
Email: support@aragonelectronics.com
www.aragonelectronics.com
Version Number 1.1
Manufactured under license from Dolby Laboratories. “Dolby”, “Pro Logic” and the double-D symbol are registered trademarks of Dolby Laboratories. Confidential Unpublished Works. ©1992-1999
Dolby Laboratories, Inc. All rights reserved.
Manufactured under license from Digital Theater Systems, Inc. U.S. Pat. No. 5,451,942 and other worldwide patents issued and pending. “DTS” and “DTS Digital Surround” are registered trademarks
of Digital Theater Systems, Inc. ©1996 Digital Theater Systems, Inc. All rights reserved.
Manufactured under license from Lucasfilm Ltd. U.S. patent numbers 5,043,970; 5,189,703; and/or 5,222,059. European patent number 0323830. Other U.S. and foreign patents pending. Lucasfilm and THX are
trademarks or registered trademarks of Lucasfilm Ltd. Surround EX is a trademark of Dolby Laboratories. Used under authorization.
3
Page 4

STAGE ONE
THX SURROUND PREAMPLIFIER
TABLE OF CONTENTS
Stage One Features
Latest Digital Decoding and Post-processing
Two-channel Analog Preamplifier
Full Auto Format Selection
Analog Volume Control
In-system Software Upgradable Design
24-Bit A/D and D/A Converters
Eight-channel Analog Preamplifier
Combination Digital and Analog Bass Management
Analog-Domain Dialog Normalization
Adjustable Crossover Point
Separate Level Settings for Each Mode
On-the-Fly Adjustments
Independent Selection of Audio and Video Sources
Built-in AM/FM Tuner
Front Panel Controls
Front Panel Control Operations
Stage Manager Control and Enter Button
Normal Mode
Post-processing Mode
Tuning Mode
Menu Mode
Speaker Configuration
Level Settings
Speaker Distance
THX Setup Menu
Input Selection Buttons
Mute Button and Mute LED
Front Panel Display
Current Mode
Two-channel and Eight-channel Analog Passthrough
Sampling Rate
Volume Level
Current Input
Post-processing
Rear Panel Inputs
Rear Panel Outputs
Remote Control
Hard Buttons
Adjust
Setup
Vol +/CH +/Mute
ƒ
Up/Down
Left/Right
OK
Mode
Device
Page Up/Down
Backlight
6
6
6
6
6
6
6
6
6
7
7
7
7
7
7
7
8
8
8
8
8
8
8
8
8
8
8
8
8
8
9
9
9
9
9
10
11
12
12
12
12
12
12
12
12
12
12
12
12
12
12
12
4
Page 5

Power and Input Selection
Modes Page
Analog
Digital
Stereo
Direct
Pro Logic II
DTS Neo:6
Club
Mono
5-Channel Stereo
Party
Adjustments
Pro Logic II
Dolby Digital
THX
DTS
Display
On-the-Fly
Video
Tuner
Pro Logic II Modes
Pro Logic II Setup
Dolby Digital
DTS
THX
THX ASA/EX
Tuner
Separate Video
Setup
On-the-Fly
Display
Input Connections
AC Input
Digital Inputs
Analog Inputs
Video Inputs
Multi-channel Analog Input
Antenna Input
Speaker Placement and Configuration
System Setup
Remote Control System Setup
Front-panel System Setup
Speaker Configuration
Level Settings
Speaker Distances
THX Setup
Crossover Setup
General Operation
THX
AM/FM Tuner
Front-panel Display and Lighting
Advanced Features
Advanced Menus
13
13
13
13
13
13
13
13
13
13
13
13
14
14
14
14
14
14
14
14
14
14
14
14
14
14
15
15
15
15
15
15
16
16
16
16
16
16
16
17
18
18
18
18
19
20
21
22
22
25
26
26
26
27
5
Page 6

UNPACKING
WE WANT YOUR NEW PREAMPLIFIER TO LOOK AS GOOD AS IT DID
LEAVING THE FACTORY. PLEASE CHECK PROMPTLY FOR TRANSIT
DAMAGE.
Carefully unpack your new preamplifier. In extreme circumstances, items may
have become damaged in transit. If any damage is discovered, notify the
delivery service and/or dealer where the system was purchased. Make a
request for inspection, and follow the instructions for evaluation. Be sure to
keep the product with its original shipping carton and save your packing material to aid in future transportation.
STAGE ONE FEATURES
Latest Digital Decoding and Post-Processing
The Stage One uses advanced digital processing and 7.1-channel output
capability to support all the latest surround-sound formats and decoding
options, including Dolby Digital, DTS, THX Surround EX, DTS ES Discrete
and Matrix, DTS Neo:6, and Dolby Pro Logic II. No matter what the source,
the Stage One can select and apply the best decoding method automatically.
And with its THX Ultra2 post-processing algorithms, the Stage One makes
sure that the final sound is exactly what the director intended. In addition, it
can apply its DSP power to multi-channel enhancement of ordinary stereo
programs via its Party, Club, and 5-Channel Stereo modes. It even does
mono!
Two-Channel Analog Preamplifier
The Stage One also includes an audiophile-quality two-channel analog preamplifier. Each analog input can be configured for Stereo Direct operation,
which bypasses the analog-to-digital converters and the DSP module to guarantee uncompromised reproduction of analog sources. Super Audio CD
(SACD) and DVD-Audio players can be connected via their analog outputs to
retain the full fidelity of these new formats.
Full Auto Format Selection
The Stage One will automatically determine the format of an incoming digital
bitstream and switch itself to the appropriate processing mode. Separate level
settings are available for each mode and are loaded automatically when a
new mode is selected. This enables the system to be operated at the push of
a button.
Analog Volume Control
The Stage One adjusts channel balance and overall volume in the analog
domain to retain the full resolution of all signals.
In-System Software Upgradable Design
As the world changes, the Stage One can change with it. Software upgrades
can be delivered in the field via a back-panel RS-232 port. This enables us to
make the Stage One compatible with new sources and to enhance its operation without ever having to touch the hardware or even remove it from your
system.
24-Bit A/D and D/A Converters
The Stage One uses identical, state-of-the-art, 24-bit Crystal Semiconductor
digital-to-analog converters for all eight output channels. The stereo
analog inputs, when not in Direct mode, are translated to digital with a
24-bit A/D converter.
Eight-Channel Analog Preamplifier
The Stage One provides an eight-channel analog input to allow direct connection of DVD players with built-in decoders, such as those for DVD-Audio and
SACD. A DB-25 connector is used. This input completely bypasses the digital
processing module, allowing the Stage One to function as an eight-channel
analog preamplifier. (See “Input Connections” for the DB-25 connector’s pin
configuration).
Combination Digital and Analog Bass Management
The Stage One incorporates an advanced hybrid bass-management system
that allows the preamp to preserve full dynamic range under all conditions. It
performs high- and low-pass crossover filtering, as well as bass summing to
the subwoofer, in the digital processor. This allows for more precise crossover
filters. When there is no subwoofer, it routes low-frequency signals (including
the LFE channel in Dolby Digital and DTS) to the system’s "Large" speakers
in the analog domain. This method eliminates any need for digital-domain
attenuation when these signals are combined. Processors that perform this
function digitally (as most others do) must attenuate the signals being combined to avoid overload in the DSP module, resulting in a loss of dynamic
range that can significantly impair sound quality.
Analog-Domain Dialog Normalization
Dolby Digital incorporates a function called Dialog Normalization, which was
originally developed with HDTV in mind. It enables content providers to maintain a constant average level for dialog at a given volume setting, regardless
of the nature of the program. The idea is to enable you to switch from channel
to channel on an HDTV set without ever having to lunge for the volume control, all while not compromising dynamic range. Dolby requires that all Dolby
Digital processors correctly respond to Dialog Normalization instructions in the
bitstream. The Stage One has the ability to make the necessary adjustments
in the analog domain. If this function were performed digitally, it could cause a
loss of resolution.
STAGE ONE
THX SURROUND PREAMPLIFIER
6
Page 7
1
8
2
3
4
7
6
5
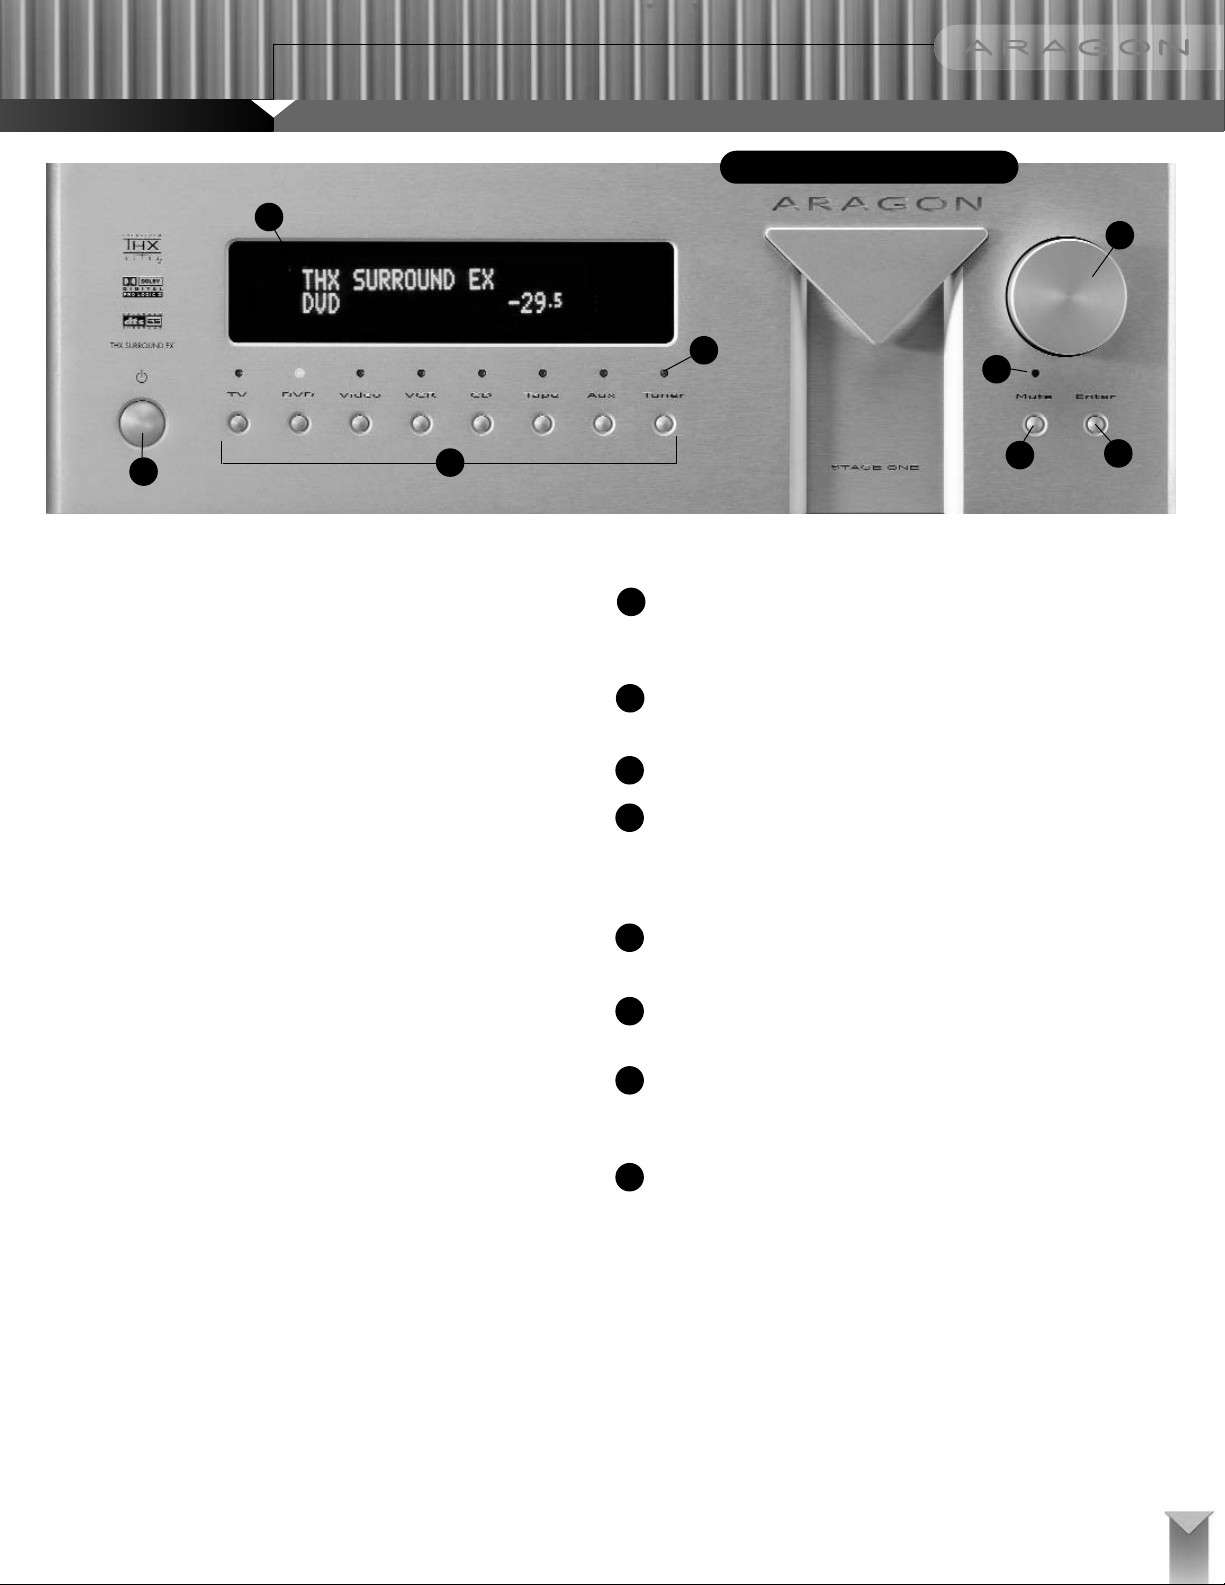
FRONT-PANEL CONTROLS
7
Adjustable Crossover Point
The Stage One enables you to designate each set of speakers in your system
(Front, Center, Surround, and Surround Back) as either Large or Small and to
adjust the crossover frequency below which bass is redirected away from the
channels feeding the Small speakers. There are twenty different crossover
frequencies to choose from. Separate crossovers can be selected for Stereo
and surround modes.
Separate Level Settings for Each Mode
The initial setup procedure defines a single channel balance for all modes.
Although this setting should be correct for most of the basic surround modes,
you can trim the balances individually for each mode from the Advanced
Menu. Once set for a particular mode, customized channel levels will be
loaded automatically whenever that mode is selected.
On-the-Fly Adjustments
You can use the remote control’s On-the-Fly and Balances functions to make
temporary channel-level adjustments for a particular soundtrack. In Stereo
mode, you can adjust the left-right balance and subwoofer level. In surround
modes, you can adjust the front-rear balance as well as the center-channel
and subwoofer levels.
Independent Selection of Audio and Video Sources
A page on the remote control enables you to select video independently with
the push of a button. This allows you to watch one source while you listen to
another, without going through any complicated setup menus.
Built-In AM/FM Tuner
The Stage One has a built-in AM/FM tuner with 20 station presets. The
remote control’s Tuner page contains buttons for selecting presets, as well as
station-seek buttons.
FRONT-PANEL CONTROLS
1 Power
The Power button switches the Stage One between its Active and Standby
modes. In Standby, the analog circuitry remains powered while the DSP
module is shut down and the outputs are muted.
2 Mute
Pressing the Mute button will toggle the Stage One’s audio outputs on
and off.
3 Mute LED
The Mute LED will illuminate red when the system is muted.
4 Enter Button
The Enter button is used in conjunction with the Stage Manager to operate the Stage One menu system. (See "Front-panel Operation.") When
the tuner is selected, the Enter button is used to switch the Stage
Manager into tuning mode. (See "Tuner.")
5 Input Selection Buttons
Pressing any of these buttons (TV, DVD, etc.) selects the corresponding
rear-panel connection as the current input.
6 Input Indicator LED
The LEDs above the Input Selection buttons indicate the source currently
engaged.
7 Stage Manager Control
The Stage Manager is both a knob and, when pushed, a button. It serves
a number of functions, including volume control, AM/FM tuning, and menu
operation. (See "Stage Manager.")
8 Display
The Stage One has a two-line by twenty-character vacuum-tube fluorescent display that indicates the current audio mode, input, and volume control setting.
Page 8

FRONT-PANEL CONTROL
OPERATIONS
Stage Manager Control and Enter Button
The Stage Manager control knob is turned clockwise and counter-clockwise to
make adjustments, and it also functions as a pushbutton in certain operations.
In combination with the Enter button, it controls many of the Stage One’s
functions.
Normal Mode
In the Normal mode, the Stage Manager functions as a volume control.
Turning it to the right will increase the volume, and turning it to the left will
decrease the volume. The Stage One’s volume-control range is from –62dB
to +12dB, with 1dB steps from –62dB to –36dB and 0.5dB steps from
–35.5dB to +12dB. Below –62dB, the system is muted.
Post-Processing Mode
In the Normal mode, holding the input selection button for the current
source and rotating the Stage Manager will change the post-processing
mode. The following selections are available: Stereo, Stereo Direct, Pro
Logic II, DTS Neo:6, Club, 5-Channel Stereo, Party, and Mono.
Tuning Mode
When the Tuner is selected, use the Stage Manager to change stations.
Press the Stage Manager to enter the tuning mode. The currently selected
band will flash. Turn the knob clockwise to tune to FM, and counter
clockwise to select AM. Press the knob a second time to allow the tuning
frequency to be changed. Turn the knob clockwise to increase the frequenc
and turn it counter-clockwise to decrease the frequency. Press the knob a
third time, and the current preset will flash. Turn the knob clockwise to
increase the selected preset and counter clockwise to decrease. Press the
knob a fourth time to exit the Tuning mode. The Stage Manager will automatically revert to Normal mode after 5 seconds of inactivity.
Menu Mode
Press the Enter button once to load the Setup Menu or twice to load the
Advanced Menu. Scroll through the menu items by turning the Stage
Manager knob and press it when you reach the one you want to adjust.
Again, you adjust that item by turning the Stage Manager knob. When a
menu item offers a Yes/No choice, turn the knob to the right to select Yes
and to the left to select No. Press the Enter button to exit the menu. Menuspecific controls are listed below.
Speaker Configuration
Turn the Stage Manager to adjust the speaker setting. Press the knob to
advance to the next available speaker. Press the Enter button to exit the
Speaker Configuration Menu.
Level Settings
Turn the Stage Manager to increase or decrease the level of a selected
output channel. Press it to advance to the next channel. Press the Enter
button to exit the Level Settings Menu.
Speaker Distance
Turn the Stage Manager knob to increase or decrease the speaker
distance setting for an output channel. Press it to advance to the next
channel. Press the Enter button to exit the Speaker Distance Menu.
THX Setup Menu
Turn the Stage Manager to change the selected THX Setup menu. Press
the knob to select the currently displayed menu item for adjustment. Turn
the knob to the left or right to adjust the value of that item. Press the
Stage Manager or the Enter button to exit the selected menu.
Crossover Setup
Turn the Stage Manager to increase or decrease the crossover frequency for the speakers selected as Small and for the Subwoofer high-pass
filter. Press the Enter button to exit the Crossover Setup Menu.
Input Selection Buttons
Along the bottom of the front panel are eight buttons for source selection.
Once you have chosen an input, you can change the post-processing
mode by holding its selection button down and turning the Stage Manager
knob.
Mute Button and Mute LED
The Mute button toggles the Stage One’s outputs off and on. The Mute
LED will illuminate red when Mute is engaged. Turning the volume down
past –62dB will also mute the Stage One.
FRONT PANEL DISPLAY
Current Mode
The top left-hand corner of the display indicates the Stage One’s current
decoding mode or the post-processing being applied to a two-channel input
signal. The following decoding and post-processing modes are available in the
Stage One: Dolby Digital, DTS, Stereo, Pro Logic II, 5-Channel Stereo, DTS
Neo:6, Club, Party, and Mono.
Dolby Digital and DTS bitstreams can contain anywhere from 1.0 to 6.1 channels of information. (The ".1" indicates the presence or absence of a low-frequency effects, or LFE, channel.) If the bitstream contains between 1.0 and
5.1 channels of information, the number will display to the right of the decoding mode.
1.0
This indicates a mono signal. This signal is reproduced through the center
channel if a center speaker is present. Otherwise, it will be reproduced
equally through the left and right front output channels. If a center speaker
is present, you can force the signal to be routed to the left and right front
channels by pressing the Stereo button on the remote control.
2.0
This indicates that a two-channel signal is present. It will be reproduced
through the left and right front output channels. Two-channel signals can
also be modified by any of the Stage One’s post-processing modes. The
post-processing function will be indicated in the bottom left-hand portion of
the front-panel display.
STAGE ONE
THX SURROUND PREAMPLIFIER
8
Page 9

3.0
This indicates a three-channel signal, which normally will be reproduced
through the left front, center, and right front output channels. If the system
contains no center speaker, the center channel signal will be split equally
between the left and right front output channels.
4.0
This indicates a four-channel signal, reproduced through the left and right
front and surround output channels.
5.0
This indicates a five-channel signal, which normally is reproduced through
the left and right front, center, and left and right surround channels.
.1
The ".1" indicates that the bitstream contains a low-frequency effects (LFE)
channel, which carries only bass information. In most systems, the LFE
channel is reproduced by a subwoofer. If there is no subwoofer, it will be
routed to speakers designated as Large.
The number of channels indicated on the front-panel display is based on the
number of channels of information present in the digital bitstream. It is not an
indication of a signal being present on a particular speaker and does not
reflect your system’s speaker configuration. For example, if you have set
"Center Speaker" and "Subwoofer" to "None" (not present) in the Speaker
Configuration Menu, the display will still show Dolby Digital 5.1 for a 5.1-channel Dolby Digital soundtrack.
When a Dolby Digital soundtrack contains surround back channel information,
the front-panel display will indicate THX Surround EX.
THX Surround EX will NOT be displayed if any of the following conditions
exist:
1. The Surround Back channels in the Speaker Configuration Menu are set
to None
2. THX Surround EX is turned to OFF in the THX Setup Menu
3. The soundtrack is flagged as not containing stereo surround information
THX Surround EX-encoded discs can be played on a system with any number
of speakers connected to it, but to take full advantage of the surround back
channel information a full complement of speakers must be connected, including the Surround Back speakers.
When a DTS soundtrack contains surround back channel information, the
front-panel display will indicate DTS ES Matrix or DTS ES Discrete.
DTS ES soundtracks containing 6.1 channels of information are encoded in a
matrixed or discrete format. In a DTS ES Matrix soundtrack, the surround
back channel information is encoded into the primary surround channels,
extracted by the DSP module, and then sent to the Surround Back output
channels. DTS ES Discrete soundtracks contain a discrete surround back
channel signal, which is decoded by the DSP module and fed to the Surround
Back outputs.
The Stage One will not decode DTS ES if the Surround Back channels are set
to "None" in the Speaker Configuration Menu. DTS ES-encoded discs are
backward-compatible with a 5.1 system, so Surround Back channels are not
required to play them. However, the system cannot take advantage of the
extra surround channel unless, in addition to the primary surround speakers,
surround back speakers are connected.
2-Channel and 8-Channel Analog Passthrough
The top line of the display will indicate when the 8-Channel Analog input or
the Stereo Direct (2-channel passthrough) mode is selected.
Sampling Rate
For PCM signals (standard uncompressed digital output from a CD, DVD, or
laserdisc player or a digital satellite receiver), the display will show the sampling frequency to the right of the post-processing mode.
Volume Level
The bottom right-hand corner of the display indicates the current master volume setting. The master volume ranges from –62dB to + 12dB, with 00dB as
the THX reference setting.
Current Input
The bottom left-hand side of the display indicates the currently selected input,
as long as there is no post processing information required to be displayed.
When the tuner is selected, this location will display the currently tuned radio
frequency.
Post-Processing
In some modes, the Stage One may need to display additional information,
such as the type of post-processing being applied. The following list presents
the Stage One modes and the post-processing or additional information available in each.
Dolby Pro Logic II has five possible decoding modes, selected from the
remote control’s Pro Logic II Modes page: Movie, Music, Panorama (indicated as PAN), Matrix and Pro Logic. (See "Modes.")
Dolby Digital has 11 possible decoding modes, either selected from the
remote control’s Modes page or loaded as the default based on system settings: PLII, Stereo, Mono, 5-Channel Stereo, Club, Party, DTS Neo:6, THX,
THX Surround EX, THX MusicMode, and THX Ultra2 Cine. Certain modes
may only be applied to Dolby Digital 2.0 signals that are not flagged as surround encoded (See "Modes.")
DTS has 10 possible decoding modes, selected from the remote control’s
Modes page or loaded as the default based on system settings: PLII,
Stereo, Mono, 5-Channel Stereo, Club, Party, DTS Neo:6, THX, THX
MusicMode, and THX Ultra2 Cine. Certain modes may only be applied to
DTS 2.0 signals that are not flagged as surround encoded (See "Modes.")
9
Page 10
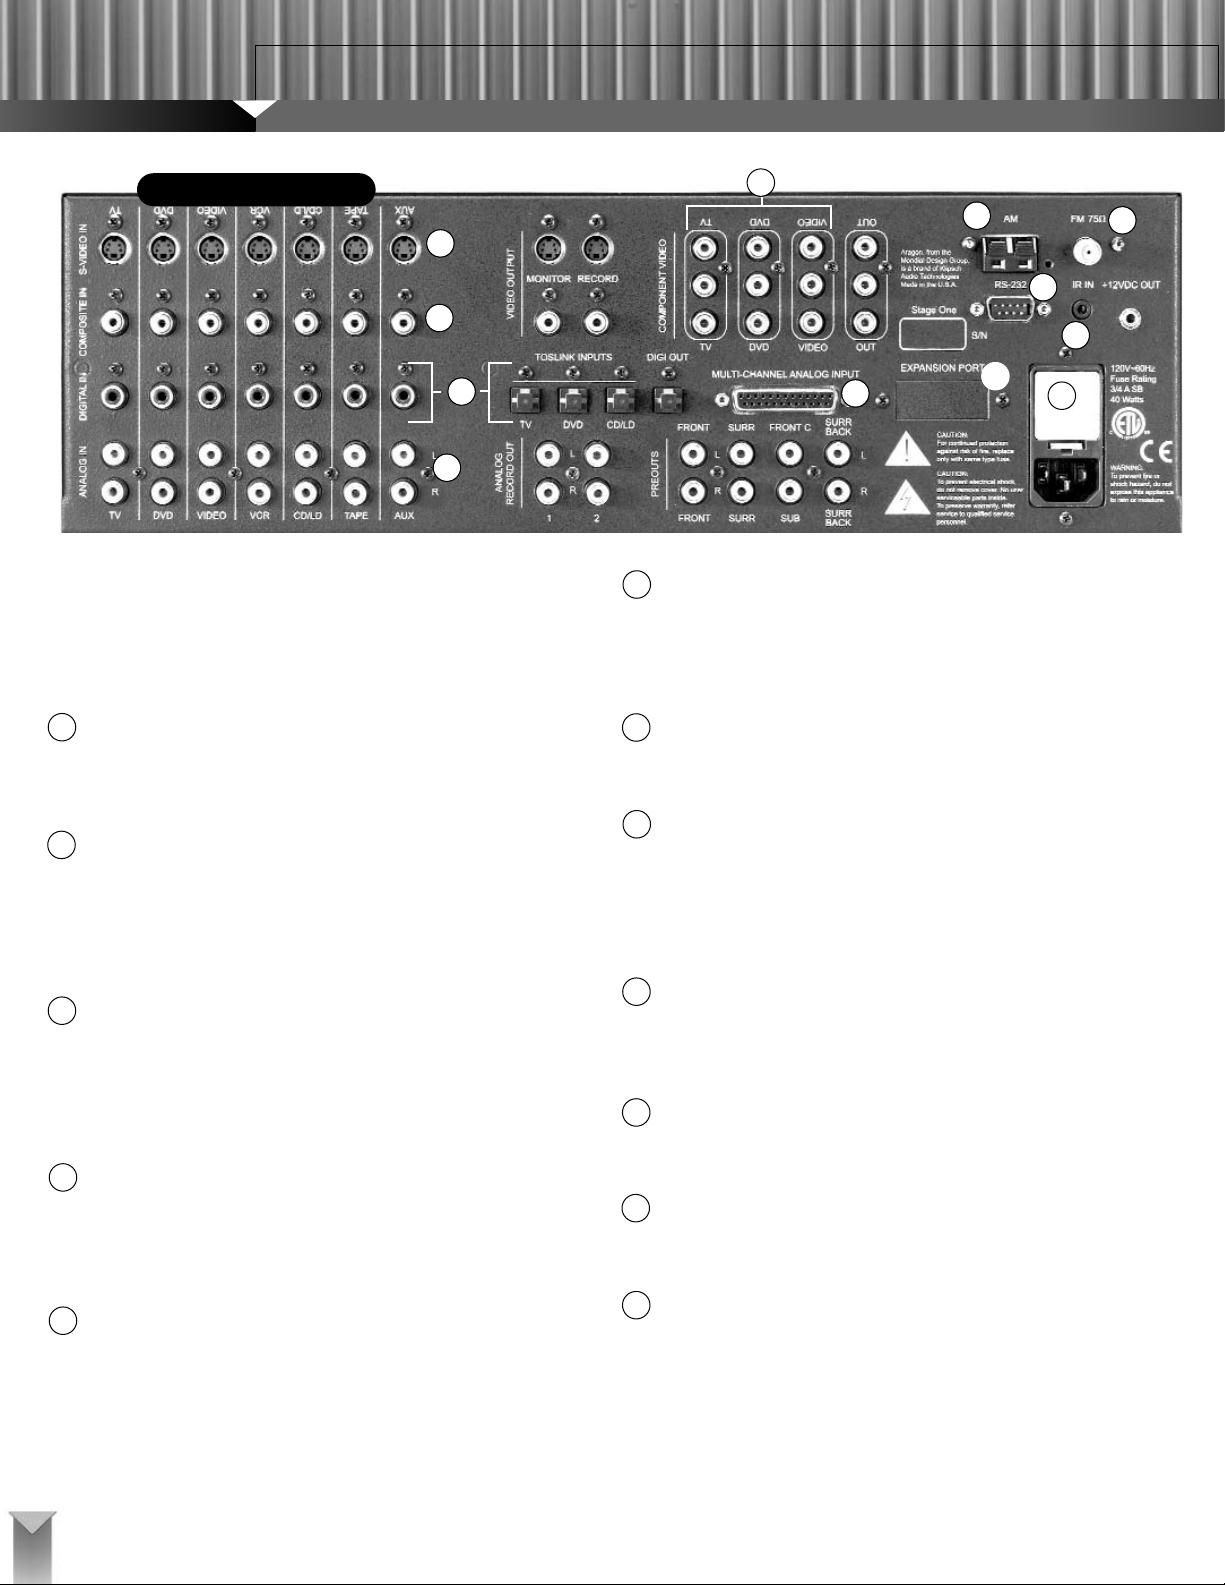
REAR-PANEL INPUTS
Be certain that the Stage One preamp/processor, your amplifiers, and all
other associated components are powered OFF before making or breaking any connections to the preamplifier. Failure to do so may result in
damage to your speakers or other equipment.
1 ANALOG INPUTS
Seven stereo analog inputs are provided on the rear panel. The analog
inputs are labeled for convenience only, as any line-level source can be
plugged into any analog input. (See "Analog Input Level Control.")
2 DIGITAL INPUTS
Ten digital inputs are provided on the rear panel: seven Coaxial and three
Toslink optical. They can accept digital output from any device that delivers
a standard S/PDIF signal. On the TV, DVD, and CD/LD inputs, the Toslink
input takes precedence over the Coaxial input. Both may be connected
simultaneously.
3 COMPOSITE VIDEO INPUTS
Seven composite video inputs are provided on the rear panel. When an
A/V source is selected, the corresponding video input is also selected and
routed to the Monitor and Record outputs. Video inputs can also be selected independently of the audio inputs. (See "Selecting a Separate Video
Source.")
4 S-VIDEO INPUTS
Seven S-video inputs are provided on the rear panel. When an A/V source
is selected, the corresponding video input is also selected and routed to
the Monitor and Record outputs. Video inputs can also be selected independently from audio inputs. (See “Selecting a Separate Video Source.”)
5 COMPONENT VIDEO INPUTS
Three Component Video inputs are provided on the rear panel. These are
assigned to the TV, DVD and Video inputs and are high-definition compatible. When one of these three sources is selected, the corresponding component video input is also selected and routed to the Component Video
output. Video inputs can also be selected independently from audio inputs.
(See “Selecting a Separate Video Source.”)
6 RS-232 IN/OUT
The RS-232 port enables the Stage One to communicate with
external control devices or to connect with expansion boxes for future
upgradability. This port also allows for software upgrades to be installed
to the Stage One.
7 IR INPUT
The external IR input on the rear panel allows for an electrical connection
to an infrared receiver module.
8 MULTI-CHANNEL ANALOG INPUT
A DB-25 connector is provided on the rear panel to allow a six- or
eight-channel analog input from a DVD, DVD-Audio, or SACD player.
Compatible RCA to DB-25 adapters are readily available from many
manufacturers. (See “Input Connections.”) This input bypasses the DSP
module.
9 EXPANSION PORT
This port provides for expansion capability for future use should current
or future formats require a method of connection not currently supplied
on the Stage One.
10 AC INPUT
AC Power is supplied to the Stage One via a standard IEC three-wire
power cord.
11 FM ANTENNA INPUT
A 75-ohm F-connector input is provided on the rear panel to attach to an
external FM antenna.
12 AM ANTENNA INPUT
Spring clips are provided on the rear panel to connect an external AM
loop antenna.
STAGE ONE
THX SURROUND PREAMPLIFIER
1
8
9
10
11
12
6
7
2
3
4
REAR-PANEL INPUTS
10
5
Page 11

REAR-PANEL OUTPUTS
1 COMPONENT VIDEO OUTPUT
One component video output is provided to connect to a monitor with a
component video input. This output is active only for routing the three
Component Video inputs (TV, DVD and Video) connected to component
video sources.
2 S-VIDEO MONITOR/RECORD OUTPUT
Two outputs are provided for S-video signals to route them to your monitor or recording device. The Stage One does not convert composite video
input signals to S-video, although both composite and S-video signals can
be used simultaneously.
3 COMPOSITE VIDEO MONITOR/RECORD OUTPUT
Two outputs are provided for composite video signals to route them to
your monitor or recording device. The Stage One does not convert composite video signals to S-video, although both composite and S-video signals can be used simultaneously.
4 TOSLINK OPTICAL DIGITAL OUTPUT
AToslink optical digital audio output is provided on the rear panel. The
signal from the selected digital source is routed to the Toslink digital output for recording purposes.
5 ANALOG RECORD OUTPUTS
Two sets of outputs are provided on the rear panel to connect to recording
devices, such as VCRs and tape decks. The analog signal from the
selected source is routed to both record outputs. (Be careful when
connecting these to a VCR line input if the VCR is the currently selected
source and line-in is selected on the VCR. This can cause a feedback
loop.)
6 PREAMPLIFIER OUTPUTS
RCA outputs are provided for each channel. Connect these to the inputs
of the corresponding power amplifier channels.
7 RS-232 IN/OUT
The RS-232 port enables the Stage One to communicate with external
control devices or to connect with expansion boxes for future
upgradability. This port also allows for software upgrades to be installed
to the Stage One.
8 12-VOLT DC OUTPUT
The 12-volt DC output can be used to trigger external devices that are
driven by a 12-volt continuous DC output (up to 100mA).
2
3
5
6
4
7
8
REAR-PANEL OUTPUTS
11
1
Page 12

REMOTE CONTROL
The supplied Philips ProntoNEO®touchscreen remote control is pre-configured for the Stage One. This programmable learning remote is enormously
flexible and can be customized to operate your entire audio/video system. The
remote has its own manual, which explains its operation in full detail. Be sure
to read the ProntoNEO manual as well as the descriptions below to get the
most from the remote control. The functions listed below apply only when the
Stage One is selected on the remote control.
HARD BUTTONS
1 ADJUST
The Adjust button switches the remote control touchscreen to the
Adjustments page, which has buttons for jumping to the most commonly
used mode and system adjustment pages.
2 SETUP
The Setup button switches the remote control to the Setup page, where
you can enter the system setup functions.
3 4 UP/DOWN
When in the menu system, the Up and Down buttons move between
menu items. In the Speaker Configuration, Level Setting, and Speaker
Distances menus, the Up and Down buttons change the channel selected
for adjustment. When the Stage One is in Normal mode and decoding
surround sound, the Up and Down buttons adjust the front/rear balance.
5 6 LEFT/RIGHT
Once you have selected a menu item, use the Left and Right buttons to
adjust the value of its setting. When the Stage One is in Normal mode
and playing a stereo signal, press the Left and Right buttons to adjust the
left/right balance.
7 8 VOL +/–
The Vol+ and Vol– buttons adjust the Stage One’s overall volume level.
910CH +/–
When the Stage One’s built-in tuner is selected, the CH+ and CH– buttons seek forward and back to the next station with enough signal
strength for clean reception.
11 ƒ
Pressing the F button brings the remote back to the input selection page.
12 MUTE
The Mute button toggles the Stage One’s audio output on and off. When
you are adjusting the Level Settings in the Setup menu, pressing the
Mute button will exit the menu without saving changes.
13 OK
Press the OK button to enter and exit menus.
14 MODE
Holding down the Mode button brings up the remote control’s setup
menu, which allows you to program the remote. For detailed instructions
on how to use this function, see the ProntoNEO manual.
15 DEVICE
Pressing the Device button brings up the top-level Device page, which is
where you select which component you want the remote to address.
Select the Stage One by pressing the Stage One button at the bottom of
the page.
16 17 PAGE UP/DOWN
On the left hand side of the remote, the Page Up and Down buttons
enable you to scroll through the pages that apply to the currently selected device.
18 BACKLIGHT
Pressing the Backlight button lights up the touchscreen and hard buttons
so you can see them clearly in the dark. To adjust the touchscreen’s contrast, press the Page Up and Down buttons while holding down the
Backlight button.
STAGE ONE
THX SURROUND PREAMPLIFIER
1
3
4
2
7
9
10
12
11
13
15
14
18
5
16
17
6
8
12
Page 13

POWER AND INPUT
SELECTION
There are separate power On and Off buttons for the
Stage One. Direct access buttons are available for
each of the eight source inputs, including the tuner.
The 8 Ch In button selects the 8-channel analog
input.
MODES PAGE
The Modes page provides Stage One post-processing adjustments and individual buttons for selection of stereo direct, analog, and digital inputs.
Analog
This button forces the Stage One to process from the analog input. The Stage
One will remain locked onto the analog input until you select a new source,
press the Digital button, or power it off.
Digital
Choosing Digital forces the Stage One to process from the digital input,
regardless of whether or not a digital signal is present for the currently selected source. The Stage One will remain locked onto the digital input until you
select a new source, press the Analog button, or power it off.
Stereo
When an analog or PCM digital signal is present for the currently selected
source, pressing the Stereo button decodes the signal in two-channel stereo
and sets the default for analog and PCM signals on the particular input to
stereo. When a Dolby Digital or DTS signal is selected, pressing the Stereo
Button will cause the Stage One to downmix multi-channel soundtracks for
reproduction by just the front left and right speakers.
Direct
Pressing the Direct button forces the Stage One into Stereo Direct mode and
sets Stereo Direct as the default mode for the currently selected source.
Stereo Direct bypasses all digital processing, enabling the Stage One to act
as a stereo analog preamplifier while still allowing subwoofer operation.
PLII
Pressing the PLII button when the signal for the currently selected source is
analog, PCM digital, Dolby Digital 2.0 or DTS 2.0 causes the Stage One to
apply Dolby Pro Logic II decoding to the signal. The Stage One will automatically apply Dolby Pro Logic II decoding to Dolby Digital 2.0 signals that are
flagged as Dolby Surround encoded. Pressing the PLII button also jumps the
remote to the Pro Logic Modes page, where you can adjust the currently
selected Dolby Pro Logic II mode.
DTS Neo:6
Pressing the DTS Neo:6 button when the signal for the currently selected
source is analog, PCM digital, Dolby Digital 2.0 or DTS 2.0 applies the DTS
Neo:6 surround processing algorithm.
Club
Pressing the Club button when the signal for the currently selected source is
analog, PCM digital, Dolby Digital 2.0 or DTS 2.0 applies Club-mode processing.
Mono
Pressing the Mono button when the signal for the currently selected source is
analog, PCM digital, Dolby Digital, or DTS will downmix all channels to mono
and send the resulting signal to the center speaker or, if the system has no
center speaker, the left and right front speakers.
5 Ch St
Pressing the 5 Ch St button when the signal for the currently selected source
is analog, PCM digital, Dolby Digital 2.0 or DTS 2.0 applies 5-Channel Stereo
processing.
Party
Pressing the Party button when the signal for the currently selected source is
analog, PCM digital, Dolby Digital 2.0 or DTS 2.0 applies Party-mode processing.
on off
13
TV
VIDEO
VCR TAPE
AUX TUNER
8 Ch In
DVD
CD/LD
Analog
Stereo Direct
PL II
DTS Neo
Club
Digital
5 Ch St
Party
Mono
Page 14

ADJUSTMENTS
Pro Logic
Pressing the Pro Logic button switches the remote to the Pro Logic II Modes
page, where you can adjust the currently selected Dolby Pro Logic II mode.
Dolby Digital
Pressing the Dolby Digital button switches the remote to the Dolby Digital
page, where you can adjust the Dolby Digital Night Mode compression level.
THX
Pressing the THX button switches the remote to the THX page, where you
can adjust the THX options.
DTS
Pressing the DTS button switches the remote to the DTS page, where you
can adjust the DTS options.
Display
Pressing the Display button switches the remote to the Display Options page,
where you can turn the front panel display on and off and adjust the front
panel lighting.
On-the-Fly
Pressing the On-the-Fly button switches the remote to the On-the-Fly page,
where you can temporarily adjust center-channel and subwoofer levels to
compensate for variations in soundtracks.
Video
Pressing the Video button jumps the remote to the Separate Video Switching
page, where you can select the video input independently of the audio signal.
Tuner
Pressing the Tuner button switches the remote to the Tuner page, where you
can select the band, select a preset, or tune stations.
PRO LOGIC II MODES
The Pro Logic II Modes page allows you to select the
Dolby Pro Logic II mode. Five Pro Logic II modes are
available: Music, Movie, Panorama, Matrix and
Pro Logic.
PRO LOGIC II SETUP
The Pro Logic II Setup page enables you to adjust
Dolby Pro Logic II parameters. The following adjustments are available: Center Channel Width and
Dimension. Changes are stored in memory and load
automatically when the Pro Logic Music or Panorama
modes are engaged.
DOLBY DIGITAL
The Dolby Digital page allows you to adjust the level
of compression in Dolby Digital.
DTS
The DTS page allows you to adjust the DTS Neo:6
mode.
THX
The THX Setup page allows THX processing to be
turned On and Off. When THX processing is on, the
Re-Equalization circuit can be turned on and off.
Once the Stage One is powered off, the ReEqualization circuit returns to the default state of ON.
STAGE ONE
THX SURROUND PREAMPLIFIER
14
Adjustments
Pro Logic
Display
Video Tuner
THX
Dolby Dig
DTS
On the Fly
Modes
Music
Panorama
Pro Logic
center
-
dimension
-
Compression
Low Medium
Night
Pg. 2
Movie
Matrix
Pg. 1
Off
+
+
Neo:6 Mode
Music Movie
Pg. 2
THX On THX Off
Re EQ
On
Off
Page 15

THX ASA/EX
The THX ASA and EX setup page allows the THX Advanced Speaker Array
and THX Surround EX modes to be adjusted. Available options for the
Advanced Speaker Array (ASA) mode are Ultra2 Cinema, THX MusicMode,
and Off. Ultra2 Cinema mode will be most appropriate for movie soundtracks
that are not Surround EX-encoded, while MusicMode will work best for multichannel music sources. The default setting for the ASA Mode menu is Ultra2
Cinema.
Available options for THX Surround EX are AUTO, ON, and OFF. In the AUTO
mode, THX Surround EX processing will occur when all Surround EX conditions have been met, and the Dolby Digital bitstream contains the appropriate
flag to indicate that the soundtrack is Surround EX encoded. In the ON mode,
THX Surround EX processing will take place whenever all Surround EX conditions have been met. In the OFF mode, THX Surround EX processing will not
take place even if the appropriate conditions are met. The default setting for
the Surround EX Mode menu is AUTO.
ASA and Surround EX adjustments can only be made when accessing 5.1
Dolby Digital and DTS soundtracks. These settings will only take effect when
the Stage One is configured with Surround Back speakers in the Speaker
Configuration menu.
TUNER
The Tuner page contains all the functions for controlling the built-in AM/FM tuner. AM and FM buttons are
provided to select the current band. Tuning Up and
Tuning Down buttons at the bottom of the page allow
for the frequency to be adjusted up and down. Ten
presets are available for each band, selected by the
buttons 1 through 10. Pressing and releasing the preset button will tune the radio to the selected preset
station. Pressing and holding the preset button for
three seconds will store the currently selected station
as the preset.
SEPARATE VIDEO
The Separate Video switching page allows the video
input to be adjusted independently of the audio
source. This allows you to listen to one source, such
as the built-in tuner, while watching another.
SETUP
The setup page allows you to enter the Setup and
Advanced Setup menus and adjust the analog input
gain when necessary. Pressing Setup or Advanced
Setup will enter and exit the menus. The Up/Down,
Left/Right and OK buttons are used to navigate the
front panel menus. When accessing an analog input,
the analog input gain can be adjusted up and down
with the Input Gain + and – buttons. Pressing the Exit
Setup Menu button will change the remote control
back to the input selection screen.
ON-THE-FLY
The center channel and subwoofer levels can be
temporarily adjusted with the buttons on the On-theFly page. These levels can be adjusted up or down to
compensate for differences in particular soundtracks.
The next time the mode is accessed, the settings
saved in memory will be loaded into the processor.
The need to continuously adjust the center channel
and subwoofer levels may be an indication that the
saved settings in the Level Settings menu are not correct.
DISPLAY
The Display page allows the front panel display to be
turned on and off, and the front panel lighting to be
turned On, Off, or set to Dim. The display setting will
revert back to the default ON setting the next time
the processor is turned on. The front panel lighting
setting is stored in memory.
15
Pg. 1
Cinema Music
ASA Mode
Off
EX Off
EX On
EX Auto
Surround EX Mode
Separate Video Switch
CD/LD
Setup
Input Gain
center
subwoofer
DVD
+
+
+
TV
VIDEO
VCR TAPE
AUX
Advanced Setup
-
Shift
Exit Setup Menu
On the Fly Adjustments
-
-
1
23
45
8
7
FM
10
6
9
AM
Display Settings
On
Light Settings
On
Dim
Off
Off
Page 16

STAGE ONE
THX SURROUND PREAMPLIFIER
16
INPUT CONNECTIONS
The Stage One allows for analog, digital, and video outputs for seven sources
to be connected to the rear panel inputs. You also have the ability to switch
the Audio and Video signals independently of each other. For easiest operation, the digital, analog, and video outputs from each source should be
attached to the same source input (lined up vertically) on the rear panel of the
Stage One. If different types of video outputs are available, one of each type
(S-video, Composite, and Component/RGB/HDTV) can be connected to a single source input. This ensures that video output will be available regardless of
the input selected on the monitor.
AC INPUT
Using the supplied IEC power cord, plug the Stage One into the wall outlet.
DIGITAL INPUTS
The rear panel of the Stage One provides ten digital inputs (three Toslink, and
seven Coaxial). Any S/PDIF digital output can be connected to any, or all ten
digital inputs. For inputs with both a Toslink and Coaxial digital connection,
Toslink takes precedence. It is possible to connect both a Toslink and a
Coaxial digital signal to a single source input, but only one will be operational
at a time. There is no need to "assign" the digital inputs, as one is provided
for each source connection. For easiest operation, the digital output of the
source should be connected to the same source input (lined up vertically) as
the analog and video outputs of the source.
ANALOG INPUTS
The rear panel of the Stage One provides seven stereo analog line level
inputs. The analog output of any line level source can be connected to any, or
all of the stereo analog inputs. The input gain of the analog inputs should be
adjusted for each analog source that you have connected. For optimum performance, the gain should be adjusted to the highest point before clipping
occurs. (See “Advanced Features.”)
VIDEO INPUTS
The rear panel of the Stage One provides 17 Video inputs (seven composite,
seven S-video and three component). The Stage One does not perform any
video conversion. For example, if you connect the S-video output of a DVD
player to the Stage One, that signal will only be available at the S-video outputs.
MULTI-CHANNEL ANALOG INPUT
The Stage One provides an 8-Channel Analog Input. This DB-25 connector
can be used to connect the analog outputs from a DVD player with a built-in
decoder. The 8-Channel Analog input is passed directly to the analog preamplifier section. Individual channel level adjustment, as well as overall level
adjustment, is available for this input.
ANTENNA INPUT
Spring clips for an AM loop antenna, and a coaxial type terminal for a 75-ohm
FM antenna connection are provided on the rear panel to allow the built-in
AM/FM tuner to be connected to an antenna.
Unbalanced DB-25 Pin Assignments
PIN
1
2
3
4
5
6
7
8
9, 10
11, 12, 13
14
15
16
17
18
19
20
21
22
23, 24, 25
ASSIGNMENT
Left positive
Center positive
Right positive
Subwoofer positive
Surround left positive
Surround right positive
Surround back left positive
Surround back right positive
Shield drains
No connection
Left ground
Center ground
Right ground
Subwoofer ground
Surround left ground
Surround right ground
Surround back left ground
Surround back right ground
Shield drain
No connection
1
13
25
14
ANALOG
OUTPUT
S VIDEO
OUTPUT
ANALOG
OUTPUT
SATELLITE
DIGITAL
OUTPUT
COMPONENT
OUT SAT
S VIDEO
OUTPUT
DIGITAL
OUTPUT
COMPOSITE
VIDEO OUTPUT
DVD PLAYER
COMPONENT
VIDEO OUT
ANALOG
OUTPUT
CD PLAYER
DIGITAL
OUTPUT
ANALOG
OUTPUT
COMPOSITE
S VIDEO
VIDEO INPUT
INPUT
COMPOSITE
S VIDEO
VIDEO OUTPUT
OUTPUT
VCR
AM ANTENNA
ANALOG
INPUT
COMPOSITE
VISEO INPUT
S VIDEO
INPUT
TELEVISION
FM ANTENNA
COMPONENT
INPUT
Page 17

SPEAKER PLACEMENT AND
CONFIGURATION
The number and placement of speakers is a very critical part of the function of
the Stage One. While you can certainly use the Stage One in systems with as
few as two main left and right speakers, you will not be able to realize the full
surround sound potential of the processor without proper set-up of a complete
surround speaker package. The following text and diagrams describe how to
place your speakers for THX Surround EX playback.
Please consult the owner’s manuals for your speakers and amplifier to
ensure correct connections. Make sure the power to your amplifier and
the Stage One are off before making or breaking any connections.
Failure to do so could result in damage to your equipment.
Front Left and Right Speakers
These are the primary speakers in the system. They function as the left and
right speakers in a stereo configuration and as the front left and right speakers in a surround speaker set-up. They should be placed to left of and to the
right of your video monitor.
Center Channel Speaker
The center channel speaker functions as the primary sound source for a surround sound system. It should be placed as close to the video monitor as
possible – typically on top of the monitor. The center channel localizes all
on-screen dialog, action and effects for realistic sonic effect.
Surround Left and Right Speakers
The surround left and right speakers function as the dimensional speakers in
a surround speaker set-up. They reproduce the ambience and three-dimensional movement required for realistic playback of surround encoded source
material. Ideally, these speakers should be placed to the left side and right
side of the primary listening position at a height of 0.5-1 meter above the listener’s ears.
Surround Back Left and Right Speakers
The surround back left and right speakers are necessary for optimal playback
of THX Surround EX and DTS ES-encoded material. They add additional
ambience and effects to the soundfield, further enhancing the movie theater
experience in your home. These speakers should be placed to the rear of the
listening position at a height of 0.5-1 meter above the listener’s ears.
Subwoofer
The subwoofer reproduces all of the deep bass that brings home the sonic
realism of a movie soundtrack. It can also reproduce bass response that has
been redirected from other speakers that are too small to do so. The subwoofer is typically placed along the front wall of the listening room in either the
right or left corner. Placement can dramatically affect the performance of this
speaker. Consult your subwoofer owner’s manual or the manufacturer for
assistance in set-up and placement of this speaker.
17
L R
SL SR
SBL
SBR
C
S
S
SL
TV
L
C
R
SR
SBL
SBR
Page 18

SYSTEM SETUP
The Stage One Setup Menu is a quick and easy step-by-step guide to configuring your system. You can access and navigate the Setup Menu from the remote
control or by using the Stage Manager and Enter button on the front panel.
When you complete a setup item, the system will automatically advance to the
next selection until setup is complete. It will then revert to the initial menu
.
Remote Control System Setup
With the ProntoNEO, select the Setup button to enter the Setup Menu. The Up and
Down buttons change the currently selected menu or option and the Left and Right
buttons change the setting. Use the OK button to enter or exit a particular menu.
Front-Panel System Setup
Although most of the instructions below are primarily for operation from the
remote control, you can use the Stage Manager and the Enter button to set up
the Stage One completely from the front panel. Press the Enter button to enter
and exit the Setup Menu. Turn the Stage Manager knob to the left or right to
make choices or adjustments in the selected menu. Press the Stage Manager
knob to enter a particular menu. When applicable, each subsequent press of
the Stage Manager will advance to the next channel or parameter. Press the
Enter button to exit a menu.
SETUP MENU
Press the Setup button on the remote or the Enter button on the front panel to
begin the setup procedure.
SPEAKER CONFIGURATION
The Speaker Configuration menu enables you to adjust the bass management
of your system. Press the remote OK button or front-panel Stage Manager to
enter the Speaker Configuration menu.
Front Speakers
Use the Left and Right buttons on the remote control or Stage Manager knob
to configure the front left and right front speakers as Large or Small. Select
Small (THX) when the front left and right speakers have limited bass response
or if you simply want the bass from all channels to go to a subwoofer. Select
Large for full low-frequency output to the front left and right speakers. The
default THX setting for the front left and right loudspeakers is Small, which
reroutes bass below the crossover frequency to the subwoofer output. (The
crossover frequency can be adjusted in a subsequent menu.) Once you have
selected the correct speaker designation, press the Up button or the Stage
Manager to move to Center Speaker configuration.
Center Speaker
The center speaker can be configured as Large, Small (THX), or None. If you
select Small, the Stage One will reroute bass below the crossover frequency
from the center channel to the subwoofer output if there is a subwoofer in the
system; if there is no subwoofer and the front left and right speakers are
configured as Large, bass from the center channel will be split between the
front left and right speakers. If you do not have a center speaker, select None,
which will split the center-channel output between the front left and right
speakers. The default THX setting for the center channel is Small. Use the
remote’s Left and Right buttons or the Stage Manager knob to select the
desired setting. Then press the Up button on the remote control or the Stage
Manager on the front panel to move to Surround Speaker configuration.
Surround Speakers
The Stage One gives you three choices for number of surround speakers—None,
One, or Two—and two choices for type—Large or Small (THX). If you select Large,
the surround speakers will receive full-range signals. Selecting Small will redirect
bass in the surround channels below the crossover frequency to the subwoofer output if there is a subwoofer in the system; if there isn’t a subwoofer, bass will be split
between the front left and right speakers if they are configured as Large. The
default THX setting for the surround speakers is 2 Small. Use the Left and Right
buttons on the remote control or the Stage Manager on the front panel to select the
Surround Speakers setting. Once you have chosen the correct speaker designation, press the Up button on the remote control or the Stage Manager knob on the
front panel to move to Surround Back Speaker configuration.
Surround Back Speakers
If you select None in surround speaker configuration, the Stage One will automatically set the surround back speaker configuration to None. If you have both
surround and surround back speakers, your only choice for this setting will be to
choose the quantity–None, One or Two–as the size configuration will be set the
same as that of the surround speakers. If your surround speakers are set to
Large, you should make sure your surround back speakers can handle a
full-range signal as well. If they cannot, you should set the surround speakers
size to Small so that the bass for all of these speakers is redirected to the subwoofer. Use the Left and Right buttons on the remote or the Stage Manager knob
to select the correct surround back speaker setting. Then press the up button on
the remote or the Stage Manager knob to move to Subwoofer configuration.
Subwoofer
There are three options for the subwoofer setting—No, Yes, and Ultra2. If your
system does not have a subwoofer, choose No. If it has a THX Ultra2-certified
subwoofer or a subwoofer that is capable of reproducing frequencies down to
20Hz, choose Ultra2. If it has a subwoofer that is not THX Ultra2 certified and
not capable of reproducing frequencies down to 20Hz, choose Yes. The subwoofer will reproduce the low-frequency effects (LFE) channel of Dolby Digital
and DTS soundtracks as well as any bass rerouted from speakers designated
as Small. A subwoofer signal is also created during Stereo and Pro Logic II
playback. Use the Left and Right buttons on the remote control or the Stage
Manager knob on the front panel to select the correct subwoofer setting. Then
press the OK button on the remote or the front-panel Enter button to exit the
Speaker Configuration menu and continue to the Level Settings menu.
STAGE ONE
THX SURROUND PREAMPLIFIER
18
Page 19

19
LEVEL SETTINGS
The most accurate method for setting the relative levels of the speakers is to
use the Stage One’s calibration signal in conjunction with a sound-pressure
level (SPL) meter. The Level Settings menu will begin with the test signal set
at a predetermined output level. THX suggests that the output of each channel be set to 75dB, read from the SPL meter at the listening position. (The
meter should be set to slow response and C-weighting, with the microphone
at seated ear height and pointed toward the ceiling. A camera tripod can be
helpful for this purpose.) If you do not use an SPL meter, set the levels by ear
so that the calibration signal sounds equally loud through all the speakers
except the subwoofer. Because our ears are much less sensitive at low frequencies than at middle ones, setting the subwoofer to an audibly equal level
on the test signal will make it too loud on program material. If you must set
levels by ear, adjust the subwoofer level for a natural tonal balance on familiar
music recordings that contain substantial bass. The test signal will either
rotate from speaker to speaker at two-second intervals or stay locked to the
selected speaker, depending on the setting of the Scroll Test Tones menu in
the Advanced Menus. (See "Advanced Menus.") The test signal and level-setting options will be available only for speakers selected as present in the
Speaker Configuration menu.
Press the OK button on the remote control or the front-panel Stage Manager
to enter the Level Settings menu.
Front Left
Press the Left and Right buttons on the remote or turn the front-panel Stage
Manager knob to adjust the level of the front left speaker to 75dB on the SPL
meter. Press the Up button on the remote or the front-panel Stage Manager to
proceed to center channel level setting.
Center
Press the Left and Right buttons on the remote or turn the Stage Manager
knob to adjust the level of the center speaker (if present) to 75dB. Press the
Up button on the remote or the front-panel Stage Manager to proceed to front
right channel level setting.
Front Right
Press the Left and Right buttons on the remote or turn the front-panel Stage
Manager knob to adjust the level of the front right speaker to 75dB. Press the
Up button on the remote or the front-panel Stage Manager to proceed to surround right channel level setting.
Surround Right
Press the Left and Right buttons on the remote or turn the front-panel Stage
Manager knob to adjust the level of the surround right speaker (if present) to
75dB. Press the Up button on the remote or the Stage Manager to proceed to
surround back right channel level setting.
Surround Back Right
Press the Left and Right buttons on the remote or turn the front-panel Stage
Manager knob to adjust the level of the surround back right speaker (if present) to 75dB. Press the Up button on the remote or the Stage Manager to proceed to surround back left channel level setting.
Surround Back Left
Press the Left and Right buttons on the remote or turn the front-panel Stage
Manager knob to adjust the level of the surround back left speaker (if present)
to 75dB. Press the Up button on the remote or the Stage Manager to proceed
to surround left channel level setting.
Surround Left
Press the Left and Right buttons on the remote or turn the front-panel Stage
Manager knob to adjust the level of the surround left speaker (if present) to
75dB. Press the Up button on the remote or the Stage Manager to proceed to
subwoofer level setting.
Subwoofer
Press the Left and Right buttons on the remote or turn the front-panel Stage
Manager knob to adjust the level of the subwoofer (if present) to 75dB. Press
the OK button on the remote or the Enter button on the front panel to exit the
Level Setting menu and proceed to the Speaker Distances menu.
Page 20

20
SPEAKER DISTANCES
In the Speaker Distances menu, you will enter the distance from each speaker
to the listening position. This enables the Stage One’s DSP engine to set
internal delays for time alignment of the speakers in the system to within
1/12th of a millisecond. Only speakers listed as present in the Speaker
Configuration menu will appear in this menu.
Press the OK on the remote button or the front-panel Stage Manager knob to
enter the Speaker Distances menu.
Front Left
Use the Left and Right buttons on the remote or turn the front-panel Stage
Manager knob to set the distance measured from the front left speaker to the
listening position. Press the Up button on the remote or the Stage Manager
knob to advance to distance setting for the center speaker (if present).
Center
Use the Left and Right buttons on the remote or turn the front-panel Stage
Manager knob to set the distance measured from the center speaker (if present) to the listening position. Press the Up button on the remote or the Stage
Manager knob to advance to distance setting for the front right speaker.
Front Right
Use the Left and Right buttons on the remote or turn the front-panel Stage
Manager knob to set the distance measured from the front right speaker to
the listening position. Press the Up button on the remote or the Stage
Manager knob to advance to distance setting for the right surround speaker
(if present).
Surround Right
Use the Left and Right buttons on the remote or turn the front-panel Stage
Manager knob to set the distance measured from the right surround speaker
(if present) to the listening position. Press the Up button on the remote or the
Stage Manager knob to advance distance setting for the surround back right
speaker (if present).
Surround Back Right
Use the Left and Right buttons on the remote or turn the front-panel Stage
Manager knob to set the distance measured from the surround back right
speaker (if present) to the listening position. Press the Up button on the
remote or the Stage Manager knob to advance to distance setting for the surround back left speaker (if present).
Surround Back Left
Use the Left and Right buttons on the remote or turn the front-panel Stage
Manager knob to set the distance measured from the surround back left
speaker (if present) to the listening position. Press the Up button on the
remote or the Stage Manager knob to advance to distance setting for the surround left speaker (if present).
Surround Left
Use the Left and Right buttons on the remote or turn the front-panel Stage
Manager knob to set the distance measured from the left surround speaker to
the listening position. Press the Up button on the remote or the Stage
Manager knob to advance to distance setting for the Subwoofer (if present).
Subwoofer
Use the Left and Right buttons on the remote or turn the front-panel Stage
Manager knob to set the distance measured from the subwoofer (if present) to
the listening position. Press the OK button on the remote or the Stage
Manager knob to exit the Speaker Distances menu and proceed to the THX
Setup menu.
STAGE ONE
THX SURROUND PREAMPLIFIER
Page 21

21
THX SETUP
There are a number of options that you can set that will be default options
when THX mode is selected. Press the OK button on the remote or the frontpanel Stage Manager knob to enter the THX Setup menu.
Boundary-Gain Compensation
If the Subwoofer is set to Ultra2 in the Speaker Configuration menu, indicating
that your subwoofer is THX Ultra2-certified or capable of reproducing frequencies down to 20Hz, the Boundary-Gain Compensation menu will be available.
When such a subwoofer is placed close to one or more room boundaries,
such as the floor and a wall, very deep bass can be exaggerated by boundary
reinforcement. Setting the Boundary Gain Compensation to On applies a filter
that will compensate for excessive bass resulting from boundary gain. Press
OK on the remote control or the front-panel Stage Manager knob to enter the
Boundary Gain Compensation Menu.
Press the Left or Right button on the remote or turn the front-panel Stage
Manager knob to adjust to the appropriate setting. Press the OK button on the
remote control or the front-panel Enter button or Stage Manager knob to exit
the menu.
Advanced Speaker Array
This menu will be available only if you have indicated the presence of surround back speakers in the Speaker Configuration menu. You use the
Advanced Speaker Array menu to set the distance between the surround back
speakers. Options are LESS THAN 12", 12" TO 48", and GREATER THAN
48". You must set this distance correctly to ensure proper operation of the
Ultra2 Cinema and MusicMode post-processing modes. The default setting is
LESS THAN 12". Press OK on the remote control or the front-panel Stage
Manager knob to enter the Advanced Speaker Array menu.
Press the Left or Right button on the remote or turn the front-panel Stage
Manager knob to select the appropriate setting. Press the OK button on the
remote control or the front-panel Enter button or Stage Manager knob to exit
the menu. See also the ASA description in the THX portion of the Mode section of this manual.
Surround EX Mode
This menu will be available only if you have indicated the presence of surround back speakers in the Speaker Configuration menu. The Surround EX
Mode menu enables you to select the operating mode for THX Surround EX
processing. Available options are Auto, On, and Off. In the Auto mode, THX
Surround EX processing will engage when your system contains both surround and surround back speakers, the surround channels in the soundtrack
are stereo, and the Dolby Digital bitstream contains a flag indicating that the
soundtrack is Surround EX-encoded. The On mode differs only in that it
forces THX Surround EX processing even when the bitstream does not contain the Surround EX flag. The Off mode turns THX Surround EX processing
off. The default setting for the THX Surround EX mode is Auto. Press OK on
the remote control or the front-panel Stage Manager knob to enter the
Surround EX Mode menu.
Press the Left or Right button on the remote or turn the front-panel Stage
Manager knob to adjust to the appropriate setting. Press the OK button on the
remote control or the front-panel Enter button or Stage Manager knob to exit
the menu.
ASA Mode
This menu will be available only if the system is set up in the Speaker
Configuration menu to utilize Surround Back speakers. It enables you to
select the operating mode for the Advanced Speaker Array post-processing.
Available options for the Advanced Speaker Array mode are Ultra2 Cinema,
THX MusicMode, and Off. Ultra2 Cinema mode is most appropriate for movie
soundtracks that are not Surround EX-encoded, while MusicMode is better for
multi-channel music sources. The default setting is Ultra2 Cinema. Press OK
on the remote control or the front-panel Stage Manager knob to enter the ASA
Mode menu.
Press the Left or Right button on the remote or turn the front-panel Stage
Manager knob to adjust to the appropriate setting. Press the OK button on the
remote control or the front-panel Enter button or Stage Manager knob to exit
the menu. See also the ASA description in the THX portion of the Mode section of this manual.
Re-Equalization
The Re-Equalization circuit adjusts frequency response to make movie
soundtracks mixed for a theater environment sound correctly balanced in the
smaller space of a typical home theater. The default setting for the ReEqualization circuit is ON. Re-Equalization can be turned off for source
material that would not benefit from such processing. If Re-Equalization is
turned to OFF, the next time the unit is powered on, it will return to the default
ON setting. Press OK on the remote control or the front-panel Stage Manager
knob to enter the Re-Equalization Menu.
Press the Left or Right button on the remote or turn the front-panel Stage
Manager knob to adjust to the appropriate setting. Press the OK button on the
remote control or the front-panel Enter button or Stage Manager knob to exit
the menu.
Page 22

THX On/Off
This menu allows you to turn off all of the THX functions on the Stage One.
This would prevent any THX post-processing from taking place on any signals. The default setting for the THX circuit is ON. If THX is turned to OFF, the
next time the unit is powered on, it will return to the default ON setting. Press
OK on the remote control or the front-panel Stage Manager knob to enter the
THX Menu.
Press the Left or Right button on the remote or turn the front-panel Stage
Manager knob to adjust to the appropriate setting. Press the OK button on the
remote control or the front-panel Enter button or Stage Manager knob to exit
the menu.
Crossover Setup
You can choose from twenty different crossover frequencies, in 5Hz increments from 25Hz to 120Hz. This selects the frequency below which the highpass crossover filter will redirect bass from channels with speakers designated as Small and above which the low-pass filter will remove higher frequencies from the subwoofer output. The default crossover setting is 80Hz (THX).
Press OK on the remote control or the front-panel Stage Manager knob to
enter the Crossover Setup Menu.
Press the Left or Right button on the remote or turn the front-panel Stage
Manager knob to adjust to the desired setting. Press the OK button on the
remote control or the front-panel Enter button or Stage Manager knob to exit
the menu.
SETUP CONCLUSION
This completes the basic set-up of the Stage One. The display should now
again read “SETUP / Speaker Configuration”. Press the Setup button on the
remote control or the front-panel Enter button to exit the setup menu, or just
wait five seconds for the menu to time out and exit on its own. If you press the
front-panel Enter button, you will see a second menu appear called “Advanced
Menus.” It is not necessary to enter this section at this time. You can press the
front-panel Enter button again to exit the Advanced Menus and return to normal operation. If you want to enter the Advanced Menus, please see the
“Advanced Menus” section of this manual. The Advanced Menus contain features not required for daily operation, but items that can be adjusted to further
tailor the Stage One to your particular system and taste.
GENERAL OPERATION
INPUT SELECTION
You can choose the input from the remote control or the front panel. Analog
audio, digital audio, and video are normally selected together for the same
source. (Video can be switched separately: see "Advanced Features.") The
inputs are labeled for convenience only. Any line-level analog output or
S/PDIF digital output can be connected to any matching input. (Dolby Digital
playback from a laserdisc player requires the use of an external RF demodulator. Playback from a turntable requires the use of an external phono preamplifier.)
AUTOMATIC FORMAT DETECTION
When you select an input, the processor will search for a digital signal, and if
it finds one, it will determine the format and switch to the proper mode. If it
does not find a digital signal from the source, the processor will default to the
analog input. The Stage One will automatically switch to the digital input for
the selected source when a digital signal appears, unless you have specifically chosen the analog input. (Pressing the Analog button on the remote control’s Modes page will force the Stage One to use the analog input. Pressing
the Digital button on the Modes page will lock the Stage One onto the digital
input, even if no digital signal is present.) The Stage One will also automatically select discrete surround formats such as DTS and Dolby Digital when it
detects these bitstreams. If the Stage One detects a PCM digital bitstream or
only an analog signal, it will use the decoding method last selected for that
particular input.
VOLUME ADJUSTMENT BY SOURCE
Individual volume settings are saved for each source input. When you select
an input, the Stage One will adjust itself to the corresponding stored volume
level. If the previous volume level of the input was set to above the –20dB
level, the volume will default to –20dB.
ON-THE-FLY ADJUSTMENTS
In multi-channel modes, you can adjust the center channel level, subwoofer
level, and front/rear balance on-the-fly by pressing the appropriate button in
the remote control’s On-the-Fly page. In stereo mode, you can adjust left/right
balance and subwoofer level on-the-fly. (Use the Up and Down buttons on the
remote to adjust front/rear balance and the Left and Right buttons to adjust
left/right balance.) These adjustments take effect immediately, but are not
saved into memory. The next time the mode is selected, the settings will
revert to their stored defaults. Need for continual adjustments of these settings while in a particular mode may indicate that the saved channel balance
settings are not optimal.
STEREO DIRECT
Pressing the Direct button on the remote control’s Modes page will put the
Stage One into Stereo Direct mode. In Stereo Direct, analog input signals
bypass the A/D converter and the DSP module, going instead directly to an
audiophile-quality two-channel analog preamplifier section. Analog sources
such as tape decks, the built-in tuner, phono preamplifiers, or the analog outputs from an external DAC can be run in the Stereo Direct mode for maximum
stereo performance. You can designate any analog input as a Direct analog
input. When the Stage One is placed into the Stereo Direct mode, this
becomes the default mode for the selected analog input until you choose a
different mode. You can assign separate level settings for the Stereo Direct
mode by entering Setup (See "Advanced Features.") The subwoofer, if one is
STAGE ONE
THX SURROUND PREAMPLIFIER
22
Page 23

present, is active in Stereo Direct mode; you can turn it off by lowering its
channel volume to below –10dB.
8-CHANNEL ANALOG INPUT
The Stage One provides an 8-channel analog input for use with a DVD player
that has a built-in surround decoder or with a DVD-Audio or SACD player. It
also allows easy adaptation to any new surround formats that might appear in
the future. Pressing the 8 Ch In button on the remote will activate this input for
the audio signal for the currently selected source. This works for any external
source input. Separate level adjustments are available for the 8-channel analog input, accessible through the Setup Menu. (See “Advanced Features.”)
STAGE ONE MODES
The Stage One has numerous processing modes to accommodate various
types of signals and playback requirements.
Stereo
The Stereo mode can be applied to analog and digital PCM signals, passing
them along unaltered to the front left and right speakers and creating a subwoofer output as well. Pressing the Stereo button on the remote control’s
Modes page will set the Stereo mode as the default for the currently selected
source input. (See also the Dolby Digital and “DTS.”)
Pro Logic II
Pressing the PLII button on the remote control’s Modes page will apply Dolby
Pro Logic II processing to any two-channel audio input signal. Five Pro Logic
II modes can be selected from the Pro Logic II Modes page (shown below).
Any time you choose a Pro Logic II mode, it becomes the default Pro Logic II
mode for the currently selected source input. (See “Dolby Digital” and “DTS”
sections.)
Movie Mode
The Movie mode is for use with stereo television shows and all programs
encoded in Dolby Surround. The result is enhanced soundfield directionality
that approaches the quality of discrete 5.1-channel sound.
Music Mode
The Music mode is for use with any stereo music recordings, and provides
a wide and deep sound space. The Music mode includes controls that
allow the sound to be tailored to individual listening tastes.
Center Width
This control allows center-channel sounds to be positioned between the
center speaker and the left/right speakers over a range of eight steps.
Step "3" uses a combination of all three front speakers to give the best
vocal imaging and most seamless soundstage presentation, and is rec-
ommended for most recordings. Step "0" places all center sound in the
center speaker. Step "7" places all center sound equally in the left/right
speakers, just as in conventional stereo.
Dimension
This control allows the user to gradually adjust the soundfield either
towards the front or the rear. This can be useful to help achieve the
desired balance from all of the speakers with certain recordings that may
contain either too much or too little spatial effect. Step "0" is the recom-
mended setting, which has no effect on the sound. Steps 1, 2, and 3
gradually move the sound forward, and steps –1, -2, and –3 move the
sound towards the surrounds.
Panorama Mode
The Panorama mode is the same as Music mode but with additional processing applied to extend the front stereo image to include the surround
speakers for a "wraparound" effect with side-wall imaging. It is particularly effective for recordings that have strong left- or right-channel elements
in the mix, as these are detected and accentuated by the Panorama
process. The Center Width and Dimension controls can be adjusted in
the Panorama mode just as in the standard Music mode.
Matrix Mode
The Matrix mode is useful to produce surround for mono soundtracks or
television programs. Conventional surround processing may not have a
pleasing effect on such soundtracks, or only result in output from the
center channel.
Pro Logic Mode
This mode emulates the original Dolby Pro Logic decoding algorithm.
Club
The Club mode simulates a small venue with just a moderate amount of
reverb, to ensure that clarity is not lost. This mode is suitable for most types
of music. (See “Dolby Digital” and “DTS.”)
Party
The Party mode converts the incoming stereo signal to mono and reproduces
it through all five speakers. This mode is suitable for most types of music
(See “Dolby Digital” and “DTS.”)
5 Channel Stereo
The 5-Channel Stereo mode converts the incoming stereo signal to a
5-channel signal. It reproduces the stereo signal on both the front and rear
speakers (with a slight delay on the rears) and a summed stereo signal for the
center channel. This mode is suitable for most types of music. (See “Dolby
Digital” and “DTS.”)
DTS Neo:6
DTS Neo:6 provides up to seven full band channels of matrix decoding from
stereo matrix material. Neo:6 technology allows various sound elements within a channel or channels to be steered separately, and in a way which follows
naturally from the original presentation. Neo:6 also offers a music mode to
expand stereo non-matrix recordings into the five or seven channel layout in a
way which does not diminish the subtlety and integrity of the original stereo
recording.
Mono
The mono mode downmixes the input signal to a single channel and reproduces it through the center speaker. If the system does not have a center
speaker, the downmixed signal is reproduced equally through the left and right
front speakers.
23
Page 24

Dolby Digital
A Dolby Digital signal can contain anywhere from one to 5.1 channels of perceptually coded audio. (The “.1” indicates a limited-bandwidth, bass-only
channel called the low-frequency effects, or LFE, channel.) A single DVD can
contain multiple soundtracks having varying numbers of channels. The Stage
One can apply numerous forms of post-processing to a Dolby Digital 2.0 signal:
Stereo
Pressing the Stereo button on the remote while playing a Dolby Digital
2.0 signal turns off all post-processing and sends the signal to the front left
and right speakers. This sets the default post-processing mode for Dolby
Digital 2.0 signals to off.
Dolby Pro Logic II
Because most two-channel Dolby Digital soundtracks are Dolby Surroundencoded, Dolby Pro Logic II is the factory default post-processing mode for
Dolby Digital 2.0 signals. Pressing the PLII button on the remote control
when playing a Dolby Digital 2.0 soundtrack will turn on Dolby Pro Logic II
decoding and make it the default post-processing mode for Dolby Digital
2.0 signals. You can select the particular Pro Logic II sub-mode from the
Pro Logic Modes page on the remote; it will then become the default Dolby
Pro Logic II decoding mode for the selected input.
5-Channel Stereo
The Stage One can apply its 5-Channel Stereo processing to Dolby Digital
2.0 signals. This processing will only take effect with signals that are not
flagged as surround encoded, although the display will still read that 5Channel Stereo processing is taking place.
Party
The Stage One can apply its Party mode processing to Dolby Digital 2.0
signals. This processing will only take effect with signals that are not
flagged as surround encoded, although the display will still read that Party
mode processing is taking place.
Club
The Stage One can apply its Club processing to Dolby Digital 2.0 signals.
This processing will only take effect with signals that are not flagged as surround-encoded, although the display will still read that Club processing is
taking place.
DTS Neo:6
The Stage One can apply DTS Neo:6 processing to Dolby Digital
2.0 signals. This processing will only take effect with signals that are not
flagged as surround-encoded, although the display will still read that DTS
Neo:6 processing is taking place.
Mono
Pressing the Mono button on the remote will cause the Stage One to downmix a Dolby Digital signal to mono and send it to the center speaker if one
is present. If the system does not have a center speaker, the mono signal
will be reproduced equally by the left and right front speakers.
THX Surround EX
Dolby Digital EX soundtracks contain a surround back channel matrix
encoded into the two primary surround channels. The Stage One can
extract and reproduce this extra channel when surround back speakers are
present in the system. These soundtracks are backwards-compatible and
can be played on a system containing any number of speakers, but to
achieve the full effect you must have the full complement of speakers. The
Stage One will automatically detect the presence of a Dolby Digital bitstream and will decode the signal appropriately for the speaker configuration in use.
If you go from the Adjustments page on the remote control to the Dolby
Digital page, you can select the amount of dynamic range compression that
is applied to a Dolby Digital soundtrack in four steps: Off, Low, Medium,
and Night Mode. The Off setting disables the compression feature.
You can make the Stage One downmix any Dolby Digital soundtrack to
stereo or mono by pressing the corresponding button on the remote control’s Modes page.
DTS
A DTS signal can contain anywhere from one to 5.1 channels of perceptually
coded audio. (The ".1" indicates a limited-bandwidth, bass-only channel called
the low-frequency effects, or LFE, channel.) A single DVD can contain multiple
soundtracks having varying numbers of channels.The Stage One can also
apply post-processing to DTS 2.0 signals. The following post-processing
modes are available:
Stereo
Pressing the Stereo button on the remote while playing a DTS 2.0 soundtrack turns off all post-processing and sends the signal to the front left and
right speakers.
Pro Logic II
Pressing the PLII button on the remote control when playing a DTS 2.0
soundtrack will turn on Dolby Pro Logic II decoding. You can select the
particular Pro Logic II sub-mode from the Pro Logic Modes page on the
remote; it will then become the default Dolby Pro Logic II decoding mode
for the currently selected input.
5-Channel Stereo
The Stage One can apply its 5-channel stereo processing to DTS 2.0
signals. This processing will only take effect with signals that are not
flagged as surround encoded, although the display will still read that
5-Channel Stereo processing is taking place.
Party
The Stage One can apply its Party Mode processing to DTS 2.0 signals.
This processing will only take effect with signals that are not flagged as
surround encoded, although the display will still read that Party mode
processing is taking place.
Club
The Stage One can apply its Club processing to DTS 2.0 signals. This
processing will only take effect with signals that are not flagged as surround
encoded, although the display will still read that Club processing is taking
place.
DTS Neo:6
The Stage One can apply DTS Neo:6 processing to DTS 2.0 signals. This
processing will only take effect with signals that are not flagged as
surround-encoded, although the display will still read that DTS Neo:6
processing is taking place.
STAGE ONE
THX SURROUND PREAMPLIFIER
24
Page 25

25
Mono
Any DTS signal can be downmixed and reproduced by the center channel
of the system by pressing the Mono button. If the center channel is not
present, the mono signal will be reproduced by the left and right front
speakers. You can make the Stage One downmix any DTS soundtrack to
stereo or mono by pressing the corresponding button on the remote control’s Modes page.
DTS ES Matrix soundtracks contain a surround back channel matrix
encoded into the two primary surround channels. The Stage One can
extract and reproduce this extra channel when surround back speakers are
present in the system. These soundtracks are backwards-compatible and
can be played on a system containing any number of speakers, but to
achieve the full effect you must have the full complement of speakers. The
Stage One will automatically detect the presence of a DTS ES Matrix bitstream and will decode the signal appropriately for the speaker configuration in use.
DTS ES Discrete soundtracks contain a discrete surround back channel in
addition to the two primary surround channels. The Stage One can decode
and reproduce this extra channel when surround back speakers are present in the system. These soundtracks are backwards-compatible and can
be played on a system containing any number of speakers, but to achieve
the full effect you must have the full complement of speakers. The Stage
One will automatically detect the presence of a DTS ES Discrete bitstream
and will decode the signal appropriately for the speaker configuration in
use.
THX
The Stage One can apply THX post-processing to Dolby Digital, DTS, and Pro
Logic II decoding.
THX Cinema Processing
THX is an exclusive set of standards and technologies established by the
world-renowned film production company, Lucasfilm Ltd. THX grew from
George Lucas’ personal desire to make your experience of the film soundtrack, in both movie theaters and in your home theater, as faithful as possible
to what the director intended.
Movie soundtracks are mixed in special movie theaters called dubbing stages
and are designed to be played back in movie theaters with similar equipment
and conditions. This same soundtrack is then transferred directly onto
Laserdisc, VHS tape, DVD, etc., and is not changed for playback in a small
home theater environment.
THX engineers developed patented technologies to accurately translate the
sound from the movie theater environment into the home, correcting the tonal
and spatial errors that occur. On this product, when the THX indicator is on,
THX features are automatically added in Cinema modes (e.g. THX Cinema,
THX Surround).
Re-Equalization
The tonal balance of a film soundtrack will be excessively bright and harsh
when played back over audio equipment in the home because film soundtracks were designed to be played back in large movie theaters using very different professional equipment. Re-Equalization restores the correct tonal balance for watching a movie soundtrack in a small home environment.
Timbre-Matching
The human ear changes our perception of a sound depending on the direction
from which the sound is coming. In a movie theater, there is an array of surround speakers so that the surround information is all around you. In a home
theater, you use only two speakers located to the side of your head. The
Timbre Matching feature filters the information going to the surround speakers
so that they more closely match the tonal characteristics of the sound coming
from the front speakers. This ensures seamless panning between the front
and surround speakers.
Adaptive Decorrelation
In a movie theater, a large number of surround speakers help create an
enveloping surround sound experience, but in a home theater there are
usually only two speakers. This can make the surround speakers sound like
headphones that lack spaciousness and envelopment. The surround sounds
will also collapse into the closest speaker as you move away from the middle
seating position. Adaptive Decorrelation slightly changes one surround
channel’s time and phase relationship with respect to the other surround
channel. This expands the listening position and creates–with only two speakers–the same spacious surround experience as in a movie theater.
THX Ultra2
Before any home theater component can be THX Ultra2 certified, it must
incorporate all the features above and also pass a rigorous series of quality
and performance tests. Only then can a product feature the THX Ultra2 logo,
which is your guarantee that the Home Theater products you purchase will
give you superb performance for many years to come. THX Ultra2 requirements cover every aspect of the product including pre-amplifier performance
and operation, and hundreds of other parameters in both the digital and analog domain.
THX Surround EX
In a movie theater, film soundtracks that have been encoded with Dolby
Digital Surround EX technology are able to reproduce an extra channel, which
has been added during the mixing of the program. This channel, called
Surround Back, places sounds behind the listener in addition to the currently
available front left, front center, front right, surround right, surround left and
subwoofer channels. This additional channel provides the opportunity for more
detailed imaging behind the listener and brings more depth, specious
ambience and sound localization than ever before.
Movies that were created using the Dolby Digital Surround EX technology,
when released into the home consumer market may exhibit wording to that
effect on the packaging. A list of movies created using this technology can be
found on the Dolby web site at www.dolby.com. A list of available DVD
software titles encoded with this technology can be found at www.thx.com.
Only receiver and controller products bearing the THX Surround EX logo,
when in the THX Surround EX mode, faithfully reproduce this new technology
in the home.
This product may also engage the "THX Surround EX" mode during the playback of 5.1 channel material that is not Dolby Digital Surround EX encoded. In
such case the information delivered to the Surround back channel will be program dependent and may or may not be very pleasing depending on the particular soundtrack and the tastes of the individual listener.
Page 26

ASA (Advanced Speaker Array)
ASA is a proprietary THX technology, which processes the sound fed to 2 side
and 2 back surround speakers to provide the optimal surround sound experience. When you set up your home theater system using all eight speaker outputs (Left, Center, Right, Surround Right, Surround Back Right, Surround
Back Left, Surround Left and Subwoofer) placing the two Surround Back
speakers close together facing the front of the room will provide the largest
sweet spot. If for practical reasons you have to place the Surround Back
speakers apart, you will need to go to the Advanced Speaker Array Setup
Menu and choose the setting that most closely corresponds to the speaker
spacing, which will re-optimize the surround sound-field.
ASA is used in two new modes–THX Ultra2 Cinema and THX MusicMode.
THX Ultra2 Cinema Mode
THX Ultra2 Cinema mode plays 5.1 movies using all 8 speakers giving you
the best possible movie watching experience. In this mode, ASA processing
blends the side surround speakers and back surround speakers providing the
optimal mix of ambient and directional surround sounds.
DTS-ES (Matrix and 6.1 Discrete) and Dolby Digital Surround EX encoded
soundtracks will be automatically detected in Ultra2 Cinema mode if the
appropriate flag has been encoded.
Some Dolby Digital Surround EX soundtracks are missing the digital flag that
allows automatic switching. If you know that the movie that you are watching
is encoded in Surround EX, you can manually select the THX Surround EX
playback mode, otherwise THX Ultra2 Cinema mode will apply ASA processing to provide optimum replay.
THX MusicMode
For the replay of multi-channel music, the THX MusicMode should be selected. In this mode THX ASA processing is applied to the surround channels of
5.1 encoded music sources such at DTS, Dolby Digital and DVD-Audio to provide a wide, stable rear soundstage.
BGC (Boundary Gain Compensation)
If your chosen listening room layout (for practical or aesthetic reasons) results
in most of the listeners being close to the rear wall, the resulting bass level
can be sufficiently reinforced by the boundary that the overall sound quality
becomes ‘boomy’. THX Ultra2 receivers and controllers contain the BGC
(Boundary Gain Compensation) feature to provide an improved bass balance.
BGC can be selected by choosing ‘Yes’ from the ‘Boundary Gain
Compensation’ section of the THX setup menu.
AM/FM TUNER
The Stage One has a built-in AM/FM tuner. You can operate it via the remote
control’s Tuner page, which you can select from the Adjustments page. It
includes AM and FM buttons to select the reception band and, at the bottom
of the page, Up and Down tuning buttons for adjusting the station frequency.
The CH + and CH – buttons seek up and down to the next cleanly receivable
station. Ten presets are available for each band, selected with the buttons 1
through 10. Pressing and releasing a preset button will tune the radio to the
selected preset station. Pressing and holding a preset button for three seconds will store the currently tuned station to that preset.
You can also operate the tuner from the Stage One’s front panel. When the
Tuner is selected, use the Stage Manager to change stations. Press the
Stage Manager to enter the tuning mode. The currently selected band will
flash. Turn the knob clockwise to tune to FM, and counter clockwise to select
AM. Press the knob a second time to allow the tuning frequency to be
changed. Turn the knob clockwise to increase the frequency and turn it
counter-clockwise to decrease the frequency. Press the knob a third time to
exit the Tuning mode. The Stage Manager will automatically revert to Normal
mode after 5 seconds of inactivity.
FRONT-PANEL DISPLAY AND
LIGHTING
You can turn the front-panel display and input selection LEDs on and off from
the remote control’s Display page, which is accessible from the Adjustments
page. You can turn on, turn off, or dim the front-panel lighting from the Display
page or from the Advanced Menu. (See "Advanced Menu.")
ADVANCED FEATURES
Level Adjustments by Mode
Separate level adjustments are available for each mode. When you adjust
level settings in the Setup Menu, they apply to every mode. However, you can
customize the levels for particular modes by means of a separate option in
the Setup Menu called Levels. For example, if you are in the Pro Logic II
mode, pressing Advanced Setup on the remote, scrolling down, and selecting
the Pro Logic II Levels will enable you to make changes specifically to the
channel balances in the Pro Logic II mode. The channels used in a particular
mode will be the only ones available for adjustment. For example, while in the
Stereo mode, you can adjust only the front left, front right, and subwoofer levels. Pressing Advanced Setup again will exit the Levels menu and save the
mode-specific settings to memory. Pressing the Mute button while in the level
settings menu will exit the menu without saving the changes.
Bass Management
The Stage One enables you to adjust the crossover settings to get the most
out of your particular speakers. Separate settings are available for stereo listening versus all other modes. The bass-management system allows you to
choose from the following crossover frequencies: 25Hz to 120Hz in 5Hz increments.
To adjust the Bass Management settings, press the Setup button on the
remote control to enter the Setup menu, scroll down to the Speaker
Configuration menu, and hit the OK button to enter the Bass Management
Selections menu. For each speaker, you are given a choice of Large, Small,
or in some cases None. Selecting Small tells the Stage One to apply a highpass (low-cut) filter to the output channel feeding that speaker. The bass
below the selected crossover frequency will be diverted to the subwoofer or, if
there is no subwoofer, to those speakers in the system designated as Large.
Once you have specified each set of speakers in your system as Large or
Small, pressing the OK or Setup button a second time exits the Speaker
Configuration menu. Then scroll down to the Crossover Setup menu to adjust
the crossover frequency. The Stage One will use the crossover frequency you
select for all speakers designated as Small and for the low-pass (high-cut)
crossover filter in the subwoofer output. If your subwoofer has a built-in
crossover, turn it off or, if that is not possible, set it to the highest frequency
available.
STAGE ONE
THX SURROUND PREAMPLIFIER
26
Page 27

Separate Bass Management Settings
for Stereo
You can set up a separate bass-management scheme for Stereo mode,
including a different crossover frequency. While the Stage One is in Stereo
mode, enter the Advanced Menu and select the SpkrConfig STEREO menu.
Configure the speakers for Stereo mode as Large or Small. Now you can go
to the Crossover Setup menu to select a crossover frequency for Stereo
mode. This is useful if, for example, you want to run large front speakers fullrange for home theater listening but set a low crossover point for low-frequency fill from the subwoofer in stereo listening.
Analog Input Level
Separate input level adjustments are available for each analog input. You can
reach them from the Setup page on the remote control. Pressing the Input
Gain +/- will bring up the analog input level adjustment. Choose a dynamic
passage from the analog source and turn the analog input gain up until
Clipping is indicated in the top left-hand corner of the front-panel display. Turn
the gain down again in half-decibel steps until the clipping indicator goes off.
Separate Video Input Switching
The Stage One allows for separate selection of audio and video input
sources. A Separate Video Switching page is available from the remote control’s Adjustments page. Selecting any of the available inputs will switch to the
video signal for that input while leaving the audio input as previously selected.
System Lock
In certain situations it may be desirable to "lock" the system. Once you have
your Stage One set up the way you want it, you can prevent accidental alterations by locking it, which prevents permanent changes to channel balances
or the Advanced Menus. When locked, the Stage One will not let anyone into
the Setup or Advanced Menus. (On-the-fly level and balance adjustments are
still permitted, but these settings are not saved.)
To lock the Stage One (or unlock it if it is already locked), turn the preamp off.
Then press the front-panel Enter and Mute buttons simultaneously, and while
keeping these buttons depressed, press the Power button. This will toggle the
Stage One between Locked (indicated by a capital L in the front-panel display) and Unlocked (indicated by a capital U in the front panel-display) mode.
Once you have the processor in the correct mode, you can release all buttons. The mode indication will remain on the front panel display until you turn
the Stage One on again.
Front/Rear Balance
You can adjust front-to-rear balance temporarily by pressing the Up and Down
buttons on the remote. (This option is available only in modes that use the
surround channels.) Shifting the balance toward the surround channels using
the Down button will reduce the volume of the front channels. Moving the balance toward the front channels using the Up button will lower the volume of
the surround channels. This is a temporary adjustment, so the next time a
mode is loaded, the balance will be reset to the center position. If you find that
you must continually readjust the front-to-rear balance, it may indicate that
your default channel levels are not set properly.
Left/Right Balance
You can temporarily adjust the left/right balance in Stereo mode using the Left
and Right buttons on the remote control. Moving the Balance toward the left
will lower the volume of the right channel. Moving the Balance toward the right
will lower the volume of the left channel. This is a temporary adjustment, so
the next time a mode is loaded, the balance will be reset to the center position. If you find that you must constantly adjust the balance, it may indicate
that your default channel levels are not set properly.
ADVANCED MENUS
Enter the Advanced Menus by pressing the Advanced Menu button on the
remote. Use the Up and Down buttons to scroll through the menu list. Press
the OK button to enter the desired menu when it appears on the bottom line
of the front-panel display. Use the Left and Right buttons to adjust settings.
Once you have edited a particular menu setting, pressing Menu or the OK
button again will bring you back to the Advanced Menu selection screen, and
pressing Advanced Menu will exit the Advanced Menus. (The Advanced
Menus can also be accessed from the front panel by using the Stage
Manager and Enter button.)
Levels
The initial setup procedure defines a single channel balance for all modes.
Although this setting should be correct for most of the basic surround modes,
you can trim the balances individually for each mode from this menu. Once
set for a particular mode, customized channel levels will be loaded automatically whenever that mode is selected. It should be noted that changing levels
in this menu will only change the settings for that particular mode and will
not affect the levels for other modes as they were set in the initial setup
procedure.
Scroll Test Tones
The default setting is No, which will cause the calibration signal to stay in a
particular channel until you tell it to change. Setting this to Yes will cause the
calibration signal to rotate from channel to channel every two seconds when
you are in the Level Settings menu.
Test Tone OFF
The default setting is No. If you set this to Yes, there will be no calibration signals when you enter the Setup Mode. This enables you to use test signals
from an external source for channel balancing.
27
Page 28

AutoMute On Input
The default setting is Yes. The Stage One’s Auto Format Detection requires
that it read a flag from the incoming digital bitstream. This can cause a slight
delay in the detection of a standard PCM signal from a CD player. To eliminate the delay, change this setting to No. This may sometimes result in a
short burst of noise from the main speakers while the processor is determining the signal format.
Front-Panel Lighting
The default setting is On. This setting controls the front-panel blue cascade
lighting. Other available options are Off and Dim.
Reset System
The default setting is No. If you press the Right button on the remote control
to change this setting to Yes and then press the OK button and the Stage One
will revert to its factory default settings.
Reprogram System
The default setting is No. If an update is available for the Stage One, it can be
downloaded into the processor from a computer through the RS-232 port. See
the readme file included with the update for instructions on reprogramming the
system. If there is any question about the operation, you should have your
dealer perform it. Incorrect update procedure can render the processor inoperative.
STAGE ONE
THX SURROUND PREAMPLIFIER
28
Page 29

WARRANTY
U.S. and Canada
The Warranty below is valid only for sales to consumers in the United
States or Canada.
The manufacturer warrants this ARAGON product to be free from defects in
materials and workmanship (subject to the terms set forth below) for a period of two (2) years from the date of purchase. During the Warranty period,
the manufacturer will repair or replace (at the manufacturer’s option) this
product or any defective parts.
To obtain technical support and/or warranty service, you may either: (a) call
ARAGON at 1-866-781-7284 (toll free) or (b) contact the ARAGON authorized dealer from which you purchased this product. If you choose to call
ARAGON directly we strongly suggest that you choose the technical support option as the majority of customer problems can be solved over the
phone. If technical support is unable to solve the problem, they will advise
as to whether the preferred route to obtain warranty service is to return the
product to the ARAGON authorized dealer from which you purchased the
product or to return the product directly to the manufacturer, freight paid, for
repair. If returning the product you will need to ship this product in either its
original packaging or packaging affording an equal degree of protection.
Proof of purchase in the form of a bill of sale or receipted invoice, which is
evidence that this product is within the Warranty period, must be presented
or included to obtain Warranty service.
This Warranty is invalid if (a) the factory-applied serial number has been
altered or removed from this product or (b) this product was not purchased
from an ARAGON authorized dealer. You may call 1-866-781-7284 (choose
the ARAGON customer service option) to confirm that you have an unaltered serial number and/or you purchased from a ARAGON authorized
dealer.
This Warranty is only valid for the original purchaser and will automatically
terminate prior to expiration if this product is sold or otherwise transferred
to another party.
This Warranty does not cover cosmetic damage or damage due to misuse,
abuse, negligence, acts of God, accident, commercial use or modification
of, or to any part of, the product. This Warranty does not cover damage due
to improper operation, maintenance or installation, or attempted repair by
anyone other than the manufacturer or an ARAGON dealer which is authorized to do ARAGON warranty work. Any unauthorized repairs will void this
Warranty. This Warranty does not cover product sold AS IS or WITH ALL
FAULTS.
REPAIRS OR REPLACEMENTS AS PROVIDED UNDER THIS WARRANTY ARE THE EXCLUSIVE REMEDY OF THE CONSUMER. THE MANUFACTURER SHALL NOT BE LIABLE FOR ANY INCIDENTAL OR CONSEQUENTIAL DAMAGES FOR BREACH OF ANY EXPRESS OR IMPLIED
WARRANTY ON THIS PRODUCT. EXCEPT TO THE EXTENT PROHIBITED BY LAW, THIS WARRANTY IS EXCLUSIVE AND IN LIEU OF ALL
OTHER EXPRESS AND IMPLIED WARRANTIES WHATSOEVER,
INCLUDING BUT NOT LIMITED TO, THE WARRANTY OF MERCHANTABILITY AND FITNESS FOR A PRACTICAL PURPOSE.
Some states do not allow the exclusion or limitation of incidental or consequential damages or implied warranties so the above exclusions may not
apply to you. This Warranty gives you specific legal rights, and you may
have other rights, which vary from state to state.
Outside the U.S. and Canada
The warranty on this product if it is sold to a consumer outside of the
United States or Canada shall comply with applicable law and shall be the
sole responsibility of the distributor that supplied this product. To obtain any
applicable warranty service, please contact the dealer from which you purchased this product, or the distributor that supplied this product.
29
Page 30

30
STAGE ONE
THX SURROUND PREAMPLIFIER
Page 31

REGISTER ONLINE AT WWW.ARAGONELECTRONICS.COM!
For multiple purchases, please fill out only one warranty card.
Name:
Street Address:
City/State/Zip:
Home Phone:
Work Phone:
E-mail Address:
Would you like to receive the latest product updates and news via e-mail?
❑ Yes ❑No
Where did you purchase your Stage One THX Surround Preamplifier from?
Store name______________________________________________________State_________________
____
How did you hear about Aragon?
❑ Audio/Home Theater Magazine ❑ Other Magazine ❑ Radio
❑ Newspaper ❑ Television ❑ Trade Show ❑ Friend ❑ Retail Dealer ❑ Direct Mail
Have you purchased Aragon products before?
❑ Ye s ❑ No
If yes, what products?
Product Name(s):
What is your favorite type of music?
❑ Classical ❑ Jazz ❑ Soft Rock/Pop ❑ Hard Rock
❑ Country ❑ R&B/Soul ❑ Alternative ❑ Blues
Please tell us about you!
❑ Married ❑ Single ❑ Male ❑ Female
Age: ❑ Under 15 ❑ 15-17 ❑ 18-24 ❑ 25-35 ❑ 36-45 ❑ 46-55 ❑ 55-64 ❑ 65+
Annual Household Income:
❑ Under $25,000 ❑ $25-35,000 ❑ $35-50,000 ❑ $50-75,000 ❑ $75-100,000 ❑ $100,000+
CUT ALONG DOTTED LINE AND MAIL
Page 32

Make sure to return your warranty
card or register your preamplifier
online at www.aragonelectronics.com
so that we may keep you up-to-date
on new Aragon products and
promotions. As always, if you have
any questions, contact your local
authorized Aragon dealer.
For your records:
Stage One THX Surround Preamplifier
Date Purchased
Serial #
A KLIPSCH AUDIO TECHNOLOGIES BRAND
3502 WOODVIEW TRACE, SUITE 200
INDIANAPOLIS, IN 46268-1104
WWW.ARAGONELECTRONICS.COM
©2002 Klipsch Audio Technologies.
Aragon is a registered trademark of Klipsch Audio Technologies.
ARAGON
P. O . BOX 688
HOPE, AR 71802
Place
FIRST CLASS
Postage
Stamp Here
REV 1
.5M0602
 Loading...