

SYNERGY SERIES
S
C
FLAT
PANEL
TV
Optional
sub
L
R
IMPORTANT SAFETY INSTRUCTIONS
1. READ these instructions.
2. KEEP these instructions.
3. HEED all warnings.
4. FOLLOW all instructions.
5. DO NOT use this apparatus near water.
6. CLEAN ONLY with dry cloth.
7. DO NOT block any ventilation openings. Install in accordance with the manufacturer's
instructions.
8. DO NOT install near any heat sources such as radiators, heat registers, stoves, or other
apparatus (including amplifiers) that produce heat.
9. DO NOT defeat the safety purpose of the polarized or grounding type plug. A polarized plug
has two blades with one wider than the other.A grounding type plug has two blades and a
third grounding prong.The wider blade or the third prong are provided for your safety. If
the provided plug does not fit into your outlet, consult an electrician for replacement of the
obsolete outlet.
10. PROTECT the power cord from being walked on or pinched, particularly at plugs,
convenience receptacles, and the point where they exit from the apparatus.
11. ONLY USE attachments/accessories specified by the manufacturer.
12. USE only with a cart, stand, tripod, bracket,or table specified by the manufacturer, or sold
with the apparatus.When a cart is used,use caution when moving the cart/appara tus
combination to avoid injury from tip-over.
13. UNPLUG this apparatus during lightning storms or when unused for long periods of time.
14. REFER all servicing to qualified service personnel. Servicing is required when the apparatus
has been damaged in any way,such as power-supply cord or plug is damaged, liquid has
been spilled or objects have fallen into the apparatus, the apparatus has been exposed to
rain or moisture, does not operate normally,or has been dropped.
GRILLE
The speaker can be used with or without its grille in place.The g rille attaches magnetically;
you can remove the grille easily by pulling it forward and replace it simply by lining up its
edges with the those of the speaker cabinet.
The logo badge on the grille can be removed, rotated 90 degrees and replaced for proper orientation when using the SLX in a horizontal position.To remove the logo badge, simply push
the two pins on the rear of the logo badge together and push it out of its location on the grille.
To reinsert it,align the two pins with the hole in the grille and push the logo badge into place
(making sure the orientation of the logo badge is correct).
PLACEMENT
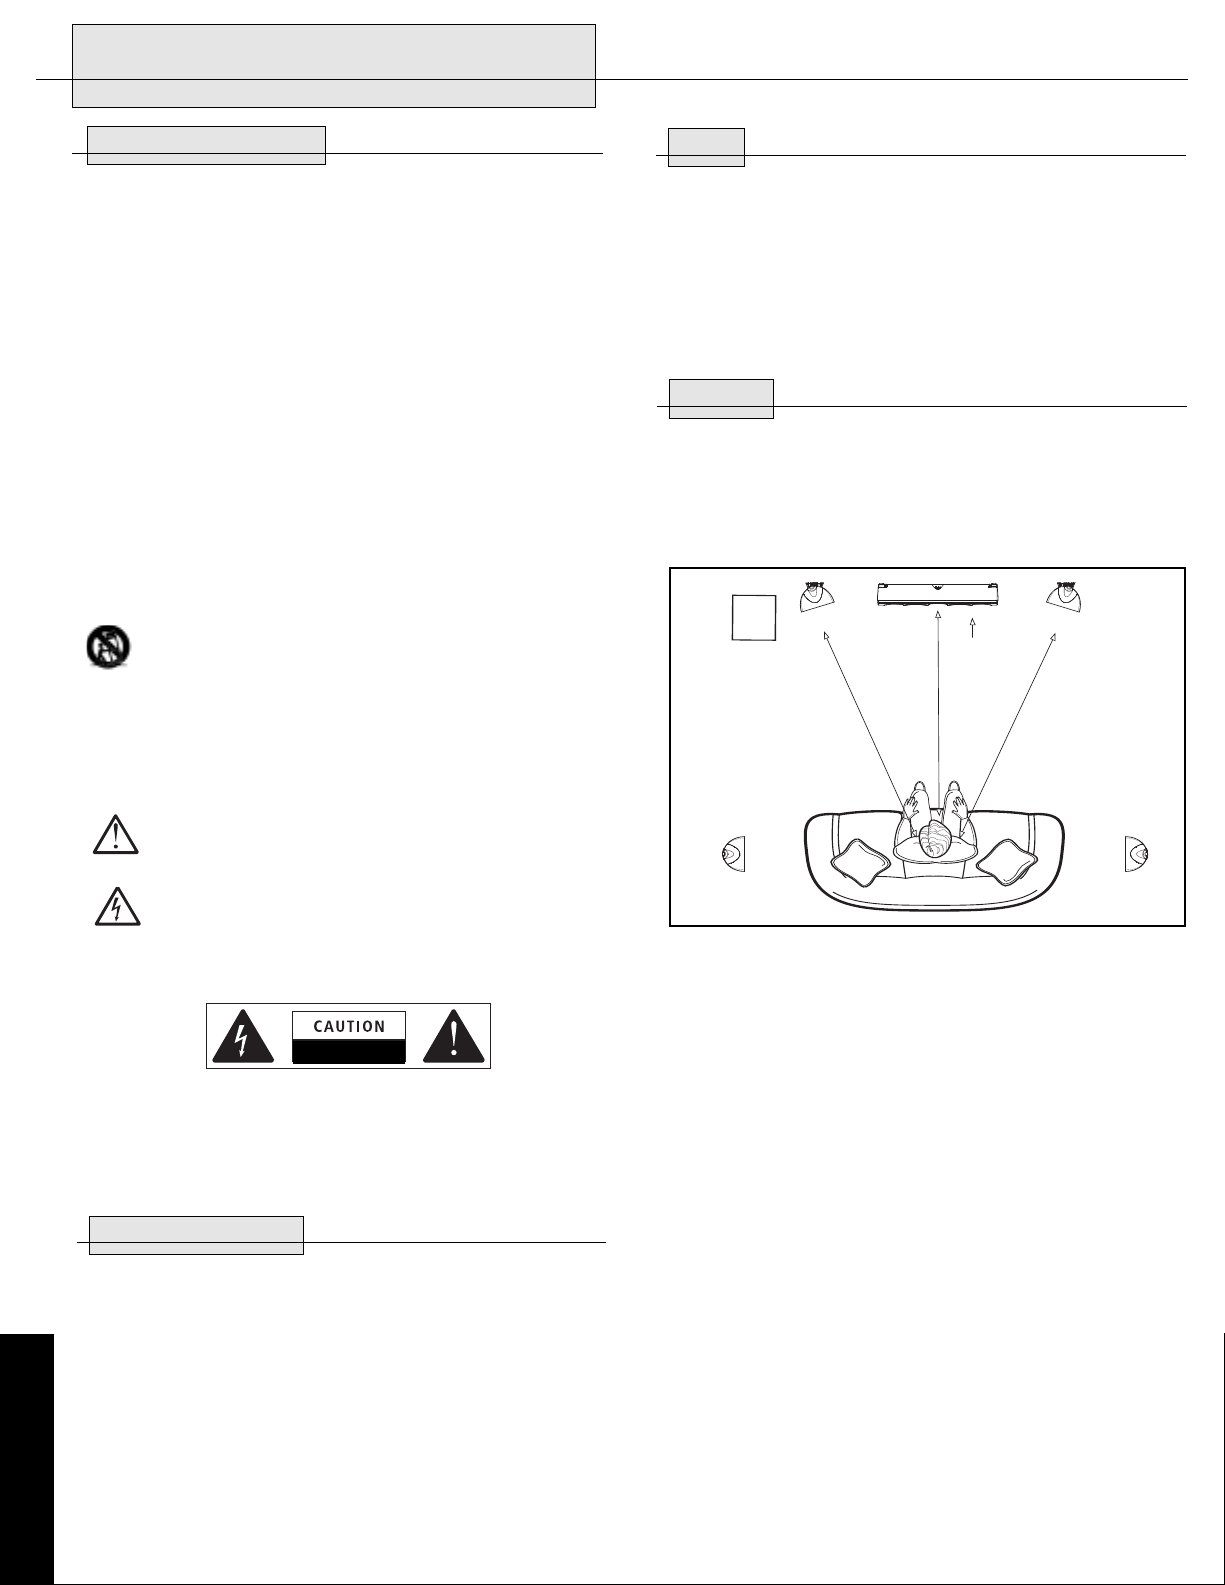
Your Synergy SLX speakers are designed for maximum flexibility and will perform well in a
wide variety of configurations. Figure 1 shows a typical home theater setup, with a centerchannel speaker (Synergy SLX) mounted below (or above) a flat panel tv,left and right front
speakers (Synergy SLX) flanking the screen, and another pair of speakers (Synergy SLX) to the
sides of the listening area for the main surrounds. Below are specific placement recommendations for each function.
ENGLISH
This symbol indicates that there are important operating and maintenance instructions
in the literature accompanying this unit.
This symbol indicates that dangerous voltage constituting a risk of electric shock is
present within this unit.
WARNING:To reduce the risk of fire or electrical shock,do not expose this apparatus to rain
or moisture.
RISK OF ELECTRIC SHOCK
DO NOT OPEN
WARNING:Voltages in this equipment are hazardous to life.No user-serviceable parts inside.
Refer all ser
vicing to qualified ser
vice personnel.
CAUTION: Changes or modifications not expressly approved by the manufacturer could void the
user’
s authority to opera
te this device.
ABOUT YOUR KLIPSCH PURCHASE
Thank you f
system,
research and development.
T
product tha
distortion,
detail and dynamics,
included
you.
music and movies f
or your purchase of Klipsch speakers.
you will hear the result of over 55 years of stringent engineering and class-leading
y—the guiding design f
echnolog
Like all Klipsch products,
or the first Klipschorn
t has followed. Horn-loading allows your speakers to deliver high sensitivity,low
t frequency response and wide dispersion,
la
f
the hallmarks of
“The Klipsch Sound.”
Warranty card or register online at www.klipsch.com so we are better able to serve
Again,
thank you f
or choosing Klipsch and we hope tha
y years.
or man
After reading this manual and connecting your
your speakers fea
®
developed in 1946 and f
which transla
ture Klipsch Horn-loaded
or ever
tes to unequaled power
Please be sure to fill out the
t your speakers bring life to your
y
,
Figure 1
Center-Channel Speaker:Center the speaker directly above or below your tv and mount it on
the wall (see wall mounting instructions).When using the supplied mounting bracket, each
Synergy SLX can be rotated 30° (15° in each direction) to obtain optimal directivity toward the
listening area.
Front Left and Right Speak
ers:
The front left and right speakers should be a
pproxima
tel
y in
line with your tv and equidistant from it.The distance from the tv is not critical, though wide
ving either speaker closer than
void ha
tion will tend to make the sound more spacious.
separa
ted ear height if tha
2 feet to a side wall.
Place them a
t sea
A
t is practical.When using the
supplied mounting bracket, each Synergy SLX can be rotated 30° (15° in each direction) to
obtain optimal directivity toward the listening area.
Left and Right Surround Speakers: Using Synergy SLX’s as surround speakers ensures an
or
acoustic and cosmetic ma
tch to the front left,
right and center speakers.
speakers employed as surround speakers is on or a
The best loca
gainst the walls to the sides of the sea
tion f
ting
area, anywhere from adjacent to the listening position to about 20º behind it. Mount them
bove the ear height of sea
a
the ceiling.
Aim them straight across the room or back slightl
ted listeners (5’-7’ high) but a
void placing them up a
y toward the rear wall f
gainst or on
or a more
diffuse sound or toward the listening position for a more direct sound.The design of the
t
y SLX allows g
Synerg
depart significantl
lexibility and good results can be achieved with configura
t f
rea
y from the ideal.
When using the supplied mounting bracket, each Synergy
tions tha
SLX can be rotated 30° (15° in each direction).
Surround Bac
k Speak
ers:
If your electronics support Dolb
ital EX,THX Surround EX, or
y Dig
DTS-ES 7.1 or 6.1-channel surround, you can place one or two speakers behind the seating
ve as surround back speakers.
area to ser
bove seated ear level. If you are using just one back surround speaker,it should be
tion is a
loca
As with the left and right surrounds,
the optimum
centered behind the listening area; if you are using two, they should be spaced fairly close
With this type of system,
.
together
adjacent to the sea
the regular left and right surrounds should be loca
ting area rather than behind it.
ted

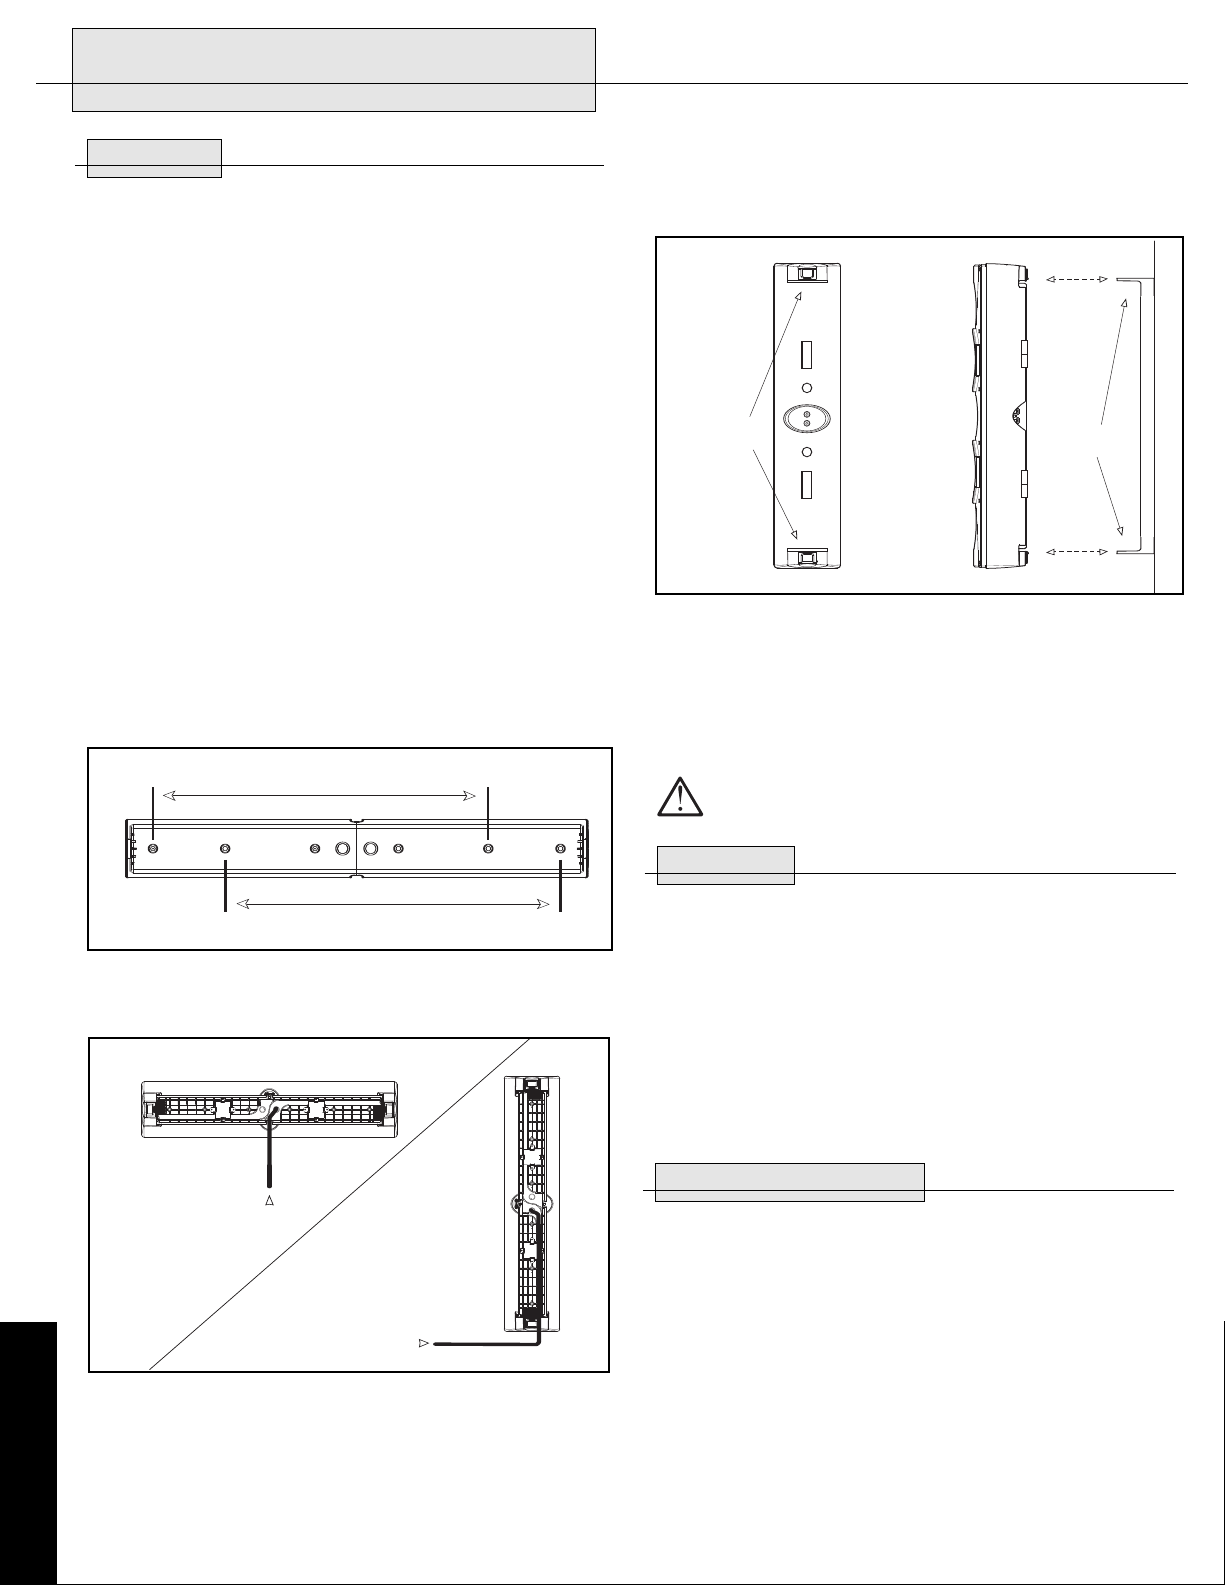
ALL MOUNTING
16"
16"
1
2
34
5
6
MOUNTING
SLOTS
WALL
BRACKETS
From Amplifier
From Amplifier
W
Each Synergy SLX speaker can be mounted vertically or horizontally.When mounted vertically,the
wall bracket can be aligned with a wall stud (in which case the supplied drywall anchors will not be
used) or simply attached to drywall (in which case the supplied dry wall anchors will be used). When
mounting the bracket horizontally,one of the two pairs of mounting holes shown in Figure 2 to be
16" apart (holes 1 and 5 or holes 2 and 6) can be aligned with wall studs that are sixteen inches
apart. Either of the two pairs can be used. Dry wall anchors and screws should then be used in the
remaining four attachment locations. If you do not wish to mount the bracket to wall studs, all six
drywall anchors and screws must be used to attach the bracket to the wall.
Figure 2
To install the Synergy SLX,follow these instructions:
1. Position the mounting bracket on the wall in the desired location and orientation (vertical
or horizontal).
2. Using the mounting bracket as a template, mark the six screw locations taking care to notice the
location of wall studs. (Wall studs can be used,if desired,as stated above.However,it is not
necessary to attach the SLX bracket to wall studs.) If used in the center channel position, make
sure that the bracket is level.
3. Remove the mounting bracket and install the necessary number of supplied drywall anchors into
the wall. (Drywall anchors are not necessary in the locations where the screw will attach to a
wall stud.)
4.Route speaker wire through the mounting bracket.Wire routing channels are incorporated into
the rear of the mounting bracket.Wire can enter at an y side of the bracket and will exit in the
center of the bracket directly behind the connections on the rear of the SLX as shown
in Figure 3.
Figure 4
8. Once the SLX is mounted, its angle can be fine tuned to obtain optimal directivity toward the
listening area.
CAUTION: DO NOT REMOVE THE MAGNETS ON THE REAR OF THE SPEAKER ENCLOSURE.
CAUTION: SYNERGY SLX SPEAKERS ARE NOT INTENDED FOR CEILING MOUNTING.
CONNECTIONS
Note: Proper connection of your speakers to your amplifier or receiver is vital to obtaining good
sound quality.Please follow these directions carefully. Sloppy connections can cause amplifier
malfunction or damage.
Klipsch Synergy SLX speakers are wired internally with multiple gauges of high-purity copper wire,
carefully selected and wound to ensure optimum signal transfer at all frequencies.You will obtain
best performance from your speakers if you connect them to your amplifier or receiver with similar
quality wire available from your dealer.We recommend that you use 18-gauge or heavier (lowergauge) stranded copper wire. Use a lower gauge (heavier) wire for longer runs to reduce the
amount of amplifier power lost due to the wire’s resistance.
BUT FIRST:TYPES OF CONNECTORS
Figure 3
5.Place the mounting bracket in the desired location and attach it to the wall by driving the
supplied screws through the bracket’s mounting holes and into the drywall anchors or wall
stud(s), making sure not to overtighten the screws.
Connect the speaker wire to the SLX's binding posts.
6.
Straight" for speaker wiring information.
Attach the SLX to the mounting bracket b
7.
y sea
See "Speaker to Amplifier:Keeping it
ting the SLX's mounting slots,
each end of the back of the SLX, onto the mounting tabs of the bracket as shown in Figure 4.
The tabs will "click" into place when the connection is made. Lightly pull forward on the SLX to
make sure a solid connection has been made.To remove the SLX from the mounting bracket,
depress both buttons at each end of the back of the SLX and pull the speaker off of the mounting
. DO NOT force it. Make sure both buttons are depressed.
y
The SLX should slide of
bracket.
f easil
loca
ted on
— Pull the two conductors apart for about an inch and strip approximately
Bare wire
tion from the end of each. (A wire stripper will simplify this, but you can use an ordinary
insula
1/4"
of
pocket knife to cut around and through the insulation down to the wire.) Twist the strands of wire
on each individual conductor tightly together.Loosen the nuts on a pair of binding posts until the
holes through the metal posts are exposed,
then insert the bare wire through the holes.
Screw the
nuts down finger-tight on the wire.Make sure that no strands of wire are touching from one
binding post to the other or to any strands from the other conductor.Failure to observe this
precaution a
t either end of the connection can result in amplifier malfunction or dama
ge.
Pins — Many pre-made speaker cables are terminated with metal pins. Loosen the nuts on a
pair of binding posts until the holes through the metal posts are exposed,
then insert the pins
through the holes. Screw the nuts down finger-tight on the pins — do not over-tighten.Make
sure that there is no metal-to-metal contact between the two pins or binding posts. Failure to
ve this precaution a
obser
t either end of the connection can result in amplifier malfunction
or damage.
Spade lugs — Some speaker ca
bles are termina
ted with U-sha
ped connectors called spade
lugs. Loosen the nuts on a pair of binding posts and slip the spade lugs around the metal posts.
Screw the nuts down finger-tight on the lugs and inspect to ensure they have remained firmly
in place.
Make sure tha
t there is no metal-to-metal contact between the two lugs or binding
posts. Failure to observe this precaution at either end of the connection can result in amplifier
malfunction or damage.
OTHER TYPES OF SPECIALTY CONNECTORS ARE AVAILABLE TO FACILITATE HOOKING UP YOUR
SPEAKERS. PLEASE CONSULT YOUR AUTHORIZED KLIPSCH DEALER FOR SUGGESTIONS AND
AILS.
THER DET
FUR
ENGLISH

SYNERGY SERIES
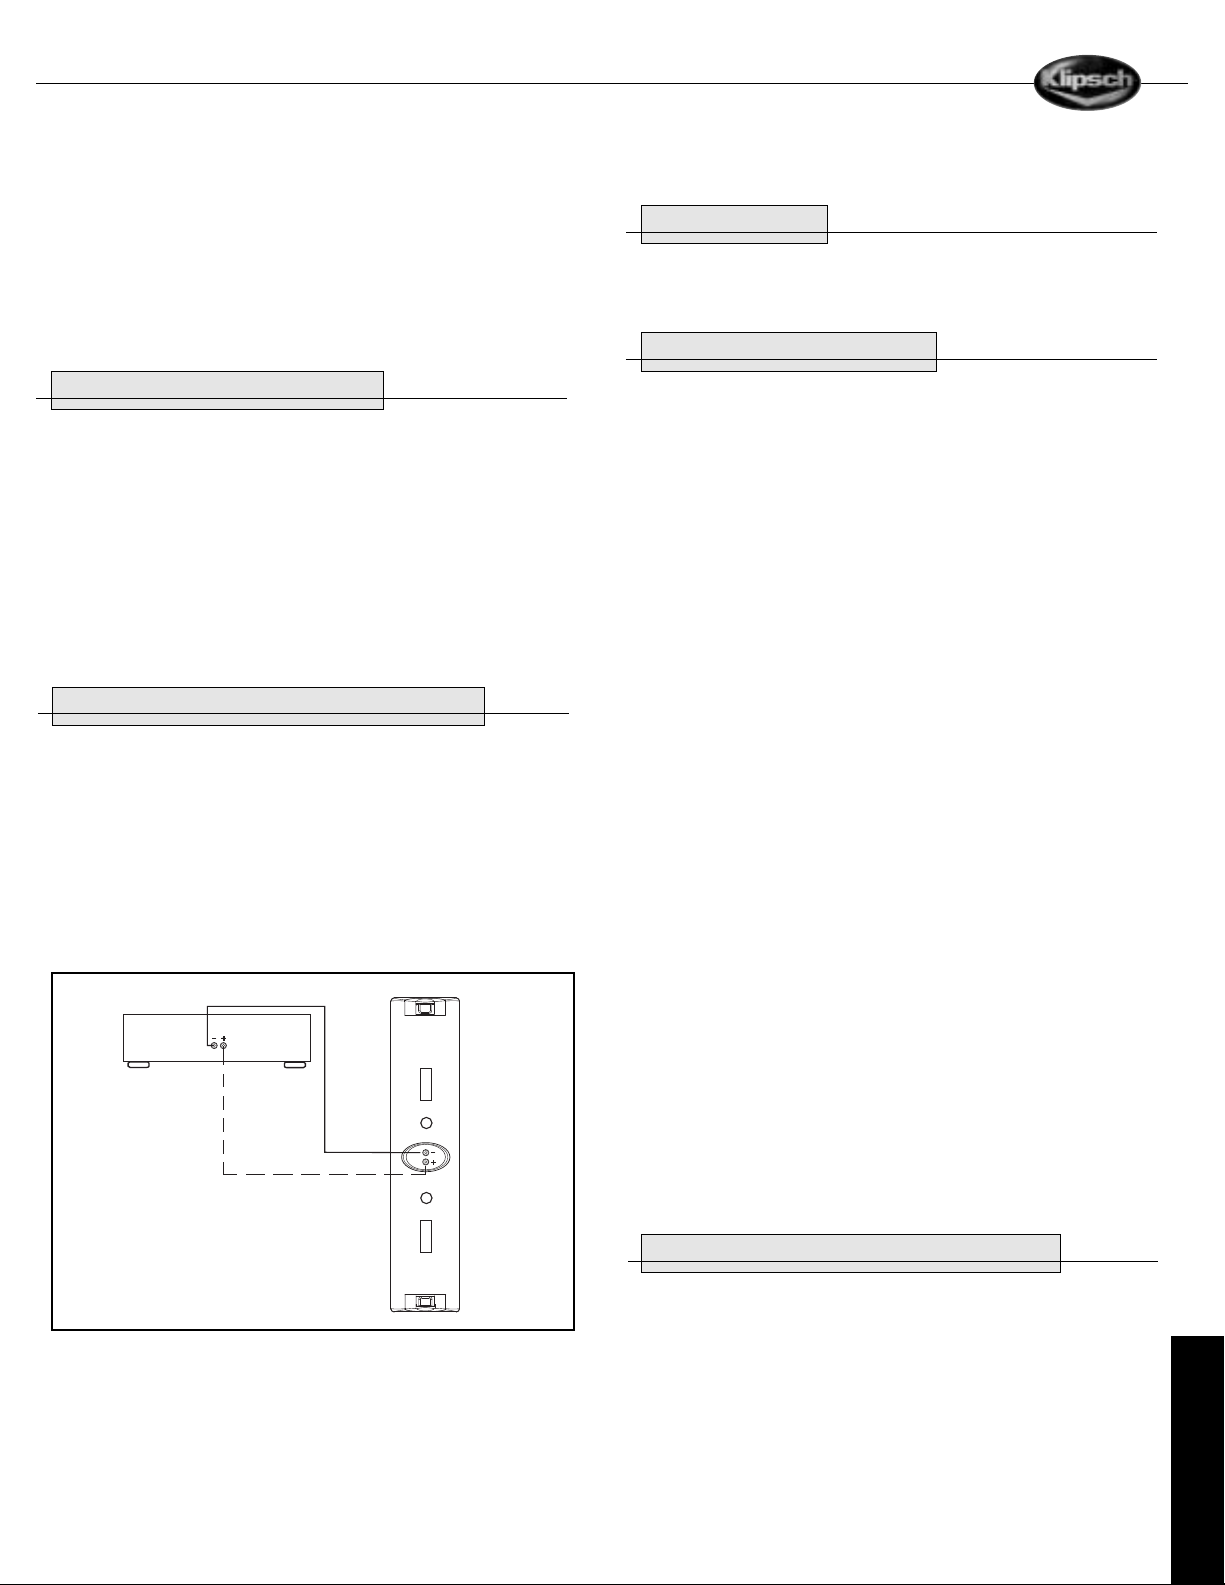
SPEAKERS TO AMPLIFIER: KEEPING IT STRAIGHT
One of the most important things about hooking up your speakers is keeping them in the
same polarity,or phase. If they are connected out of phase, bass and sound localization will
be degraded.
The easiest way to ensure that your speakers are wired in phase is to always connect the
positive and negative output terminals on your amplifier or receiver to the matching input
terminals on your speakers: positive ("+", color-coded red) to positive and negative ("–",colorcoded black) to negative. (See Figure 5).
Figure 5
Most pre-terminated speaker cables have color-coded connectors that make it easy to match
output and inputs correctly.If yours do not, or if you are making your own out of paired, twoconductor wire, look for identifying marks on the insulation of the two conductors. Normally there
will be printing, a stripe or a molded ridge along one of the conductors.
BASS MANAGEMENT SETTINGS AND SUBWOOFER ADJUSTMENT
Your Synergy SLX’s are designed to flawlessly reproduce music and movie soundtracks whether
used in conjuction with a dedicated subwoofer or in a simple two channel configuration.
, in high-output situations or if extended low frequencies are a formidable goal of your
However
audio system, the employment of a dedicated subwoofer may be desired.
WARRANTY — U.S. AND CANADA ONLY
The Warranty below is valid only for sales to consumers in the United States or Canada.
KLIPSCH, L.L.C. ("KLIPSCH") warrants this product to be free from defects in materials and
workmanship (subject to the terms set forth below) for a period of five (5) years from the date of
purchase. During the Warranty period,KLIPSCH will repair or replace (at KLIPSCH’s option) this
product or any defective parts (excluding electronics and amplifiers). For products that have
electronics or amplifiers, the Warranty on those parts is for a period of two (2) years from the
date of purchase.
To obtain Warranty service,please contact the KLIPSCH authorized dealer from which you
purchased this product.
Proof of purchase in the form of a bill of sale or receipted invoice, which is evidence that this
product is within the Warranty period,must be presented or included to obtain Warranty service.
This Warranty is invalid if (a) the factory-applied serial number has been altered or removed from
this product or (b) this product was not purchased from a KLIPSCH authorized dealer.You may call
1-800-KLIPSCH to confirm that you have an unaltered serial number and/or you purchased from a
KLIPSCH authorized dealer.
This Warranty is only valid for the original purchaser and will automatically terminate prior to
expiration if this product is sold or otherwise transferred to another party.
This Warranty does not cover cosmetic damage or damage due to misuse,abuse, negligence,
acts of God, accident, commercial use or modification of, or to any part of, the product.This
Warranty does not cover damage due to improper operation, maintenance or installation, or
attempted repair by anyone other than KLIPSCH or a KLIPSCH dealer which is authorized to do
KLIPSCH warranty work.Any unauthorized repairs will void this Warranty.This Warranty does not
cover product sold AS IS or WITH ALL FAULTS.
REPAIRS OR REPLACEMENTS AS PROVIDED UNDER THIS WARRANTY ARE THE EXCLUSIVE
REMEDY OF THE CONSUMER.KLIPSCH SHALL NOT BE LIABLE FOR ANY INCIDENTAL OR
CONSEQUENTIAL DAMAGES FOR BREACH OF ANY EXPRESS OR IMPLIED WARRANTY ON THIS
PRODUCT. EXCEPT TO THE EXTENT PROHIBITED BY LAW,THIS WARRANTY IS EXCLUSIVE AND IN
LIEU OF ALL OTHER EXPRESS AND IMPLIED WARRANTIES WHATSOEVER,INCLUDING BUT NOT
LIMITED TO,THE WARRANTY OF MERCHANTABILITY AND FITNESS FOR A PRACTICAL PURPOSE.
Some states do not allow the exclusion or limitation of incidental or consequential damages
or implied warranties so the above exclusions may not apply to you.This Warranty gives you
specific legal rights, and you may have other rights, which vary from state to state.
Digital surround receivers, amplifiers, and processors use what is known as bass management
to ensure that low frequencies in the various channels are not sent to speakers that are better
suited for mid-range and high-frequency reproduction.
If you use a dedicated subwoofer in your system, you will need to access your receiver or processor’s setup menu,employ the high-pass crossover feature for the channels connected to your
Synergy SLX speakers and enable the subwoofer output (or LFE channel) for your dedicated
subwoofer.
Most bass management systems employ an 80Hz or 100Hz crossover frequency,which is an
excellent match to the Synergy SLX’s lower limit.If your system offers a choice, we recommend
starting with 90Hz. If your subwoofer is connected to a dedicated subwoofer output, begin with
its internal crossover adjusted to the lowest possible setting and raise the frequency until the
subwoofer output blends well with the low-frequency output of your Synergy SLX speakers
(a subwoofer crossover setting between 80Hz and 100Hz should work well).
CARE AND CLEANING
The only thing you should ever need to do to your speakers is dust them occasionally.
Never apply any abrasive or solvent-based cleaner or any harsh detergent.You can clean the
grilles with the brush attachment of a vacuum cleaner.
ENGLISH
WARRANTY OUTSIDE THE UNITED STATES AND CANADA
The
W
arranty on this product if it is sold to a consumer outside of the United States or
Canada shall comply with applicable law and shall be the sole responsibility of the distributor
t supplied this product.
tha
from which you purchased this product,
SERIAL NUMBER ______________________________________________
To obtain any applicable warranty service,please contact the dealer
or the distributor tha
t supplied this product.

IMPORTANTES CONSIGNES DE SÉCURITÉ
S
C
FLAT
PANEL
TV
Optional
sub
L
R
1. LIRE ces instructions.
2. CONSERVER ces instructions.
3.
RESPECTER tous les avertissements.
4. SUIVRE toutes les instructions.
5. NE PAS utiliser cet appareil à proximité de l’eau.
6. NETTOYER UNIQUEMENT avec un chiffon sec.
7. NE PAS OBSTRUER les ouïes de ventilation. Installerconformément aux instructionsdu
constructeur.
8. Ne pas installer à proximité de sources de chaleur telles que les radiateurs,les grilles de
chauffage,lescuisinières etles autres appareils (notamment les amplificateurs) dégageant de la
chaleur.
9. NE PAS neutraliser le dispositif de sécurité que constitue la fiche polarisée ou à broche de terre.
Une fiche polarisée a une lame plus large que l’autre. Une fiche à broche de terre est munie de
deux lames et d’une troisième broche pour la terre. La lame large et la troisième broche sont
prévues pour la sécurité de l’utilisa
teur.Si la fiche fournie ne rentre pas dans votre prise de
courant, demander à un électricien de remplacer cette prise d’un type ancien.
10. PROTÉGER le cordon d’alimentation en s’assurant qu’il ne risque pas d’être piétiné ou écrasé,en
particulier près des fiches,
des blocs multiprises et de son point de sortie de l’appareil.
11. UTILISER UNIQUEMENT les accessoires préconisés par le constructeur.
12. UTILISER exclusivement avec un chariot,un support, un trépied, une console ou un bâti recom-
mandé par le fabricant ou vendu avec l’appareil. Lorsqu’un chariot est utilisé, faire preuve de
prudence pour déplacer l’ensemble chariot/appareil afin d’éviter un renversement pouvant
causer des blessures.
13. DÉBRANCHER cet appareil en cas d’orage ou lorsqu’il reste inutilisé pendant une longue durée.
14. CONFIER tout travail de dépannage à un réparateur professionnel compétent. En cas de dommages, il faut faire réparer l’appareil, par exemple si la fiche ou le cordon d’alimentation a été
endommagé, si un liquide a été renversé ou si un objet a pénétré à l’intérieur de l’appareil, si
l’appareil a été exposé à la pluie ou à l’humidité, s’il ne fonctionne pa normalement ou s’il a subi
une chute.
Ce symbole indique d’importantes instructions d’utilisation et d’entretien dans la
accompagnant cet appareil.
Ce symbole indique qu’une tension dangereuse présentant un risque d’électrocution est
présente dans l’appareil.
AVERTISSEMENT:Pour réduire les risques d’incendie et d’électrocution, ne pas exposer cet appareil à
la pluie ni à l’humidité.
OF ELECTRIC SHOCK
RISK
DO NOT OPEN
AVERTISSEMENT
: Les tensions présentes dans cet appareil peuvent être mortelles. Cet appareil ne
contient pas de pièces pouvant être remplacées par l’utilisateur.Tout travail de dépannage doit être
confié à un réparateur professionnel compétent.
ATTENTION:Les changements ou modifications non expressément approuvés par le fabricant pourraient annuler le droit de l’utilisateur à utiliser cet appareil.
À PROPOS DE VOTRE ACHAT DE PRODUIT KLIPSCH
Merci d’avoir acheté ces enceintes Klipsch.Après avoir lu ce manuel et raccordé le système, vous
bénéficierez des résultats de plus de 55 ans d’études techniques rigoureuses et d’un programme
supérieur de recherche et développement. Comme tous les produits Klipsch,ces enceintes bénéficient
de la technologie de haut-parleur à pavillon Klipsch qui a servi de ligne directrice au premier modèle
Klipschorn® développé en 1946 et à tous les produits qui ont suivi. Le haut-parleur à pavillon permet
aux enceintes d’offrir une réponse dotée de haute sensibilité, de faible distorsion,de réponse en
fréquence uniforme et de large dispersion, ce qui se traduit par une supériorité inégalée du « son
Klipsch » au niveau de la puissance, des détails et de la dynamique.Pour que nous puissions mieux
vous servir,n’oubliez pas de remplir la fiche de garantie ci-jointe ou de vous inscrire en ligne sur
www.klipsch.com.Encore une fois, merci d’avoir choisi Klipsch. Nous espérons que ces enceintes
vous permettront d’apprécier pleinement votre musique et vos films pendant de nombreuses années.
GRILLE
L’enceinte peut être utilisée avec ou sans sa grille. La grille est maintenue en place par des aimants ;
il suffit de la tirer vers l’avant pour l’enlever et d’aligner ses bords sur ceux de l’enceinte pour la
remettre en place.
Vous pouvez retirer le logo de la grille, le tourner de 90 degrés puis le remettre en place correctement orienté lorsque l’enceinte SLX est utilisée en position horizontale. Pour retirer le logo de la
g
rille, il suffit d’appuyer sur les deux broches placées à l’arrière du logo en les serrant entre elles.
Pour le remettre en place, alignez les deux broches sur le trou de la grille et appuyez sur le logo (en
vérifiant sa bonne orientation).
PLACEMENT
Conçues pour permettre une souplesse maximale, les enceintes Synergy SLX offrent de bonnes performances dans de nombreuses et diverses configurations. La figure 1 représente un exemple de
configuration pour cinéma maison, avec une enceinte de canal central (Synergy SLX) au-dessous (ou
au-dessus) d’un téléviseur à écran plat, une paire d’enceintes avant gauche et droite (Synergy SLX)
de part et d’autre de l’écran et une autre paire d’enceintes (Synergy SLX) sur les côtés de la zone
d’écoute pour l’effet ambiophonique principal. Des recommandations de placement pour chaque
fonction sont indiquées ci-dessous.
Figure 1
Enceinte de canal central : Centrez l’enceinte juste au-dessus ou au-dessous du téléviseur et
accrochez-la au mur (voir les instructions de fixation murale). Les supports de montage fournis permettent de faire pivoter chaque enceinte Synergy SLX de 30° (15° dans chaque sens) pour permettre une orientation optimale vers la zone d’écoute.
Enceintes avant gauche et droite : Les enceintes avant gauche et droite doivent être à peu près
alignées sur le téléviseur et à égale distance de celui-ci. La distance par ra
pport au téléviseur n’est
pas l’élément essentiel, mais un plus grand éloignement a tendance à augmenter la profondeur du
son. Maintenez chaque enceinte à 60 centimètres minimum d’un mur latéral.Dans la mesure du
possible, mettez-les à la hauteur d’un auditeur assis.Les supports de montage f ournis permettent de
faire pivoter chaque enceinte Synergy SLX de 30° (15° dans chaque sens) pour optimiser l’orientation vers la zone d’écoute.
Enceintes ambiophoniques gauche et droite :
enceintes ambiophoniques garantit l’unif
ormité acoustique et esthétique avec les enceintes avant
tion des enceintes Synerg
’utilisa
L
y SLX comme
gauche, droite et centre.Le meilleur emplacement des enceintes pour la fonction ambiophonique est
sur ou contre les murs la
téraux de l’espace d’écoute,
coute et environ 20º en arrière.
Montez-les à une hauteur supérieure à celle de l’oreille d’un auditeur
n’importe où entre le niveau de la position d’é
assis (1,5 à 2,1 mètres), mais évitez de les placer contre le plafond ou fixées au plafond. Orientezles soit directement vers le côté opposé de la pièce,
un son plus dif
fus, soit vers la position d’écoute pour obtenir un son plus direct.Grâce à la souplesse
soit légèrement vers le mur arrière pour obtenir
de la conception des enceintes Synergy SLX, de bons résultats sont obtenus avec des configurations
ournis permettent de faire piv-
nettement dif
oter chaque enceinte Synerg
férentes de la situa
y SLX de 30° (15° dans chaque sens).
Enceintes ambiophoniques arrière :
Les supports de monta
tion idéale.
ppareil électronique est compa
Si l’a
ge f
tible a
vec le système ambiophonique Dolby Digital EX,THX Surround EX ou bien DTS-ES 7.1 ou 6.1 canaux, vous pouvez placer
une ou deux enceintes derrière la zone d’écoute et les utiliser comme enceintes ambiophoniques
Comme pour les enceintes ambiophoniques gauche et droite,
arrière.
l’emplacement optimal se situe
au-dessus du niveau de l’oreille d’un auditeur assis. Si vous n’utilisez qu’une enceinte ambiophonique arrière, elle doit être centrée derrière la zone d’écoute ; si vous en utilisez deux,elles
doivent être rela
tivement proches l’une de l’autre.
vec ce type de système,
A
les enceintes ambiophoniques principales gauche et droite doivent être juste à côté de la zone d’écoute et non en
arrière.
-
FRENCH
16"
16"
1
2
34
5
6
MOUNTING
SLOTS
WAL
L
BRACKETS
From Amplifier
From Amplifier
SYNERGY SERIES
MONTAGE MURAL
Dans le cas d’une installation sur cloison sèche, suivez les instructions ci-dessous.Sinon, fixez les
enceintes SLX en utilisant les techniques locales habituelles et les ancrages muraux appropriés.
Chaque enceinte Synergy SLX peut être montée verticalement ou horizontalement. Dans le cas d’un
montage vertical sur panneau mural, le support mural peut être soit aligné sur un poteau d’ossature
murale, soit simplement fixé à la cloison sèche.Les ancrages de cloison sèche f ournis ne sont utilisés
que dans ce dernier cas. Dans le cas d’un montage horizontal du support,l’une des deux paires de
trous de monta
sur des poteaux d’ossature murale espacés de 16” (40,6 cm).L’une ou l’autre des deux paires peut
être utilisée. Pour les quatre points de fixation restants, utilisez les ancrages et les vis de cloison
sèche. Si vous ne fixez pas le support sur des poteaux d’ossature murale,fixez-le au mur à l’aide des
six ancrages et des vis de cloison sèche.
Pour l’installa
1. Placez le support de montage contre le mur à l’emplacement et suivant l’orientation (verticale ou
horizontale) souhaités.
2.
En utilisant le support de montage comme modèle, marquez les six emplacements de vis en faisant
attention aux emplacements de poteaux d’ossature murale. (Comme indiqué ci-dessus,vous pouvez
utiliser des poteaux d’ossature murale. Il n’est toutefois pas nécessaire de fixer le support SLX à des
poteaux d’ossature murale. Pour l’enceinte de canal central,assurez-vous que le support est de
niveau.
3. Retirez le support de montage et installez dans le mur le nombre requis d’ancrages de cloison sèche
(fournis). (Les ancrages de cloison sèche ne sont pas nécessaires là ou les vis sont vissées dans des
poteaux d’ossature murale.)
ge représentés à la figure 2 espacés de 16” (trous 1 et 5 ou 2 et 6) peut être alignée
tion de l’enceinte Synergy SLX, suivez les instructions ci-dessous :
7.
Fixez l’enceinte SLX au support de montage en mettant les encoches de montage, placées à
chaque extrémité arrière de l’enceinte,
figure 4.
sur les languettes de montage du support, comme le montre la
Figure 4
La mise en place correcte est indiquée par un déclic des languettes.T
vers l’avant pour vérifier la solidité de la fixation. Pour retirer l’enceinte SLX du support de montage,
appuyez sur les deux boutons à chaque extrémité arrière de l’enceinte et sortez-la du support. Elle
doit glisser facilement. NE FORCEZ PAS.Assurez-vous que les deux boutons sont enfoncés.
8. Une fois l’enceinte SLX installée,sa position angulaire peut être ajustée pour permettre une orientation optimale vers la zone d’écoute.
irez légèrement l’enceinte SLX
4. Faites passer le fil dans le support de montage.Des passa ges de fils sont prévus à l’arrière du support de montage. Le fil peut entrer de n’importe quel côté du support et ressort au centre,juste derrière les bornes de raccordement à l’arrière de l’enceinte SLX, comme le montre la figure 3.
5. Placez le support de montage à l’emplacement voulu et fixez-le au mur en passant les vis fournies
dans les trous de monta
sèche ou dans les poteaux d’ossature murale.
6.
FRENCH
respect de la polarité » pour plus d’informations sur le raccordement des enceintes.
Figure 2
Figure 3
ge du support et en les vissant sans trop serrer dans les ancra
Raccordez les fils de l’enceinte SLX à ses bornes.
Voir la section :« Enceintes à amplificateur:
ges de cloison
ATTENTION :NE PAS RETIRER LES AIMANTS PLACÉS À L’ARRIÈRE DE L’ENCEINTE.
ATTENTION :LES ENCEINTES SYNERGY SLX NE SONT PAS PRÉVUES POUR UN MONTAGE AU
PLAFOND.
RACCORDEMENTS
Remarque : Un bon raccordement des enceintes à l’amplificateur ou au récepteur est essentiel pour
obtenir un son de qualité supérieure. Suivez attentivement les instructions ci-dessous.Des raccordements mal réalisés risquent d’entraîner un mauvais fonctionnement de l’amplificateur ou de l’endommager.
Les enceintes Synerg
pureté et de différents diamètres, soigneusement sélectionnés et bobinés de façon à assurer une transmission optimale des signaux de dif
les reliant à l’amplifica
lants. Nous recommandons d’utiliser des fils de cuivre multibrin d’au moins 0,78 mm2 de section (cali-
Utilisez une plus g
bre 18).
sance perdue à cause de la résistance du fil.
OUT D’ABORD :
T
Fil nu — Séparez les deux conducteurs sur environ 25 mm, puis dénudez leurs extrémités sur environ
(Une pince à dénuder simplifie cette opéra
6 mm.
l’isolant jusqu’au fil à l’aide d’un canif ordinaire.)
teur.Desserrez les écrous d’une paire de bornes de raccordement de façon à faire apparaître les trous
versants,
tra
en serrant à la main.
teur,vérifiez à chaque extrémité du raccordement qu’aucun brin de fil ne met en contact les deux
bornes entre elles ni ne touche un brin de l’autre conducteur
Broches — Beaucoup de câbles d’enceintes préfabriqués sont pourvus de terminaisons à broches
métalliques.
les trous tra
serrant à la main. Ne serrez pas trop.Afin d’éviter un mauvais fonctionnement ou un endommagement
de l’amplifica
entre les deux broches,
y SLX de Klipsch sont pourvues d’un câblage interne en fils de cuivre de grande
ous tirerez le maximum de vos enceintes en
férentes fréquences.
teur ou au récepteur à l’aide de fils de qualité identique,
rande section de fil pour les plus g
TYPES DE CONNECTEURS
puis insérez dans ces trous les extrémités dénudées des fils.
Afin d’éviter un mauvais f
Desserrez les écrous d’une paire de bornes de raccordement de façon à faire a
versants, puis insérez les broches dans ces trous.Vissez chaque écrou sur la broche en
vérifiez à chaque extrémité du raccordement qu’il n’y a aucun contact métallique
,
teur
entre les deux bornes ou entre une broche et une borne.
V
en vente chez les détail
randes distances afin de réduire la puis
mais vous pouvez aussi entailler le pourtour de
tion,
orsadez en serrant bien les brins de chaque conduc-
T
Vissez chaque écrou sur le fil
onctionnement ou un endommagement de l’amplifica-
.
pparaître
-
-
Cosses à fourche — Certains câbles d’enceintes sont pourvus de connecteurs en U appelés cosses à
f
ourche. Desserrez les écrous d’une paire de bornes de raccordement et placez chaque cosse à
fourche à cheval sur la borne.
Vissez chaque écrou sur la cosse en serrant à la main et inspectez les cosses pour vous assurer
qu’elles sont bien en place.Afin d’éviter un mauvais fonctionnement ou un endommagement de l’amplificateur,vérifiez à chaque extrémité du raccordement qu’il n’y a aucun contact métallique entre les
deux cosses,
IL EXISTE D’AUTRES TYPES DE CONNECTEURS SPÉCIAUX PERMETTANT DE FACILITER LE RACCORDEMENT DES ENCEINTES.ADRESSEZ-VOUS À UN REVENDEUR AGRÉÉ KLIPSCH POUR OBTENIR DES
SUGGESTIONS ET PLUS DE DÉTAILS.
entre les deux bornes ou entre une cosse et une borne.
basse fréquence des enceintes Synerg
80 et 100 Hz devrait bien convenir).
ENTRETIEN ET MAINTENANCE
Le nettoya
ge de vos enceintes ne demande qu’un époussetage de temps en temps.
N’utilisez jamais de produits de nettoyage abrasifs ou à base de solvant ni de détergents puissants.
Vous pouvez nettoyer les grilles à l’aide d’une brosse d’aspirateur.
GARANTIE (ÉTATS-UNIS ET CANADA UNIQUEMENT)
y SLX (un réglage de filtre de caisson de graves compris entre
ENCEINTES À
Le respect de la polarité ou phase est primordial pour le raccordement des enceintes. En effet,si le
raccordement est déphasé, les graves et la localisation acoustique sont dégradés.
La façon la plus simple d’assurer le raccordement en phase des enceintes est de toujours relier les
bornes de sortie positive et négative de l’amplificateur ou du récepteur aux bornes d’entrée correspondantes des enceintes : borne positive (« + »,rouge) à la borne positive et borne négative (« – », noire) à
la borne négative. (Voir la figure 5.)
La plupart des câbles préfabriqués possèdent des connecteurs de couleur facilitant le raccordement
adéquat des entrées et des sorties. Si ce n’est pas le cas des vôtres ou si vous fabriquez vous-même
vos câbles à partir de fil à deux conducteurs, recherchez sur ceux-ci des repères d’identification.Ils
sont, en général,constitués de caractères imprimés, d’une bande ou d’une ligne en relief le long de
l’un des conducteurs.
RÉGLAGES DE GESTION DES GRAVES ET RÉGLAGE DU CAISSON DE GRAVES
L’enceinte Synergy SLX a été conçue pour reproduire parfaitement la musique et les bandes son de
films, qu’elle soit associée à un caisson de graves dédié ou utilisée dans une simple configuration à
deux canaux.
Toutefois,dans certaines situations à volume élevé ou si les très basses fréquences constituent un but
fondamental de votre installation sonore, l’utilisation d’un caisson de graves dédié peut être préférable.
Les processeurs, amplificateurs et récepteurs ambiophoniques numériques utilisent ce que l’on appelle
la gestion des graves : il s’agit de faire en sorte que les basses fréquences des différents canaux ne
soient pas envoyées à des enceintes convenant plus particulièrement à la reproduction des moyennes
et hautes fréquences.
AMPLIFICATEUR :RESPECT DE LA POLARITÉ
La garantie ci-dessous n’est valide que pour la vente aux particuliers aux États-Unis et au Canada.
KLIPSCH, L.L.C.(« KLIPSCH ») garantit ce produit contre tout vice de matériaux et de fa brication (sous
réserve des termes établis ci-dessous) pendant une période de cinq ans à partir de la date d’achat.
Pendant la période de garantie, KLIPSCH réparera ou remplacera (selon son choix) ce produit ou toute
pièce défectueuse (à l’exception des composants électroniques et des amplificateurs). Pour les produits contenant des composants électroniques ou des amplificateurs, la garantie sur ces pièces est
d’une durée de deux ans à compter de la date d’achat.
Pour obtenir une réparation sous garantie, adressez-vous au détaillant agréé KLIPSCH qui vous a
vendu ce produit.
Une preuve d’achat telle qu’une facture ou un reçu, attestant que le produit est toujours couvert par la
garantie d’un an, doit être présentée ou incluse pour que la garantie puisse s’appliquer.
Cette garantie est nulle dans les cas suivants : (a) le numéro de série apposé en usine a été modifié
ou retiré de ce produit ; (b) ce produit n’a pas été acheté auprès d’un détaillant agréé KLIPSCH. Pour
vérifier que votre produit a été acheté auprès d’un détaillant agréé KLIPSCH et que son numéro de
série n’a pas été modifié, téléphonez au 1-800-KLIPSCH.
Cette garantie ne couvre que l’acheteur initial et se termine automatiquement avant expiration si ce
produit est vendu ou cédé à un tiers.
Cette garantie ne couvre pas les dommages esthétiques ou les dégâts résultant d’une utilisation abusive, d’un cas de force majeure,d’un accident,d’une utilisation commerciale ou de la modification de
ce produit ou de l’un de ses composants. Cette garantie ne couvre pas les dégâts résultant d’une utilisation, d’un entretien ou d’une installation incorrecte,ou d’une tentative de réparation par quiconque
autre que KLIPSCH ou un détaillant KLIPSCH autorisé par KLIPSCH à effectuer une réparation sous
garantie.Toute réparation non autorisée annule la présente garantie. Cette garantie ne couvre pas les
produits vendus EN L’ÉT
AT.
Figure 5
ves dédié est présent dans votre système,
Si un caisson de g
tion du récepteur ou du processeur
figura
raccordés aux enceintes Synergy SLX et activez la sortie caisson de graves (ou canal LFE) pour votre
caisson de g
Dans la plupart des systèmes de gestion des graves, la fréquence de coupure, de 80 Hz ou 100 Hz,
est parfaitement ada
mencer par 90 Hz si votre système le permet.
de caisson de graves, commencez par régler son filtre passif interne à la valeur la plus faible possible,
puis augmentez la fréquence jusqu’à ce que le son du caisson de g
ra
. Utilisez la fonction de filtrage passe-haut pour les canaux
ves dédié.
ra
ptée à la limite inférieure des enceintes Synerg
Si le caisson de graves est raccordé à une sortie dédiée
vous devez aller dans le menu de con
Il est conseillé de com
y SLX.
ves se mélange bien a
ra
-
-
vec le son
LE SEUL RECOURS DU CLIENT EST LA RÉPARATION OU LE REMPLACEMENT SELON LES TERMES DE
CETTE GARANTIE. KLIPSCH DÉCLINE TOUTE RESPONSABILITÉ POUR TOUT DOMMAGE DIRECT OU
INDIRECT RÉSULTANT DU NON RESPECT DE TOUTE GARANTIE EXPRESSE OU IMPLICITE RELATIVE À
À L’EXCEPTION DES CAS OÙ LA LÉGISLATION L’INTERDIT,CETTE GARANTIE EST EXCLU-
CE PRODUIT
SIVE ET REMPLACE TOUTE AUTRE GARANTIE EXPRESSE OU IMPLICITE,Y COMPRIS, MAIS SANS S’Y
LIMITER, LES GARANTIES DE VALEUR MARCHANDE OU D’ADÉQUATION À UN USAGE PARTICULIER.
Certaines juridictions ne permettent pas l’exclusion ou la limitation des garanties implicites ou des
dommages directs ou indirects. Il est donc possible que dans certains cas,les exclusions ci-dessus ne
s’a
ficier d’autres droits variant suivant la juridiction.
Si ce produit est vendu dans des pa
conf
Pour obtenir un service en garantie, contactez le détaillant chez qui vous avez acheté ce produit ou le
distributeur qui l’a f
NUMÉRO DE SÉRIE
.
ppliquent pas. Cette garantie vous confère des droits spécifiques,et vous pouvez également béné-
GARANTIE DANS LES P
orme aux lois en vigueur et n’engage que la responsabilité du distributeur qui a fourni ce produit.
AYS AUTRES QUE LES ÉTATS-UNIS ET LE CANADA
ys autres que les Éta
ourni.
ts-Unis et le Canada,
la garantie doit être
______________________________________________
FRENCH

SYNERGY SERIES
S
C
FLAT
PANEL
TV
Optional
sub
L
R
WICHTIGER SICHERHEITSHINWEIS
1. LESEN Sie diese Anweisungen durch.
2.
BEHALTEN Sie diese Anweisungen.
3. BEACHTEN Sie alle Warnhinweise.
4. FOLGEN Sie allen Anweisungen.
5. Verwenden Sie diese Geräte NICHT in der Nähe von Wasser.
6.
Reinigen Sie sie NUR mit einem trockenen Tuch.
7. Blockieren Sie KEINE Lüftungsöffnungen. Installieren Sie die Geräte entsprechend den
Herstelleranweisungen.
8. Installieren Sie sie nicht in der Nähe von Wärmequellen wie Heizkörpern,
Warmlufteintrittsöffnungen, Öfen oderanderen wärmeerzeugenden Geräten (einschließlich
Verstärkern).
9. Sie dürfen die Sicherheitsfunktion polarisierter oder geerdeter Stecker NICHT außer Kraft setzen.
Ein polarisierter Stecker hat zwei Stifte, wobei einer dicker ist als der andere.Ein geerdeter
Stecker hat zwei Stifte und einen dritten Erdungsstift. Der dickere Stift oder der dritte Stift dienen
zu Ihrer Sicherheit.Wenn der mitgelieferte Stecker nicht in Ihre Steckdose passt, sollten Sie die
veraltete Steckdose durch einen Elektriker ersetzen lassen.
10.VERMEIDEN Sie, dass das Netzkabel belastet oder geknickt wird, vor allem bei Steckern,
Zusatzsteckdosen und beim Ausgang aus dem Gerät
11.Verwenden Sie AUSSCHLIESSLICH vom Hersteller empfohlene Zusatzgeräte/Zubehör.
12.Verwenden Sie beim Transport ausschließlich Wagen, Ständer, Stative,Halterungen oder Tische,
die vom Hersteller empfohlen oder mit dem Gerät verkauft wurden. Bei Verwendung eines
Wagens sollten Sie vorsichtig sein, damit Wagen und Gerät nicht umkippen und
Verletzungen verursachen.
13.Trennen Sie dieses Gerät bei Gewitter vom Netz, oder wenn es längere Zeit nicht benutzt wird.
14. Lassen Sie alle Wartungen bzw.Reparaturen von geschulten Kundendiensttechnikern durchführen.
Eine Wartung bzw. Reparatur ist nötig, wenn das Gerät auf irgendeine Weise beschädigt wurde,
z.B. durch Schäden am Netzkabel oderstecker, durch Verschütten von Flüssigkeiten,durch das
Hineinfallen von Gegenständen, durch Regen oder Feuchtigkeit,wenn es nicht richtig funktioniert
oder wenn es fallen gelassen wurde.
Dieses Symbol weist darauf hin, dass die dieser Einheit beiliegenden Anleitungen wichtige
Betriebs- und Wartungsanweisungen enthalten.
Dieses Symbol weist auf die Gefahr eines Stromschlags aufgrund von gefährlichen
Spannungen in dieser Einheit hin.
LAUTSPRECHERGRILL
Der Lautsprecher kann mit oder ohne Lautsprechergrill benutzt werden. Der Lautsprechergrill wird
magnetisch befestigt. Sie können ihn einfach entfernen,indem sie ihn a bziehen, und ihn wieder
anbringen, indem sie dessen Kanten am Lautsprechergehäuse ausrichten.
Das Firmenabzeichen am Lautsprechergrill kann abgenommen oder bei Verwendung der SLX in horizontaler Ausrichtung um 90 Grad gedreht und dann wieder eingesetzt werden.Um das
Firmenabzeichen zu entfernen, drücken Sie einfach die zwei Stifte an dessen Rückseite zusammen
und drücken es aus seinem Platz auf dem Lautsprechergrill.
Um es wieder einzusetzen, richten Sie die zwei Stifte am Loch im Lautsprechergrill aus und drücken
das Firmenabzeichen wieder hinein (achten Sie darauf, dass es korrekt ausgerichtet ist).
PLATZIERUNG
Ihre Synergy SLX-Lautsprecher sind auf maximale Flexibilität hin konzipiert und bieten in einer Vielzahl
von Konfigurationen ausgezeichnete Leistungen.Abbildung 1 zeigt ein typisches Heimkinosystem mit
einem Center
Fernsehers pla
Bildschirms sowie einem weiteren Lautsprecherpaar (Synerg
an den Seiten des Hörbereichs.
-Kanal-Lautsprecher (Synergy SLX), der unterhalb (oder oberhalb) eines Flachbildschirmtziert ist, linken und rechten Lautsprechern (Synergy SLX) vorne an beiden Seiten des
y SLX) als Haupt-Surround-Lautsprecher
Untenstehend sehen Sie die empfohlene Platzierung für jede Funktion.
GERMAN
WARNUNG:Um die Gefahr eines Feuers oder Stromschlags zu verringern,ist dieses Gerät vor Regen
oder Feuchtigkeit zu schützen.
RISK OF ELECTRIC SHOCK
DO NOT OPEN
In diesem Gerät gibt es lebensgefährliche Stromspannung. Das Gerät enthält keine durch
ARNUNG:
W
den Benutzer zu wartenden
Teile,Lassen Sie alle Wartungen bzw.Reparaturen von geschulten
Kundendiensttechnikern durchführen.
WARNUNG: Änderungen oder Modifikationen, die nicht ausdrücklich vom Hersteller genehmigt sind,
könnten des Recht des Benutzers zum Betrieb des Geräts ungültig werden lassen.
ÜBER IHR KLIPSCH-PRODUKT
Vielen Dank, dass Sie Klipsch-Lautsprecher gekauft haben.Nach der Lektüre dieses Handbuchs und
dem Anschluss Ihres Systems werden Sie das Ergebnis von über 55 Jahren herausragender
Technologie und führender Forschungs- und Entwicklungsarbeit hören können.Wie alle Produkte von
Klipsch verfügen auch Ihre Lautsprecher über die Klipsch Horn-Load-Technologie – das Grund-Design
für das erste, 1946 entwickelte Klipschorn® und für jedes darauf folgende Produkt.Horn-Loading
ermöglicht es Ihrem Lautsprecher,hohe Empfindlichkeit, niedrige Verzerrung,einen ebenen
Frequenzgang und ein breites
Klangtreue und Dynamik führt,
Abstrahlverhalten zu bieten,
eben den Merkmalen des „Klipsch-Sound“.
was zu unvergleichlicher Leistung,
Füllen Sie bitte die
beiliegende Garantiekarte aus, oder registrieren Sie sich online bei www.klipsch.com,so dass wir
Ihnen besser helfen können.
Nochmals vielen Dank,
dass Sie Klipsch gewählt ha
ben.
dass
fen,
Wir hof
Ihre Lautsprecher viele Jahre lang Ihre Musik und Ihre Filme zum Leben erwecken werden.
Figure 1
Center-Kanal-Lautsprecher: Platzieren Sie den Lautsprecher mittig direkt über oder unter Ihrem
Fernsehbildschirm und befestigen Sie ihn an der Wand (siehe Wandmontageanleitung).Wenn Sie die
beiliegende Montagehalterung verwenden, kann jeder Synergy SLX um 30° (15° in jede Richtung)
gedreht werden, um eine optimale Ausrichtung auf den Hörbereich zu gewährleisten.
Vordere linke und rechte Lautsprecher:Am besten sollten sich der vordere linke und rechte
Lautsprecher ungefähr auf einer Linie mit dem Fernseher befinden und gleich weit von ihm entfernt
Die Entfernung vom Bildschirm ist weniger wichtig, aber eine weite Trennung erzeugt meist mehr
sein.
Raumklang. Die Lautsprecher sollten mindestens 60 cm von einer Seitenwand entfernt sein.Platzieren
falls möglich,
Sie sie,
verwenden,
auf Ohrhöhe einer sitzenden Person.
kann jeder Synerg
y SLX um 30
enn Sie die beiliegende Monta
W
° in jede Richtung) gedreht werden, um eine optimale
(15
°
gehalterung
Ausrichtung auf den Hörbereich zu gewährleisten.
Linke und rechte Surround-Lautsprecher: Die Verwendung der Synergy SLX als Surround-Lautsprecher
gewährleistet eine akustische und ästhetische Übereinstimmung der vorderen linken und rechten
Die beste Position für Lautsprecher,die als Surround-
Lautsprecher sowie der Center
-Lautsprecher
Lautsprecher verwendet werden,
.
ist an oder nahe der Wand an den Seiten des Hörbereichs,von einem
Punkt direkt neben der Hörposition bis zu etwa 20° dahinter.Montieren Sie sie über der Ohrhöhe einer
tzieren Sie sie nicht nahe oder an der Decke.
ber pla
sitzenden Person (1,5 bis 2,2 m hoch),
Sie sie direkt in den Raum oder etwas gegen die hintere
a
W
um einen mehr verteilten Klang zu
and aus,
Richten
erreichen, oder direkt in Richtung auf die Hörposition,was einen mehr direkten Klang erzielt. Das
Design der Synergy SLX-Modelle ermöglicht allerdings große Flexibilität, und selbst mit nicht gerade
idealen Konfigurationen können gute Ergebnisse erzielt werden.Wenn Sie die beiliegende
Montagehalterung verwenden, kann jeder Synergy SLX um 30° (15° in jede Richtung) gedreht werden.
Hintere Surround-Lautsprecher:Wenn Ihre Elektronik Dolby Digital EX, THX Surround EX oder DTS-ES
7.1 bzw.6.1-Kanal-Sound unterstützt, können Sie ein oder zwei Lautsprecher hinter dem Sitzbereich
als hintere Surround-Lautsprecher einsetzen.
Wie bei den rechten und linken Surround-Lautsprechern
 Loading...