

Page 1

iFi SPEAKER SYSTEM
IMPORTANT SAFETY INSTRUCTIONS
1. READ these instructions.
2. KEEP these instructions.
3. HEED all warnings.
4. FOLLOW all instructions.
5. DO NOT use this apparatus near water.
6. CLEAN ONLY with dry cloth.
7. DO NOT block any ventilation openings. Install in accordance with
the manufacturer's instructions.
8. DO NOT install near any heat sources such as radiators, heat
registers, stoves, or other apparatus (including amplifiers) that
produce heat.
9. DO NOT defeat the safety purpose of the polarized or grounding
type plug. A polarized plug has two blades with one wider than the
other.A grounding type plug has two blades and a third grounding
prong. The wider blade or the third prong are provided for your
safety. If the provided plug does not fit into your outlet, consult an
electrician for replacement of the obsolete outlet.
10. PROTECT the power cord from being walked on or pinched,
particularly at plugs, convenience receptacles, and the point
where they exit from the apparatus.
11. ONLY USE attachments/accessories specified by the
manufacturer.
12. USE only with a cart, stand, tripod, bracket, or table specified
by the manufacturer, or sold with the apparatus. When a cart is
used, use caution when moving the cart/apparatus
combination to avoid injury from tip-over.
13. UNPLUG this apparatus during lightning storms or when unused
for long periods of time.
14. REFER all servicing to qualified service personnel. Servicing is
required when the apparatus has been damaged in any way,
such as power-supply cord or plug is damaged, liquid has been
spilled or objects have fallen into the apparatus, the apparatus
has been exposed to rain or moisture, does not operate
normally, or has been dropped.
This symbol indicates that there are important
operating and maintenance instructions in the
literature accompanying this unit.
This symbol indicates that dangerous voltage
constituting a risk of electric shock is present
within this unit.
To reduce the risk of fire or electrical shock, do not expose this
product to rain or moisture. The product must not be exposed to
dripping and splashing and no object filled with liquids - such as a
vase of flowers - should be placed on the product.
No naked flame sources - such as candles - should be placed on the
product.
WARNING: The AC main plug should be located such that it remains
readily operable by the user.
W
ARNING:Voltages in this equipment are hazardous to life. No
user-serviceable parts inside. Refer all servicing to qualified
service personnel.
CAUTION: Changes or modifications not expressly approved by the
manufacturer could void the user’s authority to operate this device.
CAUTION: Danger of explosion if battery is incorrectly replaced.
Replace only with the same or equivalent type.
ABOUT YOUR KLIPSCH MANUAL
Thank you for your purchase of the Klipsch iFi™Speaker System.
After reading this manual and connecting your system, you will
hear the result of over 55 years of stringent engineering and classleading research and development. Like all Klipsch products, your
system features Klipsch horn-loaded technology – the guiding
design for the first Klipschorn®developed in 1946 and for every
product that has followed. Horn loading allows your speakers to
deliver high-sensitivity, low distortion, flat frequency response and
wide dispersion, which translate to unequaled power, detail and
dynamics, the hallmarks of the “Klipsch Sound.” Please be sure
to fill out the enclosed warranty card or register online at
www.klipsch.com so we are better able to serve you. Again, thank
you for allowing Klipsch to bring life to your music and movies for
many years.
PACKAGE CONTENTS
Two RSX-3 satellite speakers
One 8-inch long-throw
subwoofer with slotted port
One iFi control dock
Five dock adapters
Two pairs 6-foot speaker cables
y (RF)
equenc
adio-fr
One r
handheld r
emote control
One
AC po
wer cor
d
Page 2
SYSTEM SETUP
Control Dock
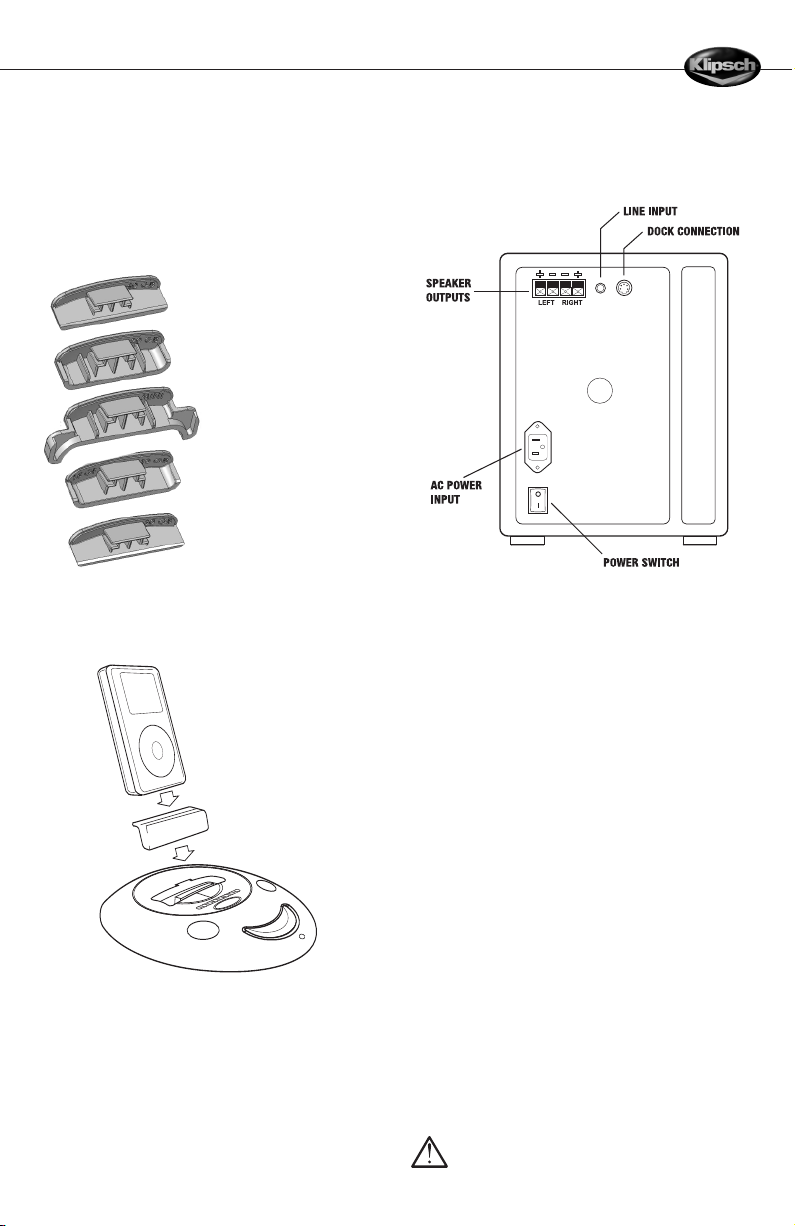
The iFi system comes with five adapters that allow different model
iPods to work with the control dock. Each adapter is labeled to
identify the
“size” iPod it is meant to fit. Depending on the age of
your iPod, the model that you have may not correspond to the size
as listed on the bottom of the adapters. The guide below will help
in choosing the appropriate insert for your particular model of iPod.
40GB
40GB
Touch Wheel, 40GB Click Wheel
40GB Photo, 60GB Photo
20GB
20GB
Touch Wheel
MINI
First and Second Generation iPod Mini
10GB/15GB
10GB Touch Wheel, 15GB Touch Wheel
Wheel, 30GB Photo
20GB Click
30GB
Wheel
ouch
T
30GB
Basic System Connections
The control dock and the two satellite speakers connect to the
amplifier on the rear of the subwoofer which powers the
entire system.
Choose the adapter that matches your iPod and insert it into the
top of the dock until it is snugly in place with the slot centered over
the multipin docking connector.
Your iPod should now fit easily but securely into the top of the dock
with the multipin connector at the base of the slot sliding into the
socket along the iPod’s bottom edge.The iFi dock will flex slightly
to relieve stress on the connector when you insert your iPod.
To avoid damage, do not apply excessive force when inserting
the iPod.
All iPod functions are available when it is in the iFi dock.
• Turn the Power switch on the subwoofer’s back panel Off and
unplug the AC power cord.
• The control dock has an attached cable. Connect the end of
that cable to the matching jack on the subwoofer.
• Use the supplied twin-conductor speaker cables to connect
the satellite speakers to the binding-post output terminals on
the subwoofer’s back panel. Follow these directions carefully
to ensure correct operation. Loosen the nuts on the speaker
binding posts until the holes through the metal posts are
fully exposed. For each conductor, insert the bare wire at the
end through one of the binding post holes and screw the nut
on the post down finger-tight against the wire. Make
sure that no strands of bare wire touch between adjacent
black and red binding posts as this may cause amplifier
malfunction or damage. Also be sure that the conductor
attached to the black (negative) terminal on each satellite is
attached to the matching black spring clip on the subwoofer
panel and that the red (positive) terminal on each satellite is
connected to the matching red spring clip on the subwoofer
panel. Reversing these connections (black to red and red to
black) will reduce bass output and impair overall sound quality.
The dashed line on the speaker cable will help in making
a correct connection.
• Attach the female end of the power cord to the matching
socket on the subwoofer and the male end to an AC
wall outlet.
• The speakers can be used with or without their grilles
attached. The grilles are held in place by magnetic catches.
To remove a grille, pull it forward; to replace, line its edges
up with the speaker’s front panel and let it snap into position.
WARNING: Do not attempt to remove the subwoofer
grille as it is permanently attached.
Page 3

iFi SPEAKER SYSTEM
Auxiliary Audio Input
The control dock also has a 3.5mm stereo minijack auxiliar
input on its back panel. It allows you to listen to an external source
(a portable CD player, for example) through the system. When a
plug is inserted in this jack, the system automatically switches to
the auxiliary input. To switch back to the iPod, disconnect the
auxiliary input.
A similar input on the subwoofer’s back panel can also be used
with an external source, but it is primarily intended to connect to
the audio output of a computer.This input is mixed with the
signal from the dock, whether from the iPod or from the
auxiliary input so that both sources are heard simultaneously.
This allows for, as an example, the sound from your computer to
be heard while music is playing from an iPod in the dock.
Subwoofer and Speaker Placement
Although you can place the components of the iFi system almost
any way that is convenient, speaker location will affect sound
quality.The subwoofer will generally perform best when placed on
the floor in a corner.A good second option is to place it 6 to 12
inches from a wall. The farther it is moved toward the middle of
the room, the lower the bass output will be.
You will get the best stereo effect with the satellite speakers
placed equidistant from the listening position. Wide separation will
tend to make the sound more spacious. If possible, avoid locating
either satellite closer than two feet from a side wall. Place them at
seated ear height. If that is not practical, adjust the stands’ ball
joints to aim the satellites up or down toward the listening position.
Stand Adjustment and Wall Mounting
The speakers attach to their stands via a ball joint that allows them
to be swiveled over a wide range.
supplied hex wrench from undernea
screws in the clamp pla
speakers as desired and tighten the f
over tighten! Each stand also incorpora
to prevent the speaker from drooping after its angle is adjusted.
ou can access the head of this down stop from the bottom side
Y
of the stand.
To adjust the angle, un-snap the
th the base, loosen the four
t surrounds the ball joint.
te tha
our clamp screws.
tes an adjusta
y audio
Position the
Do not
ble down stop
Also on the underside of the base are three (3) keyholes that
enable the stand to function as a wall mount. To install, follow the
instructions below:
1. Using a #2 Philips screwdriver, remove the four (4) screws
that attach the oval metal plate to the bottom the
speaker base.
2. Using the metal plate as a template, mark the screw
locations for the three (3) keyhole slots in the desired
location on the wall. The single keyhole slot must be located
at the top.
3. Screw #8 pan head wood screws (at least two inches/
51mm long) into a wood stud or dry wall anchors with a 20
pound (9 kg) or greater load rating. Leave the screw heads
protruding from the wall surface approximately 1/4" (~7mm).
4. Make sure the small rubber feet are facing the wall and
place the oval metal plate onto the screws through the key
hole slots. Slide the metal plate down into position and
adjust the tightness of the screws for a snug fit.
5. Remove the metal plate from the wall by sliding it up and off
the screws.
6. Remove the logo from the speaker base by compressing its
split post on the underside and rotate it 180° for
proper orientation.
7. Replace the oval metal plate onto the base of the speaker
using the four (4) screws removed in Step #1. Do
not over-tighten!
8. Remove the included hex wrench from the underside of the
speaker base. Loosen the four hex head screws on the
speaker’s ball joint assembly and rotate the base up and
behind the speaker.
9. Gently tighten the four ball joint screws to secure the
speaker’s position.You may need to fine-tune the speaker’s
angle after mounting it to the wall.
10. Hook the speaker base keyholes on the screw heads
protruding from the wall. Slide the base downward onto the
screws to lock the speaker in place.
11. If the speaker will be mounted over the location where the
speaker wire emerges from the wall, thread the wire through
the hole in the speaker base by removing the cosmetic plug.
12. Connect the speaker wire to the speakers binding posts.
13. Fine tune the speaker’s angle and tighten the ball socket
hex screws with the wrench. Do not over-tighten!
14. Store the hex wrench in the bottom of the base cover by
snapping it into the speaker base.
Page 4

RF Remote Control
Your radio-frequency (RF) remote control comes with its battery
installed. If you find the remote control is conflicting with another
nearby iFi system, see the “Remote Control” section for instructions on synching the dock with the remote control.
SYSTEM OPERATION
Power
The Main Power switch on the rear of the iFi subwoofer must be
On for the system to operate. You can switch the system between
Standby and On modes from the control dock or with the remote
control. The Power LED on the control dock will glow amber in
Standby mode and green when the system is On. No light indicates
that the Master Power switch on the subwoofer is turned Off or
that the power cord is unplugged.
To adjust the subwoofer level, first push the Volume/Subwoofer
Select button, then turn the Volume knob. The Light Bar will
now indicate the relative subwoofer level. Pressing the Volume/
Subwoofer Select button again will switch the knob back to master
volume control.
will automatically revert to master volume after five seconds.
Light Bar
The light bar on the control dock indicates current master
volume or subwoofer level, depending on the setting of the
Volume/Subwoofer Select button. Volume is indicated by
consecutive LEDs, from left to right. Muting the system turns all
the LEDs off.
When subwoofer level is being adjusted, the light bar will
indicate the relative subwoofer level as shown below.
REMOTE CONTROL
NOTE: When in the Subwoofer mode, the system
Standby/Mute Button
In Standby mode, pushing the Standby/Mute button will switch
the iFi system On. If an iPod is in the dock, it will be turned On
as well.
When the system is On, pressing the Standby/Mute button will
mute the sound and pause the iPod. Pressing the button again will
unmute the system.
will switch the system to Standb
continue to charge.
Volume/Subwoofer Select Button
The default function of the Volume knob is to adjust the overall
sound level up and down. It can also be used to adjust the subwoofer output level relative to the satellites.
Pressing and holding the Standb
. In Standby mode, the iPod will
y
y/Mute button
The remote has five buttons to control basic player functions when
an iPod is in the dock. Because it uses radio-frequency (RF) rather
than infrared signaling, it does not have to be pointed at the iFi
dock. The remote control can operate the iFi system up to 100 feet
away, depending on conditions, and even works through walls and
floors! As long as the Master Power switch is in the On position
and the subwoofer is On, pressing the Play/Pause button on the
remote will switch the system from Standby to On.
Page 5

iFi SPEAKER SYSTEM
V
olume Up/Volume Down
Pressing the Volume Up button raises the sound level; pressing the
Volume Down button lowers the sound level.
Play/Pause
When the iPod is not playing, pressing the Play/Pause button once
will initiate play. When the iPod is playing, pressing the Play/Pause
button once will pause the current track. When the iPod is paused,
pressing the Play/Pause button once will resume play of the
current track.
Holding the Play/Pause button down for 3 seconds will switch the
iFi system and any iPod docked in it to Standby mode. The iPod
will continue to charge as long as the subwoofer’s Master Power
switch is On.
Skip Forward/Skip Back
When the iPod is playing, pressing the Skip FWD button will skip to
the next track in the playlist. Pressing the Skip REV button skips
back to the beginning of the current track. Pressing the Skip REV
button at the beginning of a track skips back to the previous track
in the playlist. Holding the Skip FWD or Skip REV button down for a
few seconds will fast-forward or rewind the current track.
Synching the Remote to the Control Dock
As shipped from the factory, the Control Dock does not require that
the Remote Control be synched, meaning any iFi Remote will
control the system. If a conflict arises with multiple units being
operated in close proximity to each other, the Remote can be
matched to the Control Dock by holding down the Play/Pause
button for 10 seconds while the system is On. The unit will go into
standby mode and after 10 seconds will be properly synched.
From that point forward, the system will only work with Remotes
that have been synched.
CARE AND CLEANING
The only thing you should ever need to do to your speakers is dust
them occasionally. Never apply any abrasive or solvent-based
cleaner or any harsh detergent. You can clean the grilles with the
brush attachment of a vacuum cleaner.
TROUBLESHOOTING
iPod does not dock properly in the system
• Make sure the proper docking adapter for your iPod is
inserted in the control dock.
• Remove the iPod; check the connectors on the control
dock and the bottom of the iPod to ensure there are
no obstructions.
No sound
• Make sure the power cord is connected to the rear of the
subwoofer and to an AC outlet, that the master power switch is
set to the On position, and that the iFi system is switched On.
The power LED on the control dock should be green.
• Make sure the iPod is seated properly in the control dock,
turned On, and playing.
• If an external device is connected to the control dock’s
auxilary input, make certain that device is On and playing.
If you are trying to listen to an iPod in the dock, unplug the
cable from the auxiliary input on the control dock.
• Make certain that the volume is turned up, as indicated by
the Light Bar on the control dock.
iPod not charging
• Make sure the iPod is properly seated in the control dock.
• Make sure the system is plugged in and that the Master
Power switch on the subwoofer’s rear panel is turned On.The
iPod will not charge if the Master Power switch is in the
Off position.
IMPORTANT: Unless there is a conflict, there is no need to synch
the remote control. When a conflict does arise, in order to keep the
remotes from synching to both systems, one system should be
unplugged while the remote for the other system is synching. Once
this procedure has been completed, it should be repeated for the
second system, being certain to unplug the first system.
If you have additional questions regarding your new iFi purchase,
please contact Klipsch customer service at 1-800-KLIPSCH.
Remote Control Battery Replacement
To replace the battery, remove the two screws on back of the
remote and disassemble as shown.
Remote control will not operate the system
• Make sure the battery is properly installed.
• If the battery is old, it may need to be replaced.
Remote control conflicts with another nearby iFi system
• To avoid conflicts the remote needs to be properly synched to
the system. Use the procedure detailed in the “Remote Control”
section to synch the remote control to the iFi control dock.
WARRANTY—U.S. AND CANADA ONLY
KLIPSCH, LLC ("KLIPSCH") warrants this product to be free from
defects in materials and workmanship (subject to the terms set
forth below) for a period of one (1) year from the date of purchase.
During the warranty period, KLIPSCH will repair or replace (at
KLIPSCH's option) this product or any defective parts. Proof of
purchase in the form of a bill of sale or receipted invoice from an
authorized Klipsch dealer
within the warranty period,
warranty ser
misuse,
or modifica
not cover dama
installa
someone authorized b
unauthorized repairs will void this warranty
not cover product sold
vice.
buse, negligence, acts of God, accident, commercial use
a
tion of,
or attempted repair by anyone other than KLIPSCH or
tion,
which is evidence tha
,
must be presented or included to obtain
This warranty does not cover damage due to
or to any part of this product. This warranty does
ge due to improper opera
y KLIPSCH to do warranty work.
WITH ALL FAULTS.
AS IS or
t this product is
tion, maintenance or
Any
This warranty does
.
Page 6

This warranty is invalid if the factory applied serial number or date
stamp has been altered or removed from this product.
• Consult the dealer or an experienced radio/TV technician
for help.
REPAIRS OR REPLACEMENTS AS PROVIDED UNDER THIS
WARRANTY ARE THE EXCLUSIVE REMEDY OF THE CONSUMER.
KLIPSCH SHALL NOT BE LIABLE FOR ANY INCIDENTAL OR
CONSEQUENTIAL DAMAGES FOR BREACH OF ANY EXPRESS OR
IMPLIED
WARRANTY ON THIS PRODUCT. EXCEPT TO THE EXTENT
PROHIBITED BY LAW, THIS WARRANTY IS EXCLUSIVE AND IN LIEU
OF ALL OTHER EXPRESS AND IMPLIED WARRANTIES WHATSOEVER, INCLUDING BUT NOT LIMITED TO,THE WARRANTY OF
MERCHANTABILITY AND FITNESS FOR A PRACTICAL PURPOSE.
Some states do not allow the exclusion or limitation of incidental
or consequential damages or implied warranties so the above
exclusions may not apply to every customer. This warranty gives
you specific legal rights, and you may have other rights which vary
from State to State.
To obtain warranty service, please follow these directions:
1. If you purchased this product from a retail store, please return
this product to such store in its original packaging along with
proof of purchase.
2. If you purchased this product from a computer manufacturer,
please contact that manufacturer.
3. For purchases made through www.klipsch.com, please call
KLIPSCH Customer Service at 1-888-554-5665. Product may
only be returned to KLIPSCH after a Return Authorization
number has been obtained from KLIPSCH.
Returned product must be shipped, freight prepaid to KLIPSCH in
either its original packaging or packaging affording an equal
degree of protection along with proof of purchase.
WARRANTY OUTSIDE THE UNITED STATES AND CANADA
The Warranty on this product if it is sold to a consumer outside of the
United States or Canada shall comply with applicable law and shall be
the sole responsibility of the distributor that supplied this product. To
obtain any applicable warranty service, please contact the dealer from
which you purchased this product, or the distributor that supplied this
product.
FCC AND CANADA COMPLIANCE INFORMATION:
Note: This equipment has been tested and found to comply with
the limits for a Class B digital device, pursuant to part 15 of the
FCC Rules. These limits are designed to provide reasonable
protection against harmful interference in a residential installation.
This equipment generates, uses and can radiate radio frequency
energy and, if not installed and used in accordance with the
instructions,
tions.
occur in a particular installation. If this equipment does cause
harmful interference to radio or television reception, which can be
determined by turning the equipment off and on, the user is
encouraged to try to correct the interference by one or more of the
following measures:
• Reorient or relocate the receiving antenna.
• Increase the separation between the equipment and receiver.
• Connect the equipment into an outlet on a circuit different
may cause harmful interference to radio communica-
However, there is no guarantee that interference will not
from that to which the receiver is connected.
Modifications not expressly approved by the manufacturer could
void the user's authority to operate the equipment
under FCC rules.
This class B digital apparatus complies with Canadian ICES-003.
Cet appareil numerique de la classe B est conforme a la norme
NMB-003 du Canada.
iFi Transmitter Information
This device complies with part 15 of the FCC Rules. Operation is
subject to the following two conditions:
1. This device may not cause harmful interference, and
2. this device must accept any interference received, including
interference that may cause undesired operation.
L'utilisation de ce dispositif est autorisee seulement aux conditions
suivantes :
1. il ne doit pas produire de brouillage et
2. l'utilisateur du dispositif doit etre pret a accepter tout
brouillage radioelectrique recu, meme si ce brouillage
est susceptible de compromettre le fonctionnement du
dispositif.
iFi Receiver Information:
FCC Declaration of Conformity
Trade Name: Klipsch Audio Technologies
Product Name: Klipsch iFi Audio System
Model Number: iFi
These devices were tested and found to comply with Part 15 of the
FCC Rules. Operation is subject to the following conditions: The
devices may not cause harmful interference, and the devices must
accept any interference received, including interference that may
cause undesired operation.
Responsible Party
Manufacturer: Klipsch Audio Technologies
Address: 3502 Woodview Trace, Suite 200
Indianapolis, IN 46268
Telephone: 317-860-8100
Date: 3/3/05
Signature:
Printed Name: Clinton Bradley
 Loading...