

Page 1

1
acurusacurus
by Mondial
Advanced Bass Management upgrade
for the ACT 3
Page 2

2
Contents
Introduction ............................................................................................................................................. 2
Features ................................................................................................................................................... 2
Section 1: Speaker Settings....................................................................................................................... 3
General Operation ................................................................................................................................3
Section 2: Crossover Settings ................................................................................................................... 4
Section 3: Dolby Digital........................................................................................................................... 4
Quick Setup Guide: Stereo Mode.............................................................................................................. 5
Quick Setup Guide: Dolby Digital (Pro-Logic).......................................................................................... 6
ACT-3 Advanced Bass Management System
Introduction
The Advanced Bass Management upgrade option for the ACT-3 surround sound processor provides even
more flexible Bass Management, for those systems that require it. As Dolby is a company that licenses its
technologies for components that are sold to a broad spectrum of consumers, it is essential that there
remain compatibility within the products that they approve. In the case of Bass Management, this
compatibility refers to a speaker’s ability to handle a full range signal without damage.
Dolby Digital contains an extra, .1, or LFE channel, which is a limited bandwidth (20Hz-120Hz) channel.
Dolby recommends that this channel only contain information below 80Hz whenever possible. A system
can have a subwoofer that only reproduces the LFE channel, or the subwoofer can reproduce the LFE
channel, as well as bass from other channels in the system, that may not be as adept at reproducing lower
frequencies. The function of Bass Management is to redirect these low frequencies, when necessary, to
speakers that are better designed to handle them, such as the subwoofer. Within this document, LFE
refers to the .1 channel provided by a Dolby Digital soundtrack. Subwoofer will refer to the subwoofer
output as a whole, whether it contains just the LFE channel or a downmix of information from other
speakers as well.
We understand that not all speakers are capable of reproducing a full range signal, however we also
understand that most speakers that will be present in a high end system will be capable of handling a full
range signal without any detrimental effects. This was the concept of Configuration 0 in the original
ACT-3 Bass Management options. Configuration 0 allows you to run a full range signal to each speaker,
while also sending this signal to the subwoofer to be reproduced. Once the subwoofer’s crossover is
properly set to blend with the five main speakers, the resulting sound is the most complete and full sound
you will obtain from a system leaving virtually no frequencies unheard.
Although ideal in most cases, the inability to make adjustments to the original Bass Management scheme
limits its flexibility and compatibility in certain situations. Systems that do not contain subwoofers,
contain passive subwoofers that do not have crossovers, or contain a center and/or rear speakers that are
small and unable to handle a full range signal are not able to offer the best sound the ACT-3 has to offer.
These Bass Management advancements are ideal for these situations. As we offer this as an after-market
upgrade to the existing system, we also have the ability to offer some features that we feel are necessary,
such as the ability to optimize the system by mode, instead of just by the type of speakers in the system.
Features
• Adjustable low pass and high pass filters with low crossover points for larger speakers
• Automatic optimization depending on mode
• Separate Bass Mode setting for Stereo
• Subwoofer output can be defined as LFE only, or LFE plus a downmix of all channels for
use as a “true subwoofer”
• Subwoofer output can be full range, or low pass filtered
• LFE summer for 5.0 DTS soundtracks
• Digital Input Memorization
Page 3
3
Section 1: Speaker Settings
General Operation
The Bass Management system is accessed in the same manner as the previous system was. You must be
in the “Test Setup” mode, before you can make adjustments to the Bass Management options. With the
new system, you have the ability to have separate settings for Stereo listening and the surround modes
(Dolby Digital, and Pro-Logic). The Bass Management system is not utilized during DTS (as is suggested
by DTS) , or DSP mode operation allowing full range signals to all channels. The separate settings include
high pass/low pass filters, as well as the usual level adjustments. In Stereo and Pro-Logic, the subwoofer
will always be available(previously, using a Bass Configuration where the subwoofer was LFE only,
eliminated the subwoofer in Stereo and Pro-Logic) . Setting the Subwoofer to NO lowers the volume to 0.
While in the desired mode, press the Test button, and then press the B.Modes button to access the
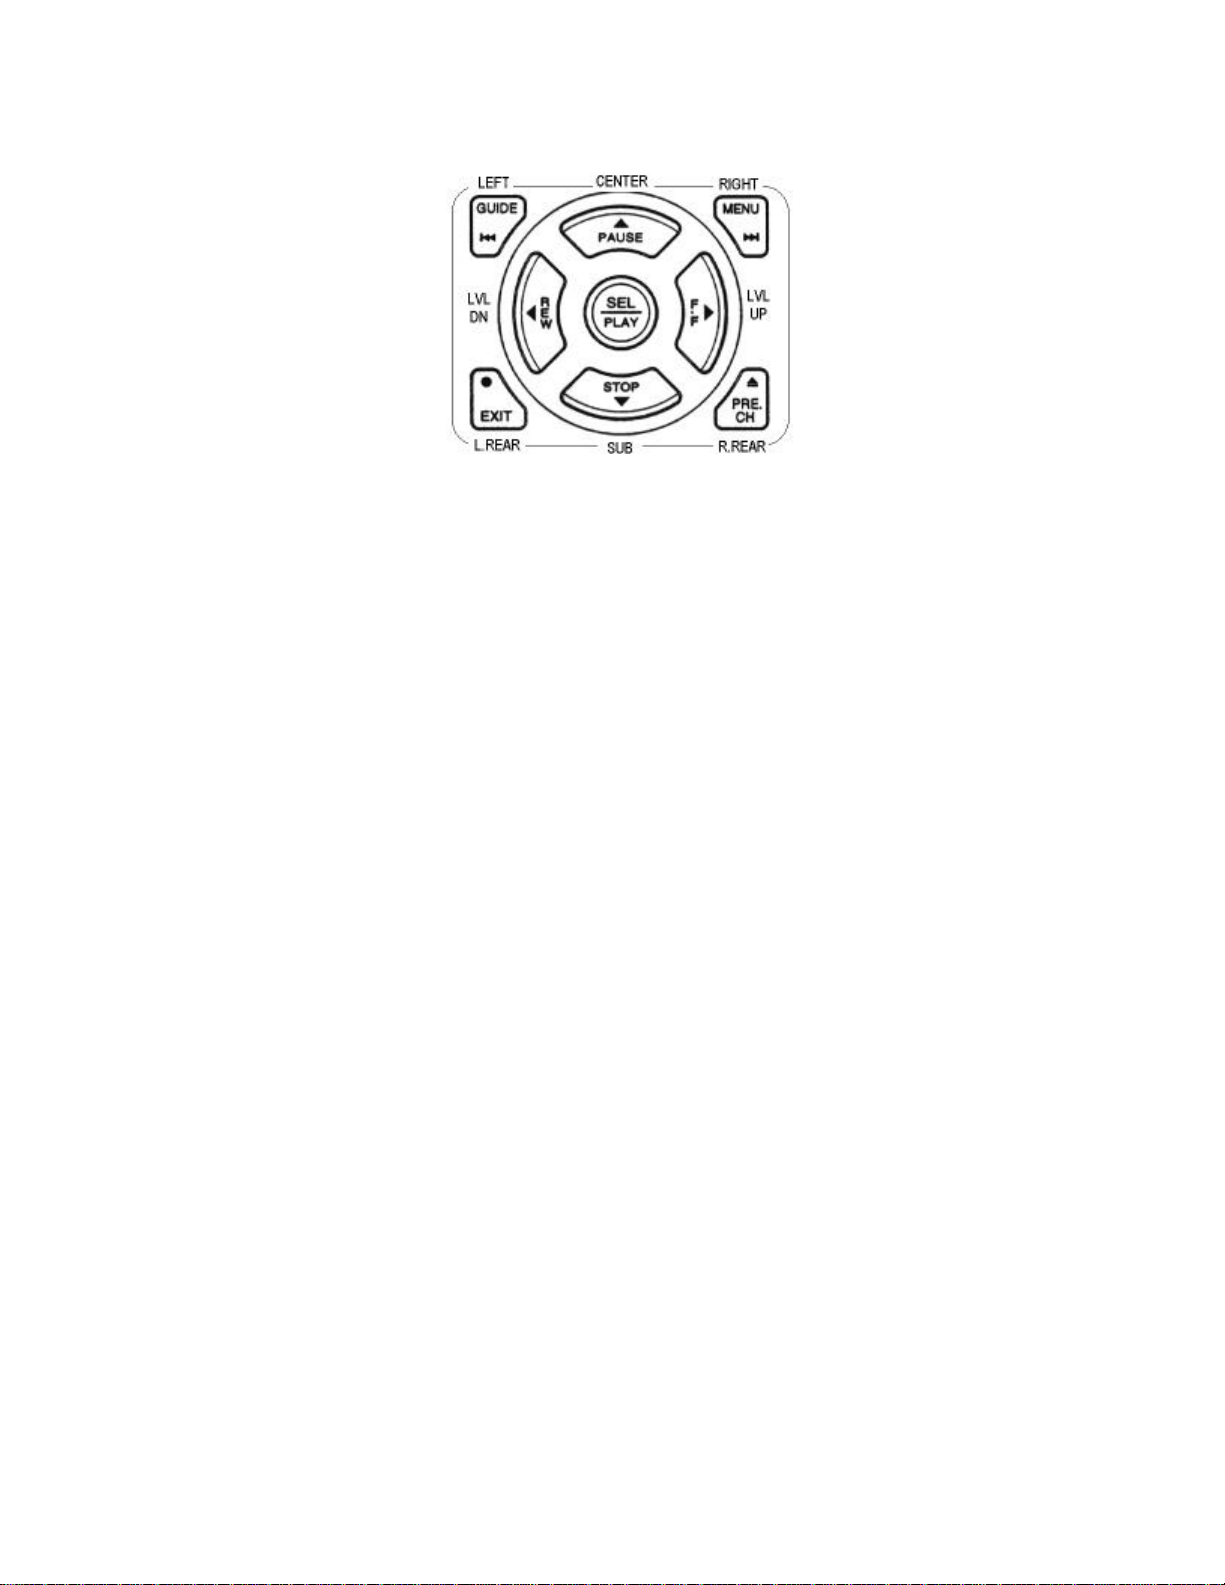
adjustments. Select the desired speaker by pressing the corresponding button in the speaker selection grid
in the middle of the remote. (See Above)
For each of the five main speakers you will have the choice of No Crossover, or With Crossover.
Selecting No Crossover sends a full range signal to that set of speakers. Selecting With Crossover sends
the signal for that channel through a high pass filter, of which the crossover frequency is selectable. Press
the LVL DN key to set the speaker up for a crossover. The speakers are automatically set up in pairs. For
example, if you change the Left Front speaker to With Crossover, when you access the Right Front
speaker it will already be set to With Crossover.
The Subwoofer can be set to either YES, or NO. The LVL DN button corresponds to YES. Different
subwoofer settings will have different effects on the overall Bass Management settings, especially in
Dolby Digital. A subwoofer setting of NO, in Dolby Digital, requires that the LFE channel be distributed
to the Large speakers in the system. When the LFE channel is rerouted to another channel in the system,
the channel it is rerouted to requires attenuation according to Dolby standards. This is done to
accommodate for the worst case scenario in which you have a 0dB Full Scale signal in both the LFE
channel, as well as the channel the signal is rerouted to. If the system were to avoid attenuating the
channel, an overload would occur in the DSP chip which could result in the damage of your amplifiers
and/or loudspeakers. We have limited the attenuation to the minimum amount necessary.
There is essentially no down side to this attenuation other than the loss of overall gain. However, it is not
always necessary to reproduce the LFE channel. The LFE channel in Dolby Digital normally contains no
extra information. Its presence is merely to augment the bass response for speakers which cannot
necessarily handle a full range (20 Hz – 20 kHz) signal.
Page 4

4
From the Dolby Laboratories website: http://www.dolby.com/digital/l.in.9901.makingthemost.html
“A final factor to consider is that the ".1 track" is ignored by Dolby Digital's downmixing process, so it
should include no vital information that would be missed in mono, stereo, or Pro Logic playback.”
To achieve the best sound from your ACT-3, we offer the following suggestions:
1. Use the ACT-3 with a subwoofer. Even if you have “full range” loudspeakers, most speakers will not
produce high quality bass below 40 Hz. (certainly check the specifications on your loudspeaker, or
contact the manufacturer) A subwoofer can greatly enhance your system, and allow you to get the full
benefits from digital 5.1 surround software. For DTS listening we strongly recommend a subwoofer,
as the DTS decoder does not utilize the Bass Management system so the LFE channel in DTS cannot
be rerouted to other channels
2. If you do not have a subwoofer, setting the subwoofer to YES in the Bass Management system will
eliminate the need for any attenuation. If you are having a gain problem due to the attenuation, this is
the recommended setting.
To Exit the Bass Management Setup, simply press the B.MODES button again. Your settings are
automatically saved whenever a change is made. There is no need to exit using the ENTER button to
save your settings.
Section 2: Crossover Settings
While in the Bass Management setup mode, pressing the SEL/PLAY button in the center of the speaker
selection grid will access the crossover setting menu. This crossover setting pertains to the high pass,
AND the low pass filter, if in use. If you currently have any speaker set to utilize a High Pass Filter, The
screen will read:
All Crossovers
50 Hz
Pressing the LVL UP button increases the crossover frequency. Pressing the LVL DN key decreases the
crossover frequency. The following frequencies are available:
35 Hz, 40 Hz, 45 Hz, 50 Hz, 60 Hz, 65 Hz, 70 Hz, 80 Hz, 90 Hz, 100 Hz, 125 Hz
Crossovers are 2nd Order filters, to allow integration with a larger array of loudspeakers.
Select the desired crossover frequency. This frequency will pertain to any channel listed in the Bass
Management With Crossover. Pressing the SEL/PLAY button again brings you to the Sub Out X-Over
selection. You have a choice of YES, or NO as to whether or not you would like the subwoofer output to
utilize a low pass filter. If you select YES, the low pass filter on the sub output will be the same
frequency as the high pass filter. If you select no, the subwoofer output will be full range.
If you have not selected any of your speakers to utilize a high pass filter, you will not have the option to
select a high pass crossover frequency. The first available option will be Sub Out X-Over YES/NO.
It is recommended that whenever possible, you utilize the crossover built into your subwoofer, as it will be
better designed to suit that specific speaker design. If you are using the crossover built into the
subwoofer, we recommend you set the Sub Out X-Over option to NO, so that the two crossovers do not
conflict with each other.
Section 3: Dolby Digital
As Bass Management was essentially designed to accommodate the full frequency benefits that Dolby
Digital 5.1 now offers, DD is treated a bit differently in the Bass Management system. As noted above,
when bass from high pass filtered channels is rerouted to other channels, these channels need to be
attenuated to accommodate the added signal. We have limited this attenuation as much as possible while
allowing the system to operate without overload during worst case scenarios.
Page 5

5
If you have not done so, please read the suggestions listed in Section 1 regarding the subwoofer output,
and Dolby Digital. It is important that you understand how the ACT-3 must accommodate for the LFE
channel in Dolby Digital to get the most from your system.
The Dolby Digital Bass Management system has an extra option regarding the LFE channel. You can
designate the subwoofer output in Dolby Digital to reproduce just the LFE channel, or to reproduce the
LFE channel, as well as operate as a true subwoofer, reproducing the low frequencies of every channel.
The choice will depend on the type of speakers that you have, and their ability to properly generate low
frequency signals.
Insert a Dolby Digital DVD into the DVD player, and select that input to allow the ACT-3 to autoselect
Dolby Digital. Press the test button to access the “test setup” and then press the B.Modes button to access
the Bass Management setup. In the Speaker Selection Grid, choose the subwoofer, and set it accordingly,
YES, or NO. Pressing the Subwoofer button again will allow you to choose whether you want the
subwoofer to be LFE only, or LFE + Downmix which gives you a true subwoofer. This setting only
applies to Dolby Digital, and does not effect the Bass Management in any other mode.
*Note: Due to LFE constraints, when making changes to the LFE mode for Dolby Digital, these changes
may not take effect right away, but will take effect the next time Dolby Digital is loaded.
Quick Setup Guide: Stereo Mode
1. Power up the ACT-3, and be sure the display indicates that you are in Stereo mode.
2. Press the TEST button on the remote to enter the Test Setup Mode.
3. Press the B.MODES button to enter the Bass Management Setup.
The front panel will indicate
Front Left
No Crossover
The default Bass Configuration is Left and Right speakers without a crossover (receiving a full range
signal), using a subwoofer. If this is your desired setup, then you have completed the Stereo Bass Mode
Setup.
4. To utilize a crossover on the Main speakers for Stereo, hit the LVL DN button on the remote.
The front panel will indicate
Front Left
With Crossover
5. Press the SUB button.
The front panel will indicate
Subwoofer
YES
If your main speakers are set to utilize a crossover, you will not be able to turn off the subwoofer.
If you do not have a subwoofer connected to the system, it is suggested that you run the speakers set to No
Crossover to run them full range.
6. If you are running your main speakers without a crossover, and do not have a subwoofer, press the
LVL UP button to set the subwoofer to NO.
Page 6

6
7. Press the SEL/PLAY button. If you are utilizing a crossover on the main speakers,
the display will read
All Crossovers
50 Hz
(available options from 35 Hz – 125 Hz)
8. Using the LVL UP and LVL DN keys, choose the desired crossover frequency.
This frequency corresponds to both the High Pass filter for the Main speakers, as well as
the Low Pass filter for the subwoofer output.
9. Press the SEL/PLAY button again to select whether or not you would like a Low Pass filter on
the subwoofer output. The display will read
Sub Out X-Over
NO
10. If your subwoofer has no built in crossover, select YES by using the LVL UP or LVL DN buttons.
We suggest you use the crossover built into your subwoofer whenever possible.
11. Press the B.MODES button to exit the Bass Mode Setup.
Quick Setup Guide: Dolby Digital (Pro-Logic)
1. Power up your DVD player, and insert a Dolby Digital disc. (a Laser Disc player can be used just as
effectively)
2. Power up the ACT-3, select your DVD input, and be sure the display indicates that you are in Dolby
Digital mode.
3. Press the TEST button on the remote to enter the Test Setup Mode.
4. Press the B.MODES button to enter the Bass Management Setup.
The front panel will indicate
Front Left
No Crossover
The default Bass Configuration is all speakers without a crossover (receiving a full range signal), using a
subwoofer.
To utilize a crossover on the Left and Right Main speakers , hit the LVL DN button on the remote.
The front panel will indicate
Front Left
With Crossover
4. Press the CENTER button and, as above, select whether or not you would like a crossover on this
speaker.
5. Press the L.REAR or R.REAR button and, as above, select whether or not you want a crossover on
these speakers.
6. Press the SUB button. If you have a subwoofer in your system, this should be set to YES. Use the
LVL DN button to set to YES.
Page 7

7
7. Press the SUB button again. The display will read
Subwoofer
LFE + Downmix
Using the LVL UP or LVL DN buttons, you can toggle between LFE Only*, or LFE +
Downmix. LFE only will set the subwoofer up to reproduce only the LFE channel, and any speakers set to
With Crossover. LFE only + Downmix will set the subwoofer up to reproduce BOTH the LFE channel, as
well as the bass from all other channels.
*The display may read (LFE Only, LFE+C/LS/RS Bass,LFE+ LS/RS Bass, or LFE+ LF.RF Bass)
8. Press the SEL/PLAY button to adjust the crossovers. If you have any of the main speakers set With
Crossover, the display will read
All Crossovers
50 Hz
(available options from 35 Hz – 125 Hz)
9. Using the LVL UP and LVL DN keys, choose the desired crossover frequency. This frequency
corresponds to both the High Pass filter for the Main speakers, as well as the Low Pass filter for
the subwoofer output
10. Press the SEL/PLAY button again to select whether or not you would like a crossover on the
subwoofer. Use the LVL UP and LVL DN buttons to toggle between YES and NO. Whenever
possible, we suggest you use the crossover built into the subwoofer.
12. Press the B.MODES button to exit the Bass Management Setup.
Extra Features
During the production of the ACT-3, we have adjusted the software operating system. This change has
been incorporated within this software. The ACT-3 now has the ability to “memorize” an input as Digital.
There are certain DVD players on the market, that do not always output a digital signal whenever the
player is on. In previous software, the ACT-3 required the presence of this digital signal at turn on, or
when the DVD input is selected to recognize the digital output. We have adjusted the software to
accommodate those players that do not always have a digital output present. Once a digital signal is
recognized by the ACT-3, that input is now “memorized” as a digital input, and will default to digital
whether or not a digital signal is present, indicated by the D at the bottom right hand corner of the display.
If you have removed the digital signal from that input, simply press the select button, and it will “erase”
the input memory.
To this Bass Management system, we have also added a DTS LFE summer. It has come to our attention
that certain DTS DVD movies, such as “Waterworld” do not contain a .1 track. By adding this LFE
summer, it allows you to have subwoofer output in DTS by summing the signal from all channels and
feeding it to the subwoofer output. While in DTS, this mode is accessed by hitting the SEL/PLAY button
in the center of the speaker selection grid.
Further documentation can be found on our website at:
http://www.mondialdesigns.com/acurus
Located on the ACT-3 webpage
 Loading...