

Page 1
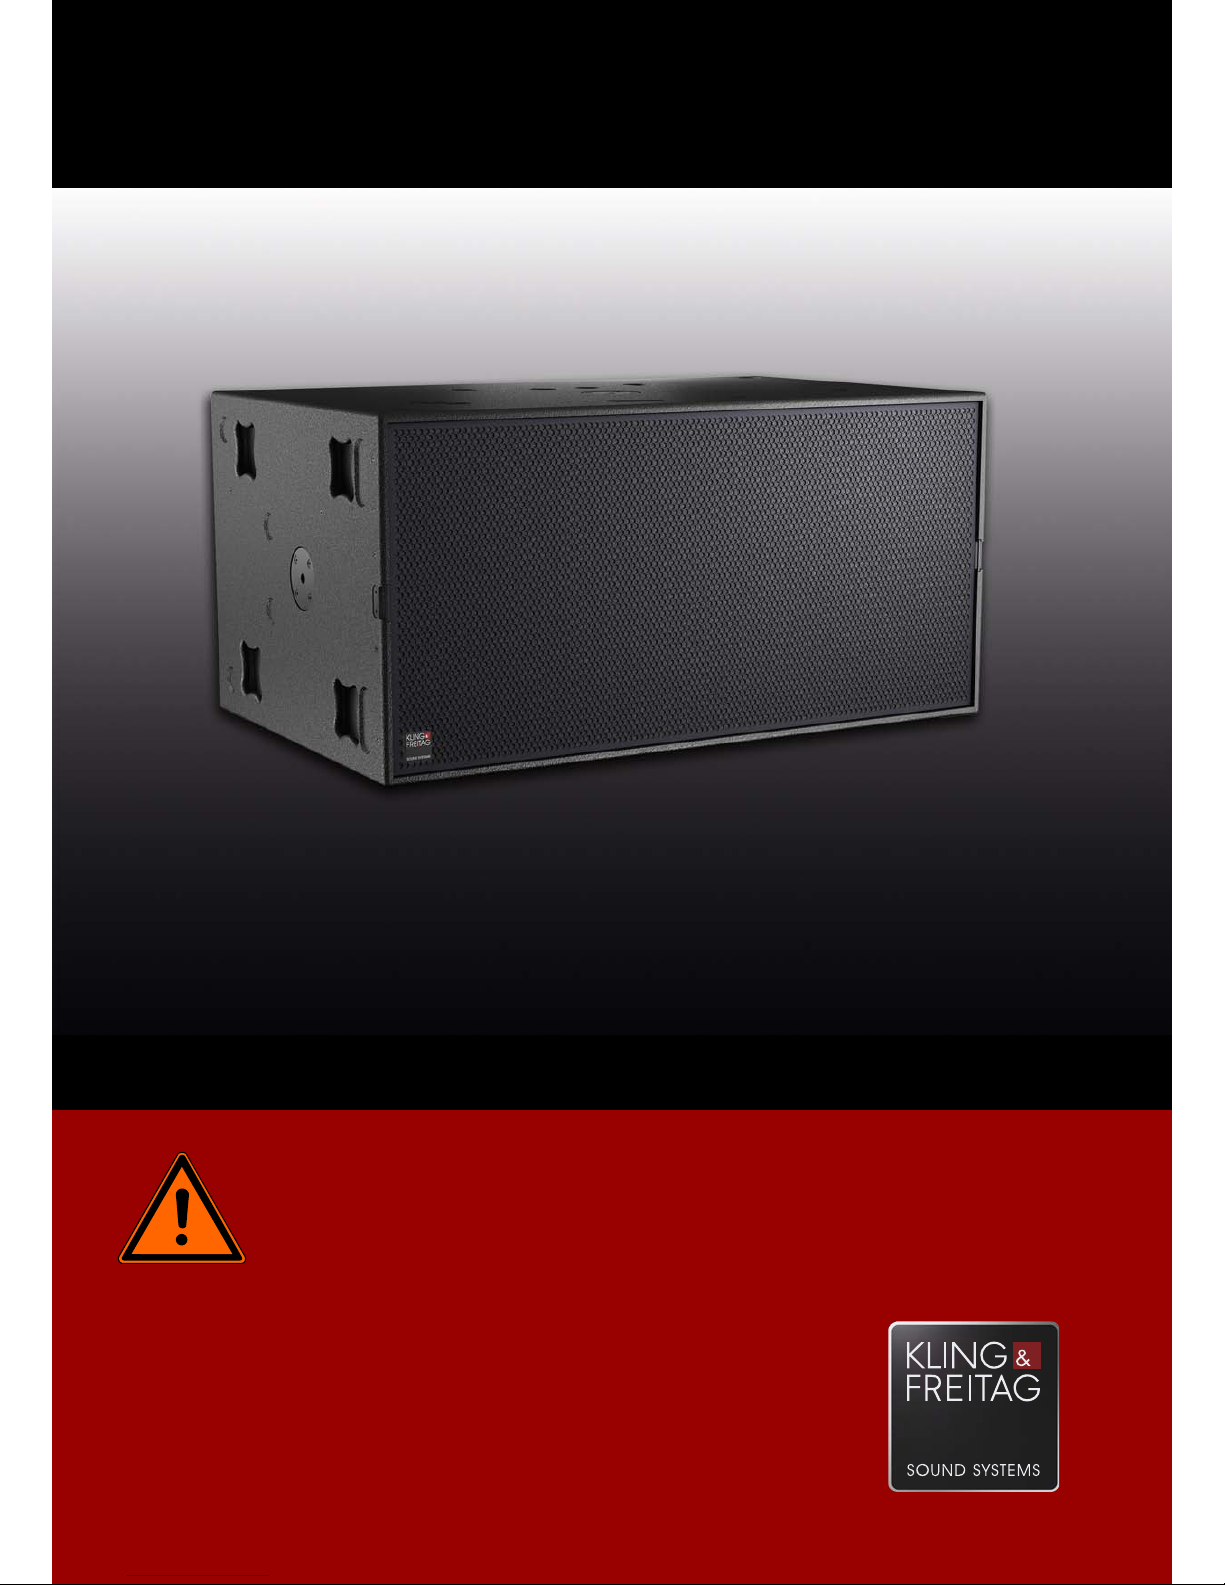
K&F NOMOS XLT
Important Information,
Please Read Before Use!
KLING & FREITAG GmbH
Junkersstraße 14
D-30179 Hannover
TEL +49 (0) 511 96 99 70
FAX +49 (0) 511 67 37 94
www.kling-freitag.de
User's Manual
Translation of the original instructions
Version 1.7
Released: 30.03.2017
Page 2

Page 3

User's Manual K&F NOMOS XLT
KLING & FREITAG GMBH © 2017 Version 1.7 Page 3 of 23
Table of contents
1
Introduction 4
1.1 Icons Used 4
1.2 About this Manual 4
2
Product Description 5
2.1 Items Included 5
2.2 Components 5
3
Safety Instructions 6
3.1 Notes for Mounting the Speakers 6
3.2 Instructions for Speaker Stacking 6
3.3 Protecting the Speakers / Operating Safety 7
4
Setup 8
4.1 Removing the Transport Covers 8
4.2 Stacked Setup 8
5
Configuration and Connecting Diagram 9
5.1 System Requirements 9
5.2 Terminal assignment 10
5.3 NOMOS XLT combined with other K&F tops. 11
5.4 Cardioid Arrays with NOMOS XLT 12
5.4.1 Setup instructions for a cardioid array 12
5.4.2 LSBlocks for cardioid use 13
5.5 Cardioid Configurations with different Speakers 14
6
Fuse in the NOMOS XLT 14
6.1 Replacing the Fuses 14
6.2 Replacing the Chassis 14
7
Measuring Diagrams 15
8
Dimensions NOMOS XLT 17
9
Technical Specifications 18
10
EC Declaration of Conformity 19
11
Accessories 19
12
Care and Maintenance 21
13
Transportation and Storage 21
14
Disposal 21
14.1 Regulations for Disposal 21
14.1.1 Germany 21
14.1.2 EU, Norway, Iceland, and Liechtenstein 22
14.1.3 All Other Countries 22
Page 4
User's Manual K&F NOMOS XLT
KLING & FREITAG GMBH © 2017 Version 1.7 Page 4 of 23
1. Introduction
Thank you for purchasing a KLING & FREITAG product. To guarantee a trouble-free operating
of the equipment and to allow your KLING & FREITAG NOMOS XLT system to achieve its full
potential read the user's manual carefully before use. This item is a quality accessory for the
NOMOS XLT speaker system. As the owner of a NOMOS XLT loudspeaker, you now have a
versatile and highly professional tool which, when operated properly, is a true pleasure to
use.
1.1 Icons Used
Warning
This icon indicates a risk of injury or death. Not following these instructions may result in
serious health problems including potentially fatal injuries.
Caution
This icon indicates a possibly dangerous situation. Not following these instructions may cause
minor injuries or damage.
This icon marks instructions for proper use of the described products. Not following these
instructions may cause malfunctions or damage.
Tip
This icon marks information provided for simplified use of the described products.
1.2 About this Manual
© KLING & FREITAG GmbH. All rights reserved.
All specifications regarding the features of the described products and applicable safety
guidelines provided in this manual are based on information available at the time of
publishing.
We assume no responsibility for technical specifications, dimensions, weights, and properties.
All information in this manual is subject to change without notice.
All persons who use the speaker system must have this guide and all further information
for safe operations available to them during assembly, disassembly, and use. The speaker
system may neither be set up nor used until these user's manual has been read, understood
and kept readily available in site.
All KLING & FREITAG manuals are originally authored in German.
KLING & FREITAG spare manuals are separately available for order or can be downloaded
from our website: www.kling-freitag.de.
Contact Us: info@kling-freitag.de
KLING & FREITAG GMBH, Junkersstr. 14, D-30179 Hannover
Phone +49 511 96 99 70, fax +49 511 67 37 94 (other countries)
Page 5
User's Manual K&F NOMOS XLT
KLING & FREITAG GMBH © 2017 Version 1.7 Page 5 of 23
2. Product Description
2.1 Items Included
• Subwoofer NOMOS XLT
• User's Manual
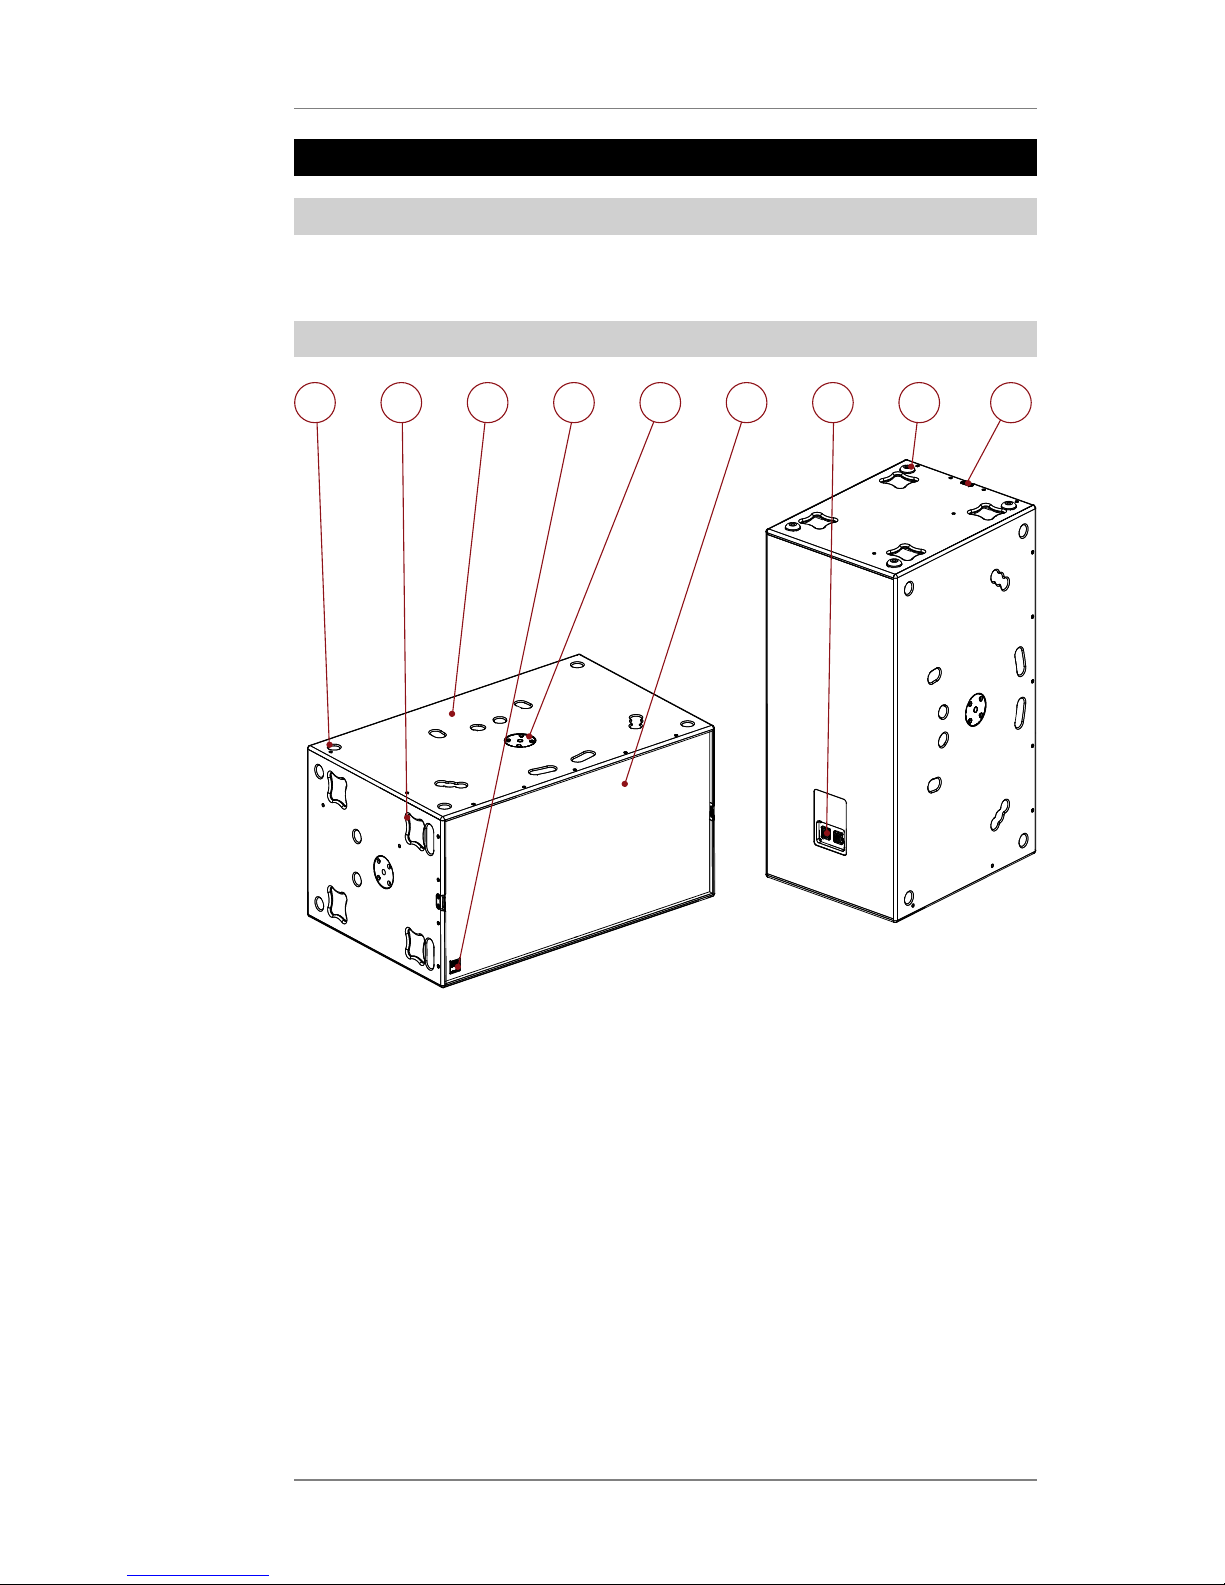
2.2 Components
1
2
3
5
6
7
8
9
4
1. Stacking grooves (8x) , adjacent: plastic glider
2. Butterfly handles (8x)
3. speaker enclosure
4. Speakon connector, front (behind company logo)
5. Threaded stand flange
6. Front grille with acoustic foam
7. SpeakOn connector
8. Plastic glider (8x) , adjacent: stacking grooves
9. locking profiles for transport cover (2x)
Page 6
User's Manual K&F NOMOS XLT
KLING & FREITAG GMBH © 2017 Version 1.7 Page 6 of 23
3. Safety Instructions
Warning
For commercial use as specified in this document only!
To prevent personal injury and damage, be sure to securely place or suspend the speaker as
specified in the locally applicable standards.
The information described here does not relieve the user of the duty to follow the given
safety requirements and legal regulations.
Only qualified technicians are permitted to perform the installation steps. Be sure to use
personal protective equipment at all times.
The persons in charge with putting up the speaker are responsible for safe setup and use and
must guarantee it.
In mobile and stationary installations, always use installation parts supplied by KLING &
FREITAG.
Unless otherwise stated, use KLING & FREITAG original parts only. Never use other parts (in
particular, parts not made by KLING & FREITAG).
Be sure to always visually inspect all safety-related speaker and accessory components before
use. In fixed installations, check the speaker for signs of wear at regular intervals. If there are
signs of wear, cracks, or deformation, etc., replace the affected parts immediately.
Caution
Run the cables in a way that nobody can trip over them.
At least 2 people are necessary to carry the speaker.
Preventing Hearing Damage
Keep your distance from operating speakers. Even loudness levels of approx. 90 dB - that you
subjectively judge as being low - can lead to hearing damage.
3.1 Notes for Mounting the Speakers
Warning
Mount the speakers securely. To avoid injury or damage, always be sure to mount the
speakers securely so that they do not fall.
Please note that speakers can move as a result of vibrations. To prevent them from falling
from their mounted position, they must be secured properly.
Run the cables in a way that nobody can trip over them.
3.2 Instructions for Speaker Stacking
Warning
Falling speakers pose the threat of fatal injuries to people near them!
Be sure to follow the relevant national specifications, norms, and safety regulations.
Always make sure that a sufficient safety level is still given, even when outside forces have
an additional impact on the stacked speakers. Before setup, carefully ascertain if there are
any possible outside forces that could result in the array falling over. (Slant of the ground /
the bearing capacity of the ground / wind / person or vehicle impact, etc.). A technical expert
who is responsible for the setup must evaluate and determine necessary measures (including
calculating the statics). If necessary, obtain expert proof of stability.
Stacked systems may not fall over even if they are inclined by 15° in each direction. If this
requirement is not fulfilled, then it is necessary to take steps to achieve compliance. Possible
measures include strapping it to an appropriate base structure or fastening it using safety
straps. A planned tilt of the loudspeakers ist not permissible. In calculations, the tilted setup
serves the purpose of levelling out unevenness.
Page 7
User's Manual K&F NOMOS XLT
KLING & FREITAG GMBH © 2017 Version 1.7 Page 7 of 23
With the set-up systems for which you cannot verify the structural safety without safeguards,
you must secure them to prevent sliding or tipping in order to provide proof of this safety. To
secure the system from tipping over, use water tanks or floor bolts. Other possible measures
include strapping it to a suitable substructure or tying it using safety straps.
For outdoor and trade fair venues in which wind loads must be considered, additional proof
of stability is necessary.
Make sure that the stacking feet of subwoofers stacked on top of one another are securely
positioned in the grooves of the lower speaker.
If you place a top speaker on a NOMOS XLT you must always strap the speakers to one
another and secure them from falling over.
3.3 Protecting the Speakers / Operating Safety
NOMOS XLT speakers may only be used in combination with a K&F SystemAmp/SystemRack.
In general, audio signals must not be overdriven. This may be caused by mixing consoles,
equalizers, effect equipment, etc. and should be indicated on this equipment. When a power
amplifier is overloaded at the output (clipping), then the amplifier activates a clipping
warning signal. In any case, the signal must be reduced as soon as it sounds unnaturally
distorted.
For damage caused by
• overloading the speakers or
• using the speakers without K&F SystemAmp/SystemRack
we do not assume warranty and excludes liability for possible consequential damage.
The following signals may damage the speakers:
• permanent high-level signals with high frequency and continuous noise from feedback,
• permanently distorted high-level signals,
• noises, which occur when the amplifier is on while equipment is being connected,
disconnected or switched on.
Do not install devices in any of the following places:
• where the devices are permanently exposed to direct sunlight.
• where the devices are exposed to high moisture or rain.
• where the devices are exposed to strong vibrations and dust.
Damage caused by the speakers' magnetic fields
Speakers are permanently surrounded by a magnetic field, even when they are not
connected. Therefore, during transport and placement of the speakers, it is important to
ensure that there is always approx. 1 m between the speakers and magnetic data media and
computer/video monitors.
Page 8

User's Manual K&F NOMOS XLT
KLING & FREITAG GMBH © 2017 Version 1.7 Page 8 of 23
4. Setup
4.1 Removing the Transport Covers
To remove the transport lid, turn the appropriate catches 180° to completely release the
latch.
Lift the lid from the speaker.
4.2 Stacked Setup
1) Securely place the bottom subwoofer
onto a level surface.
2) Stack the subwoofers on top of one
another. Make sure that the stacking
feet of subwoofers stacked on top of one
another are securely positioned in the
grooves of the lower speaker.
3) Stacked systems must be stable even if
they are inclined by 15 degrees without
additional additional securing.
If this is not the case the systems have to
be secured against falling over in order to
guarantee the stability of the stack.
For example:
Page 9

User's Manual K&F NOMOS XLT
KLING & FREITAG GMBH © 2017 Version 1.7 Page 9 of 23
5. Configuration and Connecting Diagram
5.1 System Requirements
K&F PLM+ 20k44 (SystemAmp, ProRental)
K&F PLM+ 12k44 (SystemAmp, ProRental)
K&F PLM+ 12k44 (SystemAmp, ProRental)
or
K&F D200:4 (SystemAmp, InstallSound)
K&F D120:4 (SystemAmp, InstallSound)
K&F D80:4 (SystemAmp, InstallSound)
(SystemAmp, InstallSound)
K&F D120:4 (SystemAmp, InstallSound)
K&F D80:4 (SystemAmp, InstallSound)
K&F D200:4
or
K&F SystemRack:
Please make sure to update your K&F systemamp or systemrack with the required LS Blocks,
starting with "NomXLT".
Page 10

User's Manual K&F NOMOS XLT
KLING & FREITAG GMBH © 2017 Version 1.7 Page 10 of 23
5.2 Terminal assignment
+
-
FRONT SPEAKERS
+
-
2
2+
1
1+
SPEAKON CONNECTORS
REAR
2
-
2+
1
-
1+
SPEAKON CONNECTOR
FRONT
2
2+
1
1+
Page 11

User's Manual K&F NOMOS XLT
KLING & FREITAG GMBH © 2017 Version 1.7 Page 11 of 23
5.3 NOMOS XLT combined with other K&F tops.
The NOMOS XLT can only be combined in 2 channel mode with all K&F top speakers when
using a K&F systemamp or systemrack.
To do so, select the desired LS blocks for the top speaker in the K&F systemamp or systemrack,
and combine these with the LS block for the NOMOS XLT subwoofer.
If you need a higher bass level, activate
the filter 'BassBoost' via Filter B for the
subwoofers.
If you need an higher level at the overlab
range betwenn subwoofer and top
activate the filter 'LoMidBoost' via Filter
B.
Page 12

User's Manual K&F NOMOS XLT
KLING & FREITAG GMBH © 2017 Version 1.7 Page 12 of 23
5.4 Cardioid Arrays with NOMOS XLT
The subwoofer NOMOS XLT is designed so that it can be used as a cardioid and hypercardioid
system in an array of three subwoofers, or in multiples of three.
A cardioid array results in an increase of sound pressure towards the front because of the
rear-facing subwoofer. In the rear area (cardioid) or in the lateral side area (hypercardioid),
on the other hand, the sound pressure is clearly reduced.
With this, you achieve
• less unwanted sound on the stage
• low feedback
• simplified miking
• improved room acoustics with fewer reflections from the rear and side walls, or – when
flown – from the ceiling
• simplified adherence of sound emission limits and therefore less noise disturbance for
nearby residential areas during open air events.
5.4.1 Setup instructions for a cardioid array
To achieve a cardioid or hypercardioid pattern, you must always have an array with 3
subwoofers - or a multiple of 3 subwoofers - setup next to one another (3, 6, 9, etc.). In
this set of three, the middle one must be stacked or flown rear-facing while both other
subwoofers are front-facing.
You can stack the subwoofers even when they are facing opposite directions, and you can
connect them to front-facing systems.
There is an additional SpeakOn connector on the front grille so that you can connect the
cables to the rear-facing side of all subwoofers in a cardioid array.
You can choose from the following options for cardioid and hypercardioid setups:
Unifilar drawing:
3 x NOMOS XLT horizontal
3 x NOMOS XLT vertical
3 x NOMOS XLT stacked
Page 13

User's Manual K&F NOMOS XLT
KLING & FREITAG GMBH © 2017 Version 1.7 Page 13 of 23
When cardioid arrays are stacked on the floor, ensure that there is always a distance of at least
40 cm between each unit of 3.
Unifilar drawing:
40 cm (1.3 ft)
40 cm (1.3 ft)
40 cm (1.3 ft)
5.4.2 LSBlocks for cardioid use
The rear-facing subwoofer is controlled using the Controller CD 44 via LSBlock for cardioid /
hypercardioid arrays for rear-emitting subwoofers. The front-facing subwoofers are
controlled via LSBlock for cardioid / hypercardioid arrays for front-emitting subwoofers. The
following cardioid or hypercardioid setups are available in the CD 44:
Operation Mode of the NOMOS XLT LSBlocks
'Cardioid Front', front-facing NomXLT C-F
'Cardioid Rear', rear-facing NomXLT C-R
'Hypercardioid-Front', front-facing NomXLT HC-F
'Hypercardioid-Rear', rear-facing NomXLT HC-R
'Infrabass Cardioid Front', front-facing NomXLT C-F60Hz
'Infrabass Cardioid Rear', rear-facing NomXLT C-R60Hz
'Infrabass Hypercardioid Front', frontfacing
NomXLT HC-F60Hz
'Infrabass Hypercardioid Rear', rear-facing NomXLT HC-R60Hz
Page 14

User's Manual K&F NOMOS XLT
KLING & FREITAG GMBH © 2017 Version 1.7 Page 14 of 23
5.5 Cardioid Configurations with different Speakers
NOMOS XLT are suitable for cardioid configurations with certain K&F speakers. A chassis ratio
of 1 to 2 should be maintained within these configurations.
The speaker with one chassis should be standing on the floor and directed to the rear while
the speaker with two chassis directs to the front.
1 x NOMOS XLS under NOMOS XLT
standing
6. Fuse in the NOMOS XLT
To increase the operating safety of the NOMOS XLT, the subwoofers are equipped with fuses
at the signal input. These fuses reduce the risk of consequential damage resulting from a
short circuit (i.e. charred cables / connectors / fire damage).
When the fuse is burned out, then the chassis is most likely already ruined, as the fuse just
prevents consequential damage resulting from a short circuit of the chassis. A replacement of
the chassis is, therefore, unavoidable.
6.1 Replacing the Fuses
The fuse holder is behind the terminal.
Warning
Replace the fuse with the following original fuse only:
Bussmann S 506-8A, T 250 V
Required tools:
• 2.5 mm Allen key for loosening the terminals
Instructions:
1. Loosen the four screws on the terminal.
2. Carefully pull the cables out of the speaker enclosure.
3. Open the fuse holder.
4. Replace the blown fuse.
5. Push the cables carefully back into the enclosure.
6. Pay attention to the correct alignment of the terminal.
Screw the terminal back on.
6.2 Replacing the Chassis
Required tools:
Page 15

User's Manual K&F NOMOS XLT
KLING & FREITAG GMBH © 2017 Version 1.7 Page 15 of 23
• 3 mm Allen key for loosening the front grille
• 3 mm Allen key for loosening the chassis
Instructions:
1. Remove the front grille.
2. Remove the speaker chassis.
3. Pay attention to the correct polarity of the chassis.
Connect the new chassis.
4. Check the polarity of all mounted chassis.
5. By tightening the screws diagonally in two steps, a deformation of the chassis and thus a
possible deentring of the voice coil can be avoided. First loosely fasten the screws for the
chassis diagonal from one another, then tighten them.
6. Mount the front grille.
7. Measuring Diagrams
Polar Patterns
Cardioid
Hypercardioid
Note: Attenuation factor depends on setting and configuration (s. p. ).
Frequency response
Page 16

User's Manual K&F NOMOS XLT
KLING & FREITAG GMBH © 2017 Version 1.7 Page 16 of 23
Page 17

User's Manual K&F NOMOS XLT
KLING & FREITAG GMBH © 2017 Version 1.7 Page 17 of 23
8. Dimensions NOMOS XLT
Weight: 80.5 kg
Page 18

User's Manual K&F NOMOS XLT
KLING & FREITAG GMBH © 2017 Version 1.7 Page 18 of 23
9. Technical Specifications
NOMOS XLT
Concept Bass reflex system
Operated with K&F PLM+ Serie, K&F D-Serie, K&F SystemRack
Crossover frequencies 100 Hz/60 Hz
Lower cut-off frequency 24 Hz (-10 dB)/27 Hz (-3 dB)
Coverage Omnidirectional (a cluster of 3 or in combination with
the NOMOS XLS can be driven in cardioid)
Nominal power handling 1500 watts
program 3000 watts
peak 6000 watts
Max. SPL (1 m) 141 dB (SPL Peak/1 m/half space)
Impedance nominal 4 Ohm
loudspeaker/channel see matrix
Components 2 x 18“ subwooferchassis, 57 mm peak-to-peak
excursion, inside and outside ventilated voice coil
gap for reduced power compression, aluminium
demodulating ring for very low distortion
Connection 2 x speakON® 4-pol NLT4MP (+1/-1) (rear)
1 x speakON® 4-pol NLT4MP (+1/-1) (front)
IN parallel zu OUT
Enclosure Design
Frame reinforced enclosure, 15 mm multiplex with
highly resilient Polyurea synthetic coating with 8
ergonomical butterfly handles 8 non-abrasive plastic
sliders and stacking grooves for save stacking of
NOMOS XLS and XLT and Line 212, 2 locking profiles
for optional transport cover, additional Speakon®connector hidden behind the rotatable logo on the
front grille, ball-proof steel grille with black acoustic
foam
Dimensions (H x W x D) 1191 x 591 x 740 mm
Weight 80.5 kg
Color RAL 9005 (black)
Options 'Suspension' with 3 K&F VariPoints®,
'RAL Special Colour'
Page 19

User's Manual K&F NOMOS XLT
KLING & FREITAG GMBH © 2017 Version 1.7 Page 19 of 23
10. EC Declaration of Conformity
applicable to all products designated hereafter and distributed by KLING & FREITAG
GmbH including model variants unless these products have been altered afterwards.
Loudspeaker systems:
ACCESS B5
ACCESS B10
ACCESS T5/T9
CA 106
CA 205 *) **)
CA 1001
CA 1201 *)
CA 1215 -6/-9
CA 1515 -6/-9
GRAVIS 8 W
GRAVIS 12 N/W*
GRAVIS 12+ N/W/XW
GRAVIS 12+ N/W/XW AS
GRAVIS 15 N/W/XW
E 90 MK II
LINE 212 -6/-9
NOMOS LS CIN
NOMOS LS II
NOMOS LT
NOMOS XLC
NOMOS XLS
NOMOS XLT
PASSIO **)
PASSIO SUB 12
PASSIO SUB 15
SCENA 15
SEQUENZA 10 N/W
SEQUENZA 10 B
SEQUENZA 5 W
SEQUENZA 5 B
SONA 5 **)
SONA 6
SONA 8
SONA SUB **)
SONS SUB II
SW 112
SW 115D *)
SW 115E
SW 118E
SW 212E
*) These products are discontinued.
**) These systems are not covered by the Low Voltage Directive because of the rated
voltage used.
We declare that the designated product(s) are in conformity with the protection
requirements imposed by the following EU directives:
Electromagnetic Compatibility (EMC) Directive
Low Voltage Directive
Technical documentation for the assessment of
electrical and electronic products with respect to
the restriction of hazardous substances
(2004/108/EC)
(2006/95/EC)
(VDE 0042-12:2013-02)
The operating conditions specified in these user's manual must be met accordingly.
This declaration is issued under sole responsibility of the manufacturer:
KLING & FREITAG GmbH
Junkersstraße 14, D-30179 Hannover, Germany
Hannover, 30th March 2015
Jürgen Freitag
(Managing Director / CEO)
Page 20

User's Manual K&F NOMOS XLT
KLING & FREITAG GMBH © 2017 Version 1.7 Page 20 of 23
11. Accessories
Transport Cover NOMOS XLT
Protective Cover NOMOS XLT
Loudspeaker patch cable NLT-425, 5 m
Page 21

User's Manual K&F NOMOS XLT
KLING & FREITAG GMBH © 2017 Version 1.7 Page 21 of 23
12. Care and Maintenance
Warning
For the owner and user, it is mandatory to be aware of the safety relevance of speakers that
can be flown.
The NOMOS XLT system can exhibit signs of wear over the years, for example, from
mechanical strain, transport damage, corrosion, or improper handling. Remember that flying
speakers always impose a high safety risk.
Generally, perform a visual inspection of your speaker every time you suspend it or take it
down. In fixed installations, check the speaker for signs of wear at regular intervals.
When performing those checks, particularly look for deformations, cracks, dents, damage
to threads, and corrosion. Also check slings and lifts (e.g. shackles, chains, and steel ropes)
carefully for wear and deformation.
If as a result of these checks any uncertainty should arise with regard to safety or defects are
found, don’t use the speaker any longer.
Inspection regulations may vary depending on application and country of use. Observe all
applicable regulations; when in doubt, contact the local authorities.
Many countries require regular inspection of mounting components and accessories. An
additional annual inspection is typically required to be performed by a technical expert.
Moreover, a legally certified or official authority must perform a detailed inspection every
four years.
Therefore, be sure to maintain an inspection log. Enter the values determined for each
speaker and accessory during the periodic checks into this log. This way, relevant data are
always at hand in case of inspection. The log should also document maintenance measures
and inspection intervals and contain parts lists.
The Polyurea synthetic coating used by KLING & FREITAG is impact proof and highly resistant.
We recommend using protective coverings or transport cases to help avoid damaging the
paint in case of continuous mobile use, etc.
To replace the filter foam, send the front grille incl. foam to KLING & FREITAG GMBH. Upon
payment for expenses, the grille with the new covering will be returned.
13. Transportation and Storage
The NOMOS XLT is protected against short-term moisture. despite, be sure to store, transport,
and use the accessories in dry environments only. The NOMOS XLT System is not designed for
long-term use in a corrosive environment.
Make sure that the system is adequately ventilated during longer storage periods so any
residual moisture can escape from the equipment.
Furthermore, you should ensure that the NOMOS XLT System is protected from mechanical
strain to prevent possible damage.
We recommend using suitable transport and storage cases and the optional soft cover that
protects from the above-mentioned influences.
14. Disposal
14.1 Regulations for Disposal
14.1.1 Germany
Don’t dispose of waste electrical equipment through household waste.
Don’t deliver it to official recycling points either.
Page 22

User's Manual K&F NOMOS XLT
KLING & FREITAG GMBH © 2017 Version 1.7 Page 22 of 23
All KLING & FREITAG products are plain business-to-business (B2B) products. Therefore,
KLING & FREITAG GmbH is exclusively responsible for disposing of all KLING & FREITAG waste
equipment marked with a garbage-can icon. Please call the below phone number when you
have a KLING & FREITAG product (marked with the garbage-can icon) for disposal. We will
offer you a straightforward and professional disposal at no cost.
KLING & FREITAG equipment with no such icon was sold before 24 March 2006; in that case,
the owner is legally responsible for disposal. We will, however, gladly assist you by naming
appropriate ways of disposal.
For further disposal information of KLING & FREITAG waste products, call +49 (0)511-96 99 7-0
Background information: The Electrical and Electronic Equipment and Appliances Act
(ElektroG) is the German implementation of the European (EU) Waste Electrical and
Electronic Equipment Directive (WEEE, 2002/96/EC).
Therefore, starting on 24 March 2006, KLING & FREITAG GmbH has marked all products
subject to the WEEE that are distributed in Germany with an icon showing a crossed-out
garbage can with a white bar below it. The icon indicates that the equipment was distributed
on or after 24 March 2006 and must not be disposed of through household waste.
KLING & FREITAG GmbH is legally registered as a manufacturer with the German wasteequipment registration authority (EAR). The WEEE registration number is: DE64110372.
We substantiated towards the EAR that our products are for B2B trade only.
14.1.2 EU, Norway, Iceland, and Liechtenstein
Don’t dispose of waste electrical equipment through household waste.
Starting on 13 August 2005, KLING & FREITAG GMBH has marked all products subject to the
WEEE directive that are distributed in any member state of the European Union (except
Germany), Norway, Iceland, or Liechtenstein with an icon showing a crossed-out garbage can
with a white bar below it. The icon indicates that the equipment was distributed on or after
13 August 2005 and must not be disposed of through household waste.
Unfortunately, the European WEEE directive was implemented in different national
legislation in the EU member states, making it impossible to offer a consistent disposal
solution throughout Europe.
The local distributor (sales partner) in the respective country is responsible for complying with
the applicable legislation.
Contact your retailer or the local authorities for information on the regulations applicable in
any EU member state (except Germany).
14.1.3 All Other Countries
Contact your retailer or the local authorities for information on the regulations applicable in
any country not listed above.
Page 23

User's Manual K&F NOMOS XLT
KLING & FREITAG GMBH © 2017 Version 1.7 Page 23 of 23
INDEX
• Accessories................................................................................................................................... 20
• AMP-out pinout.......................................................................................................................... 10
• Cardioid........................................................................................................................................14
• Care.............................................................................................................................................. 21
• Components...................................................................................................................................5
• Dimensions...................................................................................................................................17
• EC Declaration of Conformity....................................................................................................19
• Fuse...............................................................................................................................................14
• Items Included............................................................................................................................... 5
• Maintenance................................................................................................................................21
• Measuring Diagrams...................................................................................................................15
• Operating Safety...........................................................................................................................7
• Product Description.......................................................................................................................5
• Protecting the Speakers................................................................................................................7
• Safety Instructions.........................................................................................................................6
• Setup.............................................................................................................................................. 9
• Storage.........................................................................................................................................21
• System Requirements....................................................................................................................9
• Technical Specifications...............................................................................................................18
• Transportation............................................................................................................................. 21
• Wiring Diagrams........................................................................................................................... 9
 Loading...