

Page 1
K&F CD 44 Digital System Controller
User's Manual
Important Information,
Please Read Before Use!
KLING & FREITAG GmbH
Junkersstraße 14
D-30179 Hannover
TEL +49 (0) 511 96 99 70
FAX +49 (0) 511 67 37 94
www.kling-freitag.de
Version 11.6
Released: 17.12.2014
Page 2

Page 3

User's manual K&F CD 44 Digital System Controller
Table of contents
1
1.1 Symbols in User's Manual 6
1.2 Information about this User's Manual 6
2
3
4
5
5.1 Use of the CD 44-AutoUpdater 10
6
6.1 Front 12
6.2 Rear 14
7
Introduction 6
Safety Instructions 7
General Safety Instructions 7
Product Description 8
Software and Firmware Update 10
5.1.1 Determine update interval 10
5.1.2 Update history 10
Connectors, Functions, Controls and Displays 12
Making Adjustments and Navigating Through the
Menus 15
7.1 The Use of the Shortcut Buttons 15
7.1.1 Parametric Filters 'PEQ' + SEQ LShelv (Filter A Button) 15
7.1.2 Switchable, Speaker Specific Filters 21
7.1.3 Input and Output Gains (Gain Button) 23
7.1.4 Input and Output Delays (Delay Button) 24
7.2 InfoWindow: Display of Basic Settings 24
7.3 Main Menu 25
7.4 Submenu 25
7.5 Setups in editing mode 25
7.5.1 Editing mode with one editing line 26
7.5.2 Editing mode with several editing lines 26
7.5.3 Editing Mode with Selection Lines 27
7.5.4 Menu Tree of the CD 44 and Explanation of the Functions 28
7.5.5 Functions of the Menu Item ‘Setup’ 29
7.5.6 Functions of the Menu Items under ‘In’ 30
7.5.7 Functions of the Menu Items under ‘Out’ 33
7.5.7.1 9.6.4Functions of the Menu Items under ‘Util’ 40
8
Routings with Examples of Use and Connecting
Diagrams 41
8.1 'Rack Unit' Connecting Diagram for 1 CD 44 and 2 Amplifiers 41
8.2 K&F 'System Rack' Connecting Diagram 42
8.3 Routing '1 in 4 out' / Setup 'Example 1' 43
KLING & FREITAG GMBH © 2014 Version 11.6 Page 3 of 77
Page 4

User's manual K&F CD 44 Digital System Controller
8.3.1 Block Diagram, 'Example 1' 43
8.3.2 Setup 'Example 1', T5 / T9 with B10 on 2 Channels 43
8.4 Routing '1 in 4 out (Linked)' / Setup 'Example 2' 44
8.4.1 Block Diagram 'Example 2' 44
8.4.2 Setup 'Example 2', 4 x Line 212-6 with 4 x SW 215E 45
8.5 Routing '2 in 4 out' / Setup 'Example 3' 46
8.5.1 Block Diagram 'Example 3' 46
8.5.2 Setup 'Example 3', Line 212/SW 215E & Monitor CA 1215/SW 115E 46
8.6 Routing '2 in 4 out (Linked)' / Setup 'Example 4' 47
8.6.1 Setup 'Example 4', Line 212 / SW 215E, stereo 48
8.7 Routing '4 in 4 out' / Setup 'Example 5' 49
8.7.1 Block Diagram 'Example 5' 49
8.7.2 Setup 'Example 5', 4- Way Monitor Setup 49
8.8 Routing '1 in 2 + 2 in 2' / Setup 'Example 6' 50
8.8.1 Block Diagram 'Example 6' 50
8.8.2 Setup 'Example 6', Front: CA1515 / SW118E + 2 Adjoining Rooms 50
8.9 Routing '1 in 3 + AUX' / Setup 'Example 7' 51
8.9.1 Block Diagram 'Example 7' 51
8.9.2 Setup 'Example 7', 3 x SEQUENZA 10 B Cardioid + SW 115 E 51
8.10 Routing '1 in 4 in 4' / Setup 'Example 8' 52
8.10.1 Block Diagram 'Example 8' 53
8.10.2 Setup 'Example 8', Delay-Line 53
8.11 Routing '1 in 3 + 1 in 1' / Setup 'Example 9' 54
8.11.1 Block Diagram 'Example 9' 54
8.11.2 Setup 'Example 9', T5 / T9 with B5 and additional Bass B10 54
8.12 Routing '2 in 4 in 4' / Setup 'Example 10' 56
8.12.1 Block Diagram 'Example 10' 56
8.12.2 Setup 'Example 10 56
8.13 Routing '1 in 2 + Aux + 1 in 1' / Setup 'Example 11' 57
8.13.1 Block Diagram 'Example 11' 57
8.13.2 Setup 'Example 11 57
8.14 Patching: Analog 1&2 Mix / Routing '2 in 4 in 4' / Setup 'Example 12 58
8.14.1 Block Diagram 'Example 12' 58
8.14.2 Setup 'Example 12' 59
8.15 Sequenza 10 N / W Routing '1 in 4 out' / Setup 'Example 13' 59
8.15.1 Block Diagram 'Example 13' 60
8.15.2 Setup 'Example 13' 60
8.16 Sequenza 10 N / W: Routing '1 in 2 + Aux + 1 in 1' / Setup 'Example 14' 61
8.16.1 Block Diagram 'Example 14' 61
8.16.2 Setup 'Example 14' 62
KLING & FREITAG GMBH © 2014 Version 11.6 Page 4 of 77
Page 5

User's manual K&F CD 44 Digital System Controller
8.17 Patching: Analogue 1&2 Mix / Routing '1 in 2 in 2 + 2 in 2' / Setup 'Example
15' 64
8.17.1 Block diagram, 'Example 15' 64
8.17.2 Setup 'Example 15' 64
9
10
11
11.1 Operating several Speakers per CD 44 Channel 66
11.2 The correct Level Balance between Subwoofer and Top Speakers 66
12
12.1 General Instructions 71
12.2 Transmissions over long Distances 72
13
14
15
16
16.1 Germany 76
16.2 EU, Norway, Iceland, and Liechtenstein 76
Subwoofer with integrated Crossover 64
SP Speakers 65
Recommendations for Configuration 66
11.2.1 SW 112 / SW 115D / SW 115E / SW 118E 66
11.2.2 SW 215E / ACCESS B5 & B10 / SEQUZENZA 10 B / NOMOS XLC 69
Instructions for AES / EBU Data Transmission 71
Wiring 72
Operating the Speakers 72
Technical Specifications CD 44 74
Disposal 76
16.3 All other Countries 76
KLING & FREITAG GMBH © 2014 Version 11.6 Page 5 of 77
Page 6
Warning
User's manual K&F CD 44 Digital System Controller
1. Introduction
Thank you for your decision to buy a KLING & FREITAG product. To guarantee a trouble-free
operating of the equipment and to allow your device to achieve its full potential please read
the operating instructions carefully before use.
With the purchase of the CD 44 Controller, you have acquired a device with the highest
possible quality and performance capabilities.
As the owner of this system, you now have a versatile and highly professional tool which,
when operated properly, is a true pleasure to use.
1.1 Symbols in User's Manual
This symbol indicates the possibility of life-threatening danger and a health risk for persons.
Not following these instructions may result in serious health problems including potentially
fatal injuries.
This symbol indicates a possibly dangerous situation. Not following these instructions may
cause minor injuries or cause property damage.
Caution
Tip
This symbol gives instructions for the proper use of the described products. Not following
these instructions may cause malfunctions or property damage.
This symbol indicates notes that help you to handle the described products easier.
1.2 Information about this User's Manual
© KLING & FREITAG GMBH, all rights reserved.
All specifications in this manual are based on information available at the time of publishing
for the features and safety guidelines of the described products.
Technical specifications, measurements, weights and properties are not guaranteed.
The manufacturer reserves the right to make product alterations within legal provisions as
well as changes to improve product quality.
All persons who use the speaker system must have this guide and all further information for
safe operations available to them during assembly, disassembly, and use. The speaker system
may neither be set up nor used until this manual has been read, understood and kept readily
available on site.
We appreciate any input with suggestions and improvements for this manual. Please send this
to us at the following address:
info@kling-freitag.de or to:
KLING & FREITAG GMBH Junkersstr.14 D-30179 Hannover.
Phone +49 (0) 511 96 99 70, Fax +49 (0) 511 67 37 94.
KLING & FREITAG GMBH © 2014 Version 11.6 Page 6 of 77
Page 7
Danger
Warning
Caution
User's manual K&F CD 44 Digital System Controller
2. Safety Instructions
This symbol indicates the possibility of life-threatening danger and a health risk for persons.
Not following these instructions may result in serious health problems including potentially
fatal injuries.
This symbol indicates a possibly dangerous situation.
Failure to follow these instructions can lead to malfunctions in the product or in the
environment.
This symbol gives instructions for the proper use of the described products.
Failure to follow these instructions can lead to malfunctions in the product or in the
environment.
3. General Safety Instructions
Do not install devices in any of the following places:
Warning
• where the units are permanently exposed to direct sunlight.
• near other heat sources or open fire.
• where the airflow for cooling is blocked.
• where the devices are exposed to high moisture.
• where the devices are exposed to strong vibrations and dust.
Power supply
Before connecting to the power supply system, check if the local voltage matches the voltage
marked on the device. The device then needs to be adapted to the required mains voltage by
Kling & Freitag or an authorized service centre. Connect the device under any circumstances,
to an unauthorized power supply source. This could irreparably ruin the device.
Make sure that the power outlet supplies a ground connector, which must be connected to
the device via the PE conductor of the power cord!
All devices interconnected over signal lines with connection to a protective earth must be
connected to a common protective earth. If not, there is a risk of an electric shock or the
destruction of the connected equipment. The power plug must always be used to disconnect
from the power supply. Furthermore, the power plug must be easily accessible for use at all
times.
Protection of electrical cables
Power cables should be routed so that they are protected against impact damage and tensile
stress caused by jamming between objects.
Transportation
When transporting the device, make sure that it is protected from vibrations.
Cleaning
The equipment should only be cleaned with a damp cloth when it is not plugged in.
Pauses in use
The power cord should be disconnected from the power source during longer pauses in use.
Intrusion of liquids
It should always be ensured that no liquids get into the device.
KLING & FREITAG GMBH © 2014 Version 11.6 Page 7 of 77
Page 8

User's manual K&F CD 44 Digital System Controller
Maintenance and technical service
The user should not perform any maintenance or repair work on the unit which goes beyond
the work described in this manual. This must be carried out by qualified specialist staff.
The device may only be repaired by qualified specialist staff when, for example:
• the power cord or the mains connector have been damaged.
• objects or liquids have gotten into the device.
• the device has been exposed to rain.
• the device doesn't appear to be functioning properly.
• it has fallen down or the housing is damaged.
Unwanted interference
RF interference on the power cord or on the line signal cables may lead to unwanted sound
interference.
4. Product Description
The signal processor CD 44 is a digital 4 in 4-way speaker controller that can process both
analogue and digital signals in the AES/EBU format up to 192 kHz.
The controller is equipped with the finest AD and DA state-of-the-art converters as well as 3
micro-controllers and 8! integrated signal processors (DSP). It not only offers excellent audio
results, but also a multitude of special features and novel functions: CD 44
Multi-level memory concept for parameter management
The parameter sets for almost all K&F speaker systems are saved in the form of macros
in the device (the so-called ‘LS-Blocks’). They can be copied as a complete set of data and
independently of one another into each of the 4 output channels.
The specification of one K&F phase reference for multi-way operations is advantageous
because of its high level of compatibility. Without requiring phase adjustments, the various
K&F tops can be combined with all K&F subwoofers.
Additional LS-Blocks ‘Flat’ facilitate the integration of third-party products (with limitations)
or the processing and linking of signals to speakers with integrated filters and amplifier
electronics.
14 pre-configured routings allow every reasonable configuration from up to 4 different input
signals to the 4 output channels.
Frequently used combinations of routings and ‘LS-Blocks’ can be saved along with further
parameters (such as Gain / Delay / PEQ) in up to 64 set-ups.
Two-step limiter concept
Two limiters work in each of the 4 output channels. A quick reacting “peak limiter” limits
the peak level and, thus, the cone excursion of the connected speakers is kept at non-critical
levels.
A slow reacting ‘RMS Limiter’ reduces the level when there is a risk that the permissible
average power will be exceeded, thus resulting in the voice coils overheating.
The pre-set values have been established in extensive series of tests. With excellent sound
qualities, they provide an outstanding compromise with regard to the peak levels and
protection of the speaker systems.
Automatic determination of gain using sense technology
The CD 44 calculates the gain of the connected amplifiers in real-time and automatically
corrects the limiters’ thresholds as soon as the gain of the connected amplifier should be
changed (i.e. by using the input potentiometer or similar). Compared to conventional devices
this results in a clearly improved reliability when adjusting the limiter thresholds.
Limiter reduction
KLING & FREITAG GMBH © 2014 Version 11.6 Page 8 of 77
Page 9

User's manual K&F CD 44 Digital System Controller
The preset limiter thresholds can be reduced in fine increments for specific purposes. This
function is advantageous when the connected speakers are to be subjected to a particularly
long-lasting high load. In this case, the reduction of the limiter thresholds reduces the
maximal thermal and mechanical stress, thus significantly extending the product life of the
speakers.
Furthermore, these functions can also be used to limit the sound levels of the speakers.
The integrated limiters and the function ‘Limiter Reduction’ can also be used for speakers
with integrated amplifier electronics. For this, the gain values of the utilised power amplifiers
can be edited manually in the CD 44.
Operating with 'Shortcut' buttons
Four buttons with ‘Shortcut’ functions make it possible to directly jump to often-used
functions without having to navigate through the menu. By pushing these buttons
repeatedly, you access the functions of all input and output channels.
In doing so, the functions ‘Gain’, ‘Delay’, ‘Filter’ and ‘PEQ’ can be quickly and easily adjusted.
Additionally, the LEDs which are integrated into the respective buttons indicate if these
functions have been changed as compared to the original settings.
31 Band One-Third Octave EQs
A separate 31 band one-third-octave EQ is assigned to each of the CD 44’s four input
channels. Up to 16 different EQ setups can be saved and administrated in an individual EQ
setup library. These EQ setups can be loaded in addition to the setups.
KLING & FREITAG GMBH © 2014 Version 11.6 Page 9 of 77
Page 10
User's manual K&F CD 44 Digital System Controller
5. Software and Firmware Update
If software and firmware updates are available, they can be found in the download area of
the Kling & Freitag website www.kling-freitag.de.
Software and firmware updates are necessary if Kling & Freitag LS-Blocks are made available
for new speakers or the device’s range of function has been expanded. This ensures that the
CD 44 will always be up-to-date and assured of a good future for speaker generations to
come.
You receive the installation instructions when you execute the update.
5.1 Use of the CD 44-AutoUpdater
The CD 44-AutoUpdater allows you to keep all components of your CD 44 up-to-date. In
addition to update your K&F software, the latest LS-Blocks will also be transferred to your
hard drive, either automatically or manually, depending on the program setting. Once the
process has completed, you can transfer the LS-Blocks to your CD 44 controller, as usual. This
keeps your LS-Blocks up-to-date.
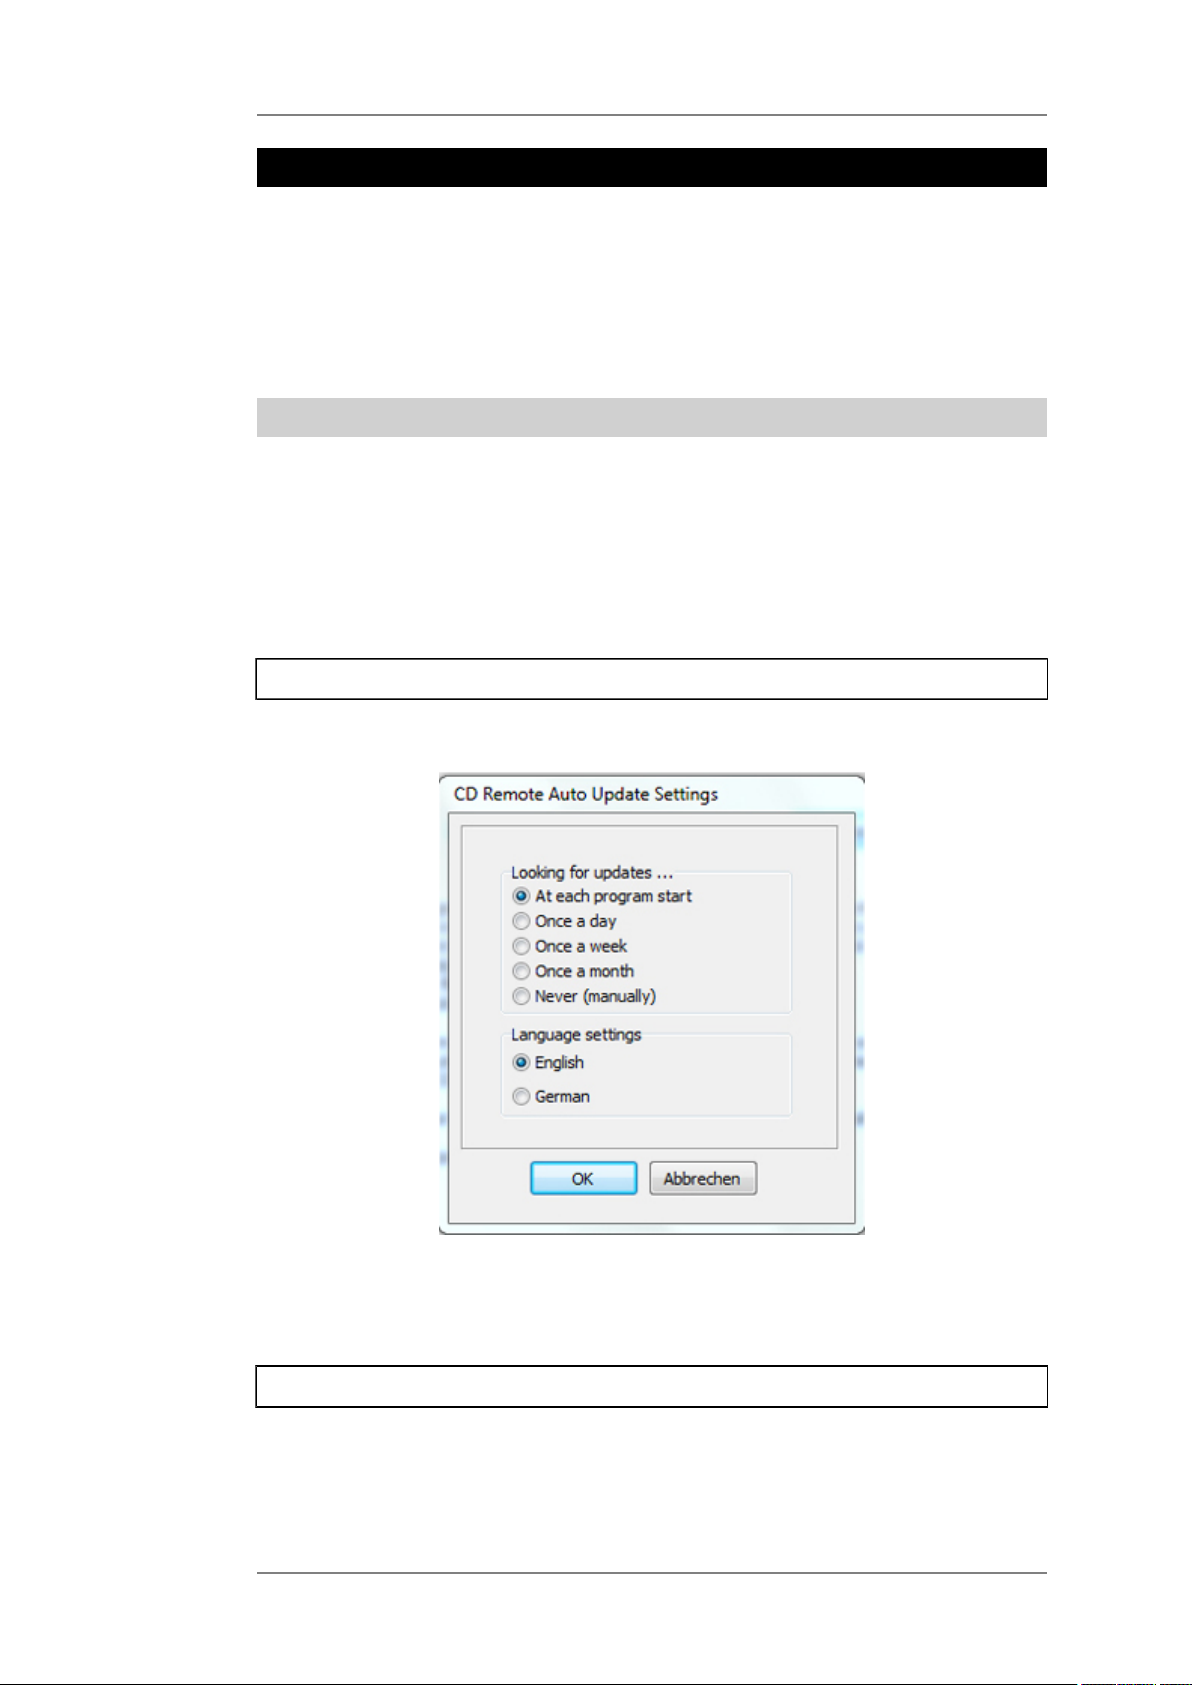
After installation, you can run the main program from the "Kling & Freitag" folder in the
startmenu. If you are running the program for the first time, a start screen is shown. With the
button of the start screen, you can set the update interval and your preferred language.
5.1.1 Determine update interval
The following possible update intervals and languages are available:
If you do not want to specify a time interval and select the option "never", you should start
the update process manually from time to time.
We recommend that you adopt default interval "at each program start".
5.1.2 Update history
Before starting the update, ensure that your computer is connected to the Internet.
During the update, you may be prompted to log in as an administrator. In Windows 7, for
example, you only need to confirm the displayed Administrator Note and the update is then
completed without further system messages.
KLING & FREITAG GMBH © 2014 Version 11.6 Page 10 of 77
Page 11
User's manual K&F CD 44 Digital System Controller
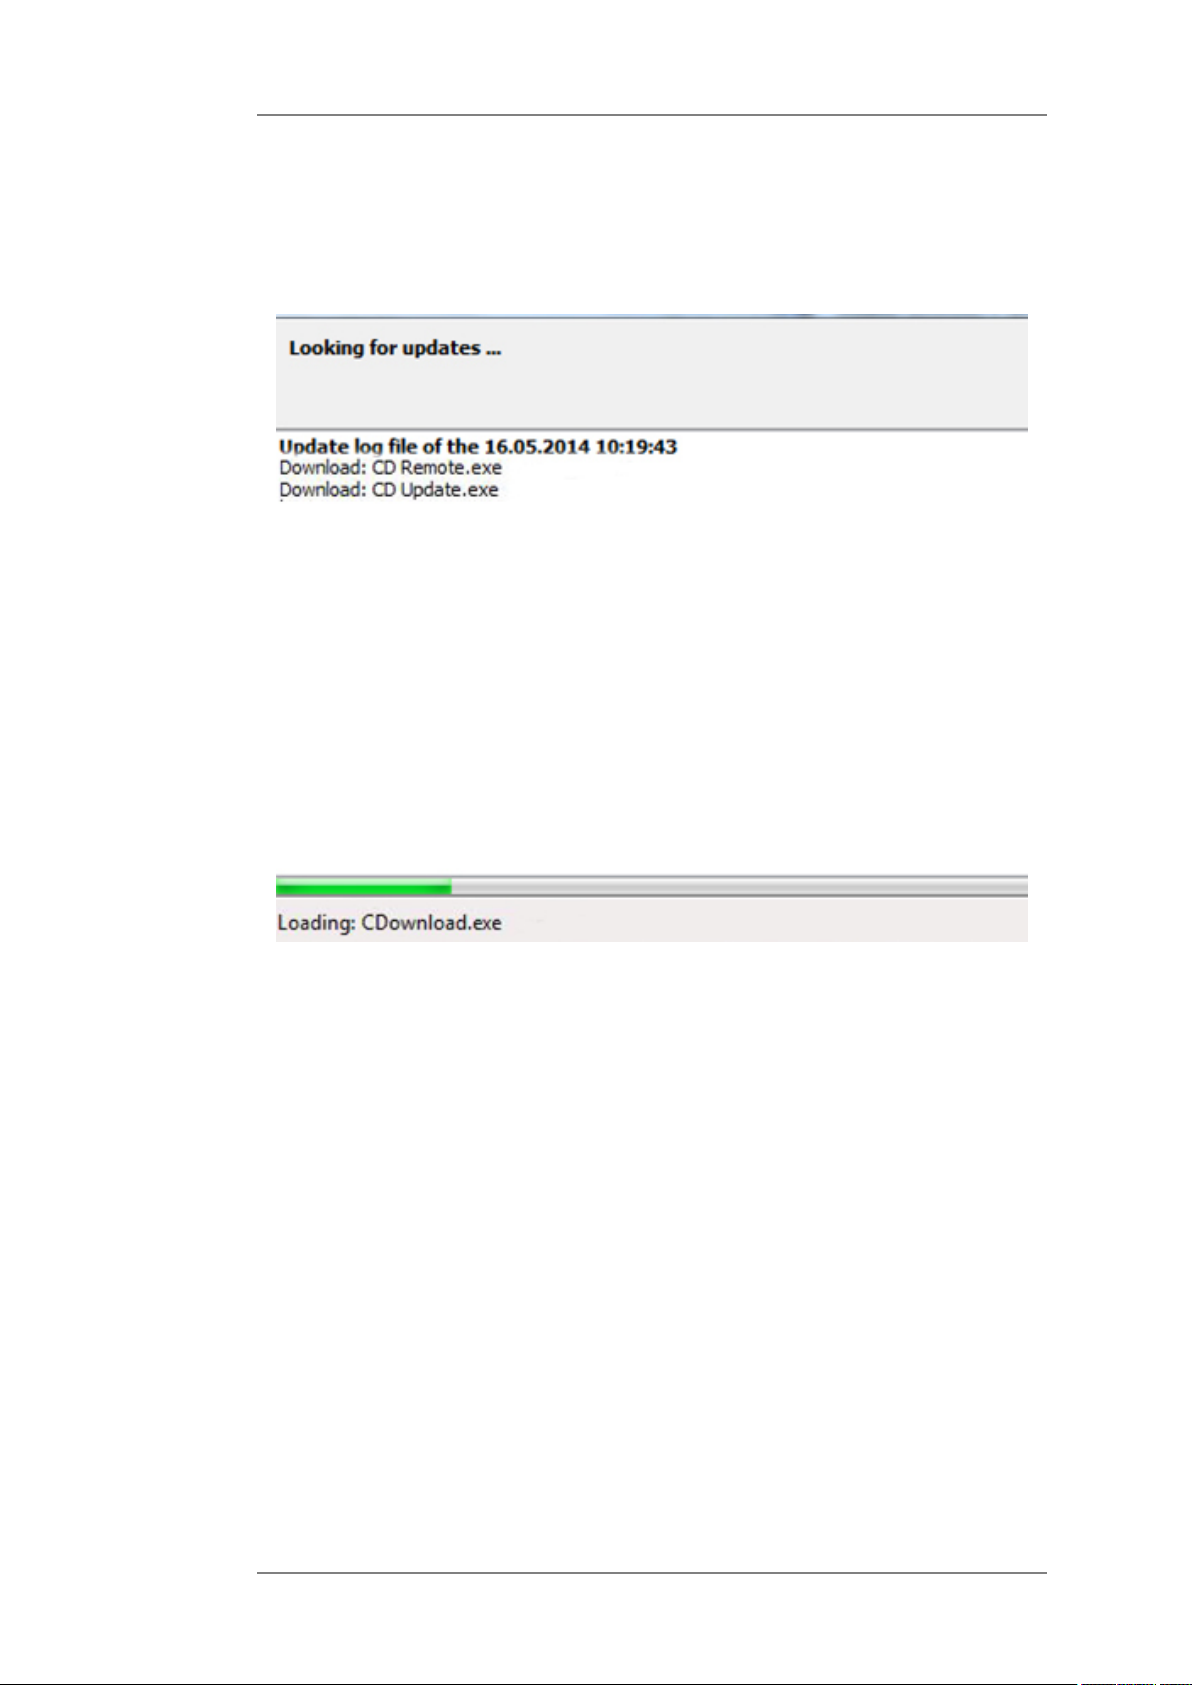
When the update starts, an update search and version synchronisation of the program
and existing LS-Blocks with our company server will first run. The search result and version
synchronisation will be shown in the information window.
If you have changed any files in the K&F system folder ("C:\Program Files (x86)\KlingFreitag
\CD Remote\"), the folder will be renamed into an archiv folder and a new folder with the
new updatefiles will be created.
The actual update process only takes a few seconds in most cases. If comments on the new LSBlocks are to be written, these are displayed in the Info window and stored in a log file.
If new LS-Blocks were copied to your hard drive, the Info window will show you where a log
file was saved on your computer and under which name.
If the update finished successful you can transfer the new LS-Blocks to your CD 44 system
controller and use the K&F software normally.
KLING & FREITAG GMBH © 2014 Version 11.6 Page 11 of 77
Page 12
User's manual K&F CD 44 Digital System Controller
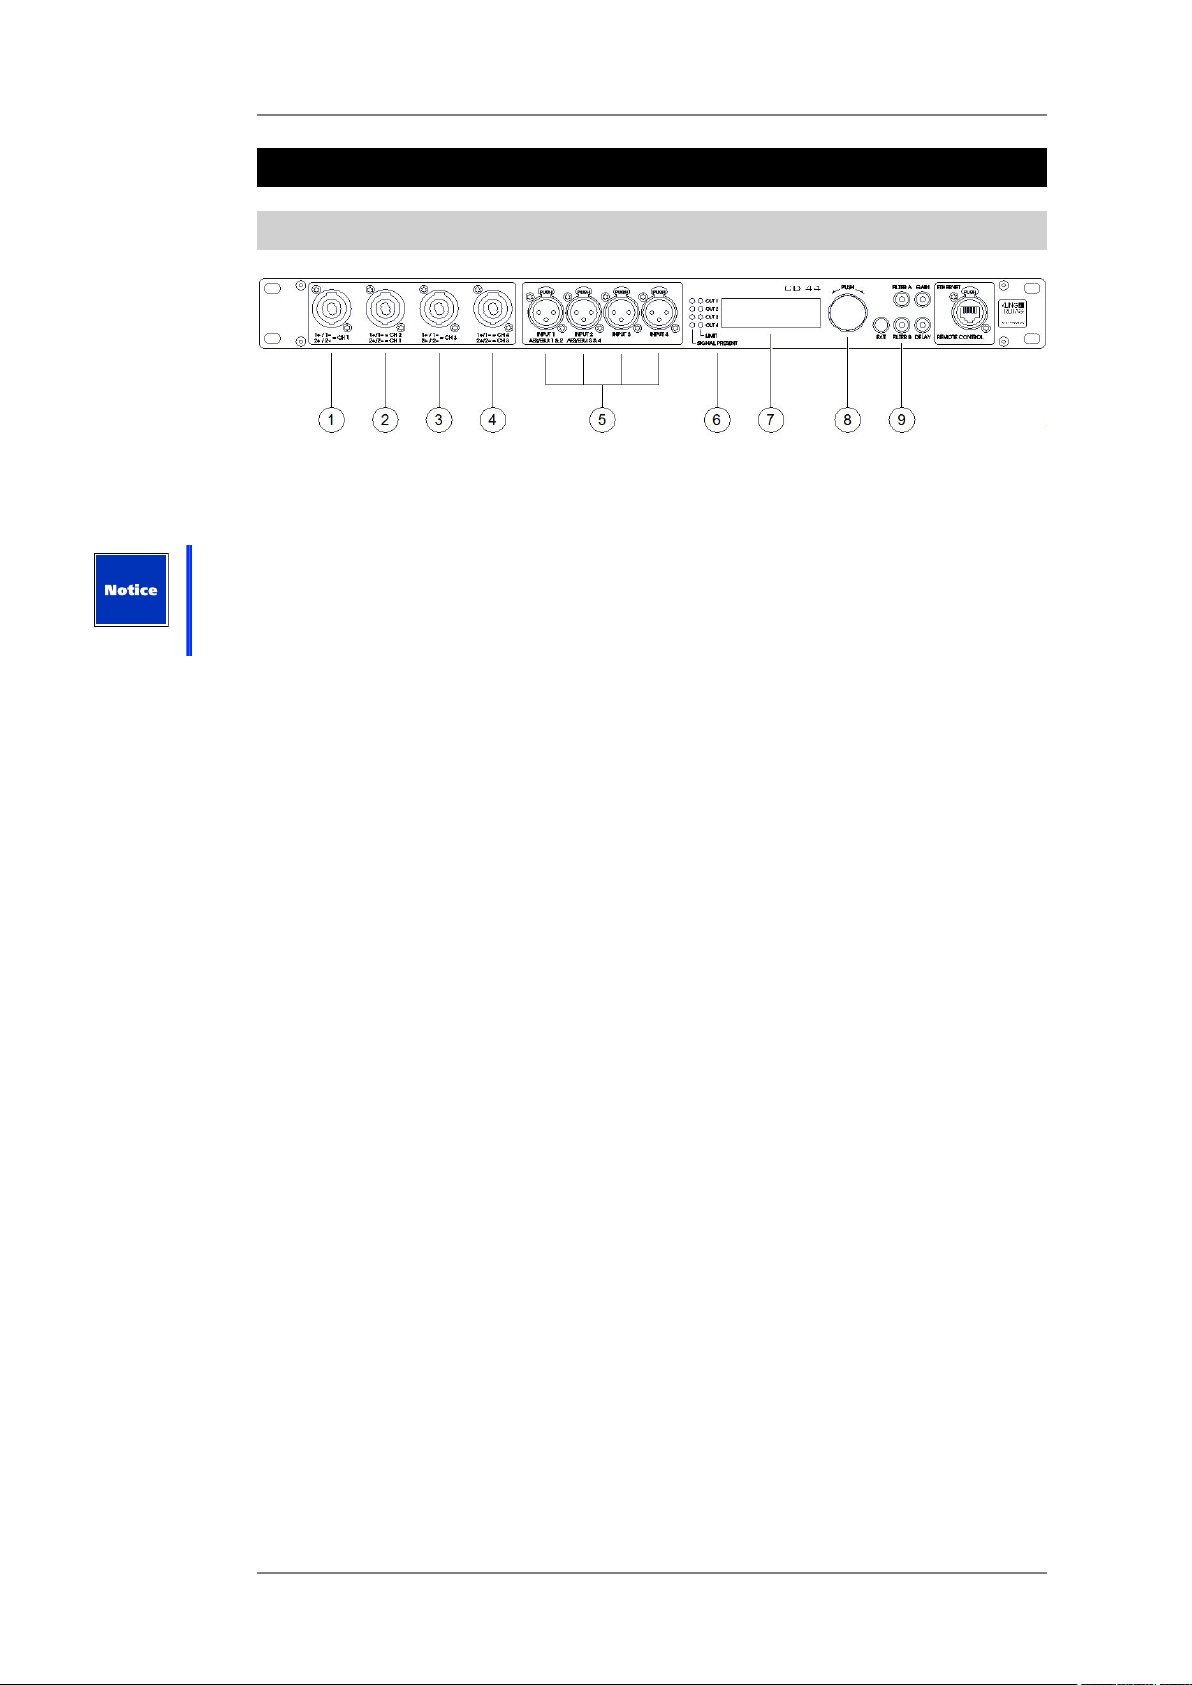
6. Connectors, Functions, Controls and Displays
6.1 Front
1 - 4: Speaker connectors (4x)
4-pin Speakon connectors. All Kling & Freitag speakers that are, by default, connected with
1+ / 1- can be plugged into these connectors.
Caution: The connectors with the position numbers 1 and 3 are connected differently than
the connectors with the position numbers 2 and 4.
In some cases, mixing up the speaker channels can lead to destruction of the speakers
(example: treble on bass output).
1. This output connector supplies the signal for the speaker channel 1. In this connector,
the pin 1+ is bridged with 2+, the pin 1- with 2-. The signal for channel 1 is, therefore,
applied to 1+ / 1- as well as 2+ / 2-.
2. This output connector transmits signals for 2 speaker channels:
The signal for the speaker channel 2 is applied to 1+ / 1-.
The signal for the speaker channel 1 is applied to 2+ / 2-.
3. This output connector supplies the signal for the speaker channel 3. On this connector,
the pin 1+ is bridged with 2+ and pin 1- with 2-. The signal for channel 3 is, therefore,
applied to 1+ / 1- as well as 2+ / 2-.
4. This output connector supplies signals for 2 speaker channels:
The signal for the speaker channel 4 is applied to 1+ / 1-.
The signal for the speaker channel 3 is applied to 2+ / 2-.
1 + 3: If you want to use the CD 44 to operate subwoofers whose 2 chassis are controlled
by separate supply lines (ACCESS B5 and ACCESS B10), then you should use these
connectors for these subwoofers in order to control the speakers via a common channel
without an adapter (CH1 or CH3). Fore more information see configuration example on
page 46.
2 + 4: You should use these connectors for ACCESS tops T5 and T9, Sequenza 10 N / W or
NOMOS XLC, because these systems must be controlled using 2 channels.
In order to implement a one-cable system (control of a top and subwoofer via a 4-core
supply cable), you must use these connectors, because the top and subwoofer must be
controlled using 2 different channels.
5. Signal input connectors: INPUT 1 through INPUT 4, 3-pin XLR female connectors.
These signal input connectors can be used both for analogue and for digital signals, in
accordance with the AES / EBU specifications. You must make the selection in the device
about the type of signals it is being supplied with: digital or analogue. Select the type of
signal source before connecting the signals!
Upon delivery, the controller is pre-programmed for the use of analogue input signals.
These inputs correspond to the connectors on the rear panel and are wired in parallel
with them.
KLING & FREITAG GMBH © 2014 Version 11.6 Page 12 of 77
Page 13

Caution
User's manual K&F CD 44 Digital System Controller
Do not assign the inputs on the front and rear panel simultaneously. This can lead to
malfunction or damage of other appliances!
• Operations with analogue input signals, settings: In » Input Patching » Analog
(Default, Flipped or 1&2 Mix): Pin configuration: 1 = ground / 2 = + / 3 = - . The LINE
inputs are electronically balanced. The nominal input level is +6dBu (1.55Vrms).
The maximum input level is +18dBu, that is, the peaks in the signal must not exceed
+18dBu (6V).
• Operations with digital input signals, setting: In » Input Patching » Digital (Default,
Flipped or 1&2 Mix)
The input connectors 'INPUT 3' and 'INPUT 4' are not used in this setup! Pin
configuration: 1 = ground / 2 and 3 = digital signal. To avoid unexpectedly high
volume levels, reduce the controller’s input gains to a value of approx. –40 dBu
before supplying these connectors with a digital signal directly from an audio
source, and then adjust the level to your needs! Adjust input gain at: <In » Input1>
through <Input4 » Gain>
6. SIGNAL PRESENT, LIMIT
• SIGNAL PRESENT: These LEDs light up green when a signal with a level higher than –
45 dBu is present at the XLR output connectors on the rear of the unit (Out 1 through
Out 4).
• LIMIT: The output level of the controller is limited. As a result, the controller avoids
an output level of the power amplifiers which is too high for the connected speaker.
These LEDs light up red as soon as the output level of the relevant channel comes
under the influence of the controller’s limiters. A gently engaging RMS limiter and
a fast peak limiter limit the output of the power amplifiers virtually inaudibly to the
maximum permitted level. If the red limiter LEDs light up frequently, the level of the
input signal should be reduced on the signal source preferably (i.e. on the mixing
console).
7. Display
To change the contrast, go to <Util » Display » Contrast>.
8. Knob
Turn the knob to navigate through the menus and adjust the values. Push the knob to
confirm a selection, access the submenus, the command lines, and the settings.
9. EXIT botton
You can confirm the chosen settings by pushing the EXIT button, and the menu returns to
the next higher level.
10. FILTER A Button (Shortcut Button)
Pushing the FILTER A button allows you to directly access the freely adjustable parametric
filters (PEQs) without having to navigate through the menu.
Up to four parametric filters (PEQs) are available for every active input channel.
If a filter is active (BYP = bypass in edit mode not active), the blue LED on the FILTER A
button lights up.
For a detailed description see chapter 'Parametric Filters 'PEQ' + SEQ LShelv' on page
15.
11. FILTER B Button (Shortcut Button)
By pushing the FILTER B button, you can access pre-set speaker-specific filters, such as
High-Boost, Cluster and Bass Boost, etc.
These filters cannot be adjusted by the user; they can only be switched on or off.
If one of these filters is active, the blue LED on the FILTER B button lights up. FILTER B
KLING & FREITAG GMBH © 2014 Version 11.6 Page 13 of 77
Page 14

User's manual K&F CD 44 Digital System Controller
For further information see chapter 'Switchable, Speaker Specific Filters' beginning on
page 21.
12. GAIN Button (Shortcut Button)
Pushing the GAIN button allows you to directly access the input and output gains without
having to navigate through the menu. GAIN
After pushing the GAIN button, the first possible setting is for the signal input (input
gains). If you push it repeatedly, you access the output gains. GAIN
If one of these gain values is not zero, the red LED on the GAIN button lights up. GAIN
For more information, see Capter 'Input and Output Delays' on page 24.
13. REMOTE CONTROL
This RJ45 connector allows for you to connect the CD 44 to a computer or integrate it
into a network in order to execute remote enquiries and remote control or to import
software updates. The connection conforms to Ethernet standards. The IP address can be
changed at <Util » IP Address>.
You can find the latest software versions on www.kling-freitag.de
6.2 Rear
Caution
1. Power Supply Connector
IEC power socket 100 - 240 V~ / 50 - 60 Hz, I nominal: 150 - 100 mA.
Connect this socket to a mains outlet using the mains cable supplied with the controller.
To avoid an unintentional loosening of the mains cable, the power supply connector is
provided with a safety clamp. Flip the clamp over the connector of the mains cable after
having plugged it into the power supply connector.
Pay attention to the stated mains voltage. Connection to an incorrect mains voltage may
result in irreparable damage!
2. OUT 1 through OUT 4
3-pin XLR male connector, pin assignment: 1 = ground, 2 = +, 3 = These outputs deliver the line signal processed by the controller to the power amplifiers.
Connect these outputs to the inputs of the power amplifiers.
3. Signal input connectors: INPUT 1 through INPUT 4, 3-pin XLR female connectors.
These connectors correspond to the connectors on the front and are wired in parallel
with them. For a detailed description of the inputs see page 9.
Do not assign the inputs on the front and rear panel simultaneously. This can lead to
malfunction or damage of other appliances!
4. AMP RETURN / SENSE
1 + / 1 - = CH 1 1 + / 1 - = CD 3
and
2 + / 2 - = CH 2
KLING & FREITAG GMBH © 2014 Version 11.6 Page 14 of 77
2 + / 2 - = CH 4
Page 15
Caution
User's manual K&F CD 44 Digital System Controller
You must plug the amplified output signals of the power amplifiers into these connectors
(speaker signal).
The amplified output signals which are connected here are required by the limiters in the
controller (sense signal). The signal is routed to the Speakon connectors CH 1, CH 2, CH 3
and CH 4 on the front, so that the speakers can be connected.
If the connectors 'AMP RETURN / SENSE' are not connected to the power amplifiers, then
there is a risk that the speakers will be ruined. Exception: When using the CD 44 with SP
speakers, the AMP RETURN / SENSE inputs are not used, as the SP speakers are equipped
with their own limiters. CD 44
7. Making Adjustments and Navigating Through the Menus
In this chapter, we will give a detailed description of how to make adjustments or to save or
cancel changes and how to navigate through the menus.
7.1 The Use of the Shortcut Buttons
The shortcut buttons help you to make quick adjustments without having to navigate
through the menu. We therefore recommend that you solely use the shortcut buttons and
not the menu navigation when making adjustments to the parametric filters (PEQs), the input
and output gains, as well as to the input and output delays.
Adjustments that are made using the shortcut buttons do not have to be confirmed by
pushing the EXIT button. After approx.10 seconds, the adjustments made to the device are
confirmed automatically.
7.1.1 Parametric Filters 'PEQ' + SEQ LShelv (Filter A Button)
By pushing the FILTER A button, you access the parametric Filters (PEQ).
Using the menu navigation, the PEQs can be accessed at <In » PEQ » Filter 1> through <Filter
4>.
Up to 4 parametric filters per input channel serve to equalise the system, i.e. to adjust the
speaker frequencies to the room conditions. They can also be used to eliminate the feedback
during monitor uses. The PEQs are saved with the setup.
In the PEQs, the parameters for filter type, gain, frequency, and Q-factor can be adjusted.
If a filter is active (BYP = bypass in edit mode not active), the blue LED on the FILTER A button
lights up.
If you change to another type of filter, the Q-factor automatically sets itself to a value of 0.707.
This safeguards against unexpectedly high levels which might be caused by a Q-factor that is
too high. When you have changed the type of filter, always make sure if a Q-factor of 0.707
meets your needs and correct it, if necessary.
Explanation of the filter types of the PEQ:
The parameter "Gain" is adjustable in steps of 0.1, from -96 to +24 dB (independent of the
input and output gains). The parameter ‘Gain’ has no effect on the filter types 'LowP', 'HighP'
and 'AP.
The parameter "Freq" is adjustable in 1Hz steps, from 10Hz to 20kHz.
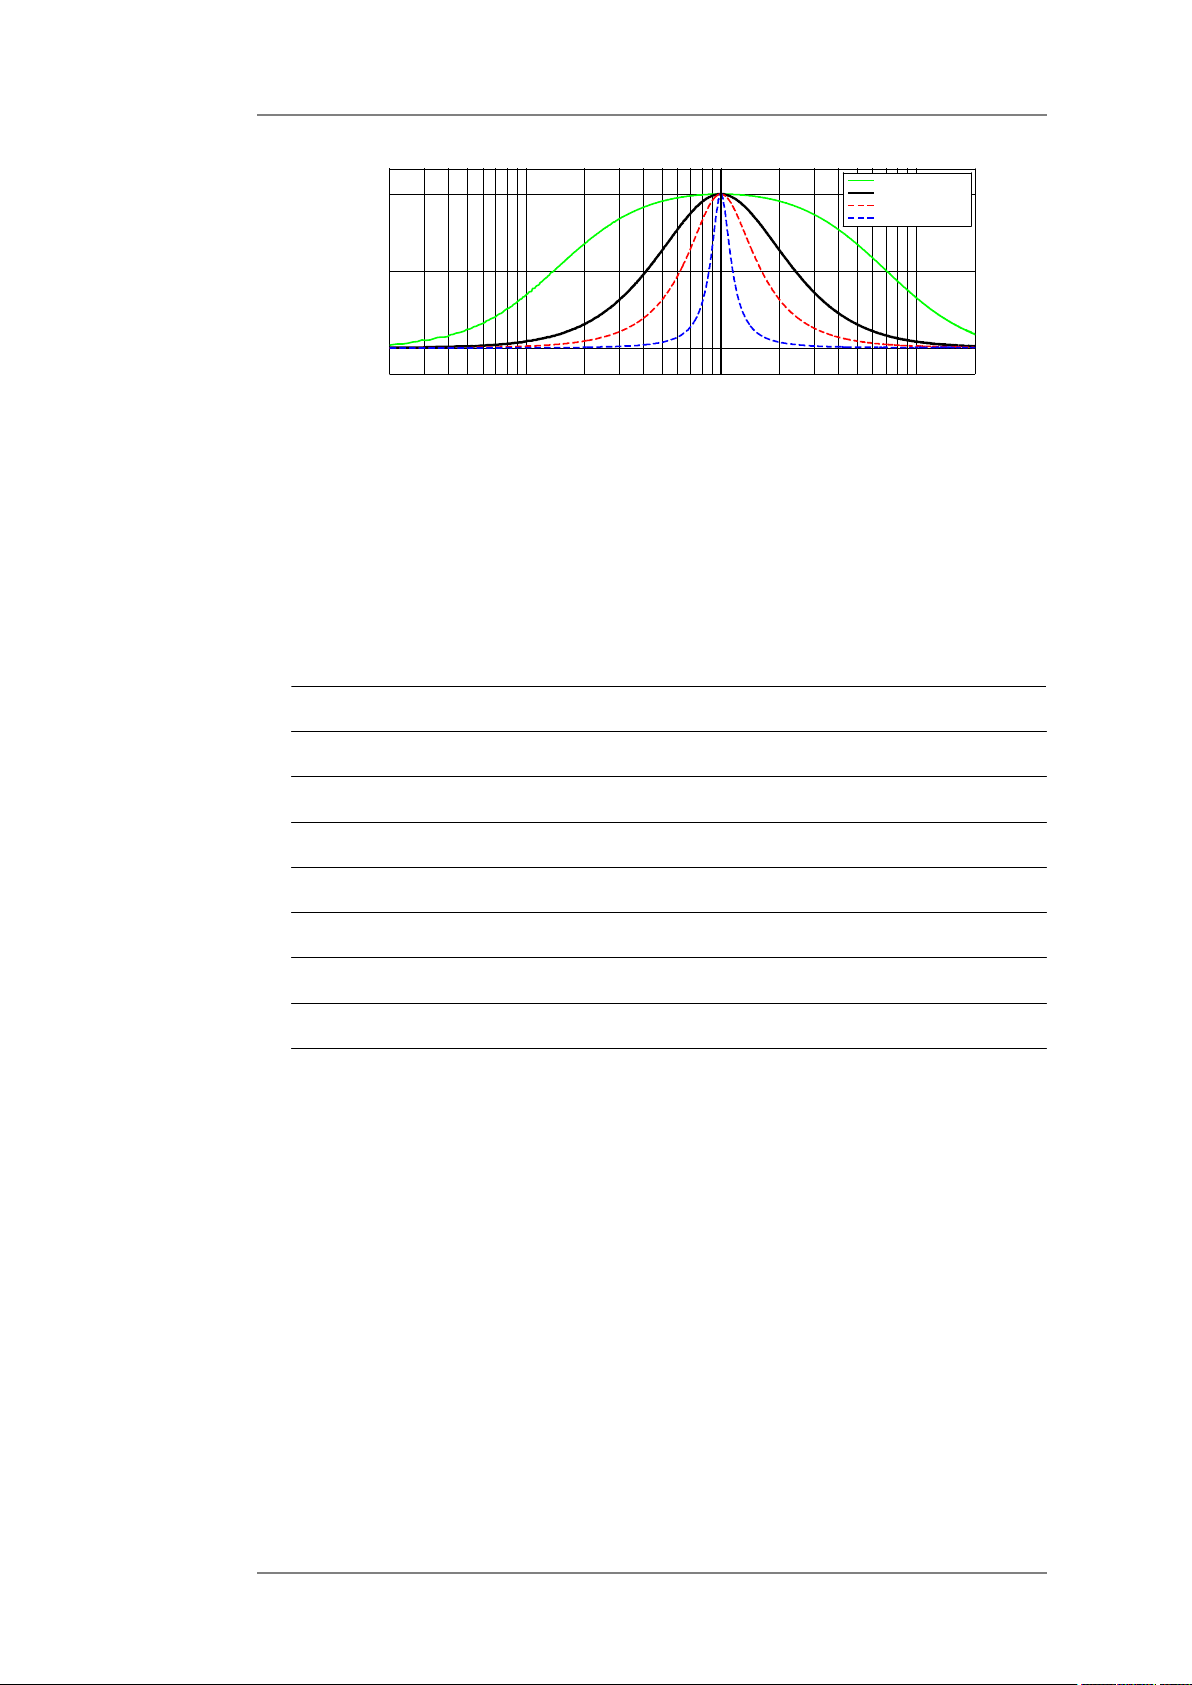
1. Bell = Bell Filter
This filter increases certain frequency ranges (positive gain) or attenuates them (negative
gain).
KLING & FREITAG GMBH © 2014 Version 11.6 Page 15 of 77
Page 16
User's manual K&F CD 44 Digital System Controller
20
50 100 500
1000
5000
10000
20000
0
3
+6
Frequency in [Hz]
Power in [dB]
FilterType = 'Bell' (Bell Passband) Gain = +6dB Freq = 1000Hz
Q = 0.2
Q = 0.707
Q = 1.414
Q = 5
The gain determines the maximum or minimum level increase or attenuation of the filter
(in the graph: increase of +6dB.
This 'bell' is logarithmically symmetrical relative to the selected frequency (in the
example: 1000 Hz).
The Q-factor defines the quality of the filter. In doing so, it determines the width of the
frequency range which is to be increased or attenuated. The higher the Q-factor, the
narrower the frequency range. A lower Q-factor thus has a wider range.
"Q" is adjustable in steps of 0.001 from 0.2 to 20.
Typical Q-values and their bandwidth equivalent:
Bandwidth Q factor
1/3 Oktave (third) 4.318
2/3 Oktave (two thirds) 2.145
1 octave 1.414
1 1/3 1.044
1 2/3 0.819
2 0.666
1/6 octave (whole step) 8.651
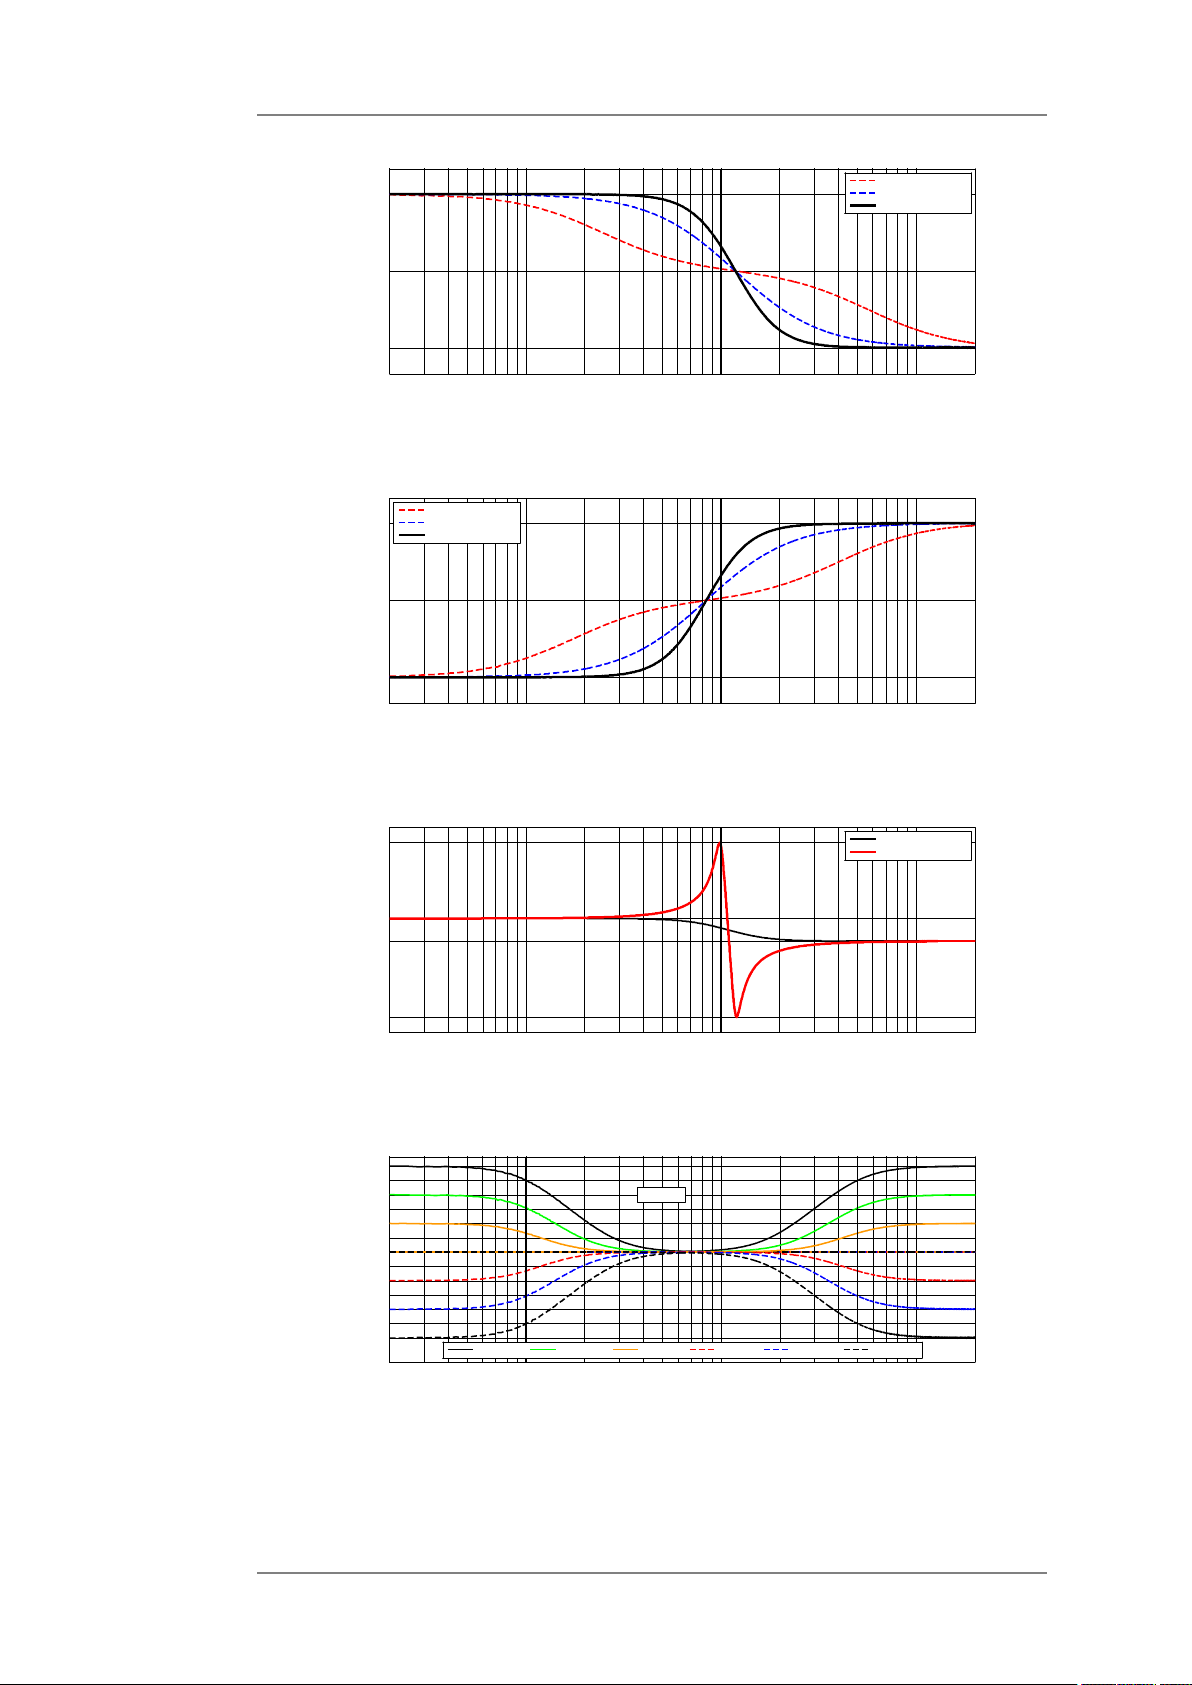
2. HShelv (high shelving filter)
3. LShelv = Low Shelving Filter
These filters increase (positive gain) or attenuate (negative gain) the frequencies below
or above the selected frequency.
Below = LShelv
Above = HShelv
KLING & FREITAG GMBH © 2014 Version 11.6 Page 16 of 77
Page 17
User's manual K&F CD 44 Digital System Controller
20
50 100 500
1000
5000
10000
20000
0
3
+6
Frequency in [Hz]
Power in [dB]
FilterType = 'LShelv' (Shelving Lowpass) Gain = +6dB Freq = 1000Hz
Q = 0.2
Q = 0.5
Q = 0.707 (default)
20
50 100 500
1000
5000
10000
20000
0
3
+6
Frequency in [Hz]
Power in [dB]
FilterType = 'HShelv' (Shelving Highpass) Gain = +6dB Freq = 1000Hz
Q = 0.2
Q = 0.5
Q = 0.707 (default)
20
50 100 500
1000
5000
10000
20000
-12
-10
0
+3
15
14
Frequency in [Hz]
Power in [dB]
FilterType = 'LShelv' (Shelving Lowpass) Gain = +3dB Freq = 1000Hz
Q = 0.707 (default)
Q = 10
20
50
100
500
1000
5000
10000
20000
-18
-12
-6
0
+6
+12
+18
Frequency in [Hz]
Power in [dB]
'LShelv'
Shelving Lowpass @ Freq = 100Hz
#
FilterType
#
'HShelv'
Shelving Highpass @ Freq = 5000Hz
Q = 0.707
Gain = +18
Gain = +12
Gain = +6
Gain = -6
Gain = -12
Gain = -18
Low Shelving Filter
Above = HShelv
Low Shelving Filter, Q > 0,707
Different increases and attenuations:
Low Shelving Filter @ 100 Hz,
High Shelving Filter @ 5 kHz,
KLING & FREITAG GMBH © 2014 Version 11.6 Page 17 of 77
Page 18

User's manual K&F CD 44 Digital System Controller
Q = 0,707
The Q-factor determines the slope of the filter.
Normally, shelving filters are used with a Q-factor of up to 0.707.
With Q-factors higher than 0.707, the selected frequency is increased and an area above
this frequency range is attenuated correspondingly. The shelving filter is, thus, normally
only used up to Q 0.707.
A Q higher than 0.707 may result in unwanted sound changes.
Q is adjustable in 0.001 steps from 0.2 to 20.
As soon as a Seq10 LS-Block is loaded into the controller, the corresponding input channel
of the input filter 4 is set to SEQ LShelv. Furthermore, frequency, Q-factor and gain are
limited to sensible levels for this use. It is necessary to set an LShelv for all tops in order to
counteract the coupling of the arrayed low-mid speakers.
The LShelv is to be programmed IDENTICALLY for every input path of all tops.
SEQ LShelv setting for exemplary speaker arrays (default values):
In practice, depending on the geometry of the room and other application-specific
factors, the actual values to be set may vary from the default values listed below.
Therefore, the sound engineer may finely adjust the output gain using an additional
parametric filter when setting the system.
The filter depth and the cut-off frequency of the low shelving filter depend on the
amount of speakers. The larger the number of speakers
• the stronger the attenuation
• and the lower the cut-off frequency
The attenuation can be set from 0 to -14 dB, the cut-off frequency from 250 Hz – 1 kHz, Q
from 0.5 – 0.707.
The following chart shows reference values for selecting the SEQ LShelv for all SEQUENZA
10 tops in each corresponding array:
Number
of tops
1, - 6, -4.5 dB 1 kHz 0.7
7 - 8 -7 dB 850 Hz 0.7
9 - 10 -9 dB 850 Hz 0.7
11 - 12 -8.5 dB 500 Hz 0.7
13 - 16 -11 dB 300 Hz 0.7
17 - 18 -11 dB 250 Hz 0.7
19 - 20 -12 dB 350 Hz 0.5
21 - 22 -13 Hz 250 Hz 0.5
23 - 24 -14 dB 250 Hz 0.5
You can create the SEQ LShelv settings by the software CD Remote automatically. Please
specify the number of used tops. Refer the Software Starter Guide 'CD Remote'.
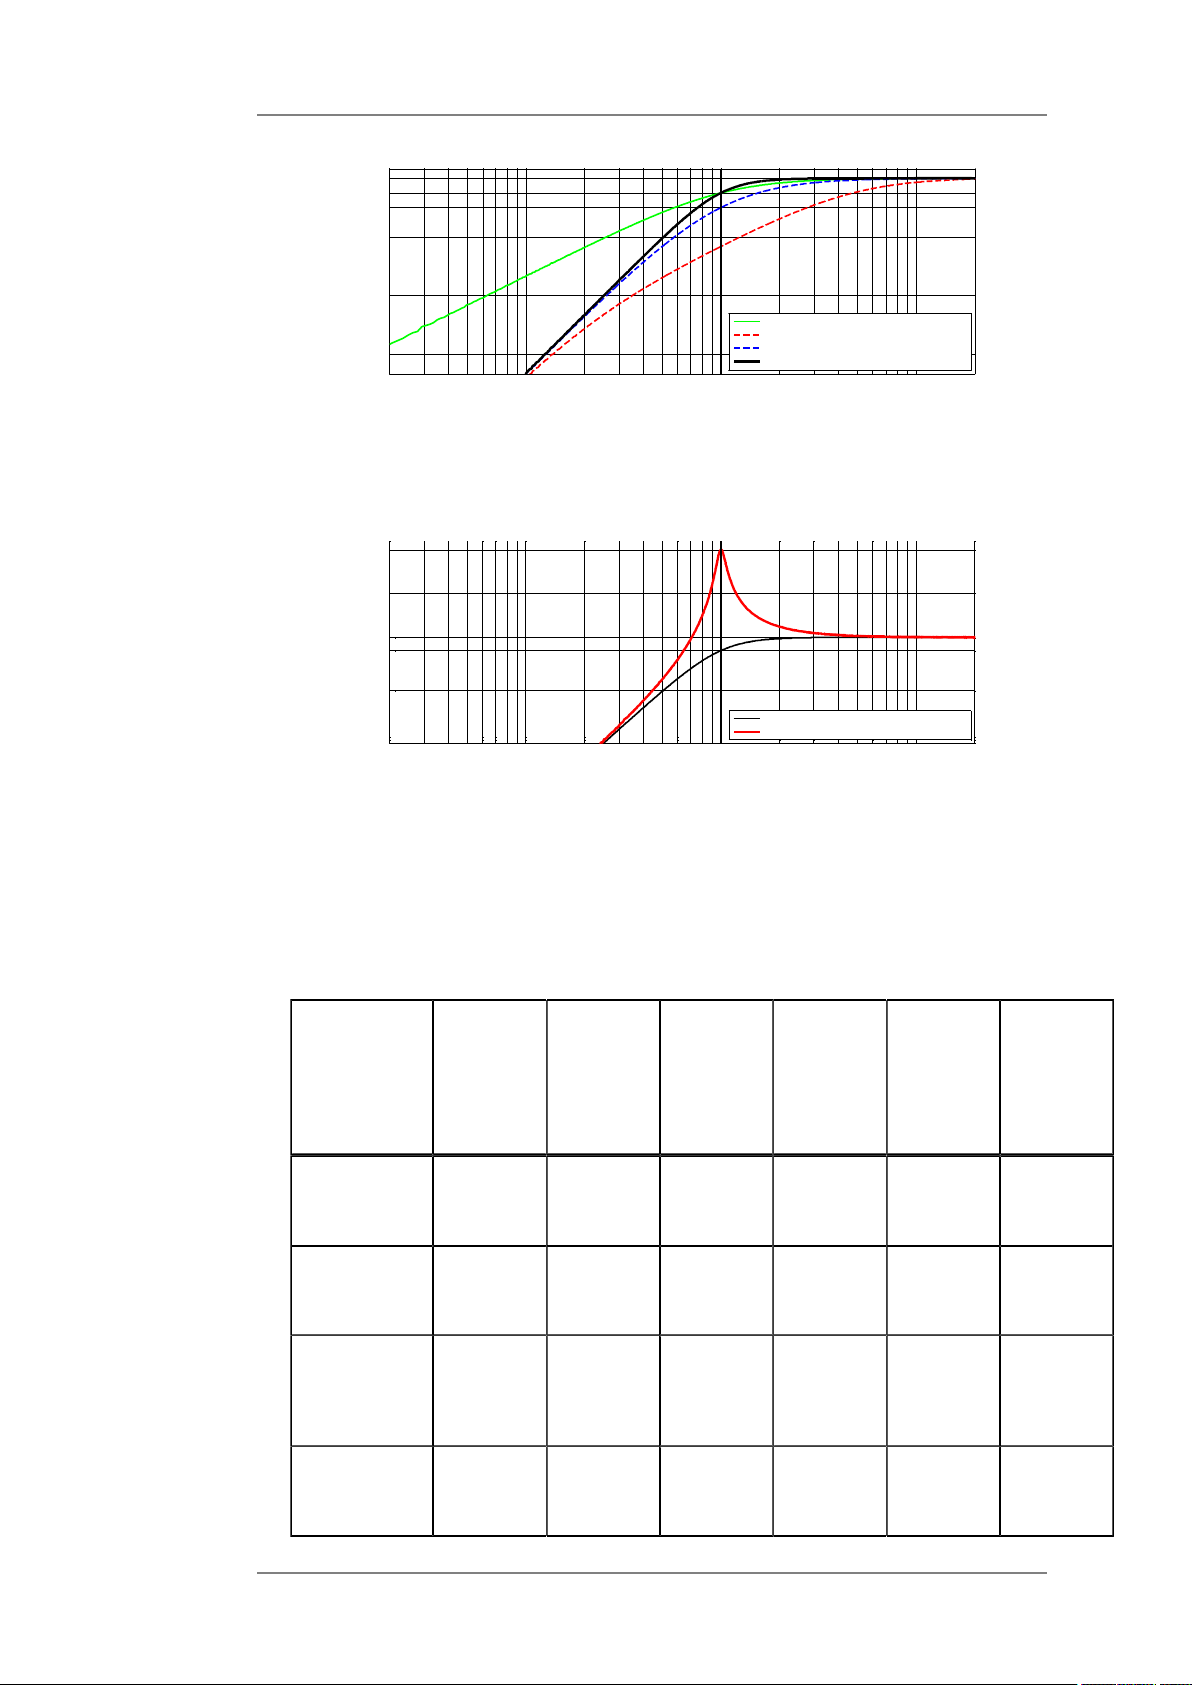
4. This example shows different high pass filters which are characterised by varying Q
factors.
GAIN Freq Q
KLING & FREITAG GMBH © 2014 Version 11.6 Page 18 of 77
Page 19
User's manual K&F CD 44 Digital System Controller
20
50 100 500
1000
5000
10000
20000
-40
-36
-24
-12
-6
-3
0
2
Frequency in [Hz]
Power in [dB]
FilterType = 'HighP' (Highpass) Freq = 1000Hz
Q = 0.707
Butterworth 1.Ordnung
Q = 0.2
Q = 0.5
Linkwitz-Riley 2.Ordnung
Q = 0.707 (default)
Butterworth 2.Ordnung
20
50
10
0
50
0 1
000
50
00
10000
20000
-2
4
-1
2
-3
0
10
20
Frequenc
y i
n [H
z]
Amplitude
i
n
[
d
B]
FilterType =
'HighP
' (High
pas
s)
Freq = 1000H
z
Q= 0.707 (default)
Butterworth -12dB/Oct
Q =10
The resulting filter Q = 0.707 is a 2nd order Butterworth filter and causes attenuation of
3 dB at the cut-off frequency (-3dB @ 1000Hz). Below the cut-off frequency, there is an
attenuation of 12 dB per octave (-12dB/octave).
A Q higher than 1 causes a level increase at the crossover frequency.
You can choose between a high pass filter 1st or 2nd order. The Q of a 1st order high pass
filter is always fixed. At a 2nd order high pass filter Q is adjustable in steps of 0.001 from
0.2 to 20.
The parameter 'Gain' has no effect with the high pass filters.
The following table illustrates how you can implement the common high and low pass
filters and how many parametric filters you need to do so.
Type of
filter
Butterworth
1st ord.
Slope Number
of
necessary
PEQs
6
1 0 - - -
dB/
Q
high- /
low
pass
filter
1
Q
high- /
low
pass
filter
2
Q
high- /
low
pass
filter
3
Q
high /
lowpass
filter
3
oct.
Butterworth
2nd
ord.
LinkwitzRiley
2nd
KLING & FREITAG GMBH © 2014 Version 11.6 Page 19 of 77
ord.
Butterworth
3rd ord.
12
dB/
oct.
12
dB/
oct.
18
dB/
oct.
1 0.707 - - -
1 0.5 - - -
2 1 0 - -
Page 20
User's manual K&F CD 44 Digital System Controller
20
50 100 500
1000
5000
10000
20000
-40
-36
-24
-12
-6
-3
0
2
Frequency in [Hz]
Power in [dB]
FilterType = 'LowP' (Lowpass) Freq = 1000Hz
Q = 0.707
Butterworth 1.Ordnung
Q = 0.2
Q = 0.5
Linkwitz-Riley 2.Ordnung
Q = 0.707 (default)
Butterworth 2.Ordnung
Butterworth
4th ord.
LinkwitzRiley
4th ord
Butterworth
5th ord.
Butterworth
6th ord.
LinkwitzRiley
6th ord.
Butterworth
7th ord.
Butterworth
8th ord.
24
dB/
oct.
24
dB/
oct.
30
dB/
oct.
36
dB/
oct.
36
dB/
oct.
42
dB/
oct.
48
dB/
oct.
2 1.307 0.541 - -
2 0.707 0.707 - -
3 1.618 0.618 0 -
3 1.932 0.707 0.518 -
3 1 1 0.5 -
4 2.247 0.802 0.555 0
4 2.563 0.9 0.601 0.51
LinkwitzRiley
8th ord.
48
dB/
oct.
4 1.307 1.307 0.541 0.541
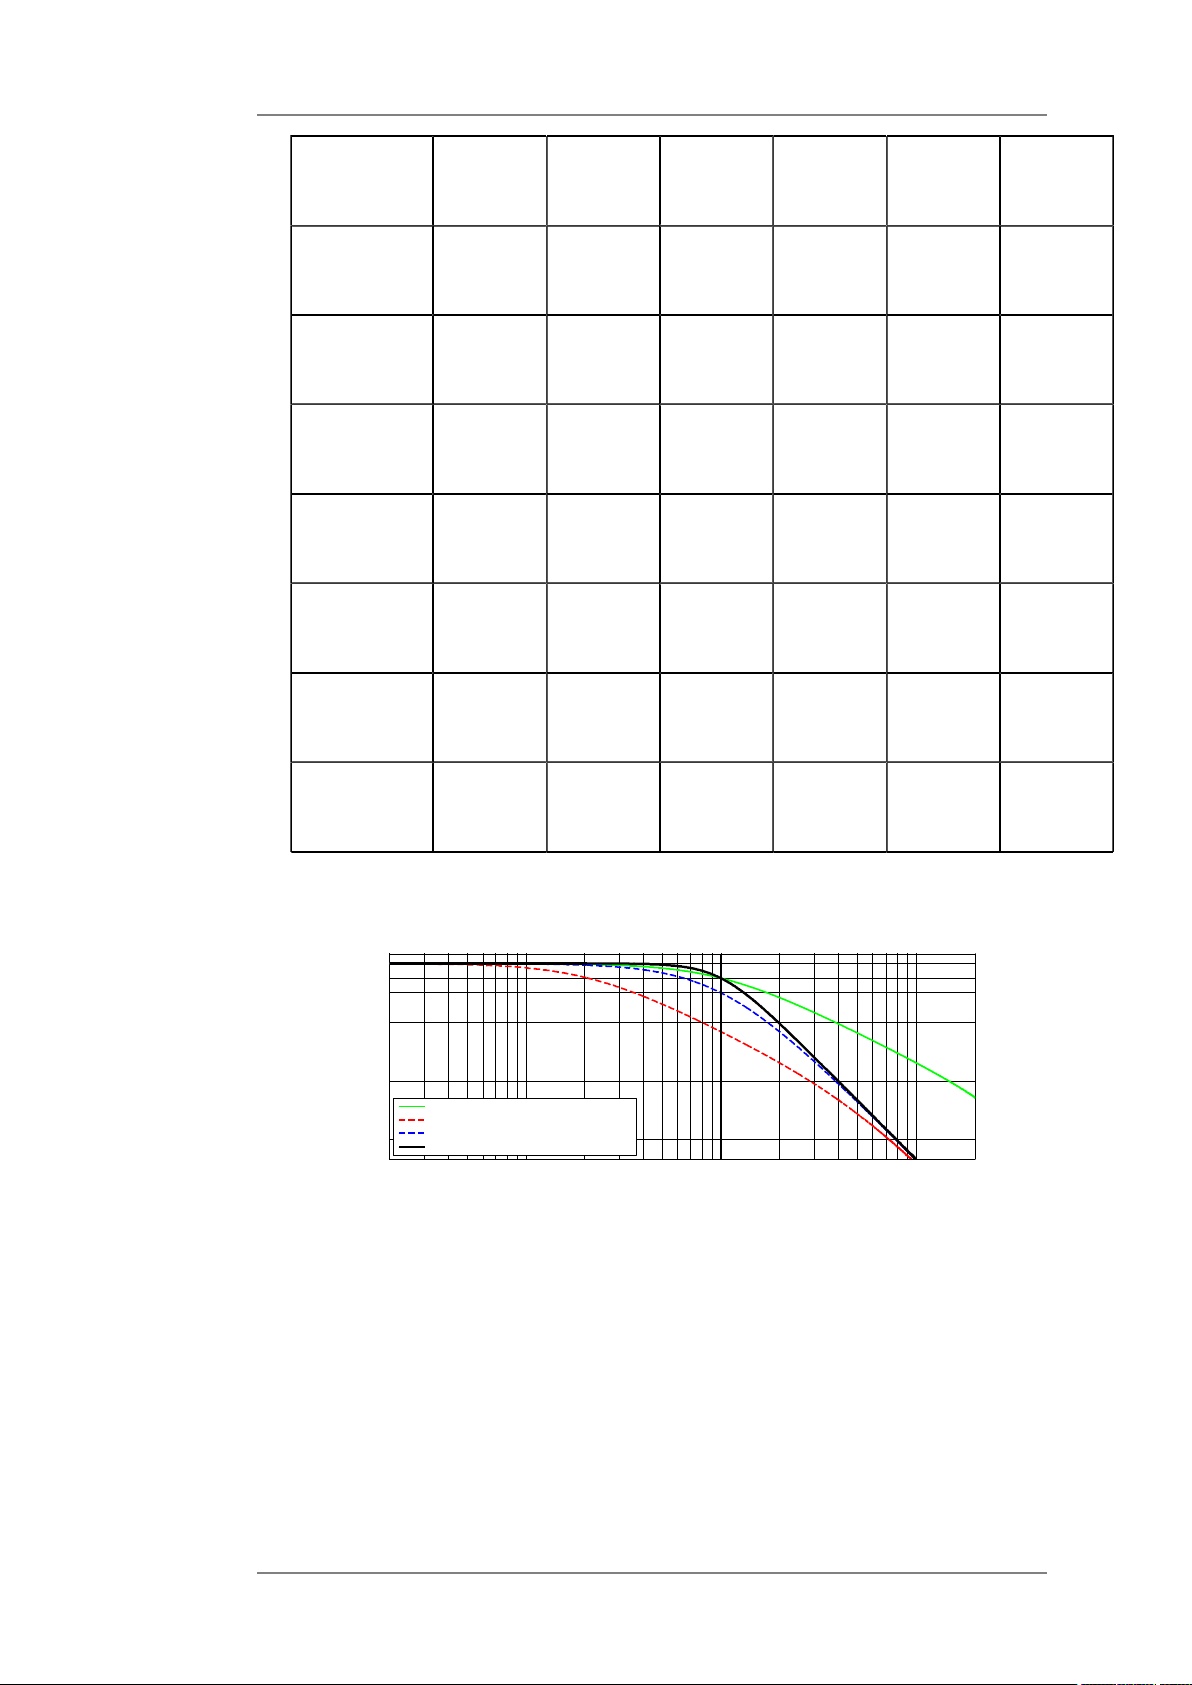
5. LowP = Low Pass Filter
This example shows various low pass filters at 1000Hz, which are characterised by
different Q-factors.
KLING & FREITAG GMBH © 2014 Version 11.6 Page 20 of 77
Page 21
User's manual K&F CD 44 Digital System Controller
20
50 100 500
1000 5000
10000
20000
-24
-12
-3
0
10
20
Frequency in [Hz]
Power in [dB]
FilterType = 'LowP' (Lowpass) Freq = 1000Hz
Q = 0.707 (default)
Butterworth 2.Ordnung
2
0
50
1
00
5
00
100
0
500010000
20000
-1
80
-1
35
-90
-45
0
4
5
9
0
1
35
1
80
Frequencyin[H
z]
P
h
a
s
e i
n
[
°]
Filte
rType='AP'
(AllpassFilt
er)
Freq
= 1000H
z
1.Ordnung (0.707)
Q =0.
2
Q =0.
5
Q =0.
707 2.O rdng.
Q =10
The resulting filter with Q = 0.707 is a 2nd order Butterworth filter and causes an
attenuation of 3dB at the cut-off frequency (-3dB @ 1000Hz). Above the cut-off
frequency, there is an at-attenuation of 12dB per octave (-12dB / octave).
A Q higher than 1 causes a level increase at the crossover frequency.
You can choose between a high pass filter 1st or 2nd order. The Q of a 1st order high pass
filter is always fixed. At a 2nd order high pass filter Q is adjustable in steps of 0.001 from
0.2 to 20.
The parameter 'Gain' has no effect with the low pass filters.
Tip
In the section HighP = High Pass Filter, you will find a table for high and low pass filters
that shows examples of how to implement common low pass filters and how many
parametric filters are required to do so.
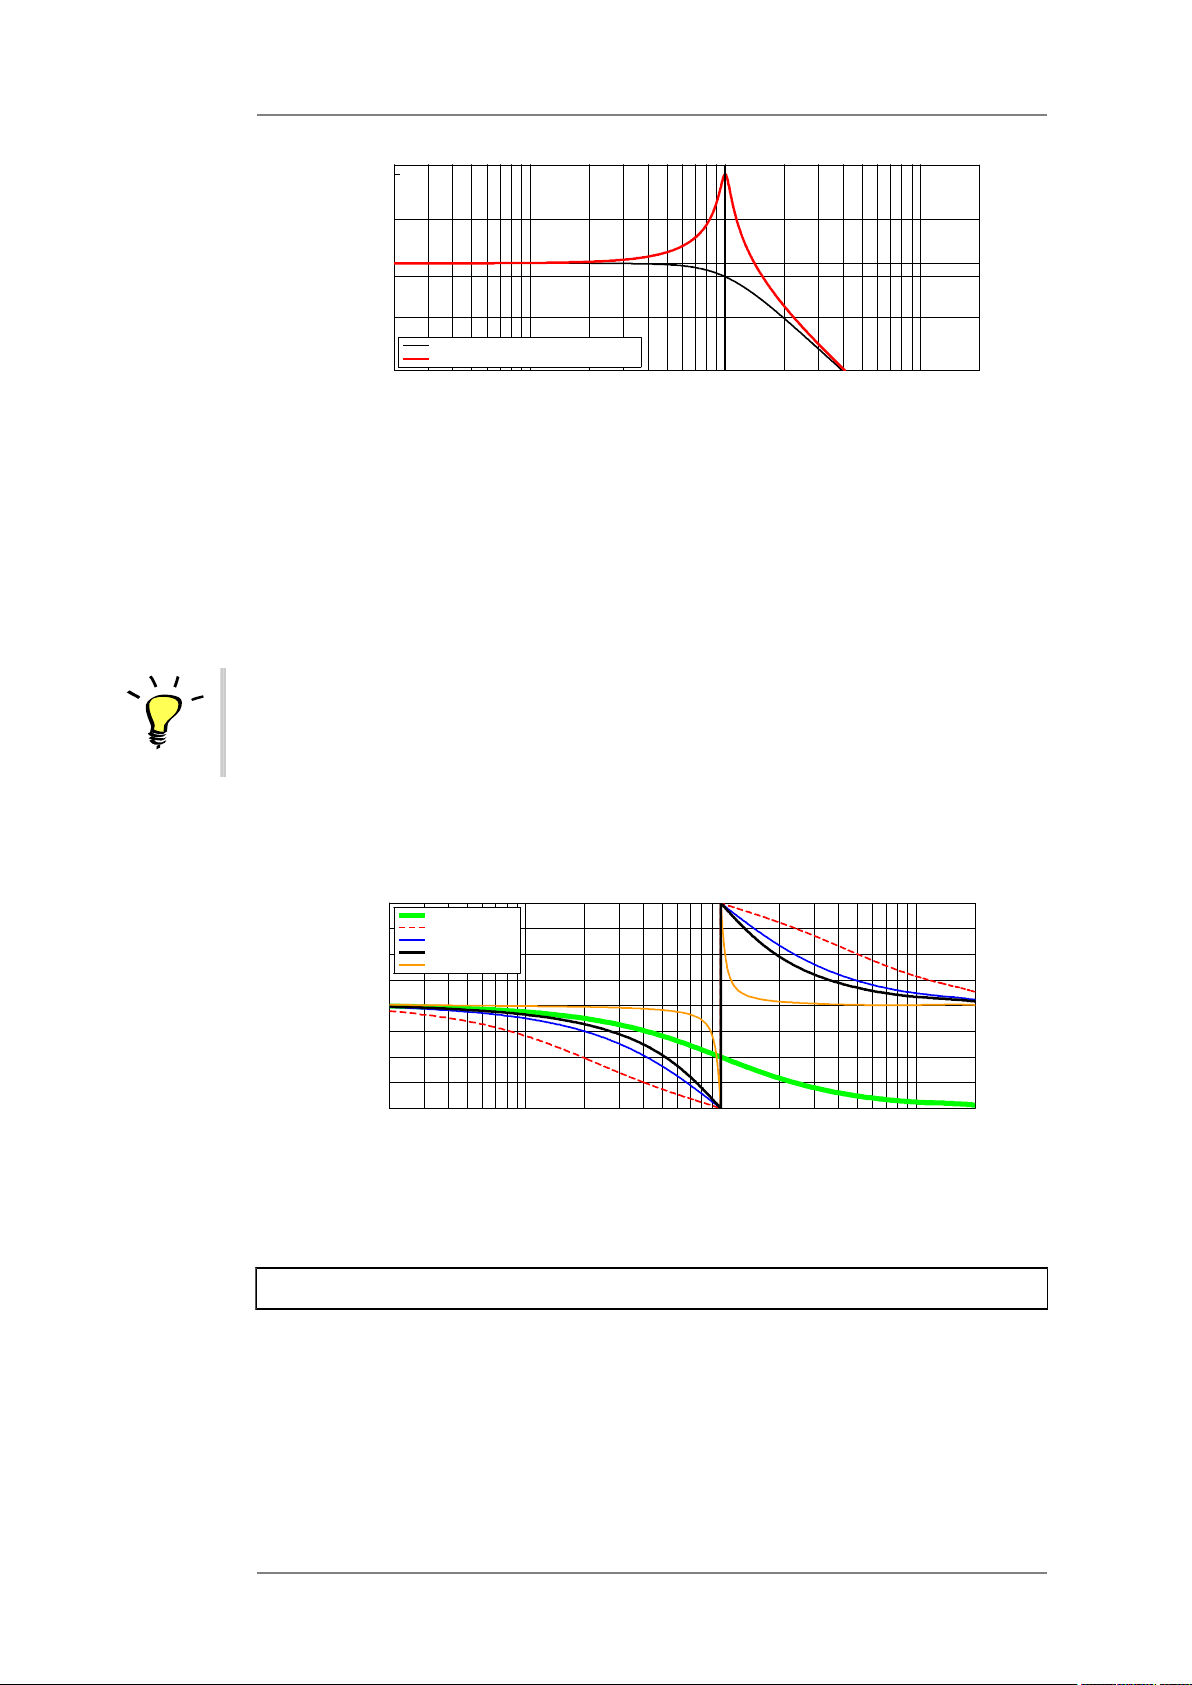
6. AP = All Pass Filter
In doing this, it does not cause any increase or attenuation of frequency levels.
Der Q-Faktor bestimmt die Steilheit des Phasensprungs. Je höher, desto steiler.
For a 1st order all pass filter, 0 must be selected for the Q. Values higher than 0 produce a
2nd order all pass filter.
7.1.2 Switchable, Speaker Specific Filters
By pushing the Filter B button, you access the preset speaker-specific filters. You cannot access
this filter setup via the menu navigation, but only by using the shortcut button. These filters
cannot be set by the user – they can only be switched on or off and are a part of the LSBlocks. Depending on which speaker was selected for which output, there are various filters
available. The speakers are assigned as follows: FILTER B
<Out » Output1> through <Output4 » Select LS-Block>
Push the Filter B button until you accesse the filter which you wish to switch on or off. FILTER
B
KLING & FREITAG GMBH © 2014 Version 11.6 Page 21 of 77
Page 22
User's manual K&F CD 44 Digital System Controller
If one of these filters is active, the blue LED on the FILTER B button lights up. FILTER B
This illustration shows a cluster filter which is assigned to a speaker at Out1.
The following table shows which filters are available for the relevant LS-Blocks:
Speaker (LS-Blocks) Filter 1 Filter 2
SONA 6 Presence High Boost
CA-Series and Line 212 Cluster High Boost
SW-Series, all B5 and B10 Cluster -
B10 SubLow Bass Boost -
ACCESS High - High Boost
ACCESS Mid (Clus / Sngl) - -
ACCESS B5 - -
ACCESS B10 (all versions) Bass Boost -
Seq10LF / (HF and FR) Straight High Boost
Seq10LF / (FR and LCut) Straight High Boost
Seq10LF / (FR and LCut) Straight -
Seq10B (all versions) - -
NomXLC (all versions) - -
Explanations for the speaker-specific filters:
• Presence: Mid boost. To achieve sound compatibility with the SONA 5 without the CD
44, switch on this filter along with the High Boost Filter. CD 44
• High Boost SONA 5: slight increase using a Shelving Filter. To achieve sound
compatibility with the SONA 5 without the CD 44, switch on this filter along with the
Presence filter. CD 44
• High Boost: To compensate high-range attenuation over long distances for tops.
• Sequenza 10 N / W: The high boost filter should only be switched on for speakers
whose main beam is directed towards audience sections that are approx. 40 m or
further away. Normally, this only applies to a few of the upper speakers.
• Cluster: To compensate undesired frequency additions in the low-mid range for monitor
and cluster usage (cluster = several speakers placed directly next to one another).
Switch on the Cluster Filter for tops if you wish to operate several tops (cluster) next
to one another or if you place the top on the floor as a monitor. This reduces the
frequency additions in the low/mid range that result from clustering the speakers (with
one another or on the floor).
If you operate several tops aligned next to one another (cluster), then there is an
addition of certain frequencies that can interfere with the sound results. This frequency
addition is compensated by the cluster filter. If these clusters are positioned on a
subwoofer, then the phasing between the tops and the subwoofer can be improved
when both ways run through the same filter, in other words: when the cluster filter is
also switched on for the subwoofer.
• Bass Boost: To boost the bass for usages with the ACCESS B10 speakers.
KLING & FREITAG GMBH © 2014 Version 11.6 Page 22 of 77
Page 23

User's manual K&F CD 44 Digital System Controller
• Straight (Sequenza 10 N / W only): The straight filter serves to harmonise the balance
of the upper-mid range between shorter and larger listening distances. It is preferably
used for speakers whose angle to the other speakers is 0°, 1° or 2. The Straight-Filter
must be switched in both paths of the speaker, so in the Seq10LF / HF (FR or LCut) and
the Seq10LF (FR or LCut) to 'ON'.
7.1.3 Input and Output Gains (Gain Button)
Pushing the GAIN button allows you to directly access the input and output gains without
having to navigate through the menu. GAIN
After pushing the GAIN button, the first possible setting is for the signal input (input gains). If
you push it repeatedly, you access the output gains. GAIN
If one of these gain values is not zero, the red LED on the GAIN button lights up. GAIN
How high a gain can actually be set depends on, among other things, if and how high an
output gain is already preset in an LS-Block. The output gains saved in the LS-Block are
neither visible nor adjustable. Depending on the LS-Block, these output gains have values
between 0dB and +5.3 dB. It is, therefore, possible that the user can set the gains accordingly
lower than the otherwise possible +24 dB. We generally advise against selecting such high
gain values.
1. The Input Gains regulate the level for the line signal input (INPUT 1 through INPUT 4).
Using the menu navigation, the input gains can be accessed at <In » Input1> through
<Input4 » Gain>.
Depending on the output gain and the previously used gain in the LS-Block, the input
gains can be set between -96 dB and +24. The sum of the input gain, the output gain,
and the LS-Block's gain can not exceed +24 dB.
Adjustments to the input gains may be necessary if, for example, the limiter LEDs light up
often. In this case, the input gains can be reduced.
If the input signal is too weak, use the input gains to increase it.
You can find an overview of the input gain settings on a prompt, subsequently referred
to as InfoWindow 1. This InfoWindow 1 initially appears approx. 7 seconds after turning
on the device, or when you have not used it for approx. 7 seconds, or after you have
pushed the EXIT button several times. EXIT
You can find more detailed information about this in the chapter 'InfoWindow: Display
of Basic Settings' on page 24.
2. The Output Gains regulate the level of the individual signal outputs (OUT 1 through OUT
4).
You can access the output gains at <Out » Output1> through <Output4 » Gain> in the
menu.
Depending on the input gain and the gain previously used in the LS-Block, the output
gains can be set up between -96 dB and +24. The sum of the input gain, the output gain,
and the LS-BLock's gain can not exceed +24 dB.
The output gains are used for, for example:
- level adjustments for different zones of sound coverage.
- level adjustments between top speakers and subwoofers. When the number of arrayed
subwoofers is doubled, the level increases by up to + 6 dB (+3 dB efficiency and +3 dB
by doubling the power amplifier output). Due to their directivity, the level of the top
speakers does not increase correspondingly.
Furthermore, because of missing floor reflections, a flown subwoofer can be several
decibels quieter than a subwoofer which is standing on the floor.
The output gain functions offer the possibility to adjust this level balance, depending on
the configuration and use.
KLING & FREITAG GMBH © 2014 Version 11.6 Page 23 of 77
Page 24

User's manual K&F CD 44 Digital System Controller
According to the room geometry, the actual level balance which needs to be adjusted
may differ from the aforementioned reference values. It is, therefore, always necessary
for a sound technician to carry through fine adjustments of the output gains when the
system is set up.
7.1.4 Input and Output Delays (Delay Button)
After pushing the DELAY button, the first settings you access are for the input delays. Pushing
the button repeatedly will give you access to the output delays.
The units for the delays can be converted from milliseconds (ms) to metres (m) at <Util »
Units>. The unit ‘Metre’ is based on a sound velocity of 343 m/s at 20°C.
If one of these delay values is not zero, the red LED on the DELAY button lights up.
1. Use the Input Delays to create delay lines.
Delay lines are speakers which are set up behind one another. The delay times of the
speakers’ sound propagation is compensated using delays.
The purpose of delay lines is to ensure that the sound from the speakers near the stage
reaches the listeners in the back of the audience simultaneously (preferably) with the
sound from the speakers in the rear audience area.
You can separately adjust the delays of up to four input channels, with every channel
having a total available delay of 200 ms or 68.6 m. Because a delay of 0.02 ms is already
set up in the LS-Block ACCESS High, the available delay time when using this LS-Block is
reduced accordingly by this amount.
2. Use the Output Delays to compensate differences in delay time of the positioned
speakers, for example from flown tops to standing subwoofers, stage edge speakers to
the main system, etc. You can separately adjust a total of 4 output channels.
Out 1 and Out 2 share 20 ms or 6.86 m delay time.
Out 3 and Out 4 also share 20 ms or 6.86 m delay time.
These values decrease if there is already a delay set in an LS-Block.
If you select a delay of 5 ms or 1.715 m for Out 1, then there are another 15 ms or 5.145
m available for Out 2. The same also applies for Out 3 and Out 4. The value stated next to
‘Avl =’ indicates how much delay time is still available.
7.2 InfoWindow: Display of Basic Settings
A window initially appears, subsequently referred to as InfoWindow 1, approx. 7 seconds
after turning on the device, or when you have not used it for approx. 7 seconds, or after you
have pushed the EXIT button several times. If you are currently in InfoWindow 1, and you
then turn the knob to the right (clockwise), you will access InfoWindow 2. EXIT
This illustration shows InfoWindow 1 for the loaded setup 'Example 5':
The InfoWindow 1 shows information about the following basic settings:
• 1st line: Name of the loaded setup, here: Example 5. If there is an asterisk next to the
setup name, this means that changes have been made to the setup that have not been
saved yet.
• 2nd and 3rd line: Settings of the Input Gains 1-4 (Depending on routing, 1 to 4
adjustable gains).
• 4th line: type of routing, here: '4in4out' and the selected input sources (ANA =
analogue inputs, AES = digital inputs)
KLING & FREITAG GMBH © 2014 Version 11.6 Page 24 of 77
Page 25

User's manual K&F CD 44 Digital System Controller
This illustration shows InfoWindow 2 for the loaded setup 'Example 1' with additionally
activated filters:
The InfoWindow 2 shows which speaker block (LS-Block) is assigned to which output (1-4).
Furthermore, it also gives you information about the status of the selectable speaker-
specific filters (ON / OFF). The left box stands for Filter 1, the right box for Filter 2. If a box is
checked off, then the corresponding filter is active. If there is no box, then the filter for the
corresponding speaker (LS-Block) is not available. You can find further information about the
filters in chapter 'Switchable, Speaker Specific Filters' beginning on page 21.
7.3 Main Menu
If you are in InfoWindow 1 or 2, you can return to the main menu by pushing the knob.
The main menu consists of the following main menu items: Setup, In, Out and Util.
Turn the knob to make the blinking cursor (position indicator) move horizontally to the
corresponding main menu item.
If the cursor is at a certain menu item, the corresponding submenu appears. In the following
illustration, the cursor is initially at the main menu item Setup. If you turn the knob some
more, then the cursor moves on to the further main menu items In, Out, and Util.
Push the knob to access the submenu where the cursor currently is located. In the following
example, the cursor has been moved to the main menu item Util which was selected by
pushing the knob.
7.4 Submenu
Turn the knob to make the blinking cursor (position indicator) move horizontally to the
corresponding main menu item. If the cursor is at a certain menu item, the corresponding
submenu appears. In the following illustration, the cursor is initially at the main menu item
Setup. If you turn the knob some more, then the cursor moves on to the further main menu
items In, Out, and Util.
Push the knob to access the submenu where the cursor currently is located. In the following
example, the cursor has been moved to the main menu item Util which was selected by
pushing the knob.
KLING & FREITAG GMBH © 2014 Version 11.6 Page 25 of 77
Page 26

User's manual K&F CD 44 Digital System Controller
7.5 Setups in editing mode
All settings are executed in real time.
There are three different editing modes:
1. Editing mode with one editing line
2. Editing mode with several editing lines
3. Selection Mode with selection lines
7.5.1 Editing mode with one editing line
In order to follow the aforementioned example, we will show the editing mode with one
editing line: the editing mode Contrast of the submenu item Display.
Changing Parameters
The underline marks if you can change the parameters in increments of 1 or 10. (In other
editing modes, further increments are also possible). In the illustration below, the underline is
below the zero, this means, the ones digit will be changed.
You can change the parameters in increments of one by turning the knob f.
If you wish to change the parameters in increments of 10, then push the knob once so that
the cursor blinks. In this case it is blinking in the ones place. Turn the knob to the left so that
the underline is under the tens place (the cursor is no longer blinking). Then you can change
the parameters in increments of 10 by turning the knob.
Confirm changes
To confirm the changes made in the current editing mode, push the EXIT button 2x. The
screen returns to the preceding submenu. The settings are kept until a new setup is loaded
or until the settings are changed. Changes that have been made in fewer than 10 seconds
before the device is shut down are lost after it is turned off. Please wait at least 10 seconds
after having made final changes before turning off the controller. EXIT
To permanently store changes in a setup, save the setup at: <Setup » Save As>.
The following changes are not saved with a setup and are, therefore, maintained even after a
setup has been loaded: InSelect, EQ 31-Band, Display, IP-Address, Units.
Undo (cancel changes)
To undo the changes made in the editing mode, turn the knob while the cursor is blink-
ing (push the EXIT button 1x) to the left until the position indicator (arrow) points to the
undo symbol. Then push the knob. The entries are cancelled and the screen returns to the
preceding submenu. EXIT
Example of a display in the editing mode with one editing line:
KLING & FREITAG GMBH © 2014 Version 11.6 Page 26 of 77
Page 27

User's manual K&F CD 44 Digital System Controller
7.5.2 Editing mode with several editing lines
The following example will familiarise you with the menu navigation. You better access the
PEQs using the shortcut button. Please read important notes beginning on page 15.
Changing Parameters
In the illustration below, you are at the following menu position:
<In » Input1> through <Input4 » PEQ » Filter 1> through <Filter 4>:
Select the line that is to be edited by turning the knob. This line is marked by the arrow. After
you push the knob, the underline marks which position of the parameters you are changing
while turning the knob.
In the illustration, the underline is under the 10ths place of the Gain parameters (here 00.0).
You can change the 10ths place of the parameters by turning the knob. In order to change
the ones or the tens places, push the knob and move the blinking cursor to the place which
you wish to change. If you push the knob again, the underline indicates the position which
you can change by turning the knob. To confirm the entry, push the EXIT button. EXIT
Confirm Changes
To confirm the changed settings in the current editing mode, push the EXIT button 2x, and
you will return to the previous submenu. The settings are kept until a new setup has been
loaded or until the settings have been changed. Changes which have been made less than 10
seconds before the device is shut down are lost after it is turned off. Please wait at least 10
seconds after having made final changes before turning off the controller. EXIT
To permanently store changes in a setup, save the setup at: <Setup » Save As>.
The following changes are not saved with a setup and are, therefore, maintained even after a
setup has been loaded: InSelect, EQ 31-Band, Display, IP-Address, Units.
Undo (cancel changes)
To undo the changes made in the editing mode, turn the knob to the left until the arrow
points to the undo symbol. Then push the knob. The entries are cancelled and the screen
returns to the preceding submenu (here: Input1).
Help
To get help with the different editing modes, turn the knob to the left until the arrow points
to the help symbol (question mark). You can find the appropriate help topic by pushing the
knob. Pushing it again returns you to the editing mode. There is not a help text for every
editing mode.
Example of a display in the editing mode with several editing lines:
7.5.3 Editing Mode with Selection Lines
In the illustration below, you are at the following menu position:
Util » Routing
KLING & FREITAG GMBH © 2014 Version 11.6 Page 27 of 77
Page 28

User's manual K&F CD 44 Digital System Controller
Move the position indicator (arrow) to the line that you want to select by turning the knob.
Push the knob to choose the selected line. The selection is made and you return to the
preceding submenu (here: Util).
Confirm selection
To confirm the changed selection in the current editing mode, push the knob and you will
return to the previous submenu. The selection is kept until a new setup has been loaded or
until the selection has been changed. Changes which are made less than 10 seconds before
the device is shut down are lost after it has been turned off. Please wait at least 10 seconds
after having made the final selection before turning off the controller.
To permanently store the selection, save the setup at: <Setup » Save As>.
The following changes are not saved with a setup and are, therefore, maintained even after a
setup has been loaded: InSelect, EQ 31-Band, Display, IP-Address, Units.
Example of a display in the editing mode with selection lines:
7.5.4 Menu Tree of the CD 44 and Explanation of the Functions
Overview of the CD 44 menu tree:
KLING & FREITAG GMBH © 2014 Version 11.6 Page 28 of 77
Page 29

User's manual K&F CD 44 Digital System Controller
Setup
Load
Save As
Delete
In
Input Patching
Analog Default
Analog Flipped
Analog1&2 Mix
Digital Default
Digital Flipped
Digital 1&2 Mix
Input 1
EQ 31-Band
Gain
Delay
PEQ
Load
Edit
Reset
Save As
Delete
Out
Output 1
Select LSBlock
AmpGain
Output 2
like Output 1
Output 3
like Output 1
Output 4
like Output 1
Gain
Delay
LimReduction
Util
Routing
Display
Rights
Lock
Change Level
IP Address
Units
Info
Input2
like Input 1, but
EQ 31-Band without Delete
Input3
like Input 2
Input4
like Input 2
The dotted-line menu items are not available in user mode.
Detailed instructions about the authorisation modes in chapter 'Functions of the Menu Items
under ‘Util’' beginning on page 40.
7.5.5 Functions of the Menu Item ‘Setup’
The submenu items <Load, Save As>, and <Delete> carry out their functions within the
named setups. You can save up to 64 setups. To save changed settings permanently, you must
save the setup in the main menu <Setup » Save As>!
Approx. 10 seconds after the last change, the CD 44 saves the current status in its memory.
This ensures that the changes that you make, even if they are not saved in a setup, are not
lost when the device is switched off or if there is a power outage. Please wait at least 10
seconds before turning off the controller to make sure that all settings can be restored after
switching the controller on again, including the loading, saving and deleting of setups.
Changes which were not saved in a setup are lost after a new setup has been loaded <(Setup
» Load)>.
• <In » Input1> through <Input4 » EQ 31-Band>
• <Util » Units> (zum Umschalten der Einheiten der Delays von m in ms),
• <Util » IP Adress> (for network connections)
KLING & FREITAG GMBH © 2014 Version 11.6 Page 29 of 77
Page 30

User's manual K&F CD 44 Digital System Controller
• <Util » Display> (display contrast)
The settings in the following functions do, however, remain after a new setup has been
loaded:
• <In » Input1> through <Input4 » EQ 31-Band>
• <Util » Units> (zum Umschalten der Einheiten der Delays von m in ms),
• <Util » IP Adress> (for network connections)
• <Util » Display> (display contrast)
1. Save As
Save under a new name
• To save a setup (changed or unchanged) under a new name, select <Setup » Save As>
by turning and pushing the knob.
• Select <new>.
• The name of the current setup appears.
• Position the arrow under the letters that you wish to change.
• Turn the knob and select the letter or number by turning the knob.
• When the desired letter or number is shown, verify the entry by pushing the knob.
• The arrow automatically jumps to the next letter or number.
Continue as described above until you have written the desired name.
By pushing the EXIT button, you save the setup under the name you have defined. EXIT
When you have selected <new>, it is not possible to save under a previously existing
name. The attempt will be answered with the error message Name exists.
Overwriting the currently selected setup
To save a changed setup under the same name, activate <Setup » Save As> (turn and push
the knob).
The arrow is on the name of the setup that you have just changed. By pushing the knob,
you can save your changes.
Overwriting a previously existing setup (not the setup currently selected)
To save a setup under another previously existing name, activate <Setup » Save As> (turn
and push the knob).
The arrow is on the name of the current setup. By turning the knob, you can select
another previously existing name and save your setup by pushing the knob.
2. Load
With <Setup » Load> you can call up the saved setups. When loading a new setup, all 31-
band EQs (<In » Input1> through <Input4 » EQ 31-Band>) are set to Bypass (switched off),
but all other settings are maintained.
3. Delete
With <Setup » Delete>, you delete the saved setups. The currently loaded setup cannot
be deleted. Select a setup by turning then pushing the knob. Confirm the deletion by
pushing the knob again, or cancel it by pushing the Exit button.
7.5.6 Functions of the Menu Items under ‘In’
In the following description the input connectors are named with capital letters (INPUT 1
through INPUT 4). The input sections in the routings are named with bold letters (Input1
through Input4).
The AES/EBU channels are described with left and right (INPUT 1 left/right; INPUT 2 left/right).
KLING & FREITAG GMBH © 2014 Version 11.6 Page 30 of 77
Page 31

User's manual K&F CD 44 Digital System Controller
The possible settings for the input signals can be set under the menu item ‘In’. Depending
on which routing you have selected, up to 4 inputs are available for settings (Input1 through
Input4):
In Input Patching, you can choose if the CD 44 will be supplied with analogue or digital
signals. Furthermore, there is the possibility here to create a mono sum or to exchange input
channels. See graphic on next page.
1. In » Input Patching:
In Input Patching, you can choose if the CD 44 will be supplied with analogue or digital
signals. Furthermore, there is the possibility here to create a mono sum or to exchange
input channels. See graphic on next page.
2. In » Input Patching » Analog Default
The controller is supplied with analogue input signals.
The nominal input level is +6dBu (1.55Vrms).
The maximum input level is +18dBu, that is, the signal peaks must not exceed +18dBu
(6V).
3. In » Input Patching » Analog Flipped
Corresponds to the setting: In » Input Patching » Analog Default, but INPUT 1 is
exchanged with INPUT 2, and INPUT 3 with INPUT 4.
4. In » Input Patching » Analog 1&2 Mix
With this setting, the mono sum out of INPUT1 and INPUT2 is created immediately behind
the physical inputs. In routings having just one input (i.e. 1 in 4 out), the second input is
activated with this setting to create the mono sum of a two channels.
5. In » Input Patching » Digital Default
The input connectors INPUT 3 and INPUT 4 are not used in this mode!
The input connectors INPUT 3 and INPUT 4 are not used in this mode!
Make the adjustment <In » Input Patching » Digital Default> before connecting the
digital signal!
To avoid unexpectedly high volume levels, reduce the controller’s input gains to a value
of approx. –40 dB before you supply these connectors with a digital signal directly from
an audio source, and then adjust the level to your needs!
Adjust input gain at: <In » Input1> through <Input4 » Gain>
The digital signals which are connected here may have a resolution of 16, 18, 20, or 24
bits and a sampling rate of 32 kHz, 44.1 kHz, 48 kHz, 88.2 kHz, 96 kHz, 176.4 kHz, or 192
kHz.
When using the AES / EBU input, in addition to the system delay of 0.5 ms, a further delay
arises from the sample rate converter: With a sample rate of 44.1 kHz = approx. 2.4 ms.
With a sample rate 48 kHz = approx. 2.2 ms. With a sample rate 88.2 kHz = approx. 1.5
ms. With a sample rate 96 kHz = approx. 1.4 ms. Further instructions in dealing with the
data transmission process AES / EBU can be found in chapter 'Instructions for AES / EBU
Data Transmission' on page 71.
6. In » Input Patching » Digital Flipped
Corresponds to the setting: <In » Input Patching » Digital Default>, but the signals have
a crossover routing. So what was previously the left signal becomes the right, and vice
versa. Exchanging the pins 2 and 3 has no effect.
7. In » Input Patching » Digital 1&2 Mix
With this setting, the mono sum out of AES/EBU INPUT1 left and right is created
immediately behind the physical inputs. In routings having just one input (i.e. 1 in 4 out),
left and right are activated with this setting to create the mono sum of a stereo signal.
8. llustration of the different Input Patchings
KLING & FREITAG GMBH © 2014 Version 11.6 Page 31 of 77
Page 32

User's manual K&F CD 44 Digital System Controller
Definition:
The routings 1 in 4 out (linked) and 2 in 4 out (linked) are not shown subsequently. With
these routings, linked means that channel 1 is linked to channel 3, and channel 2 to
channel 4 in the output section (Out). With 2 in 4 out (linked), channel 1 is also linked to
channel 2 in the input section (but not EQ 31-Band). You must only adjust the settings
one time per channel pair.
Default
Flipped
1&2 MIX
Default
Flipped
1in4out
1in4in4 1in3+1in1 2in4in4
2in4out 1in2+2in24in4out
1in2+Aux+1in1
1in3+Aux
1in2in2+2in2
1&2 MIX
<In » Input1> through <Input4 » EQ 31-Band>
This is a graphic one-third-octave band equalizer with 31 bands from 20 Hz - 20 kHz. It
serves as a system equalizer, i.e. to adjust the speaker frequencies to the room conditions.
It can also be used to eliminate feedback during monitor use.
The EQ settings are not saved in the set-up, but in a separate setups. The adjustments are
not saved in the Setup, but rather in separate EQ setups (Pay attention to the different
meanings of Setup / EQ Setup!). Up to 16 EQ setups can be saved. This makes it possible
to access and use a saved EQ setup within the different setups.
When loading a new setup, all EQs are set to ‘Bypass’ (switched off). To switch the EQs on
again, select:
<In » Input1> through <Input4 » EQ 31-Band » Edit » Bypass On>.
All other settings are maintained.
Submenus in EQ 31-Band:
With the submenus Load, Edit, Reset, Save As and Delete you can – irrespective of the
setup – access, edit, reset, save, and delete EQ setups.
KLING & FREITAG GMBH © 2014 Version 11.6 Page 32 of 77
Page 33

User's manual K&F CD 44 Digital System Controller
With this, you can load different EQs in addition to a setup (i.e. same use at different
locations).
Load
Used to load named EQ setups.
Select the desired setup (position indicator) by turning and pushing the knob.
Edit
Used to edit named EQ-Setups.
Here you can edit the 31 bands of the one-third-octave band equalizer.
Furthermore, you can set the EQ to Bypass . With the setting Bypass, the EQ is by-passed
and thus does not influence the signal. This function is, for example, advisable when
evaluating the before/after effect when editing the EQs.
Reset
Used to return all settings in the current EQ setup back to zero. This is advisable if, for
example, you are going to create a new EQ setting.
Save As
Used to save the changes in named EQ setups.
• To save a new EQ setup activate <In » Input> through <Input4 » EQ 31-Band » Save
As> (turn and push the knob). Select <new> by turning the knob, push the knob
twice, and select the first letter or number by turning the knob. If the desired letter
or number is shown, then verify the entry by pushing the knob. The position indicator
automatically jumps to the next letter or number. Continue as described above until
you have written the desired name.
By pushing the EXIT button, you will save the setup under the name you have
defined.
• To save changes in a previously existing EQ setting, activate <In » Input1> through
<Input4 » EQ 31-Band » Save As>. The position indicator is on the EQ setting that you
just edited. Pushing the knob saves the change.
Delete
This function is used to delete named EQ settings. It is accessible at <In » Input1 » EQ 31Band only>.
<In » Input1> through <Input4 » EQ 31-Band>
Gain (input)
See chapter 'Input and Output Gains' on page 23.
Delay (input)
See chapter 'Input and Output Delays'on page 24.
<PEQ » Filter 1> through <Filter 4> (easier to access with 'Filter A Button'). EXIT
See chapter 'Parametric Filters PEQ' + SEQ LShelv' on page 15.
7.5.7 Functions of the Menu Items under ‘Out’
This is where you can make the possible adjustments for the output signals. Four outputs are
available (<Out » Output1> through <Output 4>):
1. Select LS-Block
This is the position where the controller is informed which Kling & Freitag speaker is
connected to which output. The controller then loads the parameters for the speakerspecific:
• adjustment of the volume level (gains) for the optimal connection of the K&F
subwoofers to all listed K&F tops.
• filters for optimising the frequency response and the feedback prevention.
KLING & FREITAG GMBH © 2014 Version 11.6 Page 33 of 77
Page 34

User's manual K&F CD 44 Digital System Controller
• limiter settings for operating and malfunction safety.
• high and low pass filters for multiway speaker systems (tops with subwoofers).
• phase correction between tops and subwoofers in multiway systems.
• bass boost for full-range systems (tops.
A wrong assignment of the LS-Blocks may ruin the loudspeakers.
Table with the currently available LS-Blocks, their ranges of use, and their recommended
combination with other LS-Block.
Name LS-Block Application
AccessB10 120Hz* ACCESS B10 combined with ACCESS T5 / T9
(without ACCESS B5)
AccessB10 55Hz* ACCESS B10 combined with ACCESS T5 / T9 and
flown ACCESS B5
AccessB10 60Hz* ACCESS B10 combined with ACCESS T5 / T9 and
standing ACCESS B5
AccessB5* ACCESS B5 combined with ACCESS T5/T9
ACCESS High High frequency channel for the ACCESS T5 / T9
Access Mid Clus Mid frequency channel for ACCESS T5 / T9, for
clustered flown or standing systems.
Access Mid Sngl Mid frequency channel for ACCESS T5 / T9, for
single standing or flown systems
B10 SubLow ACCESS B10 combined with speakers of the CA
and Line Series and with subwoofer ACCESS B5 or
subwoofers of the SW Series.
ACCESS B10 combined with flown speakers of the
CA and Line Series in full-range mode (FR).
B10* ACCESS B10 combined with speakers of the CA and
Line Series
B5* ACCESS B5 combined with speakers of the CA and
Line Series
CA… or Line
212…LCut
CA… oder Line
212…FR
CA… oder Line 212…FR
Top speaker in full-range mode (without combined
subwoofers)
Flat Special application, e. g. for editing or forwarding
of line signals or the using of ...
* Use the LS-Blocks B10 and B5 solely for usages without ACCESS top speakers (i.e. Line
212 or speakers from the CA Series) and the LS-Blocks ACCESS B10, ACCESS B10 55Hz,
ACCESS B10 60Hz and ACCESS B5 only when ACCESS top speakers are being used.
Name LS-Block Application
KLING & FREITAG GMBH © 2014 Version 11.6 Page 34 of 77
Page 35

User's manual K&F CD 44 Digital System Controller
Sona 5 top speaker in full-range mode and
combined with the subwoofer
SE... (all) Operation of a SW series subwoofer
SEQUENZA 10:
Name LS-Block Application Combination with
LS-Block
SW215E Seq 60Hz SW215E combined
with SEQUENZA 10
N / W in full range
operations (FR)
Seq10...FR
Seq10LF/HF FR in
combination with
the LS-Block Seq10LF
FR only!
Seq10...LCut LSBlock Seq10LF/HF
LCut in combination
with the LS-Block
Seq10LF LCut only
Seq10B SEQUENZA 10 B in
Seq10B C-F SEQUENZA 10 B in
SEQUENZA 10 use in
full range mode.
SEQUENZA a 10
for maximum level
usages: In this
operating mode, the
cut-off frequency
of the Sequenza
10 N / W System is
raised to relieve the
subwoofers.
standard mode
normal mode as
Cardioid Front, front
emitting
SEQ 10...FR
SW215E SEQ 60Hz
AccessB10 60Hz
SW…(all)
AccessB10 120Hz
AccessB5.
Depending on
mounting or rigging
location of the
systems, the tops or
subwoofers must be
adjusted with delays
to align the phasing
of the systems to
one another.
Seq10...LCut,
all other K&F top
speakers:
...LCut and LS-Bock
Seq10B… with
activated Filter B
Seq10B C-R SEQUENZA 10 B in
normal mode as
Cardioid Rear, rear
emitting
Seq10B HC-F SEQUENZA 10 B in
normal mode as
Hypercardioid Front,
front emitting
Seq10B HC-R SEQUENZA 10 B in
normal mode as
hypercardioid rear,
emitting to the back
Seq10B 60Hz SEQUENZA 10B in
sub-bass mode
Seq10B C-F60Hz SEQUENZA 10 B in
sub-bass mode as
KLING & FREITAG GMBH © 2014 Version 11.6 Page 35 of 77
Seq10...FR,
all other K&F top
speakers:
Page 36

User's manual K&F CD 44 Digital System Controller
Cardioid Front, front
emitting
Seq10B C-R60Hz SEQUENZA 10 B in
sub-bass mode as
Cardioid Rear, rear
emitting
Seq10B HC-F60Hz SEQUENZA 10 B in
sub-bass mode as
Hypercardioid Front,
front emitting
Seq10B HC-R60Hz SEQUENZA 10 B in
sub-base mode as
hypercardioid rear,
emitting to the back
NOMOS XLC:
Name LS-Block Application Combination with
NomXLC C-F NOMOS XLC front
speakers in normal
mode as Cardioid
NomXLC C-R NOMOS XLC rear
speaker in normal
mode as Cardioid
…FR and LS-Bock
Seq10B… with
activated Filter B
LS-Block
Seq10...LCut,
all other K&F top
speakers:
...LCut and LS-Bock
Seq10B… with
activated Filter B
NomXLC HC-F NOMOS XLC
front speakers in
normal mode as
Hypercardioid
NomXLC HC-R NOMOS XLC
rear speaker in
normal mode as
Hypercardioid
NomXLC C-F60Hz NOMOS XLC front
speakers in sub-bass
mode as Cardioid
NomXLC C-R60Hz NomXLC C-R60Hz
NomXLC HC-F60Hz NOMOS XLC front
speaker in subbass mode as
Hypercardioid
NomXLC HC-R60Hz NOMOS XLC rear
speaker in subbass mode as
Hypercardioid
Seq10...FR,
all other K&F top
speakers:
…FR and LS-Bock
Seq10B… with
activated Filter B
Gravis 8, Gravis 15:
Name LS-Block Application Combination with
LS-Block
KLING & FREITAG GMBH © 2014 Version 11.6 Page 36 of 77
Page 37

User's manual K&F CD 44 Digital System Controller
Gra8W-FR Gravis 8W in full-
range mode
Gra8W-LCut Gravis 8W im
LowCut Betrieb
Gra15W-FR Gravis 15W in full-
range mode
Gra15W-LCut Gravis 15W in low-
cut mode
Gra15N-FR Gravis 15N in full-
range mode
Gra15N-LCut Gravis 15N in low-
cut mode
Nomos LS2, Nomos XLS, Nomos LT, Nomos XLT
Name LS-Block Application Combination with
NomLS2 / NomLT /
NomXLS / NomXLT
Nomos LS2 / Nomos
LT / Nomos XLS /
Nomos XLT im
Normalbetrieb
-
all K&F Subwoofer
-
all K&F Subwoofer
-
all K&F Subwoofer
LS-Block
all K&F loudspeaker
NomLS2 60Hz/
NomLT 60Hz /
NomXLS 60Hz /
NomXLT 60Hz
NomLS2 C-F /
NomsLT C-F /
NomXLS C-F /
NomXLT C-F
NomLS2 C-R / NomLT
C-R / NomXLS C-R /
NomXLT C-R
NomLS2 C-F60Hz /
NomLT C-F60Hz /
NomXLS C-F60Hz /
NomXLT C-F60Hz
Nomos LS2 / Nomos
LT / Nomos XLS /
Nomos XLT in
sub-bass mode to
support subwoofers
in normal mode
Nomos LS2 / Nomos
LT / Nomos XLS /
Nomos XLT in
normal mode as
cardioid front,
emitting to the front
Nomos LS2 / Nomos
LT / Nomos XLS /
Nomos XLT in
normal mode
as cardioid rear,
emitting to the back
Nomos LS2 / Nomos
LT / Nomos XLS /
Nomos XLT in
sub-bass mode
as cardioid front,
emitting to the front
all K&F loudspeaker
all K&F loudspeaker
all K&F loudspeaker
all K&F loudspeaker
NomLS2 C-R60Hz
NomLT C-R60Hz /
NomXLS C-R60Hz /
NomXLT C-R60Hz
KLING & FREITAG GMBH © 2014 Version 11.6 Page 37 of 77
Nomos LS2 / Nomos
LT / Nomos XLS /
Nomos XLT in
sub-bass mode
all K&F loudspeaker
Page 38

User's manual K&F CD 44 Digital System Controller
as cardioid rear,
emitting to the back
NomLS2 HC-F /
NomLT HC-F /
NomXLS HC-F /
NomXLT HC-F
NomLS2 HC-R /
NomLT HC-R /
NomXLS HC-R /
NomXLT HC-R
NomLS2 HC-F60Hz /
NomLT HC-F60Hz /
NomXLS HC-F60Hz/
NomXLT HC-F60Hz
NomLS2 HC-R60Hz /
NomLT HC-R60Hz /
NomXLS HC-R60Hz /
NomXLT HC-R60Hz
Nomos LS2 / Nomos
LT / Nomos XLS /
Nomos XLT in
normal mode as
hypercardioid front,
emitting to the front
Nomos LS2 / Nomos
LT / Nomos XLS /
Nomos XLT in
normal mode as
hypercardioid rear,
emitting to the back
Nomos LS2 / Nomos
LT / Nomos XLS /
Nomos XLT in
sub-bass mode as
hypercardioid front,
emitting to the front
Nomos LS2 / Nomos
LT / Nomos XLS /
Nomos XLT in
sub-bass mode as
hypercardioid rear,
emitting to the back
all K&F loudspeaker
all K&F loudspeaker
all K&F loudspeaker
all K&F loudspeaker
Sequenza 5:
Name LS-Block Application Combination with
LS-Block
S5W FR Sequenza 5 in full-
range mode
S5W LCut Sequenza 5 in low-
cut mode
S5B Sequenza 5B in
normal mode
2. Select <LS-Block » Flat>
The LS-Block 'Flat' is a distinctive feature. It is intended for special uses such as processing
or transmitting line signals, or using third party products or Kling & Freitag speakers
where no LS-Block is available. In this LS-Block, all filters are switched off, and there is
also no subsonic filter intended! It is still possible, though, to equalise signals with the
help of the PEQs and the EQ 31 band.
When using speakers with the LS-Block 'Flat', the limiter must be set at <Out » Output1>
through <Output 4 » LimReduction> based on the power ratings (W) of the speakers.
You can find the power ratings of the speakers in the information provided by the
speaker manufacturer (no liability for misrepresentation). With the following diagram,
you can match the power specifications from the speaker manufacturer with the value
for LimReduction that we recommend. We, therefore, recommend initially setting the
LimReduction lower than recommended, and then carefully approaching the correct
setting for the speaker.
-
all K&F Subwoofer
all K&F loudspeaker
KLING & FREITAG GMBH © 2014 Version 11.6 Page 38 of 77
Page 39

User's manual K&F CD 44 Digital System Controller
0 100
200
300 400
500
600
700
800
900
1000
-20 dB
-12 dB
-8 dB
-7 dB
-6 dB
-5 dB
-4 dB
-3 dB
-2 dB
-1 dB
0 dB
Typical values for 'LimReduction'
LimReduction [dB]
Loudspeaker RMS-Power [W]
Zin = 16
#
Zin = 8
#
Zin = 6
#
Zin = 4
#
The LS-Block 'Flat' is preset for 500W RMS @ 8 Ohm and 2000W Peak @ 8 Ohm.
Selected values for LimReduction, depending on the power ratings [W] of the speakers:
Caution
3. Gain (output)
See chapter 'Input and Output Gains' on page 23.
4. Delay (output)
See chapter 'Input and Output Delays'on page 24.
5. AmpGain
This is where the CD 44 shows the determined amplifier gain of the power amplifiers
connected to the SENSE / RETURN connectors. After switching off the unit the
settings always stay at the last plausibly determined value. As soon as a signal that
can be analysed by the controller is applied to the Sense connectors, the controller
determines the gain of the connected power amplifier. This value helps the controller to
automatically adjust the limiter threshold. The controller continually checks this value
and re-adjusts the limiter thresholds automatically, for example, when the gain of the
power amplifier is changed manually.
• Amp1 for power amplifier channel at CH1
• Amp2 for power amplifier channel at CH2
• Amp3 for power amplifier channel at CH3
• Amp4 for power amplifier channel at CH4
If you do not use the connectors ’AMP RETURN / SENSE’, there is imminent danger that
the speakers could be destroyed. Exception: When operating the CD 44 with SP speakers,
the AMP RETURN / SENSE inputs are not used, since the SP speakers are equipped with
their own limiters. Further information in chapter 'SP Speakers on the CD 44' on page
65.
6. LimReduction
KLING & FREITAG GMBH © 2014 Version 11.6 Page 39 of 77
Page 40

User's manual K&F CD 44 Digital System Controller
The limiters have been set during manufacturing so that they provide optimal operating
safety and a wide dynamic range when used with adequately sized power amplifiers.
• If power amplifiers are used that are too small, the limiter threshold can be
decreased by up to 20 dB so that the power amplifier does not begin to clip.
• For events where a reduction of the sound emissions is legally required, you can
adjust the limiter so that the maximum permitted sound level is observed.
• Rental companies can set the limiter lower to protect their speakers from overloads
caused by untrained personnel. For example: long-lasting techno events where the
speakers can be pushed to their limits.
7.5.7.1 9.6.4Functions of the Menu Items under ‘Util’
For general settings of the CD 44.
Util » Routing
This is where you can call up the pre-configured routings in the Controller CD 44.
The routings determine how one or several input signals can be linked to one another and to
the outputs, and which route the signals take. By calling up the routings saved in the CD 44,
you have the possibility to configure the controller to meet the needs of your application.
Familiarise yourself with the routings in order to optimally use the functions such as EQ 31Band and the long input delays. You can find a detailed explanation under Routings with
Examples of Use and Connecting Diagrams on page 35.
Display
Here, you can adjust the contrast for the display.
Rights
The controller differentiates between three different authorization modes which called
Master, User, and Lock Mode.
The device is supplied in the authorization mode Master.
Lock
The controller differentiates between three different authorization modes which we will, at
this point, call User, Master, and Lock Mode.
If you would like to unlock the controller, enter your Master or User password at <Util »
Rights » Change Level>.
Change Level
To legitimate yourself as a master or user, you must enter the appropriate password at <Util »
Rights » Change Level>.
Setting the User password
In the delivery status, the User Mode password is user (note lower case!)
If you set the User password, the user has limited rights. This mode is appropriate when you,
for example, lend the device and do not want basic changes or adjustments to be made
which could compromise the operating safety.
• Setup The user may not load, save or delete any setups.
• Out The user may not make any changes for Select LS-Block, AmpGain and
LimReduction.
• Util: The user may not change the ‘Routing’.
Setting the Master password
In the delivery status, the Master Mode password is master ((note lower case!)
If you set the Master password, the user may make any changes except for giving out
passwords.
Changing the User and Master password
KLING & FREITAG GMBH © 2014 Version 11.6 Page 40 of 77
Page 41

User's manual K&F CD 44 Digital System Controller
To change the passwords for the user and master modes, enter the administrator password
at <Util » Rights » Change Level>. The Admin Mode password is delivered with the controller
in the form of a sticker. We recommend that the owner of the controller changes the
user and master passwords before others use it. This ensures that no settings are made by
unauthorised persons, which could result in the malfunction or damage of speakers. Please
keep the password in a safe place to which unauthorised persons have no access. If this
password should get lost, you, as the owner, can request the password at Kling & Freitag
after stating the serial number.
IP Address
If you connect the CD 44 to a computer or a network via an Ethernet connection, this is
where the communication address of the CD 44 is set. If you want to connect more than one
CD 44 to the same network, the IP addresses of the controllers have to be different.
The changed IP address becomes effective only after you disconnect the unit from the power
supply and restart it.
Units
The changed IP address becomes effective only after you disconnect the unit from the power
supply and restart it.
Info
This is where you can find out the controller’s serial number and which version of the
software it uses.
8. Routings with Examples of Use and Connecting Diagrams
The usage examples which are mentioned here are saved as preset setups in the controller
upon delivery with the names Example1 through Example 14.
When using with ACCESS speakers, we generally recommend using a connector panel from
the K&F CP Series. If you do not have this connector panel, you can also connect the ACCESS
speaker directly to the controller with the help of this example.
The pre-configured setups can be accessed at <Setup » Load>.
The routings saved in the controller can be accessed at: <Util » Routing>.
The routings determine how one or several input signals can be linked to one another and to
the outputs, and which route the signals take. By calling up the routings saved in the CD 44,
you have the possibility to configure the controller to meet the needs of your application.
In the following examples, we will show you the possible routing schemes with corresponding
usage examples, including the connecting diagrams for speakers, CD 44, and power
amplifiers. The examples only show a very small extract of the range of possible uses. We
recommend that you study the routing schemes so that you can choose the correct routing
for your application. CD 44
The examples given here – 'Example 1' through 'Example 11' as well as ‘Example 13’ and
‘Example 14’ – are based on analogue input signals with the input setting:
<In » Input Patching » Analog Default>.
'Example 12' refers to analogue input signals with the setting:
<In » Input Patching » Analog.1&2 Mix>.
For more information see Chapter 'Functions of the Menu Items under ‘In’' on page 30.
8.1 'Rack Unit' Connecting Diagram for 1 CD 44 and 2 Amplifiers
All connecting diagrams and setup examples 1-12 and setup example 14 (not example 13, see
K&F SystemRack) shown in this manual are based on the following standard diagram for one
Controller CD 44 with two power amplifiers, subsequently referred to as ‘Rack Unit’. CD 44
KLING & FREITAG GMBH © 2014 Version 11.6 Page 41 of 77
Page 42

User's manual K&F CD 44 Digital System Controller
This ‘Rack Unit’ is designed for two power amplifiers of the same power ratings.
If you want to use power amplifiers with different specifications in a rack, be sure to wire the
rack according to your requirements. Pay special attention to the assignment of the speaker
output connectors.
8.2 K&F 'System Rack' Connecting Diagram
Especially for use with the Sequenza 10 systems on tour, Kling & Freitag recommends setting
up K&F system racks with one of each of the following:
K&F controller CD 44 / K&F connector panel CP 4 / power amplifier LAB GRUPPEN FP 10000Q
This system rack is also recommendable for a variety of other uses with Kling & Freitag
systems.
You will find an example of use at Setup Example 13.
When using the Sequenza 10 N / W Systems without the Connector Panel CP 4, the channels
for the LS-Blocks Seq10LF/HF (FR or LCut) and LS-Blocks Seq10LF (FR or LCut) in the CD 44
must be exchanged with one another! Apparent when you compare setup Example 13 with
setup Example14.
KLING & FREITAG GMBH © 2014 Version 11.6 Page 42 of 77
Page 43

User's manual K&F CD 44 Digital System Controller
8.3 Routing '1 in 4 out' / Setup 'Example 1'
8.3.1 Block Diagram, 'Example 1'
8.3.2 Setup 'Example 1', T5 / T9 with B10 on 2 Channels
Routing '1 in 4 out'
The tops ACCESS T5 / T9 should not be flown without using the subwoofer ACCESS B5. We,
therefore, recommend that when the ACCESS T5 / T9 is combined with the ACCESS B10
without ACCESS B5, the top must always be placed on the ACCESS B10.
If the ACCESS T5 or T9 is used with EP-5 connectors, we recommend making and using an
adapter cable from Speakon to EP-5.
The current versions of the subwoofer ACCESS B5 and ACCESS B10 have a Speakon connector
that is assigned to 1+/1- for both chassis. For these versions, you do not need the following
adapter! If you want to connect a 1+/1- assigned ACCESS bass, then connect the ACCESS
subwoofer like other 1+/1- assigned K&F subwoofers (see relevant examples).
KLING & FREITAG GMBH © 2014 Version 11.6 Page 43 of 77
Page 44

User's manual K&F CD 44 Digital System Controller
If you use an ACCESS B10 with EP-5 connectors (the same applies to ACCESS B5), we
recommend making and using an adapter cable from Speakon to EP-5. This adapter may
only be used if you connect the B10 to a Speakon connector of the CD 44 that has only one
connected channel. An example where the ACCESS B10 is connected to a CD 44 Speakon
connector that is connected on two channels is shown on page 54.
When using with ACCESS speakers, we generally recommend using a connector panel from
the K&F CP Series. If you do not have this connector panel, you can also connect the ACCESS
speaker directly to the controller with the help of this example.
8.4 Routing '1 in 4 out (Linked)' / Setup 'Example 2'
KLING & FREITAG GMBH © 2014 Version 11.6 Page 44 of 77
Page 45

User's manual K&F CD 44 Digital System Controller
8.4.1 Block Diagram 'Example 2'
The output section of channel 1 is linked to channel 3
The output section of channel 2 is linked to channel 4.
8.4.2 Setup 'Example 2', 4 x Line 212-6 with 4 x SW 215E
Routing '1 in 4 out (linked)'
The advantage of the routing ‘1 in 4 out’ (linked) as opposed to the routing ‘1 in 4 out’ is that
you need to adjust the output section for the Line 212 and SW 215E once only.
If you want to adjust the output sections differently, then you must select the routing ‘1 in 4
out!
KLING & FREITAG GMBH © 2014 Version 11.6 Page 45 of 77
Page 46

User's manual K&F CD 44 Digital System Controller
8.5 Routing '2 in 4 out' / Setup 'Example 3'
8.5.1 Block Diagram 'Example 3'
KLING & FREITAG GMBH © 2014 Version 11.6 Page 46 of 77
Page 47

User's manual K&F CD 44 Digital System Controller
8.5.2 Setup 'Example 3', Line 212/SW 215E & Monitor CA 1215/
SW 115E
Routing '2 in 4 out'
This configuration is suitable for the following example: to control one side of a front PA
with top and bass speaker, which are supplied from the Main Out of the mixing console and
a monitor (side fill) including a top and bass speaker, supplied from the AUX of the mixing
console.
KLING & FREITAG GMBH © 2014 Version 11.6 Page 47 of 77
Page 48

User's manual K&F CD 44 Digital System Controller
8.6 Routing '2 in 4 out (Linked)' / Setup 'Example 4'
The input section of channel 1 is linked to channel 2 (not EQ 31-Band)
The output section of channel 1 is linked to channel 3
The output section of channel 2 is linked to channel 4.
8.6.1 Setup 'Example 4', Line 212 / SW 215E, stereo
Routing '2 in 4 out (linked)'
If you want to make separate adjustments for the PEQs and/or the 31-band EQ for stereo use,
the routing ‘2 in 4 out’ should be used as the standard setting.
KLING & FREITAG GMBH © 2014 Version 11.6 Page 48 of 77
Page 49

User's manual K&F CD 44 Digital System Controller
8.7 Routing '4 in 4 out' / Setup 'Example 5'
8.7.1 Block Diagram 'Example 5'
8.7.2 Setup 'Example 5', 4- Way Monitor Setup
Routing '4 in 4 out'
During monitor uses where the speakers are lying on the floor, the Cluster Filter (via Filter B)
should be selected.
KLING & FREITAG GMBH © 2014 Version 11.6 Page 49 of 77
Page 50

User's manual K&F CD 44 Digital System Controller
It might make sense to turn the tweeter horns by 90°.
8.8 Routing '1 in 2 + 2 in 2' / Setup 'Example 6'
8.8.1 Block Diagram 'Example 6'
KLING & FREITAG GMBH © 2014 Version 11.6 Page 50 of 77
Page 51

User's manual K&F CD 44 Digital System Controller
8.8.2 Setup 'Example 6', Front: CA1515 / SW118E + 2 Adjoining
Rooms
Routing '1 in 2 + 2 in 2'
8.9 Routing '1 in 3 + AUX' / Setup 'Example 7'
8.9.1 Block Diagram 'Example 7'
KLING & FREITAG GMBH © 2014 Version 11.6 Page 51 of 77
Page 52

User's manual K&F CD 44 Digital System Controller
8.9.2 Setup 'Example 7', 3 x SEQUENZA 10 B Cardioid + SW 115 E
The 3 SEQUENZA 10 B’s need to be controlled with an identical level and signal. You can
achieve this most easily by using the CD 44 routings 1in4out or 1in3out+AUX.
KLING & FREITAG GMBH © 2014 Version 11.6 Page 52 of 77
Page 53

User's manual K&F CD 44 Digital System Controller
8.10 Routing '1 in 4 in 4' / Setup 'Example 8'
8.10.1 Block Diagram 'Example 8'
8.10.2 Setup 'Example 8', Delay-Line
Routing '1 in 4 in 4'
The difference as compared to the routing ‘1 in 4 out’ is that you can make separate
adjustments for every channel in the input gains, the PEQs, the EQ 31 Band, and the input
delay.
KLING & FREITAG GMBH © 2014 Version 11.6 Page 53 of 77
Page 54

User's manual K&F CD 44 Digital System Controller
8.11 Routing '1 in 3 + 1 in 1' / Setup 'Example 9'
8.11.1 Block Diagram 'Example 9'
KLING & FREITAG GMBH © 2014 Version 11.6 Page 54 of 77
Page 55

User's manual K&F CD 44 Digital System Controller
8.11.2 Setup 'Example 9', T5 / T9 with B5 and additional Bass B10
ACCESS setups with additional B10 for a separate deep bass playback of selected signals.
The main out of the mixing console delivers the sum of the signals for the top speakers T5 /
T9 as well as for the B5. Selected signals with a high share of deep bass, like bass drum,
keyboard, etc. are picked up at the mixing console’s AUX path and transmitted to the B10
using a separate controller path.
If the ACCESS T5 or T9 is used with EP-5 connectors, we recommend making and using an
adapter cable from Speakon to EP-5.
The current versions of the subwoofer ACCESS B5 and ACCESS B10 have a Speakon
connector that is assigned to 1+/1- for both chassis. For these versions, you do not need the
following adapter! If you want to connect a 1+/1- assigned ACCESS bass, then connect the
ACCESS subwoofer like other 1+/1- assigned K&F subwoofers.
ACCESS B10 with EP -5 connector:
In this example, the B10 is only connected to one channel of the CD 44! A connector is used,
though, that supplies 2 channels. When connecting the B10, use a two-core cable with the
assignment 1+ and 1-. You should use one of the following adapters at the speaker input of
the B10 in order to transmit the signal to both chassis.
KLING & FREITAG GMBH © 2014 Version 11.6 Page 55 of 77
Page 56

User's manual K&F CD 44 Digital System Controller
8.12 Routing '2 in 4 in 4' / Setup 'Example 10'
8.12.1 Block Diagram 'Example 10'
KLING & FREITAG GMBH © 2014 Version 11.6 Page 56 of 77
Page 57

User's manual K&F CD 44 Digital System Controller
8.12.2 Setup 'Example 10
Ch1+2 = Main sound system, stereo
Ch3+4 = Sound system in adjoining room, stereo
8.13 Routing '1 in 2 + Aux + 1 in 1' / Setup 'Example 11'
8.13.1 Block Diagram 'Example 11'
KLING & FREITAG GMBH © 2014 Version 11.6 Page 57 of 77
Page 58

User's manual K&F CD 44 Digital System Controller
8.13.2 Setup 'Example 11
Ch1+2 = Access top speaker
Ch3 = B5 with separate filter settings
Ch4 = B10 from separate mixing console output
8.14 Patching: Analog 1&2 Mix / Routing '2 in 4 in 4' / Setup
'Example 12
KLING & FREITAG GMBH © 2014 Version 11.6 Page 58 of 77
Page 59

User's manual K&F CD 44 Digital System Controller
8.14.1 Block Diagram 'Example 12'
8.14.2 Setup 'Example 12'
Ch1 = Sound system in adjoining room 1, mono (i.e. foyer)
Ch2 = Sound system in adjoining room 2, mono (i.e. cafeteria)
Ch3+4 = Main sound system, stereo
KLING & FREITAG GMBH © 2014 Version 11.6 Page 59 of 77
Page 60

User's manual K&F CD 44 Digital System Controller
8.15 Sequenza 10 N / W Routing '1 in 4 out' / Setup 'Example 13'
8.15.1 Block Diagram 'Example 13'
KLING & FREITAG GMBH © 2014 Version 11.6 Page 60 of 77
Page 61

User's manual K&F CD 44 Digital System Controller
8.15.2 Setup 'Example 13'
8.16 Sequenza 10 N / W: Routing '1 in 2 + Aux + 1 in 1' / Setup
'Example 14'
KLING & FREITAG GMBH © 2014 Version 11.6 Page 61 of 77
Page 62

User's manual K&F CD 44 Digital System Controller
8.16.1 Block Diagram 'Example 14'
8.16.2 Setup 'Example 14'
When connecting the Sequenza 10 N / W Systems directly to connector 2 (and / or 4) of the
CD 44 without Connector Panel CP 4, then LS-Blocks on channels 1 and 2 (and/or 3 and 4)
have to be swapped. Apparent when you compare setup Example 13 with setup Example14.
The same applies to Nomos XLC. When connecting the Nomos XLC Systems directly to
connector 2 (and/or 4) of the CD 44 without Connector Panel CP 4, then LS-Blocks on
channels 1 and 2 (and/or 3 and 4) have to be swapped.
KLING & FREITAG GMBH © 2014 Version 11.6 Page 62 of 77
Page 63

User's manual K&F CD 44 Digital System Controller
KLING & FREITAG GMBH © 2014 Version 11.6 Page 63 of 77
Page 64

User's manual K&F CD 44 Digital System Controller
8.17 Patching: Analogue 1&2 Mix / Routing '1 in 2 in 2 + 2 in 2' /
Setup 'Example 15'
This setup from top speakers in stereo mode and a subwoofer in 'mono mixed' is suitable as a
small front PA. The additional aux can be used as a monitor, delay or adjoining room sound,
for example.
CH 1: Subwoofer mono<break>CH 2 & 3: Main sound stereo<break>CH 4: Aux, e.g. Monitor
8.17.1 Block diagram, 'Example 15'
2
8.17.2 Setup 'Example 15'
KLING & FREITAG GMBH © 2014 Version 11.6 Page 64 of 77
Page 65

User's manual K&F CD 44 Digital System Controller
9. Subwoofer with integrated Crossover
When using subwoofers with integrated crossover on the CD 44, set the XO switch on the
connecting terminal of the subwoofer to XO ’OFF’.
We do not recommend the passive use of a subwoofer at a top speaker (XO ‘ON’) on the
CD 44.
10. SP Speakers
The line inputs of the SP speakers are only connected with the desired outputs of the
controller (Out 1 through Out 4). Connecting the amplified signal to the connector AMP
RETURN / SENSE of the CD 44 is not possible with an SP speaker. This is not necessary,
though, because the SP speaker is equipped with its own limiters guaranteeing the operating
safety.
If you do not wish to use the limiter in the CD 44, set up the AmpGain as followed: <Out »
Output 1> through <Output 4 » AmpGain » Gain/dB>: +20.0 (lowest possible value).
If you also wish to use the limiter in the CD 44, i.e. for level limiting, then you must set the
AmpGain to +30.0. With this setting, you can select the desired level limit at <Out » Output
1> through <Output 4 » LimitReduction>.
You can use the SP speakers in two different ways on the CD 44:
1. With the LS-Block 'Flat':
With this, the overlap filter characteristic of the SP speaker is maintained. In this case,
move the switch 'FILTERS' in the connecting panel of the SP speaker to 'ON' and the Gain
potentiometer to 0 dB.
2. With the LS-Block of the respective K&F speaker system:
With this, you can use the filter characteristic for the passive speaker. In this case, select
the LS-Block which goes with your SP speaker. For example, select the LS-Block CA 1201
LCut for 2-way operations of the speaker CA 1201-SP, or the CA 1201 FR for full-range
use. Move the switch 'FILTERS' in the connecting panel of the SP speaker to 'OFF' and
turn the Gain potentiometer on the connecting panel of the SP speaker to 0 dB.
KLING & FREITAG GMBH © 2014 Version 11.6 Page 65 of 77
Page 66

User's manual K&F CD 44 Digital System Controller
11. Recommendations for Configuration
11.1 Operating several Speakers per CD 44 Channel
The maximum number of speakers which can be operated at one time using the CD 44
Controller is limited by the minimum output impedance of the power amplifiers.
Make sure the power amplifier has sufficient headroom.
No further adjustments need to be made to the CD 44 Controller when operating with
several speakers connected to a single controller. There is no need to adjust the limiters. They
receive the necessary information via the voltage applied (not via the current).
SP speakers: Up to 50 SP speakers can be connected to one channel.
11.2 The correct Level Balance between Subwoofer and Top Speakers
When setting up the system it is very important to ensure that the volume levels of the tops
and subwoofer are correctly balanced.
The sound level of arrayed bass speakers increases by max. +6dB when doubling the number
of speakers (+3dB efficiency plus 3dB by doubling the power amplifier level). The loudness of
the tops increases in a different manner because of the directivity.
Furthermore, because of missing floor reflections, a flown subwoofer can be several decibels
quieter than a subwoofer which is standing on the floor.
With the CD 44, you can adjust this level balance to meet the requirements of different configurations and applications.
In order to intuitively set the output gain, it is important to remember that the output gain
must always be set at 0 dB for the following speaker combinations (applies to systems placed
on the floor):
• 1 small top and a subwoofer with one chassis
• 1 large top and a subwoofer with two chassis
• ACCESS top T5 or T9 with 2 x ACCESS B5 or 2 x ACCESS B10
CA 106 and CA 1001 are regarded as small tops. All other tops with available LS-Block, except
the ACCESS, are considered to be large top.
The following tables show how this relationship is to be set for the particular configurations.
In doing so, it also considers if the systems are flown or placed on the floor.
The data given apply to subwoofer placed on the floor and are valid on the condition that
all systems are driven by identical power amplifiers with the signals set at the same level. We
recommend maximum level).
When using power amplifiers with different gain characteristics it can become necessary to
adjust the balance between top and subwoofer using the output gain control of the CD 44.
Depending upon room acoustics and geometry the correct settings may well differ in practice
from that given here. For this reason the sound engineer should always carry out a fine
adjustment.
11.2.1 SW 112 / SW 115D / SW 115E / SW 118E
Prerequisite:
• identical power amplifiers for tops and subwoofers with identical volume settings.
• subwoofers placed on the floor.
1 Subwoofer with 1 Top
KLING & FREITAG GMBH © 2014 Version 11.6 Page 66 of 77
Page 67

User's manual K&F CD 44 Digital System Controller
Topteil
&
Subwoofer
1 x CA 1001
1 x SW 112
1 x SW 115D / SW 115E
1 x SW 118E
Switch off ‘Cluster’ (via Filter B) for tops and subwoofers* Accessible with:
Output gain for
subwoofer*
Accessible with:
1 x CA 12011 x CA 106
1 x CA 1215
1 x CA 1515
1 x Line 212
Output gain for
subwoofer*
Accessible with:
*Output1 / Out 1 as an example. Select the output which is connected to the speaker!
1 Subwoofer with 2 tops
Topteil
&
Subwoofer
1 x SW 112
1 x SW 115D / SW 115E
1 x SW 118E
2 x CA 1001
Output gain for
subwoofer*
Accessible with:
2 x CA 12012 x CA 106
2 x CA 1215
2 x CA 1515
2 x Line 212
Output gain for
subwoofer*
Accessible with:
Switch on ‘Cluster’ (via Filter B) for tops and subwoofer,
when the tops are placed on the subwoofer*
KLING & FREITAG GMBH © 2014 Version 11.6 Page 67 of 77
Accessible with:
Page 68

User's manual K&F CD 44 Digital System Controller
*Output1 / Out 1 as an example. Select the output which is connected to the speaker!
2 Subwoofer with 1 Top
Topteil
&
2 Subwoofer
1 x CA 1001
2 x SW 112
2 x SW 115D / SW 115E
2 x SW 118E
Switch off ‘Cluster’ (via Filter B) for tops and subwoofers* Accessible with:
Output gain for
subwoofer*
Accessible with:
1 x CA 12011 x CA 106
1 x CA 1215
1 x CA 1515
1 x Line 212
Output gain for
subwoofer*
Accessible with:
*Output1 / Out 1 as an example. Select the output which is connected to the speaker!
2 Subwoofer with 2 tops
2 Subwoofer with 2 tops
2 x CA 1001
2 x SW 112
2 x SW 115D / SW 115E
2 x SW 118E
KLING & FREITAG GMBH © 2014 Version 11.6 Page 68 of 77
Output gain for
subwoofer*
Accessible with:
2 x CA 12012 x CA 106
2 x CA 1215
2 x CA 1515
2 x Line 212
Output gain for
subwoofer*
Accessible with:
Page 69

User's manual K&F CD 44 Digital System Controller
Switch on ‘Cluster’ (via Filter B) for tops and subwoofer,
when the tops are placed on the subwoofer*
*Output1 / Out 1 as an example. Select the output which is connected to the speaker!
Accessible with:
11.2.2 SW 215E / ACCESS B5 & B10 / SEQUZENZA 10 B / NOMOS
XLC
• identical power amplifiers for tops and subwoofers with identical volume settings.
• Subwoofers placed on the floor
1 Subwoofer with 1 Top
Topteil
&
Subwoofer
1 x CA 1001
1 x CA 12011 x CA 106
1 x CA 1215
1 x CA 1515
1 x Line 212
1 x SW 215E
1 x ACCESS B5
1 x ACCESS B10
1 x NOMOS XLC
1 x SEQUENZA 10 B
Switch off ‘Cluster’ (via Filter B) for tops and subwoofers* Accessible with:
*Output1 / Out 1 as an example. Select the output which is connected to the speaker!
Output gain for
subwoofer*
Accessible with:
Output gain for
subwoofer*
Accessible with:
1 Subwoofer with 2 tops
2 tops
&
KLING & FREITAG GMBH © 2014 Version 11.6 Page 69 of 77
2 x CA 106 2 x CA 1201
Page 70

User's manual K&F CD 44 Digital System Controller
1 subwoofer
2 x CA 1001
1 x SW 215E
1 x ACCESS B5
1 x ACCESS B10
1 x NOMOS XLC
1 x SEQUENZA 10 B
Switch off ‘Cluster’ (via Filter B) for tops and subwoofers* Accessible with:
Output gain for
subwoofer*
Accessible with:
2 x CA 1215
2 x CA 1515
2 x Line 212
Output gain for
subwoofer*
Accessible with:
*Output1 / Out 1 as an example. Select the output which is connected to the speaker!
2 Subwoofer with 1 Top
Topteil
&
2 Subwoofer
2 x SW 215E
2 x ACCESS B5
2 x ACCESS B10
2 x NOMOS XLC
2 x SEQUENZA 10 B
1 x CA 1001
Output gain for
subwoofer*
Accessible with:
1 x CA 12011 x CA 106
1 x CA 1215
1 x CA 1515
1 x Line 212
Output gain for
subwoofer*
Accessible with:
Switch off ‘Cluster’ (via Filter B) for tops and subwoofers* Accessible with:
KLING & FREITAG GMBH © 2014 Version 11.6 Page 70 of 77
Page 71

User's manual K&F CD 44 Digital System Controller
*Output1 / Out 1 as an example. Select the output which is connected to the speaker!
Prerequisite:
2 Subwoofer mit 2 tops
2 tops
&
2 Subwoofer
2 x CA 1001
2 x SW 215E
2 x ACCESS B5
2 x ACCESS B10
2 x NOMOS XLC
2 x SEQUENZA 10 B
Switch off ‘Cluster’ (via Filter B) for tops and subwoofers* Accessible with:
Output gain for
subwoofer*
Accessible with:
2 x CA 12012 x CA 106
2 x CA 1215
2 x CA 1515
2 x Line 212
Output gain for
subwoofer*
Accessible with:
*Output1 / Out 1 as an example. Select the output which is connected to the speaker!
12. Instructions for AES / EBU Data Transmission
12.1 General Instructions
The interface AES / EBU offers the possibility to transmit two digital audio channels via a
balanced cable. The sampling rate of the audio signal may be 32 kHz, 44.1 kHz, 48 kHz, 88.2
kHz, 96 kHz or 192 kHz with a resolution of max. 24 bits. The Kling & Freitag CD 44 System
Controller supports any type of sampling rates ranging from 44.1 kHz to 192 kHz with a
resolution of max. 24 bits.
When using the AES / EBU input, in addition to the system delay of 0.5 ms, a further delay
arises from the sample rate converter: With a sample rate of 44.1 kHz = approx. 2.4 ms. With
a sample rate 48 kHz = approx. 2.2 ms. With a sample rate 88.2 kHz = approx. 1.5 ms. With a
sample rate 96 kHz = approx. 1.4 ms.
As the handling of digital audio signals in practice differs from that of analogue signals, you
should observe the following suggestions in order to ensure dependable operations:
KLING & FREITAG GMBH © 2014 Version 11.6 Page 71 of 77
Page 72

User's manual K&F CD 44 Digital System Controller
• The maximum cable length between two devices is 150 m.
• Use shielded ‘Twisted Pair’ cables with an impedance of 110 Ohm (80 - 150 Ohm are
tolerable). They are available at specialty stores and are called ‘AES/EBU Cables’.
• Do not mix any cables with different impedance within one transmission line.
• Do not use any ‘classical’ XLR audio cables!
• The cable may not be bent too much or pulled over sharp edges. Please observe the
permissible minimal bending radius which is provided by your cable’s manufacturer.
• Ensure the soundness of the connectors.
• If the AES/EBU signal is to be distributed over several lines of CD 44, then a special line
splitter is necessary.
If no special 110 Ohm AES/EBU cable is available, then data cables for lighting technology
(DMX data cable with an impedance of 120 Ohm) can be used.
12.2 Transmissions over long Distances
If transmission distances exceeding 150 m need to be covered, it is necessary to use a
repeater.
The interface AES / EBU is the European Broadcasting Union’s implementation of the
Standards AES3 defined by the Audio-Engineering Society.
Further information is available at these organisations:
www.aes.org und www.ebu.ch
13. Wiring
Make sure that all units are switched off and all controls are turned down before connecting
your system.
• Only use high-quality speaker cables, (i.e. from KLING & FREITAG).
• Adapters for connections between the Speakon connecting panel of the CD 44 and
EP-5 / XLR-connectors, as well as for special uses must be professionally constructed.
• For analogue connections from the mixing console to the CD 44 and from the CD 44 to
the power amplifier inputs, please use shielded microphone cable with two conductors.
For digital signal transmission you will need shielded twisted pair cables.
• Please pay attention to the respective pin diagrams in this manual!
• Avoid ground loops.
• Make sure that the +/- polarity of the speakers at the amplifier is correct. When
simultaneously using power amplifiers from different manufacturers, be sure to use the
correct specific pin configuration. It may be necessary to modify the pin configuration
on the power amplifiers or on the connectors leading to them.
• Ensure that the connected speaker channels are working in phase (phase checker).
A phase error can also be recognized when the connected channels are used
simultaneously. During simultaneous use the bass frequencies become notably quieter
or the mid-frequencies such as voices cannot be located.
• The cables should have a sufficient wire gauge. A minimum wire gauge can be easily
calculated with the following formula:
Wire Gauge [mm2] = Required Cable Length [m] / 2 x Impedance [Ω]
• Please make sure that the total impedance of the loudspeakers is not lower than the
minimal load impedance indicated on the power amplifier.
14. Operating the Speakers
• Operating the Controller
KLING & FREITAG GMBH © 2014 Version 11.6 Page 72 of 77
Page 73

User's manual K&F CD 44 Digital System Controller
• Switch off all equipment and turn down all level controls of the mixing console and the
power amplifiers.
• Wire the speaker systems according to the instructions in this manual.
• Now switch on the mixing console first, followed by the CD 44 Controller and, at last,
the power amplifiers. Always use the before mentioned switching order. Otherwise
switching noises may damage the system.
• If there is interference, turn off all appliances in the reverse order and check all cable
connections.
• Successively turn up the individual power amplifier channels and send a signal with low
volume to the system. Check to see if the desired signals are applied to the intended
speakers and make sure there is no interference. Make sure everything works properly,
i.e. if the signals come from the correct speaker paths (high signals from the tweeters,
bass signals from the bass speaker). The SIGNAL-LEDs of the CD 44 Controller light up if
there is an output signal greater than -45 dB. Your system is ready for use.
• Turning down the input level controls may not always prevent distortions in the input
section of the power amplifier, especially if this section has a relatively low headroom.
A clipping signal may not be displayed by the clipping indicator then! To prevent signal
interruptions caused by protection circuits or damages to the speakers, turn the level
controls of the power amplifier to the maximum position, if possible. Only turn up the
signal level at the mixing console or on the controller far enough so that the power
amplifiers are not overloaded; or reduce the limiter threshold at the controller (<Out1>
through <Out4 » LimReduction>).
• When turning off the system, the input controls for the power amplifiers should be
turned down first followed by the power switches of the amplifiers. After that, the
other appliances can be turned off.
KLING & FREITAG GMBH © 2014 Version 11.6 Page 73 of 77
Page 74

User's manual K&F CD 44 Digital System Controller
15. Technical Specifications CD 44
Input Signal Processing
Input delay delay up to 200 ms with 100 µs resolution
Filters 31-band graphic EQ
4 selectable filters (Bell, LShelv, HShelv,
HighP, LowP, AP)
AMPLIFICATION digital gain control +20 dB to -96 dB
Sense Inputs
Output delay 40 ms total (2 x 20 ms) with 10 µs
resolution,
Filters 31-band graphic EQ
4 selectable filters (Bell, LShelv, HShelv,
HighP, LowP, AP)
Limit RMS and peak limiter in the speaker
specific K&F LS-Blocks
Gain digital gain control +20 dB to -96 dB
Sense Inputs
Maximum input level 150 Vrms
Gain determination 20 dB to 45 dB
Analog-to-Digital Inputs
Input impedance 10 kOhm balanced, 10 kOhm unbalanced,
electronically balanced
Nominal input level +6 dBu
Maximum input level +18 dBu
Frequency response +0/-0,2 dB, 2 Hz bis 20 kHz
THD + noise 0.0006 % (-105 dB) typical @ 1 kHz/-1 dBfs
Dynamic range 119 dB typical, 20 Hz to 20 kHz, A-
weighted @ +18 dBu
CMRR 75 dB typical @ 1 kHz, 70 dB typical @ 20
kHz
65 dB, 20 Hz to 20 kHz,
AES / EBU Inputs
Supported resolutions up to 24 bit
KLING & FREITAG GMBH © 2014 Version 11.6 Page 74 of 77
Page 75

User's manual K&F CD 44 Digital System Controller
Supported sample rates 44.1 - 192 kHz, internal dejittering via
sample rate converter
Digital-to-Analog Outputs
Output impedance <40 Ohm, electronically balanced
Nominal output level +6 dBu
Maximum output level +18 dBu
Frequency response +0/-0.2 dB, 2 Hz to 20 kHz
THD + noise 0.0006 % (-105 dB) typical @ 1 kHz/-1 dBfs
Dynamic range 119 dB typical, 20 Hz to 20 kHz, A-
weighted @ +18 dBu
Analog-In to Analog-Out
Frequency response 20 Hz to 20 kHz, ±0.1 dB
Dynamic range 115 dB typical, 20 Hz to 20 kHz,
unweighted
THD + noise 0.0007 % (-103 dB) typical @ 1 kHz / +17
dBu (all gains zero)
0.001 % (-100 dB) typical @ 1 kHz / +6 dBu
(all gains zero)
Conversion resolution 24 Bit
Internal sample rate 96 kHz
Internal data path 28 bit integer, arithmetic precision: 76 bit
System propagation delay 0.5 ms (analogue to analogue)
Remote Interface
RJ45 EtherCon™ connector for a
10/100Base-TX
ethernet (IP) connection
Power supply
AC 100 - 240 V~ / 50 - 60 Hz
I nom. 150 - 100 mA
Dimensions and Weight
Dimensions (W x H x D*) 1 RU rack mount: 483 x 44 x 192 mm (19"
× 1.75" × 7.6")
*installation depth incl. power cord 260
mm (10.236")
KLING & FREITAG GMBH © 2014 Version 11.6 Page 75 of 77
Page 76

User's manual K&F CD 44 Digital System Controller
Weight 1.8 kg (3.97 lb)
16. Disposal
Please recycle the packaging material of the device.
16.1 Germany
It is not allowed to dispose of used electrical equipment as domestic waste.
But please do not dispose of them at official collecting points for recycling either!
All KLING & FREITAG products are plain business-to-business (B2B) products. KLING & FREITAG
products labelled with a waste bin sign have thus to be disposed of by KLING & FREITAG
GmbH alone. Please call KLING & FREITAG at the number stated below if you have a KLING
& FREITAG product to be disposed of. We will offer you a straightforward and professional
disposal with no costs involved.
If there is no waste bin sign on one of your KLING & FREITAG products, because it has been
sold before 24 March 2006, then by law the owner is in charge of the disposal. In this case we
will be happy to assist and offer you proper ways of disposal.
Telephone number to call about the disposal of used KLING & FREITAG products: +49 (0)
511-96 99 7-0
Explanation: With the ElektroG (law relating to electrical and electronic equipment and
appliances) we have complied with the EU-directive on waste electrical and electronic
equipment (WEEE, 2002/96/EC).
From 03/24/2006 onwards KLING & FREITAG GMBH has thus labelled all products mentioned
in the WEEE with a sign with a crossed out waste bin and a white bar below. This sign
indicates that the disposal as domestic waste is prohibited and that the product has been put
into circulation on 03/24/2006 at the earliest.
KLING & FREITAG GMBH has been legally registered as a manufacturer with the German
registration office EAR. Our WEEE registration number is: DE64110372.
For the German Registration office EAR we have accredited that our products are soleB2B
products.
16.2 EU, Norway, Iceland, and Liechtenstein
It is not allowed to dispose of used electrical equipment as domestic waste.
From 08/13/2005 onwards KLING & FREITAG GMBH has thus labelled all products for EUMember countries as well as Norway, Iceland and Liechtenstein (except Germany) mentioned
in the WEEE with a sign with a crossed out waste bin and a white bar below.
This sign indicates that the disposal on domestic waste is prohibited and that the product has
been put into circulation on 08/13/2005 at the earliest.
Unfortunately the European directive WEEE has been complied with implementing different
national provisions of law throughout all member countries, which makes it impossible for us
to offer consistent solutions for the disposal throughout Europe.
Responsible for complying with these provisions of law is the local distributor (importer) of
each country.
For proper disposal of used products in accordance with these local provisions in the
mentioned countries of the European Union (except Germany) please ask your local dealer or
the local authorities.
16.3 All other Countries
For proper disposal of used products in accordance with local provisions in other than the
above mentioned countries please ask your local dealer or the local authorities.
KLING & FREITAG GMBH © 2014 Version 11.6 Page 76 of 77
Page 77

User's manual K&F CD 44 Digital System Controller
KLING & FREITAG GMBH © 2014 Version 11.6 Page 77 of 77
 Loading...