

Page 1

TROUBLESHOOTING
Page 2
9. Troubleshooting
Safety
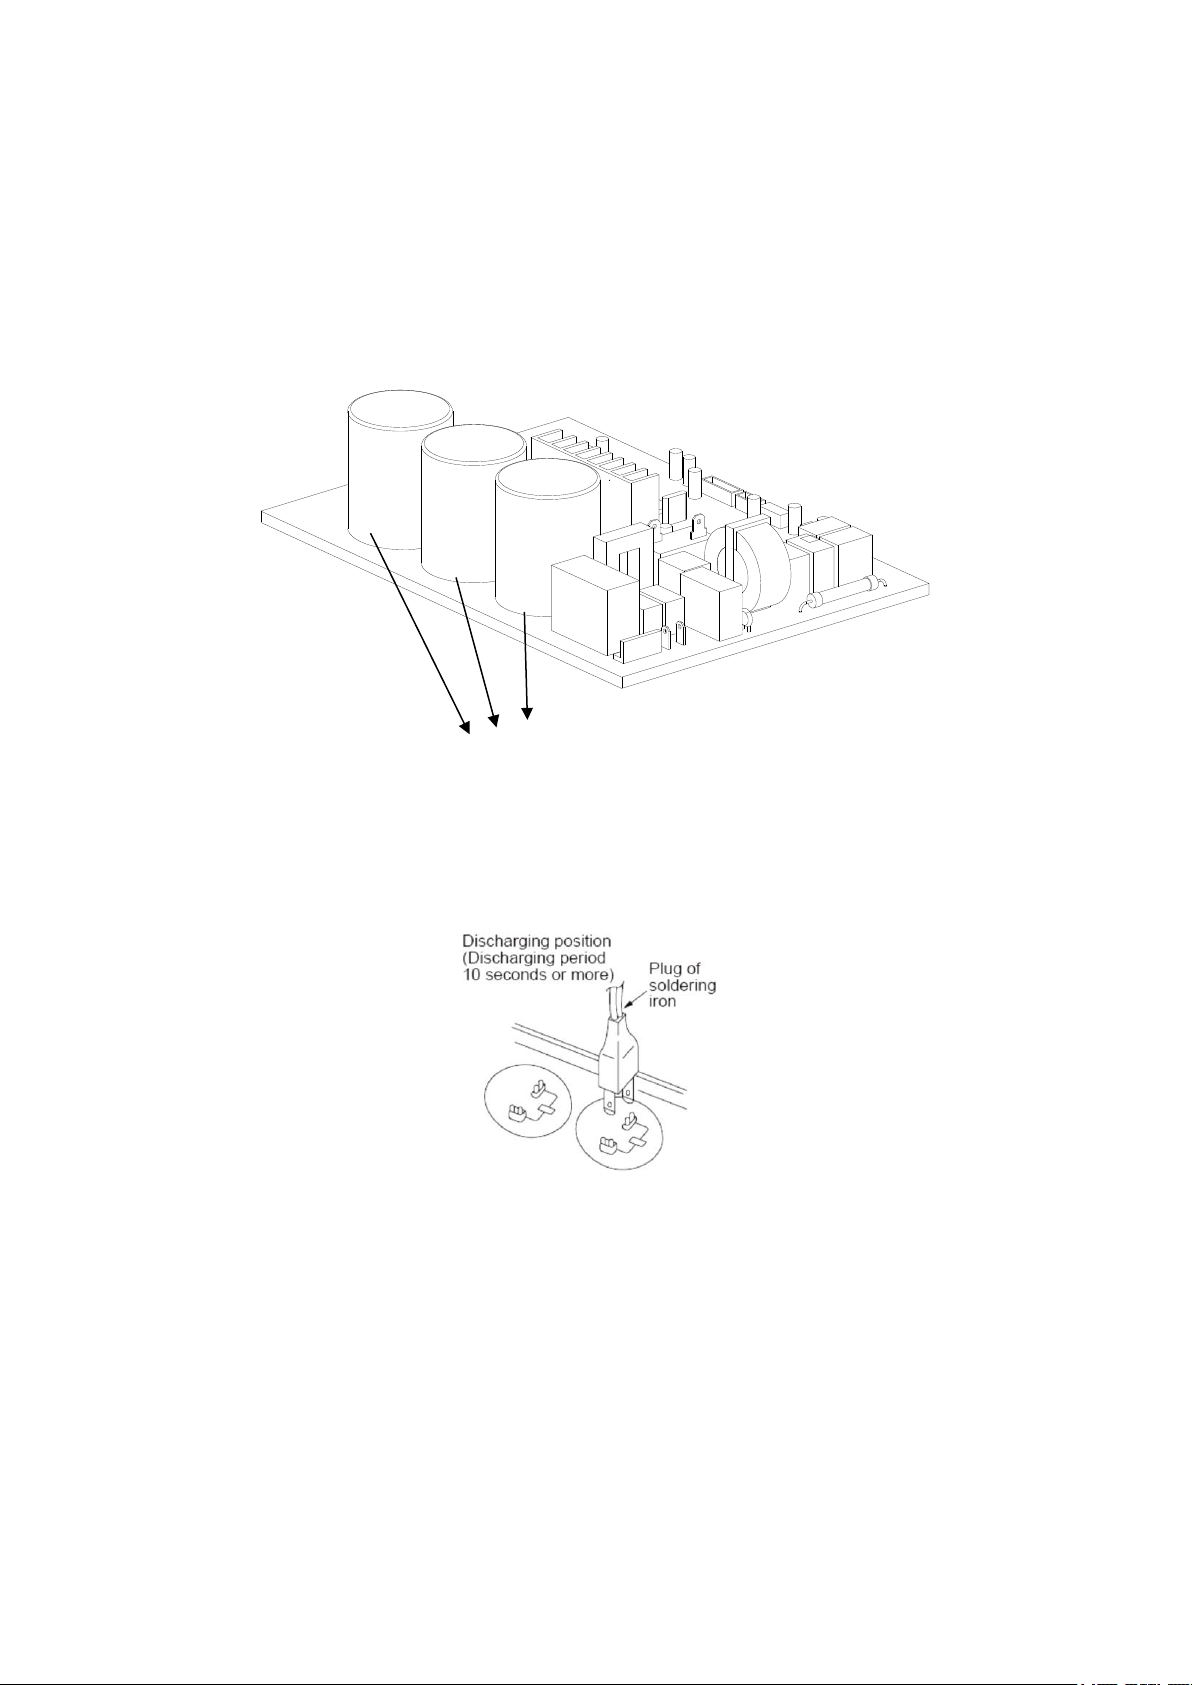
Electricity power is still kept in capacitors even the power supply is shut off. Do not forget to discharge the electricity
power in capacitor.
Electrolytic Capacitors
(HIGH VOLTAGE! CAUTION!)
For other models, please connect discharge resistance (approx.100Ω 40W) or soldering iron (plug) between +, -
terminals of the electrolytic capacitor on the contrary side of the outdoor PCB.
Note: The picture above is only for reference. The plug of your side may be different.
1
Page 3
9.1 Indoor Unit Error Display
Operation
lamp
Timer lamp
Display
LED STATUS
☆ 1 time
X
E0
Indoor unit EEPROM parameter error
☆ 2 times
X
E1
Indoor / outdoor units communication error
☆ 3 times
X
E2
Zero-crossing signal detection error
☆ 4 times
X
E3
Indoor fan speed has been out of control
☆ 5 times
X
E4
Indoor room temperature sensor T1 open circuit or short
circuit
☆ 6 times
X
E5
Evaporator coil temperature sensor T2 open circuit or
short circuit
☆ 7 times
X
EC
Refrigerant leakage detection
☆ 1 times
O
F0
Overload current protection
☆ 2 times
O
F1
Outdoor ambient temperature sensor T4 open circuit or
short circuit
☆ 3 times
O
F2
Condenser coil temperature sensor T3 open circuit or
short circuit
☆ 4 times
O
F3
Compressor discharge temperature sensor T5 open
circuit or short circuit
☆ 5 times
O
F4
Outdoor unit EEPROM parameter error
☆ 6 times
O
F5
Outdoor fan speed has been out of control
☆ 1 times
☆
P0
IPM malfunction or IGBT over-strong current protection
☆ 2 times
☆
P1
Over voltage or over low voltage protection
☆ 3 times
☆
P2
High temperature protection of compressor top
diagnosis and solution(only for 9k,12k models)
☆ 4 times
☆
P3*
Outdoor ambient temperature too low.
☆ 5 times
☆
P4
Inverter compressor drive error
☆ 6 times
☆
P5
Indoor units mode conflict (multi-zone ONLY)
O(light) X(off) ☆(flash)
*P3
1) In heating mode, when the outdoor temperature is lower than -25 for 1 hour, the indoor unit display error
code P3.
2) If the OUTDOOR temperature is higher than -22c for 10 minutes and compressor stop for 1 hour OR outdoor
temperature is higher than -5C for 10 minutes, then the unit will return to work.
2
Page 4
9.2 Outdoor unit error display(TBD)
Error Code
E0/F4
Malfunction decision
conditions
Indoor or outdoor PCB main chip does not receive feedback
from EEPROM chip.
Supposed causes
● Installation mistake
● PCB faulty
Yes
Replace the indoor/outdoor
main PCB.
Power off, then restart the
unit 2 minutes later.
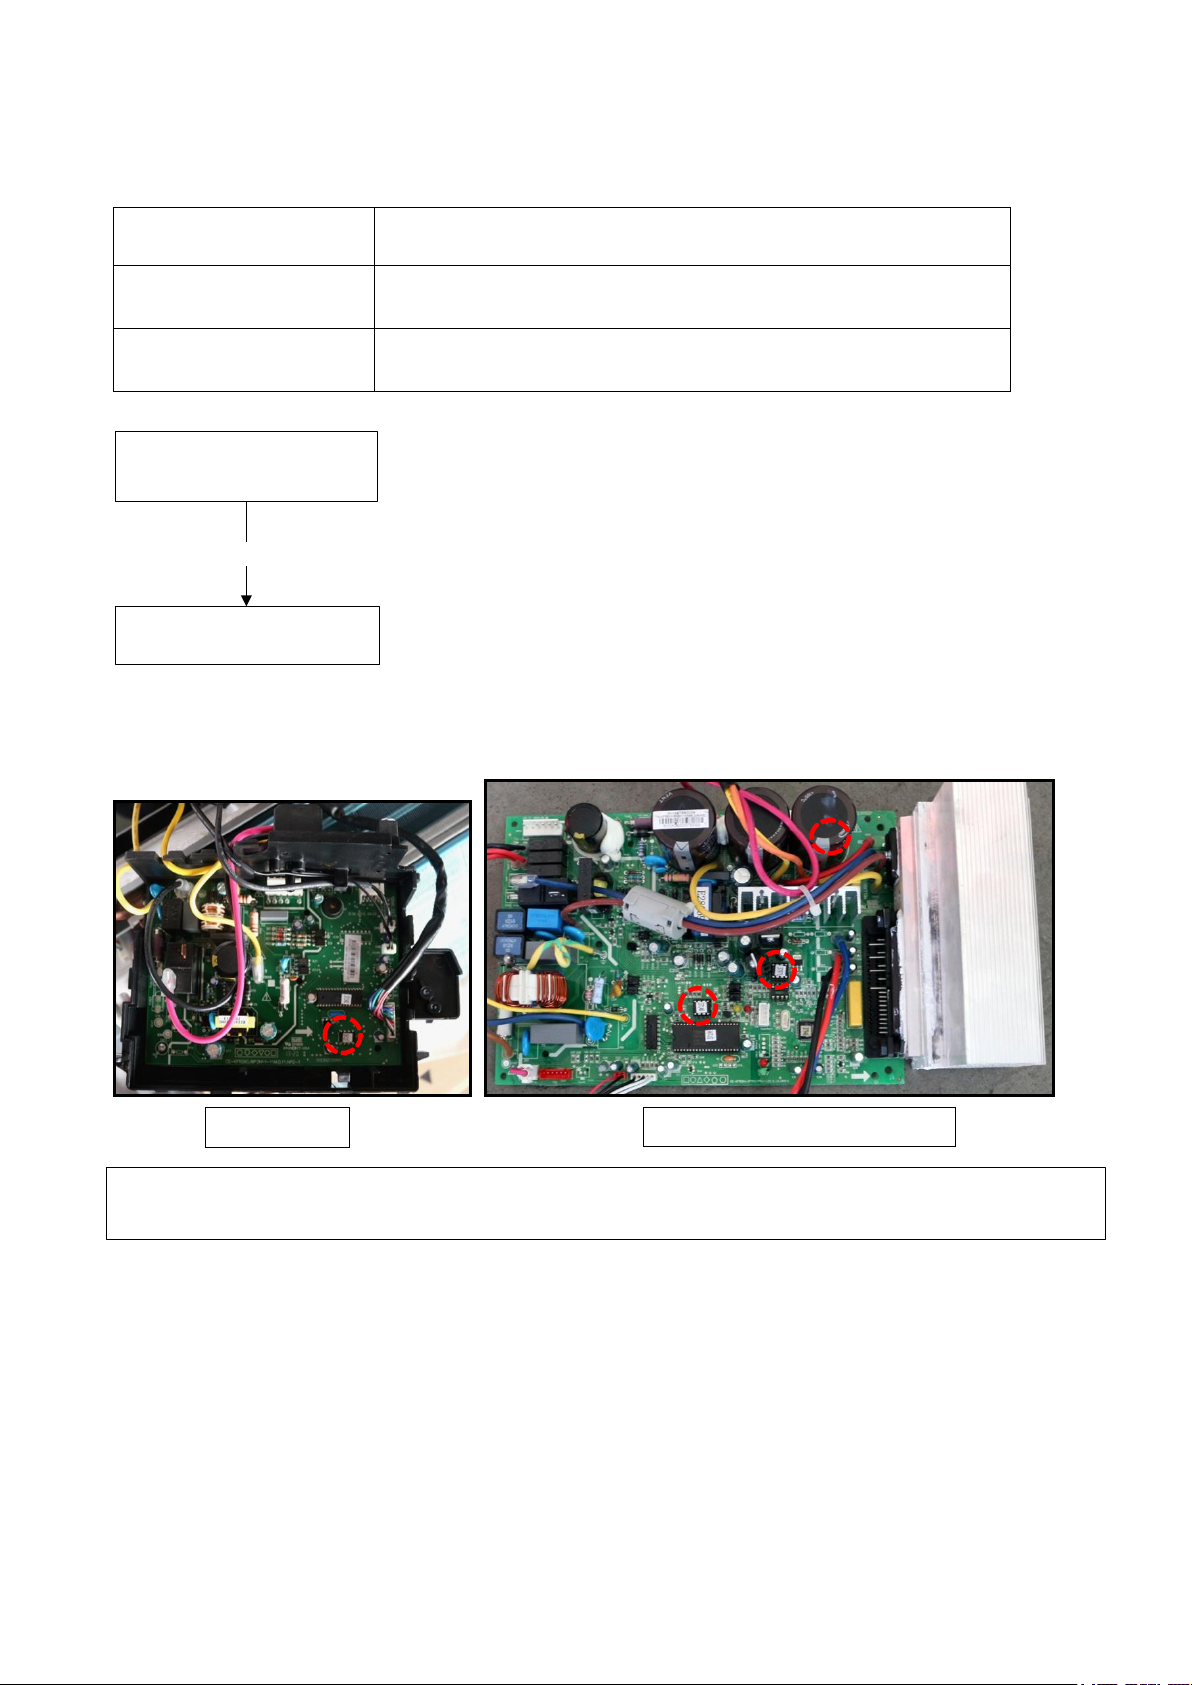
Indoor PCB
Outdoor PCB
Note: The two photos above are only for reference, it’s may be not same totally with the ones on
your side.
9.3 Diagnosis and Solution
9.3.1 EEPROM parameter error diagnosis and solution(E0/F4)
Trouble shooting:
EEPROM: a read-only memory whose contents can be erased and reprogrammed using a pulsed
voltage. For the location of EEPROM chip, please refer to the below photos.
3
Page 5
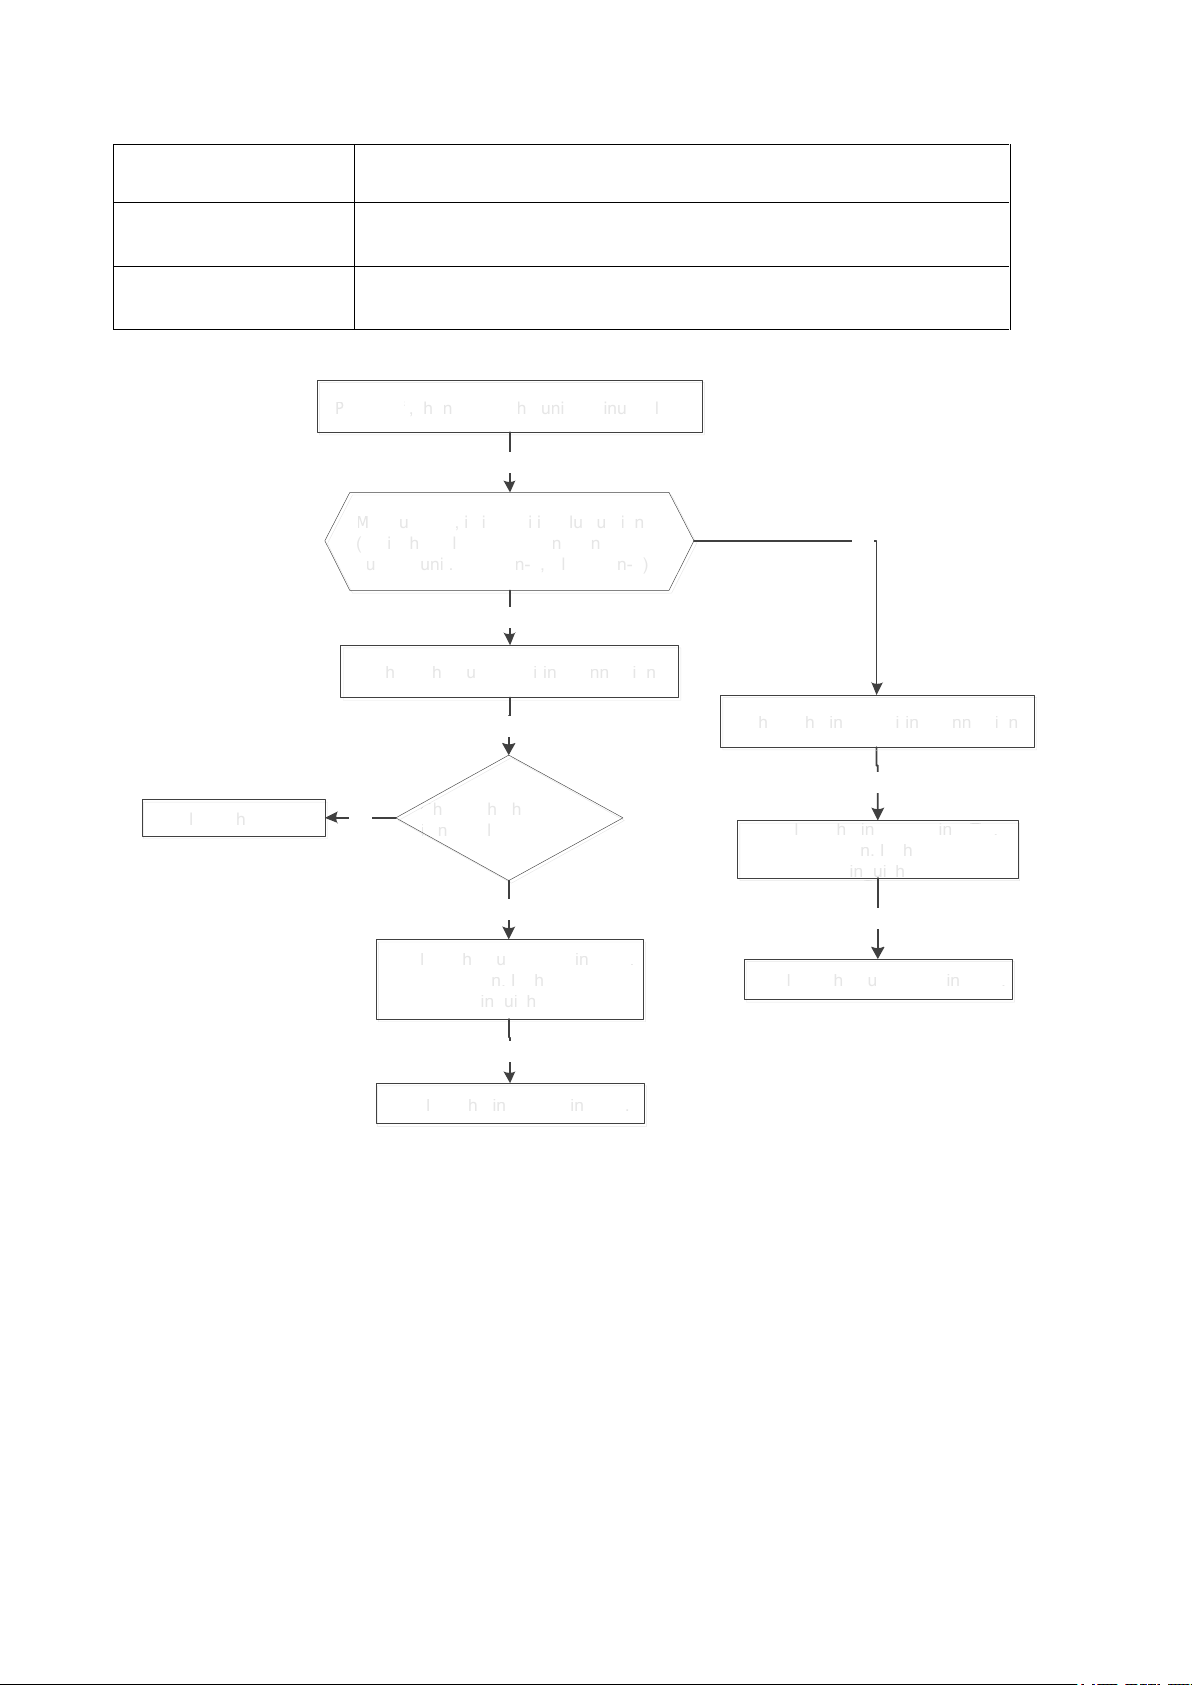
9.3.2 Indoor / outdoor unit’s communication diagnosis and solution(E1)
E1
Indoor or outdoor PCB faulty
M
eas
ureVs
V
w
Measure Vs, is it positive fluctuation?
(Vs is the voltage between 2 and 3 of
outdoor unit. Red pan-3, Black pan-2)
Yes
w
Power off, then restart the unit 2 minutes later
No
w
x
Replace the outdoor main PCB.
Power on. Is the error
extinguished?
Check the outdoor wiring connection
Replace the indoor main PCB.
Power on. Is the error
extinguished?
Yes
Replace the outdoor main PCB.
No
Replace the indoor main PCB.
No
w
Check the indoor wiring connection
Yes
Yes
Check whether reactor
is normal?
Yes
Replace the reactor No
Error Code
Malfunction decision
conditions
Indoor unit does not receive the feedback from outdoor unit during
110 seconds and this condition happens four times continuously.
Supposed causes ● Wiring mistake
●
Trouble shooting:
*
* Vs is the voltage between S and N ( for 115V 2014 models)
*Vs is the voltage between 2 and 3 ( for 2015 models)
4
Page 6
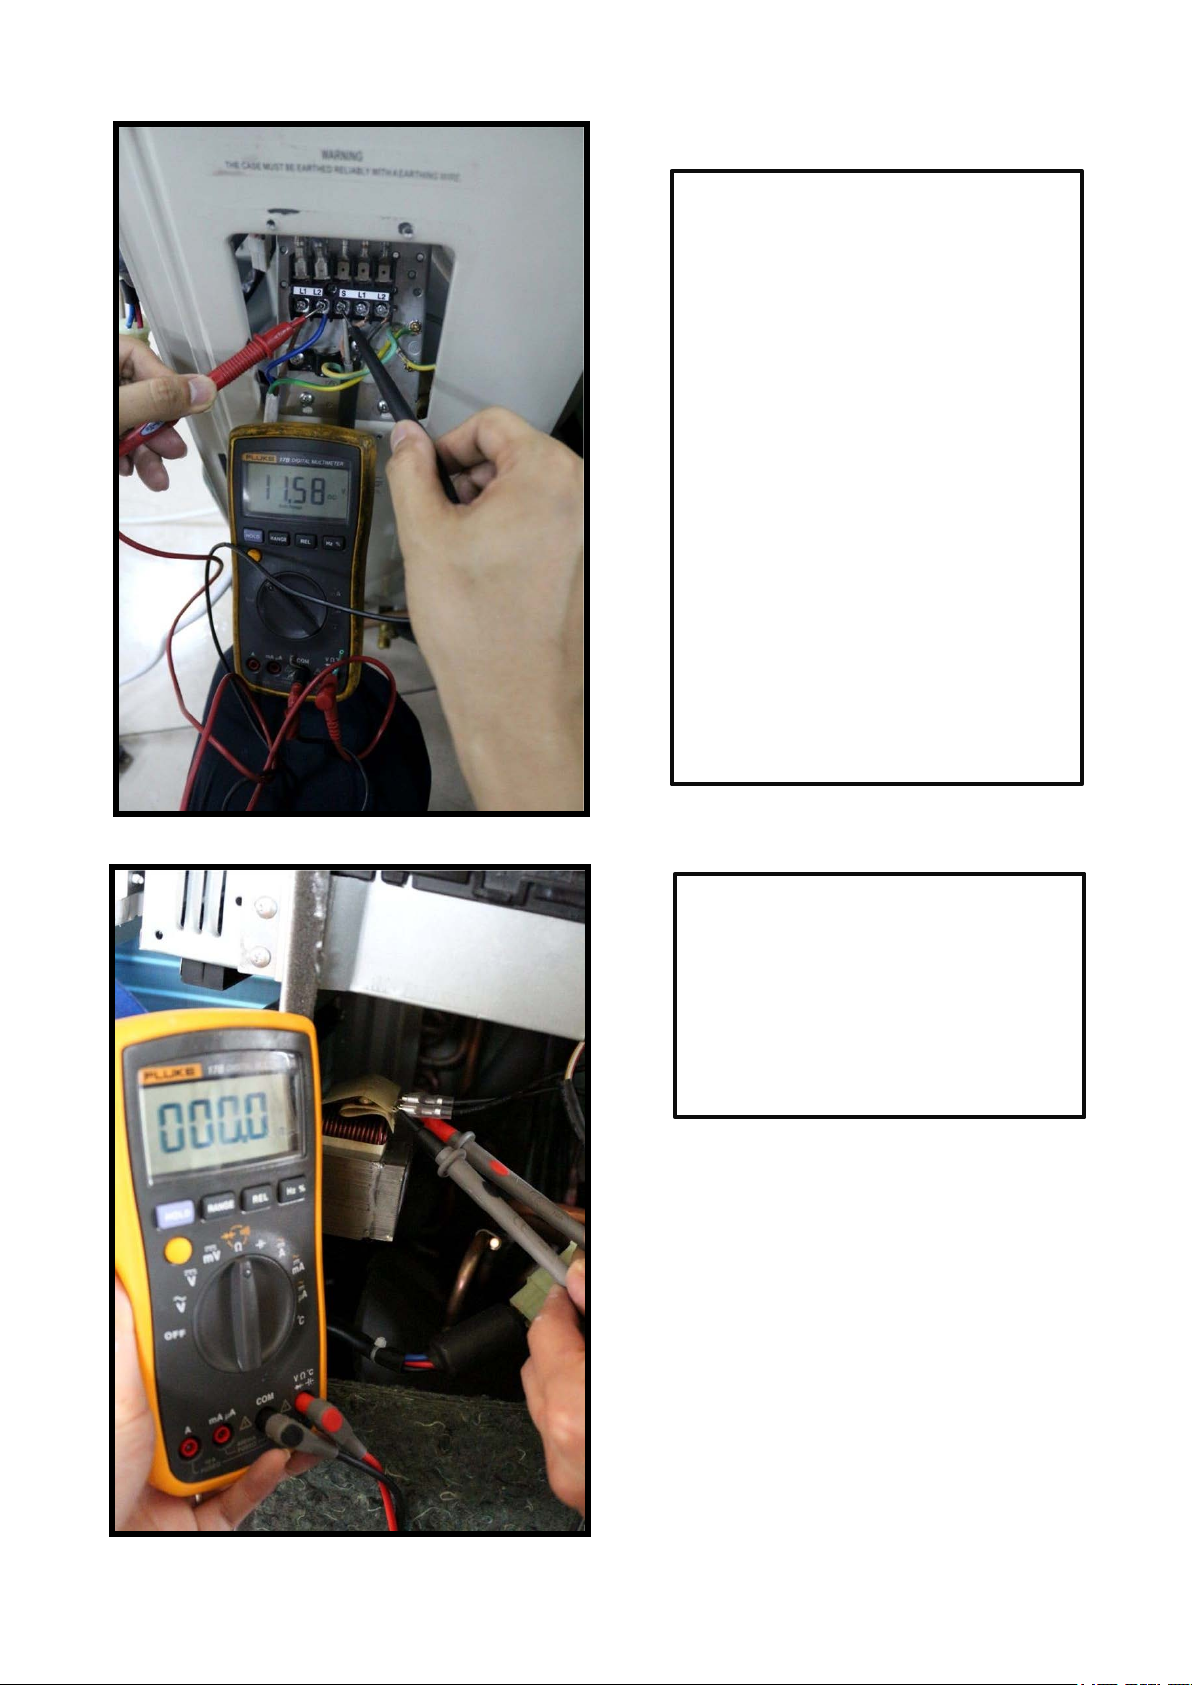
Remark:
Use a multimeter to test the DC voltage
between 2 port and 3 port of outdoor unit.
The red pin of multimeter connects with 2
port while the black pin is for 3 port.
When AC is normal running, the voltage
will move alternately between -50V to
50V.
If the outdoor unit has malfunction, the
voltage will move alternately with positive
value.
While if the indoor unit has malfunction,
the voltage will be a certain value.
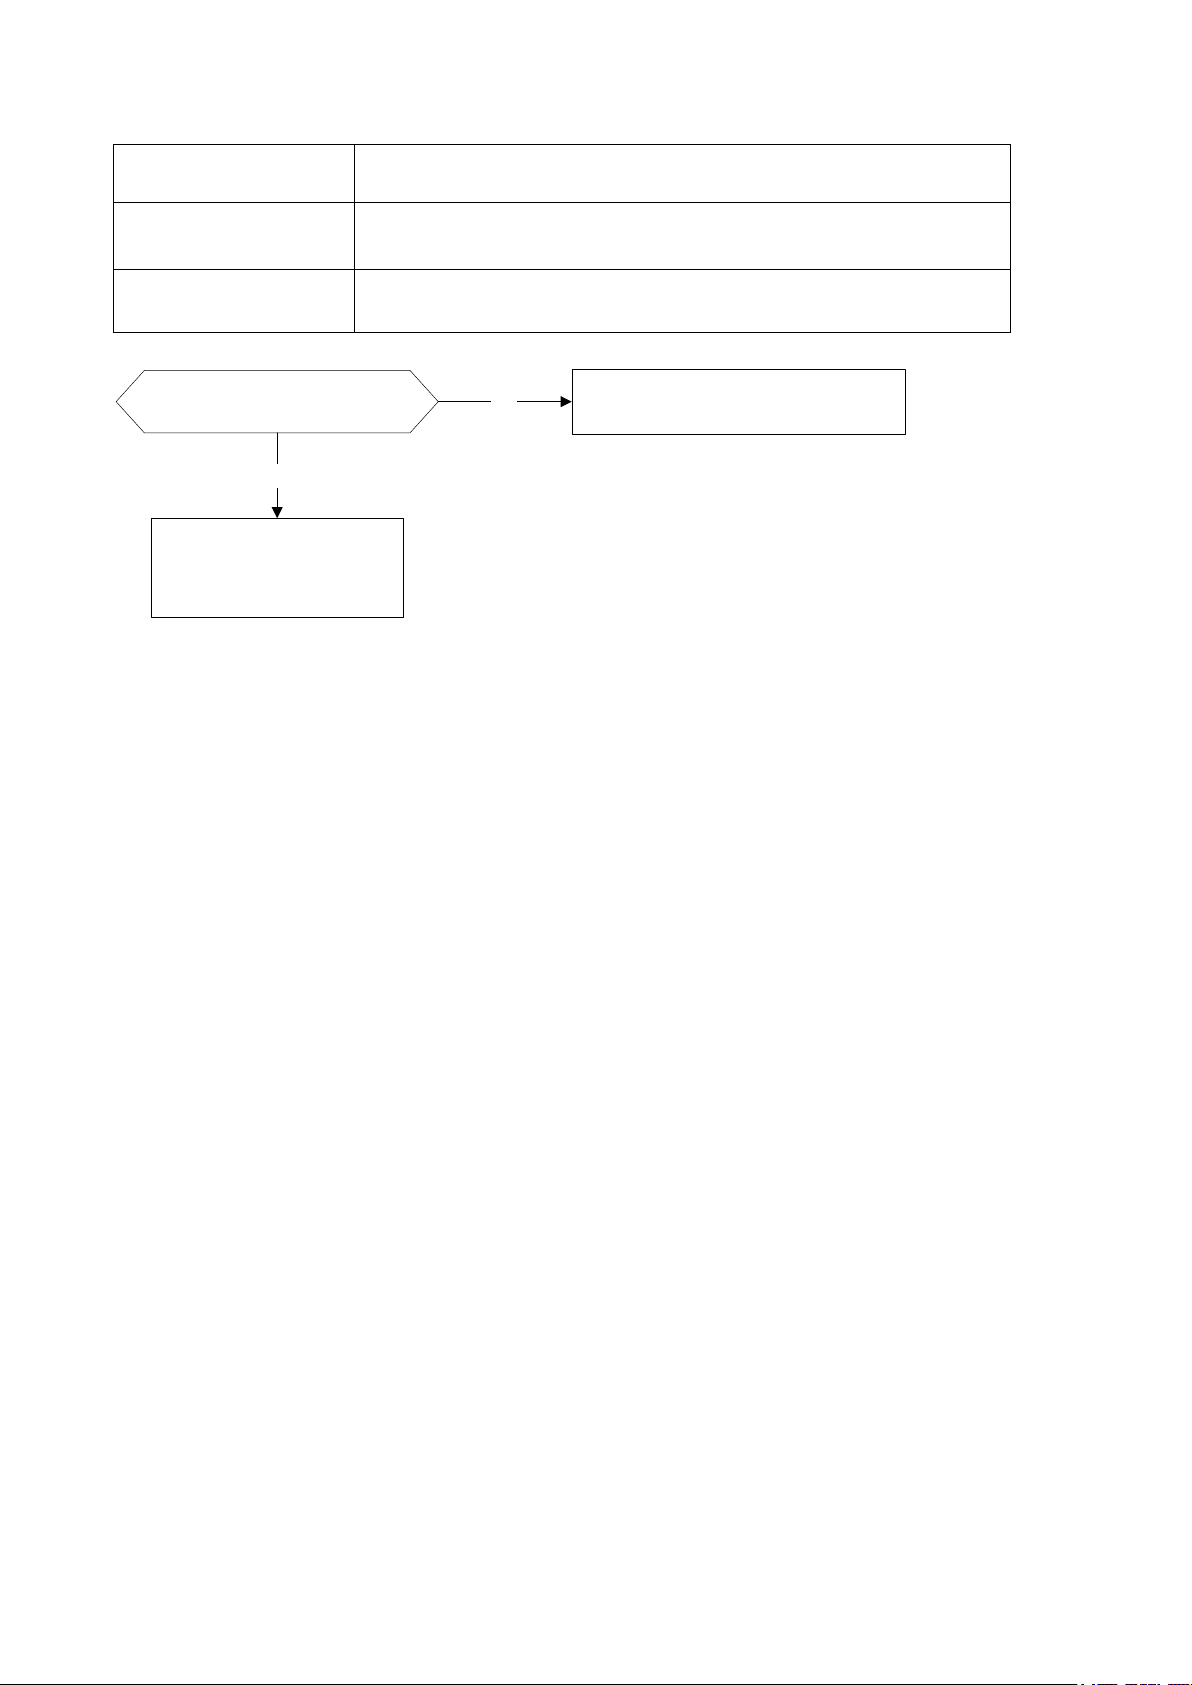
Remark:
Use a multimeter to test the resistance
of the reactor which does not connect
with capacitor.
The normal value should be around zero
ohm. Otherwise, the reactor must have
malfunction and need to be replaced.
5
Page 7
9.3.3 Zero crossing detection error diagnosis and solution (E2)
Error Code
E2
Malfunction decision
conditions
When PCB does not receive zero crossing signal feedback for 4
minutes or the zero crossing signal time interval is abnormal.
Supposed causes
● Connection mistake
● PCB faulty
Check if the connections and
power supply is normal?
Correct the connections. Turn on the
unit when the power supply is good.
No
Yes
Indoor main PCB is
defective. Replace indoor
main PCB.
Trouble shooting:
6
Page 8

9.3.4 Fan speed has been out of control diagnosis and solution(E3)
Error Code
E3
Malfunction decision
conditions
When indoor fan speed keeps too low (300RPM) for certain time,
the unit will stop and the LED will display the failure.
Supposed causes
● Wiring mistake
● Fan ass’y faulty
● Fan motor faulty
● PCB faulty
Power off, then restart the
unit 2 minutes later
Shut off the power supply,
Rotate the fan by hand.
The unit operates normally.
Find out the cause and have
it solved
Check the wiring of fan
motor
No
Yes
No
Correct the connections.
No
NoReplace the fan motor
Yes
Yes
Measure the voltage for the
fan motor from the main
PCB
Yes
Replace the main PCBNo
Trouble shooting:
7
Page 9

Index 1:
NO.
Color
Signal
Voltage
1
Red
Vs/Vm
280V~380V
2
---
---
---
3
Black
GND
0V
4
White
Vcc
14-17.5V
5
Yellow
Vsp
0~5.6V
6
Blue
FG
14-17.5V
NO.
Color
Signal
Voltage
1
Red
Vs/Vm
140V~190V
2
---
---
---
3
Black
GND
0V
4
White
Vcc
14-17.5V
5
Yellow
Vsp
0~5.6V
6
Blue
FG
14-17.5V
1:Indoor or Outdoor DC Fan Motor(control chip is in fan motor)
Power on and when the unit is in standby, measure the voltage of pin1-pin3, pin4-pin3 in fan motor
connector. If the value of the voltage is not in the range showing in below table, the PCB must has
problems and need to be replaced.
DC motor voltage input and output(voltage: 220-240V~)
DC motor voltage input and output(voltage :115V~)
2. Outdoor DC Fan Motor (control chip is in outdoor PCB)
Power on ,and check if the fan can run normally, if the fan can run normally, the PCB must has
problems and need to be replaced, If the fan can’t run normally, measure the resistance of each two
pins. If the resistance is not equal to each other, the fan motor must have problems and need to be
replaced, otherwise the PCB must has problems and need to be replaced.
3. Indoor AC Fan Motor
Power on and set the unit running in fan mode at high fan speed. After running for 15 seconds,
measure the voltage of pin1 and pin2. If the value of the voltage is less than 100V(208~240V power
supply)or 50V(115V power supply), the PCB must has problems and need to be replaced.
8
Page 10

9.3.5 Open circuit or short circuit of temperature sensor diagnosis and solution(E5)
Error Code
E4/E5/F1/F2/F3
Malfunction decision
conditions
If the sampling voltage is lower than 0.06V or higher than 4.94V,
the LED will display the failure.
Supposed causes
● Wiring mistake
● Sensor faulty
Check the connection
between temperature
sensor and PCB.
Correct the connectionNo
Yes
Replace indoor or outdoor
main PCB
Measure the resistance
value of the sensor
Repalce the sensorNo
Yes
Trouble shooting:
9
Page 11

9.3.6 Refrigerant Leakage Detection diagnosis and solution(EC)
Error Code
EC
Malfunction decision
conditions
Define the evaporator coil temp.T2 of the compressor just starts
running as Tcool.
In the beginning 5 minutes after the compressor starts up, if T2
<Tcool-2°C(Tcool-35.6°F) does not keep continuous 4
seconds and this situation happens 3 times, the display area will
show “EC” and AC will turn off.
Supposed causes
● T2 sensor faulty
● Indoor PCB faulty
● System problems, such as leakage or blocking.
Check cool air blowing out
from indoor air outlet
Yes
Yes
Check if T2 sensor
No
Check leakage of system
No
Power off, then restart the
unit 2 minutes later.
Replace indoor PCB.
Yes
Repair the leakage and
recharge the refrigerant.
Yes
check blockIng of system and
clear the blocking
Trouble shooting:
10
Page 12

9.3.6 Overload current protection diagnosis and solution(F0)
Error Code
F0
Malfunction decision
conditions
An abnormal current rise is detected by checking the specified
current detection circuit.
Supposed causes
● Power supply problems.
● System blockage
● PCB faulty
● Wiring mistake
● Compressor malfunction
Check the power supply
Che ck the conne c tions and
wires
Stop the unit
No
Yes
No
Correct the connections or
replace the wires.
Yes
Replace the outdoor unit
Yes
Check the reactor
No
Replace outdoor main PCB
Check the blockage of system
Yes
No Clear the blockage
Check the compressor
resistance values
Yes
No Replace the compressor
11
Page 13

9.3.7 IPM malfunction or IGBT over-strong current protection diagnosis and solution(P0)
Error Code
P0
Malfunction decision
conditions
When the voltage signal that IPM send to compressor drive chip
is abnormal, the display LED will show “P0” and AC will turn off.
Supposed causes
● Wiring mistake
● IPM malfunction
● Outdoor fan ass’y faulty
● Compressor malfunction
● Outdoor PCB faulty
Check the wiring between main PCB
and compressor
Correct the connection or replace
the wires and connectors.
Yes
No
Check the IPM No
Yes
Replace the IPM board or replace
the main PCB
Check the outdoor fan and the
outdoor unit ventilation
No
Please refer to the solution of 【Fan
Speed Has Been Out Of Control】
malfunction
Yes
Check the compressor resistance
values
No
Replace the compressor.
Yes
Replace the outdoor main PCB
Trouble shooting:
12
Page 14

For example:
P-U
P-V
side.
Note: The photos below are only for reference, it’s may be not same totally with the ones on your
13
Page 15

P-W
N-U
14
Page 16

N-V
N-W
15
Page 17

9.3.8 Over voltage or too low voltage protection diagnosis and solution(P1)
Error Code
P1
Malfunction decision
conditions
An abnormal voltage rise or drop is detected by checking the
specified voltage detection circuit.
Supposed causes
● Power supply problems.
● System leakage or block
● PCB faulty
Check the power supply
Che ck the conne c tions and
wires
Stop the unit
No
Yes
No
Correct the connections or
replace the wires.
Yes
Replace the reactor
Yes
No
Replace the IPM board
Check the voltage between P
and N
Check the reactor
Yes
No
Replace outdoor main PCB
Remark:
Measure the DC voltage
between P and N port. The
normal value should be
around 310V.
P
N
Trouble shooting:
16
Page 18

9.3.9 High temperature protection of compressor top diagnosis and solution(P2)
Error Code
P2
Malfunction decision
conditions
If the sampling voltage is not 5V, the LED will display the failure.
Supposed causes
● Power supply problems.
● System leakage or block
● PCB faulty
Check the air flow system
of indoor and outdoor units
Clear up the air inlet and outlet or the heat
exchanger of indoor and outdoor units.
Yes
No
Yes
Yes
Power off, then restart the unit 10
minutes later
Check if the temperature
of compressor
No
Check refrigerant system
Yes
Check the overload
protector
Correct the connection.No
Measure the resistance
between the two ports of
the OLP. Is it zero?
Yes
Replace the OLP.
No
Replace the outdoor control PCB.
Yes
Trouble shooting:
17
Page 19

9.3.10 Inverter compressor drive error diagnosis and solution(P4)
Error Code
P4
Malfunction decision
conditions
An abnormal inverter compressor drive is detected by a special
detection circuit, including communication signal detection,
voltage detection, compressor rotation speed signal detection
and so on.
Supposed causes
● Wiring mistake
● IPM malfunction
● Outdoor fan ass’y faulty
● Compressor malfunction
● Outdoor PCB faulty
Check the wiring between main PCB
and compressor
Correct the connection or replace
the wires and connectors.
Yes
No
Check the IPM No
Yes
Replace the IPM board or replace
the main PCB
Check the outdoor fan and the
outdoor unit ventilation
No
Please refer to the solution of 【Fan
Speed Has Been Out Of Control】
malfunction
Yes
Check the compressor resistance
values
No
Replace the compressor.
Yes
Replace the outdoor main PCB
Trouble shooting:
18
Page 20

Main parts check
1. Temperature sensor checking
Disconnect the temperature sensor from PCB, measure the resistance value with a tester.
Temperature sensors.
Room temp.(T1) sensor,
Indoor coil temp.(T2) sensor,
Outdoor coil temp.(T3) sensor,
Outdoor ambient temp.(T4) sensor,
Compressor discharge temp.(T5) sensor.
Measure the resistance value of each winding by using the multi-meter.
19
Page 21

The Klimaire logo is a registered Trademark of Klimaire Products Inc.
Copyright 2016 Klimaire Products Inc.
2190 NW 89 Place, Doral, FL 33172 - USA
Tel: (305)593-8358
www.klimaire.com
The design and specifications are subject to change without prior notice for product
improvement. Consult with the sales agency or manufacturer for details.
Fax (305) 675-2212
sales@klimaire.com
 Loading...