

Page 1
Gas Furnace
Installation Operation & Service Manual
80 % AFUE
GM80S Series
Page 2
THIS BOOKLET CONTAINS
IMPORTANT INFORMATION
INSTALLER: USE THE INFORMATION IN THIS BOOKLET
TO INSTALL THE APPLIANCE AND AFFIX THIS
BOOKLET ADJACENT TO THE APPLIANCE
AFTER INSTALLATION.
USER: KEEP THIS BOOKLET OF INFORMATION FOR
FUTURE REFERENCE.
SERVICER: USE THE INFORMATION IN THIS BOOKLET
TO SERVICE THE APPLIANCE AND AFFIX
THE BOOKLET ADJACENT TO THE APPLI ANCE AFTER SERVICING.
“NOTE: Please read all instruction in the manual and
retain all manuals for futrue reference. ”
WARNING:
FIRE OR EXPLOSION HAZARD
Failure to follow safety warnings exactly could result in serious injury death
or property damage.
— Do not store or use gasoline or other flammable vapors and liquids in the
vicinity of this or any other appliance.
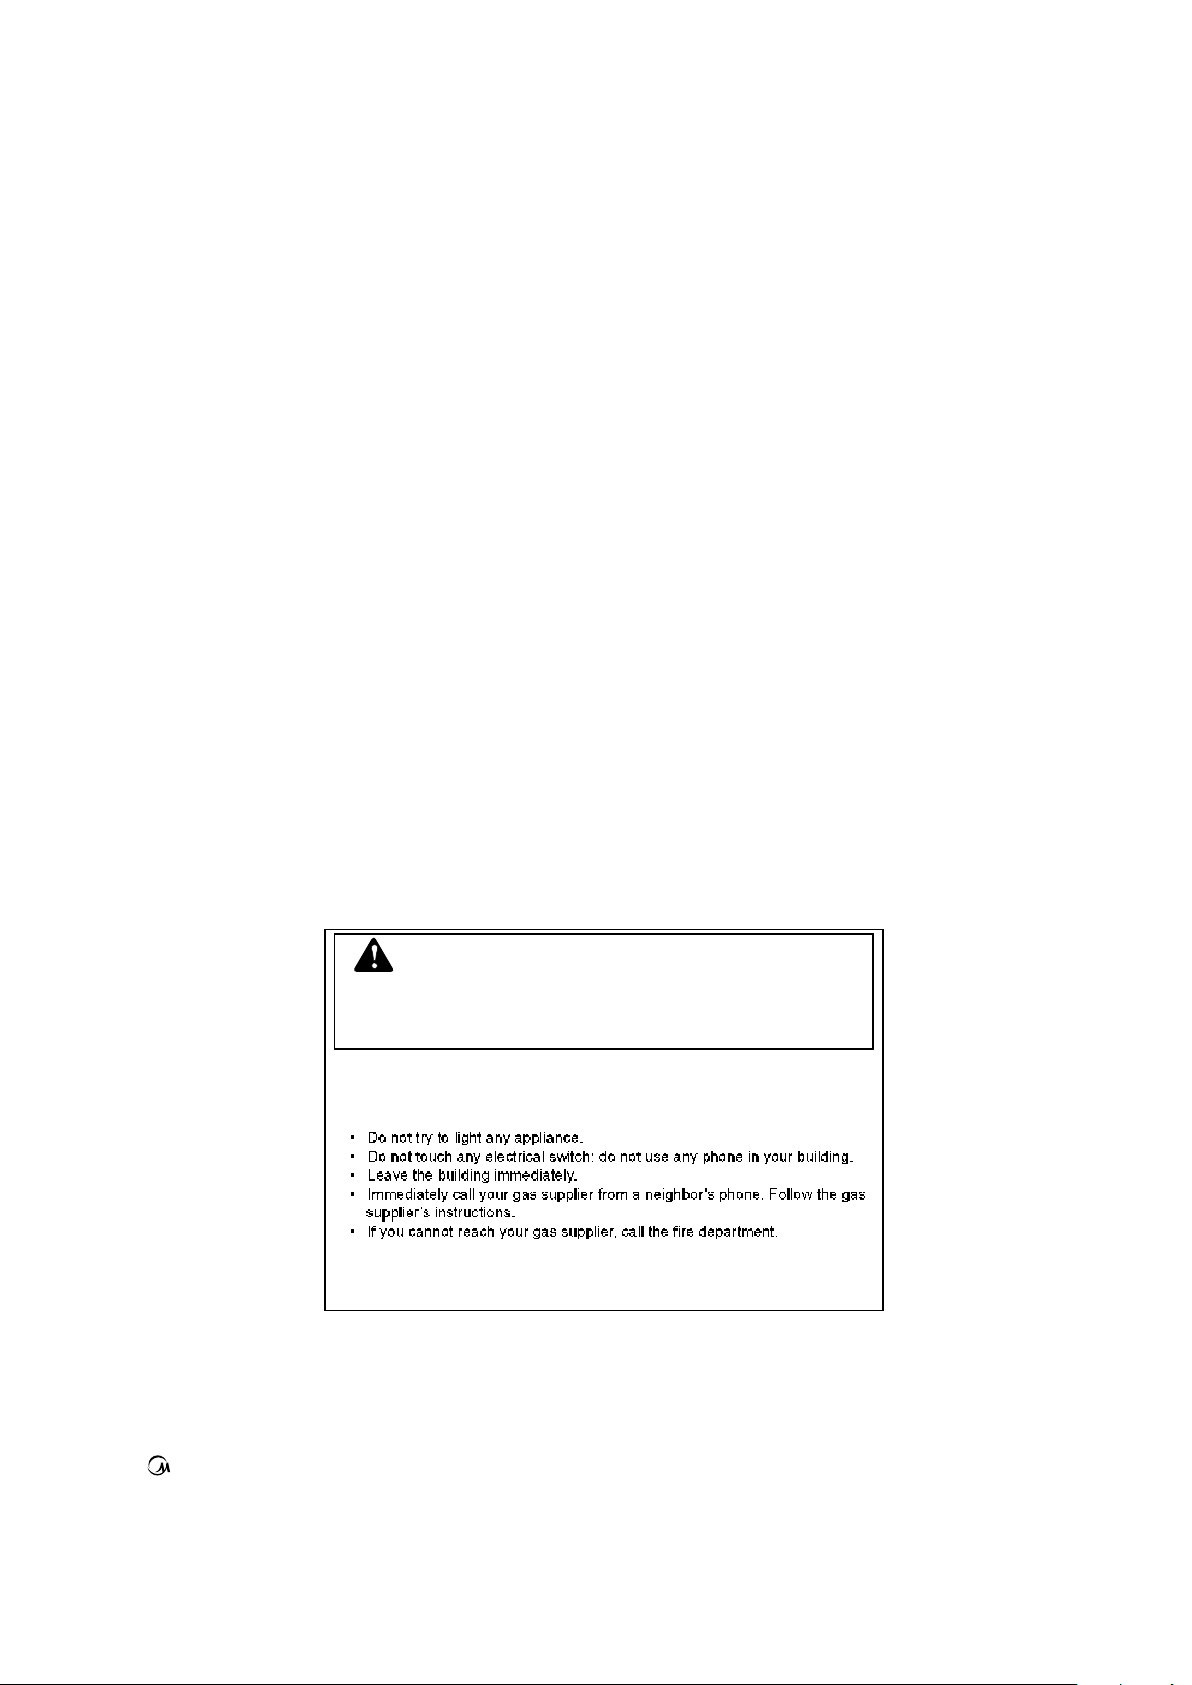
— WHAT TO DO IF YOU SMELL GAS
— Installation and service must be performed by a qualified installer,
service agency or the gas supplier.
NOTE: Do not use this furnace if any part has been under water. A flood-damaged furnace is extremely dangerous.
Attempts to use the furnace can result in fire or explosion. A qualified service agency should be contacted
to inspect the furnace and to replace all gas controls, control system parts, electrical parts that have been
wet or the furnace if deemed necessary.
GD Midea Heating & Ventilating Equipment Co., Ltd.
Penglai Industry Road, Beijiao, Shunde, Foshan
Guangdong, P.R.China
Page 3
Installation Start-up Operating and Service and Maintenance Instructions
CONTENTS PAGE
птНЯЪЫМЗ ЭСТНЧЬЫОЯМЧСТНтттттттттттттттттттттттттттттттттттттттттттттттттттттттттттттттттттто
от ЧТМОСЬЛЭМЧСТттттттттттттттттттттттттттттттттттттттттттттттттттттттттттттттттттттттттттттттттттттл
нтЭСЬЫН ЯТЬ НМЯТЬЯОЬНттттттттттттттттттттттттттттттттттттттттттттттттттттттттттттттттттттттк
нтп Н¿º»¬§тттттттттттттттттттттттттттттттттттттттттттттттттттттттттттттттттттттттттттттттттттттттттттттк
нто Щ»²»®¿´ Ч²-¬¿´´¿¬·±² тттттттттттттттттттттттттттттттттттттттттттттттттттттттттттттттттттттттк
нтн Э±³¾«-¬·±² ¿²¼ К»²¬·´¿¬·±² Я·® тттттттттттттттттттттттттттттттттттттттттттттттттттттк
нтм Ь«½¬ Н§-¬»³-тттттттттттттттттттттттттттттттттттттттттттттттттттттттттттттттттттттттттттттттттк
нтл Я½±«-¬·½¿´ Ф·²·²¹ ¿²¼ Ъ·¾®±«- Щ´¿-- Ь«½¬ттттттттттттттттттттттттттттттттттттттк
нтк Щ¿- Р·°·²¹ ¿²¼ Щ¿- Р·°» Р®»--«®» М»-¬·²¹ттттттттттттттттттттттттттттттттттттк
нтй Ы´»½¬®·½¿´ Э±²²»½¬·±²- тттттттттттттттттттттттттттттттттттттттттттттттттттттттттттттттттк
нти Ы´»½¬®·½¿´ Р±©»® Н«°°´§ттттттттттттттттттттттттттттттттттттттттттттттттттттттттттттттттттк
нтз К»²¬·²¹тттттттттттттттттттттттттттттттттттттттттттттттттттттттттттттттттттттттттттттттттттттттттттк
мт ЫФЫЭМОСНМЯМЧЭ ЬЧНЭШЯОЩЫ шЫНЬч РОЫЭЯЛМЧСТН РОСЭЫЬЛОЫ ттттттк
лт ФСЭЯМЧСТ ттттттттттттттттттттттттттттттттттттттттттттттттттттттттттттттттттттттттттттттттттттттттттттй
кт ЧТНМЯФФЯМЧСТ ттттттттттттттттттттттттттттттттттттттттттттттттттттттттттттттттттттттттттттттттттт и
ктп Л°º´±© Ч²-¬¿´´¿¬·±²ттттттттттттттттттттттттттттттттттттттттттттттттттттттттттттттттттттттти
кто Ь±©²º´±© Ч²-¬¿´´¿¬·±²ттттттттттттттттттттттттттттттттттттттттттттттттттттттттттттттттттти
ктн Ш±®·¦±²¬¿´ Ч²-¬¿´´¿¬·±²тттттттттттттттттттттттттттттттттттттттттттттттттттттттттттттттттпр
ктм Ъ·´¬»® Я®®¿²¹»³»²¬тттттттттттттттттттттттттттттттттттттттттттттттттттттттттттттттттттттпо
ктл Я·® Ь«½¬-ттттттттттттттттттттттттттттттттттттттттттттттттттттттттттттттттттттттттттттттттттттпо
йт КЫТМ НЗНМЫУттттттттттттттттттттттттттттттттттттттттттттттттттттттттттттттттттттттттттттттттттттпм
йтп К»²¬ Э±²²»½¬·±²- тттттттттттттттттттттттттттттттттттттттттттттттттттттттттттттттттттттттпм
йто К»²¬·²¹тттттттттттттттттттттттттттттттттттттттттттттттттттттттттттттттттттттттттттттттттттттттпм
йтн К»²¬·²¹ Ч²¬± Я² Ы¨·-¬·²¹ Э¸·³²»§ ттттттттттттттттттттттттттттттттттттттттттттттпм
йтм Я·® Ъ±® Э±³¾«-¬·±² ¿²¼ К»²¬·´¿¬·±²ттттттттттттттттттттттттттттттттттттттттттттпм
йтл Я·® Н«°°´§ С°»²·²¹- ¿²¼ Ь«½¬-тттттттттттттттттттттттттттттттттттттттттттттттттттпл
йтк К»²¬·´¿¬»¼ Э±³¾«-¬·±² Я·®ттттттттттттттттттттттттттттттттттттттттттттттттттттттттттпл
йтй К»²¬ ¿²¼ Н«°°´§ шС«¬-·¼»ч Я·® Н¿º»¬§ Э¸»½µ
Р®±½»¼«®»ттттттттттттттпл
и ЩЯН НЛРРФЗ ЯТЬ РЧРЧТЩттттттттттттттттттттттттттттттттттттттттттттттттттттттттттттттттттттпк
итп Щ»²»®¿´ тттттттттттттттттттттттттттттттттттттттттттттттттттттттттттттттттттттттттттттттттттттпк
ито Ш·¹¸ Я´¬·¬«¼» Ь»®¿¬»ттттттттттттттттттттттттттттттттттттттттттттттттттттттттттттттттттпй
итн Р®±°¿²» Щ¿- Э±²ª»®-·±²тттттттттттттттттттттттттттттттттттттттттттттттттттттттттттпи
итм Щ¿- Р·°·²¹ Э±²²»½¬·±²-ттттттттттттттттттттттттттттттттттттттттттттттттттттттттттттпи
итл Щ¿- Р·°·²¹ Э¸»½µ-тттттттттттттттттттттттттттттттттттттттттттттттттттттттттттттттттттттпз
з ЫФЫЭМОЧЭЯФ ЭСТТЫЭМЧСТНтттттттттттттттттттттттттттттттттттттттттттттттттттттттттттттттор
зтп пплК Й·®·²¹ттттттттттттттттттттттттттттттттттттттттттттттттттттттттттттттттттттттттттттор
зто Ы´»½¬®·½¿´ Э±²²»½¬·±² М± Цу¾±¨ тттттттттттттттттттттттттттттттттттттттттттттттттор
зтн Р±©»® Э±®¼ Ч²-¬¿´´¿¬·±² Ч² Ъ«®²¿½» Цу¾±¨ттттттттттттттттттттттттттттттттттоп
зтм Ю¨ Э¿¾´» Ч²-¬¿´´¿¬·±² Ч² Ъ«®²¿½» Цу¾±¨ттттттттттттттттттттттттттттттттттттттоп
зтл омК Й·®·²¹ттттттттттттттттттттттттттттттттттттттттттттттттттттттттттттттттттттттттттттттоп
зтк Я½½»--±®·»- шЪ·»´¼ Н«°°´·»¼чтттттттттттттттттттттттттттттттттттттттттттттттттттттоп
зтй Щ®±«²¼·²¹тттттттттттттттттттттттттттттттттттттттттттттттттттттттттттттттттттттттттттттттттоп
прт НМЯОМуЛРф ЯЬЦЛНМУЫТМф ЯТЬ НЯЪЫМЗ ЭШЫЭХ тттттттттттттттттттттттттттон
пртп Щ»²»®¿´ ттттттттттттттттттттттттттттттттттттттттттттттттттттттттттттттттттттттттттттттттттон
прто Н¬¿®¬уЛ° Р®±½»¼«®»-тттттттттттттттттттттттттттттттттттттттттттттттттттттттттттттттон
пртн Ъ«®²¿½» Н¬¿®¬у«°тттттттттттттттттттттттттттттттттттттттттттттттттттттттттттттттттттттон
пртм Н»¯«»²½» ±º С°»®¿¬·±²тттттттттттттттттттттттттттттттттттттттттттттттттттттттттттом
пртл Щ¿- У¿²·º±´¼ Р®»--«®» У»¿-«®»³»²¬ Я²¼
Я¼¶«-¬³»²¬ттттттттттол
пртк Щ¿- Ч²°«¬ О¿¬» У»¿-«®»³»²¬ шТ¿¬«®¿´ Щ¿- С²´§чтттттттттттттттттттол
пртй М»³°»®¿¬«®» О·-» тттттттттттттттттттттттттттттттттттттттттттттттттттттттттттттттттттол
прти Э·®½«´¿¬±® Ю´±©»® Н°»»¼ Я¼¶«-¬³»²¬ттттттттттттттттттттттттттттттттттттттток
пп СРЫОЯМЧСТЯФ ЭШЫЭХНттттттттттттттттттттттттттттттттттттттттттттттттттттттттттттттттттттттток
по НЯЪЫМЗ ЭЧОЭЛЧМ ЬЫНЭОЧРМЧСТтттттттттттттттттттттттттттттттттттттттттттттттттттттттттттой
п отп Щ»²»®¿´тттттттттттттттттттттттттттттттттттттттттттттттттттттттттттттттттттттттттттттттттттой
пото Ч²¬»¹®¿¬»¼ Э±²¬®±´ У±¼«´»тттттттттттттттттттттттттттттттттттттттттттттттттттттттой
потн Р®·³¿®§ Ф·³·¬тттттттттттттттттттттттттттттттттттттттттттттттттттттттттттттттттттттттттттой
потм О»ª»®-» Ъ´±© Н©·¬¸тттттттттттттттттттттттттттттттттттттттттттттттттттттттттттттттттой
потл О±´´±«¬ Ф·³·¬-ттттттттттттттттттттттттттттттттттттттттттттттттттттттттттттттттттттттттттой
потк Р®»--«®» Н©·¬½¸»-тттттттттттттттттттттттттттттттттттттттттттттттттттттттттттттттттттой
потй Ъ´¿³» Н»²-±®тттттттттттттттттттттттттттттттттттттттттттттттттттттттттттттттттттттттттой
пн МОСЛЮФЫНШССМЧТЩттттттттттттттттттттттттттттттттттттттттттттттттттттттттттттттттттттттттттттой
пнтп Ы´»½¬®±-¬¿¬·½ Ь·-½¸¿®¹» шЫ-±ч Р®»½¿«¬·±²-тттттттттттттттттттттттттттттой
пнто Ь·¿¹²±-¬·½ Э¸¿®¬тттттттттттттттттттттттттттттттттттттттттттттттттттттттттттттттттттттой
пнтн О»-»¬¬·²¹ Ъ®±³ Ф±½µ±«¬тттттттттттттттттттттттттттттттттттттттттттттттттттттттттой
пм НЫОКЧЭЫ ЯТЬ УЯЧТМЫТЯТЭЫ РОСЭЫЬЛОЫНттттттттттттттттттттттттттттттттттттттнр
пмтп Я²²«¿´ Ч²-°»½¬·±²тттттттттттттттттттттттттттттттттттттттттттттттттттттттттттттттттттнр
пмто Ъ·´¬»®-тттттттттттттттттттттттттттттттттттттттттттттттттттттттттттттттттттттттттттттттттттттнр
пмтн ЧТЬЛЭЫЬ ЬОЯЪМ ЯТЬ ЭЧОЭЛФЯЧТЩ ЮФСЙЫО УСМСОНттттттттттнр
пмтм ЪФЯУЫ НЫТНСО шПЛЯФЧЪЧЫЬ НЫОКЧЭЫО СТФЗчттттттттттттттттттттттнр
пмтл Ю«®²»®-тттттттттттттттттттттттттттттттттттттттттттттттттттттттттттттттттттттттттттттттттттнр
пмтк Э´»¿²·²¹ Ш»¿¬ Ы¨½¸¿²¹»®тттттттттттттттттттттттттттттттттттттттттттттттттттттттнп
пмтй Ю»º±®» Ф»¿ª·²¹ Я² Ч²-¬¿´´¿¬·±²тттттттттттттттттттттттттттттттттттттттттттттттно
пмти О»°¿·® Я²¼ О»°´¿½»³»²¬ Р¿®¬-тттттттттттттттттттттттттттттттттттттттттттттно
плт ЙЧОЧТЩ ЬЧЯЩОЯУНттттттттттттттттттттттттттттттттттттттттттттттттттттттттттттттттттттттттттттнн
ISO 9001:2008
NOTE: Read the entire instruction manual before starting the
installation.
Portions of the text and tables are reprinted from NFPA 54/ANSI
Z223.1-2006©, with permission of National Fire Protection
Association, Quincy, MA 02269 and American Gas Association,
Washington DC 2000l. This reprinted material is not the complete
and official position of the NFPA or ANSI on the referenced subject,
which is represented only by the standard in its entirety.
WARNING
FIRE OR EXPLOSION HAZARD
The furnace is designed and approved for use with Natural Gas
and (LP) Propane Gas ONLY. DO NOT BURN ANY LIQUID
FUEL OR SOLID FUEL IN THIS FURNACE.
Burning any unapproved fuel will result in damage to the furnace
heat exchanger, which could result in Fire, Personal Injury, and/or
Property Damage.
I&O manual
I&O manual
ï
ï
Page 4
пт НЯЪЫМЗ ЭСТНЧЬЫОЯМЧСТН
WARNING
DANGER identifies the most serious hazards which will result in
severe personal injury or death. WARNING signifies hazards which
could result in personal injury or death. CAUTION is used to identify
unsafe practices which may result in minor personal injury or product
and property damage. NOTE is used to highlight suggestions which
will result in enhanced Installation, reliability, or operation.
FIRE, EXPLOSION, ELECTRICAL SHOCK,
AND CARBON MONOXIDE POISONING HAZARD
Failure to follow this warning could result in dangerous operation, serious injury, death or property damage. Improper
installation adjustment alteration service maintenance
or use could cause carbon monoxide poisoning explosion
fire electrical shock or other conditions which may cause
personal injury or property damage. Consult a qualified service
agency local gas supplier, or your distributor or branch for
information or assistance. The qualified service agency must
use only factory-authorized and listed kits or accessories when
modifying this product.
CAUTION
FURNACE RELIABILITY HAZARD
Improper installation or misapplication of furnace may require
excessive servicing or cause premature component failure.
Application of this furnace should be indoors with special
attention given to vent sizing and material, gas input rate, air
temperature rise, unit leveling, and unit sizing.
CAUTION
CUT HAZARD
Failure to follow this caution may result in personal injury.
Sheet metal parts may have sharp edges or burrs. Use care
and wear appropriate protective clothing, safety glasses and
gloves when handling parts and servicing furnaces.
Improper installation, adjustment, alteration, service, Maintenance, or
use can cause explosion, fire, electrical shock, or other conditions
which may cause death, personal injury, or property damage. Consult
a qualified installer, service agency, or your distributor or branch for
information or assistance. The qualified installer or agency must use
factory-authorized kits or accessories when modifying this product.
Refer to the individual instructions packaged with the kits or accessories when installing.
Follow all safety codes. Wear safety glasses, protective clothing, and
work gloves. Have a fire extinguisher available. Read these instructions thoroughly and follow all warnings or cautions include in
literature and attached to the unit. Consult local building codes the
current editions of the National Fuel Gas Code (NFGC) NFPA
54/ANSI Z223.1 and the National Electrical Code (NEC) NFPA 70.
In Canada, refer to the current editions of the National Standards of
Canada CAN/CSA-BI49.1 and .2 Natural Gas and Propane Installation Codes, and Canadian Electrical Code CSA C22.1
Recognize safety information. This is the safety-alert symbol . When
you see this symbol on the unit and in instructions or manuals, be alert
to the potential for personal injury. Understand the signal words
DANGER, WARNING, and CAUTION. These words are used with the
safety-alert symbol.
Use only with type of gas approved for this furnace. Refer to the
furnace rating plate.
Install this furnace only in a location and position as specified in
the "Location" section of these instructions.
Provide adequate combustion and ventilation air to the furnace
space as specified in "Air for Combustion and ventilation" section.
Combustion products must be discharged outdoors. Connect this
furnace to an approved vent system only, as specified in the
"Venting" section of these instructions.
Never test for gas leaks with an open flame. Use a commercially
available soap solution made specifically for the detection of leaks
to check all connections, as specified in the "Gas Suppy and
Piping" section.
Always install furnace to operate within the furnace's intended
temperature-rise range with a duct system which has an external
static pressure within the allowable range, as specified in the
"Start-Up, Adjustments, and Safety Check" section. See furnace
rating plate.
When a furnace is installed so that supply ducts carry air
circulated by the furnace to areas outside the space containing the
furnace, the return air shall also be handled by duct(s) sealed to
the furnace casing and terminating outside the space containing
the furnace. See "Air Ducts" section.
A gas-fired furnace for installation in a residential garage must be
installed as specified in the warning box in the "Location" section.
The furnace may be used for construction heat provided that the
furnace installation and operation complies with the first CAUTION
in the LOCATION section of these instructions.
These multipoise Gas-Fired Furnaces are CSA (formerly A.G.A.
and C.G.A). design-certified for use with natural and propane
gases (see furnace rating plate) and for installation in alcoves
attics, basements, closets, utility rooms, crawlspaces, and
garages. The furnace is factory-shipped for use with natural gas.
A CSA listed accessory gas conversion kit is required to convert
furnace for use with propane gas.
The furnaces must be kept free and clear of insulating materials.
Inspect surrounding area to ensure insulation material is in safe
distance when installing furnaces or adding insulation materials.
Insulation materials may be combustible.
See Fig. 2 for required clearances to combustible construction.
Maintain a 1 in. (25 mm) clearance from combustible materials to
supply air ductwork for a distance of 36 in. (914 mm) horizontally
from the furnace. See NFPA 90B or local code for further requirements.
These furnaces SHALL NOT be installed directly on carpeting,
tile, or any other combustible material other than wood flooring. In
downflow installations, factory accessory floor base MUST be
used when installed on combustible materials and wood flooring.
Special base is not required when this furnace is installed on
manufacturer's Coil Assembly .
I&O manual
I&O manual
î
î
Page 5
See Fig Instruction of lighting/ shutdown operation. Should the
gas supply fail to shut off or if overheating occurs, shut off the
gas valve to the furnace before shutting of the electrical supply.
Before heating season begins, exame the furnace to determine
that:
a. All flue gas carrying areas external to the furnace (i.e.
chimney, vent connector) are clear and free of obstructions.
b. The vent connector is in place, slopes upward and is
physically sound without holes or exccessive corrosion.
c. The return-air duct connection(s) is physically cound, is
sealed to the furnace casing, and terminates outside the space
containing the furnace.
Cover old lighting instructions with this label. Note: Rating plate must be left visible for future reference.
d. The physical support of the furnace is sound without sagging,
cracks, gaps, etc around the base so as to provide a seal
between the support and the base.
e. There are no obvious sign of deterioration of the furnace.
f. The burner flames are in good adjustment (by comparison with
pictorial sketches of the main burner flame (see Fig 31).
Furnace operation needs air for combustion and ventilation.
Do not block or obstruct air openings on furnace or spacing
arroud furnace required for supplying sufficient combustion air
and ventilation.
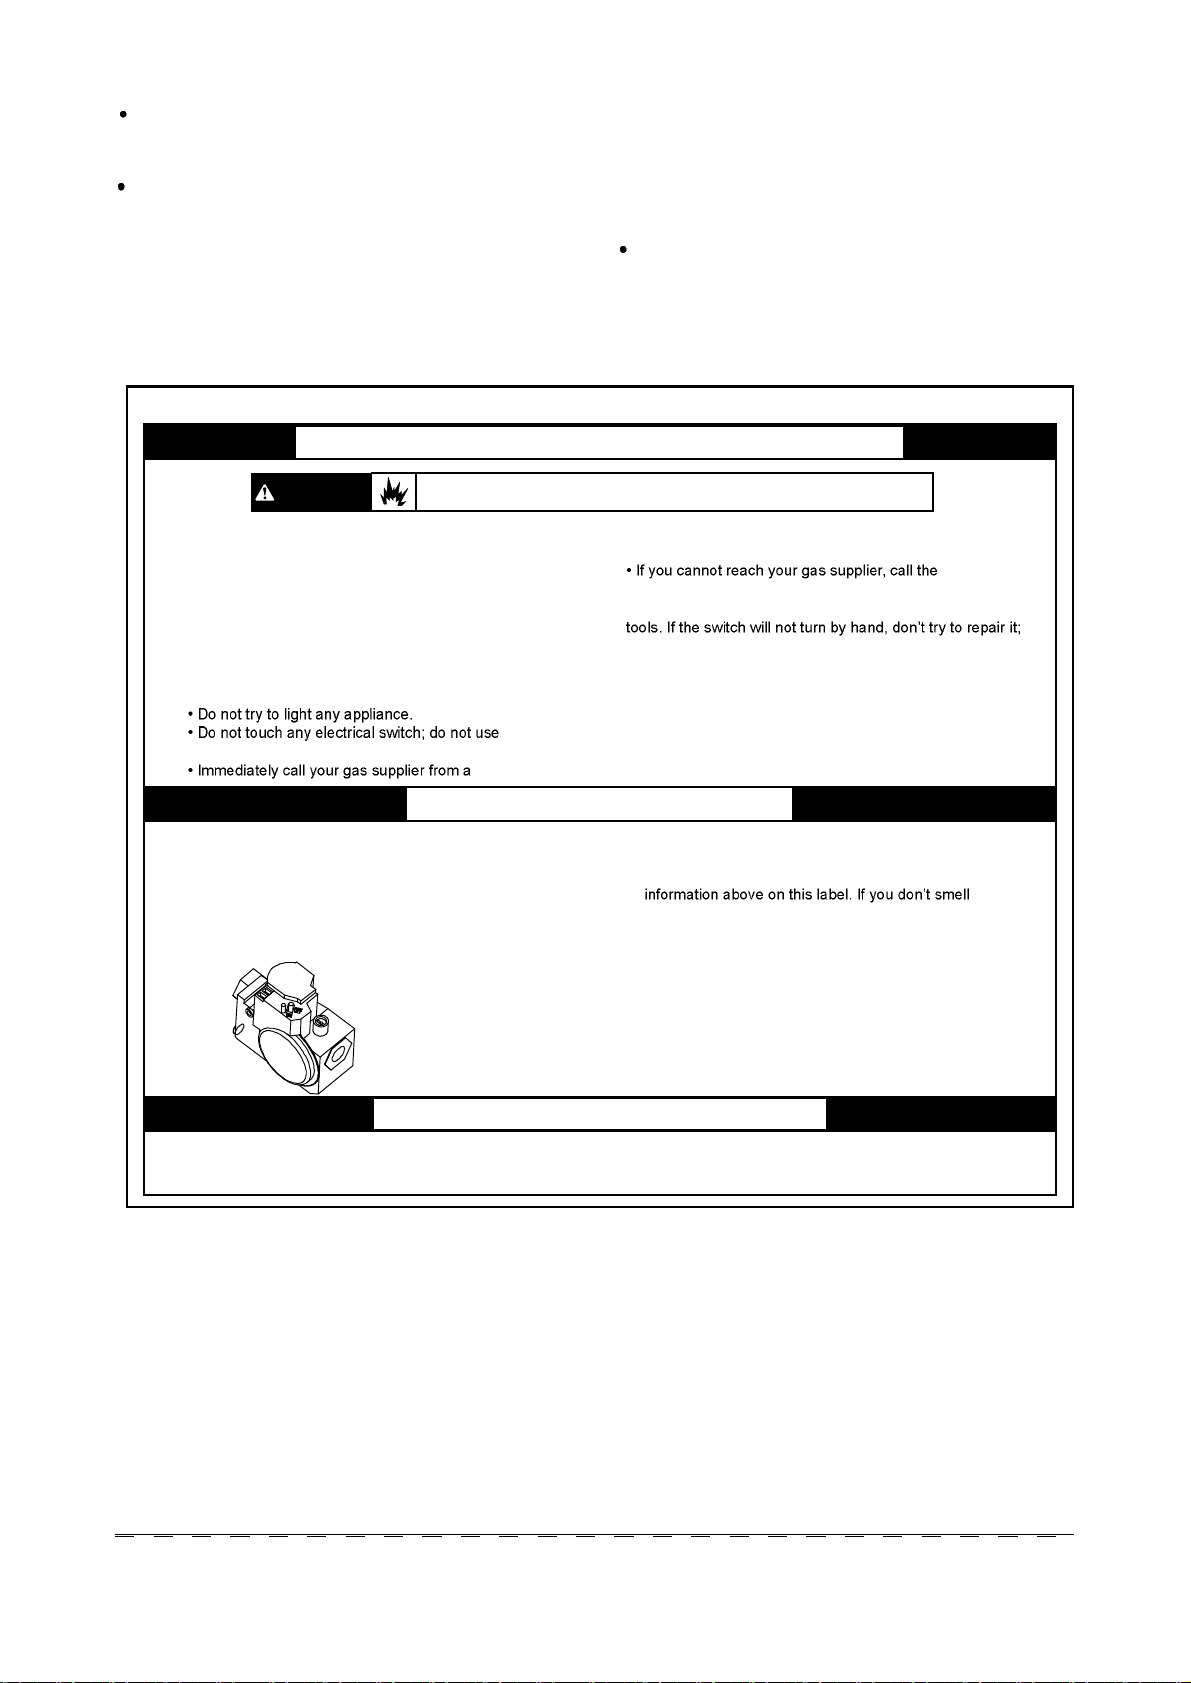
FOR YOUR SAFETY READ BEFORE OPERATING
WARNING
A.
This appliance does not have a pilot. it is equipped with an
ignition device which automatically lights the burner.
Do not try to light the burner by hand.
BEFORE OPERATING smell all around the appliance
B.
area for gas. Be sure to smell next to the floor because
some gas ls heavier than air and will settle on the floor.
If you do not follow these instructions exactly, a fire or explosion may result
causing property damage, personal injury or loss of life.
FOR YOUR SAFETY
“WHAT TO DO IF YOU SMELL GAS”
any phone in your building.
OPERATING INSTRUCTIONS
1. STOP! Read the safety information above on this
label.
2. Set the thermostat to lowest setting.
3. Turn off all electric power to the appliance.
4. This appliance is equipped with an ignition device
which automatically lights the burner. Do not try to
light the burner by hand.
SWITCH SHOWN IN
THE “OFF” POSITION
neighbors phone. Follow the gas suppliers
Instructions.
fire department.
Use only your hand to turn the gas control switch. Never use
C.
call a qualified service technician. Force or attempted repair
may result in a fire or explosion.
Do not use this appliance if any part has been under water.
D.
Immediately call a qualified service technician to inspect the
appliance and to replace any part of the control system and
any gas control which has been under water.
5. Remove control access panel.
6. Wait five (5) minutes to clear out any gas. if you
then smell gas, STOP! Follow “B” in the safety
gas, go to the next step.
7. Push gas control switch to “ON”.
NOTE: Do not force.
8. Replace control access panel.
9.Turn on all electric power to the appliance.
10.Set thermostat to desired setting
11.If the appliance will not operate, follow instructions
“To Turn Off Gas To Appliance” and call your
service technician or gas supplier.
TO TURN OFF GAS TO APPLIANCE
1. Set the thermostat to lowest setting.
2. Turn off all electric power to the appliance if
service is to be performed.
3. Remove control access panel.
4. Push gas control to “OFF”. Do not force.
5. Replace control access panel.
I&O manual
I&O manual
í
í
Page 6
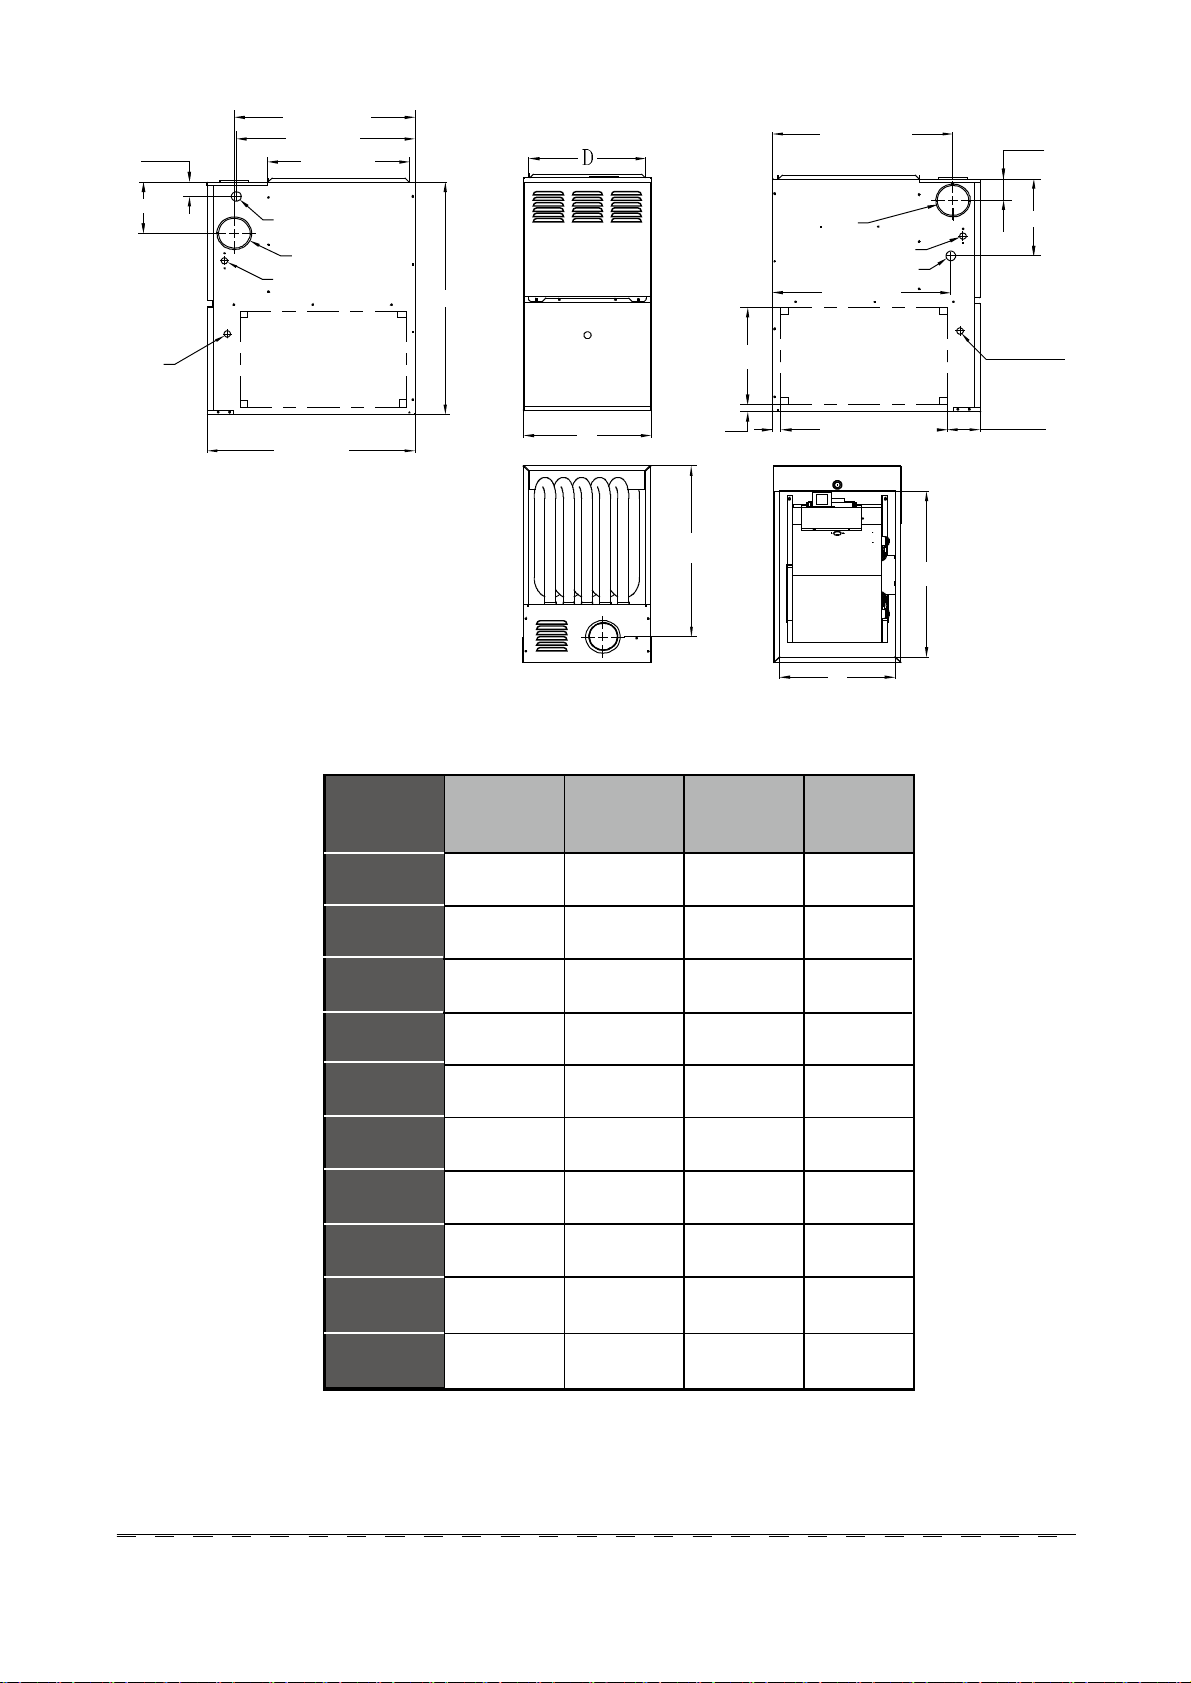
2-1/8”(54mm)
24-13/16”(630mm)
24-1/2”(622mm)
19-1/2”(495mm)
24-13/16”(630mm)
3-1/8”(79mm)
7-7/16”(189mm)
DIA.THERMOSTAT
WIRE ENTRY
7/8”(22mm)
1-1/2”(38mm)
DIA.JUNCTION BOX LOCATION
7/8”(22mm)
RIGHT SIDE RETURN AIR
28-1/2”(724mm)
Table 1 - Dimensions
33-3/4”(857mm)
14”(355mm)
A
1-1/16”(27mm)
24-13/16”(630mm)
Fig. 1 - Dimensional Drawing
DIA.LEFT VENT OUTLETDIA.RIGHT HAND GAS ENTRY
4-3/4”(120.7mm)
DIA.JUNCTION BOX LOCATION
DIA.LEFT HAND GAS ENTRY
1-3/16”(30mm)
7/8”(22mm)
1-1/2”(38mm)
24-1/2”(622mm)
LEFT SIDE RETURN AIR
22-13/16”(580mm)
E
24”(610mm)
11-3/16”(284mm)
DIA.THERMOSTAT
WIRE ENTRY
7/8”(22mm)
4-1/2”(114mm)
A
FURNACE SIZE
FURNACE SIZE
50A3A
70A3A
80B4A
80C4A
90B4A 145
100C5A
100D5A
110C5A
120D5A
135D5A
CABINET WIDTH
IN. (MM)
14.5
(368)
14.5
(368)
17.5
(445)
21
(533)
17.5
(445)
21
(533)
24.5
(622)
21
(533)
24.5
(622)
24.5
(622)
D
SUPPLY-
AIR WIDTH
IN. (MM)
13
(330)
13
(330)
16
(406)
19.5
(495)
16
(406)
19.5
(495)
23
(584)
19.5
(495)
23
(584)
23
(584)
E
RETURN-
AIR WIDTH
IN. (MM)
12-27/32
(326)
12-27/32
(326)
15-27/32
(402)
19-13/32
(493)
15-27/32
(402)
19-13/32
(493)
22-27/32
(580)
19-13/32
(493)
22-27/32
(580)
22-27/32
(580)
SHIP WT (lbs)
123
128
145
152
161
167
161
172
176
I&O manual
I&O manual
ì
ì
Page 7
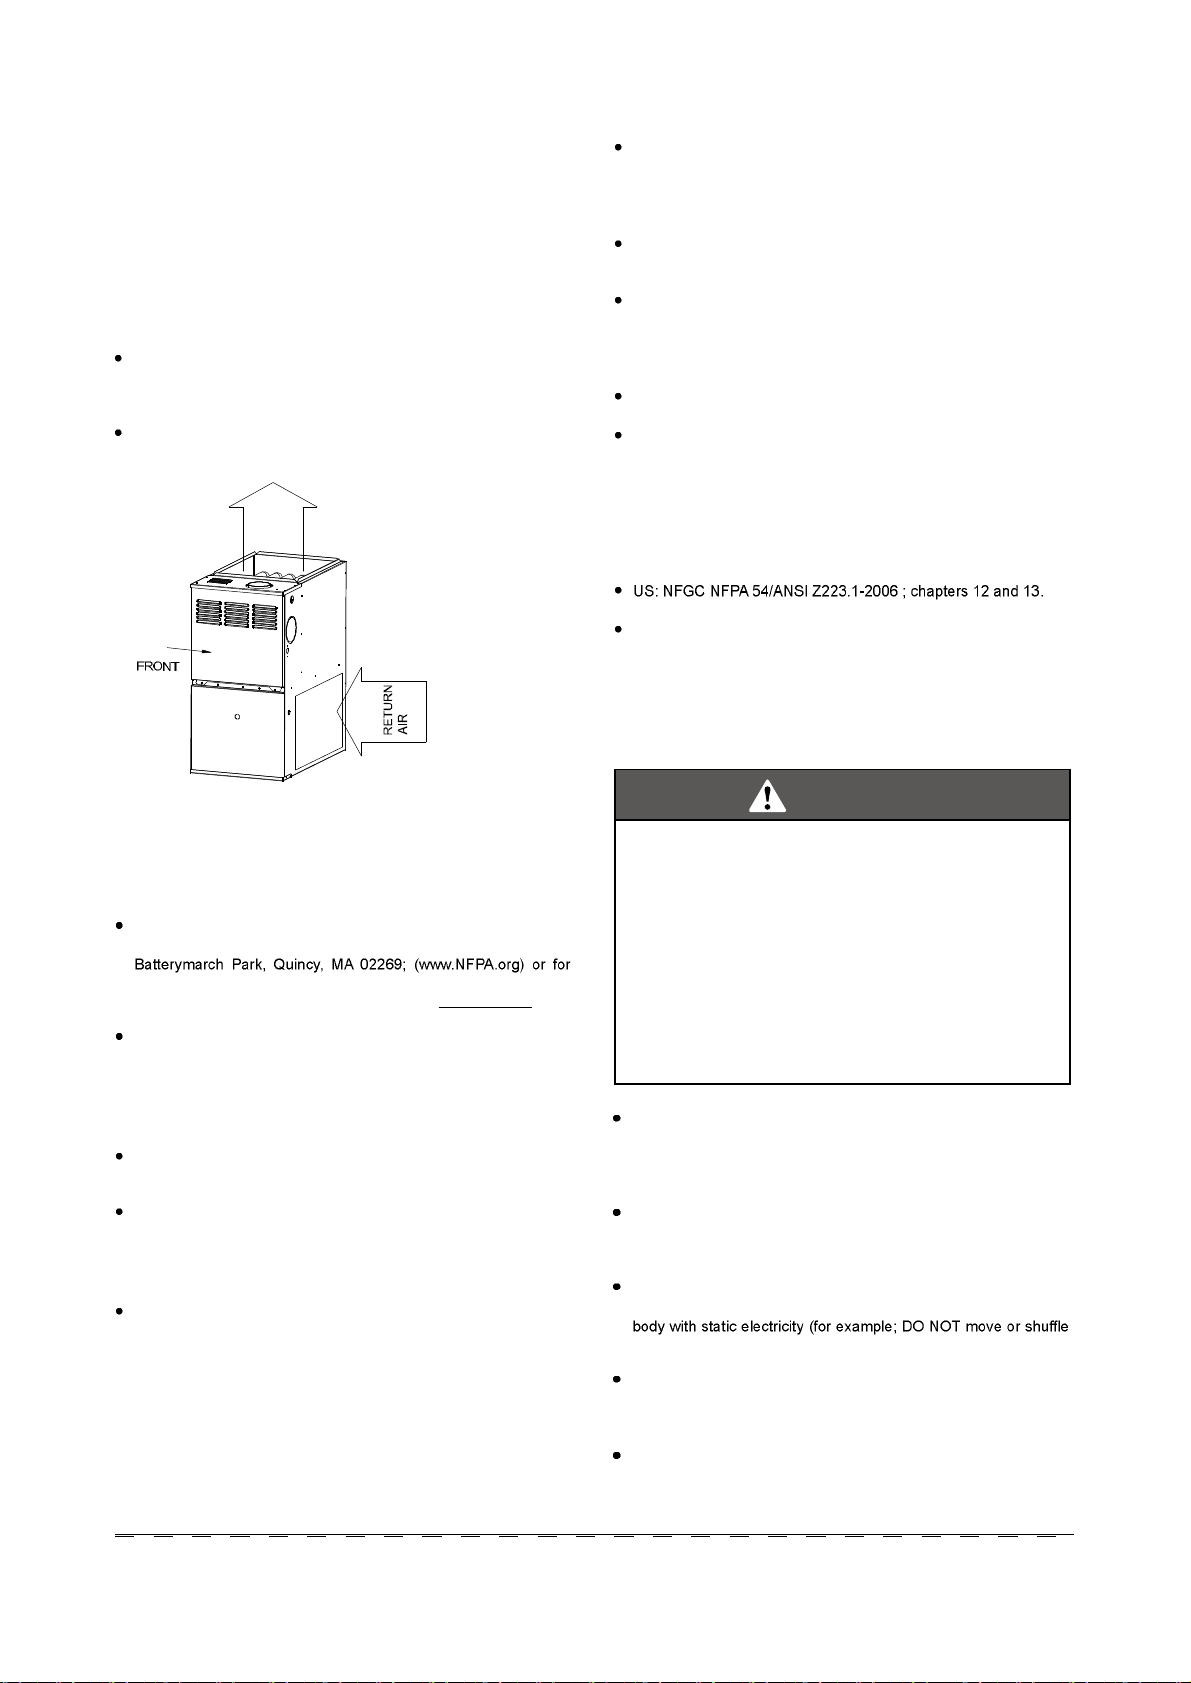
от ЧТМОСЬЛЭМЧСТ
This series 4-way multipoise Category I fan-assisted furnace is CSA
design-certified. A Category I fan-assisted furnace is an appliance
equipped with an integral mechanical means to either draw or force
products of combustion through the combustion chamber and/or heat
exchanger. The furnace is factory-shipped for use with natural gas.
This furnace is not approved for installation in mobile homes,
recreational vehicles, or outdoors. This furnace is designed for
minimum continuous return-air temperature of 60°F (16°C) db or
intermittent operation down to 55°F (13°C)db such as when used with
WARNING
AVERTISSEMENT
FIRE, EXPLOSION, ASPHYXIATION HAZARD RISQUE
D’INCENDIE, D’EXPLOSION ET ASPHYXIE
Improper adjustment, alteration, service,
maintenance, or installation can cause serious
injury or death.
Read and follow instructions and precautions in
User's Information Manual provided with this
furnace. Installation and service must be performed
by a qualified service agency or the gas supplier.
Une réglage, une modification, un reparation, un
enretien ou une installation incorrect puet entraîner
des blessures graves ou la mort.
Suivre les instructions et les consignes qui figurent
dans la notice d'utilisation qui accompagne ce
générateur d'air chaud. L'installation et I'entretien
doivent être effecturés par un réparateur qualifié
ou par Ie foumisseur de gaz.
CAUTION
MISE EN GARDE
Check entire gas assembly for leaks after lighting
this appliance.
Vérifier tous les éléments à gaz pour rechercher
les fuites après avoir allumé cet appareil.
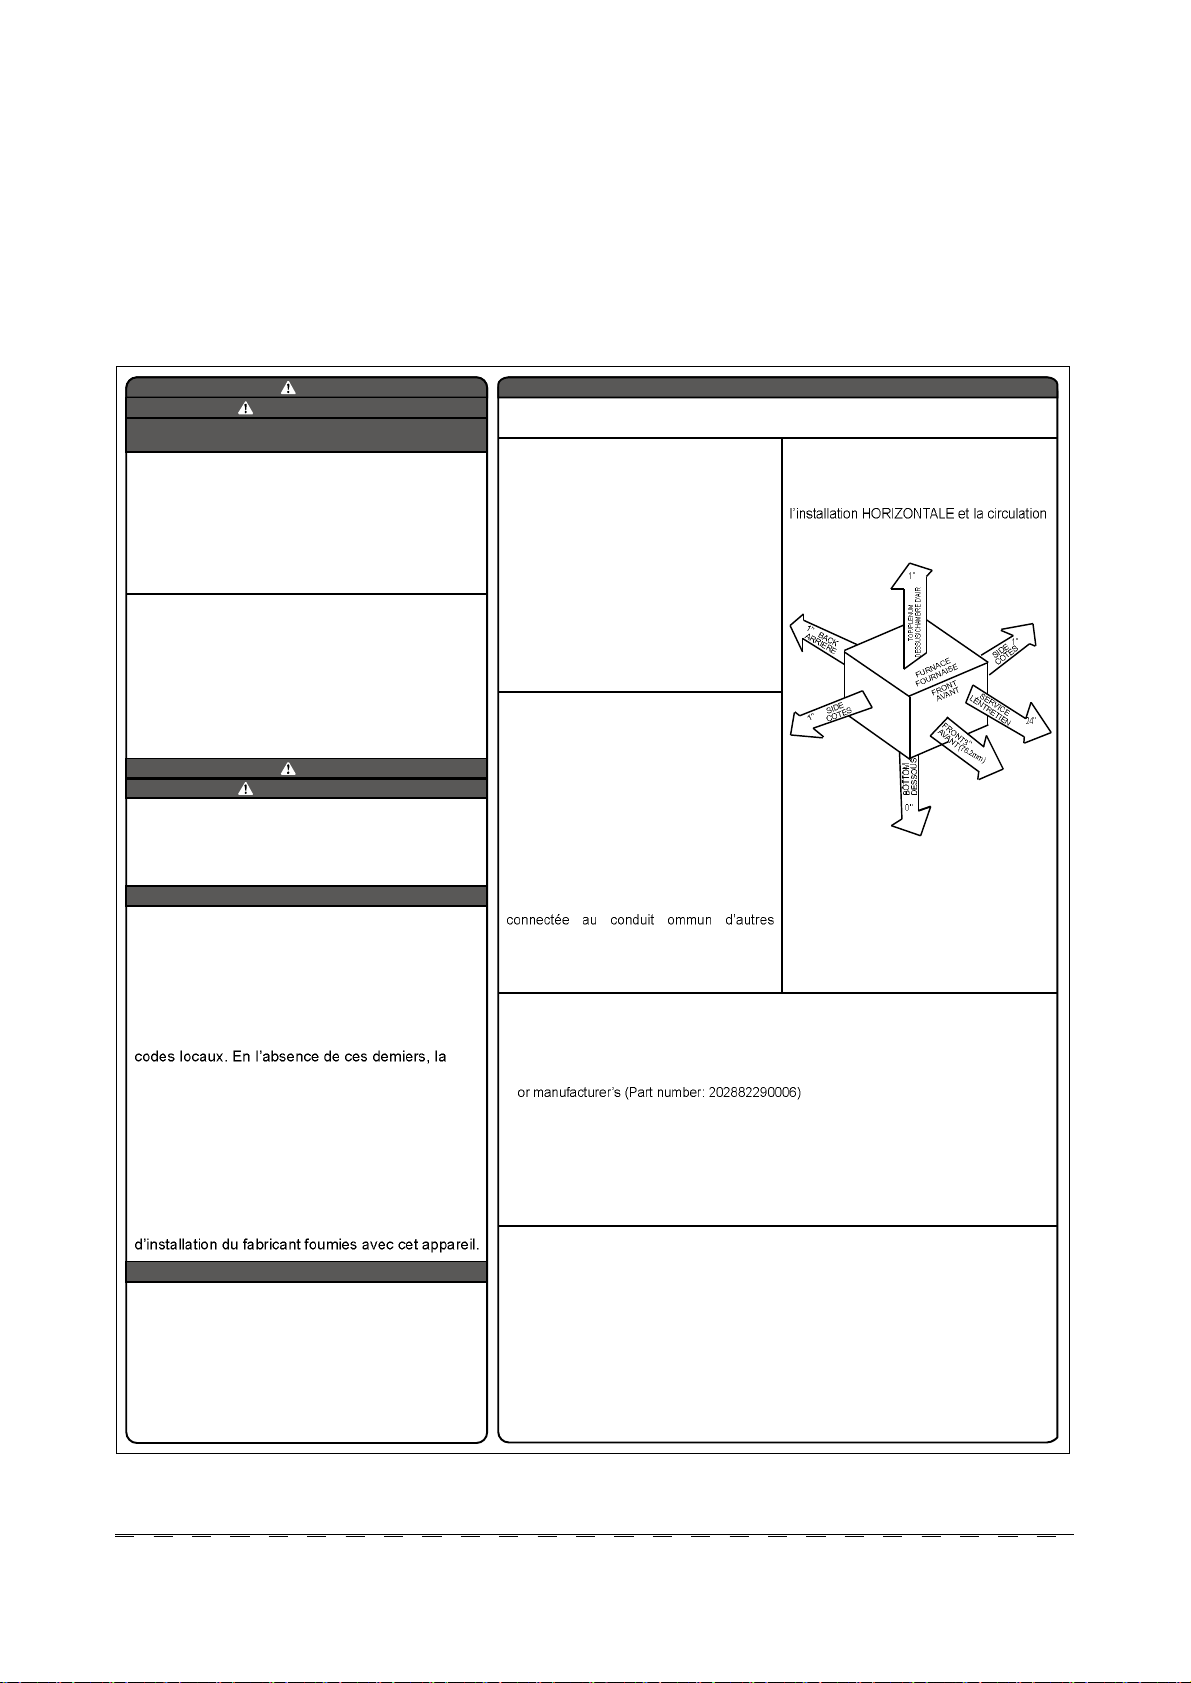
INSTALLATION
1.This fumace must be installed in accordance with
the manufacturer's instructions and local codes. In
MINIMUM INCHES CLEARANCE TO COMBUSTIBLE CONSTRUCTION
DISTANCE MINIMALE EN POUCES AUX CONSTRUCTIONS COMBUSTIBLES
An accessory kit, supplied by the
manufacturer, shall be used to convert to
propane gas use or may be required for
some natural gas applications.
This fumace is for indoor installation in a
building constructed on site.
This fumace may be installed on combustible
flooring in alcove or closet at minimum
clearance as indicated by the diagram from
combustible material.
This furnace may be used with a Type B-1
Vent and may be vented in common with
other gas fired appliances.
Utiliser une trousse de conversion, foumie
par Ie fabricant, pour passer au gaz propane
ou pour certaines installations au gaz naturel.
Cette foumaise est prévue pour être
installée dans un bâtiment construit sur
place.
Cette foumaise peut être installée sur un
pIanctler combustible dans une aIdôve ou
dans un garde-robe en respedant Ie
minimum d'espace libre des matériaux
combustibles, tel qu'indiqué sur Ie
diagramme.
Cette foumaise peut être utilisée avec un
oondutt d'évacuation de Type B-1 ou
appareils à gaz.
the absence of local codes, follow the National Fuel
Gas Code ANSI Z223.1/ NFPA54 or CSA B-149. 1
Gas Installation Code.
Ce foumaise á air chaud doit être installé
conforrnément aux instructions du fabricant et aux
norme. ANSI Z223.1/NFPA54 intitulée National Fuel
MINIMUM INCHES CLEARANCE TO COMBUSTIBLE CONSTRUCTION
DOWNFLOW POSITIONS:
Installation on non-combustible floors only.
†
For Installation on combustible flooring only when installed on sub-base provided by installer
Gas Code ou Ies code d'installation CSAB149.1.
18 inches front dearanre required for alcove.
2.This fumace must be installed so there are
provisions for combustion and ventilation air. See
manufacturer's installation information provided with
this appliance.
Ce foumaise á air chaud doit être installé de
manière à ce qu'iIyait ait suffisamment d'air de
Ø
HORIZONTAL INSTALLATION IN ATTIC
Indicates supply or return sides when furnace is in the horizontal position. Line contact only
*
permissible between lines formed by intersections of the Top and two Sides of the furnace
jacket, and building joists, studs or framing.
A special base is required (refer to “Horizontal Installation” section in Manual)
ventilation et combustion. Consulter Ies instructions
OPERATION
This fumace is equipped with manual reset limit
swich(es) in bumer compartment to protect against
overheat conditions that can result from inadequate
combustion air supply or blocked vent conditions,
1. Do not bypass limit switches.
2. If a limit opens, call a quallified serviceman to
correct the condition and reset limit switch.
†
POUR LA POSITION COURANT DESCENDANT:
Pour I'installation sur pIancher non combustible seuIement.
Ø
Pour I'installation sur un pIancher combustible seulement quand on utilise Ia base spéciale
Dans une aloôve, on doit maintenir un dégagement à I'avant de 18 po (450mm).
*
La poistion indiquée conceme Ie côté d' entrée ou de retour quand la foumaise est dans la
position horizontale.
Le contact n'est permis qu'entre Ies lignes formées par les intersections du dessus et des
deux côtés de Ia cherrise de Ia foumaise et Ies soIives, montant sous cadre de charpente.
a night setback thermostat. Return-air temperature must not exceed
85°F (29°C) db. Failure to follow these return-air temperature limits
may affect reliability of heat exchangers, motors, and controls. (See
Fig. 3).
For accessory installation details, refer to the applicable instruction
literature.
NOTE: Remove all shipping brackets and materials before
operating the furnace.
INSTALLATION
This fumace is approved for UPFLOW,
DOWNFLOW and HORIZONTAL
installations.
Cette foumaise est approuvée pour
d 'air VERS LE HAUT et VERS LE BAS.
Clearance arrows
do not change with
fumace
orientation.
Les fléches de dégagement ne change pas
(25.4mm)
avec I 'orientation de
Ia foumaise.
*
Ø
†
Clearance in inches
Dégagement (po).
Vent Clearance to combustibles:
For Single Wall vents 6 inches (6 po),
For Type B-1 vent type 1 inch (1 po).
Dégagement de I'é vent avec combustibles:
Pour oondurt d'évacuation à paroi simple 6 po (6
inches).
Pour oonduit d'évacuation de Type B-1 1 PO (1
inch).
DÉGAGEMENT MINIMUM EN POUCES AVEC ÉLÉMENTS
DE CONSTRUCTION COMBUSTIBLES
*
(609.6mm)
MI
Fig. 2 - Clearances to Combustibles
I&O manual
I&O manual
ë
ë
Page 8
нт ЭСЬЫН ЯТЬ НМЯТЬЯОЬН
Follow all national and local codes and standards in addition to these
instructions. The installation must comply with regulations of the
serving gas supplier, local building, heating, plumbing, and other
codes. In absence of local codes, the installation must comply with
the national codes listed below and all authorities having jurisdiction.
In the United States and Canada, follow all codes and standards for
the following:
íòï Í¿º»¬§
USA: National Fuel Gas Code (NFGC) NFPA 54-2006/ANSI
Z223.1-2006 and the Installation Standards, Warm Air Heating
and Air Conditioning Systems ANSI/NFPA 90B
íòë ß½±«-¬·½¿´ Ô·²·²¹ ¿²¼ Ú·¾®±«- Ù´¿-- Ü«½¬
US and CANADA: current edition of SMACNA and NFPA 90B as
tested by UL Standard 181 for Class I Rigid Air Ducts
íòê Ù¿- з°·²¹ ¿²¼ Ù¿- з°» Ю»--«®» Ì»-¬·²¹
US: NFPA 54/ANSI Z223.1-2006 Chapters 5,6, 7, and 8 and
National Plumbing Codes.
CANADA: CAN/CSA-B149.1-05 Parts 4, 5, and 6 and
Appendices A, B, E, and H.
íòé Û´»½¬®·½¿´ ݱ²²»½¬·±²-
US: National Electrical Code (NEC) ANSI/NFPA 70-2008.
CANADA: CSA B149.1-05 National Standard of Canada Natural
Gas and Propane Installation Codes (CAN/CSA-B149.1-05)
OUTLET
AIR
Max 850F/290C
Min 600F/160C
Fig. 3 - Return Air Temperature
íòî Ù»²»®¿´ ײ-¬¿´´¿¬·±²
US: Current edition of the NFGC and the NFPA 90B. For copies,
contact the National Fire Protection Association Inc.,
only the NFGC, contact the American Gas Association, 400 N.
Capitol Street, N.W., Washington, DC 20001 (www.AGA.org).
CANADA: CAN/CSA-B149.1-05. For a copy, contact Standard
Sales, CSA International, 178 Rexdale Boulevard, Etobicoke
(Toronto), Ontario, M9W 1R3 Canada.
CANADA: Canadian Electrical Code CSA C22.I.
íòè Û´»½¬®·½¿´ °±©»® -«°°´§
Voltage: ANSI C84.1-2006 (104-127 volt)
íòç Ê»²¬·²¹
CANADA: CAN/CSA-B149.1-05 Part 8 and Appendix C.
мт ЫФЫЭМОСНМЯМЧЭ ЬЧНЭШЯОЩЫ шЫНЬч
РОЫЭЯЛМЧСТН РОСЭЫЬЛОЫ
CAUTION
FURNACE RELIABILITY HAZARD
Improper installation or service of furnace may cause premature furnace component failure.
Electrostatic discharge can affect electronic components.
Follow the Electrostatic Discharge Precautions Procedure
listed below during furnace installation and servicing to protect
the furnace electronic control. Precautions will prevent electrostatic discharges from personnel and hand tools which are held
during the procedure. These precautions will help to avoid
exposing the control to electrostatic discharge by putting the
furnace, the control, and the person at the same electrostatic
potential.
íòí ݱ³¾«-¬·±² ¿²¼ Ê»²¬·´¿¬·±² ß·®
US: Section 9.3 of the NFGC, NFPA 54/ANSI Z223.1-2006 Air for
Combustion and Ventilation.
CANADA: Part 8 ofCAN/CSA-B149.1-05, Venting Systems and
Air Supply for Appliances.
íòì Ü«½¬ ͧ-¬»³-
US and CANADA: Air Conditioning Contractors Association
(ACCA) Manual D, Sheet Metal and Air Conditioning Contractors
National Association (SMACNA), or American Society of Heating,
Refrigeration, and Air Conditioning Engineers (ASHRAE) 2001
Fundamentals Handbook Chapter 34 or 2000 HVAC Systems
and Equipment Handbook Chapters 9 and 16.
I&O manual
I&O manual
ê
ê
Disconnect all power to the furnace. Multiple disconnects maybe
required. DO NOT TOUCH THE CONTROL OR ANY WIRE
CONNECTED TO THE CONTROL PRIOR TO DISCHARGING
YOUR BODY'S ELECTROSTATIC CHARGE TO GROUND.
Firmly touch the clean, unpainted, metal surface of the furnace
chassis which is close to the control.Tools held in a person's hand
during grounding will be satisfactorily discharged.
After touching the chassis, you may proceed to service the control
or connecting wires as long as you do nothing to recharge your
your feet, do not touch ungrounded objects, etc.).
If you touch ungrounded objects (and recharge your body with
static electricity), firmly touch a clean, unpainted metal surface of
the furnace again before touching control or wires,
Use this procedure for installed and un installed (ungrounded)
furnaces.
Page 9
Before removing a new control from its container, discharge your
body's electrostatic charge to ground to protect the control from
damage. If the control is to be installed in a furnace, follow items 1
through 4 before bringing the control or yourself in contact with the
furnace. Put all used and new controls into containers before
touching ungrounded objects.
An ESD service kit (available from commercial sources) may also
be used to prevent ESD damage.
лт ФСЭЯМЧСТ
ëòï Ù»²»®¿´
This multipoise furnace is shipped in packaged configuration. Some
assembly and modifications are required when used in any of the
four applications . This furnace must:
Be installed so the electrical components are protected from
water.
Not be installed directly on any combustible material other than
wood flooring (refer to SAFETY CONSIDERATIONS).
Downflow installation and horizontal installation in atttic have
additional requirements. See Section 6 Installation.
Be located as close to the chimney or vent and attached to an air
distribution system. Refer to Air Ducts section.
Be provided ample space for servicing and cleaning. Always
comply with minimum fire protection clearances shown on the
furnace clearance to combustible label.
If air is exposed to the following substances, it should not be used for
combustion air, and outdoor air may be required for combustion:
Permanent wave solutions
Chlorinated waxes and cleaners
Chlorine based swimming pool chemicals
Water softening chemicals
De-icing salts or chemicals
Carbon tetrachloride
Halogen type refrigerants
Cleaning solvents (such as perchloroethylene)
Printing inks, paint removers, varnishes, etc.
Hydrochloric acid
Cements and glues
Antistatic fabric softeners for clothes dryers
Masonry acid washing materials
All fuel-burning equipment must be supplied with air for fuel
combustion. Sufficient air must be provided to avoid negative
pressure in the equipment room or space. A positive seal must be
made between the furnace cabinet and the return-air duct to prevent
pulling air from the burner area and from draft safeguard opening.
Also see Section 6.4.
The following types of furnace installations may require OUTDOOR
AIR for combustion due to chemical exposures:
Commercial buildings
Buildings with indoor pools
Laundry rooms
Hobby or craft rooms, and
Chemical storage areas
WARNING
CARBON MONOXIDE POISONING HAZARD
Failure to follow this warning could result in personal injury or
death, and unit component damage.
Corrosive or contaminated air may cause failure of parts
containing flue gas, which could leak into the living space. Air
for combustion must not be contaminated by halogen
compounds, which include fluoride, chloride, bromide, and
iodide. These elements can corrode heat exchangers and
shorten furnace life. Air contaminants are found in aerosol
sprays, detergents, bleaches, cleaning solvents, salts, air
fresheners, and other household products. Do not install
furnace in a corrosive or contaminated atmosphere. Make sure
all combustion and circulating air requirements are met, in
addition to all local codes and ordinances.
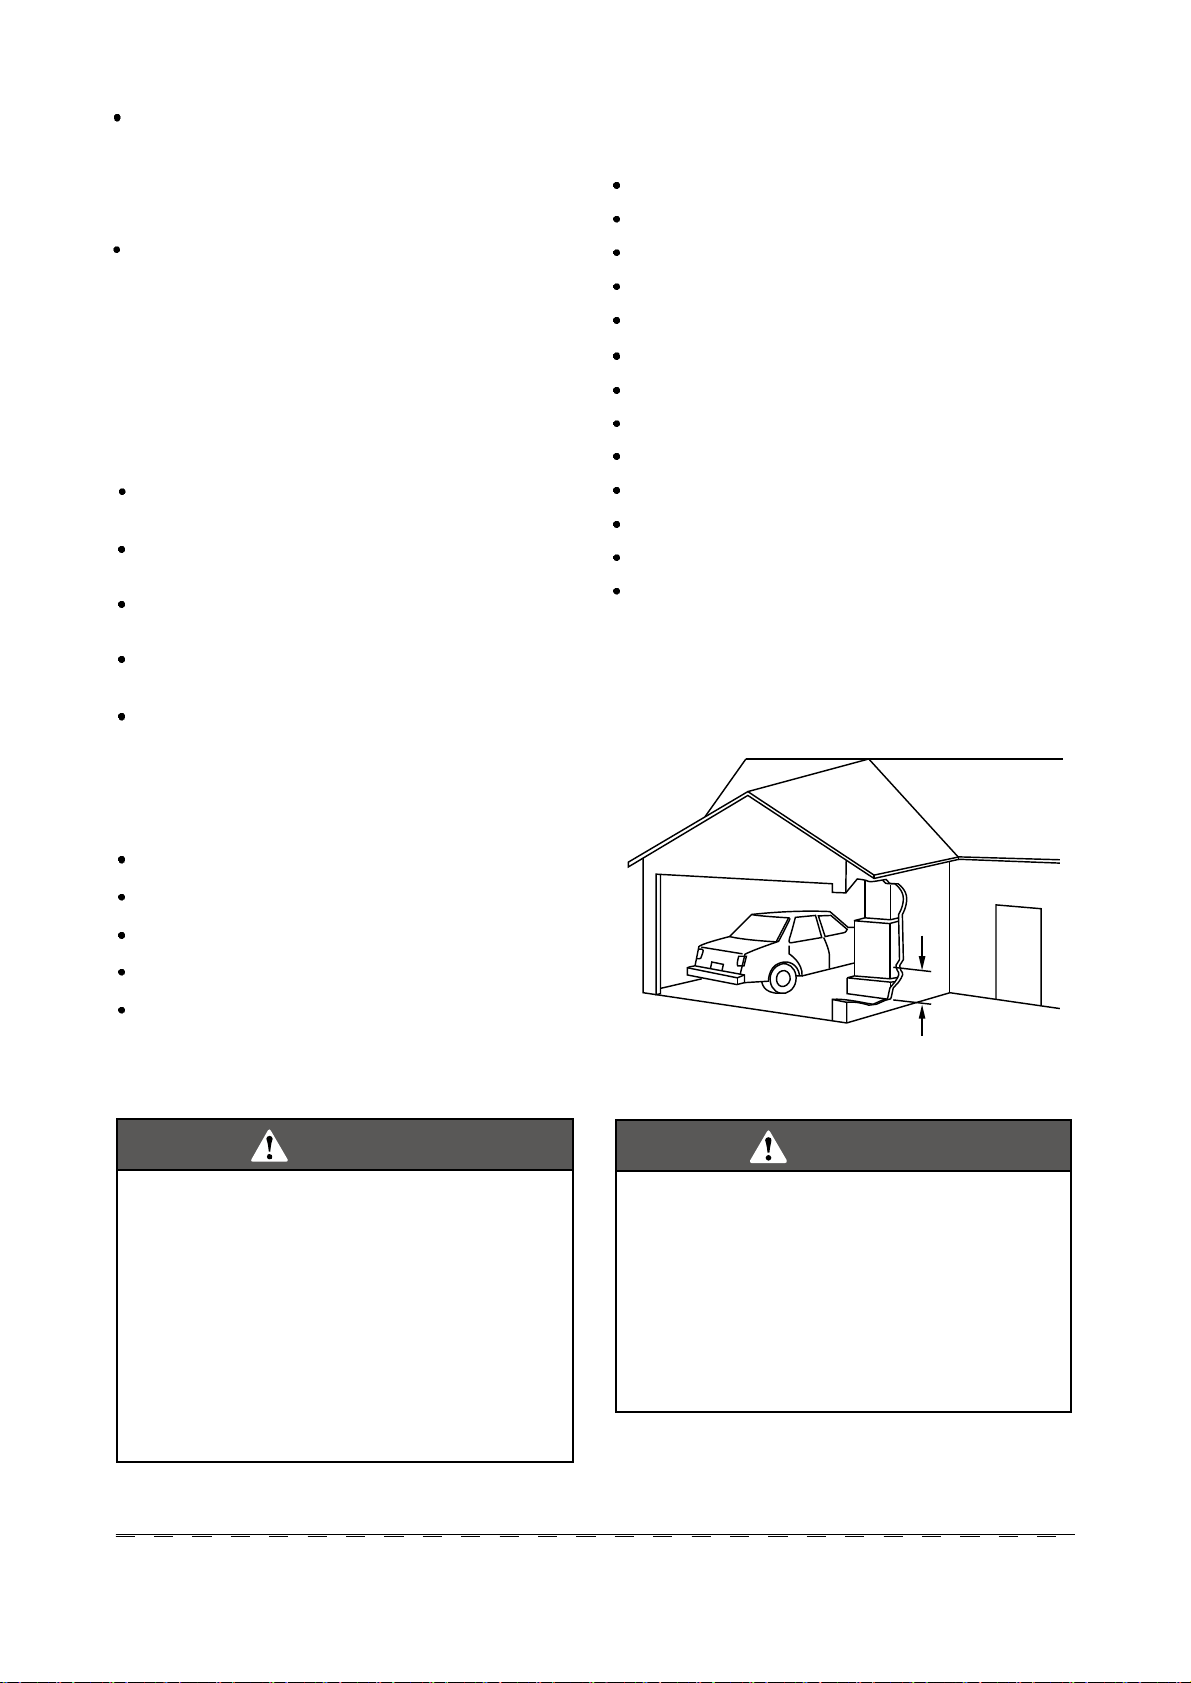
18-IN. (457.2 mm)
MINIMUM TO BURNERS
Fig. 4 - Installation in a Garage
WARNING
FIRE, INJURY OR DEATH HAZARD
Failure to follow this warning could result in personal injury,
death, and/or property damage.
When the furnace is installed in a residential garage, the
burners and ignition sources must be located at least 18 inches
(457 mm) above the floor. The furnace must be located or
protected to avoid damage by vehicles. When the furnace is
installed in a public garage, airplane hangar, or other building
having a hazardous atmosphere, the furnace must be installed
in accordance with the NFGC or CAN/CSA - B149 .1-05. (See
Fig. 4).
I&O manual
I&O manual
é
é
Page 10
CAUTION
PERSONAL INJURY AND/OR PROPERTY DAMAGE
HAZARD
Improper use or installation of this furnace may cause premature furnace component failure.
This gas furnace may be used for heating buildings under
construction provided that:
- The furnace is permanently installed with all electrical wiring,
piping, venting and ducting installed according to these installation instructions. A return air duct is provided, sealed to the
furnace casing, and terminated outside the space containing
the furnace. This prevents a negative pressure condition as
created by the circulating air blower, causing a flame rollout
and/or drawing combustion products into the structure.
- The furnace is controlled by a thermostat. It may not be "hot
wired" to provide heat continuously to the structure without
thermostatic control.
-Clean outside air is provided for combustion. This is to
minimize the corrosive effects of adhesives, sealers and other
construction materials. It also prevents the entrainment of
drywall dust into combustion air, which can cause fouling and
plugging of furnace components.
- The temperature of the return air to the furnace is maintained
between 60°F (16°C) and 85°F (29°C), with no evening setback
or shutdown. The use of the furnace while the structure is under
construction is deemed to be intermittent operation per our
installation instructions.
- The air temperature rise is within the rated rise range on the
furnace rating plate, and the gas input rate has been set to the
nameplate value.
- The filters used to clean the circulating air during the construction process must be either changed or thoroughly cleaned
prior to occupancy.
- The furnace, ductwork and filters are cleaned as necessary to
remove drywall dust and construction debris from all HVAC
system components after construction is completed.
- Verify proper furnace operating conditions including ignition,
gas input rate, air temperature rise, and venting according to
these installation instructions.
кт ЧТНМЯФФЯМЧСТ
Side Return Air Inlet
These furnaces are shipped with bottom closure panel installed in
bottom return-air opening. This panel MUST be in place when
only side return air is used.
NOTE: Side return-air openings can be used in UPFLOW and
most HORIZONTAL configurations. Do not use side return-air
openings in DOWNFLOW configuration.
êòî ܱ©²º´±© ײ-¬¿´´¿¬·±²
NOTE: For downflow applications, this furnace is approved for use
on combustible flooring when anyone of the following 3 accessories
are used:
Special Base
Cased Coil Assembly
Coil Box
Determine application being installed from Table 2.
1.
Construct hole in floor per Table 2 and Fig. 6.
2.
Construct plenum to dimensions specified in Table 2 and Fig. 6.
3.
If down flow subbase is used, install as shown in Fig. 7. If Coil
4.
Assembly or Coil Box is used, install as shown in Fig. 8.
NOTE: It is recommended that the supply-air duct flanges be
completely folded over or removed from furnace when installing the
furnace on a factory-supplied cased coil or coil box.
To remove the supply-air duct flange, use wide duct pliers or hand
seamers to bend flange Be careful of sharp edges.
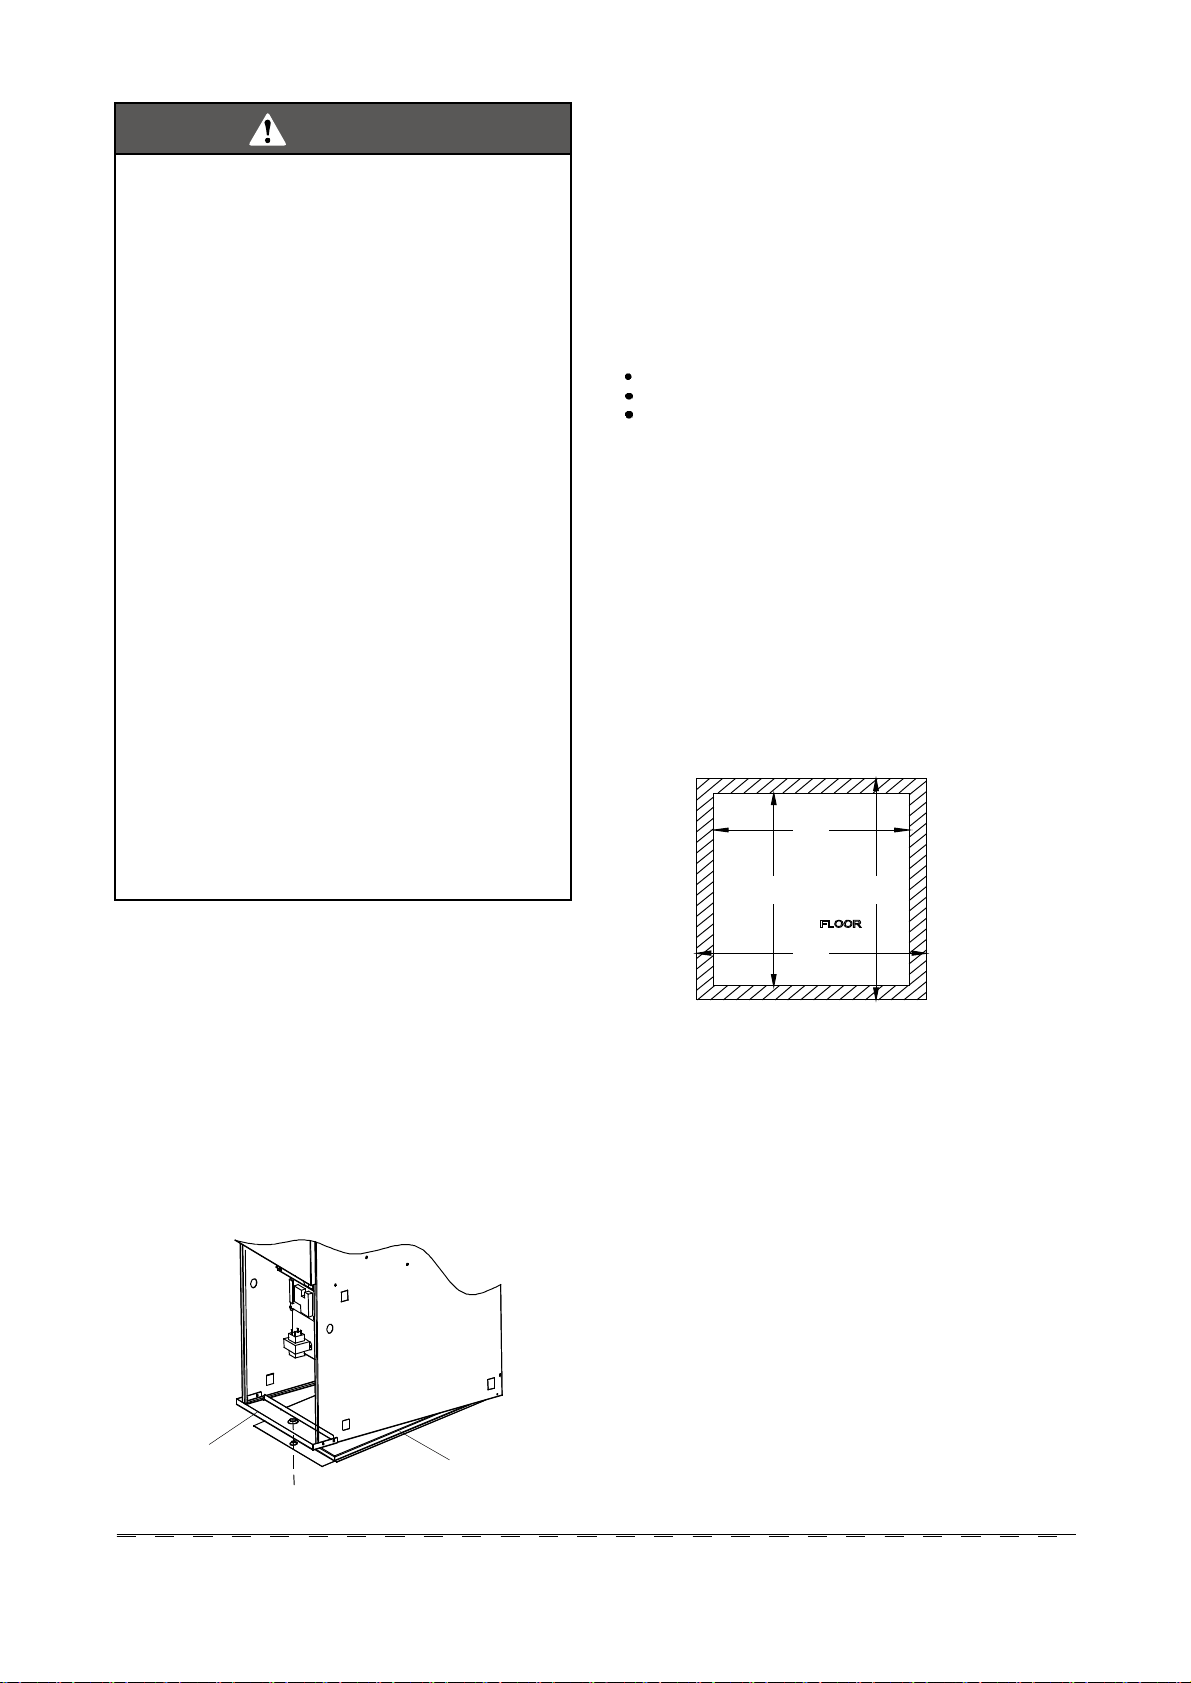
Bottom Return Air Inlet
Do not use side return openings in downflow configuration.
These furnaces are shipped with bottom closure panel installed in
bottom return-air opening. Remove and discard this panel when
bottom return air is used. See 6.1 and Fig. 5 for bottom closure
removal.
A
PLENUM
OPENING
B D
FLOOR
OPENING
C
This furnace can be installed for upflow, downflow and horizonal
positions (see Fig 12-18).
êòï Ë°º´±© ײ-¬¿´´¿¬·±²
Bottom Return Air Inlet
These furnaces are shipped with bottom closure panel installed in
bottom return-air opening. Remove and discard this panel when
bottom return air is used. To remove bottom closure panel, perform
the following:
Tilt or raise furnace and remove the screw holding bottom
1.
filler panel. (See Fig. 5.)
Remove bottom closure panel.
2.
BOTTOM FILLER
PANEL
I&O manual
I&O manual
è
è
Fig. 5 - Removing Bottom Closure Panel
SCREW
BOTTOM CLOSURE PANEL
Fig. 6 - Floor and Plenum Opening Dimensions
Page 11
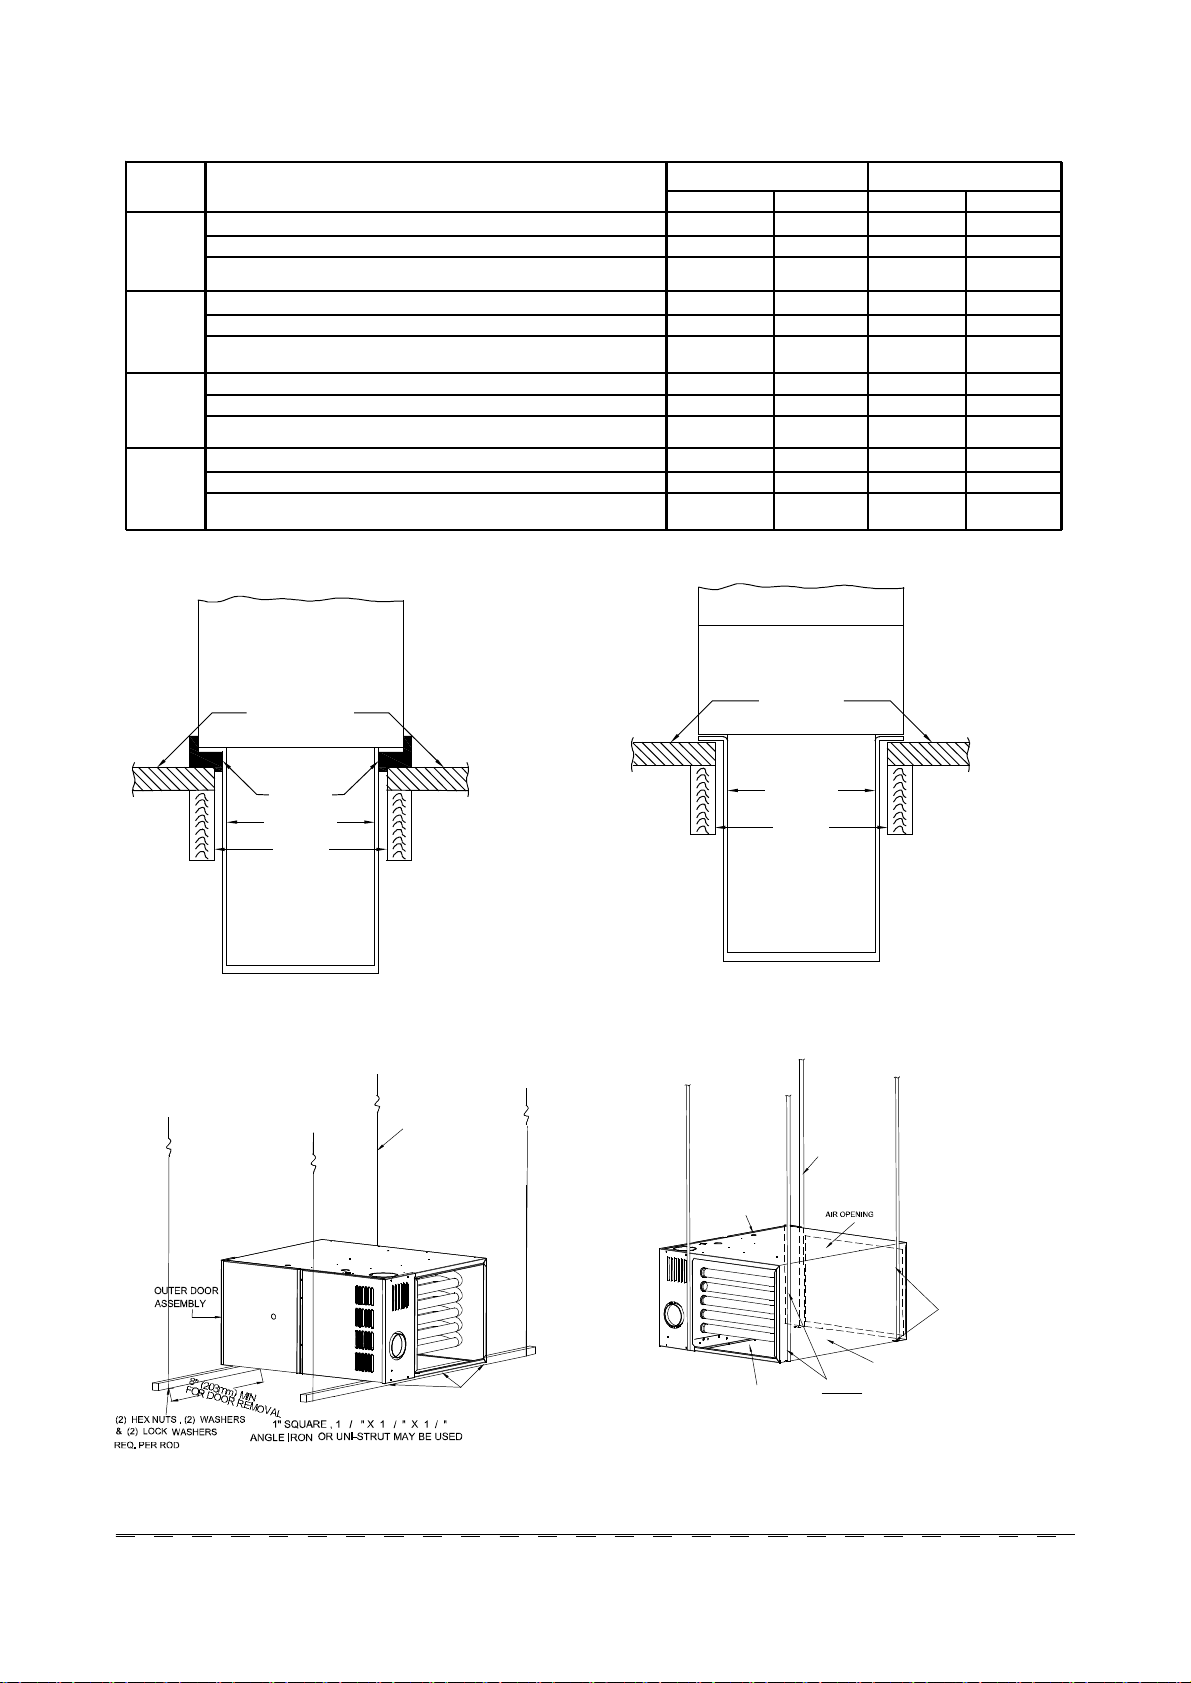
TABLE 2 - OPENING DIMENSIONS - IN. (MM)
C
E
G
H
T
FURNA
CASIN
WIDT
14-1/2
(368)
17-1/2
(445)
21
(553)
24-1/2
(622)
APPLICATION
PLENUM OPENING FLOOR OPENING
A B C D
Downflow Applications on Noncombustible Flooring 13-3/16(335) 19-11/16(500)13-13/16(350) 20-5/16(516)
Downflow Applications on Combustible Flooring Using special base 12-3/16(311) 19(483) 13(331)
Downflow Applications on Combustible Flooring with Manufacturer
Supplied Coil Assembly or Coil Box
Downflow Applications on Noncombustible Flooring
Downflow Applications on Combustible Flooring Using special base
Downflow Applications on Combustible Flooring with Manufacturer
Supplied Coil Assembly or Coil Box
Downflow Applications on Noncombustible Flooring
Downflow Applications on Combustible Flooring Using special base
Downflow Applications on Combustible Flooring with Manufacturer
Supplied Coil Assembly or Coil Box
Downflow Applications on Noncombustible Flooring
Downflow Applications on Combustible Flooring Using special base
Downflow Applications on Combustible Flooring with Manufacturer
Supplied Coil Assembly or Coil Box
FURNACE
(OR COIL CASING
WHEN USED)
COMBUSTIBLE
FLOORING
13-3/16(335)
16-3/16(411) 19-11/16(500)16-13/16(427)
15-3/16(385)
16-3/16(411)
19-11/16(500)
18-11/16(474) 19(483) 19-1/2(495)
19-11/16(500)
23-3/16(589)
22-3/16(563)
19-11/16(500)
19-3/16(487)
13-13/16(351) 19-13/16(503)
19(483) 16(406)
19-3/16(487)
16-13/16(427)
19-11/16(500)20-5/16(516) 20-5/16(516)
19-3/16(487)
20-5/16(516)
19-11/16(500)20-5/16(516) 23-13/16(605)
19(483)
19-3/16(487)
FURNACE
APPROVED
COIL ASSEMBLY
OR
COIL BOX
COMBUSTIBLE
FLOORING
23(584)
20-5/16(516)
19-3/4(503)
20-5/16(516)
19-3/4(503)
19-13/16(503)
19-3/4(503)
19-13/16(503)
19-3/4(503)
19-13/16(503)
DOWNFLOW
SUBBASE
SHEET METAL
PLENUM
FLOOR
OPENING
Fig. 7 - Furnace, Plenum, and Subbase Installed on a
Combustible Floor
1/4" (6mm) THREADED
ROD 4 REQ
4
1
4
SECURE ANGLE
IRON TO BOTTOM
OF FURNACE WITH
3 #8 X / " SCREWS
4 1
1
8
TYPICAL FOR 2 SUPPORTS
SHEET METAL
PLENUM
(B, Ref Fig 6)
FLOOR
OPENING
(D, Ref Fig 6)
Fig. 8 - Furnace, Plenum, and Coil Assembly or
Coil Box Installed on a Combustible Floor
22 GAUGE GALVANIZED
STRAPS TYPICAL
FOR 4 STRAPS
OUTER DOOR
ASSEMBLY
METHOD 2
USE (4) #8 X 3/4 (19mm) SHEE
METAL SCREWS FOR EACH
STRAP . THE STRAPS
SHOULD BE VERTICAL
AGAINST THE FURNACE
BACK OF
AIR OPENING
3
FURNACE
METHOD 1
FOLD ALL STRAPS UNDER
FURNACE AND SECURE WITH
(4) #8 X 3/4 (19MM) SHEET METAL SCREWS
(2 SCREWS IN SIDE AND 2 SCREWS
IN BOTTOM) .
SIDES AND NOT PULL AWAY
FROM THE FURNACE
SIDES.
Fig. 9 - Horizontal Unit Suspension Fig. 10 - Horizontal Suspension with Straps
I&O manual
I&O manual
ç
ç
Page 12
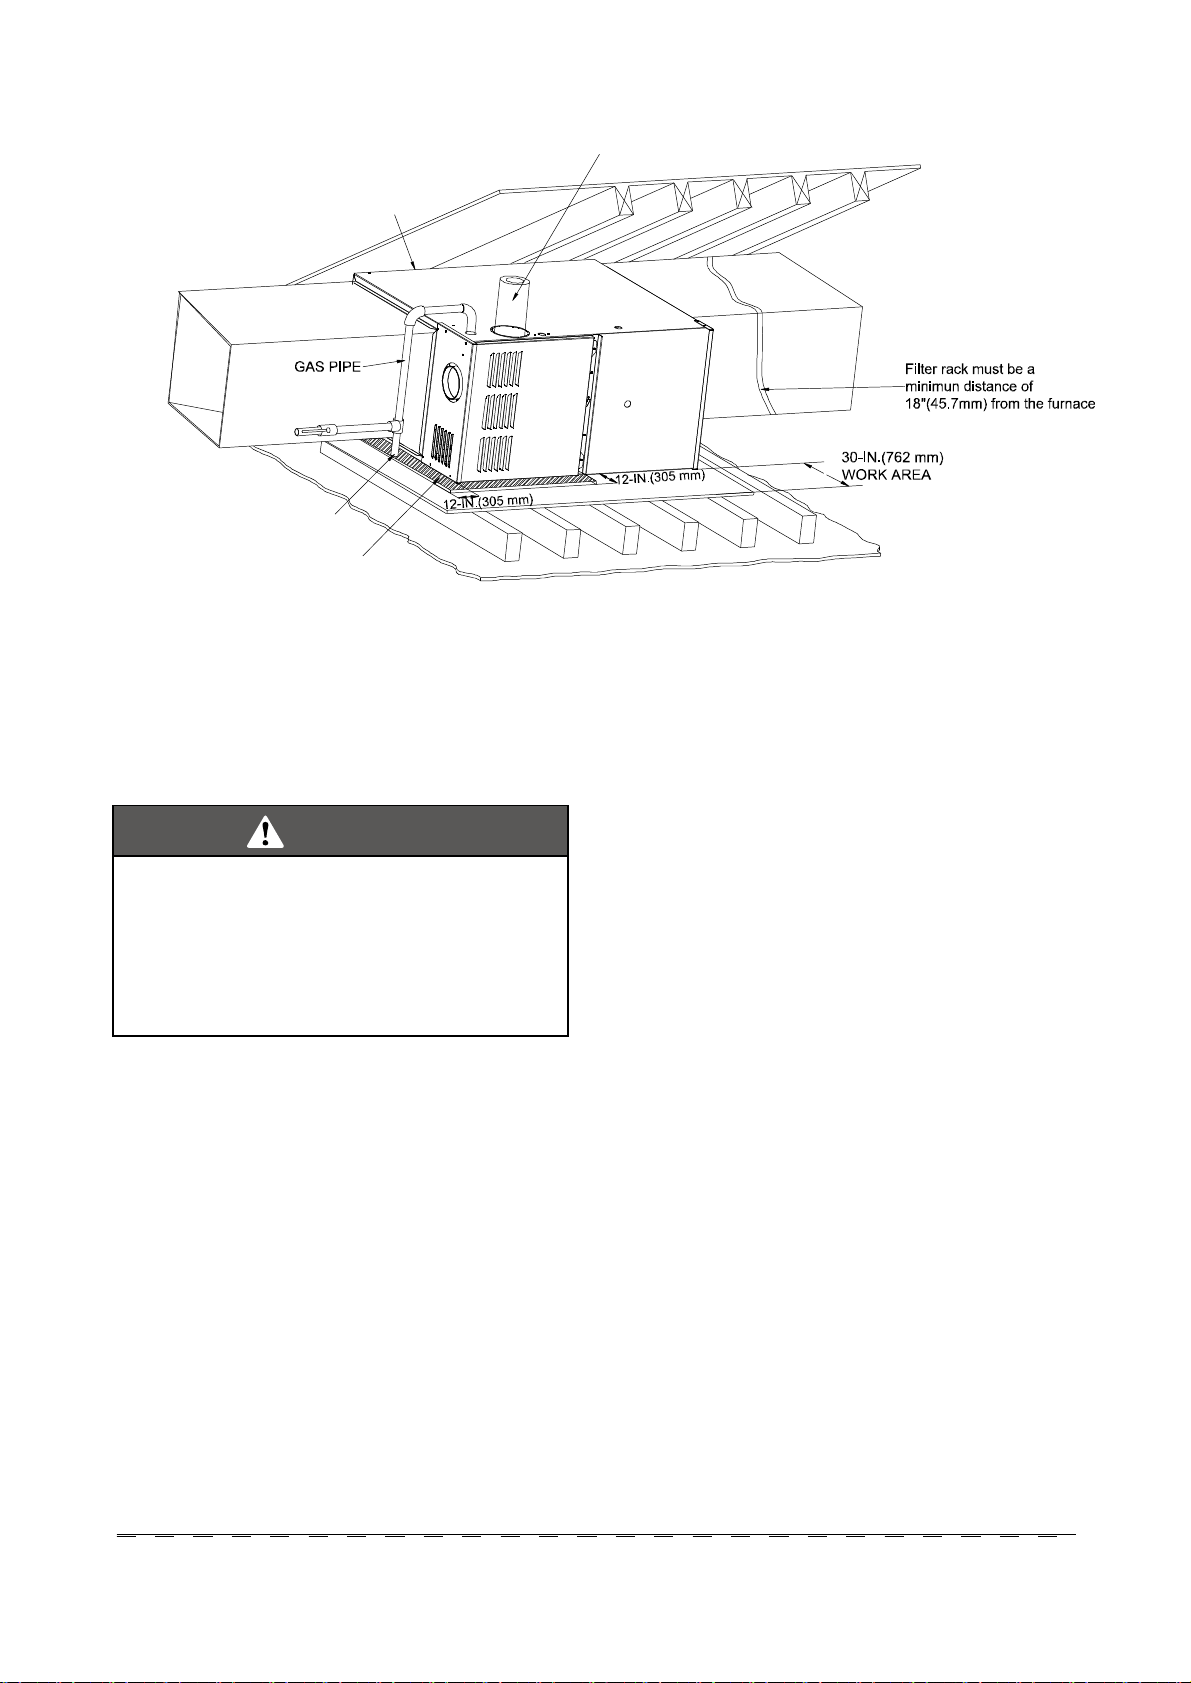
Supply Air
LINE CONTACT ONLY PERMISSIBLE BETWEEN
LINES FORMED BY INTERSECTIONS OF
THE TOP AND TWO SIDES OF THE FURNACE
JACKET AND BUILDING JOISTS ,
STUDS , OR FRAMING.
SEDIMENT
TRAP
Sheet metal in front of furnace
combustion air Openings is
Recommended
Fig. 11 - Typical Attic Installation
VENT(Maintain required clearances to
combustibles)
Return Air
êòí ر®·¦±²¬¿´ ײ-¬¿´´¿¬·±²
WARNING
FIRE, EXPLOSION, AND CARBON MONOXIDE
POISONING HAZARD
Failure to follow this warning could result in personal injury,
death, and/or property damage.
Do not install the furnace on its back or hang furnace with
control compartment facing downward. Safety control operation
will be adversely affected. Never connect return-air ducts to the
back of the furnace.
The furnace can be installed horizontally in an attic or crawl space
on bottom or either the left-hand (LH) or right-hand (RH) side. The
furnace can be hung from floor joists, rafters or trusses or installed
on a non-combustible platform, blocks, bricks or pad.
Suspended Furnace Support
The furnace may be supported under each end with threaded rod,
angle iron or metal plumber's strap as shown. (See Fig. 9 and 10.)
Secure angle iron to bottom of furnace as shown. Heavy-gauge
sheet metal straps (plumber's straps) may be used to suspend the
furnace from each bottom corner. To prevent screws from pulling out,
use 2 #8 x 3/4-in. screws into the side and 2 #8 x 3/4-in. screws in
the bottom of the furnace casing for each strap. (See Fig. 9 and 10.)
If the screws are attached to ONLY the furnace sides and not the
bottom, the straps must be vertical against the furnace sides and not
pull away from the furnace sides, so that the strap attachment
screws are not In tension (are loaded in shear) for reliable support.
Platform Furnace Support
Construct working platform at location where all required furnace
clearances are met. (See Fig. 2 and 11.) For furnaces with 1-in.
clearance requirement on side, set furnace on noncombustible
blocks, bricks or angle iron. For crawl space installations, if the
furnace is not suspended from the floor joists, the ground
underneath furnace must be level and the furnace set on blocks or
bricks.
Roll-Out Protection
Provide a piece of sheet metal for flame roll-out protection in front of
burner area for furnaces closer than 12-in. (305 mm) above the
combustible deck or suspended furnaces closer than 12-in. (305
mm) to joists. The sheet metal MUST extend underneath the furnace
casing by 1-in. (25 mm) with the door removed.
The bottom closure panel on furnaces of widths 12in. (305 mm) and
larger may be used for flame roll-out protection when bottom of
furnace is used for return air connection. See Fig. 11 for proper
orientation of roll-out shield.
I&O manual
I&O manual
ïð
ïð
Page 13

Vent the furnace with the appropriate connector as shown in Fig. 12-18.
Fig. 12 - Downflow Application- Vent Elbow Up then Left
Fig. 14 -Horizontal Left Application-Vent Elbow Up
Fig. 13- Downflow Application- Vent Elbow Up then Right
Fig. 15 -Horizontal Right Application-Vent Elbow Up
Fig. 16 -Upflow Application-Vent
Elbow Left
Fig. 17 -Upflow Application-Vent
Elbow Up
Fig. 18 -Upflow Application-Vent
Elbow Right
I&O manual
ïï
Page 14

êòì Ú·´¬»® ß®®¿²¹»³»²¬ êòë ß·® Ü«½¬-
General Requirements
WARNING
CARBON MONOXIDE AND POISONING HAZARD
Failure to follow this warning could result in personal injury, or
death.
Never operate a furnace without a filter or with filter access door
removed.
FILTER SIZE
See recommended filter size and type in Table 4.
One of the most common causes of a problem in furnace is a blocked
or dirty filter. The filter must be inspected monthy for dirt accumulation
and replace it if neccessarily.
FILTER TYPE
Air velocity through throwaway filters may not exceed 300 feet per
minute (91.4m/min). All velocities over this require the use of hight
velocity filters. If a normal speed desposable filter is used and air
speed exceeds 300 feet per minute(FPM), two side returns or one
side return and the bottom return may be needed. For airflow, refer to
Table 3.
If disposable filters are used air throw away passage through filters
should be increased to twice the size of original air opening by using
a transition duct or using two filters in V shap in normal duct size.
SIDE RETURN
Locate the 4 cutout locations. These indicate the size of the cut-out
to be made in the furnace side panel. Refer to Fig 19, "Side Return
Cutout Markings".
Frontof
Furnace
Corner
Markings
Fig. 19 Side Return Cutout Markings
Install the side filter rack followi ng the instructions provided with that
accessory. If a filter(s) is provided at another location in the return air
system, the ductwork may be directly attached to the furnace side
panel.
IMPORTANT:
pleated media may require a larger side opening. Follow the instructions supplied with that accessory for side opening requirements.
Downflow Filters
Downflow furnaces typically are inst alled with the filters located above
the furnace, extending into the re turn air plenum or duct. Any branch
duct (rectangular or round duct) attached to the plenum must attach to
the vertical plenum above the filter height.
Filter(s) may be located in the duct system external to the furnace using
an external duct filter box attached to the furnace plenum or at the end
of the duct in a return filter grille(s). The use of straps and/or supports is
required to support the weight of the external filter box.
I&O manual
Some accessories such as electronic air cleaners and
The duct system should be designed and sized according to accepted
national standards such as those published by: Air Conditioning
Contractors Association (ACCA), Sheet Metal and Air Conditioning
Contractors National Association (SMACNA) or American Society of
Heating, Refrigerating and Air Conditioning Engineers (ASHRAE) or
consult The Air Systems Design Guidelines reference tables available
from your local distributor. The duct system should be sized to handle
the required system design CFM at the design external static
pressure. The furnace airflow rates are provided in Table 6-AIR
DELIVERY -CFM (Without Filter).
When a furnace is installed so that the supply ducts carry air
circulated by the furnace to areas outside the space containing the
furnace, the return air shall also be handled by duct(s) sealed to the
furnace casing and terminating outside the space containing the
furnace.
Secure ductwork with proper fasteners for type of ductwork used.
Seal supply and return-duct connections to furnace with code
approved tape or duct sealer.
NOTE: Flexible connections should be used between ductwork and
furnace to prevent transmission of vibration. Ductwork passing
through unconditioned space should be insulated and sealed to
enhance system performance. When air conditioning is used, a
vapor barrier is recommended.
Maintain a I-in. (25 mm) clearance from combustible materials to
supply air ductwork for a distance of 36 in. (914 mm) horizontally
from the furnace. See NFPA 90B or local code for further
requirements.
Ductwork Acoustical Treatment
NOTE: Metal duct systems that do not have a 90 degree elbow and
10 ft. (3 M) of main duct to the first branch take-off may require
internal acoustical lining. As an alternative, fibrous ductwork may be
used if constructed and installed in accordance with the latest edition
of SMACNA construction standard on fibrous glass ducts. Both
acoustical lining and fibrous ductwork shall comply with NFPA 90B
as tested by UL Standard 181 for Class 1 Rigid air ducts.
Supply Air Connections
For a furnace not equipped with a cooling coil, the outlet duct shall
be provided with a removable access panel. This opening shall be
accessible when the furnace is installed and shall be of such a size
that the heat exchanger can be viewed for possible openings using
light assistance or a probe can be inserted for sampling the
airstream. The cover attachment shall prevent leaks.
Upflow and Horizontal Furnaces
Connect supply-air duct to flanges on furnace supply-air outlet. Bend
flange upward to 90° with wide duct pliers. The supply-air duct must
be connected to ONLY the furnace supply-outlet-air duct flanges or
air conditioning coil casing (when used). DO NOT cut main furnace
casing side to attach supply air duct, humidifier, or other
accessories. All accessories MUST be connected to duct external to
furnace main casing.
NOTE: For horizontal applications, the top-most flange may be bent
past 90 degrees to allow the evaporator coil to hang on the flange
temporarily while the remaining attachment and sealing of the coil
are performed.
Downflow Furnaces
Connect supply-air duct to supply-air outlet on furnace. Bend flange
inward past 90° with wide duct pliers. The supply-air duct must be
connected to ONLY the furnace supplyoutlet or air conditioning coil
casing (when used). When installed on combustible material,
supply-air duct must be connected to ONLY the accessory subbase
or a factory approved air conditioning coil casing. DO NOT cut main
furnace casing to attach supply side air duct, humidifier, or other
accessories. All accessories MUST be connected to duct external to
furnace casing.
ïî
Page 15

Table 3 - Air Delivery - CFM (Without Filter)
#
*
**
FURNACE
SIZE
50A
70A
80B
80C
90B
100C
110C
100D
120D
135D
RETURN-AIR
INLET
Bottom or
Sides
Bottom or
Sides
Bottom or
Sides
Bottom or
Sides
Bottom or
Sides
Bottom or
Sides
Bottom or
Sides
Bottom or
Sides
Bottom or
Sides
Bottom or
Sides
SPEED
H
H-M
M-L
**
L
H
H-M
**
M-L
L
H
H-M
**
M-L
L
H
H-M
**
M-L
L
H
H-M
**
M-L
L
H
H-M
**
M-L
L
H
H-M
**
M-L
L
H
H-M
**
M-L
L
H
H-M
**
M-L
L
H
H-M
**
M-L
L
0.1
1460
1210
1080
780
1415
1145
1015
740
1880
1680
1440
1190
1863
1625
1351
1096
1880
1680
1440
1190
2180
1760
1570
1410
2180
1760
1570
1410
2360
1800
1560
1360
2320
1790
1550
1360
2271
2265
1727
1516
0.2
1420
1170
1050
760
1355
1100
975
710
1810
1620
1390
1150
1816
1583
1315
1062
1810
1620
1390
1150
2070
1710
1540
1370
2070
1710
1540
1370
2280
1760
1540
1340
2240
1750
1520
1350
2188
2188
1677
1477
0.3
1370
1140
1010
730
1300
1050
930
680
1730
1560
1340
1110
1763
1534
1281
1041
1730
1560
1340
1110
1960
1660
1490
1340
1960
1660
1490
1340
2200
1720
1500
1330
2160
1700
1490
1330
2112
2101
1620
1436
EXTERNAL STATIC PRESSURE (IN.WC)
0.4
1320
1090
960
700
1240
1000
885
645
1650
1500
1290
1070
1709
1479
1246
1012
1650
1500
1290
1070
1890
1600
1440
1310
1890
1600
1440
1310
2120
1670
1460
1290
2060
1660
1450
1310
2016
2006
1568
1386
0.5
1260
1030
960
670
1165
940
840
605
1580
1430
1240
1020
1645
1428
1200
968
1580
1430
1240
1020
1810
1520
1380
1250
1810
1520
1380
1250
2020
1600
1420
1250
1980
1610
1430
1280
1939
1917
1513
1335
0.6
1200
970
870
630
1100
880
785
555
1500
1350
1170
950
1569
1356
1142
919
1500
1350
1170
950
1720
1460
1310
1200
1720
1460
1310
1200
1920
1530
1360
1210
1890
1540
1360
1220
1837
1832
1442
1268
0.7 0.8
1120
910
810
580
1010
820
730
500
1430
1270
1080
870
1483
1288
1071
841
1430
1270
1080
870
1620
1360
1240
1130
1620
1360
1240
1130
1810
1460
1300
1150
1780
1460
1300
1160
1737
1732
1368
1195
1040
840
750
510
935
750
660
430
1330
1160
970
750
1381
1190
970
738
1330
1160
970
750
1500
1260
1150
1040
1500
1260
1150
1040
1700
1360
1210
1070
1670
1360
1210
1070
1628
1622
1263
1095
0.9
950
760
670
390
850
670
575
345
1210
1020
810
640
1234
1059
831
638
1210
1020
810
640
1370
1140
1040
940
1370
1140
1040
940
1600
1240
1090
920
1540
1220
1110
960
---
---
---
---
1.0
860
780
550
---
750
565
475
240
990
800
640
530
1059
849
695
566
990
800
640
530
1230
1130
910
810
1230
1130
910
810
1460
1030
890
760
1360
1060
960
830
---
---
---
---
A filter is required for each return -air Inlet. Airflow performance Included 3/4-ln. (19 mm) washable filter media such as contained In
*
factory-authorized accessory filter rack. To determine airflow performance with this filter, assume an additional 0.1 in. wc available external static
pressure.
Manufacturer default speed tap for heating.
**
# CSA tested at Max. external static pressure 0.5 in W.C.
Table 4 - Filter Size Information - In. (mm)
FURNACE CASING WIDTH
14-1/2(368)
17-1/2(445)
21(533)
24.5(622)
FILTER SIZE
SIDE RETURN BOTTOM RETURN
16X25
(406X635)
16X25
(406X635)
16X25
(406X635)
16X25
(406X635)
14X25
(356X635)
16X25
(406X635)
20X25
(508X635)
24X25
(610X635)
FILTER TYPE
High Velocity (600 FPM)
High Velocity (600 FPM)
High Velocity (600 FPM)
High Velocity (600 FPM)
I&O manual
ïí
Page 16

й КЫТМ НЗНМЫУ
éòï Ê»²¬ ݱ²²»½¬·±²-
Fig. 20 , “Combustion Air Inducer” shows the furnace as it is shipped
from the factory. To convert to a horizontal or downflow position,
remove the four screws that secure the inducer assembly and rotate 90
being careful not to damage the gasket. Reinstall screws. Remove cap
from appropriate vent outlet location on the cabinet cut insulation in
cabinet to same size as the hole provided and reinstall cap in the hole in
the top panel.
IMPORTANT
In downflow applications, do not block the combustion air inlet.
The furnace must be installed on a coil cabinet or subbase to
allow combustionair to enter the burner compartment.
éòí Ê»²¬·²¹ ײ¬± ß² Û¨·-¬·²¹ ݸ·³²»§
This furnace may not be connected to any masonry chimney. However,
an existing masonry chimney may be used on as a chase through which
the metal vent pipe passes.
éòì ß·® Ú±® ݱ³¾«-¬·±² ¿²¼ Ê»²¬·´¿¬·±²
йтмтп Я³¾·»²¬ Э±³¾«-¬·±² Я·® Н«°°´§
This type installation will draw the air required for combustion from
within the space surrounding the appliance and from areas or rooms
adjacent to the space surrounding the appliance. This may be from
within the space in a non-confined location or it may be brought into
the furnace area rom outdoors through permanent openings or ducts.
A single, roperly sized pipe from the furnace vent connector to the
outdoors must be provided. For upflow models combustion air is
brought into the furnace through the unit top panel opening.
90
Flue Transition
90
(Do Not Remove)
Mounting Screw (Remove)
Fig . 20
Combustion Air Inducer
ЭЯМЫЩСОЗ п у млр Ът УЯИт КЫТМ МЫУРт
The venting system must be installed in accordance with Section 5.3
Air for combustion and Ventilation, of the National Fuel Gas Code
Z223.1/NFPA 54 (latest edition), or Sections 7.2, 7.3 or 7.4 of CSA
B149.1, National Gas and Propane Codes (latest edition) or applicable
provisions of the local building code and these instructions.
̸» º«®²¿½» -¸¿´´ ¾» ½±²²»½¬»¼ ¬± ¿ ¬§°» Þ ª»²¬ ½±²²»½¬±®ô ̸» º«®²¿½» -¸¿´´ ²±¬
¾» ½±²²»½¬»¼ ¬± ¿ ½¸·³²»§ º´«» -»®ª·²¹ ¿ -»°¿®¿¬» ¿°°´·¿²½» ¼»-·¹²»¼ ¬± ¾«®²
-±´·¼ º«»´ò Í·²¹´»ó©¿´´ ª»²¬ °·°» ·- ²±¬ ¿´´±©»¼ò
It is recommended that the appliance is installed in a location where the
space temperature is 32 °F( 0 °C) or higher. If the appliance is installed
in a location where the temperature is below 32 °F (0 °C) , the combustion
byproducts could condense causing damage to the appliance heat
exchanger.
This appliance may be common vented with another gas appliance for
residential installations as allowed by the codes and standards listed in
these instructions.
éòî Ê»²¬·²¹
Category I venting consists of vertically venting one or more appliances
in B-vent or B-vent connectors. Type B-vent system extends in a general vertical direction and does not contain offsets exceeding 45° .
A vent system having not more than one 60° offset is permitted.
Gas
Attic
TopAbove
Insulation
Outlet
Air(a)
Vent
Soffit
Vent
Gable
Vent
Ventilated
Attic
TopAbove
Insulation
Soffit
Vent
Gable
Vent
Optional
Inlet(a)
Ventilated
Combustion Air
Fig. 21: Combustion Airflow Path Through The Furnace Casing to
the Burner Box
WARNING
This type of installation requires that the supply air to the appliance(s) be of a sufficient amount to support all of the appliance(s) in
the area. Operation of a mechanical exhaust, such as an exhaust
fan, kitchen ventilation system, clothes dryer or fireplace may create conditions requiring special attention to avoid unsatisfactory
operation of gas appliances. A venting problem or a lack of supply air will result in a hazardous condition, which can cause the appliance to soot and generate dangerous levels of CARBON MINOXIDE, which can lead to serious injury, property damage and I or
death.
An
«²½±²º·²»¼ -°¿½»
(0.2928 kW) input rating for all of the appliances installed in that area.
Rooms communicating directly with the space containing the appliances
through openings not furnished with doors, are considered a part of the
unconfined space.
In unconfined spaces (see definition below) in buildings, infiltration may
be adequate to provide air for combustion ventilation and dilution of flue
gases. However, in buildings of tight construction (for example, weather
stripping, heavily insulated, caulked, vapor barrier, etc.), additional air
may need to be provided using the methods described in “An confined
space” section.
An
½±²º·²»¼ -°¿½»
Btu/hr (0.2928 kW) input rating for all of the appliances installed in that
area. The following must be considered to obtain proper air for combustion and ventilation in confined spaces.
Gas
Vent
is not less than 50 cu.ft (1.42m3) per 1,000Btu/hr
is an area with less than 50 cu . ft (1.42m3) per 1,000
Gas
Vent
Outlet
Air(b)
Outlet
Air(a)
I&O manual
ïì
Gas
Water
Heater
Ventilated
CrawlSpace
Gas
Inlet
Air(b)
Water
Heater
Fig. 22 Outside and Ambient Combustion Air
Inlet
Air(a)
Inlet
Air(b)
Gas
Water
Heater
Inlet
Air(a)
Page 17

WARNING
When a Category I furnace is removed or replaced, the original
venting system may no longer be correctly sized to properly vent
the attached appliances.
An improperly sized vent system can cause CARBON MONOXIDE
to spill into the living space causing personal injury, and or death.
Û¯«·°³»²¬ Ô±½¿¬»¼ ·² ݱ²º·²»¼ Í°¿½»-æ
a) All air from inside the building:
The confined space shall be provided with two permanent openings
communicating directly with an additional room(s) of sufficient volume
so that the combined volume of all spaces meets the criteria. The total
input of all gas utilization equipment installed in the combined space
shall be considered in making this determination. Each opening shall
have a minimum free area of 1 square inch per 1,000BTU per hour of
the total input rating of all gas utilization equipment in the confined sp ace. One opening shall be within 12 inches of the top and one within
12 inches of the bottom of the enclosure (See Table 5).
Table 5 : Minimum Area in Square Inch Required for Each Opening
BTUH Input Rating
50,000
70,000
80,000
90,000
100,000
110,000
120,000
135,000
Minimum Free Area in Square Inch
Required for Each Opening
50 in (322 cm
70 in (450 cm
80 in (516 cm
90 in (580 cm
100 in (645 cm
110 in (708 cm
120 in (742 cm
135 in (871 cm
2 2
)
2 2
)
2 2
)
2
2
)
2
2
)
2
2
)
2
2
)
2
2
)
a. 1 square in per 3000 Btu per hour (734 mm2/kW) of the total
input rating of all equipment located in the enclosure.
b.Not less than the sum of all vent connectors in the confined
3.The duct shall be least the same
space.
cross-sectional area as the free
area of the air supply inlet opening to which it connects.
4.The blocking effects of louvers, grilles and screens must be given
consideration in calculating free area. If the free area of a specific
louver aor grille is not known. Refer to Table ,“Estimated Free
Area” to estimated free area.
Table 7 : Estimated Free Area
Wood or Metal
Louvers or Grilles
Screens +
Wood 20-25%
Metal 60-70%
1/4” (0.635cm)
mesh or larger 100%
5.An opening may be used in lieu of a duct to provide to provide the
outside air supply to an appli ance unless otherwise permitted by
the authority having jurisdiction. The opening shall be located
within 12” (30.5 cm) horizontally from the burner level of the appliance. Refer to “COMBUSTIO N AIR SOURCE FROM OUTDOORS
and VENT AND SUPPLY AIR SAFETY CHECK” in these instructions for additional informati on and safety check procedure.
éòê Ê»²¬·´¿¬»¼ ݱ³¾«-¬·±² ß·®
The ventilated attic space or a crawl space from which the combustion
air is taken must comply with the requirements specified in “
Air Source from Outdoors
” in this instruction or in Section 7.4, Air
for Combustion and Ventilation of the National Fuel Gas Code, ANSI
Z223.1 (latest edition). This type in stallation requires two properly sized
pipes. One brings combustion air from
a properly ventilated attic space
or crawl space and a second pipe that extends from the furnace vent
connection (top right of unit) to the exterior of the building.
Combustion
b) All air from outdoors:
Table 6 : Minimum Free Area Required for Each Opening
Minimum Free Area Required for Each Opening
BTUH Input
Rating
50,000
70,000
80,000
90,000
100,000
110,000
120,000
135,000
Horizontal Duct
(2,000 BTUH)
25 in 2 (129 cm 2 )12.5 in 2 (81 cm 2 )
35 in 2 (226 cm )
40 in 2 (258 cm 2 )20 in 2 (129 cm 2 )
45 in 2 (290 cm ) 2 22.5 in 2 (145 cm 2 )
50 in 2 (323 cm 2 )25 in 2 (161 cm 2 )
55 in 2 (355 cm )
60 in 2 (387 cm 2 )30 in
70 in 2 (452 cm )
Vertical Duct or
Opening to Outside
(4,000 BTUH)
2
2
2
2
17.5 in
2
27.5 in
2
35 in 2 (226 cm 2 )
(113 cm 2 )
(178 cm 2 )
(194 cm 2 )
Round Duct
(4,000 BTUH)
4” (10 cm)
5” (13 cm)
5” (13 cm)
6” (15 cm)
6” (15 cm)
7” (18 cm)
7” (18 cm)
7” (18 cm)
EXAMPLE: Determining Free Area.
Appliance 1 Appliance 2 Total Input
100,000 +30,000 = (130,000 4,000) = 32.5 Sq. In. Vertical
Appliance 1 Appliance 2 Total Input
100,000 +30,000 = (130,000 2,000) = 65 Sq. In. Horizontal
éòë ß·® Í«°°´§ Ñ°»²·²¹- ¿²¼ Ü«½¬-
1.Two permanent openings, one within 12 in (305 mm) of the top
and one within 12 in (305 mm) of bottom of the confined space,
Two permanent openings, shall communi cate directly or by means
of ducts with the outdoors, crawl spaces or attic spaces.
2.One permanent openings, commencing within 12 in (305 mm)of
the top of the enclosure shall be permitted where the equipment
has clearances of at least 1 in (25.4 mm) from the sides and back
and 6 in (152.4 mm) from the front of the appliance. The opening
shall communicate directly with the outdoors and shall have a minimum free area of:
éòé Ê»²¬ ¿²¼ Í«°°´§ øÑ«¬-·¼»÷ ß·® Í¿º»¬§ ݸ»½µ Ю±½»¼«®»
For Category I furnaces, vent installations shall be in accordance with
Parts 7 and 11 of the National Fuel Gas Code, ANSI Z223.1/NFPA 54
and or Section 7 and Appendix B of the CAS B 149.1, Natural Gas and
Propane Installation Codes, the local building codes, furnace and vent
Multi-story or common venting systems are permitted and must be
installed in accordance with the National Fuel Gas Code,
ANSI Z223.1/NFPA 54 and / or the CSA B 149.1, Natural Gas and
Vent connectors serving Category I furnaces shall not be connected
into any portion of mechanical draft systems operating under positive
pressure.
I&O manual
ïë
Page 18

Horizontal portions of the venting system shall be supported to prevent sagging using hangers or perforated straps and must slope upwards
not less than 1/4” per foot (0.635 cm/m) from the furnace to the vent terminal.
It is recommended that you follow the venting safety procedure below. This procedure is designed to detect an inadequate ventilation system
that can cause the appliances in the area to operate improperly causing unsafe levels of Carbon Monoxide or an unsafe condition to occur.
WARNING
ЭЯОЮСТ УСТСИЧЬЫ РСЧНСТЧТЩ ШЯЖЯОЬ
Failure to follow the steps outlined below for each appliance connected to the venting system being placed into operation could result in carbon
-monxide poisoning or death. The following steps shall be followed for each appliance connected to the venting system being placed into operation, while all other appliances connected to the venting system are not in operation:
1. Inspect the venting system for proper size and horizontal pitch. Determine that there is no blockage, restriction, leakage, corrosion or other
deficiencies, which could cause an unsafe condition
2. Close all building doors and windows and all doors.
3. Turn on clothes dryers and TURN ON any exhaust fans, such as range hoods and bathroom exhausts, so they shall operate at maximum
speed. Open the fireplace damper. Do not operate a summer exhaust fan.
4. Follow the lighting instructions. Place the appliance being inspected in operation. Adjust thermostat so the appliance shall operate
continuously.
5. Test each appliance (such as a water heater) equipped with a draft hood for spillage (down-draft or no draft) at the draft hood relief opening
after 5 minutes of main burner operation. Appliances that do not have draft hoods need to be checked at the vent pipe as close to the
appliance as possible. Use a combustion analyzer to check the CO2 and CO levels o each appliance. Use a draft gauge to check for a
downdraft or inadequate draft condition.
6. After it has been determined that each appliance properly vents when tested as outlined above, return doors, windows, exhaust fans,
fireplace dampers and any other gas burning appliance to their normal condition.
7. If improper venting is observed during any of the above tests, a problem exists with either the venting system or the appliance does not
have enough combustion air (Supply Air from outside) to complete combustion. This condition must be corrected before the appliance can
function safely.
NOTE: An unsafe condition exists when the CO reading exceeds 40 ppm and the draft reading is not in excess of -0.1 in. W.W.(-25 kPa) with
all of the appliance(s) operating at the same time.
8. Any corrections to the venting system and / or to the supply (outside) air system must be in accordance with the National Fuel Gas Code
Z223.1 or CAN/CGA B149.1 Natural Gas and Propane Installation Code (latest editions). If the vent system must be resized, follow the
appropriate tables in Appendix G of the above codes or for this appliance.
и ЩЯН НЛРРФЗ ЯТЬ РЧРЧТЩ
WARNING
FIRE OR EXPLOSION HAZARD
Failure to follow this warning could result in personal injury,
death, and/or property damage.
Never purge a gas line into a combustion chamber. Never test
for gas leaks with an open flame. Use a commercially available
soap solution made specifically for the detection of leaks to
check all connections.
WARNING
FIRE OR EXPLOSION HAZARD
Failure to follow this warning could result in personal injury,
death, and/or property damage.
Use proper length of pipe to avoid stress on gas control
manifold and a gas leak.
CAUTION
FURNACE OVERHEAT HAZARD
Failure to follow this caution may result in property damage.
Connect gas pipe to gas valve using a backup wrench to avoid
damaging gas controls and burner misalignment.
WARNING
FIRE OR EXPLOSION HAZARD
Failure to follow this warning could result in personal injury,
death, and/or property damage.
If local codes allow the use of a flexible gas appliance connector, always use a new listed connector. Do not use a connector
which has previously served another gas appliance. Black iron
pipe shall be installed at the furnace gas control valve and
extend a minimum of 2 in. (51 mm) outside the furnace.
èòï Ù»²»®¿´
The furnace rating plate includes the approved furnace gas input
rating and gas types. The furnace must be equipped to operate
on the type of gas applied. This includes any conversion kits
required for alternate fuels and/or high altitude.
Inlet gas supply pressures must be maintained within the ranges
specified in Table 8. The supply pressure must be
constant and available with all other household gas fired
appliances operating. The minimum gas supply pressure must
be maintained to prevent unreliable ignition. The maximum must
not be exceeded to prevent unit overfiring.
Table 8 - Inlet Gas Supply Pressure
Inlet Gas Supply Pressure
Natural Gas
Propane Gas
Minimum:5.0" W.C.Maximum:10.5" W.C.
Minimum:11.0" W.C.Maximum:13.0" W.C.
I&O manual
ïê
Page 19

NOTE: Adjusting the minimum supply pressure below the limits
3 49 57 50 58 51 59 52
61 53 62
5 48 56
49 57 50
58 51
60 52
61
6 48 56
49 57 50
58 51
60 52
61
6 49 57 50 58 51 59 52
61 53 62
7 49 57 50 58 51 59 52
61 53 62
5 49 57 50 58 51 59 52
61 53 62
3 48 56
49 57 50
58 51
60 52
61
8 49 57 50 58 51 59 52
61 53 62
in the above table could lead to unreliable ignition. Gas input to
the burners must not exceed the rated input shown on the rating
plate. Overfiring of the furnace can result in premature heat
exchanger failure. Gas pressures in excess of 13 inches water
column can also cause permanent damage to the gas valve.
At all altitudes and with either fuel the air temperature rise must
be within the range listed on the furnace nameplate. Should this
appliance be converted to LP refer to the instructions included in
the factory authorized LP conversion kit.
Table 9 High Altitude Derate Orifice Size Chart (Natural and LP Gas*)
US Installation
Input Rate Number of
KBTU/H Burner
50
70
80
90
100
110
120
135
*LP orifice based on 10 inWC manifold pressure
The input to the furnace must be checked AFTER reorificing.
3 48 56 49 57 50 58 51 60 52 61
5 49 57 50 58 51 59 52 61 53 62
8 49 57 50 58 51 59 52 61 53 62
Elevation (Ft)
0-2000
Nat LP Nat LP Nat LP Nat LP Nat LP
Elevation (Ft)
2000-4000
èòî Ø·¹¸ ß´¬·¬«¼» Ü»®¿¬»
Alternately standard derate for altitude from National Fuel Gas
Code ANSI Z223.1 of 4% per 1000' may be taken. Refer to the
most recent version of ASNI Z223.1 for correct gas orifice. The
orifices must be selected using the table below. The furnace
derate is 4% for each 1,000 feet above sea level. This table is
based upon a heating value of approximately 1,000 Btu/ft3.
In Canada ,the input rating must be derated by 10 percent for
altitudes of 2,000 ft. (610m) to 4,500 feet (1370m) above sea level
by an authorized Gas Conversion Station or Dealer.
When an appliance is installed at elevations above 4500ft (1350m),
the certified high-altitude input rating shall be reduces at the rate of
4% for each additional 1000ft (300m).
In some areas the gas supplier may artificially derate the gas in an
effort to compensate for the effects of altitude. If the gas is artificially
derated, the appropriate orifice size must be determined based upon
the BTU/ft3 content of the derated gas and the altitude. Refer to the
latest version of NFPA54/ANSI Z223.1 for US and the latest version
of CSA B149.1 for Canada., and information provided by the gas
supplier to determine the proper orifice size.
Elevation (Ft)
4000-6000
Elevation (Ft)
6000-8000
Elevation (Ft)
8000-10000
Table 10 High Altitude Derate Orifice Size Chart (Natural and LP Gas*)
Canada Installation
Input Rate Number of
KBTU/H Burner
50
70
80
90
100
110
120
135
*LP orifice based on 10 inWC manifold pressure
The input to the furnace must be checked AFTER reorificing.
3 49 57 50 58 51 59 52 61 53 62
5 48 56 49 57 50 58 51 60 52 61
6 49 57 50 58 51 59 52 61 53 62
6 48 56 49 57 50 58 51 60 52 61
7 49 57 50 58 51 59 52 61 53 62
Elevation (Ft)
0-2000
Nat LP Nat LP Nat LP Nat LP Nat LP
Elevation (Ft)
2000-4500
Elevation (Ft)
4500-6000
Elevation (Ft)
6000-8000
Elevation (Ft)
8000-10000
I&O manual
ïé
Page 20

èòí Ю±°¿²» Ù¿- ݱ²ª»®-·±²
Possible property damage personal injury or death may occur if the
correct conversion kits are not installed. the appropriate kits must be
applied to insure safe and proper furnace operation. all conversions
must be performed by a qualified installer or service agency.
This unit is configured for natural gas. The appropriate manufacturer's
propane gas conversion kit (PRT. NO. 202082290028 ), must be
applied for propane gas installations. High Altitude Installations refer
to the "High Altitude Derate" section for details.
Contact your distributor for a tabular listing of appropriate
manufacturer's kits for propane gas and/or high altitude installations.
The indicated kits must be used to insure safe and proper furnace
operation. All conversions must be performed by a qualified installer,
or service agency.
The gas supply shall be shut off prior to disconnecting the electrical
power before proceeding with conversion
1.Make sure all utilities (gas and electricity) are turned off
2.Remove the furnace front panel
3.Disconnect the gas line from the gas valve
4.Disconnect the wires at gas control.
̱ λ°´¿½» Ñ®·º·½»- ©·¬¸ ÔÐ Ñ®·º·½»- Ú®±³ Ù¿- Ó¿²·º±´¼æ
See Fig.23.
1.Disconnect all control wires
2.Remove 4 screws holding gas manifold to supporting burner
assembly bracket
3.Slide the manifold (with valve and orifices) out of burners. Be careful
not to damage the assembly.
4.Replace the natural gas orifices with the LP orifices or appropriate
high altitude orifices (refer to Section High Altitude Installation)
5.Re-assemble the gas manifold and re-connect all wires.
̱ ݱ²ª»®¬ Ú®±³ Ò¿¬«®¿´ ¬± ÔÐ Ù¿- ±² Ù¿- Ê¿´ª»
1.Remove regulator (gas valve) cover screw
2.Remove regulator adjustment screw (beneath the cover screw)
3.Remove natural gas spring from regulator sleeve.
4.Insert the LP spring included in the conversion kit into sleeve
5.Replace the adjustment screw and adjust the outlet pressure to
10.5 and 10.6 for outlet pressure tap location and pressure measurement)
6.Replace the regulator cover screw
7.Attach the WARNING label (provided in the kit) to the gas valve,
attach small round LP label to the top of regulator cover screw.
8.Fill required blanks in provided conversion label and attach it to
appropriate location on furnace case.
èòì Ù¿- з°·²¹ ݱ²²»½¬·±²-
To avoid possible unsatisfactory operation or equipment damage due
to underfiring of equipment, use the proper size of naturaupropane
gas piping needed when running pipe from the meter/tank to the
furnace.
When sizing a trunk line, be sure to include all appliances which
will operate simultaneously.(See Table 11)
The gas piping supplying the furnace must be properly sized based
on the gas flow required specific gravity of the gas and length of
the run. The gas line installation must comply with local codes or
in their absence Refer to the latest version of NFPA54/ANSI Z223.1
for US and the latest version of CSA B149.1 for Canada.
Table 11 -Т¿¬«®¿´Щ¿- Э¿°¿½·¬§ ±º Р·°» Ч² Э«¾·½ Ъ»»¬ ±º Щ¿- Р»® Ш±«® шЭЪШч
Nominal
iron pipe
size
in.(mm)
1/2(12.7)
Internal
DIA.
in.(mm)
0.622(15.8)
Length of pipe-ft(m)
10
(3.0)
175 120 97 82 73
20
(6.0)
30
(9.1)
40
(12.1)
50
(15.2)
Burner Box
Burner Orifices
Inlet
Fig. 23
Gas Valve
on/off Lever
Gas Manifold
3/4(19.0)
1(25.4)
1-1/4(31.8)
1-1/2(38.1)
0.60 Specific GravityGas)
To connect the furnace to the building's gas piping, the installer
must supply a ground joint union, drip leg, manual shutoff valve
and line and fittings to connect to gas valve. In some cases, the
installer may also need to supply a transition piece from 1/2" pipe
to a larger pipe size.
0.824(20.9)
1.049(26.6)
1.380(35.0)
1.610(40.9)
CFH=
Heating Value of Gas (BTU/Cubic Foot)
360 250 200 170 151
680 465 375 320 285
1400 950 770 660 580
2100 1460 1180 990 900
BTUH Furnace input
I&O manual
ïè
Page 21

The following stipulations apply when connecting gas piping.
Use black iron or steel pipe and fittings for the building piping.
Use pipe joint compound on male threads only. Pipe joint
compound must be resistant to the action of the fuel used.
Use ground joint unions.
Install a drip leg to trap dirt and moisture before it can enter the
gas valve. The drip leg must be a minimum of three inches long.
Install a 1/8" NPT pipe plug fitting, accessible for test gage
connection immediately upstream of the gas supply connection
to the furnace.
Use two pipe wrenches when making connection to the gas valve
to keep it from turning. The orientation of the gas valve on the
manifold must be maintained as shipped from the factory.
Install a manual shutoff valve between the gas meter and unit
within six feet of the unit. If a union is installed the union must
be downstream of the manual shutoff valve, between the shutoff
valve and the furnace.
Tighten all joints securely.
Connect the furnace to the building piping by one of the following
methods:
Rigid metallic pipe and fittings.
Semi-rigid metallic tubing and metallic fittings. Aluminum alloy
tubing must not be used in exterior locations.
Use listed gas appliance connectors in accordance with their
instructions. Connectors must be fully in the same room as the
furnace.
Protect connectors and semi-rigid tubing against physical and
thermal damage when installed. Ensure aluminum-alloy tubing
and connectors are coated to protect against external corrosion
when in contact with masonry, plaster, or insulation, or
subjected to repeated wetting by liquids such as water (except
rain water), detergents, or sewage.
When the gas piping enters through the right side of the furnace
the installer must supply the following fittings (starting from the
gas valve):
èòë Ù¿- з°·²¹ ݸ»½µ-
Before placing unit in operation, leak test the unit and gas connections.
WARNING
FIRE AND EXPLOSION HAZARD
Failure to follow this warning could cause personal injury, death
and/or property damage.
Never test for gas leaks with an open flame. Use a commercially available soap solution made specifically for the detection
of leaks to check all connections.
Check for leaks using an approved chloride-free soap and water
solution
an electronic combustible gas detector or other approved testing
methods.
NOTE: Never exceed specified pressures for testing. Higher
pressure may damage the gas valve and cause subsequent
overfiring resulting in heat exchanger failure.
Disconnect this unit and shutoff valve from the gas supply piping
system before pressure testing the supply piping system with
pressures in excess of 1/2 psig (3.48 kPa).
This unit must be isolated from the gas supply system by closing
its manual shutoff valve before pressure testing of gas supply
piping system with test pressures equal to or less than 1/2 psig
(3.48 kPa).
Location of Manual value
(Installed Ahead of Ground
Joint Pipe Union)
Height Required
By Local Code
Ground Joint Pipe Union
To Be Installed Ahead of
Gas Valve
Reducing Coupling
1/2” x 1/8” with 1/8”
Pipe Plug To Measure
Line Gas Pressure
Drip Leg
Fig. 24 - Typical Gas Pipe Arrangement
A ground joint union, drip leg, and manual shutoff valve must also
be supplied by the installer. In some cases, the installer may also
need to supply a transition piece from 1/2" to another pipe size.
When the gas piping enters through the left side of the furnace
the installer must supply the following fittings (starting from the
gas valve):
be supplied by the installer. In some cases, the installer may also
need to supply a transition piece from 1/2 inch to another pipe size.
, drip leg, and manual shutoff valve must also
I&O manual
ïç
Page 22

з ЫФЫЭМОЧЭЯФ ЭСТТЫЭМЧСТН
NOTE: Proper polarity must be maintained for 115V wiring. If polarity
is incorrect, control LED status indicator light will flash rapidly and
furnace will NOT operate.
WARNING
ELECTRICAL SHOCK HAZARD
Failure to follow this warning could result in personal injury or death.
Blower access panel door switch opens 115V power to control.
No component operation can occur. Do not bypass or close
switch with panel removed.
See Fig. 27 for field wiring diagram showing typical field 115V wiring.
Check all factory and field electrical connections for tightness.
Field-supplied wiring shall conform with the limitations of 63°F (35°C)
rise.
WARNING
ELECTRICAL SHOCK AND FIRE HAZARD
Failure to follow this warning could result in personal injury,
death, or property damage.
The cabinet MUST have an uninterrupted or unbroken ground
according to NEC ANSI/NFPA 70-2008 and Canadian Electrical
Code CSA C22.1 or local codes to minimize personal injury if an
electrical fault should occur.
This may consist of electrical wire, conduit approved for electrical ground or a listed, grounded power cord (where permitted
by local code) when installed in accordance with existing
electrical codes. Refer to the power cord manufacturer's ratings
for proper wire gauge. Do not use gas piping as an electrical
ground.
JUNCTION BOX RELOCATION
NOTE: If factory location of J-Box is acceptable, go to next section
(ELECTRICAL CONNECTION TO J-BOX).
NOTE: On 14" wide casing models, the J-Box shall not be relocated
to other side of furnace casing when the vent pipe is routed within the
casing.
1. Remove and save two screws holding J-Box. (See Fig. 24.)
NOTE: The J-Box cover need not be removed from the J-Box in order
to move the J-Box. Do NOT remove green ground screw inside
J-Box. The ground screw is not threaded into the casing flange and
can be lifted out of the clearance hole in casing while swinging the
front edge of the J-Box outboard of the casing.
2. Cut wire tie on loop in furnace wires attached to J-box.
3. Move J-Box to desired location.
4. Fasten J-Box to casing with two screws removed in Step 1.
5. Route J-Box wires within furnace away from sharp edges,
rotating parts and hot surfaces.
J-box cover
J-box
GND screw
Door switch
CAUTION
FURNACE MAY NOT OPERATE
Failure to follow this caution may result in intermittent furnace
operation.
Furnace control must be grounded for proper operation or else
control will lock out. Control must remain grounded through
green/yellow wire routed to gas valve and manifold bracket
screw.
çòï ïïëÊ ©·®·²¹
Verify that the voltage, frequency, and phase correspond to that
specified on unit rating plate. Also, check to be sure that service
provided by utility is sufficient to handle load imposed by this
equipment. Refer to rating plate or Table 8 for equipment electrical
specifications.
U.S. installations: Make all electrical connections in accordance with
National Electrical Code (NEC) ANSI/NFPA 70-2008 and any local
codes or ordinances that might apply. Canadian installations: Make
all electrical connections in accordance with Canadian Electrical
Code CSA C22.1 or authorities having jurisdiction.
WARNING
FIRE HAZARD
Failure to follow this warning could result in personal injury,
death, or property damage.
Do not connect aluminum wire between disconnect switch and
furnace. Use only copper wire.
Use a separate, fused branch electrical circuit with a properly sized
fuse or circuit breaker for this furnace. See Table 12 for wire size and
fuse specifications. A readily accessible means of electrical disconnect must be located within sight of the furnace.
Fig. 25 - J-box
çòî Û´»½¬®·½¿´ ݱ²²»½¬·±² ̱ Ö󾱨
Field-Supplied Electrical Box on Furnace J-Box Bracket See Fig. 25.
1. Remove cover from furnace J-Box.
2. Attach electrical box to furnace J-Box bracket with at least
two field-supplied screws through holes in electrical box
into holes in bracket. Use blunt-nose screws that will not
pierce wire insulation.
3. Route furnace power wires through holes in electrical box and
J-Box bracket, and make field-wire connections in electrical
box. Use best practices (NEC in U.S. and CSA C22.1 in
Canada) for wire bushings, strain relief, etc.
4. Route and secure field ground wire to green ground screw on
J-Box bracket, OR FURNACE FAIL TO OPERATE.
5. Connect line voltage leads as shown in Fig. 27.
6. Reinstall cover to J-Box. Do not pinch wires between cover
and bracket.
Electrical Box on Furnace Casing Side. See Fig. 25 and Fig 27.
WARNING
FIRE OR ELECTRICAL SHOCK HAZARD
Failure to follow this warning could result in personal injury,
death, or property damage.
If field-supplied manual disconnect switch is to be mounted on
furnace casing side, select a location where a drill or fastener
cannot damage electrical or gas components.
1. Select and remove a hole knockout in the casing where the
electrical box is to be installed.
NOTE: Check that duct on side of furnace will not interfere with
installed electrical box.
I&O manual
îð
Page 23

Connect an accessory 115V AC, 0.5 amp. maximum
Remove the desired electrical box hole knockout and position
2.
the hole in the electrical box over the hole in the furnace casing.
Fasten the electrical box to casing by driving two field-supplied
3.
screws from inside electrical box into casing steel.
Remove and save two screws holding J-Box. (See Fig. 25.)
4.
Pull furnace power wires out of l/2-in. (13 mm) diameter hole in
5.
J-Box. Do not loosen wires from strain-relief wire-tie on outside
of J-Box.
Route furnace power wires through holes in casing and electri-
6.
cal box and into electrical box.
Pull field power wires into electrical box.
7.
Remove cover from furnace J-Box.
8.
Route field ground wire through holes in electrical box and
9.
casing, and into furnace J-Box.
Reattach furnace J-Box to furnace casing with screws removed
10.
in Step 4.
Secure field ground wire to J-Box green ground screw.
11.
Complete electrical box wiring and installation. Connect line
12.
voltage leads as shown in Fig. 27. Use best practices (NEC in
U.S. and CSA C22.1 in Canada) for wire bushings, strain relief,
etc.
Reinstall cover to J-Box. Do not pinch wires between cover and
13.
bracket.
9.3 Power Cord Installation In Furnace J-box
NOTE: Power cords must be able to handle the electrical
requirements listed in Table 12. Refer to power cord manufacturer's
Remove cover from J-Box.
1.
Route listed power cord through 7/8-in. (22 mm) diameter
2.
hole in J-Box.
Secure power cord to J-Box bracket with a strain relief
3.
bushing or a connector approved for the type of cord used.
Secure field ground wire to green ground screw on J-Box
4.
bracket.
5.
Connect line voltage leads as shown in Fig. 27.
6.
Reinstall cover to J-Box. Do not pinch wires between cover
and bracket.
9.4 Bx Cable Installation In Furnace J-box
Remove cover from J-Box.
1.
Route BX cable into 7/8-in. (22 mm) diameter hole in J-Box.
2.
Secure BX cable to J-Box bracket with connectors approved
3.
for the type of cable used.
Secure field ground wire to green ground screw on J-Box
4.
bracket.
5.
Connect line voltage leads as shown in Fig. 27.
6.
Reinstall cover to J-Box. Do not pinch wires between
cover and bracket.
9.5 24-V Wiring
Make field 24V connections at the 24V terminal strip. (See Fig. 26.)
Connect terminal Y/Y2 as shown in Fig. 25 for proper cooling
operation. Use only AWG No. 18, color-coded, copper thermostat
wire.
The 24V circuit contains an automotive-type, 3-amp.. fuse located on
the control. Any direct shorts during instaIlation, service, or
maintenance could cause this fuse to blow. If fuse replacement is
9.6 Accessories (Field Supplied)
1. Electronic Air Cleaner (EAC)
Connect an accessory Electronic Air Cleaner (if used) using
l/4-in female quick connect terminals to the two male 1/4-in
quick-connect terminals on the control board marked EAC-H
and EAC-M. The terminals are rated for 115V AC, 1.0 amps
maximum and are energized during blower motor operation.
(See Fig. 26.)
2. Humidifier (HUM)
humidifier (if used) to the l/4-in male quick-connect HUM-H
terminal and HUM-N terminal on the control board. The HUM
terminal is energized when gas valve relay (GVR) is
energized. (See Fig. 26.)
9.7 Grounding
The furnace must be electrically grounded in accordance with local
codes or, in the absence of local codes, with the National Electrical
Code, ANSI/NFPA 70, and /or the Canadian Electrical Code, CSA
C22.1, Part 1, if an external electrical source is utilized.
Table 12: Ratings & Physical / Electrical Data
11.8
18.7
18.7
23.4
23.4
28.1
31.7
Nominal
Airflow
1200
1600
1600
2000
2000
2000
2000
MAX. Unit
Amps
7.1
8.5
8.5
8.7
9.7
9.7
10.4
10.1
10.0
National Electrical Code (NFPA-70-latest edition) and all local code
AFUE
Air Temp. Rise
°F °C °F °C
801514200
25-55
30-60
80151420093
80
30-60
8030-60
80
30-60
80
30-60
8035-65
80
30-60
80
35-65
80
40-70
14-31
17-33
17-33
17-33
17-33
17-33
19-36
17-33
19-36
22-39
Input Output
MBHkWMBHkWCFM
50A
14.7
70A20.55616.412007.1
80B
23.4
90B26.47221.11600
80C
23.4
100C
110C32.28825.82000
100D
120D
135D
Annual Fuel Utilization Efficiency (AFUE) numbers are determined in accordance with DOE Test procedures.
The furnace shall be installed so that the electrical components are protected from water.
29.3
29.3
35.2
39.6
40
64
64
80
80
96
108
Max.
Over-Current
Protection Amps
15
15
15
20
20
20
20
20
Min. Wire Size
(awg) @ 75 ft
14
14
14
14
14
14
14
Max. Outlet
Air Temp
93
93
200
20014
93
200
93
200
93
200
93
93
200
93
200
200
93
I&O manual
îï
Page 24

H C T I W S P I D
Y A L E D " F F O " T A E H
4 W S 3 W S
. S C E S
N O N O
0 6
0 9 N O F F O
0 2 1 F F O N O
*
0 8 1 F F O F F O
Option Switch Positions
Humidifier
Input voltage
115V,60Hz
Unused circulator
blower terminal
Unused circulator
blower terminal
Heat stage
Cool stage
*
EAC
T E S Y R O T C A F
Neutral terminal
IND IGN
IGN
IND
N
N
1234
Option
Switch
Fig. 26 - Furnace Control
Fuse
LED OPERATION &
DIAGNOSTIC LIGHT
Thermostat
BLOWER DOOR
SWITCH
BLK
WHT
GND
115V FIELD-
SUPPLIED
DISCONNECT
FIVE WIRE
THREE-WIRE
HEATING-ONLY
BLK
WHT
GND
J-BOX
FIELD 24V WIRING
FIELD 115V, 208/230V, WIRING
FACTORY 24V WIRING
FACTORY 115V WIRING
TERMINAL
FURNACE
NOTE 2
W
C
R
O
N
T
G
R
O
C
L
Y
24V
BLOCK
W
C Y
R G
NOTE 1
NOTES: Connect Y-terminal in furnace as shown for proper blower operation.
1.
2.
3.
THERMOSTAT
TERMINALS
CONDENSING
UNIT
TWO
WIRE
Some thermostats require a "C" terminal connection as shown.
If any of the original wire, as supplied, must be replaced, use
same type or equivalent wire.
FIELD-SUPPLIED
DISCONNECT
Fig.27 - Heating and Cooling Application Wiring Diagram with I-Stage Thermostat
GND
208/230V
THREE
PHASE
208/230V
SINGLE
PHASE
I&O manual
îî
Page 25

прт НМЯОМуЛРф ЯЬЦЛНМУЫТМф ЯТЬ НЯЪЫМЗ
3. White-Rodgers Models 36J22-214: Push switch to the OFF position.
ЭШЫЭХ
ïðòï Ù»²»®¿´
WARNING
This furnace is also equipped with a self-diagnosing electronic
3.
control module. In the event a furnace component is not operating
properly the control module LED will flash on and off in a factoryprogrammed sequence depending on the problem encountered.
This light can be viewed through the observation window in the
blower access door. Refer to the Troubleshooting Chart for further
explanation of the lighting codes.
Follow the start-up and adjustment items refer to further
information in Operational Checks.
FIRE HAZARD
Failure to follow this warning could result in personal injury,
death and/or property damage.
This furnace is equipped with manual reset limit switches in the
gas control area. The switches open and shut off power to the
gas valve if a flame rollout or overheating condition occurs in
the gas control area. DO NOT bypass the switches. Correct
inadequate combustion air supply problem before resetting the
switches.
CAUTION
CUT HAZARD
Failure to follow this caution may result in personal injury. Sheet
metal parts may have sharp edges or burrs. Use care and wear
appropriate protective clothing, safety glasses and gloves when
handling parts and servicing furnaces.
1. Maintain 115V wiring and ground. Improper polarity will result in
rapid flashing LED and no furnace operation. (See Fig. 27)
2. Make thermostat wire connections at the 24-V terminal block on
the furnace control. Failure to make proper connections will result
in improper operation. (See Fig. 27.)
3. Gas supply pressure to the furnace must be greater than 4.5-in.
wc (0.16 psig ) but not exceed 14-in. we (0.5 psig).
4. Check all manual-reset switches for continuity.
5. Install blower compartment door. Door must be in place to
operate furnace.
6. Replace outer door.
ïðòî ͬ¿®¬ó«° Ю±½»¼«®»-
WARNING
FIRE AND EXPLOSION HAZARD
Failure to follow this warning could cause personal injury, death
and/or property damage.
Never test for gas leaks with an open flame. Use a commercially available soap solution made specifically for the detection
of leaks to check all connections.
ïðòí Ú«®²¿½» ͬ¿®¬ó«°
1. Close the manual gas shutoff valve external to the furnace.
2. Turn off the electrical power to the furnace.
3. Set the room thermostat to the lowest possible setting.
4. Remove the burner compartment door.
NOTE: This furnace is equipped with an ignition device which
automatically lights the burner. Do not try to light the burner by
hand.
5. White-Rodgers Models 36J22-214: Push the switch to the OFF
position.
6. Wait five minutes to clear out any gas. Then smell for gas
including near the floor.
7. If gas can be smelled following the five minute waiting period in
Step 6 If you do not smell gas after five minutes. Push the
switch to the ON position.
WARNING
FIRE AND EXPLOSION HAZARD
Failure to follow this warning could cause personal injury, death
and/or property damage.
Never test for gas leaks with an open flame. Use a commercially available soap solution made specifically for the detection
of leaks to check all connections.
8. Replace the door on the front of the furnace.
9. Open the manual gas valve external to the furnace.
10. Turn on the electrical power supply to the furnace.
11. Set the room thermostat to the desired temperature.
NOTE: There is an approximate 48 second delay between thermostat
energizing and burner firing.
FURNACE SHUTDOWN
1. Set the thermostat to lowest setting.
2. Turn off the electrical power supply to the furnace.
4. Close manual gas shutoff valve external to the furnace.
5. Replace the door on the unit.
1. Purge gas lines after all connections have been made.
2. Check gas lines for leaks.
WARNING
ELECTRICAL SHOCK HAZARD
Failure to follow this warning could result in personal injury, or
death.
Blower access door switch opens 115V power to control.
No component operation can occur unless switch is closed.
Caution must be taken when manually closing this switch
for service purposes.
I&O manual
îí
Page 26

ïðòì Í»¯«»²½» ±º Ñ°»®¿¬·±²
NOTE: Furnace control must be grounded for proper operation or
control will lock out. Control is grounded through green wire routed
to gas valve and manifold bracket screw. follow the sequence of
operation through the different modes.
Read and follow the wiring diagram very carefully.
The blower door must be installed for power to be conducted
through the blower door interlock switch ILK to the furnace control
CPU, transformer TRAN, inducer motor IDM, blower motor BLWM,
hot--surface igniter HSI, and gas valve GV.
ïò Ø»¿¬·²¹ ³±¼»
(See Fig. 27 for thermostat connections.)
The wall thermostat “calls for heat,” closing the R--to--W circuit. The
furnace control performs a self--check, verifies the pressure switch
contacts PRS are open, and starts the inducer motor IDM.
a. Inducer Prepurge Period-- The inducer blower and optional
humidifier are energized and the ignitor is powered within one
second. the pressureswitch contacts PRS close to begin a
15--second prepurge period.
b. Igniter Warm--Up-- At the end of the prepurge period, the
Hot--Surface igniter HSI is energized for a 10--second igniter
warm--up period.
This controller has an adaptive algorithm that adjusts the duration
of the ignitor warm-up, to extend ignitor life. Upon initial application
of power, the warm-up time is 10 seconds. The ignitor on-time will
then be increased or decreased depending on whether or not flame
is achieved. The warm-up time is limited to a maximum of 14
seconds. During the first 64 warm-up periods following power-up, the
warm-up time may not be less than 10 seconds.
Upon a call for heat, if the warm-up time has not been locked, it will
be decreased by one second. This reduction of the ignitor ontime
will continue until flame fails to be achieved (resulting in a retry).
In the event of a retry, the warm-up time will be increased by two
seconds and locked in at that duration. Once the warm-up time is
locked, it remains fixed until another call for heat results in a retry, in
which case the warm-up time is again increased by two seconds and
remains locked.
In the event of two successive retry attempts, the warm-up time
will be unlocked and set to 14 seconds. If flame is then achieved,
the warm-up time will begin adapting again with the next call for
heat. If, however, this third attempt fails to achieve flame, the control
will go into system lockout.
c. Trial--for--Ignition Sequence-- When the igniter warm- up period is completed, the main gas valve relay contacts
GVR close to energize the gas valve GV, the gas valve
opens 7 second. The gas valve GV permits gas flow to the
burners where it is ignited by the HSI. a 7--second flame
proving period begins.
d. Flame--Proving--When the burner flame is proved at the
flame--proving sensor electrode FSE, the furnace control
CPU begins the blower--ON delay period and continues
to hold the gas valve GV open.
If flame is not detected, the gas valves is de-energized, the ignitor is
turned off,and the furnace control goes into the “retry” sequence.The
“retry” sequence provides a 15-second wait following an unsuccess-
ful ignition attempt (flame not detected). After this wait, the ignition
sequence is restarted with an additional 2 seconds of ignitor
warm-up time. If this ignition attempt is unsuccessful, one more retry
will be made before the control goes into system lockout.
If flame is detected, then lost, the furnace control will repeat the
initial ignition sequence for a total of four “recycles”. After four
unsuccessful “recycle” attempts, the control will go into system
lockout.
e. Blower--On Delay-- If the burner flame is proven, the
blower motor is energized on HEAT-H speed 30 seconds after
the gas valve GV is energized.
Simultaneously, the electronic air cleaner terminal EAC is
energized and remains energized as long as the blower motor
BLWM is energized.
f. Blower--Off Delay--When the thermostat is satisfied, the
R--to--W circuit is opened, de--energizing the gas valve GV,
stopping gas flow to the burners, The inducer motor IDM will
remain energized for a 5-second post--purge period.
humidifier is de-energized. The blower motor BLWM and air
cleaner terminal EAC will remain energized for 60, 90, 120, or
180 seconds (depending on the HEAT-OFF delay selection).
The furnace control CPU is factory--set for a 180--second
HEAT-OFF delay.
TIMING SPECIFICATIONS
(All times are in seconds, unless noted otherwise)
* These times will vary depending on option switch position. The control is
factory-set at 30 seconds heat delay-to-fan-on, 120 seconds heat delay-to fan-off and 40 seconds cool delay-to-fan-off. See OPERATION section for
further information.
PRE-PURGE
INITIAL IGNITOR WARM-UP
(1st 64 attempts)
MINIMUM IGNITOR WARMUP
MAXIMUM IGNITOR WARMUP
IGNITION ACTIVATION
PERIOD
TRIAL FOR IGNITION
PERIOD
RETRIES
VALVE SEQUENCE PERIOD
INTERPURGE
POST-PURGE
HEAT DELAY-TO-FAN-ON
HEAT DELAY-TO-FAN-OFF*
COOL DELAY-TO-FAN-ON
COOL DELAY-TO-FAN-OFF
AUTO RESET
HUMIDIFIER
ELECTRONIC AIR CLEANER
îò ݱ±´·²¹ Ó±¼»
Thethermostat “callsforcooling.”
(SeeFig.27 forthermostatconnections)
ThethermostatclosestheR--to--G--and--Ycircuits.The
R--to--Ycircuitstartstheoutdoorunit,andtheR--to--
G--and--Y circuitsstartthefurnaceblowermotor BLWMon
COOL-H speed. The cool delay-to-fan-on period begins.
After the delay period ends, the optional electronic air
cleaner is energized, and the circulator fan is energized at cool
speed. After the thermostat is satisfied, the compressor is
de-energized and the cool mode delay-to-fan-off period begins.
After the delay-to-fan- off period ends, the circulator fan and
electronic air cleaner (optional) are de-energized.
íò ÚßÒ Ó±¼»
WhentheR--to--Gcircuitisclosedbythethermostat,the
blowermotorBLWMwilloperateonCOOL-H speed
If the thermostat fan switch is moved to the ON position, the
circulator fan (cool speed) and optional electronic air cleaner are
energized. When the fan switch is returned to the AUTO position, the circulator fan and electronic air cleaner (optional) are
de-energized.
50A55-443-01
15
10
6
14
4
7
4 times
35
15
5
30
60/90/
120*/
180
5
40
60 minutes
YES
YES
I&O manual
îì
Page 27

ïðòë Ù¿- Ó¿²·º±´¼ Ю»--«®» Ó»¿-«®»³»²¬ ß²¼ ß¼¶«-¬³»²¬
CAUTION
To prevent unreliable operation or equipment damage, the
gas manifold pressure must be as specified on the unit rating
palte. Only minor adjustments should be made by adjusting the
gas valve pressure regulator.
This valve is shipped from the factory with the regulator preset
Consult the appliance rating plate to ensure burner manifold
pressure is as specified. If another outlet pressure is required
follow these steps.(See Table 13 and Fig. 28)
1. Turn OFF all electrical power to the system.
2. Using a 3/32 inch hex wrench loosen outlet pressure tap (boss)
screw one turn. Do not remove screw.
3. Attach a hose and manometer to the potlet pressure boss of valve
to over lap at least 3/8”
4. Turn ON system power and set thermostat to a call for heat.
5. Using a leak detection solution or non-chlorine soap suds
check for leaks at hose connection. Bubbles forming indicate a
leak. SHUT OFF GAS AND FIX ALL LEAKS IMMEDIATELY!
6. Remove regulator screw cover. Turn regulator screw either
clockwis to increase pressure or counter clockwise to decrease.
Always adjust regulator to provide the correct pressure according
to the original equipment manufacturer specifications listed on the
appliance rating plate.
7. Replace regulator screw cover and finger-tighten securely.
8. Turn OFF all electrical power to the system.
9. Remove manometer and hose from outlet pressure tap.
10.Tighten outlet pressure tap clockwise 7 in-Ibs minimum to seal port.
11. Turn ON system power and set thermostat to call for heat.
12. Using a leak detection solution or non-chlorine soap suds 1`
check for leaks at hose connection. Bubbles forming
indicate a leak. SHUT OFF GAS AND FIX ALL LEAKS
IMMEDIATELY!
Outlet
Pressure
Port
Inlet
Wrench
Boss
Inlet
Pressure
Port
Regulator
Cover
Screw
Regulator
Sleeve
Fig. 28 Gas Valve and Regulator Adjustment
On/OffSwitch
(ShowninONposition)
Regulator
Spring
VentPort
MainRegulator
Adjustment
Plastic
Regulator
Adjustment
Screw
Outlet
Measure gas manifold pressure with burners firing. Adjust
manifold pressure per the Manifold Gas Pressure table.
Table 13 - Manifold Gas Pressure
Manifold Gas Pressure
Input Rating
KBTU/H
50
70 3.5-3.8” W.C. 9.3-9.9” W.C.
80 3.6-4.0” W.C. 9.7-10.3” W.C.
90 3.6-4.0” W.C. 9.7-10.3” W.C.
100 4.0-4.4” W.C. 9.7-10.3” W.C.
110 3.6-4.0” W.C. 9.1-9.7” W.C.
120 4.3-4.7” W.C. 9.7-10.3” W.C.
135 4.3-4.7” W.C. 9.7-10.3” W.C.
The final manifold pressure must not vary more than 0.3 w.c.
from specified manifold pressure.
Any necessary major changes in gas flow rate should be made by
changing the size of the burner orifice.
Natural Gas
4.3-4.7” W.C. 9.7-10.3” W.C.
Range
Propane Gas
ïðòê Ù¿- ײ°«¬ כּ Ó»¿-«®»³»²¬ øÒ¿¬«®¿´ Ù¿- Ѳ´§÷
The gas input rate to the furnace must never be greater than that
specified on the unit rating plate. To measure natural gas input
using the gas meter use the following procedure.
1. Turn OFF the gas supply to all other gas-burning
appliances except the furnace.
2. While the furnace is operating, time and record one
complete revolution of the smallest gas meter dial.
3. Calculate the number of seconds per cubic foot (sec/ft3) of
gas being delivered to the furnace. If the dial is a one cubic
foot dial divide the number of seconds recorded in step 2
by one. If the dial is a two cubic foot dial divide the number
of seconds recorded in step 2 by two.
4. Calculate the furnace input in BTUs per hour (BTU/hr).
Input equals the installation's gas heating value multiplied
by a conversion factor (hours to seconds) divided by the
number of seconds per cubic foot. The measured input
must not be greater than the input indicated on the unit
rating plate.
EXAMPLE:
Installation's gas heating (HTG) value: 1,000 BTU/ft3
(Obtained from gas supplier)
Installation's seconds per cubic foot: 34 sec/ft3
Conversion Factor (hours to seconds): 3600 sec/hr
Input = (Htg. value x 3600) + seconds per cubic foot
Input = (1,000 BTU/ft3 x 3600 sec/hr) + 34 sec/ft3
Input = 106,000 BTU/hr
This measured input must not be greater than the input
indicated on the unit rating plate.
5. Turn ON gas and relight appliances turned off in step 1.
Ensure all the appliances are functioning properly and that
all pilot burners are operating.
ïðòé Ì»³°»®¿¬«®» η-» ß¼¶«-¬³»²¬
Air temperature rise is the temperature difference between supply
and return air. The proper amount of temperature rise is usually
obtained when the unit is operated at the rated input with the "as
shipped" blower speed. If the correct amount of temperature rise
is not obtained, it may be necessary to change the blower speed.
An incorrect temperature rise can cause condensing in or
overheating of the heat exchanger. Determine and adjust the
temperature rise as follows. The temperature rise must be within
the range specified on the rating plate .
I&O manual
îë
Page 28

HEAT EXCHANGER
RADIATIO “LINE OF SIGHT”
Supply Air
4. Connect all unused blower motor leads to the "PARK"
terminals on the integrated control module. Any leads not
connected to the "PARK" terminals must be taped.
5. Turn ON power to furnace.
6. Verify proper temperature rise as outlined in Temperature
Rise section.
ЭЧОЭЛФЯМСО ЮФСЙЫО ЪЯТ МЧУЧТЩ ЯЬЦЛНМУЫТМ
NOTE: Items in this section refer to the
NOT to the induced draft blower. The induced draft blower timing
sequence is not adjustable. The circulator blower fan timing is
adjustable.
air circulator blower fan
Return Air
Fig . 29 - Temperature Rise Measurement
Ì»³°»®¿¬«®» η-» ß¼¶«-¬³»²¬
1. Operate furnace with burners firing approximately 15
minutes. Ensure all registers are open and all duct
dampers are in their final (fully or partially open) position.
2. Place thermometers in the return and supply ducts as
close to the furnace as possible. Thermometers must not
be influenced by radiant heat by being able to "see" the
heat exchanger.
3. Subtract the return air temperature from the supply air
temperature to determine the air temperature rise. Allow
adequate time for thermometer readings to stabilize.
4. Adjust temperature rise by adjusting the circulator blower
speed. Increase blower speed to reduce temperature rise.
Decrease blower speed to increase temperature rise.
Refer to the following section for speed changing details.
ïðòè Ý·®½«´¿¬±® Þ´±©»® Í°»»¼ ß¼¶«-¬³»²¬
WARNING
ELECTRICAL SHOCK HAZARD
Failure to follow this warning could result in personal injury, or
death.
Turn OFF power to the furnace before changing speed taps.
This furnace is equipped with a PSC circulator blower motor. This
blower provides ease in adjusting blower speeds. The cooling blower
speed is shipped set on HIGH. High heat ships on MEDIUM and low
heat is shipped on MEDIUM-La. These blower speeds should be
adjusted by the installer to match the installation requirements so as
to provide the correct heating temperature rise and the correct
cooling CFM
Refer to Table 2 - Air Delivery - CFM (Without Filter)*
As shipped, the circulator blower fan will remain on for 120
seconds after the gas valve closes. When a call for cooling occurs
the circulator fan comes on and remains on for 40 seconds after
the call for cooling ends. During normal heating operation, the
circulator fan will come on approximately 30 seconds after the
gas valve opens.
H C T I W S P I D
Y A L E D " F F O " T A E H
4 W S 3 W S
. S C E S
N O N O
0 6
0 9 N O F F O
0 2 1 F F O N O
*
0 8 1 F F O F F O
*
Fig. 30 Adjustment Switches - (Not present on all models)
T E S Y R O T C A F
пп СРЫОЯМЧСТЯФ ЭШЫЭХН
WARNING
FIRE, EXPLOSION, ELECTRICAL SHOCK,AND CARBON
MONOXIDE POISONING HAZARD
To avoid personal injury or death. Do not remove any interal
compartment covers or attempt any adjustment. Electrical
compartments are contained in both compartments. Contact a
qualified service agent at once if an abnormal flame
appearance should develop.
Þ«®²»® Ú´¿³»
The burner flames should be inspected with the burner compartment
door installed. Flames should be stable quiet soft and blue
(dust may cause orange tips but they must not be yellow). Flames
should extend directly outward from the burners without curling
floating,or lifting off, and should enter heat-exchanger tube.
Flames must not impinge on the sides of the heat exchanger firing
tubes.
To adjust the circulator blower speed proceed as follows:
1. Turn OFF power to the furnace.
2. Select the heating and cooling blower speeds that match
the installation requirements from the Table 5 - Air Delivery
- CFM (Without Filter)*
3. Relocate desired motor leads to the circulator blower heat
and cool speed terminals on the integrated control module.
(Terminals are identified as HEAT and COOL (hot)). If
heating and cooling blower speeds are the same a jumper
wire must be used between the heat and cool terminals.
I&O manual
îê
Check the burner flames for
1. Good adjustment
2. Stable, soft and blue
3. Not curling, floating, or lifting off
Fig. 31 Burner Flame
Page 29

по НЯЪЫМЗ ЭЧОЭЛЧМ ЬЫНЭОЧРМЧСТ
пн МОСЛЮФЫНШССМЧТЩ
ïîòï Ù»²»®¿´
A number of safety circuits are employed to ensure safe and proper
furnace operation. These circuits serve to control any potential
safety hazards and serve as inputs in the monitoring and diagnosis
of abnormal function. These circuits are continuously monitored
during furnace operation by the integrated control module.
ïîòî ײ¬»¹®¿¬»¼ ݱ²¬®±´ Ó±¼«´»
The integrated control module is an electronic device which
controls all furnace operations. Responding to the thermostat
the module initiates and controls normal furnace operation,and
monitors and addresses all safety circuits. If a potential safety
concern is detected, the module will take the necessary
precautions and provide diagnostic information through an LED.
ïîòí Ю·³¿®§ Ô·³·¬
The primary limit control is located on the partition panel and
monitors heat exchanger compartment temperature. It is an
automatic reset, temperature sensor. The limit guards against
the overheating resulting from insufficient air passing over the
heat exchanger.
ïîòì 못®-» Ú´±© Í©·¬¸
The reverse flow switch is located on the air circulating blower
housing. It is an automatic reset, temperature sensor. Reverse flow
switch shuts off the furnace when air circulating blower fails on
downflow or horizontal installations to prevent air filter or other parts
from overhating by hot air.
ïîòë α´´±«¬ Ô·³·¬-
The rollout limit controls are mounted on the burner/manifold
assembly and monitor the burner flame. They are manual-reset
temperature sensors. This limit guards against burner flames
not being properly drawn into the heat exchanger.
ïîòê Ю»--«®» Í©·¬½¸»-
The pressure switches are normally-open, negative air pressureactivated switches. They monitor the airflow (combustion air and
flue products) through the heat exchanger via pressure taps located
on the induced draft blower. These switches guard against insufficient
airflow (combustion air and flue products) through the heat exchanger.
ïîòé Ú´¿³» Í»²-±®
The flame sensor is a probe mounted to the burner/manifold
assembly which uses the principle of flame rectification to determine
the presence or absence of flame.
ïíòï Û´»½¬®±-¬¿¬·½ Ü·-½¸¿®¹» øÛ-±÷ Ю»½¿«¬·±²-
NOTE: Discharge body's static electricity before touching unit. An
electrostatic discharge can adversely affect electrical components.
Use the following precautions during furnace installation and
servicing to protect the integrated control module from damage.
By putting the furnace the control and the person at the same
electrostatic potential these steps will help avoid exposing the
integrated control module to electrostatic discharge. This
procedure is applicable to both installed and uninstalled
(ungrounded) furnaces.
1. Disconnect all power to the furnace. Do not touch the
integrated control module or any wire connected to the control
prior to discharging your body's electrostatic charge to ground.
2. Firmly touch a clean unpainted metal surface of the
furnace away from the control. Any tools held in a person's
hand during grounding will be discharged.
3. Service integrated control module or connecting wiring
following the discharge process in step 2. Use caution
do not
move or shuffle your feet do not touch ungrounded objects
etc.). If you come in contact with an ungrounded object
repeat step 2 before touching control or wires.
4. Discharge your body to ground before removing a new
control from its container. Follow steps 1 through 3 if
installing the control on a furnace. Return any old or new
controls to their containers before touching any ungrounded
object.The primary limit control is located on the partition panel and
ïíòî Ü·¿¹²±-¬·½ ݸ¿®¬
Refer to the troubleshooting chart on the following pages for
assistance in determining the source of unit operational problems.
The red diagnostic LED blinks to assist in troubleshooting the unit.
The number of blinks refer to a specific code.(See Table 16)
ïíòí λ-»¬¬·²¹ Ú®±³ Ô±½µ±«¬
Furnace lockout results when a furnace is unable to achieve ignition
after three attempts. It is characterized by a non-functioning furnace
and a one flash diagnostic LED code from the red LED. If the furnace
is in "lockout" it will (or can be) reset in any of the following ways.
1. Automatic reset. The integrated control module will
automatically reset itself and attempt to resume normal
operations following a one hour lockout period.
2. Manual power interruption. Interrupt 115 volt power to the
furnace for 1 - 20 seconds.
3. Manual thermostat cycle. Lower the thermostat so that
there is no longer a call for heat for 1 - 20 sec
NOTE: If the condition which originally caused the lockout
still exists, the control will return to lockout. Refer to the
diagnostic Chart for aid in determining the cause.
WARNING
FIRE,EXPLOSION OR CARBON MONOXIDE
POISONING HAZARD
Failure to replace with proper control could result in fire,
explosion or carbon monoxide poisoning.
This appliance uses a NEGATIVE PRESSURE REGULATED
gas control.
Replace ONLY with the same model number or as specified by
the manufacturer.
WARNING
FIRE,EXPLOSION AND ASPHYXIATION HAZARD
Improper adjustment, alteration, service, maintenance or
installation can cause serious injury or death.
information Manual provided with this furnace.
Installation and service must be performed by a qualified
service agency or the gas supplier.
I&O manual
îé
Page 30

Table 14 - Troubleshooting Chart
Symptoms of
Abnormal Operation
Associated
LED
Fault Description(s)
TROUBLE SHOOTING CHART
Possible reason
Corrective Action
Cautions and Notes
operate.
module diagnosic
LED provides
NO SIGNAL
operate
module diagnostic
LED is flashing
ONE (1) flash.
operate.
module diagnostic
LED is flashing
TWO (2) flashes
NONE
1 FLASH
2
FLASHES
furnace, or no 24 volt
power to integrated
control module
breaker
module has an
internal fault
to an excessive
number of ignition
attempts.
circuit is closed.
blower is not
operating.
or 24 volt wires
improperly connected
or loose.
breaker
module has an internal
fault.
flame. Cause may be
no gas to burners
bad igniter or igniter
alignment improper
orifices, or coated/
oxidized or improperly
connected flame sensor.
establishment. Cause
may be interrupted gas
supply lazy burner
flames (improper gas
pressure or restriction in
flue.
pressure switch contacts
sticking.
switch circuit.
power to furnace integrated
control module.
module fuse (3A). Replace
if necessary.
in 115 and 24 volt circuits.
Repair as necessary.
control module.
interruption.
Sand sensor if coated and
/or oxidized.
blockage proper length
elbows and termination.
blower performance.
blower pressure switch.
prior to repair.
module fuse with 3A
automotive fuse.
"Electrostatic Discharge"
section of manual.
prior to repair.
handle with care.
sensor with steel wool.
prior to repair.
switch with proper
replacement part.
runs continuously
with no further
furnace operation.
Integrated control
module diagnostic
LED is flashing
THREE (3) flashes.
runs continuously.
No furnace operation.
module diagnostic
LED is flashing
FOUR (4) flashes.
1 Integrated control module will automatically attempt to reset from lockout after one hour.
2 LED Flash code will cease if power to the control module is interrupted through the disconnect or door switch.
3
FLASHES
4
FLASHES
circuit not closed.
Induced draft blower
is operating
is open.
is open
blocked pinched or
connected improperly
Blocked flue or weak
induced draft blower.
setpoint or malfun
ctioning switch contacts.
connected wiring.
reverse flow limit switch.
air over the heat
exchanger. Blocked
filters restrictive
ductwork,improper
circulator blower speed
or failed circulator blower.
connected wiring.
hose. Repair
if necessary,
proper length elbows
and termination.
setpoint or contact motion.
wiring connection.
flow limit switch. Replace
if necessary.
for blockage. Clean filters
or remove obstruction.
speed and performance.
Correct speed or replace
blower if necessary.
connection.
repair.
Ventilation Air Requirements"
section for details.
with proper replacement part.
repair.
proper replacement part.
correct replacement part.
switch with proper
replacement part.
I&O manual
îè
Page 31

Symptoms of
Abonormal Operation
Associated
LED
Fault Description(s)
TROUBLE SHOOTING CHART
Possible reason
Corrective Action
Cautions and Notes
operate.
module diagnostic
LED is flashing
FIVE (5) flashes.
runs continuously.
module diagnostic
LED is flashing
SIX(6) flashes.
module diagnostic
LED is flashing
SEVEN (7) flashes.
5
FLASHES
6
FLASHES
7
FLASHES
Volt power is
reversed
microamp signal
is low
blocked flue or failed
induced draft blower.
connected wiring.
Faulty rollout limit.
power to furnace or
integrated control
module is reversed.
transformer are
reversed.
/oxidized.
positioned in burner
flame.
to Improper gas pressure
or combustion air.
alignment.
piping for blockage
proper length elbows
and termination. Correct
as necessary.
Replace if necessary.
for proper performance.
Replace if necessary.
connection.
correct polarity.
Correct if necessary
wires connected to
transformer.
alignment.
pressure to rating plate
info. Adjust as needed.
section for piping details.
blower with proper
replacement part.
correct replacement part.
to repair.
repair.
steel wool.
section for piping details.
gas pressure.
and circulator blower
runs continuously.
Integrated control
module diagnostic
LED is flashing
continuously.
failure
1 Integrated control module will automatically attempt to reset from lockout after one hour.
2 LED Flash code will cease if power to the control module is interrupted through the disconnect or door switch.
Continuous
FLASHES
Constant
ON
no call for heat.
failure
sense circuit.
frequency
failure
sensor or in flame
sensor wiring
frequency
Turn power OFF prior
to repair.
Turn power OFF prior
to repair.
I&O manual
îç
Page 32

пм НЫОКЧЭЫ ЯТЬ УЯЧТМЫТЯТЭЫ РОСЭЫЬЛОЫН
Follow the filter sizes given in the Recommended Minimum Filter
size table to ensure proper unit performance.
WARNING
ELECTRICAL SHOCK, FIRE OR EXPLOSION HAZARD
Failure to follow safety warnings exactly could result in dangerous
operation, serious injury, death or property damage.
Improper servicing could result in dangerous operation, serious
injury, death or property damage.
Reconnect wires correctly.
WARNING
FIRE, EXPLOSION OR CARBON MONOXIDE POISONING
HAZARD
Failure to replace with proper control could result in fire,explosion or
carbon monoxide poisoning.
This appliance uses a NEGATIVE PRESSURE REGULATED gas
control.
Replace ONLY with the same model number or as specified by the
manufacturer.
ïìòï ß²²«¿´ ײ-°»½¬·±²
The furnace should be inspected by a qualified installer or service
agency at least once per year. This check should be performed at
the beginning of the heating season. This will ensure that all
furnace components are in proper working order and that the
heating system functions appropriately. Pay particular attention to
the following items. Repair or service as necessary.
(a) All flue gas carrying areas external to the furnace (i.e. chimney,
vent connector) are clear and free of obstructions.
(b) The vent connector is in place, slopes upward and is physically
sound without holes or excessive corrosion.
(c) The return-air duct connection(s) is physically sound, is sealed
to the furnace casing, and terminates outside the space containing
the furnace.
(d) The physical support of the furnace is sound without sagging,
cracks, gaps, etc, around the base so as to provide a seal between
the support and the base.
(e) There are no obvious signs of deterioration of the furnace.
(f) The pilot and burner flames are in good adjustment (by comparison
with pictorial sketches or drawings of the main burner flame and,
if applicable, the pilot burner flame).
ïìòî Ú·´¬»®-
there
must be a means of filtering all of the return air. The installer will
supply filter(s) at the time of installation.
ЪЧФМЫО УЯЧТМЫТЯТЭЫ
Improper filter maintenance is the most common cause of inadequate
heating or cooling performance. Filters should be cleaned (permanent)
or replaced (disposable) every one month or as required.
When rep|acing a filter, it must be replaced with a filter of the same
type and size.
Become familiar with filter location and procedures for removal
cleaning and replacing them. If help is needed, contact the installer
of the furnace or a qualified servicer.
ЪЧФМЫО ОЫУСКЯФ
Depending on the installation, differing filter arrangements can
be applied. A media air filter or electronic air cleaner can be used
as an alternate filter.
For further details, see your distributor.
ЛРОЧЩШМ ЪЧФМЫО ОЫУСКЯФ
To remove filters from an external filter rack in an upright upflow
installation, follow the directions provided with external filter rack
kit.
Clean, wash and dry a permanent filter. When using a permanent
filter, both sides should be sprayed with a dust adhesive as
recommended on the adhesive container. Spray adhesives for
use with permanent filters can be found at some hardware stores.
BE SURE AIRFLOW DIRECTION ARROW POINTS TOWARDS
THE BLOWER.
Inspect filter. If your dirty filter is the disposable type, replace dirty
filter with the same type and size filter. If your dirty filter is a
permanent filter, clean as follows:
, rinse, and dry the permanent filters. Both sides
should then be sprayed with a filter adhesive as is
recommended on the adhesive container. Many hardware
stores stock spray adhesives for use with permanent filters.
, these filters must be replaced
by equal size permanent, high velocity filters. Throwaway
filters must not be used as replacement for permanent
filters. Under normal use, permanent filters should last for
several years.
пмтн ЧТЬЛЭЫЬ ЬОЯЪМ ЯТЬ ЭЧОЭЛФЯЧТЩ ЮФСЙЫО УСМСОН
The bearings in the induced draft blower and ciretdator blower
motors are permanently lubricated by the manufacturer. No further
lubrication is required. Check motor windings for accumulation
of dust which may cause overheating. Clean as necessary.
пмтм ЪФЯУЫ НЫТНСО шПЛЯФЧЪЧЫЬ НЫОКЧЭЫО СТФЗч
Under some conditions the fuel or air supply can create a nearly
invisible coating on the flame sensor. This coating acts as an
insulator causing a drop in the flame sense signal. If the flame
sense signal drops too low. the furnace will not sense flame and
will lock out. The flame sensor should be carefully cleaned by a
qualified servicer using emery cloth or steel wool. Following
cleaning the flame Sense signal should be 1 to 6 microamps at
115 volts.
ЧЩТЧМЫО шПЛЯФЧЪЧЫЬ НЫОКЧЭЫО СТФЗч
If the igniter and the surrounding air are at about 70°F and the
igniter wires are not connected to any other electrical components.
the resistance of the igniter should not exceed 200 ohms. If it
does the igniter should be replaced.
ïìòë Þ«®²»®-
WARNING
FIRE, EXPLOSION, ELECTRICAL SHOCK,AND CARBON
MONOXIDE POISONING HAZARD
To avoid personal injury or death. Do not remove any interal
compartment covers or attempt any adjustment. Electrical
compartments are contained in both compartments. Contact a
qualified service agent at once if an abnormal flame
appearance should develop.
Periodically during the heating season make a visual check of
the burner flames. Turn the furnace on at the thermostat. Wait a
few minutes since any dislodged dust will alter the normal flame
appearance. Flames should be stable quiet soft and blue with
slightly orange tips. They should not be yellow. They should extend
directly outward from the burner ports without curling downward
floating or lifting off the ports. See Fig.30.
NOTE: Only a qualified contractor, installer or service agency
should clean the burners, if the burners get a heavy accumulation of soot and carbon.
I&O manual
íð
Page 33

14.6 Cleaning Heat Exchanger
The following steps should be performed by a qualified service
agency:
NOTE: If the heat exchangers get a heavy accumulation of soot and
carbon, they should be replaced rather than trying to clean them
thoroughly. A heavy build-up of soot and carbon indicates that a
problem exists which needs to be corrected, such as improper adjustment of manifold pressure, insufficient or poor quality combustion air,
incorrect size or damaged manifold orifice(s), improper gas, or a
restricted heat exchanger. Action must be taken to correct the
problem.
If it becomes necessary to clean the heat exchangers because of dust
or corrosion, proceed as follows:
1. Turn OFF gas and electrical power to furnace.
2. Remove outer access door.
3. Disconnect vent connector from furnace vent elbow.
4. For downflow or horizontal furnace having an internal vent
pipe, remove internal vent pipe within the casing.
5. Disconnect wires to the following components. Mark wires to
aid in reconnection of (be careful when disconnecting wires
from switches because damage may occur):
a. Draft safeguard switch.
b. Inducer motor.
c. Pressure switch(es).
d. Limit overtemperature switch.
e. Gas valve.
f. Hot surface igniter.
g. Flame-sensing electrode.
h. Flame rollout switches.
6. Remove screws that fasten the collector box assembly to
the cell panel. Be careful not to damage the collector box.
Inducer assembly and elbow need not be removed from
collector box.
7. Disconnect gas line from gas manifold.
8. Remove the 5 screws that attach the burner assembly to
the cell panel. The gas valve and individual burners need
not be removed from support assembly.
NOTE: Be very careful when removing burner assembly to avoid
breaking igniter. See Fig. 32 and Fig.33 for correct igniter location.
9. Using field-provided 25-caliber rifle cleaning brush, 36-in.
(914 mm) long, 1/4" diameter steel spring cable, a variable
speed, reversible electric drill, and vacuum cleaner, clean
cells as follows:
a. Remove metal screw fitting from wire brush to allow in-
sertion into cable.
b. Insert the twisted wire end of brush into end of spring
cable, and crimp tight with crimping tool or crimp by
striking with ball-peen hammer. TIGHTNESS IS VERY
IMPORTANT.
Flame sensor
IgnIter
NOTE: The materials needed in item 9 can usually be purchased at
local hardware stores.
(1.) Attach variable-speed, reversible drill to the end of
spring cable (end opposite brush).
(2.) Insert brush end of cable into the outlet opening of
cell and slowly rotate with drill. DO NOT force
cable. Gradually insert cable into upper pass of cell.
(See Fig. 34.)
(3.) Work cable in and out of cell 3 or 4 times to obtain
sufficient cleaning. DO NOT pull cable with great
force. Reverse drill and gradually work cable out.
(4.) Insert brush end of cable in burner inlet opening of
cell, and proceed to clean 2 lower passes of cell in
same manner as upper pass.
(5.) Repeat foregoing procedures until each cell in fur-
nace has been cleaned.
(6.) Using vacuum cleaner, remove residue from each cell.
(7.) Using vacuum cleaner with soft brush attachment,
clean burner assembly.
(8.) Clean flame sensor with fine steel wool.
(9.) Reinstall burner assembly. Center burners in cell
openings.
10. Remove old sealant from cell panel and collector box flange.
11. Spray releasing agent on the heat exchanger cell panel
where collector box assembly contacts cell panel.
NOTE: A releasing agent such as cooking spray or equivalent (must
not contain corn or canola oil, aromatic or halogenated hydrocarbons
or inadequate seal may occur) and RTV sealant (G.E. 162, 6702, or
Dow-Corning 738) are needed before starting installation. DO NOT
substitute any other type of RTV sealant. G.E. 162 (P771-9003) is
available through RCD in 3-oz. tubes.
12. Apply new sealant to flange of collector box and attach to
cell panel using existing screws, making sure all screws
are secure.
13. Reconnect wires to the following components. (Use con-
nection diagram on wiring label, if wires were not marked
for reconnection locations.):
a. Draft safeguard switch.
b. Inducer motor.
c. Pressure switch(es).
d. Limit over-temperature switch.
e. Gas valve.
f. Hot surface igniter.
g. Flame-sensing electrode.
h. Flame rollout switches.
14. Reinstall internal vent pipe, if applicable.
Furnace
Front
Furnace
right side
Fig. 32 - Igniter Position-1
Fig. 34 - Cleaning Heat Exchanger Cell
Fig. 33 - Igniter Position- 2
I&O manual
íï
Page 34

15. Reinstall vent connector on furnace vent elbow. Securely
fasten vent connector to vent elbow with 2 field-supplied,
corrosion-resistant, sheet metal screws located 1800 apart.
16. Replace blower access door only, if it was removed.
17. Set thermostat above room temperature and check
furnace for proper operation.
18. Verify blower airflow and speed changes between heating
and cooling.
19. Check for gas leaks.
20. Replace outer access door.
WARNING
FIRE OR EXPLOSION HAZARD
Failure to follow this warning could result in personal injury,
death and/or property damage.
Never use a match or other open flame to check for gas leaks.
Use a soap-and-water solution.
21. Turn on electric power and gas supply to the furnace.
22. Check furnace for proper operation. Refer to "Operational
Checks" section to verify burner flame characteristics.
ïìòé Þ»º±®» Ô»¿ª·²¹ ß² ײ-¬¿´´¿¬·±²
Verify cooling and fan only operation.
discuss proper furnace operation and maintenance.
ïìòè λ°¿·® ß²¼ λ°´¿½»³»²¬ ﮬ-
, be sure to
provide the furnace model, manufacturing, and serial
numbers with the order.
,
all sheet metal parts, doors, etc. may be ordered by
description.
Fig . 35
ЭСУРСТЫТМ ЧЬЫТМЧЪЧЭЯМЧСТж
1. Single Stage Gas Valve
2. Gas Manifold
3. Mini Igniter
4. Natural/Propane Gas Orifice
5. Burner
6. Door Switch
7. Integrated Contol Module
8. 24 Volt Thermostat Connections
9. Circulator Blower
10. Capacitor
11. Reverse flow switch
Please contact your local installer or dealer for replacement parts.
12. Transformer
13. Rollout Limit Switch
14. Primary Limit Switch
15. Junction Box
16. Induced Draft Blower
17. Flue Collector Box
18. Heat Exchanger
19. Blower Wheel
20. Pressure Switch
21. Pressure Switch Hose
22. Flame Sensor
I&O manual
íî
Page 35

пл ЙЧОЧТЩ ЬЧЯЩОЯУН
У±¼»´-ж йрЯнЯф ирЮмЯ ирЭмЯф зрЮмЯф пррЭлЯф пррЬлЯф ппрЭлЯф порЬлЯф пнлЬлЯ
I&O manual
íí
Page 36

У±¼»´-ж лрЯнЯ
I&O manual
íì
Page 37

GM80S Series
79 09 N. W. 54 t h St r eet ,
Mi ami , FL 33 1 66 US A
Ph one : +1 (3 0 5) 59 4-4 972
Fax : + 1 ( 305 ) 675 -22 1 2
e- mai l : sa l es@ kli mai r e.c om
ww w. kli m air e.c om
 Loading...