

Page 1
!
KLIM VOICE USER MANUAL
We want to thank you for your purchase. If you have any issue with the product do
not hesitate to contact us.
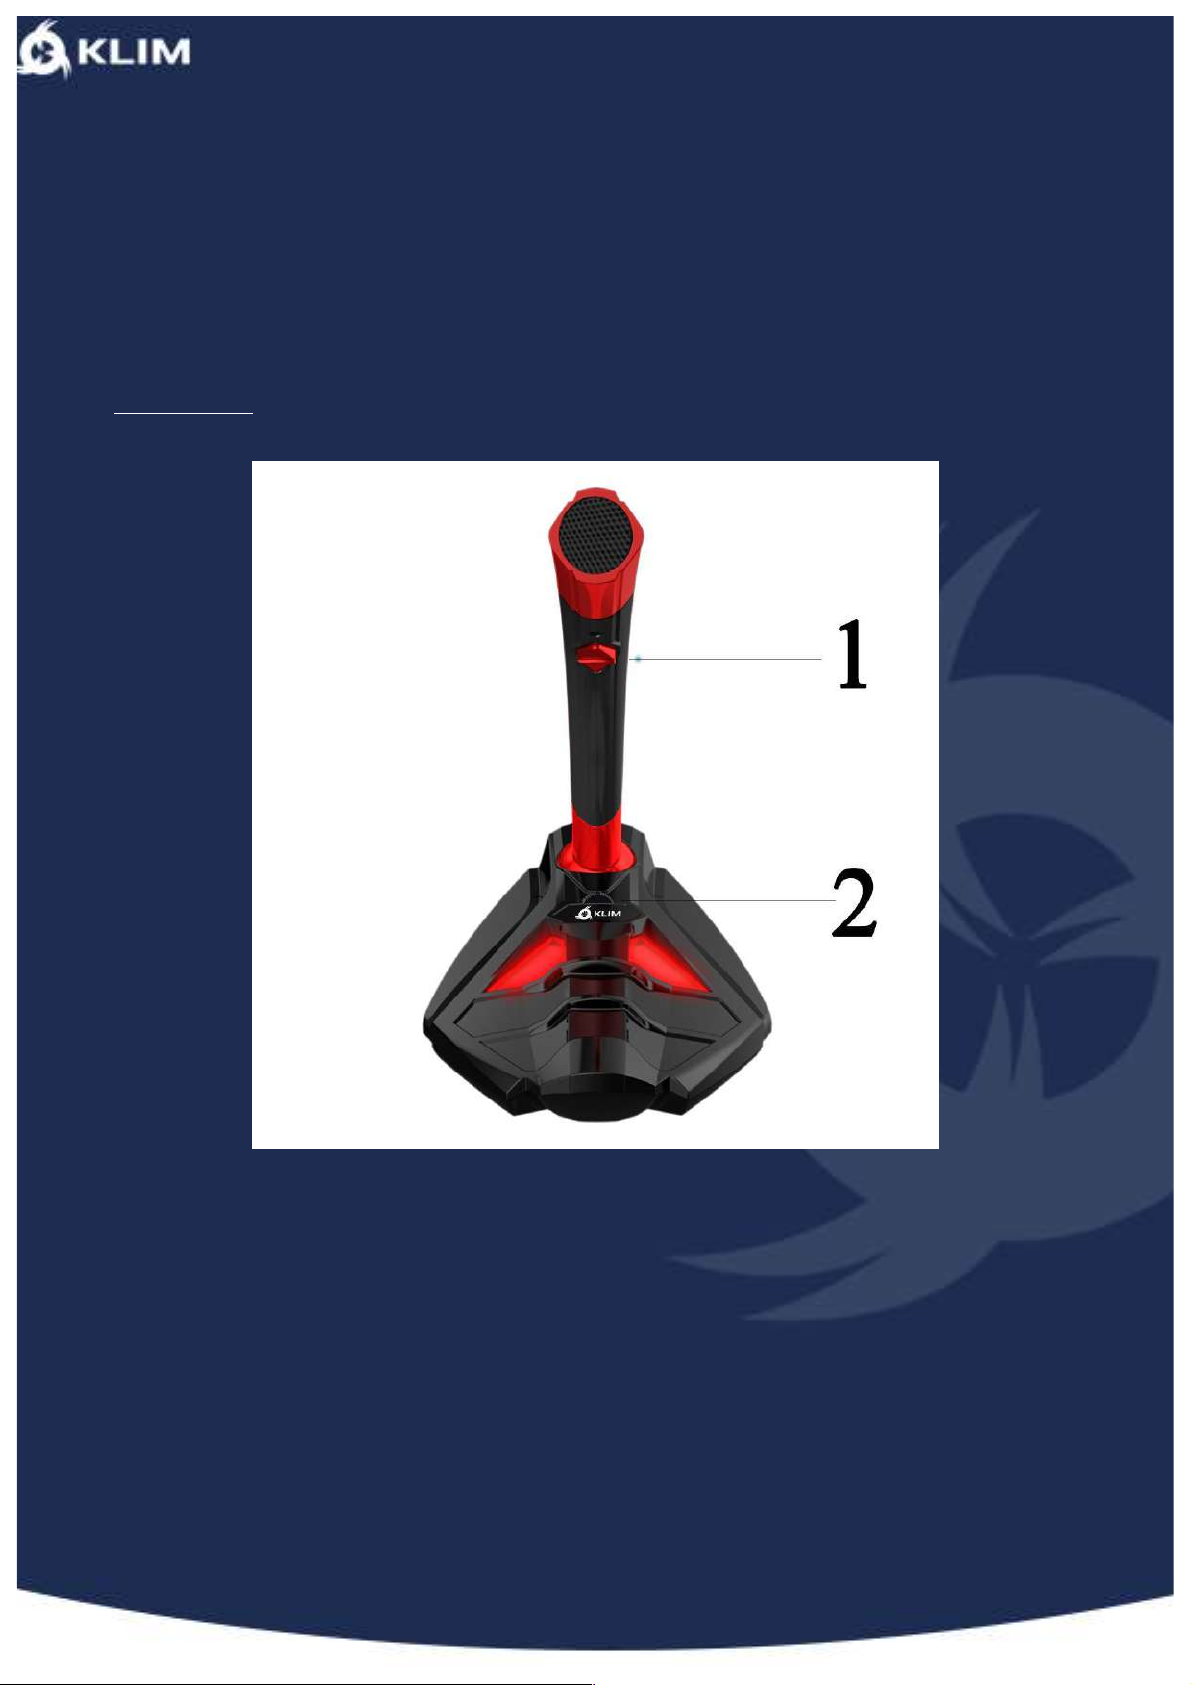
I. SWITCHES
1. It’s the mute/unmute switch. By pulling it towardS the bottom you deactivate the
microphone.
2. It’s the volume switch. Push it a few times to the right in order to increase the
volume, and inversely to decrease it. For the first use, we recommend you to push
it to the right several times in order to use it at its highest potential.
By pressing down this volume switch you can turn on and off the LED lights.
WARNING: The lights are purely decorative, they do not indicate whether the
microphone is working or not.
Page 2
!
II. SET UP
The microphone doesn’t require any driver. You just have to plug it in and it works.
Though in some cases the microphone isn’t prioritized compared to the in-built
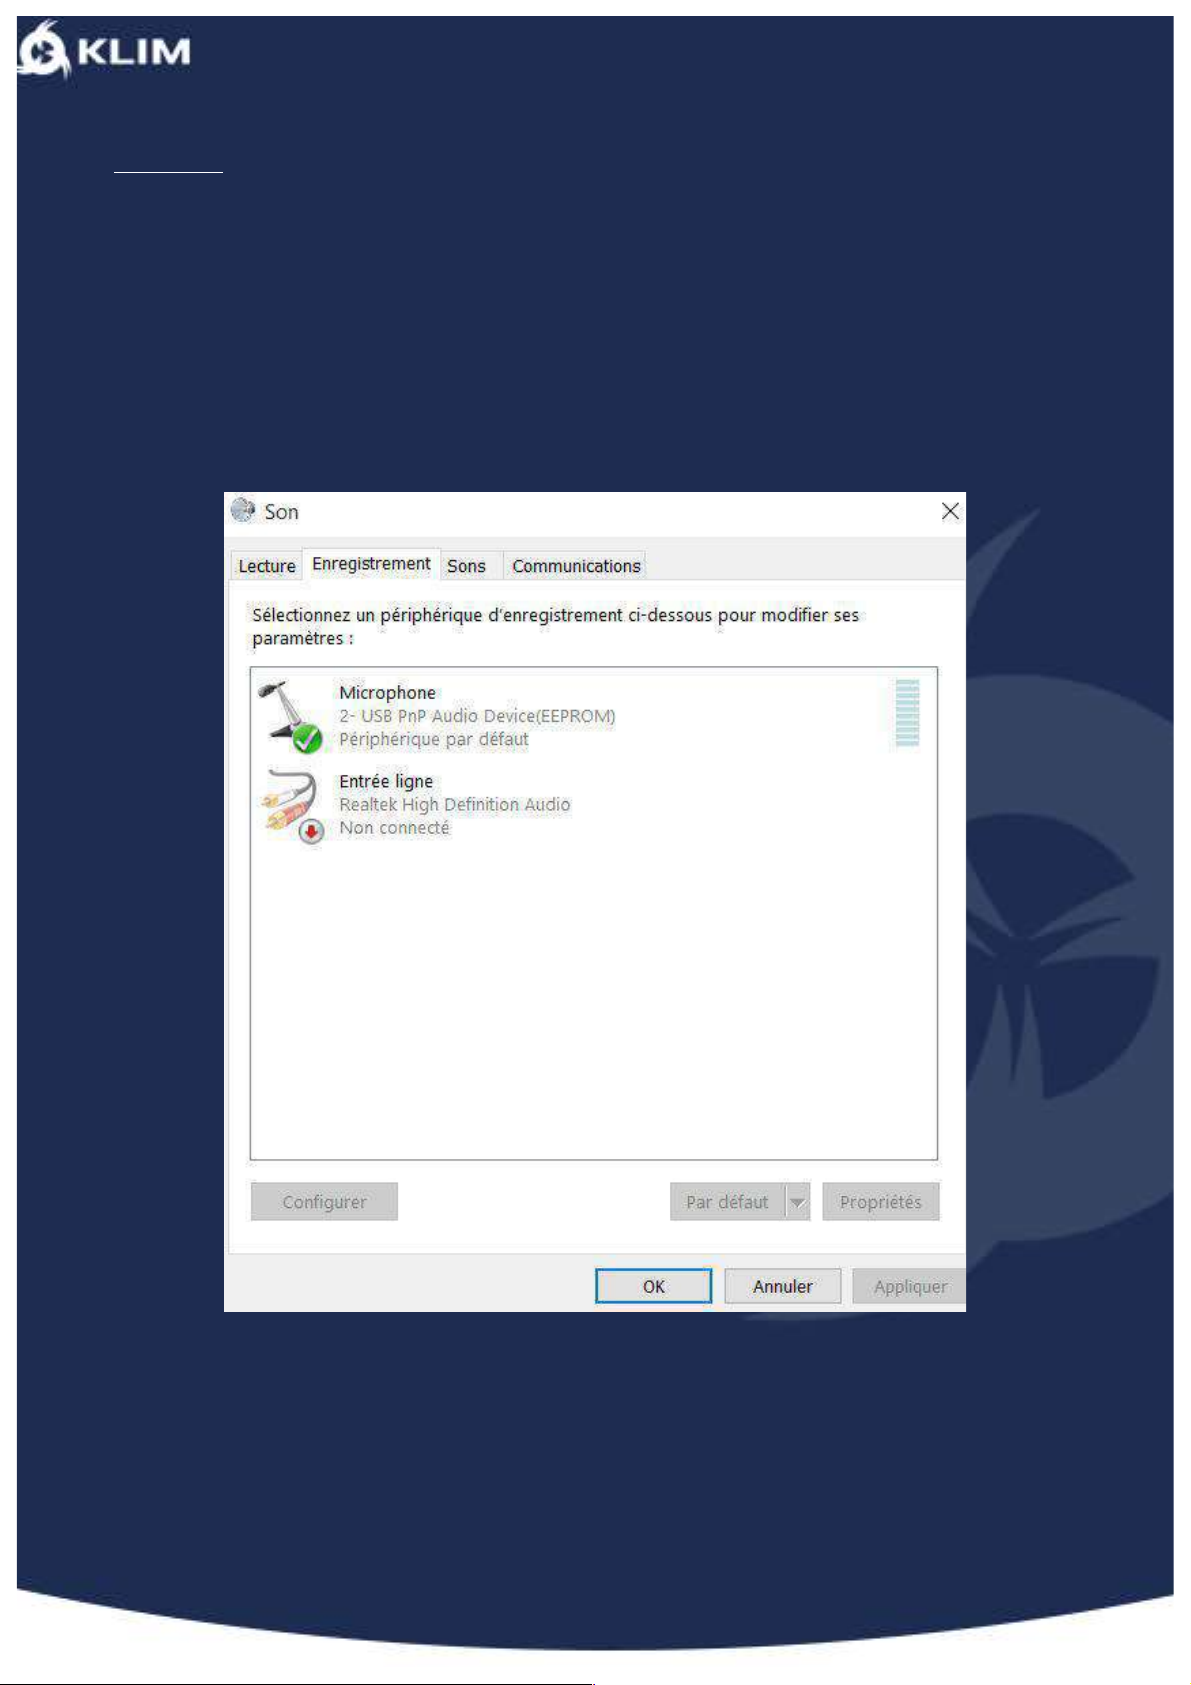
microphone (for a laptop). Here’s how you check it on Windows (sorry for the French
screenshot, from now on you can brag that you know how to say “recording” in French).
1. Go on your control panel => Hardware and sound => Manage audio devices =>
Recording
2. Check that the microphone is as such:
We strongly advise against using the Windows function “listen to the microphone”
because it will have excessive white noise. If you want to try out the microphone and
test the recording we recommend you to use Audacity, the most trusted free software
available.
You will very easily be able to record your voice and play it back.
In any case we remain available if we can be of any help.
Page 3
!
Have a very nice day!
The KLIM Techs team (well, mostly me, Thomas, since I’m the one who actually
wrote this manual).
I apologize for any possible English mistakes.
III. TROUBLESHOOTING
1. How do I know if my microphone has been installed correctly?
WINDOWS
In Windows, you need to plug your microphone into a USB port.
KLIM Voice is a plug and play device, meaning that it should be recognized immediately
by the operating system. In order to make sure that it was properly detected by
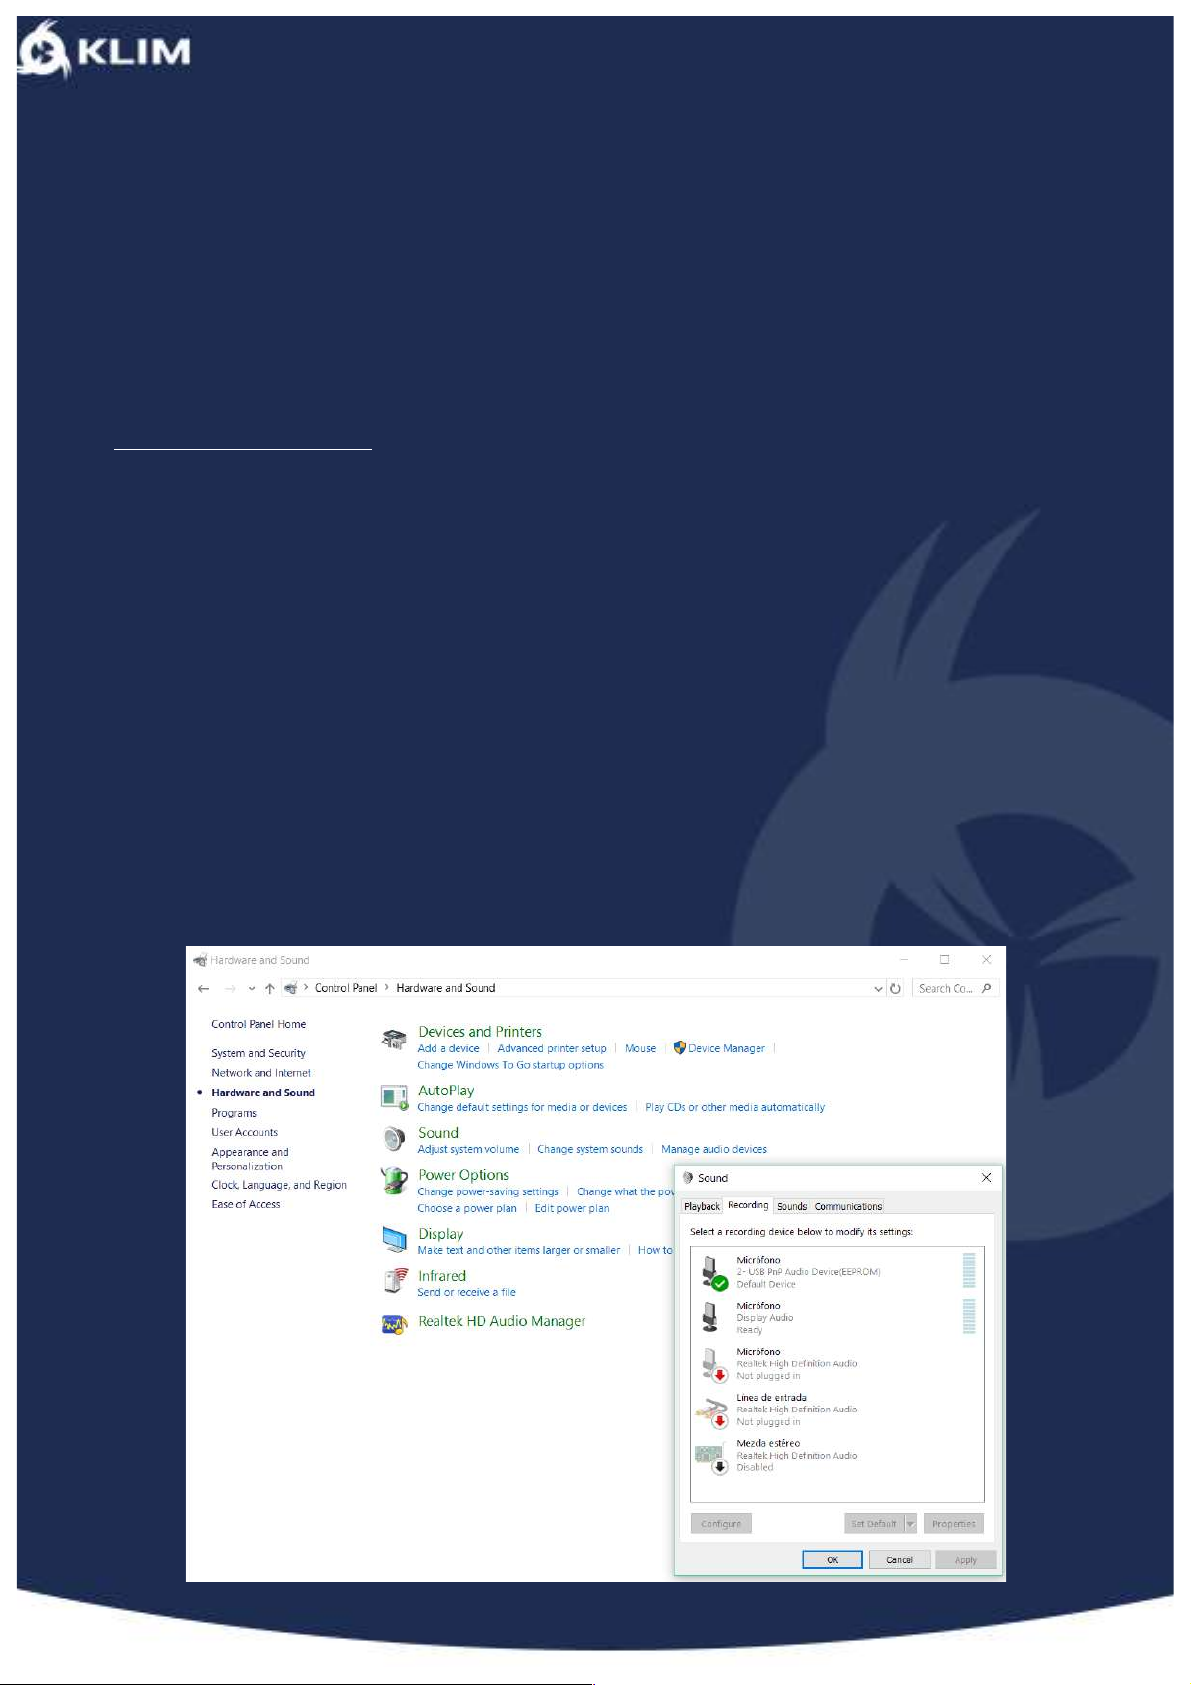
Windows, you need to open “Control Panel”, then “Hardware and Sound”, and then under
“Sound” select the “Manage audio devices” option. A new menu will be opened and
under “Recording”, you will see a Microphone named “USB PnP Audio
Device(EEPROM)”, like you can see in the following screenshot:
Page 4
!
This microphone should be configured as a “Default Device”.
MacOS
In MacOS, you need to plug your microphone into a USB port (if your Mac only has USBC ports you will need a USB-C to USB 3.0 adapter).
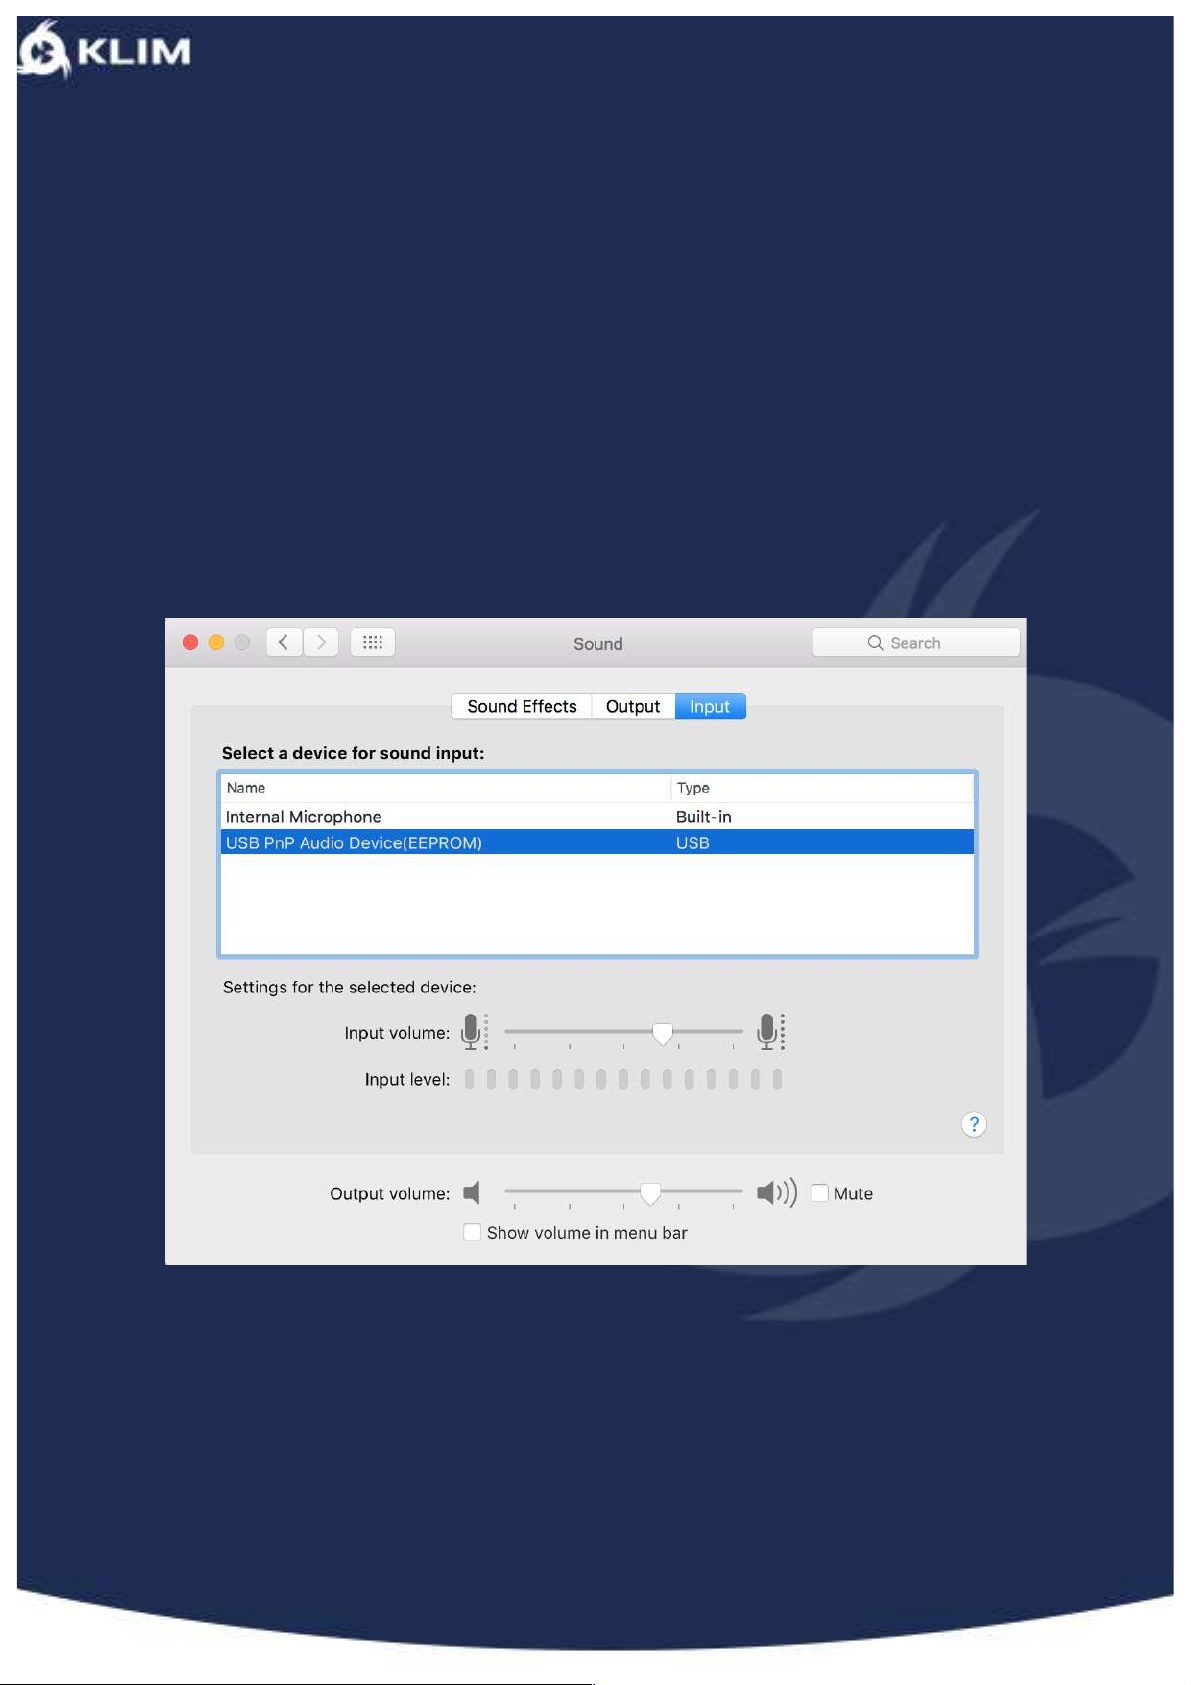
KLIM Voice is a plug and play device, meaning that it should be recognized immediately
by the operating system, and it should appear in “Sound”, under “System Preferences”
with the name “USB PnP Audio Device(EEPROM)”, as you can see it in the next
screenshot:
2. My OS shows my microphone, but is not recording any sound:
Make sure that your KLIM Voice is turned on (the arrow switch in the body of the
microphone
should be up).
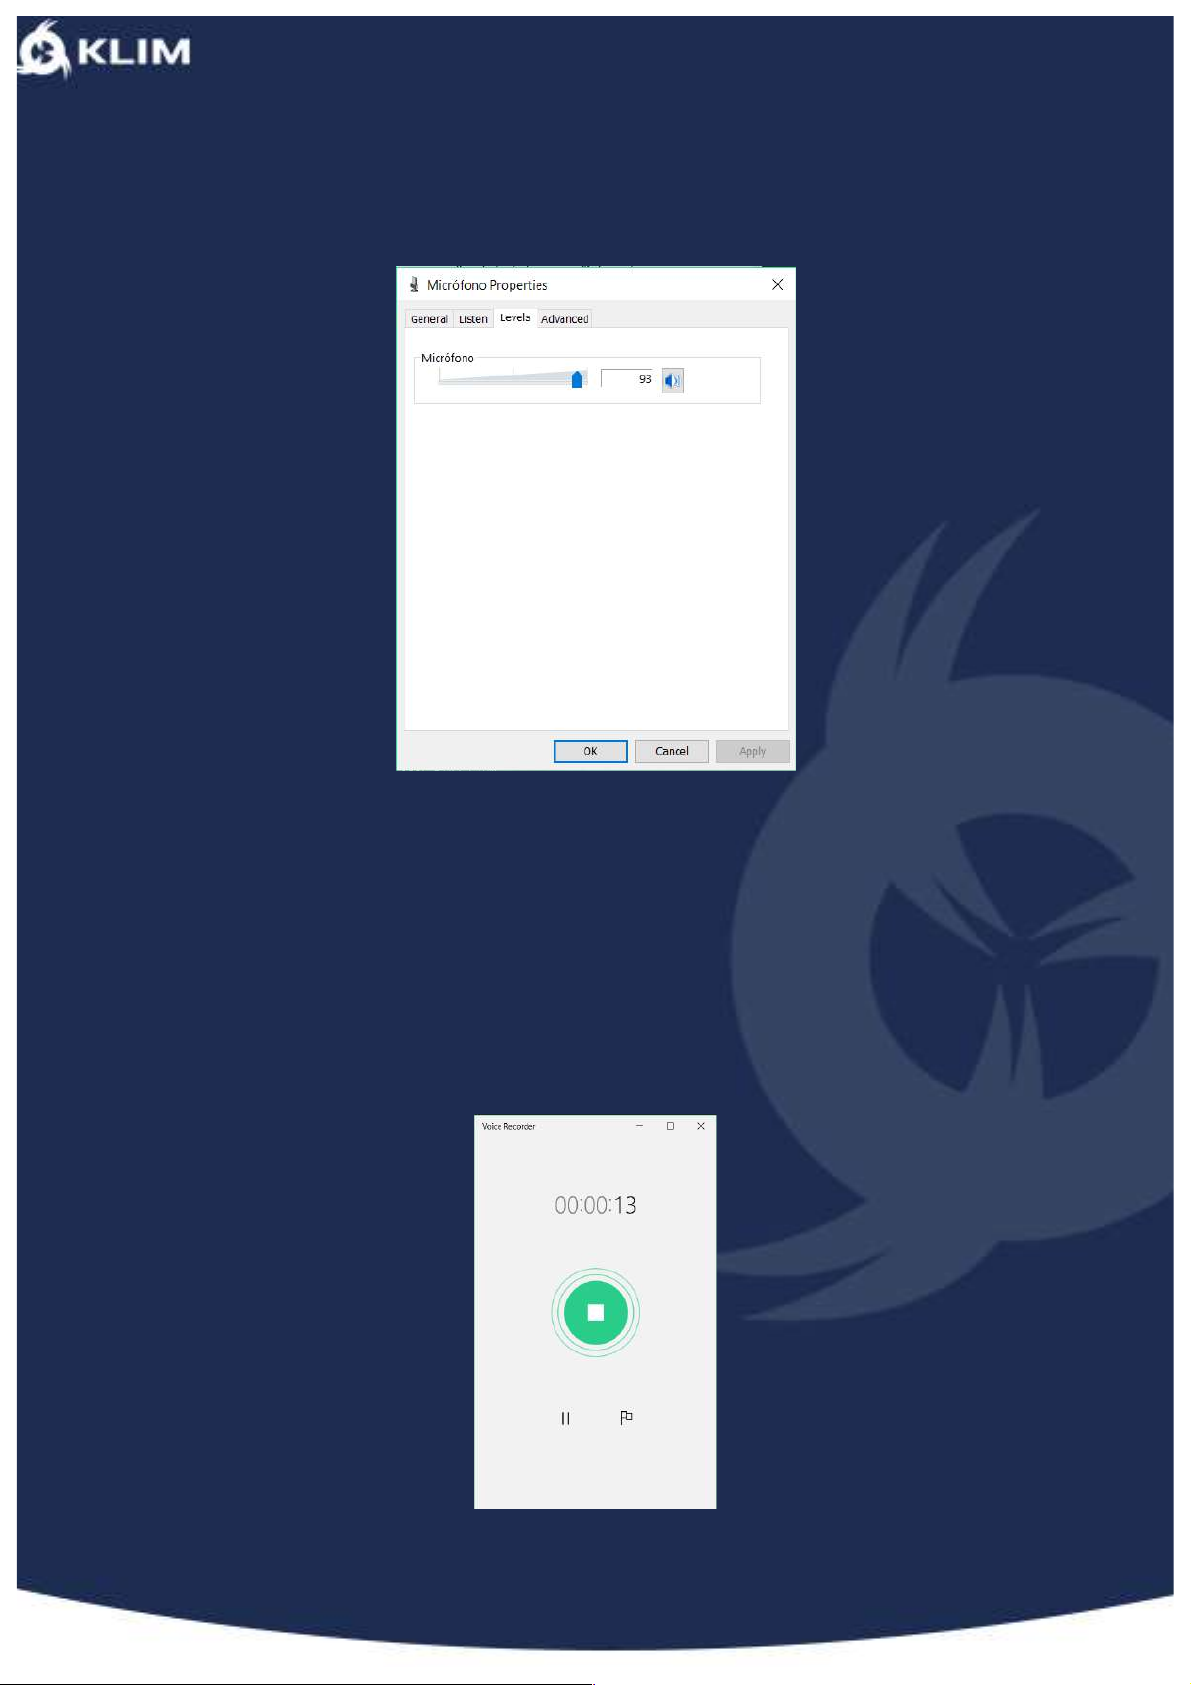
In MacOS, make sure that the input volume in the device options is enabled and is at
Page 5
!
75% or higher level.
In Windows, make sure that it’s configured as your default device, and microphone
“Levels” are higher than 90, as you can see in the next screenshot:
3. What app can I use to check that this microphone is working properly?
WINDOWS
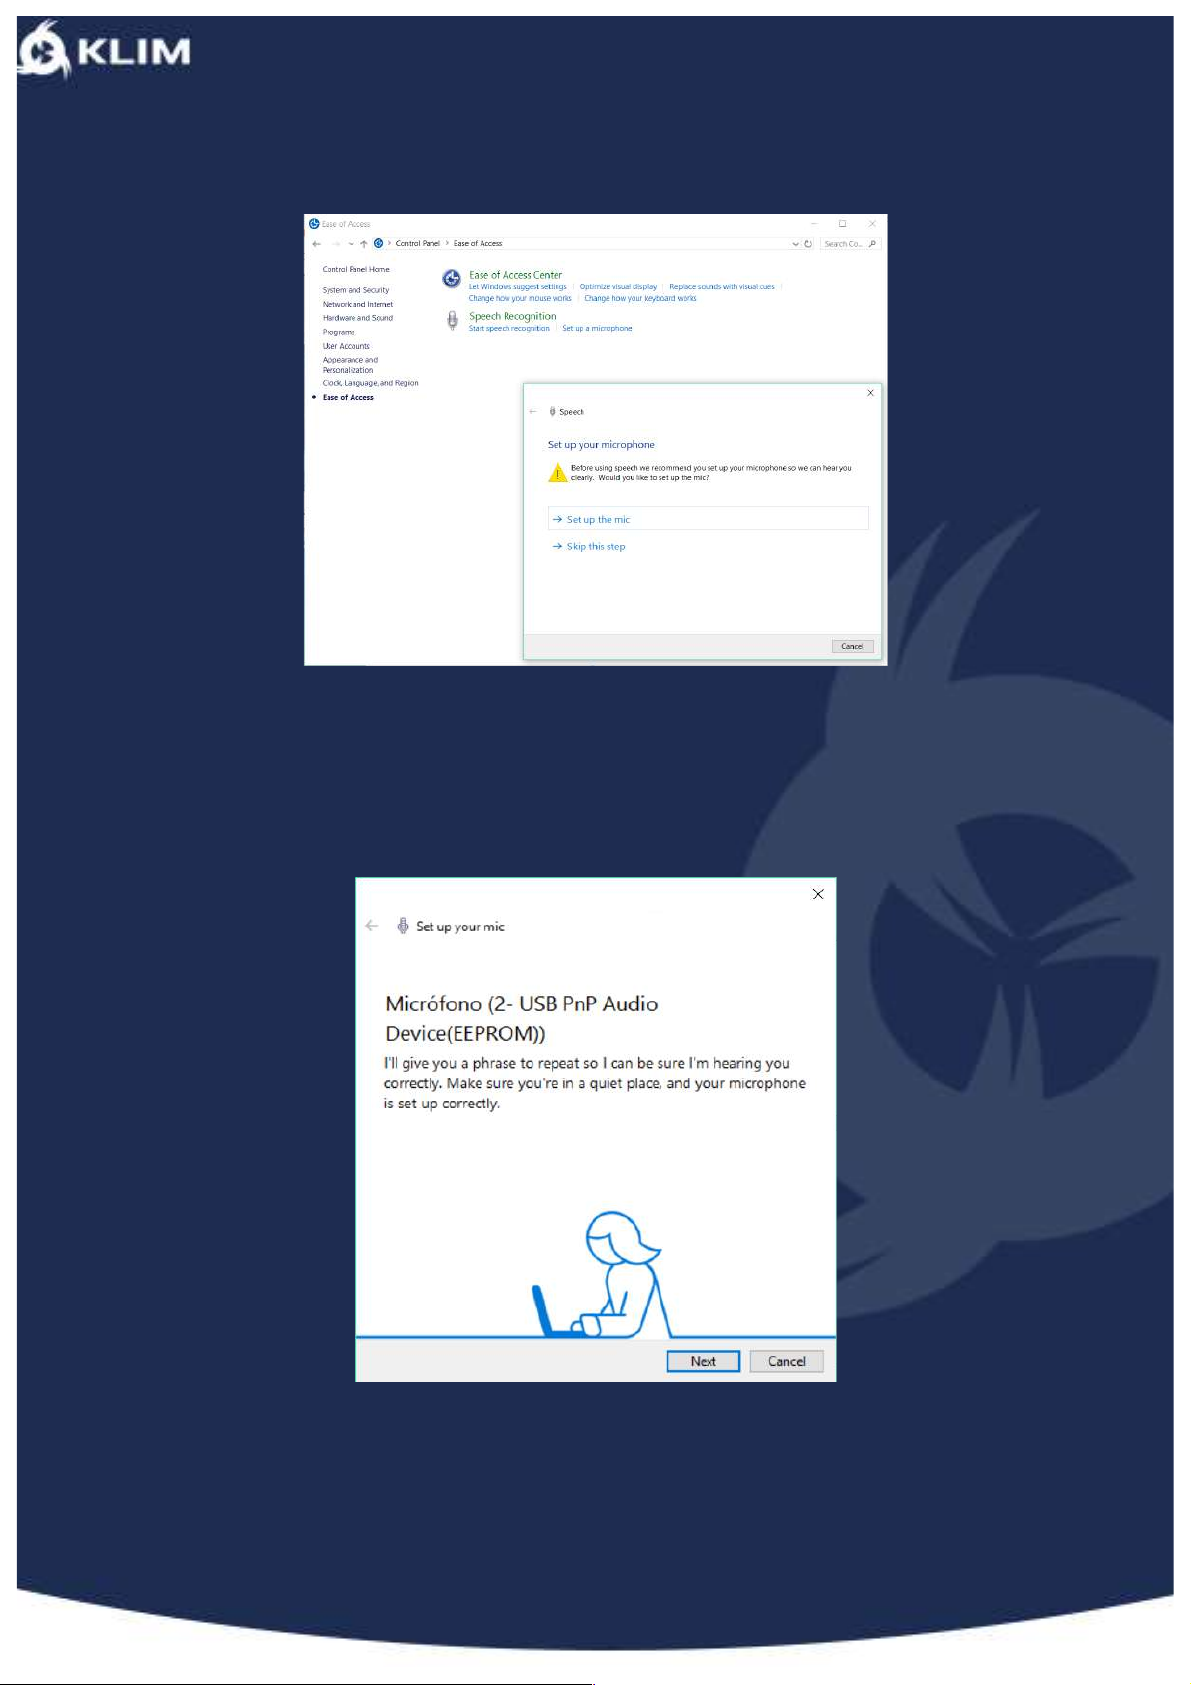
In Windows, you could test your microphone using Microsoft’s Voice Recorder to make
a quick voice recording, as you can see in the screenshot.
However, before starting recording, we suggest configuring the microphone for speech,
Page 6
!
going to “Control Panel”, then “Ease of Access”, and under Speech Recognition, click
under “Set up a microphone”, like you can see in the screenshot:
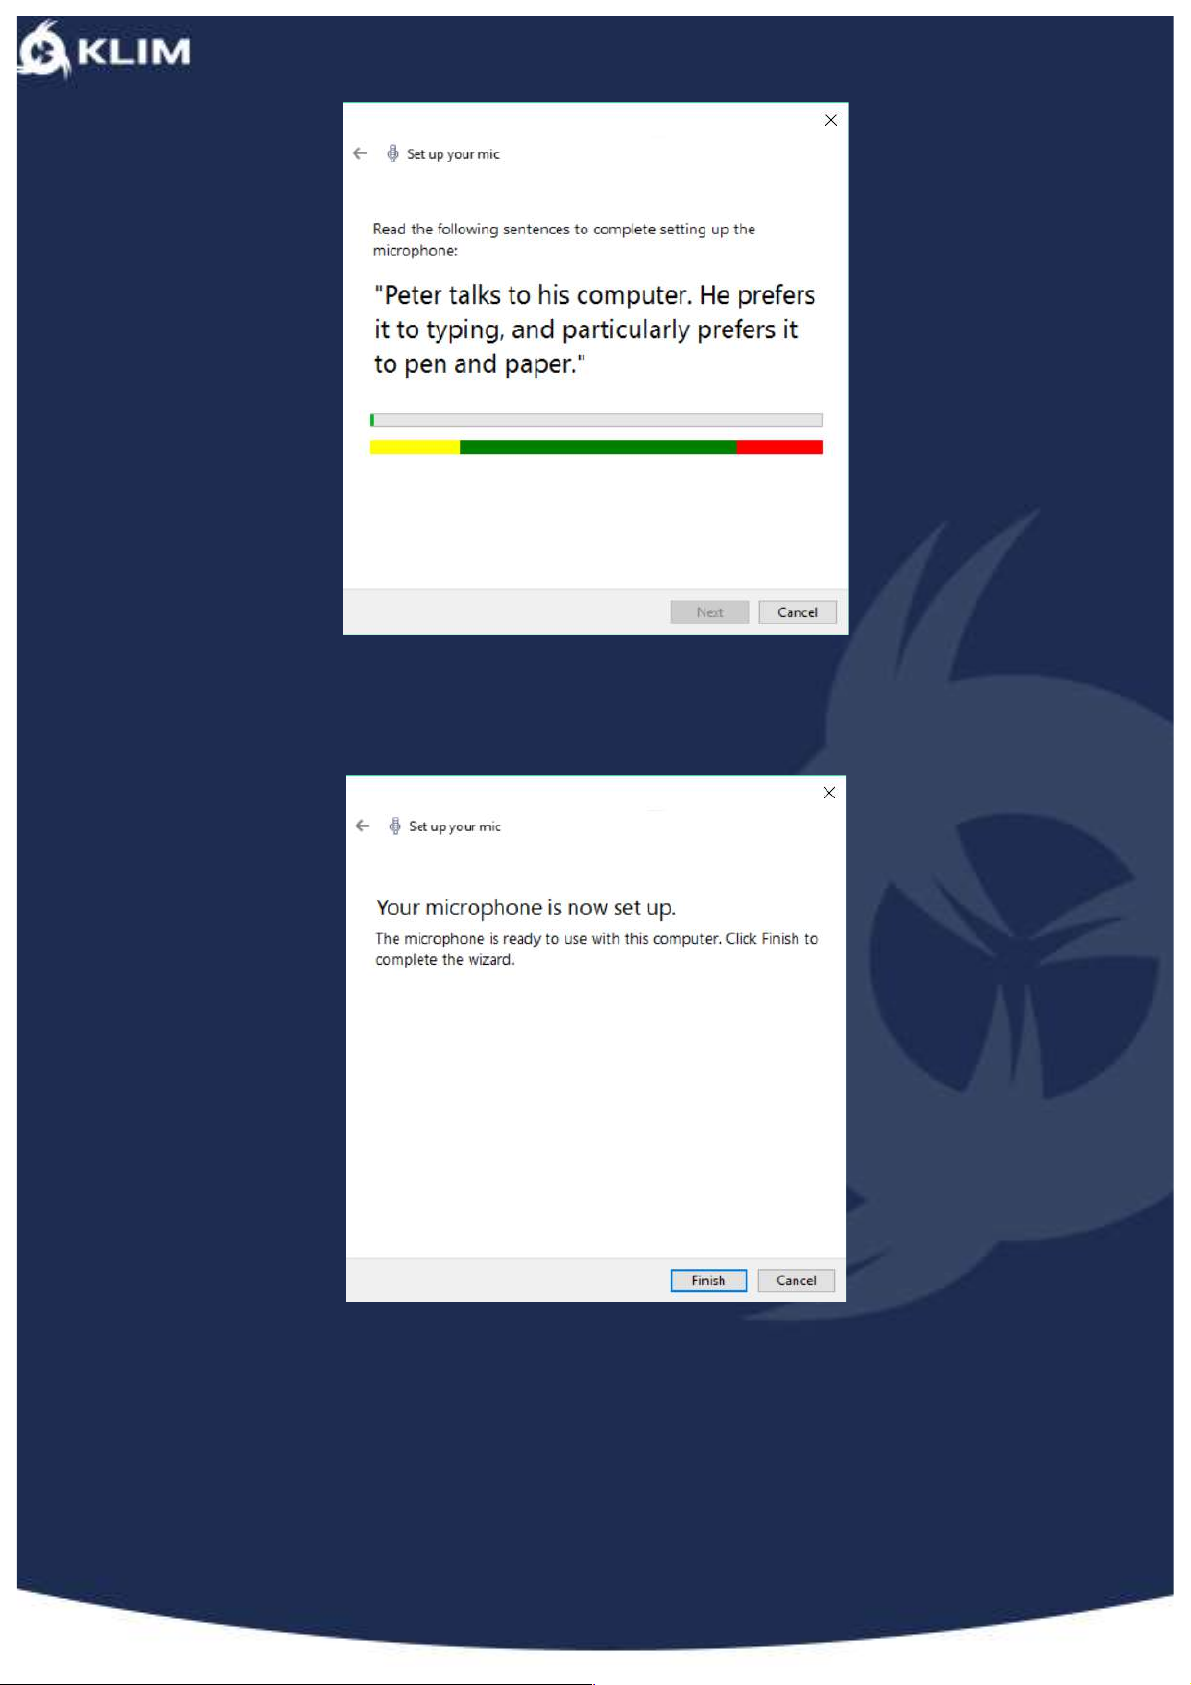
This process is very straightforward, but you will need to have the microphone at a
distance of less than 2ft from your mouth, pointing it to your head and in a quiet place.
It also has to be far away from any interference source like speakers, fans or other
electronic devices.
You will need to read the text, and make sure that the volume is at max level – the
wheel in the base of the microphone over the logo should be completely to the right.
Page 7
!
As soon as you finish this step, your microphone will be configured and ready to use
with your favorite app.
If you want to use a free audio editor and recorder, we recommend Audacity which is
available as a free download for Windows.
Page 8
!
MacOS
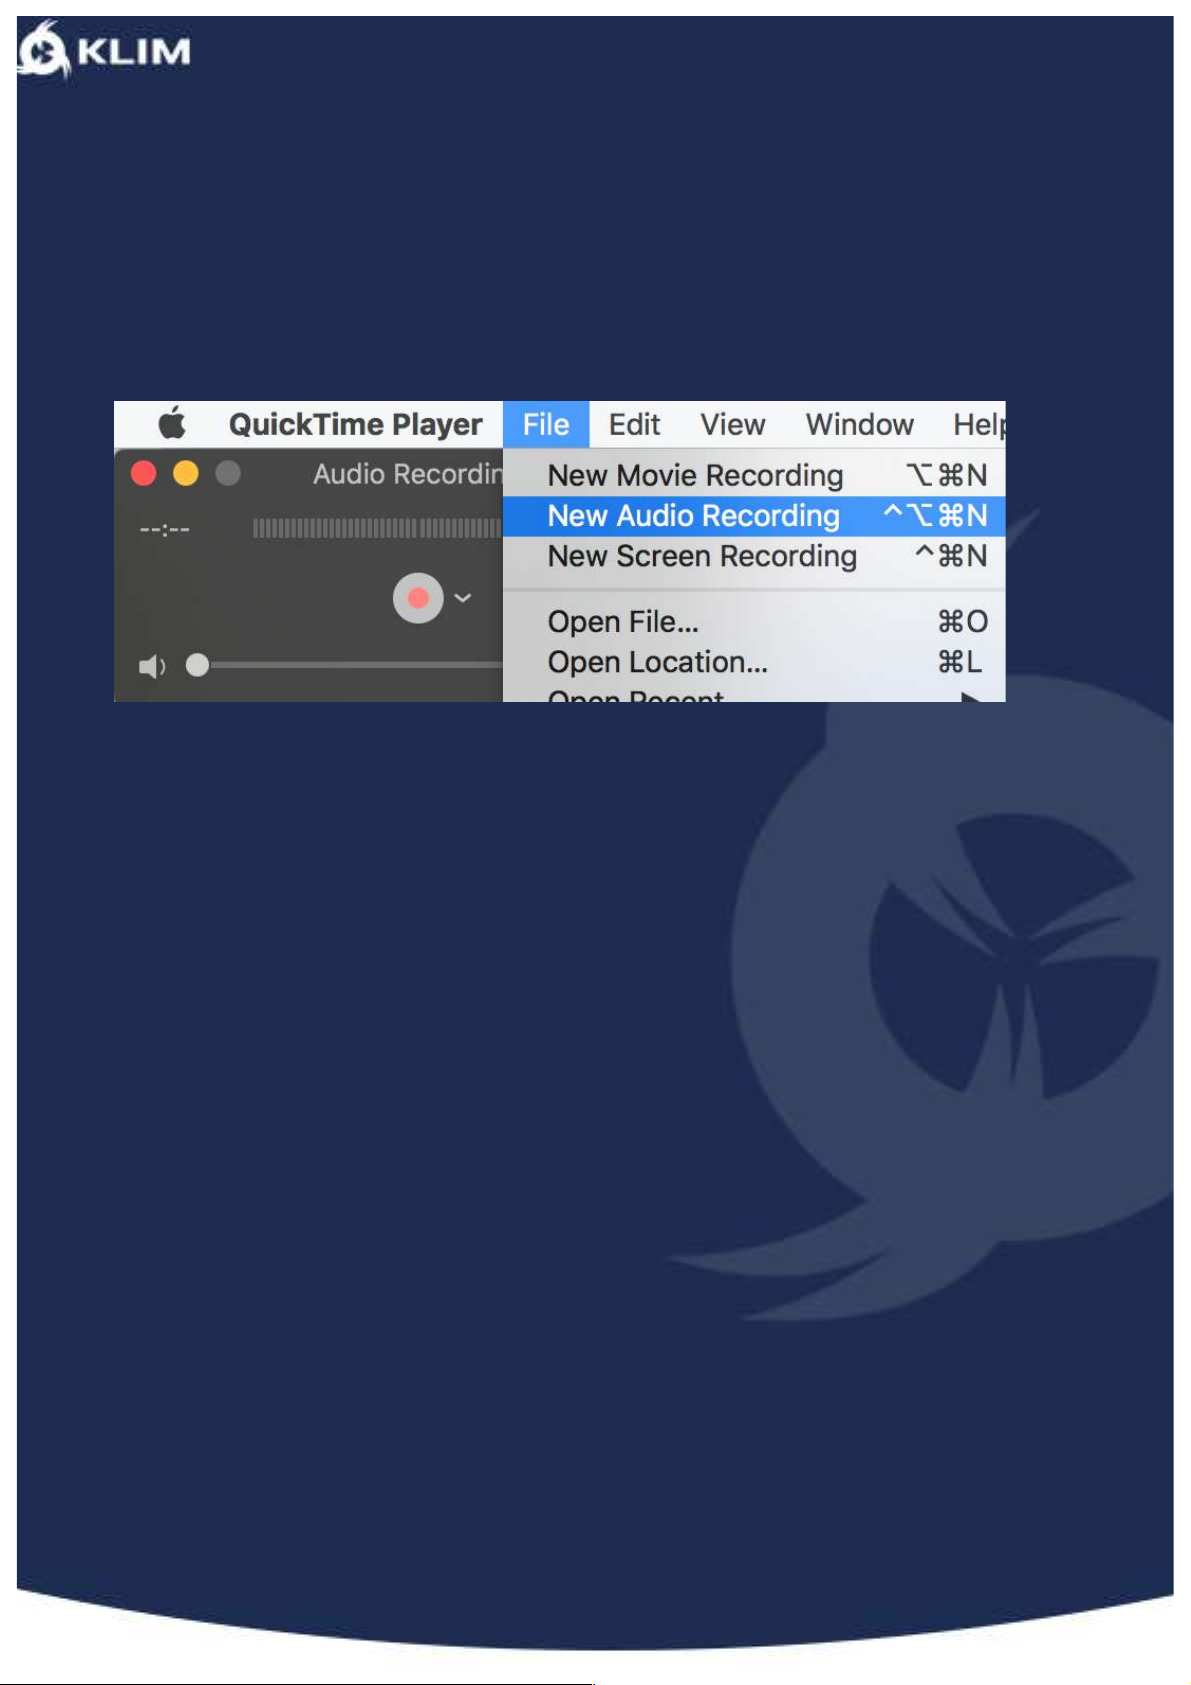
In MacOS you could use QuickTime to test your microphone, by making a quick
recording. You just need to open QuickTime, select “File” and then “New Audio
Recording”, like you can see in the screenshot. You will need to press the rec button and
save your file in the desired location.
If you want to use a free audio editor and recorder, we recommend Audacity which is
available as a free download for Mac.
Page 9
!
IV. FAQ
1. Can I use a USB HUB?
Yes, we have tested this microphone using our KLIM Bungee and it works great. We
have
also tested it using the USB back ports of a 27” Apple Cinema Display without any
issue.
2. Can I use this microphone with my videogame console?
KLIM Voice is not compatible with XBOX 360, Wii or XBOX One. But, it works great if you
plug it into a PS3 or PS4.
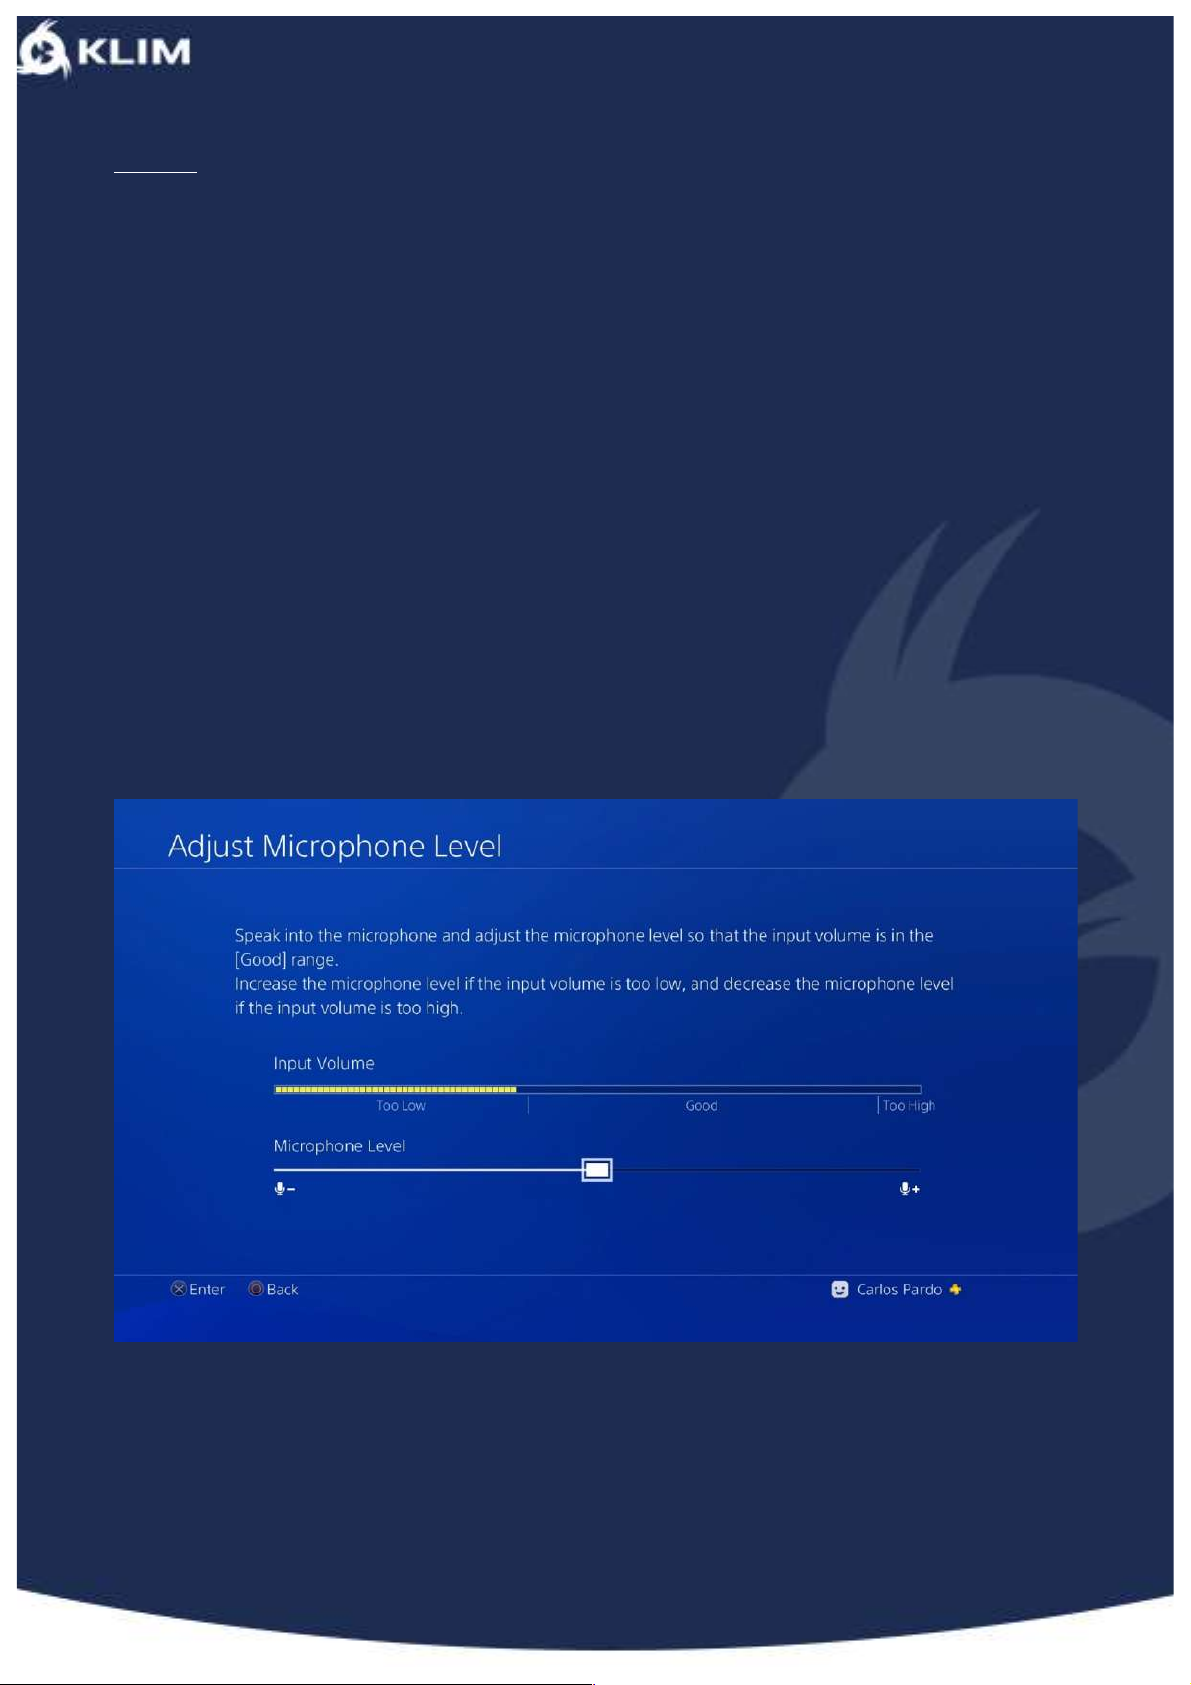
If you have a PS4, it will be automatically configured as soon as you plug it into the
console
and it will be recognized as a USB Microphone (USB PnP Audio DeviceEEPROM). You
don’t need to do anything else in order to use it. But, if you wish to adjust microphone
levels, you could go to Settings / Devices / Audio Devices and there you can select the
option “Adjust Microphone Level”, like you can see in the next screenshot.
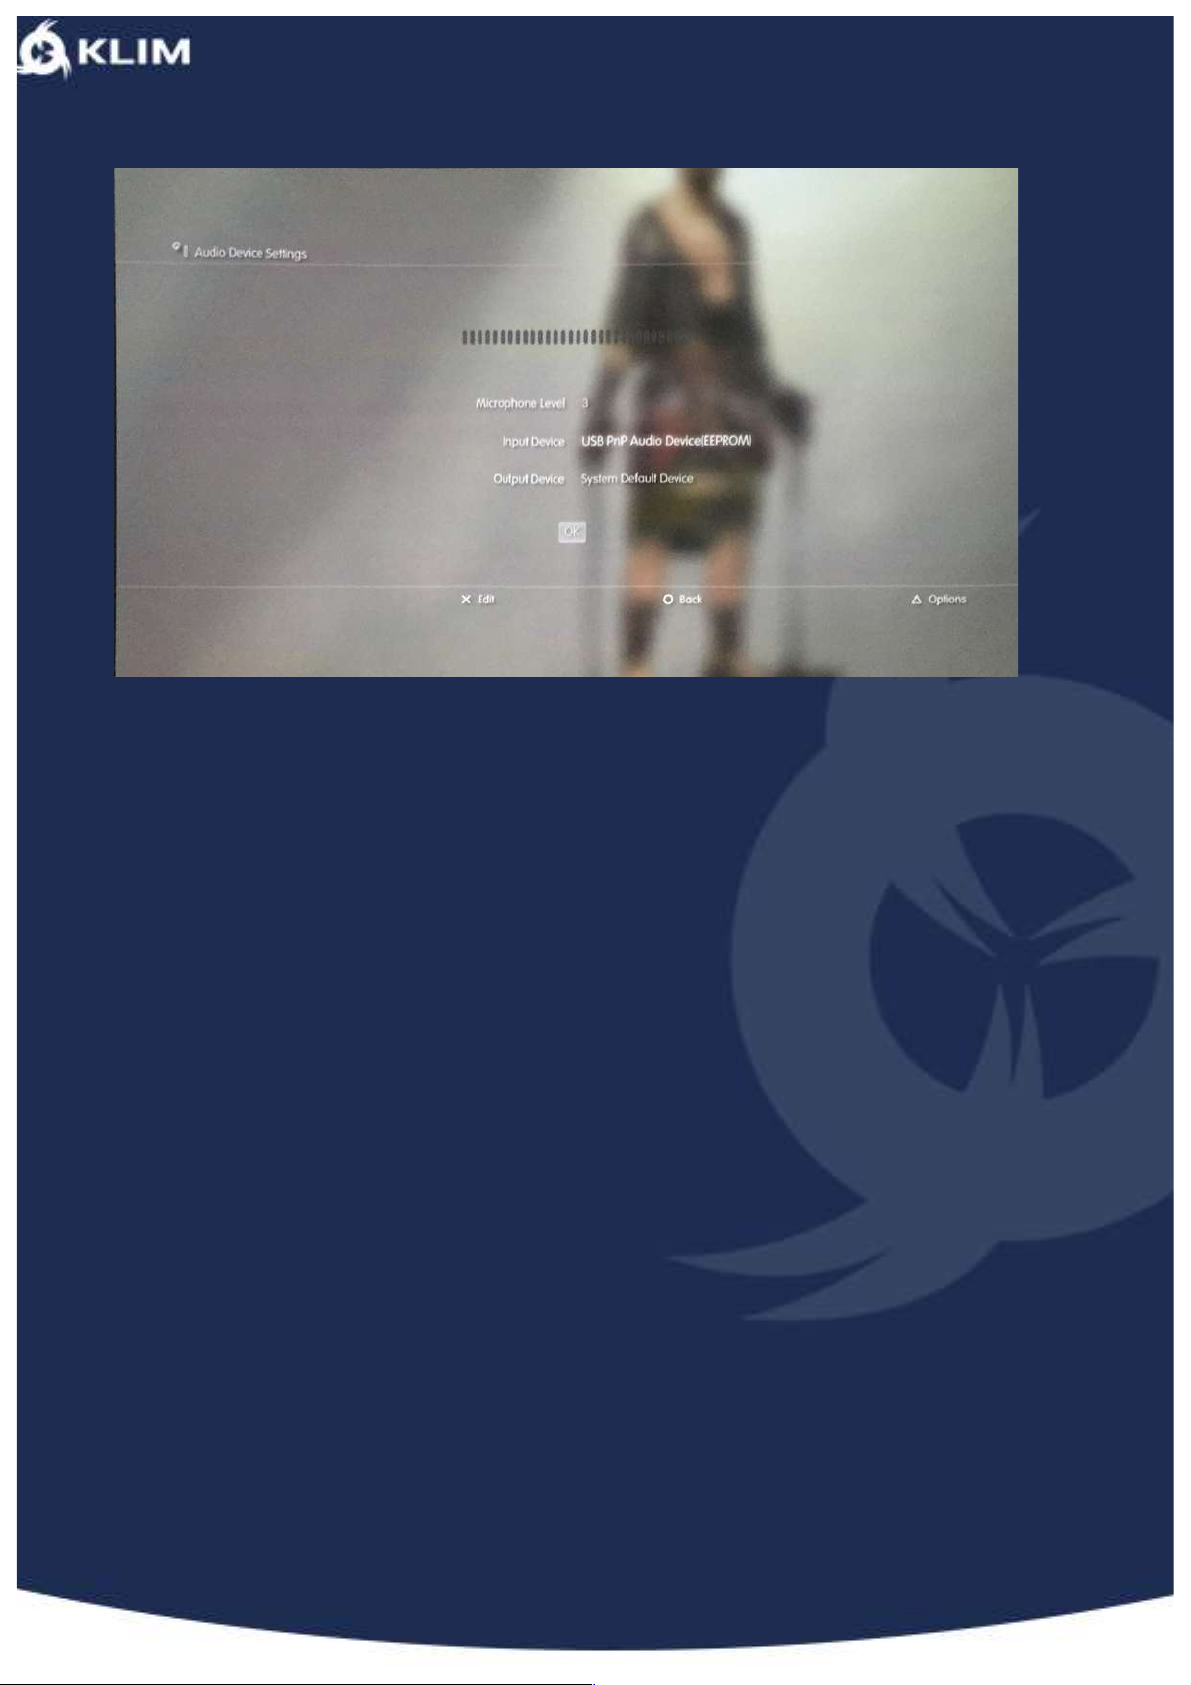
If you have a PS3, it will be automatically detected as soon as you plug it into the
console.
But, you will have to adjust some settings before using it.
In your console, go to Settings / Accessory Settings / Audio Device Settings, and then
make sure that the microphone is activated as an “Input Device”, like you can see in the
Page 10
!
next screenshot.
3. I’m hearing some ambient noise when I record my voice – what can I do?
Make sure that you are in a quiet area and you are not close to any device which could
cause interference with your microphone.
If you are in a room, we recommend you to close any doors and windows to improve
acoustics and reduce ambient noise. Make sure that your microphone is 2 ft or closer
from your mouth and pointing to your head.
If ambient noise has been recorded in an audio file, you can remove it using the free
audio editor Audacity, following the steps from this guide:
Find Some Background Noise
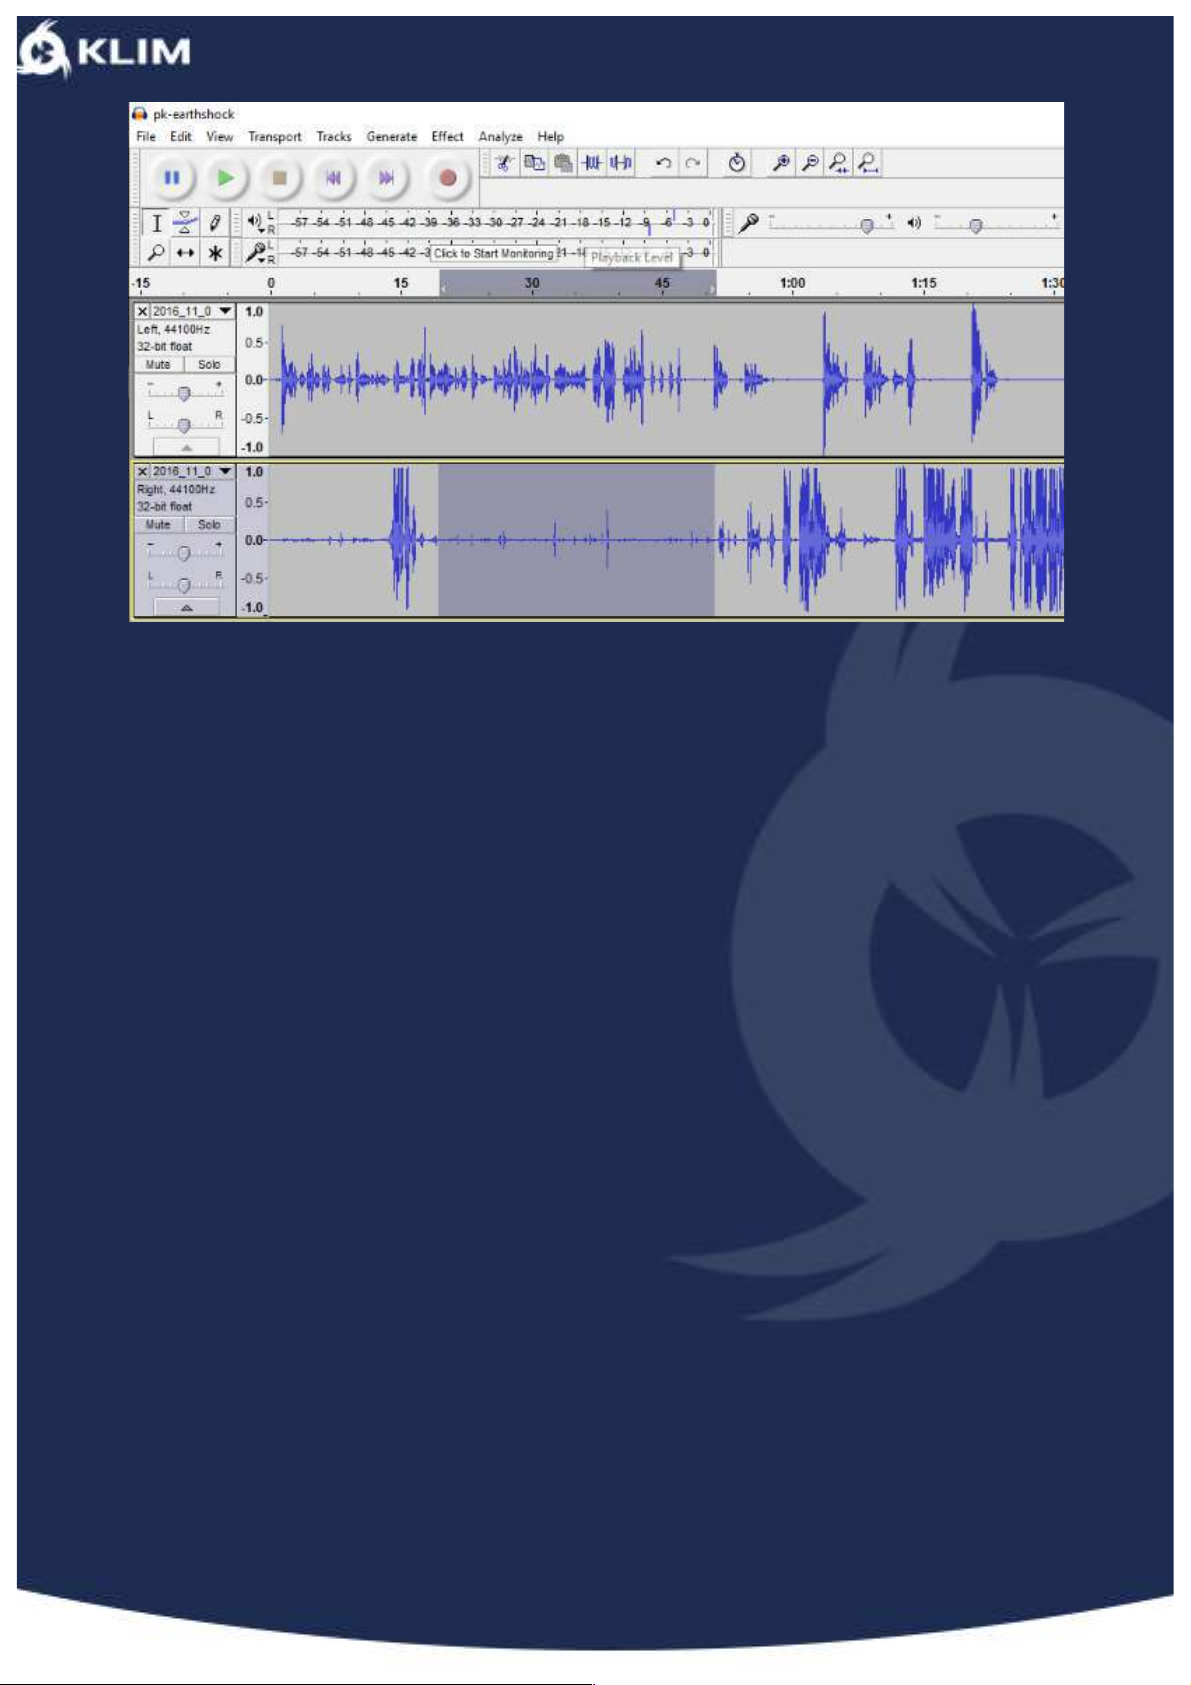
To filter out the ambient background noise, you’ll need to find a section of audio where
it can be heard alone, isolated. This might involve splitting a stereo track to two mono
tracks (via the down-arrow on the Track Control Panel, and selecting Split Stereo
Track).
Page 11
!
Once you’ve found the audio — which Audacity will use as an example — you should
select it with the mouse. Make sure the Selection tool is selected, then left-click and
drag the section of background, ambient audio.
This audio selection will be used by the Noise Reduction feature in Audacity to find
similar background ambient, and remove it from the track(s). Not only is it pretty clever,
the end results are almost always superb.
Use Noise Reduction in Audacity
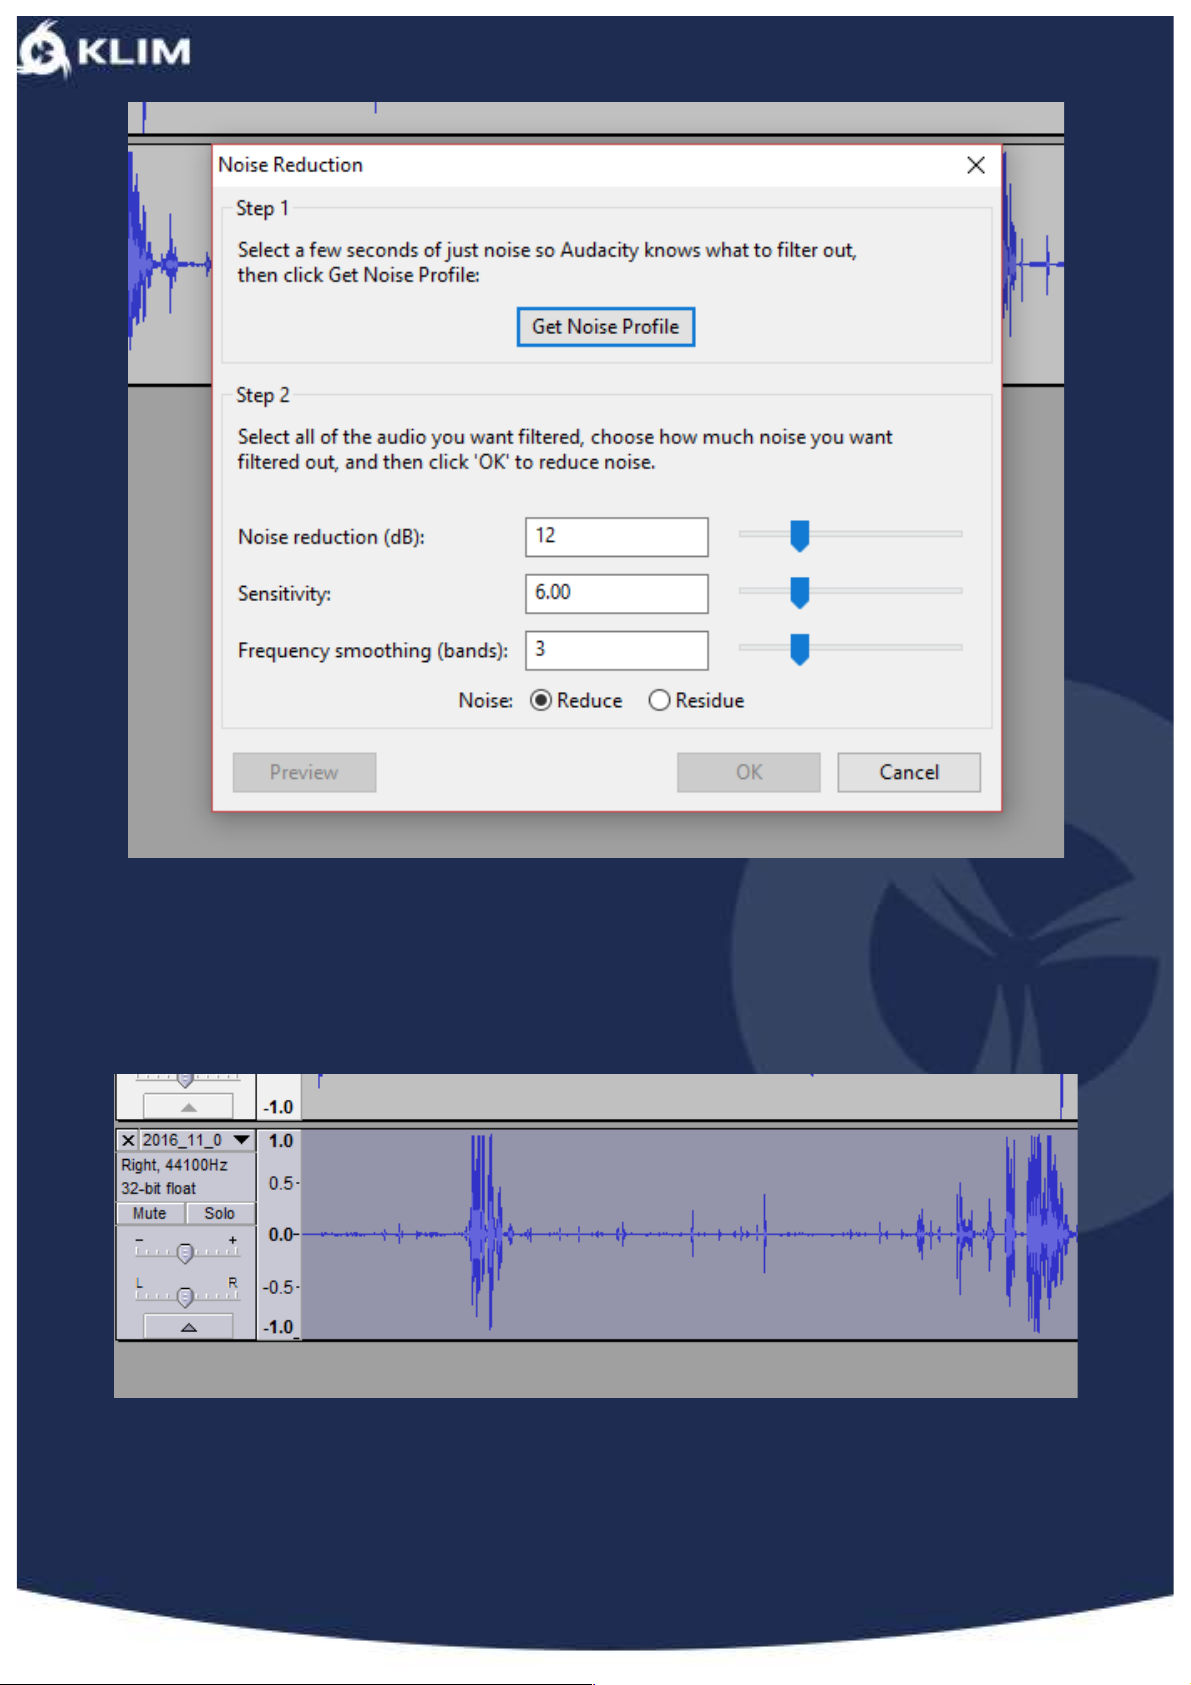
With the audio selected (it will be highlighted in blue), open the Effects > Noise
Reduction feature. You’ll see a dialogue box with a two-step tool. First, head to Step 1
and click the Get Noise Profile button. You have your profile selected already, so
proceed to click this.
Page 12
!
At this point, the Noise Reduction box will close. Don’t let this confuse you. Instead,
select the portion of audio that you wish to remove the ambient sound from. If this is an
entire track, simply left-click the track header to select it all.
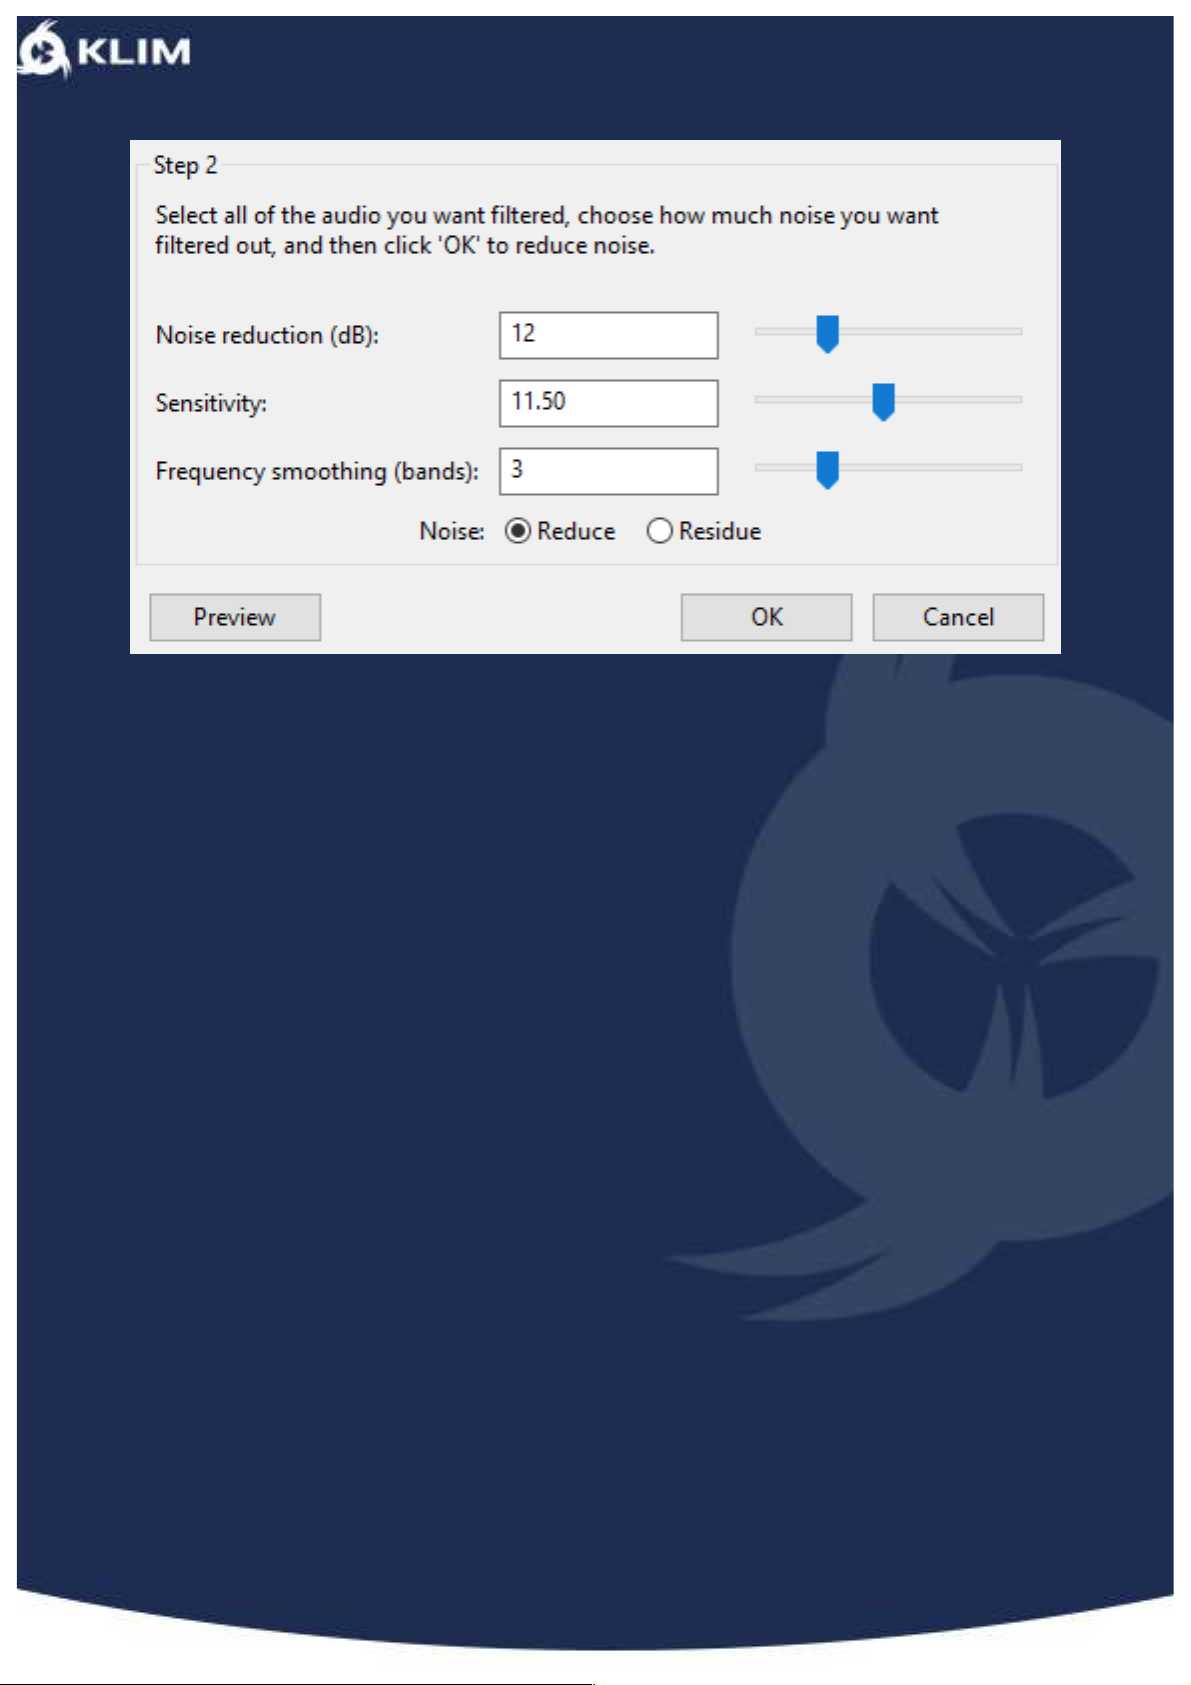
With this selected, return to Effects > Noise Reduction, and look at Step 2. In most
cases, the default Noise Reduction, Sensitivity and Frequency Smoothing settings will
work, so you can go ahead and click OK to accept these. It may take a while for the
noise reduction to be applied; this will depend on the track duration.
Page 13
!
Of course, you’re free to alter the Noise Reduction, Sensitivity and Frequency
Smoothing settings, and if you have the time to play with them (this can be tricky with
longer tracks, due to the processing time), it can be worth your while to achieve a
superior result.
Once this is done, preview the results. If you’re happy with them, hit File > Save to
remember the change.
--
We would like to thank you, in the name of the entire team here at KLIM, for having
purchased the KLIM Voice and we hope it will live up to your expectations!
Don’t hesitate to leave us a comment on the website you purchased it from, it really
helps us tremendously!
KLIM Team
 Loading...