

Page 1
Instructions for the Proper Use and Care of Klein®
Lineman’s Body Belts and Positioning Straps
Para español, vaya a la página 13.
Pour le français, allez à la page 25.
Introduction
This instruction manual explains how to use,
inspect and maintain Klein lineman’s body belts
and positioning straps.
Klein manufactures a full line of lineman’s body belts
and positioning straps, designed to meet OSHA
criteria for positioning applications.
Note: Klein’s lineman’s body belts are for positioning applications only and should not be used
alone as a personal fall-arrest system, as defined
under Subpart M of OSHA standard 1926.
The positioning symbol shown in Figure 1
appears on warning tags attached to each
body belt. This symbol identifies the belt’s
Figure 1
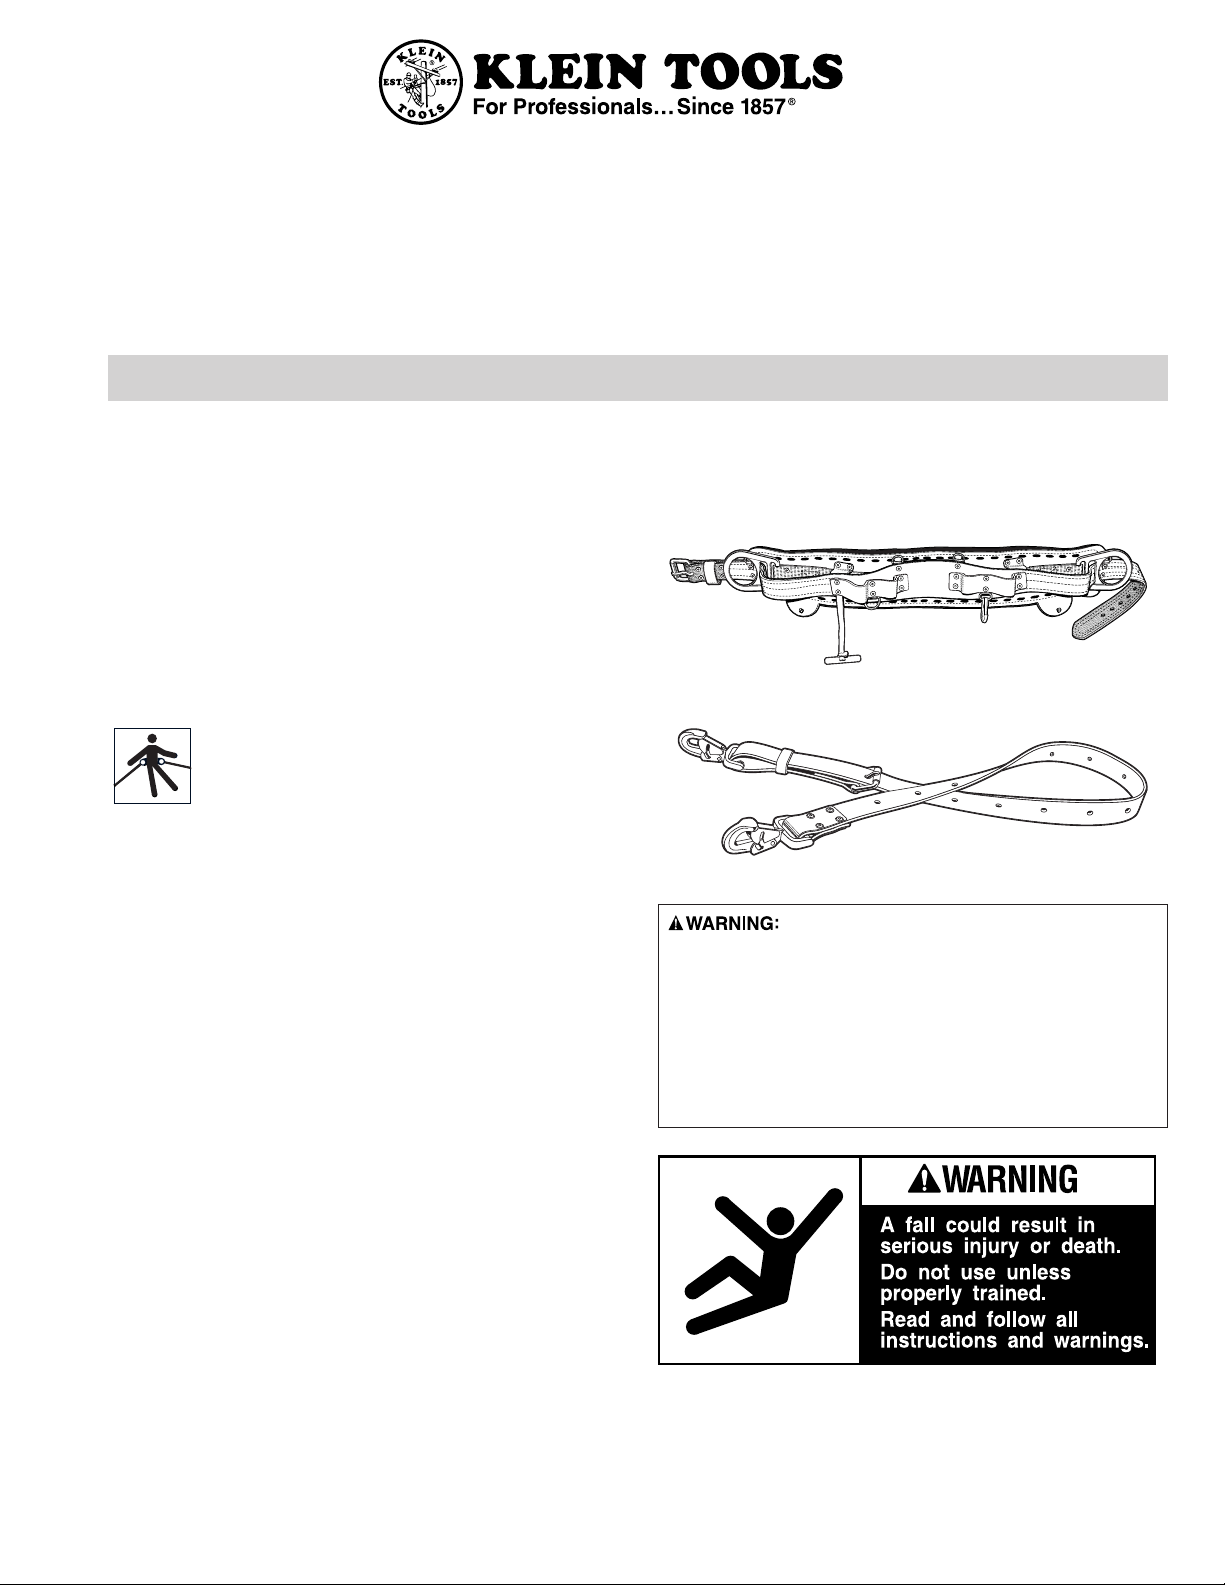
Klein lineman’s body belts are available in full-floating,
semi-floating, or fixed styles. They combine the features of an OPE (occupational protective equipment)
positioning belt with a specialized tool belt. They
meet or exceed all OSHA regulations, which apply to
positioning device systems, for power utilities (OSHA
1926.959) and telecommunications (OSHA 1910.268
and 1910.269). They also meet or exceed standards
ASTM F 887, CSA Z259.1 and CSA Z259.11. Each
belt is affixed with a permanent tag, which identifies model number, serial number, size, and date of
manufacture.
OPE function.
Note: For clarity, illustrations in this instruction
booklet do not show any warning tags or labels,
which are attached to each product.
Save these instructions. This equipment
must not be used by anyone who has not read,
understood and followed all the instructions and
inspection procedures contained in this booklet.
Failure to read, understand and follow all instructions may result in serious injury or death. Training
and instruction review should be repeated at regular
intervals by the user and his or her employer.
Klein positioning straps are available in the following lengths: 5'8" (1.7 m), 6' (1.8 m), 6'6" (2.0 m), 7'
(2.1 m), and 8' (2.4 m). They are designed to conform with OSHA standards 1910.268, 1910.269 and
1926.959.
All individuals who use Klein lineman’s body belts
and positioning straps must be instructed in how to
use that equipment correctly. Also, they must read,
understand and follow all instructions and warnings
contained in this booklet or packed with the product
before each use.
Page 2
Materials Used in Lineman’s Body Belts & Positioning Straps
Klein-Kord
The load-bearing material in Klein positioning straps
is our exclusive Klein-Kord, an exceptionally strong,
multi-ply filament nylon fabric that is neopreneimpregnated, folded, and vulcanized.
Klein-Kord is abrasion-resistant, non-conductive,
virtually free from stretch, and flexible for ease of use
and durability. It has excellent chemical resistance,
and is virtually unaffected by creosote and other poletreatment chemicals. In addition, its properties and
wear characteristics remain essentially unchanged
at temperatures up to 250°F (121°C).
Shown below is Klein's six-ply Klein-Kord, which is
1-3/4" (44 mm) wide. The center plies of Klein-Kord
are red at the core. When the red plies appear,
remove the strap from use immediately and replace
it. This “early warning” feature is yet another safety
measure provided by Klein Tools.
Note: The red center plies may become discolored
in use. Therefore, visual inspection for wear before
each use is mandatory.
®
Six-ply Klein-Kord with red center plies
Buckles and Billets
Klein lineman’s belts have drop-forged, singletongue buckles. Belt straps and billets are made
of Klein-Kord. On top-of-the-line belts, straps are
covered with harness leather.
Klein strongly recommends using fall-
arrest protection when working at any elevated
position. Therefore, independent fall-arrest equipment
should be used in addition to Klein's body belts
and positioning straps unless a competent person,
as defined by OSHA, has determined that such fallarrest equipment is not necessary or appropriate.
Klein’s lineman’s body belts and posi-
tioning straps are designed for positioning purposes
only, and are not to be used for any other OPE function (such as fall arrest, suspension, or retrieval).
Klein strongly recommends that only
Klein components be used with any Klein lineman’s
equipment. Klein components should NOT be
interchanged with other components made by other
manufacturers, because Klein cannot guarantee
that components made by other manufacturers are
properly designed or are free of defects in materials
or workmanship.
Drop-Forged Steel
Klein D-rings and tongue buckles are made of dropforged steel with a corrosion-resistant finish. All
Klein hardware is tested to meet or exceed applicable OSHA standards.
Nylon Webbing
Klein uses a high-quality, commercial-grade nylon.
The nylon webbing is impregnated with latex or resin
for extra durability and abrasion resistance.
Leather
Rolled-edge, chrome-tanned leather is used for
cushioning in all Klein lineman’s belts. These cushions have sponge-rubber cores for added comfort.
Other components, such as tool loops, are made
of harness leather. Body pads are made of latigo
leather, hand laced and stitched to the belt cushion.
2
Page 3

Physical Properties of Materials*
Type of Material
Exposure to
Excessive Heat
Exposure to
Chemicals
Exposure to
Molten Metal or
Flame
Exposure to
Paints or Solvents
Nylon Poor resistance.
Becomes brittle,
has a shriveled
brown appearance. Fibers will
break when flexed.
Weakens at 300°F
(149°C).
Klein-Kord
®
Similar to nylon;
however, neoprene
will protect nylon
fabric for a period
of time.
Generally good
resistance except
around strong acids
and phenolic compounds (phenol
is present in coal
tar and wood tar),
which cause it to
become brittle.
Excellent resistance
to hydrocarbons
as used in wood
treatment, due to
neoprene.
Poor resistance.
Strands fuse
together and form
hard shiny spots.
Has hard and brittle
feel. Will not support combustion.
Similar to nylon;
however neoprene
helps protect nylon
fabric from welding
splatter.
Generally offers
good resistance.
However, paint
can penetrate into
the weave and dry.
This can cause
webbing to become
hard and brittle
and can eventually
break the fibers.
Some solvents
may affect fibers
(see “Exposure to
Chemicals”).
Excellent resistance;
however, some
strong solvents
could soften
neoprene and
attack nylon.
Leather Poor resistance.
Excessive heat
destroys strength.
Will burn at 330°F
(165°C). Dry leather slowly at room
temperature.
* This chart shows the general physical qualities of
the materials used in Klein lineman’s body belts and
positioning straps. Due to the wide variety of conditions in the workplace, this information should only
be considered as a general guide, and a qualified
person should evaluate the specific applications and
hazards to which the materials will be exposed.
Generally poor
resistance.
Chemicals tend to
dry leather out.
Will burn; however,
chrome leather is
excellent protection
against welding
splatter.
If you need more information, call Klein Tools at
1-800-553-4676.
Generally poor
resistance.
Chemicals tend to
dry leather out.
3
Page 4
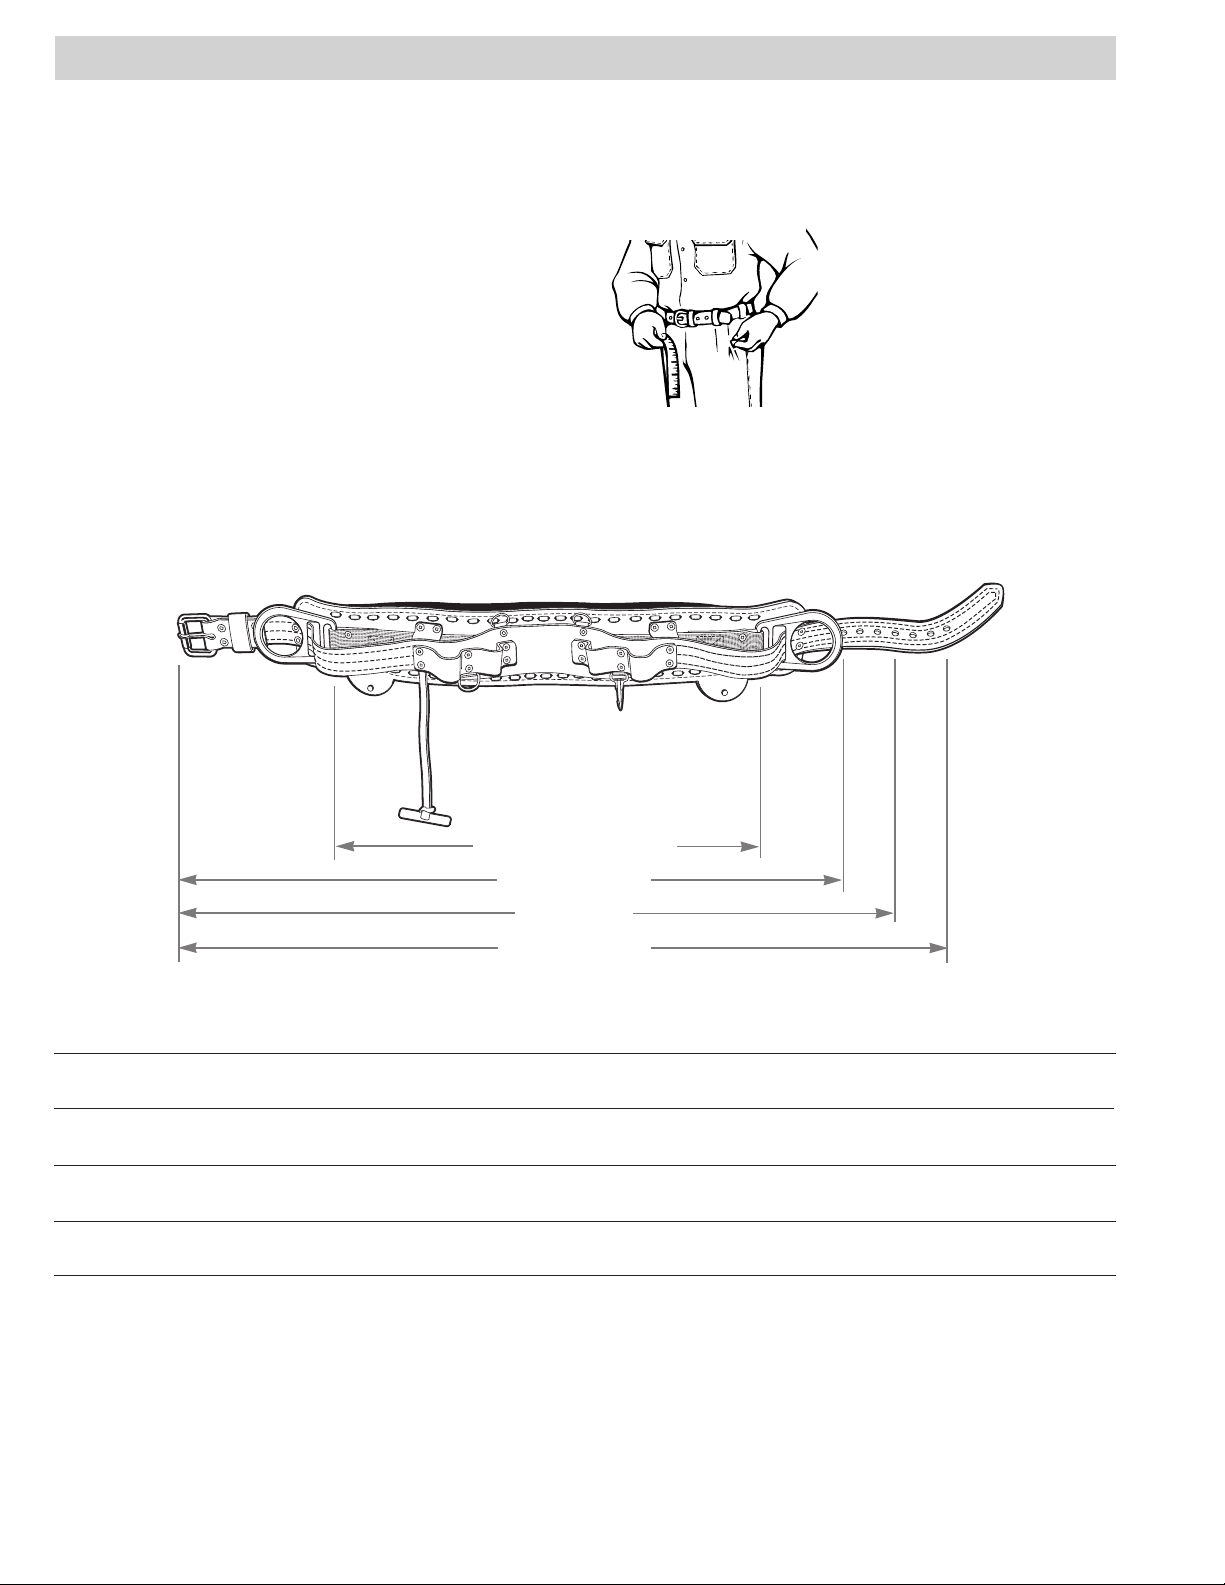
How to Select a Lineman’s Body Belt
Maximum Length
Center Hole
Minimum Length
D-to-D size:
Hipbone to Hipbone + 2"
1. Know the job and regulations governing per-
formance requirements for the equipment needed.
2. Select the belt style. Klein lineman’s body belts
are available in a choice of fixed, semi-floating and
full-floating styles, and feature the choice of belt pad
size. All Klein lineman’s body belts have chrometanned leather cushions for greater comfort. Fullfloating belts allow lateral movement of the D-rings
during use. Semi-floating belts only allow lateral
movement prior to wearing. Fixed-style belts are
lightweight and the most economical.
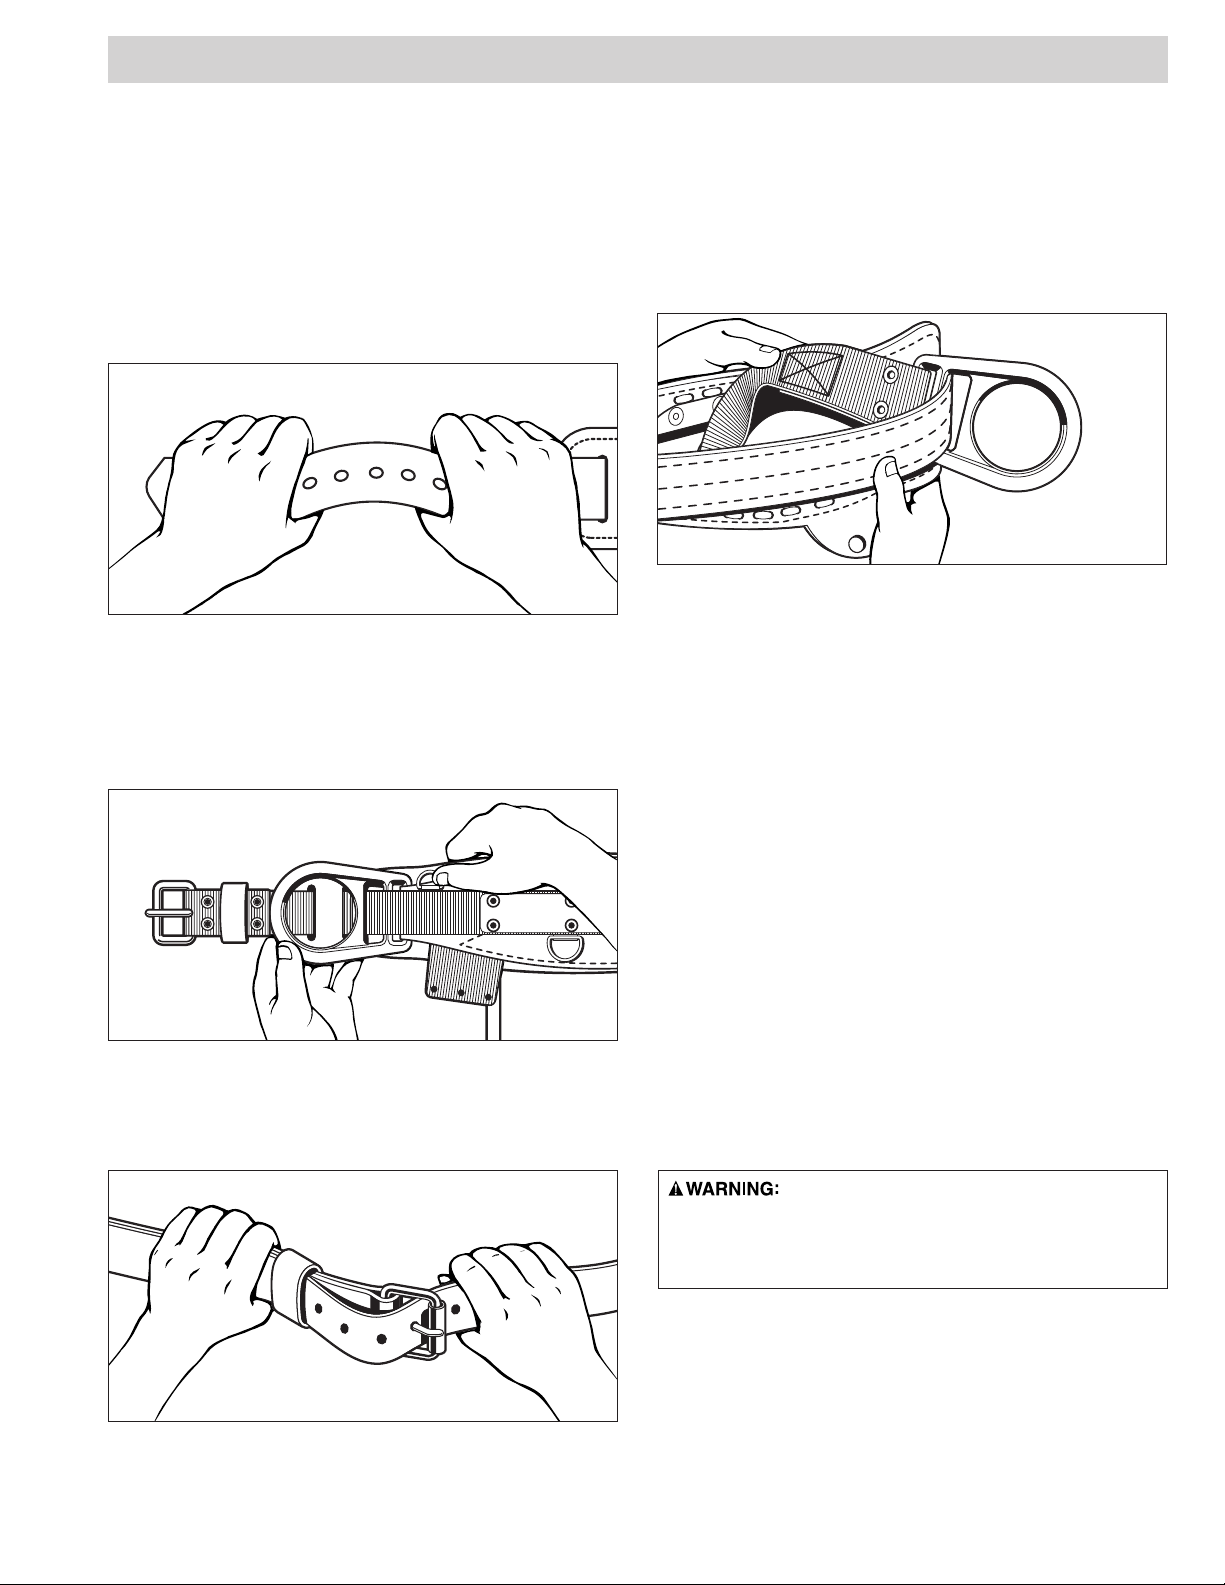
3. Select the proper belt size. The comfort of a
lineman’s belt depends on the construction of the
belt and the location of the D-rings. The D-rings should
be located about 1" (25 mm) in front of the hip bones.
Never order Klein lineman’s body belts by waist
size. Always order Klein lineman’s body belts by
the desired distance between D-rings.
Figure 1
Size your body belt using
a tape measure (Figure 1).
To obtain the correct D-to-D
(D-ring to D-ring) size, measure from hipbone to hipbone,
and then add 2" (51 mm).
The Lineman’s Belt Sizing
Table (shown below) contains
more information on selecting the proper belt size. For
non-standard sizes, please call the Klein Tools Sales
Department at 1-800-553-4676.
Lineman’s Belt Sizing Table*
D-to-D 18D 19D 20D 21D 22D 23D 24D 25D 26D 27D 28D 29D 30D
Distance** (46) (48) (51) (53) (56) (58) (61) (64) (66) (69) (71) (74) (76)
Minimum Length 32 33 34 36 37 38 40 41 42 44 45 46 47
(81) (84) (86) (91) (94) (97) (102) (104) (107) (112) (114) (117) (119)
Center Hole 36 37 38 40 41 42 44 45 46 48 49 50 51
Distance (91) (94) (97) (102) (104) (107) (112) (114) (117) (122) (124) (127) (130)
Maximum Length 40 41 42 44 45 46 48 49 50 52 53 54 55
(102) (104) (107) (112) (114) (117) (122) (124) (127) (132) (135) (137) (140)
* All measurements are listed in inches and (cm). This table shows the maximum and minimum lengths and center-hole
distances for the full range of standard D-to-D measurements. A belt sized for the proper D-to-D size will fit correctly
with buckle tongue engaged in the center hole.
** The following D-to-D sizes can be special ordered: 19" (48 cm), 25" (64 cm), 27" (69 cm) and 29" (74 cm).
4
Page 5

How to Use a Lineman’s Body Belt
1. These belts are for use only by individuals who
have been properly trained and who are qualified to
use this positioning equipment.
2. Read all the warning labels and instructional mate-
rials provided with Klein’s lineman’s belts and related
OPE equipment. They provide important information
on usage and care. Leave all affixed labels in place,
and keep all instructions for future reference.
3. Buckle the belt securely around the waist. Be
sure the buckle is fully closed, and the belt tab is in
its keeper. A lineman’s belt should fit snugly around
the waist. If you cannot achieve a snug fit, replace
the belt with one that fits properly.
4. When using a lineman’s belt, positioning
D-rings should be equally spaced on either side of
the lineman’s body.
5. Attach one end of the positioning strap (or other
positioning connecting device) to one of the positioning D-rings.
6. Pass the positioning strap around the pole (the
positioning anchorage), and then attach the other end
of the strap to the other positioning D-ring.
7. Make sure by visual inspection that both snap
hooks freely engage the positioning D-rings and that
both keepers are closed completely.
8. When properly connected, the positioning strap
will not be twisted, and both snap hooks will face
outward.
9. Do not connect any tools, wires, or other snap
hooks to the positioning D-rings.
Note: See pages 6-7 for complete information on
how to use a Klein positioning strap.
5
Page 6
How to Select a Lineman’s Positioning Strap
Depending on your application, choose a positioning
strap that allows you to work at arms’ length from the
pole you’ll be working on.
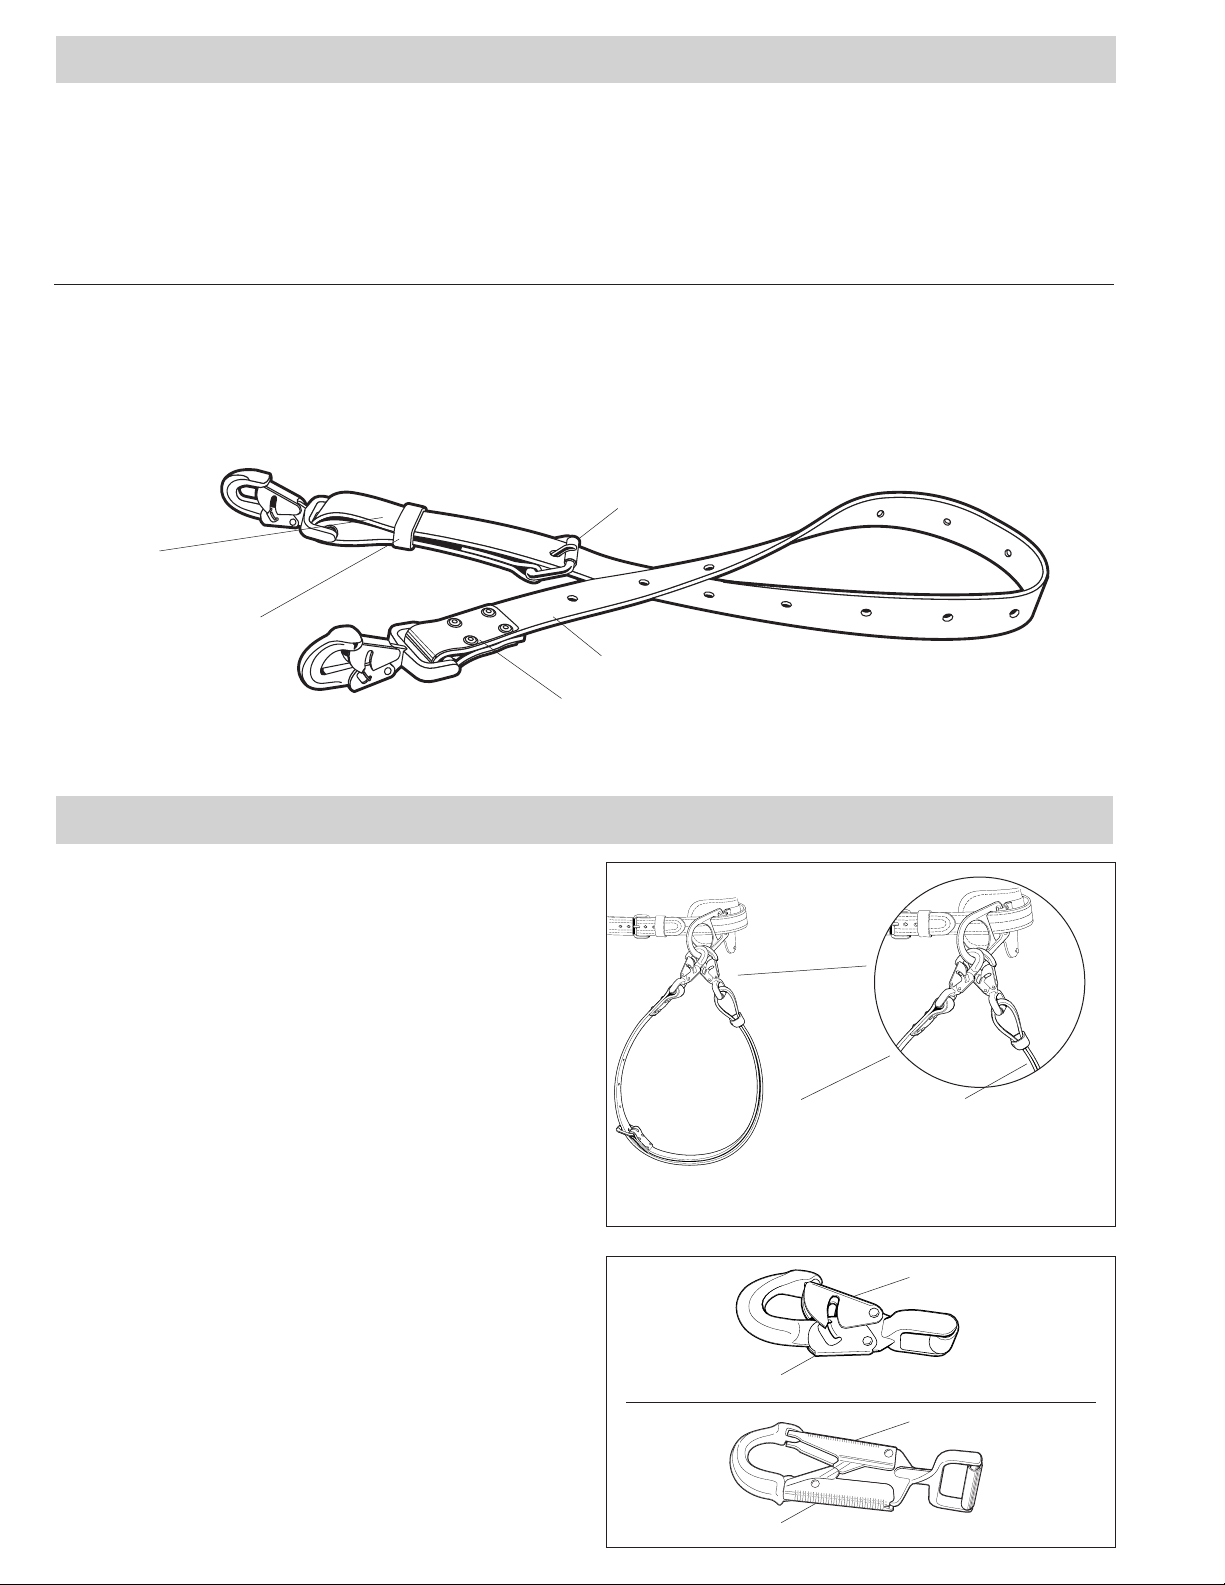
Cat. No.
Klein-Lok® Series
KL5295L
KL5295-6L
KL5295-6-6L
KL5295-7L
KL5295-8L
double end
of positioning strap
leather keeper
Cat. No.
Klein-Gard™ Series
KG5295L
KG5295-6L
KG5295-6-6L
KG5295-7L
KG5295-8L
Maximum
Length
5'8" (1.7 m)
6' (1.8 m)
6' 6" (2.0 m)
7' (2.1 m)
8' (2.4 m)
Lineman’s positioning straps are available in five sizes
and with two snap-hook styles: 5'8" (1.7 m), 6' (1.8 m),
6'6" (2.0 m), 7' (2.1 m), and 8' (2.4 m). For more information, see the following chart.
Minimum
Length
3'10" (1.17 m)
4' (1.2 m)
4'3" (1.3 m)
4'6" (1.35 m)
5'6" (1.7 m)
adjusting buckle
single end of positioning strap
Adjustable
Range
1'10" (0.5 m)
2' (0.6 m)
2'3" (0.7 m)
2'6" (0.8 m)
2'6" (0.8 m)
metal clip
How to Use a Lineman’s Positioning Strap
Note: The following instructions apply to
right-handed people.
1. These positioning straps are for use only by
individuals who have been properly trained and who
are qualified to use this positioning equipment.
2. Before climbing a pole, make sure that both lock-
ing snap hooks of the positioning belt are attached to
the left D-ring of the body belt.
Note: The snap hook closest to the body should
be the snap hook on the positioning strap’s
double end. That snap hook should be engaged
so that the keeper faces outward. The outer snap
hook will be the snap hook on the positioning strap’s
single end. That snap hook should be engaged so
that the keeper faces inward (see Figure 2).
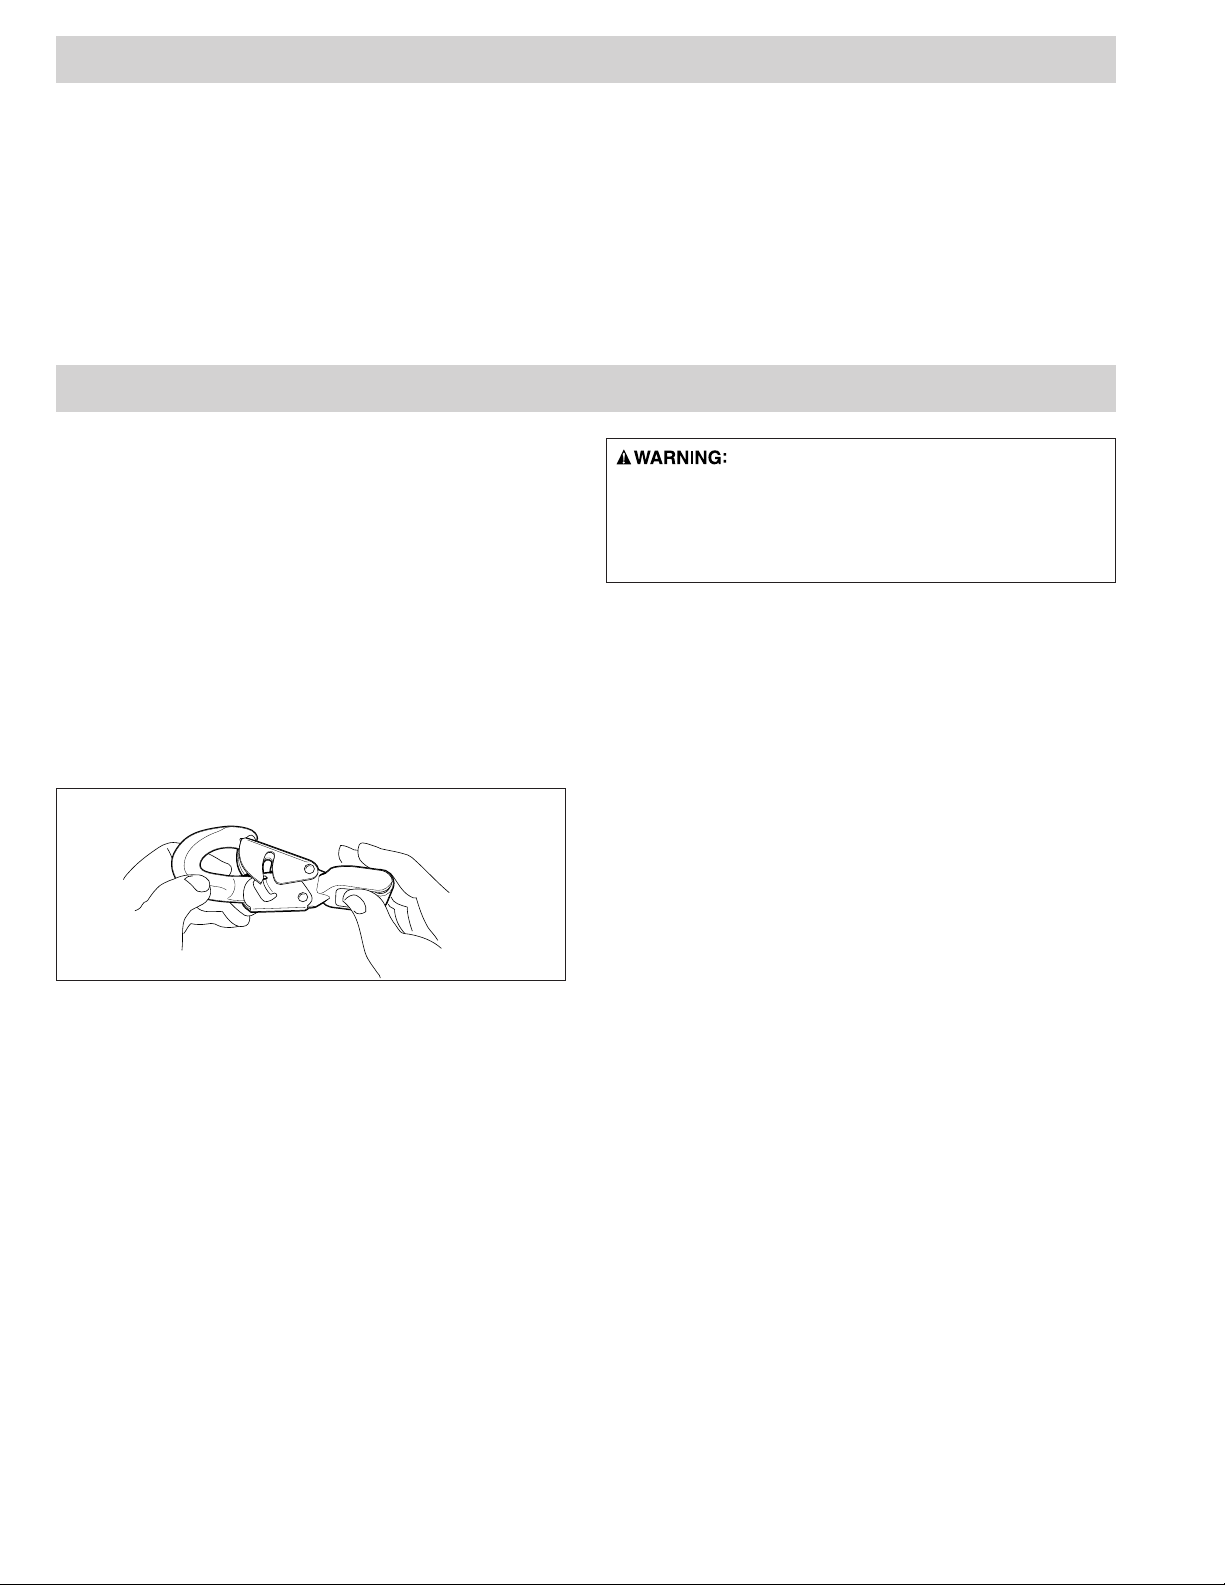
Note: To engage or release the locking snap hook,
depress both the keeper and the lock at the same
time. This can easily be done with one free hand (see
Figure 3).
Figure 2
Figure 3
KL Series
KG Series
Single end of
positioning strap,
with keeper
facing inward
lock
Double end of
positioning strap,
with keeper
facing outward
keeper
keeper
6
lock
Page 7

How to Use a Lineman’s Positioning Strap (continued)
3. Upon reaching working position, plant both gaffs
firmly into the pole, and hold onto the pole with
both hands.
4. Unsnap the outer snap hook whose keeper faces
inward (that is, the snap hook on the single end of the
positioning strap) with the left hand, while grasping
the pole with the right hand.
5. Pass the single end of the strap around the back
of the pole to the right hand, while maintaining a firm
grip on the pole.
6. Carry the positioning strap to the right D-ring with
the right hand, and fasten the snap hook so that the
keeper faces outward.
7. Make sure the positioning strap lies flat without
twists against the pole, and that the buckle tongue is
turned outward.
8. Before placing your full weight on the positioning
strap, visually check that each locking snap hook
freely engages the D-ring and that the keepers are
completely closed. Never rely solely on the feel or
sound of a snap hook engaging.
10. With the right hand, unfasten the snap hook
on the single end of the positioning strap from the
right D-ring.
11. Pass the single end of the positioning strap
around the back of the pole with the right hand until
the strap can be grasped by the left hand.
12. Now grasping the pole with the right hand, fasten
the snap hook of the single end of the positioning
strap to the left D-ring with the keeper facing in
(above the snap hook that’s already engaged).
13. When the positioning strap is not being used
for support, both ends should be fastened to the left
D-ring (see Figure 2 on page 6).
9. Removing the positioning strap (before descend-
ing the pole). Grasp the pole with the left hand and
release tension on the positioning strap by moving
the body slightly toward the pole.
7
Page 8
Maintenance Procedures
A written log of all service and inspection dates for this
equipment should be maintained by the company
safety officer or other competent individual.
1. Clean and maintain equipment as recommended.
Wash in warm water and mild detergent. Avoid harsh
chemical agents such as degreasing compounds, turpentine, paint thinner, gasoline, and other solvents.
General Inspection Procedures
1. Check for wear and deterioration. Before each
use, carefully inspect your OPE equipment for signs
of wear or deterioration or evidence of impact loading. Visually inspect for loose threads, pulled rivets,
burns, cuts, abrasions, or evidence of chemical or
physical deterioration that may have weakened the
material or assembly.
2. Inspect hardware for malfunctions and cracks,
including belt buckles, D-rings, and positioning-strap
snap hooks. Check that snap hooks are not distorted
or cracked and that the keepers are free of burrs,
functioning properly, clean, and not bent.
2. Inspect and lubricate all snap hooks after
cleaning to make sure they operate properly and
close securely. Use an all-purpose spray lubricant
or light motor oil.
3. Maintain leather parts with Neat’s-foot oil, saddle
soap or equivalent to help prolong life. Let leather
dry slowly at room temperature.
Should any unusual conditions be
noted during the inspection which are not specified here, do not use the suspect equipment
until a qualified individual has made a decision
on its usability.
KL Style Shown
3. Destroy and replace all worn or
damaged equipment. Immediately destroy and
replace any OPE system component which does not
pass inspection.
8
Page 9
Inspection of Belts & Straps
1. Straps, stitching and webbing. Check entire
length of the strap for excessive wear. Inspect the
tongue or billet end carefully. This end is subject to
considerable wear as a result of repeated buckling
and unbuckling of the belt. Also, check for torn or
excessively enlarged buckle-tongue holes. Check
stitching for broken, cut or pulled stitches. Check
webbing for broken strands, which appear as tufts
on the surface.
2. D-rings. Check all D-rings for distortion. Check
D-ring attachment points for unusual wear or damaged fibers. Badly pitted D-rings could indicate
chemical corrosion, and the equipment should be
replaced immediately.
4. Stitching or rivets at hardware attachment
points. For stitching-attachment points, check that
stitching is not broken, burned, cut or pulled. For riveted attachment points, check all rivets for tightness,
especially those at D-ring wear pads. Badly-pitted
rivets indicate chemical corrosion, and equipment
should be replaced immediately.
5. Destroy and replace all worn or damaged
OPE equipment. If any evidence of excessive
wear, deterioration, or mechanical malfunction is
observed, replace equipment immediately. Never
work with worn or damaged OPE equipment.
Using damaged or worn equipment can cause
serious injury or death.
3. Tongue buckles. Check tongue buckles for
distortion, sharp edges and cracks. The tongue
should move freely and overlap the frame. Rollers
should not be distorted and should roll freely.
6. The inspector is the most important part of any
inspection procedure. Check all equipment thoroughly
and follow all safety procedures and guidelines.
Do not take any shortcuts.
Important Note: OSHA specifies that all employers
covered by the Occupational Safety and Health Act
are responsible for inspection and maintenance of all
tools and equipment used by employees — whether
owned by the employees or by the company.
Personal-protective equipment should be inspected
before each use, and immediately removed from
service if any sign of wear or damage is found.
If you note any unusual conditions dur-
ing the inspection that are not specified here, do
NOT use the suspect equipment until a qualified
individual has made a decision on its usability.
9
Page 10
Lineman’s Equipment Warning Tags
For Positioning Use Only
■ Use this product for positioning only, NOTfor fall arrest.
■ If possible, the use of fall arrest equipment is highly
recommended in addition to this belt.
■ Assume the responsibilityfor determiningthat your belt is in
good condition at all times.
■ Do NOT use connecting devices made of leather
or
manila rope.
■ Neveruse side D-rings for fall arrest.
■ Positioning anchoragesmust support your
weight
plus any additional job related load.
■ Never allow belt to come in contact with edged or
pointed
tools; or come near a radiator, steam pipe, stove,
heater, engine exhaust pipe or other heat source.
C1b1.
997
Read
Other
Side
Read
Next
Tag
WARNINGS
W
ARNINGS
■ For use by properly trained professionals only.
■ Only use locking snap hooks.
■ OPE equipment must only be used for the
specific purpose for which it is designed and
intended.
■ OPE equipment must be destroyed if subjected
to impact loading.
■ Always visually check that all buckles are
properly
closed before each use.
■ Never allow a positioning strap to become twisted
before engaging D-ring.
■ Always visually check that: 1) each snap hook
freely engages D-ring or anchor point, 2) keeper is
completely closed with each use. Never rely solely
on the feel or sound of a snap hook engaging.
■ Before each use check that: 1) fabric or belt strap
is free
of burns, cuts, broken stitches or excessive
wear, 2) rivets are not bent, loose or missing, 3) buckles and
D-rings are
not distorted or cracked,
4) if tongue buckle,
tongue does not bind on buckle and buckle holes are
not
damaged. 5) Remove from service, destroy and discard
belt or harness if it fails inspection and replace
immediately.
B1-2 1
007
Read
Other
Side
Read
Next
Tag
INSTRUCTIONS
INSTRUCTIONS
■ For personal use only. NOT for towing or hoisting.
■ Snap hooks attached to D-rings must have
less than 3/4" (19mm) throat opening. Never attach
ladder or r
ebar hooks onto D-rings.
■ Never attach multiple snap hooks onto a D-ring.
■ Never punch additional holes in or alter any belt or
harness in any way.
■ Never work without independent fall arrest
protection if
there is danger of a fall.
■ NOT for recreational or sporting use.
■ Employer— instruct employee as to proper use and
warnings
before use of equipment.
■ Read, understand and follow all instructions and
cautions attached to and/or packed with this and
all occupational protective equipment before each use.
■ Klein strongly
recommends that Klein components
NOT be inter
changed with other components made by
other manufacturers,
because Klein cannot guarantee that
other manufacturers’ components are free of defects in
materials or workmanship.
B1-2 2.
007
Read
Other
Side
Read
Next
Tag
INSTRUCTIONS
INSTRUCTIONS
Klein permanently attaches highly durable warning
and instruction tags to its lineman’s body belts and
positioning straps.
If any of these tags become unattached, lost, or
damaged, call Klein Tools, toll-free at 1-800-553-4676,
for information on how to have the tags replaced
free of charge.
Tags for Lineman’s Body Belts
Klein strongly recommends using fallarrest protection when working at any elevated
position. Therefore, independent fall-arrest equipment
should be used in addition to Klein’s body belts
and positioning straps unless a competent person,
as defined by OSHA, has determined that such
fall-arrest equipment is not necessary or appropriate.
10
Page 11
Lineman’s Equipment Warning Tags (continued)
For Positioning Use Only
■ Always attach snap hooks to positioning
D-rings on both sides of the belt or harness with
keepers facing outward.
■ Never attach multiple snap hooks onto a D-ring.
■ Never allow a positioning strap to become
twisted before engaging D-ring.
■ Never attach multiple positioning straps
together.
■ Never attach a positioning strap back onto
itself.
■ Assume the responsibility for determining that your positioning strap is in good
condition at all times.
■ Never allow positioning strap to come in
contact with edged or pointed tools, welding;
or near a radiator, steam pipe, stove, heater, engine
exhaust pipe, or other heat source.
■ Never use a positioning strap which has worn to
the point of showing the red-colored
interior plies.
C6b 1
997
Read
Other
Side
Read
Next
Tag
WARNINGS
W
ARNINGS
■ For human support only, NOTfor towing or
hoisting material.
■ Never disable locking keeper on hook, punch holes
in or alter a positioning strap in any way
.
■ Use only with positioning belt or harness with
positioning D-rings meeting government
standards
for
intended use.
■ Klein strongly r
ecommends that Klein components
NOT be inter
changed with other components made by
other manufacturers, because Klein cannot guarantee that
other manufacturers’ components are free of defects in
materials or workmanship.
■ Before
each use check that: 1)
unit is free
of
burns, cuts, abrasions, kinks, knots, broken strands
and excessive wear, 2) hooks, buckle (and D-rings, if
any) are not distorted or cracked, 3) hook keepers are
free of burrs, functioning properly, clean, and not
bent, 4) positioning strap has not worn
to the point of
showing the red-colored interior plies, 5)Remove
from
service, destroy and discard unit if it does not
pass this inspection and replace immediately.
C6b2
007
Read
Other
Side
Read
Next
Tag
WARNINGS
WARNINGS
Copy A
( Klein recomienda enfáticamente que
los componentes Klein NO se intercam-
bien con otros componentes hechos
por otros
fabricantes, ya que Klein no
puede garantizar que los componentes
de otros fabricantes estén libres de
defectos de materiales o de fabricación.
Copy B
( Nunca deje que una correa de posi-
cionamiento se retuerza antes de
acoplarse al anillo en D.
Copy C
( Klein strongly
recommends that Klein
components NOT be interchanged with
other components made by other man
-
ufacturers, because Klein cannot guar-
antee that other manufacturers’
compo-
nents are
free of defects in materials or
workmanship.
Copy D
( Never allow a positioning strap to
become twisted before engaging D-ring.
■ For use by properly trained professionals only.
■ OPE equipment must only be used for the
specific purpose for which it is designed and intended.
■ Connecting devices must be destroyed if subjected
to impact loading.
■ Always visually check that: 1) each snap hook
freely engages D-ring or anchorage, 2) keeper is
completely closed with each use. Never rely solely
on the feel or sound of a snap hook engaging.
■ Make sure
each hook is positioned so that its keeper is
never load bearing.
■ Never join two snap hooks together. They are NOT
intended to be used that way, and could twist apart.
■ Never work without independent fall arrest pro-
tection if there is danger of a fall.
■ Employer — instruct employee as to proper use
and warnings
before use of equipment.
■ Read, understand and followall instructions
and
cautions attached to and/or packed with this and all occupational protective
equipment before each use.
C6b3.
997
Read
Other
Side
Read
Next
Tag
WARNINGS
WARNINGS
Klein permanently attaches highly durable warning
and instruction tags to its lineman’s body belts and
positioning straps.
If any of these tags become unattached, lost, or
damaged, call Klein Tools, toll-free at 1-800-553-4676,
for information on how to have the tags replaced
free of charge.
Tags for Lineman’s Positioning Straps
Klein strongly recommends using fallarrest protection when working at any elevated
position. Therefore, independent fall-arrest equipment
should be used in addition to Klein’s body belts
and positioning straps unless a competent person,
as defined by OSHA, has determined that such
fall-arrest equipment is not necessary or appropriate.
11
Page 12

Notes / Notas
12
Page 13

Para profesionales… desde 1857
®
Instrucciones para el uso y cuidado apropiados
de los cinturones de cuerpo y las correas de
posicionamiento Klein® para reparador de líneas
Introducción
En este manual de instrucciones se explica cómo utilizar,
inspeccionar y mantener los cinturones de cuerpo y las
correas de posicionamiento Klein® para reparador de
líneas.
Klein fabrica una línea completa de cinturones de cuerpo y
correas de posicionamiento para reparador de líneas, diseñada
para cumplir con los criterios de OSHA para aplicaciones de
posicionamiento.
Nota: Los cinturones de cuerpo Klein® para reparador de
líneas están diseñados solamente para aplicaciones de
posicionamiento y no deben utilizarse solamente como
un sistema personal de detención de caídas, tal como se
define en la Subparte M de la norma OSHA 1926.
El símbolo de posicionamiento que se muestra
en la Figura 1 aparece en las etiquetas de
advertencia sujetadas en el cinturón de cuerpo.
Figura 1
Los cinturones de cuerpo Klein para reparador de líneas están
disponibles en estilos de flotación completa, semiflotación
o fijos. Combinan las características de un cinturón de
posicionamiento de equipo de protección laboral (EPL) con
un cinturón especial para herramientas. Los cinturones de
cuerpo Klein para reparador de líneas cumplen o superan
todas las normas de OSHA que se aplican a los sistemas
de dispositivos de posicionamiento para empresas de
servicios públicos de energía eléctrica (OSHA 1926.959) y
telecomunicaciones (OSHA 1910.268 y 1910.269). También
cumplen o exceden las normas ASTM F 887, CSA Z259.1
y CSA Z259.11. Cada cinturón tiene colocada una etiqueta
permanente, que identifica el número de modelo, número de
serie, tamaño y fecha de fabricación.
Las correas de posicionamiento Klein son ajustables
y vienen en las siguientes longitudes: 1.73, 1.83, 1.98, 2.13
y 2.44 metros (5-2/3, 6, 6-1/2, 7 y 8 pies). Están diseñadas
para cumplir con las normas OSHA 1910.268, 1910.269 y
1926.259.
Este símbolo identifica la función del cinturón, un
equipo de protección laboral.
Nota: Para mayor claridad, en las ilustraciones de este
manual de instrucciones no se muestran los rótulos o
etiquetas de advertencia que están colocados en cada
producto.
ADVERTENCIA: Guarde estas instrucciones. Este equipo
no debe ser utilizado por ninguna persona que no haya
leído, entendido y seguido todas las instrucciones y procedimientos de inspección contenidos en este manual. Si no se
leen, entienden y siguen todas las instrucciones, el resultado
podría ser lesiones graves o la muerte. El usuario y su
empleador deben repetir con regularidad la capacitación y la
revisión de las instrucciones.
Una caída podría causar
lesiones graves o la muerte.
No utilice el cinturón a menos
que haya recibido capacitación
adecuada. Lea y siga todas las
instrucciones y advertencias.
Todas las personas que utilicen los cinturones de cuerpo y las
correas de posicionamiento Klein para reparador de líneas
deben recibir instrucciones sobre cómo utilizar correctamente
ese equipo. Además, antes de cada uso, deben leer,
entender y seguir todas las instrucciones y advertencias
contenidas en este manual y todas las advertencias o
instrucciones empaquetadas con el producto.
13
Page 14

Materiales utilizados en los cinturones de cuerpo y las correas de posicionamiento para reparador de líneas
Klein-Kord
El material de soporte de cargas de las correas de
posicionamiento Klein es nuestro Klein-Kord exclusivo, una
tela de nylon de filamentos multicapa excepcionalmente
fuerte que está impregnada con neopreno, plegada y
vulcanizada.
Klein-Kord es resistente a la abrasión, no conductor, flexible y
prácticamente inestirable para brindar fácil uso y durabilidad.
Tiene excelente resistencia a los productos químicos y
prácticamente no es afectado por la creosota y otros
productos químicos que se usan en el tratamiento de postes.
Además, sus propiedades y características de desgaste
permanecen esencialmente inalteradas a temperaturas de
hasta 121°C (250°F).
A continuación se muestra el material Klein-Kord de seis
capas de Klein, que tiene 44 mm (1-3/4 pulgada) de ancho.
Las capas centrales de Klein-Kord son rojas en el núcleo.
Cuando aparezcan las capas rojas, retire inmediatamente de
servicio la correa y reemplácela. Esta característica de “aviso
anticipado” es otra medida de seguridad proporcionada por
Klein Tools.
Nota: Las capas centrales rojas pueden descolorarse con
el uso. Por lo tanto, la inspección visual para comprobar
si existe desgaste es obligatoria antes de cada uso. Es
decir, vea y asegurese personalmente que no haya capas
desgastadas.
®
Hebillas y correas de cinturón
Los cinturones Klein para reparador de líneas tienen hebillas
de un solo clavillo forjadas en caliente. Las correas de
cinturón están hechas de Klein-Kord. En los cinturones de
calidad superior, las correas están cubiertas con cuero para
arneses.
ADVERTENCIA: Klein recomienda enfáticamente la
utilización de protección de detención de caídas cuando
se trabaje en cualquier posición elevada. Por lo tanto,
debe utilizarse equipo independiente de detención
de caídas además de los cinturones de cuerpo y las
correas de posicionamiento Klein, a menos que una
persona competente, según la definición de OSHA, haya
determinado que dicho equipo de detención de caídas no
es necesario o apropiado.
ADVERTENCIA: Los cinturones de cuerpo y las correas
de posicionamiento para reparador de líneas Klein están
diseñados para propósitos de posicionamiento solamente
y no deben utilizarse para ninguna otra función de equipo
de proteccion laboral (como por ejemplo detención de
caídas, suspensión o recuperación).
ADVERTENCIA: Klein recomienda enfáticamente que
sólo se utilicen componentes Klein con todo equipo para
reparador de líneas Klein. Los componentes Klein NO
deben intercambiarse con otros componentes fabricados
por otros fabricantes, ya que Klein no puede garantizar
que los componentes fabricados por otros fabricantes
estén diseñados apropiadamente ni que estén libres de
defectos de materiales o de fabricación.
Klein-Kord de seis capas con capas centrales rojas
Acero forjado en caliente
Los anillos en D y las hebillas con clavillo Klein están hechos
de acero forjado en caliente con un acabado resistente a la
corrosión. Todos los herrajes Klein se someten a pruebas
para asegurarse de que cumplan o superen las normas
OSHA pertinentes.
Malla de nylon
Klein utiliza nylon de grado comercial de alta calidad. La
malla de nylon está impregnada con látex o resina para dar
más durabilidad y resistencia a la abrasión.
Cuero
Se utiliza cuero de borde laminado curtido al cromo para
acojinar en todos los cinturones para reparador de líneas
Klein. Estos cojines tienen núcleos de goma esponjosa para
brindar comodidad adicional. Otros componentes de cuero,
como por ejemplo los bucles para herramientas, están
hechos de cuero para arneses. Las almohadillas de cuerpo
están hechas de cuero de látigo, unidas a mano y cosidas al
cojín de la correa.
14
Page 15

Propiedades físicas de los materiales*
Tipo de material
Nylon
Klein-Kord
®
Exposición a calor
excesivo
Mala resistencia.
Se vuelve quebradizo,
tiene un aspecto
marrón arrugado.
Las fibras se rompen
cuando se doblan.
Se debilita a 149°C
(300°F).
Parecido al nylon; sin
embargo, el neopreno
protegerá la tela de
nylon durante un
período de tiempo.
Exposición a
productos químicos
Generalmente,
buena resistencia,
excepto en presencia
de ácidos fuertes y
compuestos fenólicos
(el fenol está presente
en la brea de carbón
y la brea de madera),
los cuales hacen que
se vuelva quebradizo.
Excelente resistencia
a los hidrocarburos
que se usan en el
tratamiento de la
madera; debido al
neopreno.
Exposición a metal
fundido o llamas
Mala resistencia. Las
hebras se funden
entre sí y forman
puntos brillantes
duros. Tiene una
sensación al tacto
dura y quebradiza. No
resiste la combustión.
Similar al nylon; sin
embargo, el neopreno
ayuda a proteger la
tela de nylon contra
las salpicaduras de
soldadura.
Exposición a
pinturas o solventes
Generalmente, ofrece
buena resistencia. Sin
embargo, la pintura
puede penetrar en el
ligamento y secarse.
Esto puede hacer que
la malla se vuelva
dura y quebradiza,
y en última instancia
puede romper las
fibras. Algunos
solventes pueden
afectar las fibras
(consultar “Exposición
a productos
químicos”).
Resistencia excelente;
sin embargo, algunos
solventes fuertes
podrían ablandar el
neopreno y atacar el
nylon.
Cuero Mala resistencia.
El calor excesivo
destruye la resistencia.
Se quema a 165°C
(330°F). Seque el
cuero lentamente a
temperatura ambiente.
* En este cuadro se muestran las cualidades físicas generales
de los materiales utilizados en los cinturones de cuerpo y las
correas Klein para reparador de líneas. Debido a la amplia
variedad de condiciones que pueden existir en el lugar de
trabajo, esta información debe considerarse solamente
como una guía general, y una persona calificada debe
evaluar las aplicaciones y peligros específicos a los que los
materiales estarán expuestos.
Generalmente, mala
resistencia. Los
productos químicos
tienden a secar el
cuero.
Se quema; sin
embargo, el cuero
curtido al cromo
es una protección
excelente contra
las salpicaduras de
soldadura.
Si necesita más información, llame a Klein Tools al
1-800-553-4676.
Generalmente, mala
resistencia. Los
productos químicos
tienden a secar el
cuero.
15
Page 16

Cómo seleccionar un cinturón de cuerpo para reparador de líneas
Longitud máxima
Agujero central
Longitud mínima
Hueso de la cadera a hueso de la cadera + 2 pulg.
Tamaño de D a D:
1. Conozca el trabajo y las normas que rigen los
requisitos de rendimiento del equipo necesitado.
2. Seleccione el estilo de cinturón. Los cinturones de
cuerpo Klein para reparador de líneas están disponibles en
varios estilos fijos, semiflotantes y completamente flotantes,
con diversas características de cinturón, como tamaño de
la almohadilla. Todos los cinturones de cuerpo Klein para
reparador de líneas tienen cojines de cuero curtido al cromo
para brindar mayor confort. Los cinturones completamente
flotantes permiten el movimiento lateral de los anillos en
D durante el uso. Los cinturones semiflotantes permiten
solamente el movimiento lateral antes de ponérselos. Los
cinturones de estilo fijo son livianos y los más económicos.
3. Seleccione el tamaño de cinturón adecuado. La
comodidad de un cinturón para reparador de líneas depende
de su construcción y de la ubicación de sus anillos en D.
Los anillos en D deben estar ubicados aproximadamente a
1 pulgada (25 mm) delante de los huesos de la cadera.
Nunca pida cinturones de cuerpo Klein para reparador
de líneas por el tamaño de la cintura. Los cinturones
de cuerpo Klein para reparador de líneas deben pedirse
siempre por la distancia deseada entre los anillos en D.
Figura 1
aparece en esta página) contiene más información sobre la
selección del tamaño de cinturón apropiado. Para tamaños
que no sean estándar, tenga la amabilidad de llamar al
Departamento de Ventas de Klein Tools al 1-800-553-4676.
Mida el tamaño de su cinturón de
cuerpo utilizando una cinta para
medir (Figura 1). Para obtener el
tamaño correcto de D a D (anillo
en D a anillo en D), mida de hueso
de la cadera a hueso de la cadera
y añada 2 pulgadas (51 mm).
La tabla de tamaños de cinturón
para reparador de líneas (que
Tabla de tamaños de cinturón para reparador de líneas
*
Distancia de 18D 19D 20D 21D 22D 23D 24D 25D 26D 27D 28D 29D 30D
D a D** (46) (48) (51) (53) (56) (58) (61) (64) (66) (69) (71) (74) (76)
Longitud mínima 32 33 34 36 37 38 40 41 42 44 45 46 47
(81) (84) (86) (91) (94) (97) (102) (104) (107) (112) (114) (117) (119)
Distancia al 36 37 38 40 41 42 44 45 46 48 49 50 51
agujero central (91) (94) (97) (102) (104) (107) (112) (114) (117) (122) (124) (127) (130)
Longitud máxima 40 41 42 44 45 46 48 49 50 52 53 54 55
(102) (104) (107) (112) (114) (117) (122) (124) (127) (132) (135) (137) (140)
* Todas las medidas están en pulgadas y los centímetros están entre paréntesis. Esta tabla muestra las longitudes máximas
y mínimas y la distancia al agujero central para la gama completa de medidas estándar de D a D. Un cinturón con la medida
para el tamaño de D a D apropiado quedará ajustado correctamente con el clavillo de la hebilla acoplado en el agujero central.
** Los siguientes tamaños de D a D pueden ordenarse a pedido especial: 19" (48 cm), 25" (64 cm), 27" (69 cm), y
29" (74 cm).
16
Page 17

Cómo utilizar un cinturón de cuerpo para reparador de líneas
1. Estos cinturones están diseñados para ser utilizados
solamente por personas que hayan recibido entrenamiento
apropiado y que estén calificadas para utilizar este equipo
de posicionamiento.
2. Lea todas las etiquetas de advertencia y materiales
instructivos que se proporcionan con el cinturón Klein
para reparador de líneas y el equipo de protección laboral
relacionado. Proporcionan información importante sobre el
uso y cuidado. Deje puestas todas las etiquetas que estén
colocadas y guarde todos los materiales instructivos para
referencia futura.
3. Abroche firmemente con la hebilla el cinturón alrededor
de la cintura. Asegúrese de que la hebilla esté completamente cerrada y de que la lengüeta del cinturón esté en su
fijador. Un cinturón para reparador de líneas debe quedar
perfectamente ajustado alrededor de la cintura. Si no puede
lograr un ajuste perfecto, reemplace el cinturón con uno que
quede ajustado apropiadamente.
4. Cuando utilice un cinturón para reparador de líneas, los
anillos en D de posicionamiento deben estar separados por
igual en los dos lados del cuerpo del reparador de líneas.
5. Acople un extremo de la correa de posicionamiento (u
otro dispositivo de conexión de posicionamiento) en uno de
los anillos en D de posicionamiento.
6. Pase la correa de posicionamiento alrededor del poste
(el anclaje de posicionamiento) y luego acople el otro
extremo de la correa al otro anillo en D de posicionamiento.
7. Asegúrese mediante inspección visual de que los dos
ganchos de presión se acoplen libremente en los anillos
en D de posicionamiento y de que ambos fijadores estén
cerrados completamente.
8. Cuando esté conectada apropiadamente, la correa de
posicionamiento no estará retorcida y ambos ganchos de
presión estarán orientados hacia afuera.
9. No conecte ninguna herramienta, alambre u otros
ganchos de presión a los anillos en D de posicionamiento.
Nota: Vea las páginas 18 y 19 para obtener información
completa sobre cómo utilizar una correa de posicionamiento Klein.
17
Page 18

Cómo seleccionar una correa de posicionamiento para reparador de líneas
Dependiendo de la aplicación deseada, seleccione una
correa de posicionamiento que le permita trabajar a una
distancia del poste en el que vaya a trabajar que sea igual a
la longitud del brazo.
No. de cat.
Serie Klein-Lok
KL5295L
KL5295-6L
KL5295-6-6L
KL5295-7L
KL5295-8L
extremo doble de
la correa de posicionamiento
fijador de cuero
No. de cat.
®
Serie Klein-Gard™
KG5295L
KG5295-6L
KG5295-6-6L
KG5295-7L
KG5295-8L
Longitud
máxima
5'8" (1.7 m)
6' (1.8 m)
6' 6" (2.0 m)
7' (2.1 m)
8' (2.4 m)
Las correas posicionadoras de instalador de líneas están
disponibles en cinco tamaños y con dos estilos de ganchos
de presión: 1.73, 1.83, 1.98, 2.13 y 2.44 metros (5-2/3, 6,
6-1/2, 7 y 8 pies). Para obtener más información, consulte el
siguiente cuadro.
Longitud
mínima
3'10" (1.17 m)
4' (1.2 m)
4'3" (1.3 m)
4'6" (1.35 m)
5'6" (1.7 m)
hebilla ajustable
extremo sencillo de la correa de posicionamiento
Intervalo
ajustable
1'10" (0.5 m)
2' (0.6 m)
2'3" (0.7 m)
2'6" (0.8 m)
2'6" (0.8 m)
clip metálico
Cómo utilizar una correa de posicionamiento para reparador de líneas
Nota: Las siguientes instrucciones tienen aplicación a
personas diestras.
1. Estas correas de posicionamiento están diseñadas para
ser utilizadas solamente por personas que hayan recibido
capacitación apropiada y que estén calificadas para utilizar
este equipo de posicionamiento.
2. Antes de subir a un poste, asegúrese de que los dos
ganchos de presión de fijación del cinturón de posicionamiento estén acoplados al anillo en D izquierdo del cinturón
de cuerpo.
Nota: El gancho de presión más cercano al cuerpo debe
ser el gancho de presión que está en el extremo doble de la
correa de posicionamiento. Ese gancho de presión debe estar
acoplado de manera que el fijador esté orientado hacia afuera.
El gancho de presión exterior será el gancho de presión que
está en el extremo sencillo de la correa de posicionamiento.
Ese gancho de presión debe estar acoplado de manera que el
fijador esté orientado hacia adentro (vea la Figura 2).
Nota: Para acoplar o soltar el gancho de presión de fijación,
oprima el fijador y el cierre simultáneamente. Esto puede
hacerse fácilmente con una mano libre (vea la Figura 3).
Figura 2
Extremo sencillo
de la correa de
posicionamiento,
con el fijador
orientado hacia
adentro
Figura 3
Serie KL
cierre
Serie KG
Extremo doble
de la correa de
posicionamiento,
con el fijador
orientado hacia
afuera
fijador
fijador
18
cierre
Page 19

Cómo utilizar una correa de posicionamiento para reparador de líneas (cont.)
3. Cuando llegue a la posición de tra¸bajo, plante firmemente
los dos garfios en el poste y agárres¸e del poste con las dos
manos.
4. Desacople el gancho de presión exterior, cuyo fijador está
orientado hacia adentro (es decir, el gancho de presión que
está en el extremo sencillo de la correa de posicionamiento)
con la mano izquierda, mientras agarra el poste con la mano
derecha.
5. Pase el extremo sencillo de la correa alrededor de la
parte de atrás del poste hasta la mano derecha, mientras
mantiene un agarre firme del poste.
6. Lleve la correa de posicionamiento hasta el anillo en D
derecho con la mano derecha y sujete el gancho de presión
de manera que el fijador esté orientado hacia afuera.
7. Asegúrese de que la correa de posicionamiento esté
plana y sin torceduras contra el poste, y de que el clavillo de la
hebilla esté girado hacia afuera.
8. Antes de poner todo su peso en la correa de posiciona-
miento, asegúrese visualmente de que cada gancho de
presión de fijación se acople libremente en el anillo en D y
de que los fijadores estén completamente cerrados. Nunca
confíe únicamente en la sensación o el sonido de un
gancho de presión al acoplarse.
9. Remoción de la correa de sujeción (antes de bajar
del poste). Agarre el poste con la mano izquierda y reduzca
la tensión de la correa de posicionamiento moviendo el cuerpo
ligeramente hacia el poste.
10. Con la mano derecha, suelte el gancho de presión que
está en el extremo sencillo de la correa de posicionamiento
del anillo en D derecho.
11. Pase el extremo sencillo de la correa de posicionamiento
alrededor de la parte de atrás del poste con la mano derecha
hasta que la correa pueda agarrarse con la mano izquierda.
12. Ahora, agarrando el poste con la mano derecha, sujete
el gancho de presión que está en el extremo sencillo de la
correa de posicionamiento al anillo en D izquierdo con el fijador
orientado hacia adentro (encima del gancho de presión que ya
está acoplado).
13. Cuando la correa de posicionamiento no se esté utilizando
para obtener soporte, los dos extremos deben sujetarse al
anillo en D izquierdo (vea la Figura 2 en la página 18).
19
Page 20

Procedimiento de mantenimiento
El jefe de seguridad de la compañía u otra persona
competente debe mantener un registro escrito de todas las
fechas de servicio e inspección de este equipo.
1. Limpie y mantenga los equipos de acuerdo con la
práctica recomendada. Lávelos con agua templada y un
detergente suave. Evite los agentes químicos fuertes, como
por ejemplo compuestos desengrasadores, aguarrás, diluyente de pintura, gasolina y otros solventes.
Procedimientos de inspección general
1. Compruebe si hay desgaste y deterioro. Antes de cada
uso, inspeccione cuidadosamente su equipo de protección
laboral para ver si muestra indicios de desgaste o deterioro,
o evidencia de carga por impactos. Inspeccione visualmente
si hay roscas flojas, remaches arrancados, quemaduras,
cortes, abrasiones o evidencia de deterioro físico o químico
que puedan haber debilitado el material o el ensamblaje.
2. Inspeccione los herrajes para comprobar si
funcionan correctamente y si tienen grietas, incluyendo
las hebillas del cinturón, los anillos en D y los ganchos de
presión de la correa de posicionamiento. Compruebe que los
ganchos de presión no estén distorsionados ni agrietados,
y de que los fijadores no tengan quemaduras, funcionen
apropiadamente, estén limpios y no estén doblados.
2. Inspeccione y lubrique todos los ganchos de presión
después de realizar limpieza para asegurarse de que
funcionan apropiadamente y se cierran firmemente. Utilice
un lubricante de rociada de uso general o aceite ligero para
motores.
3. Mantenga las partes de cuero con aceite para
acondicionar el cuero (Neat’s-foot oil), jabón para silla de
montar o equivalente para ayudar a prolongar la duración. Deje
que el cuero se seque lentamente a temperatura ambiente.
ADVERTENCIA: Si se observa alguna situación irregular
durante la inspección, que no esté especificada en este
manual, no utilice el equipo sospechoso hasta que una
persona calificada haya tomado una decisión respecto a
su grado de utilización.
Estilo KL mostrado
3. Destruya y reemplace todos los equipos desgastados
o dañados. Destruya y reemplace inmediatamente todo
componente del sistema del equipo de protección laboral
(EPL) que no pase la inspección.
20
Page 21

Inspección de cinturones y correas
1. Correas, costuras y malla. Verifique la correa en
toda su longitud para ver si está desgastada. Inspeccione
cuidadosamente el extremo donde se acopla el clavillo
de la hebilla o sujeción. Este extremo está sometido a
un desgaste considerable como resultado de abrochar y
desabrochar repetidamente el cinturón. Además, compruebe
si los agujeros para el clavillo de la hebilla están desgarrados o excesivamente agrandados. Compruebe si las
costuras están rotas, cortadas o levantadas. Compruebe si
la malla tiene hebras rotas que aparecen como mechones
en la superficie.
2. Anillos en D. Verifique todos los anillos en D para saber
si tienen distorsión. Verifique los puntos de sujeción de los
anillos en D para saber si hay fibras desgastadas o dañadas
de forma irregular. Los anillos en D con picaduras fuertes
podrían indicar corrosión química y, en ese caso, el equipo
debe reemplazarse inmediatamente.
4. Costuras o remaches en el punto de sujeción de
los herrajes. Para los puntos de sujeción de las costuras,
compruebe si la costura no está rota, quemada, cortada o
levantada. Para los puntos de sujeción de los remaches,
compruebe si todos los remaches están apretados,
especialmente los que están en las almohadillas de desgaste
de los anillos en D. Los remaches con picaduras fuertes
indican corrosión química y, en ese caso, el equipo debe
reemplazarse inmediatamente.
5. Destruya y reemplace todos los equipos de protección
laboral desgastados o dañados. Si se observa evidencia
de desgaste excesivo, deterioro o funcionamiento mecánico
defectuoso, reemplace el equipo inmediatamente. Nunca
trabaje con equipo de protección laboral desgastado o
dañado. La utilización de equipo desgastado o dañado
puede causar lesiones graves o la muerte.
6. El inspector es el elemento más importante de todo
procedimiento de inspección. Verifique minuciosamente
todo el equipo y siga todos los procedimientos y normas de
seguridad. No omita nada.
3. Hebillas con clavillo. Verifique si las hebillas con
clavillo están distorsionadas, tienen bordes afilados o están
agrietadas. El clavillo debe moverse libremente y superponerse a la montura de la hebilla. Los rodillos no deben
estar distorsionados y deben rodar libremente.
Nota importante: OSHA especifica que todos los
empleadores afectados por la Ley de Seguridad y Salud
Laboral de los EE.UU. son responsables de la inspección
y el mantenimiento de todas las herramientas y equipos
utilizados por sus empleados — tanto si pertenecen a los
empleados como si pertenecen a la compañía. El equipo de
protección personal debe inspeccionarse antes de cada uso
y retirarse de servicio inmediatamente si se encuentra algún
indicio de desgaste o daño.
ADVERTENCIA: Si se observa alguna situación irregular
durante la inspección, que no esté especificada en este
manual, no utilice el equipo sospechoso hasta que una
persona calificada haya tomado una decisión respecto a
su grado de utilización.
21
Page 22

Para uso de posicionamiento solamente
■ Use este producto para posicionamiento solamente, NO para
detener caídas.
■ Si es posible, el uso de equipo de detención de caídas se
recomienda enfáticamente además de este cinturón.
■ Asuma la responsabilidad de determinar si el cinturón está en
buenas condiciones en todo momento.
■ NO utilice dispositivos de conexión hechos de cuero o
cuerda de cáñamo.
■ Nunca utilice los anillos en D laterales para detener caídas.
■ Los anclajes de posicionamiento deben soportar su peso
más toda carga adicional relacionada con el trabajo.
■ Nunca deje que el cinturón entre en contacto con
herramientas con bordes afilados o puntiagudas, ni que se
acerque a un radiador, tubería de vapor, estufa, calentador, tubo
de escape de motor u otra fuente de calor.
S-C1b1.
007
Lea el
otro
lado
Lea la
próxima
etiqueta
ADVERTENCIAS
ADVERTENCIAS
■ Para uso sólo por profesionales con capacitación
apropiada.
■ Use sólo ganchos de presión de fijación.
■ El equipo de protección laboral debe utilizarse
solamente para el propósito específico para el que está
diseñado y destinado.
■ El equipo de protección laboral debe destruirse si se
somete a carga por impactos.
■ Verifique siempre visualmente si todas las hebillas están
cerradas apropiadamente antes de cada uso.
■ Nunca deje que una correa de posicionamiento se
retuerza antes de acoplarse al anillo en D.
■ Asegúrese siempre visualmente de que: 1) cada gancho de
presión se acople libremente al anillo en D o al punto de anclaje,
2) el fijador esté completamente cerrado con cada uso. Nunca
confíe solamente en la sensación o el sonido de un gancho de
presión al acoplarse.
■ Antes de cada uso, asegúrese de que: 1)la tela o la correa del
cinturón no tenga quemaduras, cortes, costuras rotas ni desgaste
excesivo, 2) los remaches no estén doblados o sueltos, ni falten, 3) las
hebillas y los anillos en D no estén distorsionados ni agrietados, 4) si
alguna hebilla tiene clavillo, el clavillo no se atasque ni enganche en la
hebilla y los agujeros de hebilla no estén dañados. 5)Retire de
servicio, destruya y tire el cinturón o el arnés si no pasa la
inspección y reemplácelo inmediatamente.
S-B1-2 1
007
Lea el
otro
lado
Lea la
próxima
etiqueta
INSTRUCCIONES
INSTRUCCIONES
■ Para uso personal solamente. No es para remolcar
ni elevar.
■ Los ganchos de presión acoplados a los anillos en D
deben tener menos de 3/4" (19 mm) de abertura de
garganta. Nunca acople ganchos de escaleras o de barras
de refuerzo en los anillos en D.
■ Nunca acople varios ganchos de presión a un anillo
en D.
■ Nunca perfore agujeros adicionales en ningún cinturón
o arnés ni realice ninguna alteración.
■ Nunca trabaje sin protección independiente de detención de
caídas si existe peligro de caída.
■ NO es para uso recreativo ni deportivo.
■ Empleador: instruya al empleado en el uso apropiado
y las advertencias antes de utilizar el equipo.
■ Lea, entienda y siga antes de cada uso todas las
instrucciones y precauciones colocadas en este equipo
y en todos los equipos de protección laboral o
empaquetadas con ellos.
■ Klein recomienda enfáticamente que los componentes
Klein NO se intercambien con otros componentes hechos
por otros fabricantes, ya que Klein no puede garantizar
que los componentes de otros fabricantes estén libres de
defectos de materiales o de fabricación.
S-B1-2 2.
007
Lea el
otro
lado
Lea la
próxima
etiqueta
INSTRUCCIONES
INSTRUCCIONES
Etiquetas de advertencia del equipo para reparador de líneas
Klein coloca permanentemente etiquetas de advertencia e
instrucciones muy duraderas en sus cinturones de cuerpo y
correas de posicionamiento para reparador de líneas.
Si alguna de estas etiquetas se desprende, pierde o daña,
póngase en contacto con Klein Tools, llamando gratuitamente
al 1-800-553-4676, para obtener información sobre cómo
hacer que se reemplacen las etiquetas sin tener que pagar
ningún cargo.
Etiquetas para los cinturones de cuerpo para
reparador de líneas
ADVERTENCIA: Klein recomienda enfáticamente la
utilización de protección de detención de caídas cuando
se trabaje en cualquier posición elevada. Por lo tanto,
debe utilizarse equipo independiente de detención de
caídas además de los cinturones de cuerpo y las correas
de posicionamiento Klein, a menos que una persona
competente, según la definición de OSHA, haya determinado que dicho equipo de detención de caídas no es
necesario ni apropiado.
22
Page 23

Etiquetas de advertencia del equipo para reparador de líneas (cont.)
Para uso de posicionamiento solamente
■ Acople siempre los ganchos de presión a los anillos en D
de posicionamiento en ambos lados del cinturón o del arnés con
los fijadores orientados hacia afuera.
■ Cuando se esté usando, nunca acople más de un gancho de
presión a un anillo en D.
■ Nunca deje que una correa de posicionamiento se retuerza
antes de acoplarse al anillo en D.
■ Nunca acople juntas varias correas de posicionamiento.
■ Nunca acople una correa de posicionamiento de vuelta en
ella misma.
■ Asuma la responsabilidad de determinar si la correa de
posicionamiento está en buenas condiciones en todo
momento.
■ Nunca deje que la correa de posicionamiento entre en
contacto con herramientas con bordes afilados o puntiagudas,
o soldadura, ni que esté cerca de un radiador, tubería de
vapor, estufa, calentador, tubo de escape de motor u otra
fuente de calor.
■ Nunca use una correa de posicionamiento que se haya
desgastado hasta el punto de mostrar las capas interiores de
color rojo.
S-C 6b1
007
Lea el
otro
lado
Lea la
próxima
etiqueta
ADVERTENCIAS
ADVERTENCIAS
■ Sólo para soporte de seres humanos, NO es para
remolcar o elevar material.
■ Nunca desactive el fijador de sujeción en el gancho,
perfore agujeros en una correa de posicionamiento ni la altere
de ninguna manera.
■ Utilice la correa solamente con un cinturón o arnés de
posicionamiento con anillos en D que cumplan con las
normas gubernamentales para el uso previsto.
■ Klein recomienda enfáticamente que los componentes Klein
NO se intercambien con otros componentes hechos por otros
fabricantes, ya que Klein no puede garantizar que los
componentes de otros
fabricantes estén libres de defectos de
materiales o de fabricación.
■ Antes de cada uso, asegúrese de que: 1) la unidad no tenga
quemaduras, cortes, abrasiones, enredos, nudos, hebras rotas ni
desgaste excesivo, 2) los ganchos, la hebilla (y los anillos en D, si
los hay) no estén distorsionados ni agrietados, 3) los fijadores de
los ganchos no tengan quemaduras, funcionen apropiadamente,
estén limpios y no estén doblados, 4) la correa de posicionamiento
no se haya desgastado hasta el punto de mostrar las capas
interiores de color rojo, 5) Retire de servicio, destruya y tire la
unidad si no pasa esta inspección y reemplácela
inmediatamente.
S-C6b2
007
Lea el
otro
lado
Lea la
próxima
etiqueta
ADVERTENCIAS
ADVERTENCIAS
■ Para uso sólo por profesionales con capacitación
apropiada.
■ El equipo de protección laboral debe utilizarse
solamente para el propósito específico para el que se
diseñó y destinó.
■ Los dispositivos de conexión deben destruirse si
están sometidos a carga por impactos.
■ Asegúrese siempre visualmente de que: 1) cada
gancho de presión se acople libremente al anillo en D o al
anclaje, 2) el fijador esté completamente cerrado con cada uso.
Nuncaconfíe únicamente en la sensación o el sonido de un
gancho de presión al acoplarse.
■ Asegúrese de que cada gancho esté posicionado de manera
que su fijador nunca esté soportando cargas.
■ Nunca junte dos ganchos de presión. NO están diseñados
para utilizarse de esa manera y podrían retorcerse y separarse.
■ Nunca trabaje sin protección independiente de detención
de caídas si existe peligro de caída.
■ Empleador: instruya al empleado en el uso apropiado y
las advertencias antes de utilizar el equipo.
■ Lea, entienda y siga antes de cada uso todas las
instrucciones y precauciones colocadas en este equipo y en
todos los equipos de protección laboral o empaquetadas
con ellos.
S-C6b3.
007
Lea el
otro
lado
Lea la
próxima
etiqueta
ADVERTENCIAS
ADVERTENCIAS
Klein coloca permanentemente etiquetas de advertencia e
instrucciones muy duraderas en sus cinturones de cuerpo y
correas de posicionamiento para reparador de líneas.
Si alguna de estas etiquetas se desprende, pierde o daña,
póngase en contacto con Klein Tools, llamando gratuitamente
al 1-800-553-4676, para obtener información sobre cómo
hacer que se reemplacen las etiquetas sin tener que pagar
ningún cargo.
Etiquetas para correas de posicionamiento para
reparador de líneas
ADVERTENCIA: Klein recomienda enfáticamente la
utilización de protección de detención de caídas cuando
se trabaje en cualquier posición elevada. Por lo tanto,
debe utilizarse equipo independiente de detención de
caídas además de los cinturones de cuerpo y las correas
de posicionamiento Klein, a menos que una persona
competente, según la definición de OSHA, haya determinado que dicho equipo de detención de caídas no es
necesario ni apropiado.
23
Page 24

Notes / Notas
24
Page 25

Pour technicians professionnels … depuis que 1857
Instructions pour l'emploi et l'entretien corrects
des ceintures de travail et des courroies de
positionnement Klein® pour les poseurs de lignes
Introduction
Ce mode d'emploi explique comment utiliser, inspecter et
entretenir les ceintures de travail et les courroies de positionnement Klein pour les poseurs de lignes.
Klein fabrique une gamme complète de ceintures de travail et
de courroies de positionnement pour poseurs de lignes conçues
pour satisfaire aux critères de l'OSHA pour les applications
de positionnement.
Remarque : les ceintures de travail Klein pour poseurs
de ligne ne doivent être utilisées que pour les applica-
tions de positionnement et ne doivent pas être
employées seules pour servir de dispositif
anti-chute, conformément à la définition de la
sous-section M de la norme 1926 de l'OSHA
Figure 1
Le symbole de positionnement de la Figure 1 apparaît sur les
étiquettes d'avertissement qui sont apposées sur chaque ceinture
de travail. Ce symbole identifie la fonction d'équipement de protection individuelle professionnel (EPP) de la ceinture.
Les ceintures de travail Klein pour poseurs de lignes sont disponibles en styles complètement flottant, semi-flottant ou fixe.
Elles combinent les caractéristiques d'une courroie de positionnement EPP et celles d'une ceinture porte-outils spécialisée.
Elles respectent ou dépassent toutes les stipulations de l'OSHA
qui s'appliquent aux systèmes de dispositifs de positionnement
pour les entreprises de distribution d'électricité (OSHA 1926.959)
et de télécommunications (OSHA 1910.268 et 1910.269). Elles
respectent ou dépassent également les normes ASTM F 887,
ACNOR Z259.1 et ACNOR Z259.11. Chaque ceinture est
pourvue d'une étiquette permanente, qui identifie le numéro de
modèle, le numéro de série, la taille et la date de fabrication.
Les courroies de positionnement Klein sont disponibles dans les
longueurs suivantes : 5 pi 8 po (1,7 m), 6 pi 6 po (2,0 m), 7 pi
(2,1 m) et 8 pi (2,4 m). Elles sont conçues pour se conformer aux
normes OSHA 1910.268, 1910.269 et 1926.959.
Toutes les personnes qui utilisent des ceintures de travail et
des courroies de positionnement Klein pour poseurs de lignes
doivent recevoir une formation leur apprenant à utiliser ces
équipements de la façon correcte. Elles doivent également lire,
comprendre et appliquer avant chaque utilisation toutes les
instructions et tous les avertissements contenus dans ce livret ou
accompagnant le produit.
(États-Unis).
Remarque : pour des raisons de clarté, les illustrations
de ce livret d'instructions ne montrent pas les étiquettes
ou vignettes d'avertissement qui sont apposées sur
chaque produit.
Avertissement : conservez ces instructions. Ces équipements
ne doivent pas être utilisés par quiconque n'aurait pas lu, compris et
appliqué toutes les instructions et procédures d'inspection contenues
dans ce livret. Toute personne n'ayant pas lu, compris et appliqué
toutes les instructions court le risque d'être grièvement blessée ou
même tuée. Les instructions doivent être relues à intervalles réguliers
par l'utilisateur et son employeur, ce dernier devant aussi assurer la
répétition de la formation à intervalles réguliers.
AVERTISSEMENT
Une chute pourrait causer une
blessure grave ou même la mort.
N'utilisez pas ces équipements sans
avoir reçu la formation appropriée.
Lisez et suivez toutes les instructions et tous les avertissements.
25
Page 26

Matériaux utilisés pour fabriquer les ceintures de travail et
courroies de positionnement pour poseurs de lignes
Klein-Kord
Le matériau porteur dans les courroies de positionnement Klein
est un matériau exclusif de Klein, Klein-Kord, fait de nylon à filaments multi-plis d'une robustesse exceptionnelle qui est imprégné de néoprène, plié et vulcanisé.
Klein-Kord est un matériau non conducteur résistant à l'abrasion
qui ne s'étire pratiquement pas et est assez flexible pour assurer
une grande convivialité et durabilité. Sa résistance chimique est
excellente et il n'est pratiquement pas affecté par la créosote et
les autres produits chimiques utilisés pour traiter les poteaux.
De plus, ses propriétés et ses caractéristiques d'usure restent
essentiellement inchangées aux températures inférieures à
250 °F (121 °C).
On peut voir ci-dessous un exemple de matériau Klein-Kord à six
plis de Klein, qui a une largeur de 1 3/4 po (44 mm). Les plis centraux du matériau Klein-Kord sont de couleur rouge. Lorsque les
plis rouges sont visibles, cessez immédiatement d'utiliser la courroie et remplacez-la. Cette caractéristique d'« alerte précoce »
est une autre mesure de sécurité fournie par Klein Tools.
Remarque : les plis centraux de couleur rouge peuvent se
décolorer au bout d'un certain temps. Il est donc indispensable
d'effectuer une inspection visuelle de l'état d'usure des équipements avant chaque emploi.
®
Boucles et billettes
Les ceintures Klein pour poseurs de lignes ont des boucles
en acier matricé à ardillon unique. Les sangles et les billettes
des ceintures sont faites de matériau Klein-Kord. Sur les ceintures haut de gamme, les sangles sont recouvertes de cuir
à harnachement.
Avertissement : Klein recommande vivement l'emploi de dispositifs
anti-chute en cas de travail à hauteur élevée. Par conséquent, un dispositif anti-chute indépendant doit être utilisé en plus des ceintures de
travail et des courroies de positionnement Klein, sauf si une personne
compétente, conformément à la définition de l'OSHA, a déterminé
qu'un tel dispositif anti-chute n'est pas nécessaire ou est inapproprié.
Avertissement : les ceintures de travail et les courroies de positionnement Klein pour poseurs de lignes sont conçues exclusivement
dans un but de positionnement, et elles ne doivent pas être utilisées
dans un quelconque autre but d'EPP (par exemple, comme dispositif
de protection contre les chutes, ou à des fins de suspension ou
de récupération).
Avertissement : Klein recommande vivement de n'utiliser que des
composants Klein avec les équipements Klein pour poseurs de lignes.
Il ne faut PAS remplacer des composants Klein par des composants
fabriqués par d'autres sociétés parce que Klein ne pourrait alors pas
garantir que les composants fabriqués par d'autres sociétés sont conçus de façon appropriée pour ses équipements ou ne comportent pas
de défauts de matériau ou de fabrication.
Matériau Klein-Kord à six plis avec plis centraux rouges
Acier matricé
Les anneaux en D et les boucles à ardillon Klein sont fabriqués
en acier matricé avec une finition résistant à la corrosion. Tout le
matériel métallique Klein est testé pour respecter ou dépasser les
normes applicables de l'OSHA.
Sangles croisées en nylon
Klein utilise un nylon commercial de qualité élevée. Les sangles
croisées en nylon sont imprégnées de latex ou de résine pour
assurer une longévité et une résistance à l'abrasion supérieure.
Cuir
Du cuir tanné au chrome et à bords laminés est utilisé pour
rembourrer toutes les ceintures Klein pour poseurs de lignes. Ce
rembourrage a un centre en caoutchouc éponge pour plus de
confort. D'autres composants, tels que les boucles porte-outils,
sont fabriqués en cuir à harnachement. Les coussinets sont faits
de cuir latigo tressé à la main et cousu sur le rembourrage de
la ceinture.
26
Page 27

Propriétés physiques des matériaux*
Exposition à une
Type de matériau
Nylon Résistance
chaleur excessive
inadéquate. Devient
cassant et prend une
apparence brune et
racornie. Les fibres se
briseront si elles sont
fléchies. S'affaiblit à
300 °F (150 °C).
Exposition
aux produits
chimiques
Résistance
généralement
satisfaisante, sauf
au contact d'acides
forts et de composés
phénoliques (le
phénol est présent
dans le goudron de
houille et le goudron
de bois), qui le
rendent cassant.
Exposition aux
flammes ou aux
métaux en fusion
Résistance
inadéquate. Les brins
fondent et collent les
uns aux autres, et ils
forment des taches
dures et brillantes.
Donne l'impression
d'être dur et cassant.
Ne résistera pas à la
combustion.
Exposition à
la peinture ou
aux solvants
Offre généralement
une résistance
satisfaisante.
Cependant, de la
peinture risque
de pénétrer dans
l'armure et y sécher.
Ceci peut rendre les
sangles croisées
dures et cassantes,
ce qui peut briser
les fibres. Certains
solvants peuvent
affecter les fibres
(voir « Exposition aux
produits
chimiques »).
Klein-Kord
Cuir Résistance
®
Similaire au nylon ;
cependant, le
néoprène protégera le
tissu en nylon pendant
un certain temps.
inadéquate. Une
chaleur excessive
détruit sa robustesse.
Brûlera à 330 °C
(165 °C). Séchez le
cuir lentement à la
température ambiante.
Excellente résistance
aux hydrocarbures
qui sont utilisés pour
le traitement du bois,
grâce au néoprène.
Résistance
généralement
inadéquate. Les
produits chimiques ont
tendance à assécher
le cuir.
* Ce tableau montre les qualités physiques générales des matériaux utilisés pour fabriquer les ceintures de travail et les courroies
de positionnement Klein pour poseurs de lignes. En raison des
conditions extrêmement différentes dans lesquelles ces équipements sont utilisés, ces informations ne doivent être considérées
que comme un guide général, et une personne qualifiée doit
Similaire au nylon ;
cependant, le
néoprène contribue
à protéger le tissu
en nylon contre les
éclaboussures du
soudage.
Brûlera ; cependant, le
cuir tanné au chrome
offre une excellente
protection contre les
éclaboussures du
soudage.
Excellente résistance
; cependant, certains
solvants forts
pourraient affaiblir le
néoprène et attaquer
le nylon.
Résistance
généralement
inadéquate. Les
produits chimiques ont
tendance à assécher
le cuir.
évaluer les applications et les dangers spécifiques auxquels les
matériaux seront exposés.
Si vous avez besoin de plus d'informations, téléphonez à
Klein Tools au 1-800-553-4676.
27
Page 28

Maximum Length
Center Hole
Minimum Length
D-to-D size:
Hipbone to Hipbone + 2"
Comment sélectionner une ceinture de travail pour poseur
de lignes
1. Connaissez le travail pour lequel elle sera utilisée et les
règlements régissant les spécifications de performance des
équipements nécessaires.
2. Sélectionnez le style de ceinture. Les ceintures de travail
Klein pour poseurs de lignes sont disponibles en divers styles
(fixe, semi-flottant ou complètement flottant), et il existe également un choix entre diverses tailles de gaines de rembourrage.
Toutes les ceintures de travail Klein pour poseurs de lignes ont
des rembourrages en cuir tanné au chrome pour plus de confort.
Les ceintures de style complètement flottant permettent un mouvement latéral des anneaux en D pendant l'emploi. Les ceintures
de style semi-flottant permettent seulement un mouvement latéral avant le port de la ceinture. Les ceintures de style fixe sont
légères et coûtent moins cher.
3. Sélectionnez la taille de ceinture appropriée. Le confort de la
ceinture d'un poseur de lignes dépend de la construction de la ceinture et du placement des anneaux en D. Les anneaux en D doivent
être positionnés à environ 1 po (25 mm) à l'avant des os iliaques.
Ne commandez jamais de ceintures de travail Klein pour
poseurs de lignes par la taille de la ceinture. Commandez
toujours des ceintures de travail Klein pour poseurs de lignes en fonction de la distance désirée entre anneaux en D.
Figure 1
de lignes (montré ci-dessous), contient de plus amples informations sur la sélection d'une ceinture de taille appropriée. Pour
les tailles non standard, veuillez téléphoner au département des
ventes de Klein Tools au 1-800-553-4676.
Déterminez la taille de votre ceinture de travail en utilisant un mètre
à ruban (Figure 1). Pour obtenir la
distance correcte de D à D (anneau
en D à anneau en D), mesurez la
distance entre les deux os iliaques,
puis ajoutez 2 po (51 mm).
Le tableau de sélection de la taille
d'une ceinture de travail pour poseur
Distance de D à D :
Distance entre les deux os
iliaques + 2 po (51 mm)
Longueur minimum
Trou central
Longueur maximum
Tableau de sélection de la taille d'une ceinture de travail pour poseur de lignes*
Distance de 18D 19D 20D 21D 22D 23D 24D 25D 26D 27D 28D 29D 30D
D à D** (46) (48) (51) (53) (56) (58) (61) (64) (66) (69) (71) (74) (76)
Longueur minimum 32 33 34 36 37 38 40 41 42 44 45 46 47
(81) (84) (86) (91) (94) (97) (102) (104) (107) (112) (114) (117) (119)
Distance du 36 37 38 40 41 42 44 45 46 48 49 50 51
trou central (91) (94) (97) (102) (104) (107) (112) (114) (117) (122) (124) (127) (130)
Longueur maximum 40 41 42 44 45 46 48 49 50 52 53 54 55
(102) (104) (107) (112) (114) (117) (122) (124) (127) (132) (135) (137) (140)
* Toutes les mesures sont indiquées en pouces et en (cm). Ce tableau montre les longueurs maximales et minimales,
ainsi que les distances du trou central pour toute la gamme de mesures standard de D à D. Une ceinture de taille correspondant à la distance de D à D appropriée tiendra correctement avec l'ardillon de la boucle engagé dans le trou central.
** Les tailles suivantes peuvent être commandées sur mesure pour les distances de D à D indiquées : 19 po (48 cm), 25
po (64 cm), 27 po (69 cm) et 29 po (74 cm).
28
Page 29

Comment utiliser une ceinture de travail pour poseur de lignes
1. Ces ceintures doivent être utilisées exclusivement par des
personnes qui ont reçu une formation appropriée et qui sont qualifiés pour utiliser cet équipement de positionnement.
2. Lisez toutes les étiquettes d'avertissement et tous les documents d'instructions fournis avec les ceintures Klein et équipements EPP associés pour poseurs de lignes. Ils contiennent
des informations importantes sur leur utilisation et leur entretien.
Laissez en place toutes les étiquettes qui y ont été apposées, et
conservez les instructions pour référence future.
3. Bouclez solidement la ceinture autour de la taille. Vérifiez que
la boucle est complètement fermée et que la languette est dans
son logement. Une ceinture de travail pour poseur de lignes
doit tenir sans jeu autour de la taille. Si vous ne parvenez pas
à attacher correctement la ceinture, remplacez-la par une autre
ceinture de taille appropriée.
4. Lorsque vous utilisez une ceinture pour poseur de lignes, les
anneaux en D doivent être espacés à distance égale de chaque
côté du corps du poseur de lignes.
5. Attachez un bout de la courroie de positionnement (ou d'un
autre dispositif de connexion pour le positionnement) à l'un des
anneaux de positionnement en D.
6. Faites passer la courroie de positionnement autour du poteau
(l'ancrage de positionnement), puis attachez l'autre bout de la
courroie à l'autre anneau de positionnement en D.
7. Assurez-vous au moyen d'une inspection visuelle que les deux
mousquetons s'engagent librement dans les anneaux en D et que
les deux logements sont complètement fermés.
8. Quand elle est positionnée correctement, la courroie de positionnement ne se tord pas, et les deux mousquetons sont orientés
vers l'extérieur.
9. Ne connectez pas d'outils, de fils ou d'autres mousquetons aux
anneaux de positionnement en D.
Remarque : voir pages 30-31 pour des informations complètes
sur la façon d'utiliser une courroie de positionnement Klein.
29
Page 30

Comment sélectionner une courroie de positionnement pour
poseur de lignes
En fonction de votre application, choisissez une courroie de
positionnement vous permettant de travailler à une distance suffisante du poteau sur lequel vous êtes installé. Les courroies de
positionnement pour poseurs de lignes sont disponibles en cinq
N° de cat.
La série
Klein-Lok
®
KL5295L
KL5295-6L
KL5295-6-6L
KL5295-7L
KL5295-8L
bout double
de la courroie de
positionnement
logement
en cuir
N° de cat.
La série
Klein-Gard™
KG5295L
KG5295-6L
KG5295-6-6L
KG5295-7L
KG5295-8L
Longueur
maximum
5'8" (1.7 m)
6' (1.8 m)
6' 6" (2.0 m)
7' (2.1 m)
8' (2.4 m)
tailles et avec deux styles de mousquetons : 5 pi 8 po (1,7 m), 6 pi
(1,8 m), 6 pi 6 po (2,0 m), 7 pi (2,1 m) et 8 pi (2,4 m). Consultez
le tableau suivant pour plus d'informations.
Longueur
minimum
3'10" (1.17 m)
4' (1.2 m)
4'3" (1.3 m)
4'6" (1.35 m)
5'6" (1.7 m)
boucle d'ajustement
bout simple de la courroie de positionnement
pince en métal
Plage
ajustable
1'10" (0.5 m)
2' (0.6 m)
2'3" (0.7 m)
2'6" (0.8 m)
2'6" (0.8 m)
Comment utiliser une courroie de positionnement pour
poseur de lignes
Remarque : les instructions suivantes s'appliquent aux
droitiers.
1. Ces courroies de positionnements sont conçues exclusive-
ment pour emploi par des personnes qui ont reçu une formation
appropriée et qui sont qualifiées pour utiliser ces équipements
de positionnement.
2. Avant de grimper sur un poteau, assurez-vous que les deux
mousquetons de verrouillage de la courroie de positionnement sont
attachés à l'anneau en D de gauche de la ceinture de travail.
Remarque : le mousqueton le plus proche du corps doit être
le mousqueton placé sur le bout double de la courroie de positionnement. Le mousqueton doit être engagé de façon que le
logement correspondant soit orienté vers l'extérieur. Le mousqueton extérieur sera le mousqueton placé sur le bout simplet de la
courroie de positionnement. Ce mousqueton doit être engagé de
façon que le logement correspondant soit orienté vers l'intérieur
(voir Figure 2).
Remarque : pour engager ou libérer le mousqueton de verrouillage, appuyez en même temps sur le logement et sur le dispositif
de verrouillage. Ceci peut être fait facilement avec une main libre
(voir Figure 3).
Figure 2
Figure 3
La série KL
disp. de verrouillage
La série KG
Bout simple de la
courroie de positionnement avec
le logement orienté vers l'intérieur
logement
logement
Bout double de la
courroie de positionnement avec le
logement orienté
vers l'extérieur
30
disp. de verrouillage
Page 31

Comment utiliser une courroie de positionnement pour
poseur de lignes (cont.)
3. Après avoir atteint votre position de travail, plantez fermement
les deux crochets de gaffe dans le poteau, et tenez le poteau des
deux mains.
4. Détachez le mousqueton extérieur dont le logement est orienté
vers l'intérieur (en d'autres termes, le mousqueton sur le bout
simple de la courroie de positionnement) de la main gauche tout
en continuant à tenir le poteau de la main droite.
5. Faites passer le bout simple de la courroie autour de l'arrière
du poteau vers la main droite tout en continuant à tenir fermement
le poteau.
6. Amenez la courroie de positionnement à l'anneau en D de
droite avec la main droite, et attachez le mousqueton de façon
que le logement soit orienté vers l'extérieur.
7. Assurez-vous que la courroie de positionnement repose à
plat sans être entortillée autour du poteau, et que l'ardillon de la
boucle est orienté vers l'extérieur.
8. Avant d'appuyer tout votre poids sur la courroie de positionnement, assurez-vous visuellement que chaque mousque-
ton de verrouillage s'engage librement dans l'anneau en D et que
les logements sont complètement fermés. Ne vous fiez jamais
exclusivement à un déclic ou à une sensation tactile pour
confirmer qu'un mousqueton est engagé.
10. De la main droite, détachez de l'anneau en D de droite le mous-
queton sur le bout simple de la courroie de positionnement.
11. Faites passer le bout simple de la courroie de positionnement
autour de l'arrière du poteau de la main droite jusqu'à ce que la
courroie puisse être saisie de la main gauche.
12. À présent, en saisissant le poteau de la main droite, attachez
le mousqueton du bout simple de la courroie de positionnement
à l'anneau en D de gauche de façon que le logement soit orienté
vers l'intérieur (au-dessus du mousqueton qui est déjà engagé).
13. Lorsque la courroie de positionnement n'est pas utilisée pour
le support, les deux bouts doivent être attachés à l'anneau en D
de gauche (voir la Figure 2 à la page 28).
9. Retrait de la courroie de positionnement (avant de descendre du poteau). Saisissez le poteau de la main gauche et relâ-
chez la tension sur la courroie de positionnement en déplaçant
votre corps légèrement vers le poteau.
31
Page 32

Procédures de maintenance
Un journal écrit indiquant toutes les dates de service et d'inspection
pour cet équipement doit être entretenu par le responsable de la
sécurité de la société ou une autre personne habilitée.
1. Nettoyez et entretenez les équipements suivant les recommandations. Lavez avec de l'eau chaude et un détergent doux.
Évitez d'employer des produits chimiques abrasifs tels que des
produits de dégraissage, de la térébenthine, des diluants, de
l'essence et d'autres solvants.
2. Inspectez et lubrifiez tous les mousquetons après les avoir
nettoyés pour vous assurer qu'ils fonctionnent correctement, et
fermez-les solidement. Utilisez un vaporisateur de lubrifiant universel ou de l'huile légère pour moteur.
3. Entretenez les composants en cuir avec de l'huile minérale
pure, du savon pour cuir ou un produit équivalent pour aider à
prolonger leur durée de vie. Laissez le cuir sécher lentement à la
température ambiante.
Procédures générales d'inspection
1. Inspectez pour identifier toute usure ou détérioration des
équipements. Avant chaque emploi, inspectez attentivement
vos équipements EPP pour vous assurer qu'il n'y a pas de signes
d'usure ou de détérioration, ou de marques d'impact. Inspectez
visuellement pour vérifier qu'il n'y a pas de fils flottants, de rivets
arrachés, de traces de brûlure, de coupures, d'abrasions ou
d'autres manifestations de détérioration chimiques ou physiques
pouvant avoir affaibli un matériau ou la structure du matériel.
2. Inspectez le matériel métallique pour identifier des dysfonctionnements ou des fissures possibles, notamment les
boucles de ceinture, les anneaux en D et les mousquetons des
courroies de positionnement. Vérifiez que les mousquetons ne
sont pas déformés ou fissurés, et que les logements correspondants n'ont pas d'ébarbures, fonctionnent correctement et ne sont
pas tordus.
pendant l'inspection qui ne sont pas mentionnés ici, n'utilisez PAS le
matériel suspect avant qu'une personne qualifiée n'ait pris une décision quant à la possibilité de continuer à l'utiliser.
Avertissement : si des problèmes inhabituels sont constatés
Style KL illustré
3. Détruisez et remplacez tous les équipements usés ou endommagés. Détruisez immédiatement et remplacez tout composant
d'un système EPP qui ne passe pas l'inspection avec succès.
32
Page 33

Inspection des ceintures et des courroies
1. Courroies, coutures et sangles. Inspectez toute la longueur
de la courroie pour vous assurer que la courroie n'est pas excessivement usée. Inspectez soigneusement l'ardillon ou le bout de
la billette. Ce bout est soumis à une usure considérable en raison
du bouclage et du débouclage de la ceinture à maintes reprises.
Vérifiez aussi pour vous assurer les trous de l'ardillon de la boucle
ne sont pas déchirés ou excessivement agrandis. Inspectez
les coutures pour déterminer si de quelconques coutures sont
brisées, coupées ou étirées. Vérifiez les sangles croisées à la
recherche de brins brisés, qui apparaîtront alors sous forme de
touffes et de boucles sur la surface.
2. Anneaux en D. Inspectez tous les anneaux en D pour vous
assurer qu'ils ne sont pas déformés. Vérifiez les points de fixation des anneaux en D pour déterminer l'existence possible d'une
usure inhabituelle ou la présence de fibres endommagées. Des
anneaux en D excessivement piqués pourraient indiquer une corrosion chimique, auquel cas il faudrait remplacer l'équipement en
question immédiatement.
4. Coutures ou rivets aux points due fixation du matériel
métallique. Pour les points de fixation à couture, assurez-vous
que les coutures ne sont pas brisées, brûlées ou étirées. Pour
les points de fixation à rivet, assurez-vous que tous les rivets
sont bien serrés, en particulier les rivets des plaques d'usure des
anneaux en D. Les rivets excessivement piqués indiquent une
corrosion chimique, auquel cas il faudrait remplacer l'équipement
en question immédiatement.
5. Détruisez immédiatement et remplacez tous les équipements EPP usés ou endommagés. En cas de trace d'usure
excessive ou de détérioration, ou d'observation de dysfonctionnement mécanique, remplacez l'équipement immédiatement.
Ne travaillez jamais avec un équipement EPP usé ou endommagé. L'utilisation d'équipements endommagés ou usés
pourrait causer une blessure grave ou même la mort.
6. L'inspecteur est l'élément le plus important de toute procédure d'inspection. Vérifiez soigneusement tous les équipements
et suivez toutes les procédures et directives de sécurité. Ne
prenez pas de raccourcis.
3. Boucles à ardillon. Inspectez les boucles à ardillon pour vous
assurer qu'elles ne sont pas déformées, qu'elles n'ont pas de
bords avec des aspérités tranchantes et qu'elles ne sont pas fissurées. L'ardillon doit pouvoir se déplacer librement et recouvrir
la structure. Les rouleaux ne doivent pas être déformés et doivent
pouvoir rouler librement.
Remarque importante : l'OSHA spécifie que tous les employeurs couverts par la loi Occupational Safety and Health Act
(aux États-Unis) assument la responsabilité de l'inspection et
de l'entretien de tous les outils et équipements utilisés par leurs
employés – qu'ils appartiennent aux employés eux-mêmes ou à
la société. Les équipements de protection individuelle doivent être
inspectés avant chaque emploi, et ils doivent être retirés immédiatement du service si l'on observe la moindre trace d'usure
ou d'endommagement.
Avertissement : si des problèmes inhabituels sont constatés pendant l'inspection qui ne sont pas mentionnés ici, n'utilisez PAS
le matériel suspect avant qu'une personne qualifiée n'ait pris une
décision quant à la possibilité de continuer à l'utiliser.
33
Page 34

Étiquettes d'avertissement sur les équipements des
Pour emploi à des fins de positionnement seulement
■ N'utilisez ce produitqu'àdes fins depositionnement, PAS
pour empêcher unechute.
■ Sipossible,l'emploi dematériel permettantd'empêcher une
chuteest vivement recommandé en plus decette ceinture.
■ Assumezla responsabilité de vous assurer que votre
ceinture estenbon état à chaque fois quevousallez l'utiliser.
139360
F-C1b1.
7005
Lisez
l'autre
côté
AVERTISSEMENTS
■ N'utilisez PAS de dispositifsde connexion en
cuir ouencordageen manille.
■ N'utilisez JAMAIS d'anneauxen D latéraux pour empêcher
une chute.
■ Les ancrages de positionnement doivent supporter votre poids
ainsique toutecharge additionnelle en rapportavecvotre tâche.
■ Nelaissezjamais laceinture entrer en contactavecdes outils aux
bordspointus ou tranchants, ou être à proximité d'un radiateur, d'une
canalisation devapeur, d'un poêle, d'un réchaud,
d'un pot d'échappementde moteur ou de toute autre
source dechaleur.
Lisez
l'étiquette
suivante
AVERTISSEMENTS
■ Pouremploi exclusif pardes techniciens professionnels ayant
reçu une formation appropriée.
■ Utilisez seulement des mousquetons.
■ Les équipements de protection professionnels ne doivent
être utilisés quedansle butspécifique pour lequel ilssontconçus
et prévus.
■ Les équipements de protectionprofessionnelsdoivent être
détruits s'ils ontété affectéspar une chargede choc.
■ Vérifiez toujours visuellement que toutesles boucles sont
fermées correctement avant chaqueemploi.
■ Nelaissezjamais une courroiede positionnements'entortiller
avantd'engagerl'anneau en D.
139362
F-B1-2 1
7005
Lisez
l'autre
côté
INSTRUCTIONS
■ Vérifiez toujours visuellement que 1) chaquemousqueton
s'engage librement dans l'anneauen D ou dans le pointd'ancrage,
2)ledispositif de fixation estcomplètementfermé lors de chaque
emploi. Nevousfiezjamaisexclusivement à la sensation tactileou
au bruit du déclic de l'engagementd'unmousqueton.
■ Avant chaque emploi, vérifiez que : 1) le tissuoula courroie
de laceinture n'estpas brûlé, coupéou excessivementusé,etn'a
pas de mailles défaites, 2)les rivets ne sont pas tordus, lâches ou
manquants,3) les boucleset lesanneauxen D ne sont pasdéfor-
més ou fissurés, 4)sila languetteest déformée, lalanguettene
se coince pas surla boucleet les trous de la boucle nesont
pas endommagés.5) Retirez du service, détruisez et jetez
tous les harnais et ceintures qu'une inspection aura jugés
défectueux et remplacez-les immédiatement.
Lisez
l'étiquette
suivante
INSTRUCTIONS
■ Pour un emploi personnel seulement. PAS pour remorquer
ou hisser.
■ L'ouverture dela gorge des mousquetons attachésaux
anneaux enD doit être inférieureà 3/4 po (19 mm). N'attachez
jamais des mousquetons d'échellesou de barres d'armature à
des anneaux en D.
■ N'attachez jamais de multiples mousquetonsà unanneau
en D.
■ Nepercezjamais detrous additionnels dans une ceintureou
un harnaiset ne lesaltérez d'aucunefaçon.
■ Netravaillez jamais sansprotection indépendante pour
empêcher leschutes s'il existe unrisque de chute.
139361
F-B1-2 2.
7005
Lisez
l'autre
côté
INSTRUCTIONS
■ NON CONÇU pour unemploi récréatif ousportif.
■ Employeur– apprenez à vosemployés à utilisercorrectement
les équipementset à lireles avertissements appropriésavant
d'utiliserces équipements.
■ Lisez, comprenez et suiveztoutes les instructions etmises en
gardefigurant sur ceséquipementsettousautres équipements
de protection professionnelle oules accompagnantavant chaque
utilisation.
■ Klein recommande vivement de NEPASutiliser d'équipements
vendus pard'autres fabricantsà laplace de composantsKlein
parceque Kleinne peut pasgarantir que de tels équipements
d'autres fabricants necomportent aucundéfaut dematériau ou
de fabrication.
Lisez
l'étiquette
suivante
INSTRUCTIONS
poseurs de lignes
Klein appose des étiquettes permanentes et très durables contenant des avertissements et des instructions sur ses ceintures de
travail et courroies de positionnement pour poseurs de lignes.
Si l'une quelconque de ces étiquettes se détache, est perdue ou
est endommagée, téléphonez à Klein Tools au numéro gratuit 1800-553-4676 pour obtenir des informations quant à la façon de
Avertissement : Klein recommande vivement l'emploi de dispositifs
anti-chute en cas de travail à hauteur élevée. Par conséquent, un dispositif anti-chute indépendant doit être utilisé en plus des ceintures de
travail et des courroies de positionnement Klein, sauf si une personne
compétente, conformément à la définition de l'OSHA, a déterminé
qu'un tel dispositif anti-chute n'est pas nécessaire ou est inapproprié.
faire remplacer gratuitement ces étiquettes.
Étiquettes des ceintures de travail pour poseurs de lignes
34
Page 35

■ Pourle soutien d'êtres humainsseulement, PAS pour
remorquer ouhisser dumatériel.
■ Ilne faut jamaisdésactiver un dispositifde fixationsur un
mousqueton, ou percer untroudansune courroiede positionnementou l'altérer d'une façon quelconque.
■ Utilisez seulement avec une courroieou un harnais de
positionnement ayant des anneaux enDrépondantaux
normes réglementaires pour l'emploiprévu.
■ Klein recommande vivement de NEPASutiliser
d'équipements vendus par d'autresfabricants à la placede
composantsKlein parceque Kleinne peut pasgarantir que
de telséquipements d'autres fabricantsnecomportent aucun
défaut de matériau ou defabrication.
139358
F-C6b2
7005
Lisez
l'autre
côté
AVERTISSEMENTS
■ Avant chaque emploi, vérifiez que : 1) l'équipement
ne comporte pasde tracesde brûlures, de coupures,
d'abrasions, detortillements,denoeuds,de brins cassés
ou d'usureexcessive, 2) lesmousquetons etles boucles
(ainsi queles anneaux enD, le cas échéant)nesontpas
déformés ou fissurés, 3) les dispositifsde fixationdes
mousquetons ne comportentpas de bavures, fonctionnent correctement, sont propres etnesontpas tordus,
4) la courroie de positionnement n'est pasuséeau point
de rendre visibles lesplisintérieurs rouges, 5) Retirez
l'équipement du service, détruisez-le et jetez-le si
l'inspection le révèle défectueux.
Lisez
l'étiquette
suivante
AVERTISSEMENTS
Pour emploi à des fins de positionnement seulement
■ Attachez toujours les mousquetons auxanneauxde posi-
tionnementen D des deuxcôtés de laceinture ou duharnais
de façon queles dispositifs de fixation soient orientésvers
l'extérieur.
■
N'attachezjamaisdemultiplesmousquetons à unanneau enD.
■ Nelaissezjamais une courroiede positionnement
139359
F-C6b1
7005
Lisez
l'autre
côté
AVERTISSEMENTS
s'entortiller avant d'engager l'anneau en D.
■ N'attachez jamais de multiples courroies
de positionnementensemble.
■
N'attachezjamaisune courroie de positionnement à elle-même.
■ Assumezla responsabilité de vous assurer que votre
courroie de positionnement est toujoursenbon état.
■ Nelaissezjamais lacourroie depositionnemententrer encontact
avec des outilsaux bordspointus ou tranchants, ou des soudures,
ou êtreà proximité d'unradiateur,d'une canalisation devapeur, d'un
poêle, d'un réchaud,d'unpot d'échappement de moteur
ou detoute autre source dechaleur.
■ N'utilisez jamais une courroie de positionnement qui
est tellement usée queles plis intérieursrouges sontvisibles.
Lisez
l'étiquette
suivante
AVERTISSEMENTS
■ Pouremploi exclusif pardes techniciens professionnels
ayant reçu une formation appropriée.
■ Les équipements de protection professionnels ne
doivent être utilisés quedansle butspécifique pour lequel ils
sont conçus et prévus.
■ Les dispositifs de connexion doivent être détruitss'ils ont
été affectéspar une chargede choc.
■ Vérifiez toujours visuellement que : 1)chaque mous-
queton s'engagelibrementdansl'anneau enD oudans
l'ancrage,2) le dispositif defixation est complètement fermé
lors dechaque emploi.Ne vous fiez jamais exclusivement à
la sensationtactileou au bruitdudéclic del'engagement d'un
mousqueton.
■ Assurez-vousque chaque mousquetonest positionnéde
139357
F-C6b3.
7005
Lisez
l'autre
côté
AVERTISSEMENTS
tellesorte quele dispositif defixation ne supporte
jamais de charge.
■ N'attachez jamais deuxmousquetons l'unà l'autre.
Ils ne sont PAS conçuspourêtreutilisés decette façon,
et ils risqueraient dese détacheren se dévissant.
■ Netravaillez jamais sansprotection indépendante pour
empêcher leschutes s'il existe unrisque de chute.
■ Employeur– apprenez à vosemployés à utilisercorrectement
les équipementset à lireles avertissements appropriésavant d'utiliser
ces équipements.
■ Lisez, comprenez et suiveztoutes les instructions et
misesen garde figurant surces équipements et tous autres
équipements de protectionprofessionnelle et/ou les
accompagnant avant chaqueutilisation.
Lisez
l'étiquette
suivante
AVERTISSEMENTS
Étiquettes d'avertissement sur les équipements des
poseurs de lignes (cont.)
Klein appose des étiquettes permanentes et très durables contenant des avertissements et des instructions sur ses ceintures de
travail et courroies de positionnement pour poseurs de lignes.
Si l'une quelconque de ces étiquettes se détache, est perdue ou
est endommagée, téléphonez à Klein Tools au numéro gratuit 1800-553-4676 pour obtenir des informations quant à la façon de
Avertissement : Klein recommande vivement l'emploi de dispositifs
anti-chute en cas de travail à hauteur élevée. Par conséquent, un dispositif anti-chute indépendant doit être utilisé en plus des ceintures de
travail et des courroies de positionnement Klein, sauf si une personne
compétente, conformément à la définition de l'OSHA, a déterminé
qu'un tel dispositif anti-chute n'est pas nécessaire ou est inapproprié.
faire remplacer gratuitement ces étiquettes.
Étiquettes des courroies de positionnement pour poseurs de lignes
35
Page 36

Mail/Por correo/Courrier: 450 Bond Sreet, P.O. Box 1418, Lincolnshire, IL 60069-1418 U.S.A.
Shipping/Envíos/Expédition: 450 Bond Street, Lincolnshire, IL 60069-4225 U.S.A.
© 2007 Klein Tools, Inc.
Printed in U.S.A.
Impreso en EE.UU.
Imprimé aux U.S.A.
139366
 Loading...